

Page 1

Start-Up 01/2002 Edition
SINUMERIK 802C
Page 2

Page 3

Numerical Control System 1
SINUMERIK 802C
Start–Up
Installing the Control System 2
Installing the Drives 3
Start–Up 4
Update 5
Valid for
Control Software Version
SINUMERIK 802C 3
01.2002 Edition
Technical Appendix 6
Manual Machine 7
Index
Page 4

3ls
SINUMERIKDocumentation
Printing history
Brief details of this edition and previous editions are listed below.
IThe status of each edition is shown by the code in the ”Remarks” column.
Status code in the “Remarks” column:
A New documentation.. . . . .
B Unrevised reprint with new Order No.. . . . .
C Revised edition with new status. . . . . .
If actual changes have been made on the page since the last edition,
this is indicated by a new edition coding in the header on the page.
Edition Order–No. Remark
04.00 6FC5597-3AA20-0BP2 A
01.02 6FC5597-3AA20-0BP2 C
This Manual is included on the documentation on CD–ROM (DOCONCD)
Edition Order–No. Remark
11.02 6FC5298-6CA00-0AG3 C
Trademarks
SIMATICr, SIMATIC HMIr, SIMATIC NETr, SIROTECr, SINUMERIKr and SIMODRIVEr are registered
trademarks of Siemens. Third parties using for their own purposes any other names in this document which
refer to trademarks might infringe upon the rights of trademark owners.
This publication was produced with Interleaf V 7
The reproduction, transmission or use of this document or its
contents is not permitted without express written authority. Offenders
will be liable for demages. All rights, including rights created by patent
grant or registration of utility model or design, are reserved.
Siemens AG 2002. All rights reserved.
Printed in the Federal Republic of Germany
Other functions not described in this documentation might be
executable in the control. This does not, however, represent an
obligation to supply such functions with a new control or when
servicing.
We have checked that the contents of this document correspond to
the hardware and software described. Nonetheless, differences might
exist and therefore we cannot guarantee that they are completely
identical. The information contained in this document is, however,
reviewed regularly and any necessary changes will be included in the
next edition. We welcome suggestions for improvement.
Subject to change without prior notice.
Siemens–AktiengesellschaftBestell-Nr. 6FC5597-3AA20-0BP2
Page 5

Safety notices
!
!
!
This Manual contains notices intended to ensure your personal safety and to avoid material damage. The notices
are highlighted by a warning triangle and, depending on the degree of hazard, represented as shown below:
Danger
indicates that loss of life, severe personal injury or substantial material damage will result if the appropriate pre-
cautions are not taken.
Warning
indicates that loss of life, severe personal injury or substantial material damage may result if the appropriate pre-
cautions are not taken.
Caution
indicates that minor personal injury or material damage may result if the appropriate precautions are not taken.
Caution
without a warning triangle means that a material damage can occur if the appropriate precau-
tions are not taken.
Attention
means that an undesirede event or status can occur if the appropriate note is not observed.
Note
is used to draw your special attention to an important information on the product, the handling of the product or the
corresponding part of the documentation.
Qualified personnel
Start–up and operation of a device may only be carried out by qualified personnel. Qualified personnel as referred to in the safety notices provided in this Manual are persons who are authorized to start up, ground and tag
devices, systems and circuits according to the relevant safety standards.
Usage as per intended purpose
Please observe the following:
Warning
!
The device may only be used for the cases of application, as intended by the Catalog, and only in conjunction with
third–party devices and components recommended or approved by Siemens.
The proper and safe operation of the product requires transport, storage and installation according to the relevant
instructions and qualified operation and maintenance at the prescribed intervals.
SINUMERIK 802C
6FC5 597–3AA20–0BP2 (01.02)
v
Page 6

Table of Contents
Table of Contents
1 SINUMERIK 802C Control System 1-9. . . . . . . . . . . . . . . . . . . . . . . . . . . . . . . . . . . . . . . . . . . . . .
1.1 Components of the SINUMERIK 802C 1-9. . . . . . . . . . . . . . . . . . . . . . . . . . . . . . . . . . . . . . . . . . .
1.2 Technical data 1-12. . . . . . . . . . . . . . . . . . . . . . . . . . . . . . . . . . . . . . . . . . . . . . . . . . . . . . . . . . . . . . . .
2 Installing the Control System 2-15. . . . . . . . . . . . . . . . . . . . . . . . . . . . . . . . . . . . . . . . . . . . . . . . . .
2.1 Installing and removing the SINUMERIK 802C 2-15. . . . . . . . . . . . . . . . . . . . . . . . . . . . . . . . . . . .
2.2 Interfaces and cables 2-18. . . . . . . . . . . . . . . . . . . . . . . . . . . . . . . . . . . . . . . . . . . . . . . . . . . . . . . . . .
2.3 Connecting the individual components 2-21. . . . . . . . . . . . . . . . . . . . . . . . . . . . . . . . . . . . . . . . . . .
2.3.1 Connecting the operator panel 2-21. . . . . . . . . . . . . . . . . . . . . . . . . . . . . . . . . . . . . . . . . . . . . . . . . .
2.3.2 Connecting the feed drives and the spindle (X7) 2-23. . . . . . . . . . . . . . . . . . . . . . . . . . . . . . . . . . .
2.3.3 Connecting the measuring systems (X3 ... X6) 2-26. . . . . . . . . . . . . . . . . . . . . . . . . . . . . . . . . . . .
2.3.4 Configuration of the RS232 interface connection (X8) 2-27. . . . . . . . . . . . . . . . . . . . . . . . . . . . . .
2.3.5 Connecting handwheels (X10) 2-29. . . . . . . . . . . . . . . . . . . . . . . . . . . . . . . . . . . . . . . . . . . . . . . . . .
2.3.6 Connecting NCREADY (X20) 2-30. . . . . . . . . . . . . . . . . . . . . . . . . . . . . . . . . . . . . . . . . . . . . . . . . . .
2.3.7 Connecting the digital inputs and outputs (X2003 ... X2006) 2-31. . . . . . . . . . . . . . . . . . . . . . . . .
2.4 ENC and operator panel power supply (X1) 2-35. . . . . . . . . . . . . . . . . . . . . . . . . . . . . . . . . . . . . . .
2.5 Grounding 2-36. . . . . . . . . . . . . . . . . . . . . . . . . . . . . . . . . . . . . . . . . . . . . . . . . . . . . . . . . . . . . . . . . . .
2.6 LEDs and operating elements on the ENC 2-38. . . . . . . . . . . . . . . . . . . . . . . . . . . . . . . . . . . . . . . .
3 Installing the Drives 3-39. . . . . . . . . . . . . . . . . . . . . . . . . . . . . . . . . . . . . . . . . . . . . . . . . . . . . . . . . .
4 Start-Up 4-41. . . . . . . . . . . . . . . . . . . . . . . . . . . . . . . . . . . . . . . . . . . . . . . . . . . . . . . . . . . . . . . . . . . . . .
4.1 General 4-41. . . . . . . . . . . . . . . . . . . . . . . . . . . . . . . . . . . . . . . . . . . . . . . . . . . . . . . . . . . . . . . . . . . . . .
4.1.1 Access levels 4-42. . . . . . . . . . . . . . . . . . . . . . . . . . . . . . . . . . . . . . . . . . . . . . . . . . . . . . . . . . . . . . . . .
4.1.2 Structure of machine data (MD) and setting data (SD) 4-43. . . . . . . . . . . . . . . . . . . . . . . . . . . . . .
4.1.3 Handling machine data 4-44. . . . . . . . . . . . . . . . . . . . . . . . . . . . . . . . . . . . . . . . . . . . . . . . . . . . . . . .
4.1.4 Data saving 4-44. . . . . . . . . . . . . . . . . . . . . . . . . . . . . . . . . . . . . . . . . . . . . . . . . . . . . . . . . . . . . . . . . .
4.2 Turning on and booting the control system 4-46. . . . . . . . . . . . . . . . . . . . . . . . . . . . . . . . . . . . . . . .
4.2.1 Boot messages 4-48. . . . . . . . . . . . . . . . . . . . . . . . . . . . . . . . . . . . . . . . . . . . . . . . . . . . . . . . . . . . . . .
4.3 Starting up the PLC 4-49. . . . . . . . . . . . . . . . . . . . . . . . . . . . . . . . . . . . . . . . . . . . . . . . . . . . . . . . . . .
4.3.1 Commissioning of the PLC 4-49. . . . . . . . . . . . . . . . . . . . . . . . . . . . . . . . . . . . . . . . . . . . . . . . . . . . .
4.3.2 Start–up modes of the PLC 4-51. . . . . . . . . . . . . . . . . . . . . . . . . . . . . . . . . . . . . . . . . . . . . . . . . . . . .
4.3.3 PLC alarms 4-52. . . . . . . . . . . . . . . . . . . . . . . . . . . . . . . . . . . . . . . . . . . . . . . . . . . . . . . . . . . . . . . . . .
4.3.4 Machine control panel (MCP) layout 4-56. . . . . . . . . . . . . . . . . . . . . . . . . . . . . . . . . . . . . . . . . . . . .
4.3.5 PLC programming 4-57. . . . . . . . . . . . . . . . . . . . . . . . . . . . . . . . . . . . . . . . . . . . . . . . . . . . . . . . . . . . .
4.3.6 Instruction set 4-61. . . . . . . . . . . . . . . . . . . . . . . . . . . . . . . . . . . . . . . . . . . . . . . . . . . . . . . . . . . . . . . .
4.3.7 Programm organization 4-68. . . . . . . . . . . . . . . . . . . . . . . . . . . . . . . . . . . . . . . . . . . . . . . . . . . . . . . .
4.3.8 Data organization 4-69. . . . . . . . . . . . . . . . . . . . . . . . . . . . . . . . . . . . . . . . . . . . . . . . . . . . . . . . . . . . .
4.3.9 Interface to the control system 4-69. . . . . . . . . . . . . . . . . . . . . . . . . . . . . . . . . . . . . . . . . . . . . . . . . .
4.3.10 Testing and monitoring the user program 4-69. . . . . . . . . . . . . . . . . . . . . . . . . . . . . . . . . . . . . . . . .
4.4 PLC applications “Download/Upload/Copy/Compare” 4-70. . . . . . . . . . . . . . . . . . . . . . . . . . . . . . .
4.5 User Interface 4-72. . . . . . . . . . . . . . . . . . . . . . . . . . . . . . . . . . . . . . . . . . . . . . . . . . . . . . . . . . . . . . . .
4.6 Technology Setting 4-72. . . . . . . . . . . . . . . . . . . . . . . . . . . . . . . . . . . . . . . . . . . . . . . . . . . . . . . . . . . .
4.7 Commissioning 4-73. . . . . . . . . . . . . . . . . . . . . . . . . . . . . . . . . . . . . . . . . . . . . . . . . . . . . . . . . . . . . . .
4.7.1 Entering the general machine data 4-73. . . . . . . . . . . . . . . . . . . . . . . . . . . . . . . . . . . . . . . . . . . . . .
4.7.2 Starting up the axes 4-75. . . . . . . . . . . . . . . . . . . . . . . . . . . . . . . . . . . . . . . . . . . . . . . . . . . . . . . . . . .
4.7.3 Starting up the spindle 4-85. . . . . . . . . . . . . . . . . . . . . . . . . . . . . . . . . . . . . . . . . . . . . . . . . . . . . . . . .
4.7.4 Completing the Start–Up 4-87. . . . . . . . . . . . . . . . . . . . . . . . . . . . . . . . . . . . . . . . . . . . . . . . . . . . . . .
4.7.5 Cycle start–up 4-88. . . . . . . . . . . . . . . . . . . . . . . . . . . . . . . . . . . . . . . . . . . . . . . . . . . . . . . . . . . . . . . .
4.8 Series machine start-up 4-89. . . . . . . . . . . . . . . . . . . . . . . . . . . . . . . . . . . . . . . . . . . . . . . . . . . . . . . .
vi
6FC5 597–3AA20–0BP2 (01.02)
SINUMERIK 802C
Page 7

Table of Contents
5 Software Update 5-91. . . . . . . . . . . . . . . . . . . . . . . . . . . . . . . . . . . . . . . . . . . . . . . . . . . . . . . . . . . . . .
5.1 Updating the system software using a PC/PG 5-91. . . . . . . . . . . . . . . . . . . . . . . . . . . . . . . . . . . . .
5.2 Updating the system software incl. user data without using a PC/PG 5-92. . . . . . . . . . . . . . . . . .
5.3 Update errors 5-93. . . . . . . . . . . . . . . . . . . . . . . . . . . . . . . . . . . . . . . . . . . . . . . . . . . . . . . . . . . . . . . . .
6 Technical Appendix 6-94. . . . . . . . . . . . . . . . . . . . . . . . . . . . . . . . . . . . . . . . . . . . . . . . . . . . . . . . . . .
6.1 List of machine and setting data 6-94. . . . . . . . . . . . . . . . . . . . . . . . . . . . . . . . . . . . . . . . . . . . . . . . .
6.1.1 Display machine data 6-94. . . . . . . . . . . . . . . . . . . . . . . . . . . . . . . . . . . . . . . . . . . . . . . . . . . . . . . . . .
6.1.2 General machine data 6-96. . . . . . . . . . . . . . . . . . . . . . . . . . . . . . . . . . . . . . . . . . . . . . . . . . . . . . . . .
6.1.3 Channel-specific machine data 6-96. . . . . . . . . . . . . . . . . . . . . . . . . . . . . . . . . . . . . . . . . . . . . . . . . .
6.1.4 Axis-specific machine data 6-97. . . . . . . . . . . . . . . . . . . . . . . . . . . . . . . . . . . . . . . . . . . . . . . . . . . . .
6.1.5 Setting data 6-103. . . . . . . . . . . . . . . . . . . . . . . . . . . . . . . . . . . . . . . . . . . . . . . . . . . . . . . . . . . . . . . . . .
6.2 PLC user interface signals 6-105. . . . . . . . . . . . . . . . . . . . . . . . . . . . . . . . . . . . . . . . . . . . . . . . . . . . . .
6.2.1 Address ranges 6-105. . . . . . . . . . . . . . . . . . . . . . . . . . . . . . . . . . . . . . . . . . . . . . . . . . . . . . . . . . . . . . .
6.2.2 Retentive data area 6-106. . . . . . . . . . . . . . . . . . . . . . . . . . . . . . . . . . . . . . . . . . . . . . . . . . . . . . . . . . .
6.2.3 NCK signals 6-107. . . . . . . . . . . . . . . . . . . . . . . . . . . . . . . . . . . . . . . . . . . . . . . . . . . . . . . . . . . . . . . . . .
6.2.4 Channel signals 6-108. . . . . . . . . . . . . . . . . . . . . . . . . . . . . . . . . . . . . . . . . . . . . . . . . . . . . . . . . . . . . .
6.2.5 Axis/spindle signals 6-113. . . . . . . . . . . . . . . . . . . . . . . . . . . . . . . . . . . . . . . . . . . . . . . . . . . . . . . . . . .
6.2.6 Signals from/to MMC 6-116. . . . . . . . . . . . . . . . . . . . . . . . . . . . . . . . . . . . . . . . . . . . . . . . . . . . . . . . . .
6.2.7 Machine control panel signals (MCP signals) 6-118. . . . . . . . . . . . . . . . . . . . . . . . . . . . . . . . . . . . . .
6.2.8 PLC machine data 6-119. . . . . . . . . . . . . . . . . . . . . . . . . . . . . . . . . . . . . . . . . . . . . . . . . . . . . . . . . . . .
6.2.9 User alarm 6-120. . . . . . . . . . . . . . . . . . . . . . . . . . . . . . . . . . . . . . . . . . . . . . . . . . . . . . . . . . . . . . . . . . .
6.3 Application note: unipolar spindle control 6-123. . . . . . . . . . . . . . . . . . . . . . . . . . . . . . . . . . . . . . . . .
7 Manual Machine 7-125. . . . . . . . . . . . . . . . . . . . . . . . . . . . . . . . . . . . . . . . . . . . . . . . . . . . . . . . . . . . . .
7.1 Hardware and software requirements for the installation 7-125. . . . . . . . . . . . . . . . . . . . . . . . . . . .
7.2 Loading the software 7-126. . . . . . . . . . . . . . . . . . . . . . . . . . . . . . . . . . . . . . . . . . . . . . . . . . . . . . . . . .
7.3 Switching the user interface 7-128. . . . . . . . . . . . . . . . . . . . . . . . . . . . . . . . . . . . . . . . . . . . . . . . . . . .
7.4 Switching the language 7-128. . . . . . . . . . . . . . . . . . . . . . . . . . . . . . . . . . . . . . . . . . . . . . . . . . . . . . . .
7.5 Additional machine data 7-129. . . . . . . . . . . . . . . . . . . . . . . . . . . . . . . . . . . . . . . . . . . . . . . . . . . . . . . .
7.6 Input limitations with regard to the user interface 7-129. . . . . . . . . . . . . . . . . . . . . . . . . . . . . . . . . . .
7.7 Operation without machine control panel (MCP) 7-130. . . . . . . . . . . . . . . . . . . . . . . . . . . . . . . . . . .
7.8 I/O assignment in the standard PLC program 7-130. . . . . . . . . . . . . . . . . . . . . . . . . . . . . . . . . . . . . .
7.8.1 Assignment of the digital inputs: 7-130. . . . . . . . . . . . . . . . . . . . . . . . . . . . . . . . . . . . . . . . . . . . . . . . .
7.8.2 Assignment of the digital outputs: 7-132. . . . . . . . . . . . . . . . . . . . . . . . . . . . . . . . . . . . . . . . . . . . . . . .
7.9 Default assignment of special data for the “Manual machine” 7-133. . . . . . . . . . . . . . . . . . . . . . . .
SINUMERIK 802C
6FC5 597–3AA20–0BP2 (01.02)
vii
Page 8

Table of Contents
notice
viii
6FC5 597–3AA20–0BP2 (01.02)
SINUMERIK 802C
Page 9

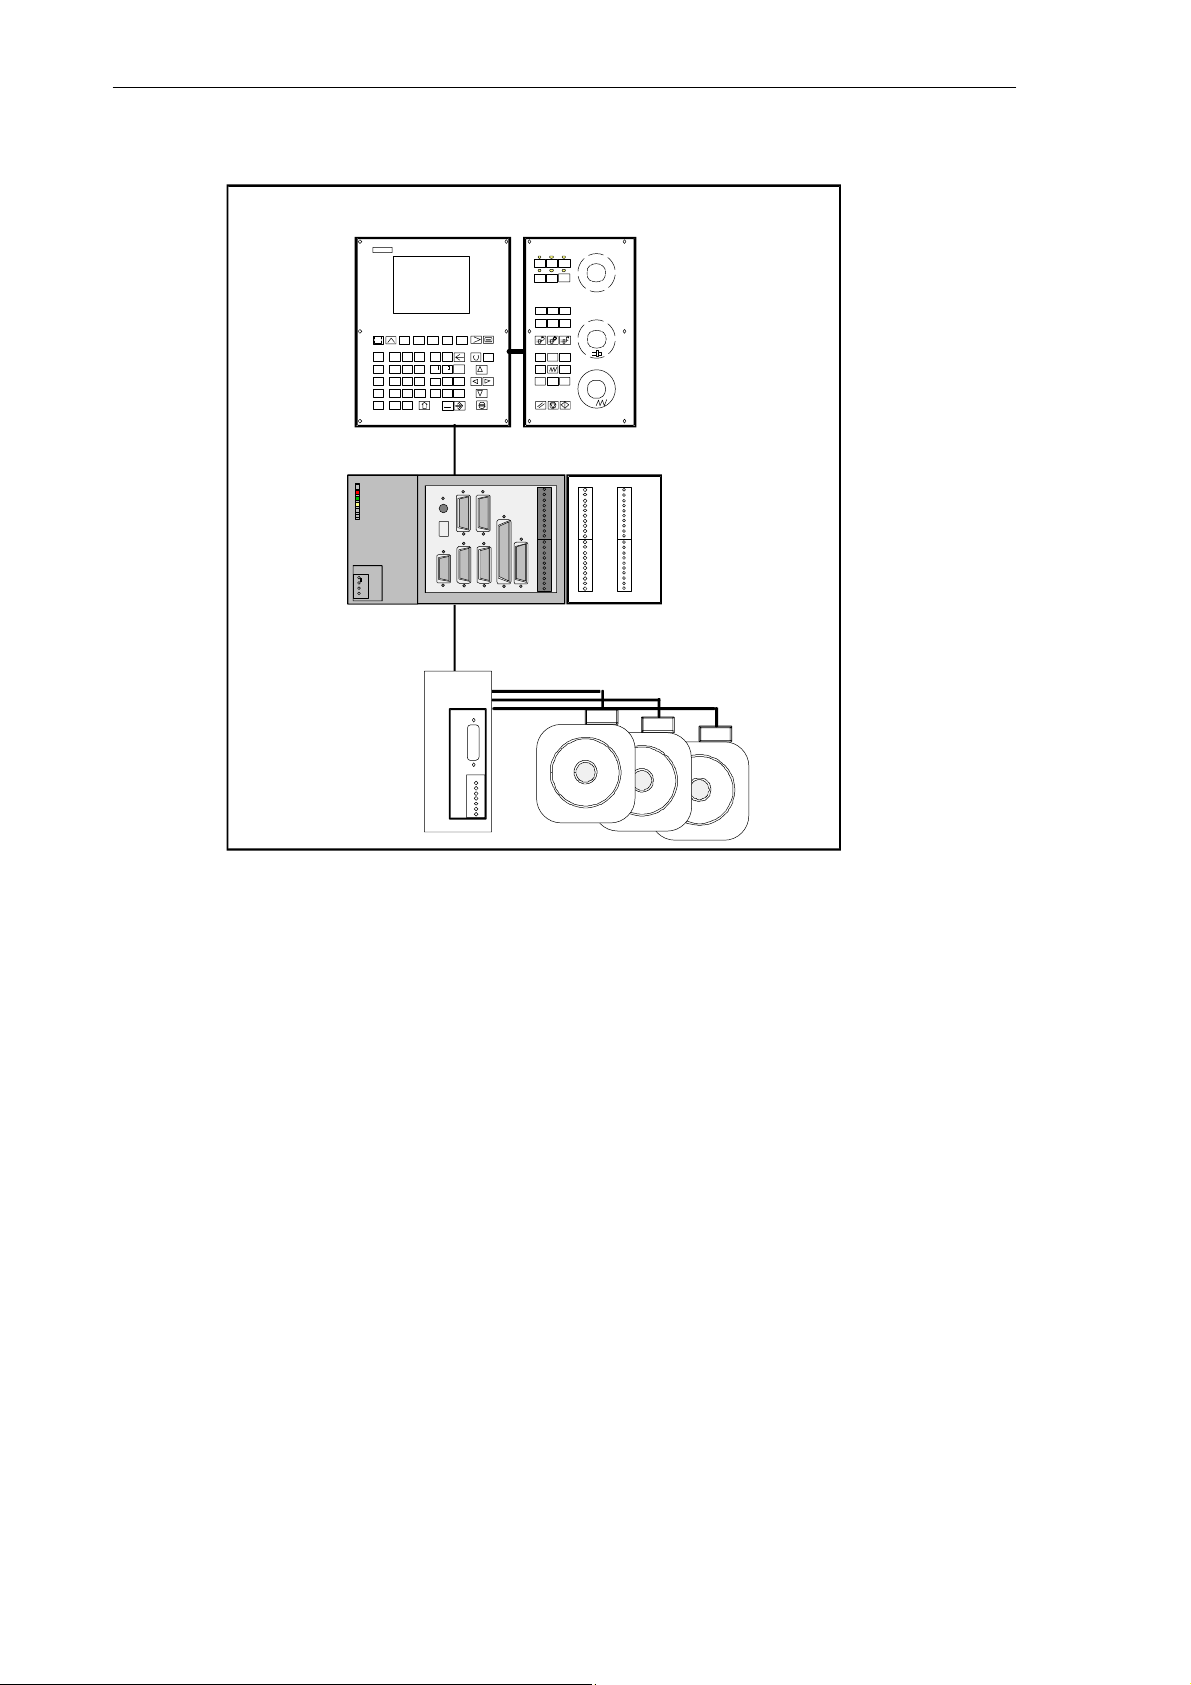
SINUMERIK 802C Control System
1.1 Components of the SINUMERIK 802C
What is SINUMERIK?
The SINUMERIK 802C is a microprocessor–controlled numerical control system for simple
machine tools with stepper motor drives .
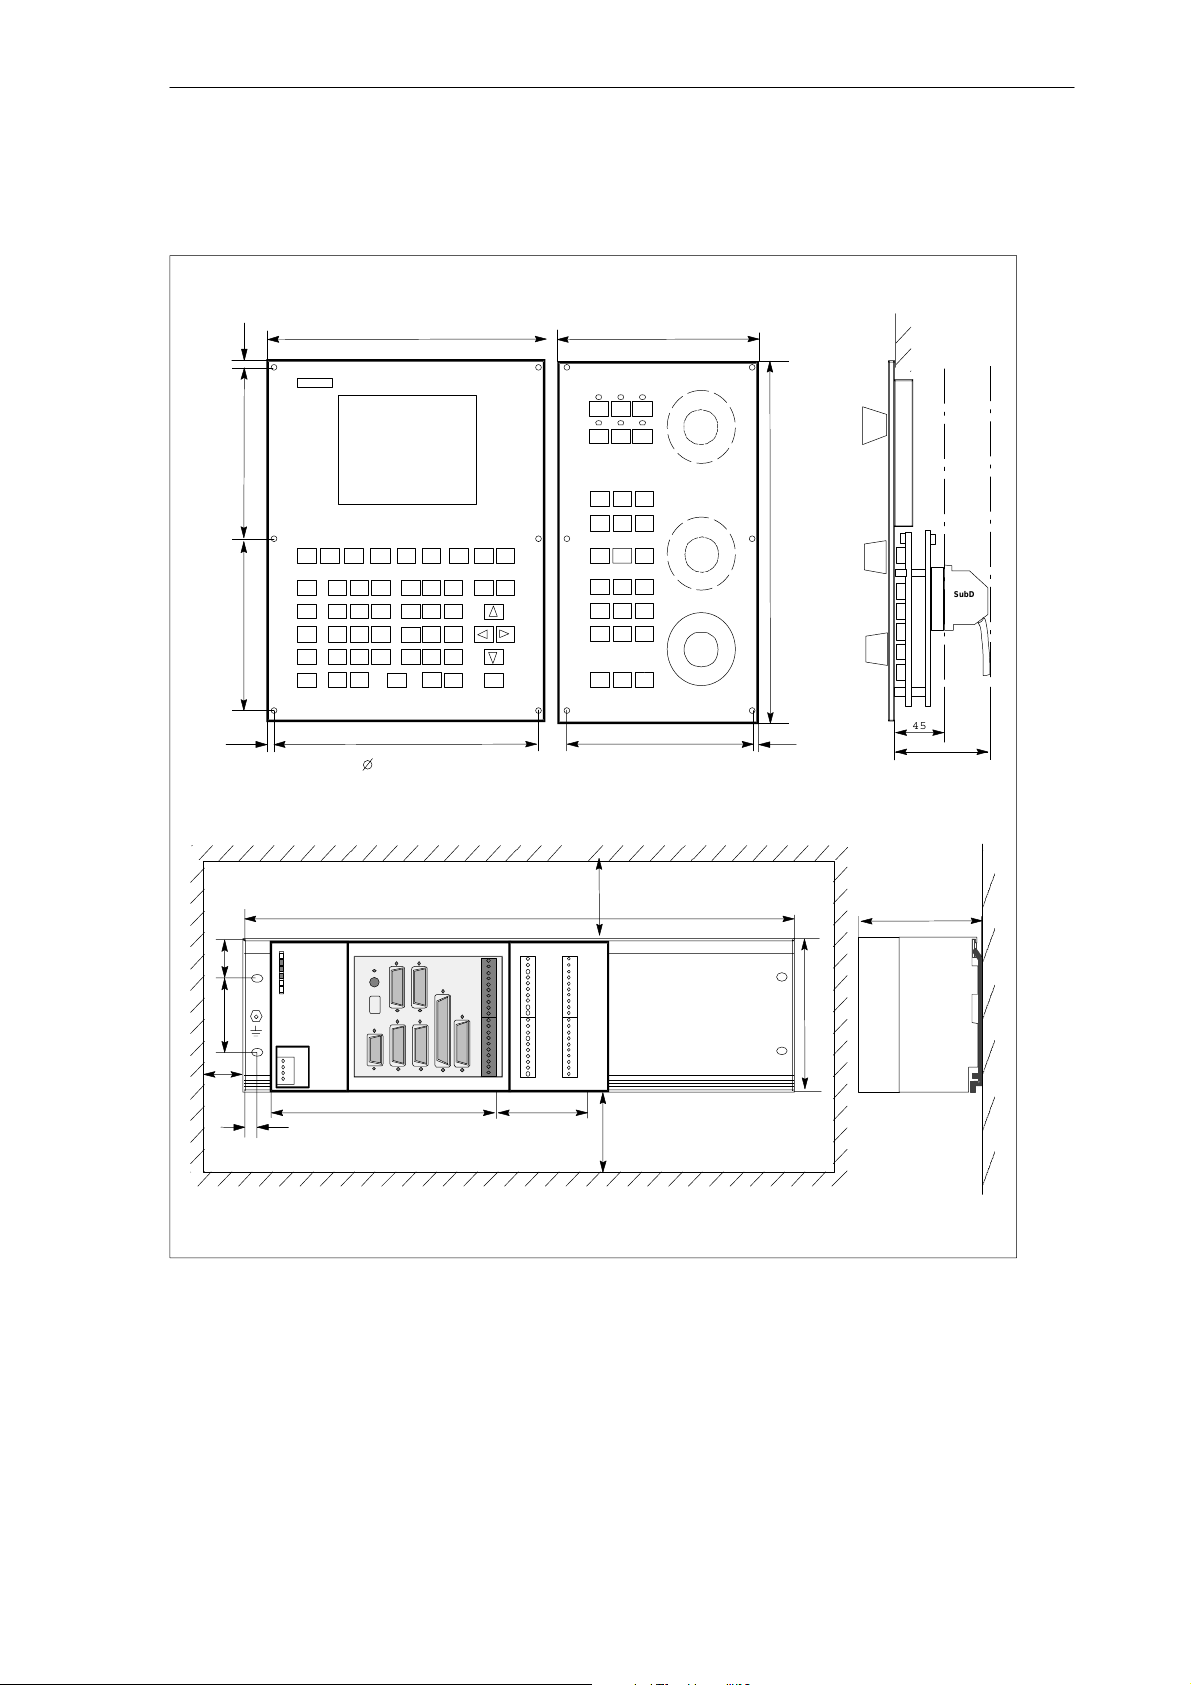
Hardware components
It consists of the following hardware components:
S ENC: Control component for a maximum of 3 analog axes and an analog interface for a
main spindle drive (ENC = Economical Numerical Control)
S OP020: NC operator panel with graphics display and keyboard
S MCP: machine control panel
S DI/O16: 16 binary inputs/outputs each extendable to max. 64 by using 4 modules
1
SINUMERIK 802C
6FC5 597–3AA20–0BP2 (01.02)
1-9
Page 10
SINUMERIK 802C Control System
1.1 Components of the SINUMERIK 802C
OP020 MCP
M
X Y Z
N
+
>
E
7
859
G
<
O
F
4
6
Q
=
S
3
2
1
$
H
0
M
VM
T D
Pg
K
_
P
RAL
W
U
BVC
FA
Pg
INS
INCJOGREF
+X
-X
MDAAUTOSBL
%
+Z-Z
%
Fig. 1-1 SINUMERIK 802C hardware components (example configuration)
Software components
The SINUMERIK 802C comprises the following software components, which can be ordered:
S System software on the permanent flash memory of the ENC
ERR
POK
DIAG
DC24V X1
ENCODER1
X4
X3
S2
S3
D15
PE
M
L+
M
RS232
SPINDLE
ENCODER3
X2
X5
X6
X10
MPG
OPI
AXIS
DI
X8
X7
X20
ENCODER2
ENC DI/O
External analog
drive
X2003 X2005
IN
0
1
2
3
4
5
6
7
M
8
9
10
11
12
13
14
15
M
X2004 X2006
OUT
L+
0
1
2
3
4
5
6
7
M
L+
8
9
10
11
12
13
14
15
M
1-10
– Boot software,
loads the remaining system software from the permanent memory into the user memory (DRAM) and starts the system.
– MMC software (Man Machine Communication),
implements all operating functions
– NCK software (NC Kernel)
implements all NC functions. This software controls an NC channel with a maximum of
3 movement axes and a spindle.
– PLC software (Programmable Logic Control),
executes the integrated PLC user program cyclically.
– Integrated PLC user program
intended to adjust the SINUMERIK 802C to the machine functions (see also Description of Functions “Integrated User Program for SINUMERIK 802C”).
6FC5 597–3AA20–0BP2 (01.02)
SINUMERIK 802C
Page 11

User data
SINUMERIK 802C Control System
1.1 Components of the SINUMERIK 802C
S Toolbox
– WinPCIN transfer program for a PC/PG (programming device) to transfer user data and
programs
– Text manager
– Cycle kit for loading into the control system using WinPCIN
– User program library
– Technological machine data files
– Programming tool
S Update diskettes
– Update program with operator prompting system
– 802C system software, packed, for loading and programming the
SINUMERIK 802C via an update program.
User data are:
Data saving
!
S Machine data
S Setting data
S Tool data
S R parameters
S Zero offsets
S Compensation data
S Part programs
S Standard cycles
Modified user data are saved for at least 50 h after power off or power failure. After then, they
might get lost.
Warning
To avoid data loss, the operator must carry out data saving (see Section 4.1.4).
SINUMERIK 802C
6FC5 597–3AA20–0BP2 (01.02)
1-11
Page 12
SINUMERIK 802C Control System
1.2 Technical data
1.2 Technical data
Connected load
Table 1-1 Connected load
Weight
Parameter
Supply voltage 20.4 28.8 V
Ripple 3.6 Vss
Current consumption from 24 V 1 A *
Power dissipation of ENC
Power dissipation of OP020
Power dissipation of MCP
Power dissipation of DI/O16
Start–up current 2.6 A
* Basic configuration of ENC,
OP020, MCP and DI/O16, all
outputs open,
current consumption for any
Table 1-2 Weight
Component
ENC component 900 g
DI/O16 component 350 g
OP020 component 1,800 g
MCP component 1,200 g
Min. Typ. Max. Unit
15
7
7
further DI/O16 connected
will increase by 0.05 A each.
** at nominal load
Weight [g]
W
W
W
**
Dimensions
1-12
Table 1-3 Component dimensions
Component
ENC component 125 x 200 x 118
DI/O component 125 x 80 x 118
OP020 component 300 x 250 x 50
MCP component 300 x 170 x 50
Dimensions HxWxD [mm]
6FC5 597–3AA20–0BP2 (01.02)
SINUMERIK 802C
Page 13

Environmental operating conditions
Table 1-4 Environmental operating conditions
Parameter
Temperature range 0...55 °C
Permissible relative humidity 5...95 % without condensation
Air pressure 700...1,060 hPa
The operating conditions comply with IEC 1131-2.
Installation in a housing (e.g. cubicle) is absolutely necessary for operation.
Transport and storage conditions
Table 1-5 Transport and storage conditions
Parameter
Temperature range T ransport: -40...70 °C
Permissible relative air humidity 5...95 % without condensation
Air pressure 700...1,060 hPa
Transport height -1,000...3,000 m
Free fall in transport package v 1,200 mm
SINUMERIK 802C Control System
1.2 Technical data
Storage: –20 ... 55 °C
Protective quality and degree of protection
Class of protection I to IEC 536.
No PE terminal required.
Foreign matter and water protection to IEC 529.
S for ENC and DI/O16: IP 20
S for OP020 and MCP: IP 54 front
IP 00 rear
SINUMERIK 802C
6FC5 597–3AA20–0BP2 (01.02)
1-13
Page 14

SINUMERIK 802C Control System
1.2 Technical data
1-14
6FC5 597–3AA20–0BP2 (01.02)
SINUMERIK 802C
Page 15

Installing the Control System
2.1 Installing and removing the SINUMERIK 802C
Warning
!
Approach
Before performing any installation work, always first make sure that the system is disconnected from the mains!
The modules contain electrostatically sensitive devices.
It must be ensured that persons without ESD protection never touch printed circuit boards or
components when handling operator and machine control panels.
Prior to installation, the machine control panel can be provided with a spindle override switch
and an emergency stop button. If these are not required, the openings must be covered with
the supplied self–adhesive covers.
2
1. Mount the spindle override switch.
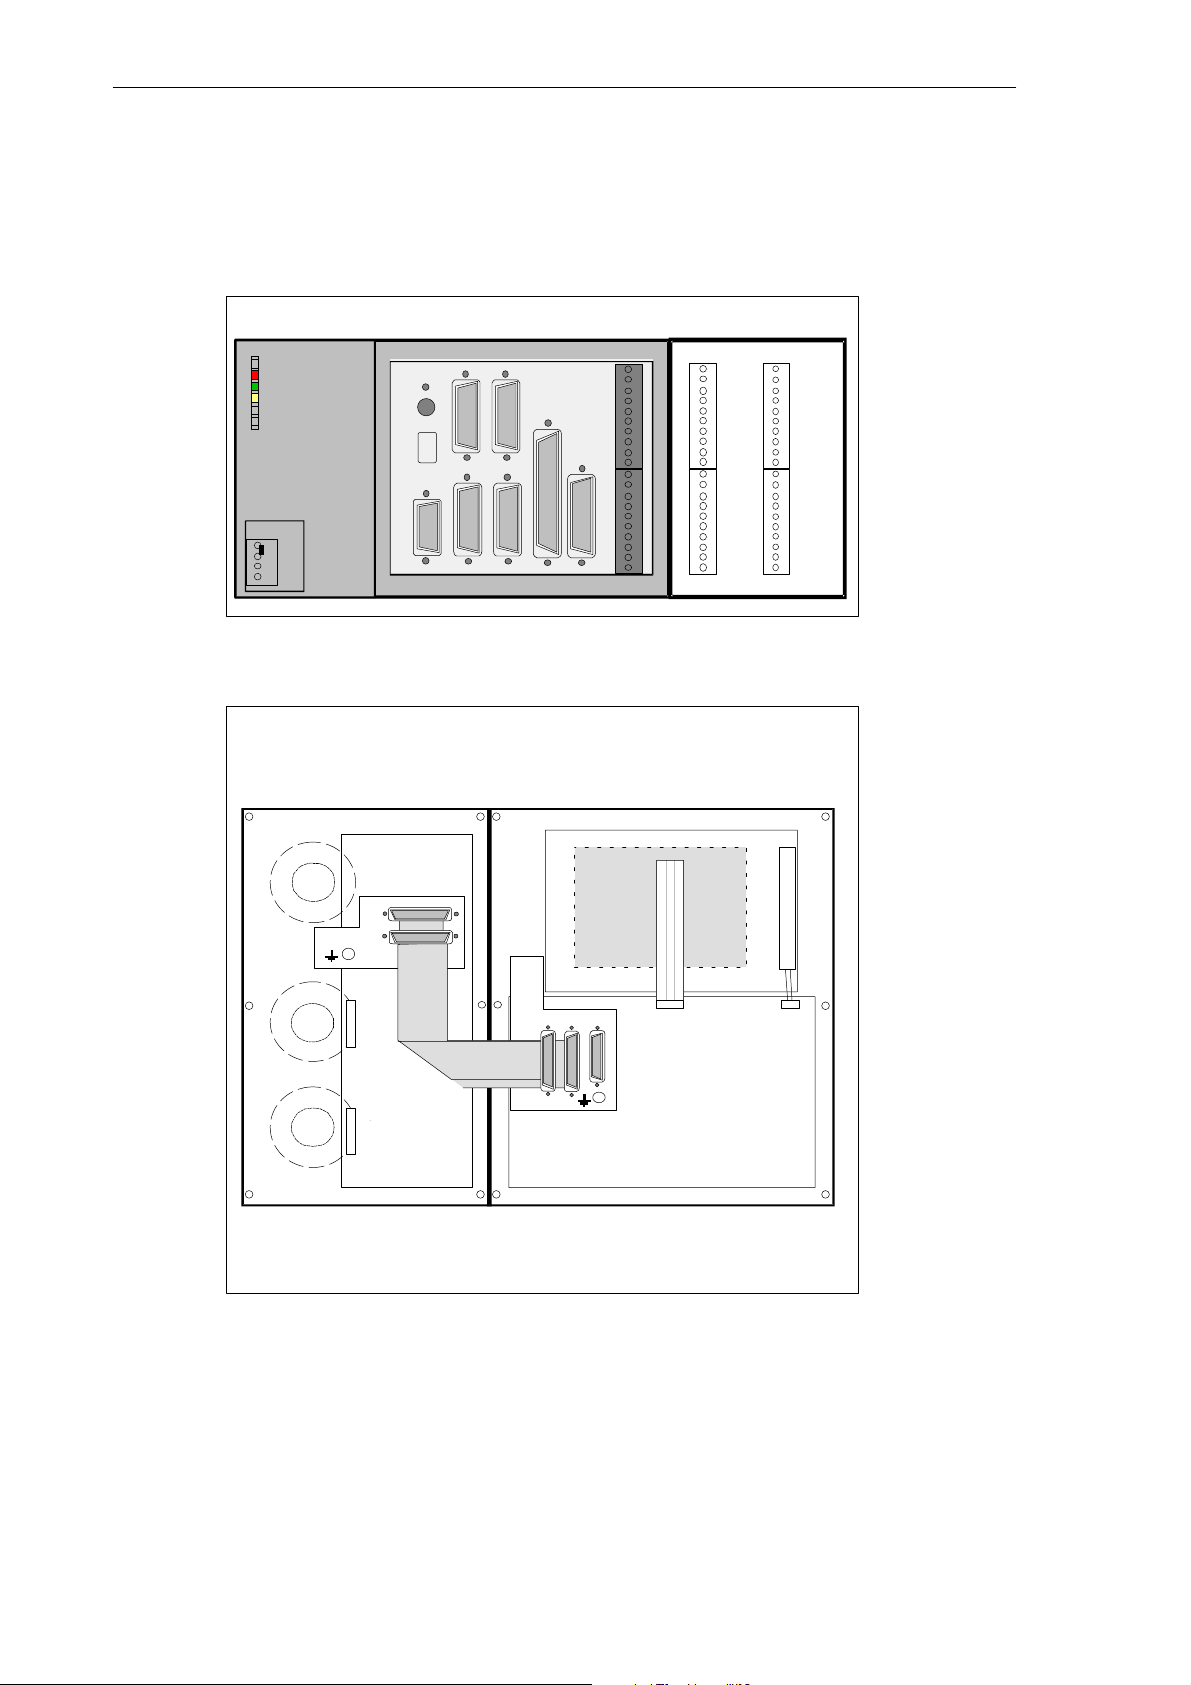
2. Install the operator panel and the machine control panel.
3. Connect the panel using ribbon cable.
4. Install the DIN rail.
5. Connect the ENC and DI/O components.
Note
If you want to connect several DI/O16 components, it may be necessary to remove the right–
hand connector from the housing.
6. Slide the components onto the DIN rail, tilt it down and screw it tight.
Removing the control system
The control components are removed as described above in the reverse order.
SINUMERIK 802C
6FC5 597–3AA20–0BP2 (01.02)
2-15
Page 16

Installing the Control System
2.1 Installing and removing the SINUMERIK 802C
Warning
!
Before removing the control components, always first make sure that the system is disconnected from the mains!
2-16
6FC5 597–3AA20–0BP2 (01.02)
SINUMERIK 802C
Page 17
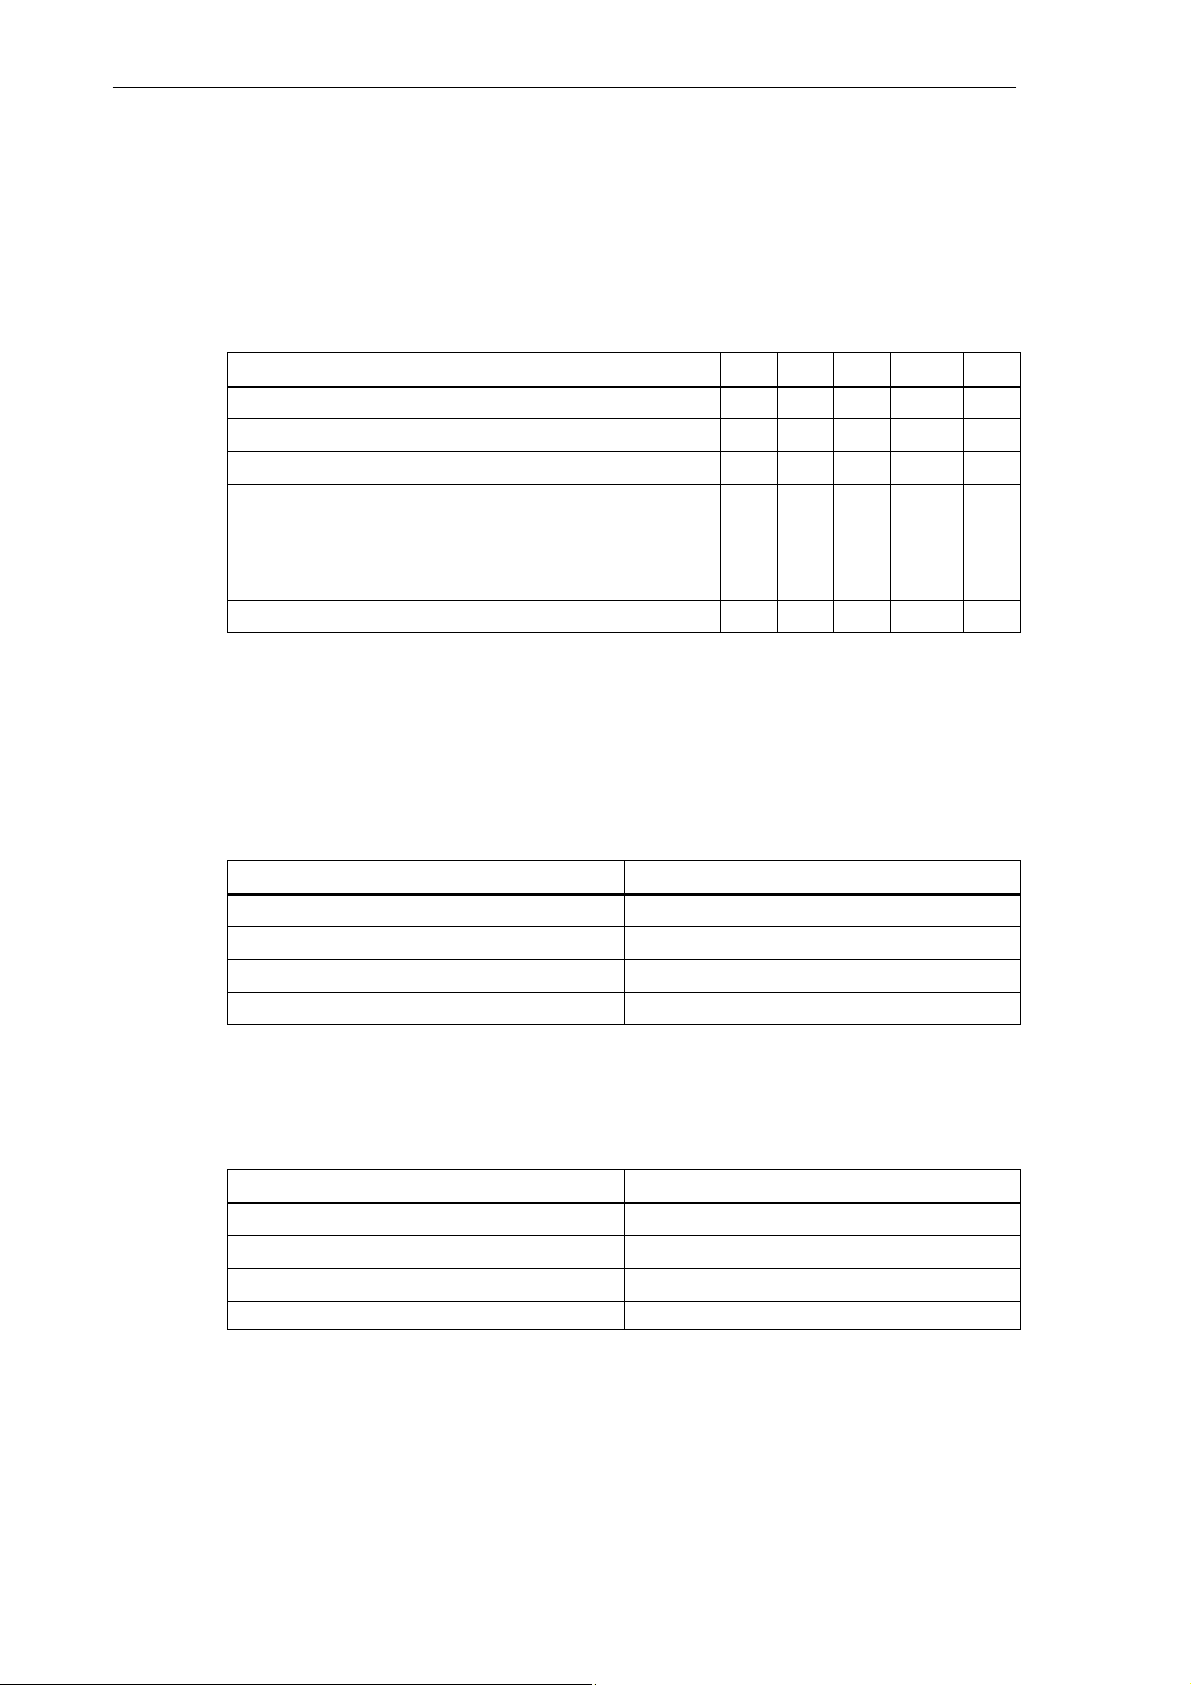
Mounting dimensions
The dimensions shown below are important for installing the control components:
Installing the Control System
2.1 Installing and removing the SINUMERIK 802C
142
142 8
8 234
Mounting Holes
ERR
DC24V X1
POK
DIAG
L+
M
L+
M
32,5
57,2
20
15
250
170
300
SubD
A
F
154
8
45
80
4,8
482
ENCODER2
ENCODER1
X4
X3
RS232
SPINDLE
ENCODER3
X2
X5
OPI
AXIS
X6
X8
X7
200
X2003 X2005
X10
IN
MPG
0
1
2
3
4
5
6
7
M
8
9
10
11
12
13
14
15
M
DI
X2004 X2006
X20
80
40
120
OUT
L+
0
1
2
3
4
5
6
7
M
L+
8
9
10
11
12
13
14
15
M
125
40
Fig. 2-1 Mounting dimensions for SINUMERIK 802C
SINUMERIK 802C
6FC5 597–3AA20–0BP2 (01.02)
2-17
Page 18
Installing the Control System
2.2 Interfaces and cables
2.2 Interfaces and cables
Position of the interfaces and front panel elements
ERR
POK
DIAG
DC24V X1
S2
S3
D15
PE
M
L+
M
RS232
Fig. 2-2 User interfaces
MCP
Rear
X1202
X1201
X2
ECU DI/O16
ENCODER1
X3
ENCODER3
X5
ENCODER2
X4
SPINDLE
X6
AXIS
X7
X10
MPG
OPI
DI
X8
X20
X2003 X2005
X2004 X2006
OP020
Rear
IN
0
1
2
3
4
5
6
7
M
8
9
10
11
12
13
14
15
M
OUT
L+
0
1
2
3
4
5
6
7
M
L+
8
9
10
11
12
13
14
15
M
CFL
X1001 X1002 X1009
Fig. 2-3 Rear of machine control panel and operator panel
LCD- signal
connector
2-18
6FC5 597–3AA20–0BP2 (01.02)
SINUMERIK 802C
Page 19

Interfaces
Installing the Control System
2.2 Interfaces and cables
ENC
S X1 power supply terminals (DC24V)
4–pin screw–type terminal block for connecting the 24 V load power supply
S X2 RS232 interface (V24)
9–pin sub–D plug connector
S X3 to X5 measuring system interfaces (ENCODER)
three 15–pin sub–D plug connectors for connecting incremental position encoders (RS422)
S X6 spindle interface (SPINDLE)
9–pin sub–D socket for connecting a spindle drive with analog interface
S X7 drive interface (AXIS)
50–pin sub–D socket connector for connecting the power sections for a maximum of four
analog drives including spindle
S X8 operator terminal interface (OPI)
25–pin D–Sub female connector for connecting the operator terminal
S X10 handwheel interface (MPG)
10–pin front connector for connecting the handwheels
S X20 digital inputs (DI)
10–pin front connector for connecting the NC READY relay
DI/O
S X2003 and X2004
10–pin front connector for connecting digital inputs
S X2005 and X2006
10–pin front connector for connecting digital outputs
LEDs
3 LEDs for fault and status displays
Operating elements
Start–up switch S
SINUMERIK 802C
6FC5 597–3AA20–0BP2 (01.02)
2-19
Page 20
Installing the Control System
2.2 Interfaces and cables
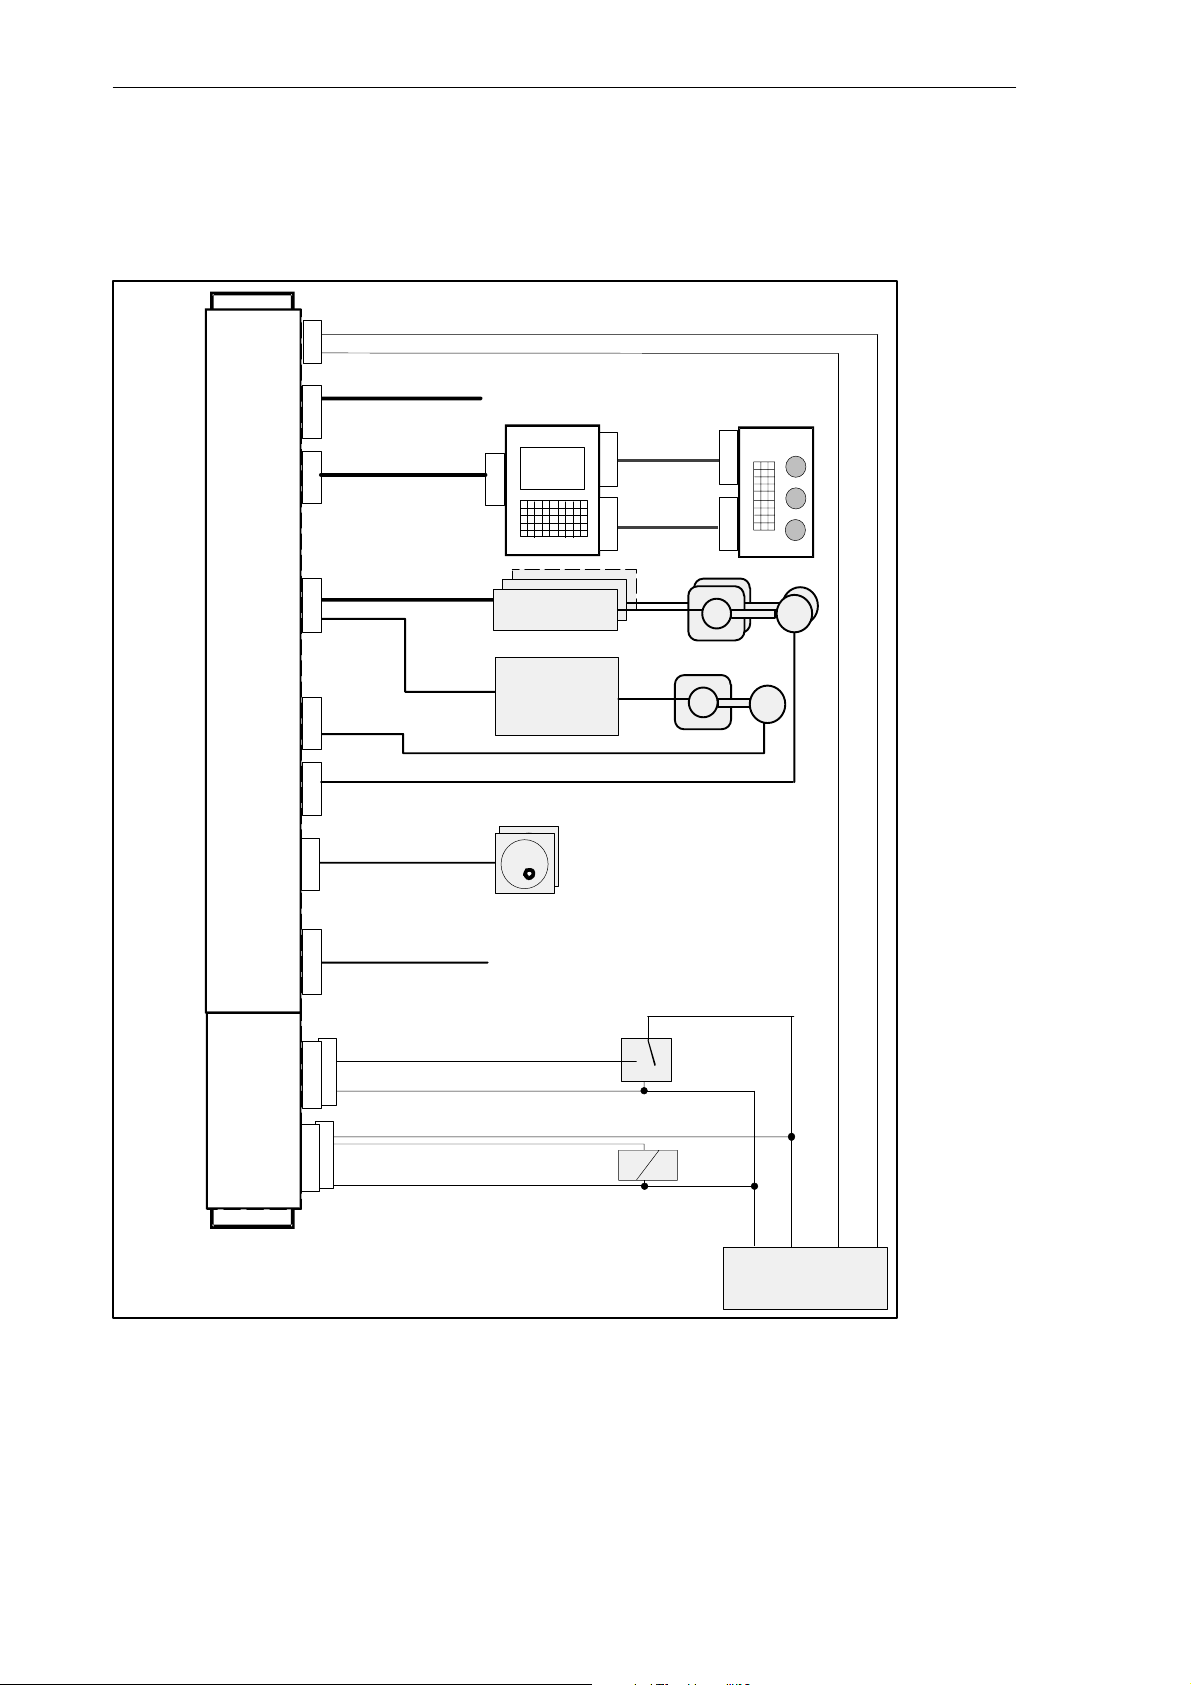
Connecting cables
The components are wired up as shown in the Connection Diagram 2-4. For the cables required, please refer to the diagram below.
DC24V
ECU
RS232
OPI
AXIS
SPINDLE
ENCODER
ENCODER
MPG
X1X2X8
X7X6X10
X3–X5
L+
M
Wire (1.0...2.5)
Machine
RS232
Op. Panel
Control
Panel
1)
X1201X1202
X1009
ANALOG DRIVE
X1001X1002
flat or round
cable
1)
ANALOG MOTOR
SPINDLE
DRIVE
SPINDLE MOTOR
ENCODER
Hand Wheels
DI
X20X2003
DI/O16
IN 0..7
IN 8..15
OUT0..7
OUT8..15
IN
M
X2004
L+
OUT
M
X2006
X2005
Wire (0.14...1.5)
Wire (0.14...1.5)
Fig. 2-4 SINUMERIK 802C connection diagram
1) Ribbon cable (included in scope of supply)
NC READY
Sensor
1...16
Actor
1...16
P24M
Power Supply
P24M
2-20
6FC5 597–3AA20–0BP2 (01.02)
SINUMERIK 802C
Page 21

2.3 Connecting the individual components
2.3 Connecting the individual components
Connecting the components
Note
Use only shielded cable and make sure that the shield is connected to the metal or metal plated connector casing on the control side. For the purpose of isolating the analog setpoint signal from low–frequency interference, we recommend not to ground the shield on the drive
side.
The preassembled cable offered as accessories provides optimum protection against interference.
General procedure:
Proceed as follows to connect the individual components:
1. Connect the cables to the components as shown in Fig. 2-4.
Installing the Control System
2. Fix the sub–D connector in place using the knurled screws.
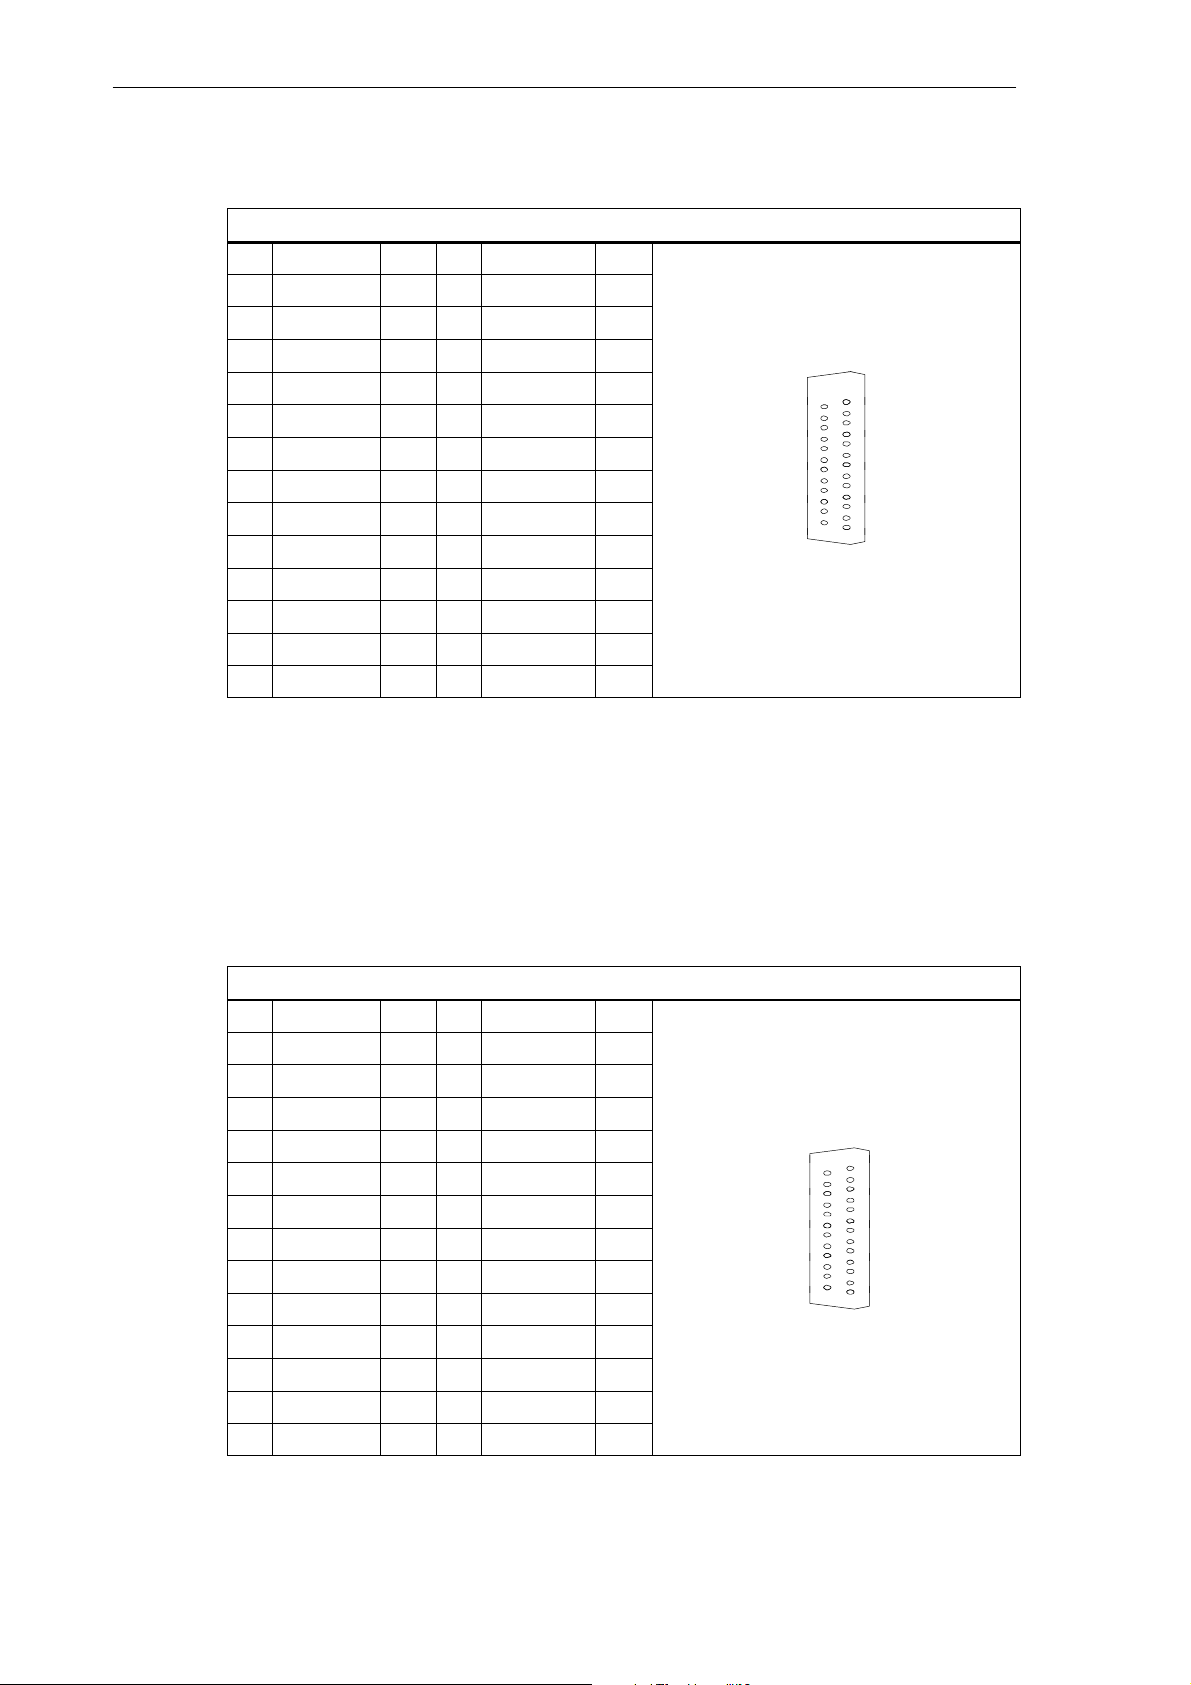
2.3.1 Connecting the operator panel
Connector pin assignment on the ENC side
Operator panel interface
Connector designation: X8
OP020
Connector type: 25–pin sub–D plug connector
SINUMERIK 802C
6FC5 597–3AA20–0BP2 (01.02)
2-21
Page 22
Installing the Control System
1
2.3 Connecting the individual components
Table 2-1 Pin assignment of connector X8
Pin Signal Type Pin Signal Type
1 14 P24_OP VO
2 M_OP VO 15 OPD0_N O
3 OPD0 O 16 OPD1_N O
4 OPD1 O 17 OPD2_N O
5 OPD2 O 18 OPD3_N O
6 OPD3 O 19 OPCP1_N O
7 OPCP1 O 20 OPCP2_N O
8 OPCP2 O 21 OPS_N O
9 OPS O 22 ENRXD_N I
10 ENRXD I 23 ENTXD_N O
11 ENTXD O 24 ENRTS_N O
12 ENRTS O 25 P24_OP VO
13 M_OP VO
X8
14
14
25
13
13
1
Connector pin assignment on the OP side
Operator panel interface
Connector designation: X1009
OP020
Connector type: 25–pin sub–D plug connector
Table 2-2 Pin assignment of connector X1009
Pin Signal Type Pin Signal Type
1 14 P24_OP VI
2 M_OP VI 15 OPD0_N I
3 OPD0 I 16 OPD1_N I
4 OPD1 I 17 OPD2_N I
5 OPD2 I 18 OPD3_N I
6 OPD3 I 19 OPCP1_N I
7 OPCP1 I 20 OPCP2_N I
8 OPCP2 I 21 OPS_N I
9 OPS I 22 OPTXD_N O
10 OPTXD O 23 OPRXD_N I
11 OPRXD I 24 OPCTS_N I
12 OPCTS I 25 P24_OP VI
13 M_OP VI
X1009
14
25
13
1
2-22
6FC5 597–3AA20–0BP2 (01.02)
SINUMERIK 802C
Page 23

2.3 Connecting the individual components
Signal names
OPD[0...3] LCD Data 0...3
OPCP1 LCD Latch
OPS LCD Frame
OPCP2 LCD Clock
OPRXD OP Receive Data
OPTXD OP Transmit Data
OPCTS OP Clear to Send
ENRXD ECU Receive Data
ENTXD ECU Transmit Data
ENRTS ECU Request to Send
P24_OP DC24V
M_OP Ground
Signal level
RS422 / LVDS
Signal type
VO Voltage output
VI Voltage input
O Output
I Input
Installing the Control System
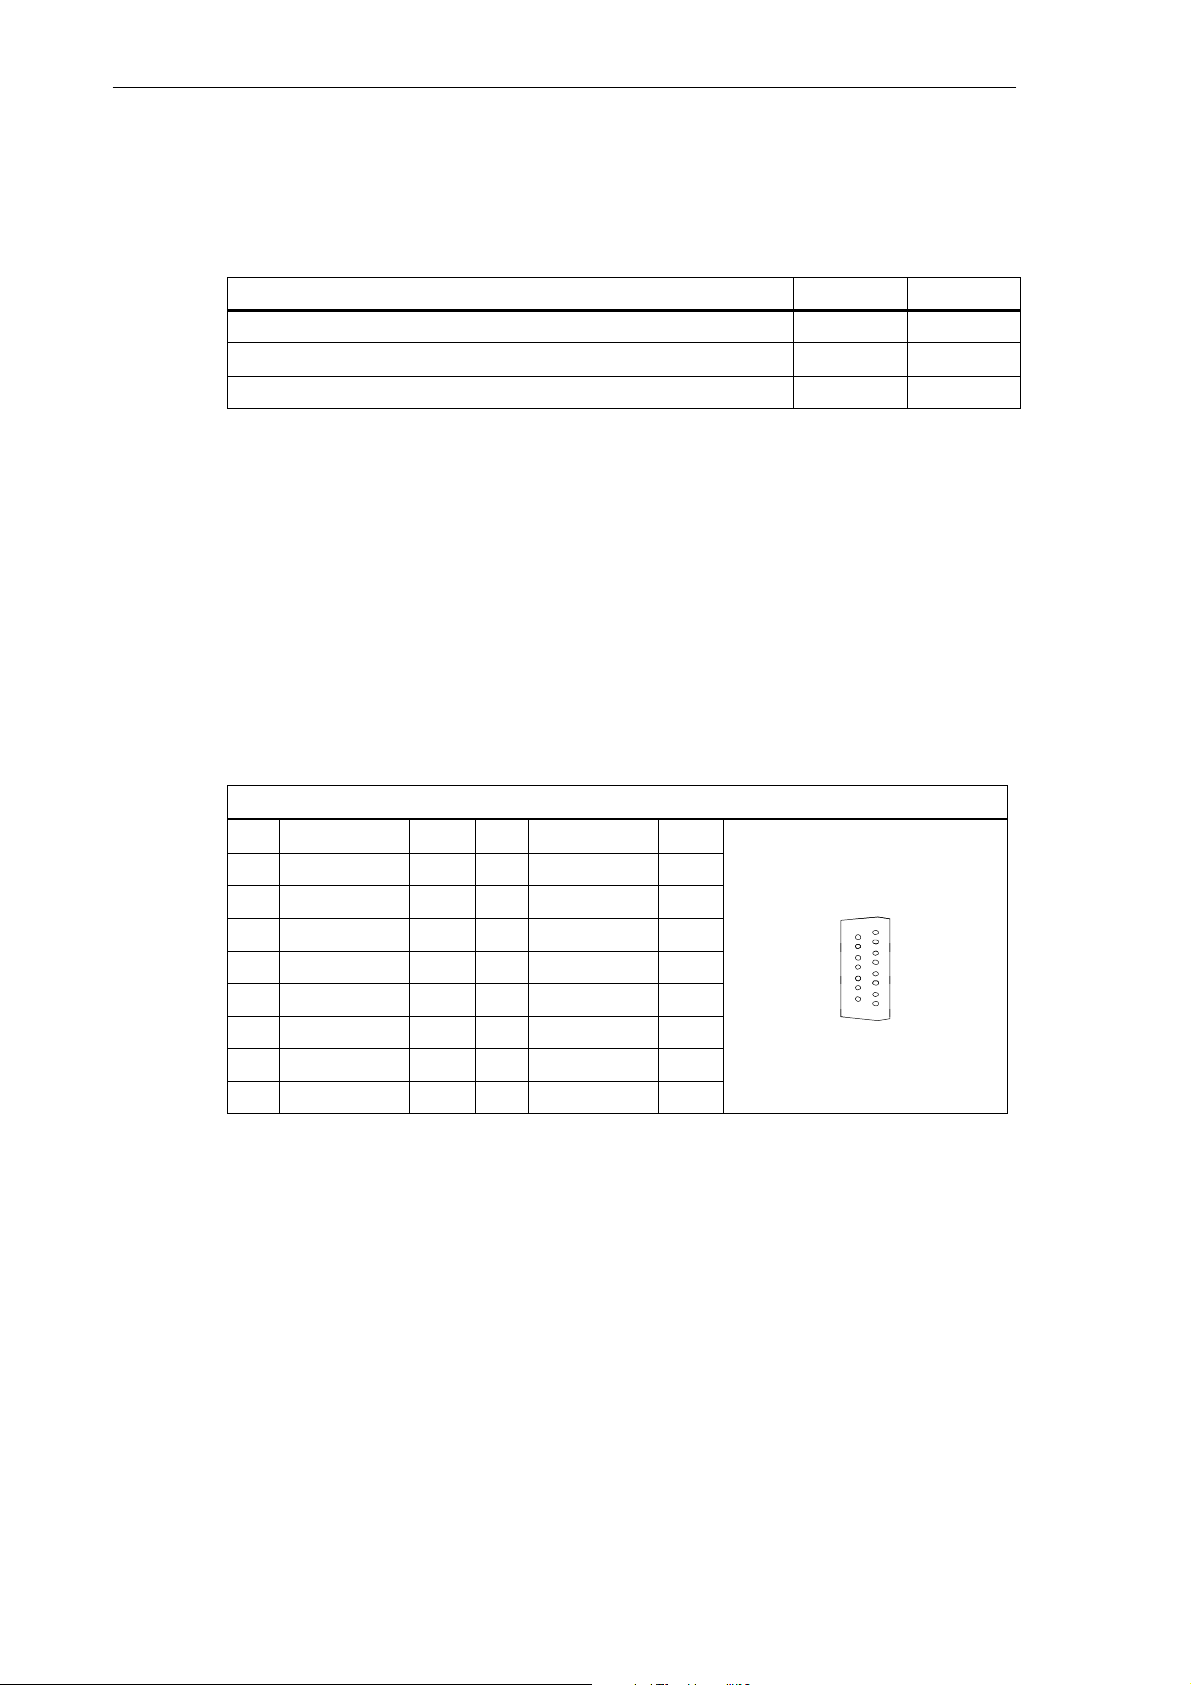
2.3.2 Connecting the feed drives and the spindle (X7)
Connector pin assignment on the ENC side
Feed drive interface
Connector designation: X7
AXIS 1-4
Connector type: 50–pin sub–D plug connector
Table 2-3 Pin assignment of connector X7
X7
Pin Signal Type Pin Signal Type Pin Signal Type
1 SW1 VO 18 34 BS1 VO
2 BS2 VO 19 35 SW2 VO
3 SW3 VO 20 36 BS3 VO
4 BS4 VO 21 37 SW4 VO
5 22 38
6 23 39
7 24 40
8 25 41
9 26 42
10 27 43
SINUMERIK 802C
6FC5 597–3AA20–0BP2 (01.02)
2-23
Page 24

Installing the Control System
2.3 Connecting the individual components
11 28 44
12 29 45
13 30 46
14 RF1.1 K 31 47 RF1.2 K
15 RF2.1 K 32 48 RF2.2 K
16 RF3.1 K 33 49 RF3.2 K
17 RF4.1 K 50 RF4.2 K
Signal names
SWn Setpoint
BSn Reference potential for setpoint
RFn.1, RFn.2 Servo enable contact
Signal level
RS422
Signal type
O Signal output
Axis assignment
1 X axis
2 Y axis
3 Z axis
4 Spindle
2-24
6FC5 597–3AA20–0BP2 (01.02)
SINUMERIK 802C
Page 25

2.3 Connecting the individual components
Table 2-4 Cable assignment (for type 6FX2 002–3AD01)
Installing the Control System
34
18
33
50
NC Side
Cable Drive Side
PIN Core Color Signal Name PIN
14 black 1st axis 1.9
47 brown 1.65
34 red 1.4
1 orange 1.56
15 yellow 2nd axis 2.9
1
48 green 2.65
2 blue 2.14
35 purple 2.56
16 gray 3rd axis 3.9
49 pink 3.65
36 white/black 3.14
17
3 white/brown 3.56
17 white/red Spindle 4.9
50 white/orange 4.65
4 white/yellow 4.14
37 white/green 4.56
Drives with analog interface Signals
One voltage and one enable signal each is output.
S SWn (SETPOINT)
Analog voltage signal in the range "10 V to output a speed setpoint
S Sn (REFERENCE SIGNAL)
Reference potential (analog ground) for the setpoint signal, internally connected to logic ground.
S RFn (SERVO ENABLE)
Relay contact pair controlling the enable of the power section, e.g. of a SIMODRIVE drive unit
controlled via a PLC program.
Signal parameters
The setpoint is output as an analog differential signal.
Table 2-5 Electrical parameters of the signal outputs for step–switching drives
Parameter Min Max Unit
Voltage range -10.5 10.5 V
Output current -3 3 mA
SINUMERIK 802C
6FC5 597–3AA20–0BP2 (01.02)
2-25
Page 26
Installing the Control System
2.3 Connecting the individual components
Relay contact
Table 2-6 Electrical parameters of the relay contacts RFn.1 and RFn.2
Parameter Max. Unit
Switching voltage 50 V
Switching current 1 A
Switching power 30 VA
Cable length: max. 35 m
2.3.3 Connecting the measuring systems (X3 ... X6)
Pin assignment of the connector on the ENC side
Measuring system interface (incremental encoder)
Connector designation: X3 ... X6
ENCODER
Connector type: 15–pin sub–D plug connector
Table 2-7 Pin assignment of the female connector X3 ... X6
X3 ... X6
Pin Signal Type Pin Signal Type
1 9 M VO
2 10 N I
3 11 N_N I
4 P5_MS VO 12 B_N I
5 VO 13 B I
6 P5_MS VO 14 A_N I
7 M VO 15 A I
8
Signal names
A, A_N Track A (true and negated)
B, B_N Track B (true and negated)
N, N_N Zero mark (true and negated)
P5_MS +5.2 V supply
M Supply ground
15
8
9
1
2-26
Signal level
RS422
Signal type
VO Voltage output (supply)
I 5V input (5V signal)
6FC5 597–3AA20–0BP2 (01.02)
SINUMERIK 802C
Page 27

Connectable encoder types
Installing the Control System
2.3 Connecting the individual components
Incremental 5 V encoders can be connected directly.
Characteristics
The encoders must meet the following requirements:
Transmission method: Differential transmission with 5 V square–wave
Track A as true and negated signal (U
Max. output frequency: 1.5 MHz
Phase offset between
tracks A and B: 90° "30°
Current consumption: max. 300 mA
Cable lengths
The maximum cable length depends on the specifications of the encoder power supply and on
the transmission frequency.
To provide fault–free operation, make sure that the following values are not exceeded when
using preassembled interconnecting cables from SIEMENS:
signalsOutput signals:
a1
Track B as true and negated signal (U
Zero signal N as true and negated signal
, Ua0)
(U
a0
a2
, Ua1)
, Ua2)
Table 2-8 Maximum cable lengths depending on the encoder power supply
Supply Voltage
5 V DC 4.75 V...5.25 V < 300 mA 25 m
5 V DC 4.75 V...5.25 V < 220 mA 35 m
Table 2-9 Maximum cable lengths depending on the transmission frequency
Encoder Type
incremental
Tolerance Current Consumption Max. Cable Length
Frequency Max. Cable Length
1 MHz 10 m
500 kHz 35 m
2.3.4 Configuration of the RS232 interface connection (X8)
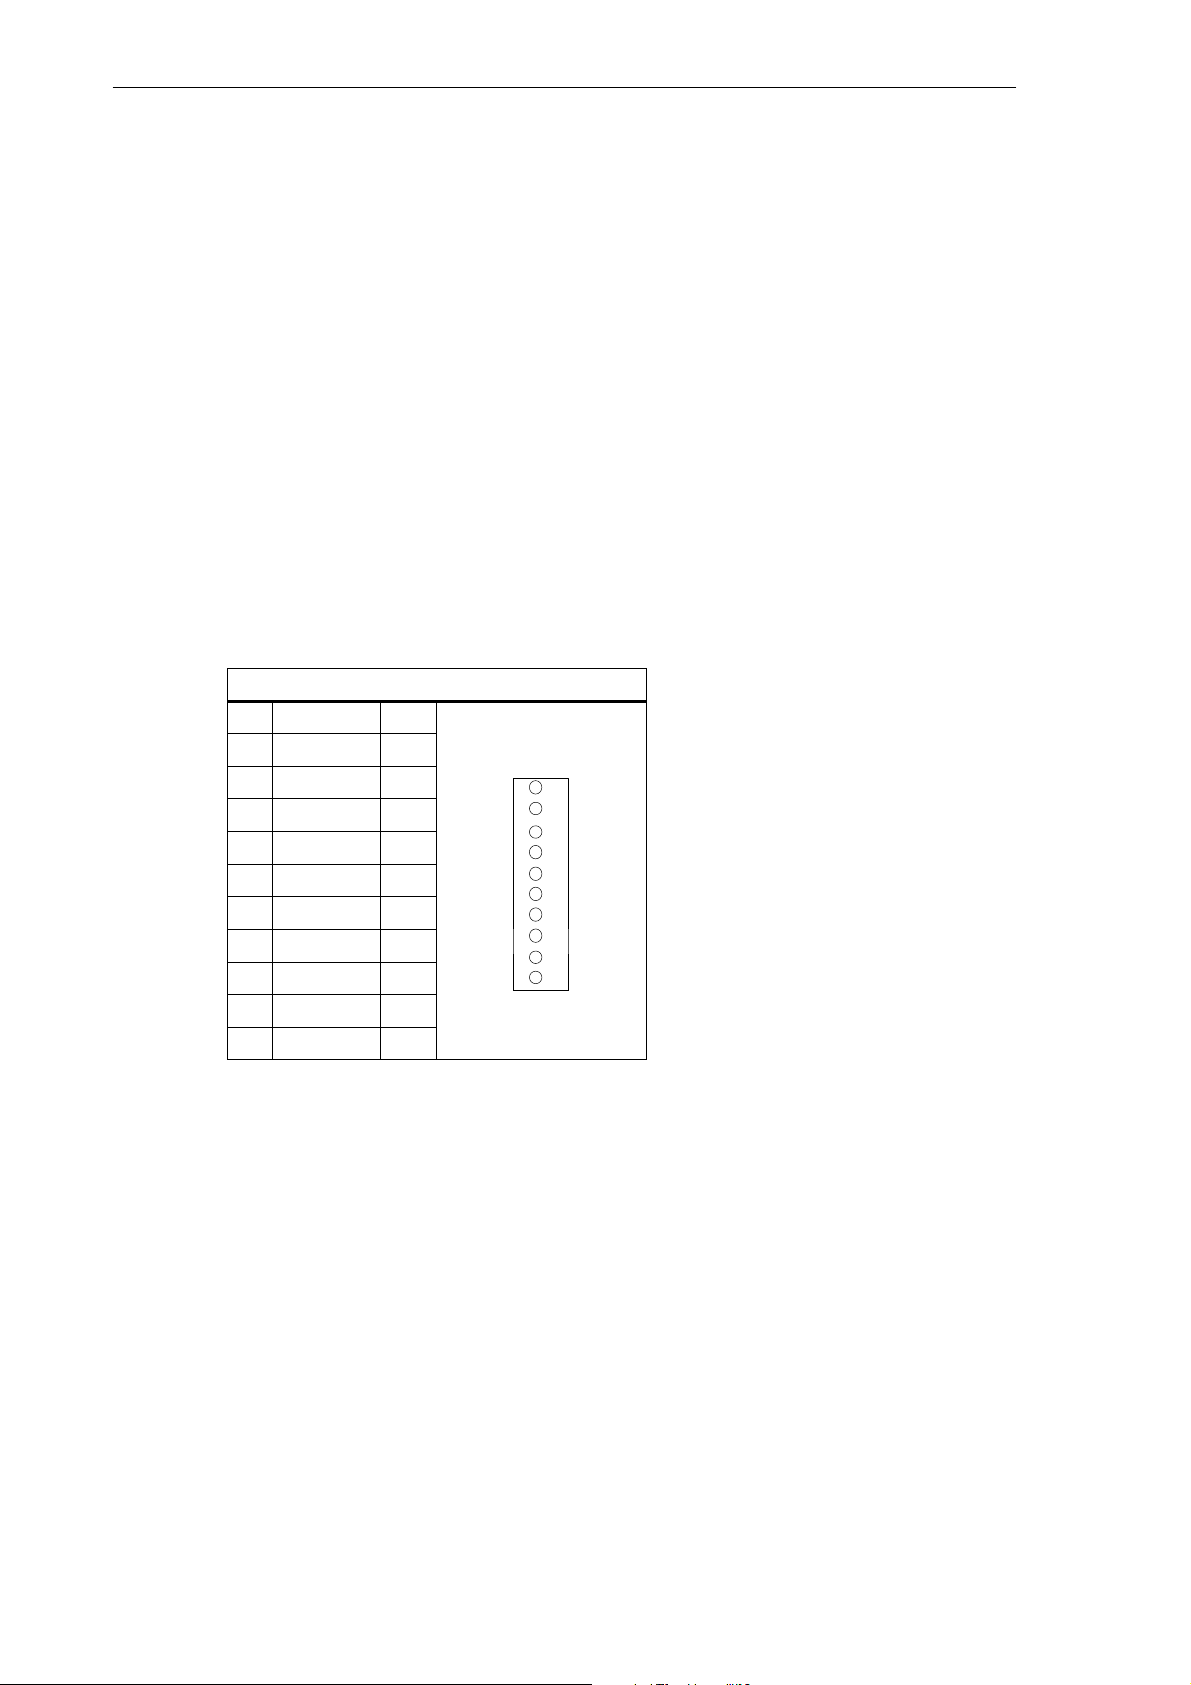
Pin assignment of the connector on the ENC side
RS232 interface
Connector designation: X2
RS232
Connector type: 9–pin sub–D plug connector
SINUMERIK 802C
6FC5 597–3AA20–0BP2 (01.02)
2-27
Page 28

Installing the Control System
2.3 Connecting the individual components
Table 2-10 Pin assignment of connector X2
Pin Name Type Pin Name Type
1 6 DSR I
2 RxD I 7 RTS O
3 TxD O 8 CTS I
4 DTR O 9
5 M VO
Signal description:
RxD Receive data
TxD Send data
RTS Request to send
CTS Send enable
DTR Standby output
DSR Standby input
M Ground
X8
6
9
1
5
Signal level
RS232 (+ 12 V)
Signal type
I Input
O Output
VO Voltage output
Cable for WinPCIN
Table 2-11 Cable for WinPCIN: Pin assignment of the Sub–D connector
9–Pin
1 Shield 1
2 RxD 2
3 TxD 3
4 DTR 6
5 M 7
6 DSR 20
7 RTS 5
8 CTS 4
9
Name 25–Pin
2-28
6FC5 597–3AA20–0BP2 (01.02)
SINUMERIK 802C
Page 29
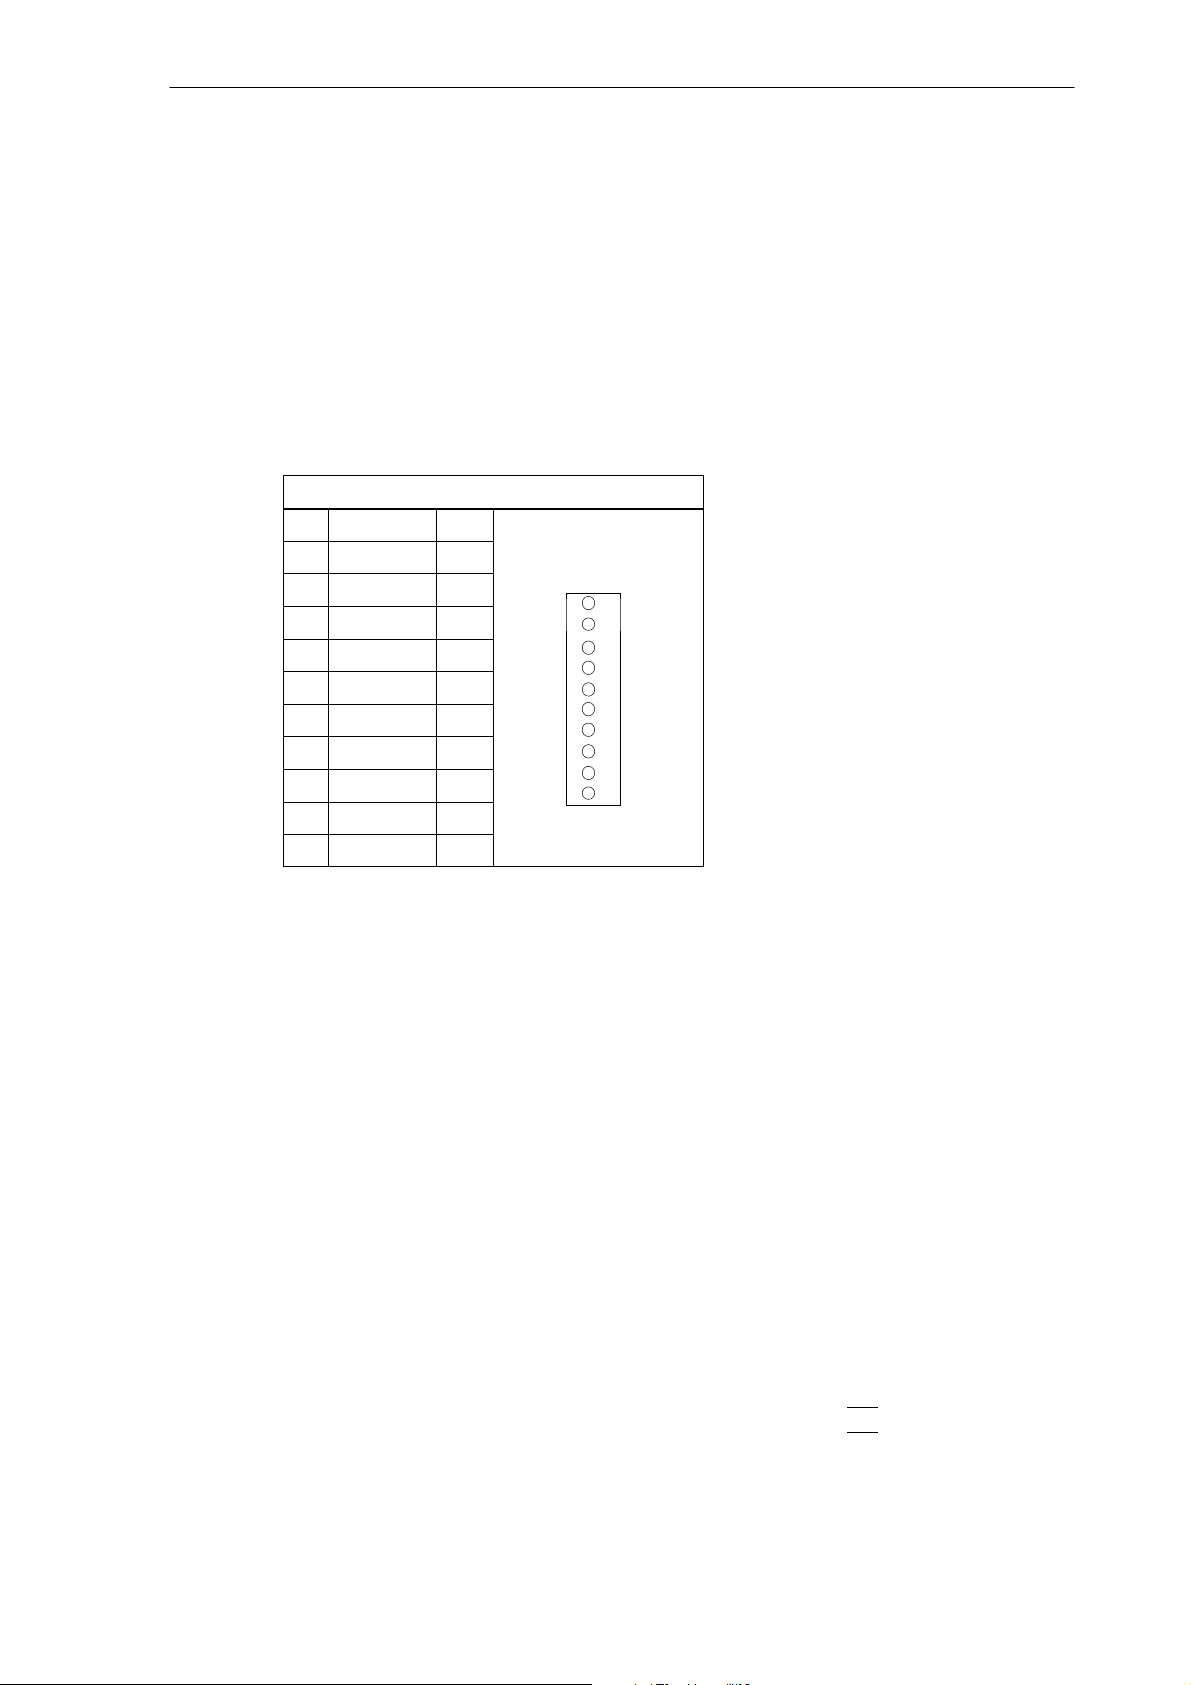
2.3.5 Connecting handwheels (X10)
Pin assignment of the connector on the ENC side
Handwheel interface
Connector designation: X10
MPG
Connector type: 10–pin mini-Combicon plug connector
Table 2-12 Pin assignment of connector
X10
X10
Pin Name Type
1 A1 I
2 A1_N I
3 B1 I
4 B1_N I
5 P5_MS VO
6 M5_MS VO
7 A2 I
8 A2_N I 10
9 B2 I
10 B2_N I
Installing the Control System
2.3 Connecting the individual components
1
Handwheels
Signal names
A1, A1_N Track A, true and negated (handwheel 1)
B1, B1_N Track B, true and negated (handwheel 1)
A2, A2_N Track A, true and negated (handwheel 2)
B2, B2_N Track B, true and negated (handwheel 2)
P5_MS 5.2 V supply voltage for handwheels
M Supply ground
Signal level
RS422
Signal type
VO Voltage output
I Input (5 V signal)
Two electronic handwheels can be connected which must meet the following requirements:
Transmission method: 5 V square–wave (TTL level or RS422)
Signals: Track A as true and negated signal (Ua1, Ua1)
Track B as true and negated signal (Ua2, Ua2)
SINUMERIK 802C
6FC5 597–3AA20–0BP2 (01.02)
2-29
Page 30
Installing the Control System
2.3 Connecting the individual components
Max. output frequency: 500 kHz
Phase offset between
tracks A and B: 90° "30°
Supply: 5 V, max. 250 mA
2.3.6 Connecting NCREADY (X20)
Pin assignment of the connector on the ENC side
BERO input interface
Connector designation: X20
DI
Connector type: 10–pin plug connector
Table 2-13Pin assignment of connector X20
X20
Pin Name Type
11 NCRDY_1 K
12 NCRDY_2 K
13 reserved DI
14 reserved DI
15 reserved DI
16 reserved DI
17 reserved DI
18 reserved DI
19 reserved VI
20 reserved VI
11
20
20
Signal names
NCRDY_1...2 NC Ready (NCREADY contacts 1...2)
Signal type
K Switching contact
NC-READY output
Readiness in the form of a relay contact (NO); must be integrated into the EMERGENCY
STOP circuit.
2-30
6FC5 597–3AA20–0BP2 (01.02)
SINUMERIK 802C
Page 31

Installing the Control System
2.3 Connecting the individual components
Table 2-14 Electrical parameters of the NCREADY relay contact
Parameter
DC switching voltage 50 V
Switching current 1 A
Switching power 30 VA
L+
EMERGENCY STOP
X20.11
NCREADY
X20.12
Machine control voltage
Max. Unit
Fig. 2-5
The NCREADY contact will switch off
the control voltage in case of danger.
2.3.7 Connecting the digital inputs and outputs (X2003 ... X2006)
Connector pin assignment
Interface for the digital inputs
Connector designation: X2003, X2004
IN
Connector type: 10–pin plug connector
SINUMERIK 802C
6FC5 597–3AA20–0BP2 (01.02)
2-31
Page 32

Installing the Control System
2.3 Connecting the individual components
Table 2-15 Connector pin assignment
X2003
Pin Name Type
1
2 DI0 I
3 DI1 I
4 DI2 I
5 DI3 I
6 DI4 I
7 DI5 I
8 DI6 I
9 DI7 I
10 M24 V
X2004
Pin Name Type
1
2 DI8 I
3 DI9 I
4 DI10 I
5 DI11 I
6 DI12 I
7 DI13 I
8 DI14 I
9 DI15 I
10 M24 V
Signal names
DI0...15 24 V digital inputs
Signal type
V Voltage input
I Input (24 V signal)
2-32
6FC5 597–3AA20–0BP2 (01.02)
SINUMERIK 802C
Page 33

2.3 Connecting the individual components
Table 2-16 Electrical parameters of the digital inputs
Installing the Control System
“1” signal, voltage range 15...30 V
“1” signal, current consumption 2...15 mA
“0” signal, voltage range -3...5 V or input open
Signal delay 0 ³ 1 0.5...3 ms
Signal delay 1 ³ 0 0.5...3 ms
Connector pin assignment
Interface for digital outputs
Connector designation: X2005, X2006
Connector type: 10–pin plug connector
Table 2-17 Connector pin assignment
Pin Name Type
1 1P24 V
2 DO0 O
3 DO1 O
4 DO2 O
5 DO3 O
6 DO4 O
7 DO5 O
8 DO6 O
9 DO7 O
10 1M24 V
Pin Name Type
1 2P24 V
2 DO8 O
3 DO9 O
4 DO10 O
5 DO11 O
6 DO12 O
7 DO13 O
8 DO14 O
9 DO15 O
10 2M24 V
Parameter
X2005
X2006
Value Unit Note
OUT
SINUMERIK 802C
6FC5 597–3AA20–0BP2 (01.02)
2-33
Page 34

Installing the Control System
2.3 Connecting the individual components
Signal names
DO0...15 Digital outputs 24V/0.5A
Signal type
V Voltage input
O Output (24 V signal)
Table 2-18 Electrical parameters of the digital outputs
Parameter
“1” signal, nominal voltage
Voltage drop
“1” signal, output current 0.5 A Simultaneity factor
“0” signal, leakage current max. 2 mA
Connecting sensors and actuators
X2003
X2004
Value Unit Note
24
max. 3
V
V
0.5 per 16 outputs
X2005
X2006
L+
4
M
L+
0
1
2
3
5
6
7
10
11
12
13
14
15
M
8
9
OUT
IN
0
1
2
3
4
5
6
7
M
8
9
10
11
12
13
14
15
M
2-34
Fig. 2-6 Connecting the digital inputs and outputs
6FC5 597–3AA20–0BP2 (01.02)
SINUMERIK 802C
Page 35

Installing the Control System
2.4 ENC and operator panel power supply (X1)
2.4 ENC and operator panel power supply (X1)
Screw–type terminal block
The 24 V DC load power supply unit required for supplying ENC and operator terminal is connected to screw–type terminal block X1.
Characteristics of the load power supply
The 24 V DC voltage must be generated as a functional extra–low voltage with safe electrical
isolation (to IEC 204-1, Section 6.4, PELV).
Table 2-19 Electrical parameters of the load power supply
Parameter
Voltage range mean value 20.4 28.8 V
Ripple 3.6 Vss
Non–periodic overvoltage 35 V
Rated current consumption 1 A
Starting current 2.6 A
Pin connector assignment on the ENC side
Table 2-20 Pin connector assignment of screw–type ter-
minal
block X1
Terminal
1 PE PE
2 M Ground
3 L+ DC 24 V
4 M Ground
Min. Max. Units Conditions
500 ms cont.
50 s recovery
The contacts 2/4 are connected internally in the device.
Operator panel
The operator panel does not possess a separate power supply connection. It is powered from
the ENC via the signal cables.
SINUMERIK 802C
6FC5 597–3AA20–0BP2 (01.02)
2-35
Page 36

Installing the Control System
2.5 Grounding
2.5 Grounding
Ground connections
The following ground connections must be implemented:
S Busbar for ENC, DI/O
S OP020 operator panel
S Machine control panel (MCP)
The ground connections for the MCP/OP020 must take into account installation in the machine or a panel.
In the case of cubicle installation, the grounding points must be connected to the grounding
bar (see Fig. 2-7).
Grounding bar
MCP
ERR
POK
DIAG
DC24V X1
L+
M
L+
M
to chassis
OP020
Installation in a cubicle or machine
CFL
LCD signal-
connector
Shielded signal
cable
ENC
ENCODER2
ENCODER1
X4
X3
RS232
SPINDLE
AXIS
ENCODER3
X2
X5
X6
X7
DI/O16
X2003 X2005
X10
MPG
OPI
DI
X8
X20
X2004 X2006
OUT
IN
L+
0
0
1
1
2
2
3
3
4
4
5
5
6
6
7
7
M
M
L+
8
8
9
9
10
10
11
11
12
12
13
13
14
14
15
15
M
M
Fig. 2-7 Grounding diagram for MCP/OP020 installation in a cubicle or machine
2-36
6FC5 597–3AA20–0BP2 (01.02)
SINUMERIK 802C
Page 37

Installing the Control System
2.5 Grounding
Panel installation requires that the ground connections on the MCP and OP020 are connected
together and to the panel frame. The panel frame is grounded centrally (see Fig. 2-8 ).
Grounding bar
MCP
ERR
POK
DIAG
DC24V X1
L+
M
L+
M
to chassis
RS232
X2
ECU
ENCODER1
X3
ENCODER3
X5
ENCODER2
X4
SPINDLE
X6
AXIS
X7
OP020
LCD signalconnector
Shielded signal
cable
DI/O16
X10
MPG
OPI
DI
X8
X20
CFL
X2003 X2005
IN
0
1
2
3
4
5
6
7
M
8
9
10
11
12
13
14
15
M
X2004 X2006
Installation in a
separate unit
OUT
L+
0
1
2
3
4
5
6
7
M
L+
8
9
10
11
12
13
14
15
M
Fig. 2-8 Grounding diagram for MCP/OP020 installation in a panel
SINUMERIK 802C
6FC5 597–3AA20–0BP2 (01.02)
2-37
Page 38

Installing the Control System
2.6 LEDs and operating elements on the ENC
2.6 LEDs and operating elements on the ENC
Error and status LEDs
There are three LEDs on the front panel of the ENC.
ERR (red)
POK (green)
ENC DI/O16
ENCODER2
ENCODER1
X4
RS232
X2
X3
ENCODER3
X5
SPINDLE
X6
AXIS
X7
ERR
POK
DIAG
DC24V X1
S2
S3
D15
PE
M
L+
M
Fig. 2-9 User interfaces
Group error
This LED indicates an error condition of the ENC.
X10
MPG
OPI
DI
X8
X20
X2003 X2005
IN
0
1
2
3
4
5
6
7
M
8
9
10
11
12
13
14
15
M
X2004 X2006
OUT
L+
0
1
2
3
4
5
6
7
M
L+
8
9
10
11
12
13
14
15
M
Power OK
The power supply is ready.
DIAG (yellow)
Diagnostics
This LED indicates various diagnosis states. Under normal operating conditions, this LED
flashes 1:1.
Start–up switch (S3)
This rotary switch is intended to assist start–up.
Position 0: Normal operation
Positions 1-4: Start–up
cf. also Section 4.2, Table 4-2
2-38
6FC5 597–3AA20–0BP2 (01.02)
SINUMERIK 802C
Page 39

Installing the Drives
Lesehinweis
Manufacturer documentation of the drives
3
SINUMERIK 802C
6FC5 597–3AA20–0BP2 (01.02)
3-39
Page 40

Installing the Drives
3-40
6FC5 597–3AA20–0BP2 (01.02)
SINUMERIK 802C
Page 41

Start-Up
4.1 General
Start-up requirements
S The following is required:
– User’s Guide: “Operation and Programming, SINUMERIK 802C”
– PC/PG (programming device) only for data saving and series start-up
– Toolbox on CD. The CD is either supplied with the control system or can be ordered
separately.
Contents: see also p. 1–11
S The mechanical and electrical installation of the equipment must be completed.
Note
Installation notes are to be found in Chapter LEERER MERKER.
4
S The control system with its components has powered up without errors.
Start-up sequence
The SINUMERIK 802C can be strated up as follows:
1. Check whether the ENC has powered up.
2. PLC start–up
3. Technology setting
4. Set general machine data.
5. Set axis/machine-specific machine data.
– Match encoder with spindle
– Match setpoint with spindle
6. Dry run for axes and spindle(s)
7. Drive optimization
8. Complete start–up, data saving
SINUMERIK 802C
6FC5 597–3AA20–0BP2 (01.02)
4-41
Page 42

Start-Up
4.1 General
4.1.1 Access levels
Protection levels
The SINUMERIK 802C provides a protection level concept for enabling data areas. The protection levels range from 0 to 7 whereby 0 is the highest and 7 the lowest level.
The control system comes with default passwords for protection levels 2 and 3. If necessary
these passwords can be changed by the appropriate authorized person.
Table 4-1 Protection level concept
Protection Le-
vel
0 Siemens, reserved
1 Siemens, reserved
2 Password: EVENING (default) Machine manufacturer
3 Password: CUSTOMER (default) Authorized operator, setter
4 No password or
5 User IS from PLC NCK
6 User IS from PLC NCK
7 User IS from PLC NCK
Protection levels 2 ... 3
The protection levels 2 and 3 require a password. The passwords can be changed after activation. For example, if the passwords are no longer known, the control system must be reinitialized (booting in Start-Up Switch position 1). This will reset all passwords to the default settings for this software version.
If the password is deleted, protection level 4 is applicable.
The password remains set until it is reset using the Delete password softkey; POWER ON
will not reset the password.
Disabled via Data Area
Authorized operator, setter
user IS from PLC NCK
Protection levels 4 ... 7
Protection level 4 is automatically set when no password is entered. If required, the protection
levels 4 ... 7 can be set from the user program via the user interface.
See Section 6.1.1 “Display Machine Data”.
Note
How to set the access levels is described in the User’s Guide “Operation and Programming”.
4-42
6FC5 597–3AA20–0BP2 (01.02)
SINUMERIK 802C
Page 43

4.1.2 Structure of machine data (MD) and setting data (SD)
Number and name
Machine data (MD) and setting data (SD) are differed either by numbers or names. Both the
number and the name are displayed on the screen.
Parameters:
S Activation
S Protection level
S Unit
S Standard value
S Range of values
Activation
The activation levels are listed according to their priority. Any data changes come into effect
after:
Start-Up
4.1 General
S POWER ON (po) switching on/off the SINUMERIK 802S
S NEW_CONF (cf)
S RESET (re) RESET key on the machine control panel (MCP) or M2/m30 at the end of the
S IMMEDIATELY (im) after entering a value
Protection level
To display machine data, protection level 4 (or higher) must be activated.
Start-up or machine data input generally requires protection level 2 or higher (password ”EVE-
NING”).
Unit
Depending on the MD SCALING_SYSTEM_IS_METRIC, the physical units of the MD are set
as follows:
– Activate MD softkey on the operator panel
– RESET key on machine control panel (MCP)
– Modifications at the block limits are possible while the program is running.
program
MD10240 = 1 MD10240 = 0
mm in
mm/min in/min
2
m/s
3
m/s
mm/rev in/rev
in/s
in/s
2
3
If no physical units are applicable to the MD, the field contains a ”-”.
SINUMERIK 802C
6FC5 597–3AA20–0BP2 (01.02)
4-43
Page 44

Start-Up
4.1 General
Note
The default setting of the machine data is MD10240 SCALING_SYSTEM IS METRIC = 1 (metric).
With the INCH scaling system MD10240=0, MD203=4 (display unit after the decimal).
Default data
This is the default value for the machine or setting data.
Range of values (minimum and maximum values)
... specifies the input limits. If no range of values is specified, then the input limits are defined
by the data type, and the field is marked with ”∗∗∗”.
4.1.3 Handling machine data
Handling methods
S Display
S Input via keys and V24 interface
S Making backup copies and reading in/reading out data via the V24 interface
These back–up copies contain
– machine data
– line check sums and
– machine data numbers.
Aborting when loading MD
If incorrect machine data files are read into the control system, an alarm is output.
At the end of reading, an alarm with the number of errors is displayed.
4.1.4 Data saving
Saving data internally
The data in the memory backed up for a limited period can be saved internally in the permanent memory of the control system.
An internal data backup should be carried out if the control system has been switched off for
more than 50 hours (at least 10 min/day with controller ON).
It is recommended to carry out internal data saving whenever important data changes have
been made.
4-44
6FC5 597–3AA20–0BP2 (01.02)
SINUMERIK 802C
Page 45

Start-Up
4.1 General
Note
During the internal data backup, a memory copy of the memory backed up for a limited time is made and stored in
the permanent memory. Selective data backup (e.g. only the machine data and not the part programs) is not pos-
sible.
Saving data internally:
Use the ETC key to extend the menu in the Diagnosis/Start-up menu and press the
Save data softkey.
Loading data from an internal data backup:
Boot the control system using the start-up switch, position 3
If the data in the backed-up memory area are lost, on POWER ON the data saved in
the permanent memory area are automatically reloaded into the memory.
Note
The note ”4062 Data backup copy has been loaded“ appears.
Saving data externally
In addition to the internal data backup, the user data of the control system can and must also
be saved internally.
External data saving requires a PC/PG (programming device) with V24 interface and the
WinPCIN tool (included in the tool box).
External data saving should be performed whenever substantial changes in the data have
been made, as well as always at the end of start-up.
External data backup variants:
1. The data record is read out completely, creating the series start–up file. This is intended
for series start–up or to restore the control system status after replacing hardware components or after data loss.
2. Files are read in or read out by areas. The following user data can be selected as individual files:
Data
– Machine data
– Setting data
– Tool data
– R parameters
– Zero offset
– Compensation data (LEC)
Part programs
Standard cycles
SINUMERIK 802C
6FC5 597–3AA20–0BP2 (01.02)
4-45
Page 46

Start-Up
4.2 Turning on and booting the control system
Saving data externally:
Use the Services/Data outp. menu to transfer the following user data as individual files to an
external PC via the V24 interface.
Loading data from an external data backup into the control system:
Press the Start data inp. softkey in the Services menu.
4.2 Turning on and booting the control system
Approach
S Inspect the system visually for:
– proper mechanical installation with tight electrical connections
– supply voltages
– connections for shielding and grounding.
S Turn on the control system.
Note
Providing memory and start-up switch S1 are set correctly (see Fig.2-9), the control system boots.
Start-up switch S1 (hardware)
The ENC is provided with a start-up switch to assist start-up of the control system. This switch
can be actuated using a screw driver.
Table 4-2 Start-up switch settings
Position
0 Normal power–up
1 Power–up with default machine data (user data determined by the software version)
2 System software update
3 Power–up with saved data
4 PLC stop
5 Reserve
6 Assigned
7 Assigned
Meaning
4-46
The switch position comes into effect with next power–up and is displayed on the screen
when the control system powers up.
6FC5 597–3AA20–0BP2 (01.02)
SINUMERIK 802C
Page 47

Start-up switch(software)
In addition to the hardware start-up switch, the following functions can also be carried out in
the Diagnosis/Start-up/Start-up switch menu:
S Normal power–up (Start-up switch position 0)
S Power–up with default machine data (Start-up switch position 1)
S Power–up with saved data (Start-up switch position 3)
These power–up functions have a higher priority than the hardware start–up switch.
Booting the control system
When the control system is turned on for the first time, an initial state of the control system is
established automatically. All memory areas are initialized and are loaded with previously
stored default data.
The PLC area of retentive bit memories is explicitly erased.
The control system changes to the JOG/Ref.point approach mode and the yellow LED DIAG
flashes (see Fig. 2-9).
Start-Up
4.2 Turning on and booting the control system
This initial state is the precondition for error-free start-up of the control system.
When the control system is already turned on, start-up is also possible in the Diagnosis menu
(see User Manual).
Normal booting (Start–up switch position 0)
User data exist, no boot
error
Data in user memory
faulty
Booting with default machine data(Start-up switch position 1)
The user memory area not loaded with default data is erased,
and the default machine data are loaded from the permanent memory into the user memory.
Control system changes to
JOG/Ref.point approach mode,
yellow LED DIAG (see Fig. 4-1) flashes.
Backed-up user data are loaded from the permanent memory into
the user memory (as in start-up switch position 3). If no valid user
data are in the permanent memory, the default data are loaded (as in
start-up switch position 1).
Any deviations from normal booting are displayed on the screen.
Result
Result
Booting with saved data (Start-up switch position 3)
The user data backed-up on the permanent memory are loaded into the user memory.
Contrast control
See User’s Guide “Operation and Programming”
SINUMERIK 802C
6FC5 597–3AA20–0BP2 (01.02)
Result
4-47
Page 48

Start-Up
4.2 Turning on and booting the control system
4.2.1 Boot messages
Displays on the screen
When the control system is booting, test patterns or boot information are displayed on the
screen as progress displays.
After the control system has booted without errors, it changes to the JOG/Ref.point appro-
ach mode, and the yellow DIAG LED (see Fig. 4-1) flashes.
Boot errors
Boot errors are displayed either on the screen or via the LED (see Fig. 4-1 in the following).
The ERR flashes, and the DIAG LED does not flash.
ERR
POK
DIAG
Fig. 4-1 LED
Table 4-3 Boot errors
Error Message
ERROR
EXCEPTION
ERROR
DRAM
ERROR
BOOT
ERROR
NO BOOT2
ERROR
NO SYSTEM
ERROR
LOAD NC
NO SYSTEM-LOADER
ERROR
LOAD NC
CHECKSUM-ERROR
ERROR
LOAD NC
DECOMPRESS-ERROR
ERROR
LOAD NC
INTERNAL-ERROR 1
Remedial Action
1. Check the connections of the plugged or connected modules
(PLC D/IO modules).
2. Switch off the control system and back on again (POWER ON).
3. Carry out a software update.
4. Replace the hardware components.
5. Inform the hotline if necessary.
4-48
6FC5 597–3AA20–0BP2 (01.02)
SINUMERIK 802C
Page 49

4.3 Starting up the PLC
General
The PLC is a store–programmable logic controller for simple machines. It has no hardware of
its own and is used as a software PLC in the SINUMERIK 802C control system.
The task of the PLC is to control machine–related functional sequences.
The PLC executes the user program cyclically. A PLC cycle is always executed in the same
sequence of order.
S Update process image (inputs, outputs, user interface, timers)
S Process communication requests (Operator Panel, PLC 802 Programming Tool)
S Execute user program
S Evaluate alarms
S Output process image (outputs, user interface)
The PLC executes the user program cyclically, starting from the first up to the final operation.
Access from user program is only carried out via the process image and not directly to the
hardware inputs or outputs. The hardware inputs and outputs are updated by the PLC at the
beginning and at the end of program execution. The signals are thus stable over a PLC cycle.
Start-Up
4.3 Starting up the PLC
The user program can be created by means of the PLC 802 Programming Tool using the programming language S7–200 in conjunction with ladder diagrams (LAD). A ladder diagram is a
graphical programming language to represent electrical circuit diagrams.
This Documentation describes the program structure and the instruction set of the PLC in detail.
4.3.1 Commissioning of the PLC
The SINUMERIK 802C comes to the user with a simulation program included.
The SAMPLE user program is stored in the permanent memory. This sample program and the
documentation are included in the SINUMERIK 802SC Toolbox component “PLC802SC Li-
brary”.
The simulation program is intended for the first function test of the control system after assembling the control.
Internal simulation program
The simulation program is integral part of the 802C system software. The simulation program
allows operation of the control system without digital input and output modules. The user program processes all firmly defined keys and the default setting of the axis keyboard (default).
Axes and spindle are switched to simulation mode. No real axis movement is carried out. The
Axis/Spindle Disable user signal is set for each axis. For this reason, the movements of the
axes and of the spindle are simulated virtually. The user can use this program to test the interrelation of the components Operator Panel / Machine Control Panel / ENC.
SINUMERIK 802C
6FC5 597–3AA20–0BP2 (01.02)
4-49
Page 50

Start-Up
4.3 Starting up the PLC
Approach
S Set MD20700 to zero.
S Use the Diagnosis/StartUp switch/PLC softkey to select Simulation.
You can check the current setting via Diagnosis/Service display/Version/PLC application.
S Select the desired key and check your setting by pressing the key.
Supported keys
S Mode selection
S Axis keys
S NC keys
Note
S The Increment key is only active in the JOG mode. The toggle function can be used to set in-
crements in the range between 1 and 1,000. Check the response by pressing the axis direction
keys.
S Reference Point is not supported.
Standard user program
The control system comes with the SAMPLE user program for simple turning machines, which
is stored in the permanent memory.
4-50
6FC5 597–3AA20–0BP2 (01.02)
SINUMERIK 802C
Page 51

4.3.2 Start–up modes of the PLC
The PLC can activate its start–up modes from two places.
Table 4-4 Start–up modes
Start–Up Switch Operator Panel
Start Up Menu
NCK start–up *
PLC Program
Selection
Program
Status
Start-Up
4.3 Starting up the PLC
Retentive Data
(Backed–
Up)
MD for the
PLC in the
User Interface
Normal power–up
Position 0
Power–up with
default values
Position 1
Power–up with
saved data
Position 3
PLC Stop
after POWER ON
Position 4
Normal power–up User program Run Unchanged Accept active
PLC MD
Power–up with default
values
Power–up with saved
data
PLC start up **
Restart User program Run Unchanged Accept active
Restart
and debug mode
Restart with simulation Simulation pro-
User program Run Deleted Standard PLC
MD
User program Run Saved data Saved
PLC MD
Unchanged Stop Unchanged Accept active
PLC MD
PLC MD
User program Stop Unchanged Accept active
PLC MD
Run Unchanged Accept active
gram
PLC MD
Overall reset User program Run Deleted Accept active
PLC MD
Overall reset and debug mode
* Diagnosis/Start up / Start up switch / NCK softkey ** Diagnosis/Start up / Start up switch / PLC softkey
User program Stop Deleted Accept active
PLC MD
The start–up switch PLC Stop can be activated either during operation or power–up.
The debug mode (see “Operation and Programming”, Chapter 7) causes the PLC to remain in
PLC Stop after the control system has powered up. All power–up modes that have been set
either via softkeys or via hardware start–up switches will only come into effect after the next
power–up of the control system. The hardware start–up switch “PLC STOP” (position 4) is
active immediately. The priority of the power–up modes activated via the softkeys on the operator panel is higher than that of the hardware start–up switches.
SINUMERIK 802C
6FC5 597–3AA20–0BP2 (01.02)
4-51
Page 52

Start-Up
4.3 Starting up the PLC
Example:
S Hardware start–up switch position 3
S Restart from operator panel
=> Restart is active from next power–up of the control system
The Run mode activates the cyclic mode.
In the Stop mode, the following actions are initiated:
S All hardware outputs are disabled.
S The NC Ready relay is inactive.
S No cyclic operation (active user program is not executed)
S Process image is no longer updated (”frozen”)
S Emergency Stop active
The user can also use the PLC 802 Programming Tool to start the Stop or Run modes.
A corrected or new project can only be loaded into the control system in the Stop mode. The
user program comes only into effect with next power–up or when the Run mode is active.
4.3.3 PLC alarms
The control system displays a maximum of 8 PLC alarms (system alarms or user alarms).
The PLC manages the alarm information per PLC cycle. It stores or deletes the alarms in the
alarm list according to their occurrence. The first alarm in the list is generally the alarm last
occurred.
If more than 8 alarms occur, the first seven alarms occured are displayed, and the last one
with the highest cancel priority is displayed.
Alarm response and cancel criterion
Furthermore, the PLC manages the alarm responses. The alarm responses are always active,
irrespective of the number of active alarms. Depending on the type of the alarm response, the
PLC triggers an appropriate response.
Each alarm requires a cancel criterion to be defined. The PLC uses the SELF– CLEARING
criterion as default criterion.
Cancel criteria are:
S POWERONCLEAR: The alarm is canceled by switching off/switching on the control sy-
stem.
S CANCELCLEAR: The alarm is canceled by pressing the Cancel key or the Reset key
(analogously to NCK alarms).
4-52
S SELF–CLEARING: The alarm is cleared because the cause resulting in the alarm has
been eliminated or does not exist any longer.
Desired alarm responses are defined for each alarm in the PLC. By default, the PLC uses the
SHOWALARM response (bit0 – bit5 = 0).
6FC5 597–3AA20–0BP2 (01.02)
SINUMERIK 802C
Page 53

Possible alarm responses are:
S PLC Stop : The user program is no longer executed, the NC Ready relay drops out, and
the hardware outputs are disabled ( OUTDS ).
S EMERGENCY STOP: The PLC provides the EMERGENCY STOP signal to the NCK in
the user interface after the user program has been executed.
S Feed disable: The PLC provides the Feed Disable signal to the NCK in the user interface
after the user program has been executed.
S Read–in disable: The NCK provides the Read–in Disable signal to the NCK in the user
interface after the user program has been executed.
S NC Start inhibited: The PLC provides the NC Start Inhibited signal to the NCK after the
user program has been executed.
S SHOWALARM : This alarm has no alarm response (bit0 – bit5 =0).
Priority of cancel conditions
The cancel conditions have the following priority:
S POWER ON CLEAR – system alarms (highest priority)
Start-Up
4.3 Starting up the PLC
S CANCEL CLEAR – system alarms
S SELF–CLEARING – system alarms
S POWER–ON CLEAR – user alarms
S CANCEL CLEAR – user alarms
S SELF–CLEARING – user alarm (lowest priority)
System alarms
see Diagnostics Guide
User alarms
The user interface “1600xxxx” provides the user with two sub–ranges for setting a user alarm.
S Sub–range 0: 4 x 8 bits to set user alarms (0 –> 1 edge)
S Sub–range 1: User alarm variables
The respective bit (sub–range 0) with a 0/1 edge change will activate a new user alarm.
Sub–range 1 is intended for additional user information.
Sub–range 2 can be used to analyze the active alarm responses.
Byte 0 : Bit0 => 1st user alarm ‘’ 700000 ‘’
Byte 3 : Bit7 => 32nd user alarm ‘’ 700031 ’’
Sub–range 1 can only be read or written as a double word. Sub–range 2 can only be read.
You can delete self–clearing alarms by resetting the respective bit in the variable range
‘’1600xxxx’’ in sub–range 0 (1 –> 0 edge).
The remaining user alarms are cleared by the PLC after detecting the respective cancel condi-
tion. If the alarm is still present, the alarm occurs again.
SINUMERIK 802C
6FC5 597–3AA20–0BP2 (01.02)
4-53
Page 54

Start-Up
4.3 Starting up the PLC
User alarm activation
User
interface
Alarm handler
Feed disable active
User program
Example:
Feed disable=0
User alarm with feed
disable
Alarm handler
Module:
Analyze user alarm
PLC cycle
Fig. 4-2 User alarm with Feed Disable alarm response
Int.
inter–
face
Feed disable in the NCK is
active for all axes as long as the
PLC user alarm is active.
Configuring user alarms
Each alarm is assigned a configuration byte. The user alarms can be configured by the user in
machine data 14516_MN_USER_DATA_PLC_ALARM.
Default setting MD 14516: 0 => SHOW ALARM/SELF–CLEARING user alarm
Configuration byte structure:
S Bit0 – bit5 : Alarm responses
S Bit6 – bit7 : Cancel criterion
Alarm responses: Bit0 – bit 5 = 0: Showalarm (default)
Cancel criteria: Bit6 + bit7 = 0: SELF–CLEARING alarm (default)
Bit0 = 1: NC Start inhibited
Bit1 = 1: Read–in disable
Bit2 = 1: Feed disable for all axes
Bit3 = 1: EMERGENCY STOP
Bit4 = 1: PLC Stop
Bit5 = Reserved
Bit6 = 1 : CANCELCLEAR alarm
Bit7 = 1 : POWERONCLEAR alarm
4-54
6FC5 597–3AA20–0BP2 (01.02)
SINUMERIK 802C
Page 55

Alarm texts
Start-Up
4.3 Starting up the PLC
The user has two possibilities to define his own alarms.
S using the Edit PLC txt softkey (cf. “Operation, Programming”, Chapter 7)
S using the Toolbox 802SC Text Manager
The procedure is described in the Toolbox readme file.
Alarm texts are structured as follows:
Alarm number Flag 1 Flag2 Text
Note
The text must be put in inverted commas (‘’ ‘’)! Adhere to the given text structure.
Table 4-5 Example
Alarm Number
700000 0 0 “User alarm 1”
Flag 1 Flag 2 Text
700000 0 0 ‘’’’ // 1st user alarm, text is assigned by the user
700001 0 0 ‘’’’ // 2nd user alarm, text is assigned by the user
700002 0 0 ‘’’’ // 3rd user alarm, text is assigned by the user
700003 0 0 ‘’’’ // 4th user alarm, text is assigned by the user
700004 0 0 ‘’’’ // 5th user alarm, text is assigned by the user
700005 0 0 ‘’’’ // 6th user alarm, text is assigned by the user
...
If no user alarm text is assigned by the user, the operator panel will display only the alarm
number.
The % character in the alarm text is the code for the additional variable. The variable type is
the representation type of the variable.
700031 0 0 ‘’ ’’ // 32nd user alarm, the text is assigned by the user
Number
The alarm text must be here.
Comment line (does not appear in the dialog window of the Operator Panel)
SINUMERIK 802C
6FC5 597–3AA20–0BP2 (01.02)
4-55
Page 56

Start-Up
4.3 Starting up the PLC
The following variable types are possible:
S %D ... Integer decimal number
S % I ... Integer decimal number
S %U ... Unsigned decimal number
S %O ... Integer octal number
S %X ... Integer hexadecimal number
S %B ... Binary representation of 32–bit value
S % F... 4 byte floating point number
User alarm text examples
S 700000 ‘’ ‘’ // Only user alarm number
S 700001 ‘’ Hardware limit switch X + axis
S 700002 ‘’ %D ‘’ // Only variable as an integer decimal number
S 700003 ‘’ Alarm number with fixed alarm text and variable %X ‘’
S 700004 ‘’ %U Alarm number with variable and fixed alarm text ‘’
S 700005 ‘’Rotation monitoring of axis active : %U’’
Operator panel display : 700005 Rotation monitoring of axis active : 1
or 700005 Rotation monitoring of axis active : 3
4.3.4 Machine control panel (MCP) layout
The machine control panel in the standard version has been configured for simple turning machines (2 axes and one spindle).
The user can use the keys 1 – 6 and the associated LEDs (the same applies to keys 1 ... 6)
for his own purposes.
The keys 16–24 should be used as axis keys (see sample program SAMPLE). The programmer can assign the axis keys depending on his particular machine type.
4-56
6FC5 597–3AA20–0BP2 (01.02)
SINUMERIK 802C
Page 57

Start-Up
4.3 Starting up the PLC
Layout when delivered (from product release 2)
%
Key number for configurable key assignment
#1
#4 #5 #6
#7 #8
#10 #11 #12
#13 #14 #15
#16 #17 #18
#19 #20 #21
#22 #23
#25 #26 #27
#3
#2
#9
%
#24
%
Included separately:
Available as accessories: Spindle override switch
and Emergency Stop button
Fig. 4-3 Layout of the machine control panel
horizonal turning machine vertical milling machine
Fig. 4-4 Examples for the assignment of the axis keyboard
4.3.5 PLC programming
The PLC user program is created using the PLC 802 Programming Tool.
The Documentation “S7–200 Automation System, System Manual“ describes how this tool is
operated for S7–200. The PLC 802 Programming Tool is to be understood as a subset of this
Documentation.
#1 ... 27 –> keys 1 ... 27 (see user interface)
+Y
–Y
SINUMERIK 802C
6FC5 597–3AA20–0BP2 (01.02)
4-57
Page 58

Start-Up
4.3 Starting up the PLC
Compared with the S7–200 MicroWin basic system, please note the following:
S The PLC 802 Programming Tool is delievered in the English language version.
S The user program can only be programmed using ladder diagram.
S Only a subset of the S7–200 programming language is supported.
S The compilation of the user program is carried out either offline on a programming device
(PG)PC or semi–automatically when downloading into the control system.
S The project can be loaded into the control system (download).
S It is also possible to load the project from the control system (upload).
S Direct data addressing is not possible; therefore, no programming errors will rsult during
the operation.
S The data/process information must be managed by the user in accordance with the parti-
cular type.
Example:
Information 1 T value DWord memory size (32–bit)
Information 2 Override Byte memory size (8–bit)
User data
Byte 0 DWord (Information 1)
Byte 4 Byte (Information 2)
The user is not allowed to access both of these data at the same time; otherwise, the relevant data access rules must be observed.
S Furthermore, the data direction in the memory model (alignment) and the data type must
be observed for all data.
Example:
Flag bit MB0.1,MB3.5
Flag byte MB0,MB1,MB2
Flag word MW0,MW2,MW4
MW3, MW5 ... are not permissible
Flag double–word MD0,MD4,MD8
MD1,MD2,MD3, MD5 ... are not permissible
Table 4-6 PLC data types permitted in the control system
Data Type
BOOL 1 bit 1 0, 1 –
BYTE 1 byte 1 00 ... FF 0 ... +255
WORD 2 bytes 2 0000 ... FFFF –32 768 ... + 32 767
DWORD
(Double
Word)
REAL 4 bytes 4 – $10
Size Address
Alignment
4 bytes 4 0000 0000 ... FFFF FFFF –2 147 483 648 ...
Range for Logic Operations Range for Arithmetical Opera-
tions
+2 147 483 647
–37
... $10
38
PLC project
4-58
In any case, the PLC 802 Programming tool manages one project (logic operations, symbols
and comments). The download function is intended to store all important information of a project in a control system.
6FC5 597–3AA20–0BP2 (01.02)
SINUMERIK 802C
Page 59

The control system is able store max. 4,000 instructions and 1,000 symbols. The required PLC
memory is influenced by the following components:
S Number of instructions
S Number and length of the symbol names
S Number and length of the comments
S7–200 ladder diagram
A ladder diagram is a graphical programming language similar to electric circuit diagrams.
When creating a program using the ladder diagram form, then you will work with graphical
components to create the networks of your logics. To create your program, you can use the
following elements:
S Contacts constitute a switch through which the current can flow. Current, however, will only
flow through a normally open contact if the contact is closed (logical
value 1). Current will flow through a normally closed contact or a negated contact (NOT) if
the contact is open (logical value 0).
S Coils constitute a relay or an output which is updated by the signal flow.
Start-Up
4.3 Starting up the PLC
S Boxes constitute a function (e.g. a timer, counter or arithmetic operation) which is carried
out at the moment when the signal flow reaches the box.
A network consists of the elements mentioned above, forming a closed circuit. The current
flows from the left conductor bar (in the ladder diagram symbolized by a vertical line at the left
window) through the closed contacts, enabling coils or boxes.
Overview of commands
Table 4-7 Operand identifers
Operand ID
V Data V0.0 to V79999999.7 (see Table
T Timers T0 to T15
C Counters C0 to C31
I Map of digital inputs I0.0 to I7.7
Q Map of digital outputs Q0.0 to Q7.7
M Flags M0.0 to M127.7
SM Special flags SM0.0 to SM 0.6 (see Table 4–10)
AC ACCU AC0 ... AC3
Description Range
4–8)
Table 4-8 Generating the addresses for the V range (see user interface)
Type Code
(DB No.)
00
(00–79)
SINUMERIK 802C
6FC5 597–3AA20–0BP2 (01.02)
Range No.
(Channel/
Axis No.)
00
(00–99)
Subrange Offset Addressing
0
(0–9)
000
(000–999)
symbolic
(8–digit)
4-59
Page 60

Start-Up
4.3 Starting up the PLC
Table 4-9 S802C ranges of operands
Accessed by:
Bit (Byte.bit) V 14000000.0–79999999.7
Byte VB 14000000–79999999
Word VW 14000000–79999998
Double Word VD 14000000–79999994
Memory Type SINUMERIK 802SC
I 0.0 – 7.7
Q 0.0 – 7.7
M 0.0 – 127.7
SM 0.0 – 0.6
T 0 – 15
C 0 – 31
L 0.0 – 59.7
IB 0 – 7
QB 0 – 7
MB 0 – 127
SMB 0
LB 0 – 59
AC 0 – 3
IW 0 – 6
QW 0 – 6
MW 0 – 126
T 0 – 15
C 0 – 31
LW 0 – 58
AC 0 – 3
ID 0 – 4
QD 0 – 4
MD 0 – 124
LD 0 – 56
AC 0 – 3
4-60
Table 4-10 Special Flag SM Bit Definition
SM Bits
SM 0.0 Flags with defined ONE signal
SM 0.1 Initial position: first PLC cycle ‘1’, following cycles ‘0’
SM 0.2 Buffered data lost – applicable only to the first PLC cycle (‘0’ data o.k., ‘1’ – data
lost)
Description
6FC5 597–3AA20–0BP2 (01.02)
SINUMERIK 802C
Page 61

Table 4-10 , FortsetzungSpecial Flag SM Bit Definition
SM Bits Description
SM 0.3 POWER ON: first PLC cycle ‘1’, following cycles ‘0’
SM 0.4 60 s cycle (alternating ‘0’ for 30 s, then ‘1’ for 30 s)
SM 0.5 1 s cycle (alternating ‘0’ for 0.5 s, then ‘1’ for 0.5 s)
SM 0.6 PLC cycle (alternating, one “0” cycle, then one “1” cycle)
4.3.6 Instruction set
A detailed description of the instructions is to be found in the help system of the PLC 802 Programming Tool (Help > Contents and Index, “SIMATIC LAD Instructions”) and in the Docu-
mentation “S7–200 Automation System, CPU22x System Manual.
Start-Up
4.3 Starting up the PLC
SINUMERIK 802C
6FC5 597–3AA20–0BP2 (01.02)
4-61
Page 62

Start-Up
4.3 Starting up the PLC
Table 4-11 Instruction set
Instruction Ladder Symbol Valid Operands
Load
And
Or
Load Not
And Not
Or Not
Output prior 0, n=0
normal open
n=1 close
n=0 open
normal close
n=0 close
n=1 open
prior 1, n=1
BASIC BOOLEAN INSTRUCTIONS
n
n
n
n: V, I, Q, M, SM, T, C, L
n: V, I, Q, M, SM, T, C, L
n: V, I, Q, M,T, C, L
Set
(1 Bit)
Reset
(1 Bit)
prior 0, not set
prior 1 or ½
prior 0, no reset
prior 1 or ½
Instruction Ladder Symbol Valid Operands
Edge Up prior ½ close
(1 PLC cycle)
Edge Down prior ¿ close
(1 PLC cycle)
Logical Not prior 0, later 1
prior 1, later 0
No operation
Instruction Ladder Symbol Valid Operands
Load Byte =
And Byte =
a = b close
a b open
Or Byte =
Load Byte .
And Byte .
a ≥ b close
a t b open
Or Byte .
Load Byte 3
And Byte 3
a ≤ b close
a u b open
Or Byte 3
Bit
S
Bit
R
S_Bit: V, I , Q , M, T, C, L
n =1
S_Bit: V, I , Q , M, T, C, L
n=1
OTHER BOOLEAN INSTRUCTIONS
P
N
NOT
n
NOP
n = 0 ... 255
BYTE COMPARES (Unsigned)
a
==B
b
a
> =B
b
a
< =B
b
a: VB, IB, QB, MB, SMB, AC, Constant,
b: VB, IB, QB, MB, SMB, AC, Constant,
LB
LB
LB
4-62
6FC5 597–3AA20–0BP2 (01.02)
SINUMERIK 802C
Page 63

Load Word =
And Word =
Or Word =
Load Word .
And Word .
Or Word .
Load Word 3
And Word 3
Or Word 3
Load DWord =
And DWord =
Or DWord =
Load DWord .
And DWord .
Or DWord .
Load DWord 3
And DWord 3
Or DWord 3
4.3 Starting up the PLC
WORD COMPARES (Signed)
Instruction Ladder Symbol Valid Operands
a = b close
a b open
a ≥ b close
a t b open
a ≤ b close
a u b open
a
==I
b
a
> =I
b
a
< =I
b
DOUBLE WORD COMPARES (Signed)
Instruction Ladder Symbol Valid Operands
a = b close
a b open
a ≥ b close
a t b open
a ≤ b close
a u b open
a
==D
b
a
> =D
b
a
< =D
b
a: VW, T, C, IW, QW, MW, AC, Constant,
LW
b: VW, T, C, IW, QW, MW, AC, Constant,
LW
LW
a: VD, ID, QD, MD, AC, Constant, LD
b: VD, ID, QD, MD, AC, Constant, LD
Start-Up
Load RWord =
And RWord =
Or RWord =
Load RWord .
And RWord .
Or RWord .
Load RWord 3
And RWord 3
Or RWord 3
REAL WORD COMPARES (Signed)
Instruction Ladder Symbol Valid Operands
a = b close
a b open
a ≥ b close
a t b open
a ≤ b close
a u b open
a
= =R
b
a
> =R
b
a
< =R
b
a: VD, ID, QD, MD, AC, Constant, LD
b: VD, ID, QD, MD, AC, Constant, LD
SINUMERIK 802C
6FC5 597–3AA20–0BP2 (01.02)
4-63
Page 64

Start-Up
4.3 Starting up the PLC
Instruction Ladder Symbol Valid Operands
Timer Retentive
On Delay
Timer On Delay EN=1, Start
Timer Of Delay If T
EN=1, Start
EN=0, Stop
If T
T
bit
Value
=1
≥ PT,
EN=0, Stop
If T
T
T
bit
bit
Value
=1
Value
=1
≥ PT,
< PT,
TIMER
Txxx
TONR
IN
PT
Txxx
TON
IN
PT
Txxx
TOF
IN
PT
Enable: (IN)
S0
Txxx: T0 – T15
Preset: (PT)
VW, T, C, IW, QW, MW, AC,
Constant
100 ms T0 – T15
Enable: (IN)
S0
Txxx: T0 – T15
Preset: (PT)
VW, T, C, IW, QW, MW, AC,
Constant
100 ms T0 – T15
Enable: (IN)
S0
Txxx: T0 – T15
Preset: (PT)
VW, T, C, IW, QW, MW, AC,
Constant
100 ms T0 – T15
Instruction Ladder Symbol Valid Operands
Count Up CU ½, Value+1
R=1, Reset
bit
Value
=1
≥ PV,
If C
C
Count Up/Down CU ½, Value+1
CD ½, Value–1
R=1, Reset
bit
bit
Value
=1
Value
=1
≥ PV,
= 0,
If C
C
Count Down If C
C
COUNTER
Cxxx
CTU
CU
R
PV
Cxxx
CU
CTUD
CD
R
PV
Cxxx
CD
CTD
LD
PV
Cnt Up:(CU)
S1
Reset: (R)
S0
Cxxx: C0 – 31
Preset: (PV)
VW, T, C, IW, QW, MW, AC, Constant, LW
Cnt Up:(CU)
S2
Cnt Dn:(CD)
S1
Reset: (R)
S0
Cxxx: C0 – 31
Preset: (PV)
VW, T, C, IW, QW, MW, AC,Constant, LW
Cnt Down: (CD)
S2
Reset: (R)
S0
Cxxx: C0 – 31
Preset: (PV)
VW, T, C, IW, QW, MW, AC, Constant, LW
4-64
6FC5 597–3AA20–0BP2 (01.02)
SINUMERIK 802C
Page 65

Word Add
Word Subtract
4.3 Starting up the PLC
MATH OPERATIONS
Instruction Ladder Symbol Valid Operands
If EN = 1,
b = a + b
b = b – a
EN
IN1
IN2
ADD_I
ENO
OUT
Enable: EN
In: VW, T, C, IW, QW, MW, AC,
Constant, LW
Out: VW, T, C, IW, QW, MW, AC, LW
Start-Up
DWord Add
DWord Subtract
If EN = 1,
b = a + b
b = b – a
Multiply If EN = 1,
b = a x b
Divide If EN = 1,
b = b ÷ a
Out:
16 bit remainder
Out+2:
16 bit quotient
Add
Subtract
Real Numbers
Multiply
Divide
Real Numbers
If EN = 1,
b = a + b
b = b – a
If EN = 1,
b = a x b
b = b ÷ a
SUB_DI
EN
IN1
IN2
MUL
EN
IN1
IN2
EN
IN1
IN2
ADD_R
EN
IN1
IN2
MUL_R
EN
IN1
IN2
DIV
ENO
OUT
ENO
OUT
ENO
OUT
ENO
OUT
ENO
OUT
Enable: EN
In: VD, ID, QD, MD, AC, Constant, LD
Out: VD, ID, QD, MD, AC, LD
Enable: EN
In: VW, T, C, IW, QW, MW, AC,
Constant, LW
Out: VD, ID, QD, MD, AC, LD
Enable: EN
In: VW, T, C, IW, QW, MW, AC,
Constant, LW
Out: VD, ID, QD, MD, LD
Enable: EN
In: VD, ID, QD, MD, AC, Constant, LD
Out: VD, ID, QD, MD, AC, LD
Enable: EN
In: VD, ID, QD, MD, AC, Constant, LD
Out: VD, ID, QD, MD, AC, LD
SINUMERIK 802C
6FC5 597–3AA20–0BP2 (01.02)
4-65
Page 66

Start-Up
4.3 Starting up the PLC
Instruction Ladder Symbol Valid Operands
Increment
Decrement
Byte
If EN = 1,
a = a + 1
a = a – 1
INCREMENT, DECREMENT
Enable: EN
In: VB, IB, QB, MB, AC, Constant LB
Out: VB, IB, QB, MB, AC, LB
EN
IN
INC_B
ENO
OUT
Increment
Decrement
Word
If EN = 1,
a = a + 1
a = a – 1
a = /a
Increment
Decrement.
If EN = 1,
a = a + 1
a = a – 1
Instruction Ladder Symbol Valid Operands
Byte AND
Byte OR
Byte XOR
If EN = 1,
b = a AND b
b = a OR b
b = a XOR b
Word AND
Word OR
Word XOR
If EN = 1,
b = a AND b
b = a OR b
b = a XOR b
DWord AND
DWord OR
DWord XOR
If EN = 1,
b = a AND b
b = a OR b
b = a XOR b
Invert Byte If EN = 1,
a = /a
INC_W
EN
ENO
OUT
IN
INC_DW
EN
ENO
OUT
IN
LOGIC OPERATIONS
WAND_B
EN
ENO
IN1
OUT
IN2
WAND_W
EN
ENO
IN1
OUT
IN2
WXOR_DW
EN
ENO
IN1
OUT
IN2
INV_B
EN
ENO
OUT
IN
Enable: EN
In: VW, T, C, IW, QW, MW, AC,
Constant, LW
Out: VW, T, C, IW, QW, MW, AC, LW
Enable: EN
In: VD, ID, QD, MD, AC, Constant, LD
Out: VD, ID, QD, MD, AC, LD
Enable: EN
In: VB, IB, QB, MB, AC, Constant, LB
Out: VB, IB, QB, MB, AC, LB
Enable: EN
In: VW, T, C, IW, QW, MW, AC,
Constant, LW
Out: VW, T, C, IW, QW, MW, AC, LW
Enable: EN
In: VD, ID, QD, MD, AC, Constant, LD
Out: VD, ID, QD, MD, AC, LD
Enable: EN
In: VB, IB, QB, MB, AC, Constant, LB
Out: VB, IB, QB, MB, AC, LB
Invert Word If EN = 1,
a = /a
Invert DWord If EN = 1,
a = /a
4-66
INV_W
EN
IN
INV_DW
EN
IN
ENO
OUT
ENO
OUT
Enable: EN
In: VW, T, C, IW, QW, MW, AC,
Out: VW, T, C, IW, QW, MW, AC, LW
Enable: EN
In: VD, ID, QD, MD, AC, Constant, LD
Out: VD, ID, QD, MD, AC, LD
Constant, LW
6FC5 597–3AA20–0BP2 (01.02)
SINUMERIK 802C
Page 67

Shift Right
Shift Left
4.3 Starting up the PLC
SHIFT AND ROTATE OPERATIONS
Instruction Ladder Symbol Valid Operands
If EN = 1,
a = a SR c bits
a = a SL c bits
SHL_B
EN
IN
N
ENO
OUT
Enable: EN
In: VB, IB, QB, MB, AC, Constant, LB
Out: VB, IB, QB, MB, AC
Count: VB, IB, QB, MB, AC, C o n s t ant, LB
Start-Up
Shift Right
Shift Left
If EN = 1,
a = a SR c bits
a = a SL c bits
DWord Shift R
DWord Shift L
If EN = 1,
a = a SR c bits
a = a SL c bits
Instruction Ladder Symbol Valid Operands
Convert Double
Word Integer to a
Real
If EN = 1, convert
the double word integer i to a real
number o.
Convert a Real to
a Double Word Integer
If EN = 1, convert
the real number i to
a double word integer o.
PROGRAM CONTROL FUNCTIONS
Instruction Ladder Symbol Valid Operands
Jump to Label If EN = 1, go to la-
bel n.
SHL_W
EN
IN
N
SHL_DW
EN
IN
N
ENO
OUT
ENO
OUT
Enable: EN
In: VW, T, C, IW, QW, MW, AC,
Out: VW, T, C, IW, QW, MW, AC, LW
Count: VB, IB, QB, MB,AC, Constant, LB
Enable: EN
In: VD, ID, QD, MD, AC, Constant, LD
Out: VD, ID, QD, MD, AC, LD
Count: VB, IB, QB, MB, AC, C o n s t ant, LB
CONVERSION OPERATIONS
DI_REAL
EN
IN
TRUNC
EN
IN
ENO
OUT
ENO
OUT
n
JMP
Enable: EN
In: VD, ID, QD, MD, AC, Constant, LD
Out: VD, ID, QD, MD, AC, LD
Enable: EN
In: VD, ID, QD, MD, AC, Constant, LD
Out: VD, ID, QD, MD, AC, LD
Enable: EN
Label: WORD: 0–127
Constant, LW
Label Label marker for the
jump.
Conditional Return
from Subroutine
If EN = 1, exit the
subroutine.
Conditional End If EN = 1, END ter-
minates the main
scan.
SINUMERIK 802C
6FC5 597–3AA20–0BP2 (01.02)
LBL
RET
END
n
Label: WORD: 0–127
Enable: EN
Enable: EN
4-67
Page 68

Start-Up
4.3 Starting up the PLC
PROGRAM CONTROL FUNCTIONS
Instruction Ladder Symbol Valid Operands
Subroutine If EN ½, go to sub-
routine n.
MOVE, FILL AND FIND OPERATIONS
Instruction Ladder Symbol Valid Operands
Move Byte If EN = 1,
copy i to o.
n
SBR
EN
x1
x3
x2
(x... optional paramete
MOV_B
EN
ENO
OUT
IN
Label: Constant : 0–63
Enable: EN
In: VB, IB, QB, MB, AC, Constant, LB
Out: VB, IB, QB, MB, AC, LB
Move Word If EN = 1,
copy i to o.
Move DWord If EN = 1,
copy i to o.
Move Real If EN = 1,
copy i to o.
Swap Bytes If EN = 1,
exchange MSB and
LSB of w.
4.3.7 Programm organization
MOV_W
EN
IN
MOV_DW
EN
IN
MOV_R
EN
IN
SWAP
EN
IN
ENO
OUT
ENO
OUT
ENO
OUT
ENO
Enable: EN
In: VW, T, C, IW, QW, MW, AC,
Constant, LW
Out: VW, T, C, IW, QW, MW, AC, LW
Enable: EN
In: VD, ID, QD, MD, AC, Constant, LD
Out: VD, ID, QD, MD, AC, LD
Enable: EN
In: VD, ID, QD, MD, AC, Constant, LD
Out: VD, ID, QD, MD, AC, LD
Enable: EN
In: VW, IW, QW, MW, T, C, AC, LW
4-68
Each programmer should divide the user program into several closed program sections (subroutines). The S7–200 programming language allows the user to create structured user programs. There are two program types – main programs and subroutines. Eight program levels
are possible.
A PLC cycle can be a multiple of the control–internal interpolation cycle (IPO cycle). The machine manufacturer must set the PLC cycle according to his/her own requirements (see machine data “PLC_IPO_TIME_RATIO”). The ratio IPO/ PLC of 1:1 is the fastest possible cyclic
processing.
6FC5 597–3AA20–0BP2 (01.02)
SINUMERIK 802C
Page 69

Example: The programmer programs a sequence control in the main program using his own
defined cycle counter. The sequence control defines all cyclic signals in the subroutine (UP0);
UP1/UP2 is called every two cycles, and UP 3 controls all signals in steps of three cycles.
4.3.8 Data organization
The data can be divided into three areas:
S non–retentive data
S retentive data
S machine data for the PLC (All these machine data are active after POWER ON.)
Most data, such as process map, timers and counters, are non–retentive data and deleted
with each power–up.
The user has a certain area available for the retentive data (data range 14000000 –140000xx
). All data that are wished to remain their validity even after POWER ON can be stored in this
area.
Start-Up
4.3 Starting up the PLC
The user can use the PLC MD (see user interface) to load his program with default data or to
parameterize various program sections.
4.3.9 Interface to the control system
This interface can be selected on the operator panel using the softkeys Diagnosis \ Start–up
\ STEP7 connect.
The V24 interface remains active even after restart or normal power–up. The connection
(STEP7 connect active) to the control system can be checked in the PLC 802 Programming
Tool menu “PLC/Information”. If the interface is active, e.g. the active PLC mode (Run/Stop) is
displayed in this window.
4.3.10 Testing and monitoring the user program
The user program can be analyzed or checked for errors using the following methods:
S PLC Status menu (PCU)
S Status list menu (PCU)
S PLC 802 Programming Tool (see Help menu > Contents and Index, “Debugging” or docu-
mentation “S7–200 Automation System”, Section “Testing and Monitoring Your Program”)
SINUMERIK 802C
6FC5 597–3AA20–0BP2 (01.02)
4-69
Page 70

Start-Up
4.4 PLC applications “Download/Upload/Copy/Compare”
4.4 PLC applications “Download/Upload/Copy/Compare”
The user can save or copy PLC applications in the control system or overwrite them by another PLC project.
This is possible using the
S Programming Tool 802
S WinPCIN (binary file)
PT PLC 802
Toolbox
WINPCIN
Download/
Upload/
Compare
802D
PLC user
texts
PLC
application
Series start–up
PLC
project
Permanent
memory
PLC machine
data
Fig. 4-5 PLC applications in the control system
4-70
6FC5 597–3AA20–0BP2 (01.02)
SINUMERIK 802C
Page 71

Download
Upload
Start-Up
4.4 PLC applications “Download/Upload/Copy/Compare”
This function is used to write the transferred data to the permanent memory (load memory) of
the control system.
S Download the PLC project using the PLC 802 Programming Tool (Step 7 connect on)
S Series start–up using the WinPCIN tool (PLC MD, PLC project and user alarm texts) Data
In
The loaded PLC user program is transferred from the permanent memory to the user
memory when the control is booted next time; it will be active from this moment.
The PLC applications can be saved using the PLC 802 Programming Tool or the tool PCIN.
S Upload PLC project using the PLC 802 Programming Tool (Step 7 connect on)
Read out the project from the control system to reconstruct the current project in the PLC
802 Programming Tool.
S Series start–up “Start–up Data” using the tool PCIN (PLC MD, PLC Project and user alarm
texts) Data Out
S Read out PLC applications using the Tool PCIN (PLC Project information and user alarm
texts) Data Out
Compare
The project in the PLC 802 Programming Tool is compared with the project contained in the
permanent memory (load memory) of the CNC.
Versions display
Calling via the softkey Diagnosis / Service Display / Version
S Project
The transmitted project including user program, which is active in the PLC after the control
system has powered up.
The programmer can use the first comment line in the program title of the PLC 802 Programming Tool for his own additional information in the version display (see “View Proper-
ties“).
SINUMERIK 802C
6FC5 597–3AA20–0BP2 (01.02)
4-71
Page 72

Start-Up
4.5 User Interface
4.5 User Interface
This interface includes all signals between NCK/PLC and HMI/PLC. In addition, the PLC decodes the auxiliary function commands for straightforward further processing in the user program.
4.6 Technology Setting
Overview
The SINUMERIK 802C is supplied with the default machine data as a control system for turning machines (2 axes, 1 spindle). If you wish to set another technology (e.g. milling), the relevant machine data file must be loaded from the tool box into the control system.
The file with the technology machine data must be loaded after the control system has booted
successfully, but prior to commissioning.
Sequence of operations
To change the technology setting, proceed as follows:
S Make a V24 link between PG/PC and the control system.
S Turn on the control system and wait until it has booted without errors.
S Press the Start data inp. softkey in the Services menu (use the V24 default interface set-
tings).
S Select the technology machine data file techmill.ini (included in the toolbox) required for
milling and transfer it to the PG/PC using WinPCIN.
S After the file has been transferred correctly, carry out POWER ON.
S The SINUMERIK 802S is now preset to the desired technology.
Example: techmill. ini
Default: 3 axes (X, Y and Z), 1 spindle, no transversal axis, G17 etc.
If you wish to reconfigure a SINUMERIK 802S control system to turning, carry out POWER
ON with the default machine data (start–up switch position 1).
Note
All memory areas are initialized or loaded with stored default values (machine data).
4-72
The basic configuration of the SINUMERIK 802C must be carried out during the commissioning prior to the general configuration (MD input).
This need not to be done when series start–up is carried out. The configured machine data
are contained in the series start–up file.
6FC5 597–3AA20–0BP2 (01.02)
SINUMERIK 802C
Page 73

4.7 Commissioning
Initializing the control system
S Turn on the control system.
S The SINUMERIK 802C will load the standard machine data automatically.
4.7.1 Entering the general machine data
Overview
To make your work easier, the most important machine data of the individual subranges are
listed. If more detailed information is required, the user is referred to the relevant chapters/
sections of this manual. The machine data and interface signals are described in detail in the
descriptions of functions to which reference is made in the relevant lists.
Start-Up
4.7 Commissioning
Note
The general machine data are selected such (default values) that only a few machine data
parameters have to be modified.
Entering the machine data (MD)
Before the machine data can be entered, the password for protection level 2 or 3 must be entered.
The following machine data ranges must be selected and modified (if necessary) using the
appropriate softkeys:
S General machine data
S Axis machine data
S Other machine data
S Display machine data
SINUMERIK 802C
6FC5 597–3AA20–0BP2 (01.02)
4-73
Page 74

Start-Up
4.7 Commissioning
Once entered, these data are immediately written to the data memory.
The machine data are activated depending on the Activation setting of the appropriate ma-
chine data, Section 4.1.2.
Note
Since these data are only stored in the memory backed up for a limited period of time, a data
backup is necessary (see Section 4.1.4).
Machine data
The following machine data list contains all general and other machine data and setting data,
which can be changed if necessary.
Setting data
Number Description
10074 Division ratio of the PLC task factor for main run 2
11100 Number of auxiliary function groups 1
11200 Standard machine data loaded on next Power On O
11210 MD backup of changed MD only 0FH
11310 Threshold for direction change of handwheel 2
11320 Handwheel pulses per detent position (handwheel number): 0...1 1
20210 Maximum angle for compensation blocks with TRC 100
20700 NC-Start disable without reference point 1
21000 Circle end point monitoring constant 0.01
22000 Auxiliary function group (aux. fct. no. in channel): 0...49 1
22010 Auxiliary function type (aux. fct. no. in channel): 0...49 “”
22030 Auxiliary function value (aux. fct. no. in channel): 0...49 0
22550 New tool compensation for M function 0
Default
Value
H
4-74
Number Explanation
41110 Jog feedrate 0
41200 Spindle speed 0
42000 Start angle 0
42100 Dry run feedrate 5000
6FC5 597–3AA20–0BP2 (01.02)
Default-
Value
SINUMERIK 802C
Page 75

4.7.2 Starting up the axes
Overview
The SINUMERIK 802C has up to three stepper motor feedrate axes (X, Y
and Z). The stepper motor drive signals are output at connector X7 for the:
S X axis at pins 1–3 (PULS1, DIR1 and EN1)
S Y axis at pins 4–6 (PULS2, DIR2 and EN2) and for the
S Z axis at pins 7–9 (PULS3, DIR3 and EN3).
Simulation/stepper motor drive
Setpoint output and pulse feedback can be switched between simulation and drive operation
using the axis MD 30130_CRTLOUT_TYPE and 30240_ENC_TYPE.
Start-Up
4.7 Commissioning
Table 4-12
MD
30130 Value = 0
To test the axis, the actual value is fed
back internally as an actual value. No setpoint output at connector X7.
30240 Value = 0 Value = 3
Machine data for axes and spindle
Number Explanation
30130 Output type of setpoint (setpoint branch): 0
30200 Number of encoders 1
Type of actual value acquisition (actual position value) (encoder no.)
30240
30350 Output of axis signals with simulation axes 0
31020 Encoder markings per revolution (encoder no.) 2048
31030 Pitch of leadscrew 10
31040 Encoder mounted directly to the machine (encoder no:) 0
31050 Denominator load gearbox (control parameter no.): 0...5 1
0: Simulation
2: Square-wave generator, standard encoder
(pulse multiplication)
Simulation Normal Operation
Value = 2
The setpoint signals for stepper motor
operation are output at connector X7. Real
axis traversal is possible using a stepper
motor.
Internal pulse feedback from setpoint output to actual value input “ON”
Default Va-
lue
0
SINUMERIK 802C
6FC5 597–3AA20–0BP2 (01.02)
4-75
Page 76

Start-Up
4.7 Commissioning
Number
31060 Numerator load gearbox (control parameter set no.): 0...5 1
31070 Denominator resolver gearbox (encoder no.) 1
31080 Numerator resolver gearbox (encoder no.) 1
32100 Traversing direction (not control direction) 1
32110 Sign actual value (control direction) (encoder no.) 1
32200 Servo gain factor (control parameter set no.): 0...5 1
32250 Rated output voltage 80
32260 Rated motor speed (setpoint branch): 0 3000
32700 Interpolatory compensation (encoder no.): 0,1 0
33050
35010 Gear change possible. Spindle has several gear steps 0
35040 Own spindle reset 0
35100 Maximum spindle speed 10000
35110 Maximum speed for gear change (gear stage no.): 0..5 500,...
35120 Minimum speed for gear change (gear stage no.): 0..5 50,...
35130 Maximum speed of gear stage (gear stage no.): 0...5 500,...
35140 Minimum speed of gearsetp (gear stage no.): 0...5 5,...
35150 Spindle speed tolerance 0.1
35160 Spindle speed limitation from PLC 1000
35220 Speed for reduced acceleration 1.0
35230 Reduced acceleration 0.0
35300 Position control switch-on speed 500
35350 Direction of rotation when positioning 3
35400 Reciprocation speed 500
35410 Acceleration during reciprocating 16
35430 Starting direction during reciprocation 0
35440 Reciprocation time for M3 direction 1
35450 Reciprocation time for M4 direction 0,5
35510 Feedrate enable for spindle stopped 0
36000
(only
SPOS)
36010
(only
SPOS)
36020
(only
SPOS)
Traversing distance for lubrication from PLC 100 000
Exact positioning coarse
Exact positioning fine
Delay exact positioning fine
Explanation
Default Va-
000
0.04
0.01
1
lue
4-76
6FC5 597–3AA20–0BP2 (01.02)
SINUMERIK 802C
Page 77

Start-Up
4.7 Commissioning
Number
36030
(only
SPOS)
36040
(only
SPOS)
36050
(only
SPOS)
36060
(only
SPOS)
36200
36300 Encoder limit frequency 300000
36302
36310
36400 Contour Tol 1
36610 Duration of the deceleration ramp for error states 0.05
36620 Cutout delay servo enable 0.1
36700 Automatic drift compensation 0
36710 Drift limit value for automatic drift compensation 1
36720 Drift basic value 0
Zero-speed tolerance
Delay zero-speed monitoring
Clamping tolerance
Maximum velocity/speed ”axis/spindle stopped” 5 (axis);
Threshold value for velocity monitoring (control parameter set no.): 0...5 11500
Encoder limit frequency at which encoder is switched on again. (Hysteresis)
Zero mark monitoring (encoder no.):
0,1 0: Zero mark monitoring off, encoder
HW monitoring on
1-99, >100: Number of recognized zero mark errors
during monitoring
100: Zero mark monitoring off, encoder
HW monitoring off
Explanation
Default Va-
lue
0.2
0.4
0.5
0.0138
(spindle)
(axis);
31,94
(spindle)
99.9
0
Matching encoder to axis/spindle
Machine data for encoder adjustment
Number Description Spindle
31040 Encoder mounted directly to the machine (encoder no.) 0 1
31020 Encoder markings per revolution (encoder no.) Incr. /rev. Incr. /rev.
31080 Numerator resolver gearbox (encoder no.) Motor revs Load rev.
31070 Denominator resolver gearbox (encoder no.) Enc. revs Enc. revs
31060 Numerator load gearbox (control parameter set no.): 0...5 Motor revs Motor revs
31050 Denominator load gearbox (control parameter no.): 0...5 Load revs Load revs
SINUMERIK 802C
6FC5 597–3AA20–0BP2 (01.02)
4-77
Page 78

Start-Up
4.7 Commissioning
Example 1 for encoder matching:
Axis with rotary encoder (500 pulses) mounted directly on the motor. The internal multiplication factor is 4. The internal computational resolution amounts to 1,000 increments per degree.
Internal
resolution
=
360 degrees
MD
310
20 @
4
MD31080
@@
M
D
3
1
0
0
0
1
0
7
0
Internal
resolution
=
360 @ 1 @ 1000
5
0
0
@
=
1
8
0
4
@
1
One encoder increment corresponds to 180 internal increments. One encoder increment corresponds to 0.18 degrees (minimum positioning step).
Example 2 for encoder matching:
Spindle with rotary encoder on motor (2,048 pulses), internal multiplication = 4, 2 speed stages exist:
Gear stage 1: Motor/spindle = 2.5/1
Gear stage 2: Motor/spindle = 1/1
4-78
6FC5 597–3AA20–0BP2 (01.02)
SINUMERIK 802C
Page 79

Gear stage 1
Start-Up
4.7 Commissioning
Internal
resolution
360 degrees
=
MD31080
@@
MD
310
20 @
4
M
D
3
1
0
7
0
MD31050
@
M
D
3
1
0
6
0
,
0
0
0
i
n
c
1
r/
d
e
g
Internal
resolution
360 degrees 1
=
4 @
2,04
8
pulses
@@
@
111
1,0
00
pulse
s/
de
g
=
4
3
.
9
4
5
One encoder increment corresponds to 43.945 internal increments. One encoder increment
corresponds to 0.043945 degrees (minimum positioning step).
Machine data default settings for analog motor axes
The machine data list below contains the default machine data with their recommended settings with the analog motor axes connected.
After they have been set, the axis are ready to be traversed, as far as the machine data are
concerned, and only fine settings have to be done.
Number Description Default Value Setting or Remark
30130
30240
31020
31030 Pitch of leadscrew 10 Leadscrew pitch
31050
Output type of setpoint
(setpoint branch): 0
Type of actual value acquisition (actual position
value) (encoder no.)
0: Simulation
2: Encoder external
Encoder markings per revolution (encoder no.)
Denominator load gearbox (control parameter
no.): 0...5
0 1
0 2
2048
1
Steps per encoder revolution
Load gear transmission
ratios
SINUMERIK 802C
6FC5 597–3AA20–0BP2 (01.02)
4-79
Page 80

Start-Up
4.7 Commissioning
Number Setting or RemarkDefault ValueDescription
31060
31070
31080
32000
32100
32110
32200
32250
32260
34070
34200
36200
36200
Nominator load gearbox
(control parameter no.)
0...5
Denominator resolver ge-
arbox (control parameter
no.): 0...5
Nominator resolver gearbox (control parameter
no.): 0...5
Maximum axis velocity
Traversing direction (not
control direction)
Sign actual value (control
direction) (encoder no.)
Servo gain factor (control
parameter set no.): 0...5
Rated output voltage
Rated motor speed (setpoint branch): 0
Reference point positioning velocity
Type of position measuring system
1: Zero pulse (on encoder
track)
Threshold value for velocity monitoring (control parameter set no.): 0...5
Load gear transmission
1
1
1
10000
0
0
1,0
80%
3000 Motor speed
300
1 Zero pulse
11500
31,94
ratios
(MD31080:MD31050)
Load gear transmission
ratios
Load gear transmission
ratios
(MD31080:MD31050)
30,000 (max. axis velocity)
Reversal of direction of
movement
Measuring system reversal
1.0 (position controller
gain)
The speed defined in
MD32260 is reached at
the setpoint of 8 V
Positioning velocity when
referencing
Threshold monitoring for
velocity monitoring in the
axis
Threshold value for speed
monitoring in the spindle
4-80
To solve monitoring problems, the following machine data must be set.
Number Description Default Value Setting or Remark
36000 Exact positioning coarse 0.04 Exact stop coarse
36010 Exact positioning fine 0.01 Exact stop fine
36020
36060
Delay exact positioning
fine
Maximum velocity/speed
”axis/spindle stopped”
1.0 Positioning dealy time
5.0
0.013889
Threshold velocity for
“Axis at standstill”
Threshold velocity for
“Spindle at standstill”
6FC5 597–3AA20–0BP2 (01.02)
SINUMERIK 802C
Page 81

Parameterization example
Encoder: 2500 [10,000 pulses per motor revolution]
Load gear: 1:1
Leadscrew pitch: 10 mm
Motor speed: 1,200 rpm
MD 30130 =1
MD 30240 =2
MD 31020 =2500
MD 32250 =80%
MD 32260 =1,200 rpm
MD 32000 =12,000 mm/min
The hardware of the drive must be set such that it will reach exactly 1,200 rpm at 8 V.
Start-Up
4.7 Commissioning
Servo gain
The servo gain default setting is Kv=1 (corresponds to 1mm following error at a velocity of 1m/
min).
The servo gain can or has to be adapted according to the particular mechanical conditions.
Too high gain will result in vibrations, too low gain in a too high following error. It is imerative
that the drive observes the set speed characteristic (MD32250, MD32260). In addition, the
continuous characteristic of the speed when passing zero is also imperative.
Service display of the axis behavior
Servo Trace
To provide axis service, the Servo Trace function is integrated in the Diagnosis menu, which
can be used for graphical representation of the axis setpoint speed.
The Trace function is selected in the Diagnosis/Service display/Servo Trace operating area
(cf. User Manual “Operation..”).
Dynamic adaptation for thread G331/G332
Function
The dynamic response of spindle and involved axis for the function G331/G332– thread inter-
polation – can be adapted to the “slower” control loop. Usually, this concerns the Z axis, which
is adapted to the more inert response of the spindle.
If an exact adjustment is carried out, it is possible to sacrifice of a compensating chuck for
tapping. At least, higher spindle speeds/smaller compensation paths can be achieved.
SINUMERIK 802C
6FC5 597–3AA20–0BP2 (01.02)
4-81
Page 82

Start-Up
4.7 Commissioning
Activation
The values for the adaptation are entered in MD 32910 DYN_MATCH_TIME [n], usually for
the axis. The adaptation is only possible if MD 32900 DYN_MATCH_ENABLE =1 has bee set
for the axis/spindle.
With active function G331/G332, parameter block n (0...5) of the axis of MD 32910 becomes
automatically active, which acts corresponding to the gear stage for the spindle. The gear
stage is dependent on the spindle speed with M40 or is directly set by M41...M45 (see also
Section 4.5.3 Start–up of the spindle).
Number Explanation
32900 Dynamic response adaptation 0
32910 Time constant of dynamic adaption (control parameter set no): 0...5 0.0
Determination of value
The dynamic value of the spindle is stored for each individual stage in MD 32200
POSCTRL_GAIN[n] as closed–loop gain. An adaptation of the axis to these values must be
made in MD 32910 DYN_MATCH_TIME [n] in accordance with the following instruction:
1 1
MD 32910 DYN_MATCH_TIME [n] = –––––––– – –––
Kv[n]s
The entry to be made in MD 32910 requires the time unit s. The values of MD 32200
POSCTRL_GAIN[n] for spindle and axis must be converted accordingly:
1000
Kv[n]
spindle
60
1000
Kv[n]
= POSCTRL_GAIN[n]
axis
60
= POSCTRL_GAIN[n]
spindle
––––––
axis
pindle
––––––
Kv[n]
Default
Value
axis
When using further gear stages with G331/G332, the adaptation must also be carried out in
these parameter blocks.
4-82
6FC5 597–3AA20–0BP2 (01.02)
SINUMERIK 802C
Page 83

4.7 Commissioning
Example for adaptation of the dynamic response of the Z axis/spindle:
1st gear stage –> parameter block[1],
for spindle–K
for axis Z–K
MD 32200 POSCTRL_GAIN[1] = 0.5 is entered,
v,
MD 32200 POSCTRL_GAIN[1] = 2.5 is entered.,
v,
The searched entry for the Z axis in
1 1
MD 32910 DYN_MATCH_TIME [1] = –––––––– – ––––
Kv[1]
Kv[1]
spindle
z
1 1 60
Start-Up
––––
=
(
–
0.5 2.5 1000
––––
*
–––––
)
MD 32910 DYN_MATCH_TIME [1] = 0.0960 s
If necessary, for fine adaptation, in practice a more exact value must be determined.
When traversing axis (e.g. Z axis) and spindle, the exact value for POSCTRL_GAIN is displayed on the service display.
MD 32900 DYN_MATCH_ENABLE must be set to = 1.
Example: service display for Z axis with POSCTRL_GAIN : 2.437 in 1,000/min
Exact calculation:
1 1 60
MD 32910 DYN_MATCH_TIME [1] =
0.5 2.437 1000
–
––––
(
–––––––
)
*
–––––
= 0.0954 s
In practice, this value can be optimized. To this aim, the thread is first tested with compensating chuck and the calculated values. Then the values should be modified sensitively such that
the difference path in the compensating chuck approximates to zero.
Now, the POSCTRL_GAIN values displayed on the service display for axis and spindle
should be identical.
Note
If MD 32900 DYN_MATCH_ENABLE has been set to “1” for the drilling axis, it should also
be set to “1” for all interpolating axes. This increases the traversing accuracy along the contour . However, the entries for these axes in MD 32910 DYN_MATCH_TIME [n] must be left
at the value “0”.
Backlash compensation
Overview
The falsification of axis travel due to mechanical backlash can be compensated (cf. Technical
Manual “Description of Functions“).
Funktion
The axis–specific actual value is corrected by the backlash compensation value (MD32450
BACKLASH) with each change of the traversing direction.
SINUMERIK 802C
6FC5 597–3AA20–0BP2 (01.02)
4-83
Page 84

Start-Up
4.7 Commissioning
Activation
The backlash compensation is active in all operating modes only after referencing.
Leadscrew error compensation (LEC)
Overview
The compensation values are determined by means of the measured error curve and entered
in the control system using special system variables during start-up. The compensation tables
(cf. Technical Manual “Description of Functions“) must be created in the form of NC programs.
Function
The leadscrew error compensation (LEC) changes the axis-specific actual position by the associated compensation value.
If the compensation values are too high, an alarm message can be output (e.g. contour monitoring, speed setpoint limitation).
Activation
!
The LEC is only activated in all operating modes if the following requirements are met:
S The number of compensation intermediate points must be defined. They are only active
after Power ON (MD: MM_ENC_MAX_POINTS).
Caution
Changing the MD: MM_CEC_MAX_POINTS[t] or MM_ENC_COMP_MAX_POINTS automatically reorganizes the NC user memory when the control system is booting. All user
data stored in the user memory (e.g. drive and MMC machine data, tool offsets, part programs, compensation tables etc.) are deleted.
S Enter the compensation value for the intermediate point N in the compensation value table
(ENC_COMP_[0,N,Axi]).
S Select the distance between the individual intermediate points (ENC_COMP_STEP
[0,Axi]).
S Select the start position (ENC_COMP_MIN [0,Axi]).
S Define the end position (ENC_COMP_MAX [0,Axi]).
S In the NC, set MD: ENC_COMP_ENABLE(0)=0. This is the only way to load the compen-
sation table.
4-84
S The compensation values for the machine axes are entered into the NC memory by means
of a part program (see also example in the Manual “Description of Functions“)
6FC5 597–3AA20–0BP2 (01.02)
SINUMERIK 802C
Page 85

S Approach the reference points in the axes. Then start the NC program with the leadscrew
error compensation table. The reference points must then be approached once more to set
the LEC active. The LEC function is activated by setting the MD: ENC_COMP_ENABLE(0)=1 for each machine axis.
– Another possibility to create the LEC compensation table is by reading out the LEC file
from the NC via the V24 interface.
MD: MM_ENC_MAX_POINTS must be set depending on the number of axes to be
compensated. Select Service using the softkey, put the cursor to Data, and press the
Show softkey. Then select “Leadscrew Error” using the cursor and press the Data Out
softkey.
Enter compensation values, intermediate point distance, start and end position in the
received file _N_COMPLETE_EEC by means of the editor (e.g. in the PCIN/OUT program). Then re–read the edited file into the control system. Approach the reference
point in the axes and set MD: ENC_COMP_ENABLE(0)=1. The LEC is thus activated.
4.7.3 Starting up the spindle
Start-Up
4.7 Commissioning
Overview
With the SINUMERIK 802C, the spindle is a subfunction of the entire axis functionality. The
machine data of the spindle are therefore to be found under the axis machine data (from
MD35000). For this reason, data have to be entered for the spindle, too; these data are described for axis start-up.
Note
With SINUMERIK 802C, the 4th machine axis (SP) is fixed for the spindle.
The spindle settings for the 4th machine axis are contained in the default machine data.
The spindle setpoint (+10 V analog voltage signal) is output to X7. The spindle measuring
system must be connected to X6.
Spindle modes
The following modes are possible for the spindle:
S Control mode (M3, M4, M5)
S Oscillating mode (to assist gearbox change)
S Positioning mode (SPOS)
MD for spindle
see MD for axis and spindle
SINUMERIK 802C
6FC5 597–3AA20–0BP2 (01.02)
4-85
Page 86

Start-Up
4.7 Commissioning
SD for spindle
Number Description
43210 Progr. spindle speed limitation G25 0
43220 Progr. spindle speed limitation G26 1000
43230 Spindle speed limitation with G96 100
Spindle MD parameterization
Spindle machine data are entered depending on the gear stages. Each gear stage is assigned
a parameter record.
The set of parameters corresponding to the current gear stage is selected.
Example: 1st gear stage set of parameters [1]
Note
The field containing the parameter “0” is not used for the spindle machine data..
Machine data for setpoint and actual values
Default
Value
Setpoints:
MD 30130 CTRLOUT_TYPE [AX4] = 1
Actual values:
MD 30200 NUM_ENCS[AX4] = 0;Spindle without encoder
MD 30200 NUM_ENCS[AX4] = 1;Spindle with encoder
MD 30240 ENC_TYPE[AX4] = 2
Interface signals of the spindle
Interface signals
“Speed change” 39032000 Bit 3
“Actual gear stage” 38032000 bits 0 to 2
“No speed monitoring on gear change”
38032000 bit 6
“Speed is changed” 38032000 Bit 3
“Set gear stage” 39032000 bits 0 to 2
“Positioning mode” 39032002 bit 5
“Oscillating through PLC”38032002 bit 4
“Oscillating mode” 39032002 bit 6
“Control mode” 39032002 bit 7
4-86
6FC5 597–3AA20–0BP2 (01.02)
SINUMERIK 802C
Page 87

Interface signals
“Traversing minus” 39030004 bit 6
“Traversing plus” 39030004 bit 7
Reciprocation mode for gear change
The reciprocation mode of the spindle is intended to facilitate the gear change. For reciprocation mode, the following axis MD and interface signals are relevant:
Number Description
Machine data
35400 Reciprocation speed
35410 Acceleration when reciprocating
35430 Start direction in reciprocation
35440 Reciprocation time for M3 direction
35450 Reciprocation time for M4 direction
Interface signals
“Change gear” 39032000 bit 3
“Reciprocation speed” 38032002 bit 5
“Reciprocating by PLC” 38032002 bit 4
“Set direction of rotation CCW” 38032002 bit 7
Start-Up
4.7 Commissioning
4.7.4 Completing the Start–Up
After start–up of the control system by the machine manufacturer, the following should be observed prior to delivery to the final customer:
1. Change the default password for access level 2 from ”EVENING” to your own password.
If the machine manufacturer uses the password ”EVENING” for access level 2 during the
start–up work, the password must be changed.
– Press the softkey Change passw.
– Enter the new password and press OK to confirm.
– Note the password in the Manufacturer Documentation.
SINUMERIK 802C
6FC5 597–3AA20–0BP2 (01.02)
4-87
Page 88

Start-Up
4.7 Commissioning
2. Reset the access level.
To save the data which have been set during the start–up, an internal data saving is requi-
red. To this aim, set access level 7 (final customer); otherwise, access level 2 will also be
saved.
– Press the softkey Delete passw.
– The access level will be reset.
3. Carry out internal data saving.
– Press the softkey Save data.
4.7.5 Cycle start–up
Sequence of operations
When loading cycles into the control system, adhere to the following sequence of operations:
1. Save tool offset data and zero offsets either on the FLASH or on the PG (programming
device).
These data can be selected in the Services menu by pressing the Data outp./data...softkey.
2. Load all files of the selected technology path from the toolbox diskette into the control system via the V24 interface.
3. Carry out POWER ON.
4. Reload the recovered data.
4-88
6FC5 597–3AA20–0BP2 (01.02)
SINUMERIK 802C
Page 89

4.8 Series machine start-up
Functionality
The objective of series machine start-up is:
S after commissioning, in order to bring another control system connected to the same ma-
chine type with minimum effort to the condition as after commissioning;
or
S under service conditions (after replacing hardware components), to bring a new control
system to the initial state with minimum effort.
Precondition
To carry out commissioning, a PC/PG provided with a V24 interface for data transfer from/to
the control system is necessary.
In the PC/PG, the PCIN tool must be used.
Start-Up
4.7 Commissioning
Sequence of operations
1. Create the series machine start-up file (transfer from the control system to the PC/PG).:
– Make a V24 cable connection between the PC/PG (COM port) and the SINUMERIK
802S (X8).
– Make the following settings in the WinPCIN tool:
– Binary format
Receive data
Select the path where you want to save your data
– Save
The PC/PG will set itself to “Receive” and will wait for data from the control system.
– Enter the password for protection level 2 in the control system.
– Call the Services/RS232 setting menu.
– Select the Start-up data line from the Services menu and press Start data outp. to
output the series machine start-up file.
2. Reading in the series machine start-up file into the SINUMERIK 802S:
– Enter the V24 interface settings as described under 1).
– Press the Data In Start button in the Service menu. The control system is thus ready
to receive data.
– Use the PCIN tool in the PC/PG to select the series start-up file from the DATA_OUT
menu and start data transfer.
– The control system is brought to “RESET with rebooting” three times during and at the
end of data transfer. On completion of error-free data transfer, the control system is
completely configured and ready to operate.
SINUMERIK 802C
6FC5 597–3AA20–0BP2 (01.02)
4-89
Page 90

Start-Up
4.7 Commissioning
Series machine start-up file
The series machine start-up file contains:
S machine data
S R parameters
S display and alarm text files
S display machine data
S PLC user program
S main programs
S subroutines
S cycles
4-90
6FC5 597–3AA20–0BP2 (01.02)
SINUMERIK 802C
Page 91

Software Update
5.1 Updating the system software using a PC/PG
General
The following reasons may require a system software update:
S You wish to install new system software (new software version).
S After hardware replacement, if software versions other than the supplied are to be loaded.
Note
In addition to the update procedure description below, the update diskette also contains a
description of the update procedure in the readme.txt file.
5
Preconditions
To change the system software of the SINUMERIK 802S, you will need the following:
S Update software (2 diskettes)
S A PG/PC with V24 interface (COM1 or COM2) and an appropriate cable.
Update procedure
As far as not yet done, carry out external data saving before you update your updating system
software (see Section 4.1.4 “Data Saving”).
1. Turn the hardware start–up switch to position “2” (software update on permanent memory).
2. Start the update file on your PC/PG by calling UPD_802.BAT on your diskette.
The installation is menu–assisted.
3. After the software has been prepared in the PC/PG completely, the message “Transfer the
selected ...” appears on the display.
4. Power On ---> control system changes to the update condition.
Various patterns appear on the screen.
5. After the patterns on the display of the SINUMERIK 802S have disappeared, start the
transfer on the PC/PG.
SINUMERIK 802C
6FC5 597–3AA20–0BP2 (01.02)
5-91
Page 92

Software Update
5.2 Updating the system software incl. user data without using a PC/PG
The progress and the end of the update (and errors if any) are displayed on the PG/PC.
6. At the end of the update --> switch off the control system.
7. Turn the start–up switch to position “1” ---> switch on the control system
8. Booting with default values
9. Prior to next POWER ON ---> start–up switch to 0 position.
Note
Reload the externally saved user standard data via V24.
5.2 Updating the system software incl. user data without using a
PC/PG
General
It is possible to transfer the entire contents of the memory of the control system including user
data from one control system directly to another control system.
This can be necessary after updating the system software of a CNC and subsequent reloading the recovered user data (series start–up file) into this control system in order to bring further control systems to the same condition.
This reduces the time needed for the transfer.
Precondition
Cable connection from master control system (source control) to slave control (control system
to be updated) via V24 interface.
Update sequence
1. Turn the hardware start–up switch of both control systems to position “2” (software update
on permament memory).
2. Carry out POWER ON for slave control system –––> control system changes to the update condition.
Various patterns appera on the screen.
3. After the patterns on the screen have disappeared, switch on the master control system on
the slave control.
5-92
3 data blocks are transferred.
6FC5 597–3AA20–0BP2 (01.02)
SINUMERIK 802C
Page 93

5.3 Update errors
Table 5-1 Update errors
Software Update
5.3 Update errors
Error T ext
ERROR
UPDATE
SINUMERIK
802S
UPDATE
NO DATA
Explanation Remedial Action
Error when updating the system software via V24
S Data already in receive buffer (send from PC
side started too early)
S Error when erasing the FLASH memory
S Error when writing to the FLASH memory
S Inconsistent data (incomplete or faulty)
Update without programming the code FLASH
completed (no data received, transfer not started)
S Repeat update
S Check link between control system
and PC/PG
S Check diskette
SINUMERIK 802C
6FC5 597–3AA20–0BP2 (01.02)
5-93
Page 94

Technical Appendix
6.1 List of machine and setting data
Data type
BOOLEAN Machine data bit (1 or 0)
BYTE Integer values (from -128 to 127)
DOUBLE Real and integer values
(from " 4.19 10
DWORD Integer values (from -2.147 109 to 2.147 109 )
STRING Character string (max. 16 characters) consisting of
upper-case letters with digits and underscore
UNSIGNED WORD Integer values (from 0 to 65536)
SIGNED WORDInteger values (from -32768 to 32767)
UNSIGNED DWORD Integer values (from 0 to 4294967300)
SIGNED DWORD Integer values (from -2147483650 to 2147483649)
WORD Hex values (from 0000 to FFFF)
DWORD Hex values (from 00000000 to FFFFFFFF)
FLOAT DWORDReal values (from "8.43 10
-307
to " 1.67 10
-37
308
)
to "3.37 10
6
38)
6.1.1 Display machine data
Number MD Name
Representation Name, Miscellaneous Activated User Class w/r
Unit Standard value Minimum value Maximum value Data type
202 $MM_FIRST_LANGUAGE
Decimal Foreground language Power On 2/3
0 1 1 2 Byte
203 $MM_DISPLAY_RESOLUTION
Decimal Display resolution Power On 2/3
0 3 0 5 Byte
206 $MM_USER_CLASS_WRITE_TOA_GEO
Decimal User class Write tool geometry Immediately 2/3
0 3 0 7 Byte
207 $MM_USER_CLASS_WRITE_TOA_WEAR
Decimal User class Write tool wear data Immediately 2/3
0 3 0 7 Byte
6-94
6FC5 597–3AA20–0BP2 (01.02)
SINUMERIK 802C
Page 95

Technical Appendix
6.1 List of machine and setting data
208 $MM_USER_CLASS_WRITE_ZOA
Decimal User class Write settable zero offset Immediately 2/3
0 3 0 7 Byte
210 $MM_USER_CLASS_WRITE_SEA
Decimal User class Write setting data Immediately 2/3
0 3 0 7 Byte
216 $MM_USER_CLASS_WRITE_RPA
Decimal User class Write R parameters Immediately 2/3
0 3 0 7 Byte
217 $MM_USER_CLASS_SET_V24
Decimal User class Set V24 Immediately 2/3
0 3 0 7 Byte
219 $MM_USER_CLASS_DIR_ACCESS
Decimal User class access directory Immediately 2/3
0 3 0 7 Byte
277 $MM_USER_CLASS_PLC_ACCESS
Decimal User class access PLC project Immediately 2/3
0 3 0 7 Byte
278 $MM_NCK_SYSTEM_FUNC_MASK
Decimal Option data to enable system–specific functions POWER ON 2/2
0 0 0 15 Byte
280 $MM_V24_PPI_ADDR_PLC
Decimal PPI address of the PLC POWER ON 3/3
0 2 0 126 BYTE
281 $MM_V24_PPI_ADDR_NCK
Decimal PPI address of the NCK POWER ON 3/3
0 3 0 126 BYTE
282 $MM_V24_PPI_ADDR_MMC
Decimal PPI address of the HMI POWER ON 3/3
0 4 0 126 BYTE
283 $MM_V24_PPI_MODEM_ACTIVE
Decimal Modem active Immediately 3/3
0 0 0 1 BYTE
284 $MM_V24_PPI_MODEM_BAUD
Decimal Modem baud rate Immediately 3/3
0 7 5 9 BYTE
285 $MM_V24_PPI_MODEM_PARITY
Decimal Modem parity Immediately 3/3
0 0 0 2 BYTE
SINUMERIK 802C
6FC5 597–3AA20–0BP2 (01.02)
6-95
Page 96

Technical Appendix
6.1 List of machine and setting data
6.1.2 General machine data
Number MD Name
Unit Name, Miscellaneous Activated
HW / function Standard value Minimum value Maximum value D type User
class
10074
- PLC task factor for main run POWER ON
10240
- Basic system metric POWER ON
_always 1 *** *** BOOLEAN 2/7
11100
- Number of auxiliary functions distr. amongst aux. fct. groups POWER ON
_always 1 1 50 BYTE 2/7
11200
HEX Standard machine data loaded on next Power On POWER ON
_always 0x0F - - BYTE 2/7
11210
HEX Saving only of modified MD (value=0: complete= no difference) RESTART
– 0x0F – – BYTE 2/7
11310
- Threshold for direction change handwheel POWER ON
_always 2 0.0 plus BYTE 2/7
11320
- Handwheel pulses per detent position (handwheel number): 0...1 POWER ON
_always 1., 1. - - DOUBLE 2/7
14510
kB User data (INT) 0 ... 31 POWER ON
_always - 0 - DWORD 2/7
PLC_IPO_TIME_RATIO
2 1 50 DWORD 2/7
SCALING_SYSTEM_IS_METRIC
AUXFU_MAXNUM_GROUP_ASSIGN
INIT_MD
UPLOAD_MD_CHANGE_ONLY
HANDWH_REVERSE
HANDWH_IMP_PER_LATCH
USER_DATA_INT [n]
14512
kB User data (Hex) 0 ... 31 POWER ON
- 0 0 0xFF BYTE 2/7
14514
- User data (Float) 0 ... 7 POWER ON
- 0.0 ... ... DOUBLE 2/7
14516
- User data (Hex) Alarm bit 0 ... 31 POWER ON
- 0 0 0xFF BYTE 2/7
USER_DATA_HEX [n]
USER_DATA_FLOAT [n]
USER_DATA_PLC_ALARM [n]
6.1.3 Channel-specific machine data
Number MD Name
Unit Name, Miscellaneous Activated
HW / function Standard value Minimum value Maximum value D type User
class
6-96
6FC5 597–3AA20–0BP2 (01.02)
SINUMERIK 802C
Page 97

Technical Appendix
6.1 List of machine and setting data
20210
Degrees Maximum angle for compensation blocks with TRC POWER ON
_always 100 0.0 150. DOUBLE 2/7
20700
- NC-Start disable without reference point RESET
_always 1 0 1 BOOLEAN 2/7
21000
mm Circle end point monitoring constant POWER ON
_always 0.01 0.0 plus DOUBLE 2/7
22000
- Auxiliary function group (aux. fct. no. in channel): 0...49 POWER ON
_always 1 1 15 BYTE 2/7
22010
- Auxiliary function type (aux. fct. no. in channel): 0...49 POWER ON
_always , , - - STRING 2/7
22030
- Auxiliary function value (aux. fct. no. in channel): 0...49 POWER ON
_always 0 - - DWORD 2/7
22550
- New tool compensation for M function POWER ON
_always 0 0 1 BYTE 2/7
27800
- Technology in the channel (value=0: milling, value=1: turning) NEW CONF
CUTCOM_CORNER_LIMIT
REFP_NC_START_LOCK
CIRCLE_ERROR_CONST
AUXFU_ASSIGN_GROUP
AUXFU_ASSIGN_TYPE
AUXFU_ASSIGN_VALUE
TOOL_CHANGE_MODE
TECHNOLOGY_MODE
1 0 1 BYTE 2/7
6.1.4 Axis-specific machine data
Number MD Name
Unit Name, Miscellaneous Activated
HW / function Standard value Minimum value Maximum value D type User
30130
- Output type of setpoint (setpoint branch): 0 POWER ON
_always 0 0 2 BYTE 2/7
30200
- Anzahl der Geber (1 oder kein Geber für die Spindel) RESTART
30240
- Type of actual value acquisition (actual position value) (encoder no.)
_always 0, 0 0 4 BYTE 2/7
30350
- Output of axis signals with simulation axes POWER ON
_always 0 *** *** BOOLEAN 2/7
30600
mm, degrees
_always 0.0 - - DOUBLE 2/7
CTRLOUT_TYPE
NUM_ENCS
1 0 1 BYTE 2/7
ENC_TYPE
0: Simulation
2: Square-wave generator, standard encoder (pulse multiplication)
3: Encoder for stepper motor
SIMU_AX_VDI_OUTPUT
FIX_POINT_POS
Fixed-value positions of axis with G75 (position no.) POWER ON
POWER ON
class
SINUMERIK 802C
6FC5 597–3AA20–0BP2 (01.02)
6-97
Page 98

Technical Appendix
6.1 List of machine and setting data
31000
- Direct measuring system (linear scale) (encoder no.) POWER ON
_always 0 *** *** BOOLEAN 2/7
31010
mm Division period for linear scales (encoder no.) POWER ON
_always 0.01 0.0 plus DOUBLE 2/7
31020
- Encoder markings per revolution (encoder no.) POWER ON
_always 2048 0.0 plus DWORD 2/7
31030
mm Pitch of leadscrew POWER ON
_always 10.0 0.0 plus DOUBLE 2/7
31040
- Encoder mounted directly to the machine (encoder no:) POWER ON
_always 0 *** *** BOOLEAN 2/7
31050
- Denominator load gearbox (control parameter no.): 0...5 POWER ON
_always 1, 1, 1, 1, 1, 1 1 2147000000 DWORD 2/7
31060
- Numerator load gearbox (control parameter set no.): 0...5 POWER ON
_always 1, 1, 1, 1, 1, 1 1 2147000000 DWORD 2/7
31070
- Denominator resolver gearbox (encoder no.) POWER ON
_always 1 1 2147000000 DWORD 2/7
ENC_IS_LINEAR
ENC_GRID_POINT_DIST
ENC_RESOL
LEADSCREW_PITCH
ENC_IS_DIRECT
DRIVE_AX_RATIO_DENOM
DRIVE_AX_RATIO_NUMERA
DRIVE_ENC_RATIO_DENOM
31080
- Numerator resolver gearbox (encoder no.) POWER ON
_always 1 1 2147000000 DWORD 2/7
31090
mm, degrees
32000
mm/min,
rev/min
_always 10000. 0.0 plus DOUBLE 2/7
32010
mm/min,
rev/min
_always 10000. 0.0 plus DOUBLE 2/7
32020
mm/min,
rev/min
_always 2000. 0.0 plus DOUBLE 2/7
32070
% Axis velocity for handwheel override, ext. ZO, cont. dressing, distance control RESET
_always 50 0.0 plus DWORD 2/7
32100
- Traversing direction (not control direction) POWER ON
_always 1 -1 1 DWORD 2/7
DRIVE_ENC_RATIO_NUMERA
JOG_INCR_WEIGHT
Evaluation of an increment with INC/handwheel RESET
MAX_AX_VELO
Maximum axis velocity NEW CONF
JOG_VELO_RAPID
Rapid treverse in jog mode RESET
JOG_VELO
Jog axis velocity RESET
CORR_VELO
AX_MOTION_DIR
6-98
6FC5 597–3AA20–0BP2 (01.02)
SINUMERIK 802C
Page 99

Technical Appendix
6.1 List of machine and setting data
32110
- Sign actual value (control direction) (encoder no.) POWER ON
_always 1 -1 1 DWORD 2/7
32200
1000/min Servo gain factor (control parameter set no.): 0...5 NEW CONF
_always (2,5; 2,5; 2,5; 1), ... 0.0 plus DOUBLE 2/7
32250
% Ratedoutput voltage (setprint brauch):0 NEW CONF
_always 80 0.0 10 DOUBLE 2/7
32260
rev/min Rated motor speed (setpoint branch): 0 NEW CONF
_always 3000 0.0 plus DOUBLE 2/7
32300
mm/s^2,
rev/s^2
_always 1 0 *** DOUBLE 2/7
32450
mm Backlash NEW CONF
_always 0.000 * * DOUBLE 2/7
32700
- Interpolatory compensation (encoder no.): 0,1 POWER ON
_always 0 *** *** BOOLEAN 2/7
32900
- Dynamic response adaptation NEW_CONF
ENC_FEEDBACK_POL
POSCTRL_GAIN
RATED_OUTVAL
RATED_VELO
MAX_AX_ACCEL
Axis acceleration NEW CONF
BACKLASH
ENC_COMP_ENABLE
DYN_MATCH_ENABLE
0 0 1 BYTE 2/7
32910
- Time constant of dynamic adaption (control parameter set no): 0...5 NEW_CONF
32920
s Smoothing factor time constant for adaptive control POWER ON
_always 0.0 0.0 plus DOUBLE 2/7
33050
mm, deg. Traversing distance for lubrication from PLC NEW CONF
_always 100000000 0.0 plus DOUBLE 2/7
34000
- Axis with reference point cam RESET
_always 1 *** *** BOOLEAN 2/7
34010
- Approach reference point in minus direction RESET
_always 0 *** *** BOOLEAN 2/7
34020
mm/min,
rev/min
_always 5000.0 0.0 plus DOUBLE 2/7
34030
mm, deg. Maximum distance to reference cam RESET
_always 10000.0 0.0 plus DOUBLE 2/7
DYN_MATCH_TIME
0 0.0 plus DOUBLE 2/7
AC_FILTER_TIME
LUBRICATION_DIST
REFP_CAM_IS_ACTIVE
REFP_CAM_DIR_IS_MINUS
REFP_VELO_SEARCH_CAM
Reference point approach velocity RESET
REFP_MAX_CAM_DIST
SINUMERIK 802C
6FC5 597–3AA20–0BP2 (01.02)
6-99
Page 100

Technical Appendix
6.1 List of machine and setting data
34040
mm/min,
rev/min
_always 300.0 0.0 plus DOUBLE 2/7
34050
- Direction reversal to reference cams (encoder no.) RESET
_always 0 *** *** BOOLEAN 2/7
34060
mm, deg. Maximum distance to reference mark. Max. distance to 2 reference marks
_always 20.0 0.0 plus DOUBLE 2/7
34070
mm/min,
rev/min
_always 1000.0 0.0 plus DOUBLE 2/7
34080
mm, deg. Reference point distance/target point for distance-coded system RESET
_always -2.0 - - DOUBLE 2/7
34090
mm, deg. Reference point offset/absolute offset distance-coded POWER ON
_always 0.0 - - DOUBLE 2/7
34092
mm, deg. Electr. cam offset of incremental measuring systems with equidistant zero marks RESET
_always 0.0 0.0 plus DOUBLE 2/7
REFP_VELO_SEARCH_MARKER
Creep speed (encoder no.) RESET
REFP_SEARCH_MARKER_REVERSE
REFP_MAX_MARKER_DIST
RESET
for distance-coded measuring systems.
REFP_VELO_POS
Reference point positioning velocity RESET
REFP_MOVE_DIST
REFP_MOVE_DIST_CORR
REFP_CAM_SHIFT
34100
mm, deg. Reference point value/irrelevant for distance-coded system: 0 ... 3 RESET
_always 0., 0., 0., 0. - - DOUBLE 2/7
34110
- Sequence of axes in channel-specific referencing
_always 1 -1 31 DWORD 2/7
34200
- Type of position measuring system
_always 1 0 6 BYTE 2/7
35010
- Gear change possible. Spindle has several gear steps POWER ON
_always 0 *** *** BOOLEAN 2/7
35040
- Own spindle reset POWER ON
_always 0 *** *** BOOLEAN 2/7
35100
rev/min Maximum spindle speed POWER ON
_always 10000 0.0 plus DOUBLE 2/7
35110
rev/min Maximum speed for gear change (gear stage no.): 0..5 NEW CONF
_always 500, 500, 1000, 2000, 4000,
REFP_SET_POS
REFP_CYCLE_NR
-1: No obligatory reference point for NC Start
0: No channel-specific reference-point approach
1-15: Sequence in channel-specific reference point approach
ENC_REFP_MODE
0: No ref. point appr.; if an absolute encoder exists: REFP_SET_POS accepted
1: Zero pulse (on encoder track)
GEAR_STEP_CHANGE_ENABLE
SPIND_ACTIVE_AFTER_RESET
SPIND_VELO_LIMIT
GEAR_STEP_MAX_VELO
8000
0.0 plus DOUBLE 2/7
RESET
POWER ON
6-100
6FC5 597–3AA20–0BP2 (01.02)
SINUMERIK 802C
 Loading...