


 Loading...
Sharp SJ-P58M, SJ-P63M, SJ-P68M, SJ-58M, SJ-63M Manual
...SJ-P58M SJ-58M SJ-P63M SJ-63M SJ-P68M SJ-68M


 Plasmacluster
REFRIGERATOR-FREEZER
CHLODZIARKA -
ZAMRAŻARKĄ
HŰTŐSZEKRÉNY - FAGYASZTÓSZEKRÉNY
FRIGIDER-CONGELATOR CHLADNICE-MRAZÁK CHLADNIČKA-MRAZNIČKA
OPERATION MANUAL ................. |
3 |
INSTRUKCJA OBSŁUGI ............... |
7 |
KEZELÉSI ÚTMUTATÓ ................ |
11 |
MANUAL DE UTILIZARE ............. |
15 |
NÁVOD K OBSLUZE ................... |
19 |
NÁVOD NA OBSLUHU................ |
23 |
ENGLISH POLSKI MAGYAR ROMÂNĂ ČESKY SLOVENSKY
SJ-P68M |
SJ-68M |
SJ-P63M |
SJ-63M |
SJ-P58M |
SJ-58M |
1

ENGLISH POLSKI MAGYAR ROMÂNĂ ČESKY SLOVENSKY
27

ENGLISH
INTRODUCTION
Thank you very much for buying this SHARP product. Before using your SHARP refrigerator, please read this operation manual to ensure that you gain the maximum benefit from it.
All persons using the cabinet must be thoroughly familiar with its operation and safety features.
Keep this operation manual with the refrigerator if you move or if the cabinet changes owners so that whoever uses it can read about the various features and safety rules.
This equipment complies with the requirements of Directives 96/57/EC, 89/336/EEC and 73/23/EEC as amended by
93/68/EEC.
Important:
•This refrigerator is for domestic use only, with an ambient temperature between +5°C and +38°C. The refrigerator should not be subjected to temperatures of -10°C for long periods.
•To be used on 220-240V mains voltage.
DESCRIPTION
1
8
2
3
4
5
6 


7
6
14 rail 8
9
10
11
12
13
14 
15
16
17
18
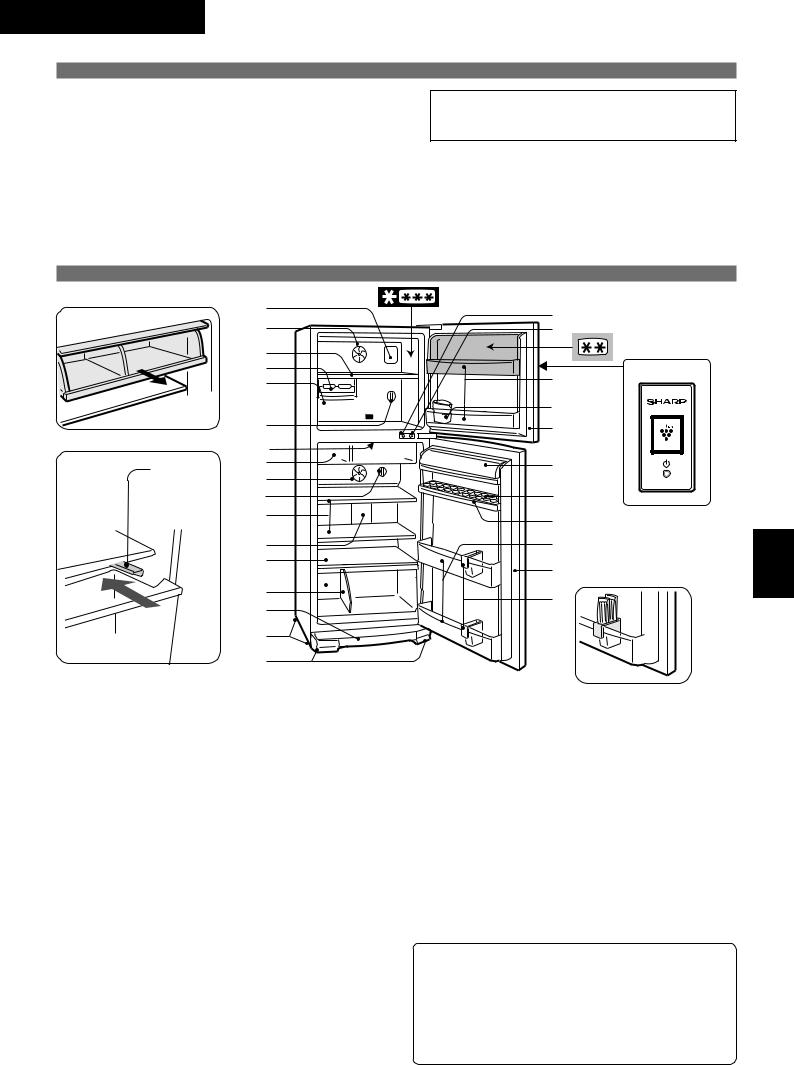
1.Freezer light
2.Freezer fan
3.Freezer shelf
4.Ice cube maker
5.Ice cube box
6.Deodorizing unit
7.Freezer temp. control knob
8.Fresh case
The cover of Fresh case opens as the case is pulled.
9.Refrigerator fan
This refrigerator compartment is equipped with a special fan, that quickly and evenly cools the refrigerator compartment should the inside temperature increase when opening the door or for other reasons. During normal operation the fan does not function.
10.Refrigerator temp. control knob
11.Refrigerator shelf
(68 type 3 shelves, 63/58 type 2 shelves)
12.Refrigerator light
13.Shelf
14.Vegetable crisper
Put in the Vegetable crisper under the rail.
15.Separator plate
16.Evaporating pan & cover
17.Casters
19 |
|
20 |
|
21 |
29 |
|
|
22 |
|
23 |
|
|
Plasmacluster |
24
25
26
27
23
28
18.Adjustable feet
19.Fan & light switch for freezer
20.Fan & light switch for refrigerator
21.Freezer pocket
22.Water supply cup
23.Magnetic door seal
24.Utility case
25.Egg holder
26.Free pocket
(68 type 2 pockets, 63/58 type 1 pocket)
27.Bottle pocket
28.Bottle guard
Prevents bottles,etc. from falling. Stick-type food products can also be stored inside.
29.Plasmacluster panel
(Only for SJ-P68M, SJ-P63M, SJ-P58M)
Replacing the lamp bulbs
Replace lamp bulbs with same types. Freezer: base E12, MAX 10W, T-20 Refrigerator: base E12, MAX 15W, T-20
Make sure that the rated voltage and wattage of the lamp bulbs are correct when replacing. (Check the label near the bulbs.) When replacing the lamp bulb, unplug the refrigerator first to prevent electric shock.
ENGLISH POLSKI MAGYAR ROMÂNĂ ČESKY SLOVENSKY
3
WARNING
1.This refrigerator is airtight. TO PREVENT FATAL ACCIDENTS TO CHILDREN, please completely remove the door prior to discarding the refrigerator.
2.Highly volatile and inflammable materials such as ether, petrol, propane gas, adhesive agents and pure alcohol etc. are liable to explode. Do not store these materials in the refrigerator.
3.To prevent damage to the outer cabinet, avoid contact with lacquer, and paint, etc.
4.When cleaning your refrigerator, do not splash water directly on the outer cabinet or the interior. This may lead to rusting and deterioration of the electrical insulation.
5.When cleaning any areas adjacent to electrical components or replacing the lamp bulb, unplug the refrigerator first to prevent electric shock.
6.Should electrical components be accidentally immersed in water, unplug the refrigerator, dry the parts and contact your nearest service agent approved by SHARP.
7.When disconnecting the power plug, do not touch the pins of plug. This may cause electric shock.
8.This refrigerator is designed solely for the purpose of storing foodstuff for domestic use in accordance with the instructions given in this manual. Using the refrigerator for other purposes might be harmful to persons or property.
9.This refrigerator is not suitable for the storage of materials requiring precise temperatures. Deterioration of these materials will be dangerous.
10.Dust deposited on the power plug may cause fire. Wipe it off carefully.
11.Do not attempt to change or modify this refrigerator. This may result in fire, electric shock or injury.
12.Information regarding disposal of the appliance
Flammable insulation blowing gases should be disposed appropriately. Take the cabinet and doors to a recycling plant for flammable insulation blowing gases.
CAUTION
1.Do not touch the compressor unit, as it can become extremely hot during operation.
2.If the power supply is accidentally disconnected, please wait for at least 5 minutes before re-connecting the power, as back pressure in the compressor may trip the overload relay.
3.Avoid removing food from the freezer with your bare hands. Directly touching products stored at sub-zero temperatures can result in frostbite.
4.To prevent accidental power disconnection, plug the refrigerator directly to the source. Do not use a double adaptor as loss of power could lead to the spoiling of the stored food.
5.Do not place bottles in the freezer as they may crack when frozen.
6.Keep the door securely closed. If the door is left ajar, the controlled inner temperature will rise, resulting in food spoilage and increase in electricity costs.
7.Do not install the refrigerator in a damp or wet location as this may cause damage to the insulation and a leak. Condensation may also build on the outer cabinet and cause rust.
8.When installing or moving the refrigerator, make sure that you do not nip or kink the power cord. Damage of the power cord may cause electric shock or fire.
9.Do not use this refrigerator when the power cord or plug is damaged, or the outlet attachment is loose, as they may cause electric shock or fire.
INSTALLATION
10.Disconnect from the mains electricity supply by removing the mains plug from the electricity supply socket. Do not remove by pulling the mains lead. This may cause electric shock or fire.
11.Make sure that you leave adequate ventilation space around the refrigerator to prevent the compressor from overheating and stopping. Please follow the instructions given for installation.
12.The refrigeration system behind and inside the refrigerator contains refrigerant. If this system is punctured it could result in serious damage to your refrigerator, therefore do not allow any sharp objects to come into contact with the refrigeration system.
13.Should the flexible supply cord be damaged, it must be replaced by service agent approved by SHARP as a special cord is required.
14.In case of gas leak, ventilate the area by opening a window, etc. Do not touch the refrigerator or the power outlet.
15.Do not place heavy or easily broken objects on top of the refrigerator. Objects may fall when opening or closing the refrigerator, causing injury.
16.Do not place objects containing liquid on top of the refrigerator. Spillage may cause electric shock or fire.
17.Do not drop objects inside the refrigerator or strike the inner wall. This may cause the inner surface to crack.
18.This refrigerator is not intended for use by young children or infirm persons without supervision. Young children should be supervised to ensure that they do not play with the refrigerator.
When transporting
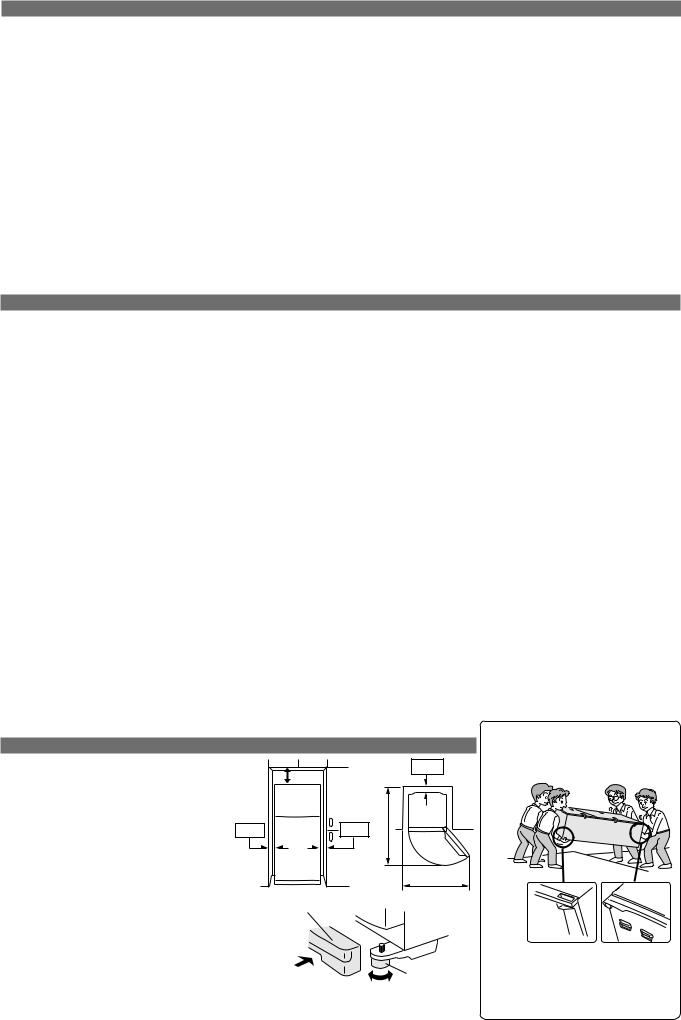
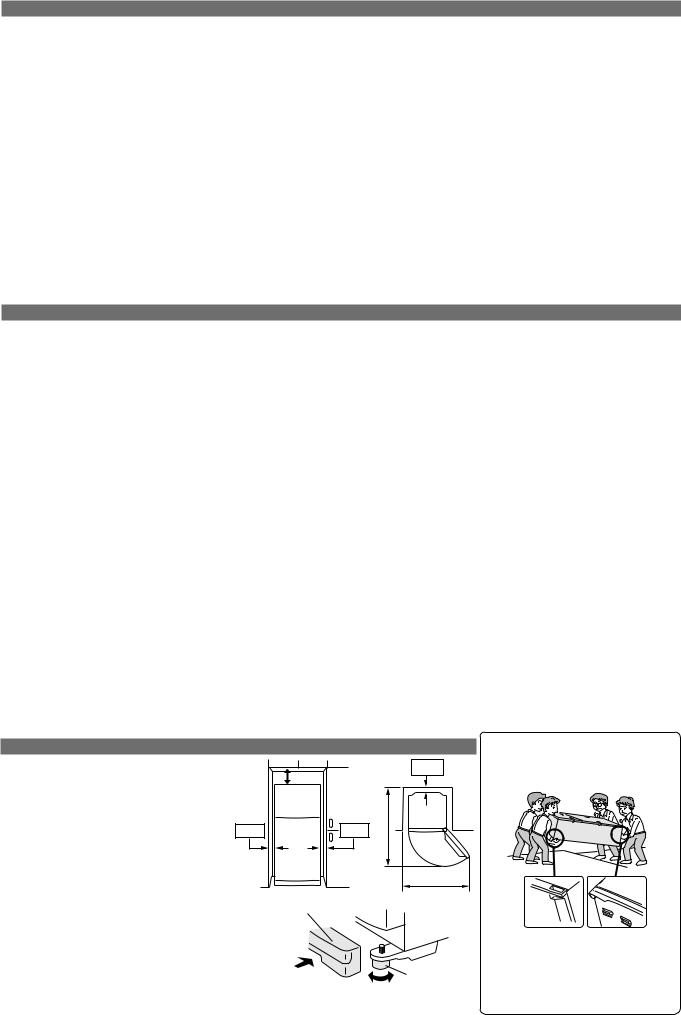
1.To ensure adequate ventilation for your refrigerator, it is recommended to provide space of 6cm on both sides and at the back, and space of 9cm above the refrigerator. Insufficient spacing will decrease the cooling efficiency, resulting in unnecessary consumption of electricity.
2.Using the two front Adjustable feet, ensure that the refrigerator is positioned firmly and level on the floor.
9cm |
|
6cm |
6cm |
Evaporating |
|
pan cover |
|
6cm
148 cm
135 cm
Carry the refrigerator by holding the handles located on the rear and bottom.
3. Clip Evaporating pan cover (supplied inside the refrigerator compartment) in position in front of the two Adjustable feet.
NOTE: • Position your refrigerator so that the plug is accessible.
• Keep your refrigerator out of direct sunlight.
• Do not place next to heat generating appliance.
• Do not place directly on the ground. Provide suitable stand.
4
Before using your refrigerator
Adjustable |
Clean the inside parts with a cloth |
|
foot |
||
soaked in warm water. If soapy wa- |
||
|
||
|
ter is used, wipe it off thoroughly. |
OPERATION
CONTROLLING TEMPERATURES
The refrigerator controls its temperature automatically. However, if needed, adjust the temperature as follows.
Freezer |
|
MED |
|
|
Refrigerator |
|
4 |
|
|
|
|
|
|
|
MED |
compartment |
3 |
4 |
5 |
6 |
compartment |
|
5 |
|
|
3 |
|||||
2 |
|
|
|
|
|||
|
1 |
|
|
|
7 |
|
|
|
MIN |
|
|
|
MAX |
2 |
6 |
|
|
|
|
|
Coldest |
|
|
|
|
|
|
|
|
MIN 1 |
MAX |
|
|
|
|
|
|
7 Coldest |
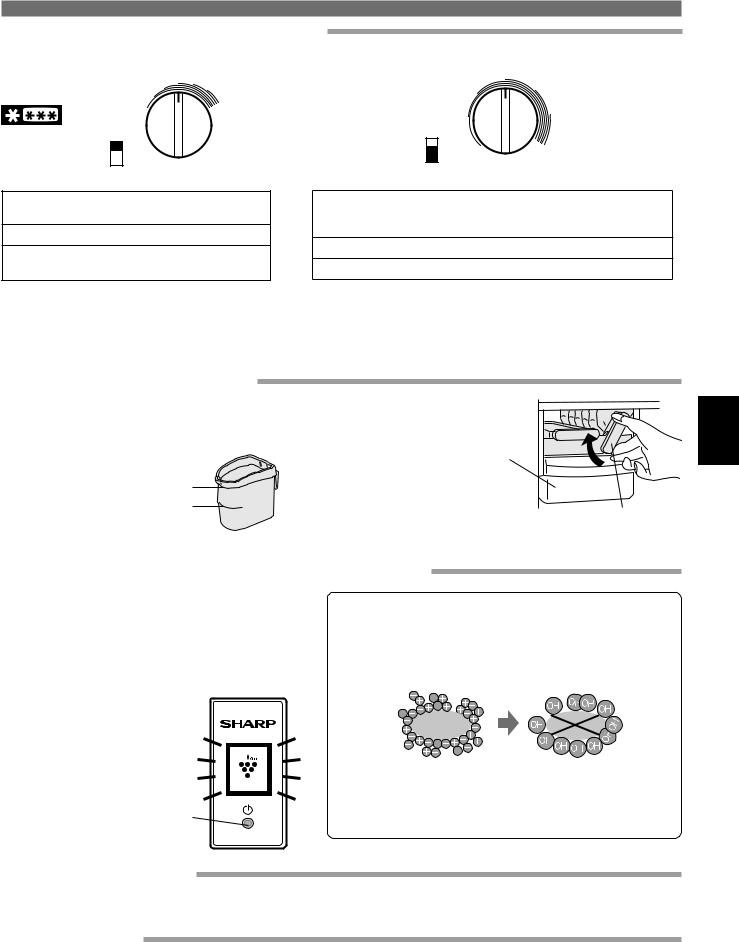
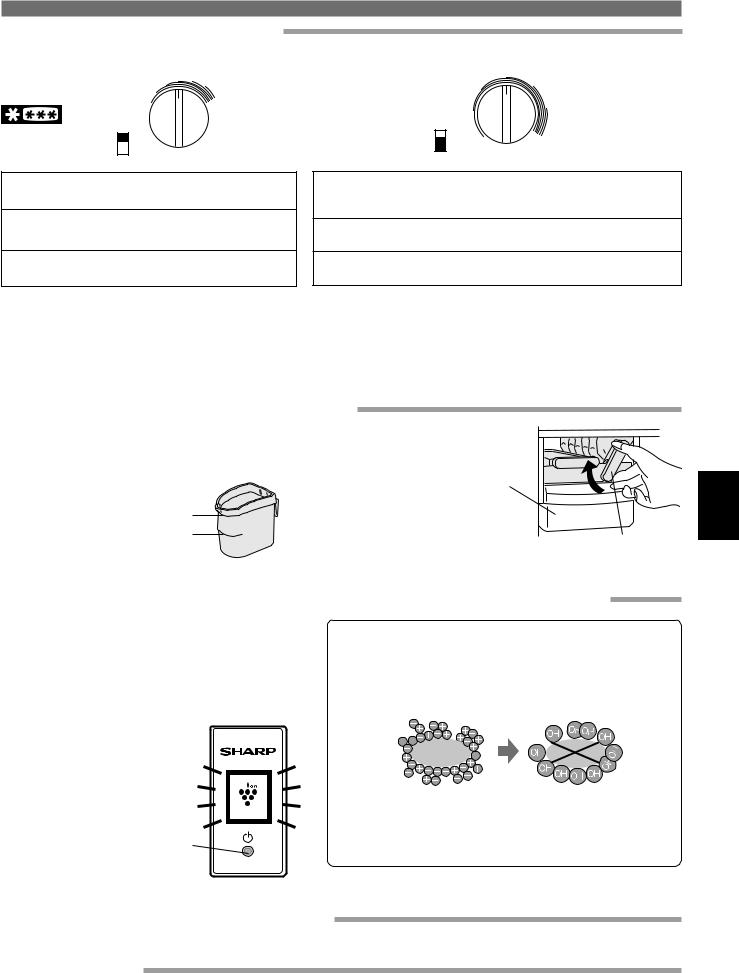
FREEZER TEMP. CONTROL
7(MAX) For making ice rapidly or fast freezing.
4(MED) For normal freezing.
1(MIN) When frozen food or ice cream is not stored.
•If the refrigerator is operated for a long time with FREEZER TEMP. CONTROL set at 7(MAX), foods stored in the refrigerator compartment may also freeze.
•2 star section  for storing frozen foods only. (not freezing)
REFRIGERATOR TEMP. CONTROL
7(MAX) For keeping foods fresher tasting.
When the refrigerator does not provide sufficient cooling.
4(MED) For normal operation.
1(MIN) When the refrigerator provides excessive cooling.
•If the refrigerator is operated for a long time with REFRIGERATOR TEMP. CONTROL set at 7 (MAX), foods stored in the refrigerator compartment may also freeze.
•Low ambient temperature may cause placed foods to freeze even if REFRIGERATOR TEMP. CONTROL is set to 1 (MIN).
HINTS WHEN MAKING ICE
1.The included Water supply cup can be used to measure the amount of water to pour into Ice cube trays. Pouring too much water into the tray will result in the ice cubes connecting to each other when frozen.
Amount for both Ice cube trays
Amount for one Ice cube tray
2.When the ice cubes are made, turn the lever clockwise to empty the ice into Ice cube box.
Ice cube box
NOTE:
To prevent damage to the Ice cube box,
do not make ice in the Ice cube box or Lever pour oil into it.
PLASMACLUSTER (Only for SJ-P68M, P63M, P58M)
The plasmacluster automatically starts operating when the refrigerator is powered on.
1.Press “PLASMACLUSTER(ON/OFF) button”, and the PLASMACLUSTER lamp goes out and the plasmacluster turns off.
2.Press “PLASMACLUSTER(ON/OFF) button” again, and the PLASMACLUSTER lamp lights up. The plasmacluster turns on.
Plasmacluster |
PLASMACLUSTER(ON/OFF) button
Notes about PLASMACLUSTER operation
The ionizer inside your refrigerator releases clusters of ions, which are collective masses of positive and negative ions, into the freezer and refrigerator compartment.
These ion clusters reduce airborne mold fungus.
mold fungus
•There may be a slight odors in the refrigerator. This is the smell of ozone generated by the ionizer. The amount of ozone is minimal, and quickly decomposes in the refrigerator.
DEODORIZING UNIT
A built-in unit which requires no manual operation because it automatically starts operating when the refrigerator is powered on.
DEFROSTING
Defrosting is fully automatic due to a unique energy saving system. Whereby the defrost cycle start time is proportional to the running time of your refrigerator compressor, i. e., the less time the refrigerator compressor operates (during the winter season or you’re away on holidays), the longer the time between each defrost cycle.
ENGLISH POLSKI MAGYAR ROMÂNĂ ČESKY SLOVENSKY
5
STORING FOOD
Refrigeration reduces the rate of food spoilage. To maximize the shelf life of perishable food products, ensure that the food is of the freshest possible quality. The following is a general guide to help promote longer food storage.
Fruit / Vegetables
To minimize moisture loss, fruit and vegetables should be loosely enclosed in a plastic material e.g. wrap, bags ( do not seal ) and place in Vegetable crisper. Those fruits and vegetables with thick skins e.g. oranges do not require wrapping.
Dairy Products & Eggs
•Most dairy products have a use by date on the outer packaging which informs the recommended temperature and shelf life of the product.
•Eggs should be stored in the Egg holder.
Meats / Fish / Poultry
•Place on a plate or dish and cover with paper or plastic wrap.
•For larger cuts of meat, fish, or poultry, place to the rear of the shelves.
•Ensure all cooked food is wrapped securely or placed in an airtight container.
NOTE:
•Evenly place the food on the shelves to allow the cooling air to circulate efficiently.
•Hot foods should be cooled before storing. Stor-
ing hot foods increases the temperature in the unit and increases the risk of food spoilage.
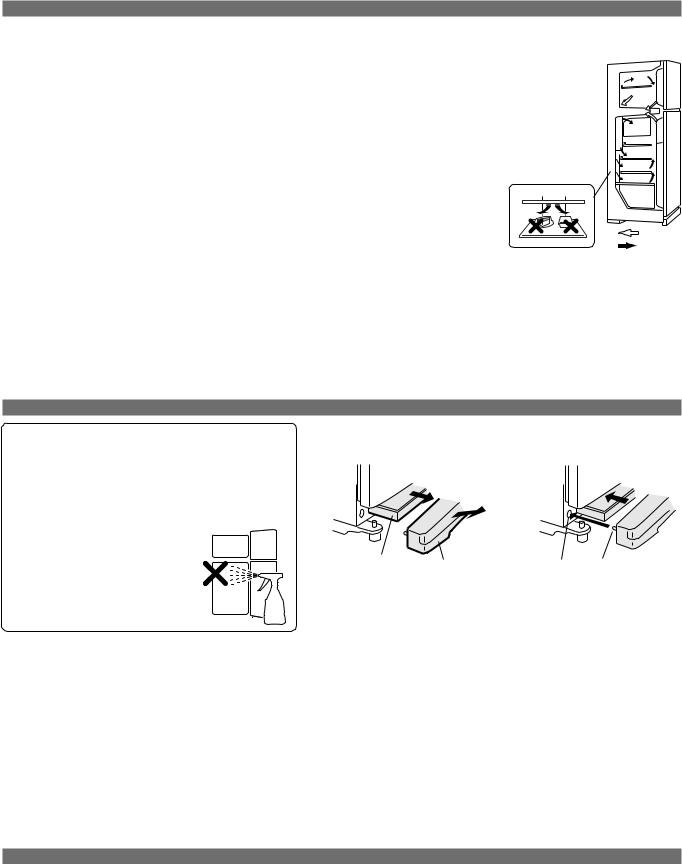
• Do not block the outlet and inlet of the cool air circulating circuit with foods or containers; otherwise the foods will not be evenly cooled throughout the refrigerator.
• Do not place food directly in front of cold air outlet. This may lead to the food freezing.
IN
OUT
FOR BEST FREEZING
•Quality of foods should be fresh.
•Freeze small quantities of food at a time to freeze them quickly.
•Food should be properly stored or covered and the air should be removed to seal tightly.
•Evenly place the food in the freezer.
•Label bags or containers to keep an inventory of freezing food.
CARE AND CLEANING
Some household cleaning chemicals may affect the inside surfaces and plastic shelves resulting in splitting or cracks occurring.
When cleaning all plastic parts inside this refrigerator, only use diluted dishwashing liquid(soapy water). Make sure that all plastic parts are thoroughly rinsed with water after cleaning.
1.Remove the shelves and pockets from the cabinet and door. Wash them in warm soapy dishwashing water; rinse in clean water and dry.
2.Clean the inside with a cloth soaked in warm soapy dishwashing water. Then, use cold water to wipe off soapy water.
3.Wipe the exterior with a soft cloth each time it is soiled.
4.Clean Magnetic door seal with a toothbrush and warm soapy dishwashing water.
5.Evaporating pan should be removed and cleaned once a year.
Evaporating pan & cover; |
|
How to remove |
How to set |
Evaporating pan Evaporating pan |
Hole Pawl |
cover |
|
NOTE:
•Do not use polishing powder, benzine, hot water etc.
•If undiluted detergent is used or soapy water is not wiped off thoroughly, cracking of plastic parts can result.
•Wipe any food oils adhered to plastic components as they can cause cracking of the plastic surface.
•The glass shelves weighs approximately 3kg each. Hold firmly when removing from the cabinet or carrying.
Switching off your refrigerator
If you switch your refrigerator off when you are going away for an extended period, remove all food, clean the interior thoroughly. Remove the power cord plug from the power socket and leave all doors open.
WHAT TO DO BEFORE YOU CALL FOR SERVICE
Before you call for service, check the following point. IT IS NORMAL for the refrigerator to produce the following sounds.
•Loud noise produced by the compressor when operation starts --- Sound becomes quieter after a while.
•Loud noise produced once a day by the compressor
---Operating sound produced immediately after automatic defrost operation.
•Sound of flowing fluid (gurgling sound, fizzing sound)
---Sound of refrigerant flowing in pipes (sound may become louder from time to time).
•Cracking or crunching sound --- Sound produced by expansion and contraction of inner walls and internal parts during cooling.
•Squeaking sound --- Sound produced by expansion and contraction of internal parts.
IT IS NORMAL that the outside of a cabinet may be hot when touched. The hot pipe is in the cabinet in order to prevent dew generation.
IF YOU STILL REQUIRE SERVICE
Refer to your nearest service agent approved by SHARP.
6
POLSKI
WPROWADZENIE
Dziękujemy Ci bardzo za zakupienie wyrobu firmy SHARP. Aby zapewnić sobie jak najwięcej korzyści z nowej lodówki SHARP, prosimy, abyś przed podjęciem eksploatacji dokładnie przeczytał niniejszą instrukcję obsługi.
Wszystkie osoby korzystające z lodówki muszą dokładnie znać jej funkcje oraz przestrzegać środków bezpieczeństwa.
Przechowuj instrukcję obsługi razem z lodówką, tak aby w razie zmiany miejsca eksploatacji lub zmiany właściciela ktokoliwiek używa lodówki, mógł zapoznać się z jej możliwościami i środkami bezpie czeństwa.
Niniejszy sprzęt odpowiada wymogom dyrekyw 96/57/ EC, 89/336/EEC oraz 73/23/EEC oraz poprawek dokonanych w 93/68/EEC.
Ważne:
•Niniejsza lodówka przeznaczona jest tylko do eksploatacji w pomieszczeniach mieszkalnych, w temperaturze otoczenia mieszczącej się w przedziale między +5˚C a + 38˚C.
Nie narażaj lodówki na działanie temperatury niższej niż -10˚C przez dłuższy czas.
•Napięcie zasilania wynosi 220-240 V prądu zmiennego.
OPIS CZĘŚCI
1
8
2
3
4
5
6 


7
6
14 Prowadnica 8
9
10
11
12
13
14 
15
16
17
18
1.Oświetlenie zamrażarki
2.Wentylator zamrażarki
3.Półka zamraźarki
4.Kasetka do produkcji lodu
5.Zbiornik lodu
6.Urządzenie dezodoryzjące
7.Pokrętło regulatora temperatury zamraźania
8.Komora na warzywa
Podczas wysuwania komory na warzywa otwiera się jej pokrywa.
9.Wentylator lodówki
Opisywane pomieszczenie lodówki wyposażone jest w specjalną dmuchawę, szybko i równomiernie chłodzącą wnętrze lodówki w wypadku wzrostu temperatury podczas otwierania drzwi lub z innych powodów. Podczas normalnego funkcjonowania lodówki dmuchawata nie działa.
10.Pokrętło regulatora temperatury chłodzenia
11.Półka lodówki
(3 półki typu 68, 2 półki typu 63/58)
12.Oświetlenie lodówki
13.Półka
14.Pojemnik na warzywa
Włóż pojemnik na warzywa pod prowadnicę.
15.Płytka oddzielająca
16.Taca zbierająca wodę i pokrywa
17.Kółka
19 |
|
20 |
|
21 |
29 |
|
|
22 |
|
23 |
|
|
Plasmacluster |
24
25
26
27
23
28
18.Nóżki regulacyjne
19.Wyłącznik wentylatora i oświetlenia zamrażarki
20.Wyłącznik wentylatora i oświetlenia lodówki
21.Kieszeń zamrażarki
22.Miarka do nalewania wody
23.Uszczelka drzwi magnetycznych
24.Przestrzeń użytkowa
25.Foremka do przechowywania jajek
26.Kieszeń
(2 kieszenie typu 68, 1 kieszeń typu 63/58)
27.Pojemink na butelki
28.Osłona butelek
Zapobiega przewracaniu się butelek i podobnych pojemników. Możesz także przechowywać podobnie pakowane produkty żywnościowe.
29.Panel Plasmacluster
(tylko dla modeli SJ-P68M, SJ-P63M, SJ-P58M)
Wymiana żarówek
Wymieniaj żarówki na żarówki tego samego typu. Zamrażarka: podstawa E12 MAKS. 10W, T-20 Lodówka: podstawa E12 MAKS. 15W, T-20
Podczas wymiany żarówek upewnij się, że napięcie znamionowe i moc znamionowa żarówek są prawidłowe (sprawdź na naklejce obok żarówek).
Aby uniknąć porażenia prądem elektrycznym, przed wymianą żarówki odłącz lodówkę od sieci.
ENGLISH POLSKI MAGYAR ROMÂNĂ ČESKY SLOVENSKY
7
OSTRZEŻENIE
1.Niniejsza lodówka jest hermetyczna. ABY UNIKNĄĆ NIESZCZĘŚLIWYCH WYPADKÓW Z UDZIAŁEM DZIECI, przed wyrzuceniem lodówki wymontuj drzwi.
2.Substancje lotne i łatwopalne takie jak eter, benzyna, gaz propan, środki klejące i czysty alkohol mogą spowodować eksplozję. Nie wolno przechowywać ich w lodówce.
3.Aby uniknąć uszkodzeń obudowy, nie dopuść, aby zetknęła się ona z lakierami lub farbami.
4.Podczas czyszczenia lodówki unikaj wylewania wody bezpośrednio na obudowę lub do środka lodówki. Może to doprowadzić do zardzewienia części oraz do zniszczenia izolacji przewodów elektrycznych.
5.Podczas czyszczenia miejsc w pobliżu instalacji elektrycznej lub wymiany żarówki, aby uniknąć porażenia prądem elektrycznym, najpierw odłącz lodówkę od sieci.
6.Jeśli przypadkowo zamoczysz części instalacji elektrycznych, odłącz lodówkę od sieci, wytrzyj zamoczone części i skontaktuj się z najbliższym autoryzowanym serwisem firmy SHARP.
7.Gdy odłączasz wtyk, nie dotykaj jego bolców. Może to spowodować porażenie prądem elektrycznym.
8.Niniejsza lodówka przeznaczona jest wyłącznie do przechowywania produktów żywnościowych w warunkach domowych, zgodnie z załączoną instrukcją obsługi. Użytkowanie lodówki do jakichkolwiek innych celów może spowodować zagrożenie dla użytkownika lub jego własności.
9.Niniejsza lodówka nie nadaje się do przecho-wywania substancji wymagających dokładnych i stałych wartości temperatury.
10.Nagromadzenie się kurzu na wtyku przewodu zasilania może spowodować pożar. Dokładnie wycieraj kurz.
11.Nie próbuj zmieniać konstukcji niniejszej lodówki. Aby uniknąć pożaru, porażenia prądem elektrycznym lub wypadku, osoby inne niż wykwalifikowani technicy serwisu nie powinny rozmontowywać ani naprawiać niniejszej lodówki.
12.Informacje dotyczące pozbywania się urządzeń
Palne gazy izolacyjne powinny wymagają specjalnej obróbki. Zawieź obudowę i drzwi do punktu recyklingu przystosowanego do obróbki palnych gazów izolacyjnych.
ŚRODKI OSTROŻNOŚCI
1.Nie dotykaj kompresora, ponieważ podczas działania lodówki może się on bardzo nagrzać.
2.Jeśli przypadkowo odłączysz lodówkę od źródła zasilania, przed ponownym podłączeniem do sieci odczekaj co najmniej 5 minut, ponieważ wspomagające ciśnienie w kompresorze może samoczynnie włączyć układ zabezpieczający przed przeciążeniem sieci.
3.Unikaj wyjmowania produktów żywnościowych z zamrażarki gołymi rękoma. Bezpośredni kontakt z żywnością przechowywaną w temperaturze niższej od zera może spowodować odmrożenia.
4.Aby uniknąć przypadkowej przerwy w dostawie energii elektrycznej, podłącz lodówkę bezpośrednio do gniazda ściennego. Nie używaj rozdzielników do gniazd sieclowych, ponieważ straty mocy mogą spowodować zepsucie się przechowywanej żywności.
5.Nie umieszczaj w zamrażarce butelek, ponieważ mogą popękać podczas zamrażania.
6.Drzwi lodówki powinny być dokładnie zamknięte. Szerokie otworzenie drzwi lodówki spowoduje wzrost temperatury, zepsucie się produktów żywnościowych oraz zwiększy koszt eksploatacji lodówki.
7.Nie instaluj niniejszej lodówki w miejscach wilgotnych lub podmokłych, ponieważ może to spowodować zniszczenie się izolacji i wycieki. Co więcej, na lodówce może kondensować się wilgoć.
8.Gdy instalujesz lub przenosisz lodówkę w inne miejse, uważaj, aby nie uszkodzić ani nie przerwać przewodu zasilania. Uszkodzenie przewodu zasilania może spowodować porażenie prądem elektrycznym lub pożar.
9.Nie używaj niniejszej lodówki gdy przewód zasilania jest uszkodzony lub wtyk pasuje luźno do gniazda ściennego, ponieważ może to spowodować porażenie prądem elektrycznym lub pożar.
10.Gdy odłączasz lodówkę od sieci, ciągnij za wtyk a nie za przewód. Ciągnięcie za przewód może spowodować porażenie prądem elektrycznym lub pożar.
11.Aby zapobiec przegrzaniu się i zatrzymaniu kompresora, upewnij się, że zostawiłeś wystarczającą wolną przestrzeń wokół lodówki. Stosuj się do instrukcji podanych do instalacji lodówki.
12.System chłodzący znajdujący się z tyłu i wewnątrz lodówki wykorzystuje płyn chłodzący. Jeśli płyn chłodzący wycieknie z układu, może to spowodować poważne uszkodzenie lodówki; w związku z tym nie dopuść, aby żaden ostry przedmiot dotknął przewodów systemu chłodzącego.
13.Jeśli uszkodzisz elastyczny przewód zasilania, musisz wymienić go w autoryzowanym punkcie SHARP, ponieważ wymagany jest specjalny przewód.
14.W przypadku ulatniania się gazu, dokładnie wywietrz pomieszczenie otwierając okna, itp. Nie dotykaj lodówki ani gniazda ściennego.
15.Nie umieszczaj ciężkich ani łatwo tłukących się przedmiotów na lodówce. Gdy otwierasz drzwi lodówki przedmioty te mogą spaść, powodując uszkodzenie ciała.
16.Nie umieszczaj naczyń zawierających płyny na lodówce. Rozlanie się płynu może spowodować porażenie prądem elektrycznym lub pożar.
17.Nie upuszczaj żadnych przedmiotów wewnątrz lodówki ani nie uderzaj w ściany wewnętrzne. Może to spowodować popękanie wewnętrznej powierzchni ścian.
18.Niniejsza lodówka nie jest przeznaczona do użytku przez dzieci ani osoby niepełnosprawne bez nadzoru. Małe dzieci powinny korzystać z lodówki pod nadzorem zapewniającym, że dzieci nie bawią się lodówką.
INSTALACJA
1.Aby zapewnić lodówce odpowiednią wentylację, zalecamy, abyś pozostawił wolną przestrzeń 6 cm z obu stron oraz tyłu lodówki oraz 9 cm od wierzchu lodówki. Pozostawienie zbyt małej przestrzeni między produktami żywnościowymi spowoduje spadek efektywności chłodzenia, a w rezultacie zwiększenie poboru energii elektrycznej.
2.Użycie dwóch regulowanych przednich nóżek zapewnia bezpieczne i poziome ustawienie lodówki na podłodze.
|
9cm |
6cm |
6cm |
6cm
148 cm
135 cm
3. Umieścić pokrywę tacki zbierającej wodę |
Pokrywa tacki zbierającej |
|
wodę |
||
(znajdą ją Państwo we wnętrzu chłodziarki) |
||
|
||
w takiej pozycji, aby przykrywała nóżki |
|
|
regulacyjne. |
|
UWAGA:
• Ustaw swoją lodówkę tak, by wtyk był łatwo dostępny.
•Nie narażaj lodówki na bezpośrednie światło słoneczne.
•Nie umieszczaj lodówki blisko obiektów wydzielających ciepło.
•Nie ustawiaj bezpośrednio na podłodze. Zapewnij odpowiednią podstawę.
Regulowane nóżki
Podcza transportu
Przenoś lodówkę trzymając ją za uchwyty z tyłu i na spodzie.
Przed rozpoczęciem obsługi lodówki
Wyczyść części wewnętrzne ściereczką zwilżoną ciepłą wodą. Jeśli używasz wody z mydłem, po umyciu dokładnie wytrzyj.
8
OBSŁUGA
REGUALCJA TEMPERATURY
Lodówka kontroluje temperaturę automatycznie. Jeśli zajdzie taka potrzeba, wyreguluj temperaturę jak podano niżej.
Komora zamrażarki |
|
MED |
|
Komora lodówki |
MED |
|
5 |
4 |
|||
|
3 |
4 |
|
5 |
|
|
|
6 |
3 |
||
|
2 |
|
7 |
|
|
1 |
|
|
|
|
|
MIN |
|
|
MAX |
2 |
6 |
|
|
|
Coldest |
|
|
|
|
|
|
MIN 1 |
MAX |
|
|
|
|
7 Coldest |
FREEZER TEMP. CONTROL
7(MAX)
Do szybkiego robienia lodu lub zamrażania żywności.
4(MED)
Do normalnego mrożenia.
1(MIN)
Gdy nie przechowujesz produktów zamrożonych lub lodów.
•Jeśli regulator temperatury zamrażarki FREEZER TEMP. CONTROL nastawiony jest na dłuższy czas w pozycji 7(MAX), żywność przechowywana w komorze lodówki również może zamarznąć.
•Przestrzeń oznaczona dwoma gwiazdkami  służy tylko do przechowywania zamrożonej żywności (nie do zamrażania).
REFRIGERATOR TEMP. CONTROL
7(MAX)
Aby zapewnić największą świeżość produktów żywnościowych. Gdy lodówka nie zapewnia dostatecznego chłodzenia.
4(MED)
Do normalnej eksploatacji.
1(MIN)
Gdy nie przechowujesz produktów zamrożonych lub lodów.
•Jeśli regulator temperatury lodówki REFRIGERATOR TEMP. CONTROL nastawiony jest na dłuższy czas w pozycji 7(MAX), żywność przechowywana w komorze lodówki również może zamarznąć.
•Niska temperatura otoczenia może także spowodować zamarznięcie produktów żywnościowych w lodówce, nawet jeśli regulator temperatury lodówki REFRIGERATOR TEMP. CONTROL nastawiony jest w pozycji 1(MIN).
WSKAZÓWKI PRZY ROBIENIU LODU
1.Załączona miarka do wody pozwala na dokładne odmierzenie wody potrzebnej do tacek na lód. Nalanie zbyt dużej ilości wody spowoduje, że kostki lodu zlepią się ze sobą po zamarznięciu.
Ilość wody do obydwóch tacek na lód
Ilość wody do jednej tacki
2. Gdy lód jest gotowy, obróć dźwignię zgodnie z ruchem wskazówek zegara, aby opróżnić foremki do zbiornika na lód w komorze zamrażarki.
Zbiornik lodu
UWAGA:
Nie rób lodu w pojemniku na lód, ani nie
nalewaj do niego oleju. Pojemnik na lód może Dźwignia pęknąć.
Jonizator "PLASMACLUSTER" (Tylko dla modeli SJ-P68M, P63M, P58M)
Jonizator "PLASMACLUSTER" włącza się automatycznie gdy włączysz zasilanie lodówki.
1.Naciśnij przycisk PLASMACLUSTER (włączania/wyłączania), a lampka kontrolna PLASMACLUSTER gaśnie, i panel plazmatyczny się wyłączy.
2.Ponownie naciśnij przycisk PLASMACLUSTER (włączania/ wyłączania), a lampka kontrolna PLASMACLUSTER zapali się. Włączy się panel plazmatyczny.
Przycisk PLASMACLUSTER (włączania/wyłączania)
Plasmacluster |
Uwagi o działaniu Jonizator "PLASMACLUSTER"
Jonizator wewnątrz lodówki wyzwala wiązki jonłow, będących strumieniami jonów dodatnich i ujemnych, dostających się do komór lodówki i zamrażarki. Jony redukują zawarte w powietrzu zarodniki pleśni.
pleśń
•W zamrażarce może być wyczuwalny lekki zapach. Jest to zapach ozonu wytwarzanego przez jonizator. Ilość ozonu jest minimalna i szybko rozkłada się on w zamrażarce.
ENGLISH POLSKI MAGYAR ROMÂNĂ ČESKY SLOVENSKY
URZĄDZENIE DEZODORYZUJĄCE
Urządzenie to nie wymaga ręcznej regulacji, ponieważ włącza się automatycznie z chwilą podłączenia lodówki do sieci.
ODMRAŻANIE
Odmrażanie lodówki odbywa się automatycznie dzięki unikalnemu systemowi oszczędności energii. Długość cyklu od odmrażania do odmrażania jest proporcjonalny do długości pracy kompresora lodówki, tj. im krócej działa kompresor (zimą, lub gdy wyłączasz lodówkę przed wyjazdem na wakacje), tym rzadziej lodówka się odmraża.
9
Loading...