


sharp operation manual
 >>
>>

sharp operation manual |
|
|
|
>> |
Contents |
|
|
<< |
1. Part Names |
5. Enjoying Photo/Music/Video Playback |
9. Appendix |
|
|||
|
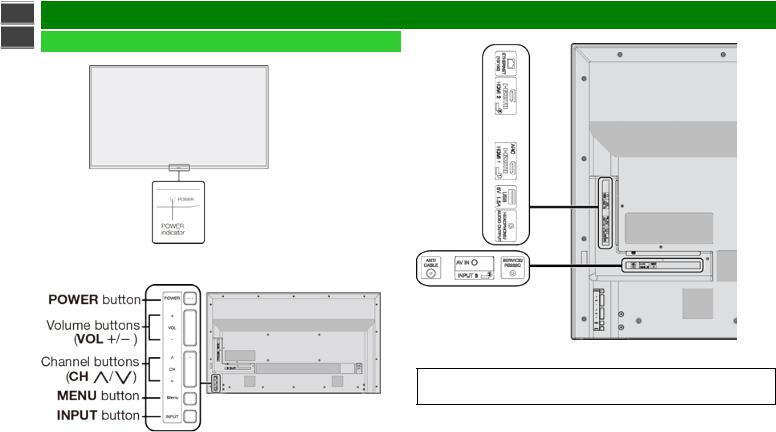
1-1. TV (4T-B60CJ1U/4T-B70CJ1U/4T-B80CJ1U) |
5-1. Preparation |
9-1. Setting the TV on the Wall |
|
1-2. Remote Control Unit |
5-2. Selecting the Folders to Play Back |
9-2. Troubleshooting |
|
2. Introduction |
5-4. Playing Back Files on a USB Memory Device/ |
10. Specifications |
|
Home Network Server |
||
|
2-1. Displaying an External Equipment Image |
6. Using LINK Operation |
10-1. TV (4T-B60CJ1U/4T-B70CJ1U/4T-B80CJ1U) |
|
2-2. Initial Installation |
10-2. Wireless LAN |
|
|
3. Direct Button Operation |
6-1. Controlling HDMI Equipment Using LINK Operation |
11. Trademarks |
|
6-3. Link Operation Menu |
||
|
3-1. Changing Channels |
7. Using a PC |
12. Dimensional Drawings |
|
3-2. Changing Volume |
||
|
3-3. MUTE |
7-1. Control of the TV |
13. Software License |
|
3-4. APPS |
7-7. PC Compatibility Chart/AV Compatibility Chart |
|
|
3-5. MPX |
8. Using the Internet |
|
|
3-6. Sleep Timer |
|
|
|
4. On-Screen Display Menu |
8-1. Connecting to the Internet |
|
|
8-2. Entering Text (Software Keyboard) |
|
|
|
4-1. Introduction |
8-4. Using the Browser |
|
|
4-3. On-Screen Display Menu Operation |
8-8. Using Keyboard and Mouse |
|
|
4-4. Menu Operation Buttons |
|
|
|
4-5. Initial Setup |
|
|
|
4-13. Information |
|
|
|
4-16. Picture Settings |
|
|
|
4-19. Audio Settings |
|
|
|
4-20. Network Settings |
|
|
|
4-22. System Options |
|
|
ENG Contents
sharp operation manual |
|
|
>> |
Part Names |
|
<< |
TV (4T-B60CJ1U/4T-B70CJ1U/4T-B80CJ1U) |
(Rear) |
|
||
|
(Front) |
|
*1 See page 4-26.
(Side)
 The illustrations and on-screen displays in this operation manual are for explanation purposes and may vary slightly from the actual operations.
 The examples used throughout this manual are based on the 4T-B60CJ1U model.
* See pages 2-1 and 4-4 for button operations.
ENG 1-1
sharp operation manual |
|
>> |
Part Names |
<< |
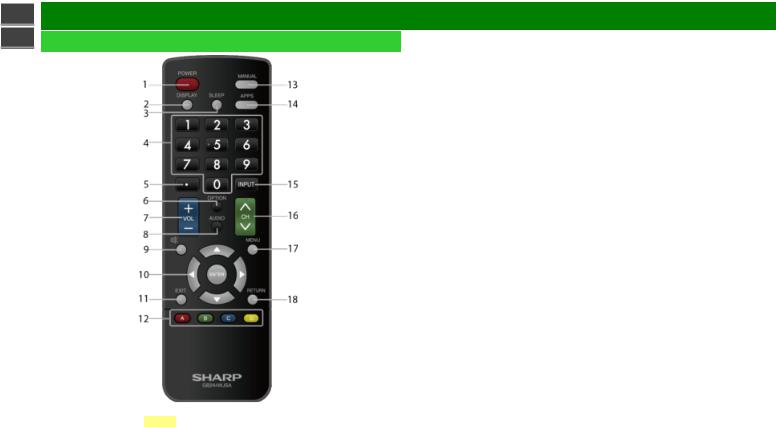
Remote Control Unit |
|
|
1 POWER: Switch the TV power on or enter standby. 2 DISPLAY: Display the channel information.
3 SLEEP: Set the sleep timer (See page 3-6.)
4 0–9: Set the channel. (See pages 3-1.)
5 • (DOT): Set the channel. (See pages 3-1.)
6 OPTION: Display the Link Operation Menu screen. This button will function only when LINK Operation is used.
(See page 6-1 to 6-4.)
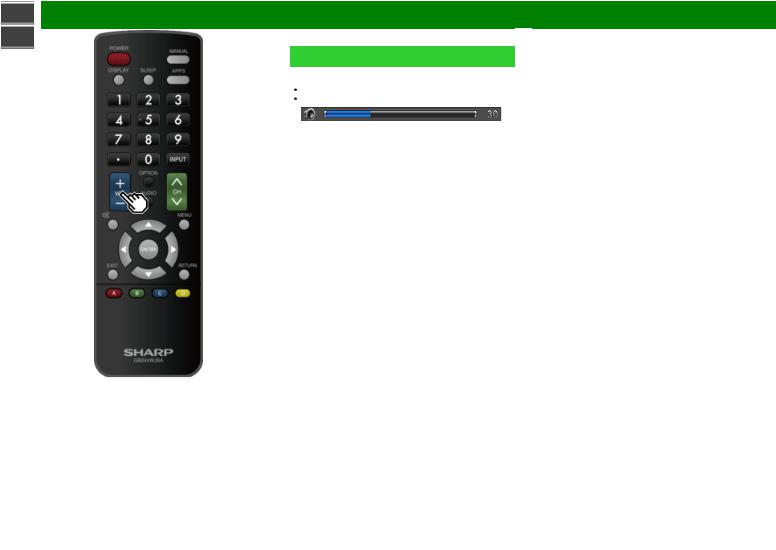
7 VOL+/-: Set the volume. (See page 3-2.)
8 AUDIO: Select the MTS/SAP or the audio mode during multichannel audio broadcast. (See page 3-5.)
9 MUTE: Mute the sound. (See page 3-3.)
10  /
/ /
/ /
/ ,
,  (ENTER): Select a desired item on the screen. 11 EXIT: Turn off the menu screen.
12 A/B/C/D: Select 4 preset favorite channels in 4 different categories. (See page 4-6.)
13 MANUAL: Display the operation manual. (See page 4-15.)
14 APPS: Display the application window. (See page 3-4.)
15 INPUT: Select a TV input source. (See page 2-1.)
16 CH: Select the channel. (See page 3-1.)
17 MENU: Display the menu screen. (See page 4-1.)
18 RETURN: Return to previous menu screen.
NOTE
 When using the remote control unit, point it at the TV.
ENG 1-2
sharp operation manual |
|
>> |
Introduction |
<< |
|
|
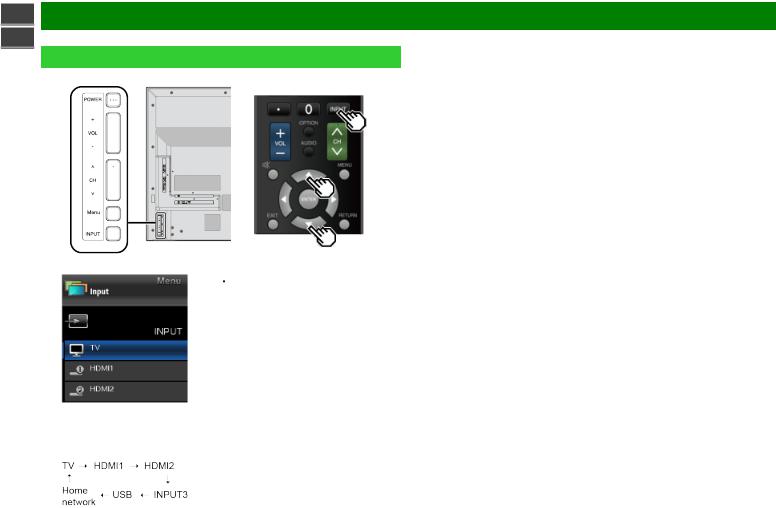
Displaying an External Equipment Image |
To view external source images, select the input source by pressing INPUT on the remote control unit or on the TV.
Example |
1 Press INPUT. |
|
The INPUT list screen displays. |
2 Press  /
/ to select the input source.
  An image from the selected source automatically displays.
 You can also select the input source by pressing INPUT.
 Each time INPUT is pressed, the input source toggles.
ENG 2-1
sharp operation manual |
|
>> |
Introduction |
<< |
|
|
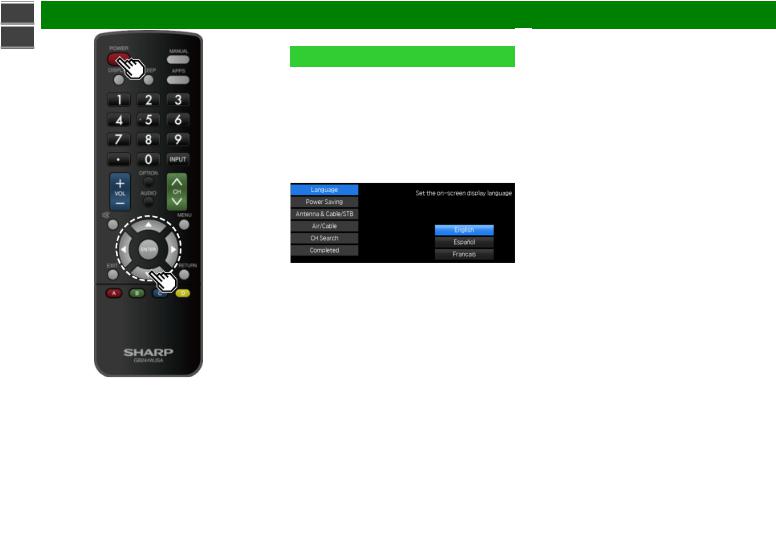
Initial Installation |
Perform the following steps before you press POWER on the remote control unit.
1. Insert the batteries into the remote control unit.
2. Connect the antenna cable to the TV. 3. Plug in the AC cord to the AC outlet.
Language (Language setting)
Select from among 3 languages: English, French and Spanish.
1 Press  /
/ to select the desired language listed on the screen, and then press ENTER.
ENG 2-2
sharp operation manual |
|
>> |
Introduction |
<< |
Initial Installation (Continue) |
|
|
|
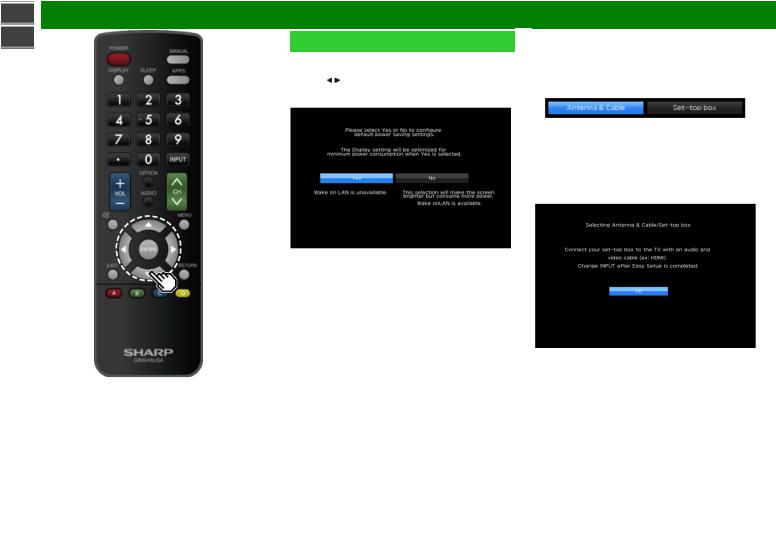
Power Saving |
|
Select "Yes" or "No" to configure default Display settings. |
|
2 Press / to select "Yes" or "No". |
|
Press ENTER to enter the setting. |
Antenna & Cable/STB
Select the type of connection you will use to watch TV.
3 Press / to select "Antenna & Cable" or "Set-top box", and then press ENTER.
Yes: AV MODE is set to "STANDARD".
No: AV MODE is set to "DYNAMIC (Fixed)". Picture Reset can be set.
Picture Reset: AV MODE will be set to "DYNAMIC (Fixed)" regardless of whether Picture Reset is "On" or "Off".
 If you select "On" and there is no operation for 30 minutes:
- AV MODE will be reset to "DYNAMIC (Fixed)".
 When "Off" is selected:
- Even after 30 minutes elapses, AV MODE is not reset to "DYNAMIC (Fixed)".
To watch TV via an antenna or cable connection (without using a set-top box):
Select "Antenna & Cable", and then go to step 4. To watch TV via set-top box:
 Select "Set-top box" and then press ENTER.
 Check that the set-top box connected to the TV is on.
ENG 2-3
sharp operation manual |
|
>> |
Introduction |
<< |
|
|
Initial Installation (Continue) |
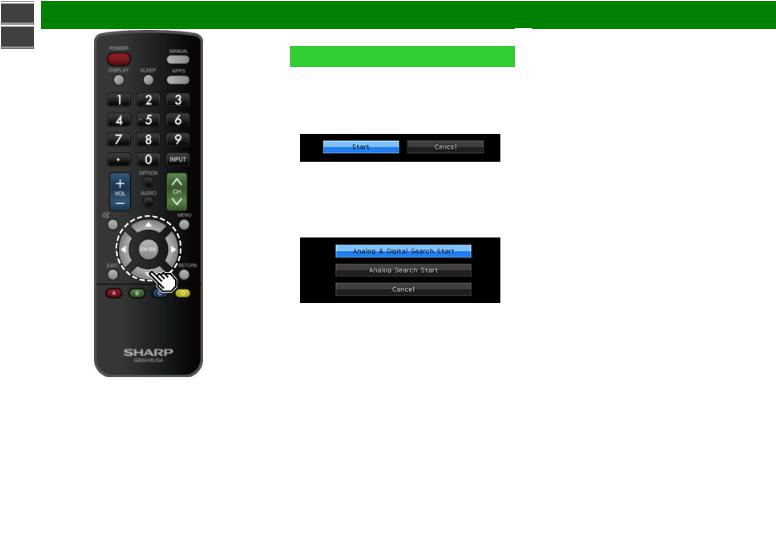
CH Search (Channel search)
Channel auto search makes the TV look for all channels viewable in the set area.
4 When "Air" is selected in Antenna setting:
Press  /
/ to select "Start", and then press ENTER.
When "Cable" is selected in Antenna setting:
Press  /
/ to select "Analog & Digital Search Start" to search both analog and digital broadcasts, or to select "Analog Search Start" to search only analog broadcasts, and then press ENTER.
 The Channel search will start automatically.
 To exit the Channel search screen, select "Cancel", and then press ENTER.
ENG 2-4
sharp operation manual |
|
>> |
Introduction |
<< |
Initial Installation (Continue) |
|
|
|
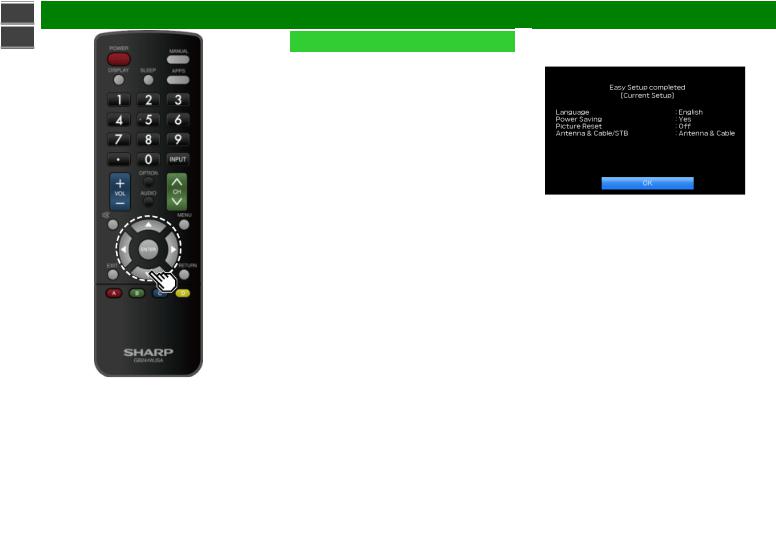
Completed |
|
5 The settings confirmation screen is displayed. Confirm |
|
the information displayed on the screen, and then press |
|
ENTER. |
Examples of the settings confirmation screen When "Antenna & Cable" was selected in step 3.
ENG 2-5
sharp operation manual |
|
>> |
Introduction |
<< |
|
|
Initial Installation (Continue) |
|
NOTE |
|
If no channel is found, confirm the type of connection |
|
made with your TV and try "Easy Setup" again. |
|
(See page 4-5.) |
|
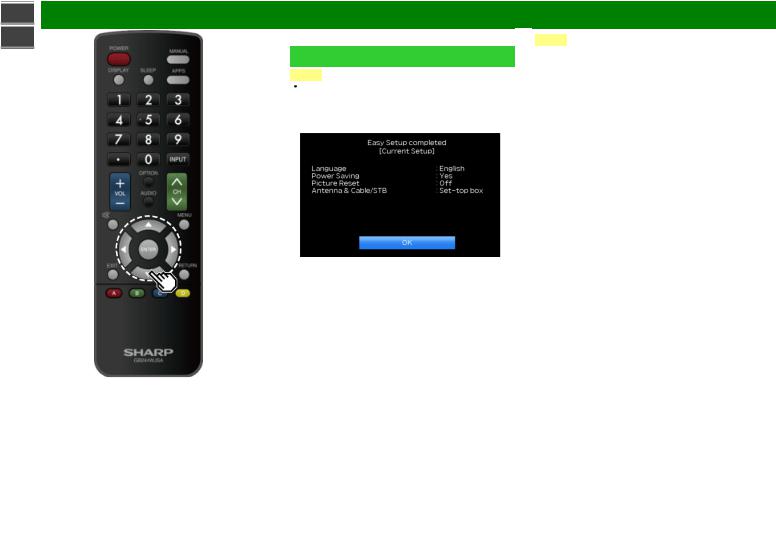
When "Set-top box" was selected in step 3. |
 Click "OK" to display the confirmation screen for input source switching.
Show the input list: You can check the current connection status of external equipment. Confirm which input terminal is connected to the set-top box.
OK: Clicking "OK" will complete the Easy Setup procedure.
NOTE
 For changing the settings of the Initial Installation, perform "Easy Setup" on the Initial Setup menu on
page 4-5.
ENG 2-6
sharp operation manual |
|
>> |
Direct Button Operation |
<< |
|
|
Changing Channels |
|
You can change channels in several ways. |
|
Method 1 |
|
Using CH / on the remote control unit or on the TV. |
|
Method 2 |
|
Using remote control buttons 0-9, • (DOT). |
|
Examples: |
|
To select a 1 or 2-digit channel number (e. g., Channel |
|
5): |
|
Press 5 ENTER |
|
To select a 3-digit channel number (e. g., Channel |
|
115): |
|
Press 1 1 5 ENTER |
|
To select a 4-digit channel number (e. g., Channel |
|
22.1): |
|
Press 2 2 • (DOT) 1 ENTER |
NOTE
 When selecting a 1-digit channel number, it is not necessary to press 0 before the number.
 When you enter 0-9 only, channel selection will be made if there is no operation within a few seconds.
 if you push "0" by itself, nothing will happen.
 Complete the above steps within a few seconds.
 When you enter 0-9 and • (DOT), channel selection will be made if there is no operation within a few seconds.
ENG 3-1
sharp operation manual |
|
>> |
Direct Button Operation |
<< |
|
|
Changing Volume |
|
You can change the volume by pressing VOL+/- on the TV |
|
or on the remote control unit. |
|
To increase the volume, press VOL +. |
|
To decrease the volume, press VOL -. |
Audio status
Output device |
Audio Output Select |
||
Audio Out |
Headphone |
||
|
|||
TV Speaker |
Variable Sound |
Mute |
|
|
|
|
|
AUDIO OUT / |
Fixed Sound |
Variable Sound |
|
HEADPHONE |
(Volume MAX) |
||
|
|||
|
|
|
|
ENG 3-2
sharp operation manual |
|
>> |
Direct Button Operation |
<< |
MUTE |
|
|
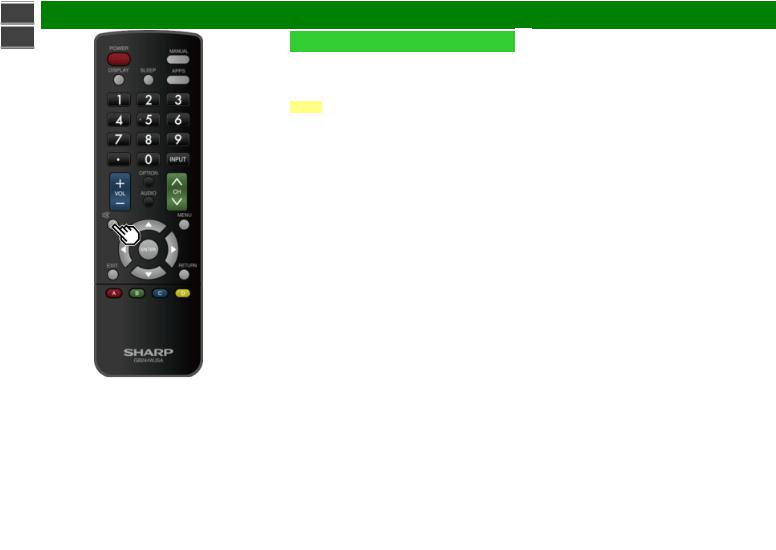
Mutes the current sound output. Press  (MUTE).
 "
" " will be displayed on the screen for 30 minutes, and the sound is silenced.
NOTE
 Mute can be cancelled by pressing VOL+/- or MUTE.
ENG 3-3
sharp operation manual |
|
>> |
Direct Button Operation |
<< |
|
|
APPS |
Allows you to directly activate various types of applications.
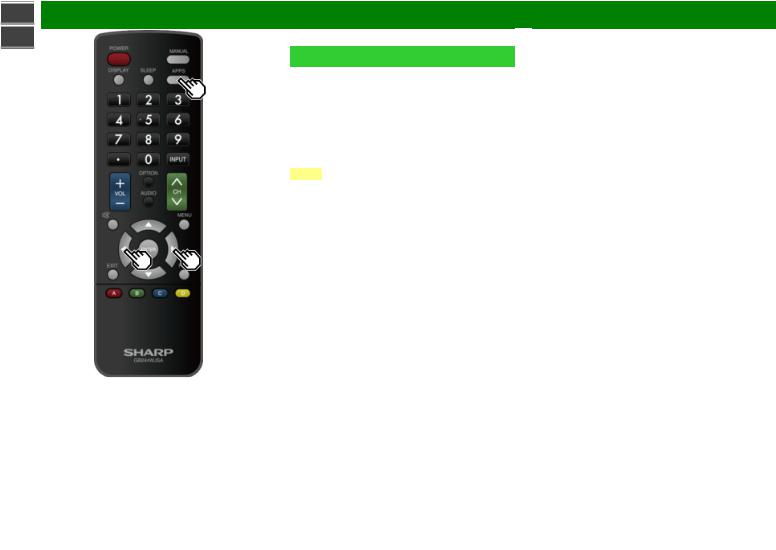
1 Press APPS to display the application window.
 Press APPS again to switch back to the currently select input.
2 Press  /
/ to select the desired application, and then press ENTER.
 If "
If " " is displayed, check the USB connection.
 If "
If " " is displayed, check your Monitor’s network settings and connection.
NOTE
 See page 5-2, 8-4 to 8-7 for details of viewable applications.
 When this function is not available, "Can not operate this function now" will display.
ENG 3-4

sharp operation manual |
|
>> |
Direct Button Operation |
<< |
|
|
MPX |
Switching the digital audio format (DTV only)
If multi sound modes are received, each time you press AUDIO (MPX) the mode switches.
NOTE
 The sound mode screen disappears in three seconds.
 Selectable items vary depending on the received broadcasts.
 The audio description sound is selected depending on the main audio.
Switching the analog audio format
You can switch between multiple audio modes when watching a multiple audio or stereo broadcast program.
When receiving a stereo signal
Each time you press AUDIO (MPX) , the mode switches between Stereo and Mono.
When receiving a Stereo + SAP signal
Each time you press AUDIO (MPX), the mode switches among SAP, Mono and Stereo.
When receiving a monaural signal
When you press AUDIO (MPX), “Mono” displays.
When receiving a monaural signal + SAP signal
Each time you press AUDIO (MPX), the mode switches between Mono and SAP.
When receiving a bilingual signal
Each time you press AUDIO (MPX) , the mode switches among Dual I and Dual II.
ENG 3-5
sharp operation manual |
|
>> |
Direct Button Operation |
<< |
|
|
Sleep Timer |
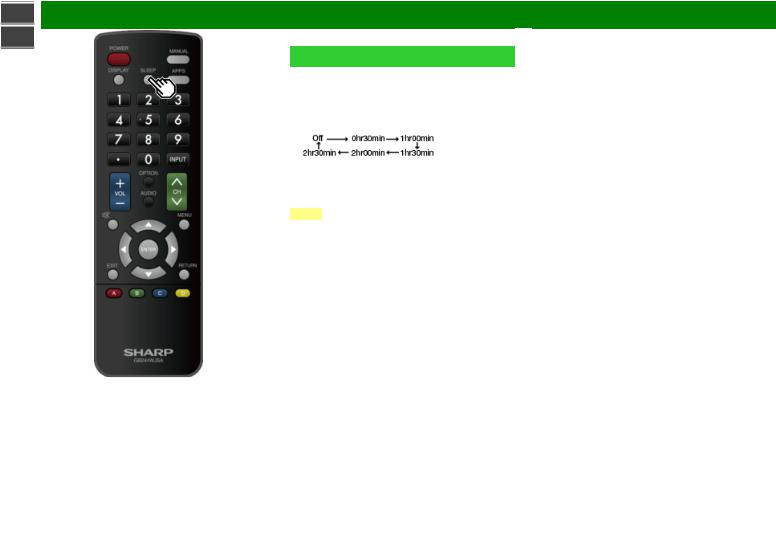
Allows you to set a time when the TV automatically switches to standby.
Press SLEEP.
 The remaining time displays when the sleep timer has been set.
 Each time you press SLEEP, the remaining time switches as shown below.
 When set, the time automatically starts counting down.
 If you want to adjust the sleep timer, you can press SLEEP twice then change the time setting.
 When it is 5 minutes before the time expires, the remaining time will start to keep appearing every minute.
NOTE
 Select "Off" by pressing SLEEP to cancel the sleep timer.
  The TV will enter standby when the remaining time reaches 0.
ENG 3-6
sharp operation manual |
|
>> |
On-Screen Display Menu |
<< |
Introduction |
|
|
 LCFONT embedded
 Guide display
 This indicates the buttons that can be operated on the displayed screen. The guide display varies depending on the menu setting screen.
 The operations for some selected items may be displayed in the operational guide bar at the bottom of the screen.
 Item displayed in blue
 This indicates the item currently selected.
 Press ENTER to go to the adjustment screen for this item.
 Item in brackets
 This indicates the current setting for the item.
 Item displayed in white
 This indicates that the item can be selected.
 Item displayed in gray
 This indicates that the item cannot be selected. There are various reasons why the items cannot be selected, but the main reasons are as follows:
—Nothing is connected to the selected input terminal.
—The function is not compatible with the current input signal.
—When this conflicts with other functions, you must change the settings for the other functions.
ENG 4-1
sharp operation manual |
|
>> |
On-Screen Display Menu |
<< |
Introduction (Continue) |
|
|
|
About Menu Items |
|
Some menu items may not be displayed depending on the |
|
selected input source. |
|
NOTE |
|
The screens in the operation manual are for explanation |
|
purposes (some are enlarged, others cropped) and may |
|
vary slightly from the actual screens. |
|
The order of explanations for each menu item in the |
|
following pages is not necessarily in accordance with the |
|
alignment of the items on the screen. |
|
LCFONT: |
|
This product is embedded with LC Font technology, which |
|
was developed by SHARP Corporation for clearly |
|
displaying easy-to-read characters on LCD screens. |
ENG 4-2
sharp operation manual |
|
>> |
On-Screen Display Menu |
<< |
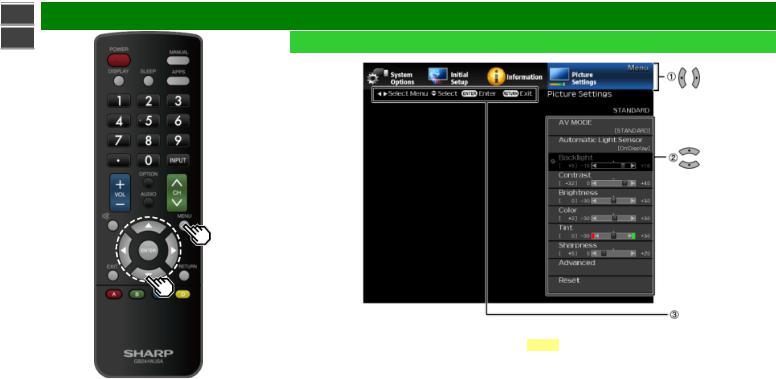
On-Screen Display Menu Operation |
|
|
|
Example |
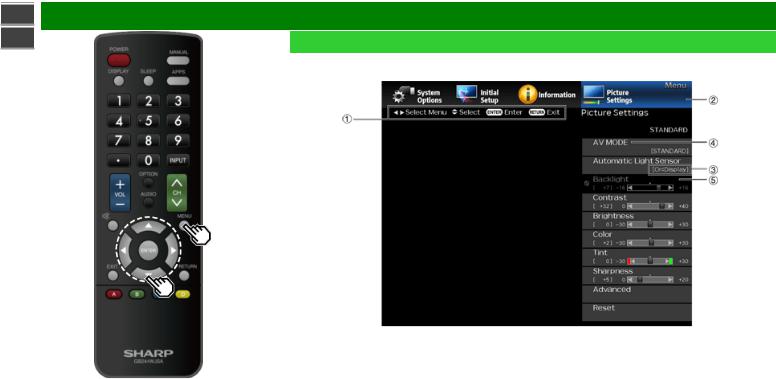
1 Press MENU to display the MENU screen.
2 Press
Press  /
/ to select the desired menu.
 Press
Press  /
/ to select a specific adjustment item, and then press ENTER.
 Additional related adjustment items may be displayed. Press
  /
/ to select the desired item.
 Adjust the item while referring to the guide display.
 Operations vary depending on the function or item. Refer to the guide display corresponding to the menu setting screen for button operations.
3 Press MENU to exit.
NOTE
 Menu options differ in the selected input modes, but the operating procedures are the same.
ENG 4-3
sharp operation manual |
|
>> |
On-Screen Display Menu |
<< |
Menu Operation Buttons |
|
|
|
Using the remote control |
|
Use the following buttons on the remote control to operate |
|
the menu. |
|
MENU: Press to open or close the menu screen. |
|
/ / / : Press to select a desired item on the screen or |
|
adjust a selected item. |
|
ENTER: Press to go to the next step or complete the |
|
setting. |
|
RETURN: Press to return to the previous step. |
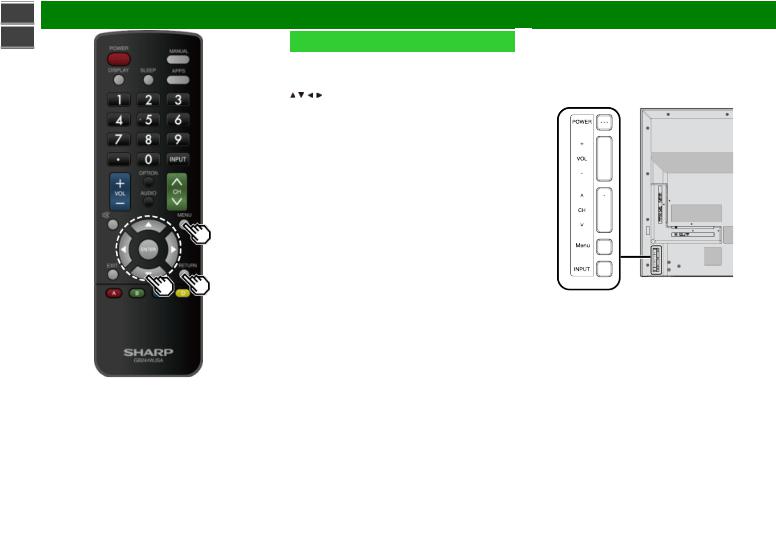
Using the control panel of the TV
You can also operate the menu with the control panel of the TV.
Button operations on the control panel correspond to the ones on the remote control as shown below.
MENU: MENU on the remote control.
INPUT: ENTER on the remote control.
CH /
/ : Cursor
  /
/ on the remote control.
VOL+/-: Cursor  /
/ on the remote control.
ENG 4-4
sharp operation manual |
|
|
>> |
On-Screen Display Menu |
|
<< |
Example |
Initial Setup |
|
||
|
NOTE |
|
|
|
|
 For operating the on-screen display menu, see page 4-3.
Easy Setup
You can change the settings of the Initial Installation.
Language: Select from among 3 languages (English, French and Spanish).
Power Saving: Select "Yes" or "No" to configure default Display settings.
Yes: AV MODE is set to "STANDARD".
No: AV MODE is set to "DYNAMIC (Fixed)". Picture Reset can be set.
Picture Reset: AV MODE will be set to "DYNAMIC (Fixed)" regardless of whether Picture Reset is "On" or "Off". If you select "On", AV MODE will be reset to "DYNAMIC (Fixed)" if there is no operation for 30 minutes. When "Off" is selected, even after 30 minutes elapses, AV MODE is not reset to "DYNAMIC (Fixed)".
Antenna & Cable/STB: Select the type of connection you will use to watch TV.
Air/Cable: Make sure what kind of connection is made with your TV when selecting "Air" or "Cable".
CH Search: Channel auto search makes the TV look for all channels viewable in the set area.
Completed: The settings confirmation screen is displayed. Confirm the information displayed on the screen.
NOTE
 See Initial Installation on
pages 2-2 to 2-6 for setting each item.
 If no channel is found, confirm the type of connection made with your TV and try "Easy Setup" again.
 If you select "Analog Search Start" and initiate the channel search, the CH Memory for Cable Digital will be deleted.
Language
You can also select a language from the Initial Setup menu. Select from among 3 languages: English, French and Spanish.
NOTE
 To change the language of the manual, select "MENU" > "Initial Setup" > "Language" to change the language. Then, press MANUAL again.
TV Channel Setup
Channel Setup
If Initial Installation does not memorize all the channels in your region, follow the instructions below to manually memorize the channels.
Air/Cable: Make sure what kind of connection is made with your TV when selecting "Air" or "Cable".
CH Search: Channel auto search makes the TV look for all channels viewable in the set area.
CH Memory: You can select the channels to skip in each ANALOG (Air), ANALOG (Cable), DIGITAL (Air) and DIGITAL (Cable).
On: Skips channels. (Channel selection disabled using CH  /
/ .)
.)
Off: Does not skip channels. (Channel selection enabled using CH /
/ .)
.)
NOTE
 See Initial Installation on
pages 2-2 to 2-6 for setting each item.
 If no channel is found, confirm the type of connection made with your TV and try channel search again.
 If you select "Analog Search Start" and initiate the channel search, the CH Memory for Cable Digital will be deleted.
ENG 4-5
sharp operation manual |
|
|
>> |
On-Screen Display Menu |
|
<< |
Example |
Initial Setup (Continue) |
|
||
|
|
|
|
|
TV Channel Setup |
|
|
Favorite CH (Favorite Channel Setting) |
|
|
This function allows you to program 4 favorite channels, in 4 |
|
|
different categories. By setting the favorite channels in |
|
|
advance, you can select your favorite channels easily. |
|
|
To register your favorite channel: |
|
|
Select "Register" and then press ENTER. Press / / / to |
|
|
select the position in the category, and then press ENTER |
|
|
to register. |
|
|
To delete your favorite channel: |
|
|
Select "1 Data Clear" and then press ENTER. Press / / / |
|
|
to select the channel you want to delete, and then |
|
|
press ENTER. Select "Yes" and then press ENTER. |
|
|
To delete all the favorite channels, select "All Data Clear". |
|
|
NOTE |
|
|
Before setting the channel, select the channel you want |
|
|
to register as a favorite channel. |
|
|
You can display the "Favorite CH" screen by pressing |
|
|
FAV CH on the remote control. |
Antenna Setup-DIGITAL
In order to receive digital air broadcasts, you need a digital broadcast antenna. You can confirm the antenna configuration through the "Antenna Setup-DIGITAL" screen. If necessary, adjust the direction of the antenna to obtain the maximum signal strength.
Signal Strength: The signal strength of DIGITAL channel is displayed. The signal information is based on the current channel.
Channel Strength: Input the 2-digit channel number to check the signal strength of the selected channel. Make sure the signal is strong enough for each channel.
 This function is available for DIGITAL (Air) only.
ENG 4-6
sharp operation manual |
|
|
>> |
On-Screen Display Menu |
|
<< |
Example |
Initial Setup (Continue) |
|
||
|
|
|
|
|
Individual Setup |
|
|
Secret No. |
|
|
Allows you to use a secret number to protect certain |
|
|
settings from being accidentally changed. |
IMPORTANT:
Three conditions must be met to enable the V-Chip 1. Secret No. is registered.
2. V-Chip/V-Chip (DTV Only) settings have been made.
 The "V-Chip (DTV Only)" will only be selectable when a new rating system can be downloaded via digital broadcasting in the U.S.
3. "Status" is set to "Enable".
Setting Secret No.
You can set and change the secret number by using 0-9. New Secret No.: Changes or sets the Secret No. Confirm Secret No: Enter Secret No. to confirm.
NOTE
 As a precautionary measure, make a note of your secret number and keep it in a familiar place.
Parental Control
(Parental Control Setting)
V-Chip
V-CHIP is an electronic filtering device built into your TV. This tool gives parents a great degree of control over broadcasts accessed by their children. It allows parents to select programs judged suitable for child viewing while blocking ones judged not suitable. It does so automatically once you activate the V-CHIP feature in your TV. "V-Chip" and "Status" will not be selectable from the menu if you do not first configure your secret number.
 The U.S. has two rating systems for viewing content: TV Parental Guidelines and movie ratings.
 The TV Parental Guidelines work in conjunction with the V-CHIP to help parents screen out inappropriate television shows from their children.
 Movie ratings are used for original movies rated by the Motion Picture Association of America (MPAA) as watched on cable TV and not edited for television. The V-CHIP can also be set to block MPAA-rated movies.
NOTE
 The setting automatically enters "Block" for any ratings below your selection.
 If Status is not set to "Enable", the configuration settings will not work.
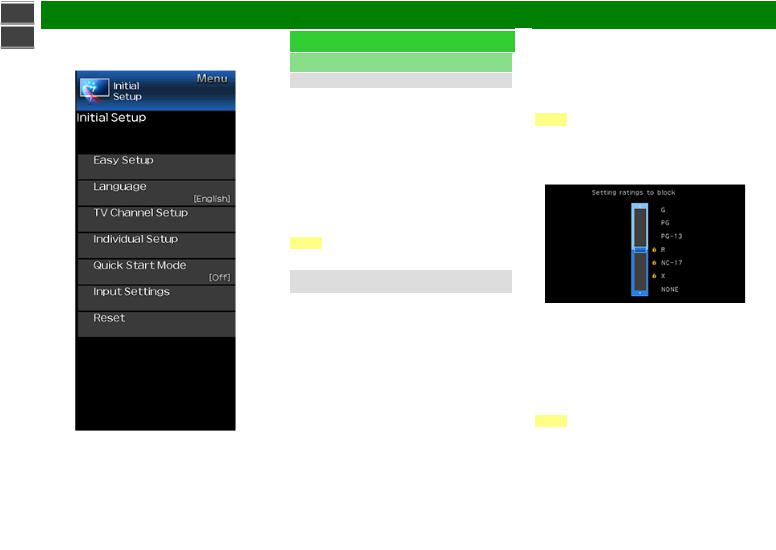
MPAA (Voluntary movie rating system) Example
Press  /
/ to adjust the item to your desired position. "
 " indicates the item is blocked. Press MENU to exit. G: General audiences. All ages admitted.
PG: Parental guidance suggested. Some material may not be suitable for children.
PG-13: Parents strongly cautioned. Some material may be inappropriate for children under 13.
R: Restricted. Under 17 requires accompanying parent or adult guardian (age varies in some jurisdictions).
NC-17: No one 17 and under admitted.
X: X is an older rating that is unified with NC-17 but may be encoded in the data of older movies.
NOTE
 Voluntary movie rating system only uses an age-based rating.
ENG 4-7
sharp operation manual |
|
|
>> |
On-Screen Display Menu |
|
<< |
Example |
Initial Setup (Continue) |
|
||
|
|
|
|
|
Individual Setup |
|
|
Parental Control |
|
|
(Parental Control Setting) |
|
|
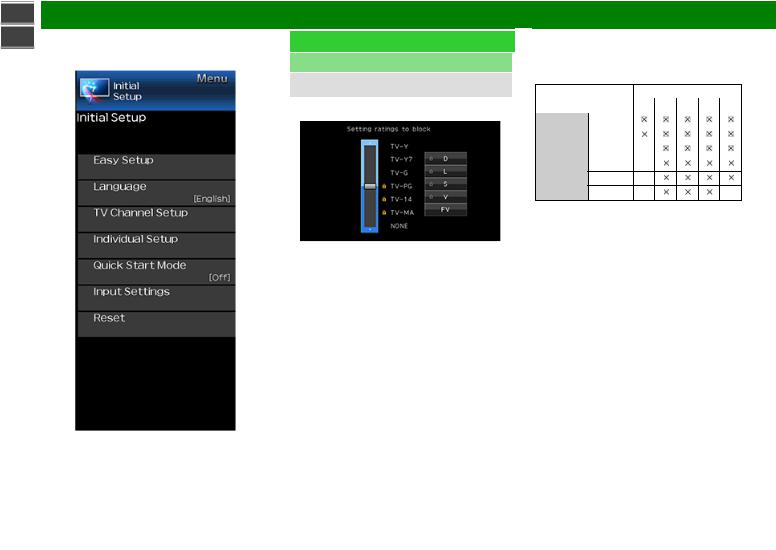
TV Parental Guidelines |
|
|
Example |
Suggested age TV-Y: All children.
TV-Y7: Directed to older children. TV-G: General audience.
TV-PG: Parental Guidance suggested. TV-14: Parents strongly cautioned. TV-MA: Mature audience only.
When setting an individual content-based rating item:
1 Press  or ENTER to access blocked content items from the currently selected age-based rating item.
2 Press  /
/ to select an individual item, and then press ENTER to unblock it ("
 " is removed). Repeat the same steps for the other items.
3 Press  or RETURN to register after all individual content rating items are set.
Content
FV: Fantasy violence.
V: Violence.
S: Sexual situation.
L: Adult language.
D: Sexually suggestive dialog.
|
Rating |
|
Content |
|
|
|
|
FV V |
S |
L |
D |
||
|
|
|
||||
|
|
TV-Y |
|
|
|
|
|
|
|
|
|
|
|
|
|
TV-Y7 |
|
|
|
|
|
|
|
|
|
|
|
Suggested TV-G |
|
|
|
|
||
age |
|
TV-PG |
|
|
|
|
|
|
|
|
|
|
|
TV-14
TV-MA
 : The content rating can be set, but this rating is not normally broadcast by TV stations.
 : Content rating can be set.
Canadian Rating Systems (Canadian English ratings and Canadian French ratings)
 The TV rating systems in Canada are based on the Canadian Radio-Television and Telecommunications Commission (CRTC) policy on violence in television programming.
 While violence is the most important content element to be rated, the structure developed takes into consideration other program content like language, nudity, sexuality and mature themes.
 When setting the V-CHIP on the Canadian system you can choose either the Canadian English ratings or the Canadian French ratings.
ENG 4-8

sharp operation manual |
|
|
>> |
On-Screen Display Menu |
|
<< |
Example |
Initial Setup (Continue) |
|
||
|
|
|
|
|
Individual Setup |
|
|
Parental Control |
|
|
(Parental Control Setting) |
|
|
Canadian English Ratings |
|
|
E: Exempt: Includes news, sports, documentaries and |
|
|
other information programming; talk shows, music |
|
|
videos, and variety programming. |
|
|
C: Children: Intended for younger children under the age of |
|
|
8 years. Pays careful attention to themes that could |
|
|
threaten their sense of security and well-being. |
|
|
C8+: Children over 8 years old: Contains no portrayal of |
|
|
violence as the preferred, acceptable, or only way to |
|
|
resolve conflict; nor encourage children to imitate |
|
|
dangerous acts which they may see on the screen. |
|
|
G: General: Considered acceptable for all age groups. |
|
|
Appropriate viewing for the entire family, contains very |
|
|
little violence, physical, verbal or emotional. |
|
|
PG: Parental Guidance: Intended for a general audience, |
|
|
but may not be suitable for younger children (under the |
|
|
age of 8) because it could contain controversial themes |
|
|
or issues. |
|
|
14+: Over 14 years: Could contain themes where violence |
|
|
is one of the dominant elements of the storyline, but it |
|
|
must be integral to the development of plot or character. |
|
|
Language usage could be profane and nudity present |
|
|
within the context of the theme. |
|
|
18+: Adults: Intended for viewers 18 years and older and |
|
|
might contain depictions of violence, which while related |
|
|
to the development of plot, character or themes, are |
|
|
intended for adult viewing. Could contain graphic |
|
|
language and portrayals of sex and nudity. |
Canadian French Ratings E: Exempt programming.
G: General: All ages and children, contains minimal direct violence, but may be integrated into the plot in a humorous or unrealistic manner.
8ans+: General but inadvisable for young children: May be viewed by a wide public audience, but could contain scenes disturbing to children under 8 who cannot distinguish between imaginary and real situations.
Recommended for viewing with parent.
13ans+: Over 13 years: Could contain scenes of frequent violent scenes and therefore recommended for viewing with parent.
16ans+: Over 16 years: Could contain frequent violent scenes and intense violence.
18ans+: Over 18 years: Only for adult viewing. Could contain frequent violent scenes and extreme violence.
How to temporarily release the V-CHIP BLOCK
When the V-CHIP BLOCK is working and censors a broadcast, "V-CHIP HAS BEEN ACTIVATED." displays.
1 Press ENTER while the V-CHIP is working, and then the secret number setting menu displays.
2 Input the 4-digit secret number by using 0–9 . At this time V-CHIP BLOCK temporarily releases.
ENG 4-9
sharp operation manual |
|
|
>> |
On-Screen Display Menu |
|
<< |
Example |
Initial Setup (Continue) |
|
||
|
|
|
|
|
Individual setip |
|
|
Parental Control |
|
|
(Parental Control Setting) |
Reactivating the temporary released V-CHIP BLOCK
You can reactivate the temporarily released V_CHIP BLOCK as shown below.
 Select "Status" setting from the Parental Control menu to reactivate BLOCK.
 Select "V_Chip" setting ("MPAA", "TV Guidelines", "Can. English Ratings" or "Can. French Ratings") from the Parental Control to reactivate BLOCK.
(See pages 4-7 to 4-9)
 Switch off the TV power. (When "Quick Start Mode" is "OFF".)
NOTE
 Performing any of the three above will activate the V- CHIP BLOCK.
Status
Used to enable or disable the parental control function. This function will not be selectable from the menu if you do not first configure your secret number.
Quick Start Mode
When this function is activated, you can reduce the Monitor's start-up time or even let the TV in standby mode start displaying images and so on via the connected equipment on the network.
NOTE
 Setting "Quick Start Mode" to "On" consumes more power.
ENG 4-10

sharp operation manual |
|
|
>> |
On-Screen Display Menu |
|
<< |
Example |
Initial Setup (Continue) |
|
||
|
|
|
|
|
Input Settings |
|
|
HDMI auto view |
|
|
When you view images sent from external equipment in an |
|
|
HDMI connection, this function allows the image size on the |
|
|
TV to automatically switch to an appropriate one. |
|
|
NOTE |
|
|
Refer to your external equipment operation manual for the |
|
|
signal type. |
|
|
HDMI type selection |
|
|
Sets the HDMI type for HDMI INPUT 1 and 2 terminals. Set |
|
|
to "Full" when a HDMI 4K60P 4:4:4 device is connected, |
|
|
and data to "Limited" when an HDMI 4:2:0 device is |
|
|
connected. |
|
|
Digital Audio Output |
|
|
You can output digital audio to an AV amplifier or similar |
|
|
device whose DIGITAL AUDIO INPUT terminal is connected |
|
|
to the DIGITAL AUDIO OUT terminal on the TV. Please |
|
|
select an audio output format compatible with the audio |
|
|
format of the program you are watching and the equipment |
|
|
connected. |
|
|
PCM: For connecting to equipment that does not support |
|
|
Dolby Digital. The same audio (main, sub, or main/sub) |
|
|
as the audio of the program being viewed is output. |
|
|
2-channel audio with a sampling rate of 48 kHz or less is |
|
|
output as linear PCM audio. |
|
|
Bitstream: For connecting to an audio system that |
|
|
supports Dolby Digital. Audio is output through both the |
|
|
main and sub channels. |
|
|
NOTE |
|
|
Video input audio are output in PCM mode even when |
|
|
"Bitstream" is selected. |
|
|
PCM digital input signals are output in PCM mode even |
|
|
when "Bitstream" is selected. |
Audio Output Select
You can select which device is used for outputting audio. Headphone: Output audio through headphones. Audio out: Output audio through an external AMP.
NOTE
 If you select "Headphone" when a cable is inserted in the AUDIO OUT terminal, the TV speakers are muted and all Audio menu items cannot be adjusted except for Balance.
 If you select "Audio out", sound via the AUDIO OUT terminal is not adjustable and constantly outputs.
CAUTION
 AUDIO OUT terminal is also used for headphones. Reduce the volume before using headphones. Overwhelming sound may damage your hearing.
Input Skip
This setting allows you to skip the TV, HDMI1, HDMI2 or Input3 on the Input Selection operation.
ENG 4-11

sharp operation manual |
|
|
>> |
On-Screen Display Menu |
|
<< |
Example |
Initial Setup (Continue) |
|
||
|
|
|
|
|
Input Settings |
|
|
Color System |
|
|
Select the video signal system compatible with your |
|
|
equipment from the list below: |
|
|
AUTO/NTSC/PAL-N/PAL-M |
NOTE
 "Color System" can only be set for the TV or VIDEO IN.
HDMI CEC Link
Make the settings to use LINK Operation.
Set the settings with "Initial Setup" > "Input Settings" > "HDMI CEC Link".
(See page 6-2.)
Reset
If complex adjustments are made and the settings cannot be restored to normal, you can reset the settings to the factory preset values.
 If you have already set the Secret No., input the 4-digit secret number here.
ENG 4-12
 Loading...