


SHARP CORPORATION
SHARP ELECTRONICS (U.K.) LTD.
Sharp House, Thorp Road, Newton Heath,
Manchester M40 5BE
37VT-26H/hyou; 99/6/14/18:00 G. K. Associates, Tokyo
TINS-6747PEZZ T2221-A
9P08-MSG

T E L E V I D E O
MODEL
37VT -26H
 OPERATION MANUAL
Please read this operation manual carefully before using the colour television.
PAL NTSC

3 7 V T- 2 6 H - a ; 9 9 / 7 / 2 6 / 1 8 : 0 0 |
G . K . A s s o c i a t e s , To k y o |
|
|
|
|
|
|
|
|
|
|
|
|
|
|
|
|
|
|
This equipment complies with the requirements of Directives 89/336/EEC and 73/23/EEC as amended by 93/68/EEC.
TERMS OF GUARANTEE
Subject to the conditions listed below Sharp Electronics (U.K.) Ltd. (hereinafter called “the Company”) guarantee to provide for the repair of, or at its option replace this Sharp Equipment, or any component thereof, (other than Batteries, Glass Turntables, User Replaceable Lamps, Audio or Video Tapes, or Jewelled Styli), which is faulty or below standard, as a result of inferior workmanship or materials.
The conditions of the guarantee are:
1.This guarantee shall only apply to defects or faults which are notified to the Company, or its approved Service Facility within one year from the date of purchase of the equipment, provided that this guarantee shall extend for a further period of one year in respect of Microwave Oven Magnetrons, Parts only.
2.This guarantee covers equipment intended for private domestic use only. This guarantee does not apply to equipment used in the course of a business, trade or profession.
3.This guarantee does not cover any faults or defects caused by accident, misuse, fair wear and tear, neglect, tampering with the equipment, or any attempt at adjustment or repair other than by an approved Service Facility.
4.In the unlikely event of your equipment requiring repair, please contact the Dealer or Supplier from whom it was purchased. Where this is not possible please contact the telephone number listed below. You will then be given details of how to obtain service.
0990-274277
Please Note; All calls will be charged at local rate.
5.The cost of carriage to and from the Dealer, Supplier or Sharp approved Service Facility shall be borne by the purchaser.
6.No person has any authority to vary the terms or conditions of this guarantee.
7.This guarantee is offered as an additional benefit to the consumer’s statutory rights and does not affect these rights in any way.
1

3 7 V T- 2 6 H - a ; 9 9 / 7 / 2 6 / 1 8 : 0 0 |
G . K . A s s o c i a t e s , To k y o |
|
|
|
|
|
|
|
|
|
|
|
|
|
|
|
|
|
|
Dear SHARP Customer
“SHARP” consumer electronic products have established a worldwide reputation for unsurpassed quality and precision manufacturing techniques since 1924, when the famous SHARP trademark first appeared on a radio receiver.
Your new SHARP TELEVIDEO uses the very latest electronic circuitry and engineering advances for the best possible performance.
Given proper care, your new TELEVIDEO will provide many years of entertainment for the entire family. Please read the following instructions before operating this set.
SPECIAL NOTE FOR USERS IN THE U.K.
The mains lead of this product is fitted with a non-rewireable (moulded) plug incorporating a 13A fuse. Should the fuse need to be replaced, a BSI or ASTA approved BS 1362 fuse marked  or
or  and of the same rating as above, which is also indicated on the pin face of the plug must be used.
Always refit the fuse cover after replacing the fuse. Never use the plug without the fuse cover fitted.
In the unlikely event of the socket outlet in your home not being compatible with the plug supplied, cutoff the mains plug and fit an appropriate type.
DANGER: The fuse from the cut-off plug should be removed and the cut-off plug destroyed immediately and disposed of in a safe manner.
Under no circumstances should the cut-off plug be inserted elsewhere into a 13A socket outlet as a serious electric shock may occur.
To fit an appropriate plug to the mains lead follow the instructions below:
IMPORTANT: The wires in the mains lead are coloured in accordance with the following code:
Blue : Neutral
Brown : Live
As the colours of the wires in the mains lead of this product may not correspond with the coloured markings identifying the terminals in your plug, proceed as follows:
–The wire which is coloured blue must be connected to the plug terminal which is marked N or coloured black.
–The wire which is coloured brown must be connected to the plug terminal which is marked L or coloured red.
Ensure that neither the brown nor the blue wire is connected to the earth terminal in your three pin plug.
Before replacing the plug cover make sure that:
–If the new fitted plug contains a fuse, its value is the same as that removed from the cut-off plug.
–The cord grip is clamped over the sheath of the mains lead and not simply over the lead wires. IF YOU HAVE ANY DOUBT CONSULT A QUALIFIED ELECTRICIAN.
In the unlikely event of this equipment requiring repair during the guarantee period, you will need to provide proof of date of purchase to the repairing company.
Please keep your invoice or receipt, which is supplied at the time or purchase.
2

3 7 V T- 2 6 H - a ; 9 9 / 7 / 2 6 / 1 8 : 0 0 |
G . K . A s s o c i a t e s , To k y o |
|
|
|
|
|
|
|
Contents
GENERAL INFORMATION |
|
RECORDING |
IMPORTANT SAFEGUARDS AND |
|
PRECAUTIONS .............................................. |
4 |
Antenna Connections ...................................... |
6 |
Accessories ...................................................... |
6 |
Location of Controls ........................................ |
7 |
•TV Front and Rear
•Remote control
SETTING UP
Auto Installation ............................................... |
9 |
•Auto Installation System (AIS)
•Automatic Channel Sorting System (ACSS)
Watching a TV Programme .............................. |
10 |
•Turn on the Power
•Adjusting the Sound Volume
•Changing Channels
•Display Call
Menu Functions ................................................ |
11 |
• Calling Up the Functions |
|
Presetting the Channels .................................. |
12 |
•Full Auto Channel Preset
•Semi Auto Channel Preset
•Adding weak or additional channels
•Erasing unwanted channels
Postcode Security ............................................ |
15 |
•Setting the Postcode
•Changing the Password and Postcode
Colour System .................................................. |
17 |
• Setting the Colour System |
|
Setting the Clock .............................................. |
18 |
Wake-up Timer .................................................. |
19 |
Sleep Timer ....................................................... |
20 |
Blue Screen ...................................................... |
20 |
Picture Adjustment .......................................... |
21 |
•Adjusting the picture (CONTRAST, COLOUR, BRIGHT, TINT, V-TONE, WHITE TEMP.)
PLAYBACK
Playback ............................................................ |
22 |
•Inserting a Video Cassette
•Ejecting a Video Cassette
•Playback
•Automatic Tracking Control System
•Video Search
•Fast Forwarding and Rewinding
•Slow Playback
•Still Picture and Frame Advance
•Full Automatic Playback Function
•Full Auto Head Cleaning System
•Tape Counter
•Checking the Amount of Tape Remaining
Auto Repeat Playback ...................................... |
25 |
Recording a TV Programme ............................ |
26 |
•Cassette Erase Protection
•Recording a TV Programme
Recording with the Timer ................................ |
27 |
•VIDEOplus+ Programming System
•Setting the Programme Timer
•VPS/PDC Recording
•Confirming Timer Setting
SPECIAL FUNCTIONS |
|
Sharp Super Picture ......................................... |
33 |
2-Way Child-Proof Lock ................................... |
33 |
DPSS (Digital Programme Search System) ... |
34 |
TELETEXT Broadcasts .................................... |
35 |
•TELETEXT Mode
•Other Features
HELPFUL HINTS |
|
On-Screen Display ........................................... |
37 |
21-Pin Euro-SCART .......................................... |
38 |
Video Equipment Connections ....................... |
39 |
Before Calling for Service ............................... |
40 |
Calling for Service ............................................ |
41 |
Specifications ................................................... |
42 |
CASSETTE TAPE:
This set uses  standard video signals. Use only video cassette tapes that carry either the
  mark or the
  mark.
mark.
•VIDEO Plus+ and PlusCode are registered trademarks of Gemstar Development Corporation.
•The VIDEO Plus+ system is manufactured under license from Gemstar Development Corporation.
3
3 7 V T- 2 6 H - a ; 9 9 / 7 / 2 6 / 1 8 : 0 0 |
G . K . A s s o c i a t e s , To k y o |
|
|
|
|
|
|
|
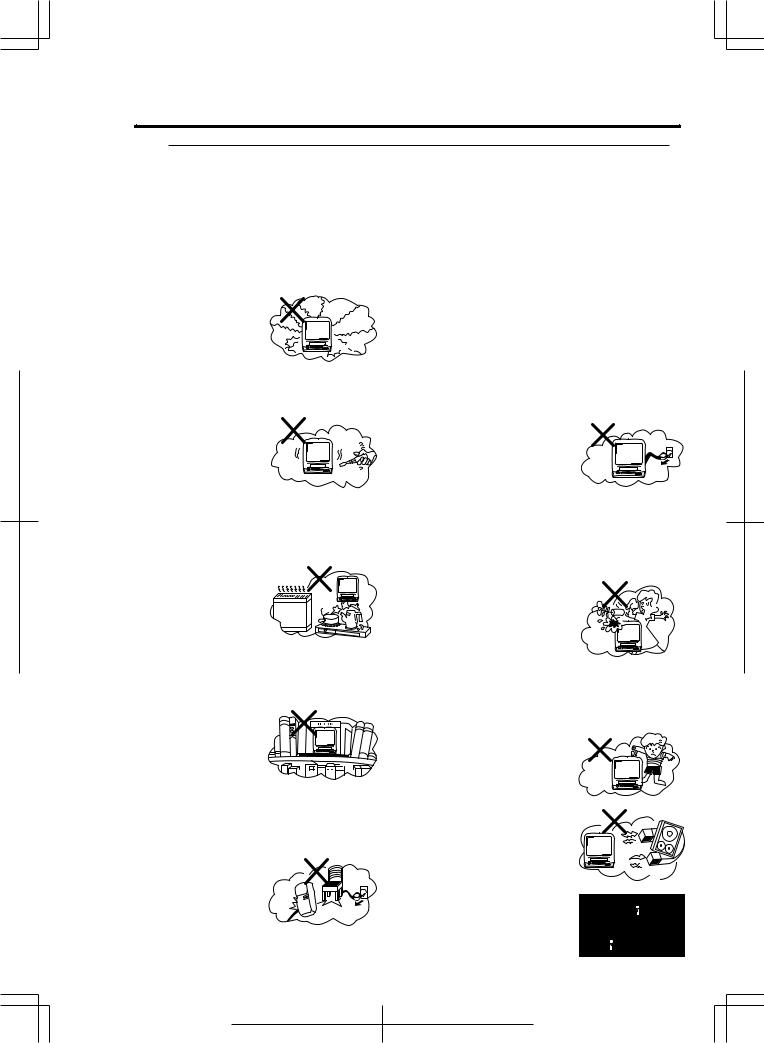
 IMPORTANT SAFEGUARDS AND PRECAUTIONS
CAUTION
BEFORE OPERATING YOUR NEW TELEVIDEO, PLEASE CAREFULLY READ THIS OPERATION MANUAL AND THEN SAVE IT FOR FUTURE REFERENCE. IT WILL BE USEFUL IF YOU HAVE ANY PROBLEMS WHEN OPERATING YOUR TELEVIDEO IN THE FUTURE.
Location and Handling
1.It is dangerous to use this new set if:
This set begins to smoke, smell, or make strange sounds. If this happens, immediately switch off the power, unplug the power cord and contact the nearest authorized service centre.
2.Never remove the back of the cabinet.
Do not remove the back of the cabinet. Touching high voltage parts inside the cabinet can result in electric shock and/or damage to the unit. For service and adjustment inside the cabinet, call a qualified dealer or service centre approved by Sharp.
3.Avoid exposing this set to
direct sunlight, dust, heat sources or moisture.
Do not place this set in a location where it is exposed to direct sunlight, dust, heat sources, high humidity, kitchen smoke, etc., as these may cause malfunctions.
4.Select a well-ventilated location.
The cabinet has air vents to allow heat to escape. Obstructing these air vents may result in malfunction or, in some cases, fire. Always observe the following guidelines:
•Keep this set 10 cm or more away from walls.
•Do not place this set in a confined spaces with poor ventilation.
5.Handling the power cord
Using a damaged power cord, or one with the bare wires exposed, could cause fire or result in electric shock. Always observe the following guidelines:
•When unplugging from the AC mains, never pull the cord. Always grip the plug when unplugging the power cord.
•Never place this set itself, furniture, rugs, or other heavy objects on the power cord.
•If the power cord must pass near a heater, make sure the cord is far enough from the heater that the cord under no circumstances will melt or come in contact with the heater.
6.When the set will not be used
for an extended period of time
If you go away on holiday or otherwise will be absent for a long time, as a safety precaution, unplug the power cord from the AC mains or press the power button ( ) on the set to turn it OFF.
7. D o n o t p l a c e o b j e c t s containing liquids on top of the set.
•Do not place any objects containing water or other liq-
uids on this set.
• If liquid enters this set, it can cause malfunction, electrical shock or fire. If liquid should enter the cabinet, unplug the power cord from the AC mains and contact the nearest service centre approved by Sharp.
8.Never insert objects into the TV set.
Do not insert or drop metallic
or inflammable objects into this set through the air vents, as this can cause serious damage, electrical shock, or possibly fire.
9. Keep the set and tapes away
from strongly magnetic objects.
10. To prevent fire, never place any type of candle or naked flames on the top of or near the cabinet.
4

3 7 V T- 2 6 H - a ; 9 9 / 7 / 2 6 / 1 8 : 0 0 |
G . K . A s s o c i a t e s , To k y o |
|
|
|
|
|
|
|
IMPORTANT SAFEGUARDS AND PRECAUTIONS
Location
•For normal operation, your TELEVIDEO should be located in an area of the room where cool adequate ventilation is provided. Do not place the back of the TELEVIDEO set in a place where free airflow will be restricted.
•Any magnetic force may disturb the colour picture. Make sure that magnets, electric clocks, toys using magnets or any other magnetic substance, such as iron, are kept well away from this TELEVIDEO set.
Power
Your TELEVIDEO operates on 220 ~ 240 Volts, 50 Hertz (normal household current) and has a moulded 13 AMP fused plug fitted.
Other
Recording and playback of any material may require consent. Please refer particularly to the provisions of the Copyright Act 1956, the Dramatic and Musical Performers Protection Act 1958, the Performers Protection Acts 1963 and 1972, and to any subsequent statutory enactment and orders.
•If the set will not be used for a long period, such as during a holiday, unplug the set from the wall outlet to economize power.
•Lines and other noise may appear in TV broadcast images when a FM tuner or radio is located near the TELEVIDEO and both radio and TV broadcasts are being received. Should such noise appear, turn off either the TELEVIDEO or the radio.
•If you listen to AM broadcasts, turn the TELEVIDEO off. AM broadcast signals may not be received due to the interference of the TELEVIDEO.
Moisture Condensation (Dew)
Rapid temperature changes and storage or operation in extremely high humidity conditions may cause “dew” to condense inside the cabinet. Dew can cause serious damage to your tapes and the video heads. To prevent this, turn the power switch on and wait for a few hours for this set to warm up and dry before attempting playback.
This is particularly important before loading a cassette for the first time after purchasing this set.
5

3 7 V T- 2 6 H - a ; 9 9 / 7 / 2 6 / 1 8 : 0 0 |
G . K . A s s o c i a t e s , To k y o |
|
|
|
|
|
|
|
 Antenna Connections
To enjoy a clearer picture, we recommend that you use an outdoor antenna. The following is a brief explanation of types of connection that are used for coaxial and feeder cables:
(1)If your outdoor antenna uses a 75-ohm coaxial cable, with a standard DIN45325 plug (IEC169-2), plug it into the antenna jack at the rear of the set.
(2)If your outdoor antenna uses a 300ohm twin-lead flat feeder, change this for a 300-ohm to 75ohm impedance converter and plug it into the antenna jack at the rear of the set.
75-ohm coaxial cable (round cable)
300-ohm twin-lead flat feeder
Combination VHF/UHF Antennas |
|
300-75 ohm |
VHF/UHF |
ANTENNA |
|
ADAPTOR |
|
(not supplied) |
300 ohm |
|
|
|
twin lead |
VHF/UHF ANTENNA |
|
75 ohm coaxial |
|
cable |
|
 Accessories
After unpacking the set, check to make sure that the following accessories are included:
TV/VIDEO
1 |
2 |
3 |
|
4 |
5 |
6 |
|
7 |
8 |
9 |
|
|
0 |
|
|
|
|
CH |
|
|
|
TR |
|
|
PLAY |
|
|
REW |
|
FF |
|
|
STOP |
|
|
REC |
|
PAUSE/ |
|
TAPE SPEED COUNTER RESET STILL |
|
||
|
|
F.ADV |
|
|
SLOW |
DPSS |
|
|
|
|
|
|
|
MENU |
|
|
CONFIRM PROG |
|
|
RETURN |
SET |
TIMER |
|
ON/OFF |
|
||
|
|
G1521SA |
|
TV/VCR/TEXT REMOTE CONTROL |
|
||
Remote control |
Size-AA batteries |
||
6
3 7 V T- 2 6 H - a ; 9 9 / 7 / 2 6 / 1 8 : 0 0 |
G . K . A s s o c i a t e s , To k y o |
|
|
|
|
|
|
|
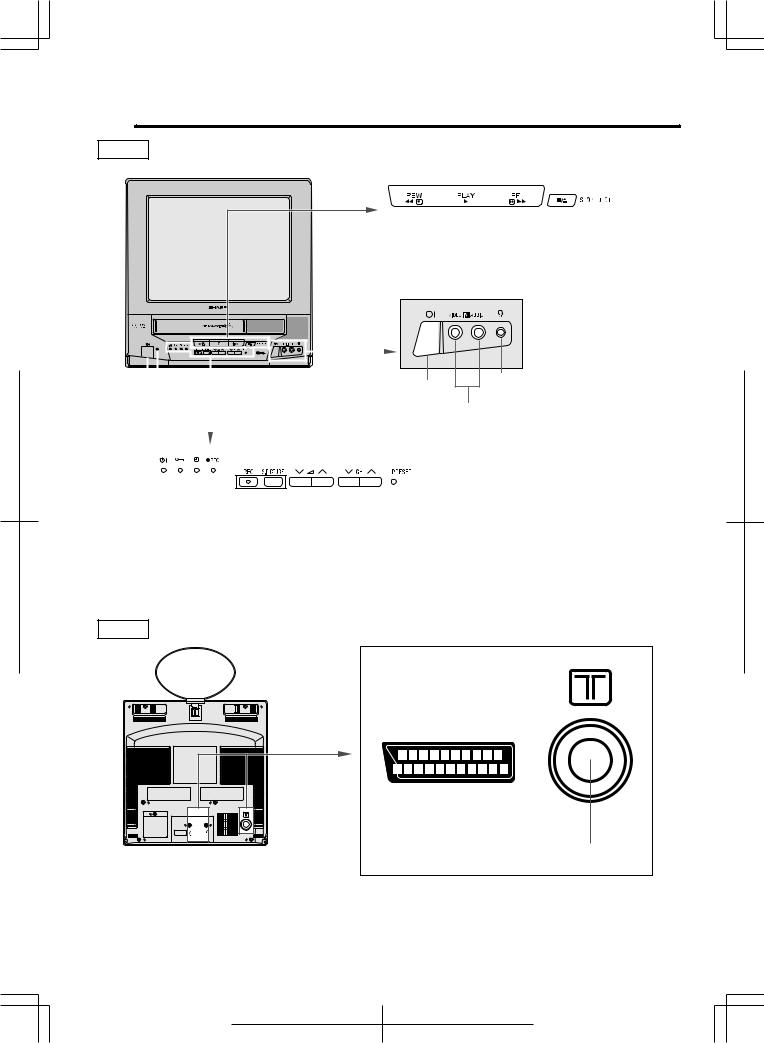
 Location of Controls
Front
|
|
|
|
|
|
|
|
|
button |
|
|
|
|
|
|
|
|
|
|
|
|
|
|
|
|
|
|
|
|
|
|
|
|
|
|
|
|
|
|
|
|
|
|
|
|
|
STOP/EJECT |
||
|
|
|
|
|
FF (Forward Video |
|
|||
|
|
|
|
|
|
||||
|
|
PLAY button Search) |
button |
|
|||||
REW (Reverse Video |
|
||||||||
Search) |
button |
|
|
|
|
|
|
|
|
|
|
|
|
|
|
|
|
|
|
|
|
|
STANDBY/ON |
|
|
|
|
|
|
|
|
|
|
|
MAIN POWER |
|
|
|
|
|
|
|
|
|
|
|
||
|
|
|
|
|
|
|
|
|||||
button |
|
|
|
|
|
|
|
|
|
|
|
VIDEO/AUDIO INPUT |
|
|
|
|
|
|
|
|
|
|
|
|
|
|
Remote control |
|||||||||||
|
|
|
|
|
||||||||
|
sensor window |
|
|
|
|
|||||||
|
|
|
|
|
|
|
|
|
|
|
|
|
button |
HEADPHONE |
jack |
terminals |
(Speakeraudioturnsoffwhenconnectedto |
|
apairofheadphones.) |
||
|
|
|
|
|
|
|
|
|
|
|
|
|
|
|
|
|
|
|
|
|
|
|
|
|
|
|
button |
|
|
|
|
|
|
|
|
|
|
|
|
|
|
|
|
|
|
|
|
|
|
|
|
|
|
|
|
|
|
|
|
|
|
|
|
|
|
|
|
|
|
|
|
|
|
|
|
|
|
|
|
|
|
|
|
|
|
|
|
|
|
|
|
|
|
|
|
|
|
|
|
|
|
|
|
|
|
|
|
|
PRESET |
||
|
|
|
|
|
|
|
|
|
|
|
|
|
|
|
|
|
|
|
|
|
|
|
CHANNEL UP/DOWN |
buttons |
|||
|
|
|
|
|
|
|
|
|
|
|
|
|
|
|
|
|
|
|
|
|
|
|
|||||
|
|
|
|
|
|
|
|
|
|
|
|
|
|
|
|
|
|
VOLUME UP/DOWN |
|
|
|
|
buttons |
||||
|
|
|
|
|
|
|
|
|
|
|
|
|
|
|
|
|
|
|
|
|
|
||||||
|
|
|
|
|
|
|
|
|
|
|
|
|
|
SHARP SUPER PICTURE |
|
button (Thisfunctionwillcreateaclearerimageduringplayback.) |
|||||||||||
|
|
|
|
|
|
|
|
|
|
|
|
|
|
||||||||||||||
|
|
|
|
|
|
|
|
|
|
|
|
REC |
|
(Recording) button |
|
|
|
|
|
||||||||
|
|
|
|
|
|
|
|
|
|
|
|
|
|
|
|
|
|
||||||||||
|
|
|
|
|
|
|
|
Recording |
|
|
indicator: Red |
|
|
|
|
|
|||||||||||
|
|
|
|
|
|
|
|
|
|
|
|
|
|
|
|||||||||||||
|
|
|
|
|
|
Programme timer |
|
|
|
indicator (Timer set: Red, Clock not set: Flashing red) |
|||||||||||||||||
|
|
|
|
|
|
|
|
|
|||||||||||||||||||
|
|
|
|
Child-proof lock |
|
indicator: Red |
|
|
|
|
|
||||||||||||||||
|
|
|
|
|
|
|
|
|
|
||||||||||||||||||
|
|
|
Power/Wake-up timer |
|
|
indicator (Power on: Green, Power standby: Red, Wake-up timer: Orange) |
|||||||||||||||||||||
|
|
|
|
|
|||||||||||||||||||||||
Rear
Euro-SCART 21 Pin Terminal
ANTENNA IN terminal
7

3 7 V T- 2 6 H - a ; 9 9 / 7 / 2 6 / 1 8 : 0 0 |
G . K . A s s o c i a t e s , To k y o |
|
|
|
|
|
|
|
Location of Controls
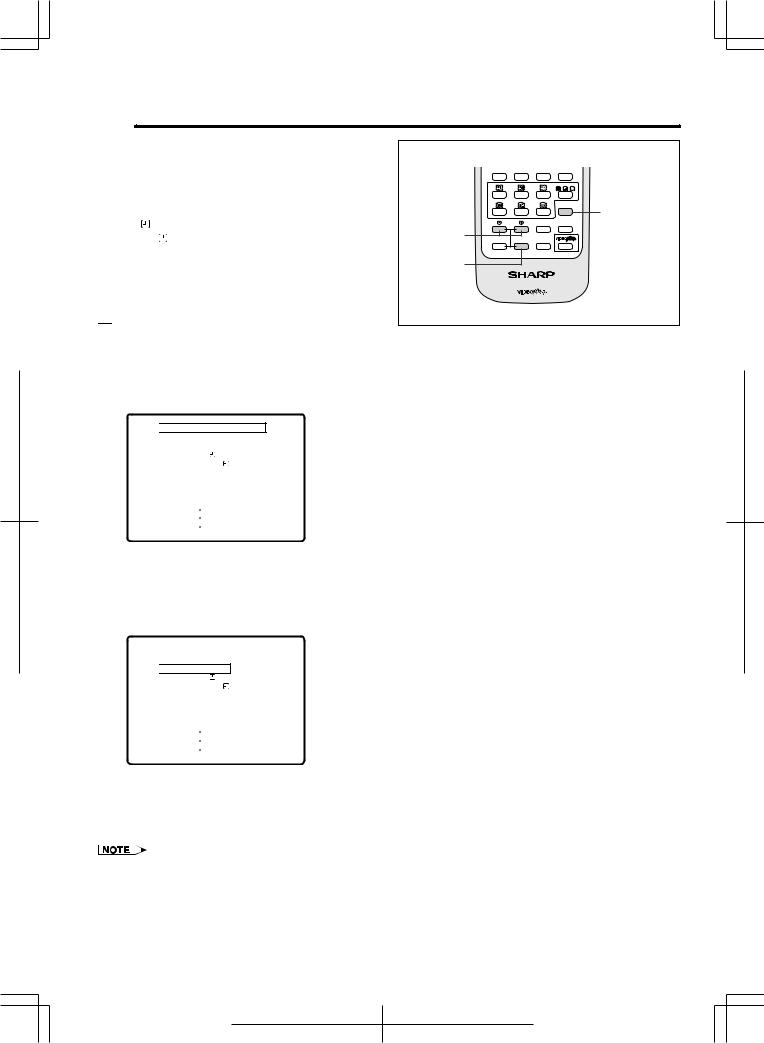
Remote Control
TV/VIDEO select button
STANDBY/ON button
CHANNEL SELECT |
buttons |
FLASHBACK button
•Returns to previously viewed channel.
VOLUME UP/DOWN |
buttons |
PLAY button
•Used for tape playback.
•Used to cancel the PAUSE/STILL mode and return to normal playback operation.
REW button
•Used to rewind the tape or to conduct Reverse Video Search during playback.
TAPE SPEED |
button |
•Used to select the recording tape speed.
REC |
button |
|
• |
Used to record a programme. |
|
CHILD-PROOF LOCK |
button |
|
•Used to lock any selected mode.
SLOW button
TELETEXT colour |
buttons |
TELETEXT control |
buttons |
These buttons are used to operate the TELETEXT functions.
j, k buttons
RETURN button
SET button
TV/VIDEO
1 |
2 |
3 |
4 |
5 |
6 |
7 |
8 |
9 |
|
0 |
|
|
|
CH |
|
|
TR |
REW |
PLAY |
FF |
|
 STOP
STOP
PAUSE/
REC TAPE SPEED COUNTER RESET STILL
F.ADV
DPSS
SLOW
MENU
CONFIRM PROG
TIMER
RETURN SET ON/OFF
G1521SA
TV/VCR/TEXT REMOTE CONTROL

 Installing batteries in the remote control unit
Infrared transmitter window
DISPLAY button
•Used to display the different current settings on the screen.
MUTE button
•Press → Mutes sound.
•Press again → Restores sound to previous level.
CHANNEL UP/DOWN/TRACK-
ING j/k buttons
•Used to select the channel.
•Used to adjust the tracking while playing the tape.
FF button
•Used to fast forward the tape or to conduct Forward Video Search during playback.
STOP button
• Used to stop the tape.
COUNTER RESET button
• Used to reset the tape counter.
PAUSE/STILL/F.ADV button
•Used to temporarily stop the tape during recording.
•Used to display a still picture during playback.
•Used to display a frame advance picture during still picture.
DPSS/SLOW speed |
j/k buttons |
•Press the ( /
/ ) button to search for the index signal and begin playback automatically.
•Used for variable slow playback.
MENU button
• Used to select the menu screen.
PROGRAMME button
•Press the button to set the programme timer.
CONFIRM button
•Used to confirm the timer programme setting.
VIDEOplus button
TIMER ON/OFF |
button |
Before using the TV set for the first time, install the supplied batteries in the remote control.
Inserting batteries
Pull up 

!With your thumb nail, pull up the slit as indicated by the arrow to remove the back cover.
@Insert two batteries (size “AA”). Be sure to match the battery j/k terminals with the j/k marks inside the compartment.
# Replace the battery cover.
• Remove batteries if weak or if the unit is not in use for long periods.
• Do not mix old and new batteries.
• Incorrect installation of the batteries may damage the remote control.
8
3 7 V T- 2 6 H - a ; 9 9 / 7 / 2 6 / 1 8 : 0 0 |
G . K . A s s o c i a t e s , To k y o |
|
|
|
|
|
|
|
 Auto Installation

 Auto Installation System (AIS)
Your TELEVIDEO is provided with an Automatic Installation System (AIS) which makes installation easier. This system is activated when you turn on the TELEVIDEO for the first time.
Auto Installation Procedure:
!Put batteries into the remote control and connect the antenna jack in the antenna input terminal at the rear of your TELEVIDEO.
M O V E
S E L E C T P R O G R A M C H
|
|
|
T O L O C A T E |
||
|
|
|
|
|
|
|
P R 0 1 |
|
C H 0 2 |
B B C 2 |
|
|
P R 0 2 |
|
C H 0 5 |
B B C 1 |
|
|
P R 0 3 |
|
C H 1 2 |
I T V |
|
|
P R 0 4 |
|
C H 2 0 |
C H 4 |
|
|
P R 0 5 |
|
C H 3 2 |
|
|
|
S E L E C T |
|
[ - / + ] |
|
|
|
S E T |
|
[ S E T ] |
|
|
|
|
|
|||
|
E X I T |
|
[ M E N U ] |
|
|
|
|
|
|||
If you wish to return to normal screen, press the MENU button.
@Connect the TELEVIDEO power cable to a 220 - 240V wall socket.
# Press the MAIN POWER button ( ) on the right hand side of the TELEVIDEO to start the “AUTO INSTALLATION”.
Power indicator MAIN POWER button
$The power indicator turns from red to green and the screen turns on.
%The “AUTO INSTALLATION” message will appear on your TELEVIDEO screen.
S H A R P
A U T O I N S T A L L A T I O N
P L E A S E C O N N E C T T H E
A N T E N N A J A C K I N T O T H E
A N T E N N A I N P U T A T T H E
R E A R O F T H E T V
P L E A S E P R E S S [ S E T ] K E Y |
||
T O S T A R T T H E A U T O T U N I N G |
||
O K |
|
[ S E T ] |
|
||
E X I T |
|
[ M E N U ] |
|
||
Automatic Channel Sorting
System (ACSS)
The TELEVIDEO searches for TV frequencies, memorizes the channels found, and sorts them from PR 01 to a maximum of 100 programmes.
•This tuning process may take several minutes to perform. If you need to repeat the “AUTO
INSTALLATION”, see Presetting the Channels |
on |
pages 12-14. |
|
!MOVE screen will appear after Auto channel preset. Press the j / k buttons to select the channel you wish to move, then press the SET button.
M O V E
S E L E C T P R O G R A M C H
T O L O C A T E
|
P R 0 1 |
|
C H 0 2 |
B B C 2 |
|
|
P R 0 2 |
|
C H 0 5 |
B B C 1 |
|
|
P R 0 3 |
|
C H 1 2 |
I T V |
|
|
P R 0 4 |
|
C H 2 0 |
C H 4 |
|
|
P R 0 5 |
|
C H 3 2 |
|
|
|
S E L E C T |
|
[ - / + ] |
|
|
|
S E T |
|
[ S E T ] |
|
|
|
|
|
|||
|
E X I T |
|
[ M E N U ] |
|
|
|
|
|
|||
The TELEVIDEO is ready to automatically preset all local channels for you.
^Now press the SET button and follow the instructions on the screen to start Auto channel preset.
F U L L A U T O T U N I N G
S E A R C H |
5 4 C H1 2 |
U H F |
|
S T O P |
|
[ - / + ] |
||
|
||||
|
|
|
|
|
|
|
|
|
|
@ Press the j / k buttons to move the selected channel to the desired position, then press the SET button.
M O V E
|
S E L E C T C H T O M O V E |
|
|
||
|
P R 0 1 |
|
C H 0 5 |
B B C 1 |
|
|
P R 0 2 |
|
C H 0 2 |
B B C 2 |
|
|
P R 0 3 |
|
C H 1 2 |
I T V |
|
|
P R 0 4 |
|
C H 2 0 |
C H 4 |
|
|
P R 0 5 |
|
C H 3 2 |
|
|
|
S E L E C T |
|
[ - / + ] |
|
|
|
S E T |
|
[ S E T ] |
|
|
|
|
|
|||
|
E X I T |
|
[ M E N U ] |
|
|
|
|
|
|||
#If you wish to move other channels, repeat steps ! and @ above.
$ Press the MENU |
button to exit. |
9
3 7 V T- 2 6 H - a ; 9 9 / 7 / 2 6 / 1 8 : 0 0 |
G . K . A s s o c i a t e s , To k y o |
|
|
|
|
|
|
|
 Watching a TV Programme

 Turn on the Power
! Press the MAIN POWER ( ) button on the TELEVIDEO to turn the power ON.
Power indicator lights up in red.
@ Press the STANDBY/ON |
( |
|
) button either on |
|
the remote control or on the unit.
The power indicator turns from red to green and the screen turns on.
•The unit is factory preset to turn on when the MAIN POWER ( ) button is pressed.
|
Adjusting the |
Sound Volume |
|
||
Press the VOLUME UP |
( ) button to increase the |
|
sound to the desired level, and then release. |
||
Press the VOLUME DOWN |
( ) button to decrease |
|
the sound level. |
|
|
To select a two-digit channel (e.g., Channel 15):
!Press the  button to set the 2-digit select mode.
@ Press the 1 button.
# Press the 5 button.
– –
1 –
1 5
•For presetting the channels, please refer to pages 12–14.

 Display Call
Pressing the DISPLAY ( ) button will change the display on the screen in the following sequence.
V O L U M E
3 5

 Changing Channels
Changing channels using the CHANNEL SELECT buttons
To select a one-digit channel (e.g., Channel 5):
! Press the 5 button.
@If “5-” is displayed and the picture does not
change, press the  button to switch over to the 1-digit select mode and press the 5 button again.
5
|
DISPLAY |
Press once |
• Current Time |
|
• Channel Number (Large) |
|
• Colour System |
|
• Broadcast Name |
|
• (Tape Operation Display) |
|
• (Tape Mark) |
|
• (Tape Counter) |
|
• (Repeat On Mark) |
|
• (Tape Speed) |
|
• (Tape Remaining Time) |
|
• <WAKE-UP TIMER> |
|
• <SLEEP TIMER> |
|
|
Press twice |
• Channel Number (Small) |
|
• (Tape Mark or Tape Operation |
|
Display) |
|
|
Press three times |
• Current Time |
|
• (Tape Remaining Time) |
|
• (Tape Counter) |
|
|
Press four times |
• Display will disappear. |
|
|
•Colour system (PAL or NTSC) will be displayed in AV mode or during playback.
• Ten seconds after the DISPLAY ( ) button is pressed once, the screen will change to the “Press Twice” display.
•Items in round brackets ( ) will be displayed when the tape is loaded.
•Items in angle brackets < > will be displayed when Wakeup timer or Sleep timer is set.
•Reception of weak or no TV signals will result in picture noise. This is not a malfunction.
10
3 7 V T- 2 6 H - a ; 9 9 / 7 / 2 6 / 1 8 : 0 0 |
G . K . A s s o c i a t e s , To k y o |
|
|
|
|
|
|
|
 Menu Functions
The following nine items can be displayed by pressing the MENU button.
PICTURE ADJUST: |
|
Adjusting the Picture |
|
REPEAT PLAY: |
|
|
Using the Auto Repeat Playback |
CLOCK SET: |
|
|
Setting the Present Time |
SLEEP |
: |
|
Setting the Sleep Timer |
WAKE-UP |
|
: |
Setting the Wake-Up Timer |
BLUE SCREEN: |
|
|
Using the Blue Screen |
CH. PRESET: |
|
|
Setting the Channels |
COLOUR SYSTEM: |
|
Setting the Colour System |
|
POST CODE: |
|
|
Using the Postcode Security |

 Calling Up the Functions
(Understanding these basic menu operations will help you set the menu functions on the following pages.)
j/k button
SET button
MENU
MENU button
CONFIRM PROG
TIMER
RETURN SET ON/OFF
G1521SA
TV/VCR/TEXT REMOTE CONTROL
!Press the MENU button to call the MENU screen.
 P I C T U R E A D J U S T
R E P E A T P L A Y
C L O C K S E T
S L E E P
W A K E - U P
B L U E S C R E E N
C H . P R E S E T
C O L O U R S Y S T E M
P O S T |
|
C O D E |
S E L E C T |
|
[ - / + ] |
|
||
S E T |
|
[ S E T ] |
|
||
E X I T |
|
[ M E N U ] |
|
(MENU screen)
@Press the j / k buttons to select the desired function mode.
Each time you press the j / k buttons, the “ ” mark moves up or down.
P I C T U R E A D J U S T
R E P E A T P L A Y
 C L O C K S E T
S L E E P
W A K E - U P
B L U E S C R E E N
C H . P R E S E T
C O L O U R S Y S T E M
P O S T |
|
C O D E |
S E L E C T |
|
[ - / + ] |
|
||
S E T |
|
[ S E T ] |
|
||
E X I T |
|
[ M E N U ] |
|
#Press the SET button to select the desired function mode.
•To leave the MENU screen, press the MENU button.
•There are some items that cannot be selected from the MENU screen during Blue screen, Timer standby, AV input, recording and playback modes. These items are displayed in red.
11
3 7 V T- 2 6 H - b ; 9 9 / 7 / 2 6 / 1 8 : 0 0 |
G . K . A s s o c i a t e s , To k y o |
|
|
|
|
|
|
|
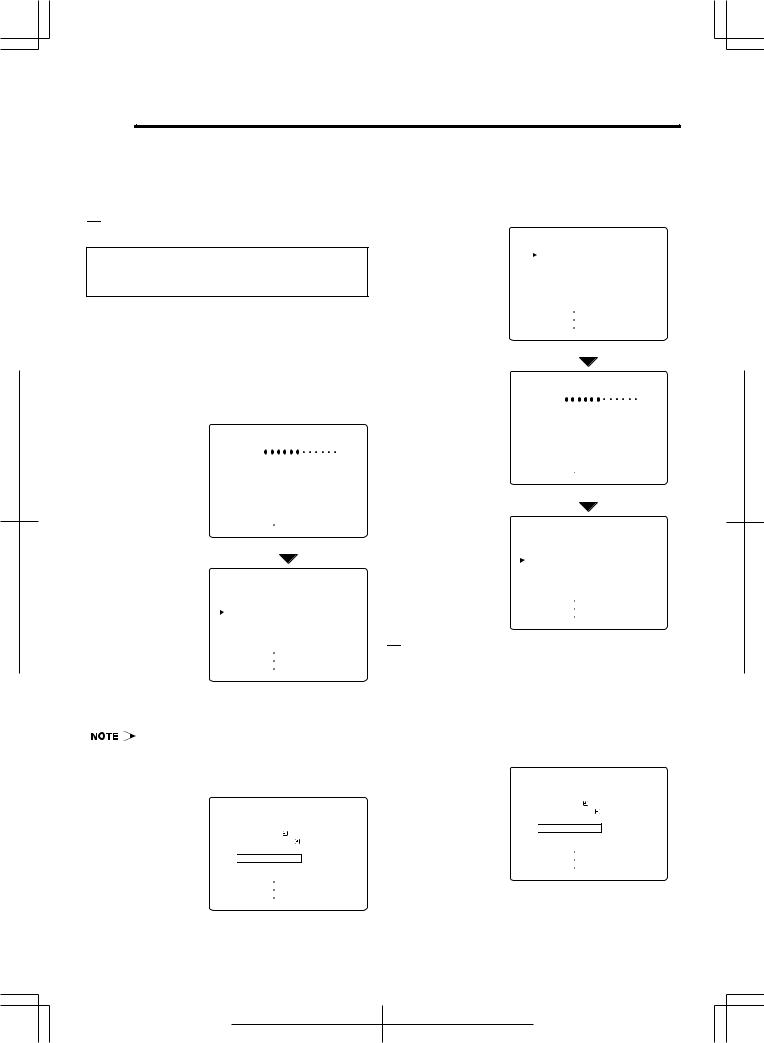
 Presetting the Channels
By operating the channel presetting controls, you may preset your TELEVIDEO to the desired chan-
nels for viewing. First follow the instructions for auto channel presetting and then add or erase in-
dividual channels as desired.
@ Press the j / k buttons to select “FULL AUTO TUNING”, and press the SET button.
The screen will change as shown below and all the channels in your area that the TELEVIDEO can receive will be automatically preset (between the channel position 1 and 99, 0).

 Full Auto Channel Preset
C H . P R E S E T
The channels can be preset by using the
PRESET button on the unit or by using the
MENU screen.
To automatically tune in and preset all the channels your TELEVIDEO can receive in your area, follow the steps below.
A. Using the PRESET button:
Press the PRESET button on the TELEVIDEO for at least two seconds. The screen below appears and channel auto tuning begins.
F U L L A U T O T U N I N G
S E A R C H |
2 C H 1 |
U H F |
|
S T O P |
|
[ P R E S E T ] |
||
|
|
|
|
|
|
|
|
|
|
M O V E
S E L E C T P R O G R A M C H
T O L O C A T E
|
P R 0 1 |
|
C H 0 2 |
B B C 2 |
|
|
P R 0 2 |
|
C H 0 5 |
B B C 1 |
|
|
P R 0 3 |
|
C H 1 2 |
I T V |
|
|
P R 0 4 |
|
C H 2 0 |
C H 4 |
|
|
P R 0 5 |
|
C H 3 2 |
|
|
|
S E L E C T |
|
[ - / + ] |
|
|
|
S E T |
|
[ S E T ] |
|
|
|
|
|
|||
|
E X I T |
|
[ M E N U ] |
|
|
|
|
|
|||
When channel presetting is complete, the “MOVE” screen appears.
• To cancel full auto tuning, press the PRESET |
button again. |
B. Using the MENU screen:
!Select “CH. PRESET” from the MENU screen by pressing the j / k buttons, then press the SET button.
P I C T U R E A D J U S T
R E P E A T P L A Y
C L O C K S E T
S L E E P
W A K E - U P
B L U E S C R E E N
 C H . P R E S E T
C O L O U R S Y S T E M
P O S T |
|
C O D E |
S E L E C T |
|
[ - / + ] |
|
||
S E T |
|
[ S E T ] |
|
||
E X I T |
|
[ M E N U ] |
|
(“CH. PRESET” cannot be selected during playback, recording, AV input, or Timer standby modes.)
12
|
F U L L |
A U T O T U N I N G |
|
|||
|
S E M I |
A U T O T U N I N G |
|
|||
|
F I N E |
T U N I N G |
||||
|
S K I P |
|
|
|
|
|
|
M O V E |
|
|
|
|
|
|
|
|
|
|
|
|
S E L E C T |
|
[ - / + ] |
|
|||
|
||||||
S E T |
|
[ S E T ] |
||||
|
||||||
E X I T |
|
[ M E N U ] |
||||
|
||||||
|
|
|
|
|
|
|
|
|
|
|
|
|
|
F U L L A U T O T U N I N G
S E A R C H |
2 C H 1 |
U H F |
|
S T O P |
|
[ - / + ] |
||
|
||||
|
|
|
|
|
|
|
|
|
|
M O V E
S E L E C T P R O G R A M C H
T O L O C A T E
|
P R 0 1 |
|
C H 0 2 |
B B C 2 |
|
|
P R 0 2 |
|
C H 0 5 |
B B C 1 |
|
|
P R 0 3 |
|
C H 1 2 |
I T V |
|
|
P R 0 4 |
|
C H 2 0 |
C H 4 |
|
|
P R 0 5 |
|
C H 3 2 |
|
|
|
S E L E C T |
|
[ - / + ] |
|
|
|
S E T |
|
[ S E T ] |
|
|
|
|
|
|||
|
E X I T |
|
[ M E N U ] |
|
|
|
|
|
|||

 Semi Auto Channel Preset
To set broadcast stations to individual channels, follow the steps below.
!Select “CH. PRESET” from the MENU screen by pressing the j / k buttons, then press the SET button.
P I C T U R E A D J U S T
R E P E A T P L A Y
C L O C K S E T
S L E E P
W A K E - U P
B L U E S C R E E N
 C H . P R E S E T
C O L O U R S Y S T E M
P O S T |
|
C O D E |
S E L E C T |
|
[ - / + ] |
|
||
S E T |
|
[ S E T ] |
|
||
E X I T |
|
[ M E N U ] |
|
 Loading...