


28KF-84H 32KF-84H
COLOUR TELEVISION
OPERATION MANUAL
Please read this operation manual carefully before using the colour television.
PRINTED ON ENVIRONMENTALLY FRIENDLY PAPER
Downloaded from: http://www.usersmanualguide.com/
TERMS OF GUARANTEE
Subject to the conditions listed below Sharp Electronics (U.K.) Ltd. (Hereinafter called «the Company») guarantee to provide for the repair of, or at its option replace the Sharp Equipment, or any component thereof, (other than Batteries), which is faulty or below standard, as a result of inferior workmanship or materials.
The conditions of the Guarantee are:
1.This guarantee shall only apply to defects or faults which are notified to the Company, or its approved Service Facility within one year from the date of purchase of the equipment.
2.This guarantee covers equipment intended for private domestic use only. This guarantee does not apply to equipment used in the course of a business, trade or profession.
3.This guarantee does not cover any faults or defects caused by accident, misuse, fair wear and tear, neglect, tampering with the equipment, or any attempt at adjustment or repair other than by an approved Service Facility.
4.In the unlikely event of that your equipment should require repair, please contact the dealer or supplier from whom it was purchased.
5.The cost of carriage to and from the Dealer, Supplier or Sharp approved Service Facility shall be borne by the purchaser.
6.No person has any authority to vary the terms or conditions of this guarantee.
7.This guarantee is offered as an additional benefit to the consumer’s statutory rights and does not affect rights in any way.
In the unlikely event of this equipment requiring repair during the guarantee period, you will need to provide proof of date of purchase to the repairing company.
Please keep your invoice or receipt, which is supplied at the time of purchase.
1
Downloaded from: http://www.usersmanualguide.com/
Safety Precautions
This equipment complies with the requirements of Directives 89/336/EEC, 92/31/EEC and 73/23/EEC as amended by
93/68/EEC.
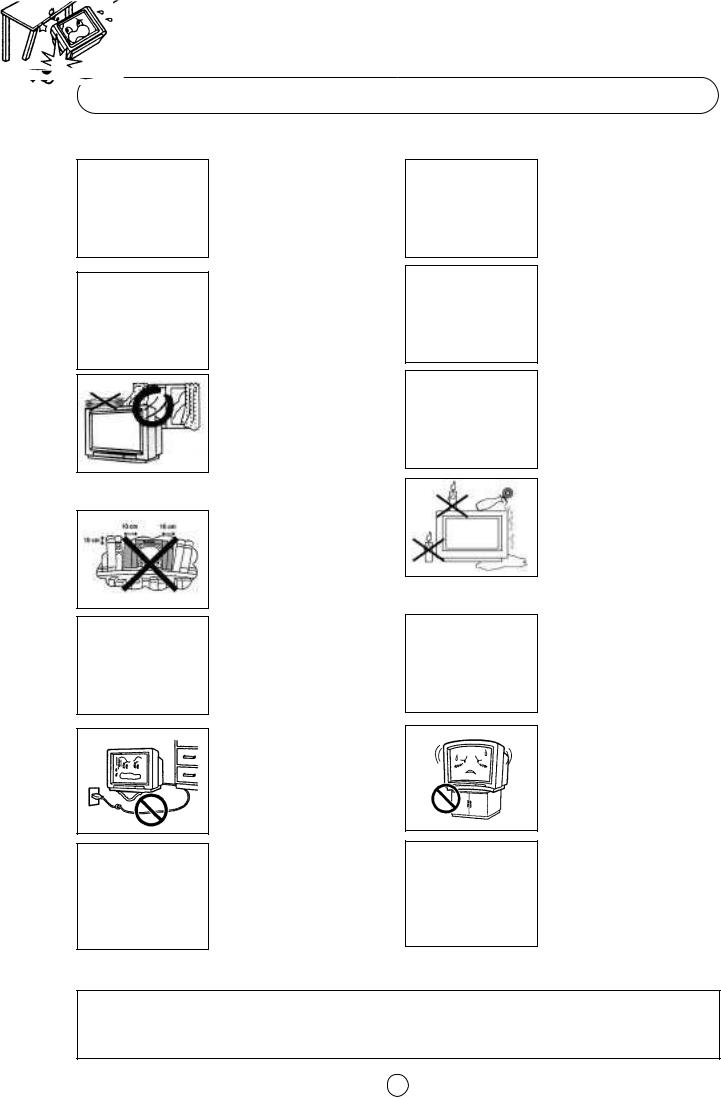
To prevent fire or electrical shock, do not use the TV set in an excessively damp place.
Position the TV set out of direct sunlight and away from heat, as high temperatures can damage the cabinet, CRT, or other electronic parts.
Don't cover ventilation salts with objects such as newspapers, tablecloths, curtains, etc.
Do not cover the ventilation holes at the back of the TV set, this can cause fire or other serious problems. Leave an adequate open space behind the TV set for good ventilation.
In order to ensure that the television is properly ventilated, leave a space of at least 10 cm around the set.
Do not install this equipment in a confined space such as a bookcase or a built-in cabinet.
Television equipment and cart combination should be moved with care. Quick stops, excessive force, and uneven surfaces may cause the equipment and cart combination to overturn.
To prevent electrical shock, do not subject the AC power cord to damage by bending or twisting it, or by placing heavy items on top of it and do not place the AC power cord under the TV set. If the AC power cord becomes damaged, unplug it from the wall outlet immediately and call your dealer for service.
Do not place this television equipment on an unstable cart, stand, or table. The television equipment may fall, causing serious injury to a child or an adult, and serious damage to the equipment. Use only with a cart or stand recommended by the manufacturer, or sold with the television equipment.
Never remove the back of the cabinet, as there is high voltage in the TV set.
Please call for service.
Unplug the power cord from the wall outlet immediately if the TV set begins to make unusual noises or give off smoke or an odd smell, then call your dealer for service.
Always disconnect your television from the mains and the aerial cables during thunderstorms.
Even if your television is switched off, it can still be damaged by lightning striking the mains and/or aerial cable.
In order to prevent electrical shocks and fires, ensure that the television is not subjected to splashes or spills of water, and avoid inserting objects or pouring any type of liquid into the set.
To prevent fire, never place any type of candle or naked flames on the top or near the TV set. In the case that an object or liquid enters the set, don't use and contact technical service.
Wall or shelf mounting should follow the manufacturer's instructions, and should use a mounting kit approved by the manufacturer.
Do place the TV set onto an even stand, table or track which size is bigger than the TV set.
If the TV set is put onto a smaller size or uneven stand, table or track may cause the TV cabinet distort. Do not put or insert anything between TV set and the stand, table or track.
The tube of your TV has a special coating. Do not knock or rub on the tube face with sharp or hard surfaces, otherwise you will damage the coating.
To prevent damaging the surface of the television screen, remove finger prints only with a soft cloth dampened with glass cleaner. Do not use any abrasive cleaners.
Do not use thinner, benzene or other strong chemical cleaners.
CAUTION: For environmental and safety reasons, it is recommended that the television isn't left in stand-by mode while not in use. Switch it off using the main button and unplug it during periods of absence from the home.
2
Downloaded from: http://www.usersmanualguide.com/
Dear SHARP Customer
Congratulations! You are now the proud owner of a SHARP Colour Television Receiver. To ensure proper operation, please read this manual carefully. After reading, keep this manual in a safe place for future reference.
Contents |
|
Terms of guarantee ......................................................... |
1 |
Safety precaution ............................................................ |
2 |
Contents ......................................................................... |
3 |
Accessories .................................................................... |
3 |
Remote Control Battery Installation ................................ |
3 |
Remote Control buttons ................................................. |
4 |
Controls and Terminals ................................................... |
5 |
Typical Connections (Aerial, VCR, DVD, etc.).................. |
6 |
Auto Installation ............................................................ |
11 |
Switching on ................................................................. |
13 |
TV operation (Channel selection) .................................. |
14 |
Menu Structures ............................................................. |
15 |
Picture Adjustments ..................................................... |
16 |
100 Hz Fast Menu ......................................................... |
18 |
Wide Mode ................................................................... |
19 |
Audio Adjustments ......................................................... |
21 |
Sound Setting Mode....................................................... |
22 |
Features setting mode: |
|
On Timer and Off Timer ................................................ |
24 |
Child Lock (Channel Block) .......................................... |
25 |
Demo ............................................................................ |
26 |
Postcode Security ........................................................ |
27 |
TV Channel Setting (Advanced): |
|
To repeat the AUTO INSTALLATION ............................ |
29 |
Manual Channel Preset ................................................. |
30 |
After preset has been performed (Fine-tuning) ............. |
32 |
TV/VIDEO Selector, Clock button, Headphone Jack |
|
and Sub-titles button ..................................................... |
34 |
VCR Mode .................................................................... |
35 |
Teletext Mode ............................................................... |
36 |
21-pin Euro-SCART and 21-pin Audio/Video ............... |
39 |
Troubleshooting ............................................................ |
40 |
General Specifications for Television Receiver ............ |
41 |
Index page .................................................................... |
42 |
Supplied Accessories |
|
||
|
Typical Connections |
28/32KF-84H |
28KF-84H |
|
|
|
|
|
Aerial connection - TV set only - |
|
32KF-84H |
|
|
|
COLOUR TELEVISION |
|
|
|
Q U I C K |
|
|
|
S TA R T |
|
|
|
G U I D E |
|
|
|
For easy installation |
|
|
|
Fitting the batteries into the remote control |
|
Aerial Connections - TV and VCR - |
|
Connecting the aerial cable |
|
|
|
Tuning the TV channels |
|
|
|
Using this installation guide should |
|
|
|
enable you to set up your TV in less |
|
|
|
than 15 minutes - - - |
|
|
|
- - - Please refer to your operation |
|
|
|
manual for more tips and advice. |
|
|
|
If problems persist, contact the SHARP Helpline (office hours only) on |
|
|
|
tel: 08705 274277 (or (01) 676 0648 if telephoning from Ireland) and/or |
|
|
|
WEB-SITE: www.sharp.co.uk/support |
|
Typical |
|
Quick Start |
Remote control |
Connections |
Guide |
|
28KF-84H 32KF-84H
COLOUR TELEVISION
OPERATION MANUAL
Please read this operation manual carefully before using the colour television.
Operation
Manual
|
Respect the |
|
environment and |
|
put used batteries |
Type-AA |
in a container that is |
especially designed |
|
Dry-Batteries |
for this purpose. |
|
|
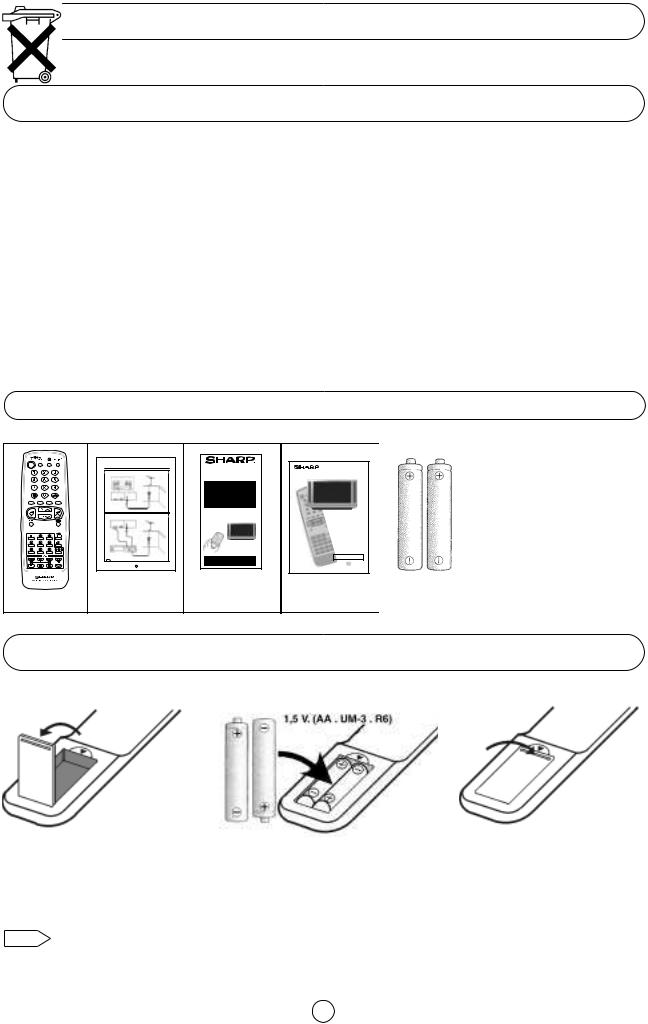
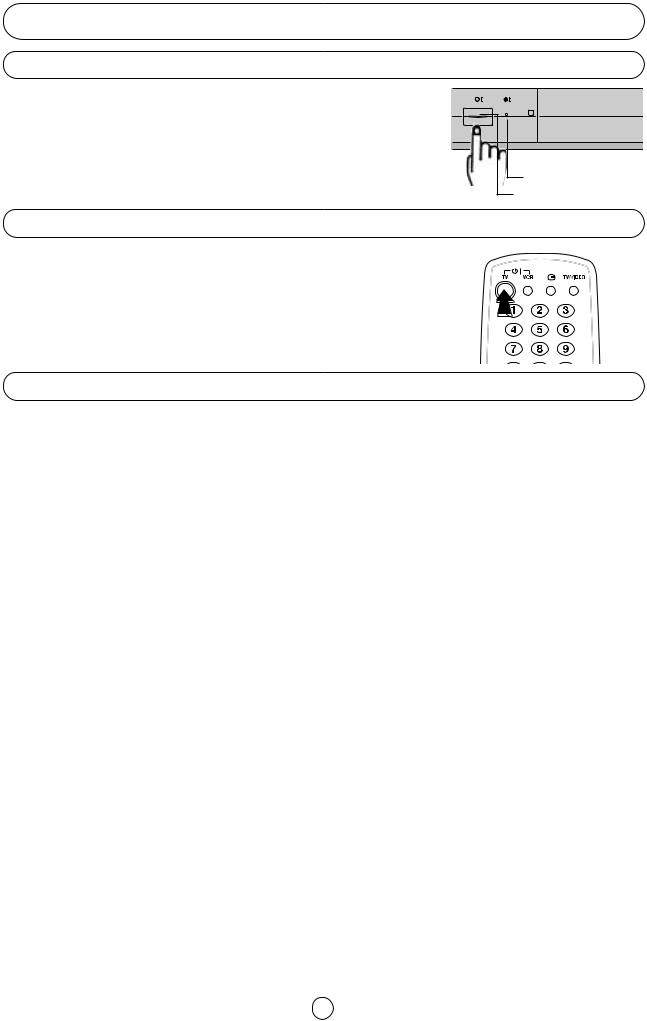
Remote Control Battery Installation
Before using the TV set for the first time, install the supplied dry batteries in the remote control.
1.With your thumb nail, pull up the slit as indicated by the arrow to remove the battery cover.
2. Insert two batteries 1.5 V (R-6 |
3. Replace the battery cover. |
"AA" size). Be sure to match the |
|
battery ±/— terminals with the |
|
±/—marks inside the |
|
compartment. |
|
Note: • Remove batteries if weak or if the unit is not in use for long periods.
•Do not mix old and new batteries.
•Incorrect installation of the batteries may damage the remote control.
3
Downloaded from: http://www.usersmanualguide.com/

Remote control buttons
|
|
TV |
1. |
Stand-by ON/OFF switch (TV) |
|
|
|
Video |
2. |
Power ON / OFF switch (VCR) |
|
|
|
TV |
3. |
Digit buttons 0 ~ 9 |
|
|
|
|
4. |
Flashback button |
|
1. |
19. |
Teletext |
5. |
Green button |
|
|
6. |
Red button |
|||
|
|
|
|||
2. |
20. |
TV |
7. |
Volume Down/Cursor control Left |
|
|
|
||||
|
|
|
8. |
Menu button |
|
3. |
|
Teletext |
9. |
Reveal button |
|
|
|
||||
|
|
|
10. |
List selector |
|
|
|
|
11. |
Store button |
|
|
|
|
12. |
Cancel button |
|
4. |
21. |
|
13. |
Top/ Bottom/Full button |
|
|
14. |
Reset button |
|||
|
|
||||
5. |
22. |
|
|
|
|
6. |
23. |
Video |
15. |
Rewind/picture search/reverse |
|
|
24. |
|
16. |
Play button |
|
|
|
17. |
Pause / Still button |
||
|
|
|
|||
7. |
25. |
|
18. |
Stop button |
|
|
|
|
|||
|
26. |
TV |
19. |
TV/VIDEO selector |
|
|
|
20. |
100 Hz Fast Menu button |
||
|
|
|
|||
8. |
27. |
|
21. |
Single/Double entry |
|
9. |
28. |
Teletext |
22. |
Yellow button |
|
|
23. |
Blue button |
|||
10. |
29. |
TV |
24. |
Channel Up/Cursor control Up |
|
30. |
|||||
11. |
|||||
|
25. |
Volume Up/Cursor control Right |
|||
|
|
|
|||
12. |
31. |
|
26. |
Channel Down/Cursor control Down |
|
|
|
|
27. |
Wide Mode Selector |
|
13. |
32. |
TV/Teletext |
28. |
Time button |
|
|
33. |
||||
14. |
|
|
|
||
15. |
34. |
TV |
29. |
Sound mode selector |
|
16. |
35. |
Teletext |
30. |
Hold button |
|
|
36. |
||||
17. |
|
|
|
|
|
18. |
37. |
TV |
31. |
Sound Mute button |
|
|
|
|
|
||
|
|
Teletext |
32. |
Text/Mix/Picture button |
|
|
|
|
33. |
Index button |
|
|
|
Video |
34. |
Channel Up selector |
|
|
|
|
35. |
Fast forward/picture search/forward |
|
|
|
|
36. |
Channel Down selector |
|
|
|
|
37. |
Record button |
4
Downloaded from: http://www.usersmanualguide.com/
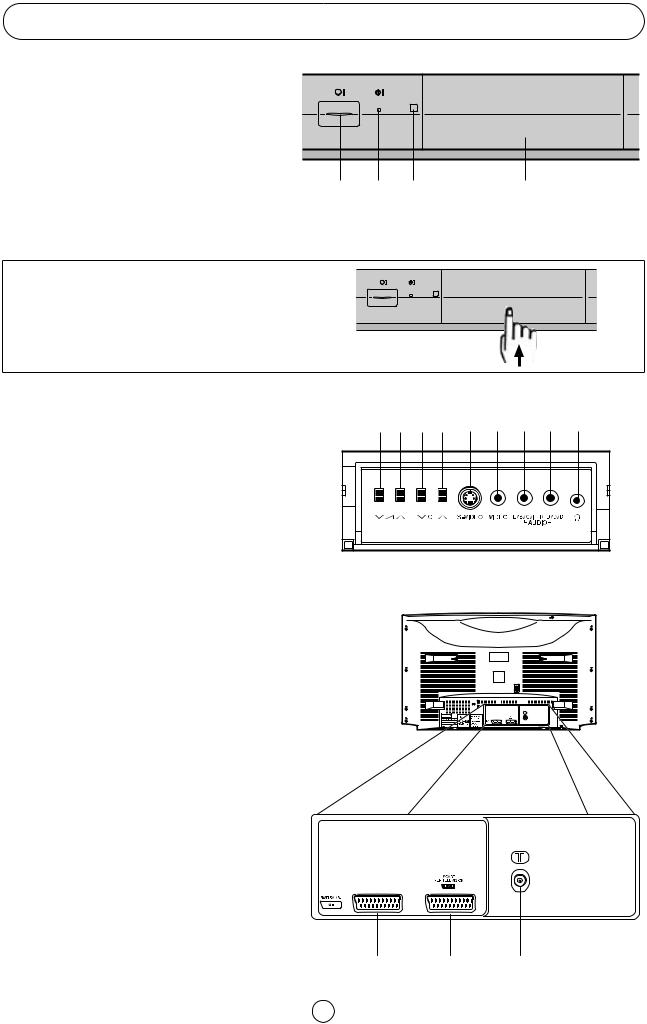
Controls and Terminals
FRONT TV
1.Main Power On/Off Switch
2. Power Indicator
3.Remote Control Sensor
4. Door
1 |
2 |
3 |
4 |
HOW TO OPEN THE DOOR
Put the finger in the lower part of the door and press upward.
Behind the door
5.Volume Button (DOWN)
6.Volume Button (UP)
7.Program Selector (NEXT)
8.Program Selector (PREVIOUS)
9.S-Video input terminal
10.Video Input Terminal (PAL/SECAM/NTSC)
11.Audio Input Terminal (left)
12.Audio Input Terminal (right)
13.Headphone Socket (3.5mm Ø, 16~600 ohms)
REAR TV
21-pin In/Out
1.21-pin Audio/Video (AV-1) With PAL/SECAM/NTSC/S-Video Input
2.21-pin Euro SCART (RGB) With PAL/SECAM/NTSC Video Input
RF Input
3. Aerial terminal
5 |
6 |
7 |
8 |
9 |
10 |
11 |
12 |
13 |
1 |
2 |
3 |
5
Downloaded from: http://www.usersmanualguide.com/
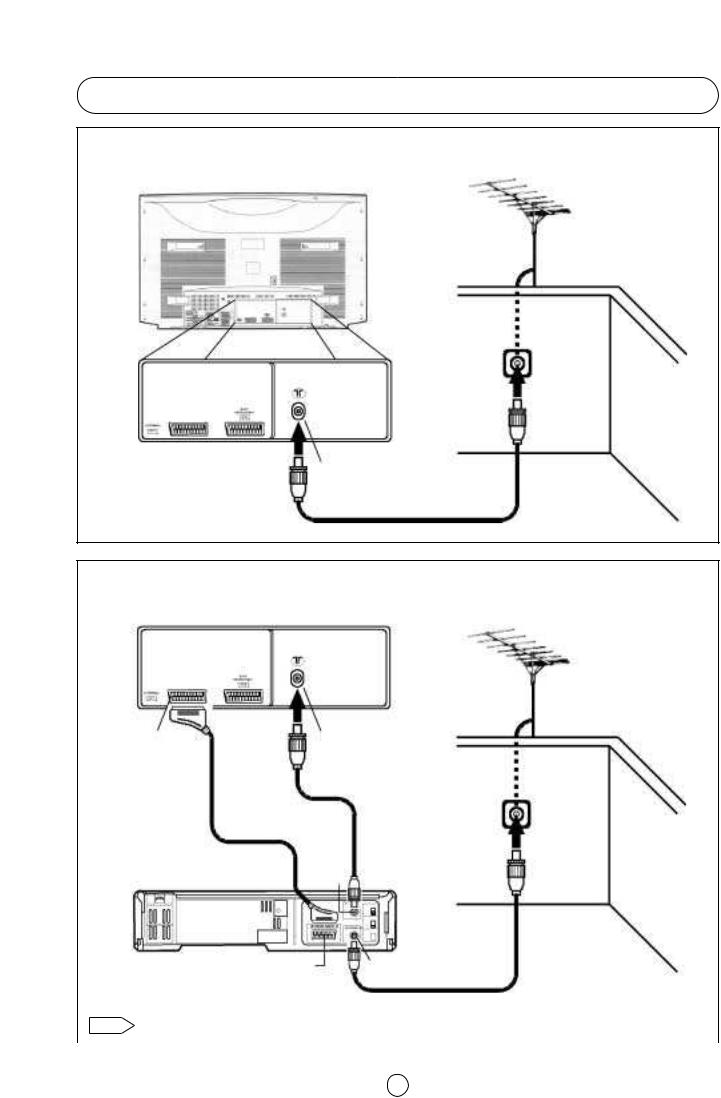
Typical Connections
Aerial connection - TV set only -
BACK OF TV
Aerial (Not supplied)
Aerial IN |
Aerial Lead |
|
(Not supplied) |
Aerial Connections - TV and VCR -
BACK OF TV
Aerial (Not supplied)
Aerial IN
AV/TERMINAL (AV-1)
Aerial Lead (Not supplied)
Scart Lead (Not supplied)
RF OUT
BACK OF VCR
Aerial Lead (Not supplied)
|
Audio/Video |
Aerial IN |
Note: |
For further details, please refer to operation manual of your VCR. |
|
|
|
|
|
|
6 |
Downloaded from: http://www.usersmanualguide.com/
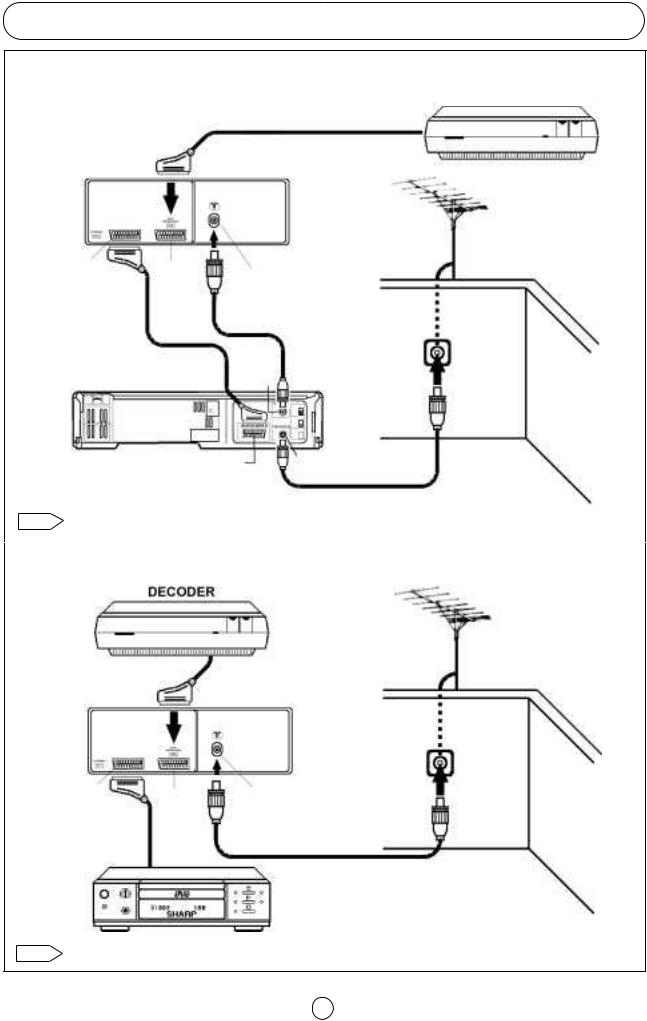
Typical Connections (Continued)
Connections - TV, DECODER and VCR (Videorecorder) -
DECODER
Scart Lead (Not supplied)
BACK OF TV
|
|
|
|
|
Aerial |
|
|
|
|
|
(Not supplied) |
AV/TERMINAL |
Euro |
|
Aerial IN |
|
|
SCART |
|
|
|||
(AV1) |
|
|
|
||
(RGB) |
|
|
|
||
|
|
|
|
|
|
|
|
|
|
Aerial Lead |
|
Scart lead |
|
|
(Not supplied) |
|
|
|
|
|
|
||
(Not supplied) |
|
|
|
|
|
BLACK OF VCR |
RF |
|
|
||
OUT |
|
||||
|
|
Audio/Video |
Aerial IN |
Aerial Lead |
|
|
|
(Not supplied) |
|||
|
|
|
|
|
|
Note: For further details, please refer to operation manuals of your DECODER and VCR. |
|||||
|
|
|
|
|
|
|
|
Connections - TV, DECODER and DVD Player - |
|||
|
|
|
|
|
|
|
|
DECODER |
|
|
|
Aerial (Not supplied)
Scart Lead
(Not supplied)
BACK OF TV
AV/TERMINAL |
Euro |
Aerial IN |
|
(AV1) |
SCART |
|
|
|
|
||
|
(RGB) |
Aerial Lead |
|
Scart Lead |
|
||
DVD |
(Not supplied) |
||
(Not supplied) |
|||
PLAYER |
|
||
|
|
Note: |
For further details, please refer to operation manuals of your DECODER and DVD Player. |
7
Downloaded from: http://www.usersmanualguide.com/
Typiccal Connections (Continued)
Connections - TV, DVD Player and Digital Set Top Box -
BACK OF TV
DVD PLAYER
Scart Lead (Not supplied)
Satellite dish (Not supplied)
Aerial (Not supplied)
AV/TERMINAL |
Euro |
Aerial IN |
|
(AV 1) |
SCART |
|
|
|
(RGB) |
|
|
Aerial Lead |
|
|
|
(Not supplied) |
|
|
|
|
|
Scart Lead |
Aerial Lead |
|
|
(Not supplied) |
|
|
|
(Not supplied) |
|
|
|
DIGITAL SET |
|
|
|
|
|
|
|
TOP BOX |
Dish Lead |
|
|
|
(Not supplied) |
|
RF OUT |
TV SCART |
AERIAL IN |
DISH IN |
Note: |
For further details, please refer to operation manuals of your DVD Player and Digital Set Top Box. |
|||
8
Downloaded from: http://www.usersmanualguide.com/

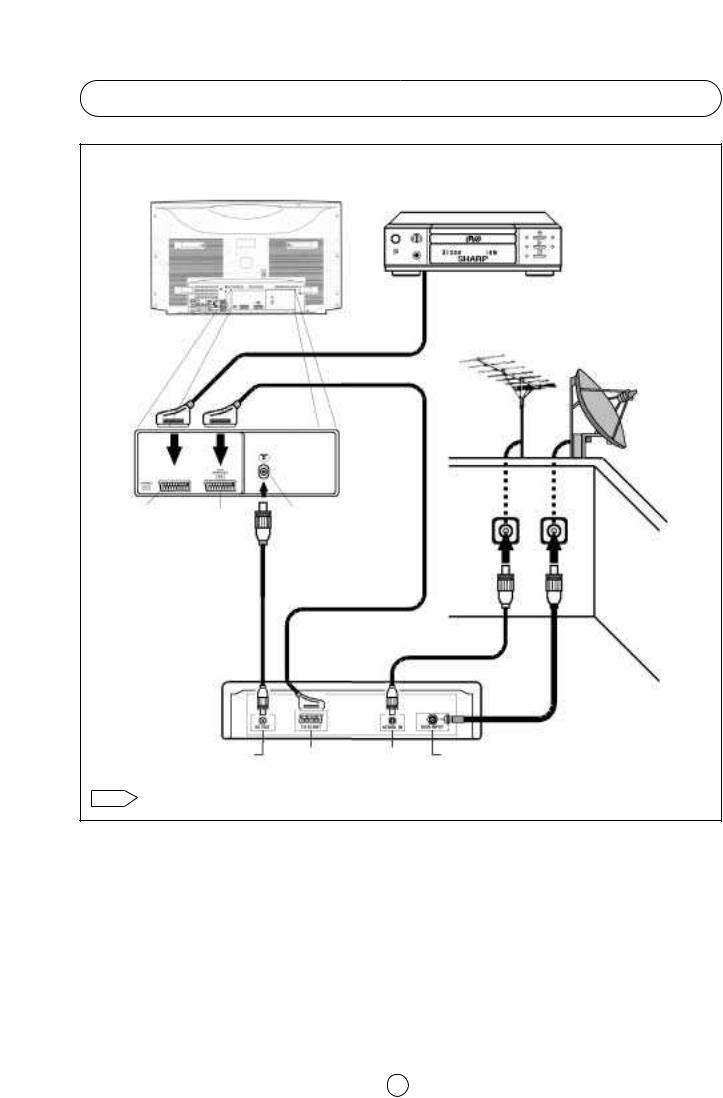
Typical Connections (Continued)
Connections - TV, VCR and Digital Set Top Box -
Scart Lead (Not supplied)
BACK OF TV |
Aerial |
|
(Not supplied) |
||
|
Satellite dish (Not supplied)
|
Euro |
Aerial IN |
AV/TERMINAL |
|
|
SCART |
|
|
(AV1) |
|
|
(RGB) |
|
|
|
Aerial Lead |
|
|
|
|
Scart Lead |
|
(Not supplied) |
|
|
|
(Not supplied) |
|
|
BACK OF VCR |
RF OUT |
Audio / Vídeo |
Aerial IN |
|
|
|
Aerial Lead |
|
|
||
(Not supplied) |
|
|
||
|
Scart Lead |
|
|
|
|
(Not supplied) |
Aerial Lead |
Dish Lead |
|
|
|
(Not supplied) |
||
DIGITAL SET |
(Not supplied) |
|||
|
||||
TOP BOX
|
RF OUT |
TV SCART |
AERIAL IN |
DISH IN |
Note: |
For further details, please refer to operation manuals of your VCR and Digital Set Top Box. |
|||
9
Downloaded from: http://www.usersmanualguide.com/
Typical Connections (Continued)
Front connections -TV and Video camera-
FRONT TV
(Behind the door)
S-Video lead (Hi-8) (Not supplied)
Audio/Video lead (Not supplied)
S-Video Input Terminal (Hi-8)
Video Input Terminal
Audio Input Terminal (left)
WIEW CAM
Audio Input Terminal (right)
Note: |
For further details, please refer to operation manual of your Video Camera. |
Connection-TV power cable to a 220 ~ 240 V system -
BACK OF TV
Mains Socket Outlet
AC 220~240 V, 50 Hz
10
Downloaded from: http://www.usersmanualguide.com/
Auto Installation
■ Auto Installation System (AIS)
Your television set is provided with an Automatic Installation System which makes Installation easier.
This new system is activated when you turn on the TV for the first time.
Note: |
You may not have to follow this procedure if it has already been |
|
done for you at the establishment where you purchased your TV. If |
|
this is the case, go on to the section entitled -Switching ON- |
|
(page 13). |
Procedure:
1.Put batteries into the remote control, as shown on page 3.
2.Connect the aerial jack into the aerial input terminal on the rear side of your TV, as shown on page 6.
3.Connect the TV power cable to a 220 ~ 240 V system, as shown on page 10.
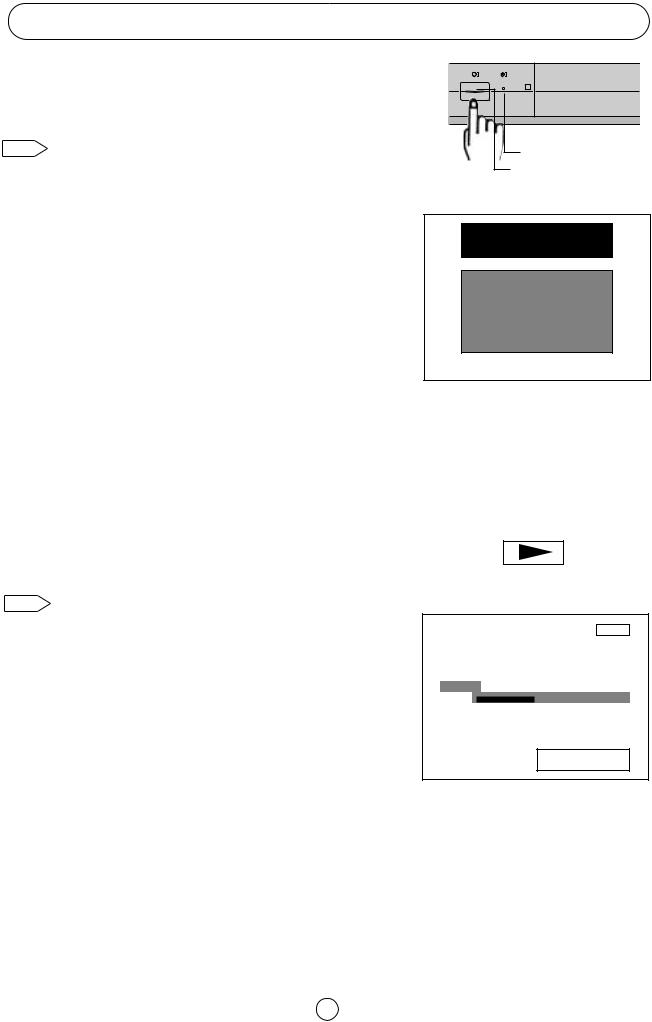
4.Press the main power button (® ), on the front of the TV set, to start the “AUTO INSTALLATION”. The orange power indicator will light..
5.The «AUTO INSTALLATION» menu will appear on your TV screen.
The TV is ready to preset automatically all local channels for you.
If the TV is being used with a VCR, turn on the VCR and play back a pre-recorded tape. The signal from the RF terminal of your VCR is assigned to a TV channel.
6.Now, press any button on the TV remote control to start Auto Channel Preset.
The TV will go through the following steps automatically and sequentially:
Automatic Channel Sorting System (ACSS): The TV set SEARCHES FOR FREQUENCIES, memorises the channels found, and sorts them (according to technical criteria) from Pr-01 of the TV, to a maximum of 99 programmes.
Note: This tuning process may take several minutes to perform. If you need to repeat the “AUTO INSTALLATION”, go on to the section entitled -TV Channel Setting- (page 29).
Editing: When the TV has finished the automatic search, the «Stored programmes» menu will appears on the screen. In this menu, you can change the order of the channels and change or give the channels a four-letter name.
On next page is a detailed explanation of editing options about
«Stored programmes» menu.
11
Power Indicator
Main power button
«AUTO INSTALLATION»
SHARP
AUTOINSTALLATION
Be sure the antenna cable is
connected…
Press any button on
the handset to start.
VCR
VÍDEO
Searching
Pr 01
01 %
Searching please wait
Downloaded from: http://www.usersmanualguide.com/
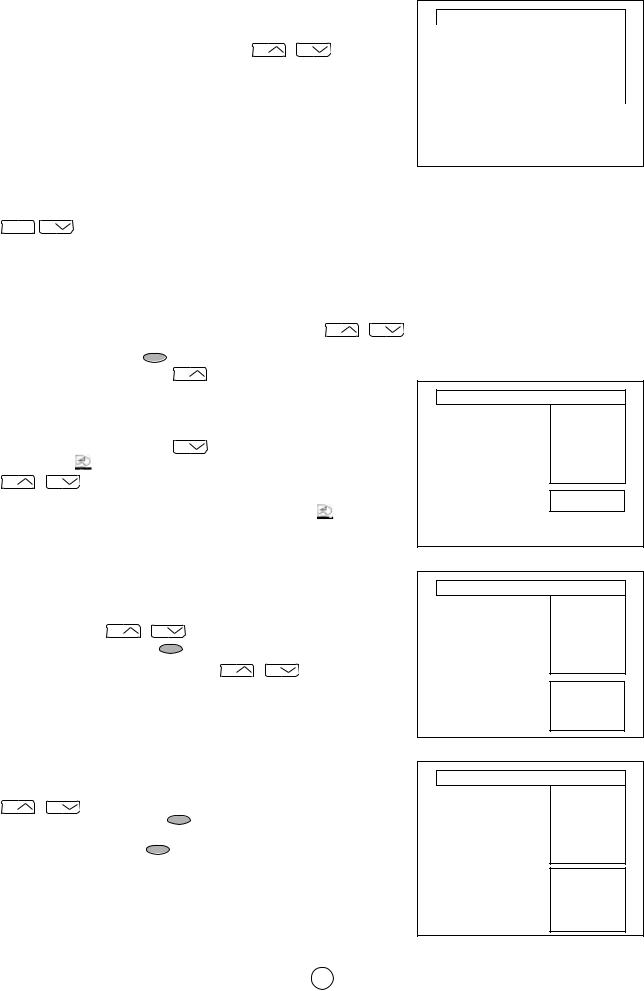
Stored programmes
When the TV has finished the automatic search, the «Stored programmes» menu will appear on screen with a list of the channels, which have been memorised with the available options:
a) Select programme to be edited CH |
/ CH . |
b)«Edit this program» RED button  .
.
c)«Go to sorting mode» GREEN button  .
.
d)«Delete this program» YELLOW button  .
.
e)«Exit this menu» BLUE button  .
.
With these options, you will be able to organise the real channels (CH **) memorised in the TV programmes (Pr 01 ... Pr 99) and put them into your own preferred order.
The following is a detailed explanation of options a), b), c), d) and e).
a) Select a programme to be edited.
Use this option to select a programme from the list. Each time you press CH / CH the memorised channel will be viewed and will remain selected on the list by means of white letters.
b) «Edit this program» (Change of name)
Use this option for giving a name made up of four digits to the channels or for changing the one, which appears on some channels, in the following
way: |
|
|
|
|
b.1 |
Select the channel using the Cursor UP/DOWN buttons CH |
/ CH |
||
(marked in white letters). |
|
|
|
|
b.2 |
Press the RED button |
to see the Edit name mode. |
|
|
b.3 |
Press the Cursor UP button |
CH |
to change the first letter. |
|
Letters A to Z of the alphabet, a blank space and the numbers 0 to 9 will appear sequentially. Some of the broadcasting stations names such as BBC1 or ITV are already incorporated in the TV and appear among the
alphabet to make this task easier. |
|
|
||
Press the Cursor DOWN button CH |
to go backwards in the sequence. |
|||
b.4 Press the |
buttons for changing the position of the cursor and the |
|||
CH |
/ CH |
buttons for changing the letters (repeat this action for other |
||
letters). |
|
|
|
|
When you have finished the fourth letter, press the Cursor |
button to |
|||
quit the Change of Name option. |
|
|
||
c) «Go to sorting mode» (Sorting channels)
Use this option for sorting the channels (CH) into the desired programme (Pr), as follows:
c.1 |
Select the programme |
(Pr) you wish to change using Cursor |
|
UP/DOWN buttons CH / |
CH |
(marked in white letters). |
|
c.2 |
Press the GREEN button |
to see the Sorting mode. |
|
c.3 |
Press the Cursor UP/DOWN buttons CH / CH to move the |
||
channel (CH) to the required position (marked in red letters on a black background).
c.4 Press the GREEN button  to finish.
d) «Delete this program» (Delete channels)
Use this option for cancelling programmes, which are badly tuned or
repeated. |
|
|
|
d.1 |
Select the channel you wish to delete using Cursor UP/DOWN buttons |
||
CH |
/ CH |
(marked in white letters). |
|
d.2 |
Press the YELLOW button |
to see the Delete mode. |
|
d.3 |
The TV will ask for confirmation that you wish to cancel, and you must |
||
press the YELLOW button |
again. The channels that follow it on the |
||
list will automatically rearrange themselves by moving up one programme (Pr) place, to restore the space of the cancelled channel (CH).
e) «Exit this menu»
Use this option to quit the menu by pressing the BLUE button  .
.
12
«Stored programmes» menu
Stored programmes:
|
|
Pr 01 |
CH21 |
BBC1 |
|
|
Pr 02 |
CH31 |
BBC2 |
|
|
Pr 03 |
CH41 |
ITV |
|
|
Pr 04 |
CH51 |
CH4 |
|
|
Pr 05 |
CH61 |
CNN |
|
|
Pr 06 |
- - - - |
- - - - |
|
|
Pr 07 |
- - - - |
- - - - |
|
|
Pr 08 |
- - - - |
- - - - |
|
|
Pr 09 |
- - - - |
- - - - |
|
|
Pr 10 |
- - - - |
- - - - |
|
|
|
|
|
(red) |
Edit this program |
|
|
|
(green) |
Go to sorting mode |
|
|
|
(yellow) |
Delete this program |
|
|
|
(blue) |
Exit this menu |
|
|
|
|
|
|
|
|
«Edit this program» Edit name mode
Stored programmes:
Pr 01 |
CH21 |
BBC1 |
Pr 02 |
CH31 |
BBC2 |
Pr 03 |
CH41 |
ITV |
Pr 04 |
CH51 |
CH4 |
Pr 05 |
CH61 |
CNN |
Pr 06 |
- - - - |
- - - - |
Pr 07 |
- - - - |
- - - - |
Pr 08 |
- - - - |
- - - - |
Pr 09 |
- - - - |
- - - - |
Pr 10 |
- - - - |
- - - - |
Press the MENU button to exit.
«Go to sorting mode» Sorting mode
Stored programmes:
Pr 01 |
CH21 |
BBC1 |
Pr 02 |
CH31 |
BBC2 |
Pr 03 |
CH41 |
ITV |
Pr 04 |
CH51 |
CH4 |
Pr 05 |
CH61 |
CNN |
Pr 06 |
- - - - |
- - - - |
Pr 07 |
- - - - |
- - - - |
Pr 08 |
- - - - |
- - - - |
Pr 09 |
- - - - |
- - - - |
Pr 10 |
- - - - |
- - - - |
Insert the marked programme in the position you wish.
Press green button to finish.
«Delete this program» Delete mode
Stored programmes:
Pr 01 |
CH21 |
BBC1 |
Pr 02 |
CH31 |
BBC2 |
Pr 03 |
CH41 |
ITV |
Pr 04 |
CH51 |
CH4 |
Pr 05 |
CH61 |
CNN |
Pr 06 |
- - - - |
- - - - |
Pr 07 |
- - - - |
- - - - |
Pr 08 |
- - - - |
- - - - |
Pr 09 |
- - - - |
- - - - |
Pr 10 |
- - - - |
- - - - |
WARNING! This programme will be erased. Press yellow button again to confirm.
Or press any other button to cancel
Downloaded from: http://www.usersmanualguide.com/
Switching on
Power supply on/off buton
This TV memorizes the Mode last used when it was switched off. When the main power button (® ) is pressed to turn on the set, the power indicator will light and the set will resume in either the Stand-by mode or Programme mode, depending upon its condition when it was switched off.
On-Off/Stand-by button
Power Indicator
Main power button
When the TV is in Stand-by mode, to turn ON the TV press the Stand-by button ( TV) on the remote control, or one of the four buttons on the TV (V
 /\, VCH/\). The TV will change from Stand-by mode to Program mode and an image will appear on the screen. Press the Stand-by button (
 TV) again and the TV will return to Stand-by mode.
Blue back off timer
If noise appears in TV or VCR mode, the screen turns blue. The blue back off-timer is then engaged and will automatically switch the set to Stand-by mode after 15 minutes.
13
Downloaded from: http://www.usersmanualguide.com/
 Loading...