

Page 1

TAC Vista
TAC Pangaea
WorkStation
TAC Xenta 280/300/401
Product Manual
Page 2

Page 3

TAC Vista
TAC Xenta 280/300/401
Product Manual
Page 4

Copyright © 2007-2011 Schneider Electric Buildings AB. All rights reserved.
This document, as well as the product it refers to, is only intended for licensed users. Schneider Electric Buildings AB owns the copyright of
this document and reserves the right to make changes, additions or deletions. Schneider Electric Buildings AB assumes no responsibility for
possible mistakes or errors that might appear in this document.
Do not use the product for other purposes than those indicated in this document.
Only licensed users of the product and the document are permitted to use the document or any information therein. Distribution, disclosure,
copying, storing or use of the product, the information or the illustrations in the document on the part of non-licensed users, in electronic or
mechanical form, as a recording or by other means, including photo copying or information storage and retrieval systems, without the express
written permission of Schneider Electric Buildings AB, will be regarded as a violation of copyright laws and is strictly prohibited.
Trademarks and registered trademarks are the property of their respective owners.
Page 5

TAC Xenta, TAC Xenta 280/300/401 Contents
Contents
INTRODUCTION
1 About this Manual 9
1.1 Structure..................................................................................................................... 9
1.2 Typographic Conventions.......................................................................................... 10
1.3 Prerequisites............................................................................................................... 10
REFERENCE
2 TAC Xenta Components 13
2.1 Hardware Units ................................................................................................ ..... ..... 13
2.2 Configurations............................................................................................................ 14
2.3 Communications ........................................................................................................ 15
3 Technical Description 17
3.1 The TAC Xenta 280 Controller........................................................................ ..... ..... 17
3.1.1 Terminals.................................................................................................................... 17
3.1.2 Jacks........................................................................................................................... 18
3.1.3 LED Indicators and Service pin................................................................................. 19
3.1.4 Technical Data TAC Xenta 280................................................................................. 20
3.2 The TAC Xenta 300 Controller........................................................................ ..... ..... 21
3.2.1 Terminals.................................................................................................................... 21
3.2.2 Jacks........................................................................................................................... 23
3.2.3 LED Indicators and Service pin................................................................................. 23
3.2.4 Technical Data TAC Xenta 300................................................................................. 24
3.3 The TAC Xenta 401 Controller........................................................................ ..... ..... 25
3.3.1 Terminals.................................................................................................................... 25
3.3.2 Jacks........................................................................................................................... 25
3.3.3 LED Indicators and Service pin................................................................................. 26
3.3.4 Technical Data TAC Xenta 401................................................................................. 27
4 Installation 29
4.1 Mounting the Controller............................................................................................. 29
4.2 Electrical Installation ................................................................................................. 30
4.2.1 General Considerations.............................................................................................. 30
4.2.2 Cabinet Connections .................................................................................................. 32
4.2.3 Cables......................................................................................................................... 34
4.3 Terminations .............................................................................................................. 39
4.3.1 The TAC Xenta OP Operator Panel........................................................ ..... .... .......... 42
5 Configuring your System 45
5.1 Overview.................................................................................................................... 45
Schneider Electric Buildings AB, June 2011 5 (74)
04-00067-02-en
Page 6

Contents TAC Xenta, TAC Xenta 280/300/401
5.2 A Single TAC Xenta 280/300/401 Controller............................................................ 46
5.2.1 Initial Check ............................................................................................................... 46
5.2.2 OP Panel Activities..................................................................................................... 47
5.3 Two or more TAC Xenta 280/300/401 Units............................................................. 47
5.3.1 Initial Check ............................................................................................................... 47
5.3.2 Device Configuration ................................................................................................. 47
5.3.3 OP Panel Activities..................................................................................................... 48
5.4 Additional I/O Units................................................................................................... 48
5.4.1 Selecting I/O Modules................................................................................................ 48
5.4.2 Initial Check ............................................................................................................... 49
5.4.3 I/O Module Configuration.......................................................................................... 49
5.5 Setting the Date and Time.......................................................................................... 50
5.6 Clearing the Xenta Application..................................... ..... ........................................ 51
5.7 Lock a Xenta OP to a specific TAC Xenta Controller............................................... 51
5.7.1 Creating the PVI-block in the Xenta.......................................................................... 51
5.7.2 Enabling the function in TAC Xenta OP.................................................................... 52
6 The TAC Xenta Service Menu 53
6.1 Accessing the Service Menu ...................................................................................... 53
6.2 Submenus 1-8............................................................................................................. 54
6.2.1 Submenu 6: Test dial.................................................................................................. 57
APPENDIX
A Appendix A Restart Values 63
B Appendix B Restart Sequences 67
Index 71
6 (74) Schneider Electric Buildings AB, June 2011
04-00067-02-en
Page 7

INTRODUCTION
1 About this Manual
Page 8

Page 9

TAC Xenta, TAC Xenta 280/300/401 1 About this Manual
1 About this Manual
This manual describes a particular process. For information on certain
products, we refer you to the manual or the Help for the product in question.
For information on how to install software, we refer you to the instructions delivered with the software.
For information on third party products, we refer you to the instructions
delivered with the third party product.
If you discover errors and/or unclear descriptions in this manual, please
contact your Schneider Electric representative.
Note
1.1 Structure
• We are continuously improving and correcting our documentation. This manual may have been updated.
Please check our Docnet site at www.tac.com for the latest version.
The manual is divided into the following parts:
• Introduction
The Introduction section contains information on how this manual
is structured and how it should be used to find information in the
most efficient way.
• Reference
The Reference section contains more comprehensive information
about various parts of the Getting Started section. It also provides
you with information on alternative solutions not covered by the
Getting Started section.
Schneider Electric Buildings AB, June 2011 9 (74)
04-00067-02-en
Page 10

1 About this Manual TAC Xenta, TAC Xenta 280/300/401
!
1.2 Typographic Conventions
Throughout the manual the following specially marked texts may occur.
Warning
• Alerts you that failure to take, or avoid, a specific action might
result in physical harm to you or to the hardware.
Caution
• Alerts you to possible data loss, breaches of security, or other
more serious problems.
Important
• Alerts you to supplementary information that is essential to the
completion of a task.
Note
• Alerts you to supplementary information.
Tip
• Alerts you to supplementary information that is not essential to
Advanced
• Alerts you that the following information applies to complex
1.3 Prerequisites
To be able to profit from the contents in this manual, it is recommended
that you read the following documents:
• TA C Xenta 280 Programmable Controller datasheet
the completion of the task at hand.
tasks or tasks restricted by access.
• TA C Xenta 300 Programmable Controller datasheet
• TA C Xenta 400 Controller, freely programmable datasheet
10 (74) Schneider Electric Buildings AB, June 2011
04-00067-02-en
Page 11

REFERENCE
2 TAC Xenta Components
3 Technical Description
4 Installation
5 Configuring your System
6 The TAC Xenta Service Menu
Page 12

Page 13

TAC Xenta, TAC Xenta 280/300/401 2 TAC Xenta Components
TAC Xenta 280 or 300 controller
12 13 14 15 16 17 18 20
TAC Xenta 401 controller
Operator panel
12 13 14 15 16 17 18 20
I/O expansion module
2 TAC Xenta Components
2.1 Hardware Units
The TAC Xenta 280/300/400 family consists of the following units:
• The TAC Xenta 280/300/401 controller. The controller contains
the database of the inputs and outputs of the TAC Xenta system. It
also contains the system and application software for all the functions that are to be performed by the controller and the connected
peripheral units.
• TAC Xenta OP. The operator panel includes control buttons while
a screen displays the values and menus. TAC Xenta OP can be
connected to any controller in the network.
I/O expansion modules. These can be used to extend the number of
inputs and outputs on a TAC Xenta 300/401 controller.
The I/O modules are described in a separate manual, TAC Xenta 400 I/
O Modules.
Schneider Electric Buildings AB, June 2011 13 (74)
04-00067-02-en
Fig. 2.1: The basic units of the TAC Xenta: the controller, the operator
panel, and an I/O expansion module
Page 14

2 TAC Xenta Components TAC Xenta, TAC Xenta 280/300/401
Inputs Outputs I/O Modules See section
TAC Xenta 280 3.1
TAC Xenta 281 6 6 none
TAC Xenta 282 8 8 none
TAC Xenta 283 6 6 none
TAC Xenta 300 3.2
TAC Xenta 301 12 8 up to 2
TAC Xenta 302 12 8 up to 2
TAC Xenta 401 none none up to 10 3.3
A number of controllers and I/O modules can form a local network and
exchange data.
The TAC Xenta OP operator panel allows the user to:
• Obtain access to certain parameters
• Monitor the system status
• Adjust setpoints and time channels
• Display alarms (without communicating with a central system)
Up to two OPs may be connected to each controller.
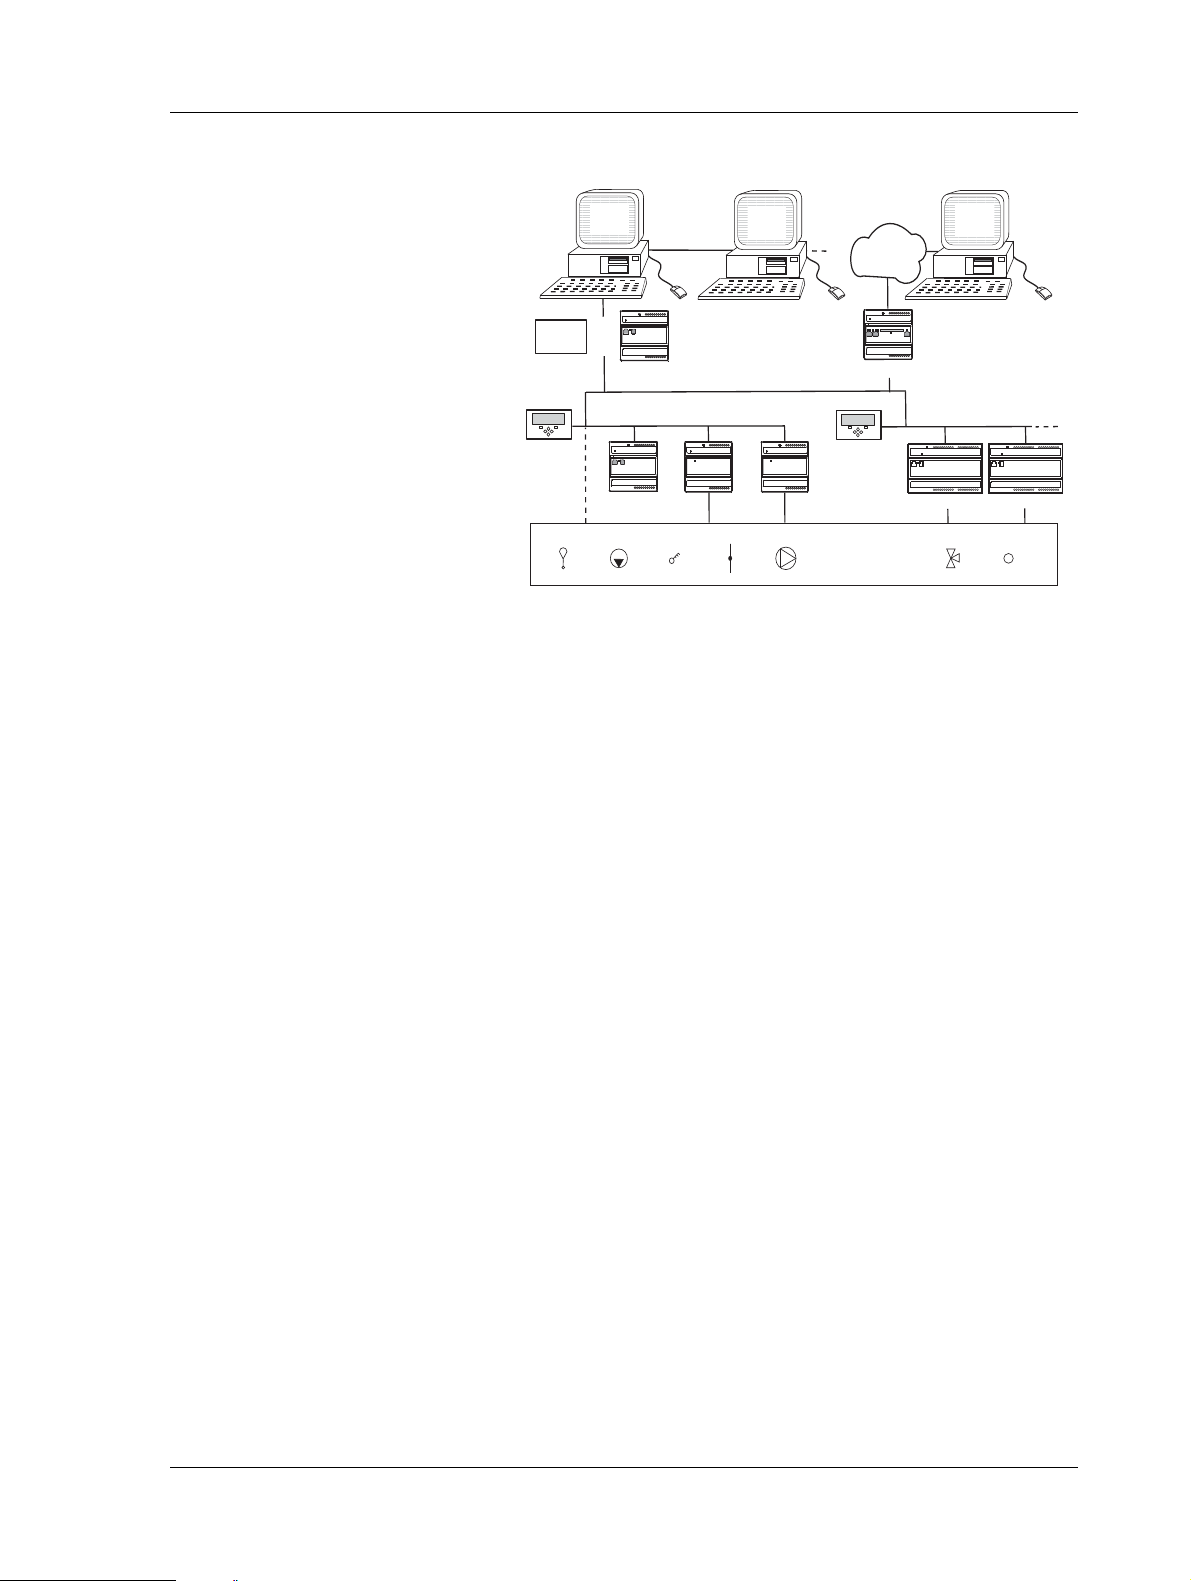
2.2 Configurations
The TAC Xenta controllers can be used in different configurations, for
example:
• As stand-alone units (for a TAC Xenta 401 with at least one I/O
module).
• With controllers and OPs in a network, with extra I/O modules as
required (no I/O modules for the TAC Xenta 280).
• With controllers, OPs, I/O modules and other equipment in a full
network with suitable adapters, possibly with connections to a
TAC Vista Central System.
14 (74) Schneider Electric Buildings AB, June 2011
04-00067-02-en
Page 15
TAC Xenta, TAC Xenta 280/300/401 2 TAC Xenta Components
+
-
TAC
Vista
TAC Xenta OP
TP/FT-10
TAC Xenta OP
TAC Xenta 401
TAC Xenta 281
TAC Xenta 901
TAC
Vista
TAC Xenta 511
TAC Xenta 301
Management
level
Automation
level
Field
level
I/O ModuleorI/O Module
Web
Browser
IP Network
PCLTA
card
Fig. 2.2: A TAC Xenta network example
2.3 Communications
The TAC Xenta units communicate with each other in a network using
a common bus, Echelon® L
10). Additional I/O units also connect to the network and may be added
as required. An I/O unit can only be associated with one controller.
Explicit L
operator panel and the controller.
The L
defined on foreign equipment.
The Functional Block applications are modeled as true L
troller Objects.
The Network Variable interface (including the Standard Network Variable Types, SNVTs) can be customized, and External Interface Files
(XIFs) can be generated in the field using the TAC Menta tool. Available SNVTs are listed in an appendix to the Engineering Applications
in TAC Menta manual.
When connected to a TAC Vista Central System, the operating conditions of equipment such as fans, pumps, and recovery units can be displayed as graphs on the monitor and printed as reports. All temperatures
and alarms may be read, while setpoints and time settings may be
altered as required
TAC Xenta controllers can be reached from TAC Vista in many ways.
Using LonWorks in the Xenta controller, some examples are:
• From a PCLTA card in some form, directly on the PC.
ONWORKS® Free Topology 78 kbps (FTT-
ONTALK® messages are used in communications between the
ONTALK protocol makes it possible to use Network Variables,
ONMARK Con-
Schneider Electric Buildings AB, June 2011 15 (74)
04-00067-02-en
Page 16

2 TAC Xenta Components TAC Xenta, TAC Xenta 280/300/401
• Via the LTA function in the TAC Xenta 911.
• Via the LTA function in the TAC Xenta 511.
• Using the TAC Xenta 901.
• Via an Ethernet/LON gateway.
Using the serial channel in the Xenta controller, for example:
• Directly connected to a PC serial channel.
• Connected to a PC serial channel via a telephone modem.
• Connected to a PC serial channel via the IP modem function of the
TAC Xenta 911.
Starting from v 3.1, application programs generated in TAC Menta may
be downloaded from TAC Vista via the network.
The TAC Xenta 280/300/401 can communicate as follows:
• It can send alarm and trend logging (versions 3.2 and higher) messages.
• It can answer requests for the status of inputs and outputs.
• It can send/ any of the parameters/variables in the program which
are freely available (“Public signal”).
• It can communicate with other T AC Xenta controllers to exchange
data.
• It can communicate with the Operator Panel, the I/O-modules, and
TAC Vis ta.
For further details, please consult the TAC Vista IV, Engineering Clas-
sic/LNS Network manuals.
RS232
The TAC Xenta 280/300/401 controller has an RS232 port that can be
used to:
• Load the system software.
• Load the application software from the TAC Menta programming
tool.
• Connect to TAC Menta when used as a commissioning tool.
• Connect a specific controller directly to T AC V ista or via a modem
(modem connection not available with TAC Xenta 280).
• Retrieve the “System Error Log File” using the “Xenta System
Error Log Viewer”.
16 (74) Schneider Electric Buildings AB, June 2011
04-00067-02-en
Page 17

TAC Xenta, TAC Xenta 280/300/401 3 Technical Description
3 Technical Description
3.1 The TAC Xenta 280 Controller
Fig. 3.1: The TAC Xenta 280 controller
3.1.1 Terminals
The TAC Xenta 281, 282 and 283
The TAC Xenta 280 has three I/O configurations, called the TAC Xenta
281, 282, and 283.
No external TAC Xenta 400 I/O modules can be used.
Digital
inputs
Term. notation
TAC Xenta 281 2-43-3
TAC Xenta 282 2244-4
TAC Xenta 283 24 --6-
XBUKVY
Thermistor
inputs
Universal inputs
Relay
outputs
TRIAC
outputs
Analog
outputs
Schneider Electric Buildings AB, June 2011 17 (74)
04-00067-02-en
Page 18

3 Technical Description TAC Xenta, TAC Xenta 280/300/401
20
17
18
16
19
15
12
13
11
14
40
37
38
36
39
35
32
33
31
34
10
7
8
6
9
5
2
3
1
4
30
27
28
26
29
25
22
23
24
21
K2
KC1
K1
Y2
G0
Y1
G
M
X2
M
M
X1
M
U4
U3
U2
C2
U1
M
C1
K3
KC2
0~24 V
AC/DC
}
Comm
{
max 230 V AC
Y3
M
TAC Xenta 281
max 230 V AC
20
17
18
16
19
15
12
13
11
14
40
37
38
36
39
35
32
33
31
34
10
7
8
6
9
5
2
3
1
4
30
27
28
26
29
25
22
23
24
21
K4
KC2
KC1
K2
K1
K3
M
Y4
Y3
Y2
G0
Y1
G
M
X2
M
M
X1
M
B2
M
M
U4
U3
B1
U2
C2
U1
M
C1
0~24 V
AC/DC
}
Comm
{
TAC Xenta 282
20
17
18
16
19
15
12
13
11
14
40
37
38
36
39
35
32
33
31
34
10
7
8
6
9
5
2
3
1
4
30
27
28
26
29
25
22
23
24
21
V2
V6
V5
V1
G0
G
X2
M
M
X1
B3
M
B2
B4
M
M
B1
C2
M
C1
V3
V4
0
~
24 V
AC/DC
}
Comm
{
24 V AC
VC
TAC Xenta 283
Fig. 3.2: The terminals of the TAC Xenta 281, 282, and 283
Inputs
All TAC Xenta 280 controllers have digital inputs (X).
The TAC Xenta 281 and 282 have universal (analog or digital, U)
inputs. The universal inputs can be used for three types of signals:
• TAC thermistor 1.8 kohm at 25 °C (the same as the thermistor
inputs)
• Voltage input 0–10V
• open/closed contact (the same as the digital inputs).
The TAC Xenta 282 also has thermistor inputs (labeled B) for
1.8 kohm.
The TAC Xenta 283 has thermistor inputs (labelled B) that can be used
with either 1.8 kohm or 10 kohm thermistors.
All controller inputs are protected from transients, in compliance with
the EN 50082-1 norm.
Outputs
The TAC Xenta 281 and 282 have the following outputs;
• Analog (Y) — 0–10V DC outputs
• Digital (K) — relay potential-free outputs
While the TAC Xenta 283 has TRIAC (V) — outputs capable of supplying inductive loads.
3.1.2 Jacks
18 (74) Schneider Electric Buildings AB, June 2011
The TAC Xenta 280 has two modular jacks–one for the TAC Xenta OP
operator panel and one for an RS232 connection with TAC Menta.
The socket for the operator panel provides it with 24V AC or DC,
depending on the supply.
04-00067-02-en
Page 19

TAC Xenta, TAC Xenta 280/300/401 3 Technical Description
Service pin
Red service diode
indicates a non-configured
node or a hardware fault
Green status diode indicates that the program is running
At distances greater than 10 m (32 ft.) between the TAC Xenta controller and the OP, an external power supply should be used. In addition, the
communications connection has to follow the same rules as for other
nodes.
Jack for the
RS232/modem
Fig. 3.3: Location of jacks on the TAC Xenta 280 controller
3.1.3 LED Indicators and Service pin
The Service pin can be activated through a small hole on the front. Also
on the front, there are two LED indicators–one red and one green.
Jack for the
Operator panel
Fig. 3.4: LED Indicators and Service Pin
The red service diode is primarily an error indication. It also lights up if
the Service pin is activated.
The green status diode blinks once per second to indicate that the program is running.
Schneider Electric Buildings AB, June 2011 19 (74)
04-00067-02-en
Page 20

3 Technical Description TAC Xenta, TAC Xenta 280/300/401
3.1.4 Technical Data TAC Xenta 280
Note
• For a complete list of updated technical data for the Xenta 280
controller, see the TAC Xenta 280 Programmable Controller
datasheet (003-2248).
Program cycle time min. 1 s
Universal inputs (TAC Xenta 281, 282: U1–U4):
A/D-resolution 12 bits
–as Thermistor Inputs
Supply voltage 0.6V DC
Thermistor inputs (B1–B2, only TAC Xenta 282):
A/D-resolution 12 bits
Accuracy (Measuring range):
–50 °C to –30 °C (–58 °F to –22 °F) ±4 °C (±7.2 °F)
–30 °C to –10 °C (–22 °F to +14 °F) ±2 °C (±3.6 °F)
–10 °C to +10 °C (14 °F to 50 °F) ±1 °C (±1.8 °F)
+10 °C to +30 °C (50 °F to 86 °F) ±0.5 °C (±0.9 °F)
+30 °C to +60 °C (86 °F to 140 °F) ±1 °C (±1.8 °F)
+60 °C to +120 °C (140 °F to 248 °F) ±2 °C (±3.6 °F)
+120 °C to +150 °C (248 °F to 302 °F) ±4 °C (±7.2 °F)
Thermistor inputs (B1–B4, only TAC Xenta 283):
A/D-resolution 10 bits
Accuracy (Measuring range):
–20 °C to –10 °C (–4 °F to +14 °F) ±2 °C (±3.6 °F)
–10 °C to +10 °C (14 °F to 50 °F) ±1 °C (±1.8 °F)
+10 °C to +30 °C (50 °F to 86 °F) ±0,5 °C (±0.9 °F
+30 °C to +60 °C (86 °F to 140 °F) ±1 °C (±1.8 °F)
+60 °C to +90 °C (140 °F to 194 °F) ±2 °C (±3.6 °F)
+90 °C to +120 °C (194 °F to 248 °F) ±4 °C (±7.2 °F
TRIAC outputs (TAC Xenta 283 only, V1–V6)
Load may require auxiliary power
(term. 40) of up to
Pulse length (TAC Menta DOPU
block)
72 VA
min. 0.5 s
Analog outputs (TAC Xenta 281: Y1–Y3, TAC Xenta 282: Y1–
Y4):
D/A-resolution 12 bits
a
:
20 (74) Schneider Electric Buildings AB, June 2011
04-00067-02-en
Page 21

TAC Xenta, TAC Xenta 280/300/401 3 Technical Description
a. If the active sensor (0–10V), analog actuators and the TAC Xenta con-
troller itself are supplied by the same transformer, the following restrictions will ensure the specified accuracy (for thermistor inputs,
universal inputs, and analog outputs):
Cable length from controller to:
Transformer: 3 m (10 ft.)
Active sensor/actuator: 20 m (65 ft.)
Number of active sensors: max. 4
Number of actuators: max.6
Network communication (C1–C2, polarity insensitive):
Protocol FTT-10, L
ONTALK®
Communication speed 78 kbits/s
Other communication:
TAC Menta RS232, up to 9600 bits/
s, RJ45
TAC Vista (version IV or higher
TP/FT-10, screw term.
required), also for appl.pgm download
TAC Xenta OP TP/FT-10, modular
jack
3.2 The TAC Xenta 300 Controller.
Fig. 3.5: The TAC Xenta 300 controller
3.2.1 Terminals
TAC Xenta 301 and 302
TAC Xenta 300 has two I/O configurations: TAC Xenta 301 and TAC
Xenta 302.
Digital
inputs
Thermistor
inputs
Universal
inputs
Relay
outputs
Analog
outputs
Term. notation
Schneider Electric Buildings AB, June 2011 21 (74)
04-00067-02-en
XB UKY
Page 22

3 Technical Description TAC Xenta, TAC Xenta 280/300/401
Digital
inputs
Thermistor
inputs
Universal
inputs
Relay
outputs
Analog
outputs
TAC Xen ta 301 44 462
TAC Xen ta 302 44 444
max 230 V AC
K4
KC2
K3
K2
KC1
K1
Y4
M
Y3
Y2
M
Y1
G0
G
0
}
19-40 V DC
~
24 V AC or
Comm
X4
20
M
19
X3
18
X2
17
M
16
X1
15
B4
14
M
13
B3
12
B2
11
10
M
9
B1
8
U4
7
M
6
U3
5
U2
4
M
3
U1
2
C2
{
1
C1
40
39
38
37
36
35
34
33
32
31
30
29
28
27
26
25
24
23
22
21
TAC Xenta 301
max 230 V AC
K4
KC2
K3
K2
KC1
K1
K6
KC3
K5
Y2
M
Y1
0
G0
~
G
24 V AC or
}
19-40 V DC
Comm
X4
20
M
19
X3
18
X2
17
M
16
X1
15
B4
14
M
13
B3
12
B2
11
10
M
9
B1
8
U4
7
M
6
U3
5
U2
4
M
3
U1
2
C2
{
1
C1
40
39
38
37
36
35
34
33
32
31
30
29
28
27
26
25
24
23
22
21
TAC Xenta 302
Fig. 3.6: The terminals of the TAC Xenta 301 and 302
Inputs
The TAC Xenta 300 controllers have twelve inputs:
• Four thermistor inputs (labeled B1–B4)
• Four universal (analog or digital, U1–U4)
• Four digital (X1–X4).
The universal inputs can be used for three types of signals:
• TAC thermistor 1.8 kohm at 25 °C (the same as the thermistor
inputs)
• Voltage input 0–10V
• Open/closed contact (the same as the digital inputs)
All controller inputs are protected from transients, in compliance with
the EN 50082-1 norm.
Outputs
The TAC Xenta 300 controllers have eight outputs:
• Analog — 0–10V DC outputs
• Digital — relay potential-free outputs
22 (74) Schneider Electric Buildings AB, June 2011
04-00067-02-en
Page 23

TAC Xenta, TAC Xenta 280/300/401 3 Technical Description
3.2.2 Jacks
The TAC Xenta 300 has two modular jacks–one for the TAC Xenta OP
operator panel and one for an RS232 connection with TAC Menta.
The socket for the operator panel provides it with 24V AC or DC,
depending on the supply.
At distances greater than 10 m (32 ft.) between the TAC Xenta controller and the OP, an external power supply should be used. In addition, the
communications connection has to follow the same rules as for other
nodes.
Jack for the
RS232/modem
Fig. 3.7: Location of jacks on the TAC Xenta 280 controller
3.2.3 LED Indicators and Service pin
The Service pin can be activated through a small hole on the front. Also
on the front are two LED indicators–one red and one green.
Red service diode
indicates a non-configured
node or a hardware fault
Jack for the
Operator panel
Service pin
Green status diode indicates that the program is running
Fig. 3.8: LED Indicators and Service Pin
The red service diode is primarily an error indication. It also lights up if
the Service pin is activated.
The green status diode blinks once per second to indicate that the program is running.
Schneider Electric Buildings AB, June 2011 23 (74)
04-00067-02-en
Page 24

3 Technical Description TAC Xenta, TAC Xenta 280/300/401
3.2.4 Technical Data TAC Xenta 300
Note
• For a complete list of updated technical data for the Xenta 300
controller, see the TAC Xenta 300 Programmable Controller
datasheet (003-1302).
Real-time clock:
Power outage TAC Xenta 301 2
Program cycle time min. 1 s
Universal inputs (U1–U4):
Quantity 4
–as Thermistor Inputs
Supply voltage 0.6V DC
Thermistor inputs (B1–B4):
A/D-resolutiony 12 bits
Accuracy (Measuring range):
–50 °C to –30 °C (–58 °F to –22 °F) ±4 °C (±7.2 °F)
–30 °C to –10 °C (–22 °F to +14 °F) ±2 °C (±3.6 °F)
–10 °C to +10 °C (14 °F to 50 °F) ±1 °C (±1.8 °F)
+10 °C to +30 °C (50 °F to 86 °F) ±0.5 °C (±0.9 °F)
+30 °C to +60 °C (86 °F to 140 °F) ±1 °C (±1.8 °F)
+60 °C to +120 °C (140 °F to 248 °F) ±2 °C (±3.6 °F)
+120 °C to +150 °C (248 °F to 302 °F) ±4 °C (±7.2 °F)
Digital outputs (K1–K6 or K1–K4):
Control voltage, relay outputs to be protected by max. 10 A fuse
Pulse length (TAC Menta DOPU
block)
Analog outputs (Y1–Y2 or Y1–Y4)
Quantity
D/A-resolution 12 bits
Network communication (C1–C2, polarity insensitive):
Protocol FTT-10, L
Communication speed 78 kbits/s
¨
min. 0.5 s
1
ONTALK®
1
If the active sensor (0–10V), analog actuators, and the TAC Xenta controller itself are supplied by the same transformer, the following restrictions will ensure the specified accuracy (for thermistor inputs, universal
inputs, and also for analog outputs):
24 (74) Schneider Electric Buildings AB, June 2011
04-00067-02-en
Page 25

TAC Xenta, TAC Xenta 280/300/401 3 Technical Description
12 13 14 15 16 17 18 20
Cable length from controller to:
Transformer: 3 m (10 ft.)
Active sensor/actuator: 20 m (65 ft.)
Number of active sensors: max. 4
Number of actuators: max. 6
3.3 The TAC Xenta 401 Controller
Fig. 3.9: The TAC Xenta 401 controller
3.3.1 Terminals
3.3.2 Jacks
The TAC Xenta 401 controller uses four of the screw terminals–two for
power supply and two for network communication.
24 V AC
(19-40 V DC)
Comm
}
}
~ 0
G G0 C1C2
1 2 3 4 5 6 7 8 9 10
11 12 13 14 15 16 17 18 19 20
Fig. 3.10: The terminals of the TAC Xenta 401
The TAC Xenta 401 has two modular jacks–one for the TAC Xenta OP
operator panel and one for an RS232 connection with TAC Menta.
The socket for the operator panel provides it with 24V AC or DC,
depending on the supply.
At distances greater than 10 m (32 ft.) between the TAC Xenta controller and the OP, an external power supply should be used. In addition, the
Schneider Electric Buildings AB, June 2011 25 (74)
04-00067-02-en
Page 26

3 Technical Description TAC Xenta, TAC Xenta 280/300/401
Jack for the
RS232/modem
Jack for the
Operator panel
Service pin
Red service diode
indicates a non-configured
node or a hardware fault
Green status diode indicates that the program is running
communications connection has to follow the same rules as for other
nodes.
Fig. 3.11: Location of jacks on the TAC Xenta 280 controller
3.3.3 LED Indicators and Service pin
The Service pin can be activated through a small hole on the front. Also
on the front, there are two LED indicators–one red and one green.
Fig. 3.12: LED Indicators and Service Pin
The red service diode is primarily an error indication. It also lights up if
the Service pin is activated.
The green status diode blinks once per second to indicate that the program is running.
26 (74) Schneider Electric Buildings AB, June 2011
04-00067-02-en
Page 27

TAC Xenta, TAC Xenta 280/300/401 3 Technical Description
3.3.4 Technical Data TAC Xenta 401
Note
• For a complete list of updated technical data for the Xenta 280
controller, see the TAC Xenta 400 Controller, freely programma-
ble datasheet (003-1629).
Program cycle time min. 1 s
Network communication (C1–C2; polarity insensitive):
Protocol FTT-10, L
Communication speed 78 kbits/s
ONTALK®
Schneider Electric Buildings AB, June 2011 27 (74)
04-00067-02-en
Page 28

3 Technical Description TAC Xenta, TAC Xenta 280/300/401
28 (74) Schneider Electric Buildings AB, June 2011
04-00067-02-en
Page 29

TAC Xenta, TAC Xenta 280/300/401 4 Installation
4 Installation
4.1 Mounting the Controller
The TAC Xenta 280/300/401 controller is designed to be mounted on a
DIN rail inside a cabinet. The controller can also be mounted directly
on a wall. A wide range of standard enclosures meeting DIN 43 880,
with different enclosure ratings, are available for wall mounting.
The enclosure primarily consists of a terminal part containing screw terminals, and an electronics part where the printed circuit boards are situated. The enclosure is designed in such a way that the entire electrical
installation can be connected to the screw terminals of the terminal part
when mounted on a DIN rail or on a wall.
Fig. 4.1: The terminal part (left) and the electronics part (right) of the
TAC Xenta 401
The operator panel can be mounted in the front of the cabinet or on top
of a TAC Xenta controller, or it can be held in the hand.
Fig. 4.2: The TAC Xenta 280/300 controller and the TAC Xenta OP
operator panel mounted on a DIN rail
Schneider Electric Buildings AB, June 2011 29 (74)
04-00067-02-en
Page 30

4 Installation TAC Xenta, TAC Xenta 280/300/401
148 – 2.0 (5.83 – 0.08)
4.0
(0.16)
48 – 0,5
(1.89–0.02)
16.1
(0.63)
180 (7.09)
77.4 (3.05)
45
(1.77)
110
(4.33)
180 + 0.4 (7.09 + 0.02) to the next TAC Xenta 280/300/3000
174 + 0.4 (6.85 + 0.02) to the next TAC Xenta 400/500/900
70 –2.0 (2.76 –0.08)
10.1
(0.40)
90 (3.54)
77.4 (3.05)
45
(1.77)
2 3 4 5 6 7 8 10
12 13 14 15 16 17 18 20
90 + 0.4 (3.54 + 0.02) to the next TAC Xenta 400/500/900
96 + 0.4 (3.78 + 0.02) to the next TAC Xenta 280/300/3000
4.0
(0.16)
48 – 0,5
(1.89–0.02)
110
(4.33)
Fig. 4.3: Mounting distances for TAC Xenta 280/300
Fig. 4.4: Mounting distances for TAC Xenta 401
4.2 Electrical Installation
4.2.1 General Considerations
The installation is normally treated as a CAT III category (IEC 664), in
30 (74) Schneider Electric Buildings AB, June 2011
principle entailing permanent connection to a 230V AC mains supply.
For the TAC Xenta 280/300 and the I/O modules, this is only applicable
to the relay outputs.
All equipment connected to the controller has to comply with the following standards:
• EN 60 742 (or other relevant safety standard; for example ETL
listing UL 3111-1, first version and CAN/CSA C22.2 No. 1010.1-
04-00067-02-en
Page 31

TAC Xenta, TAC Xenta 280/300/401 4 Installation
~ 0
24 V AC
(19-40 V DC)
}
1 2 3 4 5 6 7 8 9 10
G G0 C1C2
Comm
}
92) for the device(s) that provide an ELV-type power supply (normally 24V AC) to the controller and other connected equipment.
• EN 61 010 or IEC 950 (or other relevant safety standard) for computers, modems, and other equipment supplied by 230V mains.
If equipment using 230 V mains is connected to one of the relay output
terminals on the controller, then low-voltage equipment connected to
the other relay terminals on the controller must provide at least basic
insulation on all touchable parts.
Caution
• We strongly recommend that switches be installed to make it
possible to separate the external equipment when the relay output
terminals control equipment using the 230V mains.
Terminals G, G0 and C1, C2
• Mount the terminal part of the
T AC Xenta 280, 300, or 40 1 on a DIN
rail.
• Connect the cables to the correct terminals (see figure below).
• For the TAC Xenta 401, put the electronics part of the controller
on to the terminal part (the remaining terminals are not used).
Fig. 4.5: Terminals for power supply and network communication
Remaining terminals (TAC Xenta 280 and 300)
For information on the remaining terminal connection, see the
datasheets:
• TAC Xenta 280 Programmable Controller (003-2248)
• TAC Xenta 300 Programmable Controller (003-1302)
Note
• Do not use the unlabeled terminals!
Schneider Electric Buildings AB, June 2011 31 (74)
04-00067-02-en
Page 32

4 Installation TAC Xenta, TAC Xenta 280/300/401
1 2
G G0 U1 M U2 Y1 M Y2 B1 M B2 M U3
G1 G G0
G G0 M X
G G0 MX X1
TAC Xenta 280, 300 or 400 I/O module(s)
PU
230
VAC
G
G0
N
1 2 1 2
G G0 M S
G G0 M S
R =500 Ω
Insulated
signal
ground rail
Cabinet
terminals
R
min 1.5 mm
2
(14 AWG), max 2 m (6.5 ft)
Cabinet
ground
rail
4.2.2 Cabinet Connections
When cabinet mounting is used, jumpers may be used between M (measurement neutral) terminal pairs, as shown in the figure below. All G0
points have to be connected to protective ground.
Fig. 4.6: Skeleton diagram for cabinet connections
When connecting G0 to ground, each TAC Xenta unit has to its own
connection with the ground rail, that is, jumpers cannot be used for the
G0 terminals. Please refer to the figure on the next page.
Several units may share the same ground rail, but every unit with measuring inputs and/or analog outputs has to have all its gr ound connec-
32 (74) Schneider Electric Buildings AB, June 2011
tions with the same ground rail.
In other words, a discontinuity in the ground rail cannot be allowed to
split a controller or separate it from the connected units.
04-00067-02-en
Page 33

TAC Xenta, TAC Xenta 280/300/401 4 Installation
(14 AWG)
TR
G0
2
TAC Xenta 1
G0
PU
G0
TAC Xenta 2
G0
PU
G0
min 1.5 mm
Fig. 4.7: Connections between insulated signal ground rails and the
cabinet ground rail
When a Wall Module (ZS101–105) is connected to the TAC Xenta 280
or 300, the following terminals can be used (term. B2: v 3.0 or later).
2
(14 AWG),
TAC Xenta 282 or 300
G G0 C2 C1 M B1 B2
G
X1 M K1 KC1
Insulated
signal
ground rail
230
VAC
min 1.5 mm
max 2 m (6.5 ft)
G0
N
Cabinet
ground
Cabinet
terminals
rail
ZS 101-105
F0 F1 F2 F3G0 G C2 C1 1 2 3 4 5 6 7 8
2
1
0
3
470 Ω
10 kΩ
(24 V AC)
Fig. 4.8: Skeleton diagram for the connection of Wall Module ZS 101–
105 to TAC Xenta 282 or 300
Schneider Electric Buildings AB, June 2011 33 (74)
04-00067-02-en
Page 34

4 Installation TAC Xenta, TAC Xenta 280/300/401
4.2.3 Cables
G and G0 (Power supply):
G, min. cross-sectional area 0.75 mm² (18 AWG)
G0 to TAC Xenta, min. cross-sectional
area
C1 and C2 (network):
The FTT-10 system allows the user to wire the control devices with
virtually no topology restrictions.
Min. cross-sectional area 0.65 mm² (18 AWG)
Note that the max. wire distance in one segment depends on the type
of wire and the topology.
The wires are polarity insensitive, but they have to be a twisted-pair.
Terminals X (Digital inputs):
Min. cross-sectional area 0.25 mm² (22 AWG)
Max. cable length 200 m (660 ft.)
Terminals U (Universal inputs as digital inputs):
Min. cross-sectional area 0.25 mm² (22 AWG)
Max. cable length 200 m (660 ft.)
Terminals U (Universal inputs, device powered via
the same transformer as the base unit):
Min. cross-sectional area 0.75 mm² (18 AWG)
Max. cable length 20 m (65 ft.)
Terminals U (Universal inputs, measurement device powered via
their own transformer, external or internal):
Min. cross-sectional area 0.25 mm² (22 AWG)
Max. cable length 200 m (660 ft.)
Terminals B, U (as thermistor inputs):
Min. cross-sectional area 0.75 mm² (18 AWG)
Max. cable length
up to 75 °C, cross-sectional area 0.75 mm²75 m (250 ft.)
up to 75 °C, cross-sectional area 1.5 mm²150 m (500 ft.)
up to 150 °C, cross-sectional area 1.5 mm²75 m (250 ft.)
Terminals K1–K6 (Relay outputs):
Cross-sectional area 0.75 – 1.5 mm² (18–14
Max. cable length 200 m (660 ft.)
Terminals V1–V6 (TRIAC outputs):
Cross-sectional area 0.75 – 1.5 mm² (18–14
1.5 mm² (14 AWG)
AWG)
AWG)
34 (74) Schneider Electric Buildings AB, June 2011
04-00067-02-en
Page 35

TAC Xenta, TAC Xenta 280/300/401 4 Installation
Max. cable length 200 m (660 ft.)
Terminals Y (Analog outputs, for actuator powered via
the same transformer as the base unit):
Min. cross-sectional area 0.75 mm² (18 AWG)
Max. cable length 20 m (65 ft.)
Some actuators allow greater cable length, for example:
EM52 0.5 mm².(20 AWG)80 m(260 ft.)three wires
EM15LBB0.75 mm²(18 AWG)80 m(260 ft.)three wires
EM420.75 mm²(18 AWG)80 m(260 ft.)four wires
TAC Forta0.75 mm²(18 AWG)80 m(260 ft.)four wires
Terminals Y (Analog outputs, for actuator powered via
their own transformer, ext. or int.; or when the outputs have isolated
converters):
Min. cross-sectional area 0.25 mm² (22 AWG)
Max. cable length 200 m (660 ft.)
TP/FT-10 Free Topology & Bus Topology Segments
Five cable types have been validated for the TP/FT-10 channel (for use
with the FTT-10A Free Topology Transceiver and LPT-10 Link Power
Transceiver). These cable types are:
Cable Bus Topology Free Topology
Type AWG
Belden 8471
(PVC Jacket)
or equivalent
Belden 85102
(PVC Jacket)
or equivalent
Category 5 24AWG 0.5 900 3 450 250
Level IV cable 22AWG 0.65 1400 3 500 400
JY (st)
Y 2X2X0.8
16AWG 1.3 2700 3 500 400
16AWG 1.3 2700 3 500 500
20.4AWG 0.8 900 3 500 320
Diameter
(mm)
If a Loop is used, the bus polarity has to be observed:
Length
(m)
Stub
(m)
Length
(m)
Stub
(m)
Schneider Electric Buildings AB, June 2011 35 (74)
04-00067-02-en
Page 36

4 Installation TAC Xenta, TAC Xenta 280/300/401
Fig. 4.9: Bus polarity within a loop
TP/XF-1250 Bus Topology Segment
Two cable types have been validated for the TP/XF-1250 channel (for
use with the TPT/XF-1250 Bus Topology Transceiver). These cable
types are:
Cable Type AWG Diameter Bus
TIA 568A
Category 5 Cable
Level IV Cable 22AWG 0.65 mm 130 m 0.3 m
24AWG 0.5 mm 130 m 0.3 m
For the TP/FX-1250 Channel operating in a bus topology, the maximum
bus length of TIA 568A Category 5 cabling is 130 meters, with a maximum stub length of 0.3 meters. There are topology restrictions associated with the use of this channel - refer to www.echelon.com.
Note
• If a shielded cable is used in TP/FT-10, the shield shall be connected to link power source that is ground to a 470kW, 1/4Watt,
> 10%, metal film resistor to prevent static charge buildup.
A gas discharge tube can be connected in parallel with the resistor for
lightning protection.
A restriction for TP/XF-1250 is the 8-in-16 rule, which says that the
number of nodes in an arbitrary 16-meter section of the cable cannot
exceed eight.
If circumstances require that more nodes have to be gathered at a certain
part, this can be done in two ways, while still observing the rule.
1 Add more cable between suitable nodes; remember, though, that
the maximum length of the bus is still 130 m.
2 Split the channel in two by inserting a router in such a way that the
rule is observed for each part.
36 (74) Schneider Electric Buildings AB, June 2011
04-00067-02-en
Page 37

TAC Xenta, TAC Xenta 280/300/401 4 Installation
TAC Xenta 1
C1 C2
C1 C2
C1 C2
C1 C2
TAC Xenta 1
TAC Xenta 2
TAC Xenta 2
470 kΩ
¼ W
If a shielded communication cable is used, the shield can only be
grounded at one point.
Redundant wires (second pair of Siemens J-Y(st)Y) are cut at the end of
the shield.
Fig. 4.10: Connecting the communication cable
Schneider Electric Buildings AB, June 2011 37 (74)
04-00067-02-en
Page 38

4 Installation TAC Xenta, TAC Xenta 280/300/401
5
4
3
2
1
9
8
7
6
GND (Red)
RxD-TxD (Green)
TxD-RxD (Y ellow)
1 3 5 7
2 4 6 8
~10 cm
(4")
TAC Xenta
Modular jacks, 8/8 male,
emission damper and cable
Modular jack, female
(from inside of adapter)
D9, female
(from inside of adapter)
TAC Xenta
RS232 RS232
PC
TxD
RxD
GND
G0G
0 V
230 V
24 V
Earth current
in GND wire
Transformer
Transformer
RS232
Modular jack for RS232 serial comm. portmax. 10 m (32 ft.)
Fig. 4.11: RS232 cable connections and adaptor for PC
Caution
• The G terminal of the TAC Xenta should never be connected to
protective ground. This may cause a short-circuit via a Laptop,
where the earth of the RS232 port is directly connected to protective ground in the power supply.
Fig. 4.12: Incorrect G, G0 connection, short-circuited via the RS232
connection.
38 (74) Schneider Electric Buildings AB, June 2011
04-00067-02-en
Page 39

TAC Xenta, TAC Xenta 280/300/401 4 Installation
13
12
11
10
9
8
7
6
5
4
3
2
1
25
24
23
22
21
20
19
18
17
16
15
14
1 3 5 7
2 4 6 8
DCD
GND
DSR
CTS
RTS
RxD
TxD
DTR
Modular jack, female
(from inside of adapter)
D25 male
This type of connection has to be avoided. One way to protect the circuits is to use battery power on the laptop if you are uncertain of the connections.
TAC Xenta
RS232 RS232
G0G
24 V
TxD
RxD
GND
Fig. 4.13: Correct G, G0 connection
PC
230 V
0 V
4.3 Terminations
Schneider Electric Buildings AB, June 2011 39 (74)
04-00067-02-en
Fig. 4.14: RS232 connection between the TAC Xenta controller and a
modem
Each network segment requires a termination for proper data transmission performance. The terminations are connected differently, depend-
Page 40

4 Installation TAC Xenta, TAC Xenta 280/300/401
To Network
C1
+
R1
C2
+
C1, C2: 100 mF, >50 V
R1: Resistance: see the text
1%, 0,125 W
ing on the network topology. Terminations are sometimes built into a
node in, for example, a linked power supply.
Free Topology Segment
In a Free Topology segment only one termination is required and can be
placed anywhere on the segment.
If there is a router or a repeater, it is convenient to put the termination
near it, generally on the “downstream” side.
If there is a supervisory PC in the segment equipped with a PCLTA
board, a termination on the board can be connected for this segment.
Doubly Terminated Bus Topology Segment
In a doubly terminated bus topology, exactly two terminations are
required – one at each end of the segment – at the true endpoints.
TP/FT-10
The termination is built from the following components, where a total
termination impedance of approximately 53
Ω is required.
Fig. 4.15: Network Terminator for a TP/FT-10 connection
Observe polarity shown for C1 and C2. These capacitors are recommended.
Free topology: one termination with R1 = 52,3 W
Doubly terminated bus topology: two terminations, one on each end of
the segment, each with R1 = 105 W.
A LonWorks termination device (single/double) is available from
Schneider Electric, part no. 007309051.
40 (74) Schneider Electric Buildings AB, June 2011
04-00067-02-en
Page 41

TAC Xenta, TAC Xenta 280/300/401 4 Installation
.15 μF 10%
.33 μF 10%
59
Ω
1%
340
Ω
1%
102
Ω
1%
TP/XF-1250
Doubly terminated bus topology. The termination has a different circuit
diagram from that of TP/FT-10.
Fig. 4.16: Network Terminator for a TPT/XF-1250 connection
With the free topology, connections may be made anywhere on the segment and only one terminator is required.
The total length of all wires of the segment, can be up to 500 m under
optimal conditions. Stub length 3 m.
With the bus topology two terminations - one at each end - are required.
When a TP/FT-10A channel is used, the total length of all wires of the
segment can be up to 2700 m, under optimal conditions. If a TP/XF1250 channel is used, the total length of all wires of the segment can be
up to 130 m, under optimal conditions. Stub length 0.3 m.
Schneider Electric Buildings AB, June 2011 41 (74)
04-00067-02-en
Page 42

4 Installation TAC Xenta, TAC Xenta 280/300/401
4
3
21
C1 C2 G G0
Socket and screw terminals for
TAC Xenta controller connection
TAC Xenta
controller
Socket for connection
to operator panel
4.3.1 The TAC Xenta OP Operator Panel
Cable between the controller and the operator panelmax. 10 m (32 ft.)
There are two ways to connect the operator panel (see figures below):
• Use the modular socket on the front of the TAC Xenta controller
and on the back of the operator panel. A modular jack 4/4 cable is
supplied with the OP for this purpose.
• Use the screw terminals, labeled 1–4, located on the back of the
operator panel. T erminals 1 and 2 are used for communication and
terminals 3 and 4 for 24V AC.
Fig. 4.17: The OP panel
To adjust the contrast of the display, use the potentiometer on the rear
of the operator panel.
Normally, there is a logout time once you have logged into the OP.
It is, however, possible to override this timeout and obtain a permanent
display by setting a bit in the SYSREG block. Please refer to the TAC
Vista IV, Engineering Applications in TAC Menta manual.
42 (74) Schneider Electric Buildings AB, June 2011
04-00067-02-en
Page 43

TAC Xenta, TAC Xenta 280/300/401 4 Installation
Options for connecting the OP to the Controller
Modular jack
G0 G C2 C1
4321
TAC Xenta OP
C1 C2 G G0
4321
Fig. 4.18: Modular jack for connection of TAC Xenta OP to TAC Xenta
280/300/401 or to a separate jack
max. 10 m (32 ft.)
TAC Xenta Controller TAC Xenta OP
G0 22
G21
C2 2
C1 1
G0 4
G3
C2 2
C1 1
Fig. 4.19: Terminal connection TAC Xenta 280/300/401 - TAC Xenta OP,
power supply from controller
230 V / 24 V
TAC Xenta Controller TAC Xenta OP
G0 22
G21
C2 2
C1 1
0
~
G0 4
G3
C2 2
C1 1
Fig. 4.20: Terminal connection TAC Xenta 280/300/401 (or the network
directly) - TAC Xenta OP, local power supply
Schneider Electric Buildings AB, June 2011 43 (74)
04-00067-02-en
Page 44

4 Installation TAC Xenta, TAC Xenta 280/300/401
44 (74) Schneider Electric Buildings AB, June 2011
04-00067-02-en
Page 45

TAC Xenta, TAC Xenta 280/300/401 5 Configuring your System
PC
TAC Menta:
- Address allocation
- Download application
- Online simulation
TAC Xenta controller
(Part no.
0-073-0920)
RS232
5 Configuring your System
5.1 Overview
A TAC Xenta 280/300/401 controller is delivered as a freely programmable controller. A customer-specific application is created using the
programming tool TAC Menta.
A PC that has TAC Menta installed and running is connected, using the
Programming Serial Kit cable (part no. 007309200), to the RS232 port
of the TAC Xenta controller to be loaded. How this is done is described
in the Engineering Applications in TAC Menta manual.
During the customizing process, the online/simulation mode of TAC
Menta can also be used to monitor the input and output status of the
TAC Xenta controller. Parameter tuning can also be done from TAC
Menta.
Note
• Starting from TAC Xenta v 3.1, the application program download may also be done from TAC Vista via the network.
However, the online/simulation mode in TAC Menta still has to use the
RS232 port.
Fig. 5.1: Commissioning tool (principle of operation)
Devices have to be configured in the following situations:
• When there are I/O modules (see sections 5.3 and 5.4 of this manual)
• When there are several controllers (see section 5.5 of this manual)
Schneider Electric Buildings AB, June 2011 45 (74)
04-00067-02-en
Page 46

5 Configuring your System TAC Xenta, TAC Xenta 280/300/401
5.2 A Single TAC Xenta 280/300/401 Controller
5.2.1 Initial Check
Caution
• TAC Xenta 280/300: It is important that the electronics part has
the same input/output configuration as the terminal part.
After the wires have been connected, but before the electronics part has
been mounted on the terminal part, perform these checks:
1 Turn on the power.
2 Check that the supply voltage, 24V AC or 19–40V DC, is con-
nected to the proper terminals G and G0.
3 T AC Xenta 280/300: Check that the voltage levels of the input and
output terminals are appropriate, bearing in mind their use and
possible preset values.
4 TAC Xenta 280/300: Check the voltage, both AC and DC,
between G0 and the other (labeled) terminals.
5 Repeat step 4 with G as the reference terminal.
6 Turn off the power and mount the electronics part on the terminal
part.
7 Turn on the power again.
8 If previously unloaded, load the program, using TAC Menta,
according to the method described in the Engineering Applications
in TAC Menta manual.
9 Check that the green status LED on the front starts to blink, indi-
cating that the internal program is running.
Service pin
Red service diode indicates
a non-configured node or a hardware fault
Green status diode indicates
that the program is running
Neuron ID
(on the rear)
Fig. 5.2: LEDs and service pin in the controller
10 If additional I/O-units are used, follow the steps in section 5.4.
46 (74) Schneider Electric Buildings AB, June 2011
04-00067-02-en
Page 47

TAC Xenta, TAC Xenta 280/300/401 5 Configuring your System
Network address:
- Subnet no. 1
- Node no. 10
TAC Xenta
Device name:
CU_1
PC
RS232
Device Configuration
tool
Device name:
CU_2
Network address:
- Subnet no. 1
- Node no. 20
TAC Xenta
TAC Xenta
controller
5.2.2 OP Panel Activities
1 Connect the TAC Xenta OP to the TAC Xenta unit.
2 TAC Xenta 280/300: Select the Temp & Status menu (or equiva-
lent) to check that all inputs have appropriate values.
5.3 Two or more TAC Xenta 280/300/401 Units
5.3.1 Initial Check
Perform the steps described in section 5.2.1.
5.3.2 Device Configuration
Before it can start to communicate, each TAC Xenta unit has to be
assigned a network address (a subnet/node address and a device name).
This is done using a separate Device Configuration programming tool.
The tool is either run on a PC and started from TAC Menta or it is run
as a stand-alone tool.
The procedure is fully explained in the Engineering Applications in
TAC Menta manual.
If two or more units have the same Device name, they have to be given
unique names. This is also done using the Device Configuration tool.
The figure below indicates some of the parameters that are involved.
The use of network addresses is explained in the TAC Vista IV, Engi-
neering Classic/LNS Networks manuals.
Fig. 5.3: Device Configuration parameters (example)
Schneider Electric Buildings AB, June 2011 47 (74)
04-00067-02-en
Page 48

5 Configuring your System TAC Xenta, TAC Xenta 280/300/401
5.3.3 OP Panel Activities
When an operator panel is connected to a network that includes a number of TAC Xenta controllers, the following will happen:
1 The operator panel (OP) will send a request to the network for any
TAC Xenta controller that is not occupied to start acting as a
server and send texts to the operator panel.
2 The first available Xenta controller will send a list of all the
groups in the network. These will be shown on the OP and when
one of them has been selected, the TAC Xenta controllers of the
group will be shown on the operator panel. As all TAC Xenta controllers know which other TAC Xenta controllers are present in
the network, an operator panel can be served by any TAC Xenta
controller in the network.
3 From this list, the desired TAC Xenta controller will be chosen by
the user, and the controller that first acted as a server will be
released from its duties.
4 The selected TAC Xenta controller will then supply the operator
panel with the menu on the highest level in the program.
5 TAC Xenta 280/300: Select the Temp & Status menu (or equiva-
lent) to check that all inputs have reasonable values.
6 Now select another controller from the top menu and repeat steps
5-6, as many times as required.
5.4 Additional I/O Units
5.4.1 Selecting I/O Modules
There are two types of I/O modules:
• Configured (older, for older versions of the Base unit)
• Unconfigured (newer, for Base units of version 3.2 or higher)
Note
• The TAC Xenta 280 does not use extra I/O modules.
48 (74) Schneider Electric Buildings AB, June 2011
04-00067-02-en
Page 49

TAC Xenta, TAC Xenta 280/300/401 5 Configuring your System
Service pin
Neuron ID
(on the side)
Service LED: red ind. =
hardware fault
Comm. status LED, green flashing light:
• once every other sec: communication with Base unit
• faster: the unit is off-line
5.4.2 Initial Check
Note
• It is important that the electronics part has the same input/output
configuration as the terminal part.
Perform these checks after the wires have been connected to the I/O
modules, but before the electronics part has been mounted on the terminal part.
1 Turn on the power.
2 Check that the supply voltage, 24V AC or 19–40V DC, is con-
nected to the proper terminals (G and G0).
3 Check that the voltage levels of the input and output terminals are
appropriate, bearing in mind their use and possible preset values.
4 Check the voltage, both AC and DC, between G0 and all the other
terminals.
5 Repeat steps 1-4 with G as the reference terminal.
6 Turn off the power and mount the electronics part on the terminal
part.
7 Turn on the power again.
8 Check the LEDs for the following:
• The red service LED on the front will now blink once.
• The green communication status LED on the front starts
flashing rapidly (about 2-3 Hz), indicating that the unit is offline.
Fig. 5.4: LEDs and service pin of the I/O modules
5.4.3 I/O Module Configuration
Schneider Electric Buildings AB, June 2011 49 (74)
04-00067-02-en
An I/O module always belongs to a specific TAC Xenta controller.
Before the module can be utilized, it has to be linked to that controller
by using the Device Configuration programming tool. The tool is either
run on a PC and started from TAC Menta or it is run as a stand-alone
tool.
Page 50

5 Configuring your System TAC Xenta, TAC Xenta 280/300/401
The procedure is described in the manual Engineering Applications in
TAC Menta.
In some versions of TAC Xenta OP, these items can also be set from the
Service menu. This is described in chapter 6 (‘IO Module Config’) of
this manual. Please note that this menu can only be reached from the
Service access level.
The figure below indicates some of the parameters that are involved.
The use of network addresses is described in the TAC Vista IV, Engi-
neering Classic/LNS Networks manuals.
Device Configuration
PC
tool
RS232
TAC Xenta
I/O
Module no.: 1
Module type: 421
I/O
Module no.: 2
Module type: 411
Network address:
- Subnet no. 1
- Node no. 10
Network address:
- Subnet no. 1
- Node no. 13
Fig. 5.5: I/O module configuration parameters (example)
About 45 seconds after the configuration procedure has completed, the
green LED should start to blink at a rate of about once every other second. This will indicate that the unit is communicating with the application in the Base unit.
5.5 Setting the Date and Time
Set the current date and time from TAC Menta during commissioning
(Online mode). The setting affects only the controller that is connected
to TAC Menta. Please refer to the Engineering Applications in TAC
Menta manual for further details.
Date and time can also be set from the TAC Xenta OP, if the operator
has logged on at the appropriate access level (usually the medium level).
For details, refer to the TAC Xenta OP Handbook.
If the controllers are connected to a supervisory system like TAC Vista,
the date and time can be set in all units with one command from TAC
Vista.
Network address:
- Subnet no. 1
- Node no. 14
A TAC Xenta Master unit broadcasts its clock time once every
24 hours.
In both cases, the date and time are sent periodically. This will ensure
that even if some units are offline when the time data is sent, they will
eventually be updated with the values from the central system or, with
regards to standalone, from the Master.
50 (74) Schneider Electric Buildings AB, June 2011
04-00067-02-en
Page 51

TAC Xenta, TAC Xenta 280/300/401 5 Configuring your System
1 3 5 7
2 4 6 8
DTR CTSDCD
Modular jack
(seen from the underside,
with the fastening flap)
2 DCD
3 DTR
7 CTS
TAC Vista sends the time in GMT format. The time value is transformed in each separate TAC Xenta to the valid time zone and the current standard or daylight saving time.
5.6 Clearing the Xenta Application
If a Xenta 280/300/401 application has crashed and refuses to accept a
new download, both from Vista and Menta, there is a way to clear the
application (Xenta version 3.61 or higher).
1 Manufacture a jack with the following pins short-circuited.
Fig. 5.6: A “Clear application” device
2 Turn off power to the controller.
3 Put the jack in the RS232 port.
4 Turn on power to the controller; a forced Clear Application will be
made.
5 Remove the jack.
5.7 Lock a Xenta OP to a specific TAC Xenta Controller
You can lock a Xenta OP to a specific TAC Xenta 280/300/401 controller.
To be able to do this you have to enable the function by adding a PVI
block in the Menta application in the Xenta and enable the function in
the Xenta OP.
5.7.1 Creating the PVI-block in the Xenta
1 Create a Public PVI-block with the name XENTASYSREG and
set this block’s initial value to 8.
Schneider Electric Buildings AB, June 2011 51 (74)
04-00067-02-en
Page 52

5 Configuring your System TAC Xenta, TAC Xenta 280/300/401
Fig. 5.7: XENTASYSREG With the initial value to 8
If you have multiple TAC Xenta OP panels in the network, each one
connected to a specific Xenta Controller, you have to create this special
PVI block in every one of these Xenta Controller’s Menta code.
5.7.2 Enabling the function in TAC Xenta OP
1 Open the TAC Xenta OP local service menu.
2 Press and hold the “escape” and “enter” buttons for a few seconds.
3 Enter the bottom command: “11 OP connects to”.
4 Enter this sub-command, and then type in, using “+” or “-“, the
specific T AC Xenta controller’ s subnet and node you want t his OP
to be “locked” to.
The TAC Xenta controller subnet and node addresses can easily be
found in TAC Vista Workstation; select “properties” for the TAC Xenta
controller and the subnet / node will be displayed.
Note
• When you select, in the OP panel’s new menu, the node number
and press enter the TAC Xenta OP will restart and seek for the
selected TAC Xenta controller.
• It will still be possible to access the TAC Xenta controller from
another T AC Xenta OP in the network if the TAC Xenta OP is of
a version prior to 3.70 or if the lock-function is not enabled in the
TAC Xenta OP. Ho wever doing t his, you will only h ere also “see
the local Xenta controller”. In this case you will be able to exit
this TAC Xenta controller again by pressing “escape”. While in
the locked TAC Xenta OP you will not be able to exit from the
TAC Xenta controller it is locked to.
52 (74) Schneider Electric Buildings AB, June 2011
04-00067-02-en
Page 53

TAC Xenta, TAC Xenta 280/300/401 6 The TAC Xenta Service Menu
TAC Service menu
1. Name
2. LON Address
3. Wink
4. Restart
5. IO Module Config
6. Test Dial
7. System info
6 The TAC Xenta Service Menu
6.1 Accessing the Service Menu
When a TAC OP is connected to a TAC Xenta controller 280, 300, or
401, menus appear on the display.
Use the password-protected Service menu for system information and
actions.
Schneider Electric Buildings AB, June 2011 53 (74)
04-00067-02-en
Fig. 6.1: Connecting TAC Xenta OP (left) to the controllers 300 or 401
(right).
The Service menu has the following options (the frame symbolizes the
four-line display window of the OP):
Page 54

6 The TAC Xenta Service Menu TAC Xenta, TAC Xenta 280/300/401
AHU2: West
Status
Temperature
Alarm
.
.
Password
Password
CODE:
Enter code to
extend menu
.
.
Status
Password
Service menu
To access the Service menu, press “Enter” ( ) directly after startup. The menu will look something like this:
Move the cursor to Password and press Enter to get:
Enter the code ”1919” by using + or – , Enter and finally “Home”
( ). The Start-up menu reappears.
The bottom line will now include the Service menu option.
6.2 Submenus 1-8
Submenu 1: Device Name and
Submenu 2 Lon address
To get the Name and address of a specific controller:
1 Disconnect the controller from the network.
2 Connect the OP to this unit and select the Service menu, where the
name and address can be checked. Please note that this menu is
only available from the “Service” access level.
3 Select submenu “
1. Name” or ”2. LON address”:
54 (74) Schneider Electric Buildings AB, June 2011
04-00067-02-en
Page 55

TAC Xenta, TAC Xenta 280/300/401 6 The TAC Xenta Service Menu
Name
LON address
Subnet: 1
Node : 10
Wink node
While pressing HOME,
LED stays ON for
3 seconds.
Restart type: _
0:No restart
1:Warm 2:Cold
3:Orig. appl.
• Reconnect the unit to the network.
• Repeat steps 1–4, as many times as required.
Submenu 3: Wink node
In some cases, it may be necessary to know which physical unit corresponds to a certain node address. Select submenu “
3. Wink”:
1:Warm
2:Cold
3:Orig. appl.
When you press the Home key ( ), the green status diode of the
selected Base unit will light up for about three seconds.
Submenu 4: Restart
There are different types of restarts. These are selected from submenu
“
4. Restart”:
Upon restarting, parameters and values will be retrieved as follows (also
refer to Appendix 1, Restart Values):
Most values according to the ones already present in RAM.
Most values are reset to the original, downloaded application, except
for saved PV Block values, Public parameters,
and certain OPT values.
Resets all values to the original, downloaded application.
Submenu 5: IO module Config, Configuring I/O modules
via the OP
Schneider Electric Buildings AB, June 2011 55 (74)
04-00067-02-en
Chapter 5 contains information about configured and unconfigured I/O
modules, as well as instructions for “Initial checks” on the newly connected units.
Page 56

6 The TAC Xenta Service Menu TAC Xenta, TAC Xenta 280/300/401
T AC Xent a
I/O
I/O
Module no.: 1
Module type: 421
LonTalk
protocol
Module no.: 2
Module type: 411
Network address:
- Subnet no. 1
- Node no. 10
Network address:
- Subnet no. 1
- Node no. 13
Network address:
- Subnet no. 1
- Node no. 14
IO Module Config
Module No: 1
Node Addr.: 13
Valid Service Pin: 0
An I/O module always belongs to a specific TAC Xenta controller (the
Base unit). Before an I/O module can be utilized, it has to be linked to
that controller.
To do this, go to menu “
5. IO Module Config”.
The I/O modules will automatically get the same Subnet number as the
base unit. Normally, this is the number that should be used.
The figure below indicates the parameters that are involved.
Fig. 6.2: I/O module configuration parameters (example)
1 On the operator panel, select the list of controllers on the network.
2 Select the TAC Xenta to configure.
3 Select submenu “5. IO Module Config” and enter the address
value:
4 Press the service pin on the corresponding unit (see diagram
below). Following this, Valid Service Pin: 0 should change to 1.
5 Press Enter to confirm the configuration within 20 seconds or so.
6 About 45 seconds after configuration has finished, the green LED
will start blinking slowly , showing that the unit is communicating
with the Base unit.
7 Repeat steps 3–6 if there is a second I/O module.
8 Repeat steps 2-7 for all the listed controllers with I/O modules.
56 (74) Schneider Electric Buildings AB, June 2011
04-00067-02-en
Page 57

TAC Xenta, TAC Xenta 280/300/401 6 The TAC Xenta Service Menu
Service pin
Red service diode indicates
a non-configured node or a hardware fault
Neuron ID
(on the rear)
Green status diode indicates
that a program is running
Please note the angle of the screwdriver
being used to activate the service pin!
Upon activation, the red service diode
will flash momentarily.
Service pin
Neuron ID
(on the side)
Comm. status LED, green flashing light:
• once every other sec: communication with Base unit
• faster: the unit is off-line
Fig. 6.3: LEDs and service pin of the controller (Base unit)
Fig. 6.4: Activating the service pin of the controller or the I/O module
Fig. 6.5: LEDs and service pin of the TAC Xenta 400 I/O modules
6.2.1 Submenu 6: Test dial
This function is used in dial-up systems (not applicable to the
TAC Xenta 280) and is explained in the TAC Vista IV, Engineering
Classic/LNS Networks manuals.
Schneider Electric Buildings AB, June 2011 57 (74)
04-00067-02-en
Page 58

6 The TAC Xenta Service Menu TAC Xenta, TAC Xenta 280/300/401
Test dial
Dial 0
Status 08
0000 0000 0010 0100
9 Select “6. Test dial” and the following menu will appear:
10 On Dial use:
•The value 0 for the normal telephone number
or toggle to
•The value 1 for the alternative telephone number
11 Press Enter to initiate a dial-up between the controller and a super-
visory system.
The two Status lines will display codes containing information about the
procedure as described below.
(Dynamic) Status (upper integer value) shows the progress of the dial-up sequence.
Code Meaning
IDLE 00 This is the state before any attempts to dial have been made.
LINE_BLOCKED 01 The line was blocked.
NO_DIAL_STRING 02 No dial string was defined, so no dial attempt was made.
SENDING_DIAL_STR. 03 We are either in the process of sending the dial string to the modem or
waiting for the response.
BUSY 04 The line was busy.
NO_ANSWER 05 No one picked up the phone at the other end.
NO_CARRIER 06 There was no modem at the other end which could answer.
ERROR 07 Something was wrong with the dial string.
NO_DIAL_TONE 08 No normal dial tone.
TIMEOUT 09 The modem did not reply to the dial string at all.
CONNECT 10 We are connected to the remote modem.
NO_LOGIN_REPLY 11 Attempting to log in, but no reply from TAC Vista.
LOGIN_FAIL 12 Our password (and/or network ID) was not accepted by TAC Vista.
LOGIN_OK 13 Connection established!
58 (74) Schneider Electric Buildings AB, June 2011
04-00067-02-en
Page 59

TAC Xenta, TAC Xenta 280/300/401 6 The TAC Xenta Service Menu
Date: 2002-02-11
Ver: X300 3.50
By: TAC
302NP (Neuron ID: 12 chars)
(Static)
Status (lower 16-bit string) pertains to the modem and communication envi-
Code Meaning
---- ---- ---- ---1
---- ---- ---- --1-
---- ---- ---- -1--
---- ---- ---- 1---
ronment, that is, the availability of the modem and other communication issues.
DSR is set when TAC Xenta detects that the modem is driving the
Data Set Ready line. Possible reasons for DSR being low: modem not
connected, modem not powered on, DSR line not connected in the
cable.
AT OK is set when TAC Xenta has sent an AT command to the
modem and received an OK reply. Possible reasons for not receiving
AT OK: modem configured to not respond to modem commands.
Reset OK is set when AT OK is not set and TAC Xenta has sent an
AT&F sequence ordering the modem to reset to the factory defaults,
and an OK reply was received. Possible reasons for not receiving
Reset OK: RX line not connected in the cable or the modem is configured to not respond to modem commands.
Init string defined is set when TAC Vista has defined a modem initialization string.
---- ---- ---1 ----
---- ---- --1- ----
---- ---- -1-- ----
---- ---- 1--- ----
Init OK is set when the Init string defined is set and TAC Xenta has
sent the init string and received an OK reply. Possible reasons for not
receiving Init OK: the init string contained a command that has turned
replies off, the init string contained an illegal command.
No contact.
Ready.
Phone number defined is set when TAC Vista has defined a modem
dial string.
Submenu 7: System info and
Submenu 8: Boot info
To obtain information about the controller program version, select submenu “
7. System info”.
Schneider Electric Buildings AB, June 2011 59 (74)
04-00067-02-en
Page 60

6 The TAC Xenta Service Menu TAC Xenta, TAC Xenta 280/300/401
Date: 2002-02-11
Ver: X400 B 3.52-01
By: TAC
To obtain information about the Boot program, select submenu
8. Boot info”.
“
60 (74) Schneider Electric Buildings AB, June 2011
04-00067-02-en
Page 61

APPENDIX
A Appendix A Restart Values
B Appendix B Restart Sequences
Page 62

Page 63

TAC Xenta, TAC Xenta 280/300/401 A Appendix A Restart Values
A Appendix A Restart Values
There are two kinds of memory in the controller:
1 RAMworking memory, cu rrent val ues;
the contents will be lost after 72 hours without power
2 Flash program memory, nonvolatile storage memory
Certain items which are used in RAM are also saved in the Flash mem-
ory when the value is changed, so that they will not be lost during
lengthy power outages.
The Flash memory is also the location of the original application and the
trend log definition values. These are the values specified in the most
recent application downloaded from TAC Menta.
During a restart, whether caused by a power outage or by operator
demand, it is important to know which start values will apply.
Below are some examples of the value as taken from RAM, from the
value saved in Flash memory, or from the original application value
(also in Flash memory).
• Internal status and output values of Function Blocks
(may affect the control of actuators, fans, or other equipment)
• PV Blocks, for example, the set values
(it may be important not to lose the newly adjusted set values)
• Public parameters
(values which affect other nodes of the plant)
• Trend log definition
(log channels, log interval, storage area)
• Trend log data
(stored values)
• Optimization parameters
(automatically adjusted values, taking a long time to settle)
• Time parameters
(local time zone, current Daylight Saving Time status)
• Modem parameters
(such as phone numbers, dial-up interval, and initialization com-
mands)
During a restart, the system has to have usable start values in the work-
ing areas of RAM. The start values used will depend on:
Schneider Electric Buildings AB, June 2011 63 (74)
04-00067-02-en
Page 64

A Appendix A Restart Values TAC Xenta, TAC Xenta 280/300/401
• which type of restart has been ordered,
• Whether or not the content of RAM is still valid (<
power outage
) and
72 h after a
• Whether or not the Backup boxes for the Function and PV Blocks
in TAC Menta have been checked
If the Backup box has been checked, this means that as soon as a value
has changed, the system will save it and use it as a start value during a
Warm start and, with regards to the PV Blocks, during a Cold start as
well.
The Public parameters (which do not use RAM at all) and certain calculated OPT values are always saved in the Flash memory.
The table below shows the principal storage locations.
Value Backup
Stored in
indication
Status and output values of Function Blocks x (default) RAM
PV Blocks x (default) Flash
Public parameters (always) Flash
Trend log definition (always) Flash
Trend log data (always) RAM
Certain OPT values (always) Flash
Time parameters (always) Flash
Modem parameters (always) Flash
Applied to the three types of restart, this gives us:
• Warm start (operator request or due to power outage <72 h;
RAM intact)
Almost all values are the current ones, kept in RAM; among them
are the trend log definitions and data. An event is added to the trend
log data, stating that a Warm start has occurred.
Exception:
Function Block internal state values, if Backup was not checked, in
which case the original values will be used instead.
• Cold start (operator request or due to power outage >72 h; RAM
not intact)
Almost all values (for example all Function Block internal state
values) are retrieved from the original application values resident
in the Flash memory. The trend log definitions are re-stored in the
RAM, based on the stored values in the Flash memory, while the
trend log values are being cleared.
64 (74) Schneider Electric Buildings AB, June 2011
04-00067-02-en
Page 65

TAC Xenta, TAC Xenta 280/300/401 A Appendix A Restart Values
Exceptions:
• Original application
The table below shows the status that the different start values will have
during different types of restart.
Value Backup
indication
FB internal state
values
x
–
The most recently stored PV Block values, if Backup was checked:
- Public constants
- Trend log definitions
- Certain OPT values
- Modem parameters
All start values are retrieved from the original application values
resident in the Flash memory. All SNVT bindings (version 3.0 and
later) are erased.
“Original application” means the most recent application that has
been downloaded from TAC Menta.
(If no application has been loaded, there is always the LonMark
”Plant Controller” application shipped from the factory.)
Restart type:
Warm start (<72h)
Current value
Original value
2
a
Cold start Original appl.
b
Original value
Current value
Original value
Current value
b
PV Block x
–
Current value
Original value
Current value
Original value
Original value
Original value
Public parameters (always) Current value Current value Original value
Trend log def. (always) Current value Current value Original value
Trend log data (always) Current value Cleared Original value
Certain OPT
c
values
(always) Current value Current value Original value
Time parameters (always) Current value Default value Current value
Modem parameters (always) Current value Current value Current value
a. After a power outage > (more than) 72 hours, a Warm start cannot be used, as the ‘Current value’ in the
memory may have been changed.
b. Original value are the values from the most recent application downloaded from TAC Menta.
c. Applies to the following OPT block values:
- Curve points
- Holiday compensation
Schneider Electric Buildings AB, June 2011 65 (74)
04-00067-02-en
Page 66

A Appendix A Restart Values TAC Xenta, TAC Xenta 280/300/401
66 (74) Schneider Electric Buildings AB, June 2011
04-00067-02-en
Page 67

TAC Xenta, TAC Xenta 280/300/401 B Appendix B Restart Sequences
0 *
15 s
1 - 30 s
≤ 40 s
≤ 60 s
≤ 60 s
5 - 60 s
"Download B"
Waiting for
external unit
to Restart
Reset
(Restart)
Delay
Appl. B
Application B
In.val
Application B
In.val
Application A
Application A
Application A
Subscribing to Base Unit 1 (A)
Subscribing to
Base Unit 1 (B)
(Appl.dependant)
Base Unit 2:
Base Unit 1:
Outputs
I/O module:
Outputs
Base Unit 1:
Appl. software
TAC Menta:
Appl. A
Initial values
Appl. code download
Code gen., etc
Running
(Dep. on selected Period)
*All Universal Inputs are defined as Digital Inputs.
All Analog Outputs are set to 0.
All Digital Outputs are set to 0.
B Appendix B Restart Sequences
The figure shows the Download sequence for:
• TAC Menta, which initiates the Downloading of a new application, B, to Base Unit 1.
• Xenta Base Unit 1, whose application A is disrupted and then
replaced by the new application, B.
• The Outputs of Base Unit 1, which will be reset for 1–30 seconds
after the Restart of Base Unit 1.
• The I/O module Outputs that will change to Initial Values, first of
Appl A then of Appl B, as the module temporarily loses contact
with its Base Unit.
• Base Unit 2, which subscribes to a value in Base Unit 1 and also
temporarily loses contact with that unit.
Schneider Electric Buildings AB, June 2011 67 (74)
04-00067-02-en
Page 68

B Appendix B Restart Sequences TAC Xenta, TAC Xenta 280/300/401
0 *
15 s
0
≤ 40 s
≤ 60 s
≤ 60 s
Reset
Delay
Appl. A
Application A
No Back-up flag: In.val
Application A
Application A
Application A
Application A
Subscribing to Base Unit 1 (A)
Subscribing to
Base Unit 1 (A)
(Appl.dependant)
Base Unit 2:
Base Unit 1:
Outputs
I/O module:
Outputs
Base Unit 1:
Appl. software
Power level
Base Unit 1:
Appl. A
Running
Back-up flag: Prev.val
(Dep. on selected Period)
Override values (or Initial values)
Override values, or else:
* All Universal Inputs are defined as Digital Inputs.
All Analog Outputs are set to 0.
All Digital Outputs are set to 0.
TAC Xenta 280 and 300
The figure shows the Power outage (less than 72 h) sequence for:
• Xenta Base Unit 1, whose application A goes down and, after a
restart and delay, starts running again.
• The Outputs of Base Unit 1, which go down during the power outage and whose values during the restart will be set to the Override
values, or, if these are not set, t o dif fer ent values depending on the
status of the backup flags in TAC Menta.
• The I/O module Outputs that will change to the Forced values (or,
if these are not set, the Initial values of the application), as the
module temporarily loses contact with its Base Unit.
• Base Unit 2, which subscribes to a value in Base Unit 1 and also
temporarily loses contact with that unit.
68 (74) Schneider Electric Buildings AB, June 2011
04-00067-02-en
Page 69

TAC Xenta, TAC Xenta 280/300/401 B Appendix B Restart Sequences
15 s
1 - 30 s
≤ 40 s
≤ 60 s
≤ 60 s
5 - 60 s
"Download B"
Waiting for
external unit
to Restart
Reset
(Restart)
Delay
Appl. B
Application B
In.val
Application A
Application A
Subscribing to Base Unit 1 (A)
Subscribing to
Base Unit 1 (B)
(Appl.dependant)
Base Unit 2:
I/O module:
Outputs
Base Unit 1:
Appl. software
TAC Menta:
Appl. A
Initial values
Appl. code download
Code gen., etc
Running
(Dep. on selected Period)
TAC Xenta 401
The figure shows the Download sequence for:
• TAC Menta, which initiates the Downloading of a new application, B, to Base Unit 1.
• Xenta Base Unit 1, whose application A is disrupted and then
replaced by the new application, B.
• The I/O module Outputs that will change to Initial Values, first of
Appl A then of Appl B, as the module temporarily loses contact
with its Base Unit.
• Base Unit 2, which subscribes to a value in Base Unit 1 and also
temporarily loses contact with that unit.
Schneider Electric Buildings AB, June 2011 69 (74)
04-00067-02-en
Page 70

B Appendix B Restart Sequences TAC Xenta, TAC Xenta 280/300/401
15 s
≤ 40 s
≤ 60 s
≤ 60 s
Reset
Delay
Appl. A
Application A
Application A
Application A
Subscribing to Base Unit 1 (A)
Subscribing to
Base Unit 1 (A)
(Appl.dependant)
Base Unit 2:
I/O module:
Outputs
Base Unit 1:
Appl. software
Power level
Base Unit 1:
Appl. A
Running
(Dep. on selected Period)
Override values (or Initial values)
TAC Xenta 401
The figure shows the Power outage (less than 72 h) sequence for:
• Xenta Base Unit 1, whose application A goes down and, after a
restart and delay, starts running again.
• The I/O module Outputs that will change to Forced values (or, if
there are none, to the Initial values of the application), as the module temporarily loses contact with its Base Unit.
• Base Unit 2, which subscribes to a value in Base Unit 1 and also
temporarily loses contact with that unit.
70 (74) Schneider Electric Buildings AB, June 2011
04-00067-02-en
Page 71

TAC Xenta, TAC Xenta 280/300/401 Index
Index
Numerics
8-in-16 rule 36
A
additional I/O units 48
application crash
B
Backup box 64
Boot info
Bus Topology
C
C1, C2 31
cables
34
clear application
Cold start
communications
configured (I/O module)
configuring the system
contrast of the display
51
59
36
51
55
15
42
45
48
ground rail
groups
32
48
I
I/O expansion modules 13
I/O module
IEC-listing
Indicators
installation
IO module Config
49
31
26
29
55
L
LED Indicators 19, 23
log-out time
Lon address
LonTalk®
LonWorks®
42
54
15
15
M
M terminal 32
Master unit
modem
Modular jack
modular jack
modular jacks
50
16
38
18
23, 25
D
date and time 50
device name
Device Name (OP menu)
Dial
58
DIN rail
display (OP)
Docnet
47
54
29
42
9
E
electronics part 49
EN-standards
30
F
Flash memory 63
Free Topology
FTT-10
15
15
G
G, G0 31
Schneider Electric Buildings AB, June 2011 71 (74)
04-00067-02-en
N
Name (Device ~) 54
network address
Network Variables
node
47
47
O
Operator Panel 42
operator panel
Orig. appl.
48
55
P
P/FT-10 36
PCLTA card
protective ground
Public signal
PV Blocks
15
32
16
63
R
RAM memory 63
15
Page 72

Index TAC Xenta, TAC Xenta 280/300/401
Restart 55
restart values
RS232
RS232 port
63
38
18
S
serial channel 16
service diode
Service Menu
service pin
shielded cable
SNVTs
Status
status diode
subnet/node
SYSREG block
System info
19
53
19, 23, 26
37
15
58
19
47
42
59
T
TAC Menta 16, 45
TAC Vista
TAC Xenta 280/300/400 family
TAC Xenta 280/300/401
TAC Xenta 281, 282, 283
TAC Xenta 301, 302
TAC Xenta 401
TAC Xenta 511
TAC Xenta 901, 911
TAC Xenta OP
Technical Data
Xenta 280
Xenta 300
Xenta 401
terminal part
terminals
Terminations
Test dial
thermistor inputs
time
TP/FT-10
termination
TP/XF-1250
termination
15, 51
46
17
22
25
16
16
13
20
24
27
49
18
39
57
18, 22
50
40
41
13
W
wall modules 33
Warm start
Wink node
55
55
Z
ZS101–105 33
U
UL-listing 30
unconfigured (I/O module)
universal inputs
18, 22
48
V
version 3.2 (hw) 48
72 (74) Schneider Electric Buildings AB, June 2011
04-00067-02-en
Page 73

Page 74

Copyright © 2007-2011, Schneider Electric Buildings AB
All brand names, trademarks and registered trademarks are
the property of their respective owners. Information contained within this document is subject to changewithout notice. All rights reserved.
04-00067-02-en
For more information visit
Last Manual Page
Page 75

TAC Xenta, TAC Xenta 280/300/401 Imported Images
Pictures/Default/Logo_SE_Green_CMYK_A4.eps 1
Pictures/Default/Vista_SE.eps 1
Pictures/Default/Logo_SE_Black_A4.eps 3
Pictures/Default/note.eps 9
Pictures/Default/warning.eps 10
Pictures/Default/caution.eps 10
Pictures/Default/Important.eps 10
Pictures/Default/note.eps 10
Pictures/Default/Tip.eps 10
Pictures/Default/Advanced.eps 10
Pictures/1.eps 13
Pictures/2.eps 15
Pictures/3.eps 17
Pictures/12.eps 18
Pictures/4.eps 19
Pictures/5.eps 19
Pictures/Default/note.eps 20
Pictures/3.eps 21
Pictures/13.eps 22
Pictures/4.eps 23
Pictures/5.eps 23
Pictures/Default/note.eps 24
Pictures/15.eps 25
Pictures/16.eps 25
Pictures/4.eps 26
Pictures/5.eps 26
Pictures/Default/note.eps 27
Pictures/6.eps 29
Pictures/7.eps 29
Pictures/17.eps 30
Pictures/18.eps 30
Pictures/Default/caution.eps 31
Pictures/19.eps 31
Pictures/Default/note.eps 31
Pictures/20.eps 32
Pictures/21.eps 33
Pictures/22.eps 33
Pictures/8.eps 36
Pictures/Default/note.eps 36
Pictures/23.eps 37
Pictures/24.eps 38
Pictures/Default/caution.eps 38
Pictures/25.eps 38
Pictures/26.eps 39
Pictures/27.eps 39
Pictures/9.eps 40
Schneider Electric Buildings AB, 2011-08-23 1 (2)
04-00067-02-en
Page 76

TAC Xenta, TAC Xenta 280/300/401 Imported Images
Pictures/10.eps 41
Pictures/11.eps 42
Pictures/28.eps 43
Pictures/29.eps 43
Pictures/30.eps 43
Pictures/Default/note.eps 45
Pictures/41.eps 45
Pictures/Default/caution.eps 46
Pictures/42.eps 46
Pictures/43.eps 47
Pictures/Default/note.eps 48
Pictures/Default/note.eps 49
Pictures/44.eps 49
Pictures/45.eps 50
Pictures/46.eps 51
Pictures/1.tif @ 150 dpi 52
Pictures/Default/note.eps 52
Pictures/31.eps 53
Pictures/32.eps 54
Pictures/32.eps 54
Pictures/32.eps 55
Pictures/33.eps 56
Pictures/34.eps 57
Pictures/35.eps 57
Pictures/36.eps 57
Pictures/37.eps 67
Pictures/38.eps 68
Pictures/39.eps 69
Pictures/40.eps 70
Pictures/Default/Logo_SE_Green_CMYK_A4.eps 74
Schneider Electric Buildings AB, 2011-08-23 2 (2)
04-00067-02-en
 Loading...