


 Loading...
www.samsung.com

USER MANUAL
SM-R324
Printed in Korea
GH68-48025A Rev.1.0
English (EU). 05/2017

About the Gear VR
The Samsung Gear VR allows you to enjoy 2D, 3D, and 360-degree content by connecting it with your mobile device.
You can also view webpages and your own 360-degree images or videos. Connect other devices, such as controllers (included), game controllers, or headsets (sold separately), with the mobile device for a more immersive experience.
2
Table of Contents
Read me first
Getting started
7Package contents
8Device layout
17Connecting the mobile device and wearing the Gear VR
32Preparing the controller for use
37Installing the Gear VR app (Oculus) and connecting the controller
Basics
47Using the Gear VR's touchpad
49 Using the controller
52Moving the pointer or the screen
53Selecting items
53 Using the Universal menu
56Downloading apps and content
57Viewing notifications received on the mobile device
3

Table of Contents
Viewing content
59Viewing content on the Oculus Home screen
63Viewing content on the mobile device
66 Viewing online content
Health and safety warnings
Safety information
Appendix
89 Troubleshooting
4
Read me first
•Please read this manual before using the Samsung Gear VR (also referred to as Gear VR) to ensure safe and proper use.
•To prevent injury or damage to your devices, read the health and safety warnings and information before using the Gear VR.
•Use the Gear VR for its intended purpose only. Using the Gear VR for other purposes may result in injury.
•The Gear VR cannot be operated by itself. To use the Gear VR, connect a mobile device to it. Visit www.samsung.com to see a list of compatible mobile devices.
•To use a mobile device with the Gear VR, upgrade the mobile device's software to the latest version.
•Some languages or content may not be available depending on the region or network.
•To view the open source licence for the Gear VR, refer to opensource.samsung.com.
5

Read me first
Instructional icons
Warning: situations that could cause injury to yourself or others
Caution: situations that could cause damage to your device or other equipment
Notice: notes, usage tips, or additional information
6

Getting started
Package contents
Check the product box for the following items:
•Gear VR, top strap, main strap, Micro USB connector, Micro USB device holder (for replacement), controller, wrist strap, controller holder, two AAA batteries, and user manual
• The items supplied with the device and any available accessories may vary depending on the region or service provider.
•The supplied items are designed only for this device and may not be compatible with other devices.
•Appearances and specifications are subject to change without prior notice.
•Use only Samsung-approved accessories. Using unapproved accessories may cause performance problems and malfunctions that are not covered by the warranty.
•Availability of all accessories is subject to change depending entirely on manufacturing companies. For more information about available accessories, refer to the Samsung website.
7
Getting started
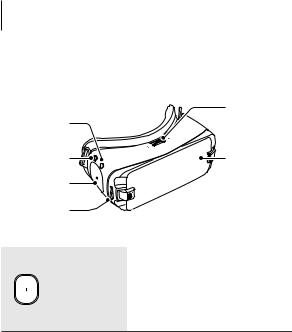
Device layout
Gear VR
Focus
Back key 
 adjustment wheel
Home key |
Front cover |
Touchpad |
|
Volume key |
|
Touchpad and keys |
Function |
|
|
•Tap to select an item. You can move to the next or previous
Touchpad |
item by swiping forwards or |
|
backwards. For more information, |
||
|
||
|
refer to Using the Gear VR's |
|
|
touchpad. (p. 47) |
8

|
|
|
|
|
|
Getting started |
|
|
|
|
|
|
|
|
|
|
|
|
|
|
|
|
|
|
Touchpad and keys |
|
Function |
|
|||
|
|
|
|
Home |
• |
Press to return to the Oculus |
|
|
|
|
|
|
Home screen. |
|
|
|
|
|
|
|
|
|
|
|
|
|
|
|
|
|
|
|
|
|
|
|
• |
Press to return to the previous |
|
|
|
|
|
|
|
screen. |
|
|
|
|
|
Back |
• |
Press and hold to open the |
|
|
|
|
|
|
Universal menu. You can view |
|
|
|
|
|
|
|
|
|
|
|
|
|
|
|
|
the status of the Gear VR and |
|
|
|
|
|
|
|
configure settings. |
|
|
|
|
|
|
|
|
|
|
|
|
|
Volume |
• |
Press to adjust the Gear VR |
|
|
|
|
|
|
volume. |
|
|
|
|
|
|
|
|||
|
|
|
|
|
|
|
|
|
|
|
|
|
|
|
|
|
|
|
|
Focus |
• |
Rotate to focus by adjusting the |
|
|
|
|
|
adjustment |
|
distance between the mobile |
|
|
|
|
|
|
|
||
|
|
|
|
|
|
||
|
|
|
|
wheel |
|
device and the Gear VR's lenses. |
|
|
|
|
|
|
|
|
|
9
Getting started
Main strap loop
Top strap loop
Device holder (left)
Multipurpose 
jack (USB
Type-C)
Foam cushioning
Main strap loop |


 Device holder (right)
Proximity sensor
Lenses
10

Getting started
•The Gear VR does not require charging as it is powered using the mobile device’s battery.
•You can charge your mobile device by connecting a charger to the Gear VR's multipurpose jack. Use only Samsung-approved chargers. Unapproved chargers can cause the mobile device's battery to explode or damage your devices.
−−If you use a Micro USB charger, connect a Micro USB connector before plugging the charger into the Gear VR. The Micro USB connector is only for battery charging.
11

Getting started
−−If you use the Gear VR while the charger is connected to the Gear VR's multipurpose jack, it is powered by the charger and does not use the mobile device's battery. When you use content that has high power demand (more than 1 A) while the charger is connected,
the Gear VR uses two power sources. In high power demand situations, the Gear VR is powered by the charger and the mobile device's battery at the same time.
−−If the Gear VR is not used while the charger is connected, the mobile device's battery will be charged.
−−If the Gear VR is connected to or disconnected from the charger while the Gear VR is being used, the image on the screen may be briefly inactive. During this period, the screen recalibrates and the Gear VR may not recognise your head movements.
•To save energy, unplug the charger when not in use. The charger does not have a power switch, so you must unplug the charger from the electric socket when not in use to avoid wasting power. The charger should remain close to the electric socket and easily accessible while charging.
12
Getting started
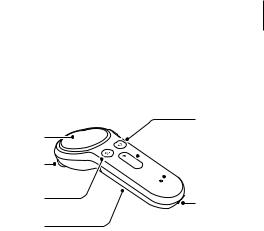
Controller
You can connect the controller to a mobile device connected with a Gear VR via Bluetooth. Control various Gear VR features with the controller keys and touchpad.
Touchpad |
Trigger |
Home key
 Volume key
 Indicator light
Back key |
Wrist strap |
|
|
Battery cover |
connection hole |
|
13

Getting started
Touchpad and keys |
|
Function |
|
• |
Press to select an item. You can |
Touchpad |
|
move to the next or previous item |
|
by swiping to the left or right. For |
|
|
|
more information, refer to Using |
|
|
the controller. (p. 49) |
|
|
|
|
When the controller is not |
|
|
connected with a Gear VR: |
|
|
• |
Press and hold to enter Bluetooth |
|
|
pairing mode. |
Home |
When the controller is connected |
|
with a Gear VR: |
||
|
• |
Press to return to the Oculus |
|
|
Home screen. |
|
• |
Press and hold to reorient the |
|
|
controller's pointer direction |
|
|
when it is off-centre. |
|
|
|
14
|
|
Getting started |
|
|
|
|
|
|
|
|
|
Touchpad and keys |
|
Function |
|
|
• |
Press to return to the previous |
|
|
|
screen. |
|
Back |
• |
Press and hold to open the |
|
|
Universal menu. You can view |
|
|
|
|
|
|
|
|
the status of the Gear VR and |
|
|
|
configure settings. |
|
|
|
|
|
Volume |
• |
Press to adjust the Gear VR |
|
|
volume. |
|
|
|
|
|
|
|
|
|
|
|
• |
Press to select an item or use it |
|
Trigger |
|
as a trigger when playing certain |
|
|
games. Its function may vary |
|
|
|
|
|
|
|
|
depending on the launched apps. |
|
|
|
|
|
15

Getting started
Indicator light
Colour |
Status |
|
Flashes red, green, and |
• |
The controller is in Bluetooth |
blue |
|
pairing mode. |
|
|
|
Flashes blue three times |
• |
Bluetooth is connected. |
|
|
|
Flashes blue one time |
• |
Sleep mode is deactivated. |
|
|
|
Band and mode
Band and mode |
Output power |
|
|
Bluetooth 2.4 GHz |
13 dBm |
|
|
Declaration of Conformity
Samsung Electronics declares that this device complies with the essential requirements and relevant provisions of Directive 2014/53/EU.
Go to www.samsung.com/mobile_doc to view the Declaration of Conformity.
16

Getting started
Connecting the mobile device and wearing the Gear VR
•Do not put on the Gear VR when you are wearing glasses. Doing so may cause facial injuries. If you need corrective lenses, it is recommended that you wear contact lenses when using the Gear VR.
•If you are farsighted or there is a big difference between your left and right eyes' vision, wear corrective lenses before using the Gear VR.
•Factory lens protectors are pre-installed on the Gear VR.
Remove the lens protectors before you use the Gear VR so you can see clearly.
•Keep the lenses clean and protect them from getting scratched. If the lenses get dirty or steam up, clean them with the lens cleaning cloth.
17

Getting started
• The foam cushioning may get dirty if your face is sweating while you are wearing the Gear VR. Do not try to wash the foam cushioning. Remove the polluted foam cushioning from the Gear VR and attach a new one.
•The touchpad works only while you are wearing the Gear VR.
•A proximity sensor inside the Gear VR detects the position of your face. When wearing the Gear VR, the mobile device's screen will turn on and the Gear VR's touchpad will be activated. When you are not wearing the Gear VR, do not place objects near the proximity sensor inside the Gear VR. Doing so may cause the mobile device's screen to remain on and drain its battery.
18

Getting started
Connecting straps
1Insert the ends of the straps through the strap loops on the Gear VR and use the velcro to fasten each end.
19
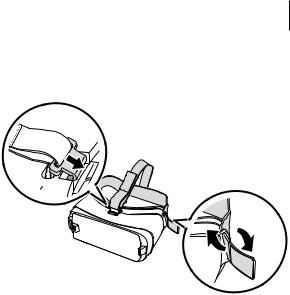
Getting started
2Pull the device holder (right) to the right ( 1 ) then remove the front cover ( 2 ).


 1
1 
 2
2 


20
Getting started
Removing straps
Remove the top strap by pulling its loop towards the foam cushioning. Then, remove the main strap from the Gear VR.
21

Getting started
Replacing the device holder
The USB Type-C device holder is attached to the Gear VR by default. If your mobile device's multipurpose jack is USB Type-C, you can connect the mobile device to the Gear VR. If your mobile device's multipurpose jack is Micro USB, replace the device holder with the Micro USB device holder before connecting your mobile device to the Gear VR.


 Device holder lock switch
|
Locked |
Unlocked |
Micro USB |
USB Type-C |
|
device holder |
device holder |
|
22
Getting started
1Slide the lock switch to the  position and remove the device holder from the Gear VR.
1 |
2 |
Lock switch
23
Getting started
2Select another device holder. While the lock switch is in the  position, slide the device holder into the holder slot. Then, lock the holder by sliding the lock switch to the
  position.
1 |
2 |
24

Getting started
•Do not slide the device holder into the holder slot while
the lock switch is in the  position. This may damage the lock switch's latch.
•Ensure that you lock the device holder by sliding the lock
switch to the  position. If not, the mobile device may accidentally separate from the Gear VR and be damaged.
25

Getting started
Connecting the mobile device
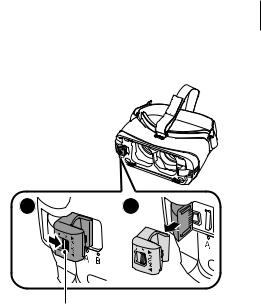
1Pull the device holder (right) to the right thoroughly ( 1 ). Then, push the device holder (left) gently ( 2 ) and slide it to position A or B ( 3 ) depending on the size of the mobile device's screen you want to use.
|
Position A: For larger devices. |
|
Position B: For smaller devices. |
|
3 |
2 |
|
Device holder (left) |
1 |
|
|
Device holder (right) |
|
2 Unlatch the device holder (left).
26
Getting started
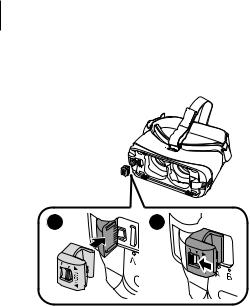
3While the mobile device is on, connect it to the connector on the device holder ( 1 ).
The mobile device will emit a sound when it is connected to the Gear VR properly.
Insert the mobile device into the centre of the Gear VR and gently push the mobile device until it locks into place ( 2 ). The device holder (right) will return to the previous position and hold the mobile device ( 3 ).
 1
1
2 


3
27
Getting started
•Do not forcefully insert the connector into the mobile device. Doing so may damage the connector.
•Do not twist or bend the Gear VR’s connector when you connect or disconnect the mobile device. Doing so may damage the connector.
•Push the mobile device into the Gear VR firmly until it locks in place. If it is not securely locked, the mobile device may accidentally separate from the Gear VR and be damaged.
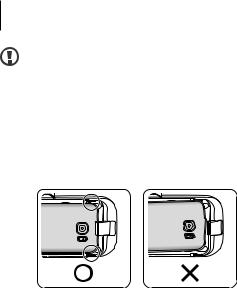
•If you insert the mobile device tilted to one side, it may cause discomfort.
28
Loading...