


 Loading...
Samsung AW0503B, AW0505B, AW0509B, AW0603B, AW0605B User Manual
...
OWNER’S
INSTRUCTIONS
AW0503B AW1203B
AW0505B AW1205B
AW0509B AW1209B
AW0603B AW1403B
AW0605B AW1409B
AW0609B AW1803B
AW0803B AW1805B
AW0805B AW1809B
AW0809B AW2402B
AW1003B AW2404B
AW1005B AW2406B
AW1009B
Window-type Room Air Conditioner
(Cool)
E S DB98-15114B(3)

Safety Precautions
The following safety precautions must be taken when using your air conditioner.
 WARNING
DURING OPERATION
DISPOSING OF THE UNIT
OTHERS
Risk of electric shock. • Can cause injury or death. • Disconnect all remote electric power supplies before servicing, installing or cleaning.
• This must be done by the manufacturer or its service agent or a similar qualified person in order to avoid a hazard.
The air conditioner must be plugged into its own specific power source, which must be installed in compliance with national wiring,earthing and safety regulations.
If the power cord is damaged in any way, it must be replaced by the manufacturer or its service agent or a similarly qualified person in order to avoid a hazard.
 This device must be installed according to the national electrical rules.
The appliance must be installation that the plug should be easily accessible after installation.
If the fuse on PC board is broken please change it with the type of T 3.15A 250V.
The breaker of the air conditioner should be all-pole switch; and the distance between its two contacts should be no less than 3.5mm. Such means for disconnection must be incorporation in the fixed wiring.
 Before throwing out the device, it is necessary to pull back the battery cells and get rid of them safely for recycling reasons.
 When you need to dispose of the unit, consult your dealer. If pipes are removed incorrectly, refrigerant may blow out and come into contact with your skin,causing injury. Releasing refrigerant into the atmosphere also damages the environments.
 Please recycle or dispose of the packaging material for this product in an environmentally responsible manner.
 Never store or ship the air conditioner upside down or sideways to avoid damage to the compressor.
 The appliance is not intended for use by young children or infirm persons without supervision: Young children should be supervised to ensure that they do not play with the appliance.
 Max current is measured according to IEC standard for safety and current is measured according to ISO standard for energy efficiency.
E-2

|
Contents |
|
PREPARING YOUR AIR CONDITIONER |
|
|
■ |
Safety Precautions ......................................................................................... |
2 |
■ Description of Each Component .................................................................... |
4 |
|
■ |
Remote Control - Buttons .............................................................................. |
5 |
■ |
Getting Started ............................................................................................... |
6 |
■ Inserting the Remote Control Batteries .......................................................... |
7 |
|
OPERATING YOUR AIR CONDITIONER |
|
|
■ |
Cooling Your Room ........................................................................................ |
8 |
■ |
Airing Your Room ........................................................................................... |
9 |
■ |
Removing Excess Humidity ............................................................................ |
10 |
■ Adjusting the Air Flow Direction Horizontally .................................................. |
11 |
|
■ Adjusting the Air Flow Direction Vertically ...................................................... |
11 |
|
PROGRAMMING YOUR AIR CONDITIONER |
|
|
■ Setting the On Timer ...................................................................................... |
12 |
|
■ Setting the Off Timer ...................................................................................... |
13 |
|
■ Setting the Sleep Timer .................................................................................. |
14 |
|
■ Selecting Energy Saving mode ...................................................................... |
15 |
|
RECOMMENDATIONS FOR USE |
|
|
■ Temperature and Humidity Ranges ................................................................ |
16 |
|
■ |
Cleaning Your Air Conditioner ........................................................................ |
17 |
■ |
Solving Common Problems ............................................................................ |
18 |
■ |
Technical Specifications ................................................................................. |
19 |
E-3

Description of Each Component
The design and shape are subject to change.
Air outlet
Inner air flow blades (right/left orientation)
Air inlet (Inside) 
Mode selection button |
Mode |
(Cool,Fan, Dry) |
Cool/Dry/Fan |
|
|
Energy Saver button |
E.Saver |
Sleep timer setting button |
Sleep |
Timer setting button |
Timer |
Outer air flow blades (up/down orientation)
- Except AW0503B / AW0505B / AW0603B / AW0605B
Air outlet
Ventilation lever
- Except AW0503B / AW0505B / AW0603B / AW0605B
Air inlet (Outside)
 Air filter (Inside)
Power plug
(The type of power plug may differ, depending on the local power supply.)
|
|
Temperature/Timer |
|
|
settings |
|
Temp. |
|
|
|
Temperature adjustment |
|
Power |
buttons |
|
|
|
Fan Speed |
|
On/Off button |
|
|
Fan speed adjustment button Remote control
E-4
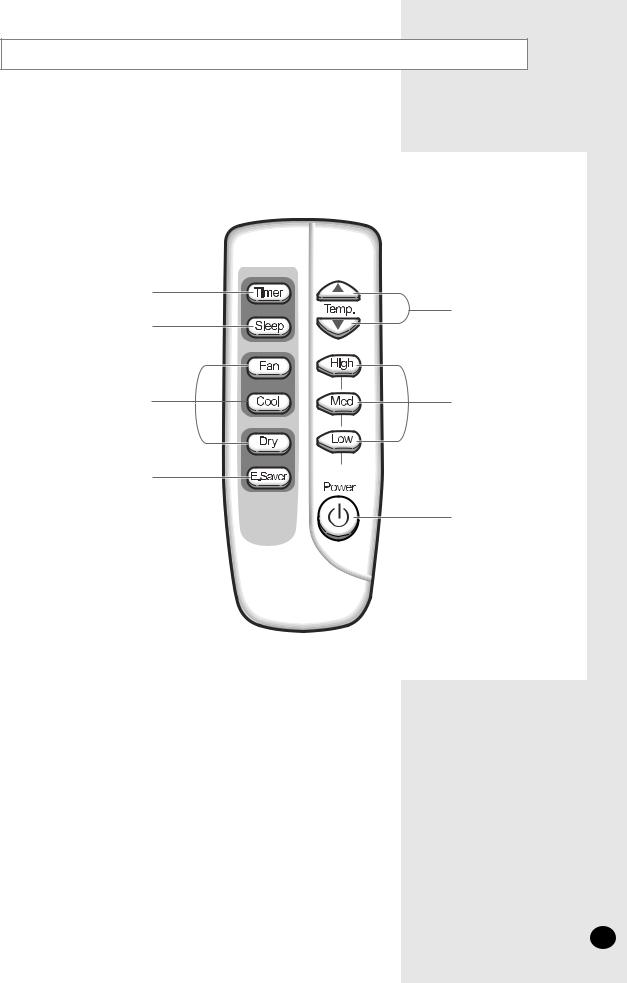
Remote Control - Buttons
Timer setting button
Sleep timer setting button
Mode selection buttons
Energy Saver button
Temperature adjustment buttons
Fan speed adjustment buttons
On/Off button
E-5

Getting Started
You have just purchased a Samsung window-type room air conditioner which should be installed following your installation manual.
Your Owner’s Instructions contain much valuable information on using your air conditioner. Please take the time to read them as they will help you take full advantage of the unit’s features.
The booklet is organized as follows.
The following figures are shown on pages 4 and 5:
-Description of Each Component
-Remote control (buttons)
They will help you find the buttons and understand the symbols displayed.
In the manual, you will find a series of step-by-step procedures for each function available.
The illustrations in the step-by-step procedures use four different symbols:
PRESS |
PUSH |
IMPORTANT |
NOTE |
E-6
Loading...