


Evoke H3
Evoke H3
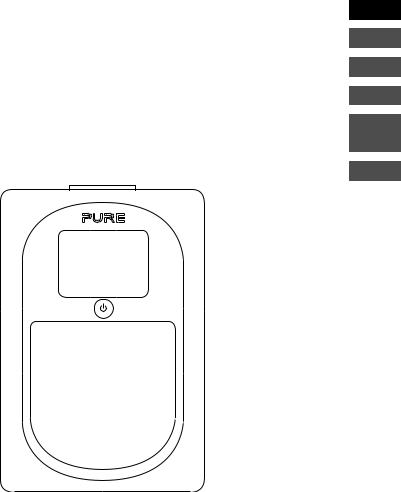
Thank you for choosing the Evoke H3. This user manual explains how to use the various features of your Evoke H3. If you need more help, you can view our help topics at support.pure.com.
EN
DE
FR
IT
NO DA
NL
1
2

Contents
Evoke H3 |
1 |
Safety |
4 |
Getting started |
5 |
Your Evoke |
5 |
Setting up your Evoke H3 |
6 |
Switching your Evoke H3 on |
|
and off |
7 |
Changing the volume |
7 |
Digital radio |
8 |
Listening to digital radio |
8 |
Changing the digital radio station |
8 |
Automatically tuning to digital |
|
radio stations |
9 |
FM radio |
9 |
Listening to FM radio |
9 |
Changing the FM radio station |
9 |
Changing the scan settings for |
|
FM radio |
9 |
Choosing stereo or mono |
|
reception for FM radio |
10 |
Radio station presets |
10 |
About presets |
10 |
Storing a radio station as a preset |
10 |
Listening to a preset |
11 |
EN
Bluetooth and auxiliary |
|
devices |
11 |
Connecting a Bluetooth device |
11 |
Connecting a device with an |
|
auxiliary cable |
12 |
Alarms |
12 |
Setting an alarm |
12 |
Cancelling an existing alarm |
13 |
Snoozing or silencing an alarm |
14 |
Timers |
14 |
Setting the kitchen timer |
14 |
Silencing the kitchen timer |
15 |
Setting the sleep timer |
15 |
Settings |
16 |
Personalising the sound on your |
|
Evoke H3 |
16 |
Display settings |
16 |
Clock settings |
17 |
Changing the language |
18 |
Resetting to factory settings |
19 |
Updating the software |
19 |
Using a ChargePAK |
20 |
About ChargePAKs |
20 |
Inserting a ChargePAK |
20 |
Troubleshooting |
21 |
Specifications |
22 |
3
Safety
Safety instructions and cautions
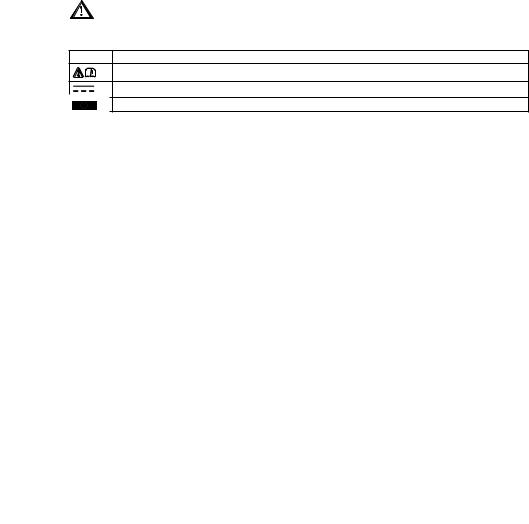
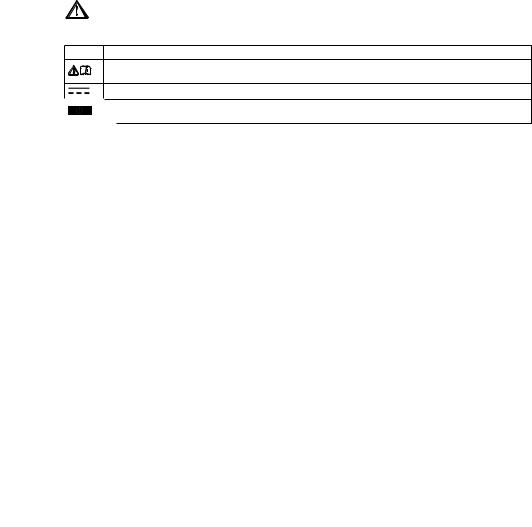
Symbols used on this product
Symbol Description
This symbol is used on the product to indicate a caution and that instructions should be read before use.
This symbol indicates DC voltage.
This symbol indicates where the product is switched on or put into standby.
1.Read, heed and retain these instructions – All the safety and operating instructions should be read before this product is used and retained for future reference. All warnings on the appliance and in the operating instructions should be followed
2.Failure to install or use the product in accordance with these instructions may impair the safety of the product and invalid the warranty.
3.Use only power supply listed in these user manual/user instructions (supplied by Pure with model number SW0551000-AM) to power the equipment and do not use the power supply for any other purpose.
4.The direct plug-in adapter is used as a disconnect device, the disconnect device shall remain readily operable and accessible.
5.Do not immerse in water or use in a wet / moist environment, such as in the shower or bathroom if plugged into the mains supply. The power supply shall not be exposed to dripping or splashing and no objects filled with liquids, such as vases, placed above it.
6.Do not remove screws from or open the product casing.
7.Keep the product away from direct sunlight and from heat sources such as radiators, heaters or other appliances that produce heat.
8.Danger of explosion if the battery is incorrectly replaced (ensure correct polarity). Replace only with the same or equivalent type. The battery shall not be exposed to excessive heat such as sunshine, fire or similar. Attention is drawn to the environmental aspects of battery disposal. See Section - “Using a ChargePAK”
9.Do not expose the product to naked flame sources, such lighted candles which should not be placed on or near the product.
10.Ventilation should not be impaired by covering the product or power supply.
11.Clean only with a dry cloth.
12.This product is intended for use in moderate climates.
13.If the product is used in a manner not specified by the instructions, the product’s protection could be impaired.
14.Do not use the product if any damage is noticed.
15.Product repairs are only allowed to be carried out by competent and authorised personnel.
4
Getting started |
|
EN |
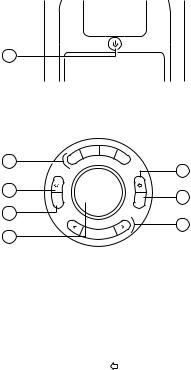
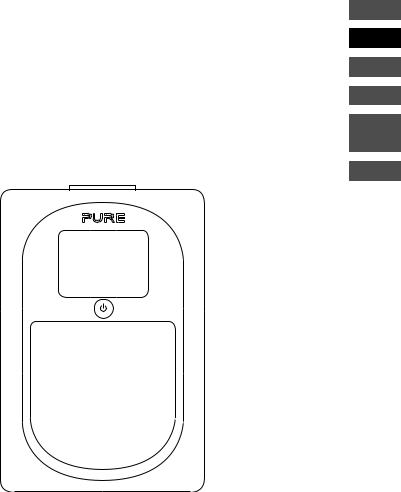
Your Evoke
Front controls
|
|
1 |
1 |
Standby |
Switch your Evoke H3 on and off, or put it in standby |
Top controls
|
2 |
3 |
1 |
1 |
|
|
|
|
2 |
|
|
|
Source |
|
3 |
|
|
4 |
|
Select |
4+
Menu
7
6
5
1 |
Presets |
Press to store and access your favourite radio stations |
|
2 |
Alarm |
Press to set an alarm, a kitchen timer or a sleep timer |
|
3 |
Source |
Press to change between digital radio, FM radio, Bluetooth, and auxiliary input |
|
4 |
Volume/Scroll |
Turn to change the volume, press to mute the volume |
|
|
|
Tip: When you are in a menu, you can turn and press the Volume dial to |
|
|
|
choose settings and options. To then use the dial to change the volume again, |
|
|
|
wait 10 seconds or press . |
|
5 |
Select |
Press to browse radio stations, or choose settings and options |
|
6 |
Menu |
Press to change settings and options |
|
7 |
Back |
Press when in the menu to go back to the previous screen |
5 |
|
|
|

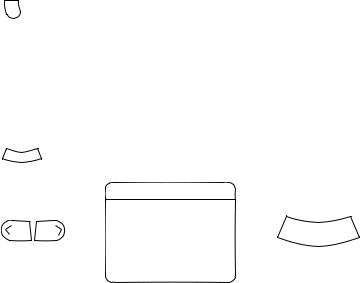
Rear connections
|
|
|
|
|
|
|
|
|
|
Aux in |
|
|
|
|
|
|
|
|
|
|
|
|
|
5.5V DC 1A |
|
|
|||||||||
Input for supplied |
3.5mm output for |
Analogue stereo |
Micro USB |
||||||||
mains adapter only |
stereo headphones |
input for auxiliary |
connector for |
||||||||
|
|
|
|
|
|
|
|
|
|
cables |
software updates |
Setting up your Evoke H3
To set up your Evoke H3:
1.Unclip the aerial and fully extend it.
2.Connect the supplied mains adapter to the input on the back of your Evoke H3.
3.Plug the mains adapter into the mains supply.
>
|
5.5V DC 1A |
Aux in |
|
5.5V DC 1A |
Aux in |
5.5V DC 1A |
Aux in |
6

Switching your Evoke H3 on and off |
EN |
If you have a ChargePAK rechargeable battery, insert it before you switch your Evoke H3 on. Read more about using a ChargePAK on page 20.
To switch your Evoke H3 on:
•Press  .
.
Note: When you switch your Evoke H3 on for the first time, it starts tuning to digital radio stations. After the autotune is complete, you can start listening to digital radio.
To switch your Evoke H3 off or put it in standby:
•Press  .
.
If your Evoke H3 is being powered by a ChargePAK, your Evoke H3 switches off. If your Evoke
H3 is connected to a power socket, your Evoke H3 enters standby. In standby, your Evoke H3 uses a low amount of power and displays the time and date on the screen.
Changing the volume
To change the volume:
•To increase the volume, turn the Volume dial clockwise.
•To decrease the volume, turn the Volume dial anticlockwise.
To mute the volume:
•Press the Volume dial.
7
Digital radio
Listening to digital radio
To listen to digital radio:
•Press Source until ‘Digital Radio’ is displayed.
Tip: Some digital radio stations also broadcast information and graphics, such as music album artwork or weather updates. Press and hold the Select button to change between slideshow, large slideshow and display modes.
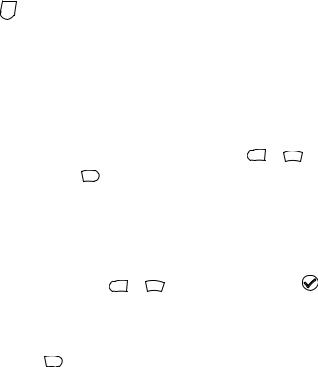
Changing the digital radio station
To change the digital radio station:
1.Press  or
or  to browse through the available radio stations.
2. Press |
Select |
to change radio station. |
|
|
Station List |
|
|
|
BBC Radio 1 |
|
|
|
BBC Radio 1Xtra |
|
|
> |
BBC Radio 2 |
> |
Select |
BBC Radio 3 |
|||
|
BBC Radio 4 |
|
|
|
BBC Radio 4Extra |
|
|
|
BBC Radio 5 Live |
|
|
Tip: A ‘>>’ next to a radio station name means the station has a secondary service, which provides more content. The secondary service is listed below the radio station with a ‘<<’ next to the service name. Secondary services may only be available at certain times.
A ‘?’ next to a radio station name means the station is inactive or unavailable.
8
Automatically tuning to digital radio stations |
EN |
When you switch your Evoke H3 on for the first time, it automatically scans for digital radio stations. If you move your Evoke H3 to a new location, perform an autotune to update the list of radio stations.
To automatically tune to digital radio stations:
1.Press
Menu
.
2.Press the Select buttons to choose ‘Autotune’.
Your Evoke H3 starts scanning for digital radio stations.
FM radio
Listening to FM radio
To listen to FM radio:
•Press
Source
until ‘FM’ is displayed.
Changing the FM radio station
To change the FM radio station:
•To scan to the previous or next radio station, press and hold  or
or  .
.
•To manually tune to a radio station, press  or
or  . The frequency steps up or down by 0.05 MHz.
Changing the scan settings for FM radio
When you scan for FM radio stations, you can include all radio stations or only those with a strong signal.
To change scan settings for FM radio:
1.Press
Menu
.
2.Press the Select buttons to choose ‘Scan Setting’.
3.Press the Select buttons to choose ‘Strong Stations Only’ or ‘All Stations’.
9
Choosing stereo or mono reception for FM radio
By default, your Evoke H3 uses stereo reception for FM radio. If your FM radio stations have a weak signal, try using mono reception to improve the signal strength.
To choose stereo or mono reception:
1.Press
Menu
.
2.Press the Select buttons to choose ‘Stereo’.
3.Press the Select buttons to choose ‘FM Stereo’ or ‘Forced Mono’.
Radio station presets
About presets
You can store your favourite radio stations as presets. You can use presets to quickly tune to your stored radio stations whenever you want.
On the top of your Evoke H3, there are four preset buttons. Use
favourite radio stations. Use |
4+ |
to open a list of all your presets. |
1
to
3
for quick access to your
You can store up to 20 digital radio stations and up to 20 FM radio stations as presets.
Storing a radio station as a preset
To store a radio station to a preset from 1 to 3:
1.Tune to the radio station you want to store.
2.
Choose a preset button from |
1 |
to |
3 |
then press and hold it until a |
is displayed. |
Tip: If there is already a radio station stored to the preset you’ve selected, the new station replaces it.
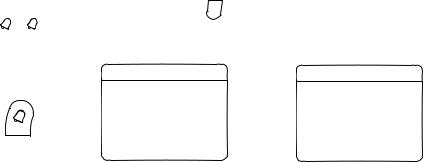
To store a radio station to the preset list:
1.Tune to the radio station you want to store.
2.Press and hold
4+
until the preset list is displayed.
3.Press the Select buttons to choose a preset number. A  is displayed.
Tip: If there is already a radio station stored to the preset you’ve selected, the new station replaces it.
10

4+
Save to Preset |
EN |
1:BBC Radio 1
2:(Empty)
>3: (Empty)
4:(Empty)
5:(Empty)
6:(Empty)
7:(Empty)
Listening to a preset
To listen to a preset from 1 to 3:
•Press a preset button from 1
2, press |
2 |
. |
to
3
. For example, to listen to the radio station stored as preset
To listen to any preset:
1.Press
4+
to open the preset list.
2.Press the Select buttons to choose a preset.
Bluetooth and auxiliary devices
Connecting a Bluetooth device
You can use Bluetooth to wirelessly connect to a device, such as a mobile phone or tablet. You can then stream music from your mobile phone or tablet through your Evoke H3.
The first time you connect a Bluetooth device to your Evoke H3, you need to pair them. After you’ve paired a device with your Evoke H3, your Evoke H3 remembers it for the next time.
To connect a Bluetooth device:
1.Press
Source
until ‘Bluetooth’ is displayed.
2.On your Bluetooth device, switch Bluetooth on and connect to your Evoke H3.
Note: For more information, see your Bluetooth device’s user manual. If you are asked to enter a passcode, enter 0000.
When ‘Connected’ is displayed on your Evoke H3 screen, your Evoke H3 is ready to stream music.
11

Tip: If you want to connect a different Bluetooth device to your Evoke H3, switch off Bluetooth on the connected device first.
Bluetooth
14-7-2016 Thursday Connected
Connecting a device with an auxiliary cable
You can use an auxiliary cable to connect a device, such as an MP3 player, to your Evoke H3. You can then enjoy music saved on the device through your Evoke H3.
To connect a device with an auxiliary cable:
1.Press Source until ‘Auxiliary Input’ is displayed.
2.Insert an auxiliary cable into the Aux in socket on the back of your Evoke H3.
3.Insert the other end of the auxiliary cable into the device you want to connect. Your Evoke H3 is now ready to play music from the connected device.
Alarms
To wake up to your favourite radio station, you can set up to two alarms on your Evoke H3. Note: You cannot set alarms when your Evoke H3 is being powered by a ChargePAK.
Setting an alarm
To set an alarm:
1.Press  .
.
2.Press the Select buttons to choose ‘Alarm 1’ or ‘Alarm 2’.
3.Press the Select buttons to change settings for the alarm.
12
‘Alarm’ |
Turn the alarm on or off |
EN |
‘Frequency’ |
Choose how often you want the alarm to sound |
|
‘Wake Up time’ |
Choose the time for the alarm |
|
‘Source’ |
Choose to wake up to an FM or digital radio station, or a buzzer |
|
|
Tip: To choose FM or digital radio, you need to have stored a |
|
|
radio station as a preset. |
|
‘Preset’ |
Choose a radio station to wake up to |
|
|
Tip: If you do not choose a preset, the default setting is the radio |
|
|
station that you last listened to. |
|
‘Duration’ |
Choose how many minutes the alarm sounds for |
|
‘Volume’ |
Choose the volume for the alarm |
|
4.When you have made all of your changes, press Menu to exit the menu.
The 1 or 2 symbol is displayed at the bottom of the screen when an alarm is set.
|
Alarm |
|
|
Alarm 1 Info. |
|
|
Alarm 1 |
On 09:00 |
|
Alarm |
On |
|
Alarm 2 |
Off 11:30 |
|
Frequency |
Daily |
|
Timer |
|
|
Wake Up time |
9:00 AM |
> |
Sleep |
|
> |
Source |
FM |
|
|
|
|
Preset |
Last Listened |
|
|
|
|
Duration |
60 |
|
|
|
|
Volume |
5 |
Cancelling an existing alarm
To cancel an existing alarm:
1.Press  .
.
2.Press the Select buttons to choose ‘Alarm 1’ or ‘Alarm 2’.
3.Press the Select buttons to change the ‘Alarm’ setting to ‘Off’.
13
Snoozing or silencing an alarm
To snooze an alarm:
•Press the Select button or the Volume dial.
The alarm snoozes for 5 minutes.
Tip: For a longer snooze, press the Select button multiple times.
To silence an alarm:
•Press  .
.
Timers
Setting the kitchen timer
The kitchen timer counts down and then ends with an alarm tone.
To set the kitchen timer:
1.Press  .
.
2.Press the Select buttons to choose ‘Timer’.
3.Press  or
or  to choose the duration of the timer.
4. Press |
Select to start the timer. |
|
|
|
|
The |
symbol is displayed at the bottom of the screen when the timer is set. |
||||
|
|
Alarm |
|
|
Kitchen timer |
|
|
Alarm 1 |
On 09:00 |
|
|
|
|
Alarm 2 |
Off 11:30 |
|
00:00 |
|
> |
Timer |
|
> |
|
|
Sleep |
|
|
||
14
Silencing the kitchen timer |
EN |
To silence the kitchen timer:
•Press  .
.
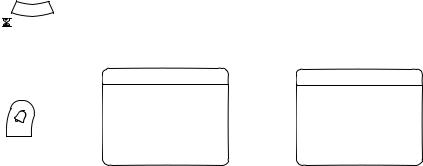
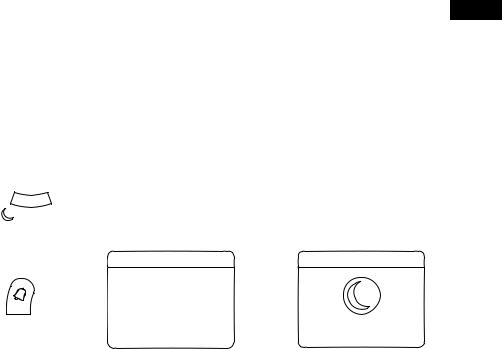
Setting the sleep timer
The sleep timer puts your Evoke H3 in standby after a set amount of time.
To set the sleep timer:
1.Press  .
.
2.Press the Select buttons to choose ‘Sleep’.
3.Press  or
or  to choose the duration of the timer. Tip: You can choose between 15 and 90 minutes.
4. Press |
Select to start the timer. |
|
|
The |
symbol and remaining time is displayed at the bottom of the screen when the timer is set. |
||
|
|
Alarm |
Set Sleep Timer |
|
|
Alarm 1 |
On 09:00 |
|
|
Alarm 2 |
Off 11:30 |
|
> |
Timer |
> |
|
|
Sleep |
|
15 minutes
15

Settings
Personalising the sound on your Evoke H3
Use the equaliser setting to get the most out of your music. There are several equaliser settings set up already. For example, to hear classical music at its best, change the equaliser setting to ‘Classic’. You can also customise the equaliser to change the treble, bass and loudness.
To use the equaliser:
1.Press Menu .
2.Press the Select buttons to choose ‘Audio’.
3.Choose an equaliser setting:
•To choose an equaliser setting, press the Select buttons.
•To use custom settings, press the Select buttons to choose ‘Custom’. Then press the Select buttons to change the treble, bass and loudness.
Display settings
Changing the information displayed on the screen
You can change the information that is displayed on the screen when you are listening to the radio. For example, you can display scrolling information about the current radio station.
To change the information displayed on the screen:
1.Press
Menu
.
2.Press the Select buttons to choose ‘Display’.
3.Press the Select buttons to choose ‘Info’.
4.Press the Select buttons to choose the information to display.
Changing the screen brightness
Your Evoke H3 has a light sensor, which adjusts the screen brightness based on your surroundings. You can also manually change the screen brightness.
To help save energy, you can dim the screen after 10 seconds of inactivity.
16

To change the brightness of the screen when switched on: |
EN |
1.Press Menu .
2.Press the Select buttons to choose ‘Display’.
3.Press the Select buttons to choose 'Backlight'.
4.Press the Select buttons to choose ‘On Level’.
5.Press the Select buttons to choose a brightness level. To make your screen brighter, choose a higher number. To automatically set the screen brightness, choose ‘Auto’.
To dim the screen after 10 seconds of inactivity:
1.Press Menu .
2.Press the Select buttons to choose ‘Display’.
3.Press the Select buttons to choose 'Backlight'.
4.Press the Select buttons to choose ‘Duration’.
5.Press the Select buttons to choose ‘Timed’.
To change the brightness of the screen when dimmed:
1.Press
Menu
.
2.Press the Select buttons to choose ‘Display’.
3.Press the Select buttons to choose 'Backlight'.
4.Press the Select buttons to choose ‘Dim Level’.
5.Press the Select buttons to choose a brightness level. To make your screen brighter, choose a higher number.
Clock settings
Setting the time and date
Your Evoke H3 can use FM and digital radio signals to set the time and date automatically. If the time and date do not update automatically, you can set them manually.
To set the time and date automatically:
1.Press
Menu
.
17

2.Press the Select buttons to choose ‘Clock’.
3.Press the Select buttons to choose ‘Auto Update’.
4.Press the Select buttons to choose how to set the time and date.
To set the time and date manually:
1.Press Menu .
2.Press the Select buttons to choose ‘Clock’.
3.Press the Select buttons to choose ‘Set Time/Date’.
4.Press the Select buttons to set the date.
5.Press the Select buttons to set the time.
Changing the time format
To change the time format:
1.Press
Menu
.
2.Press the Select buttons to choose ‘Clock’.
3.Press the Select buttons to choose ‘Set 12/24 Hour’.
4.Press the Select buttons to choose the time format.
Changing the date format
To change the date format:
1.Press
Menu
.
2.Press the Select buttons to choose ‘Clock’.
3.Press the Select buttons to choose ‘Set Date Format’.
4.Press the Select buttons to choose the date format.
Changing the language
You can change the language of menus and settings.
To change
1.Press
the language:
Menu |
. |
18
2. Press the Select buttons to choose ‘Settings’. |
EN |
3.Press the Select buttons to choose ‘Language’.
4.Press the Select buttons to choose a language.
Resetting to factory settings
A factory reset removes all stored presets, alarms, timers and settings on your Evoke H3. Note: You cannot undo a factory reset.
To reset to factory settings:
1.Press Menu .
2.Press the Select buttons to choose ‘Settings’.
3.Press the Select buttons to choose ‘Factory Reset’.
4.Press the Select buttons to choose ‘Yes’.
Your Evoke H3 resets to factory settings and then restarts.
Updating the software
Pure may provide software updates to your Evoke H3. To check for available software updates, visit support.pure.com.
Tip: To be contacted when software updates are available, you can register your product at pure.com/ register.
To check the current software version:
1. Press |
Menu |
. |
2.Press the Select buttons to choose ‘Settings’.
3.Press the Select buttons to choose ‘Software Version’.
To update the software:
1.Use a Micro USB cable to connect your Evoke H3 to your computer.
2.Follow the instructions provided with the software update file.
19
Using a ChargePAK
About ChargePAKs
A ChargePAK is a rechargeable battery pack that allows you to listen to your music anywhere. When your Evoke H3 is connected to a power outlet, it charges the ChargePAK. You can then disconnect your Evoke H3 from the power and take your music with you.
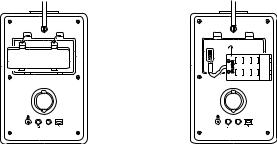
Inserting a ChargePAK
Note: Your Evoke H3 is only compatible with a Pure ChargePAK B1. Do not use any other batteries or ChargePAK models with your Evoke H3.
To insert a ChargePAK:
1.Switch your Evoke H3 off and disconnect it from the power supply.
2.At the back of your Evoke H3, press the two clips on the battery cover to remove it.
3.Insert the ChargePAK connector into the socket in the battery compartment.
4.Insert the ChargePAK into the battery compartment with the Pure label facing you.
5.Replace the battery cover.
6.Connect your Evoke H3 to the power supply.
The ChargePAK starts charging. If the ChargePAK is new or has not been used for a long time, we recommend you charge it for at least 24 hours.
Note: When the ChargePAK is charging, it is normal for it to get warm. The efficiency of the ChargePAK may decrease over time.
>
5.5V DC 1A |
Aux in |
5.5V DC 1A |
Aux in |
20
Troubleshooting |
|
|
|
|
|
|
EN |
||
|
|
|
|
|
Problem |
|
Solution |
|
|
|
|
|
|
|
I can’t hear any sound |
|
Use the Volume dial to turn the volume up. |
|
|
|
|
For digital radio, perform an autotune. Read more on page 9. |
|
|
|
|
For Bluetooth or auxiliary devices, check a device is connected. Turn |
|
|
|
|
the volume up on the connected device. |
|
|
|
|
|
|
|
The screen is very dark |
|
Remove any obstructions from in front of the speaker. There is a light |
|
|
|
|
sensor behind the speaker grill. |
|
|
|
|
Turn up the screen brightness. Read more on page 16. |
|
|
|
|
|
|
|
I can’t find an FM or |
|
Adjust your aerial and check it is fully extended. |
|
|
digital radio station |
|
Move your radio to another location. |
|
|
|
|
|
|
|
|
|
For digital radio, perform an autotune. Read more on page 9. |
|
|
|
|
For FM radio, try using mono reception to improve the signal strength. |
|
|
|
|
Read more on page 10. |
|
|
|
|
|
|
|
21

Specifications
Radio |
Digital and FM radio |
|
Frequencies |
DAB/DAB+ |
|
|
FM radio 87.5-108MHz |
|
Bluetooth |
Bluetooth v4.1 |
|
|
A2DP support |
|
Speaker |
Full range 3” driver unit |
|
Audio output power |
3 Watts RMS |
|
Inputs |
5.5V DC power adapter socket (230V supplied) |
|
|
3.5mm stereo Aux In for auxiliary devices |
|
|
USB connection (Micro USB) for software updates only |
|
Outputs |
3.5mm stereo headphone |
|
Presets |
20 digital radio and 20 FM radio presets |
|
Display |
2.4” colour display |
|
Mains power adapter |
Adapter |
Input AC 100-240V~, 50/60 Hz, 0.5A |
|
|
Output DC 5.5V , 1A |
|
Main unit |
DC 5.5V , 1A |
ChargePAK |
Pure ChargePAK B1 rechargeable battery pack (available separately) |
|
Power consumption |
Standby: 0.8W |
|
|
Active: 4.5W |
|
Dimensions |
180mm high x 115mm wide x 110mm deep |
|
Aerial |
Captive telescopic aerial |
|
Approvals |
CE marked. |
|
|
Compliant with R&TTE (RED 2014/53/EU after 13th June 2017) and |
|
|
RoHS Directives (1999/95/EC and 2011/65/EU). |
|
|
ETSI EN300 401 compliant. |
|
|
See pure.com for the full Declaration of Conformity. |
|
22

Warranty information |
|
|||||
EN |
||||||
Pure International Limited warrants to the end user that this product will be free from defects in materials and |
||||||
|
||||||
workmanship in the course of normal use for a period of three years from the date of purchase. This guarantee |
|
|||||
covers breakdowns due to manufacturing or design faults; it does not apply in cases such as accidental damage, |
|
|||||
however caused, wear and tear, negligence, adjustment, modification or repair not authorised by us. Should you |
|
|||||
have a problem with your unit please contact your supplier or contact Pure Support at http://support.pure.com |
|
|||||
Disclaimer |
|
|||||
Pure International Limited makes no representation or warranties with respect to the content of this document and |
|
|||||
specifically disclaims any implied warranties of merchantability or fitness for any particular purpose. Further, Pure |
|
|||||
International Limited reserves the right to revise this publication and to make changes in it from time to time without |
|
|||||
obligation of Pure International Limited to notify any person or organization of such revisions or changes. |
|
|||||
Trademarks |
|
|||||
Evoke, Evoke H3, Pure and the Pure logo are trademarks or registered trademarks of Pure International Limited. |
|
|||||
Copyright |
|
|||||
Copyright © 2016 Pure International Limited. All rights reserved. No part of this publication may be copied or distributed, |
|
|||||
transmitted, transcribed, stored in a retrieval system, or translated into any human or computer language, in any form or |
|
|||||
by any means, electronic, mechanical, magnetic, manual or otherwise, or disclosed to third parties without the express |
|
|||||
written permission of Pure International Limited. Version 1 August 2016. |
|
|||||
Correct disposal of this product |
|
|||||
This marking indicates that this product should not be disposed with other household waste throughout the EU. To |
|
|||||
prevent possible harm to the environment or human health from uncontrolled waste disposal, recycle it responsibly |
|
|||||
to promote the sustainable reuse of material resources. To return your used device, please use the return and |
|
|||||
|
|
|
|
collection system or contact the retailer where the product was purchased. They can take this product for |
|
|
|
|
|
|
environmental safe recycling. |
|
|
|
|
|
|
|
||
|
|
|
|
|
|
|
|
|
|
|
|
|
|
23
Evoke H3
Vielen Dank, dass Sie sich für das Evoke H3 entschieden haben. Dieses Benutzerhandbuch beschreibt die Nutzung der verschiedenen Funktionen Ihres Evoke H3. Wenn Sie weitere Hilfe benötigen, rufen Sie unsere Hilfethemen unter support.pure.com auf.
EN
DE
FR
IT
NO DA
NL
1
2
Inhaltsverzeichnis
Evoke H3 |
1 |
Sicherheitsanweisungen |
4 |
Erste Schritte |
5 |
Ihr Evoke |
5 |
Einrichten Ihres Evoke H3 |
6 |
Einund Ausschalten Ihres |
|
Evoke H3 |
7 |
Ändern der Lautstärke |
7 |
Digitalradio |
8 |
Hören von digitalen Radiosendern |
8 |
Ändern des digitalen Radiosenders |
8 |
Automatisches Einstellen von |
|
digitalen Radiosendern |
9 |
UKW-Radio |
9 |
Hören von UKW-Radiosendern |
9 |
Ändern des UKW-Radiosenders |
9 |
Ändern der Suchlauf-Einstellungen |
|
für UKW-Sender |
9 |
Auswählen von Stereooder |
|
Mono-Empfang für UKW-Sender |
10 |
Speicherplätze für |
|
Radiosender |
10 |
Info über Speicherplätze |
10 |
Speichern eines Radiosenders |
10 |
Aufrufen eines gespeicherten |
|
Senders |
11 |
Bluetooth und externe Geräte 11
Anschließen eines Bluetooth-Geräts 11 Anschließen eines Geräts per Kabel 12
Wecker |
12 |
|
|
DE |
|||
Einstellen eines Weckers |
13 |
||
|
|||
Deaktivieren eines eingerichteten |
|
|
|
Weckers |
14 |
|
|
Verwenden der Schlummerfunktion |
|
|
|
oder Abschalten eines Weckers |
14 |
|
Kurzzeitmesser |
14 |
Einrichten des Kurzzeitmessers |
14 |
Abschalten des Kurzzeitmessers |
15 |
Einrichten des Sleeptimers |
15 |
Einstellungen |
16 |
Individuelles Anpassen des Klangs |
|
Ihres Evoke H3 |
16 |
Anzeigeeinstellungen |
16 |
Uhreinstellungen |
17 |
Ändern der Sprache |
18 |
Rücksetzung auf die |
|
Werkseinstellungen |
19 |
Aktualisieren der Software |
19 |
Verwenden eines |
|
ChargePAK-Akkus |
20 |
Info über ChargePAK-Akkus |
20 |
Einlegen eines ChargePAK |
20 |
Fehlerbehebung |
21 |
Technische Daten |
22 |
3
Sicherheitsanweisungen
Sicherheitsanweisungen und Warnhinweise
Bei diesem Produkt verwendete Symbole
Symbol Beschreibung
Durch dieses Symbol wird bei dem Produkt darauf hingewiesen, dass Vorsicht geboten ist und dass vor der Verwendung Anweisungen zu lesen sind.
Dieses Symbol weist auf Gleichspannung hin.
Dieses Symbol zeigt die Taste an, über die das Produkt eingeschaltet oder in den Standby-Betrieb geschaltet wird.
1.Lesen und beachten Sie die folgenden Anweisungen, und bewahren Sie diese auf. Alle Sicherheitsund Bedienungsanweisungen sind vor der Verwendung dieses Produkts zu lesen und zur späteren Einsichtnahme aufzubewahren. Alle Warnhinweise am Gerät und in den Bedienungsanweisungen sind zu befolgen.
2.Eine von den vorliegenden Anweisungen abweichende Installation oder Verwendung kann dazu führen, dass die Sicherheit des Produkts beeinträchtigt wird und die Garantie erlischt.
3.Verwenden Sie zur Stromversorgung des Geräts nur das in diesem Benutzerhandbuch bzw. in diesen Bedienungsanweisungen angegebene Netzteil (geliefert von Pure, Modellnummer SW0551000-AM), und verwenden Sie das Netzteil zu keinem anderen Zweck.
4.Der direkte Netzadapter dient als Trennvorrichtung. Diese Trennvorrichtung muss frei zugänglich sein.
5.Das Gerät darf nicht in Wasser getaucht oder in einer nassen/feuchten Umgebung wie der Dusche oder im Badezimmer verwendet werden, wenn es an den Netzstrom angeschlossen ist. Das Netzteil darf nicht mit Tropfen oder Spritzern in Berührung kommen, und es dürfen keine mit Flüssigkeiten gefüllten Gegenstände wie Vasen daraufgestellt werden.
6.Lösen Sie keine Schrauben vom Produktgehäuse, und öffnen Sie dieses nicht.
7.Setzen Sie das Produkt nicht direkter Sonneneinstrahlung aus, und achten Sie auf einen ausreichenden Abstand zu Wärmequellen wie Heizkörpern, Heizlüftern und anderen Geräten, die Wärme erzeugen.
8.Bei einem unsachgemäßen Austausch der Batterie besteht Explosionsgefahr (achten Sie auf eine korrekte Polarität). Tauschen Sie die Batterie nur gegen eine baugleiche oder gleichwertige Batterie aus.Die Batterie darf nicht großer Hitze wie Sonneneinstrahlung, Feuer oder Ähnlichem ausgesetzt werden. Achten Sie auf eine umweltgerechte Batterieentsorgung. Siehe Sektion - “Verwenden eines ChargePAK-Akkus”
9.Setzen Sie das Produkt keinen offenen Flammen wie brennenden Kerzen aus. Diese dürfen nicht auf das Produkt oder in dessen Nähe gestellt werden.
10.Das Produkt und das Netzteil dürfen nicht abgedeckt werden, um die Belüftung nicht zu beeinträchtigen.
11.Reinigen Sie das Produkt nur mit einem trockenen Tuch.
12.Dieses Produkt ist für den Einsatz in Regionen mit gemäßigtem Klima vorgesehen.
13.Bei einer von der Anleitung abweichenden Verwendung des Produkts kann der Schutz des Produkts beeinträchtigt werden.
14.Verwenden Sie das Produkt nicht, wenn es beschädigt ist.
15.Produktreparaturen dürfen nur von kompetenten und autorisierten Personen durchgeführt werden.
4
 Loading...