


ENGLISH
Thank you for choosing Contour D1. This manual will get you up and running in no time, and explains how to make the most of your Contour. We’re constantly improving and adding new features to our products. To take advantage of any enhancements made since your product was
shipped, please visit www.pure.com where you can download the latest version of this user guide in PDF format.
DE
FR
IT
DA
NL
1

Safety instructions
1.\\ |
Read these instructions. |
|
2.\\ |
Keep these instructions. |
|
3.\\ |
Heed all warnings. |
|
4.\\ |
Follow all instructions. |
|
5.\\ |
Keep the radio away from heat sources such as naked flames, candles, radiators, heaters or other \ |
|
\ |
appliances that produce heat. |
|
6.\\ |
Do not expose the unit to direct sunlight. |
|
7.\\ |
Do not use the radio near water |
|
8.\\ |
Avoid objects or liquids getting into the radio. |
|
9.\\ |
Clean only with dry cloth. |
|
10.\ |
Ensure that the unit has adequate ventilation (at least 10cm space all round). |
|
11.\ |
Do not remove screws from or open the radio casing. |
|
12.\ |
Fit the mains adapter to an easily accessible socket, located near the radio in case isolation from \ |
|
\ |
the mains is required and ONLY use the mains power adapter supplied by Pure (model number \ |
|
\ |
KSAS0251200240HK or KSAS0251200240D5). |
|
13.\ |
Only use attachments/accessories specified by the manufacturer. |
|
14.\ |
When plugged in, the radio remains connected to the mains power, even in standby with the display \ |
|
\ |
backlight off. |
|
15.\ |
To disconnect completely, unplug from the mains socket. |
|
16.\ |
WARNING: To reduce the risk of fire or electric shock, do not expose this apparatus to rain or \ |
|
\moisture. The apparatus shall not be exposed to dripping or splashing and objects filled with liquids, \
\such as vases, shall not be placed on apparatus.
17.\ |
CAUTION: Danger of explosion if the battery in the remote control is incorrectly replaced. Replace only \ |
|
\ |
with the same or equivalent type. |
|
18.\ |
WARNING: The battery in the remote control shall not be exposed to excessive heat such as \ |
|
\ |
sunshine, fire or the like. |
|
WARNING
\DO NOT INGEST BATTERY, CHEMICAL BURN HAZARD
The\ remote control supplied with this product contains a coin/button cell battery. If the coin/button cell battery is swallowed, it can cause severe internal burns in just 2 hours and can lead to death. \Keep new and used batteries away from children. If the battery compartment does not close securely, stop using the product and keep it away from children. If you think batteries may have been swallowed or placed inside any part of the body, seek immediate medical attention.
Damage to hearing can occur with consistent exposure to high volume when using headphones. Always check the volume level before inserting headphones into your ears.
Stop listening to your radio if you find it distracting while performing any activity that requires your full attention.
2

Contents
EN
4\ Getting started
4\ Setting up
7\ Controls and connectors 8\ Remote control
8\ Display
9\ Listening to iPod/iPhone/iPad
10\ Pure Connect app
11\ Listening to radio
11\ Selecting Digital or FM radio 11\ Changing stations
11\ Saving and selecting your favourite stations 11\ Changing the information displayed on screen
12\ Using Bluetooth 12\ Using the aux input
13\ Alarms and timers
13\ Setting an alarm
14\ Cancelling a sounding alarm 14\ Snoozing a sounding alarm 14\ Changing the snooze duration 14\ Cancelling a snoozing alarm 14\ Setting the sleep timer
14\ Cancelling the sleep timer
15\ Options and settings
15\ Digital radio options 15\ FM radio options 15\ General options 16\ Advanced options
17\ Help
17\ Secondary and inactive stations 17\ Hints and tips
18\ Specifications
3

Getting started
Setting up
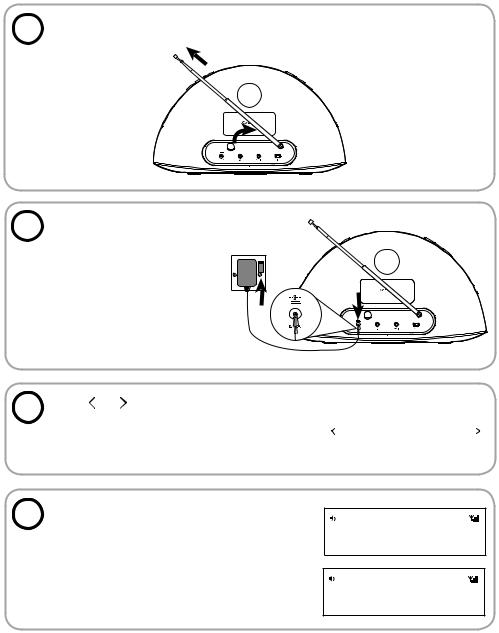
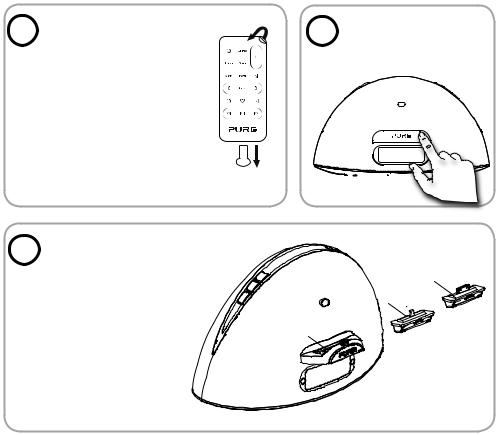
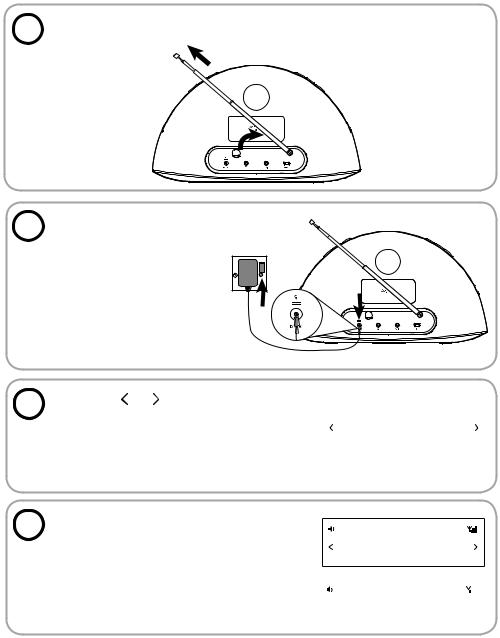
1 |
Pull the plastic tab |
|
|
|
|
|
from the remote |
|
|
|
|
|
|
|
|
|
|
|
|
|
|
control battery |
|
|
|
|
|
|
|
|
|
|
|
|
|
compartment and |
|
|
|
|
|
|
|
|
|
|
|
|
|
|
|
|
|
|
|
|
remove the protective |
|
|
|
|
|
|
|
|
|
|
|
|
|
|
|
|
|
|
|
|
film from remote |
|
|
|
|
|
|
|
|
|
|
|
|
|
|
|
|
|
|
|
|
buttons. |
|
|
|
|
|
|
|
|
|
|
|
|
|
|
|
|
|
|
3 |
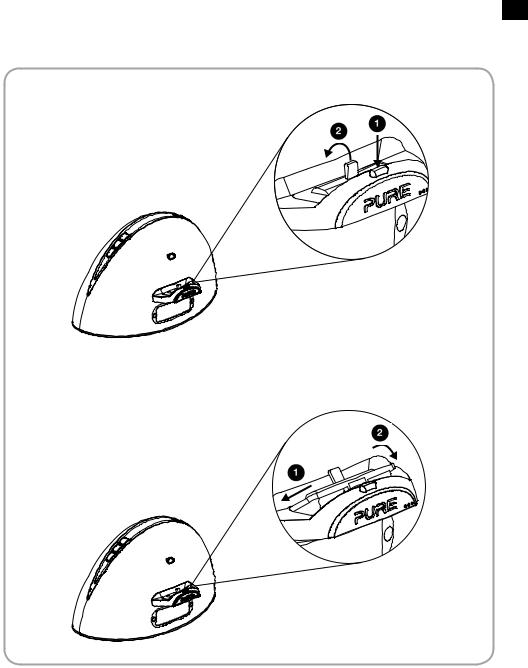
Insert the adaptor |
|
(lightning (A) or 30 pin |
||
|
||
|
(B)) that corresponds |
|
|
to your iPod/iPhone/ |
|
|
iPad into the connector |
|
|
socket (C) as shown on |
|
|
the following page. |
2 |
|
Push the right hand |
|||||
|
end of the front panel |
||||||
|
|
||||||
|
|
to release the dock. |
|||||
|
|
|
|
|
|
|
|
|
|
|
|
|
|
|
|
|
|
|
|
|
|
|
|
|
|
|
|
|
|
|
|
(B)
 (A)
(A)
(C)
4

EN
Removing an adaptor:
Inserting an adaptor:
5
4 |
Fully extend the aerial. |
|
5 |
Insert the connector of the |
|
mains power adapter into the |
socket on the rear of Contour.
Attach the appropriate adapter pins for your region, if required and plug in to the mains supply.
6 |
Press and on the remote to view the available |
|
|
|
|
|
languages (English/French/German/Italian/Spanish) |
LANGUAGE |
|
used for displaying menus and options and press |
|
|
Select to confirm your choice. |
|
|
|
7 |
Wait for Contour to complete an autotune, |
|
|
|
which finds all available digital stations (this |
|
takes about one minute). |
|
When the autotune is complete, a digital |
|
station will be selected. |
DR
 SCAN 26
DR
BBC R2
6
EN
Controls and connectors
Source
Press to change between Digital radio, FM, iPod, Auxiliary input and Bluetooth.
On/
Standby
Favourites/Snooze
Press and repeat to browse Mute through your favourite stations.
Press to snooze a sounding alarm.
Volume down
Volume up
iPod/iPhone/ iPad dock
Press the right hand end of the front panel to open the iPod dock.
LCD display
Bass port
Telescopic |
Remote control |
|
Aerial |
||
holder |
||
|
||
|
Storage recess for |
|
|
remote control. |
Power adapter socket |
Headphone |
Aux In socket |
USB socket |
Connector for supplied |
socket |
Analogue |
USB connector for |
mains power adapter. |
3.5mm stereo |
stereo input |
software updates |
|
headphone socket. |
for MP3 player. |
(mini-B type). |
7

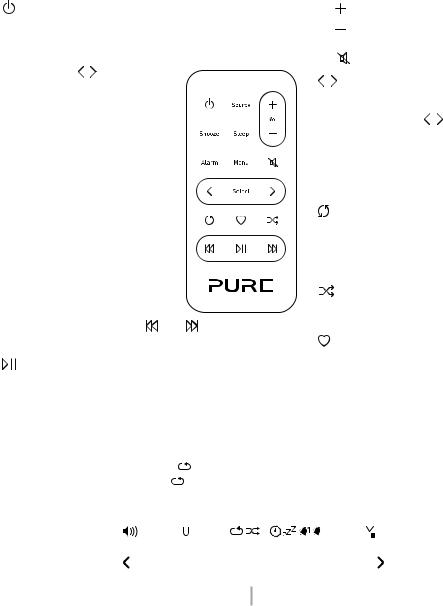
Remote control
 On/Standby
Snooze
Press to view the current Snooze time. Use 
 and Select to change. Press to snooze a sounding alarm.
Sleep
Press and repeat to set a sleep timer. See page 14.
Alarm
Press to set up an alarm. See page 13.
Menu
Press to view options menu. In iPod source press to navigate iPod menu.*

 Play/Pause
Play/pause current track.
Source
Press to change between Digital radio, FM, iPod, Auxiliary input and Bluetooth.
 and
and  Skip to start of current track or go to previous/next track. Hold to fast rewind or fast forward. In FM seek tune to the next station.
 Volume up
Volume down
 Mute
Mute
 Select
Browse and select tracks and menu options.
In FM 
 step down and up the frequency range in steps of 0.05 MHz. Press and hold to seek tune to the next station.
 Repeat
Toggle to repeat current track, repeat all or no repeat.
 Shuffle
Shuffle the track playback order.
 Favourites
Press to view your favourite stations list. Then press and hold to save the current station.
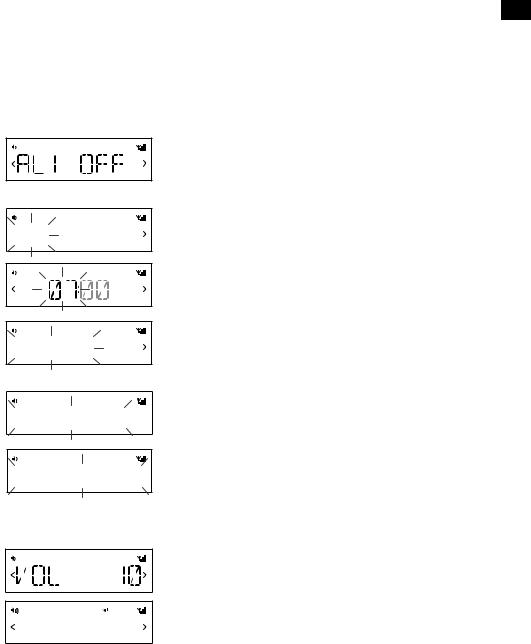
Display
Source |
Repeat one |
Shuffle |
Sleep |
Alarm |
Alarm |
||||||||||||||||||||||
indicators |
Repeat all |
|
|
|
|
|
timer set |
snoozed |
1/2 set |
||||||||||||||||||
|
|
|
|
|
|||||||||||||||||||||||
|
|
|
|
|
|||||||||||||||||||||||
|
|
|
|
|
|
|
|
|
|
|
|
|
|
|
|
|
|
|
|
|
|
|
|
|
|
||
|
|
|
|
|
|
|
|
|
|
|
|
|
|
|
|
|
|
|
|
|
|
|
|
|
|
|
|
|
|
|
|
|
|
|
|
|
|
|
|
|
|
|
|
|
|
|
|
|
|
|
|
|
|
|
|
Volume |
|
|
|
|
|
|
|
|
|
|
|
|
|
|
|
|
|
|
|
|
|
|
|
|
|
|
|
|
|
|
|
|
|
DRFMA XiPod |
|
|
|
|
|
|
|
|
|
|
|
|
|
Signal strength |
|||||||
|
|
|
|
|
|
|
|
|
|
|
|
|
|
|
|
|
|
|
|||||||||
|
Scroll |
|
|
|
|
|
|
|
|
|
|
|
|
|
|
|
|
|
|
|
|
|
Scroll |
||||
|
|
|
|
BBC |
|
R2 |
|
|
|
|
|
||||||||||||||||
|
indicator |
|
|
|
|
|
|
|
|
|
|
indicator |
|||||||||||||||
|
|
|
|
|
|
|
|
|
|
|
|||||||||||||||||
|
|
|
|
|
|
|
|
|
|
|
|
|
|
|
|
|
|
|
|
|
|
|
|
|
|
|
|
Text area
*Not supported on Apple products running iOS version 7.
8
Listening to iPod/iPhone/iPad EN
Compatibility
Contour is compatible with most iPod, iPhone and iPad models. For the latest information, check the compatibility table on our website:
www.pure.com/products/ipod-compatibility.
Docking your device
1.\ Push the right hand end of the front panel as shown to release the dock. 2.\ Carefully dock your device onto the connector.
\Your device will start charging as soon as it is docked and will continue charging whether Contour is switched on or in standby.
Note: If Contour is switched on, Contour will automatically switch to the iPod source as soon as you dock your iOS device. If Contour is in standby, Contour will remain in standby and start charging your iOS device.
Note: The headphone socket is disabled when an iPhone/iPod/iPad is docked.
Selecting the iPod source
Press the Source button to select IPOD. On devices with apps you can also play audio from other apps e.g. the Pure Connect app, if you pause the iPod playback.
Controlling your device
When the iPod source is selected your device will start playing the last iPod track you were listening to. Use the remote or controls on your Apple device to navigate menus and control playback.
To access the Contour options menu while you have an iPod/iPhone docked, press and hold the Menu button on the remote.*
Changing the information displayed on screen
Press and hold the Menu button, press Select to choose the DISPLAY option. Choose one of the following options:
TITLE/ARTIST\ |
Track title and artist name. |
TIME \ |
Full screen clock. |
*Not supported on Apple products running iOS version 7.
9
Pure Connect app
Make the most of Contour’s high quality audio by installing the free Pure Connect app on your iPod touch, iPhone or iPad. The Pure Connect app gives you free access to thousands of internet radio stations, on demand content (podcasts and listen again programmes) and ambient sounds, as well as millions of tracks, via Pure’s on-demand music streaming service.
iOS Pure Connect App
10

Listening to radio
EN
Selecting Digital or FM radio
Press the Source button to select DIGITAL or FM. You’ll see the relevant icon.
Changing stations
Digital
Press  and
and  to browse the available station and press Select to tune to a station.
FM
Press  or
or  (or hold
  or
or  ) to seek to the next station with a strong signal. Press
  or
or  to change the frequency in steps of 0.05 MHz.
Saving and selecting your favourite stations
You can save up to 40 (FM or digital) stations in a list for easy access.
Saving
1.\\ Tune to the station you want to save as a favourite. 2.\ Press  on the remote to view the favourites list.
3.\ Press  or
or  on the remote to decide where you want to save the favourite (if you \ \ choose an existing favourite it will be replaced).
4.\\ Press and hold down  or Select on the remote until you see ‘SAVED’ on the screen.
Selecting
Press  on the unit or remote to view the favourites list.
Press  again on the unit to cycle through the list or press
  or
or  on the remote.
Wait for the station to change if using the main unit or press Select on the remote to change immediately.
Changing the information displayed on screen
Press the Menu button, press  and
and  to browse and press Select to choose the DISPLAY option.
Choose one of the following options:
STATION\ |
Station name or frequency. |
TEXT \ |
Scrolling text broadcast by the station. |
TIME\ |
Full screen clock updated by the radio broadcast. |
11
Using Bluetooth
You can stream audio to Contour from a Bluetooth device.
Note: Adding a Bluetooth device varies on different mobile devices. See your Bluetooth mobile device manual for specific information.
Preparing Contour to stream audio using Bluetooth
1.\\ \Enable Bluetooth on your mobile device.
2.\\ On\ your mobile device, select the option to add a new Bluetooth device. On some mobile devices you may need to select the search or scan option.
3.\\ \Start the pairing process on your mobile device. Do this by selecting CONTOUR D1 ******
from the list of available devices that appear on the mobile device’s screen. On most Bluetooth devices, your device will automatically connect to Contour once paired. On some devices, you will need to manually connect after pairing. See your Bluetooth device user guide for more information.
Note: ****** represents a six digit code that will be unique to each Contour.
Any audio you play on your mobile device will now be streamed to your Contour.
Note: If you cannot see Contour when searching for Bluetooth devices, check that the Bluetooth setting is set to “On” on Contour (see page 16 for more information).
Note: You will need to disconnect any connected mobile Bluetooth devices from Contour to stream from a different Bluetooth device. Bluetooth will automatically disconnect if you go out of range of Contour. To manually disconnect you will usually need to use the Bluetooth settings on your mobile device.
Note: Some legacy Bluetooth devices may prompt you to enter a passcode when trying to pair with Contour. If this occurs, enter the code 0000.
Using the aux input
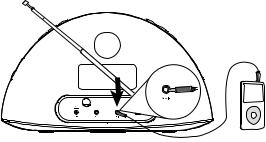
Connecting an auxiliary device
Connect the line out or headphone socket of your auxiliary device to the Aux-In socket on your Contour using a suitable cable.
Selecting the auxiliary input
Press the Source button to select AUX.
12
Alarms and timers
EN
Contour features two alarms and a sleep timer.
Setting an alarm
You can set an alarm to sound a tone, tune to a radio station or play a track from your iPod/iPhone.
DR
DR

 ON
ON
DR
DR

 DAILY
DAILY
DR
 DIGITAL

DR
 LAST USE
DR
 1
1
SAVED
Press the Alarm button on the remote to show the status of Alarm 1, press  or
or  to show the status of Alarm 2.
Press the Select button to choose and adjust either alarm and press  or
or  and Select to adjust the following settings:
Alarm on/off
Press  or
or  to choose between ‘ON’ (alarm sounds) or ‘OFF’ (alarm does not sound) and press Select.
Time
Set the alarm time. Press  or
or  to adjust the hours then press Select. Repeat to set the minutes then press Select.
Days
Set the days that the alarm sounds. Press  or
or  to choose between: DAILY (every day), ONCE (no repeat), WEEKENDS or WEEKDAYS (Monday to Friday) then press Select.
Type
Press  or
or  to choose between: DIGITAL, FM, IPOD or TONE (buzzer).
Station
If you’ve set alarm mode as DIGITAL or FM, press  or
or  to choose between: LAST USED (Last station tuned to) or select a favourite if you have any saved.
Note: NO PRESETS is displayed if you have not created any favourites.
Volume
Press  or
or  to change the alarm volume then press Select.
You see the message ‘SAVED’ once you have completed all the alarm settings.
The  and
and  icons on the screen indicate when an alarm is set.
13

Cancelling a sounding alarm
To cancel a tone alarm press the Alarm, Select or Standby button. To cancel a radio alarm press any button except volume.
Note: A sounding alarm will switch off after one hour unless you cancel it.
Snoozing a sounding alarm
To snooze a sounding alarm press the Favourites/Snooze button on Contour or the Snooze button on the remote. The alarm will be silenced for 10 minutes (the default snooze time) then sound again.
The 
 icon on the screen indicates when an alarm is snoozed.
Changing the snooze duration
The default snooze time for the alarms is 10 minutes. To change the snooze time:
Press the Snooze button on the remote and press  or
or  to choose a snooze duration then press Select to confirm. You can also change the snooze duration in the Clock menu. See the following page for more information.
Cancelling a snoozing alarm
To cancel a snoozing alarm press the Alarm or Select button.
Setting the sleep timer
The sleep timer switches your radio into standby after a number of minutes has elapsed.
1.Press the Sleep button on the remote and repeat to increase the duration of the \ \ sleep timer from 15 to 90 minutes
2.Push Select, or wait to start the sleep timer.
The 

 icon on the screen indicates when the sleep timer is set.
Note: Press the Sleep button on the remote control again at any time to view the time remaining.
Cancelling the sleep timer
Press the Sleep button and set the timer duration to OFF.
14

Options and settings
EN
Press the Menu button to access the options menu, press  or
or  to scroll through and change the options and press Select to confirm. Current value of settings are indicated by an
asterisk ( ).
).
Digital radio options
Autotune
Scans all digital frequencies for stations, automatically adds any new stations found to the station list and removes inactive stations. To stop an autotune press Menu.
FM radio options
FM Stereo
Choose from Stereo or Mono (default). Mono may improve audio clarity where stereo signals are weak.
General options
Clock
The clock is automatically set if you have a good digital or FM (RDS) signal and will automatically update for daylight saving time. You can adjust the following settings:
SET TIME\ |
Manually set the time and date if required. |
|
|
12/24HR\ |
Choose between 12 or 24 hour time display. |
|
|
SNOOZE\ |
Set your preferred snooze duration for alarms. |
|
|
SYNC TO\ |
Choose the radio source that you want to use for setting the time. |
|
|
\ |
BOTH\ |
(Default) Set the time by using both the digital and FM \ |
\ |
\ |
|
(RDS) radio signal. |
|
\ |
DIGITAL\ |
Set the time using the digital radio signal. |
|
\ |
FM\ \ |
Set the time using the FM (RDS) signal. |
|
Backlight
DURATION
Choose how long the backlight remains switched on:
TIMED \ |
The backlight turns on for 7 seconds when any button is |
|
\ |
pressed (default). |
|
\ |
OFF\ |
The backlight does not switch on |
\ON\ The backlight is always on when the radio is on.
LEVEL
Choose the brightness of the backlight:\
AUTO\ |
|
Adjusts automatically depending on the light level in your \ |
|
\ |
\ |
|
room (default). |
|
|
1-5 \ |
|
Set a brightness level between 1 (dim) and 5 (bright). |
|
|
15
Audio
Adjust the bass and treble:
BASS\ |
Adjust the bass between -3 (minimal bass), 0 (neutral) and 3 (maximum bass). |
TREBLE\ |
Adjust the treble between -3 (minimal treble), 0 (neutral) and 3 (high treble). |
Language
Choose from English, French, German, Italian or Spanish.
Advanced options
Press the Menu button to access the options menu, press  or
or  to scroll to SETTINGS and press Select to confirm.
Bluetooth
You can use the Bluetooth menu to make Contour visible or invisible to other Bluetooth devices. Choose from one of the following options:
ON (DISCOVERABLE) ON (HIDDEN)
OFF
Bluetooth name
Scroll 
 to BT NAME and press Select to display the name that Bluetooth uses to identify Contour.\
Bluetooth version
Scroll 
 to BT VER and press Select to display the Bluetooth version on Contour.\
Bluetooth upgrade
Scroll 
 to BT UPGRD and press Select to upgrade the Bluetooth software on Contour.\
Version
Scroll 
 to VERSION and press Select to display the software version on Contour.
Update
Scroll 
 to UPDATE and press Select to update Contour’s software. Software updates for your Contour D1 may be made available in the future. If you register your product and include a valid e-mail address you will receive notification of software updates (register at www.pure.com/ register). Available software updates are also listed at: http://support.pure.com.
Reset
Reset removes all saved favourites and resets all options to their defaults. Scroll 
 to RESET and press Select.
Choose YES to confirm the reset or NO to cancel the reset.
16

Help
EN
Secondary and inactive stations
Secondary digital services
Secondary services accompany some stations, providing extra information or alternative content and may only be broadcast at certain times. Secondary services will appear next to the primary station in the list.
Inactive or unavailable digital radio station
Inactive or unavailable stations
Inactive or unavailable stations are those which appear on the station list but are not currently available because either you are outside the broadcast area, have lost reception or the station is not currently broadcasting. Unavailable stations have a ‘?’ before their name on the station list. If you select a station which has this symbol, your radio tries to tune to that station. If still unavailable, you will return to the last station you were listening to.
Hints and tips
Display says ‘NO SIG’
Use Autotune (page 15) to search for stations. Try adjusting your aerial or radio position.
Receiving new digital stations that have started broadcasting
Use Autotune (page 15) to scan for new stations and add any new stations to the station list.
Contour does not recognise my iOS device
If Contour does not recognise your iOS device after it has been docked, try cleaning the contacts of the connector module with a dry cloth.
17

Specifications
Radio \ |
|
Digital and FM radio |
|
|
|
Frequencies\ |
\ |
DAB/DAB+/DMB-R/Parametric stereo decode up to 256 kbps, \ |
|
||
|
\ |
FM radio 87.5-108 MHz |
|
|
|
Bluetooth \ |
|
A2DP and AVRCP support |
|
|
|
iPod/iPhone/iPad\ |
|
Supports most iPod, iPhone and iPad models. |
|
|
|
|
\ |
For the latest information, check the compatibility table on \ |
|
||
|
\ |
our website: www.pure.com/products/ipod-compatibility. |
|
||
Speakers\ |
|
2 full-range 3" drive units. |
|
|
|
Audio output\ |
|
2 x 10W RMS. Rear bass port. |
|
|
|
Input connectors\ |
|
12V DC power adapter socket. iPod/iPhone/iPad \ |
|
\ |
|
|
\ |
connector. 3.5mm Aux-in for auxiliary devices. USB (mini-B \ |
|
||
|
\ |
type) for software updates. |
|
|
|
Output connectors\ |
3.5mm stereo output for headphones. |
|
|
||
LCD display\ |
|
Custom auto-dimming LCD display, large text and feature icons. |
|
||
Remote control \ |
|
Infrared remote control. CR2025 button cell battery included. |
|
||
Mains power supply\ |
Adapter: |
|
|
|
|
\ |
|
Input: 100-240V, 50/60Hz, 0.9A |
|
|
|
\ |
|
Output: DC 12V, 2.4A; |
|
|
|
\ |
|
Main unit: DC 12V |
, 2.4A |
|
|
Dimensions\ |
|
308mm wide x 174mm high x 145mm deep. |
|
|
|
Aerial\ |
|
Telescopic aerial. |
|
|
|
Approvals\ |
\ |
\CE marked. Compliant with the EMC and Low Voltage Directives \ |
|||
|
\ |
\(2004/108/EC and 2006/95/EC). ETSI EN 300 401 compliant. |
|
||
18
Copyright |
EN |
Copyright 2013 by Imagination Technologies Limited. All rights reserved. No part of this publication may be copied or distributed, transmitted, transcribed, stored in a retrieval system, or translated into any human or computer language, in any form or by any means, electronic, mechanical, magnetic, manual or otherwise, or disclosed to third parties without the express written permission of Imagination Technologies Limited.
Version 1 November 2013.
Trademarks
Contour, Pure, the Pure logo, Imagination Technologies, and the Imagination Technologies logo are trademarks or registered trademarks of Imagination Technologies Limited.
iPad, iPod and iPhone are trademarks of Apple Inc., registered in the U.S. and other countries.
“Made for iPod,” “Made for iPhone,” and “Made for iPad” mean that an electronic accessory has been designed to connect specifically to iPod, iPhone or iPad, respectively, and has been certified by the developer to meet Apple performance standards. Apple is not responsible for the operation of this device or its compliance with safety and regulatory standards. Please note that the use of this accessory with iPod, iPhone or iPad may affect wireless performance.
All other product names are trademarks of their respective companies.
Warranty Information
Imagination Technologies Limited warrants to the end user that this product will be free from defects in materials and workmanship in the course of normal use for a period of two years from the date of
purchase. This guarantee covers breakdowns due to manufacturing or design faults; it does not apply in cases such as accidental damage, however caused, wear and tear, negligence, adjustment, modification or repair not authorised by us. Please visit www.pure.com/register to register your product with us. Should you have a problem with your unit please contact your supplier or contact Pure Support at the address shown on the rear of this manual. If you need to return your product please use the original packaging and include all parts and accessories. We reserve the right to refuse incomplete or badly packaged returns.
Disclaimer
Imagination Technologies Limited makes no representation or warranties with respect to the content of this document and specifically disclaims any implied warranties of merchantability or fitness for any particular purpose. Further, Imagination Technologies Limited reserves the right to revise this publication and to make changes in it from time to time without obligation of Imagination Technologies Limited to notify any person or organization of such revisions or changes.
Correct disposal of this product
This marking indicates that this product should not be disposed with other household waste throughout the EU. To prevent possible harm to the environment or human health from uncontrolled waste disposal, recycle it responsibly to promote the sustainable reuse of material resources. To return your used device, please use the return and collection system or contact the retailer where the product was purchased. They can take this product for environmental safe recycling.
19
20
DEUTSCH
Vielen Dank, dass Sie sich für das Contour D1 entschieden haben. Mit diesem Handbuch ist das Gerät in kürzester Zeit betriebsbereit. Lesen Sie hier, wie Sie die fantastischen Funktionen des Contour D1 optimal nutzen können. Wir
arbeiten ständig daran, unsere Produkte weiter zu verbessern und um neue Funktionen zu erweitern. Um die vielen Erweiterungen zu nutzen, die seit der Auslieferung Ihres Geräts vorgenommen wurden, besuchen Sie bitte www.pure.com. Hier können Sie die neueste Version dieses Benutzerhandbuchs im PDF-Format herunterladen.
EN
FR
IT
DA NL
1

Sicherheitshinweise
1.\ Lesen Sie diese Anleitungen.
2.\ Bewahren Sie diese Anleitungen auf. 3.\ Beachten Sie alle Warnungen.
4. \ Befolgen Sie alle Anleitungen.
5.\ Achten Sie auf einen ausreichenden Abstand des Radios zu allen Wärmequellen wie Heizkörpern, \ \Heizlüftern und anderen Geräten, die Wärme erzeugen.
6.\ Setzen Sie das Gerät nicht direkter Sonneneinstrahlung aus. 7.\ Nutzen Sie das Radio nicht in der Nähe von Wasser.
8.\ Lassen Sie keine Objekte oder Flüssigkeiten in das Radio eindringen. 9.\ Reinigen Sie das Gerät nur mit einem trockenen Tuch.
10.\ Vergewissern Sie sich, dass das Gerät ausreichend Freiraum für einen angemessenen Luftaustausch \ hat\ (mindestens 10 cm auf allen Seiten).
11.\ Lösen Sie keine Schrauben vom Gehäuse des Radios.
12.\ Verwenden Sie nur Netzteile, die in den Benutzeranleitungen aufgelistet sind (mit Modell-Nr. KSAS0251200240HK oder KSAS0251200240D5, hergestellt von Pure).
13.\ Verwenden Sie ausschließlich vom Hersteller vorgegebenes Zubehör.
14.\ Wenn das Netzkabel des radio eingesteckt ist, besteht eine aktive Verbindung zum Stromnetz. Dies gilt auch für den Stand-by-Modus mit ausgeschalteter Display-Beleuchtung. Um das Gerät vollständig vom Netz zu lösen, muss es von der Netzsteckdose getrennt werden.
15.\ Um das Gerät vollständig vom Netz zu lösen, muss es von der Netzsteckdose getrennt werden.
16.\ WARNUNG! Setzen Sie das Gerät nicht Regen oder Feuchtigkeit aus, um das Risiko eines Brandes \ oder\ elektrischen Schlags zu verringern. Das Gerät darf nicht mit Tropfen oder Spritzern in Berührung \ kommen,\ und es sollten keine mit Flüssigkeiten gefüllten Gegenstände, z. B. Vasen, auf das Gerät \ gestellt werden.
17.\ ACHTUNG! Bei einem unsachgemäßen Austausch des Akkus besteht Explosionsgefahr. Tauschen Sie den Akku nur gegen einen baugleichen oder gleichwertigen Akku aus.
18.\ WARNUNG! Die Batterien auf dem Fernbedienung dürfen nicht extremer Hitze wie direkter Sonneneinstrahlung, Feuer oder ähnlichen Einflüssen ausgesetzt werden.
WARNUNG
BATTERIEN NICHT VERSCHLUCKEN, GEFAHR EINER CHEMISCHEN VERBRENNUNG Die mit diesem Produkt gelieferte Fernsteuerung enthält eine Knopfzellen-Batterie. Das
Verschlucken einer Knopfzellen-Batterie kann innerhalb von zwei Stunden zu schweren inneren Verbrennungen und zum Tod führen.
Halten Sie neue wie auch verbrauchte Batterien außerhalb der Reichweite von Kindern. Wenn das Batteriefach nicht fest schließt, arbeiten Sie nicht mehr mit dem Produkt, und halten Sie es außerhalb der Reichweite von Kindern. Wenn Sie befürchten, dass Batterien verschluckt worden oder in den Körper gelangt sein könnten, suchen Sie unverzüglich einen Arzt auf.
Bei der Verwendung von Kopfhörern kann das Hören von Musik in hoher Lautstärke dauerhafte Hörschäden verursachen. Überprüfen Sie immer die eingestellte Lautstärke, bevor Sie Kopfhörer oder Ohrhörer verwenden.
Es wird dringend davon abgeraten, beim Steuern eines Kraftfahrzeugs Kopfhörer zu verwenden. In manchen Ländern ist dies strikt verboten. Stoppen Sie die Wiedergabe Ihres Radio, wenn Sie feststellen, dass Sie dadurch vom Steuern eines Kraftfahrzeugs oder anderen Tätigkeiten, die Ihre volle Aufmerksamkeit erfordern, abgelenkt werden.
2

Inhalt
DE
4\ Erste Schritte
4\ Kurzanleitung zur Einrichtung 8\ Fernbedienung
8\ Anzeige
9\ Anhören von iPod/iPhone/iPad
10\ Pure Connect app
11\ Radio hören
11\ Digitaloder UKW-Radio auswählen 11\ Senderwechsel
11\ Lieblingssender sichern und auswählen 11\ Ändern der angezeigten Informationen
12\ Verwendung von Bluetooth 13\ Zusatzeingang verwenden
14\ Alarme verwenden
14\ Alarm einstellen
15\ Abbrechen eines Wecktons 15\ Schlummerfunktion verwenden 15\ Ändern der Schlummerdauer 15\ Schlummeralarm abbrechen
16\ Optionen und Einstellungen
16\ Digitalradio-Optionen
16\ UKW-Radiooptionen
16\ Allgemeine Optionen 17\ Weitere Optionen
18\ Hilfe
18\ Sekundärsender / inaktive Sender 18\ Tipps und Tricks
19\ Technische Daten
3
Erste Schritte
Kurzanleitung zur Einrichtung
1 |
Ziehen Sie den |
|
|
|
|
|
Plastikstreifen vom |
|
|
|
|
|
|
|
|
|
|
|
|
|
|
Batteriefach der |
|
|
|
|
|
|
|
|
|
|
|
|
|
Fernbedienung ab |
|
|
|
|
|
|
|
|
|
|
|
|
|
|
|
|
|
|
|
|
und ziehen Sie die |
|
|
|
|
|
|
|
|
|
|
|
|
|
|
|
|
|
|
|
|
Schutzfolie von den |
|
|
|
|
|
|
|
|
|
|
|
|
|
|
|
|
|
|
|
|
Fernbedienungstasten ab. |
|
|
|
|
|
|
|
|
|
|
|
|
|
|
|
|
|
|
3 |
Setzen Sie den |
|
Adapter (Blitz (A) |
||
|
||
|
oder 30-pin (B)) für Ihr |
|
|
iPod/iPhone/iPad in |
|
|
die Anschlussbuchse |
|
|
(C) ein, wie auf der |
|
|
folgenden Seite gezeigt. |
2 |
|
Drücken Sie rechts auf |
|||||
|
das vordere Bedienfeld, |
||||||
|
|
||||||
|
|
um den Dock zu öffnen. |
|||||
|
|
|
|
|
|
|
|
|
|
|
|
|
|
|
|
|
|
|
|
|
|
|
|
|
|
|
|
|
|
|
|
(B)
 (A)
(A)
(C)
4
DE
Entfernen eines Adapters:
Einsetzen eines Adapters:
5
4 |
Ziehen Sie die Antenne vollständig heraus. |
5 |
Stecken Sie den Stecker des |
|
Netzkabels in den Anschluss |
auf der Rückseite des Radios.
Schließen Sie ggf. die passenden Adapterstifte für Ihre Region an und stecken Sie das Netzkabel ein.
6 |
Drücken Sie und an der Fernbedienung, um |
|
|
|
|
|
die für die Anzeige der Menüs und Optionen |
LANGUAGE |
|
verfügbaren Sprachen (Englisch/Französisch/ |
|
|
Deutsch/Italienisch/Spanisch) anzuzeigen, und |
|
|
|
|
|
drücken Sie Select (Auswahl), um Ihre Auswahl |
|
|
zu bestätigen. |
|
7 |
Warten Sie, bis Contour die automatische |
DR |
|
|
Sendersuche für alle verfügbaren digitalen |
SCAN |
26 |
|
Sender abgeschlossen hat (dies dauert etwa |
||
|
eine Minute). |
|
|
Wenn die automatische Sendersuche |
|
|
|
DR |
|
|
|
abgeschlossen ist, wird ein digitaler |
|
|
|
BBC R2 |
|
||
Sender ausgewählt. |
|
||
|
|
|
|
6

DE
Source (Quelle) |
Favoriten/Schlummer |
|
Drücken Sie, |
Drücken Sie mehrmals, um durch |
|
um zwischen |
die Liste Ihrer Lieblingssender |
|
Digitalradio, |
zu blättern. Drücken Sie, um die |
Mute (Stummschalten) |
UKW, iPod, dem |
Schlummerfunktion zu verwenden, |
|
Zusatzeingang |
wenn ein Alarm ertönt. |
|
zu wechseln |
|
Lautstärkeregelung |
und Bluetooth. |
|
(leiser) |
On/Standby |
|
Lautstärkeregelung |
|
(lauter) |
|
(Ein/Standby) |
|
|
|
|
iPod-/iPhone-/ |
|
|
iPad-Dock |
|
|
Drücken Sie |
|
|
rechts auf |
|
|
das vordere |
|
|
Bedienfeld, um |
|
|
den iPod-Dock |
|
|
zu öffnen. |
LCD-Display
Bassanschluss
|
Fernbedienungs |
Teleskop |
halterung |
antenne |
Aufbewahrung |
|
svertiefung für die |
|
Fernbedienung. |
Netzteilanschluss |
Kopfhörerbuchse |
Aux-In-Buchse |
USB-Buchse |
Anschluss für das |
3,5-mm-Buchse für |
Analoger Stereo- |
USB-Anschluss für |
mitgelieferte Netzteil. |
Stereokopfhörer. |
Eingang für |
Software-Updades |
|
|
MP3-Player. |
(Typ Mini B). |
7
Fernbedienung
On/Standby (Ein/Standby) |
Source (Quelle) |
Lautstärkeregelung (lauter) |
|
Drücken Sie, um zwischen |
|||
|
|
||
Snooze-Funktion |
Digitalradio, UKW, iPod, |
Lautstärkeregelung (leiser) |
|
Drücken Sie, um die aktuelle |
dem Zusatzeingang zu |
|
|
Schlummerzeit anzuzeigen. |
wechseln und Bluetooth. |
Mute (Stummschalten) |
Verwenden Sie |
und Select |
und Select (Auswahl) |
||||||||||
(Auswahl) zum Ändern der |
|
|
|
|
|
|
|
|
|
|||
|
|
|
|
|
|
|
|
|
Durchsuchen und Auswählen von |
|||
Einstellung. Drücken Sie, um die |
|
|
|
|
|
|
|
|
||||
|
|
|
|
|
|
|
|
|||||
|
|
|
|
|
|
|
|
Titeln und Menüoptionen. |
||||
Schlummerfunktion zu verwenden, |
|
|
|
|
|
|
|
|
||||
|
|
|
|
|
|
|
|
Verschiebt bei UKW |
den |
|||
wenn ein Alarm ertönt. |
|
|
|
|
|
|
|
|
|
|||
|
|
|
|
|
|
|
|
|
||||
|
|
|
|
|
|
|
|
|
Frequenzbereich in Schritten |
|||
Sleep |
|
|
|
|
|
|
|
|
|
|
||
|
|
|
|
|
|
|
|
|
|
von 0.05 MHz nach oben oder |
||
|
|
|
|
|
|
|
|
|
|
|||
Drücken Sie die Taste mehrmals, |
|
|
|
|
|
|
|
|
unten. Drücken Sie die Taste und |
|||
um einen Sleep-Timer einzustellen. |
|
|
|
|
|
|
|
|
halten Sie sie gedrückt, um den |
|||
|
|
|
|
|
||||||||
Alarm (Wecker) |
|
|
|
|
|
|
|
|
|
|
nächsten Sender zu suchen. |
|
|
|
|
|
|
|
|
|
|
|
|
|
|
Drücken Sie diese Taste, um |
|
|
|
|
|
|
|
|
Repeat (Wiederholen) |
|||
|
|
|
|
|
||||||||
|
|
|
|
|
|
|
|
|||||
einen Alarm einzurichten. Siehe |
|
|
|
|
|
|
|
|
||||
|
|
|
|
|
|
|
|
Umschalten zwischen "Alle |
||||
Seite 14. |
|
|
|
|
|
|
|
|
|
|
||
|
|
|
|
|
|
|
|
|
|
wiederholen", "Aktuellen Titel |
||
Menu (Menü) |
|
|
|
|
|
|
|
|
|
|
||
|
|
|
|
|
|
|
|
|
|
wiederholen" und "Keine |
|
|
Drücken Sie die Taste, |
|
|
|
|
|
|
|
|
|
Wiederholung". |
|
|
|
|
|
|
|
|
|
|
|
|
|||
um das Optionsmenü |
|
|
|
|
|
|
|
|
|
Shuffle (Mischen) |
|
|
anzuzeigen. |
|
|
|
|
|
|
|
|
|
|
|
|
Drücken Sie bei iPod-Quelle |
|
|
|
|
|
|
|
|
|
Titel-Wiedergabereihenfolge |
||
die Taste, um zum iPod- |
und Überspringen zum |
mischen. |
|
|||||||||
Menü zu navigieren.* |
|
|
||||||||||
Anfang des aktuellen Titels oder |
Favoriten |
|
||||||||||
|
|
|
||||||||||
Wiedergabe/ |
|
zum vorigen/nächsten Titel. |
Drücken Sie die Taste, um die Liste |
|||||||||
|
Gedrückt halten, um schnell |
der Favoriten-Sender anzuzeigen. |
||||||||||
Pause |
|
voroder zurückzuspulen. |
Drücken Sie die Taste und halten |
|||||||||
Wiedergabe-/Pause- |
Versucht bei UKW, den |
Sie sie gedrückt, um den aktuellen |
||||||||||
Taste für aktuellen Titel. |
nächsten Sender einzustellen. |
Sender zu sichern. |
|
|||||||||
Anzeige
Source |
1x Wiederholen |
Shuffle |
|
|
|
|
Sleep-Timer |
Alarm- |
Alarm 1/2 |
|||||||||||||||||||||
|
|
|
|
Snooze |
||||||||||||||||||||||||||
(Quelle) |
Alles Wiederh. |
(Mischen) |
|
|
aktiviert |
|||||||||||||||||||||||||
|
|
aktiviert |
aktiviert |
|||||||||||||||||||||||||||
Indikatoren |
|
|
|
|
|
|
|
|
|
|
|
|
|
|
|
|
|
|
||||||||||||
|
|
|
|
|
|
|
|
|
|
|
|
|
|
|
|
|||||||||||||||
|
|
|
|
|
|
|
|
|
|
|
|
|
|
|
|
|
|
|
|
|
|
|
|
|
|
|
|
|||
|
|
|
|
|
|
|
|
|
|
|
|
|
|
|
|
|
|
|
|
|
|
|
|
|
|
|
|
|
|
|
Lautstärke |
|
|
|
|
|
|
|
|
|
|
|
|
|
|
|
|
|
|
|
|
|
|
|
|
|
|
|
|
||
|
|
|
|
|
|
DRFMA |
XiPod |
|
|
1 |
|
|
|
1 2 |
|
|
|
|
|
|
Signalstärke |
|||||||||
|
Blättern- |
|
|
|
|
|
|
|
|
|
|
|
|
|
|
|
|
|
|
|
||||||||||
|
|
|
|
BBC |
|
|
R2 |
|
|
|
|
|
|
Blättern- |
||||||||||||||||
|
Indikator |
|
|
|
|
|
|
|
|
|
|
Indikator |
||||||||||||||||||
|
|
|
|
|
|
|
|
|
|
|
|
|
|
|
|
|
|
|
|
|
|
|
|
|||||||
|
|
|
|
|
|
|
|
|
|
|
|
|
|
|
|
|
|
|
|
|
|
|
|
|
|
|
|
|
|
|
Textbereich
*Nicht unterstützt auf Apple Produkten mit iOS Version 7.
8
 Loading...