


Elan E3

Elan E3
Thank you for choosing Elan E3. This manual will get you up and running in no time, and explains how to make the most of your product.
EN
DE
FR
IT
NO DA
NL
1

Safety instructions and cautions
Symbols used on this product
Symbol Description
This WARNING symbol is used throughout this manual to indicate a potentially serious risk to your personal safety. Obey all safety notices that accompany this symbol to avoid possible injury or death.
This symbol is used on the product to indicate a caution and that instructions should be read before use.
This symbol indicates DC voltage.
This symbol indicates where the product is switched on or put into standby.
1.Read, heed and retain these instructions – All the safety and operating instructions should be read before this product is used and retained for future reference. All warnings on the appliance and in the operating instructions should be followed
2.Failure to install or use the product in accordance with these instructions may impair the safety of the product and invalid the warranty.
3.Use only power supply listed in these user manual/user instructions (supplied by Pure with model number SW0600500-A01, SW0600500-A02 or SW0600500-AM) to power the equipment and do not use the power supply for any other purpose.
4.The direct plug-in adapter is used as a disconnect device, the disconnect device shall remain readily operable and accessible.
5.Do not immerse in water or use in a wet/moist environment, such as in the shower or bathroom if plugged into the mains supply. The power supply shall not be exposed to dripping or splashing and no objects filled with liquids, such as vases, placed above it.
6.Do not remove screws from or open the product casing. Product repairs are only to be carried out by competent and authorised personnel. Do not use the product if any damage is noticed.
7.Keep the product away direct sunlight and from heat sources such as radiators, heaters or other appliances that produce heat.
8.Danger of explosion if the batteries are incorrectly replaced (ensure correct polarity). Replace only with the same or equivalent type. The batteries shall not be exposed to excessive heat such as sunshine, fire or similar. Attention is drawn to the environmental aspects of battery disposal.
9.Do not expose the product to naked flame sources, such lighted candles which should not be placed on or near the product.
10.Ventilation should not be impaired by covering the product or power supply.
11.Clean only with a dry cloth.
12.This product is intended for use in moderate climates.
13.If the product is used in a manner not specified by the instructions, the product’s protection could be impaired.
14.Do not use the product if any damage is noticed.
15.Keep batteries out of the reach of babies and children.
2

Contents
EN
4 Introduction
4Package contents
4Front panel controls
5Rear panel connectors
6Display
7Getting started
7Quick set up
8Listening to digital or FM radio
8Changing digital stations
8Changing FM stations
8 Using radio presets
8To quick-store a station to a preset button (1-3)
8To store a station to the preset list (4-20)
8To recall a preset when listening to digital radio or FM radio
9Using the auxiliary input
9Connecting an auxiliary device to your Elan E3
9Selecting the auxiliary input
10Setting alarms and timers
10 Setting an alarm
10Setting the sleep timer
10Setting the kitchen timer
10Cancelling a sounding alarm
10Snoozing a sounding alarm
11Options and settings
12Time and date settings
13Changing your preferred language
14Backlight
15DAB settings
16FM radio settings
17Specifications
3

Introduction
Package contents
You’ll find the following items in the box:
•Elan E3
•Power adapter
Note: Retain all packaging after removing your Elan E3 and the accessories from the box. If you decide to dispose the packaging, please do so according to local regulations.
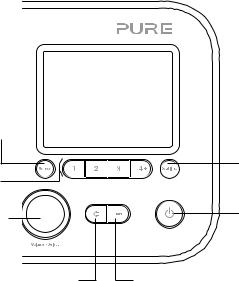
Front panel controls
Source
Press to select digital radio,
FM radio or auxiliary input.
Presets 1 − 4+: Store up to 20 digital and 20 FM radio preset stations
Volume/Select: Turn and press to select menu options. If listening to content, turn to adjust the volume.
Back: Press to return |
|
|
|
Menu: Press to access |
|
|
|||
to the previous menu. |
|
|
|
the settings menu. |
Digital radio: Press to see digital radio station list. FM: Press to enter FM manual tuning mode.
Standby: Switch between on and standby if powered by the mains power adapter or on and off if powered by batteries.
4
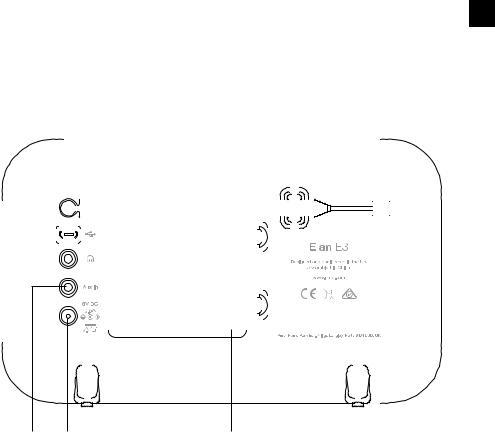
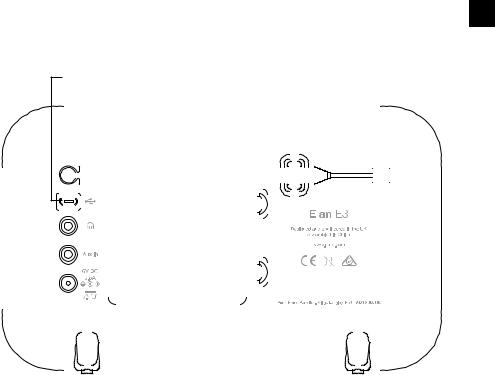
Rear panel connectors
EN
3.5 mm stereo |
|
|
|
|
Micro B USB |
|
|
|
|
|
|
|
|
|
|||||||||||||||||||||||
headphone socket |
|
|
|
|
Software updates only |
|
|
|
|
|
|
|
|
|
|||||||||||||||||||||||
|
|
|
|
|
|
|
|
|
|
|
|
|
|
|
|
|
|
|
|
|
|
|
|
|
|
|
|
|
|
|
|
|
|
|
|||
|
|
|
|
|
|
|
|
|
|
|
|
|
|
|
|
|
|
|
|
|
|
|
|
|
|
|
|
|
|
|
|
|
|
|
|
|
|
|
|
|
|
|
|
|
|
|
|
|
|
|
|
|
|
|
|
|
|
|
|
|
|
|
|
|
|
|
|
|
|
|
|
|
|
|
|
|
|
|
|
|
|
|
|
|
|
|
|
|
|
|
|
|
|
|
|
|
|
|
|
|
|
|
|
|
|
|
|
|
|
|
|
|
|
|
|
|
|
|
|
|
|
|
|
|
|
|
|
|
|
|
|
|
|
|
|
|
|
|
|
|
|
|
|
|
|
|
|
|
|
|
|
|
|
|
|
|
|
|
|
|
|
|
|
|
|
|
|
|
|
|
|
|
|
|
|
|
|
|
|
|
|
|
|
|
|
|
|
|
|
|
|
|
|
|
|
|
|
|
|
|
|
|
|
|
|
|
|
|
|
|
|
|
|
|
|
|
|
|
|
|
|
|
|
|
|
|
|
|
|
|
|
|
|
|
|
|
|
|
|
|
|
|
|
|
|
|
|
|
|
|
|
|
|
|
|
|
|
|
|
|
|
|
|
|
|
|
|
|
|
|
|
|
|
|
|
|
|
|
|
|
|
|
|
|
|
|
|
|
|
|
|
|
|
|
|
|
|
|
|
|
|
|
|
|
|
|
|
|
|
|
|
|
|
|
|
|
|
|
|
|
|
|
|
|
|
|
|
|
|
|
|
|
|
|
|
|
|
|
|
|
|
|
|
|
|
|
|
|
|
|
|
|
|
|
|
|
|
|
|
|
|
|
|
|
|
|
|
|
|
|
|
|
|
|
|
|
|
|
|
|
|
|
|
|
|
|
|
|
|
|
|
|
|
|
|
|
|
|
|
|
|
|
|
|
|
|
|
|
|
|
|
|
|
|
|
|
|
|
|
|
|
|
|
|
|
|
|
|
|
|
|
|
|
|
|
|
|
|
|
|
|
|
|
|
|
|
|
|
|
|
|
|
|
|
|
|
|
|
|
|
|
|
|
|
|
|
|
|
|
|
|
|
|
|
|
|
|
|
|
|
|
|
|
|
|
|
|
|
|
|
|
|
|
|
|
|
|
|
|
|
|
|
|
|
|
|
|
|
|
|
|
|
|
|
|
|
|
|
|
|
|
|
|
|
|
|
|
|
|
|
|
|
|
|
|
|
|
|
|
|
|
|
|
|
|
|
|
|
|
|
|
|
|
|
|
|
|
|
|
|
|
|
|
|
|
|
|
|
|
|
|
|
|
|
|
|
|
|
|
|
|
|
|
|
|
|
|
|
|
|
|
|
|
|
|
|
|
|
|
|
|
|
|
|
|
|
|
|
|
|
|
|
|
|
|
|
|
|
|
|
|
|
|
|
|
|
|
|
|
|
|
|
|
|
|
|
|
|
|
|
|
|
|
|
|
|
|
|
|
|
|
|
|
|
|
|
|
|
|
|
|
|
|
|
|
|
|
|
|
|
|
|
|
|
|
|
|
|
|
|
|
|
|
|
|
|
|
|
|
|
|
|
|
|
|
|
|
|
|
|
|
|
|
|
|
|
|
|
|
|
|
|
|
|
|
|
|
|
|
|
|
Aux in |
|
|
|
Mains input |
|
Battery compartment |
|
|
|
||||
3.5mm auxiliary input connection |
Connect to supplied |
|
Compartment for four |
|||
for an iPod, MP3 player, etc. |
mains adapter only |
|
AA batteries |
|||
|
|
|
|
|
|
(sold separately). |
5

Display
Source menu
Press the Source button to display the ‘Source’ menu. Turn and press the Select dial to switch between input sources.
Digital Radio
Description |
Function |
DAB Radio |
Listen to a digital radio station. |
FM Radio |
Listen to an FM radio station. |
Auxiliary Input |
Listen to content from a device connected to your Aux in connection. |
Changing the information shown on screen
When listening to a digital or FM radio station, you can change the information that is displayed on the screen.
Digital radio
When listening to digital radio, press the Select dial to toggle the information displayed on screen between Scrolling text, Programme type, Ensemble, Channel / frequency, Signal strength / error, Bitrate or Date
When listening to digital radio, you can also press and hold the Select dial to toggle the display to show the ‘Now playing’ screen, a full screen version of the radio station artwork and a screen that shows information about the show that is being broadcast along with the radio station artwork.
FM radio
When listening to FM radio, press the Select dial to toggle the information displayed on the screen between ‘Scrolling text’, ‘Programme type’, ‘Frequency’, ‘Stereo/Mono’ and ‘Date’.
6

Getting started
Quick set up
EN
1• Unclip the aerial and fully extend it (steps A and B).
•Insert the jack of the supplied mains adapter into the socket on the rear of the radio (C).
•Plug the mains adapter into the mains supply (D).
B
A
D
C 


2 Press the Standby button to switch your Elan E3 on.
3Wait for your radio to complete an Autotune and find all available digital stations. When the Autotune is complete, a station will start playing.
Full Scan |
10:27 |
|
|
|
|
|
|
||
|
|
|
||
|
|
|
Scanning...
Stations: 25
7

Listening to digital or FM radio
Digital Radio |
10:27 |
|
|
|
|
|
BBC Radio 2
Pop Music
Digital radio screen
Station List |
10:27 |
|
|
|
|
|
|
||
|
|
|
||
|
|
|
BBC Radio 1
BBC Radio 1Xtra
BBC Radio 2
BBC Radio 3
BBC Radio 4
BBC Radio 5 Live
BBC Radio 6Music
Changing digital radio station
Changing digital stations
1.Press the Source button and turn and press the Select dial to select ‘DAB radio’ from the Home screen. The first time you select DAB radio, your Elan E3 will perform an autotune to find all available stations and will tune into one when finished.
2.Press the Stations button and turn the Select dial left or right to browse through the list of available digital stations.
3.Press the Select dial to change the station.
Changing FM stations
Seek tuning
1.Press the Source button and turn and press the Select dial to select ‘FM radio’ from the Home screen.
2.Press and hold the Select dial to seek to the next FM radio station that has a strong signal.
Manual tuning
1.Press the Source button and turn and press the Select dial to select ‘FM radio’ from the Home screen.
2.Press the Stations button to enter manual tuning mode.
3.Turn the Select dial to step up or down 0.05 MHz.
Using radio presets
You can store up to 20 digital and 20 FM radio stations for quick access.
To quick-store a station to a preset button (1-3)
Tune to the digital or FM radio station you want to store. Press and hold one of the numbered Preset buttons (1-3) for two seconds until you see a message to confirm that the preset has been stored.
To store a station to the preset list (4-20)
1.Tune to the digital or FM radio station you want to store.
2.Hold the 4+ button to view the numerical list of stored presets, then turn and press the Select dial to choose any Preset number between 4 and 20. You can overwrite existing presets.
To recall a preset when listening to digital radio or FM radio
1.To tune to Presets 1 to 3, press the corresponding numbered button on the front panel.
2.To access presets 4 to 20 on the front panel press the 4+ button, turn the Select dial right or left to scroll through the list of presets, then push and release the Select dial to tune to the selected preset.
8
Using the auxiliary input
EN
You can use the auxiliary input on your Elan E3 to play any music from your phone or tablet.
Connecting an auxiliary device to your Elan E3
Connect the line out or headphone socket of your auxiliary device to the Aux In socket on your Elan E3 using a suitable cable.
Selecting the auxiliary input
1.Press the Source button and turn and press the Select dial to select ‘Auxiliary Input’ from the Home screen.
2.On your auxiliary device, select the content that you want to listen to on your Elan E3.
Your Elan E3 will start to play the content that you selected on your auxiliary device.
9
Setting alarms and timers
Your Elan E3 has two alarms and a sleep timer.
The alarm features are only functional when your Elan E3 is connected to mains power.
Setting an alarm
1.Press the Menu button and turn and press the Select dial to select ‘System Settings’.
2.Turn and press the Select dial to select ‘Alarms’.
3.From the ‘Alarm’ menu, turn and press the Select dial to select either ‘Alarm 1’ or ‘Alarm 2’.
4.Press Select to turn ‘Alarm’ to ‘On’.
5.Turn and press the Select dial to change the ‘Frequency’
6.Select ‘Wake Up time’ by turning and pressing the Select dial, turn the dial to adjust the hours and minutes, pressing Select to confirm each section.
7.Turn and press the Select dial to select ‘Source’. Turn and press the Select dial to choose between ‘Buzzer’, ‘Digital Radio’ or ‘FM’, then press the Select dial to confirm.
8.If you’ve chosen ‘Digital Radio’ or ‘FM’ radio, turn and press the Select dial to select ‘Preset’. To play the station you last listened to, turn and press the Select dial to select ‘Last listened’ or turn and press the Select dial to choose a radio station from the preset list.
Note: Skip this step if you are setting a Tone alarm.
9.Turn and press the Select dial to select ‘Duration’. Turn and press the Select to set the duration that the alarm will sound in minutes.
10.Turn and press the Select dial to select ‘Volume’. Turn and press the Select the dial to set the volume of the alarm.
Setting the sleep timer
1.Press the Menu button and turn and press the Select dial to select ‘System Settings’.
2.Turn and press the Select dial to select ‘Sleep’.
3.Turn and press the Select dial to adjust the length of the sleep timer.
Setting the kitchen timer
1.Press the Menu button and turn and press the Select dial to select ‘System Settings’.
2.Turn and press the Select dial to select ‘Kitchen timer’.
3.Turn and press the Select dial to adjust the length of the kitchen timer.
Cancelling a sounding alarm
Press Standby to cancel any sounding alarm or press Source to cancel and leave the radio on.
Snoozing a sounding alarm
To snooze a sounding alarm, press the Select dial. The display will show a countdown timer to show how long the alarm will snooze for. To adjust the amount of time the alarm will be snoozed by, press the Select dial to change the snooze duration in 5 minute intervals up to 15 minutes, and then 30 minutes. To cancel a snoozing alarm press the Standby button.
10

Options and settings
EN
Choosing an equalisation setting
Your Elan E3 includes equalisation audio presets and also includes a loudness setting to help improve your listening experience when listening at a low volume.
1.Press the Menu button to view the main menu.
2.Turn and press the Select dial to select ‘System settings’ > ‘Equalizer’.
3.Turn and press the Select dial to choose between ‘Flat’, ‘Classic’, ‘Jazz’, ‘Pop’, ‘Rock’, ‘News’ and ‘Custom’. If you want to use a custom equalisation setting, select ‘Custom’ (see below for more information).
Creating a custom equalisation setting
You can manually set the bass and treble levels and specify if the loudness setting is enabled to help improve your listening experience when listening to your Elan E3 at a low volume.
Setting the bass and treble manually
1.Press the Menu button to view the main menu.
2.Turn and press the Select dial to select ‘System settings’ > ‘Equalizer’ > ‘Custom setup’.
3.Turn and press the Select dial to choose ‘Bass’ or ‘Treble’.
4.Turn and press the Select dial to set the level from ‘-3‘ (low) to ‘+3’ (high).
Switching on the loudness setting
If listening to your Elan E3 at low volume, you can use the loudness setting to improve your listening experience.
To switch the loudness setting on or off:
1.Press the Menu button to view the main menu.
2.Turn and press the Select dial to select ‘System settings’ > ‘Equalizer’ > ‘Custom setup’.
3.Turn and the Select dial to scroll down to ‘Loudness’.
4.Press the Select dial to toggle the loudness setting ‘On’ or ‘Off’.
Choosing a custom equalisation setting
When you have finished setting up your profile, carry out the following to listen to it on your Elan E3.
1.Press the Menu button to view the main menu.
2.Turn and press the Select dial to select ‘System settings’ > ‘Equalizer’.
3.Turn and press the Select dial to choose ‘Custom’.
11
Time and date settings
The clock will automatically set itself using your digital or FM radio signal. If the time or date does not update automatically, you can manually set it using this option.
Note: Any time or date updates received by a digital broadcast will override manual settings.
Setting the time and date manually
1.Press the Menu button to view the main menu.
2.Turn and press the Select dial to select ‘System settings’ > ‘Time/Date’.
3.Turn and press the Select dial to choose ‘Set Time/Date’.
4.Turn and press the Select dial to set the day of the month. Repeat to set the month and year.
5.Turn and press the Select dial to set the hour. Repeat to adjust the minutes.
Note: If you have set your Elan E3 to use the 12 hour time format, make sure that you select the ‘AM’ or ‘PM’ version of the hour before pressing the Select dial.
Time and date synchronization options
You can synchronize the time and date on your Elan E3 using either the FM or digital radio signal. To specify the clock synchronization options:
1.Press the Menu button to view the main menu.
2.Turn and press the Select dial to select ‘System settings’ > ‘Time/Date’.
3.Turn and press the Select dial to choose ‘Auto update’.
4.Turn and press the Select dial to choose between the ‘from Any’, ‘from Digital Radio’, ‘from FM’ and ‘No Update’ clock synchronization options.
Changing the time format
1.Press the Menu button to view the main menu.
2.Turn and press the Select dial to select ‘System settings’ > ‘Time/Date’.
3.Turn and press the Select dial to choose ‘Set 12/24 hour’.
4.Turn and press the Select dial to choose between ‘12’ or ‘24’ hours.
Changing the date format
1.Press the Menu button to view the main menu.
2.Turn and press the Select dial to select ‘System settings’ > ‘Time/Date’.
3.Turn and press the Select dial to choose ‘Set date format’.
4.Turn and press the Select dial to choose between ‘DD-MM-YYYY’ and ‘MM-DD-YYYY’.
12

EN
Changing your preferred language
You can select the language that your Elan E3 uses for menus and options.
1.Press the Menu button to view the main menu.
2.Turn and press the Select dial to choose ‘System settings’ > ‘Language’.
3.Turn and press the Select dial to select a menu language.
Carrying out a factory reset
Resetting your Elan E3 removes all presets, stored stations, alarms and resets all other options to default settings.
1.Press the Menu button to view the main menu.
2.Turn and press the Select dial to choose ‘System settings’ > ‘Factory Reset’.
3.Turn and press the Select dial to select ‘Yes’ to reset your Elan E3 to factory settings. Select ‘No’ if you do not want to reset your Elan E3 to factory settings.
13
Backlight
You can adjust the duration that the screen is illuminated for and the brightness of the screen when your Elan E3 is switched on.
Timeout
To adjust the duration of the screen backlight before dimming:
1.Press the Menu button to view the main menu.
2.Turn and press the Select dial to choose ‘System settings’ > ‘Backlight’.
3.Turn and press the Select dial to choose ‘Timeout’.
4.Turn and press the Select dial to choose a timeout setting. To specify that the backlight should always remain on, choose ‘On’.
On level
To specify the brightness of the screen when your Elan E3 is switched on:
1.Press the Menu button to view the main menu.
2.Turn and press the Select dial to choose ‘System settings’ > ‘Backlight’.
3.Turn and press the Select dial to choose ‘On Level’.
4.Turn and press the Select dial to choose between ‘High’, ‘Medium’ or ‘Low’.
Dim level
To specify the brightness of the screen when your Elan E3 is dimmed:
1.Press the Menu button to view the main menu.
2.Turn and press the Select dial to choose ‘System settings’ > ‘Backlight’.
3.Turn and press the Select dial to choose ‘Dim Level’.
4.Turn and press the Select dial to choose between ‘High’, ‘Medium’, ‘Low’ or ‘Off’.
14

EN
DAB settings
Note: You can only see the DAB settings when you have selected ‘DAB’ as the radio source.
Full scan
You can use the ‘Full Scan’ (autotune) function to automatically scan for new digital radio stations and remove inactive ones.
To carry out an autotune:
1.Press the Menu button.
2.Turn and press the Select dial to choose ‘Full Scan’. The number of stations found will be displayed during the autotune.
When the autotune has finished, your Elan E3 will tune to the last station that you were listening to. If the last station you were listening to is no longer available, your Elan E3 will tune into the first station in the alphabetical list.
Manual tuning
To manually check the signal strength of a known channel:
1.Press the Menu button.
2.Turn and press the Select dial to choose ‘Manual tune’.
3.Turn and press the Select dial to choose the channel.
Dynamic range control
Dynamic Range Control (DRC) is used to make quieter sounds in a digital radio broadcast easier to hear at low volume or in a noisy environment. Check with the broadcasters to find out if they use DRC.
To change the DRC settings:
1.Press the Menu button.
2.Turn and press the Select dial to choose ‘DRC’.
3.Turn and press the Select dial to choose between one of the following options: DRC high: Applies maximum compression to the DRC level.
DRC low: Applies reduced compression to the DRC level. DRC off: Removes DRC compression.
15
FM radio settings
Note: You can only see the FM radio settings when you have selected ‘FM’ as the radio source.
FM stereo option
You can choose between stereo or mono reception when listening to FM radio. Mono may improve clarity where stereo signals are weak.
To change between Stereo or Mono reception:
1.Press the Menu button.
2.Turn and press the Select dial to choose ‘Audio Setting’.
3.Select between ‘Stereo Allowed’ or ‘Forced Mono’.
FM scan
You can choose whether your Elan E3 automatically stops at the next available FM station or the next available FM station with a strong signal when scanning for an FM station. To change the FM scan setting:
1.Press the Menu button.
2.Turn and press the Select dial to choose ‘Scan Setting’.
3.Select between ‘Strong Stations Only’ or ‘All Stations’.
16

Specifications |
EN |
|
|
|
|
|
|
Radio |
Digital (DAB/DAB+) and FM radio. |
|
|
|
|
||
Frequencies |
Digital Band III 174–240 MHz, FM 87.5-108 MHz (with RDS). |
|
|
Display |
2.8", 320 x 240, TFT colour display. |
|
|
Speaker |
3" full range driver, 2 Watts output |
|
|
Input connectors |
6 V DC power adapter socket (adapter supplied) |
|
|
Output connectors |
3.5mm stereo headphone socket |
|
|
Power supply |
6 V DC, 500 mA or 4x AA batteries |
|
|
Standby power |
0.44 Watts |
|
|
Dimensions |
200mm wide x 53mm deep x 115mm high |
|
|
Weight |
420g |
|
|
Operational temperature |
0°C to +40°C |
|
|
Warranty |
Comprehensive three year warranty. |
|
|
Software version |
1RC3 |
|
|
Approvals |
CE marked. Hereby, Pure International Limited declares that this radio model |
|
|
|
Elan E3 is in compliance with the essential requirements of RED 2014/53/EU. The |
|
|
|
full text of the EU Declaration of Conformity is available at the following internet |
|
|
|
address: http://www.pure.com/about/red |
|
|
Under the environment with electrostatic discharge, the sample may malfunction and need user reset to recover sometimes.
17

Warranty information
Pure International Limited warrants to the end user that this product will be free from defects in materials and workmanship in the course of normal use for a period of three years from the date of purchase. This guarantee covers breakdowns due to manufacturing or design faults; it does not apply in cases such as accidental damage, however caused, wear and tear, negligence, adjustment, modification or repair not authorised by us. Should you have a problem with your unit please contact your supplier or contact Pure Support at http://support.pure.com
Disclaimer
Pure International Limited makes no representation or warranties with respect to the content of this document and specifically disclaims any implied warranties of merchantability or fitness for any particular purpose. Further, Pure International Limited reserves the right to revise this publication and to make changes in it from time to time without obligation of Pure International Limited to notify any person or organization of such revisions or changes.
Trademarks
Elan E3, Pure and the Pure logo are trademarks or registered trademarks of Pure International Limited.
Copyright
Copyright © 2017 Pure International Limited. All rights reserved. No part of this publication may be copied or distributed, transmitted, transcribed, stored in a retrieval system, or translated into any human or computer language, in any form or by any means, electronic, mechanical, magnetic, manual or otherwise, or disclosed to third parties without the express written permission of Pure International Limited.
Correct disposal of this product
This marking indicates that this product should not be disposed with other household waste throughout the EU. To prevent possible harm to the environment or human health from uncontrolled waste disposal, recycle it responsibly to promote the sustainable reuse of material resources. To return your used device, please use the return and collection system or contact the retailer where the product was purchased. They can take this product for environmental safe recycling.
18

Elan E3
Vielen Dank, dass Sie sich für das Elan E3 entschieden haben. Mit diesem Handbuch ist das Gerät in kürzester Zeit betriebsbereit. Lesen Sie hier, wie Sie Ihr Produkt optimal nutzen können.
EN
DE
FR
IT
NO DA
NL
1

Sicherheitsanweisungen und Warnhinweise
Bei diesem Produkt verwendete Symbole
Symbol Beschreibung
Das Symbol WARNUNG wird in diesem Handbuch verwendet, um auf mögliche ernste Gefahren für Ihre Sicherheit hinzuweisen. Beachten Sie alle Warnhinweise mit diesem Symbol, um mögliche Gefährdungen für Leben und Gesundheit auszuschließen.
Durch dieses Symbol wird bei dem Produkt darauf hingewiesen, dass Vorsicht geboten ist und dass vor der Verwendung Anweisungen zu lesen sind.
Dieses Symbol weist auf Gleichspannung hin.
Dieses Symbol zeigt die Taste an, über die das Produkt eingeschaltet oder in den Standby-Betrieb geschaltet wird.
1.Lesen und beachten Sie die folgenden Anweisungen und bewahren Sie sie auf. Alle Sicherheitsund Bedienungsanweisungen sind vor der Verwendung dieses Produkts zu lesen und zur späteren Einsichtnahme aufzubewahren. Alle Warnhinweise am Gerät und in den Bedienungsanweisungen sind zu beachten.
2.Eine von der vorliegenden Anleitung abweichende Installation oder Verwendung kann dazu führen, dass die Sicherheit des Produkts beeinträchtigt wird und die Garantie erlischt.
3.Verwenden Sie zur Stromversorgung des Geräts nur das in diesem Benutzerhandbuch bzw. in diesen Bedienungsanweisungen angegebene Netzteil (geliefert von Pure, Modellnummer SW0600500-A01, SW0600500-A02 oder SW0600500-AM), und verwenden Sie das Netzteil zu keinem anderen Zweck.
4.Der direkte Netzadapter dient als Trennvorrichtung. Diese Trennvorrichtung muss betriebsbereit und frei zugänglich sein.
5.Das Gerät darf nicht in Wasser getaucht oder in einer nassen/feuchten Umgebung wie der Dusche oder im Badezimmer verwendet werden, wenn es an den Netzstrom angeschlossen ist. Das Netzteil darf nicht mit Tropfen oder Spritzern in Berührung kommen, und es dürfen keine mit Flüssigkeiten gefüllten Gegenstände wie Vasen daraufgestellt werden.
6.Lösen Sie keine Schrauben vom Produktgehäuse, und öffnen Sie das Gehäuse nicht. Produktreparaturen dürfen nur von kompetenten und autorisierten Personen durchgeführt werden. Verwenden Sie das Produkt nicht, wenn es beschädigt ist.
7.Setzen Sie das Produkt nicht direkter Sonneneinstrahlung aus, und achten Sie auf einen ausreichenden Abstand zu Wärmequellen wie Heizkörpern, Heizlüftern und anderen Geräten, die Wärme erzeugen.
8.Bei einem unsachgemäßen Austausch die Batterien besteht Explosionsgefahr (achten Sie auf eine korrekte Polarität). Tauschen Sie Batterien nur gegen Batterien desselben oder gleichwertigen Typs aus. Die Batterien darf nicht großer Hitze wie Sonneneinstrahlung, Feuer oder Ähnlichem ausgesetzt werden. Achten Sie auf eine umweltgerechte Batterieentsorgung.
9.Setzen Sie das Produkt keinen offenen Flammen wie brennenden Kerzen aus. Diese dürfen nicht auf das Produkt oder in dessen Nähe gestellt werden.
10.Das Produkt und das Netzteil dürfen nicht abgedeckt werden, um die Belüftung nicht zu beeinträchtigen.
11.Reinigen Sie das Produkt nur mit einem trockenen Tuch.
12.Dieses Produkt ist für den Einsatz in Regionen mit gemäßigtem Klima vorgesehen.
13.Bei einer von den Anweisungen abweichenden Verwendung des Produkts kann der Schutz des Produkts beeinträchtigt werden.
14.Verwenden Sie das Produkt nicht, wenn es beschädigt ist.
15.Bewahren Sie Batterien außerhalb der Reichweite von Babys und Kindern auf.
2

Inhalt
DE
4 Einführung
4 Packungsinhalt
4Bedienelemente an der Vorderseite
5Anschlüsse an der Rückseite
6Anzeige
7Erste Schritte
7Schnellstart
8Digitaloder UKW-Radio hören
8Wechsel des Digitalsenders
8Wechsel des UKW-Senders
9Verwendung von gespeicherten Radioprogrammen
9 Schnellspeichern eines Senders auf einem der Programmtasten (1–3) 9 Speichern eines Senders in der Programmliste (4-20)
9 Aufruf eines gespeicherten Programms beim Empfang von Digitaloder UKW-Radio
9 Verwendung des Hilfseingangs
9Anschluss eines Zusatzgeräts an Ihr Elan E3
9Auswahl des Hilfseingangs
10Einstellung von Weckern und Timern
10Einstellen eines Weckers
10Einstellen des Sleep-Timers
10Einstellen des Küchen-Timers
10Abstellen eines Weckalarms
10Verwendung der Schlummerfunktion
11Optionen und Einstellungen
12Zeitund Datumseinstellungen
13Wechsel der bevorzugten Sprache
14Beleuchtung
15DAB-Einstellungen
16UKW-Radioeinstellungen
17Technische Daten
3
Einführung
Packungsinhalt
Folgende Artikel befinden sich im Lieferkarton:
•Elan E3
•Netzteil
Anmerkung: Bewahren Sie das gesamte Verpackungsmaterial auf, nachdem Sie das Elan E3 und die Zubehörteile aus dem Karton genommen haben. Wenn Sie die Verpackung lieber entsorgen möchten, verfahren Sie bitte nach den vor Ort geltenden Bestimmungen.
Bedienelemente an der Vorderseite
Quelle
Drücken Sie hier, um zwischen
Digital Radio, FM Radio oder
Hilfseingang zu wählen.
Programme 1 - 4+:
Speichern Sie bis zu 20 digitale und 20 UKW Sender
Lautstärke/Auswahl: Drehen und |
|
drücken Sie diesen Schalter, um |
|
Menüoptionen auszuwählen. |
|
Wenn Sie Inhalte hören, drehen |
|
Sie den Schalter zum Einstellen |
|
der Lautstärke. |
|
Zurück: Drücken Sie |
Menü: Drücken Sie |
diese Taste, um zum |
diese Taste, um das |
vorherigen Menü |
Einstellungsmenü |
zurückzukehren. |
aufzurufen. |
Digital Radio: Drücken Sie hier, um die DigitalradioSenderliste anzuzeigen.
FM: Drücken Sie hier, um den manuellen FM-Einstellmodus für UKW-Radio auszuwählen.
Standby: Schalten Sie zwischen „Ein“ und „Standby“ um, wenn das Gerät über das Netzteil betrieben wird bzw. zwischen „Ein“ und „Aus“, wenn Sie Batterien verwenden.
4
Anschlüsse an der Rückseite
DE
Micro B USB
3,5-mm-Buchse für Nur Software-Updates
Stereokopfhörer
|
|
|
|
|
|
|
|
|
|
|
|
|
|
|
|
|
|
|
|
|
|
|
|
|
|
|
|
|
|
|
|
|
|
|
|
|
|
|
|
|
|
|
|
|
|
|
|
|
|
|
|
|
|
|
|
|
|
|
|
|
|
|
|
|
|
|
|
|
|
|
|
|
|
|
|
|
|
|
|
|
|
|
|
|
|
|
|
|
|
|
|
|
|
|
|
|
|
|
|
|
|
|
|
|
|
|
|
|
|
|
|
|
|
|
|
|
|
|
|
|
|
|
|
|
|
|
|
|
|
|
|
|
|
|
|
|
|
|
|
|
|
|
|
|
|
|
|
|
|
|
|
|
|
|
|
|
|
|
|
|
|
|
|
|
|
|
|
|
|
|
|
|
|
|
|
|
|
|
|
|
|
|
|
|
|
|
|
|
|
|
|
|
|
|
|
|
|
|
|
|
|
|
|
|
|
|
|
|
|
|
|
|
|
|
|
|
|
|
|
|
|
|
|
|
|
|
|
|
|
|
|
|
|
|
|
|
|
|
|
|
|
|
|
|
|
|
|
|
|
|
|
|
|
|
|
|
|
|
|
|
|
|
|
|
|
|
|
|
|
|
|
|
|
|
|
|
|
|
|
|
|
|
|
|
|
|
|
|
|
|
|
|
|
|
|
|
|
|
|
|
|
|
|
|
|
|
|
|
|
|
|
|
|
|
|
|
|
|
|
|
|
|
|
|
|
|
|
|
|
|
|
|
|
|
|
|
|
|
|
|
|
|
|
|
|
|
|
|
|
|
|
|
|
|
|
|
|
|
|
|
|
|
|
|
|
|
|
|
|
|
|
|
|
|
|
|
|
|
|
|
|
|
|
|
|
|
|
|
|
|
|
|
|
|
|
|
|
|
|
|
|
|
|
|
|
|
|
|
|
|
|
|
|
|
|
|
|
|
|
|
|
|
|
|
|
|
|
|
|
|
|
|
|
|
|
|
|
|
|
|
|
|
|
|
|
|
|
|
|
|
|
|
|
|
|
|
|
|
|
|
|
|
|
|
|
|
|
|
|
|
|
|
|
|
|
|
|
|
|
|
|
|
|
|
|
|
|
|
|
|
|
|
|
|
|
|
|
|
|
|
|
|
|
|
|
|
|
|
|
|
|
|
|
|
|
|
|
|
|
|
|
|
|
|
|
|
|
|
|
|
|
|
|
|
|
|
|
|
|
|
|
|
|
|
|
|
|
|
|
|
|
|
|
|
|
|
|
|
|
|
|
|
|
|
|
|
|
|
|
|
|
|
|
|
|
|
|
|
|
|
|
|
|
|
Hilfseingang |
|
|
|
|
|
|
|
|
|
|
|
|
|
|
|
|
|
|
|
|
|
|
|
|
|
|
|
|
|
|
|
|
|
|
|
|
||
|
|
|
|
|
|
|
|
|
|
|
|
|
|
|
|
|
|
|
|
|
|
|
|
|
|
|
|
|
|
|
|
|
|
|
|
|||
|
|
|
|
|
|
|
|
|
|
|
|
|
|
|
|
|
|
|
|
|
|
|
|
|
|
|
|
|
|
|
|
|
|
|
|
|||
|
|
|
|
|
|
|
|
|
|
|
|
|
|
|
|
|
|
|
|
|
|
|
|
|
|
|
|
|
|
|
|
|
|
|
|
|||
3,5 mm |
|
|
|
|
|
|
|
|
|
|
|
|
|
|
Netzeingang |
|
|
|
|
|
|
Batteriefach |
|
|||||||||||||||
|
|
|
|
|
|
|
|
|
|
|
|
|
|
|
|
|
|
|
|
|
||||||||||||||||||
Hilfseingang |
|
|
|
|
|
|
|
|
|
|
|
|
|
|
Nur mit beiliegendem |
|
|
|
|
|
|
Fach für vier AA-Batterien |
|
|||||||||||||||
für iPod, MP3 |
|
|
|
|
|
|
|
|
|
|
|
|
|
|
Netzadapter verbinden |
|
|
|
|
|
|
(separat erhältlich). |
|
|||||||||||||||
Player o.ä. |
|
|
|
|
|
|
|
|
|
|
|
|
|
|
|
|
|
|
|
|
|
|
|
|
|
|
|
|
|
|
|
|
|
|
|
|
||
5

Anzeige
Quellenmenü
Drücken Sie die Taste Source, um sich das Menü „Quelle“ anzeigen zu lassen. Drehen und drücken Sie den Drehknopf Select, um zwischen den Quellen zu wechseln.
Digital Radio
Beschreibung |
Funktion |
DAB Radio |
Einen Digitalradiosender hören. |
FM Radio |
Einen UKW-Radiosender hören. |
Hilfseingang |
Inhalte von einem über den Hilfseingang angeschlossenen Gerät hören. |
Anzeige der Informationen auf dem Display ändern
Beim Hören von Digitaloder UKW-Radiosendern können Sie die Anzeige der Informationen auf dem Display wechseln.
Digital Radio
Wenn Sie Digitalradio hören, drücken Sie den Drehknopf Select, um bei der Informationsanzeige auf dem Bildschirm zwischen „Lauftext“, „Programmtyp“, „Ensemble“, „Kanal/Frequenz“, „Signalstärke/ Signalfehler“, „Bitrate“ oder „Days“ zu wechseln.
Sie können beim Hören von Digitalradio auch den Drehknopf Select drücken und gedrückt halten, um auf dem Display die Anzeige „Jetzt abspielen“ einzublenden, eine Vollbildschirm-Version der SenderGrafik und einen Bildschirm, der dasrüber hinaus Informationen über die momentan ausgestrahlte Sendung enthält.
FM Radio (UKW)
Drücken Sie beim Hören von UKW-Radio den Drehknopf Select, um die auf dem Bildschirm angezeigten Informationen zwischen „Lauftext“, „Programmtyp“, „Frequenz“, „Stereo/Mono“ und „Days“ umzuschalten.
6

Erste Schritte
DE
Schnellstart
1• Drücken Sie die Antenne aus ihrer Arretierung und ziehen Sie sie vollständig heraus (Schritte A und B).
•Stecken Sie den Stecker des mitgelieferten Netzteils in die Buchse auf der Rückseite des Radios (C).
•Stecken Sie den Netzadapter in eine Netzsteckdose (D).
B
A
D
C 


2 Drücken Sie die Taste Standby, um Ihr Elan E3 einzuschalten.
3Warten Sie, bis Ihr Radio die automatische Sendersuche abgeschlossen und alle verfügbaren digitalen Sender gefunden hat. Wenn die automatische Sendersuche abgeschlossen ist, wird ein Sender wiedergegeben.
Full Scan |
10:27 |
|
|
|
|
|
|
||
|
|
|
||
|
|
|
Scanning...
Stations: 25
7

Digitaloder UKW-Radio hören
Digital Radio |
10:27 |
|
|
|
|
|
BBC Radio 2
Pop Music
Digitalradio-Anzeige
Station List |
10:27 |
|
|
|
|
|
|
||
|
|
|
||
|
|
|
BBC Radio 1
BBC Radio 1Xtra
BBC Radio 2
BBC Radio 3
BBC Radio 4
BBC Radio 5 Live
BBC Radio 6Music
Digitalradiosender wechseln
Digitalsender wechseln
1.Drücken Sie die Taste Source und drehen und drücken Sie den Drehknopf Select, um „DAB Radio“ auf dem Home-Bildschirm auszuwählen. Wenn Sie DAB Radio zum ersten Mal auswählen, führt Ihr Elan E3 eine automatische Sendersuche durch, um die verfügbaren Radiosender zu finden, und stellt nach Abschluss des Vorgangs einen Sender ein.
2.Drücken Sie die Taste Stations und drehen Sie den Drehknopf Select nach links oder rechts, um durch die Liste der verfügbaren Digitalsender zu blättern.
3.Drücken Sie den Drehknopf Select, um den Sender zu wechseln.
UKW-Sender wechseln
Automatische Sendersuche
1.Drücken Sie die Taste Source und drehen und drücken Sie den Drehknopf Select, um „FM Radio“ auf dem Home-Bildschirm auszuwählen.
2.Drücken Sie auf den Drehknopf Select und halten Sie ihn gedrückt, um den nächsten UKW-Sender mit starkem Signal zu suchen.
Manuelle Einstellung
1.Drücken Sie die Taste Source und drehen und drücken Sie den Drehknopf Select, um „FM Radio“ auf dem Home-Bildschirm auszuwählen.
2.Drücken Sie die Taste Stations, um den manuellen Einstellmodus auszuwählen.
3.Drehen Sie den Drehknopf Select, um die Frequenz in Schritten von 0,05 MHz zu erhöhen oder zu verringern.
8

Verwendung von gespeicherten Programmen
DE
Sie können für einen schnellen Zugang bis zu 20 digitale und 20 UKW-Radiosender (FM Radio) speichern.
Schnellspeichern eines Senders mit einer der Programmtasten (1-3)
Stellen Sie den Digitalbzw. UKW-Sender ein, den Sie speichern wollen. Drücken Sie eine der nummerierten Programmtasten (1-3) und halten Sie sie zwei Sekunden lang gedrückt, bis eine Meldung anzeigt, dass das Programm gespeichert wurde.
Speichern eines Senders in der Programmliste (4-20)
1.Stellen Sie den Digitalbzw. UKW-Sender ein, den Sie speichern wollen.
2.Halten Sie die Taste 4+ gedrückt, um die numerische Liste der gespeicherten Programme angezeigt zu bekommen. Drehen Sie dann den Drehknopf Select und drücken Sie ihn, um eine Programmzahl zwischen 4 und 20 auszuwählen. Sie können zuvor gespeicherte Programme überschreiben.
Aufruf eines gespeicherten Programms beim Empfang von Digitaloder UKW-Radio
1.Um ein der unter den Nummern 1 bis 3 gespeichertes Programm aufzurufen, drücken Sie die entsprechende Nummerntaste am Bedienfeld.
2.Um zu den gespeicherten Programmen 4 bis 20 zu gelangen, drücken Sie an der Gerätevorderseite die Taste 4+, drehen Sie den Drehknopf Select nach rechts oder links, um durch die Programmliste zu scrollen, und drücken dann den Drehknopf Select und lassen ihn wieder los, um das ausgewählte Programm einzustellen.
Verwendung des Hilfseingangs
Sie können über den Hilfseingang Ihres Elan E3 Musik von Ihrem Smartphone oder Tablet wiedergeben.
Anschluss eines Zusatzgeräts an Ihr Elan E3
Verbinden Sie über ein geeignetes Kabel den Line-out- oder Kopfhöreranschluss Ihres externen Geräts mit dem Hilfseingang an Ihrem Elan E3.
Auswahl des Hilfseingangs
1.Drücken Sie die Taste Source und drehen und drücken Sie den Drehknopf Select, um „Hilfseingang“ auf dem Home-Bildschirm auszuwählen.
2.Wählen Sie auf Ihrem Zusatzgerät den Inhalt, den Sie auf Ihrem Elan E3 hören möchten.
Ihr Elan E3 beginnt mit der Wiedergabe des Inhalts, den Sie auf Ihrem externen Gerät ausgewählt haben.
9
Einstellung von Weckern und Timern
Ihr Elan E3 verfügt über zwei Wecker und einen Sleep-Timer.
Die Weckfunktionen stehen nur zur Verfügung, wenn Ihr Elan E3 an den Netzstrom angeschlossen ist.
Einstellen eines Weckers
1.Drücken Sie die Taste Menu und drehen und drücken Sie den Drehknopf Select, um „Sys. einstell.“ auszuwählen.
2.Drehen und drücken Sie den Drehknopf Select, um „Wecker“ auszuwählen.
3.Im Menü „Wecker“ drehen und drücken Sie den Drehknopf Select, um entweder „Wecker 1“ oder „Wecker 2“ auszuwählen.
4.Drücken Sie Select, um den „Wecker“ einzuschalten („Ein“).
5.Drehen und drücken Sie den Drehknopf Select, um die „Frequenz“ zu ändern.
6.Wählen Sie „Weckzeit“, indem Sie den Drehknopf Select drehen und drücken, und drehen Sie den Drehknopf zum Einstellen der Stunden und Minuten. Drücken Sie jeweils Select zur Bestätigung.
7.Drehen und drücken Sie den Drehknopf Select, um „Quelle“ auszuwählen. Drehen und drücken Sie den Drehknopf Select, um zwischen folgenden Optionen zu wählen: „Summer“, „Digital Radio“ oder „FM“ (UKW). Drücken Sie anschließend zur Bestätigung den Drehknopf Select.
8.Wenn Sie „Digital Radio“ oder „FM“ Radio ausgewählt haben, drehen und drücken Sie den Drehknopf Select, um „Programm“ auszuwählen. Um den zuletzt gehörten Sender einzustellen, drehen und drücken Sie den Drehknopf Select, um „Zuletzt gehört“ auszuwählen, oder drehen und drücken Sie den Drehknopf Select, um einen Radiosender aus der gespeicherten Programmliste auszuwählen. Anmerkung: Überspringen Sie diesen Schritt, wenn Sie einen Tonalarm einstellen.
9.Drehen und drücken Sie den Drehknopf Select, um „Dauer“ auszuwählen. Drehen und drücken Sie Select, um die Dauer des Alarms in Minuten festzulegen.
10.Drehen und drücken Sie den Drehknopf Select, um „Lautstärke“ auszuwählen. Drehen und drücken Sie den Drehknopf Select, um die Lautstärke des Alarms einzustellen.
Einstellen des Sleep-Timers
1.Drücken Sie die Taste Menu und drehen und drücken Sie den Drehknopf Select, um „Sys. einstell.“ auszuwählen.
2.Drehen und drücken Sie den Drehknopf Select, um „Sleep“ auszuwählen.
3.Drehen und drücken Sie den Drehknopf Select, um die Dauer des Sleep-Timers anzupassen.
Einstellen des Küchen-Timers
1.Drücken Sie die Taste Menu und drehen und drücken Sie den Drehknopf Select, um „Sys. einstell.“ auszuwählen.
2.Drehen und drücken Sie den Drehknopf Select, um „Küchen-Timer“ auszuwählen.
3.Drehen und drücken Sie den Drehknopf Select, um die Dauer des Küchen-Timers anzupassen.
Abstellen eines Weckalarms
Drücken Sie Standby, um einen Weckalarm abzustellen, oder drücken Sie Source, um den Vorgang abzubrechen und das Radio eingeschaltet zu lassen.
Verwendung der Schlummerfunktion
Zur Verwendung der Schlummerfunktion bei einem Weckalarm drücken Sie den Drehknopf Select. Im Display erscheint ein Countdown-Zähler, sodass Sie sehen können, wie lange der Weckalarm schlummert. Um die Schlummerzeit des Alarms einzustellen, drücken Sie das Wählrad Select, um die Schlummerzeit in 5-Minuten-Intervallen bis zu 15 Minuten und dann 30 Minuten einzustellen. Zum Abbrechen der Schlummerfunktion drücken Sie die Taste Standby.
10
 Loading...