


Owner’s manual |
EN |
Bedienungsanleitung |
DE |
Manuel de l’utilisateur |
FR |
Manuale dell’utente |
IT |
Brugsvejledning |
DK |
Manual de instrucciones |
ES |
|
|

Safety instructions |
Copyright |
Keep the radio away from heat sources. Do not use the radio near water.
Avoid objects or liquids getting into the radio.
Do not remove screws from or open the radio casing. Fit the mains adaptor to an easily accessible socket, located near the radio and ONLY use the mains power adapter supplied. Always switch the unit off and disconnect it from mains power before inserting or removing a ChargePAK.
 Sicherheitshinweise
Halten Sie das Radio fern von Heizquellen.
Benutzen Sie das Radio nicht in der Nähe von Wasser. Verhindern Sie, dass Gegenstände oder Flüssigkeiten in das Radio gelangen.
Entfernen Sie keine Schrauben vom Gehäuse und öffnen Sie dieses nicht.
Schließen Sie das Netzteil an eine leicht erreichbare Steckdose in der Nähe des Radios an, und benutzen Sie AUSSCHLIESSLICH das mitgelieferte Netzteil.
Schalten Sie das Gerät immer aus und trennen Sie es vom Netz, bevor Sie ein ChargePAK einsetzen oder entnehmen.
 Consignes de sécurité
Copyright 2010 by Imagination Technologies Limited. All rights reserved. No part of this publication may be copied or distributed, transmitted, transcribed, stored in a retrieval system, or translated into any human or computer language, in any form or by any means, electronic, mechanical, magnetic, manual or otherwise, or disclosed to third parties without the express written permis sion of Imagination Technologies Limited.
Copyright
Copyright 2010 by Imagination Technologies Limited. Alle Rechte vorbehalten. Kein Teil dieser Publikation darf ohne ausdrückliche und schriftliche Zustimmung von Imagination Technologies Limited in irgendeiner Form (elektronisch, mechanisch, magnetisch, manuell oder auf andere Weise) kopiert, verteilt, übermittelt, überschrieben, in einem Suchsystem gespeicher t, in eine andere natürliche oder Computer sprache übersetzt oder Dritten zugänglich gemacht werden.
Copyright
Tenir la radio éloignée de toute source de chaleur. Ne pas utiliser la radio à proximité d’un point d’eau.
Éviter que des objets ou des liquides ne pénètrent à l’intérieur de la radio.
Ne pas ouvrir le boîtier de la radio ou en enlever les vis. Branchez l’adaptateur sur une prise de courant facilement accessible, à proximité de la radio et utilisez UNIQUEMENT l’adaptateur fourni.
Toujours éteindre la radio et la débrancher du secteur avant d’insérer ou de retirer le ChargePAK.
 Istruzioni di sicurezza
Tenere la radio lontana da fonti di calore. Non utilizzare la radio vicino all’acqua.
Evitare che oggetti o liquidi penetrino nella radio. Non rimuovere le viti né aprire l’involucro della radio. Collegare l’adattatore di rete ad una presa della corrente facilmente accessibile, situata vicino alla
radio e utilizzare ESCLUSIVAMENTE l’adattatore di rete fornito. Prima di inserire o rimuovere un ChargePAK, è indispensabile spegnere l’unità e scollegarla dalla rete di alimentazione.
 Sikkerhedsforskrifter
Copyright 2010 Imagination Technologies Limited. Tous droits réservés. Aucune partie de la présente publication ne doit être copiée ou diffusée, transmise, retranscrite, stockée dans un système de récupération de données ou traduite, que ce soit dans une langue humaine ou dans un langage informatique, sous quelque forme et par quelque moyen que ce soit, électronique, mécanique, magnétique, manuel ou autre, ou encore diffusée auprès de tiers sans autorisation écrite expresse de Imagination Technologies Limited.
Copyright
Copyright 2010 by Imagination Technologies Limited. Tutti i diritti riservati. Nessuna parte della presente pubblicaziEVOKE-1S può essere copiata o distribuita, trasmessa, trascrit ta, memoriz zata in un sistema di archiviaziE VOK E-1S, o tradot t a in un formato normalmente comprensibile, in qualsiasi forma o con qualsiasi mezzo, elettronico, meccanico, magnetico, manuale o altro, o divulgata a terze par ti senza il permesso scritto di Imagination Technologies Limited.
Copyright
Hold radioen på afstand af varmekilder. Brug ikke radioen i nærheden af vand.
Undgå at der kommer genstande eller væske i radioen.
Fjern ikke skruer fra og åbn ikke radiokabinettet. De bør tilslutte strømforsyningen til et lettilgængeligt strømudtag tæt på radioen. De bør KUN bruge den medfølgende strømforsyning. Sluk altid for enheden, og afbryd den fra
hovedstrømforsyningen, før du isætter eller fjerner ChargePAK.
 Instrucciones de seguridad
Copyright 2010 tilhører Imagination Technologies Limited. Alle rettigheder forbeholdes. Ingen dele af denne publikation må kopieres eller distribueres, transmitteres, omskrives, gemmes i et system, hvor den kan hentes, eller oversættes til menneskeligt forståeligt sprog eller computersprog, i nogen som helst form eller med nogen som helst midler, det være sig elektroniske, mekaniske, magnetiske, manuelle eller på anden måde, eller fremvises til tredje parter uden udtrykkelig, skriftlig tilladelse fra Imagination Technologies Limited.
Copyright
Mantenga la radio alejada de fuentes de calor. No utilice la radio cerca del agua.
Evite que entren objetos o líquidos en la radio. No retire los tornillos ni abra el alojamiento de la radio.
Ajuste el adaptador de corriente a un enchufe accesible, situado cerca de la radio y use EXCLUSIVAMENTE el adaptador de corriente suministrado.
Apague siempre la unidad y desconéctela de la red eléctrica antes de insertar o retirar un ChargePAK.
Copyright 2010 por Imagination Technologies Limited. Reser vados todos los derechos. Ninguna par te de e s t a public ación puede copiar se o dis t r ibuir se, transmitirse, transcribirse, almacenarse en un sistema de recuperación, o traducirse a ningún idioma humano o informático, de ninguna forma o por ningún medio, ya sea electrónico, mecánico, magnético, manual o de otro tipo, ni revelarse a terceras partes sin el consentimiento explícito por escrito de Imagination Technologies Limited.
Trademarks
Marshall and the Marshall logo are trademarks or registered trademarks of Marshall Amplification plc. EVOKE-1S, the EVOKE-1S logo, Intellitext, textSCAN, ChargePAK, PURE, the PURE logo, PURE, the PURE logo, EcoPlus, the EcoPlus logo, Imagination Technologies, and the Imagination Technologies logo are trademarks or registered trademarks of Imagination Technologies Limited. All other product names are trademarks of their respective companies. Version 5 July 2010.
Warenzeichen
EVOKE-1S, das EVOKE-1S Logo, Intellitext, textSCAN, C har g e PA K , P U RE , da s P U RE L og o, P U RE , da s PURE Logo, EcoPlus, das EcoPlus logo, Imagination Technologie s und das Imaginat ion Technologie s L o g o s i n d W a r e n z e i c h e n o d e r e i n g e t r a g e n e Warenzeichen von Imagination Technologies Limited. Alle ander en Pr oduk t namen sind War enzeichen ihrer jeweiligen Besit zer. Ver sion 5 . Juli 2010
Marques commerciales
EVOKE-1S, le logo EVOKE-1S, Intellitext, textSCAN, ChargePAK, PURE, le logo PURE, PURE, le logo PURE, EcoPlus, le logo EcoPlus, Imagination Technologies et le logo Imagination Technologies sont des marques commerciales ou des marques déposées de Imagination Technolog ie s L imit ed. Tous le s au t r e s noms de produits sont des marques commerciales de leurs détenteurs respectifs. Version 5 er juillet 2010.
Marchi
EVOKE-1S, il logo EVOKE-1S, Intellitext, textSCAN, ChargePAK, PURE, il logo PURE, PURE, il logo PURE, EcoPlus, il logo EcoPlus, Imagination Technologies e il logo Imagination Technologies sono marchi o marchi registrati di Imagination Technologies Limited. Tutti gli altri nomi di prodotti sono marchi di proprietà delle rispettive società. Version 5. luglio 2010.
Varemærker
EVOKE-1S, EVOKE-1S-logoet, Intellitex t, tex tSCAN, C h a r g e PA K , P U R E , P U R E - l o g o e t , P U R E , P U R E - l o g o e t , E c o P l u s , E c o P l u s - l o g o e t , I m a g i n a t i o n Technologies og Imagination Technologies - logoet er varemærker eller registrerede varemærker, der t il h ø r e r I m a g i n a t i o n Te c h n o l o g i e s L i m i t e d . A l l e andr e pr oduk t nav ne er var emær ker, der t ilhør er deres respektive virksomheder. Version 1. juli 2010.
Marcas comerciales
Sirocco 150, PURE, el logotipo PURE, Imagination Technologies y el logotipo Imagination Technologies son marcas comerciales o marcas comerciales registradas de Imagination Technologies Limited. Todos los demás nombres de productos son marcas comerciales de
sus respectivas compañías. Versión del 2 de agosto de 2010.

Contents |
|
Star t ........................................................................ |
2 |
Quick set up ......................................................................................... |
2 |
Controls at a glance .............................................................................. |
3 |
Rear connectors .................................................................................... |
3 |
Using your EVOKE-1S Marshall ................................... |
4 |
Volume controls..................................................................................... |
4 |
Switching between DAB (digtal radio), FM and Auxiliar y device .................. |
4 |
Changing stations.................................................................................. |
4 |
Changing the information shown on screen .............................................. |
5 |
Using textSCAN™ to pause and control scrolling text ................................. |
5 |
Setting the alarm & timer .......................................... |
6 |
Setting the alarm .................................................................................. |
6 |
To cancel a sounding tone or radio alarm ................................................ |
7 |
Kitchen timer ........................................................................................ |
7 |
Setting the sleep timer........................................................................... |
8 |
Presets and Intellitext ............................................... |
8 EN |
Storing and selecting presets ................................................................. |
8 |
Intellitext® ............................................................................................. |
9 |
Setup options ......................................................... |
10 |
Options available in DAB ...................................................................... |
10 |
Options available in FM........................................................................ |
10 |
General options................................................................................... |
11 |
Changing your preferred language ......................................................... |
11 |
Adjusting the display ........................................................................... |
11 |
Energy saving ...................................................................................... |
12 |
Software Updates ................................................................................ |
12 |
Using a ChargePAK™............................................................................ |
12 |
Help and Specifications ........................................... |
13 |
Secondar y and inactive stations ........................................................... |
13 |
Hints and tips ..................................................................................... |
13 |
Technical Specifications ....................................................................... |
14 |

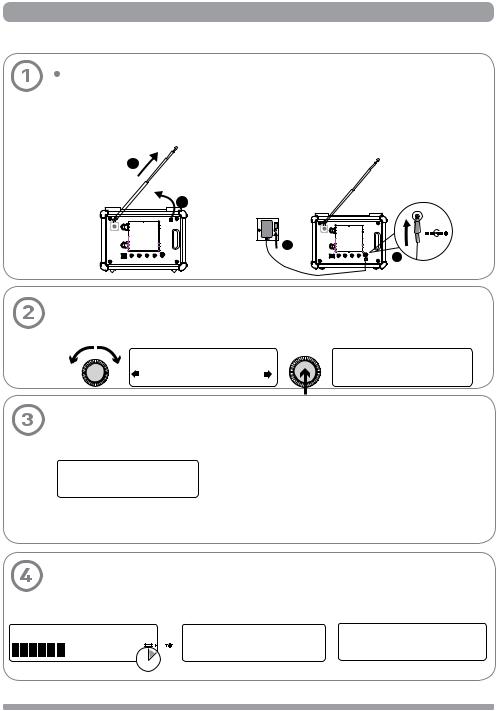
Star t
Quick set up > Controls at a glance > Rear connectors
Quick set up
 Unclip the aerial and fully extend it (steps A and B).
 Insert the jack of the supplied mains adapter into the socket on the rear of the radio (C).
  Plug the mains adapter into the mains supply (step D).
B
A
6V DC
D
C
Select your language when prompted. Turn the tune dial to select (English/Francais/ Deutsch) and push to confirm.
Tune |
Tune |
ect Language. Choisissez |
E VOK E -1 S |
Deutsch |
M a r s h a l l |
This will be followed by the Energy Saving mode screen.
By default, Energy saving is enabled but can be switched off from within the menu.
Energy saving
Enabled
With energy saving mode on, the power consumption of EVOKE-1S Marshall in standby is less than 1 Watt.
For more information: energy saving > page 12
Wait for EVOKE-1S Marshall to complete an Autotune for available digital stations (this takes about a minute). When the Autotune is complete, a station will be selected.
Autotune... |
29 1 Now tuning... |
Planet Rock |
|
|
‘World in blood’: Slayer |
2

Controls at a glance
Volume dial |
Adjust and mute |
volume |
> page 4 |
Source |
Switch audio |
source |
> page 4 |
Standby |
Switch the radio |
into standby. |
(Off if ChargePAK is |
fitted > page 12) |
Timer |
|
|
|
|
|
|
|
||
Kitchen timer > page 7 |
|
Info |
||
|
||||
Sleep timer > Page 8 |
|
Change the information shown |
||
Alarm > Page 6 |
|
on screen > page 5 |
||
Tune dial
Browse and select radio stations > page 4
Use textSCAN > page 5
Presets 1 − 6+
Store up to 30 DAB or FM preset stations > page 8
Menu
Use Intellitext > page 9 Adjust the display > page 11 Setup options > pages 10-13
Light sensor
Auto-adjusts the display EN brightness > page 11
Rear connectors
|
|
|
|
|
|
|
|
|
|
|
|
|
|
|
|
|
|
6V DC |
|||||||||||||
|
|
|
|
|
|
|
|
|
|
|
|
|
|
|
|
|
|
||||||||||||||
|
|
|
|
|
|
|
|
|
|
|
|
|
|
|
|
|
|
||||||||||||||
|
|
|
|
|
|
|
|
|
|
|
|
|
|
|
|
|
|
||||||||||||||
|
|
|
|
|
|
|
|
|
|
|
|
|
|
|
|
|
|
||||||||||||||
|
|
|
|
|
USB |
Aux Speaker |
|
Stereo Out |
Aux In |
|
|
|
|
|
|
|
|
|
|
|
|
|
|
|
|
||||||
|
|
|
|
|
|
|
|
|
|
|
|
|
|
|
|
|
|||||||||||||||
|
|
|
|
|
|
|
|
|
|
|
|
|
|
|
|
|
|
|
|
|
|
|
|
|
|
|
|
|
|
|
|
|
|
|
|
|
|
|
|
|
|
|
|
|
|
|
|
|
|
|
|
|
|
|
|
|
|
|
|
|
|
|
|
Mini-B type |
Connect to |
3.5 mm |
Connect to |
Analogue |
Connect to |
||||||||||||||||||||||||||
USB connector |
an optional |
headphone |
an external |
stereo input |
supplied |
||||||||||||||||||||||||||
for upgrades |
Marshall S-1 |
socket. |
amplifier. |
for iPod/MP3 |
mains |
||||||||||||||||||||||||||
only. |
speaker for |
|
|
player, etc. |
adapter only. |
||||||||||||||||||||||||||
|
|
|
|
|
|
|
|
|
|
|
|
stereo sound. |
|
|
|
|
|
|
|
|
|
|
|
|
|
|
|
|
|
|
|
|
|
|
|
|
|
|
|
|
|
|
|
|
|
|
|
3 |
|||||||||||||||

Using your EVOKE-1S Marshall
Adjust volume > Switch DAB/FM/Aux > Change stations > Change on-screen info > textSCAN™
Volume controls
Adjusting the volume |
Muting the volume |
Volume |
Volume |
Volume |
Planet Rock |
|
Muted |
Switching between DAB (digtal radio), FM and Auxiliary device
Press the Source button and then repeat to listen to digital radio, FM or an Auxiliary device (a separate device connected by a cable, such as an MP3 player).
FM |
Auxiliary Input |
Source |
Source |
Changing stations
When listening to digital radio
Turn the Tune dial left or right to browse through the list of available DAB stations. The current station remains at the top of the screen. Push the Tune dial to change the station.
Tune |
Tune |
Planet Rock |
BBC Radio 6Music |
BBC Radio 6Music |
Now playing: Race For T |
When listening to FM
Seek Tuning
Turn and release the Tune dial right or left to seek to the next or previous FM station that has a strong signal.
Tune |
96.60MHz FM |
87.50MHz FM |
|
Searching... |
> |
Manual Tuning
1.Change the FM tuning mode to ‘Manual’ (see page 11).
2.Turn the Tune dial right or left to step up or down 0.05 MHz.
4

Changing the information shown on screen
You can change the information that is displayed on screen. Press the Info button and repeat to cycle through the information display options available for the current audio source.
Scrolling text |
Information broadcast by most digital and FM (RDS) stations. |
Full screen time Displays the time (and an alarm indicator if the alarm is set).
Signal quality |
Displays digital signal quality: 85-100 good; 70-84 OK; 0-69 poor. |
Signal strength Displays a meter illustrating the strength of the digital or FM signal.
ChargePAK status Displays a charging or percentage power remaining indicator for the optional ChargePAK E1 rechargeable battery pack (see page 12).
Charging indicator |
|
% Charge remaining |
||||||
(on mains power). |
|
(when powered by ChargePAK E1) |
||||||
BBC Radio 6Music |
OR |
BBC Radio 6Music |
||||||
|
|
|
charging |
|
|
|
|
50% |
|
|
|
|
|
|
|
||
EN
Using textSCAN™ to pause and control scrolling text
1. When ‘Scrolling text’ information is displayed in either digital radio or FM, push the Tune dial to pause the scrolling text.
|
Tune |
BBC Radio 6Music |
BBC Radio 6Music |
Now playing: Race For T |
Playing: Race For Th |
2. Turn the Tune dial right and left to scroll forwards and backwards through the current scrolling text. To exit textSCAN push the Tune dial again.
Tune |
Tune |
BBC Radio 6Music |
> Exit |
The prize by Flaming |
5

Setting the alarm & timer
Set the alarm > Set the kitchen timer
Setting the alarm (Timer > Alarm settings)
EVOKE-1S Marshall has an alarm which switches the radio on (from standby mode only) and tunes to a digital or FM radio station, or sounds an alarm tone.
1.Press the Timer button, push the Tune dial to select ‘Alarm settings’.
2.Push the Tune dial to select ‘Set alarm’, scroll to ‘On’ and push the Tune dial to select. The
alarm is now active. |
|
Tune |
Tune |
Off |
Off |
Set alarm |
On |
3.Push the Tune dial to select ‘Set time’. To set the time you want the alarm to sound turn the Tune dial to adjust the hours and then push to confirm. Repeat to adjust the minutes.
Tune |
Tune |
07:00
 08:00 set hours
4.Push the Tune dial to select ‘Set days’. Choose when you want the alarm to repeat (turn the Tune dial to browse through the options and push to select).
Daily |
Every day |
|
|
Weekday |
Monday – Friday, every week |
|
|
Weekend |
Every weekend |
If you want to set a |
|
one-off alarm choose |
|||
Saturday |
Every Saturday |
||
‘Once only’. |
|||
|
|
||
Sunday |
Every Sunday |
|
|
Once only |
The alarm will sound at the time you have selected and not repeat. |
||
5.Push the Tune dial to select ‘Set mode’ and choose the type of alarm you want to sound: DAB, FM or Tone. If you select ‘Tone’, there are no further options.
6.For DAB and FM alarms only, push the Tune dial to select ‘Select station’ and choose which digital or FM radio station you want to sound for the alarm.
For DAB alarms
Select a digitalstation from the station list or ‘last tuned’. If you select ‘Last tuned’ the alarm will tune to the last station you listened to before the alarm sounds.
For FM alarms
Choose between ‘Last tuned’ or an FM preset station.
6

7.If you have selected a DAB or FM alarm you can push the Tune dial to select ‘Alarm volume’ and turn to adjust the volume level for the alarm from 1 (very quiet) to 32 (very loud).
Tune |
Tune |
Tune |
08 |
10 |
Alarm volume |
That’s it! You can see if the alarm is currently switched on in the ‘Full screen time’ display (see page 5). Alarms can be set and adjusted from standby by pressing the Timer button.
08:30 |
08:30 |
22:45 |
An outlined bell |
will not sound within |
|||
The alarm is set to |
|
|
shows that the alarm |
|
|
|
sound at 8:30 am
the next 24 hours.
To cancel a sounding tone or radio alarm
When a tone alarm is sounding, push the Tune dial or press Standby to cancel the alarm. To cancel a radio alarm and return the radio to standby, press the Standby button.
08:30 |
08:30 |
Tune |
|
or |
|||
|
|||
|
|
Kitchen timer
EVOKE-1S Marshall has a countdown timer which will sound an alarm after a set time period –
handy for use in the kitchen.
EN
To set a kitchen timer
1. Press the Timer button.
Timer
2.Turn the Tune dial to change the hours and push to confirm. Turn again to change the minutes and push to confirm and start the countdown timer.
Tune |
Tune |
Tune |
Tune |
01 hours 00 mins |
|
|
01 hours 25 mins |
The alarm will sound after the time period you have set whether the radio is on or in standby. Cancel the beeping alarm tone by pressing any button on the radio.
To stop and reset the kitchen timer
To stop and reset the kitchen countdown timer to zero before it sounds a beeping tone, press and hold down the Timer button for three seconds until you see the message ‘Timer cleared’.


 Timer cleared
Timer
7

Setting the sleep timer
EVOKE-1S Marshall has a sleep timer that switches your radio into standby (or off if powered by a ChargePAK) after a number of minutes has elapsed. Use this if you want to fall asleep to the radio.
To set a sleep timer
1.Press the Timer button, turn the dial to display ‘Sleep timer’ then push the dial to select.
2.Turn the dial to increase the duration of the sleep timer from 15 to 90 minutes in fifteen minute intervals. Press the dial to start the sleep timer.
The time remaining until shut-down is displayed on the right of the full-screen clock view.
Tune |
Tune |
Sleep off |
08:30 45 |
45 minutes |
To cancel a sleep timer
Press and hold the Timer button until you see the message ‘Timers cleared’.
Presets and Intellitext
Store and select preset stations > Browse Intellitext
Storing and selecting presets
Store up to 30 of your favourite DAB or FM radio stations in a combined list.
To quick-store a station to a preset button (1–5)
Tune to the digital or FM station you want to store. Press and hold one of the numbered Preset buttons (1–5) for two seconds until you see the ‘Preset saved’ message on the bottom line.
BBC Radio 6 Music |
2 |
BBC Radio 6Music |
|
||
Now playing: No Cars G |
|
Preset 01 saved |
To store a station to the preset list (1–30)
1. Tune to the digital or FM station you want to store.
Tune |
Tune |
NME Radio
Text us your gig stories
2.Press and release the 6+ button to view the numerical list of stored presets, then turn the Tune dial to choose any Preset number between 1 and 30. You can overwrite existing presets.
Preset 06 |
Tune |
Preset 10 |
|
Empty preset |
Empty Preset |
8
3.Press and hold the 6+ button (or the Tune dial) for two seconds until you see the ‘Preset saved’ message. The current station is now stored to that number on the Preset list.
|
Tune |
2 |
2 |
|
|
|
NME Radio |
|
|
|
Preset 10 saved |
To recall a preset when listening to radio
1.To tune to Presets 1 to 5, press the corresponding numbered button on the unit (1 to 5).
2.To access the full list of presets (from 1 to 30), press and release the 6+ button, turn the Tune dial right or left to scroll through the list of presets, then push and release the Tune dial to tune to the selected preset. Presets are labelled with ‘DAB’, ‘FM’ or ‘Empty Preset’.
Tune Tune
Preset |
10 |
NME Radio |
DAB NME Radio |
Text us your gig stories |
|
Intellitext® (Menu >Intellitext |
>View) |
|
Intellitext provides on-demand text information such as sports headlines, weather forecasts and news from digital stations that support the service. The text is updated by the broadcasters and stored in your radio while you listen to stations. Intellitext is listed by station and split into categories, eg, Football, Cricket, Headlines, etc.
To view Intellitext messages
1. Press Menu, then use the Tune dial to select ‘Intellitext’ and enter the Intellitext menu. Push |
EN |
the Tune dial to select ‘View’ and access a list of stations for which you have Intellitext |
|
information (if you see ‘No data’ you need to tune to a station broadcasting Intellitext for a |
|
few minutes before information is received). |
|
2Push the Tune dial to select a station then turn and push the Tune dial to browse Intellitext categories for that station, e.g., Radio Sport > SPORT > FOOTBALL. The selected information will scroll across the screen.
|
Tune |
SPORT |
FOOTBALL |
FOOTBALL |
England team training fo |
To change Intellitext options (Menu > Intellitext > Options)
Set timeout
Choose to delete old Intellitext messages after 1 week (default) or 1 day.
Clear all
Delete all stored Intellitext messages immediately.
9

Setup options
Options available in DAB > Options available in FM > General options
Options available in DAB
When listening to digital radio, press the Menu button, turn the Tune dial to scroll through the options and push the Tune dial to select.
Autotune (Menu > Autotune)
Scans all digital frequencies for stations and automatically adds any new stations found to the station list. This may take a few minutes. To stop an Autotune press Menu.
Options available in FM
FM tuning mode (Menu > FM tuning mode)
Seek
When you turn the Tune dial, the radio tunes to the next station with a good signal.
Manual
When you turn the Tune dial, the radio tunes up or down the FM frequency range by 0.05 MHz.
FM stereo mode (Menu > FM stereo mode)
Choose from Stereo or Mono (default). Mono may improve audio clarity where stereo signals are weak.
10 

General options
Changing your preferred language (Menu > Language)
You can select the language that your EVOKE-1S Marshall uses for menus and options.
1.Press Menu, scroll to ‘Language’ and push the Tune dial.
2.Turn the Tune dial to select a language (English/Francais/Deutsch) and press to confirm.
Adjusting the display (Menu > Display settings)
You can adjust the brightness and time-out duration of the display for when the unit is switched on and in standby. To change display options:
1.Press Menu, scroll to ‘Display settings’ and push the Tune dial.
2.Now choose either ‘Active’ to change settings that apply when the unit is switched on, or ‘Standby’ to change settings that apply in standby.
Changing the display time-out duration
Select ‘Duration’ and choose from the following two modes:
Always on The screen is always set to your preferred brightness level.
Timed off The screen is set to your preferred brightness level when a
button is pressed and then switches off after 7 seconds of inactivity.
Changing your preferred brightness level |
EN |
Select ‘Brightness’ and choose from the following options:
Automatic |
The brightness of the screen adjusts automatically depending on the ambient light |
|
levels in the room (default). |
1–10 |
Turn the Tune dial to vary the brightness level between 1 (very dim) and 10 (very |
|
bright) and push to confirm your preferred setting. |
Set clock (Menu > Set clock)
You can manually set the time and date if required. If you have a digital signal and/or a good FM (RDS) reception these will be updated automatically.
11

Energy saving (Menu > Energy saving)
EVOKE-1S Marshall is part of the PURE EcoPlus product family, designed and manufactured to minimise power consumption when the unit is switched on and to use less than 1 Watt in
standby. One way this low power consumption is enabled is by not collecting and storing Intellitext messages when the unit is in standby. You can override this option by switching off energy saving mode, but this will increase standby power consumption. Two options are available:
Energy saving On (the default setting)
EVOKE-1S Marshall updates the Intellitext data when you tune to a station that broadcasts Intellitext. Intellitext data is not collected in standby.
Energy saving Off
EVOKE-1S Marshall collects Intellitext data in standby from the last station you tuned to with Intellitext, which increases standby power consumption.
Note: if you fit the optional ChargePAK E1 (see below) the unit will switch off when you press the Standby button and not enter standby, as long as the unit is not connected to mains power.
Software Updates (Menu > Upgrade)
Software updates for your EVOKE-1S Marshall may be made available in the future. If you register your product and include a valid e-mail address you will receive notification of software updates. Alternatively, visit http://support.pure.com at any time to check for available software updates.
To update your software
Connect your radio to your PC using a suitable USB cable. Follow the instructions provided with the software download at support.pure.com.
Note: USB update requires a PC (not Mac) with internet access running Microsoft® Windows XP or higher and a suitable USB cable (not included).
 +
+
Using a ChargePAK™ ChargePAK ™
ChargePAK E1 is a rechargeable battery pack which plugs into the socket in the radio’s battery compartment. Whenever your radio is connected to a mains supply the ChargePAK will charge up and the power remaining will be available to view as a percentage in the Information display options (page 5).
To purchase a PURE ChargePAK E1, contact your nearest PURE dealer, or visit www.pure.com
Important: EVOKE-1S Marshall can only be powered by ChargePAK E1 and is not compatible with any other batteries, either disposable or rechargeable, or any other ChargePAK model. Always switch the unit off and disconnect it from mains power before inserting or removing a ChargePAK. Charge a new ChargePAK for 24 hours before first using battery power.
12

Help and Specifications
Secondary and inactive stations > Hints and tips > Technical Specifications
Secondary and inactive stations
(<</>>) Secondary services
Secondary services accompany some stations, providing extra information or alternative content and may only be broadcast at certain times. If a station has secondary services available, the station shows ‘>>’ next to its name in the station list and the secondary service appears next to the station in the list. A secondary service has a ‘<<’ before its name in the station list.
(?) Inactive or unavailable stations
Inactive or unavailable stations appear on the station list preceded by ‘?’ and cannot be tuned to. A station may be inactive or unavailable because the station is not broadcasting at the current time (check with the station) or has stopped broadcasting altogether. Also, you may not have a strong enough signal to receive the Multiplex on which the station is broadcast.
Hints and tips
Display says ‘No stations available’
Use Autotune (page 10) to search for stations. Try adjusting your aerial or radio position.
Receiving new digital stations that have started broadcasting
Use Autotune (page 10) to scan for new stations and add any new DAB stations to the station list.
The screen is very dark
Check that the light sensor on the front panel is not obstructed.
Using the alarm when a ChargePAK E1 is fitted
When the radio is powered by a ChargePAK E1 for portable listening, i.e., a ChargePAK rechargeable battery is fitted and the unit is not connected to mains power, the radio switches off completely when the Standby button is pressed and the alarm will not sound. In this case, the message ‘Disabling alarm’ will be displayed when the Standby button is pressed.
Resetting your radio
Resetting your radio removes all presets, clears the station list and resets all options to defaults.
1.Press and hold the Menu button for three seconds to enter the hidden menu. Select ‘Factory reset’
2.Push the Tune dial within 3 seconds to confirm the reset or the reset will cancel.
EN
13

Technical Specifications
Radio |
Stereo* digital and FM radio. |
Frequencies |
DAB Band III 174-240 MHz (UK), FM 87.5-108 MHz. DAB/DAB+/DMB-R |
|
decode up to 256 kbps (non-UK). UK products receive DAB/FM; non-UK |
|
products receive DAB/DAB+/DMB Radio/FM. Chargeable DAB+ upgrade |
|
available for UK products if UK broadcasts commence. |
Speaker |
Full-range 3” drive unit. |
Inputs |
6V DC power adaptor socket (230V supplied). 3.5mm Line-in for auxiliary |
|
devices. USB mini socket for software updates. |
Outputs |
3.5mm headphone, 3.5mm line out (analogue), 3.5mm auxiliary speaker output. |
Presets |
30 digital and FM presets in a combined list. |
Display |
High contrast yellow graphical 128 x 22 OLED display |
Power supply |
230V AC to 6V DC external power adapter. |
Approvals |
CE marked. Compliant with the EMC and Low Voltage Directives (2004/108/EC |
|
and 2006/95/EC). ETSI EN 300 401 compliant. |
Dimensions |
175 mm high x 210 mm wide x 110 mm deep. |
Aerial |
Captive telescopic aerial. |
*Stereo output requires optional auxiliary speaker, headphones or external amplifier.
Disposal of Waste Electrical & Electronic Equipment
This symbol on the product or on its packaging indicates that this product should not be treated as household waste. Instead it should be handed over to a suitable collection point for the recycling of electrical and electronic equipment. By ensuring this product is disposed of correctly, you will help prevent potential negative consequences for the environment and human health, which could otherwise be caused by inappropriate waste handling of this product. The recycling of materials will help to conserve natural resources. For more detailed information about recycling of this product, please contact your local council office, your household waste disposal service or the shop where you purchased the product.
14

Inhalt |
|
Zu Beginn ................................................................. |
2 |
Quick Setup - Schnellstart...................................................................... |
2 |
Die Bedienelemente auf einen Blick ........................................................ |
3 |
Anschlüsse auf der Rückseite ................................................................. |
3 |
Bedienung Ihres radio ............................................... |
4 |
Lautstärkeregler .................................................................................... |
4 |
Umschalten zwischen DAB, UKW und einem Zusatzgerät ............................ |
4 |
Senderwechsel ...................................................................................... |
4 |
Angezeigte Display-Informationen ändern ................................................ |
5 |
textSCAN™ zum Anhalten und Überprüfen von Lauftext .............................. |
5 |
Einstellen von Wecker und Timer ................................ |
6 |
Einstellen des Weckers ........................................................................... |
6 |
Abstellen des Wecksignals oder des Radio-Wecksignals ............................ |
7 |
Küchenwecker ....................................................................................... |
7 |
Speicherplätze und Intellitext...................................... |
8 |
Voreinstellungen speichern und anwählen................................................ |
8 |
Intellitext® ............................................................................................. |
9 |
|
DE |
Einstellungsoptionen ............................................... |
10 |
Optionen im DAB-Betrieb ..................................................................... |
10 |
Optionen im UKW-Betrieb ..................................................................... |
10 |
Allgemeine Optionen ............................................................................ |
11 |
Ändern der Display-Einstellungen .......................................................... |
11 |
Energiesparmodus ............................................................................... |
12 |
Software-Updates ................................................................................ |
12 |
Verwendung von ChargePAK™ ................................................................ |
12 |
Hilfe und Spezifikationen ......................................... |
13 |
Sekundärstationen / inaktive Stationen................................................. |
13 |
Tipps und Tricks ................................................................................... |
13 |
Technische Daten ................................................................................ |
14 |
Zu Beginn
Schnellaufstellung > Die Bedienelemente auf einen Blick > Anschlüsse auf der Rückseite
Quick Setup - Schnellstart
Drücken Sie die Antenne aus ihrer Arretierung, und ziehen Sie sie vollständig heraus (Schritte A und B).
 Stecken Sie den Stecker des mitgelieferten Netzteils in die Buchse auf der Rückseite des Radios (C).
 Verbinden Sie das Netzteil mit dem Netzanschluss (Schritt D).
B
A
6V DC
D
C
Wenn Sie dazu aufgefordert werden, wählen Sie Ihre Sprache aus. Stellen Sie die gewünschte Sprache (English/Francais/Deutsch) mit dem Wählrad ein, und drücken Sie es zum Bestätigen.
Tune |
ect Language. Choisissez |
Tune |
E VOK E -1 S |
||
|
|
|
|
Deutsch |
M a r s h a l l |
Daraufhin öffnet sich das Menü für den Energiesparmodus.
Der Energiesparmodus ist standardmäßig aktiviert, lässt sich aber in diesem Menü deaktivieren.
Energy saving
Enabled
Bei aktiviertem Energiesparmodus liegt der Stromverbrauch des EVOKE-1S Marshall im Standby-Betrieb bei unter 1 Watt. Weitere Informationen: Energiesparmodus > Seite 12
Warten Sie, bis das EVOKE-1S Marshall die automatische Sendersuche für alle verfügbaren DAB-Sender abgeschlossen hat (dies dauert etwa eine Minute). Wenn die automatische Sendersuche abgeschlossen ist, wird ein Sender ausgewählt.
Autotune... 29 Now tuning... Planet Rock
1 |
‘World in blood’: Slayer |
|
2

Die Bedienelemente auf einen Blick
Lautstärkeregler
Lautstärkereglung und Stummschalten > Seite 4
Quelle
Wechseln der Audioquelle > Seite 4
Stand-by |
|
|
Schalten des |
|
|
Radios in den |
|
|
Stand-by-Modus |
|
|
oder Ausschalten |
|
|
bei eingesetztem |
|
|
ChargePAK |
Timer |
|
> Seite 12 |
||
Küchenwecker > Seite 7 |
||
|
||
|
Sleep-timer > Seite 8 |
|
|
Wecker > Seite 6 |
Tune (Frequenzsteller)
Radiosender suchen und auswählen > Seite 4 Verwendung von textSCAN > Seite 5
Speicherplätze 1 − 6+
Speichern von bis zu 30 DABoder UKW-
Voreinstellungen > Seite 8
Menu
Verwendung von Intellitext > Seite 9
Anpassen des Displays > Seite 11
Einstellungsoptionen > Seite 10-13
Info |
DE |
Anpassung der auf dem Display |
|
angezeigten Informationen > Seite 5 |
|
Anschlüsse auf der Rückseite
6V DC
Aux Speaker |
Stereo Out |
Aux In |
|
|
|
|
|
|
|
|
|
|
|
|
|
|
|
|
|
|
|
|
|
|
|
|
|
|
|
||||
|
|
|
|
|
|
|
|
|
|
|
|
|
|
|
|
|
USB-Anschluss (Typ Mini-B) nur für SoftwareUpgrades.
Anschluss für einen optionalen S-1-Lautsprecher für StereoWiedergabe
3,5-mm- |
Anschluss |
Analoger |
Anschluss |
Buchse für |
für externen |
Stereoeingang für |
nur für |
Stereokopf- |
Verstärker |
iPod/Mp3 Player |
mitgelieferten |
hörer |
|
usw. |
Netz-Adapter |
3
Bedienung Ihres radio
Lautstärkeregelung > Umschaltung DAB/FM/Aux > Senderwechsel > Info > textSCAN™
Lautstärkeregler
Lautstärkereglung |
Stummschalten |
Volume |
Volume |
Volume |
Planet Rock |
|
Muted |
Umschalten zwischen DAB, UKW und einem Zusatzgerät
Drücken Sie die Quelltaste Source einbzw. zweimal, um zwischen DAB, UKW oder Aux (einem separaten Zusatzgerät wie etwa einem MP3-Player) umzuschalten. Durch Drücken des
FM |
Auxiliary Input |
Source |
Source |
Frequenzstellers Tune wird die Audioquelle unmittelbar gewechselt.
Senderwechsel
Bei DAB-Betrieb
Drehen Sie den Frequenzregler Tune nach links oder rechts um sich durch die Liste der verfügbaren DAB-Sender zu bewegen. Der aktuelle Sender bleibt dabei auf der ersten Zeile des Displays angezeigt. Drücken Sie den Frequenzsteller Tune, um den Sender zu wechseln.
Tune |
Tune |
BBC Radio 2 |
BBC Radio 6Music |
BBC Radio 6Music |
Now playing: Race For T |
Bei UKW-Betrieb (FM)
Automatische Sendersuche
Drehen Sie den Frequenzsteller Tune nach links oder rechts um zum jeweils nächsten bzw. vorhergenden UKW-Sender mit einem starken Signal zu gelangen.
Tune
87.50MHz FM |
96.60MHz FM |
Searching... |
> |
Manuelle Senderwahl
1.Wechseln Sie den UKW-Frequenzwahlmodus auf manuell (siehe Seite 11).
2.Drehen Sie den Frequenzsteller Tune nach links oder rechts, um sich jeweils um 0,05 MHz fortzubewegen.
4
Angezeigte Display-Informationen ändern
Die auf dem Display angezeigten Informationen lassen sich ändern. Drücken Sie mehrmals die Taste Info um sich durch die verschiedenen Anzeigeoptionen für die aktuelle Audioquelle zu bewegen.
Scrolling text |
Lauftext, der von den meisten DABund einigen UKW-Sendern (RDS) |
|
|
gesendet wird. |
|
Full screen time |
Anzeige der Uhrzeit (sowie eines Alarmanzeigers bei eingestelltem Wecker). |
|
Signal quality |
Zeigt die Qualität des DAB-Signals an: 85 bis 100: gut; 70 bis 84: OK; 0 |
|
|
bis 69: schwach. |
|
Signal strength |
Anzeige eines Messzählers zur optischen Wiedergabe der Stärke des DAB- |
|
|
bzw. UKW-Signals. |
|
ChargePAK status |
Anzeige des Ladestands/Batteriestands des optional erhältlichen |
|
|
ChargePAK-E1-Akkusatzes (siehe Seite 12). |
|
Ladestandsanzeige |
% des Batteriestands |
|
(bei vorhandenem Netzanschluss) |
(bei Betrieb über ChargePAK) |
|
BBC Radio 6Music


 charging
ODER |
BBC Radio 6Music |
||||
|
|
|
|
|
50% |
|
|
|
|
|
|
|
|
|
|
||
DE
Verwendung von textSCAN™ zum Anhalten und Steuern von Lauftext
1.Wenn im DABoder UKW-Modus Lauftextinformationen angezeigt werden, können Sie die Anzeige durch Drücken des Frequenzstellers Tune anhalten.
|
Tune |
BBC Radio 6Music |
BBC Radio 6Music |
Now playing: Race For T |
Playing: Race For Th |
2.Drehen Sie den Frequenzsteller Tune nach rechts oder links, um sich durch den aktuellen Lauftext vorund zurückzubewegen. Um den textSCAN-Modus zu verlassen, drücken Sie erneut den Frequenzsteller Tune.
Tune |
Tune |
BBC Radio 6Music |
> Beenden |
Prize by Flaming Lips |
|
5

Einstellen von Wecker und Timer
Einstellen des Weckers > Einstellen des Küchenweckers
Einstellen des Weckers (Menu > Alarm settings)
Der EVOKE-1S Marshall verfügt über eine Weckfunktion, über die zur eingestellten Weckzeit (wenn es im Stand-by-Modus ist) das Radio eingeschaltet und auf einen DABoder UKW-Sender eingestellt wird oder ein Signalton erklingt.
1.Drücken Sie die Timer-Taste, drehen Sie den Frequenzsteller Tune und drücken Sie ihn bei 'Alarm settings' (Weckeinstellungen).
2.Drücken Sie den Frequenzsteller Tune bei ‘Set alarm’ (Wecker einstellen), bewegen Sie sich zur Option ‘On’ (Ein) und drücken Sie den Frequenzsteller Tune um diese auszuwählen. Der
Alarm ist damit aktiviert. |
Tune |
Tune |
Off |
|
Off |
Set alarm |
|
On |
3.Drücken Sie den Frequenzsteller Tune bei der Anzeige ‘Set time’ (Uhrzeit einstellen). Um die Uhrzeit für das Wecksignal zu bestimmen, drehen Sie den Frequenzsteller Tune bis zur gewünschten Stunde und bestätigen Sie Ihre Auswahl, indem Sie ihn drücken. Wiederholen
Sie diesen Vorgang für die Minuten. |
Tune |
Tune |
|
||
|
|
07:00
 08:00 set hours
4.Drücken Sie den Frequenzsteller Tune bei der Anzeige ‘Set days’ (Tage einstellen). Wählen Sie aus, wann das Wecksignal wiederholt werden soll. Drehen Sie hierzu den Frequenzsteller Tune, um sich durch die Optionen zu bewegen und bestätigen Sie Ihre Auswahl, indem Sie ihn drücken.
Daily |
Jeden Tag |
Falls Sie einen einma- |
|
Weekday |
Montag − Freitag, jede Woche |
||
Weekend |
Jedes Wochenende |
ligen Alarm einstellen |
|
wollen, wählen Sie |
|||
Saturday |
Jeden Samstag |
||
‘Once only’. |
|||
Sunday |
Jeden Sonntag |
||
|
|||
Once only |
Der Alarm wird nur zu der von Ihnen eingestellten Zeit aktiv; keine |
||
|
Wiederholung. |
|
|
5.Drücken Sie den Frequenzsteller Tune um die Option ‘Set Mode’ (Modus einstellen) auszuwählen und bestimmen Sie die Art des Wecksignals, das ertönen soll: DAB, FM (UKW) oder Tone (Tonalarm). Wenn Sie ‘Tone’ auswählen, gibt es keine weiteren Optionen.
6.Wenn Sie DAB oder FM ausgewählt haben, drücken Sie den Frequenzsteller Tune beim Eintrag ‘Select station’ (Sender auswählen) und wählen Sie den DABoder UKW-Sender aus, der beim Wecken abgespielt werden soll.
Bei DAB-Wecksignalen Wählen Sie einen DAB-Sender aus der Senderliste.
Bei UKW-Wecksignalen Wählen sie zwischen ‘Last tuned’ (zuletzt angehört) oder einem gespeicherten UKW-Sender aus. Wenn Sie ‘Last tuned’ auswählen, wird der jeweils zuletzt gehörte UKW-Sender zur Weckzeit abgespielt.
6

7.Wenn Sie einen DABoder UKW-Sender als Wecksignal ausgewählt haben, können Sie jetzt seine Lautstärke regeln. Drücken Sie hierzu den Frequenzsteller Tune beim Eintrag ‘Alarm volume’ (Wecksignallautstärke) und drehen Sie ihn zum Anpassen der Lautstärkestufen von 1
(sehr leise) bis 32 (sehr laut).
Tune |
Tune |
Tune |
08 |
|
10 |
Alarm volume |
|
Fertig! Über die Anzeigeoption ‘Full screen time’ (Vollbild-Uhrzeitanzeige) können Sie sich die aktuell aktivierten Weckeinstellungen anzeigen lassen (siehe Seite 5). Die Weckeinstellungen lassen sich aus dem Stand-by-Modus durch Drücken der Menu-Taste bestimmen und anpassen.
Abschalten eines aktuell ertönenden Wecksignals
Zum Abschalten eines Tonsignals drücken Sie den Frequenzsteller Tune oder die Taste Standby. Zum Abschalten eines DABoder UKW-Wecksignals und der Rückstellung des Radios in den Stand-by-Modus drücken Sie die Standby-Taste.
08:30 08:30 |
Tune |
oder |
Küchenwecker
Der EVOKE-1S Marshall verfügt über einen Countdown-Timer, über den ein Wecksignal nach Ablauf eines voreingestellten Zeitraums ertönt – praktisch zur Verwendung in der Küche.
Zum Einstellen des Küchenweckers
1. Drücken Sie die Taste Timer.
Timer
2. Drehen Sie den Frequenzsteller Tune zur Auswahl der Stunden und drücken Sie ihn zur
Bestätigung. Drehen Sie ihn erneut zur Auswahl der Minuten und drücken Sie ihn zur |
DE |
||
Bestätigung und zum Starten des Countdown-Timers. |
|
||
Tune |
Tune |
Tune |
Tune |
01 hours 00 mins |
|
01 hours 25 mins |
|
Der Alarm ertönt nach Ablauf des gewählten Zeitraums, unabhängig davon, ob das Radio eingeschaltet oder im Stand-by-Modus ist. Schalten Sie das Tonsignal durch Drücken einer beliebigen Taste ab.
Stoppen und Rückstellen des Küchenweckers
Um den Küchenwecker vor Ablauf des Countdown-Zeitraums zu stoppen und zurückzustellen halten Sie die Timer-Taste für drei Sekunden gedrückt, bis die Textanzeige ‘Timer cleared’ (Timer gelöscht) erscheint.


 Timer cleared
Timer
7

Einstellen des Sleep-Timers
Das EVOKE-1S Marshall verfügt über einen Sleep-Timer, der das Radio nach einer bestimmten Anzahl von Minuten in den Standby-Modus versetzt (oder beim Betrieb mit einem ChargePAK ausschaltet). Verwenden Sie diese Funktion, wenn Sie bei Radiomusik einschlafen möchten.
So stellen Sie einen Sleep-Timer ein:
1.Drücken Sie die Timer-Taste, drehen Sie das Wählrad, bis 'Sleep-Timer' erscheint, und drücken Sie das Wählrad, um diese Option auszuwählen.
2.Drehen Sie das Wählrad, um die Dauer des Sleep-Timers von 15 bis 90 Minuten in Schritten von 15 Minuten zu verlängern. Drücken Sie das Wählrad, um den Sleep-Timer zu starten. Die bis zum Ausschalten verbleibende Zeit wird rechts in der Vollbild-Uhrenanzeige angezeigt.
Tune |
Tune |
Sleep off |
08:30 45 |
45 minutes |
So deaktivieren Sie den Sleep-Timer
Halten Sie die Taste Timer gedrückt, bis der Hinweis ‘Timer gelöscht’ angezeigt wird.
Speicherplätze und Intellitext
Speichern und Auswählen von gespeicherten Sendern > Intellitext anzeigen
Voreinstellungen speichern und anwählen
Speichern Sie bis zu 30 Ihrer Lieblings-DAB- oder UKW-Sender in einer kombinierten Liste.
Schnellspeichern eines DABoder UKW-Senders
Stellen Sie den Sender (DAB oder UKW) ein, den Sie speichern wollen. Halten Sie eine der nummerierten Voreinstellungstasten (1–5) für zwei Sekunden gedrückt, bis die Meldung ‘Preset saved’ (Voreinstellung gespeichert) in der unteren Zeile des dispays erscheint.
BBC Radio 6 Music |
2 |
Now playing: No Cars G |
Preset 1 saved |
Speichern eines DABoder UKW-Senders auf einem der Speicherplätze (1–30)
1. Stellen Sie den Sender (DAB oder UKW) ein, den Sie speichern wollen.
Tune |
Tune |
NME Radio
Text us your gig stories
2.Drücken Sie die Taste 6+, um eine Liste der gespeicherten Sender angezeigt zu bekommen und drehen Sie den Frequenzsteller Tune, um eine beliebige Speicherplatzzahl zwischen 1 und 30 auszuwählen. Sie können bereits vorhandene Speicherplätze überschreiben.
Preset 6  Empty preset
Tune
Preset 10
 Empty Preset
8

3.Halten Sie die Taste 6+ (oder den Frequenzsteller Tune ) für zwei Sekunden gedrückt, bis die Meldung ‘Preset saved’ (Voreinstellung gespeichert) auf dem Display erscheint. Damit wird der
aktuelle DABoder UKW-Sender unter dieser Nummer auf der Speicherplatzliste gespeichert.
|
Tune |
2 |
2 |
NME Radio |
|
|
Preset 10 saved |
Aufruf eines gespeicherten Senders während der Wiedergabe von DAB oder UKW
1.Um einen der unter den Nummern 1 bis 5 gespeicherten Sender aufzurufen, drücken Sie die entsprechende Nummerntaste.
2.Um die Liste aller gespeicherten Sender (von 1 bis 30) aufzurufen, drücken Sie die Taste 6+
. Drehen sie den Frequenzsteller Tune nach rechts oder links, um sich durch diese Liste zu bewegen und drücken Sie dann den Frequenzsteller Tune beim gewünschten gespeicherten Sender. Die Speicherplätze sind mit der Angabe ‘DAB’, ‘FM’ oder ‘Empty Preset’ (leerer
Speicherplatz) gekennzeichnet.
Tune |
|
Tune |
|
|
|
Preset |
10 |
NME Radio |
DAB NME Radio |
Text us your gig stories |
|
Intellitext
Intellitext bietet Textinformationen auf Abruf, wie etwa Sportschlagzeilen, Wettermeldungen und Nachrichten der DAB-Sender, die diesen Dienst anbieten. Der Text wird von den DAB-Sendern aktualisiert und im Radioempfangsbetrieb in Ihrem Radiowecker gespeichert. Intellitext ist nach Sendern geordnet und in Kategorien unterteilt, die vom Anbieter definiert werden (z. B. Fußball, Radsport, Schlagzeilen etc.).
Anzeige von Intellitext-Meldungen
1. Drücken Sie die Taste Menu, drücken Sie das Wählrad zur Auswahl von „Intellitext“, und |
DE |
rufen Sie das Intellitext-Menü auf. Drücken Sie das Wählrad, um „View“ auszuwählen und |
|
auf eine Liste der Sender zuzugreifen, für die Intellitext-Informationen vorliegen (wird „No |
|
Data“ angezeigt, müssen Sie einige Minuten lang einen Sender einstellen, der Intellitext- |
|
Informationen sendet, bevor Sie diese Informationen empfangen können). |
|
2Drücken Sie das Tune Wählrad, um einen Sender auszuwählen. Drehen/drücken Sie das Wählrad, um durch die Intellitext-Kategorien für diesen Sender zu blättern (z. B. Radio Sport > SPORT > FUSSBALL). Die ausgewählten Informationen werden dann über das Display gescrollt. Drücken Sie Menu, um zur vorherigen Kategorie zurückzukehren.
|
Tune |
SPORT |
FOOTBALL |
FOOTBALL |
England team training fo |
Anpassen der Intellitext-Optionen (Menu > Intellitext > Options)
Set timeout (Löschfrist einstellen) Sie können einstellen, ob alte Intellitext-Daten nach 1 Woche (Standard) oder 1 Tag gelöscht werden sollen.
Clear all (Alle löschen) Löscht alle gespeicherten Intellitext-Daten sofort.
9

Einstellungsoptionen
Optionen im DAB-Betrieb > Optionen im UKW-Betrieb > Allgemeine Optionen
Optionen im DAB-Betrieb
Wenn Sie gerade einen DAB-Sender hören, drücken Sie die Menu-Taste und drehen Sie den Frequenzsteller Tune um sich durch die Optionen zu bewegen. Zur Auswahl einer Option drücken Sie den Frequenzsteller Tune.
Autotune (Menu > Autotune)
In der Autotune-Funktion durchsucht das Gerät automatisch alle Frequenzen im DAB Band III nach Sendern und fügt sie zur Senderliste hinzu. Dies kann einige Minuten in Anspruch nehmen. Um die Autotune-Funktion anzuhalten, drücken Sie die Menu-Taste.
Optionen im UKW-Betrieb
UKW-Frequenzwahlmodus (Menu > FM tuning mode)
Seek (Suchen)
Beim Drehen des Frequenzstellers Tune springt das Radio zum nächsten Sender mit einem guten Eingangssignal.
Manual (Manuell)
Beim Drehen des Frequenzstellers Tune bewegt sich das Radio in Schritten von 0,05 MHz durch den UKW-Frequenzbereich.
UKW-Stereomodus (Menu > FM stereo mode)
Wählen Sie zwischen Stereo und Mono (Standard). Bei schwachen Stereosignalen kann sich der Klang durch die Auswahl des Monomodus verbessern.
10 

Allgemeine Optionen
Wie Sie Ihre bevorzugte Sprache einstellen (Menu > Language)
Sie können auswählen, welche Menüsprache Ihr EVOKE-1S Marshall verwendet.
1.Drücken Sie die Menu-Taste, scrollen Sie bis ‚Language‘ und drücken Sie den Tune-Knopf (Frequenzsteller).
2.Drehen Sie den Tune-Knopf (Frequenzsteller), um eine Sprache (English/Francais/Deutsch) auszuwählen und drücken Sie erneut, um die Eingabe zu bestätigen.
Ändern der Display-Einstellungen (Menu > Display settings)
Sowohl die Helligkeit als auch die Zeitabschaltung des Displays lassen sich für den Normalund Stand-by-Betrieb verändern. Änderung der Display-Optionen:
1.Drücken Sie die Menu-Taste, bewegen Sie sich zum Eintrag ‘Display settings’ (DisplayEinstellungen) und drücken Sie den Frequenzsteller Tune.
2.Wählen Sie jetzt entweder den Eintrag ‘Active’ aus, um die Einstellungen für den Normalbetrieb des Radios zu ändern, oder ‘Standby’, um die Einstellungen für den Stand-by- Betrieb zu ändern.
Ändern der Zeitabschaltungseinstellungen für das Display
Wählen Sie den Eintrag ‘Duration’ (Dauer) aus und wählen Sie zwischen den folgenden beiden Modi:
Always on |
Das Display wird immer mit der von Ihnen gewählten Helligkeit beleuchtet. |
|
Timed off |
Sobald Sie eine Taste drücken, wird das Display mit der von Ihnen gewählten |
|
|
Helligkeit beleuchtet. Nach sieben Sekunden der Inaktivität schaltet sich die |
DE |
|
Beleuchtung des Displays wieder ab. |
Ändern der bevorzugten Helligkeit
Wählen Sie den Eintrag ‘Brightness’ (Helligkeit) aus und wählen sie zwischen folgenden Optionen:
Automatic |
Die Helligkeit des Displays passt sich automatisch an die Umgebungshelligkeit im |
|
Raum an (Standard). |
1–10 |
Drehen Sie den Frequenzsteller Tune um eine Helligkeitsstufe zwischen 1 (sehr |
|
dunkel) und 10 (sehr hell) zu wählen und bestätigen Sie Ihre Auswahl durch |
|
Drücken des Frequenzstellers. |
Einstellen der Uhr (Menu > Set clock)
Erforderlichenfalls können Sie die Uhrzeit und das Datum manuell einstellen. Bei gutem DABSignalempfang und/oder einem guten UKW-Empfang (RDS) werden diese Anzeigen automatisch aktualisiert.
11
 Loading...