

Page 1
1
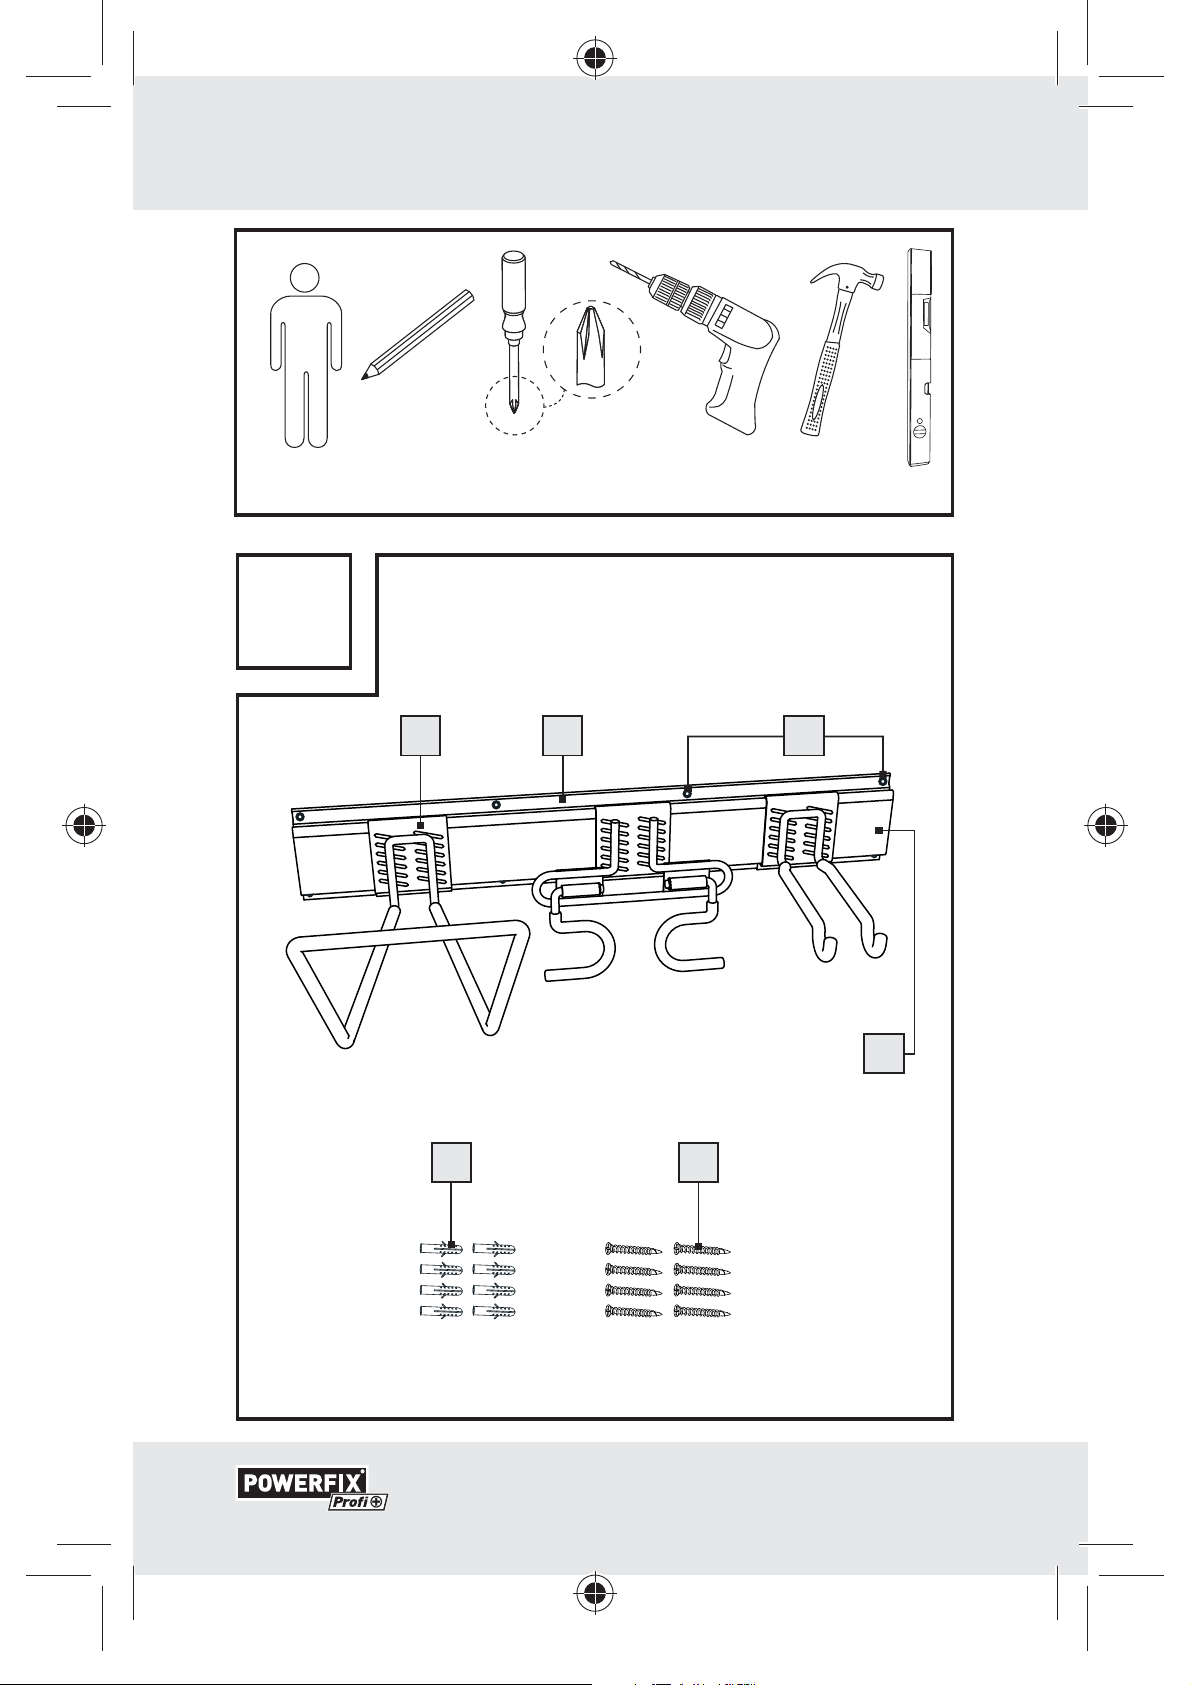
Necesita · Vi servono · Necessita de · You need · Sie benötigen:
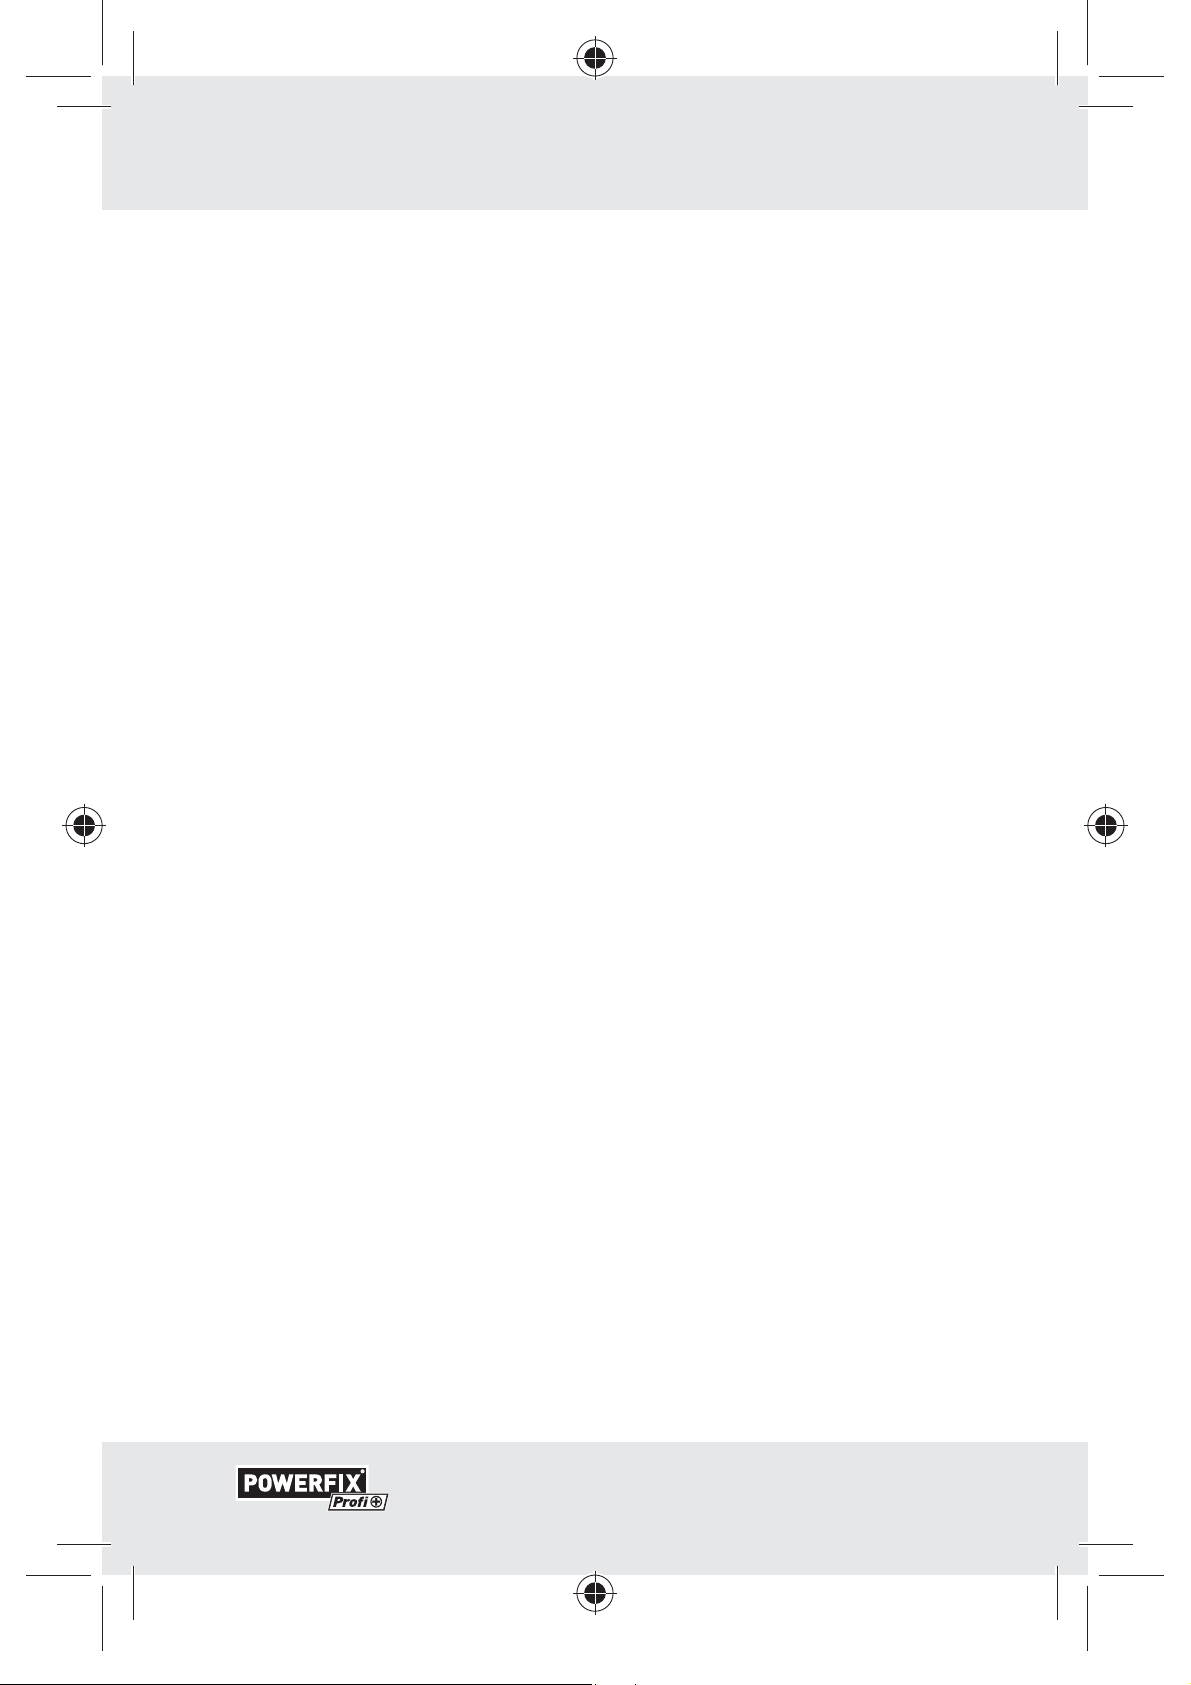
A
321
5 6
4
3
66777_pow_Ordnungs-System_Content_LB5.indd 3 22.06.11 09:22
Page 2
B
3
4
min.
127 cm
C
4
66777_pow_Ordnungs-System_Content_LB5.indd 4 22.06.11 09:22
Page 3
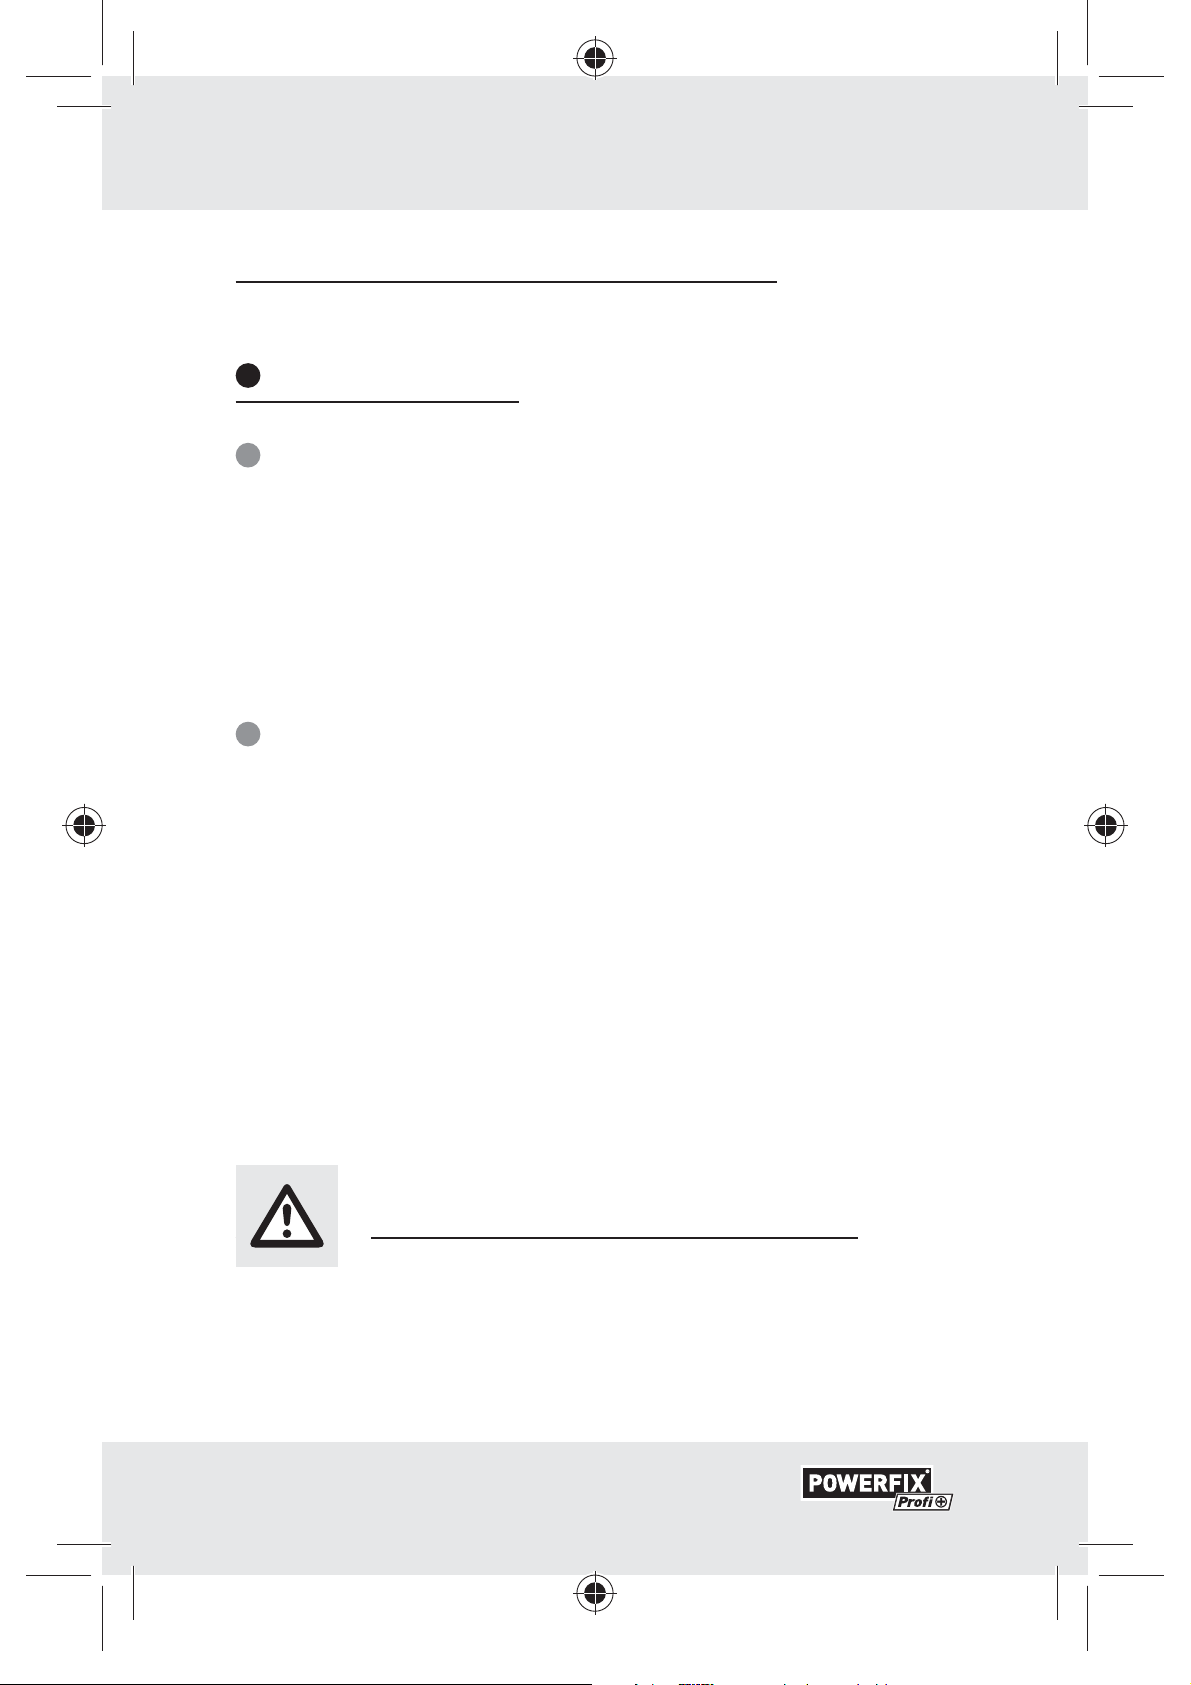
D
5
E
4
6
3
2
5
66777_pow_Ordnungs-System_Content_LB5.indd 5 22.06.11 09:22
Page 4
F
2
1
6
G
1
66777_pow_Ordnungs-System_Content_LB5.indd 6 22.06.11 09:22
Page 5
Índice
Introducción
Uso adecuado ........................................................ Página 8
Datos técnicos......................................................... Página 8
Indicaciones de seguridad .............. Página 8
Montaje ................................................................. Página 10
Limpieza y mantenimiento ............. Página 11
Eliminación......................................................... Página 11
7 ES
66777_pow_Ordnungs-System_Content_LB5.indd 7 22.06.11 09:22
Page 6
Introducción / Indicaciones de seguridad
Sistema de soporte de pared
Introducción
Uso adecuado
Este producto está diseñado para colgar ropa u otros
objetos ligeros. Este producto no ha sido diseñado para
un uso industrial.
Datos técnicos
Dimensiones
(Barra de aluminio): aprox. 610 x 102 x 18 mm
(An x Al x P)
Carga máxima por gancho
(Z30943A-1 / Z30943A -2 /
Z30943A-3): 10 kg
Carga máxima por colgador
de tres ganchos: 30 kg
Indicaciones de seguridad
¡GUARDAR TODAS LAS ADVERTENCIAS E INDICACIONES DE SEGURIDAD POR SI LAS NECESITA EN
UN FUTURO!
8 ES
66777_pow_Ordnungs-System_Content_LB5.indd 8 22.06.11 09:22
Page 7
Indicaciones de seguridad
¡Peligro de
muerte y de accidente para bebés
y niños! No deje nunca a los niños sin vi-
gilancia con el material de embalaje. Existe peligro
de asfixia. Mantenga el producto fuera del alcance
de los niños. El producto no es un juguete.
¡ATENCIÓN! ¡PELIGRO DE LESIONES! Asegú-
rese de que todas las piezas están en buenas condiciones y montadas correctamente. Si se realiza un
montaje incorrecto existe el riesgo de sufrir lesiones.
Las piezas dañadas pueden mermar la seguridad y
el funcionamiento.
¡ATENCIÓN! ¡No deje a los niños sin vigilancia!
El producto no es un juguete ni sirve para trepar por
él. Asegúrese de que nadie se suba ni trepe por el
producto, especialmente los niños. El producto podría
desprenderse de la pared. Esto podría ocasionar lesiones y / o daños materiales.
Tenga en cuenta que el producto sólo debe ser mon-
tado por personas competentes.
kg
No cargue el producto con un peso superior a la carga máxima permitida.
¡ATENCIÓN! ¡PELIGRO DE LESIONES! Antes
del montaje, compruebe que la pared elegida para
fijar el producto es apropiada.
No cargue el producto con más de tres ganchos.
Utilice en el producto los ganchos incluidos, y no
otros ganchos o productos de otro fabricante.
9 ES
66777_pow_Ordnungs-System_Content_LB5.indd 9 22.06.11 09:22
Page 8
Indicaciones de seguridad / Montaje
Monte el producto en una pared sirviéndose de los
8 alojamientos roscados de la barra de aluminio.
No monte el producto en una pared de un grosor in-
ferior a 15 mm.
Montaje
¡ATENCIÓN! ¡PELIGRO DE LESIONES! Consulte
las instrucciones de uso de su taladro.
Nota: Para mampostería utilice una broca de 8 mm,
y para yeso, una broca de 6 mm.
Nota: En el montaje en una pared de madera no es necesario el uso de tacos
5
. Introduzca los tornillos 6
directamente en la pared.
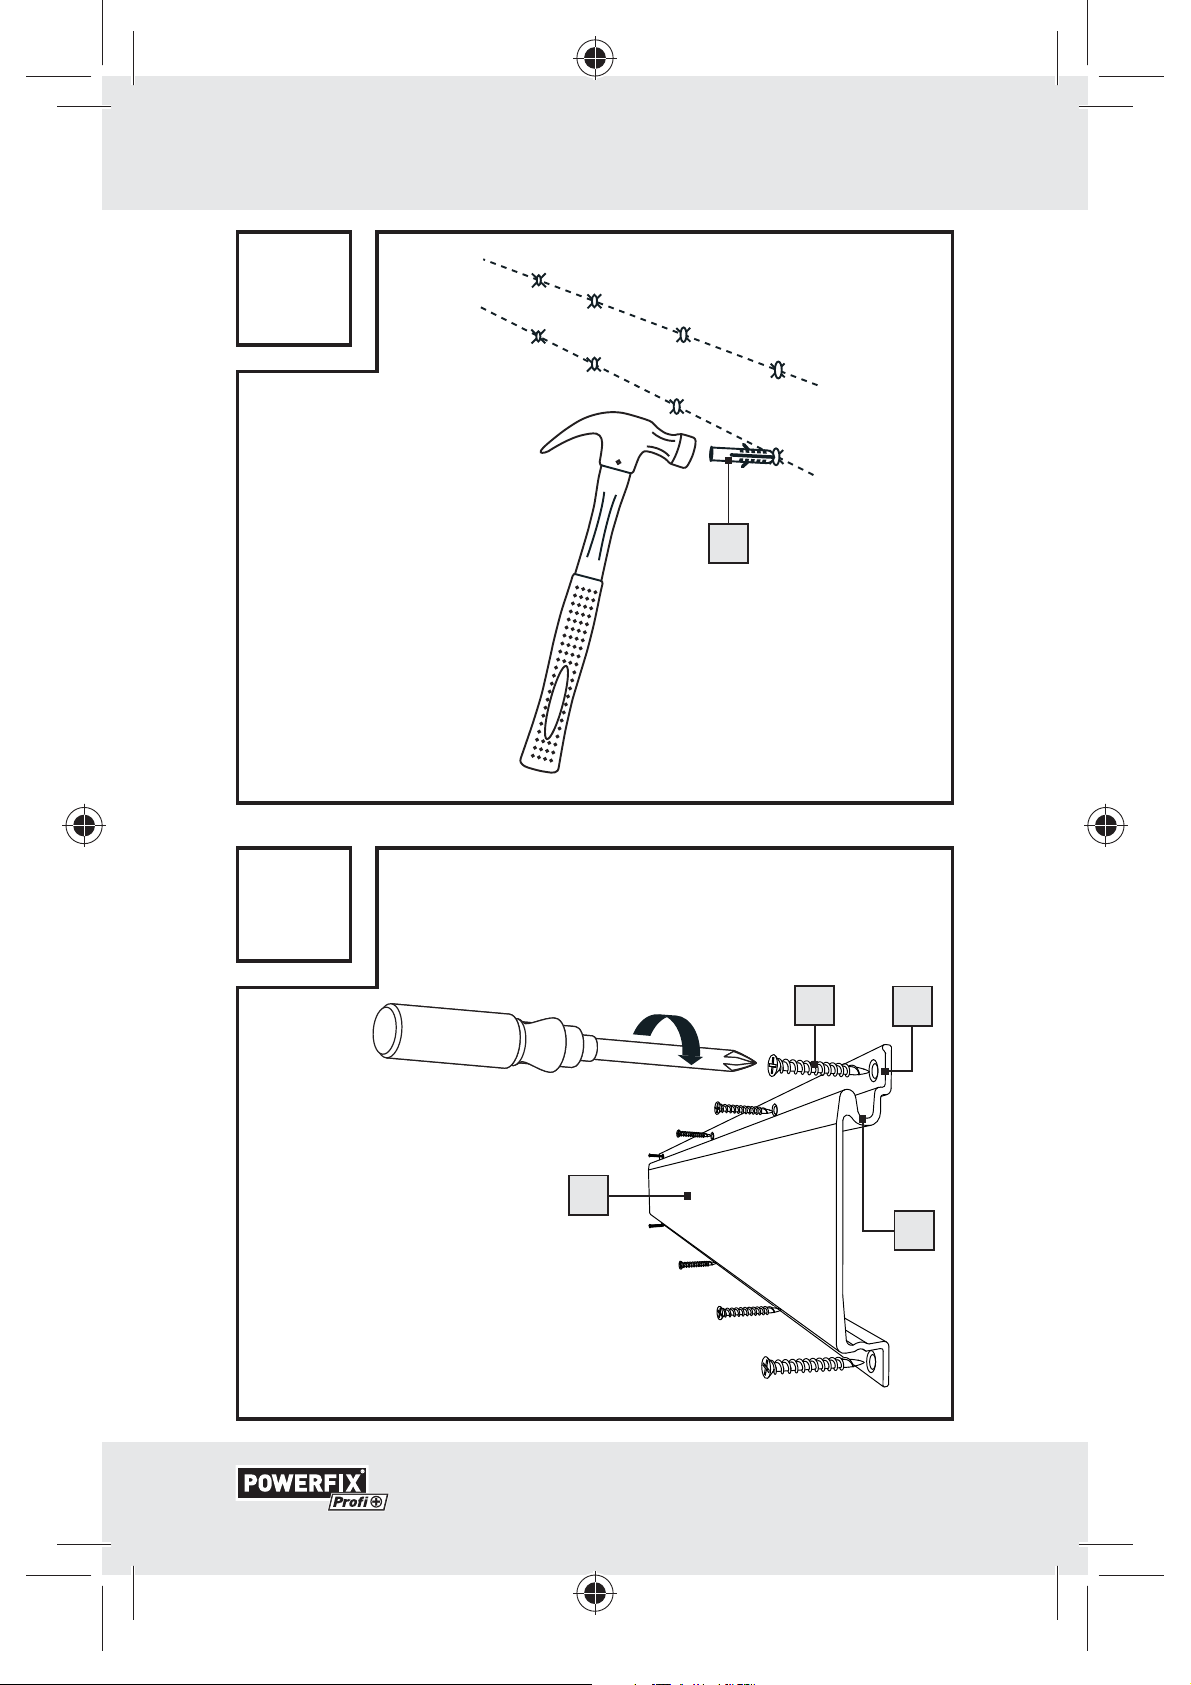
Marque los agujeros de perforación con ayuda de
un nivel de línea en la posición deseada de la pared
(véase fig. B).
Perfore los agujeros con una broca adecuada e intro-
duzca el taco
5
en el agujero de perforación (véase
fig. C, D).
Sostenga la barra de aluminio 4 en la posición de-
seada de la pared, e introduzca los tornillos
el alojamiento roscado
3
en el taco 5 (véase fig.
6
por
E). Cuide de fijar en la pared la barra de aluminio
4
en la orientación correcta. La concavidad con
forma de u
2
debe estar orientada hacia arriba
(véase fig. F).
10 ES
66777_pow_Ordnungs-System_Content_LB5.indd 10 22.06.11 09:22
Page 9
… / Limpieza y mantenimiento / Eliminación
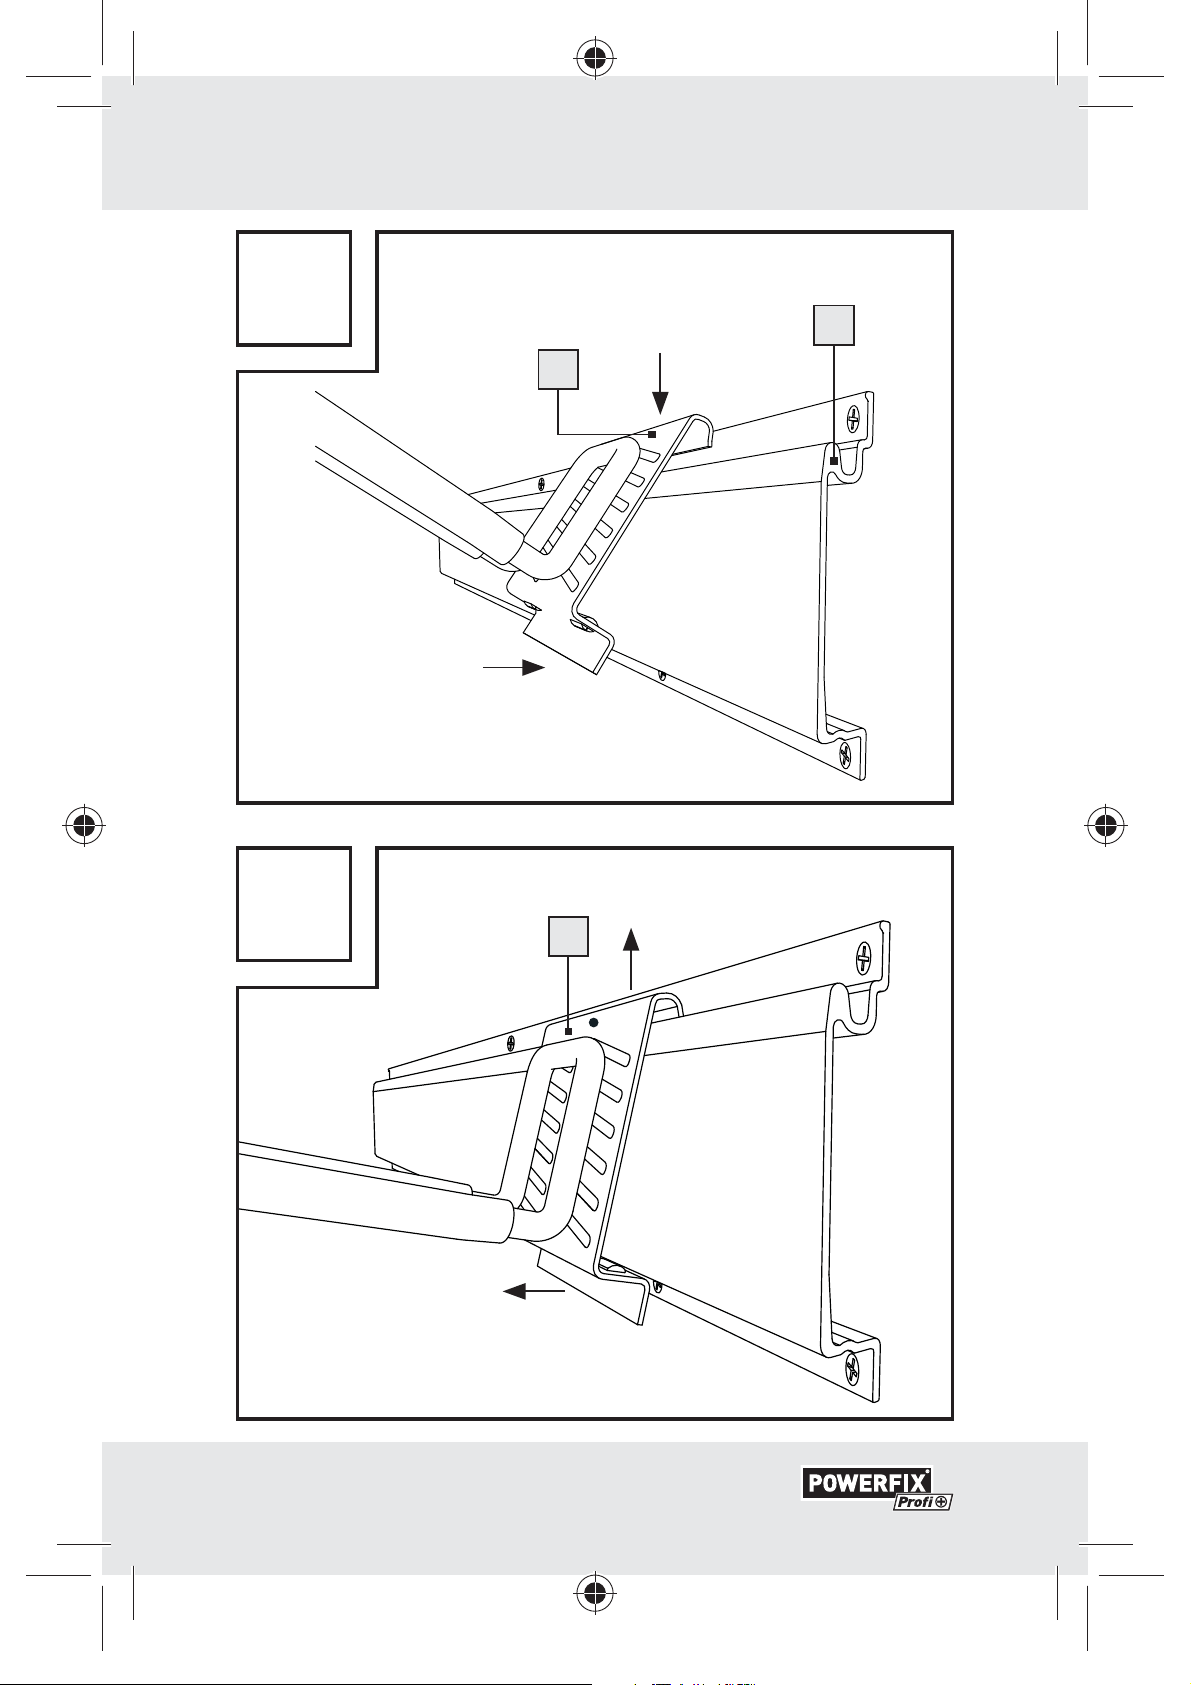
Coloque ahora los ganchos 1 en la concavidad
con forma de u
2
. Apriete los ganchos 1 con la
barra, para que se enganchen en la barra de alumi-
4
nio
(véase fig. F).
Retire los ganchos 1 tirando simplemente de ellos
(véase fig. G).
Limpieza y mantenimiento
No utilice, bajo ningún concepto productos de limpieza
abrasivos o corrosivos.
Limpie el producto con un paño. En caso de suciedad
persistente, utilice un paño sin pelusas ligeramente
humedecido y un detergente suave.
Eliminación
El embalaje está compuesto de materiales
reciclables. Elimínelos en los contenedores de
reciclaje locales.
Para deshacerse del producto una vez que ya no sirva
pregunte a las autoridades locales o municipales.
11 ES
66777_pow_Ordnungs-System_Content_LB5.indd 11 22.06.11 09:22
Page 10
Denominación del producto:
Sistema de soporte de pared
Nº de modelo: Z30943A
Versión: 07 / 2011
12 ES
66777_pow_Ordnungs-System_Content_LB5.indd 12 22.06.11 09:22
Page 11

Indice
Introduzione
Utilizzo secondo la destinazione d’uso ........... Pagina 14
Dati tecnici ............................................................... Pagina 14
Indicazioni di sicurezza ....................... Pagina 14
Montaggio ......................................................... Pagina 16
Pulizia e manutenzione ...................... Pagina 17
Smaltimento ..................................................... Pagina 17
13 IT/MT
66777_pow_Ordnungs-System_Content_LB5.indd 13 22.06.11 09:22
Page 12

Introduzione / Indicazioni di sicurezza
Sistema di supporto a muro
Introduzione
Utilizzo secondo la
destinazione d’uso
Questo prodotto è previsto per appendere utensili e altri
oggetti. Il prodotto non è destinato a un utilizzo in ambito
commerciale.
Dati tecnici
Dimensioni (guida di alluminio): ca. 610 x 102 x 18 mm
(L x H x P)
Max. carico per ogni gancio
(Z30943A-1 / Z30943A -2 /
Z30943A-3): 10 kg
Max. carico per guida con 3 ganci: 30 kg
Indicazioni di sicurezza
CONSERVARE TUTTE LE INDICAZIONI DI SICUREZZA
E LE ISTRUZIONI D’USO PER UN’EVENTUALE FUTURA
CONSULTAZIONE!
14 IT/MT
66777_pow_Ordnungs-System_Content_LB5.indd 14 22.06.11 09:22
Page 13

Indicazioni di sicurezza
PERICOLO DI
MORTE E DI INCIDENTI PER BAMBINI E INFANTI! Non lasciare mai i
bambini incustoditi con il materiale per imballaggio.
Vi è pericolo di soffocamento. Tenere il prodotto lontano dalla portata dei bambini. Il prodotto non è un
giocattolo.
ATTENZIONE! PERICOLO DI LESIONI! Assicurarsi
che tutti i componenti siano intatti e montati correttamente. In caso di montaggio errato vi è pericolo di
lesioni. Eventuali componenti danneggiati possono
influire negativamente sulla sicurezza e la funzionalità
del prodotto.
ATTENZIONE! Non lasciare i bambini incustoditi!
Il prodotto non deve essere utilizzato per arrampicarsi
o per giocare! Assicurarsi che nessuno, in modo particolare nessun bambino, si arrampichi sul prodotto o
si appoggi su di esso. Il prodotto può staccarsi dalla
parete. Ciò potrebbe provocare lesioni a persone
e / o danni a cose.
Fare attenzione a che il prodotto venga montato sola-
mente da persone esperte.
kg
Non caricare il prodotto con un peso superiore a quello massimo consentito.
ATTENZIONE! PERICOLO DI LESIONI! Prima
del montaggio sulla parete, controllare che la parete
scelta per il fissaggio del prodotto sia adatta a tale
scopo.
15 IT/MT
66777_pow_Ordnungs-System_Content_LB5.indd 15 22.06.11 09:22
Page 14

Indicazioni di sicurezza / Montaggio
Non fissare più di tre ganci per ciascun prodotto.
Utilizzare solamente i ganci in dotazione e in nessun
caso ganci o articoli di un altro produttore.
Montare il prodotto su una parete facendo uso di tutti
gli 8 fori per viti della guida di alluminio.
Non montare il prodotto a una parete avente uno
spessore inferiore a 15 mm.
Montaggio
ATTENZIONE! PERICOLO DI LESIONI! Consultare
le istruzioni d’uso del trapano.
Nota: Per la muratura utilizzare una punta per trapano
ø 8 mm, per il gesso una punta per trapano ø 6 mm.
Nota: In caso di montaggio su una parete di legno non
è necessario alcun tassello
5
. Ruotare le viti 6 diretta-
mente nella parete.
Contrassegnare i fori da eseguire nel punto della pa-
rete desiderato facendo uso di una livella (vedi fig. B).
Eseguire i fori con una punta per trapano adatta e in-
serire i tasselli
5
nei fori (vedi figg. C, D).
Mantenere la guida di alluminio 4 al punto desiderato
della parete e avvitare le viti
nei tasselli
guida di alluminio
5
(vedi fig. E). Fare attenzione a che la
4
venga fissata con l’allineamento
6
attraverso i fori 3
corretto. Facendo questo, fare attenzione a che la
16 IT/MT
66777_pow_Ordnungs-System_Content_LB5.indd 16 22.06.11 09:22
Page 15

… / Pulizia e manutenzione / Smaltimento
cavità a forma di U 2 sia rivolta verso l’alto (vedi
fig. F).
Appendere i ganci 1 nella cavità a forma di U 2.
Premere i ganci
nella guida di alluminio
1
, in modo che questi possa inserirsi
4
(vedi fig. F).
Allentare i ganci 1 semplicemente estraendoli (vedi
fig. G).
Pulizia e manutenzione
Per la pulizia non utilizzare mai detergenti corrosivi
o aggressivi.
Pulire il prodotto con un panno. Qualora vi fosse dello
sporco più ostinato, utilizzare un panno privo di peli
leggermente inumidito e un detergente blando.
Smaltimento
L’imballaggio è realizzato con materiali non
dannosi per l’ambiente. Smaltirlo nei contenitori locali di raccolta di materiale destinato al
riciclaggio.
Informarsi presso l’amministrazione cittadina o comunale
sulle possibilità di uno smaltimento ecologico e corretto
del prodotto usato.
17 IT/MT
66777_pow_Ordnungs-System_Content_LB5.indd 17 22.06.11 09:22
Page 16

Definizione del prodotto:
Sistema di supporto a muro
Modello n°: Z30943A
Versione: 07 / 2011
18 IT/MT
66777_pow_Ordnungs-System_Content_LB5.indd 18 22.06.11 09:22
Page 17

Índice
Introdução
Utilização correcta ................................................ Página 20
Dados técnicos ....................................................... Página 20
Indicações de segurança ................... Página 20
Montagem ......................................................... Página 22
Limpeza e conservação ...................... Página 23
Eliminação .......................................................... Página 23
19 PT
66777_pow_Ordnungs-System_Content_LB5.indd 19 22.06.11 09:22
Page 18

Introdução / Indicações de segurança
Sistema de arrumação para parede
Introdução
Utilização correcta
Este produto é adequado para pendurar ferramentas e
outros objectos. Este produto não se destina à utilização
industrial.
Dados técnicos
Dimensões (calhas de alumínio):
Carga máx. por gancho
(Z30943A-1 / Z30943A -2 /
Z30943A-3): 10 kg
Carga máx. por calha com
3 ganchos: 30 kg
aprox. 610 x 102 x 18 mm
(L x A x P)
Indicações de segurança
GUARDE TODAS AS INDICAÇÕES DE SEGURANÇA
E INSTRUÇÕES PARA CONSULTA FUTURA!
20 PT
66777_pow_Ordnungs-System_Content_LB5.indd 20 22.06.11 09:22
Page 19

Indicações de segurança
PERIGO DE MORTE E DE
ACIDENTE PARA CRIANÇAS E BEBÉS!
Nunca permita que as crianças brinquem
com o material de embalagem sem vigilância. Existe
perigo de asfixia. Mantenha o produto fora do alcance
das crianças. O produto não é um brinquedo.
CUIDADO! PERIGO DE FERIMENTOS! Certifique-
se de que todas as peças estão em bom estado e
correctamente montadas. Uma montagem incorrecta
representa perigo de ferimentos. As peças danificadas
podem afectar a segurança e o funcionamento.
CUIDADO! Não deixe as crianças sem vigilância!
O produto não é um brinquedo, nem é adequado
para trepar! Certifique-se de que ninguém, especialmente crianças, sobre para o produto nem se encosta
nele. O produto pode soltar-se da parede. Provocando
danos e / ou ferimentos.
Certifique-se de que o produto é montado apenas
por pessoas especializadas.
kg
Não sobrecarregue o produto com carga
superior à máxima permitida.
CUIDADO! PERIGO DE FERIMENTOS! Antes da
montagem na parede, verifique se a parede escolhida
é indicada para a fixação do produto.
Não fixe mais de 3 ganchos no produto.
Utilize apenas os ganchos incluídos no produto e nunca
outros ganchos ou produtos de outros fabricantes.
21 PT
66777_pow_Ordnungs-System_Content_LB5.indd 21 22.06.11 09:22
Page 20

Indicações de segurança / Montagem
Monte o produto numa parede com o auxílio de todos
os 8 orifícios roscados da calha de alumínio.
Não monte o produto numa parede com uma espes-
sura inferior a 15 mm.
Montagem
CUIDADO! PERIGO DE FERIMENTOS! Consulte
o manual de instruções do seu berbequim.
Nota: Utilize uma broca de ø 8 mm para alvenaria e
uma de ø 6 mm para gesso.
Nota: Para a montagem numa parede de madeira não
são necessárias buchas
5
. Aperte os parafusos 6 direc-
tamente na parede.
Marque os orifícios a perfurar na parede no local
pretendido com o auxílio de um nível de bolha de ar
(ver fig. B).
Efectue as perfurações com uma broca correspon-
dente e insira as buchas
5
nos orifícios de perfura-
ção (ver fig. C, D).
Coloque as calhas de alumínio 4 na parede no lo-
cal pretendido e aperte os parafusos
orifícios de parafusos
3
nas buchas 5 (ver fig. E).
Certifique-se de que fixa a calha de alumínio
6
através dos
4
à
parede com o alinhamento correcto. A cavidade em
forma de u
2
fica virada para cima (ver fig. F).
22 PT
66777_pow_Ordnungs-System_Content_LB5.indd 22 22.06.11 09:22
Page 21

… / Limpeza e conservação / Eliminação
Pendure então os ganchos 1 na cavidade em forma
de u
ganchos
alumínio
2
. Ao mesmo tempo exerça pressão contra os
1
de forma a que encaixem na calha de
4
(ver fig. F).
Solte os ganchos 1 bastando puxar (ver fig. G).
Limpeza e conservação
Ao limpar, nunca utilize produtos de limpeza corrosi-
vos ou agressivos.
Limpe o produto com um pano. Em caso de maior su-
jidade utilize um pano ligeiramente humedecido e um
produto de limpeza suave.
Eliminação
A embalagem é composta por materiais
recicláveis. Coloque-os nos ecopontos locais.
Poderá obter informações relativas à eliminação do
produto usado junto das autoridades locais responsáveis
pela reciclagem.
23 PT
66777_pow_Ordnungs-System_Content_LB5.indd 23 22.06.11 09:22
Page 22

Designação do produto:
Sistema de arrumação para parede
Nº de modelo: Z30943A
Versão: 07 / 2011
24 PT
66777_pow_Ordnungs-System_Content_LB5.indd 24 22.06.11 09:22
Page 23

Table of Contents
Introduction
Proper use ....................................................................Page 26
Technical data ............................................................Page 26
Safety advice ......................................................Page 26
Installation
.............................................................Page 28
Cleaning and care .........................................Page 29
Disposal ....................................................................Page 29
25 GB/MT
66777_pow_Ordnungs-System_Content_LB5.indd 25 22.06.11 09:22
Page 24

Introduction / Safety advice
Wall Mounting System
Introduction
Proper use
This product is suitable as a storage device from which tools
and other objects can be hung. The product is not intended
for commercial use.
Technical data
Dimensions (aluminium rail): approx. 610 x 102 x 18 mm
(W x H x D)
Max. load per hook
(Z30943A-1 / Z30943A -2 /
Z30943A-3): 10 kg
Maximum load per rail
with three hooks: 30 kg
Safety advice
KEEP ALL THE SAFETY ADVICE AND INSTRUCTIONS
IN A SAFE PLACE FOR FUTURE REFERENCE!
26 GB/MT
66777_pow_Ordnungs-System_Content_LB5.indd 26 22.06.11 09:22
Page 25

Safety advice
DANGER OF LOSS
OF LIFE AND ACCIDENT TO INFANTS
AND CHILDREN! Never leave children
unsupervised with the packaging materials. Danger of
suffocation. Keep out of the reach of children. It is not
a toy.
CAUTION! DANGER OF INJURY! Please ensure
that no parts are damaged and that all parts are cor-
rectly assembled. Incorrect assembly or fitting may
lead to injury. Damaged parts can adversely affect
safety and proper function.
CAUTION! Do not leave children unsupervised! The
product is not a climbing frame or a toy! Make sure
that nobody, especially a child, climbs on or pulls
themselves up on the product. The product could be
pulled out of the wall, resulting in injury or damage.
Make sure that the product is only assembled by
competent persons.
kg
Do not exceed the permissible maximum
load on the product.
CAUTION! RISK OF INJURY! Check before
attaching the product to the wall whether the wall is
suitable for the product to be attached to it.
Do not attach more than 3 hooks to the product.
Use only the hooks supplied with the product. Under
no circumstances use other hooks or products supplied
by another manufacturer.
27 GB/MT
66777_pow_Ordnungs-System_Content_LB5.indd 27 22.06.11 09:22
Page 26

Safety advice / Installation
Attach the product to a wall through the 8 screw holes
in the aluminium rail.
Do not attach the product to a wall if it is less than
15 mm thick.
Installation
CAUTION! RISK OF INJURY! Refer to the operat-
ing instructions for your electric drill.
Note: In the case of a masonry wall, use an ø 8 mm drill
bit. For plaster use a ø 6 mm drill bit.
Note: No dowels
product to a wooden wall. Screw in the screws
5
are necessary for attaching the
6
directly
into the wall.
Mark the positions of the holes with the help of a
spirit level in the desired place on the wall (see Fig. B).
Drill the holes with an appropriate drill bit and insert
the dowels
5
into the drilled holes (see Figs. C, D).
Hold the aluminium rail 4 in position at the desired
place on the wall and screw the screws
the screw holes
Ensure that the aluminium rail
3
into the dowels 5 (see Fig. E).
4
is attached the right
way up on to the wall. The U-shaped recess
6
through
2
must
face upwards (see Fig. F).
Now suspend the hooks 1 in the U-shaped recess 2.
When doing this, press the hooks
1
so that they en-
gage in the aluminium rail
28 GB/MT
66777_pow_Ordnungs-System_Content_LB5.indd 28 22.06.11 09:22
4
(see Fig. F).
Page 27

Installation / Cleaning and Care / Disposal
Simply pull on the hooks 1 to release them (see
Fig. G).
Cleaning and care
Do not use corrosive or aggressive cleaning agents.
Clean the product with a cloth. Use a slightly moist,
fluff-free cloth and a mild detergent to remove stub-
born dirt.
Disposal
The packaging is made entirely of recyclable
materials, which you may dispose of at local
recycling facilities.
Contact your local refuse disposal authority for more details
of how to dispose of your worn-out product.
Product description:
Wall Mounting System
Model No.: Z30943A
Version: 07 / 2011
29 GB/MT
66777_pow_Ordnungs-System_Content_LB5.indd 29 22.06.11 09:22
Page 28

Inhaltsverzeichnis
Einleitung
Bestimmungsgemäße Verwendung ......................Seite 31
Technische Daten ...................................................... Seite 31
Sicherheitshinweise ...................................Seite 31
Montage ..................................................................Seite 33
Reinigung und Pflege ............................... Seite 34
Entsorgung ...........................................................Seite 34
30 DE/AT/CH
66777_pow_Ordnungs-System_Content_LB5.indd 30 22.06.11 09:22
Page 29

Einleitung / Sicherheitshinweise
Wandhalterungssystem
Einleitung
Bestimmungsgemäße Verwendung
Dieses Produkt ist zum Aufhängen von Werkzeugen und
anderen Gegenständen geeignet. Das Produkt ist nicht für
den gewerblichen Einsatz bestimmt.
Technische Daten
Maße (Aluminiumschiene): ca. 610 x 102 x 18 mm
(B x H x T)
Max. Belastung je Haken
(Z30943A-1 / Z30943A -2 /
Z30943A-3): 10 kg
Max. Belastung je Schiene
mit 3 Haken: 30 kg
Sicherheitshinweise
BEWAHREN SIE DIE SICHERHEITSHINWEISE UND
ANWEISUNGEN FÜR DIE ZUKUNFT AUF!
31 DE/AT/CH
66777_pow_Ordnungs-System_Content_LB5.indd 31 22.06.11 09:22
Page 30

Sicherheitshinweise
LEBENS- UND
UNFALLGEFAHR FÜR KLEINKINDER
UND KINDER! Lassen Sie Kinder niemals
unbeaufsichtigt mit dem Verpackungsmaterial. Es besteht Erstickungsgefahr. Halten Sie das Produkt von
Kindern fern. Das Produkt ist kein Spielzeug.
VORSICHT! VERLETZUNGSGEFAHR! Stellen
Sie sicher, dass alle Teile unbeschädigt und sachgerecht montiert sind. Bei unsachgemäßer Montage
besteht Verletzungsgefahr. Beschädigte Teile können
die Sicherheit und Funktion beeinflussen.
VORSICHT! Lassen Sie Kinder nicht unbeaufsichtigt!
Das Produkt ist kein Kletter- oder Spielgerät! Stellen
Sie sicher, dass Personen, insbesondere Kinder nicht
auf das Produkt klettern bzw. sich nicht am Produkt
hochziehen. Das Produkt kann aus der Wand herausreißen. Verletzungen und / oder Beschädigungen
können die Folgen sein.
Achten Sie darauf, dass das Produkt nur von fachkun-
digen Personen montiert wird.
kg
Belasten Sie das Produkt nicht über die
zulässige maximale Belastung hinaus.
VORSICHT! VERLETZUNGSGEFAHR! Überprüfen
Sie vor der Wandmontage, ob die gewählte Wand
zum Befestigen des Produkts geeignet ist.
Befestigen Sie nicht mehr als 3 Haken an dem Produkt.
32 DE/AT/CH
66777_pow_Ordnungs-System_Content_LB5.indd 32 22.06.11 09:22
Page 31

Sicherheitshinweise / Montage
Benutzen Sie nur die im Produkt enthaltenen Haken
und keinesfalls andere Haken oder Produkte anderer
Hersteller.
Montieren Sie das Produkt mit Hilfe aller 8 Schrauben-
löcher der Aluminiumschiene an einer Wand.
Montieren Sie das Produkt nicht an einer Wand von
weniger als 15 mm Dicke.
Montage
VORSICHT! VERLETZUNGSGEFAHR! Ziehen Sie
die Bedienungsanleitung Ihrer Bohrmaschine hinzu.
Hinweis: Nutzen Sie für Mauerwerk einen Bohrer
ø 8 mm, für Gips einen Bohrer ø 6 mm.
Hinweis: Bei der Montage in eine Holzwand sind keine
Dübel
5
notwendig. Drehen Sie die Schrauben 6 direkt
in die Wand ein.
Markieren Sie die Bohrlöcher mit Hilfe einer Wasser-
waage an der gewünschten Stelle einer Wand (siehe
Abb. B).
Bohren Sie die Bohrlöcher mit einem entsprechenden
Bohrer und stecken Sie die Dübel
5
in die Bohrlöcher
(siehe Abb. C, D).
Halten Sie die Aluminiumschiene 4 an die gewünschte
Stelle der Wand und drehen Sie die Schrauben
durch die Schraubenlöcher
3
in die Dübel 5 ein
6
(siehe Abb. E). Achten Sie darauf, die
33 DE/AT/CH
66777_pow_Ordnungs-System_Content_LB5.indd 33 22.06.11 09:22
Page 32

Montage / Reinigung und Pflege / Entsorgung
Aluminiumschiene 4 mit der richtigen Ausrichtung an
der Wand zu befestigen. Die u-förmige Vertiefung
2
ist
dabei nach oben gerichtet (siehe Abb. F).
Hängen Sie nun die Haken 1 in der u-förmigen Ver-
tiefung
so dass diese in der Aluminiumschiene
2
ein. Drücken Sie dabei gegen die Haken 1,
4
einrasten
(siehe Abb. F).
Lösen Sie den Haken 1 durch einfaches Ziehen
(siehe Abb. G).
Reinigung und Pflege
Verwenden Sie zur Reinigung keinesfalls ätzende
oder aggressive Reinigungsmittel.
Reinigen Sie das Produkt mit einem Tuch. Verwenden Sie
bei stärkerer Verschmutzung ein leicht angefeuchtetes
Tuch und mildes Spülmittel.
Entsorgung
Die Verpackung besteht aus umweltfreundlichen
Materialien. Entsorgen Sie diese in den örtlichen
Recyclingbehältern.
Möglichkeiten zur Entsorgung des ausgedienten Produkts
erfahren Sie bei Ihrer Gemeinde- oder Stadtverwaltung.
34 DE/AT/CH
66777_pow_Ordnungs-System_Content_LB5.indd 34 22.06.11 09:22
Page 33

Produktbezeichnung:
Wandhalterungssystem
Modell-Nr.: Z30943A
Version: 07 / 2011
35 DE/AT/CH
66777_pow_Ordnungs-System_Content_LB5.indd 35 22.06.11 09:22
 Loading...