

Page 1

Owner’s Manual
ADD-ON NAVIGATION SYSTEM
AVIC-U260
For details on software updates,
visit www.naviextras.com.
English
Page 2
Contents
Thank you for buying this Pioneer product.
Please read through these instructions so you will know how to operate your model
properly. After you have finished reading the instructions, keep this document in a
safe place for future reference.
Important
The screens shown in the examples may differ
from actual screens, which may be changed
without notice for performance and function
improvements.
Precaution
The Safety of Your Ears is in Your Hands 5
ESTABLISH A SAFE LEVEL: 5
BE SURE TO OBSERVE THE FOLLOWING
GUIDELINES: 5
Introduction
License agreement 6
– PIONEER AVIC-U260 - for U.S.A. 6
– PIONEER AVIC-U260 - for Canada 8
– END USER LICENSE AGREEMENT 11
About the data for the map database 13
Important safety information 13
– Fuel cost management 15
– Traffic information 15
– Speed limit indication 15
Additional safety information 15
– To avoid battery exhaustion 15
– Handling the SD card slot 15
Notes before using the system 15
– In case of trouble 15
– Visit our website 16
Checking part names and functions 16
Inserting an SD memory card 16
Resetting the microprocessor 17
Before you start
On first-time startup 18
Regular startup 19
How to use the navigation menu screens
Screen switching overview 20
What you can do on each menu 21
Operating list screens (e.g. route settings
screen) 21
Operating the on-screen keyboard 21
Monitoring the GPS reception quality 22
How to use the map
How to read the map screen 23
Frequently shown route events 24
Seeing the current position on the map 24
– Checking the detailed information
about the current position 25
Browsing the data field 26
Display during freeway driving 26
Operating the map screen 27
– Changing the scale of the map 27
– Smart Zoom 27
– Switching the map orientation 27
– Changing the view angle of the
map 28
– Switching the map between 2D and
3D 28
– Scrolling the map to the position you
want to see 29
– Viewing information about a specified
location 29
Searching for and selecting a location
Searching for a location by address 30
Searching for a location by entering the
midpoint of a street 31
Searching for a location by entering the city
center 31
Finding the location by specifying the ZIP
code 31
Searching for Points of Interest (POI) 32
– Searching for POIs using “Quick
Search” 32
– Searching for POIs using preset
categories 33
2
En
Page 3

Contents
Searching for POIs by categories 33
Searching for a POI directly from the name of
the facilities 35
Searching for a nearby POI 36
Selecting a location by using “Find on
Map” 36
Selecting destination from stored
locations 37
Selecting a location you searched for
recently 37
– Smart History 38
– History 38
Searching for a location by coordinates 38
Searching for a location by scrolling the
map 39
After the location is decided
Setting a route to your destination 40
– Setting a route using a searched
location 40
– Checking route alternatives when
planning the route 40
– Setting a route using the “My Route”
menu 41
Checking and modifying the current
route
Displaying the route overview 43
Checking route parameters and accessing
route related functions 43
Modifying the route calculation
conditions 43
– Changing the vehicle used 43
– Setting the vehicle parameters 44
– Setting the route calculation 45
– Changing road types used 46
Modifying the route 47
– Selecting a new destination when a
route is already set 47
– Setting a new starting position for the
route 47
Editing the list of destinations 48
Canceling the current route guidance 49
Checking route alternatives for the current
route 49
Watching the simulation of the route 50
Navigating in off-road mode 50
Registering and editing locations
Storing a location in “Favorites” 51
Saving a location as an alert point 51
Editing an alert point 52
Using traffic information
Checking historical traffic information 53
Receiving real-time traffic information
(TMC) 53
– Checking the traffic incidents on the
map 54
Customizing preferences
Displaying the settings screen 55
Setting the volume and the guidance voice
for navigation system 55
Customizing the quick menu 56
Setting the traffic information 57
Setting the user profiles 58
Customizing the map screen settings 58
Setting the visual guidance 59
Customizing the display settings 60
Customizing the regional settings 61
Setting the Trip Monitor 61
Starting the configuration wizard 61
Resetting to the default settings 62
Other operations
More menu 63
Installation
Important safeguards 64
En
3
Page 4

Contents
Precautions before connecting the
system 64
Before installing this product 65
To prevent damage 65
Precautions before installation 66
Connecting the system 67
Installing with the hook and loop
fastener 68
Appendix
Positioning technology 69
– Positioning by GPS 69
Handling large errors 69
– When positioning by GPS is
impossible 69
– Conditions likely to cause noticeable
positioning errors 69
Route setting information 71
– Route search specifications 71
SD and SDHC logo 72
Display information 73
Glossary 74
Specifications 75
4
En
Page 5

Precaution
Chapter
01
! This device complies with part 15 of the
FCC Rules. Operation is subject to the following two conditions: (1) This device may
not cause harmful interference, and (2) this
device must accept any interference received, including interference that may
cause undesired operation.
! Information to User
Alteration or modifications carried out without appropriate authorization may invalidate the user’s right to operate the
equipment.
NOTE: This equipment has been tested and
found to comply with the limits for a Class B digital device, pursuant to Part 15 of the FCC
Rules. These limits are designed to provide reasonable protection against harmful interference in a residential installation. This
equipment generates, uses and can radiate
radio frequency energy and, if not installed
and used in accordance with the instructions,
may cause harmful interference to radio communications. However, there is no guarantee
that interference will not occur in a particular
installation. If this equipment does cause
harmful interference to radio or television reception, which can be determined by turning
the equipment off and on, the user is encouraged to try to correct the interference by one or
more of the following measures:
— Reorient or relocate the receiving antenna.
— Increase the separation between the equip-
ment and receiver.
— Connect the equipment into an outlet on a
circuit different from that to which the receiver is connected.
— Consult the dealer or an experienced radio/
TV technician for help.
WARNING
Handling the cord on this product or cords associated with accessories sold with the product
may expose you to chemicals listed on proposi-
tion 65 known to the State of California and other
governmental entities to cause cancer and birth
defect or other reproductive harm. Wash hands
after handling.
The Safety of Your Ears is in
Your Hands
Get the most out of your equipment by playing
it at a safe level—a level that lets the sound
come through clearly without annoying blaring or distortion and, most importantly, without affecting your sensitive hearing. Sound
can be deceiving. Over time, your hearing
“comfort level” adapts to higher volumes of
sound, so what sounds “normal” can actually
be loud and harmful to your hearing. Guard
against this by setting your equipment at a
safe level BEFORE your hearing adapts.
ESTABLISH A SAFE LEVEL:
! Set your volume control at a low setting.
! Slowly increase the sound until you can
hear it comfortably and clearly, without distortion.
! Once you have established a comfortable
sound level, set the dial and leave it
there.
BE SURE TO OBSERVE THE
FOLLOWING GUIDELINES:
! Do not turn up the volume so high that you
can’t hear what’s around you.
! Use caution or temporarily discontinue use
in potentially hazardous situations.
! Do not use headphones while operating a
motorized vehicle; the use of headphones
may create a traffic hazard and is illegal in
many areas.
Precaution
En
5
Page 6

Chapter
02
Introduction
License agreement
PIONEER AVIC-U260 - for U.S.A.
THIS IS A LEGAL AGREEMENT BETWEEN
YOU, AS THE END USER, AND PIONEER
ELECTRONICS (USA) INC. (“PIONEER”).
PLEASE READ THE TERMS AND CONDITIONS OF THIS AGREEMENT CAREFULLY BEFORE USING THE SOFTWARE INSTALLED ON
THE PIONEER PRODUCTS. BY USING THE
SOFTWARE INSTALLED ON THE PIONEER
PRODUCTS, YOU AGREE TO BE BOUND BY
THE TERMS OF THIS AGREEMENT. THE SOFTWARE INCLUDES A DATABASE LICENSED BY
THIRD PARTY SUPPLIER(S) (“SUPPLIERS”),
AND YOUR USE OF THE DATABASE IS COVERED BY THE SUPPLIERS’ SEPARATE
TERMS, WHICH ARE ATTACHED TO THIS
AGREEMENT (Refer to page 11). IF YOU DO
NOT AGREE WITH ALL OF THESE TERMS,
PLEASE RETURN THE PIONEER PRODUCTS
(INCLUDING THE SOFTWARE, AND ANY
WRITTEN MATERIALS) WITHIN FIVE (5) DAYS
OF RECEIPT OF THE PRODUCTS, TO THE
AUTHORIZED PIONEER DEALER FROM
WHICH YOU PURCHASED THEM. USE OF
THE SOF TWARE SHALL BE DEEMED TO BE
YOUR CONSENT TO THE LICENSE AGREEMENT.
other means. You shall not use the Sof tware to
operate a service bureau or for any other use
involving the processing of data for other persons or entities.
Pioneer and its licensor(s) shall retain all copyright, trade secret, patent and other proprietary ownership rights in the Software. The
Software is copyrighted and may not be copied, even if modified or merged with other products. You shall not alter or remove any
copyright notice or proprietary legend contained in or on the Software.
You may transfer all of your license rights in
the Software, the related documentation and a
copy of this License Agreement to another
party, provided that the party reads and agrees
to accept the terms and conditions of this License Agreement.
1 GRANT OF LICENSE
Pioneer grants to you a non-transferable, non
exclusive license to use the software installed
on the Pioneer products (the “Software”) and
the related documentation solely for your own
personal use or for internal use by your business, only on such Pioneer products.
You shall not copy, reverse engineer, translate,
port, modify or make derivative works of the
Software. You shall not loan, rent, disclose,
publish, sell, assign, lease, sublicense, market
or otherwise transfer the Software or use it in
any manner not expressly authorized by this
agreement. You shall not derive or attempt to
derive the source code or structure of all or
any portion of the Software by reverse engineering, disassembly, decompilation, or any
6
En
Page 7

Introduction
Chapter
02
2 DISCLAIMER OF WARRANTY
THE SOF TWARE AND RELATED DOCUMENTATION ARE PROVIDED TO YOU “AS IS”.
PIONEER AND ITS LICENSOR(S) (FOR THE
PURPOSE OF PROVISIONS 2 AND 3,
PIONEER AND ITS LICENSOR(S) SHALL BE
COLLECTIVELY REFERRED TO AS “PIONEER”)
MAKES AND YOU RECEIVE NO WARRANTY
FOR THE SOFTWARE, WHETHER EXPRESS
OR IMPLIED, AND ALL WARRANTIES OF
MERCHANTABILITY AND FITNESS FOR ANY
PARTICULAR PURPOSE FOR THE SOFTWARE
ARE EXPRESSLY EXCLUDED. SOME STATES
DO NOT ALLOW EXCLUSION OF IMPLIED
WARRANTIES, SO THE ABOVE EXCLUSION
MAY NOT APPLY TO YOU. THE SOFTWARE IS
COMPLEX AND MAY CONTAIN SOME NONCONFORMITIES, DEFECTS OR ERRORS.
PIONEER DOES NOT WARRANT THAT THE
SOFTWARE WILL MEET YOUR NEEDS OR EXPECTATIONS, THAT OPERATION OF THE
SOFTWARE WILL BE ERROR FREE OR UNINTERRUPTED, OR THAT ALL NONCONFORMITIES CAN OR WILL BE CORRECTED.
FURTHERMORE, PIONEER DOES NOT MAKE
ANY REPRESENTATIONS OR WARRANTIES
REGARDING THE USE OR RESULTS OF THE
USE OF THE SOFTWARE IN TERMS OF ITS
ACCURACY, RELIABILITY OR OTHERWISE.
3 LIMITATION OF LIABILITY
IN NO EVENT SHALL PIONEER BE LIABLE
FOR ANY DAMAGES, CLAIM OR LOSS INCURRED BY YOU (INCLUDING, WITHOUT LIMITATION, COMPENSATORY, DIRECT,
INCIDENTAL, INDIRECT, SPECIAL, CONSEQUENTIAL, OR EXEMPLARY DAMAGES, LOST
PROFITS, LOST INCOME, LOST SALES OR
BUSINESS, EXPENDITURES, INVESTMENTS,
OR COMMITMENTS IN CONNECTION WITH
ANY BUSINESS, LOSS OF ANY GOODWILL,
OR DAMAGES) RESULTING FROM THE USE
OF OR INABILITY TO USE THE SOFTWARE,
EVEN IF PIONEER HAS BEEN INFORMED OF,
KNEW OF, OR SHOULD HAVE KNOWN OF
THE LIKELIHOOD OF SUCH DAMAGES. THIS
LIMITATION APPLIES TO ANY AND ALL
CAUSES OF ACTION INDIVIDUALLY OR IN
THE AGGREGATE, INCLUDING WITHOUT LIMITATION BREACH OF CONTRACT, BREACH
OF WARRANTY, NEGLIGENCE, STRICT LIABILITY, MISREPRESENTATION, AND OTHER
TORTS. IF PIONEER’S WARRANTY DISCLAIMER OR LIMITATION OF LIABILITY SET FORTH
IN THIS AGREEMENT SHALL OR FOR ANY
REASON WHATSOEVER BE HELD UNENFORCEABLE OR INAPPLICABLE, YOU AGREE
THAT PIONEER’S LIABILITY SHALL NOT EXCEED FIFTY PERCENT (50 %) OF THE PRICE
PAID BY YOU FOR THE ENCLOSED PIONEER
PRODUCT.
Some states do not allow the exclusion or limitation of incidental or consequential damages, so the above limitation or exclusion
may not apply to you. This warranty disclaimer
and limitation of liability shall not be applicable to the extent that they are prohibited by
any applicable federal, state or local law which
provides that such a disclaimer or limitation
cannot be waived or preempted.
4 EXPORT LAW ASSURANCES
You agree and certify that neither the Software
nor any other technical data received from
Pioneer, nor the direct product thereof, will be
exported outside the United States except as
authorized and as permitted by the laws and
regulations of the United States. If the Software has been rightfully obtained by you outside of the United States, you agree that you
will not re-export the Software nor any other
technical data received from Pioneer, nor the
direct product thereof, except as permitted by
the laws and regulations of the United States
and the laws and regulations of the jurisdiction in which you obtained the Software.
5 TERMINATION
This Agreement is effective until terminated.
You may terminate it at any time by destroying
the Software. The Agreement also will terminate if you do not comply with any terms or
conditions of this Agreement. Upon such termination, you agree to destroy the Software.
Introduction
En
7
Page 8

Chapter
02
Introduction
6 U.S. GOVERNMENT END USERS
If the Software is being acquired by or on behalf of the United States government or any
other entity seeking or applying rights similar
to those customarily claimed by the United
States government, the Data is licensed with
“Limited Rights”. Utilization of the Software is
subject to the restrictions specified in the
“Rights in Technical Data” clause at DFARS
252.227-7013, or the equivalent clause for nondefense agencies. Pioneer Electronics (USA)
Inc., 1925 E. Dominguez Street, Long Beach,
CA 90810.
7 MISCELLANEOUS
This is the entire Agreement between Pioneer
and you regarding its subject matter. No
change in this Agreement shall be effective
unless agreed to in writing by Pioneer. Pioneer
retailers do not have the authority to change
this Agreement. This Agreement shall be governed by and construed in accordance with
the internal laws of the State of California. If
any provision of this Agreement is declared invalid or unenforceable, the remaining provisions of this Agreement shall remain in full
force and effect.
PIONEER AVIC-U260 - for Canada
THIS IS A LEGAL AGREEMENT BETWEEN
YOU, AS THE END USER, AND PIONEER
ELECTRONICS OF CANADA, INC.
(“PIONEER”). PLEASE READ THE TERMS AND
CONDITIONS OF THIS AGREEMENT CAREFULLY BEFORE USING THE SOFTWARE INSTALLED ON THE PIONEER PRODUCTS. BY
USING THE SOFTWARE INSTALLED ON THE
PIONEER PRODUCTS, YOU AGREE TO BE
BOUND BY THE TERMS OF THIS AGREEMENT. THE SOFTWARE INCLUDES A DATABASE LICENSED BY THIRD PARTY SUPPLIER
(S) (“SUPPLIERS”), AND YOUR USE OF THE
DATABASE IS COVERED BY THE SUPPLIERS’
SEPARATE TERMS, WHICH ARE ATTACHED
TO THIS AGREEMENT (Refer to page 11). IF
YOU DO NOT AGREE WITH ALL OF THESE
TERMS, PLEASE RETURN THE PIONEER PRODUCTS (INCLUDING THE SOFTWARE, AND
ANY WRITTEN MATERIALS) WITHIN FIVE (5)
DAYS OF RECEIPT OF THE PRODUCTS, TO
THE AUTHORIZED PIONEER DEALER FROM
WHICH YOU PURCHASED THEM. USE OF
THE SOF TWARE SHALL BE DEEMED TO BE
YOUR CONSENT TO THE LICENSE AGREEMENT.
1 GRANT OF LICENSE
Pioneer grants to you a non-transferable, non
exclusive license to use the software installed
on the Pioneer products (the “Software”) and
the related documentation solely for your own
personal use or for internal use by your business, only on such Pioneer products.
8
En
Page 9

Introduction
Chapter
02
You shall not copy, reverse engineer, translate,
port, modify or make derivative works of the
Software. You shall not loan, rent, disclose,
publish, sell, assign, lease, sublicense, market
or otherwise transfer the Software or use it in
any manner not expressly authorized by this
agreement. You shall not derive, or attempt to
derive, the source code or structure of all or
any portion of the Software by reverse engineering, disassembly, decompilation, or any
other means. You shall not use the Sof tware to
operate a service bureau or for any other use
involving the processing of data for other persons or entities.
Pioneer and its licensor(s) shall retain all copyright, trade secret, patent and other proprietary ownership rights in the Software. The
Software is copyrighted and may not be copied, even if modified or merged with other products. You shall not alter or remove any
copyright notice or proprietary legend contained in or on the Software.
You may transfer all of your license rights in
the Software, the related documentation and a
copy of this License Agreement to another
party, provided that the party reads and agrees
to accept the terms and conditions of this License Agreement.
2 DISCLAIMER OF WARRANTY
THE SOF TWARE AND RELATED DOCUMENTATION ARE PROVIDED TO YOU “AS IS”.
PIONEER AND ITS LICENSOR(S) (FOR THE
PURPOSE OF PROVISIONS 2 AND 3,
PIONEER AND ITS LICENSOR(S) SHALL BE
COLLECTIVELY REFERRED TO AS “PIONEER”)
MAKES AND YOU RECEIVE NO WARRANTY
FOR THE SOFTWARE, WHETHER EXPRESS
OR IMPLIED, AND ALL WARRANTIES OF
MERCHANTABILITY AND FITNESS FOR ANY
PARTICULAR PURPOSE FOR THE SOFTWARE
ARE EXPRESSLY EXCLUDED. SOME STATES
DO NOT ALLOW EXCLUSION OF IMPLIED
WARRANTIES, SO THE ABOVE EXCLUSION
MAY NOT APPLY TO YOU. THE SOFTWARE IS
COMPLEX AND MAY CONTAIN SOME NONCONFORMITIES, DEFECTS OR ERRORS.
PIONEER DOES NOT WARRANT THAT THE
SOFTWARE WILL MEET YOUR NEEDS OR EXPECTATIONS, THAT OPERATION OF THE
SOFTWARE WILL BE ERROR FREE OR UNINTERRUPTED, OR THAT ALL NONCONFORMITIES CAN OR WILL BE CORRECTED.
FURTHERMORE, PIONEER DOES NOT MAKE
ANY REPRESENTATIONS OR WARRANTIES
REGARDING THE USE OR RESULTS OF THE
USE OF THE SOFTWARE IN TERMS OF ITS
ACCURACY, RELIABILITY OR OTHERWISE.
3 LIMITATION OF LIABILITY
IN NO EVENT SHALL PIONEER BE LIABLE
FOR ANY DAMAGES, CLAIM OR LOSS INCURRED BY YOU (INCLUDING, WITHOUT LIMITATION, COMPENSATORY, INCIDENTAL,
INDIRECT, SPECIAL, CONSEQUENTIAL, OR
EXEMPLARY DAMAGES, LOST PROFITS, LOST
SALES OR BUSINESS, EXPENDITURES, INVESTMENTS, OR COMMITMENTS IN CONNECTION WITH ANY BUSINESS, LOSS OF
ANY GOODWILL, OR DAMAGES) RESULTING
FROM THE USE OF OR INABILITY TO USE
THE SOF TWARE, EVEN IF PIONEER HAS
BEEN INFORMED OF, KNEW OF, OR SHOULD
HAVE KNOWN OF THE LIKELIHOOD OF
SUCH DAMAGES. THIS LIMITATION APPLIES
TO ALL CAUSES OF ACTION IN THE AGGREGATE, INCLUDING WITHOUT LIMITATION
BREACH OF CONTRACT, BREACH OF WARRANTY, NEGLIGENCE, STRICT LIABILITY, MISREPRESENTATION, AND OTHER TORTS. IF
PIONEER’S WARRANTY DISCLAIMER OR
LIMITATION OF LIABILITY SET FORTH IN THIS
AGREEMENT SHALL OR FOR ANY REASON
WHATSOEVER BE HELD UNENFORCEABLE
OR INAPPLICABLE, YOU AGREE THAT
PIONEER’S LIABILITY SHALL NOT EXCEED
FIFTY PERCENT (50 %) OF THE PRICE PAID BY
YOU FOR THE ENCLOSED PIONEER PRODUCT.
Introduction
En
9
Page 10

Chapter
02
Introduction
Some jurisdictions do not allow the exclusion
or limitation of incidental or consequential damages, so the above limitation or exclusion
may not apply to you. This warranty disclaimer
and limitation of liability shall not be applicable to the extent that they are prohibited by
any applicable federal, state or local law which
provides that such a disclaimer or limitation
cannot be waived or preempted.
4 EXPORT LAW ASSURANCES
You agree and certify that neither the Software
nor any other technical data received from
Pioneer, nor the direct product thereof, will be
exported outside Canada except as authorized
and as permitted by the laws and regulations
of Canada. If the Software has been rightfully
obtained by you outside of Canada, you agree
that you will not re-export the Software nor any
other technical data received from Pioneer,
nor the direct product thereof, except as permitted by the laws and regulations of Canada
and the laws and regulations of the jurisdiction in which you obtained the Software.
5 TERMINATION
This Agreement is effective until terminated.
You may terminate it at any time by destroying
the Software. The Agreement also will terminate if you do not comply with any terms or
conditions of this Agreement. Upon such termination, you agree to destroy the Software.
6 MISCELLANEOUS
This is the entire Agreement between Pioneer
and you regarding its subject matter. No
change in this Agreement shall be effective
unless agreed to in writing by Pioneer. Pioneer
retailers do not have the authority to change
this Agreement. This Agreement shall be governed by and construed in accordance with
the internal laws of the Province of Ontario
and the federal laws of Canada applicable
therein. If any provision of this Agreement is
declared invalid or unenforceable, the remaining provisions of this Agreement shall remain
in full force and effect.
10
En
Page 11

T
T
T
Introduction
END USER LICENSE AGREEMENT
END USER TERMS
he content provided by HERE (“Data”) is licensed, not
sold. By opening this package, or installing, copying,
or otherwise using the Data, you agree to be bound by
the terms of this agreement.
he Data is provided for your personal, internal
use only and may not be resold. It is protected by
copyright, and is subject to the following terms (this
“End User License Agreement”) and conditions which
are agreed to by you, on the one hand, and HERE and
its licensors (including their licensors and suppliers)
on the other hand. For purposes of these terms,
“HERE” shall mean (a) HERE North America, LLC
with respect to Data for the Americas and/or the Asia
Pacific region and (b) HERE Europe B.V. for Data for
Europe, the Middle East and/or Africa.
he Data includes certain information and related
content provided under license to HERE from third
parties and is subject to the applicable supplier terms
and copyright notices set forth at the following URL:
http://corporate.navteq.com/supplier_terms.html.
TERMS AND CONDITIONS
License Limitations on Use: You agree that your
license to use this Data is limited to and conditioned
on use for solely personal, noncommercial purposes,
and not for service bureau, timesharing or other
similar purposes. Except as otherwise set forth herein,
you agree not to otherwise reproduce, copy, modify,
decompile, disassemble or reverse engineer any
portion of this Data, and may not transfer or distribute
it in any form, for any purpose, except to the extent
permitted by mandatory laws.
License Limitations on Transfer: Your limited license
does not allow transfer or resale of the Data, except on
the condition that you may transfer the Data and all
accompanying materials on a permanent basis if: (a)
you retain no copies of the Data; (b) the recipient agrees
to the terms of this End User License Agreement; and
(c) you transfer the Data in the exact same form as
you purchased it by physically transferring the original
media (e.g., the CD-ROM or DVD you purchased),
all original packaging, all Manuals and other
documentation. Specifically, Multidisc sets may only be
transferred or sold as a complete set as provided to you
and not as a subset thereof.
Additional License Limitations: Except where you
have been specifically licensed to do so by HERE in
a separate written agreement, and without limiting
the preceding paragraph, your license is conditioned
on use of the Data as prescribed in this agreement,
and you may not (a) use this Data with any products,
systems, or applications installed or otherwise
connected to or in communication with vehicles
capable of vehicle navigation, positioning, dispatch,
real time route guidance, fleet management or similar
applications; or (b) with, or in communication with,
including without limitation, cellular phones, palmtop
and handheld computers, pagers, and personal digital
assistants or PDAs.
Warning: This Data may contain inaccurate or
incomplete information due to the passage of time,
changing circumstances, sources used and the nature
of collecting comprehensive geographic Data, any of
which may lead to incorrect results.
No Warranty: This Data is provided to you “as is”,
and you agree to use it at your own risk. HERE and
its licensors (and their licensors and suppliers) make
no guarantees, representations or warranties of any
kind, express or implied, arising by law or otherwise,
including but not limited to, content, quality, accuracy,
completeness, effectiveness, reliability, fitness for a
particular purpose, usefulness, use or results to be
obtained from this Data, or that the Data or server will
be uninterrupted or error free.
Disclaimer of Warranty: HERE AND ITS LICENSORS
(INCLUDING THEIR LICENSORS AND SUPPLIERS)
DISCLAIM ANY WARRANTIES, EXPRESS OR IMPLIED,
OF QUALITY, PERFORMANCE, MERCHANTABILITY,
FITNESS FOR A PARTICULAR PURPOSE OR NONINFRINGEMENT. Some States, Territories and Countries
do not allow certain warranty exclusions, so to that
extent the above exclusion may not apply to you.
Disclaimer of Liability: HERE AND ITS LICENSORS
(INCLUDING THEIR LICENSORS AND SUPPLIERS)
SHALL NOT BE LIABLE TO YOU IN RESPECT OF
ANY CLAIM, DEMAND OR ACTION, IRRESPECTIVE
OF THE NATURE OF THE CAUSE OF THE CLAIM,
DEMAND OR ACTION ALLEGING ANY LOSS, INJURY
OR DAMAGES, DIRECT OR INDIRECT, WHICH
MAY RESULT FROM THE USE OR POSSESSION
OF THIS DATA; OR FOR ANY LOSS OF PROFIT,
Chapter
02
Introduction
En
11
Page 12
Chapter
02
Introduction
12
En
Page 13

Introduction
Chapter
02
About the data for the map
database
! Modifications related to roads, streets/high-
ways, terrain, construction and other things
before/during the development period may
not be reflected in this database. Inevitably,
those modifications after that period are
not reflected in this database.
! Regardless of existing and newly-built
things, the data may be different from the
actual condition.
! For details about the map coverage of this
navigation system, refer to the information
on our website.
! It is strictly prohibited to reproduce and use
any part or the whole of this map in any
form without permission from the copyright
owner.
! If the local traffic regulations or conditions
deviate from this data, follow the local traf-
fic regulations (such as signs, indications,
etc.) and conditions (such as construction,
weather, etc.).
! The traffic regulation data used in the map
database applies only to standard sized
passenger vehicles. Note that regulations
for larger vehicles, motorbikes, and other
non-standard vehicles are not included in
the database.
! © 1987-2013 HERE. All rights reserved.
Important safety information
WARNING
! Do not attempt to install or service this pro-
duct by yourself. Installation or servicing of
this product by persons without training and
experience in electronic equipment and automotive accessories may be dangerous and
could expose you to the risk of electric shock,
injury or other hazards.
! If liquid or foreign matter should get inside
this navigation system, park your vehicle to
safe place and turn the ignition switch off
(ACC OFF) immediately and consult your dealer or the nearest authorized Pioneer Service
Station. Do not use the navigation system in
this condition because doing so may result in
a fire, electric shock, or other failure.
! If you notice smoke, a strange noise or odor
from the navigation system, or any other abnormal signs on the LCD screen, turn off the
power immediately and consult your dealer or
the nearest authorized Pioneer Service Station. Using this navigation system in this condition may result in permanent damage to the
system.
! Do not disassemble or modify this navigation
system, as there are high-voltage components
inside which may cause an electric shock. Be
sure to consult your dealer or the nearest
authorized Pioneer Service Station for internal
inspection, adjustments or repairs.
! Do not allow this product to come into contact
with liquids. Electrical shock could result.
Also, damage to the product, smoke, and overheating could result from contact with liquids.
Introduction
! For copyright of contents, please check the
About window in the software.
= For details, refer to More menu on page
63.
En
13
Page 14

Chapter
02
Introduction
CAUTION
When a route is calculated, the route and voice
guidance for the route are automatically set.
Also, for day or time traffic regulations, only information about traffic regulations applicable at the
time when the route was calculated is considered. One-way streets and street closures may
not be taken into consideration. For example, if a
street is open during the morning only, but you
arrive later, it would be against the traffic regulations so you cannot drive along the set route.
When driving, please follow the actual traffic
signs. Also, the system may not know some traffic regulations.
Before using your navigation system, be sure
to read and fully understand the following
safety information:
! Read the entire manual before operating
this navigation system.
! This navigation system may in certain cir-
cumstances display inaccurate position of
your vehicle, the distance of objects shown
on the screen, and compass directions. In
addition, the system has certain limitations, including the inability to identify oneway streets, temporary traffic restrictions
and potentially unsafe driving areas. Please
exercise your own judgment in the light of
actual driving conditions.
! The navigation features of your navigation
system (and rear view camera option if purchased) are intended solely as an aid to
you in the operation of your vehicle. It is
not a substitute for your attentiveness,
judgment, and care when driving.
! Certain country and government laws may
prohibit or restrict the placement and use
of this system in your vehicle. Please comply with all applicable laws and regulations
regarding the use, installation and operation of your navigation system.
! Do not operate this navigation system (or
the rear view camera option if purchased) if
doing so will divert your attention in any
way from the safe operation of your vehicle.
Always observe safe driving rules and fol-
low all existing traffic regulations. If you experience difficulty in operating the system
or reading the display, park your vehicle in
a safe location and apply the parking brake
before making the necessary adjustments.
! Never allow others to use the system un-
less they have read and understood the operating instructions.
! Never use this navigation system to route
to hospitals, police stations or similar facilities in an emergency. Stop using any functions relating to the hands-free phoning
and please call the appropriate emergency
number.
! Route and guidance information displayed
by this equipment is for reference purposes
only. It may not accurately reflect the latest
permissible routes, road conditions, one
way streets, road closures, or traffic restrictions.
! Traffic restrictions and advisories currently
in force should always take precedence
over guidance given by the navigation system. Always obey current traffic restrictions, even if the navigation system
provides contrary advice.
! Failure to set correct information about the
local time may result in the navigation system providing improper routing and guidance instructions.
! Never set the volume of your navigation
system so high that you cannot hear outside traffic and emergency vehicles.
! The data encoded in the built-in memory is
the intellectual property of the provider, and
the provider is responsible for such content.
! Keep this manual handy as a reference for
operating procedures and safety information.
! Pay close attention to all warnings in this
manual and follow the instructions carefully.
Failure to follow the warnings and cautions
as described in this manual and on the product itself and/or failure to use this product
properly may result in serious injury or
death.
14
En
Page 15
Introduction
Chapter
02
! Please remember to wear your seat belt at
all times while operating your vehicle. If
you are in an accident, your injuries can be
considerably more severe if your seat belt
is not properly buckled.
! Never use headphones while driving.
Fuel cost management
These calculations are based only on the information that you provide and not on any data
from the vehicle. The fuel mileage displayed is
only a reference value, and does not guarantee
the fuel mileage displayed can be obtained.
Traffic information
! Pioneer does not bear responsibility for the
accuracy of the information transmitted.
! Pioneer does not bear responsibility for
changes to information services provided
by broadcasting stations or by related com-
panies, such as cancellation of services or
changing to pay-services. Also, we do not
accept return of the product for this rea-
son.
Speed limit indication
The speed limit is based on the map database.
The speed limit in the database may not
match the actual speed limit of the current
road. This is not a definite value. Be sure to
drive according to the actual speed limit.
Handling the SD card slot
The SD memory card and SDHC memory card
are collectively referred to as the “ SD memory
card”.
CAUTION
! Keep the SD memory card out of the reach of
small children to prevent them from accidentally swallowing it.
! Ejecting an SD memory card during data
transfer can damage the SD memory card. Be
sure to eject the SD memory card by the procedure described in this manual.
! To prevent data loss and damage to the sto-
rage device, never remove it from this navigation system while data is being transferred.
! If data loss or corruption occurs on the sto-
rage device for any reason, it is usually not
possible to recover the data. Pioneer accepts
no liability for damages, costs or expenses
arising from data loss or corruption.
! Never insert or eject an SD memory card
while driving.
! Do not insert anything other than SD memory
cards into the SD card slot.
Notes before using the system
In case of trouble
Should the navigation system fail to operate
properly, contact your dealer or nearest
authorized Pioneer Service Station.
Introduction
Additional safety information
To avoid battery exhaustion
Be sure to run the vehicle engine while using
this product. Using this product without running the engine can drain the battery.
WARNING
Do not install this product in a vehicle that does
not have an ACC wire or circuitry available.
En
15
Page 16
Chapter
02
Introduction
Visit our website
Visit us at the following site:
http://www.pioneerelectronics.com
In Canada
http://www.pioneerelectronics.ca
1 Register your product.
2 Receive updates on the latest products and
technologies.
3 Download owner’s manuals, order product
catalogs, research new products, and much
more.
4 Receive notices of software upgrades and
software updates.
The names of private corporations, products and other entities described in this
product are the registered trademarks or
trademarks of their respective firms.
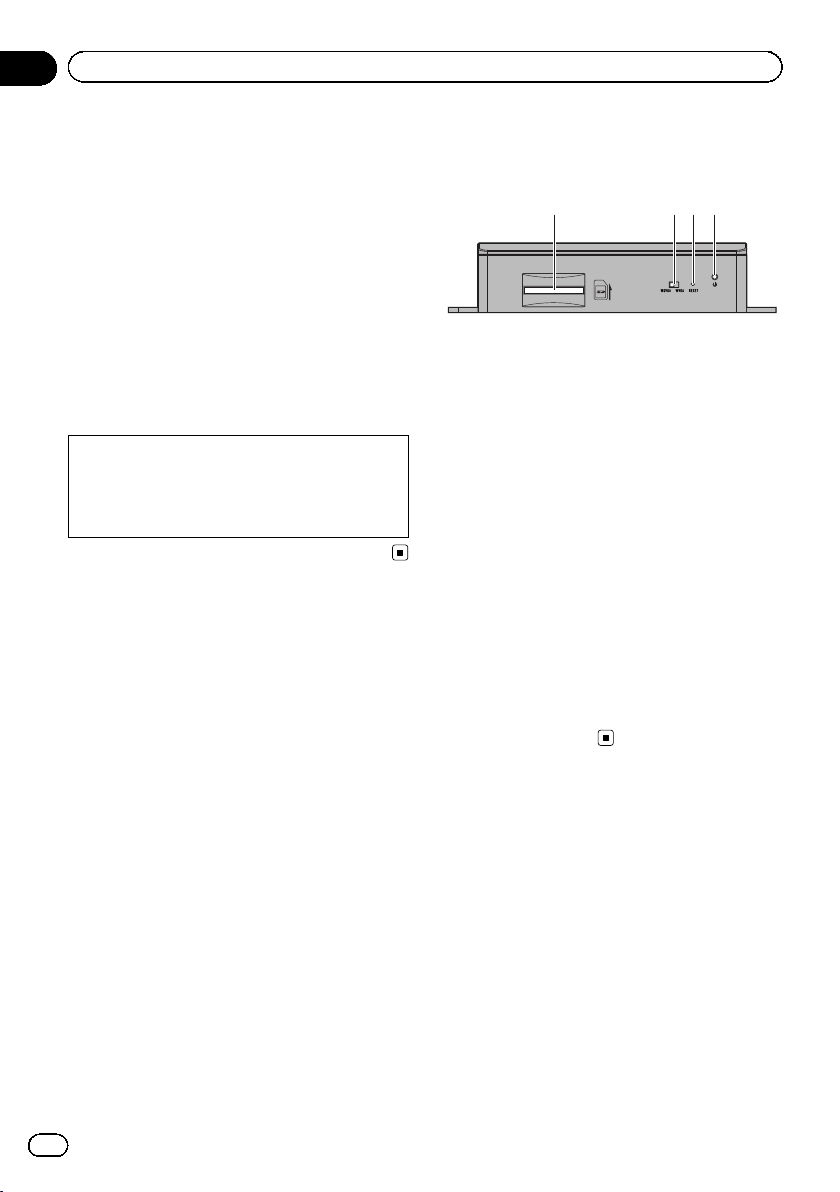
Checking part names and
functions
3 421
1 SD card slot
p An SD memory card containing map
data is inserted at the factory.
p Do not erase the map data stored on the
SD memory card (inserted at the factory).
Without the data, the navigation function
is disabled.
2 Video output selector switch
The switch is used to change the resolution
of video output to the AV receiver.
! When the switch is set to the left,
WQVGA video is output.
! When the switch is set to the right,
WVGA video is output.
3 Reset button
= For details, refer to Resetting the micro-
processor on page 17.
16
4 Power indicator
Inserting an SD memory card
p The included SD memory card must be in-
serted into the SD card slot for prior to
using the AVIC-U260 for the first time.
En
Page 17
Introduction
1 Insert an SD memory card into the SD
card slot.
2 Gently press the card in against the
spring latch until it stops, then release.
The card will lock firmly into place inside the
SD card slot.
Resetting the microprocessor
CAUTION
Please refer to the related section before clearing.
The microprocessor should be reset under the
following conditions:
! Prior to using this product for the first time
after installation.
! If this product fails to operate properly.
! When adding/removing additional pro-
ducts that connect to the navigation sys-
tem.
! If your vehicle position is shown on the
map with a significant positioning error.
Chapter
02
Introduction
% Press the reset button on this product
with a pointed object such as the tip of a
pen.
Reset button
En
17
Page 18
Chapter
03
Before you start
On first-time startup
When you use the navigation system for the
first time, an initial setup process starts automatically. Follow the steps below.
1 Start the engine to boot up the system.
2 Wait approximately 10 seconds, and
then press the MODE button of the AV receiver.
After a short pause, the navigation splash
screen appears.
3 Set the video output selector switch according to your AV receiver.
p If the screen remains black after pressing
the MODE button of the AV receiver, set the
switch to the other side.
= For details, refer to Checking part names
and functions on page 16.
4 Select the language that you want to
use on the screen, then touch [Done].
p Later you can change it in “Regional” set-
tings.
= For details, refer to Customizing the regional
settings on page 61.
The navigation system will restart and the
“End User Licence Agreement” screen is displayed.
5 Read the terms carefully, checking its
details, and then touch [Accept] if you
agree to the conditions.
The configuration wizard starts.
6 Touch [Next] to continue.
7 Select the language that you want to
use for voice guidance messages, then
touch [Next].
p Later you can change it in “Sound and
Warnings” settings.
= For details, refer to Setting the volume and
the guidance voice for navigation system on
page 55.
8 If needed, modify the time format and
unit settings, then touch [Next].
18
p Later you can change it in “Regional” set-
tings.
= For details, refer to Customizing the regional
settings on page 61.
En
Page 19
Before you start
Chapter
03
9 If needed, modify the default route
planning options, then touch [Next].
p Later you can change them in “Route Set-
tings”.
= For details, refer to Modifying the route cal-
culation conditions on page 43.
p You can restart the configuration wizard
later from the “Settings” menu.
= For details, refer to Starting the configuration
wizard on page 61.
10 Touch [Finish].
The initial setup is now complete.
After touching [Finish], the “Navigation
Menu” screen appears and you can start
using the navigation system.
wait (approximately 10 seconds) after restart before pressing the MODE button.
Before you start
Regular startup
1 Start the engine to boot up the system.
2 Press the MODE button of the AV receiver.
After a short pause, the navigation screen appears.
p The display will turn off if you press the
MODE button of the AV receiver immediately after the navigation system restarts, so
En
19
Page 20
Chapter
04
How to use the navigation menu screens
Screen switching overview
Navigation screen
20
Press the MODE button of the AV receiver.
AV receiver screen (e.g. AVH-X2600BT)
En
Page 21
How to use the navigation menu screens
Chapter
04
What you can do on each
menu
1 Map screen
Touch [Show Map] on the “Navigation
Menu” screen.
2 Quick menu
Registering your favorite menu items in short-
cuts allows you to quickly jump to the regis-
tered menu screen by a simple touch on the
quick menu screen. The master volume slider
at the bottom of the screen adjusts the sound
volume of the device. All sounds of this sys-
tem are affected.
p You can customize the menu options.
= For details, refer to Customizing the
quick menu on page 56.
3 “Navigation Menu” screen
Touch [Menu] on the map screen to display
the “Navigation Menu” screen.
This is the starting menu to access the desired
screens and operate the various functions.
4 “Find” menu
You can search for your destination on this
menu.
Other features include useful functions to
support your navigation.
5 “My Route” menu
You can display your route information on the
map. You can also perform route-related ac-
tions such as editing or canceling your route
on this menu.
6 “More...” menu
You can customize the way the navigation sys-
tem works, to simulate demo routes or to run
some additional applications.
7 Traffic summary screen
You can check the summary of traffic events
on the set route.
Operating list screens (e.g.
route settings screen)
1
2
1 Listed items
Touching an item on the list allows you to narrow down the options and proceed to the next
operation.
2 Back
The previous screen returns. Touching and
holding [Back] returns to the map screen.
3 Touching
you to see the next or previous page.
or on the right of screen allows
Operating the on-screen
keyboard
8
1
2
345
1 Text box
Displays the characters that are entered.
2 Keyboard
Touch the keys to enter the characters.
p To enter a space, touch at the bottom
center of the screen.
How to use the navigation menu screens
3
7
6
En
21
Page 22
Chapter
04
How to use the navigation menu screens
p When entering text, the first character
appears in upper case while the rest of
the text is in lower case. Touch
enter an upper case letter or touch
twice to turn on Caps Lock. Touch again
and lower case letters return.
3 Back
The previous screen returns. Touching and
holding [Back] returns to the map screen.
4 More
Touching [More] switches to another keyboard layout, for example from an English keyboard to a Greek keyboard.
5 Results
Touch to finalize the keyboard entry (open the
list of search results).
If the desired name does not show up, the
names that match the string appear in a list
after entering a couple of characters (to open
the list of results before it appears automatically, touch [Results]).
6
Touch to switch to a keyboard offering numeric and symbol characters.
7
Touch to correct your entry on the keyboard.
Touching and holding
acters or the entire input string.
8
Touch to finalize the keyboard entry (accept
the suggested search result).
deletes several char-
to
Monitoring the GPS
reception quality
In the top right corner, the GPS reception quality icon shows the current accuracy of the position information.
Indicator Meaning
: GPS navigation possible
: Insufficient GPS navigation
: GPS navigation not possible
: No connection to GPS receiver
22
En
Page 23
How to use the map
Most of the information provided by your navigation system can be seen on the map. You need to become familiar with how information appears on the map.
How to read the map screen
1
Chapter
05
2
3
4
5
6
p Information with an asterisk (*) appears
only when the route is set.
p Depending on the conditions and settings,
some items may not be displayed.
1 Name of the street to be used (or next gui-
dance point)*
Shows information about the next guidance
point (maneuver) and the next street or the
next city.
2 Next guidance point (maneuver)*
When you approach the next maneuver, this
appears in orange. Both the type of the event
(turn, traffic circle, exiting freeway, etc.) and
its distance from the current position are dis-
played. A smaller icon shows the type of the
second next maneuver if it is near the first
one.
= For details, refer to Frequently shown
route events on page 24.
3 Distance to the next guidance point (man-
euver)*
Shows the distance to the next maneuver.
4 Second maneuver arrow*
7
Shows the turning direction after the next guidance point and the distance to it.
5 Current position
Indicates the current location of your vehicle.
The apex of the triangular mark indicates your
orientation and the display moves automatically as you drive.
8
p The exact location of the arrow mark de-
pends on the vehicle type used for route
calculation and the navigation mode.
= For details, refer to Changing the vehicle
used on page 43.
6 Menu key
Touch [Menu] to return to the “Navigation
Menu” screen.
= For details, refer to What you can do on
each menu on page 21.
7 Street name (or city name) that your vehi-
cle is traveling along
8 Data field
b
a
9
How to use the map
En
23
Page 24
Chapter
05
How to use the map
Touching this field displays route information
during navigation. By default, only one data
field is displayed. Touch this field to see all
data fields.
= For details, refer to Browsing the data
field on page 26.
9 Current route*
The route currently set is highlighted in color
on the map.
= For details of the POI icons, refer to Cus-
tomizing the map screen settings on
page 58.
a Traffic information
The recommended route is not always the
same between two points. Whenever suitable
data exists, traffic information can be taken
into account in the route calculation.
b Quick menu
Touching this key causes the quick menu to
appear.
= For details, refer to Quick menu on
page 21.
Frequently shown route
events
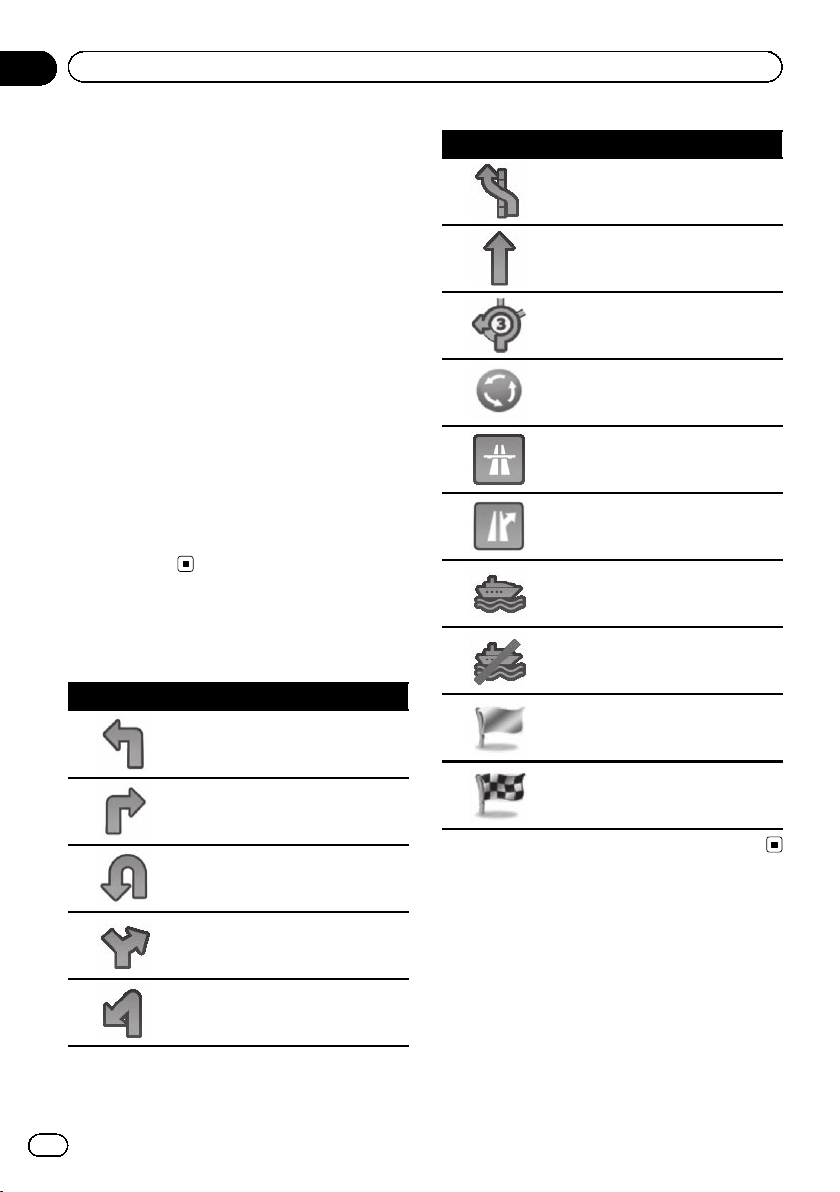
Icon Description
Turn left.
Icon Description
Keep left.
Continue straight in the intersection.
Go left on the traffic circle, 3rd exit
(next maneuver).
Enter traffic circle (second next
maneuver).
Enter freeway.
Exit freeway.
Board ferry.
Leave ferry.
Approaching a waypoint.
24
En
Turn right.
Turn back.
Bear right.
Turn sharp left.
Approaching the destination.
Seeing the current position
on the map
1 Display the “Navigation Menu” screen.
= For details of the operations, refer to Screen
switching overview on page 20.
Page 25

How to use the map
Chapter
05
2 Touch [Show Map] on the “Navigation
Menu” screen.
The map screen appears showing the current
position (a blue arrow by default), recommended route (an orange line) and surrounding map area.
p The arrow mark appears in blue by default.
You can change this icon.
= For details of the POI icons, refer to Custo-
mizing the map screen settings on page 58.
When there is no GPS position, the arrow
mark is transparent. It shows your last known
position. The more green dots you see in a satellite symbol in the top left corner, the closer
you are to get the valid GPS position.
When GPS position is available, the arrow
mark is displayed in full color, now showing
your current position.
Checking the detailed information
about the current position
You can get the detailed information about the
current position (or about the last known position if GPS reception is not available) from the
“Where Am I?” screen. You can also search
for useful Points Of Interest (POI) nearby on
the screen. Follow the steps below to open the
“Where Am I?” screen.
1 Display the map screen.
= For details of the operations, refer to Screen
switching overview on page 20.
2 If the current street is displayed below
the arrow mark (current position), touch it
to open the “Where Am I?” screen.
# Touch in the top right corner of the screen
to open the quick menu screen, then touch
[Where Am I?].
The screen provides the following information:
! Latitude and longitude (coordinate of the
current position in WGS84 format)
! Altitude (elevation information coming from
the GPS receiver – often inaccurate)
! House number on the left
! House number on the right
! Position information (current or last
known)/time left since it was last updated
! Address details of the current position
(when available)
p To save the current position as a “Favor-
ites” destination, touch [More].
= For details, refer to Storing a location in
“Favorites” on page 51.
p You can also search for assistance near
your current position.
= For details, refer to Searching for a nearby
POI on page 36.
How to use the map
En
25
Page 26

Chapter
05
How to use the map
Browsing the data field
The data fields are different when you are navigating the current route and when you have
no specified destination (the orange line is not
displayed). The data field provides the following information.
! When the route is set:
Distance to final destination, time needed
to reach the final destination and estimated
arrival time
! When the route is not set:
Current speed, speed limit of the current
road and current time
Display during freeway
driving
In certain locations of the freeway, lane information is available, indicating the recommended lane to be in to easily maneuver the
next guidance.
Lane information
While driving on the freeway, freeway exit
numbers and freeway signs may be displayed
in the vicinity of interchanges and exits.
If you are approaching a complex intersection
and the needed information exists, the map is
replaced with a 3D view of the junction.
Signposts
p The estimated time of arrival is an ideal
value calculated based on the value set for
“Max. Speed” and the actual driving
speed. The estimated time of arrival is only
a reference value, and does not guarantee
arrival at that time.
= For details, refer to Setting the vehicle
parameters on page 44.
p You can change the value by touching and
holding any of the fields.
26
En
Junction view
p If the data for these items is not contained
in the map data, the information is not
available even if there are signs on the actual road.
Page 27

How to use the map
Chapter
05
An icon showing a gas station or a restaurant
will appear on the map during you are driving
on freeways. Touch the icon to open the details
of the next few exits or service stations.
Freeway exit services
p You can add any of them as a waypoint to
your route.
= For details, refer to Setting a route using the
“My Route” menu on page 41.
p If you want to display other types of POIs
for the exits, you can change the icons in
“Visual Guidance Settings”.
= For details, refer to Setting the visual gui-
dance on page 59.
Operating the map screen
Changing the scale of the map
You can change how much of the map is displayed on the screen with street names and
other text displayed in the same font size.
1 Display the map screen.
= For details of the operations, refer to Screen
switching overview on page 20.
2 Touch anywhere on the map during navigation.
The map stops following the current position
and control keys appear.
3 Touch
p Map scaling has a limit in 3D map view
= For details, refer to Switching the map be-
4 Touch [Back] to move the map back to
follow the current GPS position.
or to change the map scale.
mode. If you zoom out further, the map
switches to 2D view mode.
tween 2D and 3D on page 28.
Smart Zoom
Your navigation system features “Smart Zoom”
that works in two ways:
! When the route is set:
When approaching a turn, it will zoom in
and raise the view angle to let you easily recognize your maneuver at the next junction. If the next turn is at a distance, it will
zoom out and lower the view angle to be
flat so you can see the road in front of you.
! When the route is not set:
“Smart Zoom” will zoom in if you drive
slowly and zoom out when you drive at
high speed.
Switching the map orientation
You can switch how the map shows your vehicle’s direction between “Heading up” and
“North up”.
! Heading up:
The map display always shows the vehicle ’s
direction as proceeding toward the top of
the screen.
! North up:
The map display always has north at the
top of the screen.
How to use the map
En
27
Page 28

Chapter
05
How to use the map
p The map orientation is fixed at “Heading
up” when the 3D map screen is displayed.
1 Display the map screen.
= For details of the operations, refer to Screen
switching overview on page 20.
2 Touch anywhere on the map during navigation.
The map stops following the current position
and control keys appear.
3 Touch
Each time you touch the key the setting
changes.
4 Touch [Back] to move the map back to
follow the current GPS position.
to switch the map orientation.
Changing the view angle of the
map
You can change the view angle of the map horizontally or vertically.
p You can change the vertical view angle of
the map in 3D mode only.
= For details, refer to Switching the map be-
tween 2D and 3D on page 28.
1 Display the map screen.
= For details of the operations, refer to Screen
switching overview on page 20.
2 Touch anywhere on the map during navigation.
The map stops following the current position
and control keys appear.
3 Touch
rotate left/right.
p Touching the key once modifies the view in
4 Touch [Back] to move the map back to
follow the current GPS position.
/ to tilt up/down or / to
large steps and touching and holding the
key modifies it continuously and smoothly.
Switching the map between 2D
and 3D
1 Display the map screen.
= For details of the operations, refer to Screen
switching overview on page 20.
2 Touch anywhere on the map during navigation.
The map stops following the current position
and control keys appear.
3 Touch
and 3D view modes.
Each time you touch the key the setting
changes.
p When the 2D map screen is selected, is
p When the 3D map screen is selected,
4 Touch [Back] to move the map back to
follow the current GPS position.
or to switch between 2D
displayed.
is
displayed.
28
En
Page 29

How to use the map
Scrolling the map to the
position you want to see
1 Display the map screen.
= For details of the operations, refer to Screen
switching overview on page 20.
2 Touch and drag the map in the desired
direction to scroll.
p Positioning the cursor to the desired loca-
tion results in a brief information overview
about the location being displayed at the
top of the screen, with street name and
other information for this location being
shown.
p The scrolling increment depends on your
dragging length.
3 Touch [Back] to move the map back to
follow the current GPS position.
Viewing information about a
specified location
An icon appears at registered places such as
“Favorites” entries and places where there is
a POI icon or traffic information icon. Place
the cursor over the icon to view detailed information.
Chapter
05
How to use the map
1 Scroll the map and move the scroll cursor to the icon you want to view.
2 Touch
lected location.
3 Touch the item that you want to check
the detailed information.
# Touch [Back] to return to the map.
= For details of the POI icons, refer to Custo-
= For details of the traffic information icons,
to see the details of the se-
mizing the map screen settings on page 58.
refer to Setting the traffic information on
page 57.
En
29
Page 30

Chapter
06
Searching for and selecting a location
p Some information regarding traffic regula-
tions depends on the time when the route
calculation is performed. Thus, the information may not correspond with a certain
traffic regulation when your vehicle actually
passes through the location in question.
Also, the information on the traffic regulations provided applies for a passenger vehicle, and not for a truck or other delivery
vehicles. Always follow the actual traffic
regulations when driving.
Searching for a location by
address
The most frequently used function is “Find
Address”, in which the address is specified
and the location is searched.
p Depending on the search results, some
steps may be skipped.
1 Touch [Menu] on the map screen.
The “Navigation Menu” screen appears.
= For details of the operations, refer to Screen
switching overview on page 20.
2 Touch [Find], then [Find Address].
4 Touch [City] and enter the name of the
city on the keyboard.
5 Touch [Street] and enter the street
name on the keyboard.
6 Touch [House Number] and enter the
house number on the keyboard.
p To enter letters, touch .
7 When the entry is complete, touch
[Done].
3 Touch [Country], enter the first few letters of the country or state on the keyboard and then select one country or state
from the list of results.
p By default, your navigation system proposes
the country and state where you are. If no
changes are required, skip steps 3.
p If you select a country without a state, you
can search for a city in all its states.
30
En
p If the entered house number cannot be
found, the midpoint of the street is selected
as the destination.
The searched location appears on the map
screen.
= For subsequent operations, refer to Setting
a route to your destination on page 40.
Page 31

Searching for and selecting a location
Chapter
06
Searching for a location by
entering the midpoint of a
street
You can also navigate to the midpoint of a
street if the house number is not available.
1 Touch [Menu] on the map screen.
The “Navigation Menu” screen appears.
= For details of the operations, refer to Screen
switching overview on page 20.
2 Touch [Find], then [Find Address].
3 If necessary, modify the country.
= For details of the operations, refer to Search-
ing for a location by address on page 30.
4 Touch [Street] and enter the street
name on the keyboard.
5 Touch [Select Street].
The map screen appears with the selected
point in the middle. The midpoint of the street
is selected as the destination.
= For subsequent operations, refer to Setting
a route to your destination on page 40.
Searching for a location by
entering the city center
You can search for a location by entering the
city center.
1 Touch [Menu] on the map screen.
The “Navigation Menu” screen appears.
= For details of the operations, refer to Screen
switching overview on page 20.
2 Touch [Find], then [Find Address].
3 If necessary, modify the country.
= For details of the operations, refer to Search-
ing for a location by address on page 30.
4 Touch [City] and enter the name of the
city on the keyboard.
Searching for and selecting a location
5 Touch [Select City].
The map screen appears with the selected
point in the middle. The center of the displayed city becomes the destination of the
route.
= For subsequent operations, refer to Setting
a route to your destination on page 40.
Finding the location by
specifying the ZIP code
If you know the ZIP code of the location that
you want to find, you can use it to find the location.
p Depending on the search results, some
steps may be skipped.
1 Touch [Menu] on the map screen.
The “Navigation Menu” screen appears.
= For details of the operations, refer to Screen
switching overview on page 20.
2 Touch [Find], then [Find Address].
3 If necessary, modify the country.
= For details of the operations, refer to Search-
ing for a location by address on page 30.
En
31
Page 32

Chapter
06
Searching for and selecting a location
4 Touch [City] and enter the name of the
city using its ZIP code.
p To open the numeric keypad, touch .
5 Touch [Street] and enter the street
name on the keyboard.
6 Touch [House Number] and enter the
house number on the keyboard.
p To enter letters, touch .
7 When the entry is complete, touch
[Done].
p If the entered house number cannot be
found, the midpoint of the street is selected
as the destination.
Searching for Points of
Interest (POI)
Information of various facilities (Points Of Interest – POI), such as gas stations, parking
lots or restaurants, is available. You can
search for a POI by using the “Quick Search”
feature, or by selecting the category (or entering the POI name).
Searching for POIs using “Quick
Search”
You can quickly find a favorite place by its
name. The search is always carried out along
the recommended route if it exists or around
your current position if no destination is set.
1 Touch [Menu] on the map screen.
The “Navigation Menu” screen appears.
= For details of the operations, refer to Screen
switching overview on page 20.
2 Touch [Find], then [Find Places].
3 Touch [Quick Search Along Route].
The searched location appears on the map
screen.
= For subsequent operations, refer to Setting
a route to your destination on page 40.
32
En
A keyboard screen appears. Start entering the
name of the place.
4 After entering a few letters, touch [Results].
Page 33

Searching for and selecting a location
Chapter
06
The list of places opens with names containing the entered character sequence.
5 Scroll the list and touch the place you
want.
A full screen map appears with the selected
point in the middle. The name and address of
the place is displayed at the top of the screen.
= For subsequent operations, refer to Setting
a route to your destination on page 40.
p To see the details of the selected place,
touch
.
Touching [Back] returns to the map screen.
p The places in the list are ordered by their
distance from the current or last known position, from the destination or by the length
of the necessary detour. To change the
order, follow the steps below:
Touch [More], then touch one of the list
items.
Searching for POIs using preset
categories
The preset search allows you to quickly find
the most frequently selected types of POIs.
1 Touch [Menu] on the map screen.
The “Navigation Menu” screen appears.
= For details of the operations, refer to Screen
switching overview on page 20.
p When the route is set and any of the above
search categories are selected, the category
search will occur along the route.
p When a route has not been set and any of
the above search categories are selected,
the category search will occur around your
current position.
p When the current position is not available
(no GPS signal) and any of the above
search categories are selected, the category
search will occur around your last known
position.
3 Touch the POI you want.
The searched location appears on the map
screen.
= For subsequent operations, refer to Setting
a route to your destination on page 40.
Searching for POIs by
categories
You can search for POIs by their categories
and subcategories.
1 Touch [Menu] on the map screen.
The “Navigation Menu” screen appears.
= For details of the operations, refer to Screen
switching overview on page 20.
Searching for and selecting a location
2 Touch [Find], then [Find Places].
The preset search categories are as follows.
! Gas Station Along Route
! Parking At My Destination
! Restaurant Along Route
! Accommodation At My Destination
En
33
Page 34

Chapter
06
Searching for and selecting a location
2 Touch [Find], then [Find Places].
3 Touch [Custom Search].
4 Select the area around which the POIs
should be searched for.
! In a City:
Searches for a place within a selected city.
(The result list will be ordered by the distance from the center of the selected city.)
! Around Last Known Position:
Searches around the current position or if it
is not available, around the last known position. (The result list will be ordered by the
distance from this position.)
! Around Destination:
Searches for a place around the destination
of the current route. (The result list will be
ordered by the distance from the destination.)
! Along Route:
Searches along the current route, and not
around a given point. This is useful when
you search for a later stopover that results
in a minimal detour only, such as searching
for upcoming gas stations or restaurants.
(The result list will be ordered by the length
of the necessary detour.)
p If you have selected [In a City], select the
city to search in.
5 Select one of the main place categories
(e.g. Accommodation) or touch [List All
Places].
The screen appears showing all places around
the selected location or along the route.
6 Select one of the sub place categories
(e.g. Hotel or Motel) or touch [List All
Places in Accommodation].
The screen appears showing all places in the
selected main category around the selected location or along the route.
Sometimes the list of brands in the selected
place subcategory appears.
7 Select one brand or touch [List All
Places in Accommodation >> Hotel or
Motel].
34
The screen appears showing all places in the
selected subcategory around the selected location or along the route.
En
Page 35

Searching for and selecting a location
Chapter
06
Finally, the results appear in a list.
8 Touch the POI you want.
The searched location appears on the map
screen.
= For subsequent operations, refer to Setting
a route to your destination on page 40.
Searching for a POI directly
from the name of the facilities
You can search for POIs by their names.
1 Touch [Menu] on the map screen.
The “Navigation Menu” screen appears.
= For details of the operations, refer to Screen
switching overview on page 20.
2 Touch [Find], then [Find Places].
3 Touch [Custom Search].
4 Select the area around which the POIs
should be searched for.
Searches around the current position or if it
is not available, around the last known position. (The result list will be ordered by the
distance from this position.)
! Around Destination:
Searches for a place around the destination
of the current route. (The result list will be
ordered by the distance from the destination.)
! Along Route:
Searches along the current route, and not
around a given point. This is useful when
you search for a later stopover that results
in a minimal detour only, such as searching
for upcoming gas stations or restaurants.
(The result list will be ordered by the length
of the necessary detour.)
p If you have selected [In a City], select the
city to search in.
5 Select one of the main place categories
(e.g. Accommodation) to search in, or
touch [Find by Name] to search among all
places.
Searching for and selecting a location
! In a City:
Searches for a place within a selected city.
(The result list will be ordered by the distance from the center of the selected city.)
! Around Last Known Position:
6 Select one of the place subcategories
(e.g. Hotel or Motel) to search in, or touch
[Find by Name] to search in the selected
place category.
En
35
Page 36

Chapter
06
Searching for and selecting a location
7 Touch [Find by Name] if you have not
done it before.
8 Using the keyboard, start entering the
name of the place.
9 After entering a few letters, touch [Results].
The screen appears showing the list of places
with names containing the entered character
sequence.
10 Touch the POI you want.
The searched location appears on the map
screen.
= For subsequent operations, refer to Setting
a route to your destination on page 40.
Searching for a nearby POI
You can search for POIs in your surroundings.
1 Display the map screen.
= For details of the operations, refer to Screen
switching overview on page 20.
2 Touch on the map screen.
= For details, refer to Customizing the quick
menu on page 56.
3 Touch [Where Am I?], then [Help Nearby].
The following preset search categories appear,
all for searching around the current position
(or around the last known position if the current position is not available).
! Car Repair Around Here:
Car repair and roadside assistance services
! Health Around Here:
Medical and emergency services
! Police Around Here:
Police stations
! Gas Station Around Here:
Gas stations
4 Touch the desired quick search key.
5 Touch the POI you want.
The searched location appears on the map
screen.
= For subsequent operations, refer to Setting
a route to your destination on page 40.
Selecting a location by
using “Find on Map”
1 Touch [Menu] on the map screen.
The “Navigation Menu” screen appears.
= For details of the operations, refer to Screen
switching overview on page 20.
2 Touch [Find] on the “Navigation Menu”
screen.
36
En
Page 37

Searching for and selecting a location
Chapter
06
3 Touch [Find on Map].
4 Move and scale the map to locate your
destination.
5 Touch [Select].
The selected location appears on the map
screen.
= For details, refer to Setting a route to your
destination on page 40.
p You can also select a map location as the
destination by scrolling the map.
= For details, refer to Searching for a location
by scrolling the map on page 39.
= For details, refer to Modifying the route cal-
culation conditions on page 43.
Selecting destination from
stored locations
Storing locations you visit frequently saves
time and effort.
Selecting an item from the list provides an
easy way to specify the position.
p This function is not available if no locations
have been registered in “ Favorites ” .
= For details, refer to Storing a location in “Fa -
vorites” on page 51.
1 Touch [Menu] on the map screen.
The “Navigation Menu” screen appears.
= For details of the operations, refer to Screen
switching overview on page 20.
2 Touch [Find] on the “Navigation Menu”
screen.
3 Touch [Favorites].
Searching for and selecting a location
The list of “Favorites” destinations appears.
4 Touch the entry you want.
The searched location appears on the map
screen.
= For subsequent operations, refer to Setting
a route to your destination on page 40.
p To see more of the list, browse down or
touch [Filter] to enter a few letters from the
name of the “Favorites” destination.
Selecting a location you
searched for recently
The places that you set as destinations or waypoints previously are automatically stored in
“History”.
En
37
Page 38

Chapter
06
Searching for and selecting a location
Smart History
Two of the most recently set destinations are
shown in the “History” field for easier access.
1 Touch [Menu] on the map screen.
The “Navigation Menu” screen appears.
= For details of the operations, refer to Screen
switching overview on page 20.
2 Touch [Find] on the “Navigation Menu”
screen.
3 Touch
The searched location appears on the map
screen.
= For subsequent operations, refer to Setting
a route to your destination on page 40.
or in the “History” field.
History
Three most likely destinations are displayed on
the first page of the list while the rest of the
destinations are ordered by time they were last
selected.
1 Touch [Menu] on the map screen.
The “Navigation Menu” screen appears.
= For details of the operations, refer to Screen
switching overview on page 20.
2 Touch [Find] on the “Navigation Menu”
screen.
3 Touch [History].
The list of recent destinations appears.
Searching for a location by
coordinates
Entering a latitude and longitude pinpoints
the location.
1 Touch [Menu] on the map screen.
The “Navigation Menu” screen appears.
= For details of the operations, refer to Screen
switching overview on page 20.
2 Touch [Find] on the “Navigation Menu”
screen.
3 Touch [More], then touch [Coordinate].
4 Enter the latitude and longitude values.
p You can enter the latitude and longitude va-
lues in any of the following formats: Decimal degrees; degrees and decimal minutes;
or degrees, minutes and decimal seconds.
p When entering the coordinate in UTM for-
mat, touch [More], then [UTM].
4 Touch the entry you want.
The searched location appears on the map
screen.
= For subsequent operations, refer to Setting
a route to your destination on page 40.
38
En
5 When finished, touch [Done].
The searched location appears on the map
screen.
= For subsequent operations, refer to Setting
a route to your destination on page 40.
Page 39

Searching for and selecting a location
Searching for a location by
scrolling the map
Specifying a location after scrolling the map
enables you to set the position as destination,
waypoint.
1 Display the map screen.
= For details of the operations, refer to Screen
switching overview on page 20.
2 Touch and drag the screen to scroll the
map to the position you want.
3 Touch the location that you want to select as your destination.
The cursor appears.
4 Touch [Select].
The selected location appears on the map
screen.
= For subsequent operations, refer to Setting
a route to your destination on page 40.
p You can also select a map location as the
destination using the “Find on Map” feature.
= For details, refer to Selecting a location by
using “Find on Map” on page 36.
Chapter
06
Searching for and selecting a location
En
39
Page 40

Chapter
07
After the location is decided
Setting a route to your
destination
You can set a route to your destination by
using either a searched location or the “My
Route” menu.
Setting a route using a
searched location
1 Search for a location.
= For details, refer to Searching for and select-
ing a location on page 30.
The map screen appears with the selected
point in the middle.
2 Touch [Go] to confirm the destination.
After a short summary of the route parameters, the map appears showing the entire
route. The route is automatically calculated.
p If you have already set the route to the desti-
nation, [Next] will appears. Touch [Next]
and select the way to modify the current
route.
= For details, refer to Selecting a new destina-
tion when a route is already set on page 47.
3 Touch [Go!].
Your navigation system starts the route guidance.
# Touch [More] to modify route parameters.
Checking route alternatives
when planning the route
You can select from different route alternatives
or change the route planning method after
you have selected a new destination.
1 Search for a location.
= For details, refer to Searching for and select-
ing a location on page 30.
The map screen appears with the selected
point in the middle.
2 Touch [Go] to confirm the destination.
After a short summary of the route parameters, the map appears showing the entire
route. The route is automatically calculated.
p If you have already set the route to the desti-
nation, [Next] will appears. Touch [Next]
and select the way to modify the current
route.
3 Touch [More].
40
4 Touch [Route Alternatives].
En
Page 41

After the location is decided
Chapter
07
5 Touch any of the alternatives to see it
on the map.
If you cannot find a good alternative, touch
[More Results] and scroll down for routes
with different routing methods.
6 Select one of the alternatives and
touch [Back].
The previous screen returns. The navigation
system calculates the route. The orange line
now shows the new recommended route.
Setting a route using the “My
Route” menu
1 Touch [Menu] on the map screen.
The “Navigation Menu” screen appears.
= For details of the operations, refer to Screen
switching overview on page 20.
3 Touch [Create Route].
p The start point of the route, normally it is
the current GPS position, is displayed.
4 Touch .
p When the “Create Route” option is not dis-
played, touch [More] to open a list with
more options.
5 Select the destination you want to set.
You can select the destination of the route the
same way as described in the previous sections.
= For details, refer to Selecting a location you
searched for recently on page 37.
When the new destination is selected, the list
returns.
After the location is decided
2 Touch [My Route] on the “Navigation
Menu” screen.
p To add more destinations, touch where
you want to insert the new point in the list,
and repeat the above steps.
En
41
Page 42

Chapter
07
After the location is decided
6 Touch [Go] to confirm the destination.
After a short summary of the route parameters, the map appears showing the entire
route. The route is automatically calculated.
p If you have already set the route to the desti-
nation, [Next] will appears. Touch [Next]
and select the way to modify the current
route.
= For details, refer to Selecting a new destina-
tion when a route is already set on page 47.
7 Touch [Go!].
Your navigation system starts the route
guidance.
42
En
Page 43

Checking and modifying the current route
Chapter
08
Displaying the route overview
1 Touch [Menu] on the map screen.
The “Navigation Menu” screen appears.
= For details of the operations, refer to Screen
switching overview on page 20.
2 Touch [My Route] on the “Navigation
Menu” screen.
3 Touch [Overview].
The current route is displayed in its full length
on the map together with additional information and controls.
Checking route parameters
and accessing route related
functions
You can check different parameters of the
route recommended by the navigation system.
1 Touch [Menu] on the map screen.
The “Navigation Menu” screen appears.
= For details of the operations, refer to Screen
switching overview on page 20.
2 Touch [My Route] on the “Navigation
Menu” screen.
The following information is displayed on this
screen:
5
4
3
1
2
6
7
5 The symbol of the vehicle type used in route
calculation
6 Route planning method (e.g. Fast)
7 Estimated delay calculated from traffic
events on your route
p The following options are available.
= For details, refer to Registering and editing
locations on page 51.
! Edit Route:
Touch this key to add or remove destinations or change their sequence. You can
also set a route start point other than your
current location. This can be useful to plan
and save a future map.
! Overview:
Touch this key to display the entire route on
the map.
! Avoidances:
Touch this key to bypass a part of the route.
! Cancel Route:
Touch this key to delete the current route.
! More:
Touch this key to open a list with more options like selecting from route alternatives,
changing route parameters, simulating the
route, saving the current route or loading a
previously saved route.
! Back:
Touch this key to return to the “Navigation
Menu” screen.
Modifying the route
calculation conditions
You can modify the conditions for route calculation and recalculate the current route.
Checking and modifying the current route
1 Name and/or address of the destination
2 Warning icons (if any). They provide extra
information about your route (e.g. unpaved
roads or toll roads to be taken).
3 Total time of the route
4 Total length of the route
Changing the vehicle used
You can set the type of vehicle you will use to
navigate the route. Based upon this setting,
some of the road types can be excluded from
the route, or some of the restrictions may not
be taken into account in route calculation.
En
43
Page 44

Chapter
08
Checking and modifying the current route
1 Touch [Menu] on the map screen.
The “Navigation Menu” screen appears.
= For details of the operations, refer to Screen
switching overview on page 20.
2 Touch [More...], then [Settings].
3 Touch [Route Settings].
4 Touch [Vehicle], then touch the vehicle
type you use.
You can select from the following vehicle
types:
! Default Car:
! Maneuver restrictions and directional
constraints are taken into account when
planning a route.
! Roads are used only if access for cars is
allowed.
! Private roads and resident-only roads
are used only if they are inevitable to
reach the destination.
! Walkways are excluded from routes.
! Default Bus:
! Maneuver restrictions and directional
constraints are taken into account when
planning a route.
! Roads are used only if access for buses
is allowed.
! Private roads, resident-only roads and
walkways are excluded from routes.
! Default Taxi:
! Maneuver restrictions and directional
constraints are taken into account when
planning a route.
! Roads are used only if access for taxis is
allowed.
! Private roads, resident-only roads and
walkways are excluded from routes.
This system calculates the route optimized for
the new vehicle type. The orange line now
shows the new recommended route.
Setting the vehicle parameters
You can edit the parameters of the vehicle profile.
1 Touch [Menu] on the map screen.
The “Navigation Menu” screen appears.
= For details of the operations, refer to Screen
switching overview on page 20.
2 Touch [More...], then [Settings].
3 Touch [Route Settings].
4 Touch [Vehicle].
5 Touch
you want to modify.
next to the vehicle profile that
44
En
Page 45

Checking and modifying the current route
Chapter
08
6 Scroll the list and touch any of the lines
to change the parameters.
! Name:
Touch this key to rename the profile.
! Fuel Consumption in Cities:
Enter the average consumption of your vehicle when used in built-up areas. The unit
for consumption can be set in “Regional”
settings.
! Fuel Consumption on Highways:
Enter the average consumption of your vehicle when used on freeways. The unit for
consumption can be set in “Regional” settings.
! Engine Type:
Select the engine and fuel type of your vehicle. This helps in estimating the CO
sion.
! Fuel Price:
Enter the average fuel price for travel cost
calculation. The currency can be set in “Re-
gional” settings.
! Max. Speed:
Set the maximum speed you travel with the
vehicle.
! Use Extended Settings:
Check this box to enable more settings for
the following parameters.
! Length:
Set the total length of the vehicle.
! Width:
Set the width of the vehicle.
! Height:
Set the height of the vehicle.
! Trailer:
Set if there is a trailer attached to the vehicle.
! Maximum Allowed Weight:
emis-
2
Set the maximum allowed weight of the
vehicle.
! Actual Weight:
Set the actual weight of the vehicle.
! Freight:
Select one or more hazard types if the
vehicle carries dangerous material.
You can also set the following option:
! Confirm Parameters for Each Route Plan-
ning:
When enabled, the list of vehicle parameters always appears before route calculation. This helps you quickly adjust the
parameters when some of them (actual
weight, for instance) often change.
7 When finished modifying an existing
vehicle profile, touch [Back].
The settings are completed.
p While this profile is selected, the para-
meters of your vehicle are taken into account when planning routes.
Setting the route calculation
These settings determine how routes will be
calculated. Select the type of vehicle you are
driving, the road types used in route planning,
and the route planning method.
1 Touch [Menu] on the map screen.
The “Navigation Menu” screen appears.
= For details of the operations, refer to Screen
switching overview on page 20.
2 Touch [More...], then [Settings].
3 Touch [Route Settings].
4 Touch the setting item.
! Navigation Mode:
On-road navigation creates a turn by turn
itinerary using the road network on the
map. Switch to off-road navigation to navigate between destinations in a straight line.
! Route Planning Method:
Checking and modifying the current route
En
45
Page 46

Chapter
08
Checking and modifying the current route
The route calculation can be optimized for
different situations and vehicle types by
changing the planning method.
! Fast:
Calculates a route with the shortest travel time to your destination as a priority.
! Green:
Calculates a quick but fuel efficient
route based on the fuel consumption
data given in Route settings. Travel cost
and CO
mations only. They cannot take elevations, curves and traffic conditions into
account.
! Short:
Calculates a route with the shortest distance to your destination as a priority.
Usually practical for pedestrians, cyclists or slow vehicles. Searching for a
short route regardless of the speed, this
route type is rarely practical for normal
vehicles.
! Easy:
Results in a route with fewer turns and
no difficult maneuvers. With this option,
you can make this system to take, for example, the freeway instead of a series of
smaller roads or streets.
emission calculations are esti-
2
Changing road types used
To recalculate the current route with different
road type preferences, follow the steps below.
p To let the route fit your needs, you can also
set which road types are to be considered
for or to be excluded from the route if possible. Excluding a road type is a preference. It
does not necessarily mean total prohibition.
p If your destination can only be accessed
using some of the excluded road types,
they will be used but only as much as necessary. In this case a warning icon will be
shown on the route parameter, and the part
of the route not matching your preference
will be displayed in a different color on the
map.
= For details, refer to Checking route para-
meters and accessing route related functions on page 43.
1 Touch [Menu] on the map screen.
The “Navigation Menu” screen appears.
= For details of the operations, refer to Screen
switching overview on page 20.
2 Touch [More...], then [Settings].
3 Touch [Route Settings].
4 Touch any of the listed road types.
If needed, scroll the list for all road types. The
following options can be set for route calculation:
! Highways:
Set whether to avoid freeways when you are
driving a slow car or you are towing another
vehicle.
! Period Charge:
Set whether to include toll roads with restricted time access where you can purchase a pass or vignette to use the road for
a longer period of time. This option can be
enabled or disabled separately from toll
roads.
! Per-use Toll:
Set whether to include toll roads where
there is a per-use charge. The navigation
system includes toll roads by default.
! Ferries:
Set whether to include ferries. The navigation system includes ferries by default.
! Carpool/HOV:
Sets whether to include the carpool or HOV
lanes. The navigation system excludes carpool or HOV by default.
46
En
Page 47

Checking and modifying the current route
Chapter
08
p Carpool or HOV lanes can be used if a
given number of passengers are traveling in the vehicle.
! Unpaved Roads:
Set whether to include unpaved roads. The
navigation system excludes unpaved roads
by default.
! Calculate Green Alternative:
If the selected routing method is not
“Green”, you can have your route compared
to the best green alternative on the screen
when confirming the route. If this alternative is much better than the selected method, you can quickly switch to “Green”
mode.
5 Touch [Back] to confirm the changes.
The navigation system recalculates the route.
The orange line now shows the new recommended route.
Modifying the route
When navigation is already started, there are
several ways to modify the current route. The
following sections describe some of those options.
Selecting a new destination
when a route is already set
If you already have a recommended route and
you select a new destination, the navigation
system will ask you whether to start a new
route, add a new waypoint to the route or append the newly selected destination at the end
of the current route.
Touch this key to plan a new route to the
newly selected location. The previous destination and waypoint(s) are deleted.
! Waypoint:
Touch this key to add the newly selected location as a waypoint to your route. The
other destinations of the route remain intact.
p The new waypoint is placed among des-
tinations to keep the route optimal. To
decide where a waypoint to appear, use
the “Edit Route” menu.
! Final Destination:
Touch this key to append the newly selected destination at the end of the route.
The other destinations of the route remain
intact. The previous final destination is now
the last waypoint.
Setting a new starting position
for the route
For normal navigation, all routes are planned
from the current position. In order to check future routes, simulate them or see their length
in time and distance, you can turn off the GPS
receiver. Then you can set the starting point of
the route to a different location than the current GPS position.
1 Touch [Menu] on the map screen.
The “Navigation Menu” screen appears.
= For details of the operations, refer to Screen
switching overview on page 20.
2 Touch [My Route] on the “Navigation
Menu” screen.
Checking and modifying the current route
! New Route:
En
47
Page 48

Chapter
08
Checking and modifying the current route
3 Touch [Edit Route] when you already
have a route.
4 Touch on the first line (normally the
current GPS position) and confirm your action on the warning message screen.
5 Touch [Set Start Point].
8 Select [Go] when the new start point is
set.
The map screen returns with a transparent
arrow mark (showing that there is no GPS reception). If the current route already existed, it
is now recalculated starting from the selected
location.
# Touch [Turn on GPS].
Normal navigation returns.
= For details, refer to Seeing the current posi-
tion on the map on page 24.
Editing the list of destinations
You can edit the route by modifying the list of
destinations. You can add or remove destinations, modify the start position or reorder the
list.
6 Select the start point of the route the
same way as you select a destination.
7 Touch [Set Start].
48
En
1 Touch [Menu] on the map screen.
The “Navigation Menu” screen appears.
= For details of the operations, refer to Screen
switching overview on page 20.
2 Touch [My Route] on the “Navigation
Menu” screen.
3 Touch [Edit Route] when you already
have a route.
! :
Page 49

Checking and modifying the current route
Chapter
08
Touch this key to add a new destination.
!
:
Touch this key to delete a destination.
!
:
Touch this key to modify the start point of
the route.
! More:
Touch this key to reorder the list. You can do
it manually or you can let this system optimize the route for you.
Canceling the current route
guidance
If you no longer need to travel to your destination, follow the steps below to cancel the route
guidance. You can cancel it from either the
“Navigation Menu” screen or the map
screen.
1 Touch [Menu] on the map screen.
The “Navigation Menu” screen appears.
= For details of the operations, refer to Screen
switching overview on page 20.
2 Touch [My Route] on the “Navigation
Menu” screen.
3 Touch [Cancel Route].
The current route is deleted with all its
waypoints.
Checking route alternatives
for the current route
To recalculate the current route with a different route planning method, you can modify
the settings for the route calculation (refer to
Checking and modifying the current route on
page 43). There is another way to do this and
to compare different route alternatives with
the same route planning method.
1 Touch [Menu] on the map screen.
The “Navigation Menu” screen appears.
= For details of the operations, refer to Screen
switching overview on page 20.
2 Touch [My Route] on the “Navigation
Menu” screen.
3 Touch [More].
4 Touch [Route Alternatives].
Checking and modifying the current route
5 Touch any of the alternatives to see it
on the map.
If you cannot find a good alternative, touch
[More Results] and scroll down for routes
with different routing methods.
6 Select one of the alternatives and
touch [Back].
The map screen returns. The navigation system recalculates the route. The orange line
now shows the new recommended route.
En
49
Page 50

Chapter
08
Checking and modifying the current route
Watching the simulation of
the route
You can run a simulated navigation that demonstrates the current route. Follow the steps
below.
1 Touch [Menu] on the map screen.
The “Navigation Menu” screen appears.
= For details of the operations, refer to Screen
switching overview on page 20.
2 Touch [My Route] on the “Navigation
Menu” screen.
3 Touch [More].
4 Scroll down the list and touch [Simulate
Navigation].
The simulation starts from the starting point of
the route, and using a realistic speed, it leads
you through the whole recommended route.
p During simulation, you can use the follow-
ing control keys (they disappear after a few
seconds but you can open them again by
touching the map).
!
:
Jumps to the previous guidance point
(maneuver).
!
:
Pauses the simulation.
!
:
Jumps to the next guidance point (maneuver).
!
:
Increases the speed of the simulation to
four, eight or 16 times faster. Touching the
key again returns to the normal speed.
# Touch [Back].
The simulation stops.
Navigating in off-road mode
You can switch your navigation to off-road
mode. The off-road mode navigates between
destinations in a straight line regardless of the
road network and traffic regulations.
CAUTION
Do not follow the route suggestions if they suggest an illegal route or would put you in an unsafe situation. This feature is not a replacement
for attentiveness or proper preparation. Navigate
in off-road mode at your own risk as weather,
trail/route conditions, and other factors may affect your safety while navigating.
1 Touch [More...], then [Settings].
2 Touch [Route Settings].
50
3 Touch [Navigation Mode], then select
[Off-road].
En
Page 51

Registering and editing locations
Chapter
09
Storing a location in
“Favorites”
Storing your favorite locations as “Favorites”
provides you with the opportunity to save the
time and effort of re-entering this information.
“Favorites” can include your home location,
favorite places, destinations you have already
registered and any location on the map.
1 Select a destination.
= For details, refer to Searching for and select-
ing a location on page 30.
2 When the map screen appears with the
selected location in the middle, touch
[More].
3 Touch [Add to Favorites].
To change the name, use the keyboard. Touch
to enter numbers or symbols.
4 Touch [Done].
Saving a location as an
alert point
Alert points are preloaded in your navigation
system. You can also download more from our
website, or save any map location as an alert
point (a speed camera or a railway crossing,
for example).
p This feature can warn you when you ap-
proach one of these points. The following
alert types are available:
! Audio and Visual: A sound beeps or
announces the type of the alert.
! Visual: The type of the alert point, its
distance and the related speed limit appear on the map.
= For details, refer to Setting the volume and
the guidance voice for navigation system on
page 55.
1 Touch [Menu] on the map screen.
The “Navigation Menu” screen appears.
= For details of the operations, refer to Screen
switching overview on page 20.
2 Touch [More...], then [Settings].
3 Touch [Sound and Warnings].
4 Touch [Alert Point Settings].
5 Touch [Alert Point Warnings], then
[Turn On].
Registering and editing locations
The location is saved as a new “Favorites”
destination.
6 Scroll the map and select a location.
The cursor appears at the selected point.
7 Touch [More].
8 Scroll down the list and touch [Add
Alert Point].
En
51
Page 52

Chapter
09
Registering and editing locations
9 Set the necessary parameters.
! Type of Alert:
Set the type of alert point.
! Direction of Alert:
Set the direction from which you expect the
alert.
! Speed Limit:
Set the speed limit for this alert point (if applicable).
10 Touch [Save].
The location is saved as a new alert point.
p The warning for road safety cameras (like
speed cameras) is disabled when you are in
certain countries where road safety camera
warning is prohibited. However, you are
fully responsible for ensuring that this feature is legal in the country where you intend
to use it.
3 Scroll down the list and touch [Edit
Alert Point].
4 Modify the necessary parameters.
! Type of Alert:
Modify the type of alert point.
! Direction of Alert:
Modify the direction from which you expect
the alert.
! Speed Limit:
Modify the speed limit for this alert point (if
applicable).
Editing an alert point
You can edit a previously saved alert point (a
speed camera or a railway crossing, for example).
1 Scroll the map and select the alert point
to edit.
The cursor appears around the alert point.
2 Touch [More].
52
En
5 Touch [Save].
The changes are saved to the alert point.
p The warning for road safety cameras (like
speed cameras) is disabled when you are in
certain countries where road safety camera
warning is prohibited. However, you are
fully responsible for ensuring that this feature is legal in the country where you intend
to use it.
Page 53

Using traffic information
Chapter
10
Checking historical traffic
information
When this feature is enabled on the “Traffic”
settings menu, the navigation system can take
the traffic information into account when planning a route. For settings, follow the steps
below.
1 Touch [Menu] on the map screen.
The “Navigation Menu” screen appears.
= For details of the operations, refer to Screen
switching overview on page 20.
2 Touch [More...].
3 Touch [Settings], then [Traffic].
4 Touch [Historical Traffic] and enable the
historical traffic data.
p When the traffic data is available, a 2D map
is displayed with road segments colored by
the density of the traffic in the given period.
p You can modify the day of week and the
time of day to see the desired period.
p You can disable this feature on public holi-
days, for example, in order not to take into
account normal weekday traffic congestion.
Receiving real-time traffic
information (TMC)
Traffic Message Channel (TMC) can provide
you with the real-time status of the traffic. Your
device contains the TMC receiver that is
needed to receive traffic incidents (the receiver
is enabled by default). If you need to enable
the TMC receiver, follow the steps below.
1 Touch [Menu] on the map screen.
The “Navigation Menu” screen appears.
= For details of the operations, refer to Screen
switching overview on page 20.
2 Touch [More...].
3 Touch [Settings], then [Traffic].
4 Touch [Traffic Receiver] and enable the
receiver.
p When traffic information that may affect
your route is received, this system will warn
you that it is recalculating the route, and
navigation will continue with a new route
that is optimal considering the most up-todate traffic conditions.
To fine-tune this calculation, you can set the
minimum delay that can trigger a route recalculation, or you can instruct the software to
have you confirm the new recommended
route before it takes effect. You can set these
in “Traffic” settings.
= For details of the traffic information icons,
refer to Setting the traffic information on
page 57.
p When the traffic data is available, a 2D map
is displayed with road segments colored by
the severity of traffic incidents. Touch the
event type icon at the road segment and
then touch
traffic incident.
p TMC is not a global service. It may not be
available in your country or region. Ask your
local dealer for coverage details.
to get information about the
Using traffic information
En
53
Page 54

Chapter
10
Using traffic information
Checking the traffic incidents
on the map
You can check the details of traffic incidents
on the map.
p Road segments affected by traffic incidents
are displayed with an alternate color on the
map, and small symbols above the road
show the nature of the incident.
p A special icon
whether traffic incidents are received. The
icon shows the status of the traffic receiver
when there are no traffic incidents on your
route, otherwise it shows the type of the
next traffic incident on your route.
appears to show you
1 Touch
2 Touch [Event List].
The list of traffic incidents appears.
3 Touch any of the list items to see its details, and to display the affected road segment on the map.
If there are traffic incidents on the recommended route that this system has not bypassed, the
significant traffic incidents to let you quickly
check them.
.
icon will open the list of
54
En
Page 55

Customizing preferences
Chapter
11
Displaying the settings screen
1 Touch [Menu] on the map screen.
The “Navigation Menu” screen appears.
= For details of the operations, refer to Screen
switching overview on page 20.
2 Touch [More...].
3 Touch [Settings].
4 Touch the setting item.
Setting the volume and the
guidance voice for
navigation system
You can adjust the sound volume, mute your
device or change the voice guidance language.
1 Display the settings screen.
= For details of the operations, refer to Dis-
playing the settings screen on page 55.
2 Touch [Sound and Warnings].
3 Touch the setting item.
! Volume:
You can adjust the volume of the following
sounds in this system. If you touch this key,
a new screen appears where you can set
the following sound types and their controls.
! Voice: These controls affect the volume
of the guidance sounds (verbal instructions).
! Ding: Turn off the attention tone preced-
ing verbal instructions or adjust its volume.
! Alert Beeps: These controls affect the
volume of the non verbal alert sounds
(beeps).
! Key: Key sounds provide audible confir-
mation of either pressing hardware keys
or touching the touch panel screen.
These controls affect key sounds.
! Voice Language:
Displays the current voice guidance profile.
If you touch this key, you can select a new
profile from the list of available languages
and speakers. Touch any of these to hear a
sample voice prompt. Just touch [Back]
when you have selected the new spoken
language.
Different voice profiles are capable of different levels of service:
! Natural Voice: These prerecorded
sounds can only tell you basic information about turns and distances.
! TTS Voice: These computed voices can
tell you complex instructions. They can
tell you the street names or read out the
messages for you.
! Advanced Settings:
You can set this system to read the street
names in a foreign country, use road numbers in your language or announces the
maneuver only.
You can also decide whether you want an
announcement for distance maneuvers or it
is enough to receive the information when
the turn is near.
! Verbosity Level:
You can set the verbosity of the voice instructions: how much information is given
and how often the prompts occur.
! Speed Warning Settings:
This system is able to warn you if you exceed the current limit. This information may
not be available for your region (ask your
local dealer), or may not be fully correct for
all roads in the map.
Customizing preferences
En
55
Page 56

Chapter
11
Customizing preferences
The maximum speed set in the vehicle profile is also used for this warning. This system alerts you if you exceed the preset
value even if the legal speed limit is higher.
This setting lets you decide whether you
wish to receive visible and/or audible warnings.
Adjust the slider to set the relative speed
above which the application initiates the
warning.
The following alert types are available:
! Audio and Visual: you receive a verbal
warning when you exceed the speed
limit with the given percentage.
! Visual: the current speed limit is shown
on the map when you exceed it.
If you prefer to see the speed limit sign on
the map all the time (normally it is shown
only if your speed exceeds it), you can set it
here.
! Alert Point Settings:
This feature allows you to receive a warning
when approaching a Road Safety Camera
or other alert points like school zones or
railroad crossings. You must ensure on
your own liability that using this feature is
legal in the country where you intend to use
it.
You can set the alert for the different alert
point categories individually. The following
alert types are available:
! Audio and Visual: beeps can be played
(natural voice) or the type of the alert
can be announced (TTS) while you are
approaching one of these points, and an
extra alert can warn you if you exceed
the given speed limit while approaching.
! Visual: the type of the alert point, its dis-
tance and the related speed limit appear
on the map screen while you are ap-
proaching one of these cameras.
For some of the alert points, the enforced or
expected speed limit is available. For these
points, the audio alert can be different if
you are below or above the given speed
limit.
! When approaching: The audio alert is
always played when approaching one of
these alert points. In order to draw your
attention, the alert is different when you
exceed the speed limit.
! Only when speeding: The audio alert is
only played when you exceed the given
speed limit.
! Warning Sign Alerts:
Maps may contain driver alert information.
Touch this key to turn on or off these warnings and to set the distance from the hazard to receive the warning at. These can be
set individually for the different warning
types.
Customizing the quick menu
You can customize the items of the quick
menu.
1 Display the settings screen.
= For details of the operations, refer to Dis-
playing the settings screen on page 55.
2 Touch [Customize Quick Menu].
3 Touch the key from the list that you
want to set.
! Favorites:
Displays the list of your favorite destinations.
! Overview:
Displays a 2D map scaled and positioned to
show the entire route.
! Quick Place Search:
This function lets you search for a place
along your route or around your current location if there is no route calculated.
! Map Settings:
Displays the map related settings.
! Visual Guidance Settings:
Displays the settings related to route information on the map screen.
! Traffic:
Displays the traffic information.
! Avoid:
56
En
Page 57

Customizing preferences
Chapter
11
Touching this key lets you bypass parts of
the recommended route.
! Cancel Route:
Cancels the route and stops navigation. The
key is replaced with the next one if waypoints are given.
! Remove Next Waypoint:
Skips the next waypoint from the route.
! Trip Monitor:
Displays the “Trip Monitor” where you can
manage your trip logs and track logs that
you previously saved.
! Where Am I?:
Displays a special screen with information
about the current position and a key to
search for nearby emergency or roadside
assistance services.
! Create Route/Edit Route:
Displays the screen for creating a route to
the destination or editing the current route.
! Itinerary:
Displays the list of maneuvers (the itinerary).
! Vehicle Profile:
Displays the parameters of the selected vehicle profile.
! Save Route:
With this function you can save the active
route for later use.
! Load Route:
With this function you can replace the active route with a previously saved route.
! History:
Displays the destinations history list. You
can select one of your previous destinations.
! Route Settings:
Displays the route related settings.
! Find Places:
With this function you can search for Points
of Interest in various different ways.
! Simulate Navigation:
Displays the map screen and starts simulating the active route.
! GPS Info:
Displays the GPS information screen with
satellite position and signal strength information.
Setting the traffic information
The recommended route is not always the
same between two points. Whenever suitable
data exists, traffic information can be taken
into account in the route calculation.
1 Display the settings screen.
= For details of the operations, refer to Dis-
playing the settings screen on page 55.
2 Touch [Traffic].
3 Touch the setting item.
! Historical Traffic:
You can switch to enable or disable historical traffic data and traffic patterns by touching this key. This locally stored information
can be very useful in normal circumstances
but for example on public holidays it may
be better to turn off in order not to take into
account normal weekday traffic congestion.
! Traffic Receiver:
You can set to enable or disable the TMC receiver that can receive real-time traffic information. The following items (Detour, and
Event types) are all related to the TMC function and are available only if the receiver is
enabled.
! Detour:
This setting determines how this system
uses the received real-time traffic information in route calculation. When calculating
a new route, or when recalculation becomes necessary based on the received
traffic events, this system avoids traffic
events if it makes sense.
You can also set the minimum delay that
triggers route recalculation, and you can instruct the application if you want to confirm
every recalculation.
! Event Types:
Customizing preferences
En
57
Page 58

Chapter
11
Customizing preferences
Touch this key to open the list of traffic
event types, and select which events to take
into account in route calculation.
Setting the user profiles
If more drivers use this navigation system,
their settings can be remembered by using
one of the user profiles.
1 Display the settings screen.
= For details of the operations, refer to Dis-
playing the settings screen on page 55.
2 Touch [User Profiles].
3 Touch the key on the right of new profile that you want to set.
p Rename the profiles so that all users know
which profile to use and switch between
profiles by touching its name.
p If you select a new profile, this system re-
starts so that the new settings can take
effect.
Customizing the map
screen settings
You can fine-tune the appearance of the map
screen.
Adjust the map view to your needs, choose
suitable color themes from the list for both
daytime and night use, change the blue arrow
to a 3D car model, show or hide 3D buildings,
turn track logging on or off, and manage your
place visibility settings (which places to show
on the map).
1 Display the settings screen.
= For details of the operations, refer to Dis-
playing the settings screen on page 55.
2 Touch [Map Settings].
The “Map Settings” screen appears.
3 Touch the setting item.
You can see the effect when you change a setting.
! View Mode:
Switch the map view between a 3D perspective view and a 2D topdown view.
! Viewpoint:
Adjust the basic zoom and tilt levels to your
needs. Three levels are available.
! Automatic Overview:
When selected, the map zooms out to show
an overview of the surrounding area if the
next route event (maneuver) is far. When
you get close to the event, the normal map
view returns.
! Colors:
Switch between daytime and night color
modes or let the software switch between
the two modes automatically a few minutes
before sunrise and a few minutes after sunset.
! Day Map Color:
Select the color scheme used in daytime
mode.
! Night Map Color:
Select the color scheme used in night
mode.
! 3D Vehicle Gallery:
Replace the default position marker to one
of the 3D vehicle models.
You can select separate icons for different
vehicle types selected for route planning.
Separate icons can be used for car, pedestrian and the other vehicles.
! Landmarks:
Show or suppress 3D landmarks, 3D artistic
or block representations of prominent or
well-known objects.
! Buildings:
Show or suppress 3D city models, 3D artistic or block representation of full city building data containing actual building size
and position on the map.
! 3D Terrain:
Show or suppress the 3D elevation of the
surrounding terrain.
! Track Logs:
58
En
Page 59

Customizing preferences
Chapter
11
Turn on or off track log saving, that is, saving the sequence of the locations your journeys go through.
! Place Markers:
Select which places to show on the map
while navigating. Too many places make
the map crowded so it is a good idea to
keep as few of them on the map as possible. For this, you have the possibility to save
different place visibility settings. You have
the following possibilities:
! Touch the checkbox to show or hide the
place category.
! Touch the name of the place category to
open the list of its subcategories.
! Touch [More] to save the current place
visibility set or to load a previously saved
one. Here you can also revert to the default visibility settings.
Setting the visual guidance
Adjust how this system helps you navigate
with different kinds of route related information on the map screen.
1 Display the settings screen.
= For details of the operations, refer to Dis-
playing the settings screen on page 55.
2 Touch [Visual Guidance Settings].
3 Touch the setting item.
! Data Fields:
The data fields in the corner of the map
screen can be customized. Touch this key
and select the values you want to see. The
values can be different when you navigate a
route from when you are just cruising without a given destination. You can select general trip data like your current speed or the
altitude, or route data related to your final
destination or the next waypoint on your
route.
! Offer Freeway Services:
You may need a gas station or a restaurant
during your journey. This feature displays a
new key on the map when you are driving
on freeways. Touch this key to open a panel
with the details of the next few exits or service stations. Touch any of them to display
it on the map and add it as a waypoint to
your route if needed.
! Facility Types:
Select the service types displayed for the
freeway exists. Choose from the POI categories.
! Signposts:
Whenever adequate information is available, lane information similar to the real
ones on road signs above the road is displayed at the top of the map. You can turn
this feature on or off.
! Junction View:
Customizing preferences
En
59
Page 60

Chapter
11
Customizing preferences
If you are approaching a freeway exit or a
complex intersection and the needed information exists, the map is replaced with a
3D view of the junction. You can turn this
feature on or let the map be displayed for
the whole route.
! Tunnel View:
When entering tunnels, the surface roads
and buildings can be distracting. This feature shows a generic picture of a tunnel instead of the map. A top-down overview of
the tunnel and remaining distance are also
displayed.
! Route Progress Bar:
Turn on the route progress bar to see your
route as a straight line on the left side of
the map. The blue arrow represents your
current position and moves up as you travel. Waypoints and traffic events are also
displayed on the line.
! Offer Congestion Detour on Highways:
When you slow down while driving on a
freeway, there is a chance that you are in a
traffic congestion so this system offers you
a detour using the next exit. The message
shows you distance of the exit and the difference in distance and estimated time
compared to the original route. You can
choose from one of the following options:
! Touch [Dismiss] or just ignore the mes-
sage if you want to keep the original
route.
! Touch [Preview] to see the overview of
the original route and the detour to
make the decision. You can accept the
detour as offered or increase the by-
passed freeway segment before accept-
ing.
! Turn to the suggested new direction and
the route will be automatically recalcu-
lated.
! Offer Real-time Route Alternatives:
Alternative routes can be suggested when
driving on normal roads. This system will
select a different turn in the upcoming intersection and offers you a different route
for the next section of the route. But you
cannot modify the offered detour.
! Offer Parking Around Destination:
Parking at the destination may not be easy
in city areas. As you approach the destination, this system can offer parking category
places near your destination. Touch this key
to open a top-down map with the destination and the offered parking places. Select
one and modify the route accordingly.
! Offer Hints Upon Detour:
If you leave the recommended route and
suddenly exit the freeway, this system offers
different alternatives near the exit like gas
stations or restaurants. Also, if there are
avoidable parts of the original route ahead
(like a tunnel, a toll road or a ferry), you will
find them in the list in case you want to bypass them with the help of this system.
Customizing the display
settings
Display related settings include menu animations and the brightness of the display.
1 Display the settings screen.
= For details of the operations, refer to Dis-
playing the settings screen on page 55.
2 Touch [Display].
3 Touch the setting item.
! Menu Animations:
When animation is turned on, keys on
menus and keyboard screens appear in an
animated way. Screen transitions are also
animated.
60
En
Page 61

Customizing preferences
Chapter
11
Customizing the regional
settings
These settings allow you to customize this system for your local language, measurement
units, time and date settings and formats, as
well as to choose the time zone.
1 Display the settings screen.
= For details of the operations, refer to Dis-
playing the settings screen on page 55.
2 Touch [Regional].
3 Touch the setting item.
! Program Language:
This key displays the current written language of the user interface. By touching
the key, you can select a new language
from the list of available languages. This
system will restart if you change this setting.
! Units and Formats:
You can set the distance units to be used by
this system. This system may not support
all the listed units in some voice guidance
languages.
Select between 12 and 24 hours time display and the various international date display formats.
You can also set other country specific
units used to display different values in this
system.
! Time Zone:
By default, time zone is taken from the map
information and adjusted by your current location. Here you can set time zone and daylight saving time manually.
Setting the Trip Monitor
Trip logs contain useful information about
your trips. Trip logs can be saved manually
when you reach your destination or you can
turn on the automatic saving here. You can access these logs in the “Trip Monitor”. “Trip
Monitor” is available from the “More...”
menu.
1 Display the settings screen.
= For details of the operations, refer to Dis-
playing the settings screen on page 55.
2 Touch [Trip Monitor].
3 Touch [More], then touch [Trip Monitor
Settings].
4 Touch the setting item.
! Enable Auto-Saving:
Trip monitor can record statistical data of
your trips. If you need these logs later, you
can let this system save them automatically
for you.
! Trip Database Size:
You cannot select this. This line shows the
current size of the trip database, the sum of
all trip and track logs saved.
! Save Track Log:
Track logs, the sequence of the positions
given by the GPS receiver, can be saved together with trip logs. They can later be displayed on the map. You can let this system
save the track log whenever it saves a
trip.
Starting the configuration
wizard
Modify the basic software parameters set during the initial setup process.
= For details, refer to On first-time startup on
page 18.
1 Display the settings screen.
= For details of the operations, refer to Dis-
playing the settings screen on page 55.
2 Touch [Start Configuration Wizard].
Customizing preferences
En
61
Page 62

Chapter
11
Customizing preferences
3 Select the language that you want to
use for voice guidance messages, then
touch [Next].
p Later you can change it in “Sound and
Warnings” settings.
= For details, refer to Setting the volume and
the guidance voice for navigation system on
page 55.
4 If needed, modify the time format and
unit settings, then touch [Next].
p Later you can change it in “Regional” set-
tings.
= For details, refer to Customizing the regional
settings on page 61.
5 If needed, modify the default route
planning options, then touch [Next].
p Later you can change them in “Route Set-
tings”.
= For details, refer to Setting the route calcula-
tion on page 45.
Resetting to the default
settings
Delete all saved data and reset all settings to
their factory defaults.
1 Display the settings screen.
= For details of the operations, refer to Dis-
playing the settings screen on page 55.
2 Touch [Reset to Defaults].
62
En
Page 63

Other operations
Chapter
12
More menu
The “More...” menu provides you with various
options and additional applications.
1 Touch [Menu] on the map screen.
The “Navigation Menu” screen appears.
= For details of the operations, refer to Screen
switching overview on page 20.
2 Touch [More...].
3 Touch the desired menu item.
! Settings:
You can configure the program settings,
and modify the behavior of the software,
fine-tune route planning options, change
the look of the map screen, turn on or off
warnings, or restart the configuration wizard, etc.
! Updates and Extras:
Visit www.naviextras.com to get additional
content, such as new maps or 3D landmarks and useful applications.
! Unit Converter:
Access travel applications: the unit converter helps you convert between various different international units for temperature,
speed, area or pressure, etc.
! Clothing:
Access travel applications: the clothing size
converter helps you convert between various different international size units for
men’s or women’s cloth types and shoes.
! Fuel Consumption:
The Fuel consumption monitor helps you
keep track of the consumption of your car
even if you do not use navigation for all
your journeys. Set the initial odometer value
and then record the distance taken and fuel
filled in whenever you fill your car. You can
also set reminders for regular car maintenance.
! Sunrise & Sunset:
Touch this key to see the sunlit and dark
areas of the world. Your current location
and route points are marked on the map.
Touch [Details] to see the exact sunrise and
sunset times for all your route points (your
current location, all waypoints and the final
destination).
! Trip Monitor:
If you save your trip logs when you arrive at
some of your destinations or let this system
automatically save the trip logs for you,
those logs are all listed here. Touch one of
the trips to see the trip statistics, speed and
altitude profile. If track log has also been
saved, you can display it on the map with
the selected color. Track logs can be exported to GPX files for later use.
! Country Information:
Select a country from the list and see useful
driving information about the selected
country. Information may include speed
limits on different road types, the maximum
blood alcohol level and any compulsory
equipment you need to show when stopped
by the police.
! Calculator:
The scientific calculator helps you in all
your calculation needs. Touch [MODE] for
additional functions and use the memory to
save your results.
! Help:
Run the Demo to watch sample route simulations to see how navigation works. The
“About” section provides you with product
information. Read the software and database end user license agreement, or check
the map and other contents of the application. You can also access program usage
statistics.
Other operations
En
63
Page 64

Chapter
13
Installation
Important safeguards
WARNING
Pioneer does not recommend that you install
your navigation system yourself. This product is designed for professional installation
only. We recommend that only authorized
Pioneer service personnel, who have special
training and experience in mobile electronics, set up and install this product. NEVER
SERVICE THIS PRODUCT YOURSELF. Installing or servicing this product and its connecting cables may expose you to the risk of
electric shock or other hazards, and can
cause damage to the navigation system that
is not covered by warranty.
! Read this manual fully and carefully before
installing your navigation system.
! As with any accessory in your vehicle’s in-
terior, the navigation system should not divert your attention from the safe operation
of your vehicle as it may result in serious
injury or death. If you experience difficulty
in operating the system or reading the display, please make adjustments while safely
parked.
Precautions before
connecting the system
CAUTION
! If you decide to perform the installation
yourself, and have special training and experience in the mobile electronics installations, please carefully follow all of the
steps in the installation manual.
! Secure all wiring with cable clamps or
electrical tape. Do not allow any bare wiring to remain exposed.
! Do not directly connect the yellow lead of
this product to the vehicle battery. If the
lead is directly connected to the battery,
engine vibration may eventually cause
the insulation to fail at the point where
the wire passes from the passenger compartment into the engine compartment. If
the yellow lead’s insulation tears as a result of contact with metal parts, short-circuiting can occur, resulting in
considerable danger.
! It is extremely dangerous to allow cables
to become wound around the steering column or shift lever. Be sure to install this
product, its cables, and wiring away in
such so that they will not obstruct or hinder driving.
! Make sure that the cables and wires will
not interfere with or become caught in
any of the vehicle’s moving parts, especially the steering wheel, shift lever, parking brake, sliding seat tracks, doors, or
any of the vehicle’s controls.
! Do not route wires where they will be ex-
posed to high temperatures. If the insulation heats up, wires may become
damaged, resulting in a short circuit or
malfunction and permanent damage to
the product.
! Do not cut the GPS antenna cable to
shorten it or use an extension to make it
longer. Altering the antenna cable could
result in a short circuit or malfunction.
! Do not shorten any leads. If you do, the
protection circuit (fuse holder, fuse resistor or filter, etc.) may fail to work properly.
! Never feed power to other electronic pro-
ducts by cutting the insulation of the
power supply lead of the navigation system and tapping into the lead. The current
capacity of the lead will be exceeded,
causing overheating.
64
En
Page 65

Installation
Chapter
13
Before installing this product
! Use this unit with a 12-volt battery and ne-
gative grounding only. Failure to do so may
result in a fire or malfunction.
! To avoid shorts in the electrical system, be
sure to disconnect the (–) battery cable before installation.
To prevent damage
WARNING
! The black lead is ground. Please ground
this lead separately from the ground of
high-current products such as power
amps. Do not ground more than one product together with the ground from another product. For example, you must
separately ground any amp unit away
from the ground of this navigation system. Connecting grounds together can
cause a fire and/or damage the products if
their grounds became detached.
! When replacing the fuse, be sure to only
use a fuse of the rating prescribed on this
product.
! When disconnecting a connector, pull the
connector itself. Do not pull the lead, as
you may pull it out of the connector.
! This product cannot be installed in a vehi-
cle without ACC (accessory) position on
the ignition switch.
C
C
A
O
F
N
F
O
S
T
A
R
T
O
F
N
F
O
S
T
A
R
T
Installation
ACC position No ACC position
! To avoid short-circuiting, cover the discon-
nected lead with insulating tape. It is especially important to insulate all unused
speaker leads, which if left uncovered may
cause a short circuit.
! Attach the connectors of the same color to
the corresponding colored port, i.e., blue
connector to the blue port, black to black,
etc.
En
65
Page 66

Chapter
13
Installation
Precautions before
installation
CAUTION
! Never install this product in places where,
or in a manner that:
! Could injure the driver or passengers if
the vehicle stops suddenly.
! May interfere with the driver’s opera-
tion of the vehicle, such as on the floor
in front of the driver’s seat, or close to
the steering wheel or shift lever.
! Make sure there is nothing behind the
dashboard or paneling when drilling holes
in them. Be careful not to damage fuel
lines, brake lines, electronic components,
communication wires or power cables.
! When using screws, do not allow them to
come into contact with any electrical lead.
Vibration may damage wires or insulation,
leading to a short circuit or other damage
to the vehicle.
! To ensure proper installation, be sure to
use the supplied parts in the manner specified. If any parts are not supplied with
this product, use compatible parts in the
manner specified after you have the parts’
compatibility checked by your dealer. If
parts other than supplied or compatible
ones are used, they may damage internal
parts of this product or they may work
loose and the product may become detached.
! It is extremely dangerous to allow cables
to become wound around the steering column or shift lever. Be sure to install this
product, its cables, and wiring away in
such so that they will not obstruct or hinder driving.
! Make sure that leads cannot get caught in
a door or the sliding mechanism of a seat,
resulting in a short circuit.
! Please confirm the proper function of
your vehicle’s other equipment after installation of the navigation system.
! Install the navigation system between the
driver’s seat and front passenger seat so
that it will not be hit by the driver or passenger if the vehicle stops quickly.
! Never install the navigation system in
front of or next to the place in the dashboard, door, or pillar from which one of
your vehicle’s airbags would deploy.
Please refer to your vehicle’s owner’s
manual for reference to the deployment
area of the frontal airbags.
! Failure to follow all of these precautions
may result in serious injury or death.
66
En
Page 67

Installation
Chapter
13
Connecting the system
AV receiver
RGB cable (supplied)
TMC antenna
(supplied)
Attach the GPS antenna to
the “GPS ANTENNA” jack
on the side of this product.
3 m (9 ft. 10 in.)
2.65 m (8 ft. 8 in.)
TMC antenna IF
Installation
Insert one end of the RGB cable into the “DATA BUS”
slot on the side of this product and secure it with an
11 mm (.4 in) screw (supplied). Connect the other
end of the cable to RGB IN input on the back of your
Pioneer AV receiver.
2 m (6 ft. 7 in.)
Secure the RGB cable with
the 11 mm (.4 in) screw
Where applicable, secure the cable to
the AV receiver using an 11 mm (.4 in)
screw (supplied).
GPS antenna (supplied)
Affix the double-sided tape (supplied)
on the surface as level as possible
where the GPS antenna faces the
window. Place the GPS antenna on
the double-sided tape.
Fuse (3 A, 250 V)
The navigation unit
Power cord (supplied)
Black (GND)
To vehicle (metal) body.
FUSE
Yellow (B+)
To the terminal that the power is always supplied
regardless of the ignition switch position.
En
67
Page 68

Chapter
13
Installation
Installing with the hook
and loop fastener
1 Thoroughly wipe off both surfaces before affixing the hook and loop fastener.
2 Peel off the protective sheet and attach
the hook and loop fastener.
Navigation unit
Protective sheet
3 Decide on the installation position.
4 Peel off the other protective sheet and
install the navigation unit on the surface of
the glove compartment or similar location.
Navigation unit Protective sheet
Surface of the glove compartment or similar location
68
En
Page 69

Appendix
Appendix
Positioning technology
Positioning by GPS
The Global Positioning System (GPS) uses a
network of satellites orbiting the Earth. Each
of the satellites, which orbit at a height of
68 900 000 feet (21 000 km), continually broadcasts radio signals giving time and position information. This ensures that signals from at
least three can be picked up from any open
area on the ground’s surface.
The accuracy of the GPS information depends
on how good the reception is. When the signals are strong and reception is good, GPS
can determine latitude, longitude and altitude
for accurate positioning in three dimensions.
But if signal quality is poor, only two dimensions, latitude and longitude, can be obtained
and positioning errors are somewhat greater.
Handling large errors
Positioning errors are kept to a minimum by
combining GPS, dead reckoning and map
matching. However, in some situations, these
functions may not work properly, and the error
may become bigger.
When positioning by GPS is
impossible
! GPS positioning is disabled if signals can-
not be received from more than two GPS
satellites.
! In some driving conditions, signals from
GPS satellites may not reach your vehicle.
In this case, it is impossible for the system
to use GPS positioning.
In tunnels or enclosed parking
garages
When driving
among high buildings
! If a car phone or cellular phone is used
near the GPS antenna, GPS reception may
be lost temporarily.
! Do not cover the GPS antenna with spray
paint or car wax, because this may block
the reception of GPS signals. Snow buildup
can also degrade the signals, so keep the
antenna clear.
p If a GPS signal has not been received for a
long time, your vehicle’s actual position
and the current position mark on the map
may diverge considerably or may not be updated. In such case, once GPS reception is
restored, accuracy will be recovered.
Under elevated
roads or similar
structures
When driving through
a dense forest or tall
trees
Conditions likely to cause
noticeable positioning errors
For various reasons, such as the state of the
road you are traveling on and the reception
status of the GPS signal, the actual position of
your vehicle may differ from the position displayed on the map screen.
Appendix
En
69
Page 70

Appendix
Appendix
! If you make a slight turn.
! If there is a parallel road.
! If there is another road very nearby, such
as in the case of an elevated freeway.
! If you take a recently opened road that is
not on the map.
! If the road has a series of hairpin bends.
! If there is a loop or similar road configura-
tion.
! If you take a ferry.
! If you are driving on a long, straight road or
a gently curving road.
! If you drive in zigzags.
70
En
! If you are on a steep mountain road with
many height changes.
Page 71

Appendix
Appendix
! If you enter or exit a multi-storey parking lot
or similar structure using a spiral ramp.
! If your vehicle is turned on a turntable or si-
milar structure.
! If trees or other obstacles block the GPS
signals for a considerable period.
! If you drive very slowly, or in a start-and-
stop manner, as in a traffic congestion.
! When you drive around a traffic circle.
Appendix
! When starting driving immediately after
starting the engine.
Route setting information
Route search specifications
Your navigation system sets a route to your
destination by applying certain built-in rules to
the map data. This section provides some useful information about how a route is set.
CAUTION
When a route is calculated, the route and voice
guidance for the route are automatically set.
Also, for day or time traffic regulations, only information about traffic regulations applicable at the
time when the route was calculated is considered. One-way streets and street closures may
not be taken into consideration. For example, if a
street is open during the morning only, but you
arrive later, it would be against the traffic regulations so you cannot drive along the set route.
When driving, please follow the actual traffic
signs. Also, the system may not know some traffic regulations.
! If you join the road after driving around a
large parking lot.
! The calculated route is one example of the
route to your destination decided by the navigation system while taking the type of
streets or traffic regulations into account. It
is not necessarily an optimum route. (In
some cases, you may not be able to set the
streets you want to take. If you need to take
a certain street, set a waypoint on that
street.)
En
71
Page 72

Appendix
Appendix
! If the destination is too far, there may be in-
stances where the route cannot be set. (If
you want to set a long-distance route going
across several areas, set waypoints along
the way.)
! During voice guidance, turns and intersec-
tions from the freeway are announced.
However, if you pass intersections, turns,
and other guidance points in rapid succession, some may delay or not be announced.
! It is possible that guidance may direct you
off a freeway and then back on again.
! In some cases, the route may require you
to travel in the opposite direction to your
current heading. In such cases, you are instructed to turn around, so please turn
around safely by following the actual traffic
rules.
! In some cases, a route may begin on the
opposite side of a railway or river from your
actual current location. If this happens,
drive towards your destination for a while,
and try route calculation again.
! When there is a traffic congestion ahead, a
detour route may not be suggested if driving through the traffic congestion would
still be better than taking the detour.
! There may be instances when the starting
point, the waypoint and the destination
point are not on the highlighted route.
! The number of traffic circle exits displayed
on the screen may differ from the actual
number of roads.
Auto reroute function
! If you deviate from the set route, the system
will re-calculate the route from that point
so that you remain on track to the destination.
! This function may not work under certain
conditions.
SD and SDHC logo
SD Logo is a trademark of SD-3C, LLC.
SDHC Logo is a trademark of SD-3C, LLC.
Route highlighting
! Once set, the route is highlighted in bright
color on the map.
! The immediate vicinity of your starting
point and destination may not be highlighted, and neither will areas with particularly complex road layouts. Consequently,
the route may appear to be cut off on the
display, but voice guidance will continue.
72
En
Page 73

Appendix
Display information
Find
Find Address 30
Find Places 32, 33
Find on Map 36
Favorites 37
History 37
Coordinate 38
My Route
Create Route 41
Edit Route 47, 48
Overview 43
Avoidances 43
Cancel Route 49
More...
Settings
Sound and Warnings 55
Customize Quick Menu 56
Traffic 53, 57
Route Settings 44, 45
User Profiles 58
Map Settings 58
Visual Guidance Settings 59
Display 60
Regional 61
Trip Monitor 61
Start Configuration Wizard 61
Reset to Defaults 62
Page
More...
Updates and Extras
Unit Converter
Clothing
Calculator
Fuel Consumption
Sunrise & Sunset
Trip Monitor
Country Information
Help
Page
63
Appendix
Appendix
En
73
Page 74

Appendix
Appendix
Glossary
Current location
The present location of your vehicle; your current location is shown on the map by a blue
triangle mark (default).
Destination
A location you choose as the end point of your
journey.
Favorites
A frequently visited location (such as your
workplace or a relative’s home) that you can
register to allow easy routing.
GPS
Global Positioning System. A network of satellites that provides navigation signals for a variety of purposes.
Guidance mode
The mode in which guidance is given as you
drive to your destination; the system automatically switches to this mode as soon as a route
has been set.
Guidance point
These are important landmarks along your
route, generally intersections. The next guidance point along your route is indicated on
the map by the flag icon.
matically by the system when you specify a
destination.
Set route
The route marked out by the system to your
destination. It is highlighted in bright color on
the map.
Track log
Your navigation system logs routes that you already passed through if the track logger is activated. This recorded route is called a “track
log”. It is handy when you want to check a
route traveled or if returning along a complex
route.
Voice guidance
The giving of directions by navigation voice
while in guidance.
Waypoint
A location that you choose to visit before your
destination; a journey can be built up from
multiple waypoints and the destination.
Point Of Interest (POI)
Any of a range of locations stored in the data,
such as railway stations, shops, restaurants,
and amusement parks.
RDS-TMC
A communication system for informing drivers
of the latest traffic information using FM multiplex broadcast. Information such as traffic
congestion or accidents can be checked on
the display.
Route setting
The process of determining the ideal route to a
specific location; route setting is done auto-
74
En
Page 75

Appendix
Specifications
General
Rated power source ............... 14.4 V DC
(allowable voltage range:
12.0 V to 14.4 V DC)
Grounding system ................... Negative type
Maximum current consumption
..................................................... 0.21 A
Dimensions (W × H × D):
............................................... 134 mm × 29 mm × 84 mm
(5-1/4 in. × 1-1/8 in. ×
3-1/4 in.)
Weight .......................................... 140 g (0.31 lbs)
Tolerable temperature range:
Power on ............................ –10 °C to +60 °C
GPS receiver
System .......................................... L1, C/Acode GPS
Reception system .................... 32 tracking/32 acquisition-
channel system
Reception frequency .............. 1 575.42 MHz
Sensitivity .................................... –157.5 dBm (typ)
Position update frequency
..................................................... Approx. once per second
GPS antenna
Antenna ....................................... Micro strip flat antenna/
right-handed helical polari-
zation
Antenna cable ........................... 3.0 m (9.84 ft.)
Dimensions (W × H × D) ... 50.6 mm × 15.5 mm ×
50.6 mm
(1.99 in. × 0.61 in. ×
1.99 in.)
Weight .......................................... 85 g (0.19 lbs)
Appendix
Appendix
SD
Compatible physical format
..................................................... Version 2.00
Max memory capacity ........... 32 GB
File system .................................. FAT16, FAT32
Note
Specifications and design are subject to possible
modifications without notice due to improvements.
En
75
Page 76

PIONEER CORPORATION
1-1, Shin-ogura, Saiwai-ku, Kawasaki-shi,
Kanagawa 212-0031, JAPAN
PIONEER ELECTRONICS (USA) INC.
P.O. Box 1540, Long Beach, California 90801-1540, U.S.A.
TEL: (800) 421-1404
PIONEER ELECTRONICS OF CANADA, INC.
340 Ferrier Street, Unit 2, Markham, Ontario L3R 2Z5, Canada
TEL: 1-877-283-5901
TEL: 905-479-4411
PIONEER EUROPE NV
Haven 1087, Keetberglaan 1, B-9120 Melsele, Belgium/Belgique
TEL: (0) 3/570.05.11
PIONEER ELECTRONICS ASIACENTRE PTE. LTD.
253 Alexandra Road, #04-01, Singapore 159936
TEL: 65-6472-7555
PIONEER ELECTRONICS AUSTRALIA PTY. LTD.
5 Arco Lane, Heatherton, Victoria, 3202, Australia
TEL: (03) 9586-6300
PIONEER ELECTRONICS DE MEXICO, S.A. de C.V.
Blvd.Manuel Avila Camacho 138 10 piso
Col.Lomas de Chapultepec, Mexico, D.F. 11000
TEL: 55-9178-4270
先鋒股份有限公司
台北市內湖區瑞光路407號8樓
電話 : 886-(0)2-2657-3588
先鋒電子(香港)有限公司
香港九龍長沙灣道909號5樓
電話 : 852-2848-6488
© 2014 PIONEER CORPORATION.
All rights reser ved.
<KTSZ13L>
<127075005636> UC
Page 77

CAUTION I
operation manual as
Re,ad
the
well as
instructions and cautions provided
all
with
familiar
limit
operated safely in your location and environment. ·Distracted driving may
result in serious
this product and the compatible
with
glances to
any applicable state and
device, and
the
injury~
including death.
do
Pioneer
local
not use any feature
headunit before use. Become
laws. Pay attention to the road,
it cannot be
if
ATTENTION!
manuel de fonctionnement ainsi
Lisez
precautions accompagnant ce produit
compatible avant
provinciales en vigueur. Portez votre attention sur Ia
des coups d'ceil
6tre utilisees
environnement.
graves, voire mortelles.
le
tJtiHsation.
l'appareil
a
securite
en
~tre
Familiarisez-vous
n'utilisez pas
et
sur-votre emplacement _et dans votre-
distrait au volant peut provoquer des blessures
que
l'unite
et
toutes les instructions et
principale Pioneer
avec
las fonctions qui
les lois locales et
route, evitez
ne
de
peuvent
jeter
ATTENZIONEI
istruzioni e
manuale di funzionamento, nonche
Prima
awertenze fomite con questo prodotto e l'unita principale Pioneer compatibile.
lnformarsi
alia
-utilizzare alcuna
nell'ambiente
morte.
dell'uso,
su
strada,
leggere
eventuali leggi nazionali e
limitare al
funzione che comporti dei rischi
attuale. Una guida distratta
il
vigore. Prestare attenzione
locali
minimo di distrarsi per guardare
in
nella
causare ferite gravi e perfino
puo
dispositive e non
il
posizione o
le
Ia
PRECAUCI6NI
instrucciones y precauciones
de
las
unidad principal Pioneer compatible
Ia
leyes estatales y
las
forma segura en su ubicaci6n
de
locales
el dispositive y no
vigentes.
utilice
operaci6n y todas
Lea el manual
proporcionadas con este producto y
su
antes
Presta atenci6n a Ia carretera, no mire en exceso
ninguna funci6n que no pueda utilizarse
de
de
uso:
Este al corriente
y
entomo. Conducir distraido podrfa provocar lesiones graves, e incluso
muerte.
<KMZZX>
<127071
003225>
d
Ia
Page 78

P1oneer
Model:
Type:
Register
your
product at
http://www.pioneerelectronics.com
in Canada
http://www. pioneerelectron ics.
Tips,
Your
New
on
be
such as
benefits:
Updates,
New
Investment:
file for reference
Development:
product
loss or theft.
and
The
the event of
in
Your
following
the
for
Receive
Bulletins
Protect
purchase
insurance
Improve
important
most advanced, consumer-focused product
Free
on
Your
will
claim
Product
our continual effort to design
in
ca
Service
details
feedback
build
and
the industry.
in
of your
an
is
the
Serial
Number :
Numero de
Enregistrez votre
http://www. pioneerelecron ics. com
Au Canada
http://www. pioneerelectlon ics.
pour
Beneficier
mises
veau
Proteger
tions detaillees
sur fichiers pour
tion pour perte
Ameliorer
duit:Votre avis est fondamental pour renforcer les efforts
que nous
fadriquer des appareils
besoins des
profiter des avantages ci-apres exposes:
produit.
serie:
I
produit
gratuitement
des
jour
a
deployons
et
votre
le
utilisateurs les plus
recente
relatives
reference ulterieure
vol.
ou
developpeme"t
constamment afin de concevoir et
n
lradresse
a
suivante:
ca
des
services
acquisition:
votre achat sont conservees
a
pointe aptes
de
informations,
votre
lies
continu
exigeants.
a
cas de
en
satisfaire les
a
Les informa-
reclama-
drun
I
des
nou-
pro-
KKYZX
<
CRY1271-B
> <
>
P/N:127071002165
Page 79

PIONEER ELECTRONICS (USA)
INC.
GARANTIE
VALIDE
SEULEMENT
GARANTIE
DANS
LIMITI~E
LE
PAYS
OU
LE
GARANTIE
Pioneer
Electronics
avoir
ete installes
vice de fabrication, seront
Les unites ou
LA
PRESENTE
A
CONDITION
OU
UNE
AUTRE
LA
PREMIERE
PAYS
OU
L'ACHAT
PUSAOU
POC,
PERIODE DE
Prodults
La
periode
de garantie pour
ELEMENTS NON COUVERTS
UN
PRODUIT
IMPLICITE
"AVEC
TOUS
PIONEER
N'EST
PIONEER
DE
TOUTE APPLICATION INDUSTRIELLE
LA
PRESENTE GARANTIE
DOCUMENTS S'Y APPLIQUANT.
LA
PRESENTE GARANTIE
PENDANT DE
LA
PRESENTE GARANTIE
DISQUES
PAR
ECRIT
LES DOMMAGES SUBSEQUENTS DECOULANT
CONFORMES
LA
PRESENTE GARANTIE
PRESENTE GARANTIE, Sl ELLES SONT OBTENUES AUPRES D'UNE SOURCE AUTRE QU'UNE SOCIETE
PIONEER.
NON AUTORISEES,
LES
NUMEROS
INVALIDITE
AUX
ETATS-UNIS
DE
QUALITE
APRES
LA
L'EXCLUSION
S'APPLIQUER
ETAT
A
L'AUTRE.
AU CANADA QU'ELLE SOIT IMPLICITE, OBLIGATOIRE
(USA)
Inc.
et
utilises
pieces
GARANTIE
QUE
LOCATION.
LE
repares
de
rechange foumies en vertu
LIMITEE
LE
PRODUIT
PREUV
E
D'ACHAT
Sl
A
ETE
EFFECTUE
CAS
ECHEANT,
(PUSA) et Pioneer
confonnement au manuel
ourem
S'APPLIQUEAU
AIT
ETEACHETE
VALIDE
JAMAIS
UN
SERVICE
SEULEMENT,
PAIERA
POURVOUS
places
par une
PROPRIETAIRE
CHEZ
INDIQUANT
DE
TEL
Electronique
de
UN
REPARATION
QU'IL
RETOURNER
du Canada,
de
l'utilisateur inclus
unite de
Ia
LA
valeur comparable,
presente garantie peuvent
INITIALAINSI
DISTRIBUTEUR
DATE
DE
L'ACHAT
EST
EST
REQUIS,
EXPLJQUE
LE
PRODUIT
Inc. (POC)
avec
QU'A
OU
MARCHAND
INITIAL
DANS
REPARE
garantissent que
l'unne,
ne fonctionnent pas
au choix
6tre neuves ou remises
TOUT
LE
PRODUIT
LE
de
PROPRIETAIRE
PIONEERAUTORISE
OU,
Sl
VOUS
DOlT
PRESENT
DOCUMENT.
OU
REMPLACE,
PUSAou de POC,
LOUEZ
hRE
GARANTIE DES PRODUITS
stereo
pour
l'auto
les
clients
qui
louent
le
produit commence
PAR
ACHETE CHEZ
DE
QUALITE
SES
DEFAUTS EVENTUELS
PAS
NE
OU
LA
RESPONSABLE
GARANTIT PAS LES PRODUITS ENUMERES Cl-DESSUS LORSQU'ILS SONT UTILISES
LONGUES PERIODES (IMAGES REMANENTES).
AUX RUBANS
PAR
PIONEER, D'UN ACCIDENT, D'UN USAGE INAPPROPRIE
A
CELLES QUI SONT SPECIFIEES DANS
PRESENTE GARANTIE
Nl
DE
SERlE MODIFIES, OBLITERES
DE
TOUTE
-
PIONEER LIMITE SES OBLIGATIONS
MARCHANDE
PERIODE
OU
LA
A
VOUS.
SOUS RESERVE
UN
MARCHANDE
NE
S'APPLIQUE PAS Sl LE
NE
COUVRE PAS LES TELEVISEURS
NE
COUVRE
OU
DISQUES D'ENREGISTREMENT, LES DOMMAGES AU PRODUIT DECOULANT D'UNE RETOUCHE, D'UNE MODIFICATION NON AUTORISEE
NE
COUVRE PAS
D'UN ENTRETIEN INADEQUAT.
AUTRE
OU
D'ADAPTATION
DE
GARANTIE. CERTAINS
LIMITATION
LA
PRESENTE GARANTIE VOUS
DE
LA
DISTRIBUTEUR
OU
D'ADAPTATION
".
DE
QUELQUE
OU
COMMERCIALE QUE
PAS
LE COFFRAGE
LE
NE
COUVRE
GARANTIE
A
DES
DOMMAGES CONSECUTIFS
CE
QUI EST EXPRESSEMENT STIPULE DANS LES PRESENTES, AUCUNE REPRESENTATION, GARANTIE, OBLIGATION
OU
AUTRE,
le
jour
ou
le
produit est
utilise
pour
Ia
GARANTIE
NON
AUTORISE N'EST COUVERT
A
UN
USAGE PARTICULIER QUE
DOMMAGE CONSECUTIF ET(OU) INDIRECT
PRODUIT A
DE
FUITES, LES DOMMAGES DECOULANT
LE
COOT DES PIECES
PAS
LES DEFECTUOSITES
OU
ENLEVES ANNULENT
EN
UN
USAGE PARTICULIER,
ETATS
NE
PERMETTENT
DONNE
NE
S'APPLIQUE
CE SOIT.
ETE SOUMIS
OU
LES ECRANS ENDOMMAGES
OU
LES ELEMENTS ESTHETIQUES, LES ANTENNES INSTALLEES
MANUEL
VERTU
DE
OU
DE
TOUTE GARANTIE IMPLICITE
OU
DES
DROITS
A
A
OU
D'UN USAGE ABUSIF, LES DOMMAGES PRODUITS
L'UTILISATEUR.
DE
LA
MAIN-D'CEUVRE QUI SERAIENT AUTREMENT OFFERTES SANS FRAIS
OU
LES DOMMAGES CAUSES
LA
PRESENTE GARANTIE DANS SA TOTALITE.
A
UNE
PERIODE
PAS
LA
LIMITATION
INDIRECTS. LES LIMITATIONS
LEGAUX
CE
PRODUIT.
premiere
fois (a) pendant
PAR
AUCUNE GARANTIE EXPRESSE
QUE
UNE PUISSANCE NOMINALE
N'EXCEDANT
SPECIFIQUES. VOUS POUVEZ JOUIR D'AUTRES DROITS,
les
produits distribues par
de
a
neuf, au choix de PUSAou
SUBSEQUENT
AUX
LE
PRODUIT,
EXPEDIE
VOUS
A
L'INTERIEUR
CE
SOIT.
CE
SOIT.
EN
DE PILES DEFECTUEUSES
QUE
DE
LA
DUREE D'UNE GARANTIE IMPLICITE,
SERVICE
Pour profiter du service en vertu de
indiquant l'endroit
AUX
ETATS-UNIS
Votre marchand
de
caisse devrait
Votre
societe
Veuillez acceder
Ia
plus
proche.
Pioneer Customer Support ci-dessous pour communiquer avec Pioneer par
AU
CANADA
Communiquez avec Pioneer
Expedition
en port
prepaye
pendant
Pour toutes
Satisfaction de
Pour
le
raccordement ou
REGLEMENT
AUX
ETATS-UNIS
recours au Programme de
de
resolution
Improvement Act, 15
Pour
avolr
problema
dlstrlbuteur
resolution
par
ecrlt
a
votre
plalnte
AU
CANADA- Communlquez avec
No. du
modele:----------------------
Date d'achat : Achete
et
Ia
date
- Communiquez avec un des partenaires Pioneer suivants pour
Pioneer autorise - Votre marchand Pioneer peut reparer ou
enumerer
de service autorisee -
au site Web de Pioneer
-
POC
a
designe
de
votre
unite
et
selon
le
transport.
les plaintes
Ia
lncluez
et
clientele
le fonctionnement
une
au 1-877-283-5901.
DES CONFLITS
-
Sl
un conflit
des
plalntes avant de vous
U.S.C.
recours
au
vous
marchand
sera
communique.
vous
avlser
par
ecrlt
Programme
faltes
autorise
pour
auquel
I
vous
pour
Ia
de
ses coordonnees (numeros de
Ce
Electronique
aux
votre nom, votre adresse et un
problemas
resolution des
2301
des
garantie aux Etats-Unis et
Ia
transaction par
Celle-ci
service peut vous aviser des options
un certain nombre
fins
de
methode
aux Etats-Unis, communiquez avec le
CUSTOMER SUPPORT GROUPE DE
PIONEER ELECTRONICS
LONG BEACH. CALIFORNIA 90801
http
://www.
se prodult
et
s.s.
de
face
et
les
aupres
Pioneer
demarches
vous
lndiquer
le
dlrecteur
le premier proprietaire.
peut reparer
a
www
.pioneerelectronics.com, cliquer sur l'onglet
telephone,
de
du
Canada (les
service
de
transport pouvant
de
AUX
p
0
1-800-421-1404
pioneerelectronics
plaintes de Pioneer pour
prevalolr
resolution
demarches
duquel
PRENEZ
societas
-
Si
vous
votre unite, ou pour trouver une
ETATS-UNIS
BOX 1720 340 FERRIER STREET, UNIT
I
entre vous et Pioneer
de vos
des
que
vous vous
etudlera
qu'elle
les
dela
le
entreprendra
raisons
Satisfaction
ENREGISTREZ
SOIN
DE
au Canada, vous devez presenter votre
le
service :
telephone
Ia
plupart
par courrier ou par
de service autorisees partout au
coordonnees se trouvent ci-dessous) pour trouver une
expediez l'unite,
6tre
suivie
numero
(USA) INC. PIONEER ELECTRONIQUE
.
com
drolts
plalntes,
vous
avez
6tes
confllt
et,
pour
lesquelles
dela
LE
LIEU
GARDER
CETTE
remplacer
et
de
telecopieur, courriel,
des produits
de
service optimales
le
vous
et
assuree.
de
telephone ou
service de So.utien
societe
apres
Ia
resoudre le
ou de chercher
appelez
au 1
entreprlses
procure
le
dans
un
pour
resoudre
elle
clientele
au
ET
LA
INFORMATION
votre unite, ou bien vous diriger vers une
electroniques
biais
de
son site Web.
devez
Emballez le
nous pouvons vous joindre pendant
de service
reponse
confllt.
reparation
800
421-1404
pour
prodult
d81al
de
le
n'entreprendra
(905)
946-7412 pour
DATE
D'ACHAT POUR REFERENCE ULTERIEURE
No.
etc.).
pour
II
pour votre
l'emballer
a
Ce
falre
Pioneer.
quarante
confllt,
de
serie:
de:-------------------:-----------
ET
VOTRE
l'auto
Support
II
et choisir
modele
Canada
soigneusement
produit au moyen de materiaux coussines adequats pour eviter
a
Ia
clientele
autorisee,
une demande
programme vous est offert sans frais. Vous devez avolr recours au Programme
en
vertu
du
et
expllquez
reparer
le
Une
fols
(40)
jours
et
lndlquera
aucune
dlscuter
---------------------------
RECU
PIONEER ELECTRONIQUE
PRODUIT
fa~n
ETATS-UNIS
PENDANT
~TES
A
ETE
ACHETE
PUSA
appropriee
sans que vous deviez payer pour
DU
PRESENT
OU
VOTRE
DU
AU
CONTRAT
LA
PERIODE
RESPONSABLE
PAYS
OU
L'ACHAT
aux Etats-Unis
dans des conditions d'utilisation
de
POC.
PRODUIT PIONEER
CANADA.
VOUS
DE
LOCATION
DE
GARANTIE,
DU
DEMONT
AGE
AETE
EFFECTUE.
les pieces
PENDANT
DEVREZ
INDIQUANT
EN
PORT
ET
et
par
FOURNIR
DE
f.lGa
1
Ia
periode de
location
ou
(b) apres
Ia
vente
au
detail, selon
OU
DE
PLUS,
CE
PRODUIT EST STRICTEMENT VENDU "
A
DES FINS COMMERCIALES
EXCEDANT CELLE
RAISON
DE L'APPLICATION D'IMAGES STATIQUES
DE
SERVICE
PAR
L'UTILISATION D'UNE MAIN-D'CEUVRE
CE
SOIT~
Y
PAS
ET
releve de caisse ou, si vous
et vous aviser des options supplementaires
et votre
si jamais vous avez besoin de services
au 1-800-421-1404. Au Canada, communiquez avec
appelez
lnltlale falte au service de
Titre
au
produit
que
apres
combien
demarche.
de votre
D'ACHAT
COMPRIS
LA
PERIODE
EXCLUSIONS ETABLIES Cl-DESSUS PEUVENT
II
Find a Service
emplacement geographique. Veuillez consulter les coordonnees
societe
de service autorisee.
et
l'envoyer
ou ecrivez
MARKHAM,
http://www.pioneerelectronics.ca
I
de
Ia lol
representant
pendant
votre
plalnte
Ia
reception
de
plainte et resoudre
DANS
UN
IMPLICITE,
PAR
OU
DE L'UTILISATION
OU
AUTRE AUTORISEE
ENTRE
DE
GARANTIE. AUCUNE GARANTIE
societe
Center
a
une
les
heures
a
:
AU
CANADA
SATISFACTION
ON
(905) 479-4411
1-877-283-5901
Magnuson-Moss Warranty-Federal Trade Commission
du
service
Ia
perlode
a
ete
de
temps
ces
ENDROIT
SOR
Y
COMPRIS QUELQUE GARANTIE
OU
PROFESSIONNELLES,
QUI
A
ETE ETABLIE DANS LES
L'UTILISATEUR, LES DOMMAGES AUX
PAR
LA
FOUDRE
DE PILES
OU
AUTRES LES GARANTIES IMPLICITES
ET
CERTAINS
QUI
louez le
produit, votre contrat de
de service Pioneer autorisee. Votre
II
pour trouver
societe
de
bureau.
DE
DU CANADA,
L3R
Soutlen
de
garantle,
expllquee
votre
plalnte,
demarches
rapldement
Ia
de
reparation pour votre produit.
de
service autorisee ou
LA
CLIENTELE
2
2Z5
a
Ia
clientele,
a
Ia
clientele
puis
au
representant,
(1)
prendront
le problema.
DU
CANADA,
POC
au
nonnales
ou
les
travaux
LA
PERIODE
UN
L'ENDROIT
PREPAYE,
L'INSTALLATION
an
ce qui se produit en premier.
ET IMMOBILES
OU
LA
SURTENSION,
NON
EN
VERTU
DESIGNEE PAR
OU
NE
PERMETTENT
PEUVENT VARIER D'UN
qui pourraient s'appliquer.
societe
de service Pioneer
INC.
vous pouvez avolr
qui
vous
donnez-lul
repondra
;
<
QRY3001-B/S
lmprime
INC.
Canada
qui, a
en
ra1son
de
reparation.
DE
GARANTIE,
RELEVE
DE
CAISSE
ET
LA
DATE
A
L'INTERIEUR
DU
PRODUIT.
Majn:d'muvre
1
an
TEL
QUEL "
OU
AU SEIN
DE
LA
DE
PIECES
NE
S'APPLIQUE
DONC
NE
OU
CONDITION,
location
a
Pioneer,
les
dommages
le
groupe
repondra
le
nom
un
numero
a
votre
plalnte
ou
(2)
repondra
en
Chine
pres .
d'un
DU
ET
PAS
PAS
reyu
de
du
de
>
DE
le
,
Page 80

PIONEER ELECTRONICS (USA) INC.
LIMITED
ONLY
WARRANTY
WARRANTY
Pioneer Electronics
function properly
comparable value,
of
a unit
rebuilt
or
new
THIS LIMITED
PRODUCT
RECEIPTOR
DATE
AND
PREPAID, ONLY FROM WITHIN
PRODUCT.
THE
under
the option
at
WARRANTY
PURCHASED
WAS
OTHER
FIRST
OF
PUSAOR
(USA) Inc.
PRODUCT WARRANTY
Products
Stereo
Car
The warranty period for retail customers
IS NOT COVERED
WHAT
PRODUCT
IF THIS
MERCHANTABILITY
OF
PIONEER
PIONEER DOES NOT
WARRANTY
THIS
WARRANTY
THIS
THIS WARRANTY DOES
DAMAGE TO THE PRODUCT RESULTING
UGHTNINGORTOPONERSURGES,SUBSEQUENTDAMAGEFROMLEAKING,DAMAGEFROMINOPERATIVEBATTERES,ORTHEUSEOFBATTERESNOTCONFORMNGTOTHOSE
SPECIREDINTHEOWNER'SMANUAL
WARRANTY
THIS
OBTAINED FROM
DEFECTS
ALTERED,
OTHER WARRANTIES
NO
U.S.A.
THE
IN
MERCHANTABILITY
WARRANTY
LIMITATIONS
OR
YOU SPECIFIC
CANADA·
IN
OTHERWISE,
OR
WAS
NOT
SHALL
DOES
DOES
DOES
ANY
DAMAGE
OR
DEFACED,
-PIONEER
PERIOD. SOME STATES
OF
LEGALRIGHTSANDYOU
EXCEPT
APPLICABLE
(PUSA), and Pioneer Electronics
normal use
atthe
PUSAor
of
APPLIES
PROOF
VALID
RENTAL.
POC,ASAPPROPRIATE,
a manufacturing defect when installed and operated according to the owner's manual enclosed with the unit
to
due
ofPUSAor
option
POC.
ORIGINALORANYSUBSEQUENTOWNER
THE
TO
AUTHORIZED
AN
FROM
PURCHASE
OF
EVENT
THE
IN
COUNTRY
THE
OF
PERIOD
rent the product commences upon the date product is first put into use (a) during the rental period
who
PURCHASED
AND
LIABLE
BE
WARRANT
NOT
NOT
NOT COVER THE
NOT
SOURCE OTHER
CAUSED
REMOVED
OR
FITNESS
AND
INCIDENTAL
EXPRESSLY PROVIDED HEREIN,
AS
FROMAN
IMPUEDWARRANTY
THE
FOR
ANY
IF
APPLY
COVER DISPLAY SCREENS
COVER
THE
BY
ITS
LIMITS
FORA
OR
TO THIS
UNAUTHORIZED DISTRIBUTOR,
CONSEQUENTIALAND/OR
ANY
PRODUCT LISTED
PRODUCT
THE
~ETORANY
FROM ALTERATIONS, MODIFICATIONS NOT AUTHORIZED IN WRITlNG
COST
THE
THANA
OF
USE
NUMBERS
SERIAL
OBLIGATIONS
PARTICULAR PURPOSE,
ALLOWLIMITATIONSON
NOT
DO
CONSEQUENTIAL DAMAGES,
MAYHAVEOTHERRIGHTSWHICH
PRODUCT.
POC, without charge to you for parts
SERVICE IS REQUIRED,
PURCHASE
PIONEER AUTHORIZED SERVICE
UNAUTHORIZEDPARTSORLABOROR
TO OBTAIN SERVICE
Canada to receive warranty service you need to present your sales receipt
In the U.S.A.
USA
Your Authorized
the
list
Your Authorized
Pioneer
Pioneer
email
~-
Shipping
Use adequate padding material to prevent damage in transit.
On
or
one
contact
Please
-
Pioneer
information
contact
Pioneer
www.pioneerelectronics.com
at
website
POC
Your
Support
the
has
Unitfor
Pioneer
number
a
Service-
and
Customer
access
or
complaints
all
For hook-up
Authorized
CUSTOMER SUPPORT
following
the
of
Your
Dealer-
(phone
Company
Service
advise
Can
website
Authorized Service Companies should
of
Please package it carefully and send it, transportation prepaid
concerns
and
Service
BEACH,
LONG
Pioneer
Dealer
Pioneer
number, fax, email, etc.)
perform
Can
-
optimal
the
Pioneer.
contact
to
U.S.A.
the
in
U.S.A.
THE
IN
operation of your unit or
Company,
PIONEER ELECTRONICS (USA)
I
BOX 1720 340
P.O.
CALIFORNIA
VALID
Canada,
Of
PIONEER
SHOWING
WILLPAYTO
OF
ABOVE
HAS
PARTS
OF
UNDER
partners
may
click
and
service
call Customer
DISTRIBUTOR/DEALER
THE DATE
EXPLAINED
AS
RETURN THE
FORAPARTJCULAR PURPOSE
FITNESS
WHEN
SUBJECTED
BEEN
DAMAGED
APPEARANCE
LABOR
OR
VOID THIS ENTIRE
ANY
TOA
ARE
THERE
obtain
to
or
repair
Dealer.
your
for
for
repairs
"Support"
on
for
option
your name, address and telephone
Include
Support
locate
to
please call or write:
90801
Inc. (POC),
INCIDENTAL
IT
STATIC,
BY
rTEM,
IMPLIED
PERIOD NOT TO
HOW
SO
NO
service:
replace
most
your
your
WARRANTY
PRODUCT PURCHASE
COUNTRY
IN
or
ORIGINAL
OF
PRODUCT
THE
IN THIS DOCUMENT.
REPAIREDORREPLACEMENTPRODUCTTOYOUWITHIN
THERE
INA
IS USED
POWER IN EXCESS OF ITS PUBLISHED
TO
NON-MOVING,IMAGESAPPLIED
USERATTACHEDANTENNA,ANYDAMAGE TO RECORDS OR
WHICH
WARRANTY
WARRANTIES
LONGAN
ABOVE
THE
MAYVARYFROMSTATETOSTATE.
REPRESENTATIONS, WARRANTIES, OBLIGATIONS
unit
your
Electronics
Car
select
and
and
model
product require service. Contact
1-800-421-1404,
at
an
INC
OF
warrantthat
actual repair
WOULD
COMPANY
products distributed
. Replacement units and/or parts supplied
work
OF THIS PIONEER
PURCHASE
ARE
DAMAGES.
TRADE
FROM IMPROPER MAINTENANCE.
EXCEED THE
IMPLIEDWARRANTYLASTSANDSOMESTATES
LIMITATIONS
or
refer you to an
or
,
"Find
geographic
U.S.A.
THE
IN
MUST
NO
your rental contract showing place and date
products
by
OR,
DELIVERED
BE
WILL
YOU
WARRANTIES, EXPRESS
THIS
AND
BUSINESS
OR
OTHERWISE
BE
OTHER
OR
INCLUDING,
WARRANTY
EXCLUSIONS MAY
OR
Authorized
can
and
Center"
Service
a
location.
a traceable, insured method, to an Authorized Service Company
number
Canada, call Customer Satisfaction at (905)
in
or,
For additional information
. PIONEER ELECTRONICS
1-800-421-1404 (905)
PIONEER ELECTRONICS OF
the U.S.A., and
PUSAin
by
WARRANTY
THE
PRODUCT
OR
RENTED,
IF
PRODUCT
BY
DESIGNATED LOCATION. THIS
Please
Pioneer
where you can
CUSTOM~R
DURING
CANADA.
BE
OR
PROVIDED
BUT
advise
YOU
RENTAL
YOUR
THE
WITHIN
RESPONSIBLE
IMPUED,INCLUDING
OR
SOLD STRICTLY"AS
IS
INDUSTRIAL
ANY
IN
POWER
LENGTHY
FOR
PIONEER, ACCIDENT,
WITHOUT
LIMITED
NOT
PERIOD.
NOT
Service
Pioneer
options
other
nearest
the
to find
reference
as
Canada
of
reached during business hours.
be
CANADA
IN
on
SATISFACTION GROUP
FERRIER
MARKHAM,
479-4411
REQUIRED
BE
WILL
CONTRACT
WARRANTY
REMOVALAND
FOR
(b) retail sale, whichever occurs first.
or
OR
RATING.
PERIODS (BURN-IN).
MSUSE
CHARGE
TO,
WARRANTIES
NO
DO
APPLY TO YOU. THIS
CONDITIONS, IMPLIED, STATUTORY
OR
of
Company. Your sales receipt should
applicable. Please
as
Pioneer
information listed
the
below
listed
this warranty, please call or write:
OF
STREET,
L3R
ON
1-877-283-5901
by
will
PERIOD, TRANSPORTATION
THE
COMMERCIALAPPLICATION.
RECORI::*G
WARRANTY
THE
NOT
original owner's transaction.
servicer.
to obtain a local service location.
CANADA,
UNIT 2
2Z5
CANADA,
in Canada that fail to
POC
repaired
be
this warranty may be
under
PERIOD PROVIDED
PROVIDE
TO
SHOWING
INSTALLATION
COUNTRY
f.IJ:tl
Year
1
THE IMPLIED
''WITHALLFAULTS".
AND
IS"
TAPES OR
ABUSE, DAMAGE DUE TO
OR
THIS
UNDER
DOES
IMPLIED
WARRANTIES
APPLY
SHALL
THE
ALLOW
WARRANTY GIVES
access
below
INC.
INC.
replaced with
or
THE
SALES
A
PLACE
THE
OF PURCHASE.
OF
Li.bm:
Year
1
WARRANTY
ANY
DISCS,
WARRANTY
COVER
NOT
THE
AFTER
EXCLUSIONS
the
,
phone
and
Pioneer.
or
479-4411.
OF
http://www. pioneerelectronics.com http://www. pioneerelectronics.ca
DISPUTE RESOLUTION
Customer
initial request
any
any
to
The
any remedies, created
seek
or
call1-800-421-1404
action.
Manager
RECORD
Complaint
KEEP
response
- Following
U.S.A.
THE
IN
Resolution Program to resolve the dispute.
before you exercise
use the Complaint Resolution Program
To
have the product repaired during the warranty period and the name
has been explained to the representative, a resolution number will be issued.
(1) respond to your complaint in writing informing you what action Pioneer
informing you
CANADA-
IN
Model
Purchased
UCC0212
why
Call
No.------------------
From--------------------------------------------------
our
rights under,
any
take
not
will
it
the Customer Satisfaction
to
Resolution Program is available
and explain to the customer service representative the problem you
946-7
(905)
at
PLACE
THE
THIS INFORMATION
Support, should a dispute arise between you and
of
I
Title
by
the authorized Distributor/Dealer from
of
will
discuss your complaint and
to
412
DATE
AND
No.-----------------
Serial
Pioneer
,
Pioneer
required to use
the Magnuson-Moss Warranty-Federal Trade Commission Improvement Act,
Within
take, and in
OF
YOUR
AND
to
receiving your complaint, Pioneer will
of
days
40
PURCHASE
time period,
what
to
FOR
SALES RECEIPT IN
to
obtain a prompt resolution.
FUTURE REFERENCE
charge. You
without
you
are
the Pioneer product was purchased . After the complaint
whom
resolve the dispute;
Purchase
SAFE PLACE
A
the
experiencing, steps you have taken
are
investigate the dispute and
(2) respond to your complaint in writing
or
Date----------
available its Complaint
makes
Complaint
Resolution Program
U.S.C. 2301
15
QRY3001-B/S
<
et
will either:
Pimted in China
PIN:127071002217
seq.
to
>
 Loading...