


I
InstructionBook
Push-Button thefor
and1222
1221Pfaff
sewing these study you that reommond We
Customer: Plaff (new) Dear
sewing that hope and carefully, instructions
pleasure. a be always will Pfff your wdh
the at world efficient modern, the to Welcome
very probably are You machine, sewing Pfaff
we but machine, new your out try to anxious
read to time the take first you that suggest
sewing Pfff Your booklet instruction this
like wnd we and versatile, very is machine
boicts you
wonderful the all about you tell to
it. with create can
the through thumb you that suggest We
62 pages at it open then and first booklet
of parts essential roost the where 63, and
identifyinq By illustrated. are machine your
H b rn 0. aubalrnaschinen
PFAFF i
quickly will you machine, your on parts these
WestGorrnooy
ir lach .
ubo.[) k,arlsr
Pfaff your with yourself familiarize

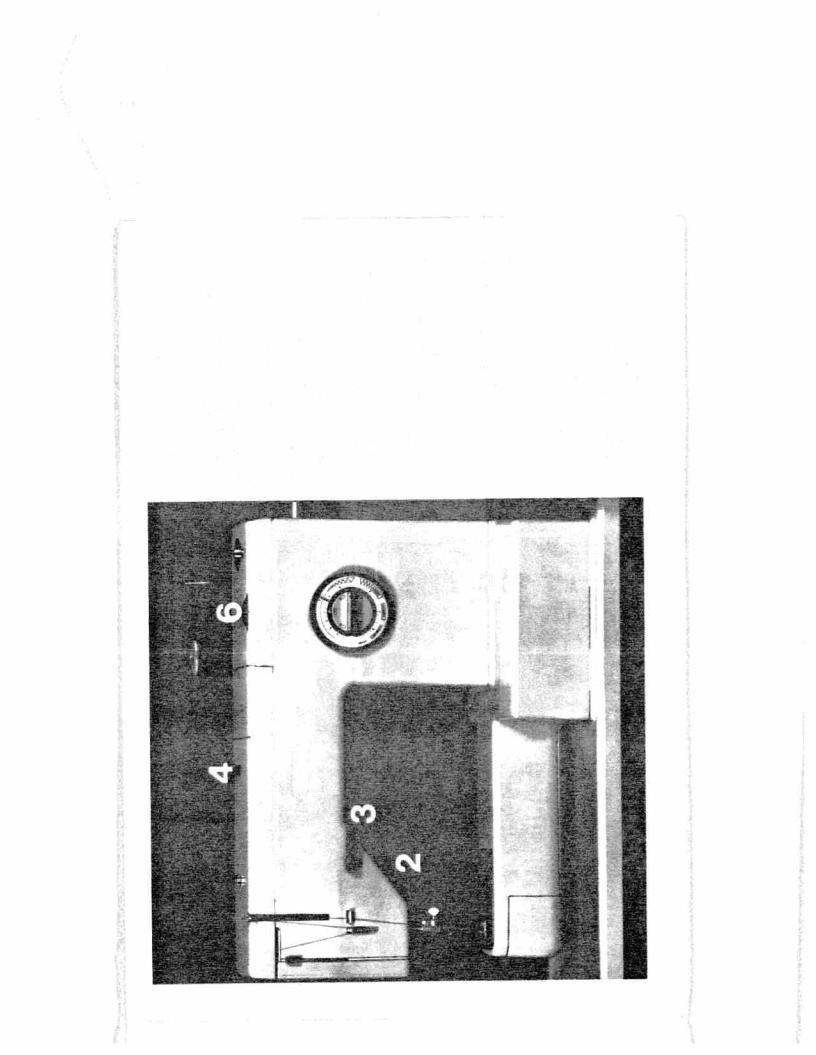
To start sewing right away.
only a few simple steps are necessary |
Just |
|||
plug in the machine, wmd the |
bobbm |
and |
||
thread the needle |
Push the master pluq |
into |
||
socket A in |
the |
machine base, |
and plug B |
|
into the wall |
socket |
|
|
|
Place the foot control under the table in a convenient posWon.
All you have to do now is push button C which is the onoff control of your machine. This button al%o switches on the glarefres sewing tight
3
.
••.:•. . .. ...,
•.
...
bobhn the w[radlnq start you Before
sew to threads two need you that remember
These thread. lower a and upper an seam: a
middle the In together locked are threads two
seam The stitch, lock
i form to fabric the of
below illustrated is way this in produced
illustration. the like look doesnt seam your If
19. page to turn
by on machine the turn bobbin, the wind To
the raise Then
. 2)
(page C button pushing
machine the of hack the on lifter bar pressei
iii (see mechanism sewing the disengage to
helcw)
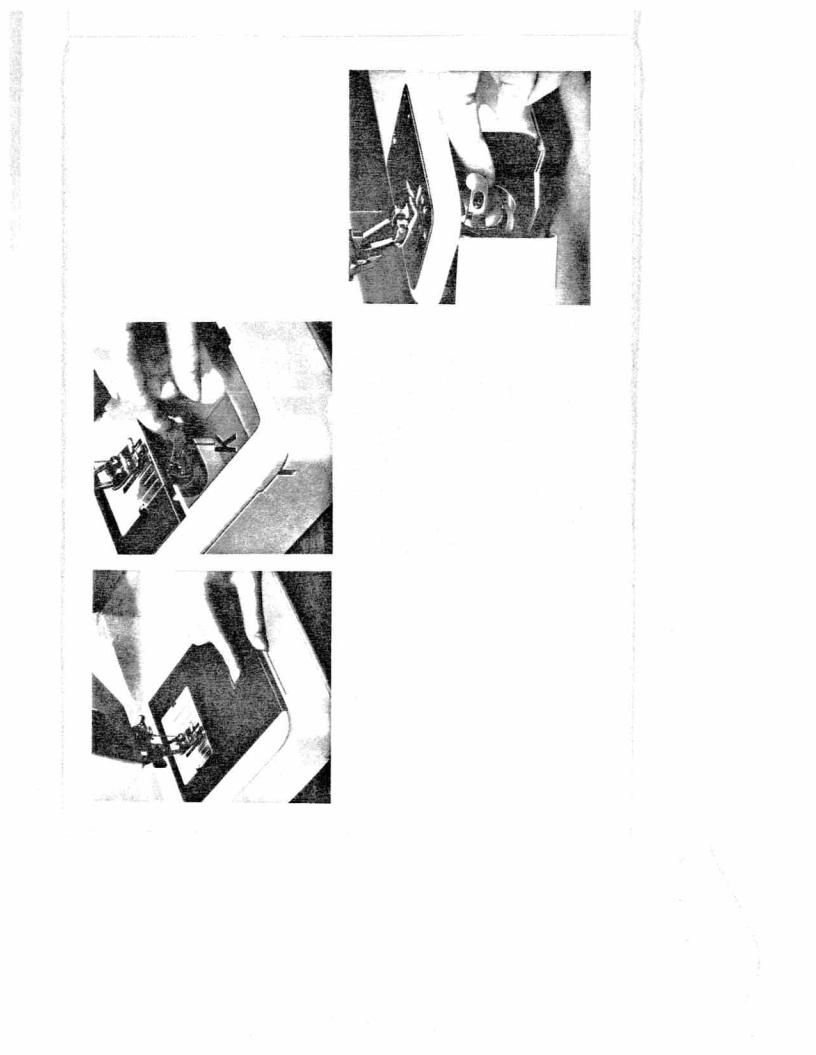
N
patented th and lifter bar presser thu Rais
case bobbin the remove To
aiitutalicolIy iS tiiechiiiSin Siopnistw Ptatf
ings hr
rnechuncni Stoprnatic The engaged.
iemov tor posihon correct the to needle the
the tiietdiiq and case bobbin the ing
needle.
Lilt |
cae |
|
OU |
When |
drops |
|
cover |
like |
out |
|
|
|
|
|
|||||||
ovur |
|
|
|
|
|
|
|
just |
pull |
|
|
|
ig |
|
|
|
|
|
|
|
|
|
bobbin |
|
Os |
latch |
bobbin |
|
|
|
|
|
|
|
|
|
- |
|
and |
|
|||
|
|
|
|
|
|
|
in |
|
|
|
bed |
|
|
aio |
|
|
|
di |
|
|
|
tho |
|
ii |
empty |
|
Cu |
Thci |
K |
bobbin |
||
|
|
Out |
|
|
Ii |
laid |
||||
|
out |
|
its |
|
|
|||||
the |
|
|
|
opi |
|
|
the |
left. |
|
|
|
|
|
|
|
|
|
|
|||
remose |
|
|
|
|
|
|
|
|
||
pull |
|
tall |
by |
the |
|
open |
lilt |
the |
||
|
|
the |
||||||||
|
|
|
||||||||
|
|
|
|
|
||||||
|
|
case |
latch, |
|
|
with |
||||
|
and |
|
|
|
|
|
||||
1221 |
bobbin. |
cannot |
|
1222 |
toward |
1221 |
||||
|
|
|
case |
|||||||
ill |
|
|
|
|||||||
|
) |
|
bobbin |
the |
|
|
|
Ptatf |
||
Ptati |
(see |
|
bobbin |
|
release |
|
Ptatt |
it |
|
bobbin |
the |
K |
the |
the |
|
the |
swing |
the |
|||
On |
latch |
with |
The |
hold |
you |
out |
On |
and |
with |
the |
4

its in is machine the of back the on lifter bar
bobbin the wind to and
the against E lever Push
. position
highest
press by winder bobbin the start and bohhin
. control
foot the on down ing
of spool a place and pins spool both Raise
when automatically stops winder bobbin The
. them
of one on thread
full, is bobbin the
disc |
(see |
|
|
winder |
magnetically |
|
|
|
|
||
bobbin |
position |
|
|
the |
|
||
|
|
||
on |
in |
. |
|
|
|||
bobbin |
held |
left) |
|
at |
|||
|
|||
Place |
is |
illustration |
|
where |
|||
the |
it |
|
|
|
|
I
...
—
5
bobbin, |
|
bobbin |
sewing |
presser |
|
|
|
|
|||
the |
|
the |
the |
the |
|
. |
around |
sure |
|||
to |
|
||||
illustration |
|
. |
|||
spool |
|
make |
e |
||
|
|
|
|||
|
|
|
i. |
||
the |
above |
clockwise |
to |
disengaged, |
|
|
|||||
|
|
||||
from |
|
|
|||
thread |
Check |
|
|||
thread |
the |
is |
|||
. |
|||||
|
|
||||
|
in |
|
|
||
|
|
times |
mechanism |
||
Pass |
as |
Wind |
|||
a |
|||||
the |
shown |
the |
few |
|
|
|
|
||||
|
|
|
|
||
|
|
|
|
I |
4

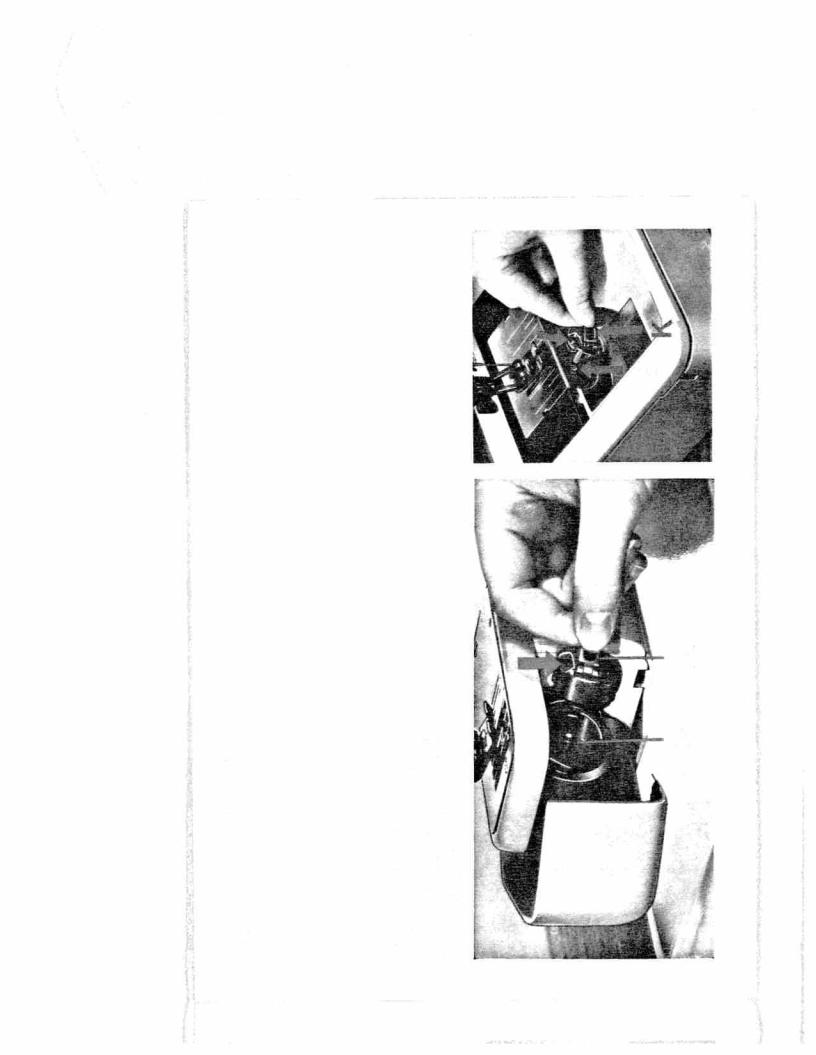
To insert the bobbin into the bobbin case. . -
2
6
Fig. 1 Insert the tilled bobbin into the bobbin case, making sure the thread end drops from the top down towards you
Fig. 2 Pull the thiead into the slot
Fig. 3 |
and under the spring, As you draw |
th thread, the bobbin should rotate clock |
|
wise (as indicated by an arrow). Leave about three inches of thread hanging from the bobbin case
3
7
case bobbhi the repace to nd
mach3ne the n
onto case bobbin the push and K latch Lift
(see slot its sure rnakinq
. S
stud center
latch the Release upwards, points arrow)
you until case bobbin the against press and
. place
into snap it hear

Now
thread
the
needle
Pull the thread from the spool and into the slot in the top cover of the machine. By this motion, the thread is drawn into the upper
tension |
which is |
enclosed under |
the |
top |
||||
cover |
|
|
|
|
|
|
|
|
Pull |
th |
thread |
to |
the |
right |
and |
pass it |
|
through |
the slots |
in |
the |
thread |
guides |
and |
||
the take-up lever, as shown in the illustma tions below and on the right
The built-in Pfaff needle threader will then thread the needle for you quickly and easily.
8
a
automatic the with needle the Threading
threader needle Plait
needle lh that sure make
. begirt
you Before
bar presser the
. e
I point, highest its at is
its at is machine the of back the on lifter
. 3)
page (see position highest
9
11
|
place |
|
Ill |
down |
thoad |
|
slightly |
thread |
the |
pull |
eom |
|
of |
posh |
|
|
|
of |
|
|
back |
|
|||||||||||
with |
|
the |
|
|
|
|
|
|
|
|
|
|
||||
down |
|
|
(see |
contml |
|
|
|
|
release |
and |
eye |
|
the |
(horizontal) |
|
|
|
|
|
|
|
|
|
|
|
||||||||
same |
|
|
|
|
|
|
loop |
|
|
|||||||
|
|
|
|
|
|
|
|
|
|
|||||||
|
|
|
|
|
|
|
|
|
|
|
||||||
|
time |
hook |
hand |
|
needk |
|
control |
the |
|
|
|
|
|
|
||
control |
|
|
|
pulls |
Fully |
|
needle |
|
on |
|
|
|||||
|
the |
threader |
|
thread |
|
|
|
|||||||||
|
|
|
|
|
|
|
|
|||||||||
|
right |
|
|
threader |
|
lifter |
|
|
||||||||
|
the |
|
and |
|
normal |
|
||||||||||
|
|
|
|
|
|
|||||||||||
|
|
. |
|
|
|
|
||||||||||
|
at |
under |
|
|
|
|
the |
|
|
bar |
|
|||||
|
your |
|
|
|
|
|
|
|
||||||||
threader |
the |
|
|
|
|
prong |
|
reverses |
eye |
|
the |
|
|
|
|
|
|
|
|
needle |
draw |
|
|
|
|
|
|
||||||
|
|
|
|
|
|
|
|
|
|
|
||||||
|
and |
thread |
with |
needle |
needle |
of |
through |
|
presser |
|
|
|||||
|
|
|
|
|
||||||||||||
|
|
|
|
|
|
|
||||||||||
|
|
and |
|
|
|
|
to |
|
||||||||
needle |
hand, |
|
threader |
|
|
threader |
|
|
hold |
|
|
its |
|
|||
|
the |
|
|
prong |
|
|
|
|
|
|
||||||
|
|
|
|
|
|
|
|
|
|
|||||||
needle |
completely |
|
the |
the |
take |
thread |
|
the |
machine |
|
||||||
|
left |
|
push |
|
Release |
the |
|
|
|
|||||||
|
|
|
|
|
|
|
|
|
|
|
|
|||||
Push |
your |
the |
needle |
New |
under |
until |
through |
control, |
the |
pletely |
the |
tion |
||||
Return |
||||||||||||||||
the |
|
|
|
|
|
the |
|
|
|
|
|
. |
|
|
|
|
|
|
|
|
|
|
|
|
|
|
|
|
|
|
|
. |
a

I
seam the in break should thread bobbin the If
Stopmatic with up thread bobbin Draw
sewing, while empty becomes
bobbin the or
Stopniatic the of description detailed a (For
without thread bobbin too up ciraw
r rr
c you
16) page to refer
the push this, do to
fool sowing the
ensinig r
nom in instructed as down, lnttr bar presaur
ttireau t)ObbiIi the sewing, start you Before
lb. pagi.. ann 3 her
hub eodie
the tnraugn up drawn he to has
left your in loosely thread needle the Hold
pre. the raise hand right your with and hand
normal ta to it return then aria lifter bar ser
position. (horizontal)
and uown move to needle the causes This
the throogh thrcad bobbin the up bring
neudle tl pull Ligritly loop. a in hole needle
oni
ap ttrread bobbin the draw to thread
the under back threads both Place pletely.
tool sewing
1222 PFAFF)
10
your on sewing start you Before
machine new
Place
. material
scrap of piece a sewing try
presser Flick
. foot
sewing the under fabric the
position lowest its to ill,) (see 2 lifter bar
the onto lowered is foot sewing the and
fabric,
sewing for machine your prepare To
have you after even items foilowing the chock
. Pfaff
your with acquainted well bocome
machine turn to 1 button
off - on
Touch
•
. on
lowest Its at be must 2 lifter bar Presser
•
sewing the that ensure to order in position
. down
is foot
hod its in be must 3 contro!
feed - Reverse
•
the show must and position zontal
on symbol sewing
reverse - forward
. surface
top its
de the sewing, zigzag and straight For •
mechanism
stitch - functional
and corative
is, it sure make To
. disengaged
he must
your of cover top the on 4 button push
. machine
S selector stitch
Matic
-
Ultra
of knob The •
the with horizontally positioned be must
at located
symbol buttonhole
. left
the
for need you which 6, dial length Pattern
•
to turned be must stitching, decorative
symbol: this
ii
12
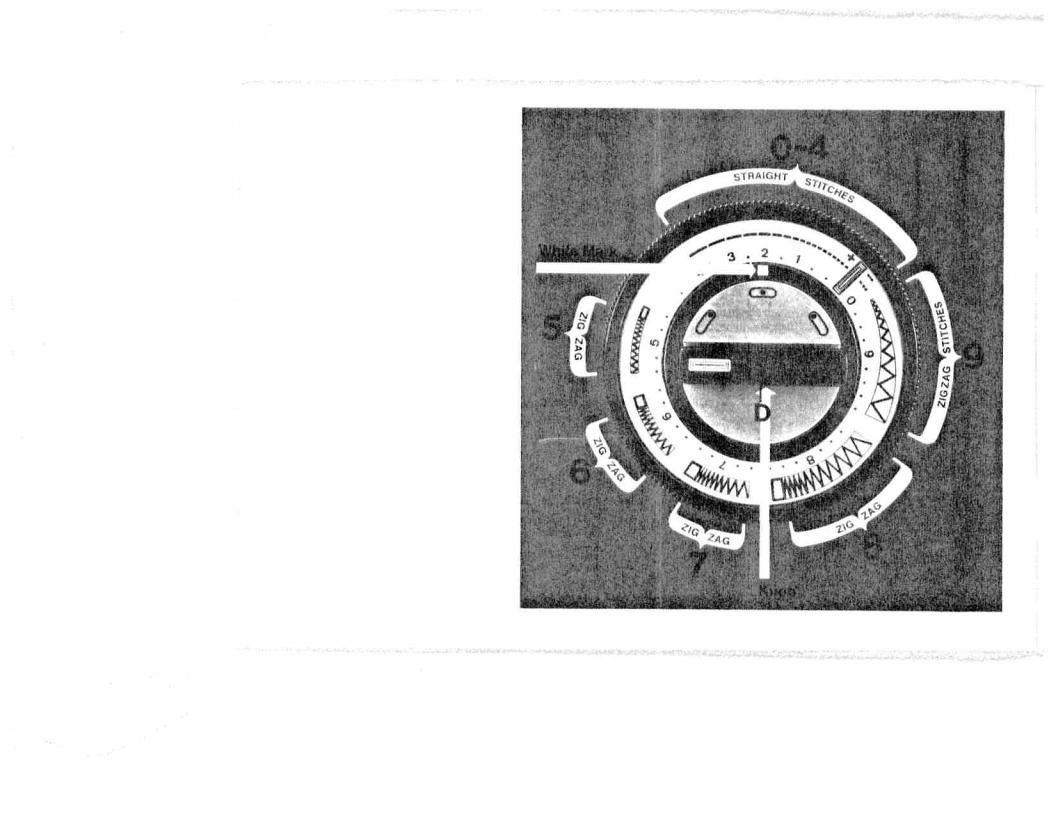
The Ultra-Mafia stftch seector
The Ultra-Matic stitch selector sets your ma chine for straight. and zigzag stitching.
The different stitch ranges are marked by numbers. For instance, the range from 0 to 4 comprises straight stitches of different lengths. Turn the outer ring of the stitch selector until the symbol of the stitch desired is opposite the white mark, ln the illustration on the left, the stitch selector is set for sewing straight stitches about 2 mm long (about 12 stitches per inch),
Start by making a sewing test.. Press the foot control pedal, and watch your machine sew a straight’stitch seam.
Then lot your Pfaff run at diffe rent speeds. The harder you press the foot control pedal, the faster your machine will run.
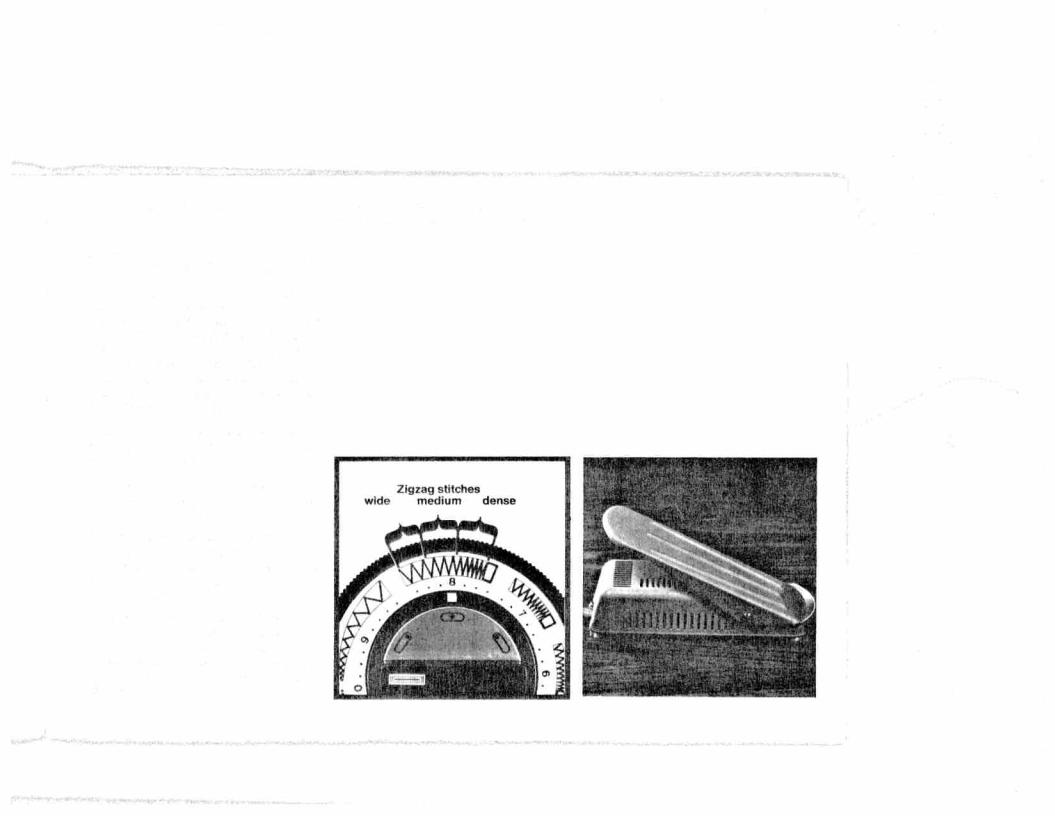
Now try a zigzag stitch, Zigzag stitches are shown on the UitraMatic stitch selector In the stitch ranges marked 5, 6, 7, 8 and 9. The zigzag stitch desired is dialed just as easily as a straight stitch,
The setting of the stitch selector is indicated for every sewing operation discussed, This simplifies the operation of your machine, In the illustration on this page the stitch selector is shown set for a medium zigzag stitch in stitch range 8.
Note: The needle must never be in the mate del when you turn the Ultra-Matic stitch selector,
13

To sew backwards |
Darntng with your Pfatt is discussed on |
|
page 24. |
or backtack a seam, press the reverse- |
|
|
|
|
|
|
|
|
feed control on the front of your machine |
|
|
|
|
|
|
|
|
down, moving it from A to B. When this |
/frur i |
this |
cuiti ci |
is fur nod |
to |
pusrtiori |
0 |
|
control is released, it returns to position A |
(illustrated |
below), |
the |
darrrrrrj |
symbol |
is |
||
automatically. |
\isrDfe |
and |
the niachirie |
teed |
is |
disengaged. |
||
If you wish to sew a longer seam in roverse, flick the reverse-feed cuntiol to position C
(vertical),
14

that |
push |
Stop |
position |
bobbin |
seam |
becomes |
. |
posi |
high |
re |
|
|
it |
|
|||||||||||
breaks |
|
its |
|
|
||||||||
|
|
|
|
|
|
|
|
|
|
|
||
means |
|
|
|
|
|
|
|
lowest |
|
|
|
|
you |
the |
(as |
the |
of |
|
|
thread |
at |
released, |
|
||
|
When |
0, |
in |
|
case |
bobbin |
|
|
|
|
|
|
below) |
|
when |
|
|
|
stopped |
|
. |
||||
|
|
|
|
|
|
|||||||
position |
|
|
|
|
in |
|
||||||
|
|
|
up, |
|
|
|
|
|
||||
|
|
|
|
|
|
|
|
|
its |
|
|
C |
|
. |
|
engaged |
|
in |
|
|
bobbin |
|
|
is |
position |
|
|
|
|
|
|
|
|
|
||||
|
to |
used |
|
the |
|
lifter |
has |
lover |
|
|||
(illustrated |
lowered |
litter |
is |
is |
drawn |
when |
|
the |
bar |
needle |
this |
to |
|
Is |
|
|
|||||||||
|
|
|
|
|
automatically |
|||||||
|
|
|
|
|
|
|
||||||
|
|
|
mechanism |
position |
to |
|
|
when |
presser |
the |
When |
|
|
|
|
|
|
|
|
||||||
C |
foot |
bar |
|
|
be |
interruptions, |
|
|
|
|||
3 |
the |
the |
matic |
A) |
thread |
empty, |
Hold |
tion |
est |
|
||
Position |
sewing |
presser |
|
This |
|
|
|
or |
|
|
. |
|
|
|
|
|
|
is |
|
|
|
the |
until |
point |
|
|
|
|
|
|
|
|
|
|
|
|
turns |
|
. |
|
|
|
. |
|
|
|
|
|
|
|
|
|
|
|
|
|
|
|
|
|
|
|
|
|
‘
I
|
highest |
|
|
various |
|
|
|
is |
bobbin |
autorni,caIty |
|
|
|
pnsi |
menttoned |
you |
posi |
|
for |
fnhrin, |
and |
|
|
|
|
|
|
|
to |
|
|
used |
the |
raised |
for |
|
|
|
|
|
|
tell |
|
|
|
|
|
|
|
|
|
|
|
|
going |
|
|
is |
removing |
|
disengaged |
|
|
|
sewing |
to |
has |
at |
|
|
foot |
|
raised |
|
|||
its |
its |
|
|
|
|
|
|
|||||
|
been |
|
belowt |
|
|
|
|
|
||||
|
|
|
now |
|
|
|
sewing |
|
|
|
|
|
|
litter |
|
|
|
lillustrrited |
500 |
|
|
|
|
||
|
|
|
when |
|
|
|
needle |
|
||||
finished |
|
lever |
were |
set |
|
|
|
|
mechanism |
is |
|
|
|
|
|
needle |
|
|
|
||||||
bar |
|
|
|
the |
|
point |
||||||
far, |
|
|
|
|
||||||||
|
presser |
|
|
|
|
|
|
|
|
|
|
. |
you’ve |
this |
so |
works |
|
A |
the |
position, |
|
|
The |
highest |
|
|
|
|
|
|||||||||
|
Since |
|
PositIon |
sewing |
||||||||
|
it |
|
|
|
||||||||
When |
the . |
repeatedly |
how |
tions |
threadinq |
this |
winding |
its |
||||
flick |
tion |
1 |
In |
the |
|
|||||||
|
|
|
|
|
|
|
|
|
|
|
. |
|
|
|
|
|
|
|
|
|
|
|
|
|
to |
1222 (i,F4FF)
when |
foot |
fabric |
the |
|
|
turning |
|
||
sewing |
|
|
||
used |
in |
|
||
|
|
the |
|
|
is |
The |
remains |
for |
|
above) |
|
|||
point |
|
|||
. |
|
|||
(illustrated |
fabric |
needip |
pivot |
|
the |
|
|||
the |
|
|||
|
|
|
|
|
|
turn |
|
a |
|
B |
hot |
as |
|
|
to |
serves |
|
||
|
|
|
||
PosItion |
need |
. |
. |
|
|
you |
raised |
and |
material |
2 |
is |
1 —--
— ‘r —
J: .

and |
and |
sewing |
cross |
|
seams |
striped |
Matchmaker |
thick |
|
long |
over |
|||
plaids, |
||||
|
|
|||
sewing |
matching |
The |
sewing |
|
tor |
for |
|||
. |
||||
|
||||
used |
perfectly |
fabrics |
used |
|
|
||||
is |
patterned |
also |
||
|
||||
This |
for |
|||
toot |
||||
toot |
|
|
is |
|
seam |
match |
the |
iong |
wUl |
how |
|
fabric |
|
|
matter |
|
|
of |
|
|
no |
|
|
pieces |
|
|
pertectly, |
.be |
|
Two |
may |
seams
machine sewing home only the is Pfaff Your
sewing Matchmaker a featuring world the in
. toot
toot sewnig Matchmaker the engage To
raised the ot slot the in down it push simply
(see place into snaps it until foot sewing
. lutt
bottom at illustraOon in arrow
,liqhiIy, down it push loot, this disengage To
sewinj tue fl
0 . 51
the of out up it pull then
toot
$

Match the with used be can which feet Other
toot, hemmer the include foot sewing maker
. foot
felling and foot blindstitch
are |
|
seams |
|
cross |
|
thickest |
. |
the |
obstacle |
|
|
Even |
no |
material |
foot |
(See |
|
|
|
. |
|
|
|
||
sewing |
. |
|
|
||
checked |
exactly |
|
|
||
|
|
|
|||
Matchmaker |
match |
|
|
||
of |
|
|
|||
|
|
|
|||
pieces |
|
will |
1 |
|
|
|
stripes |
|
|||
two |
the |
page |
|
||
join |
of |
nr |
0f |
|
|
aid |
|
|
|||
squares |
bottom |
|
|||
you |
|
||||
th |
|
||||
|
|
||||
|
|
|
|||
When |
the |
ill |
|
||
with |
|
||||
|
|
|
at |
|
|
the |
be |
illustration |
Match |
|
|
will |
|
||||
|
|
||||
match |
|
|
|||
result |
|
the |
|
||
|
|
top |
|
||
you |
the |
without |
|
||
trio |
|
||||
|
|
||||
|
|
|
|||
carefully |
patterns, |
|
|
||
in |
sow |
. |
|||
|
|
shown |
|
||
how |
other |
you |
foot |
||
that |
|||||
when |
sewing |
||||
|
|||||
matter |
or |
||||
to |
|||||
squares |
(below) |
||||
No |
similar |
maker |
Art Pfaff, your of advantage another is This
the “behind operates
which control electronic
whenever assistance your to comes
scenes
several or seams thick over sew to have you
on pressure the relieve Just
. fabric
of layers
control electronic the and
,
control foot the
machine your of speed the reduces instantty
stitching for sewing
stitch - stitchby
stow to
. material
the in spots thickest the through
17

simple. CS Just is foot sewing the Changing
different require operations sewing Vanous
contains macnine your of box acctssory The
detailed A needles. special or needles size
foot, (hemmer feet sewing special several
on shown is Chart Thread and Needle
for used are which
) etc
foot, buttonhole
61. page
toot sewing Which operations. sewing venous
bar presser the lower needle, the change To
discussed is job ewrrtg secrfrc a for use to
15) page (see D position to it hick and lifter
pages. following the and 21 page on
to mechanism Stopmatic the causes This
for position correct the to needle the bring
changing.
presser the push foot, sewIng the change To
the pull and below) ill. (see N screw Loosen
screw Loosen position. highest ifs to lifter bar
a Insert
holder needle the of out needle old
tilt removed, be can foot sewing the until B
go, will it as far as up it push and needle new
sewing new The backwards. or sideways it rug
tacos shank its of side flat the sure making
Tighten order. reverse me in attached is tnot
needle the tighten Now back. the toward
sew. to starting betore again B screw
screw
only. needles 130 System Use
foot |
|
sewing |
|
or |
|
needle |
|
the |
|
Changing |
is |
|
easy. |
18
I
‘V
the turning by regulated is tension lower The
when correctly set are tensions thread The
this Turn case. bobbin the on screw small
means This factory. our leaves machine the
rather thumb your (with right the to screw
adjusted. be not need normally they that
or tension, tighter a for nail) finger your than
and |
|
|
(R) |
|
|
Right |
arrows, |
|
tension. |
||
by |
||
looser |
||
indicated |
||
a |
||
|
||
for |
are |
|
left |
||
(L) |
||
the |
||
left |
||
to |
the |
check |
|
with |
||
case, |
||
satisfied |
||
this |
||
|
||
be |
In |
|
seam. |
||
not |
||
|
||
may |
the |
|
|
||
you |
of |
|
Even |
appearance |
|
so, |
|
tension lower or upper the whether see to
bobbin’ the from thread the pull can you If
tensions the regulate Then adjusting needs
bobbin the resistance, little against easily
follows: as
not need You right. just is tension thread
use |
in |
|
|
always |
and |
|
|
bobbin |
|
||
you |
|
||
the |
|
||
if |
|
||
tension |
on |
|
|
lower |
thread |
|
|
size |
|
||
the |
needle, |
||
same |
|||
change |
|||
|
|||
the |
the |
top |
is |
the |
|
dial |
|||
the |
higher |
||
tension |
|||
|
|||
under |
The |
||
|
|||
|
|
||
located |
The |
10. |
|
to |
|||
|
|||
|
|
||
|
machine, |
0 |
|
is |
numbers |
||
tension |
your |
with |
|
upper |
|||
of |
provided |
||
The |
cover |
normal The tension, the tighter the number,
19
on |
|
|
line |
|
|
black |
|
|
a |
|
|
by |
|
|
marked |
|
|
s |
|
|
setting |
scale. |
|
tension |
||
the |
property through seams Perfect
balancedtensions

your nareases workpate detachaWe A
surface workEng
Pfaft your of ama sowing the increase lo
detachable a with supplied is 1222 Platl The
extcnsion bedpate tie attach Portable, 1221
the at illustration the in shown as workplate,
. below
Ilustrated
pushed simply is worKpiate This
. (left>
bottom
pins guide two its until arm tree the over
. machine
the in holes appropriate the enter
 Loading...