


1214
I
%
4,-
1W
at
\f
‘4
b
4’
SW
‘I
I
4
n
S
4’
4”
“S
ontentS
:oreword
‘arts
ofthePfaff
1213
arts
of
Ptaff
machines
214
and
1222-E
viachine
drive
3
reparations
for
bobbin
winding
Removing
the
bobbin
case
Bobbin
winding
Disengaging
the
sewing
mechanism
Inserting
the
bobbin
Inserting
the
bobbin
case
Upper
threading
Automatic
needle
threader
Drawing
up
the
bobbin
thread
Thread
cutter
Before
you
start
sewing
Ultra-Matic
stitch
selector
Straight
stitching
Zigzag
stitching
Foot
control
Reverse
sewing
Dropping
the
machine
feed
Presser
bar
lifter
Stopmatic
control
Dual
feed
1
Sewing
over
cross
seams
2
Electronic
control
Changing
the
needle
3
Changing
the
sewing
foot
4
Regulating
the
thread
tensions
5
Detachable
workplate
6
Felling
7
Hemming
7
Zipper
insertion
8
Darning
9
Basting
10
Single-needle
cording
11
Shirring
with
filler
thread
12
Overcasting
edges
12
Cording
13
Inserting
lace
14/15
Elastic
zigzag
seam
15
Appliqué
work
15
Needle
position
control
15
Button
sewing
16
Sewing
buttonholes
16
Monogram
embroidery
17
Quilting
17
Edge
stitching
18/19
Darning
with
wool
thread
Eyelet
embroidery
Utility-stitch
mechanism
Mending
hems
Darning
rips
20
20
21
Sewing
on
elastic
22
Stitching
terry
cloth
23
Elastic
triple
straight
stitch
seam
24
Shell
edging
25
Blindstitching
26
Inserting
patches
28
Reinforcing
edges
of
elastic
29
woven
fabrics
30
Joining
elastic
knitted
fabrics
31
Utility-stitch
combinations
32
Sewing
on
elastic
strands
Joining
knitted
and
jersey
fabrics
57
Elastic
triple
zigzag
stitch
57
Reinforcing
hems
in
elastic
fabrics
57
Decorative
stitch
mechanism
58
Ornamental
stitch
combinations
60/61/62
Needle
and
thread
chart
63
Cleaning
and
oiling
64
Changing
the
light
bulb
65
Trouble
shooting
65
Carrying
case
66
Page
Page
19
19
Page
45
46
48
48
49
50
51
52
53
54
55
55
56
56
34
35
36
38
39
40
42
43
43
44
V&id
for
United
Kingdom
ony!
The
wires
in
this
mains
lead
are
coloured
in
accordance
with
the
following
code:
Blue:
Neutral,
Brown:
Live.
As
the
colours
of
the
wires
in
the
mains
lead
of
this
appliance
may
not
correspond
with
the
coloured
markings
identifying
the
terminals
in
your
plug,
proceed
as
follows:
The
wire
which
is
coloured
blue
must
be
connected
to
the
terminal
which
is
marked
with
the
letter
N
or
coloured
black.
The
wire
which
is
coloured
brown
must
be
connected
to
the
terminal
which
is
marked
with
the
letter
L
or
coloured
red.
Please
note:
When
13
amperes
plug
is
used
a
3
amperes
fuse
has
to
be
fitted.
Uz1I®
Instruction
Book
for
the
Push-Button
Pfaff
1213,
1214
and
1222-E
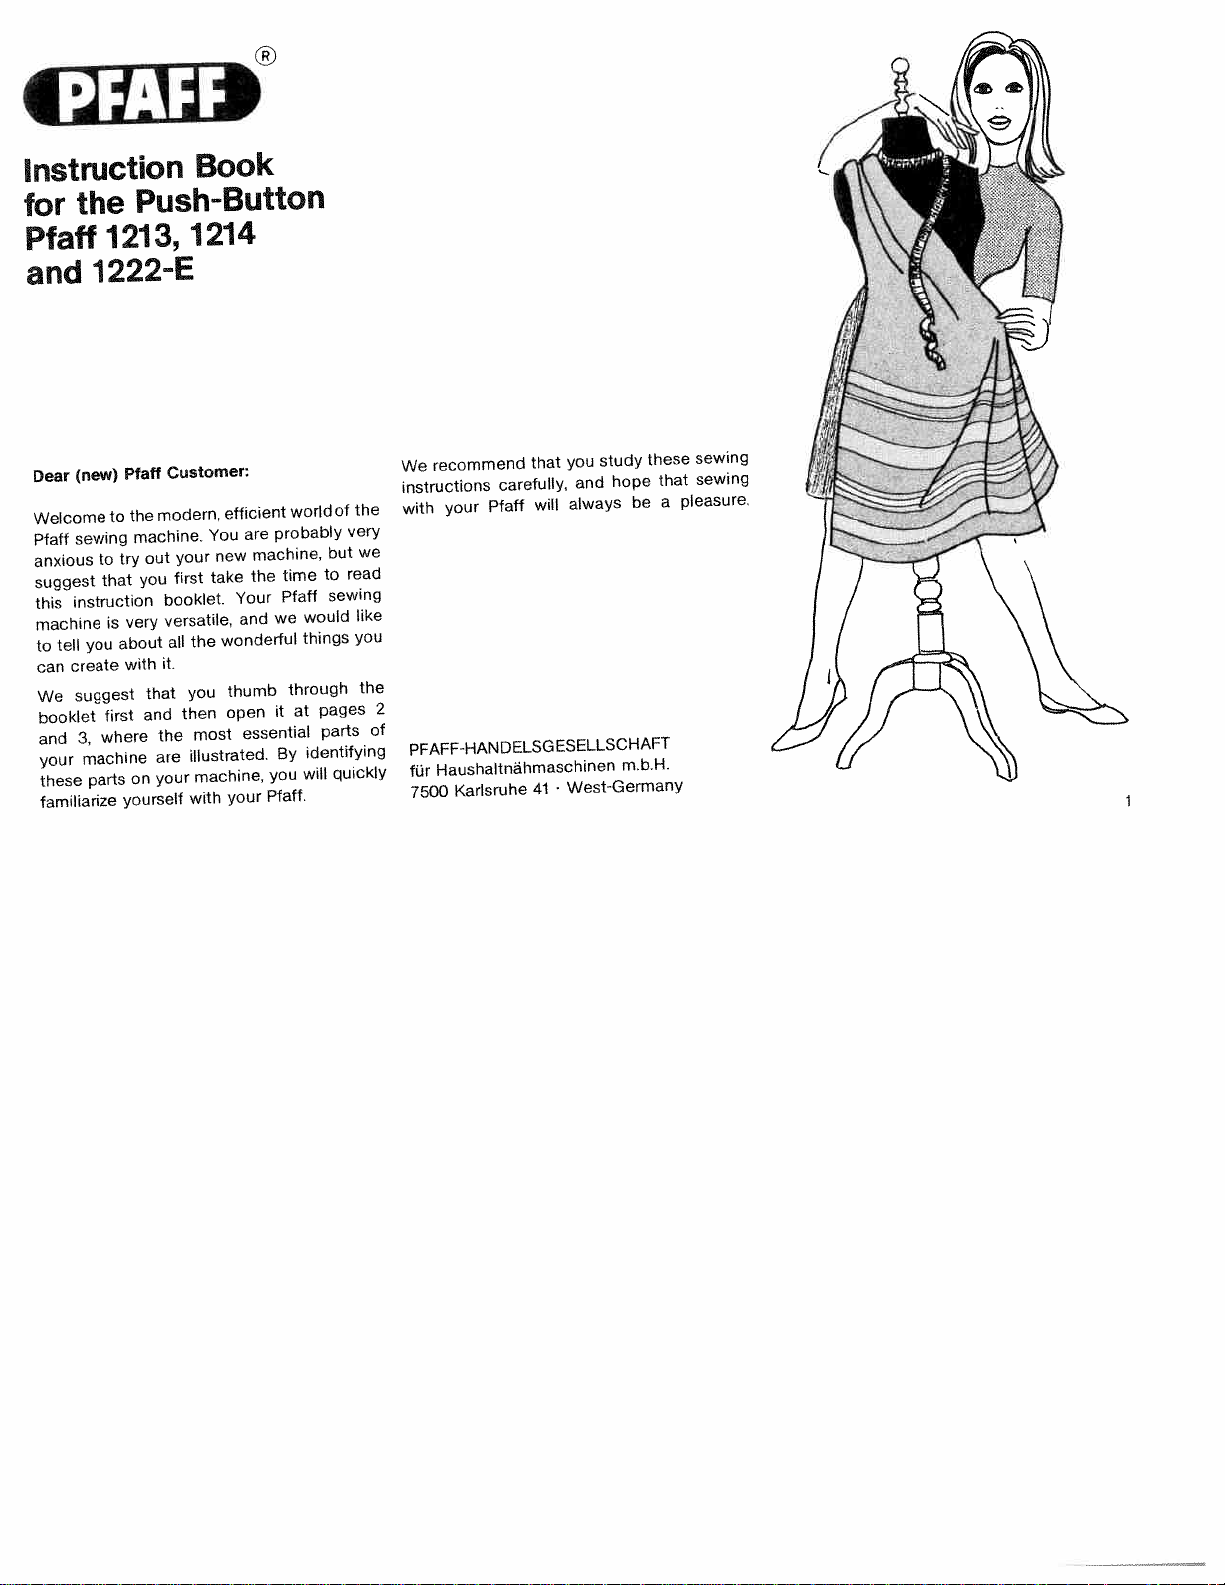
Dear
(new)
Pfaff
Customer:
Welcome
to
the
modern,
efficient
world
of
the
Pfaff
sewing
machine.
You
are
probably
very
anxious
to
try
out
your
new
machine,
but
we
suggest
that
you
first
take
the
time
to
read
this
instruction
booklet.
Your
Pfaff
sewing
machine
is
very
versatile,
and
we
would
like
to
tell
you
about
all
the
wonderful
things
you
can
create
with
it,
We
suggest
that
you
thumb
through
the
booklet
first
and
then
open
it
at
pages
2
and
3,
where
the
most
essential
parts
of
your
machine
are
illustrated.
By
identifying
these
parts
on
your
machine,
you
will
quickly
familiarize
yourself
with
your
Pfaff.
We
recommend
that
you
study
these
sewing
instructions
carefully,
and
hope
that
sewing
with
your
Pfatf
will
always
be
a
pleasure.
PFAFF-HANDELSG
ESELLSCHAFT
für
Haushaltnähmaschinen
m.b.H.
7500
Karlsruhe
41
West-Germany
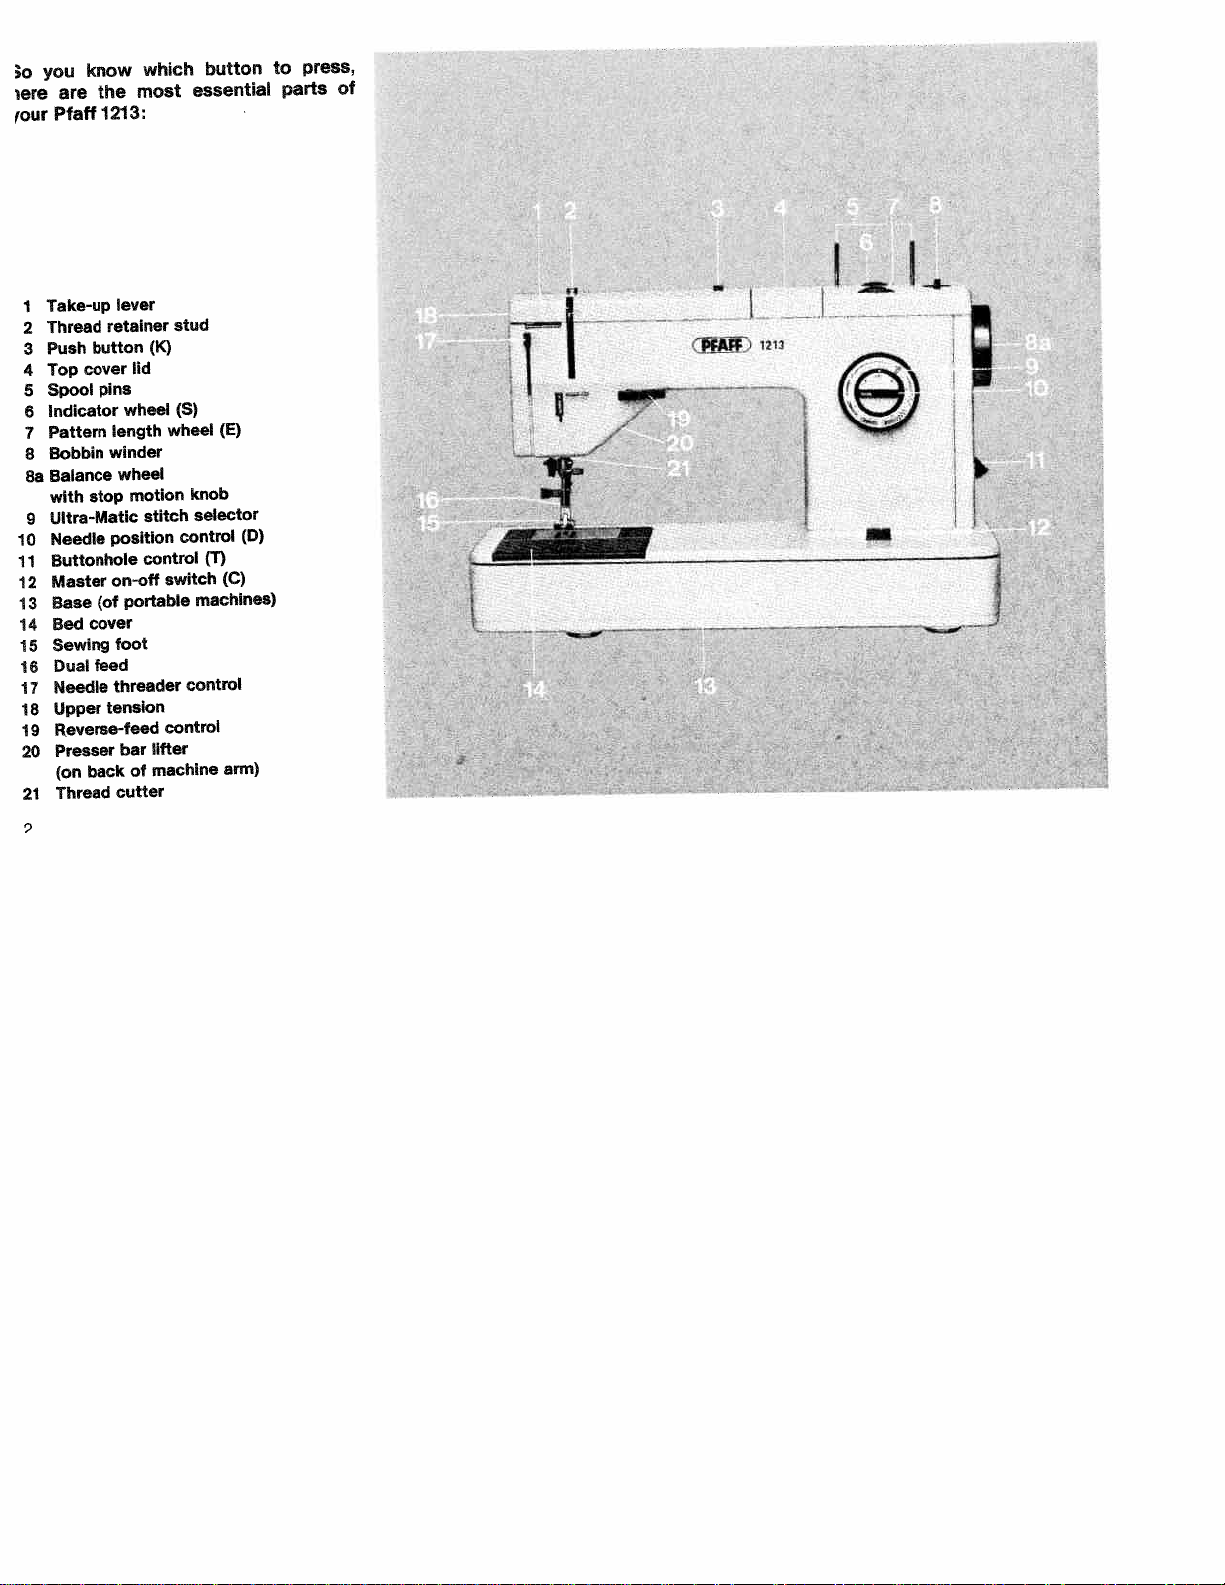
194
o
you
know
which
button
to
press,
ere
are
the
most
essential
parts
of
tour
Pfaff
1213:
1
Take-up
lever
2
Thread
retainer
stud
3
Push
button
(K)
4
Top
cover
lid
5
Spool
pins
6
Indicator
wheel
(S)
7
Pattern
length
wheel
(E)
8
Bobbin
winder
Ba
Balance
wheel
with
stop
motion
knob
9
Ultra-Matic
stitch
selector
10
Needle
position
control
(D)
11
Buttonhole
control
()
12
Master
on-off
switch
(C)
13
Base
(of
portable
machInes)
14
Bed
cover
15
Sewing
foot
16
Dualfeed
17
Needle
threader
control
18
Upper
tension
19
Reverse-teed
control
20
Presser
bar
lifter
(on
back
of
machine
aim)
21
Thread
cutter
2
H
ErL
I
a
•
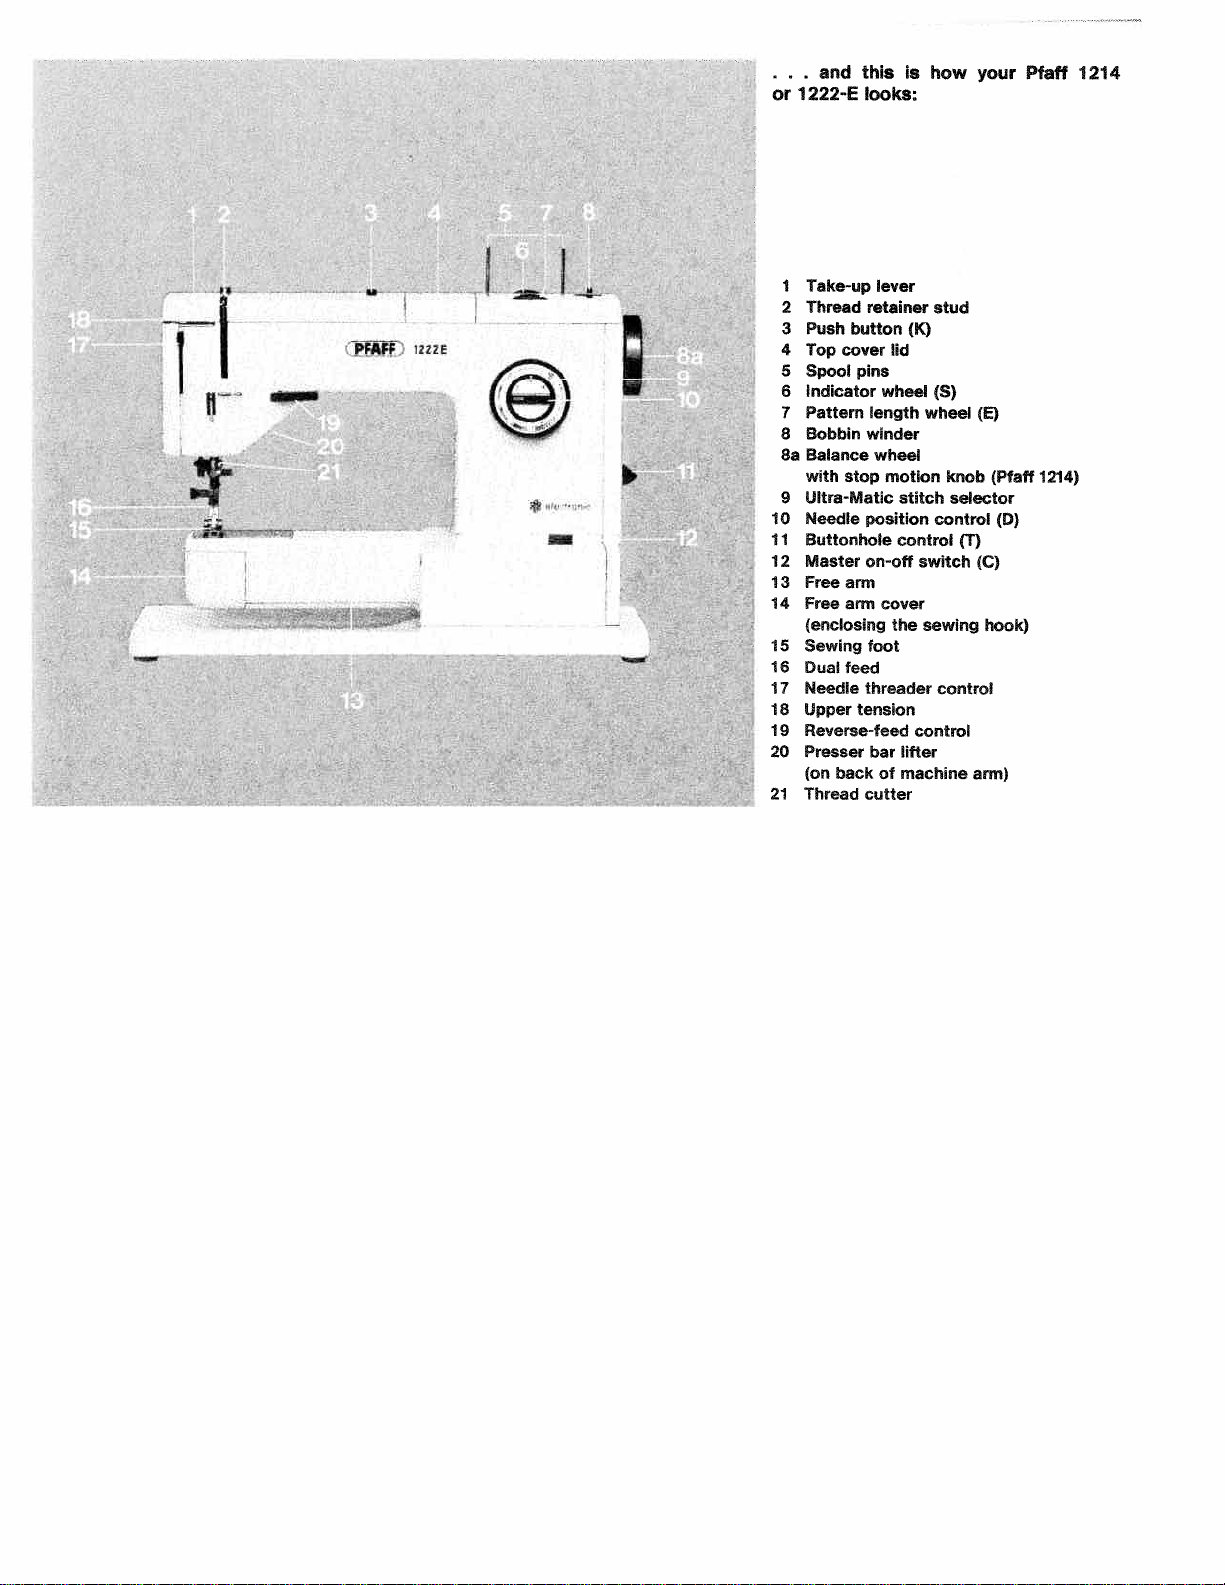
and
this
is
how
your
Pfaff
1214
or
1
222-E
looks:
1
Take-up
lever
2
Thread
retainer
stud
3
Push
button
(K)
•PAFF
1222E
4
Topcoverlid
5
Spool
pins
•
_____
6
Indicator
wheel
(S)
7
Pattern
length
wheel
(E)
8
Bobbin
winder
8a
Balance
wheel
with
stop
motion
knob
(Pfaff
1214)
9
Ultra-Matic
stitch
selector
10
Needle
position
control
(D)
11
Buttonhole
control
(1)
12
Master
on-off
switch
(C)
13
Free
arm
14
Free
arm
cover
(enclosing
the
sewing
hook)
15
Sewing
foot
16
Dualfeed
17
Needle
threader
control
18
Upper
tension
19
Reverse-feed
control
20
Presser
bar
lifter
(on
back
of
machine
arm)
21
Thread
cutter
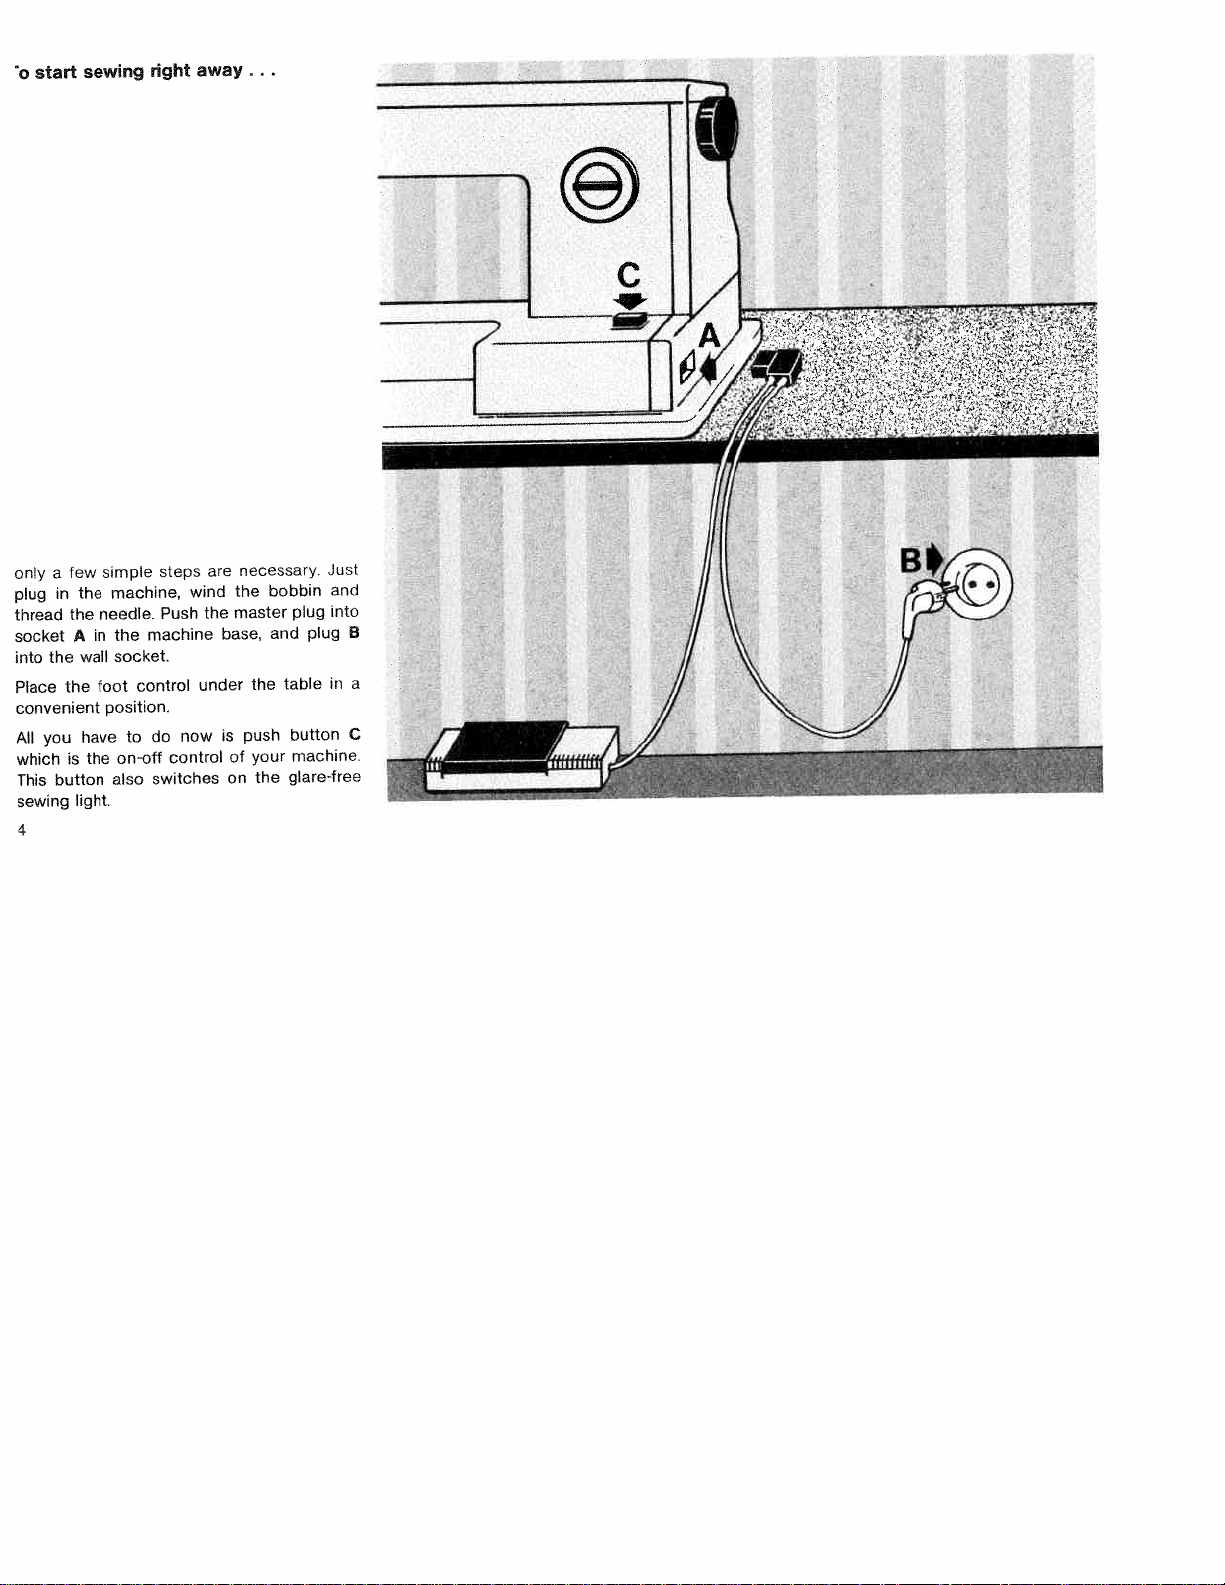
o
start
sewing
right
away.
only
a
few
simple
steps
are
necessary.
Just
plug
in
the
machine,
wind
the
bobbin
and
thread
the
needle.
Push
the
master
plug
into
socket
A
in
the
machine
base,
and
plug
B
into
the
wall
socket.
Place
the
foot
control
under
the
table
in
a
convenient
position.
All
you
have
to
do
now
is
push
button
C
which
is
the
on-off
control
of
your
machine
This
button
also
switches
on
the
glare-free
sewing
light.
4
Th.
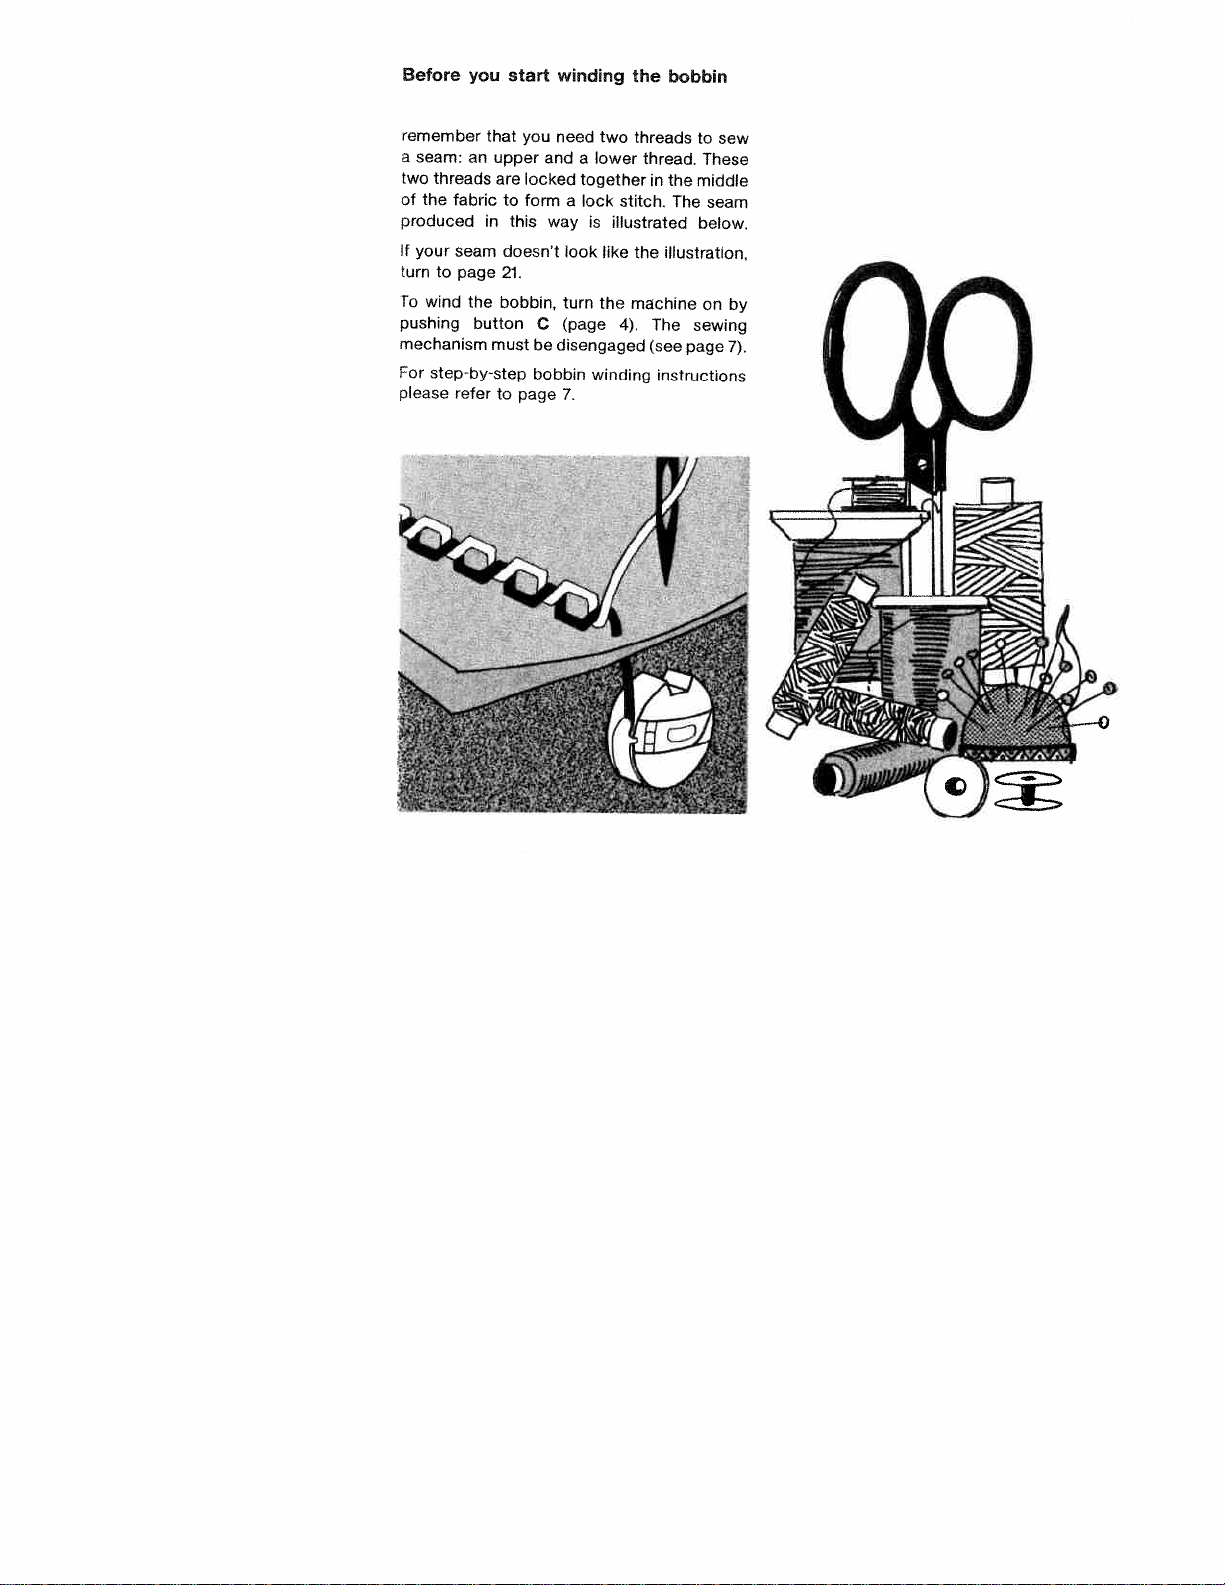
Before
you
start
winding
the
bobbin
remember
that
you
need
two
threads
to
sew
a
seam:
an
upper
and
a
lower
thread.
These
two
threads
are
locked
together
in
the
middle
of
the
fabric
to
form
a
lock
stitch.
The
seam
produced
in
this
way
is
illustrated
below.
If
your
seam
doesn’t
look
like
the
illustration,
turn
to
page
21.
To
wind
the
bobbin,
turn
the
machine
on
by
pushing
button
C
(page
4).
The
sewing
mechanism
must be
disengaged
(see
page
7).
For
step-by-step
bobbin
winding
instructions
please
refer
to
page
7.
\
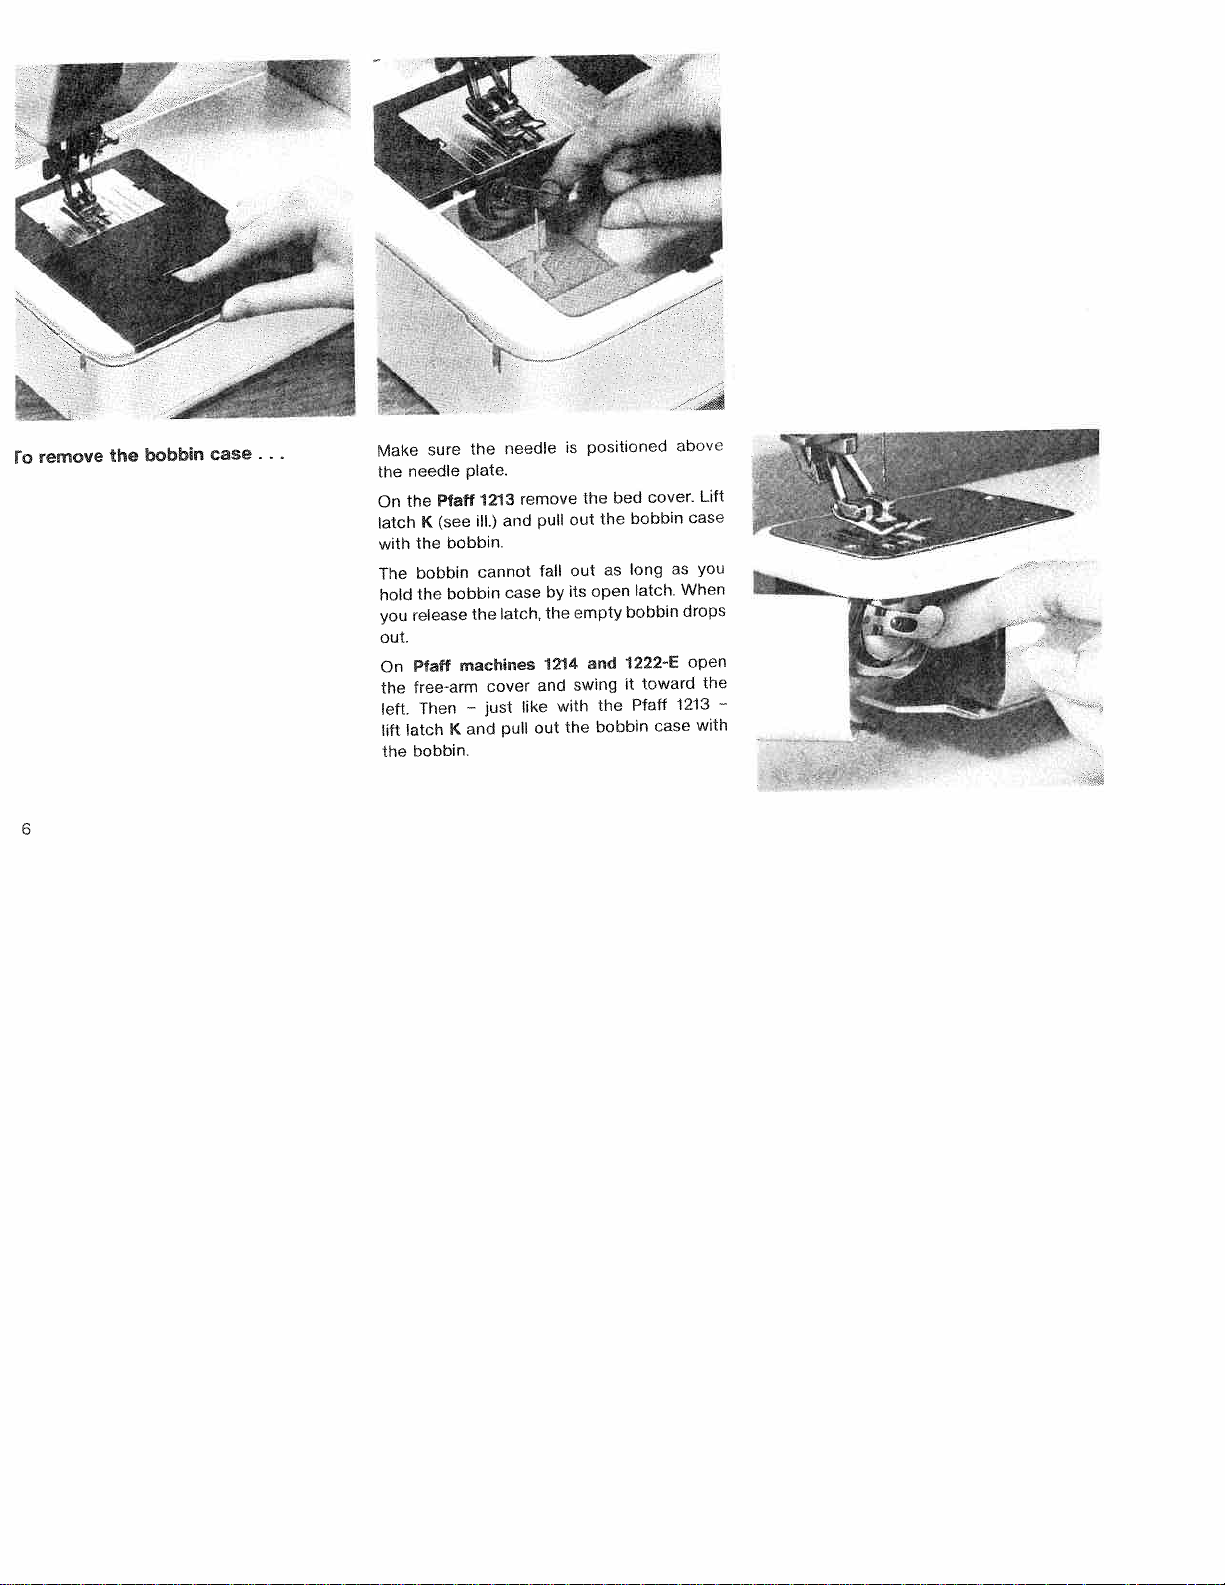
Make
sure
the
needle
is
posiboned
above
the
need’e
plato.
On
the
Pfaff
1213
remove
the
bed
cover.
Lift
latch
K
(see
ill.)
and
pull
out
the
bobbin
case
with
the
bobbin.
The
bobbin
cannot
faH
out
as
long
as
you
hold
the
bobbin
case
by
its
open
latch.
When
you
release
the
latch,
the
empty
bobbin
drops
out.
On
Ptaff
machines
1214
and
1222E
open
the
free-arm
cover
and
swing
it
toward
the
left.
Then
—
just
like
with
the
Pfaff
1213
—
lift
latch
K
and
pull
out
the
bobbin
case
with
the
bobbin.
ro
remove
the
bobbin
case.

Raise
both
spool
pins
and
place
a
spool
of
thread
on
one
of
them.
Simply
place the
bobbin
on
bobbin
winder
disc S
where
it
is
held
in
position
magnetically
(see
ill,
at
leffl.
Pass
the
thread
from
the
spool
to
the
bobbin,
as shown
in
the above
illustration,
Wind
the
thread
clockwise
around
the
bobbin
a
few
times.
Push lever
E
against
the
bobbin,
hold
the
balance
wheel,
and
turn
the
stop
motion
knob
of
Pfaft
machines
1213
and
1214
(8a
I
The
bobbin winder
stops
automatically
when
the bobbin
is
full,
To
re-engage
the
sewing
mechanism
after
bobbin
winding,
turn
the
stop
motion
knob
away
from
you.
The
sewing
mechanism
is
re-engaged
automatically
on
starting
the
machine,
On
the
Pfaff
1222-E,
the
sewing
mechanism
is
engaged
or
disengaged
by
the
Stopmatic
control.
For
details
please
refer
to
page
17.
to
wind
the
bobbin
and
disengage
the
sewing
mechanism:
on
page
2>
toward
you.
Start
the
bobbin
winder
by
pressing
down
on
the
foot
control.

insert
the
bobbin
into
the
bobbin
se.
Fig.
1:
Insert
the
filled
bobbin
into
the
bobbin
case,
making
sure
the
thread
end
drops
from
the
top
down
towards
you.
Fig.
2:
Pull
the
thread
into
the
slot
Fig.
3:
.
.
.
and
under
the
spring.
As
you
draw
the
thread,
the
bobbin
should
rotate
clock
wise
(as
indicated
by
an
arrow).
Leave
about
three
inches
of
thread
hanging
from
the
bobbin
case.
$
2
•
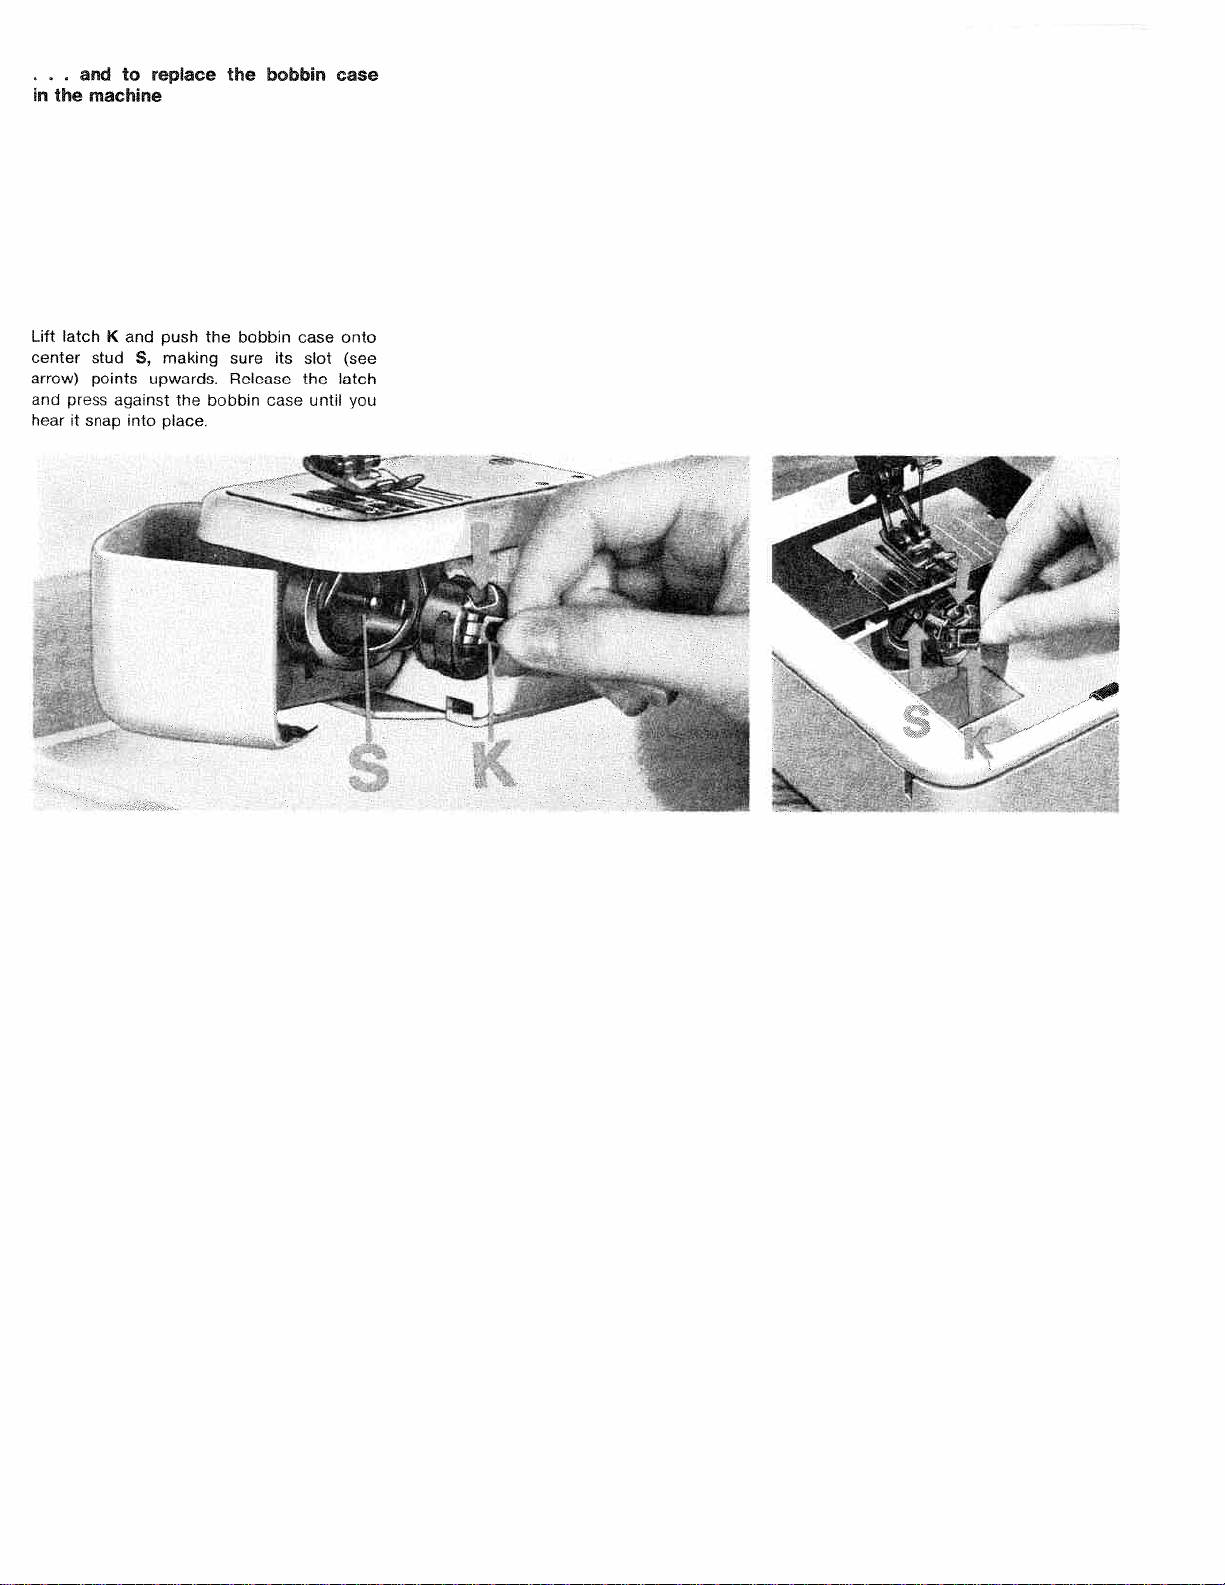
and
to
replace
the
bobbin
case
in
the
machine
Lift
latch
K
and
push
the
bobbin
case
onto
center
stud
S,
making
sure
its
slot
(see
arrow)
points
upwards.
Release
the
latch
and
press
against
the
bobbin
case
until
you
hear
it
snap
into
place.
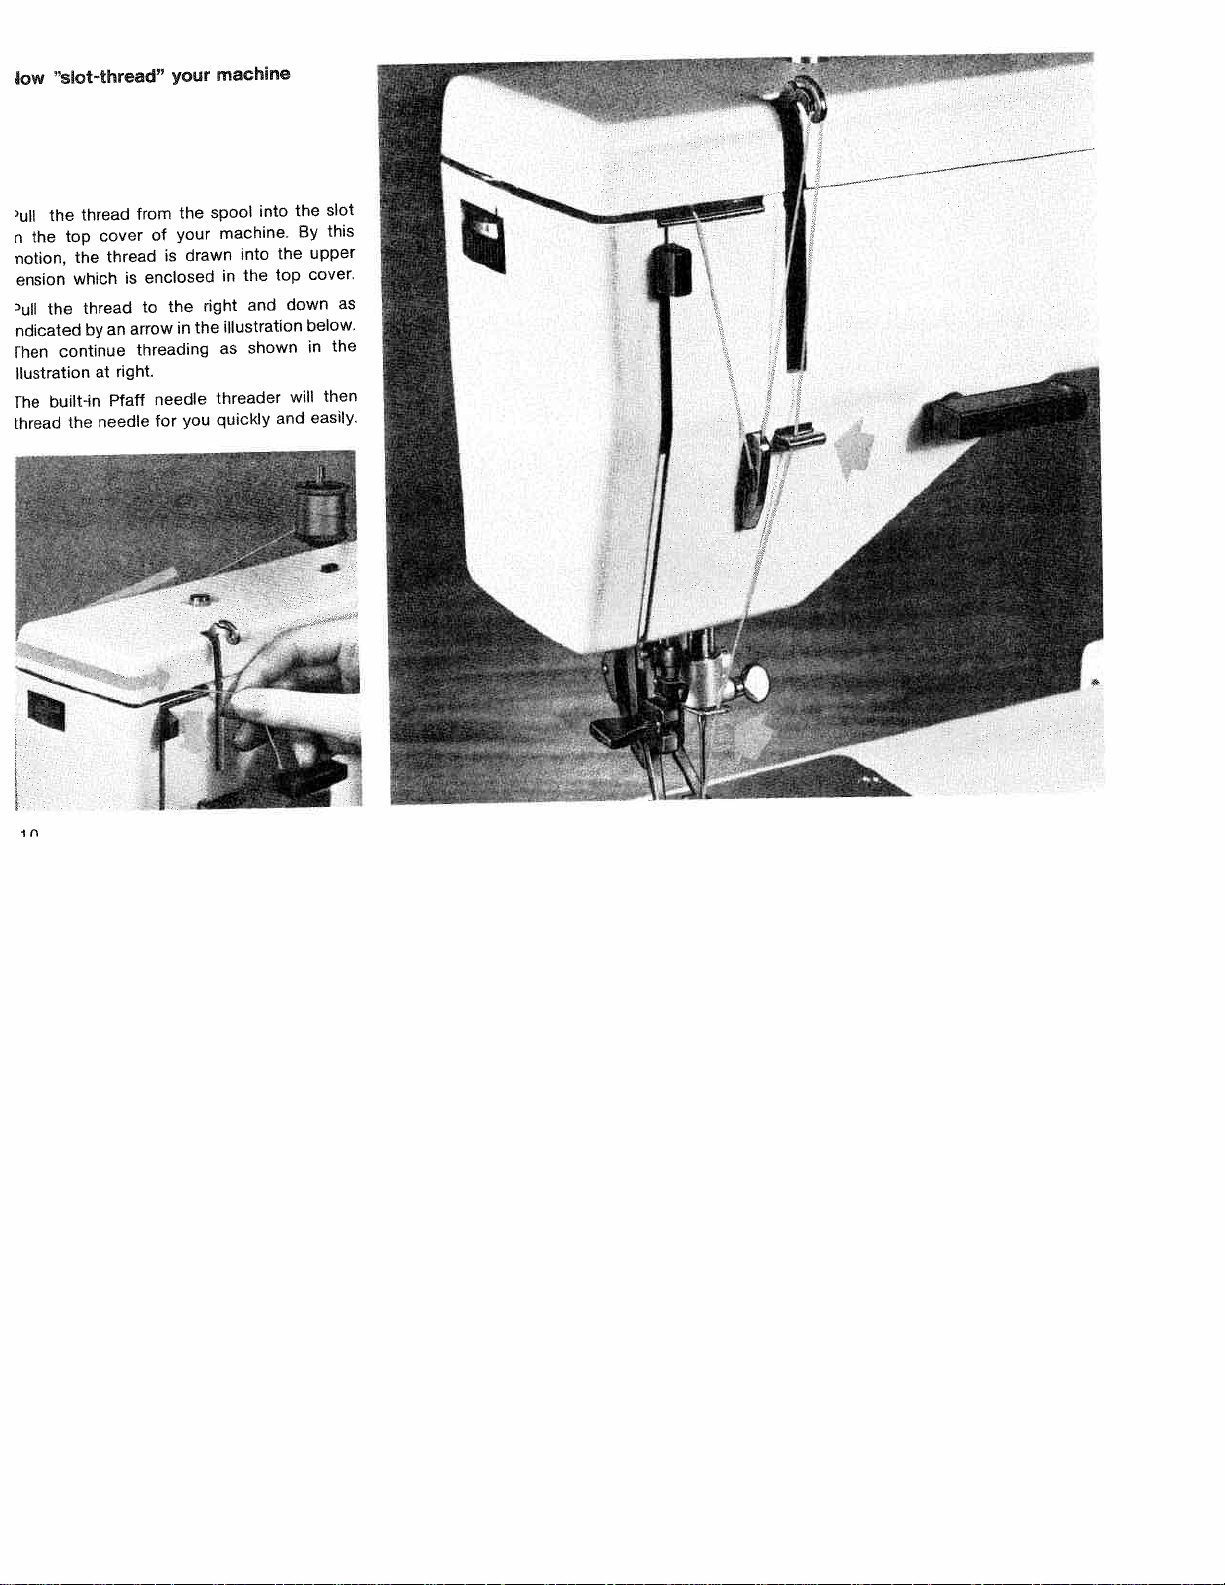
ow
“slot-thread”
your
machine
ull
the
thread
from
the
spool
into
the
slot
n
the
top
cover
of
your
machine.
By
this
notion,
the
thread
is
drawn
into
the
upper
ension
which
is
enclosed
in
the
top
cover.
ulf
the
thread
to
the
right
and
down
as
ndicated
by
an
arrow
in
the
illustration
below.
[hen
continue
threading
as
shown
in
the
Ilustration
at
right.
[he
built-in
Pfaff
needle
threader
will
then
thread
the
needle
for
you
quickly
and
easily.
‘1
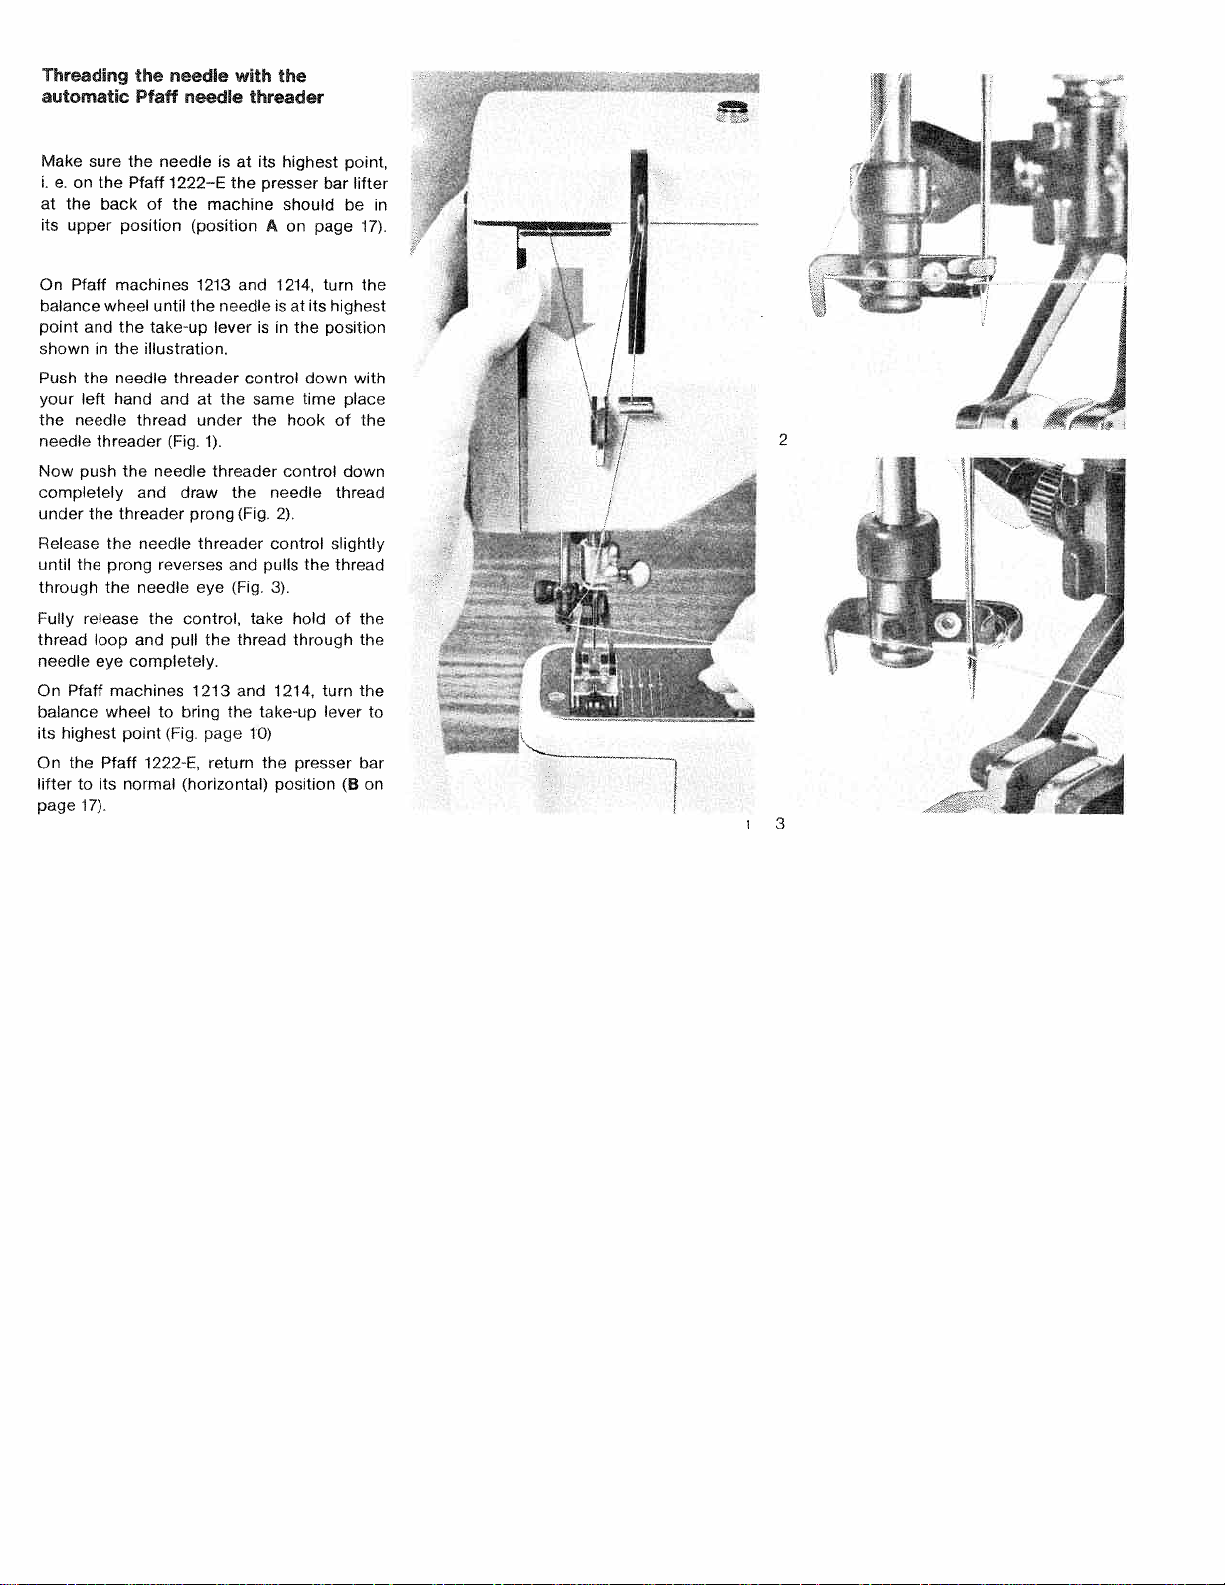
Threading
the
need’e
with
the
automatic
Pfaff
need’e
threader
Make
sure
the
needle
is
at
its
highest
point,
i.
e.
on
the
Pfaff
1222—E
the
presser
bar
lifter
at
the
back
of
the
machine
should
be
in
its
upper
position
(position
A
on
page
17).
On
Pfaff
machines
1213
and
1214,
turn
the
balance
wheel
until
the
needle
is
at
its
highest
point
and
the
take-up
lever
is
in
the
position
shown
in
the
illustration.
Push
the
needle
threader
control
down
with
your
left
hand
and
at
the
same
time
place
the needle
thread
under the
hook
of
the
needle
threader
(Fig.
1).
Now
push
the needle
threader
control
down
completely
and
draw
the
needle
thread
under
the threader
prong
(Fig.
2).
Release the
needle
threader
control
slightly
until
the
prong
reverses
and
pulls
the
thread
through
the
needle
eye
(Fig.
3).
Fully
release
the
control,
take
hold
of
the
thread
loop
and
pull
the
thread
through
the
needle
eye
completely.
On
Pfaff
machines
1213
and
1214,
turn
the
balance
wheel
to
bring
the
take-up
lever
to
its
highest
point
(Fig
page
10)
On
the
Pfaff
1222—E,
return
the
presser
bar
lifter
to
its
normal
(horizontal)
position
(B
on
page
17).
2
3

qoU)1
I.
‘p
Ok
0
N
0
N
6
weas
r
fteZB!Z
oiS9B
Pew
eW4M
1HOlVB
MM
V
/
a
/
p
$
.7
/
A
/
,—.
—
The
Ultra-Matic
stitch
selector
Note
The
needle
must
never
be
in
the
mate
rial
when
you
turn
the
Liltra-Matic
stitch
selector.
The
Ultra-Matic
stitch
selector
sets
your
ma
chine
for
straight
and
zigzag
stitching.
The
different
stitch
ranges
are
marked
by
numbers.
For
instance,
the
range
from
0
to
4
comprises
straight
stitches
of
different
lengths.
Turn
the
outer
ring
of
the
stitch
selector
until
the
symbol
of
the
stitch
desired
is
opposite
the
white
mark.
In
the
illustration
on
the
left,
the
stitch
selector
is
set
for
sewing
straight
stitches
about
2
mm
long
(about
12
stitches
per
inch).
Start
by
making
a
sewing
test.
Press
the
foot
control
pedal,
and
watch
your
machine
sew
a
straight-stitch
seam.
Then
let
your
Pfaff
run
at
different
speeds.
The
harder
you
press
the
foot
control
pedal,
the
faster
your
machine
will
run.
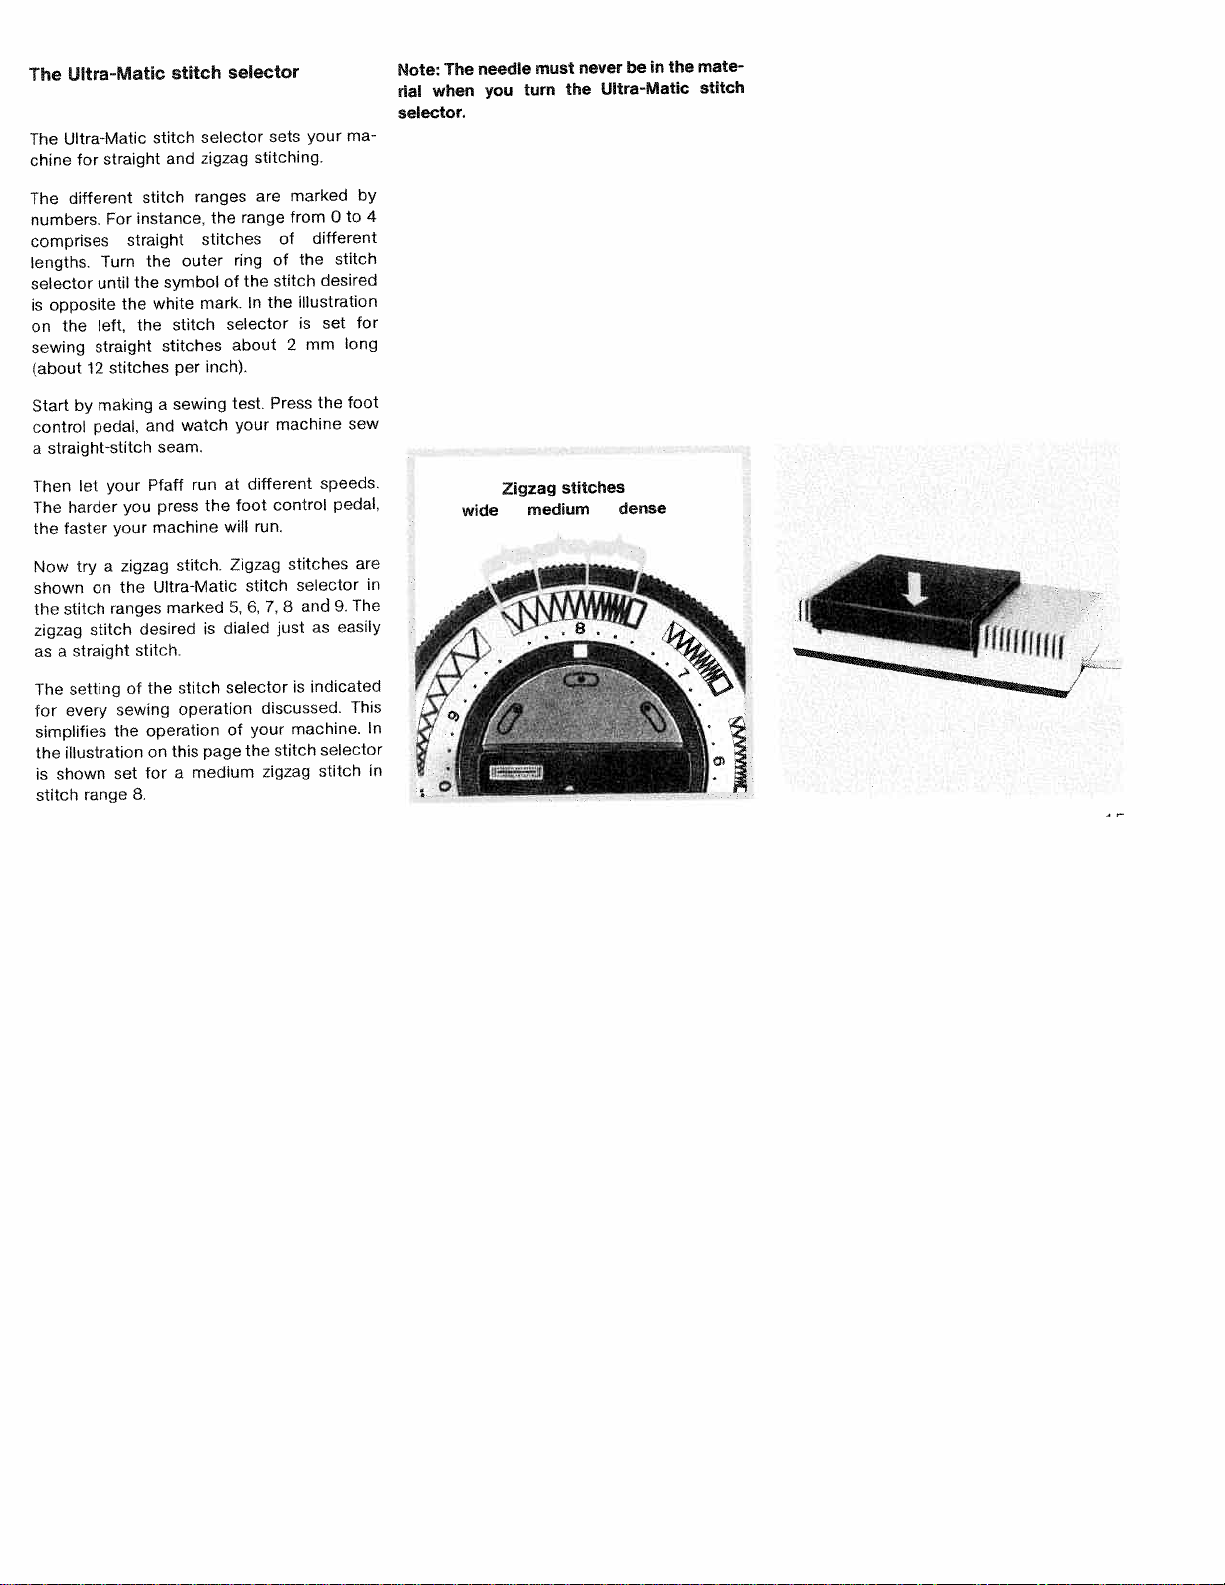
Now
try
a
zigzag
stitch.
Zigzag
stitches
are
shown
on
the
Ultra-Matic
stitch
selector
in
the
stitch
ranges
marked
5,
6,
7,
8
and
9.
The
zigzag
stitch
desired
is
dialed
just
as
easily
as
a
straight
stitch
The
setting
of
the
stitch
selector
is
indicated
for
every
sewing
operation
discussed.
This
simplifies
the
operation
of
your
machine.
In
the
illustration
on
this
page
the
stitch
selector
is
shown
set
for
a
medium
zigzag
stitch
in
stitch
range
8.
Zigzag
stitches
wide
medium
dense
-U.
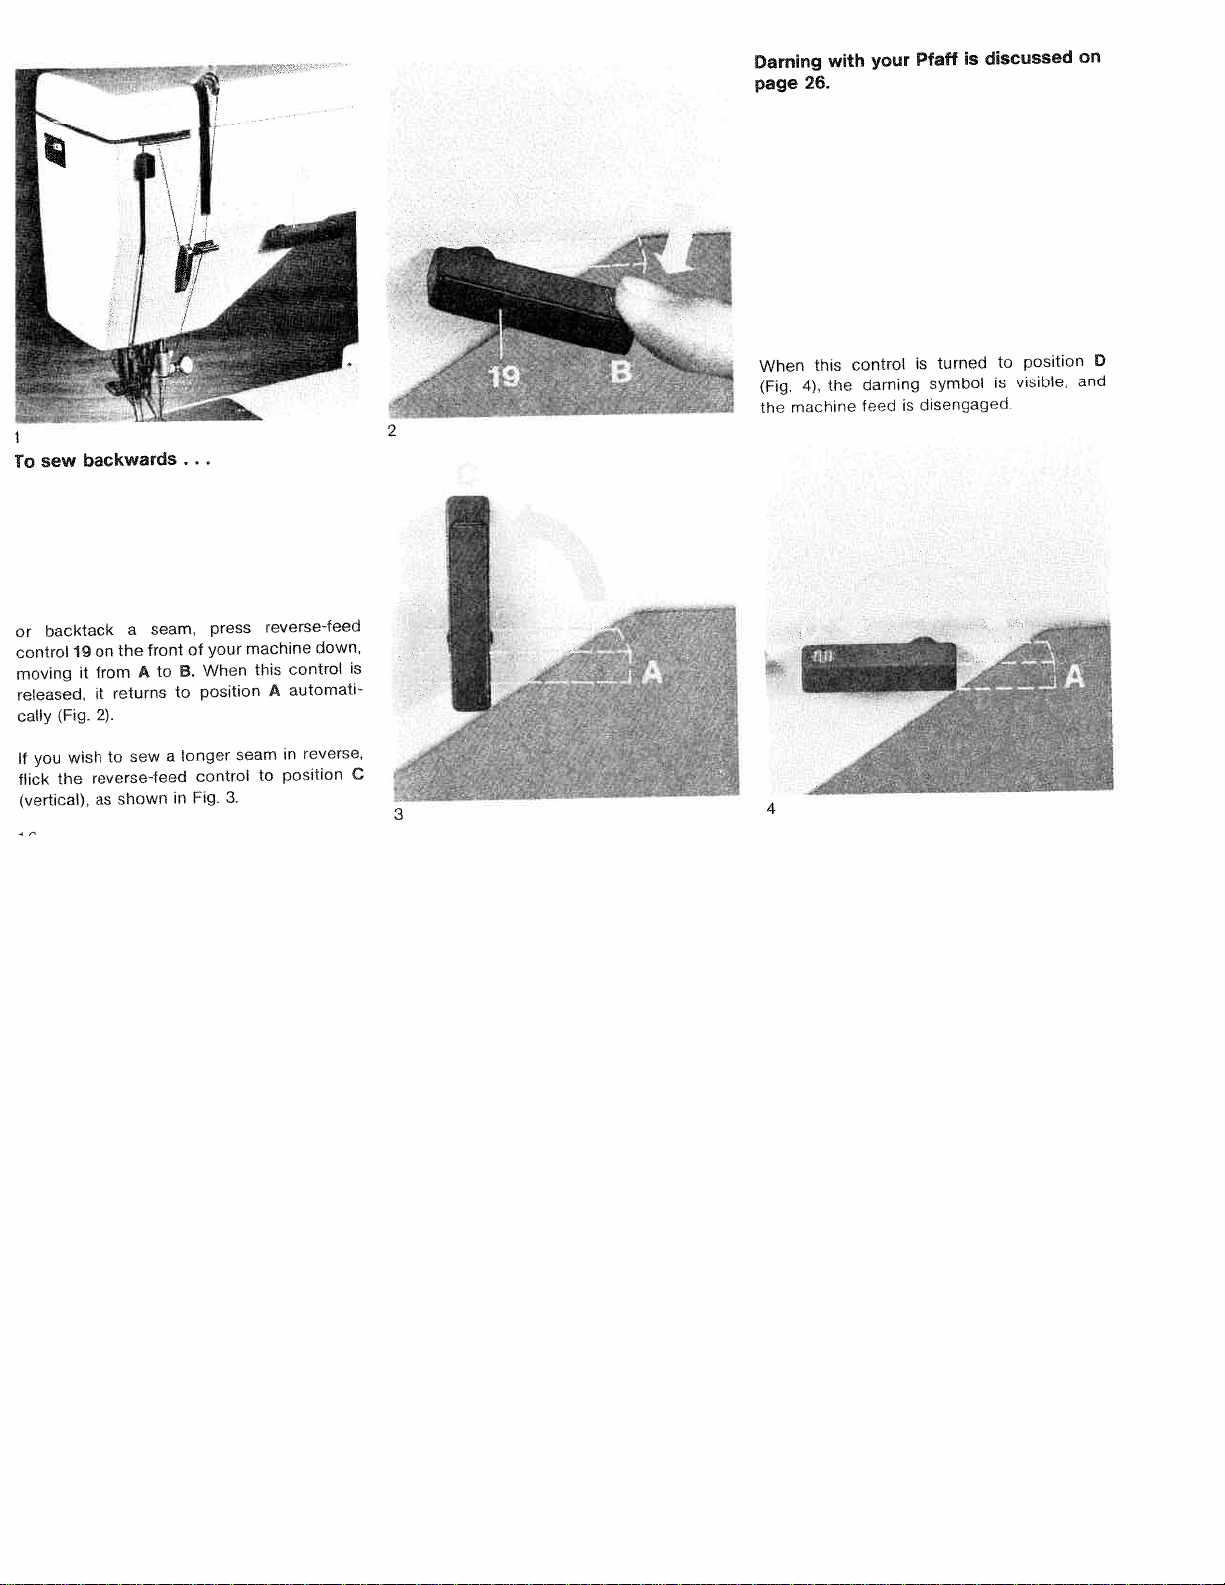
Darning
with
your
Pfaff
is
discussed
on
page
26.
When
this
control
is
turned
to
position
0
(Fig.
4),
the
darning
symbol
is
visible,
and
the
machine
teed
is
disengaged
or
backtack
a
seam,
press
reverse-feed
control
19
on
the
front
of
your
machine
down,
moving
it
from
A
to
B.
When
this
control
is
released,
it
returns
to
position
A
automati
cally
(Fig.
2).
If
you
wish
to
sew
a
longer
seam
in
reverse,
flick
the
reverse-feed
control
to
position
C
(vertical),
as
shown
in
Fig.
3.
.2
;
‘
ro
sew
backwards
3
4
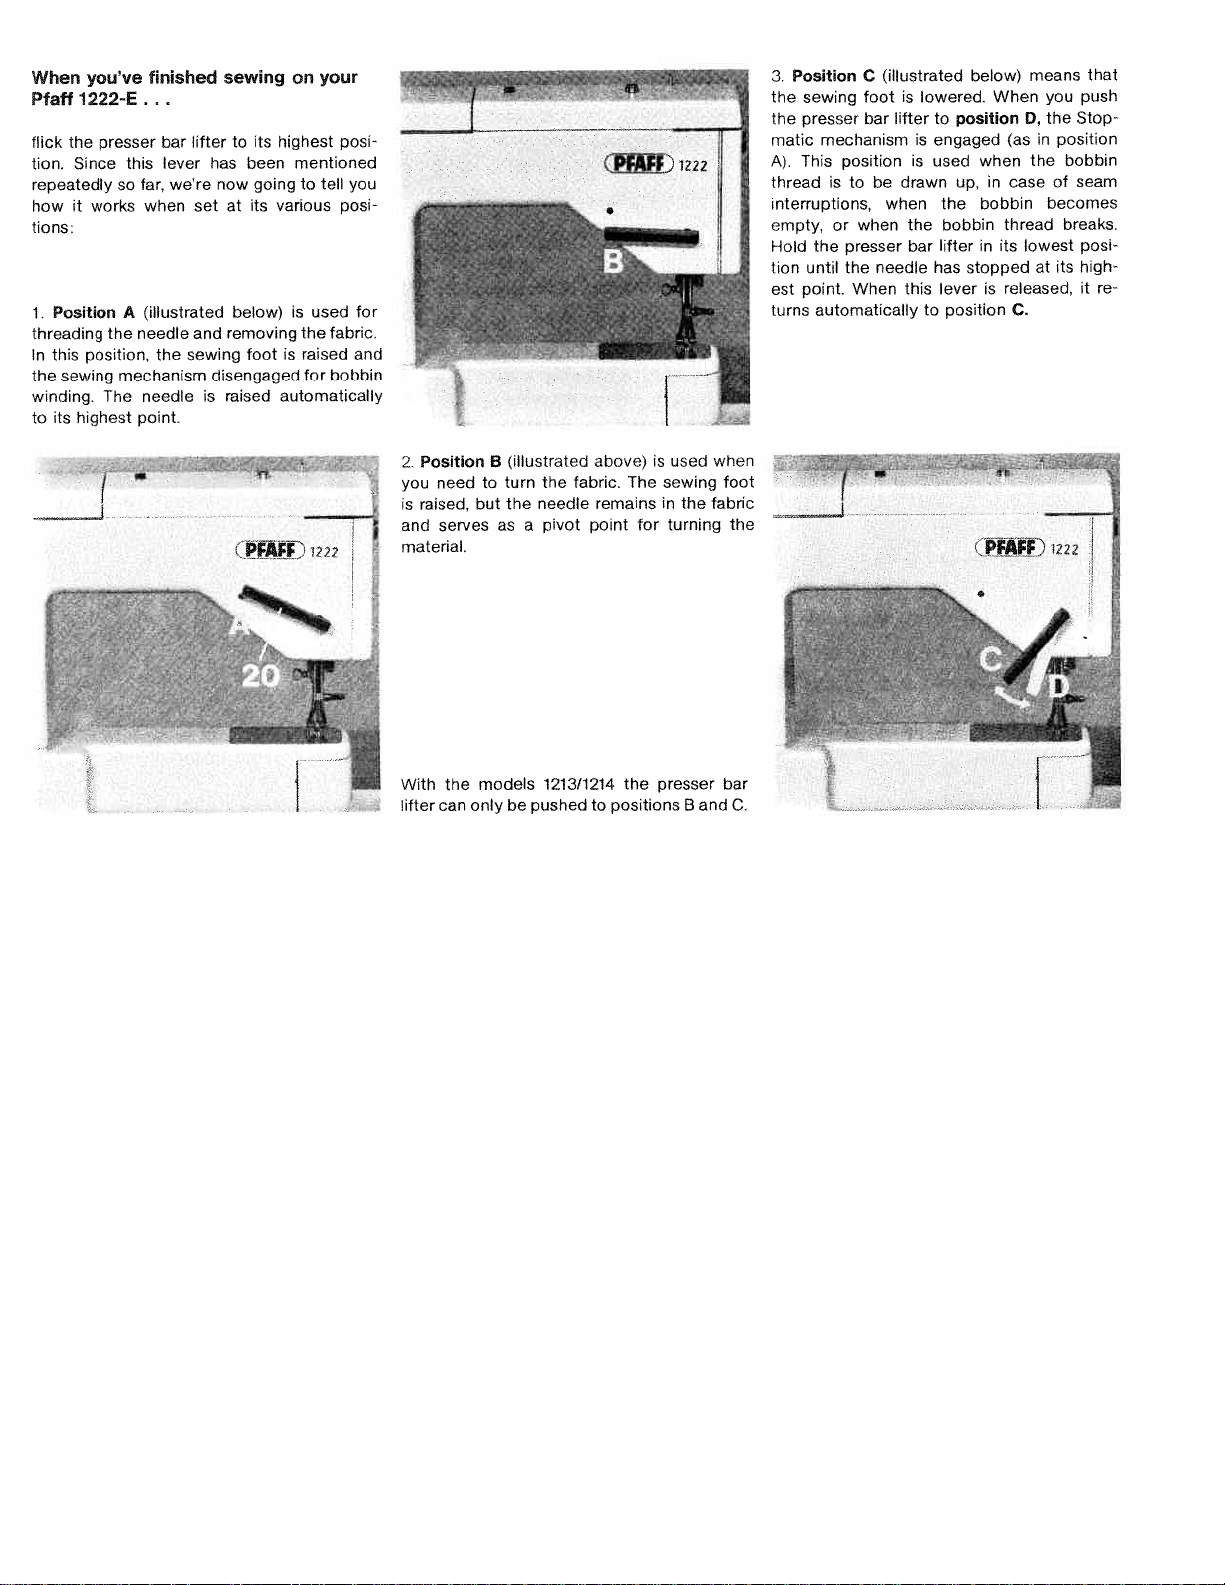
When
you’ve
finished
sewing
on
your
Pfaff
1222E.
flick
the
presser
bar
lifter
to
its
highest
posi
tion.
Since
this
lever
has
been
mentioned
repeatedly
so
far,
we’re
now
going
to
tell
you
how
it
works
when
set
at
its
various
posi
tions:
1.
Position
A
(illustrated
below)
is
used
for
threading
the
needle
and
removing
the
fabric.
In
this
position,
the
sewing
foot
is
raised
and
the
sewing
mechanism
disengaged
for
bobbin
winding
The
needle
is
raised
automatically
to
its
highest
point.
3.
Position
C
(illustrated
below)
means
that
the
sewing
foot
is
lowered.
When
you
push
the
presser
bar
lifter
to
position
D,
the
Stop
matic
mechanism
is
engaged
(as
in
position
A).
This
position
is
used
when
the
bobbin
thread
is
to
be
drawn
up,
in
case
of
seam
interruptions,
when
the
bobbin
becomes
empty,
or
when
the
bobbin
thread
breaks.
Hold
the
presser
bar
lifter
in
its
lowest
posi
tion
until
the
needle
has
stopped
at
its
high
est
point.
When
this
lever
is
released,
it
re
turns
automatically
to
position
C
--I
PMF)
1222
2
Position
B
(illustrated
above)
is
used
when
you
need
to
turn
the
fabric.
The
sewing
foot
is
raised,
but
the
needle
remains
in
the
fabric
and
serves
as
a
pivot
point
for
turning
the
material.
--
With
the
models
1213/1214
the
presser
bar
lifter
can
only
be
pushed
to
positions
B
and
C.

wo
pieces
of
fabric
wiH
match
erfectly,
no
matter
how
long
the
seam
iay
be.
our
Ptaff
is
the
only
home
sewing
machine
the
world
featuring
a
dual
feed.
This
foot
is
used
for
sewing
long
seams
and
for
perfectly
matching
plaids,
striped
and
patterned
fabrics.
The
dual
feed
is
also
used
for
sewing
over
thick
cross
seams.
To
engage
the
dual
feed,
simply
push
it
down
in
the
slot
of
the
raised
sewing
foot
until
it
snaps
into
place
(see
arrow
in
illustra
tion
at
bottom
left).
To
disengage
this
foot,
push
it
down
slightly,
then
pull
it
up
out
of
the
slot
in
the
sewing
foot.

Other
feet
which
can
be
used
with
the
dual
feed
include
the
hemmer
foot,
blindstitch
foot
and
felling
foot.
No
matter
how
carefully
you
match
the
Whenyoujointwopiecesofcheckedmaterial
squares
or
other
patterns,
the
result
will
be
with
the
aid
of
the
dual
feed
the
squares
or
similar
to
that
shown
in
the
top
illustration
stripes
will
match
exactly.
(See
ill,
at
bottom
(below)
when
you
sew
without
the
dual
feed,
of
pagel
The
electronic
control
which
operates’
behind
the
scenes”
comes
to
your
assistance
whenever
you
have
to
sew
over
thick
seams
or
several
layers
of
fabric.
Just
relieve
the
pressure
on
the
foot
control
. .
.
and
the
electronic
control
instantly
reduces
the
speed
of
your
machine
to
slow
stitchbystitch
sewing
for
stitching
through
the
thickest
spots
in
the
material.
Even
the
thickest
cross
seams
are
no
obstade
for
the
dectronic
Control
of
the
Pfaff
1222-E.
19
Dhangng
the
neede
or
sewing
foot
s
easy.
Various
sewing
operations
require
different
size
needles
or
special
needles.
A
detailed
Needle
and
Thread
Chart
is
shown
on
page
63.
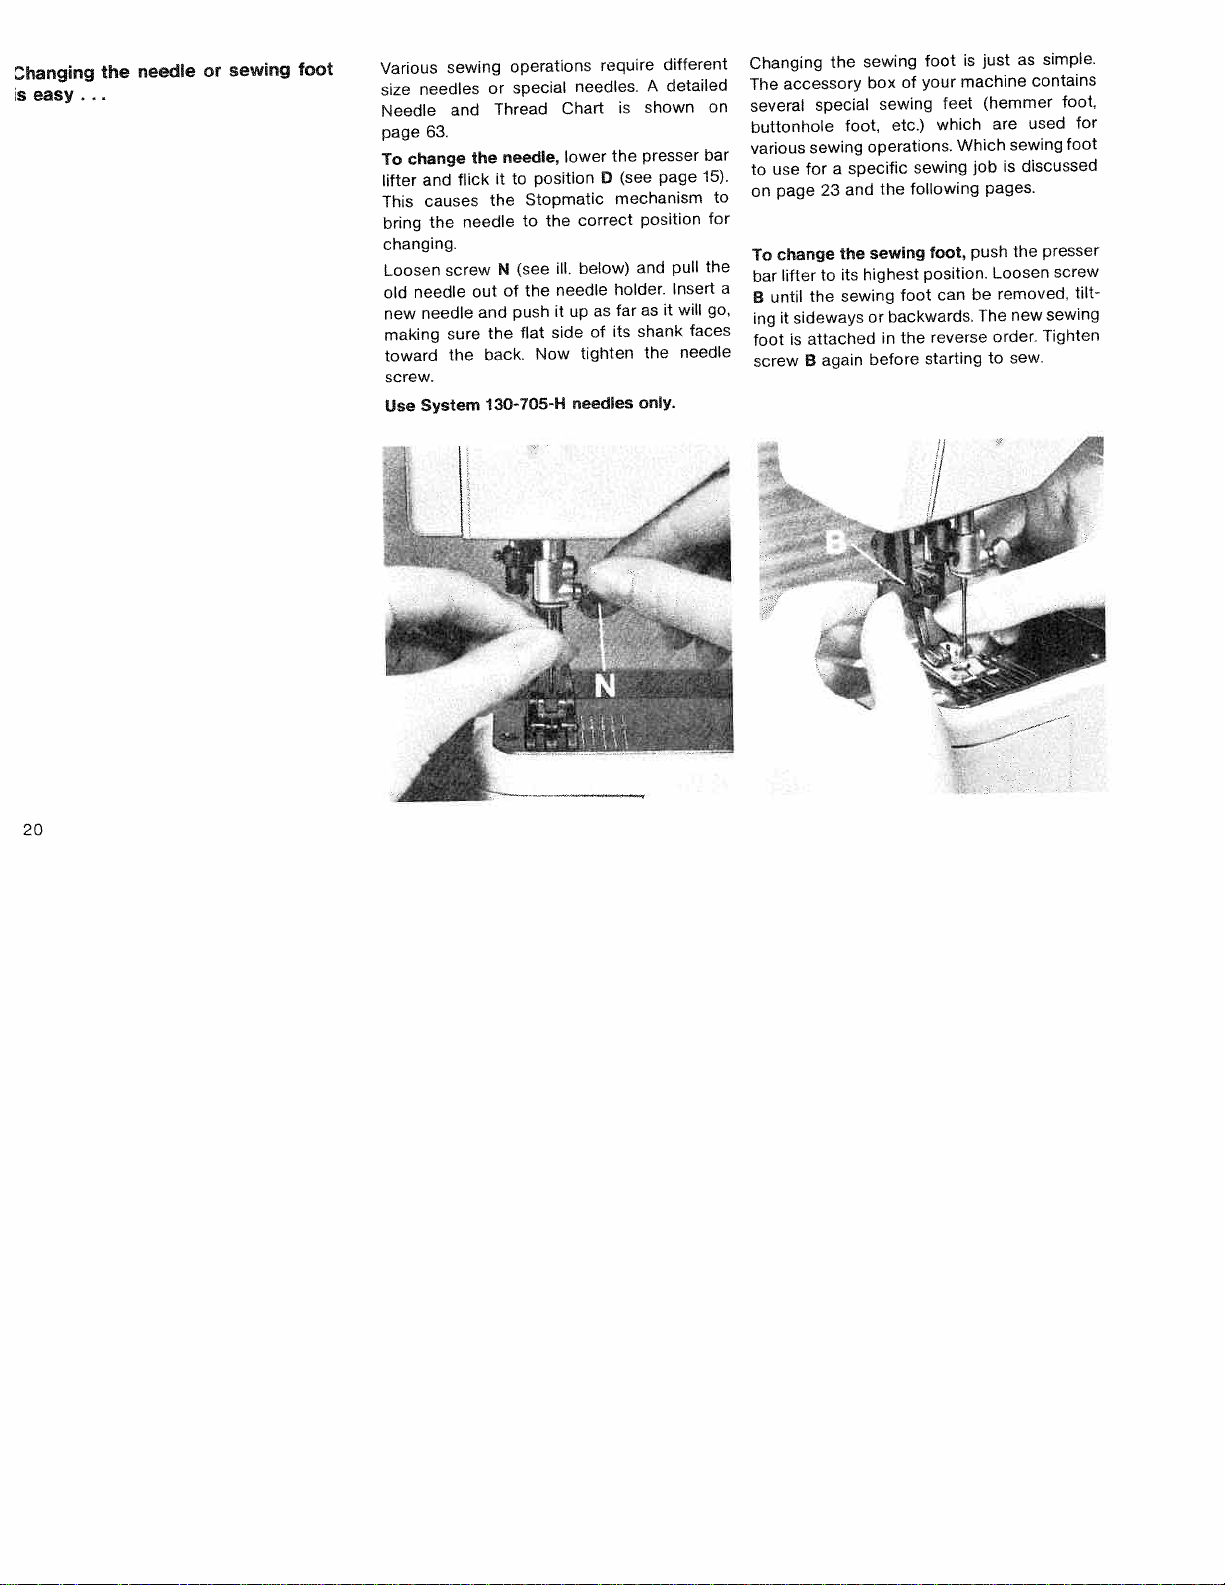
To
change
the
needle,
lower
the
presser
bar
lifter
and
flick
it
to
position
D
(see
page
15).
This
causes
the
Stopmatic
mechanism
to
bring
the
needle
to
the
correct
position
for
changing.
Loosen
screw
N
(see
ill,
below)
and
pull
the
old
needle
out
of
the
needle
holder.
Insert
a
new
needle
and
push
it
up
as
far
as
it
will
go,
making
sure
the
flat
side
of
its
shank
faces
toward
the
back.
Now
tighten
the
needle
screw.
Changing
the
sewing
foot
is
just
as
simple.
The
accessory
box
of
your
machine
contains
several
special
sewing
feet
(hemmer
foot,
buttonhole
foot,
etc.)
which
are
used
for
various
sewing
operations.
Which
sewing
foot
to
use
for
a
specific
sewing
job
is
discussed
on
page
23
and
the
following
pages.
To
change
the
sewing
foot,
push
the
presser
bar
lifter
to
its
highest
position.
Loosen
screw
B
until
the
sewing
foot
can
be
removed.
tilt
ing
it
sideways
or
backwards.
The
new
sewing
foot
is
attached
in
the
reverse
order.
Tighten
screw
B
again
before
starting
to
sew.
Use
System
130-705-H
needles
only.

Perfect
seams
through
properly
balanced
tensions
V
Even
so,
your
seam
may
not
look
as
the
one
shown
in
Fig.
1.
In
this
case,
check
to
see
whether
the
upper
or
lower
tension
needs
adjusting.
Then
regulate
the
tensions
as
fol
lows;
The
upper
tension
is
located
under
the
top
cover
of
your
machine’,
as
was
already
explained
on
page
10.
‘The
tension
dial
is
provided
with
numbers
0
to
10.
The
higher
the
number,
the
tighter
the
tension.
The
nor
mal
tension
setting
is
between
3
and
5.
The
lower
tension
is
regulated
by
turning
the
small
knurled
screw
on
the
bobbin
case.
Turn
this
screw
to
the
right
(with
your
thumb
rather
than
your
finger
nail)
for a
tighter
tension,
or
to
the
left
for
a
looser
tension.
Right
(R)
and
left
(L)
are
indicated
by
arrows.
If
you
can
pull
the
thread
from
the
bobbin
easily
against
little
resistance,
the
bobbin
thread
tension
is
just
right.
Always
use
the
same
size
thread
on
the
bobbin
and
in
the
needle.
Both
ten&ons
btanced
The
thread
tensions
are
set
at
our factory,
using
the
most
popular
threads.
‘11

detachab’e
workplate
increases
your
vorking
surface...
Pfaffmachines
1214
and
1222-E
are
supplied
with
a
detachable
workplate,
as
shown
in
the
illustration
below.
This
workplate
is
simply
pushed
over
the
free
arm
until
its
two
guide
pins
enter
the
appropriate
holes
in
the
machine.
To
increase
the
sewing
area
of
your
Pfaff
1213
Portable,
attach
the
bedplate
extension
illustrated
below.
Straightstitch
and
zigzag
sewing
work
I
 Loading...