


Operating Instructions
IC Recorder
Model No. RR-US591
RR-US571
RR-US551
The illustration shows
RR-US591.
Dear customer
Thank you for purchasing this product.
For optimum performance and safety, please read these instructions carefully.
Before connecting, operating or adjusting this product, please read the instructions completely. Please keep this manual for future reference.
If you have any questions contact
In the U.S.A. and Puerto Rico: 1-800-211-PANA (7262)
In Canada: |
1-800-561-5505 |
For Canada only
The warranty can be found on pages 40 and 41.
For U.S.A. and Puerto Rico only
The warranty can be found on pages 42 and 43.
Please return the product registration card (if included), or register via the Internet at:
www.panasonic.com/register
PP En Cf |
VQT2M17 |
H1209TY0 |

Features
Recording
Meeting |
Lesson/Lecture |
Dictation |
Playing back to listen
• Recorded file |
with speaker |
or earphones |
|
• MP3 music file |
|||
|
(not included) |
||
|
|
Connecting this unit to a computer
Using a computer
•Copy/Organize (Delete) recorded files/ Play back to listen
From a computer
• Transfer MP3 music files
VQT2M17
2
Supplied accessories
Please check and identify the supplied
accessories.
Use numbers indicated in parentheses when asking for replacement parts. (Product numbers correct as of December 2009. These may be subject to change.)
Only for the U.S.A. and Puerto Rico:
To order accessories, refer to “Accessory Purchases (United States and Puerto Rico)” on page 43.
Only for Canada: To order accessories, call the dealer from whom you have made your purchase.

 1 USB cable [K2KZ4CB00012]
CAUTION
Danger of explosion if battery is incorrectly replaced. Replace only with the same
or equivalent type recommended by the manufacturer. Dispose of used batteries according to the manufacturer’s instructions.

Table of contents |
|
Preparation |
|
Features ........................................................................... |
2 |
Supplied accessories ....................................................... |
2 |
Part names ....................................................................... |
4 |
Inserting the batteries....................................................... |
5 |
Turning ON/OFF the Power .............................................. |
6 |
Hold function..................................................................... |
6 |
Setting the time................................................................. |
7 |
Basic Operations |
|
Recording settings............................................................ |
8 |
Switching recording position ........................................ |
8 |
Recording ......................................................................... |
9 |
Playing............................................................................ |
10 |
Listening to the audio using earphones.......................... |
11 |
Deleting recorded files.................................................... |
12 |
Locking recorded files (File protection)........................... |
13 |
Advanced Operations |
|
Changing recording settings |
|
(Monaural/Stereo, Microphone sensitivity) ..................... |
14 |
Changing recording settings |
|
(Zoom microphone/Recording mode (XP/LP/SLP)) ....... |
15 |
Preventing unnecessary recording (VAS)....................... |
16 |
Confirming possible (remaining) recording time............. |
16 |
Setting the playback speed control function ................... |
17 |
Reducing noise (EQ setting)........................................... |
18 |
Slight return playback ..................................................... |
18 |
..........................................Repeat play/Successive play |
19 |
|
|
|
|
|
|||
A-B Repeat play ............................................................. |
19 |
Preparation |
||
Security functions |
20 |
|||
|
|
|||
Recording using an external microphone ....................... |
22 |
|
|
|
Recording from other devices......................................... |
22 |
|
|
|
Recording to other devices............................................. |
23 |
|
|
|
Canceling the operation beep......................................... |
23 |
|
|
|
Using with a computer |
|
|
|
|
Connecting this unit to a computer................................. |
24 |
|
|
|
Opening the folder of this unit using a computer ............ |
25 |
|
|
|
Importing the recorded files in this unit to a |
|
|
|
|
computer/Organizing files............................................... |
26 |
|
|
|
Returning the files imported to the computer to this unit .... |
27 |
|
|
|
Listening to music on this unit (Transferring MP3 music files to this unit)... |
28 |
|
|
|
Listening to music on this unit (Playing MP3 music files on this unit) ....... |
29 |
|
|
|
Creating MP3 music files................................................ |
30 |
|
|
|
Other |
|
|
|
|
System requirements...................................................... |
31 |
|
|
|
Q & A (Frequently Asked Questions).............................. |
32 |
|
|
|
Troubleshooting guide .................................................... |
33 |
|
|
|
Care and use.................................................................. |
36 |
|
|
|
Maintenance................................................................... |
37 |
|
|
|
Product Service .............................................................. |
38 |
|
|
|
Specifications ................................................................. |
39 |
VQT2M17 |
||
Limited Warranty (ONLY FOR CANADA) |
40 |
|||
|
|
|||
Limited Warranty |
|
|
|
|
(ONLY FOR U.S.A. AND PUERTO RICO)...................... |
42 |
|
|
|
3

VQT2M17
4
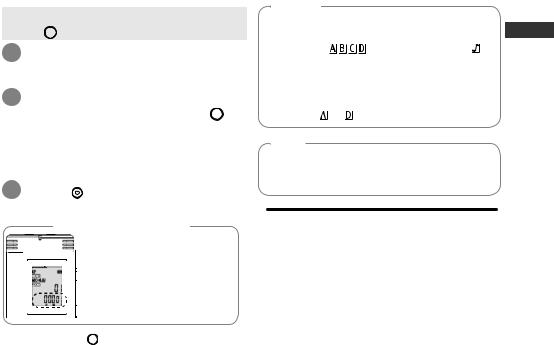
Part names
Main unit
Recording indicator (red) LCD display FOLDER/SPEED
STOP
+ (Volume)
u (Fast backward) q/g (Play/Stop/Enter)
– (Volume)
i (Fast forward) Built-in speaker OPR/HOLD
Recording position switch (ZOOM/WIDE/MANUAL) REC/PAUSE
•A-B (A-B repeat/Repeat)/−MENU ERASE
USB jack
Built-in microphone
External microphone jack (MIC) Headphone/earphone jack (W) Stand
When you perform zoom recording with the unit placed on a surface, stable zoom effect can be obtained by using the stand.
stand
Zoom microphone ġBattery cover ġHand strap hole
Display |
The enclosed Canadian French label sheet corresponds to |
|||
English display on the unit. |
|
|||
|
Remaining memory/Recording level |
|
: Noise reduction |
: Battery indicator |
|
XPLPSLP : Recording mode |
SPEED : Playback speed control |
: Delete |
|
|
: Monaural/Stereo |
|
: Formatting |
: Security |
|
: Microphone sensitivity |
|
: Folder |
: File protection |
|
|
|
|
|
|
File number |
|
: Zoom recording |
: VAS recording |
|
: Slight return playback |
ALL |
: Successive/Repeat play |
: Operation beep |
|
: Possible remaining recording time |
|
|
|
|
Recording (Playback) elapsed time/Possible remaining recording time/Remaining playback time/Current time etc. |
|||
|
|
|
|
|
|
Clock/Recording (Playback) time/Recording date |
|
||

Inserting the batteries
1
3
2
2 AAA LR03 batteries (not included)
Make sure the batteries face the right direction.
*Use alkaline batteries.
The remaining battery display shown below is displayed while recording or playing. Preparation
Blinking
*If the batteries run out, “ ” blinks. Replace the batteries as soon as possible.
*Remove the batteries from the unit if you will not use it for a long period of time.
*Please replace batteries within approx. 30 seconds for preservation of the clock data.
Make sure to turn the power off before removing the batteries.
•If the batteries are removed while recording, deleting, etc., all data on this unit may be lost or this unit may be destroyed.
VQT2M17
5

Turning ON/OFF the Power
OPERATION/HOLD Switch
HOLD |
OPR |
OPR: operation |
|
Hold function
Button operations are ignored when you set Hold on.
Switching Hold on/off |
|
||
|
Hold on |
Hold off |
|
HOLD OPR |
HOLD OPR |
||
|
|
|
|
|
|
|
|
|
|
|
|
|
|
|
|
VQT2M17
6
Turning the power ON
•Slide OPERATION/HOLD switch to OPR  side, then the power turns on and the display lights on.
Turning the power OFF
•Slide and hold OPERATION/HOLD switch to OPR  side for 2 seconds.
Also, when you do not operate the unit for more than approx. 15 minutes while the unit is stopped,
“


 ” is displayed and the power automatically turns off.
*When batteries are inserted for the first time,
“

 ” blinks on the display. Please set the time ( page 7).
•When the Hold function is on, button operation is ignored even if the unit is on (“


 ” is displayed). Accordingly, operation mistakes (i.e. Recording or playback stopping midway) can be prevented.

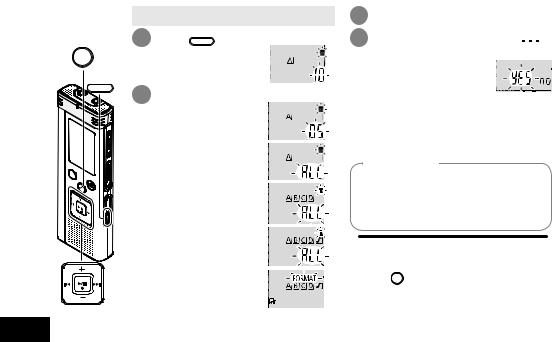
Setting the time
When the power is turned on, “

 ” blinks on the display when the time is not set (e.g. at the time of purchase). (In power-on condition, the display changes to “


 ” (blinking) in approx. 1 minute.)
The clock is used for preserving recording date. Please set the time first. 

Recording is possible even if the clock is not set. However, the Recording date, Recording start time will be displayed as “
 ”.
”.
• A-B / MENU |
When “ |
” is blinking |
When the time display is |
|||||||||||
|
|
|
|
|
“ |
” (blinking) or you change |
||||||||
|
• Turn the power on ( page 6). |
|||||||||||||
STOP |
the time |
|
|
|
|
|||||||||
1 |
Press q/g . |
|
|
|
|
|
|
|||||||
|
|
|
|
|
|
STOP |
|
|
|
|
||||
|
2 Press +, – to set the year and |
|
|
|
|
|
|
|||||||
|
|
press q/g to enter. |
|
• Turn the power on ( |
|
page 6). |
||||||||
|
|
|
• Press |
|
|
to stop the unit. |
|
|||||||
|
|
Set month and day in the same way. |
1 |
Press and hold • A-B / MENU |
for 1 |
|||||||||
|
|
|
|
|
|
|||||||||
|
|
Year |
Month |
Day |
|
second or longer. |
|
|||||||
|
|
|
“ |
|
|
|
” (blinking) or “ |
” (blinking) |
||||||
|
|
The above illustration is a display example. |
|
|
|
|
||||||||
|
|
|
is displayed. |
|
|
|
||||||||
|
3 |
Press u, i to select the time |
2 |
|
|
|
||||||||
|
Press +, – to select “ |
” |
||||||||||||
|
display and press q/g to enter. |
|||||||||||||
|
|
|
|
|
|
|
and press q/g to enter. |
|||||||
|
|
|
|
|
|
|
If “ |
|
|
|
” blinks, press q/g to enter. |
|||
|
4 |
24-hour display |
12-hour display |
3 |
Follow step 2 , 3 and 4 |
|||||||||
|
Press +, – to set the time and |
shown at left. |
|
|
|
|||||||||
|
|
press q/g to enter. |
|
*Press |
STOP |
to stop the setting process midway. |
||||||||
|
|
You can adjust the time quickly by |
|
|
||||||||||
|
|
pressing and holding +, –. |
*The clock operates with the monthly loss/gain |
|||||||||||
|
|
|
|
|
of approx. 60 seconds at normal temperature. |
|||||||||
|
|
|
|
|
|
*The time setting is cleared, if the battery has |
||||||||
|
|
24-hour display |
12-hour display |
been consumed completely. |
|
|||||||||
Preparation
VQT2M17
7

VQT2M17
8
Recording settings
This unit has 4 recording setting items related to recording quality. Using different combinations of recording settings, you can adjust audio quality according to recording situations.
Recording |
Setting contents and |
|||
setting item |
display |
|
||
|
|
|
|
|
Recording |
High-quality |
|
|
: |
mode |
|
|
|
: |
( page 15) |
Long recording |
: |
||
|
|
|
|
|
Switching |
Monaural |
: |
|
|
Monaural/ |
Stereo |
: |
|
|
Stereo |
|
|
|
|
( page 14) |
|
|
|
|
|
|
|
|
|
Microphone |
High |
: |
|
|
|
|
|||
sensitivity |
Normal |
: |
|
|
|
|
|||
( page 14) |
Low |
: |
|
|
|
|
|||
|
|
|
|
|
Zoom |
Zoom microphone ON |
|
||
microphone |
|
: |
|
|
( page 15) |
Zoom microphone OFF |
|||
|
|
: No display |
||
|
|
|
|
|
The total possible recording time ( page 39) changes according to the combination of the recording mode and Stereo/Monaural.
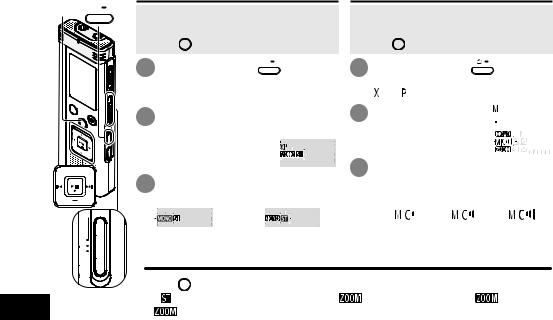
Switching recording position
This unit is equipped with 3 recording positions: [ZOOM], [WIDE] and [MANUAL]. The [ZOOM] and [WIDE] content settings are fixed while [MANUAL] content settings can be changed according to your preference. You can switch among the positions using Recording position switch.
Recording |
Setting contents (display) |
||
position |
and situations |
||
|
|
For lessons, lectures, |
|
ZOOM |
|
etc. (Recording the |
|
|
|
aimed person’s voice). |
|
WIDE |
For meetings, etc. (Recording |
||
|
offering a sense of being in |
||
|
the actual situation). |
||
|
|
For |
|
|
dictation, |
||
|
|
||
|
|
etc. |
|
MANUAL |
[MANUAL] position has been set to |
||
be suitable for dictation at the time |
|||
|
|||
|
of purchase. You can change the |
||
|
setting according to your preference |
||
|
( pages 14, 15). |
||
You can change the recording mode (XP,
LP, SLP) in all positions ( page 15).
REC/PAUSE
FOLDER/SPEED
 STOP
STOP
MANUAL WIDE ZOOM

Recording position switch
Recording
•Turn the power on ( page 6).
•Press STOP to stop the unit.
1Slide recording position switch to select a position.
Switch modes according to situations ( page 8).
2 Select a folder for recording.
The folder is switched each time you press FOLDER/SPEED .
Select among “


 ” (The factory setting is
“ ”).
”).
When you select “ ”, recording is automatically saved in “
 ” (If the folder already contains 99 files, the next folder with recordable space is used).
3 Press REC/PAUSE (Recording starts).
Each time you press Pause  Recording resumes
Display during recording


 Light stays on. (Blinks while paused.)


 The display changes depending on


 recording levels.
 In stereo Top side: ch-L/Bottom side:
 ch-R
ch-R
 Recording elapsed time


 (Blinks while paused.)
To stop: Press STOP .
Folder
[Folder] for this unit means locations in which recording (music) files are stored. There are 4
audio folders “ |
” and 1 music folder “ |
” in |
Operations |
||
this unit. |
|
|
|||
|
|
|
|||
Using each folder according to the purposes of |
|
||||
recording enables you to search files easily later. |
|
||||
A maximum of 99 files can be saved into each |
|
||||
audio folder |
to . |
|
|
||
|
|
|
|
|
Basic |
|
File |
|
|
||
Recorded audio data from the starting point to the |
|||||
ending point is saved as a file. |
|
||||
The saved data is called a file.
*Even if you change the position of Recording position switch during recording, the setting will not be changed until the recording is complete.
*Change the recording mode as necessary ( page 15).
*Do not block the holes of the zoom microphone and |
VQT2M17 |
|
built-in microphone during recording ( page 4). |
||
*Note if your finger or an object touches this unit |
|
|
during recording, the noise will be recorded |
|
|
9 |
||
through the microphone. |
||
|
|

VQT2M17
10
Playing
•Press STOP to stop the unit.
•Select a folder ( right).
•Select a file ( right).
STOP |
1 Press q/g (Playback starts). |
FOLDER/SPEED |
|
|
Adjusting the volume |
Turn up the volume: Press +. Turn down the volume: Press –.
Volume range is 0 to 20. (The factory setting is 13.)
Operations during playback
Jump (Skip):
Press u, i.
Press u midway while playing a file and the playback jumps to the beginning of the file. To return to the previous file, press u again within 1 second.
|
Fast backward/Fast forward |
|
|
(Search): |
|
Press and hold u, i. |
||
|
||
|
Stop: Press q/g or STOP . |
Select a folder
The folder is switched each time you
press FOLDER/SPEED .
Select among “ ”, “
”, “ ”, “
”, “ ”, “
”, “ ”, “
”, “ ”. Select the folder that contains the file to play.
Select a file
Press u, i to select.
Each time you press, the file number changes.
File number
When a file is selected, the recording information below is displayed.
Recording date → Recording start time → Recording time →Total number of files in the folder
Confirming the remaining time
Press and hold FOLDER/SPEED
for 1 second or longer during playback.
The remaining time of the file being played is displayed for approx. 3 seconds.
Remaining 


 playback time


*The remaining playback time for the last approx. 3 seconds of file is not displayed.
Listening to the audio using earphones
Connect stereo earphones (not included). Plug type: ø 3.5 mm (1/8") stereo mini plug
Insert securely.
Built-in 

 speaker


Monitoring the recording |
Operations |
||
|
|
||
progress |
|
|
|
Adjusting the volume: |
|
|
|
You can adjust the volume by pressing |
|
|
|
+, –, but the recording level is not |
Basic |
||
affected. |
|||
|
|
||
Listening to the audio |
|
|
|
during playback |
|
|
|
The audio during playback comes from |
|
|
|
the speaker. Listening may be difficult in |
|
|
|
noisy places due to the speaker output. |
VQT2M17 |
||
In that case, connect stereo earphones |
|||
(not included). |
|||
|
|
||
*The built-in speaker is turned off when |
|
|
|
|
11 |
||
earphones are connected. |
|
||
|
|
|
|
Deleting recorded files
STOP
ERASE
VQT2M17
12
• Select a folder ( page 10).
1 Press ERASE while playing or the unit
is stopped.
2 Press u, i to select the file.
Deleting one file
Deleting all files in one folder
Deleting all files in folder A through D
Deleting all files in all folders
Formatting this unit
to : Protected files and files which cannot be played back on this unit cannot be deleted.
3Press q/g to enter.
4Press u, i to select “


 ” and press q/g to enter.
When deleting is complete, “
 ” is displayed.
It may take dozens of seconds until deleting is complete.
Formatting
If the unit is formatted, all existing files including protected files, music files, data files transferred from PCs, etc. are deleted.
*Deleted files cannot be recovered.
*You cannot delete a portion of a file.
*Press STOP to stop the operation midway.
*The file numbers displayed on this unit are moved forward after deleting files.
*Both deleting and formatting data are not available when the remaining battery display shows “ ” (blinking).

Locking recorded files (File protection)
Locked files cannot be deleted on this unit (except when formatting). Use this function to protect files.
• A-B / MENU
STOP
•Select a folder ( page 10).
•Press STOP to stop the unit.
1Press and hold • A-B / MENU for 1 second or longer.
“


 ” (blinking) is displayed.
2 |
Press +, – to select “ |
|
” and |
|
|
press q/g to enter. |
|
|
|
|
|
|
|
|
|
|
|
|
|
3 Pressfile. u, i to select the
Selecting one file
Selecting all files in one folder
Selecting all files in all folders
4Press q/g to enter.
5Press u, i to select “


 ” and press q/g to enter.
Lock is performed. 
 It may take dozens of seconds until locking is complete.
To cancel lock:
Follow step 1 to 4 , select “


 ” and enter in step 5 .
*Press STOP to stop the setting process midway.
*“
 ” is displayed for the locked files when the file is selected.
*“
 ” is not displayed when there is no file in the selected folder.
*You cannot lock files when the remaining
battery display shows “ ” (blinking).
Basic Operations
VQT2M17
13
Changing recording settings (Monaural/Stereo, Microphone sensitivity)
STOP
 • A-B
• A-B / MENU
Switching Monaural/Stereo
•Set the Recording position switch to [MANUAL] ( page 8).
•Press STOP to stop the unit.
1Press and hold • A-B / MENU for 1 second or longer.
“


 ” (blinking) is displayed.
2Press +, – to select “
 ” and press q/g to enter.
Changing microphone sensitivity
•Set the Recording position switch to [MANUAL] ( page 8).
•Press STOP to stop the unit.
1Press and hold • A-B / MENU for 1 second or longer.
“ 
 ” (blinking) is displayed.
2Press +, – to select “  ” and press q/g to enter.


VQT2M17
14


MANUAL WIDE ZOOM
Recording position switch
3Press u, i to select “ ” or “
 ” and press q/g to enter.
Monaural Stereo
3Press u, i to select microphone sensitivity and press q/g to enter.
|
|
|
|
|
|
|
|
|
|
|
|
|
|
|
|
|
|
|
|
|
|
|
|
|
|
|
|
|
|
|
|
|
|
|
|
|
Low |
Normal |
|
High |
|||||||
*Press STOP to stop the setting process midway.
*If “ |
” is selected and entered while “ |
” is on ( page 15), “ |
” turns off. |
(“ |
” disappears.) |
|
|
 Loading...