


IC Recorder
Operating Instructions
Model No. RR-QR400
RR-QR200
RR-QR100
|
|
|
|
|
|
Model RR-QR200 is only for the U.S.A. |
This manual was printed |
||||
with soy based ink. |
|
||||
Before connecting, operating or adjusting this product, |
|
|
|
|
|
please read these instructions completely. Please keep this |
|
|
|
|
|
manual for future reference. |
|
|
P |
|
PC |
|
|
|
|
|
|
Panasonic Consumer Electronics Company, Division of |
p |
|
Matsushita Electric Corporation of America |
||
|
||
One Panasonic Way Secaucus, New Jersey 07094 |
|
http://www.panasonic.com
Panasonic Sales Company, Division of Matsushita Electric of Puerto Rico, Inc. (“PSC”)
Ave. 65 de Infantería, Km. 9.5 San Gabriel Industrial Park, Carolina, Puerto Rico 00985
Panasonic Canada Inc.
5770 Ambler Drive, Mississauga, Ontario L4W 2T3 www.panasonic.ca
c 2001 Matsushita Electric Industrial Co., Ltd. |
RQT5967-P |
|
F0301KB0 |
||
Printed in Japan |
||
|
Dear customer
Thank you for purchasing this product.
For optimum performance and safety, please read these instructions carefully.
THE FOLLOWING APPLIES ONLY IN THE U.S.A.
CAUTION:
This equipment has been tested and found to comply with the limits for a Class B digital device, pursuant to Part 15 of the FCC Rules. These limits are designed to provide reasonable protection against harmful interference in a residential installation. This equipment generates, uses and can radiate radio frequency energy and, if not installed and used in accordance with the instructions, may cause harmful interference to radio communications. However, there is no guarantee that interference will not occur in a particular installation. If this equipment does cause harmful interference to radio or television reception, which can be determined by turning the equipment off and on, the user is encouraged to try to correct the interference by one or more of the following measures:
≥Reorient or relocate the receiving antenna.
≥Increase the separation between the equipment and receiver. ≥Connect the equipment into an outlet on a circuit different from
that to which the receiver is connected.
≥Consult the dealer or an experienced radio/TV technician for help.
Any unauthorized changes or modifications to this equipment would void the user’s authority to operate this device.
This device complies with Part 15 of the FCC Rules. Operation is subject to the following two conditions: (1) This device may not cause harmful interference, and (2) this device must accept any interference received, including interference that may cause undesired operation.
1
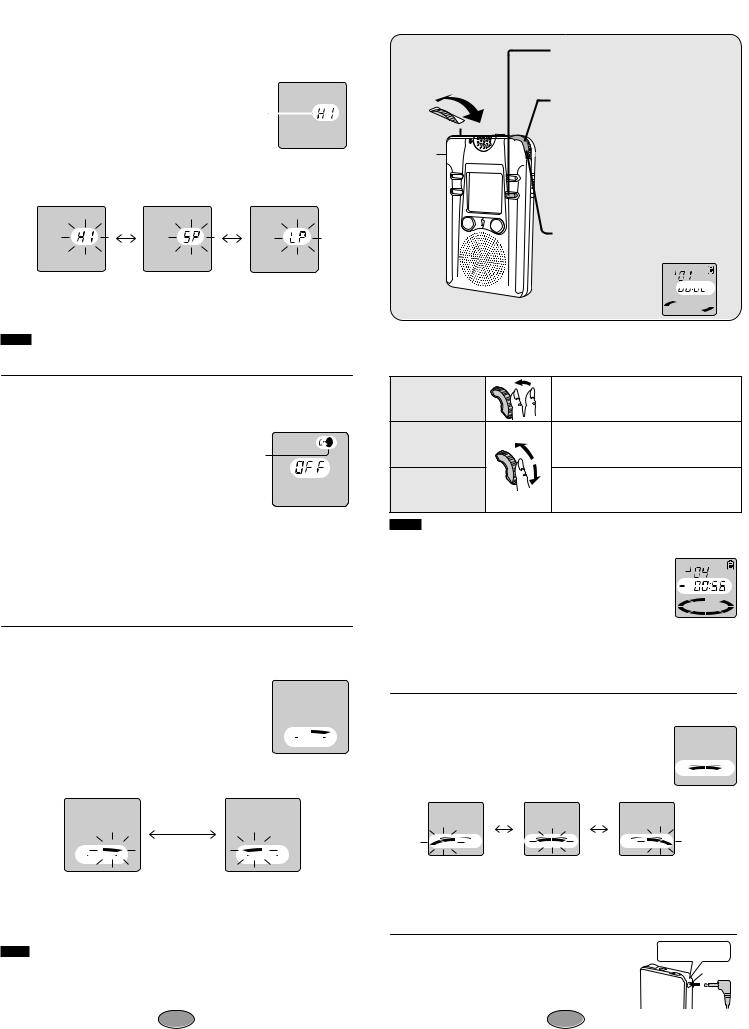
Inserting the batteries
Long life alkaline batteries are recommended.
If rechargeable batteries are to be used, rechargeable batteries manufactured by Panasonic are recommended.
3
- |
+ |
|
|
|
|
+ |
- |
|
|
|
|
AAA SIZE (R03/LR03, UM-4) |
Ribbons |
|
(not included) |
|
|
|
|
|
Note .
≥Lay the ribbons under the batteries to make removal easier. ≥Be sure the ribbons do not stick out when the lid is closed.
If the battery cover comes loose:
Push the cover’s levers into the cutouts in the compartment as shown in the illustration.
After the batteries are inserted:
If the year starts flashing on the display, set the time
so the unit can keep track of the time and date of recordings. For details see “Setting the time” (page 3).
Note .
Do not press the buttons while inserting the batteries. This may cause malfunction of the unit or its display.
The battery indicator
FULL EMPTY FLAT
Replace the batteries when the indicator flashes.
The flash memory preserves files and file information even if you remove the batteries or they go flat. Other memory items, however, revert to the factory settings if you take more than thirty seconds to replace the batteries or leave flat batteries in the unit for an extended period.
Note .
≥The battery indicator is not shown while the recorder is stopped.
≥The unit does not work correctly if the battery cover is not closed completely.
Hold function
This function prevents accidental operation.
Hold mode
HOLD
Release
HOLD
“hold” appears when a button is pressed but there is no other response while this function is on.
Release HOLD before attempting any operation.
2

Setting the time
Set the time after inserting the batteries so the times for the recordings are saved. Reset the clock regularly to maintain accuracy. (Monthly accuracy i/j 60 seconds.)
1 SELECT
Within 10 seconds, turn [PLAY/STOP, SEL] to select the item.
 2 SET
2 SET
Within 10 seconds, press [PLAY/STOP, SEL] to set the item.
Repeat 1 and 2 to complete the settings.
1 SELECT |
2 SELECT |
|
SELECT |
the year |
the |
|
|
SET |
|
SET |
|
|
M |
|
|
|
|
SET |
|
4 SELECT |
5 SELECT |
Normal display |
|
12 or 24 hour |
the |
||
time display |
|
|
|
SET |
|
SET |
|
|
AM |
|
|
|
H |
|
|
Correcting the time settings |
|
|
|
Press [MODE] to display the setting you want |
SELECT |
SET |
|
to change it. |
|
|
|
Changing modes
MODE
 Locking files (see page 8)§ v
Recording mode (see page 5) v
Microphone sensitivity (see page 5) v
Voice activated system (see page 5) v
Playback speed (see page 6) v
Operation tone (see page 11) v
Timer recording (see pages 9 and 10)
v
Timer playback (see pages 9 and 10)§
v
Time setting — year>month>day> time display>time — (see above)
§Not displayed if there are no recordings.
Note .
≥The original display is restored if an operation isn’t performed within 10 seconds. ≥Settings can be canceled by pressing [STOP].
3
Recording
Files can be stored in separate “folders”. Each folder can hold up to 99 files. Total recording time depends on the model and recording mode (see page 5, “Changing recording mode”).
|
Recording mode |
|
Model |
|
|
RR-QR400 |
RR-QR200 |
RR-QR100 |
|
|
|
|||
Available |
LP (Long play) |
420 minutes |
200 minutes |
100 minutes |
|
131 minutes |
65 minutes |
31 minutes |
|
recording |
SP (Standard play) |
|||
time |
HQ (High quality) |
65 minutes |
32 minutes |
15 minutes |
|
||||
Folders |
|
|
4 (A, B, C, D) |
|
Note .
≥Total recording time is the combined time of all the folders. ≥The recording mode is originally set to “HQ”.
≥The recording being made can be lost if the unit receives a shock (e.g. it is dropped), or if the batteries and cover come loose.
≥Leave VAS (page 5) off when recording important files.
Recording indicator
Built-in microphone MIC
1 Press [FOLDER] to select the folder to record into.
Folder B
HQ
2 Press [$REC, %PAUSE].
Recording begins and the recording indicator lights.
B
File number

 HQ
HQ
Recording time
M S
3 Press [STOP].
Recording stops.
The display changes in the following order:
B |
B |
REC |
B |
|
B |
REC |
|
|
|
|
|
DATE |
|
DATE |
|
|
|
HQ |
|
HQ |
|
HQ |
HQ |
|
PM |
|
M |
S |
|
M D |
H |
M |
|
Date |
Time |
Length |
Total number |
of recording |
of recording |
of recording |
of files |
To pause recording:
Press and hold [$REC, %PAUSE].
The recording indicator flashes.
Press again to resume recording.
To record through the external microphone:
Plug the external microphone (not included) into the [MIC] jack. Then follow the steps 1-3 as illustrated above.
You can use a condenser microphone with or without built-in power supply. Plug type: 3.5 mm (1⁄8 in.) monaural
To check available recording time:
Press [MODE] while recording.
Press again to restore the display.
This display also appears when there is about 10% of the total recording time left. Press [MODE] to show the normal recording display for about 3 seconds.
Recording time displays
Available |
|
|
B |
|
|
|
|
HQ |
|
recording |
|
|
|
|
|
|
|
|
|
|
|
|
|
|
time |
|
|
M |
S |
Time indicator |
|
|
|
|
|
|
|
|
e.g. Display for RR-QR400
The display shows minutes and seconds.
RR-QR400 : The display shows hours and minutes when the length of recording and remaining recording time are 300 minutes or longer.
The time indicator is a rough guide to the remaining recording time. The sections disappear as available time reduces and the last section flashes when there is about 10 percent left.
“FULL” is displayed when there is no time or file numbers left. Erase unnecessary files to continue recording.
∫ Changing recording mode
Three modes can be selected. The mode is originally set to HQ (“HI”).
1Press [MODE] several times until the recording mode display is displayed.
Recording mode display
2 Within 10 seconds, turn [PLAY/STOP, SEL] the required mode.
Recording mode changes the total recording time.
High quality mode |
Standard play mode |
Long play mode |
3 Within 10 seconds, press [PLAY/STOP, SEL].
The mode is selected.
Note .
“HQ” lights in other displays to indicate you have selected high quality mode.
∫ Preventing unnecessary recording
(Voice activated system: VAS)
VAS detects silence and pauses recording automatically.
The voice mark flashes while VAS is waiting for a sound to record.
1 Press [MODE] several times until the
voice mark is displayed. |
V o i c e |
|
mark |
||
|
2Within 10 seconds, turn [PLAY/STOP, SEL] to select “On”.
3Within 10 seconds, press [PLAY/STOP, SEL].
VAS is now on.
To turn the function off:
Select “OFF” in step 2 and press [PLAY/STOP, SEL].
∫ Changing microphone sensitivity
Two levels of microphone sensitivity can be selected. The level is originally set to “H”.
1Press [MODE] several times until the microphone sensitivity display is displayed.
Microphone sensitivity display |
|
L |
MIC SENS |
H |
|
|
|
|
2Within 10 seconds, turn [PLAY/STOP, SEL] to select the required level of sensitivity.
L MIC SENS |
H |
L MIC SENS H |
High: Relatively soft sounds are |
Low: Only relatively louder sounds |
|
recorded. |
|
are recorded. Use when |
|
|
recording close to the mouth. |
3 Within 10 seconds, press [PLAY/STOP, SEL].
The level is selected.
Note .
Microphone sensitivity is shown only when sensitivity level is being changed. It is not shown constantly.
Playback
4 Adjust the
volume.
Earphone jack#
1 Press [FOLDER] to select the folder containing the file you want to play.
2 Turn [PLAY/STOP, SEL] to select the file
you want to play.
Information about the selected file
appears in the following order:
1 Date of recording
2 Time of recording
3 Length of recording
4 Number of files
5 Normal display
3 Press [PLAY/STOP, SEL].
Playback starts.
B
Play time 


 HQ
HQ
M S
To stop play
Press [STOP]. Press [PLAY/STOP, SEL] to resume play from you stopped.
Other methods of playback
Use [PLAY/STOP, SEL].
To stop playback |
Press during play. |
|
||
Press again to resume playback. |
||||
|
||||
|
Turn slowly. |
|
|
|
To move to other |
Return to |
the beginning |
of the file |
|
files during play |
by turning |
backward. Turn |
again within |
|
|
3 seconds to move to the previous file. |
|||
|
Turn quickly during play. You can cue and |
|||
Cue and review |
review not only within a file, but the previ- |
|||
|
ous and the following files as well. |
|||
Note .
Volume may be changed after cueing, reviewing, stopping and dividing files.
∫ To check the remaining playback time:
Press [MODE] during play.
Press again to restore the display. |
Remaining |
|
B |
|
||
|
|
|
||||
Time indicator: |
playback |
|
|
HQ |
||
The sections disappear clockwise to indicate |
time |
|
|
|
M |
S |
|
|
|
||||
remaining playback time. |
Time indicator |
|
|
|
|
|
|
|
|
|
|
||
∫To listen to the first few seconds of each file (Intro-scan)
Press and hold [PLAY/STOP, SEL] while stopped for a moment.
The first 5 seconds of each file are played, in order, beginning with the first file. If you want to listen to a file in full, press [PLAY/STOP, SEL] while it is playing.
∫ To change playback speed
Three playback speeds can be selected. The speed is originally set to normal.
1 Press [MODE] several times
until the playback speed display |
Playback |
|
|||||
is displayed. |
|
|
|
||||
|
|
speed |
|
W |
F |
||
|
|
|
|
|
|
||
2 Within 10 seconds, turn [PLAY/STOP, |
display |
SLO |
AST |
||||
|
|
|
|||||
SEL] to select the speed. |
|
|
|
|
|
||
W |
F |
W |
F |
W |
F |
|
|
SLO |
AST |
SLO |
AST |
SLO |
AST |
|
|
|
Slow |
Normal |
|
Fast |
|
|
|
3 Within 10 seconds, press [PLAY/STOP, SEL].
The speed is selected.
For your reference
Press and hold [STOP] to restore normal playback speed.
∫ Using earphone (not included) |
Plug in firmly. |
Use a monaural type if you want to listen with an |
|
earphone. |
|
Insert the earphone plug into the earphone jack. |
|
Sound will not be heard from the speaker. |
|
Plug type: 3.5 mm (1⁄8 in.) monaural |
|
5
 Loading...