

Page 1

Portable Stereo Component System
Operating Instructions
RX-CT65
Dear customer
Thank you for purchasing this product.
Before connecting, operating or adjusting this product, please read
these instructions completely.
Please keep this manual for future reference.
Table of contents
Model No. RX-CT65
RX-CT60
Control guide.................................................................................3
Speaker connection
Power supply
The radio
Tapes
Recording the radio
Recording tape to tape
Other functions
Troubleshooting guide
Maintenance
Specifications
.........................................................................................6
................................................................................................7
................................................................Back cover
.....................................................................4
.................................................................................5
.....................................................................8
................................................................9
...........................................................................10
.............................................................11
.............................................................Back cover
Supplied accessories
Check the packaging for these accessories.
1 AC power supply cord
Note
The included AC power supply cord is for use with this unit only.
Do not use it with other equipment.
GC
GU GS
RQT7611-G
Page 2
These operating instructions are applicable to models RXCT65 and RX-CT60, however, are intended primarily for
model RX-CT65.
CAUTION:
Change the voltage setting to suit the AC voltage in your
area. See page 5. Note that the unit will be seriously damaged
or fail to operate correctly if this setting is not made
correctly.
CAUTION!
• DO NOT INSTALL, OR PLACE THIS UNIT IN A BOOKCASE,
BUILT-IN CABINET OR IN ANOTHER CONFINED SPACE.
ENSURE THE UNIT IS WELL VENTILATED. TO PREVENT
RISK OF ELECTRIC SHOCK OR FIRE HAZARD DUE TO
OVERHEATING, ENSURE THAT CURTAINS AND ANY
OTHER MATERIALS DO NOT OBSTRUCT THE
VENTILATION VENTS.
• DO NOT OBSTRUCT THE UNIT’S VENTILATION OPENINGS
WITH NEWSPAPERS, TABLECLOTHS, CURTAINS, AND
SIMILAR ITEMS.
• DO NOT PLACE SOURCES OF NAKED FLAMES, SUCH AS
LIGHTED CANDLES, ON THE UNIT.
• DISPOSE OF BATTERIES IN AN ENVIRONMENTALLY
FRIENDLY MANNER.
WARNING:
TO REDUCE THE RISK OF FIRE, ELECTRIC SHOCK OR
PRODUCT DAMAGE, DO NOT EXPOSE THIS APPARATUS TO
RAIN, MOISTURE, DRIPPING OR SPLASHING AND THAT NO
OBJECTS FILLED WITH LIQUIDS, SUCH AS VASES, SHALL
BE PLACED ON THE APPARATUS.
This product may receive radio interference caused by mobile
telephones during use. If such interference is apparent, please
increase separation between the product and the mobile
telephone.
THIS UNIT IS INTENDED FOR USE IN TROPICAL CLIMATES.
The speakers do not have magnetic shielding. Do not place the
unit near televisions, personal computers or other devices easily
influenced by magnetism.
The socket outlet shall be installed near the equipment and easily
accessible or the mains plug or an appliance coupler shall remain
readily operable.
2
RQT7611
Page 3
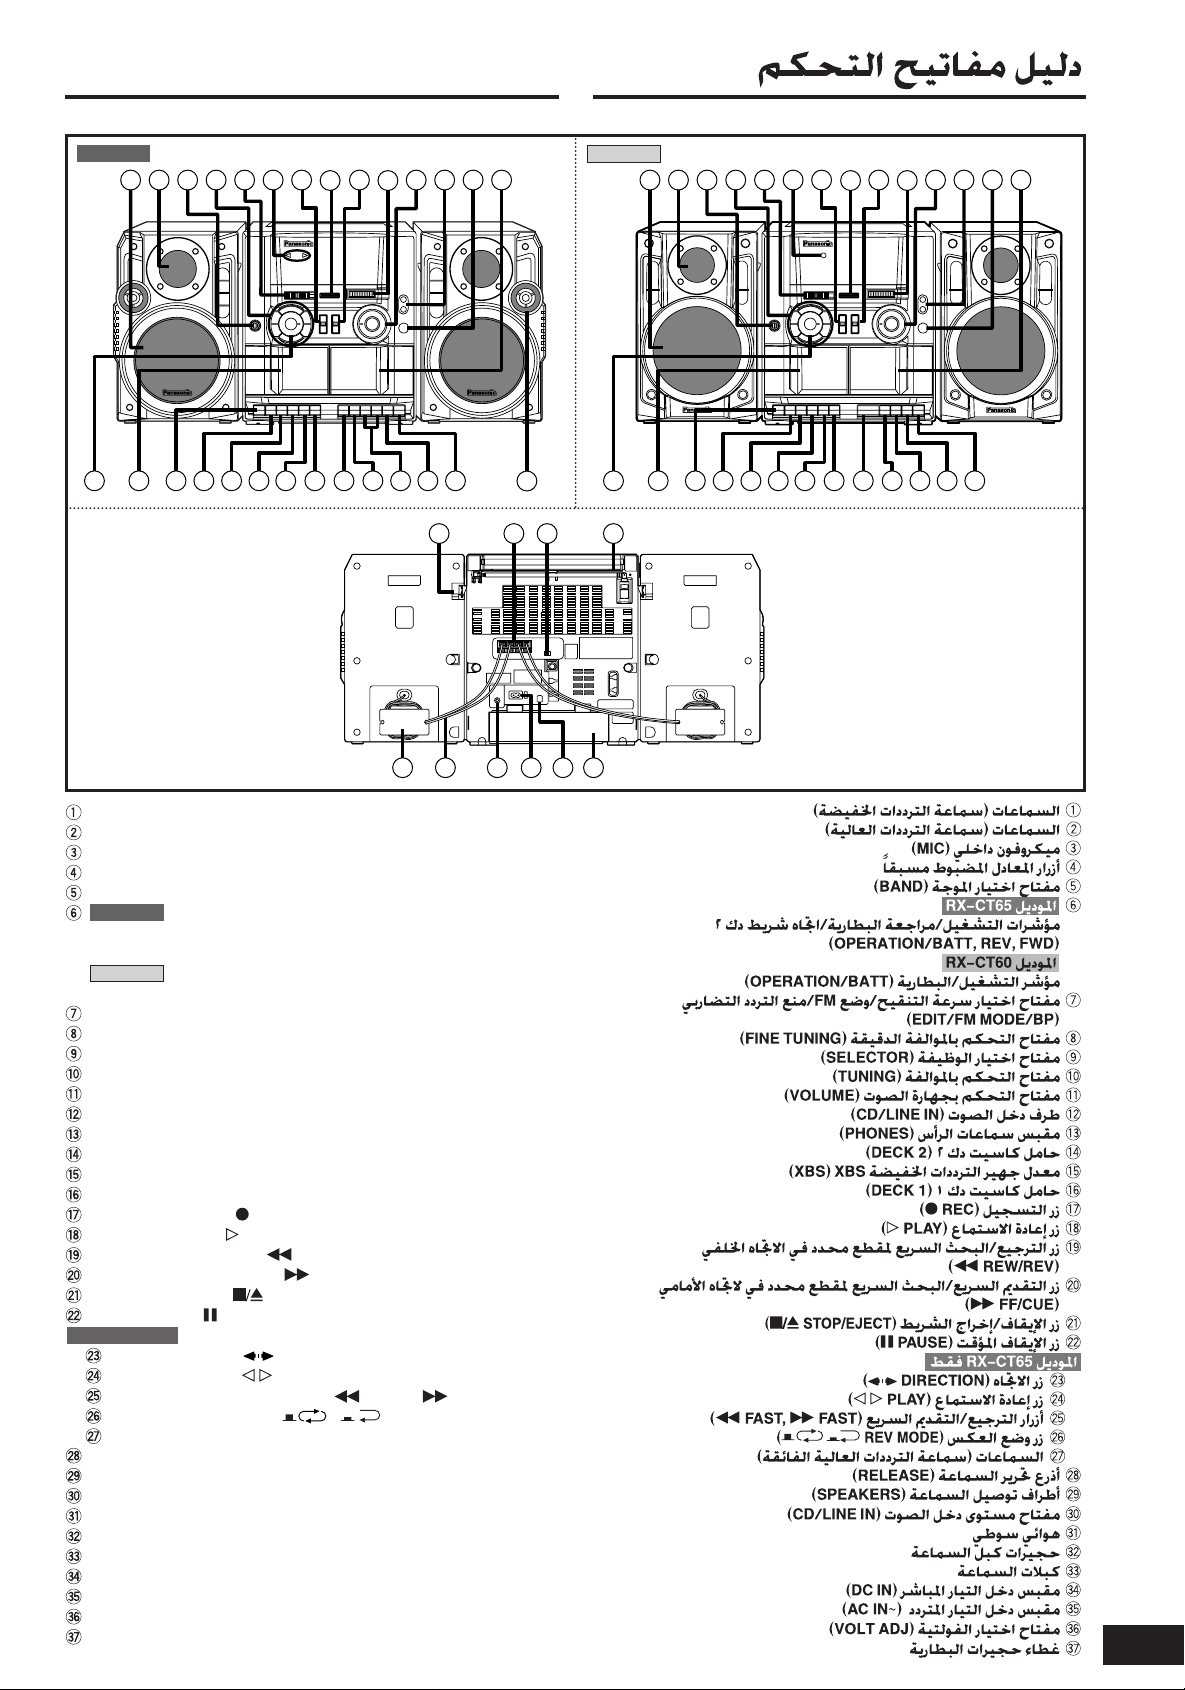
Control guide
RX-CT65 RX-CT60
43
2
1
5 6
7
9
111213
10
8
14
2
1
43
5 6
7
9
111213
10
8
14
17
15
16
Speakers (woofer)
Speakers (tweeter)
Built-in microphone (MIC)
Preset equalizer buttons
Band selector (BAND)
RX-CT65
Operation/battery check/deck 2 tape direction indicators
(OPERATION/BATT, REV, FWD)
RX-CT60
Operation/battery indicator
Editing speed/FM mode/beat proof selector (EDIT/FM MODE/BP)
Fine tuning control (FINE TUNING)
Function selector (SELECTOR)
Tuning control (TUNING)
Volume control (VOLUME)
Audio input terminal (CD/LINE IN)
Headphones jack (PHONES)
Deck 2 cassette holder (DECK 2)
XBS adjustor (XBS)
Deck 1 cassette holder (DECK 1)
Recording button ( REC)
Playback button ( PLAY)
Rewind/review button ( REW/REV)
Fast forward/cue button ( FF/CUE)
Stop/eject button ( STOP/EJECT)
Pause button ( PAUSE)
RX-CT65 only
Direction button ( DIRECTION)
Playback button ( PLAY)
Rewind/fast forward buttons ( FAST, FAST)
Reverse mode button ( REV MODE)
Speakers (super tweeter)
Speaker release levers (RELEASE)
Speaker terminals (SPEAKERS)
Audio input level switch (CD/LINE IN)
Whip antenna
Speaker cord compartments
Speaker cords
DC input jack (DC IN)
AC socket (AC IN~)
Voltage selector (VOLT ADJ)
Battery compartment cover
19
18 20
23
21 21
22
24 25 26
(OPERATION/BATT)
27
28 29 3130
3332 36 373534
15
16 18 20
17 19
21 21 2222 20
18
19
3
RQT7611
Page 4
OPR OFF
OPR OFF
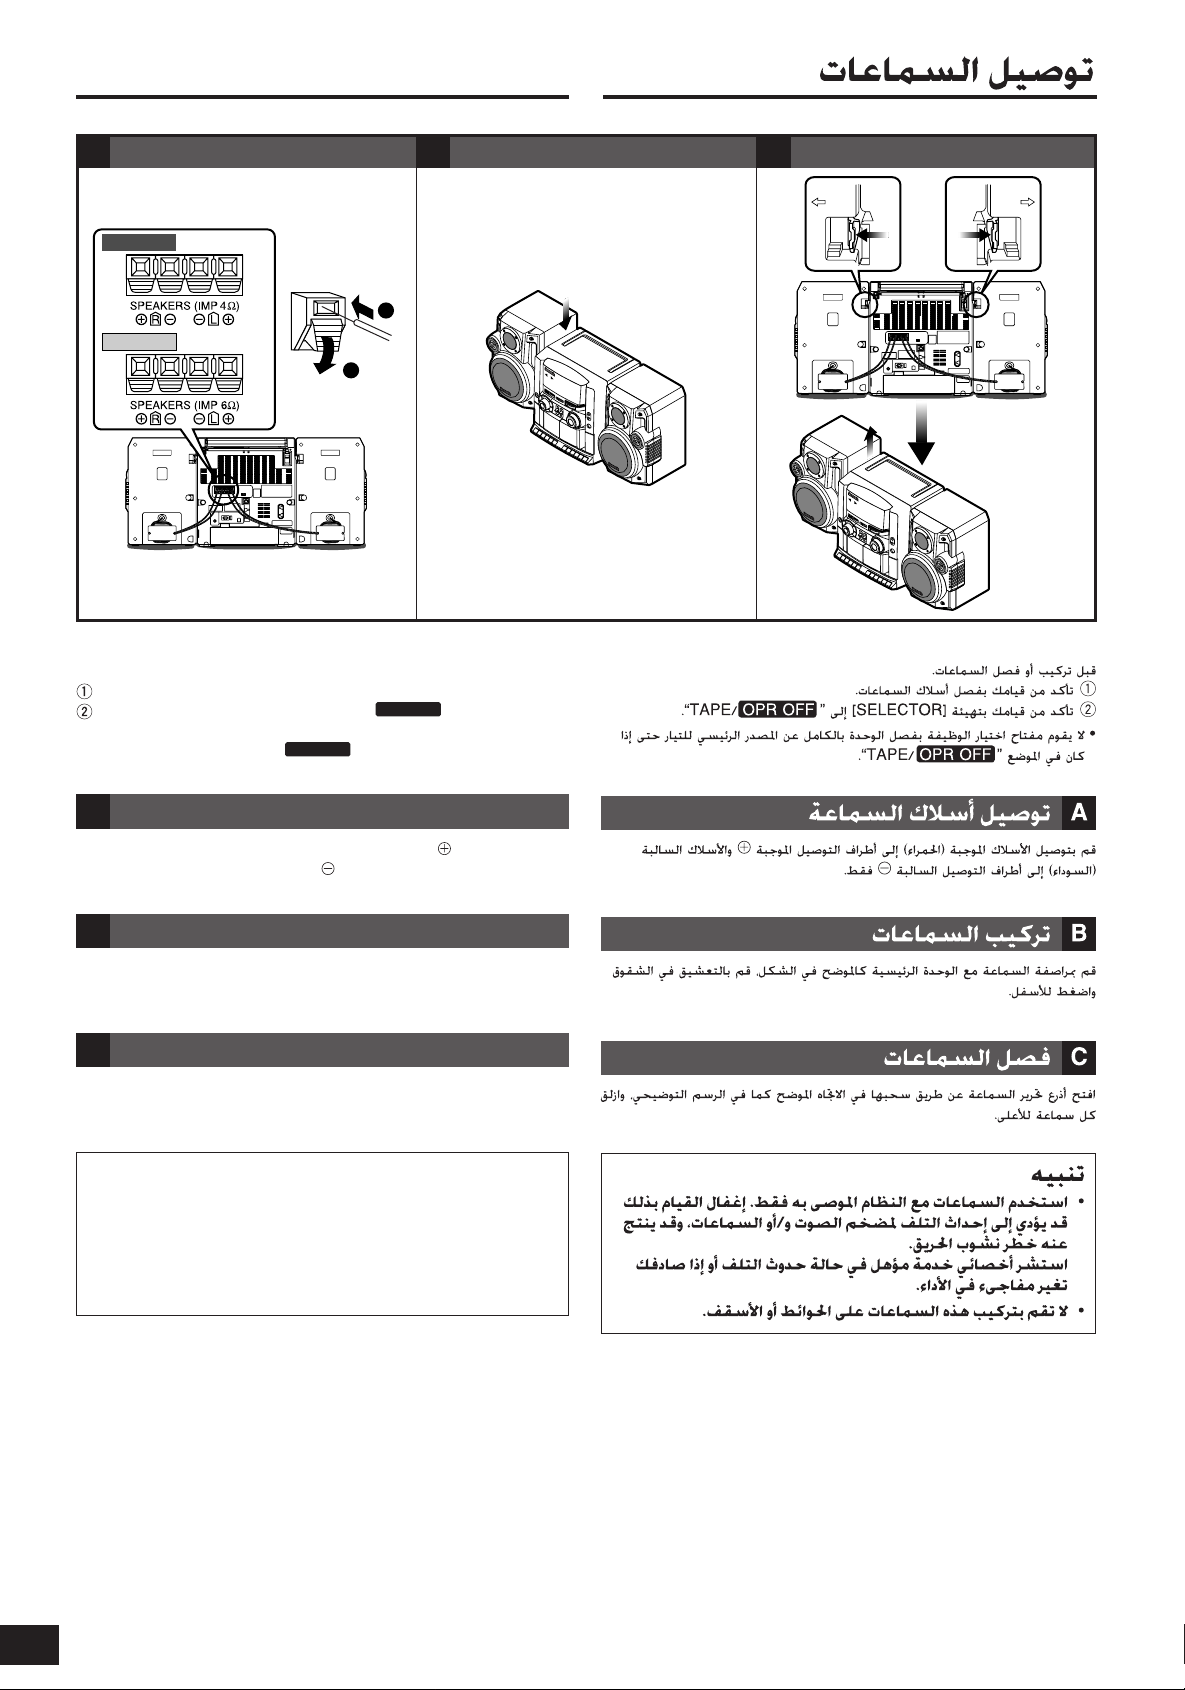
Speaker connection
RELEASE RELEASE
Connect the speaker cordsAAttaching the speakers
RX-CT65
RX-CT60
1
Before attaching or detaching the speakers,
Be sure to disconnect the speaker cords.
Be sure to set [SELECTOR] to “TAPE/ ”.
• The function selector switch does not separate entire unit from
mains even if in “TAPE/ ” position.
B
2
C
Detaching the speakers
A
Connect the speaker cords
Connect only positive (red) wires to positive terminals and
negative (black) wires to negative terminals.
B
Attaching the speakers
Align the speaker with the main unit as shown in the figure, interlock
the grooves and press down.
C
Detaching the speakers
Unlock the speaker release levers by pulling them in direction shown
as illustrated, and slide each speaker up.
Caution
• Use the speakers only with the recommended system.
Failure to do so may lead to damage to the amplifier and/or
the speakers, and may result in the risk of fire.
Consult a qualified service person if damage has occurred
or if you experience a sudden change in performance.
• Do not attach these speakers to walls or ceilings.
4
RQT7611
Page 5
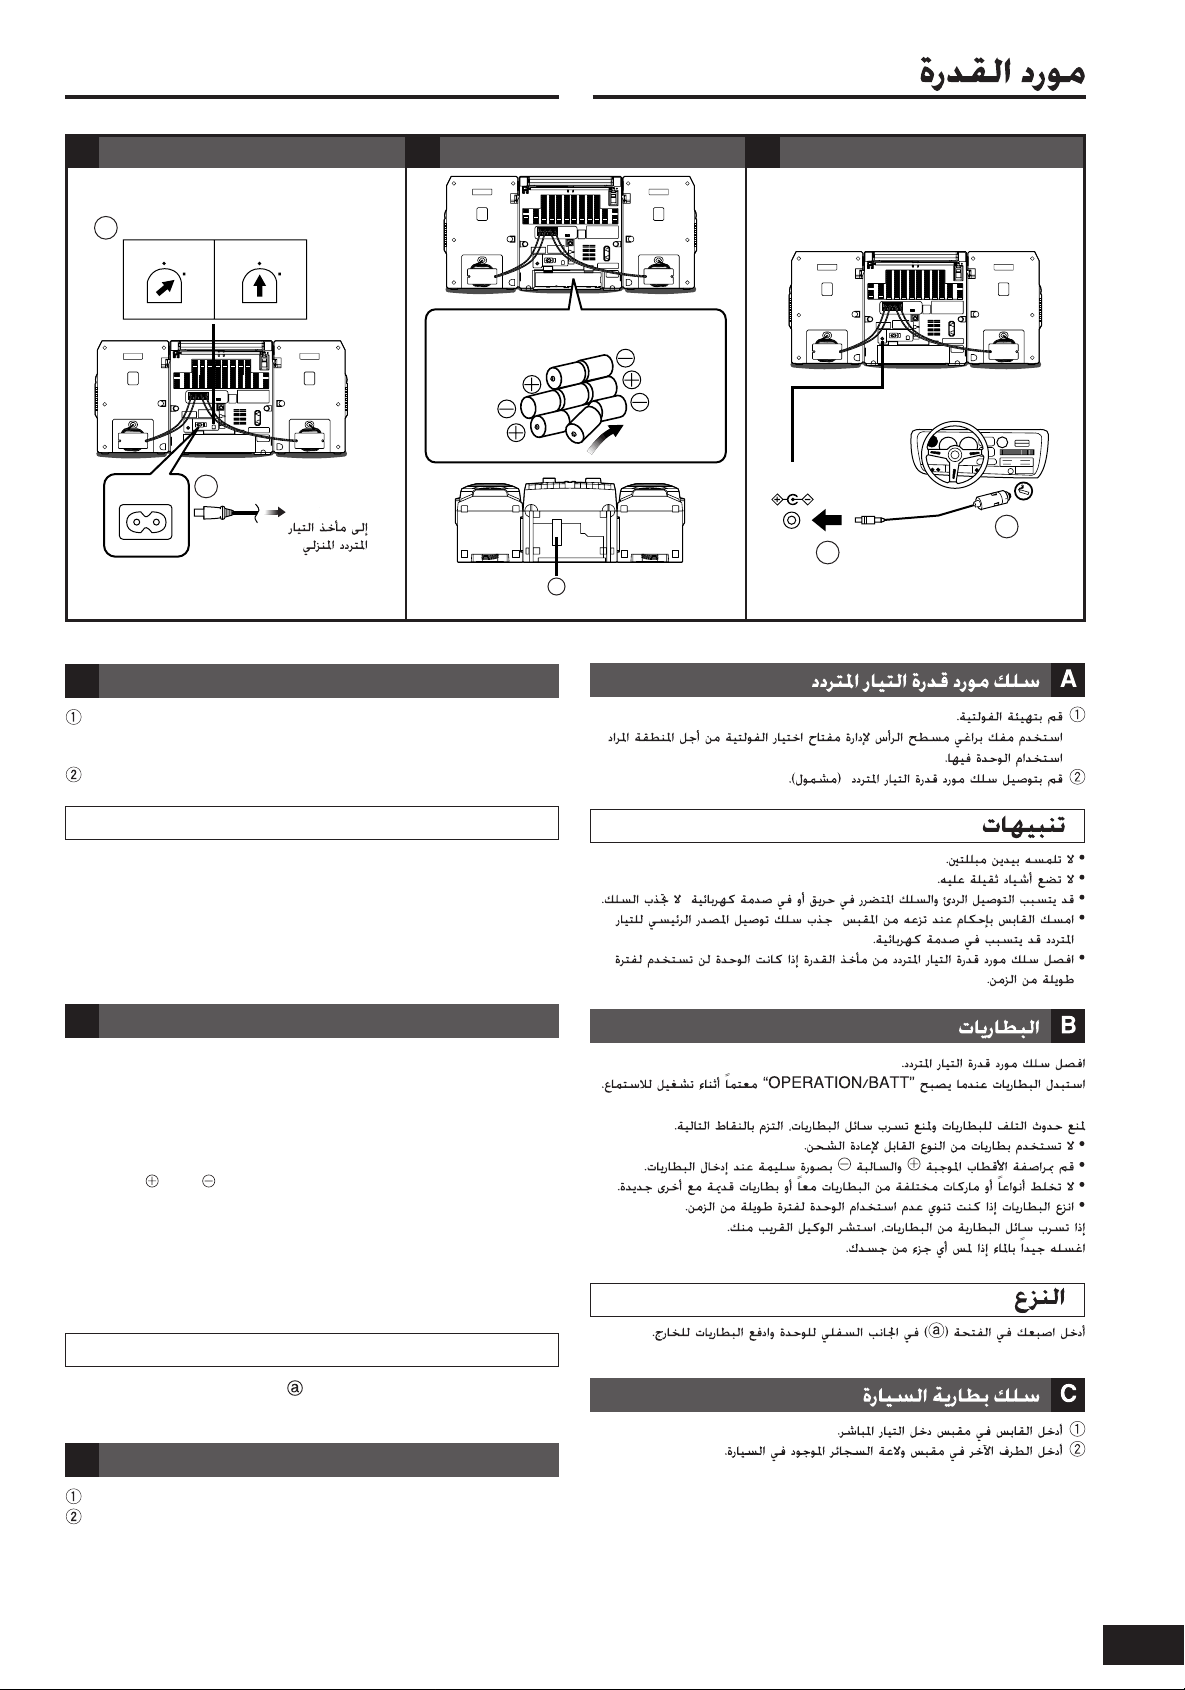
Power supply
1
2
VOLT ADJ
110-127V
220240V
220-240V
220240V
110127V
110127V
AC IN ~
R20/LR20 (D, UM-1)
3
5
4
6
8
7
1
2
a
1
2
DC IN
(12-13.2V)
A
AC power supply cord
To household
AC outlet
A
AC power supply cord
Set the voltage.
Use a flat-head screw-driver to turn the voltage selector for the
area in which the unit will be used.
Connect the AC power supply cord (included).
B
Batteries
C
Car battery cord
Cautions
• Do not touch it with wet hands.
• Do not place heavy objects on it.
• Poor connection and cord damage can cause fire or electric shock.
• Grasp the plug firmly when unplugging the cord. Pulling the AC
power supply cord can cause electric shock.
• Disconnect the AC power supply cord from the household AC outlet
if the unit is not going to be used for a long time.
B
Batteries
Disconnect the AC power supply cord.
Replace the batteries when “OPERATION/BATT” goes dim during
play.
To prevent damage to the batteries and electrolyte leakage, heed the
following points.
• Do not use rechargeable type batteries.
• Align the and polarities properly when inserting the batteries.
• Do not mix different types or makes of batteries or old and new
batteries.
• Remove batteries if you do not plan to use the unit for a long time.
If electrolyte leaks from the batteries, consult your dealer.
Wash thoroughly with water if electrolyte comes in contact with any
part of your body.
Insert your finger into the slot ( ) at the bottom of the unit and push
out the batteries.
C
Insert the plug into the DC Input Jack.
Plug the other end into the cigarette lighter socket in your car.
Removal
Car battery cord
5
RQT7611
Page 6
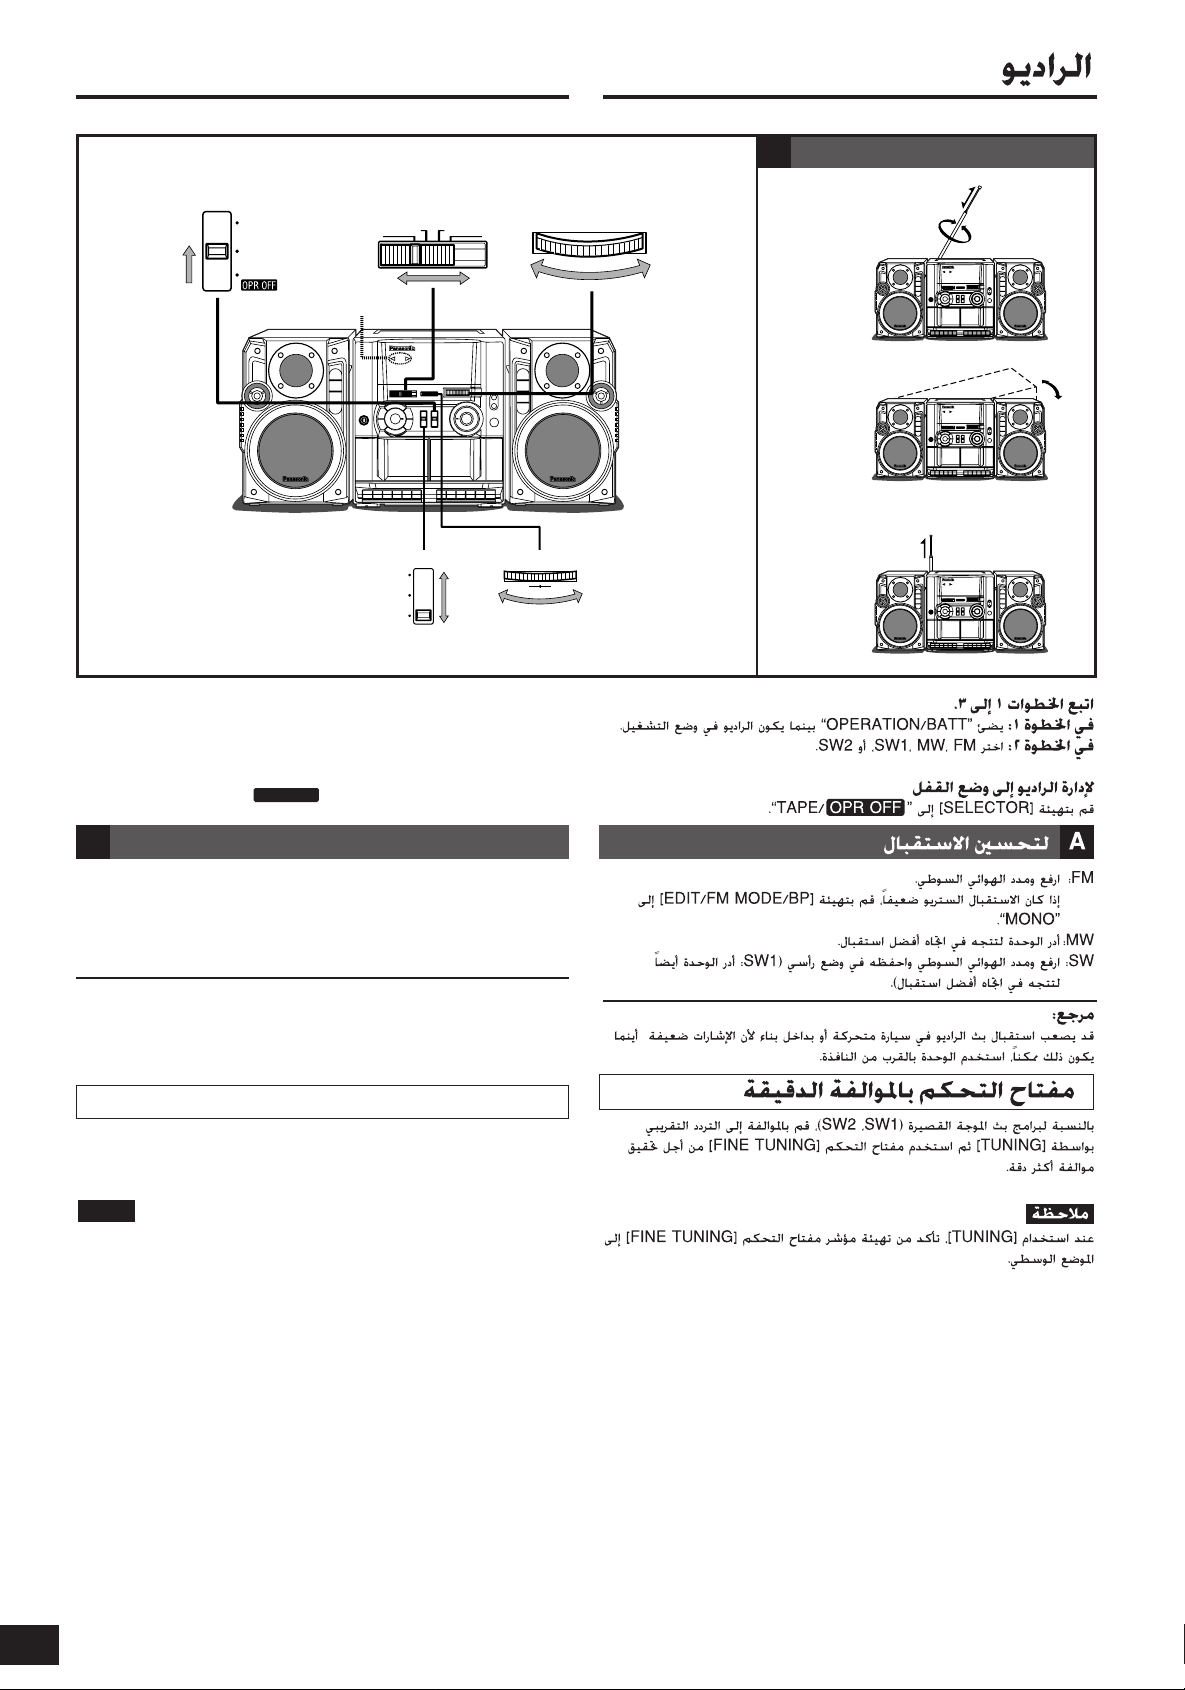
The radio
OPR OFF
1 23
TUNING
FM MW SW1 SW2
BAND
CD/
LINE IN
RADIO
TAPE/
SELECTOR
HIGH/
STEREO/II
MIC/
MONO/I
NORMAL/
STEREO/II
EDIT/FM MODE/BP
LH
FINE TUNING
OPERATION/BATT
MW/SW1
FM
SW1/SW2
A
To improve reception
Follow steps 1 to 3.
In step 1: “OPERATION/BATT” lights while the radio is on.
In step 2: Select FM, MW, SW1 or SW2.
To turn off the radio
Set [SELECTOR] to “TAPE/ ”.
A
To improve reception
FM: Raise and extend the whip antenna.
If stereo reception is poor, set [EDIT/FM MODE/BP] to “MONO”.
MW:Turn the unit to face in the direction of best reception.
SW:Raise and extend the whip antenna and keep it vertical
(SW1: also turn the unit to face in the direction of best reception).
Reference:
Radio broadcasts may be hard to receive in a moving vehicle or
building because their signals are weak. Whenever possible, use the
unit by a window.
Fine tuning control
For short-wave broadcasts (SW1, SW2), tune to the approximate
frequency with [TUNING], and then use [FINE TUNING] control for
more precise tuning.
Note
When using [TUNING], be sure to set [FINE TUNING] control pointer
to the center position.
6
RQT7611
Page 7
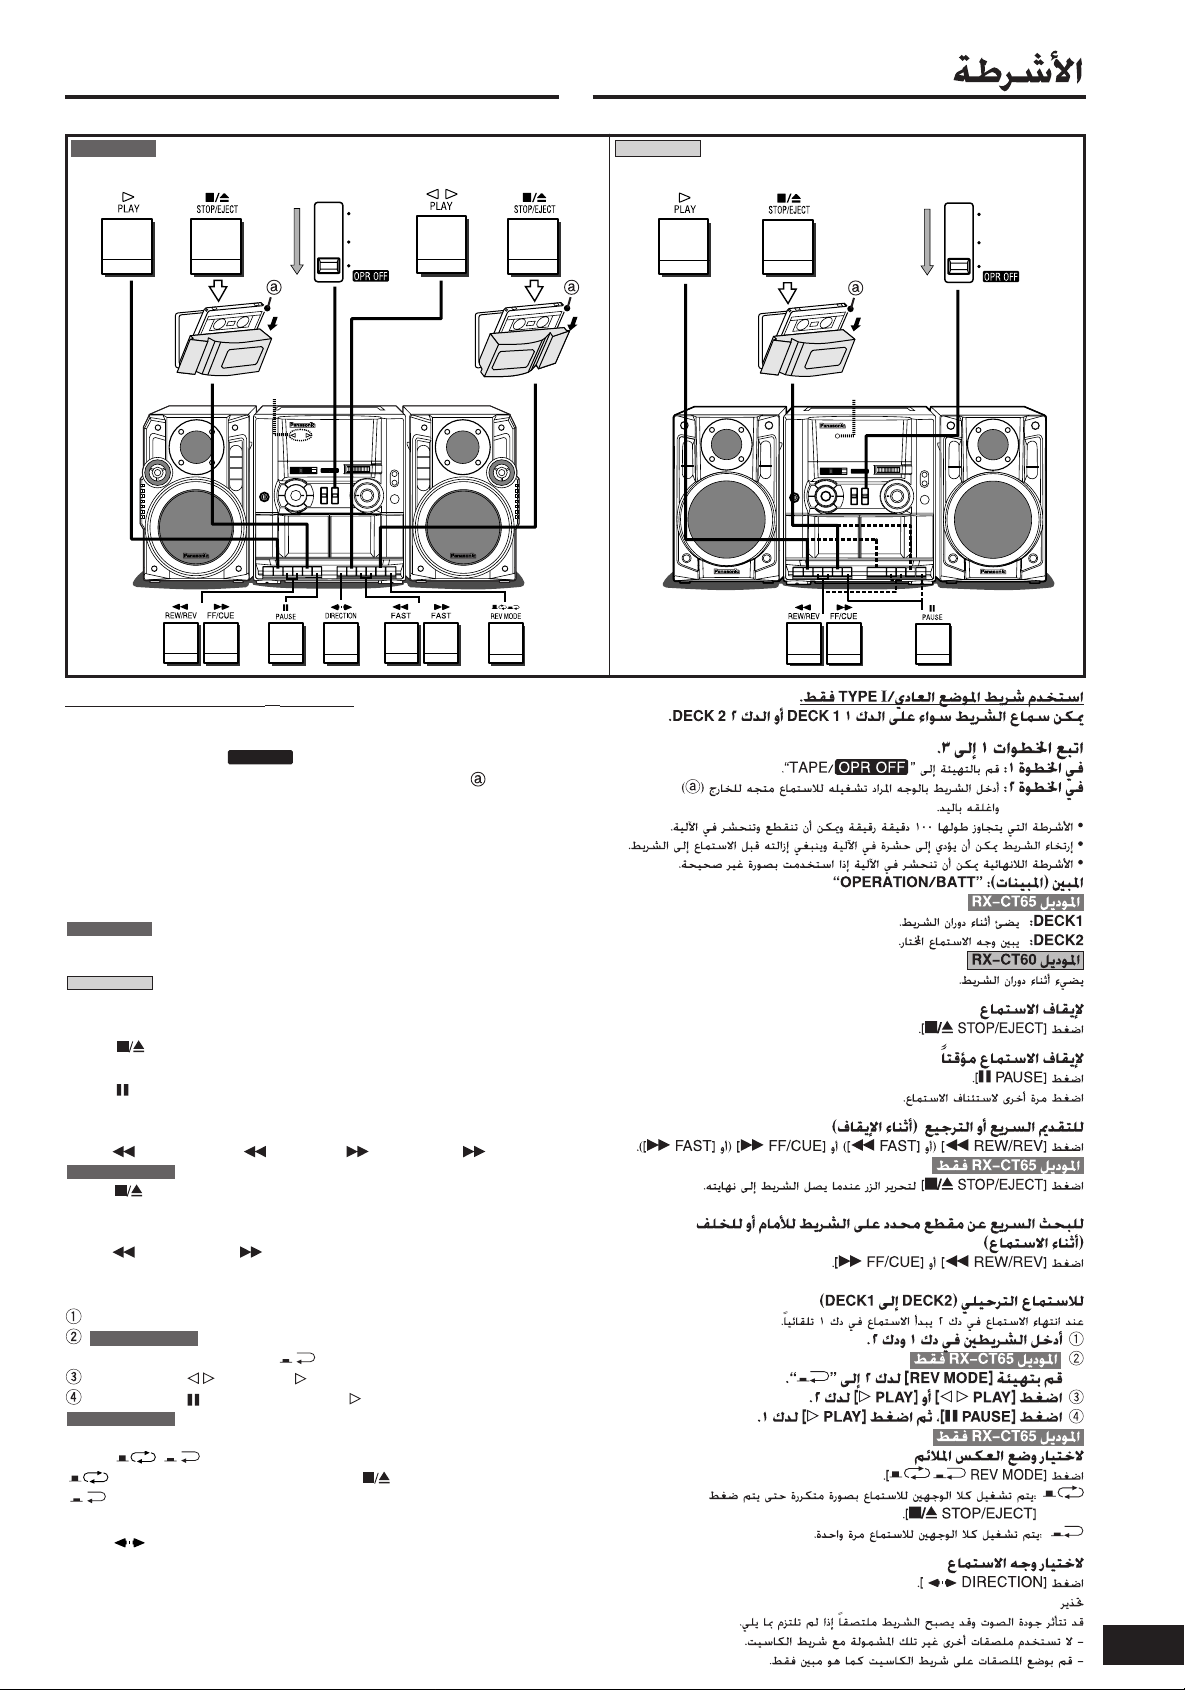
Tapes
OPR OFF
SELECTOR
CD/
LINE IN
RADIO
TAPE/
122
33
OPERATION/BATT
SELECTOR
CD/
LINE IN
RADIO
TAPE/
123
OPERATION/BATT
RX-CT65 RX-CT60
Use normal position/TYPE
Tape can be played either DECK 1 or DECK 2.
I
tape only.
Follow steps 1 to 3.
In step 1: Set to “TAPE/ ”.
In step 2: Insert the tape with the side to be played facing out ( ) and close
• Tapes exceeding 100 minutes are thin and can break or get caught in the
• Tape slack can get caught up in the mechanism and should be taken up
• Endless tapes can get caught up in the mechanism if used incorrectly.
“OPERATION/BATT” indicator(s)
DECK 1: Lights while tape is travelling.
DECK 2: Shows the selected play side.
Lights while the tape is travelling.
To stop play
Press [ STOP/EJECT].
To pause play
Press [ PAUSE].
Press once again to resume play.
To fast-forward or rewind (while stopped)
Press [ REW/REV] (or [ FAST]) or [ FF/CUE] (or [ FAST]).
Press [ STOP/EJECT] to release the button when the tape reaches the
end.
To cue or review (during play)
Press [ REW/REV] or [ FF/CUE].
To play relay (DECK 2 to DECK 1)
When Deck 2 play has finished, Deck 1 play starts automatically.
To select the appropriate reverse mode
Press [ REV MODE].
To select the play side
Press [ DIRECTION].
Caution
Sound quality may be effected and the cassette tape may become
stuck if you do not adhere to the following.
• Do not use other stickers not included with the cassette tape.
• Place stickers on the cassette tape only as indicated.
by hand.
mechanism.
before playing the tape.
RX-CT65
RX-CT60
RX-CT65 only
”.
Insert the tapes into Deck 1 and Deck 2.
RX-CT65 only
Set Deck 2 [REV MODE] to “
Press Deck 2 [ PLAY] or [ PLAY].
Press Deck 1 [ PAUSE], then press [ PLAY].
RX-CT65 only
Both sides are played repeatedly until [ STOP/EJECT] is pressed.
:
Both sides are played once.
:
7
RQT7611
Page 8
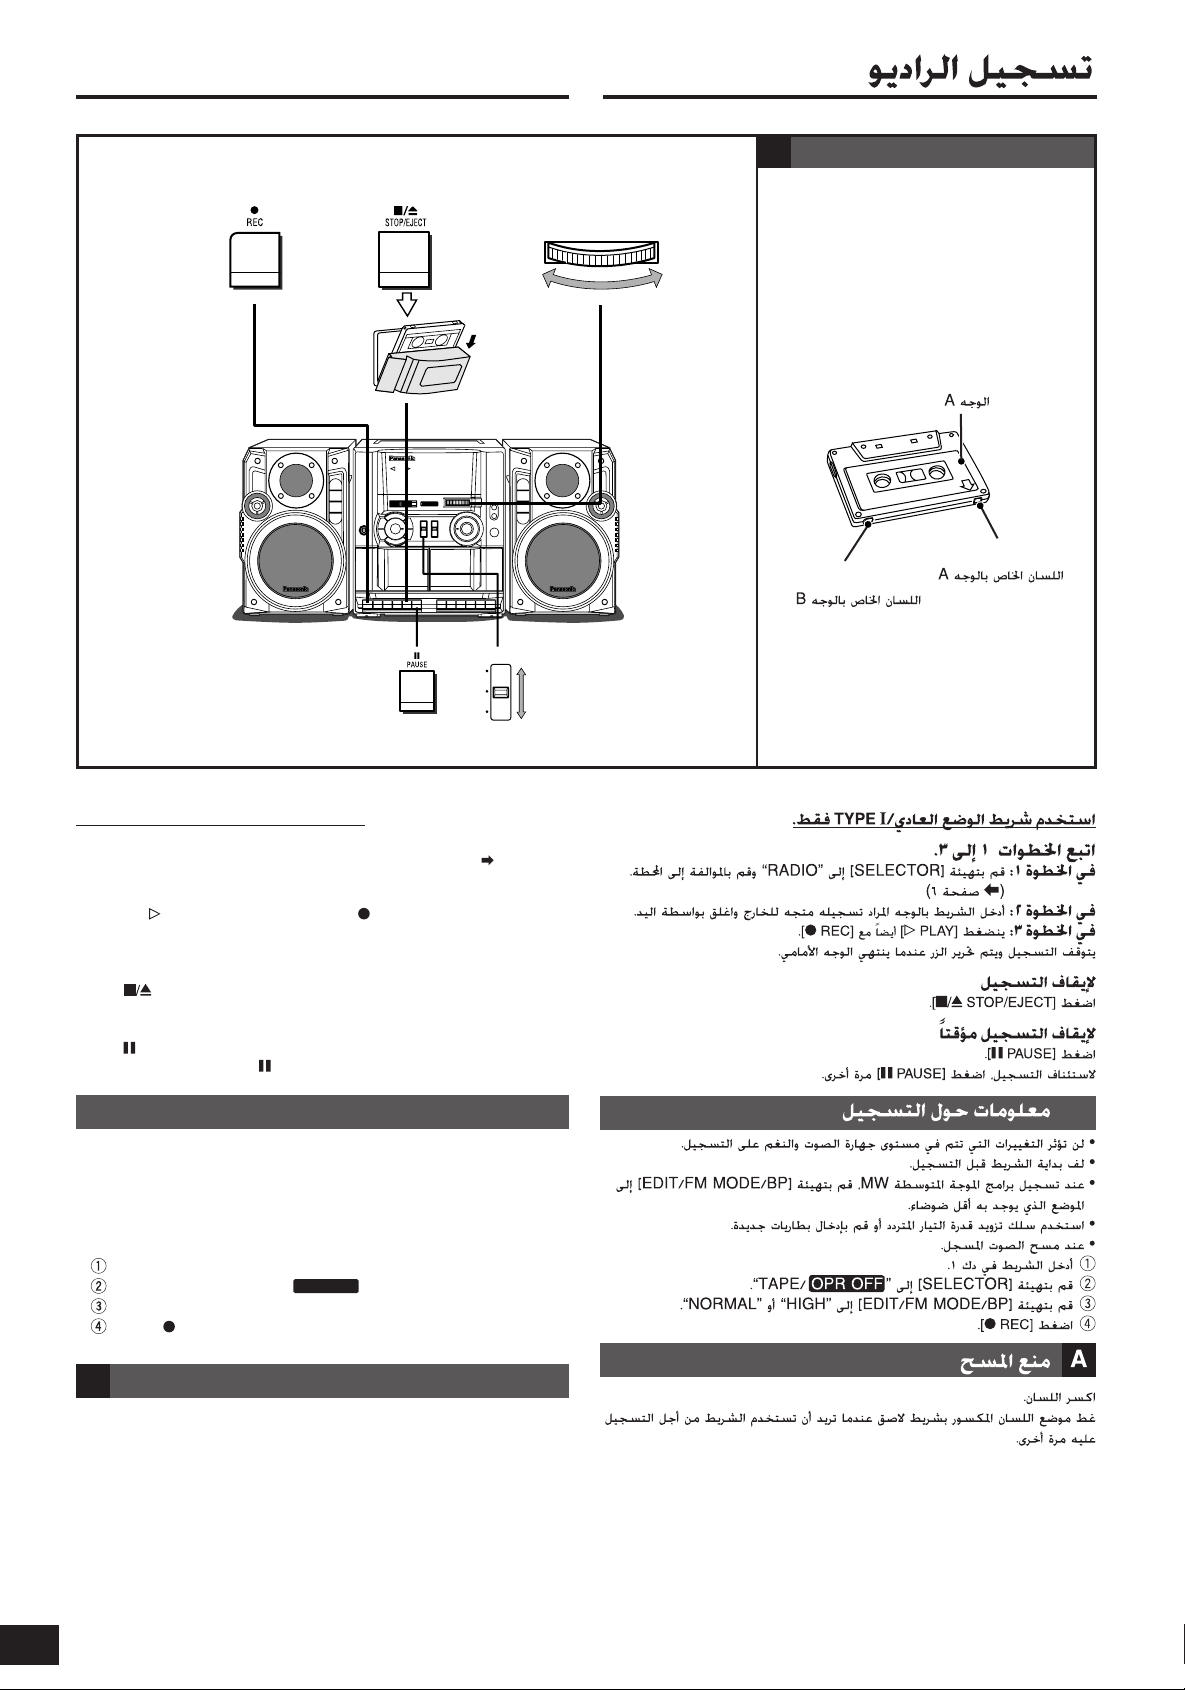
Recording the radio
OPR OFF
HIGH/
STEREO/II
MIC/
MONO/I
NORMAL/
STEREO/II
EDIT/FM MODE/BP
TUNING
123
Erasure preventionA
Side A
Tab for Side A
Tab for Side B
Use normal position/TYPE
Follow steps 1 to 3.
In step 1: Set [SELECTOR] to “RADIO” and tune to the station. ( page 6)
In step 2: Insert the tape inside with the side to be recorded facing out and
In step 3: [ PLAY] is also depressed with [ REC].
Recording stops and the button is released when the front side finishes.
close by hand.
I
tape only.
To stop recording
Press [ STOP/EJECT].
To pause recording
Press [ PAUSE].
To resume recording, press [ PAUSE] again.
Recording tips
• Changes to volume and tone will not affect the recording.
• Wind up the leader tape before recording.
• When recording MW, set [EDIT/FM MODE/BP] to the position
where there is less noise.
• Use the AC power supply cord or insert fresh batteries.
• When erasing recorded sound,
Insert the tape in Deck 1.
Set [SELECTOR] to “TAPE/ ”.
Set [EDIT/FM MODE/BP] to “HIGH” or “NORMAL” .
Press [ REC].
Erasure preventionA
Break out the tab.
Cover the tab with adhesive tape when you want to use the tape for
recording again.
8
RQT7611
Page 9
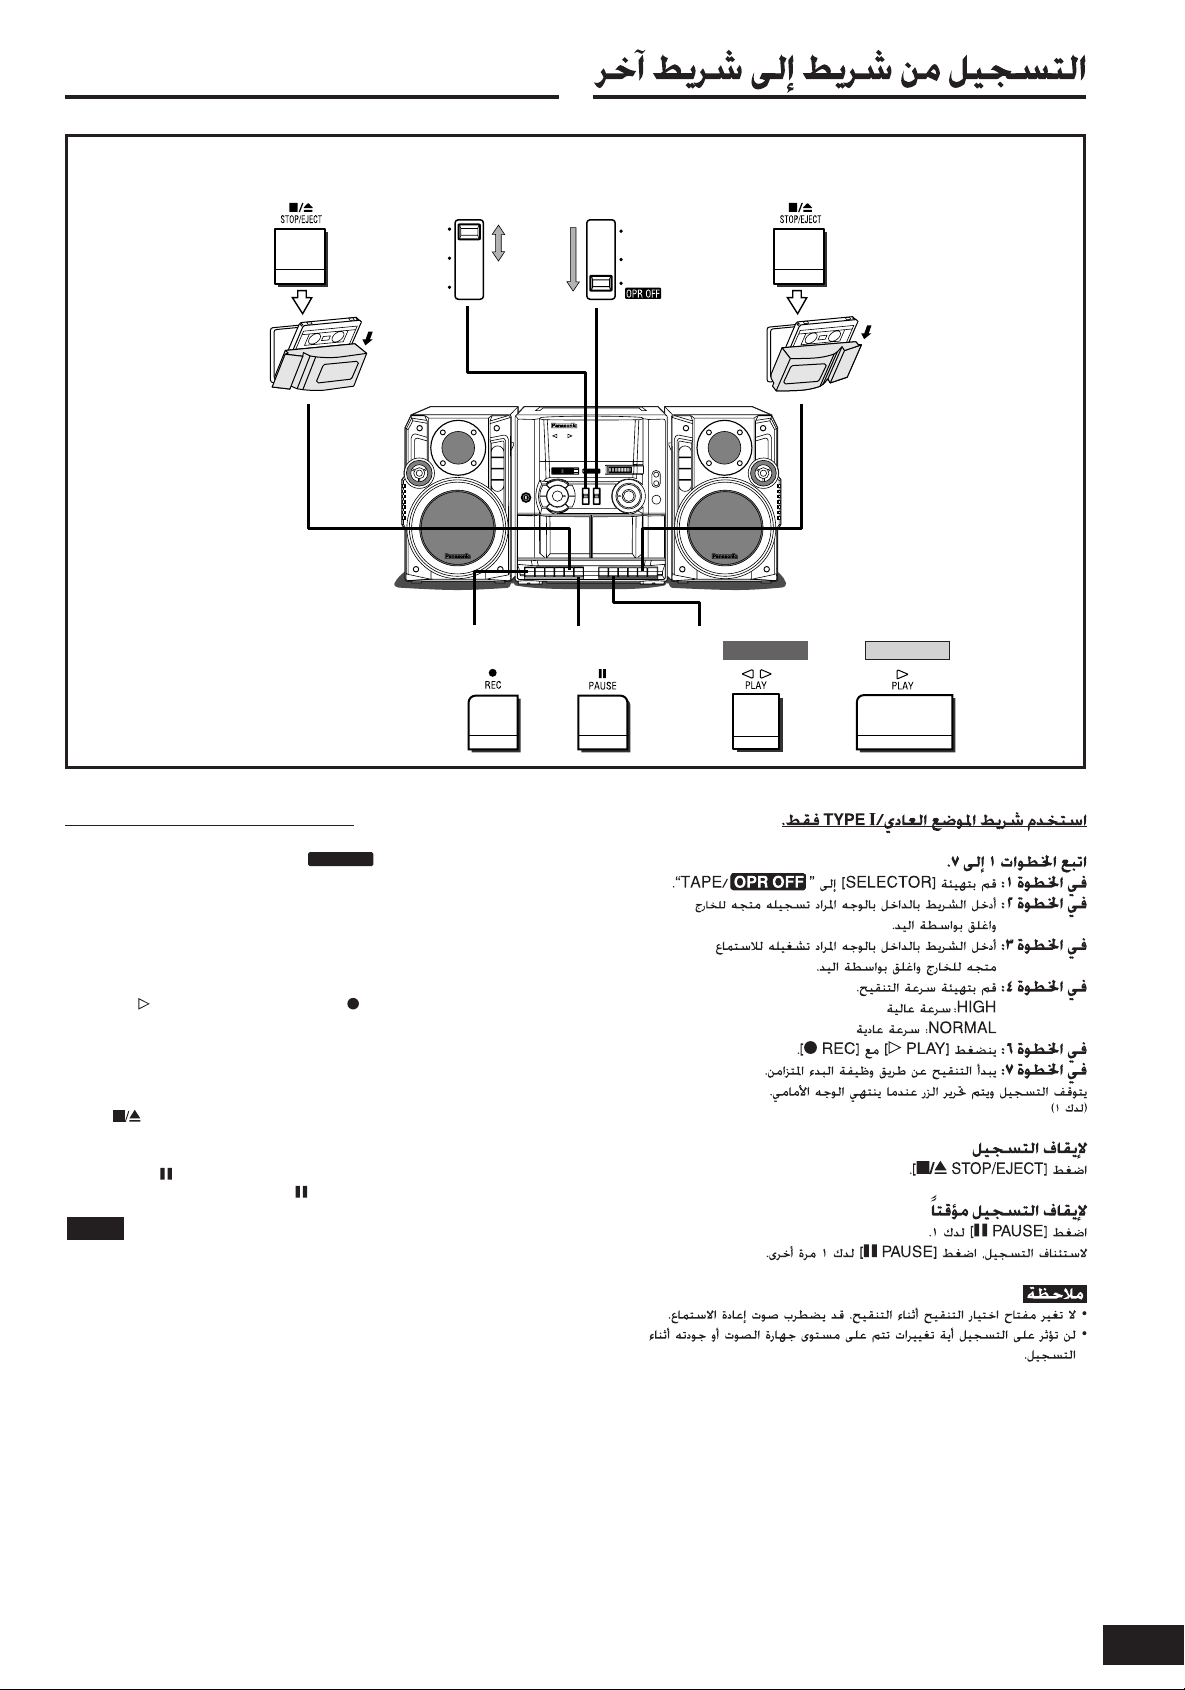
Recording tape to tape
OPR OFF
SELECTOR
HIGH/
STEREO/II
MIC/
MONO/I
NORMAL/
STEREO/II
EDIT/FM MODE/BP
CD/
LINE IN
RADIO
TAPE/
1234
567
RX-CT65 RX-CT60
Use normal position/TYPE
Follow steps 1 to 7.
In step 1: Set [SELECTOR] to “TAPE/ ”.
In step 2: Insert the tape inside with the side to be recorded facing out and
In step 3: Insert the tape inside with the side to be played facing out and close
In step 4: Set the editing speed.
In step 6: [ PLAY] is also depressed with [ REC].
In step 7: Editing is started by means of the synchro start function.
Recording stops and the button is released when the front side finishes.
(DECK 1)
To stop recording
Press [ STOP/EJECT].
To pause recording
Press Deck 1 [ PAUSE].
To resume recording, press Deck 1 [ PAUSE] again.
• Do not change the editing selector during editing. The playback
• Any changes made to the volume or sound quality during recording
close by hand.
by hand.
HIGH: High speed
NORMAL: Normal speed
Note
sound may flutter.
will not affect the recording.
I
tape only.
9
RQT7611
Page 10
OPR OFF
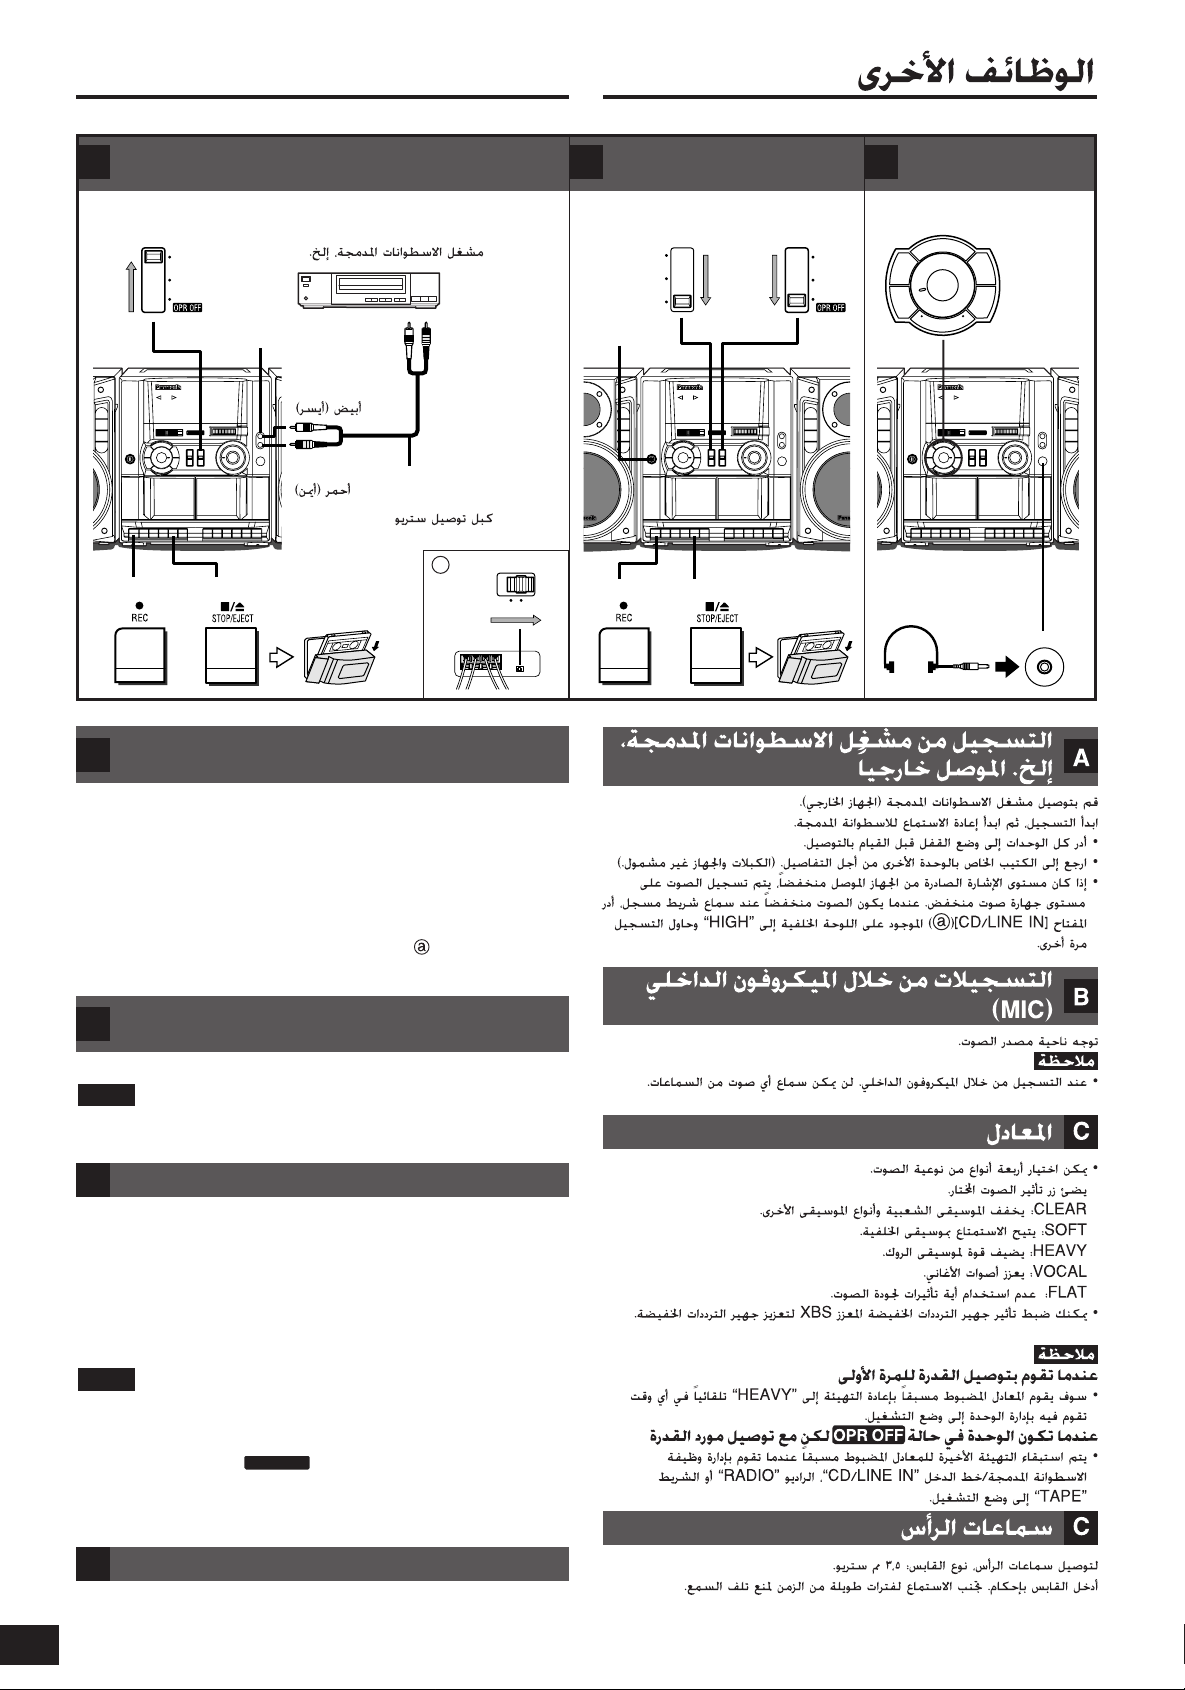
Other functions
SELECTOR
CD/
LINE IN
RADIO
TAPE/
34
21
CD/LINE IN
NORMAL HIGH
CD/LINE IN
a
SELECTOR
HIGH/
STEREO/II
MIC/
MONO/I
NORMAL/
STEREO/II
EDIT/FM MODE/BP
CD/
LINE IN
RADIO
TAPE/
12
34
MIC
XBS
HEAVY
VOCAL
SOFT
FLAT
CLEAR
PHONES
MIN MAX
Recording from an externally connected CD
A
player etc.
CD player,etc.
White (L)
Red (R)
Stereo connection
cable
Recording through the
B
built-in microphone (MIC)
Equalizer/
C
Headphones
Recording from an externally connected CD
A
player etc.
Connect the CD player (External equipment).
Start recording, then start the CD playback.
• Turn off all equipment before making any connection.
• Refer to the operating instructions of the other equipment for
details. (Cables and equipment not included.)
• If the signal level from the connected equipment is low, sound is
recorded at a low volume. When the sound is low when playing a
recorded tape, set the [CD/LINE IN] switch ( ) on the rear panel
to “HIGH” and try recording again.
Recording through the built-in microphone
B
(MIC)
Face towards the sound source.
Note
• When recording through the built-in microphone, no sound can be
heard from the speakers.
Equalizer
C
RQT7611
• Four types of sound effects can be selected.
The selected sound effect button lights.
CLEAR: Lightens pop and other music
SOFT: Allows background music enjoyment
HEAVY: Adds punch to rock
VOCAL: Enhances vocals
FLAT: No sound effects used
• You can adjust XBS effect to boost the bass.
Note
When you initially apply the power source
• The preset equalizer will automatically reset to “HEAVY” when the
unit is turned on.
When the unit is in condition and when the power
source is connected
• The last preset equalizer setting will be retained when you turn on
the “CD/LINE IN”, “RADIO” or “TAPE” function.
C
To connect headphones,
Plug type: 3.5 mm stereo
Plug in firmly. Avoid listening for prolonged periods of time to prevent
10
hearing damage.
Headphones
Page 11
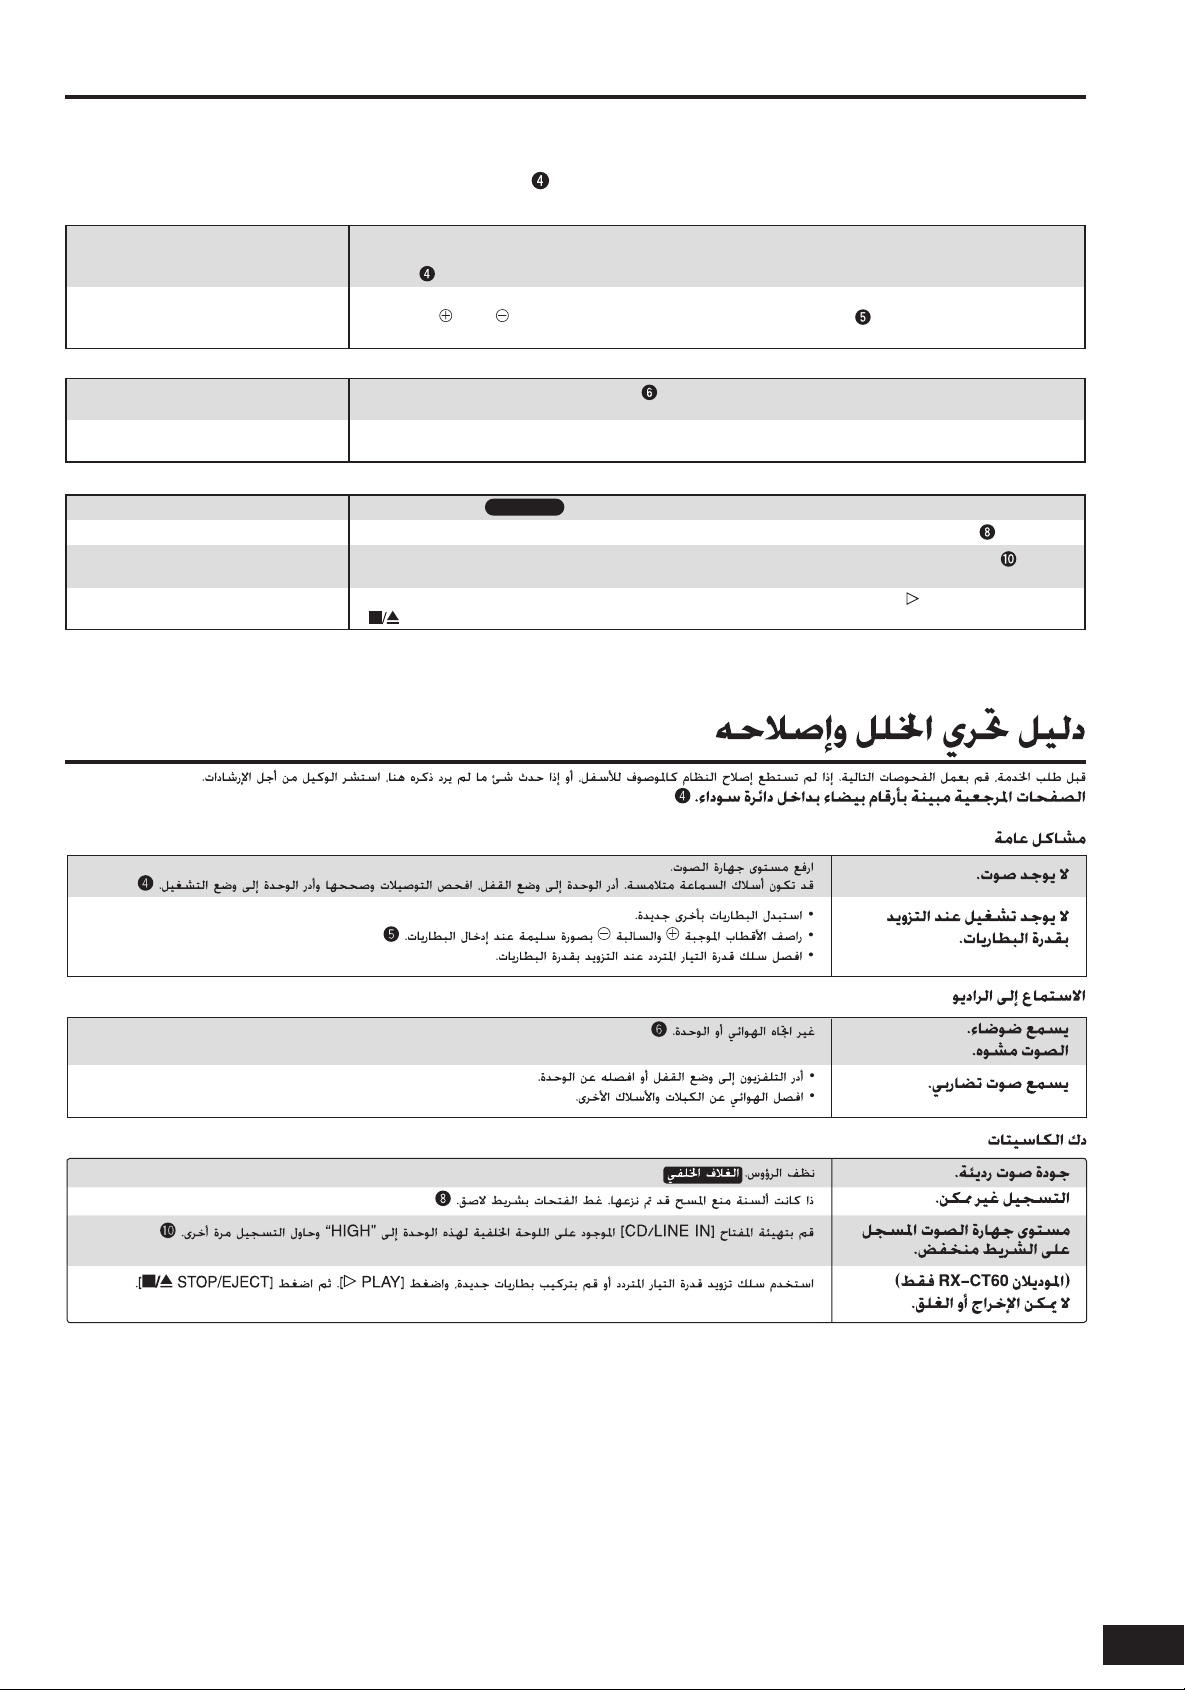
Troubleshooting guide
Before requesting service, make the below checks. If you can’t fix the system as described below, or if something not listed here occurs, consult
your dealer for instructions.
Reference pages are shown as black circled numbers .
Common Problems
No sound.
No operation when powered by
batteries.
Listening to the radio
Noise is heard.
Sound is distorted.
A beat sound is heard.
The cassette deck
Poor quality sound. Clean the heads.
Recording is not possible.
Volume recorded on the tape is
low.
(RX-CT60 only)
Not ejected or closed.
Turn the volume up.
The speaker cords may be shorted. Turn the unit off, check and correct the connections and turn the
unit on.
• Replace with new batteries.
• Align the and polarities properly when inserting the batteries.
• Disconnect the AC power cord when powered by batteries.
Change the antenna or unit’s direction.
•
Turn the TV off or separate it from the unit.
•
Separate the antenna from other cables and leads.
Back cover
If the erasure prevention tabs have been removed, cover the holes with adhesive tape.
Set the [CD/LINE IN] switch on the rear panel of this unit to HIGH and try recording again.
Use the AC power supply cord or insert fresh batteries, and press [ PLAY], then press
[ STOP/EJECT].
11
RQT7611
Page 12
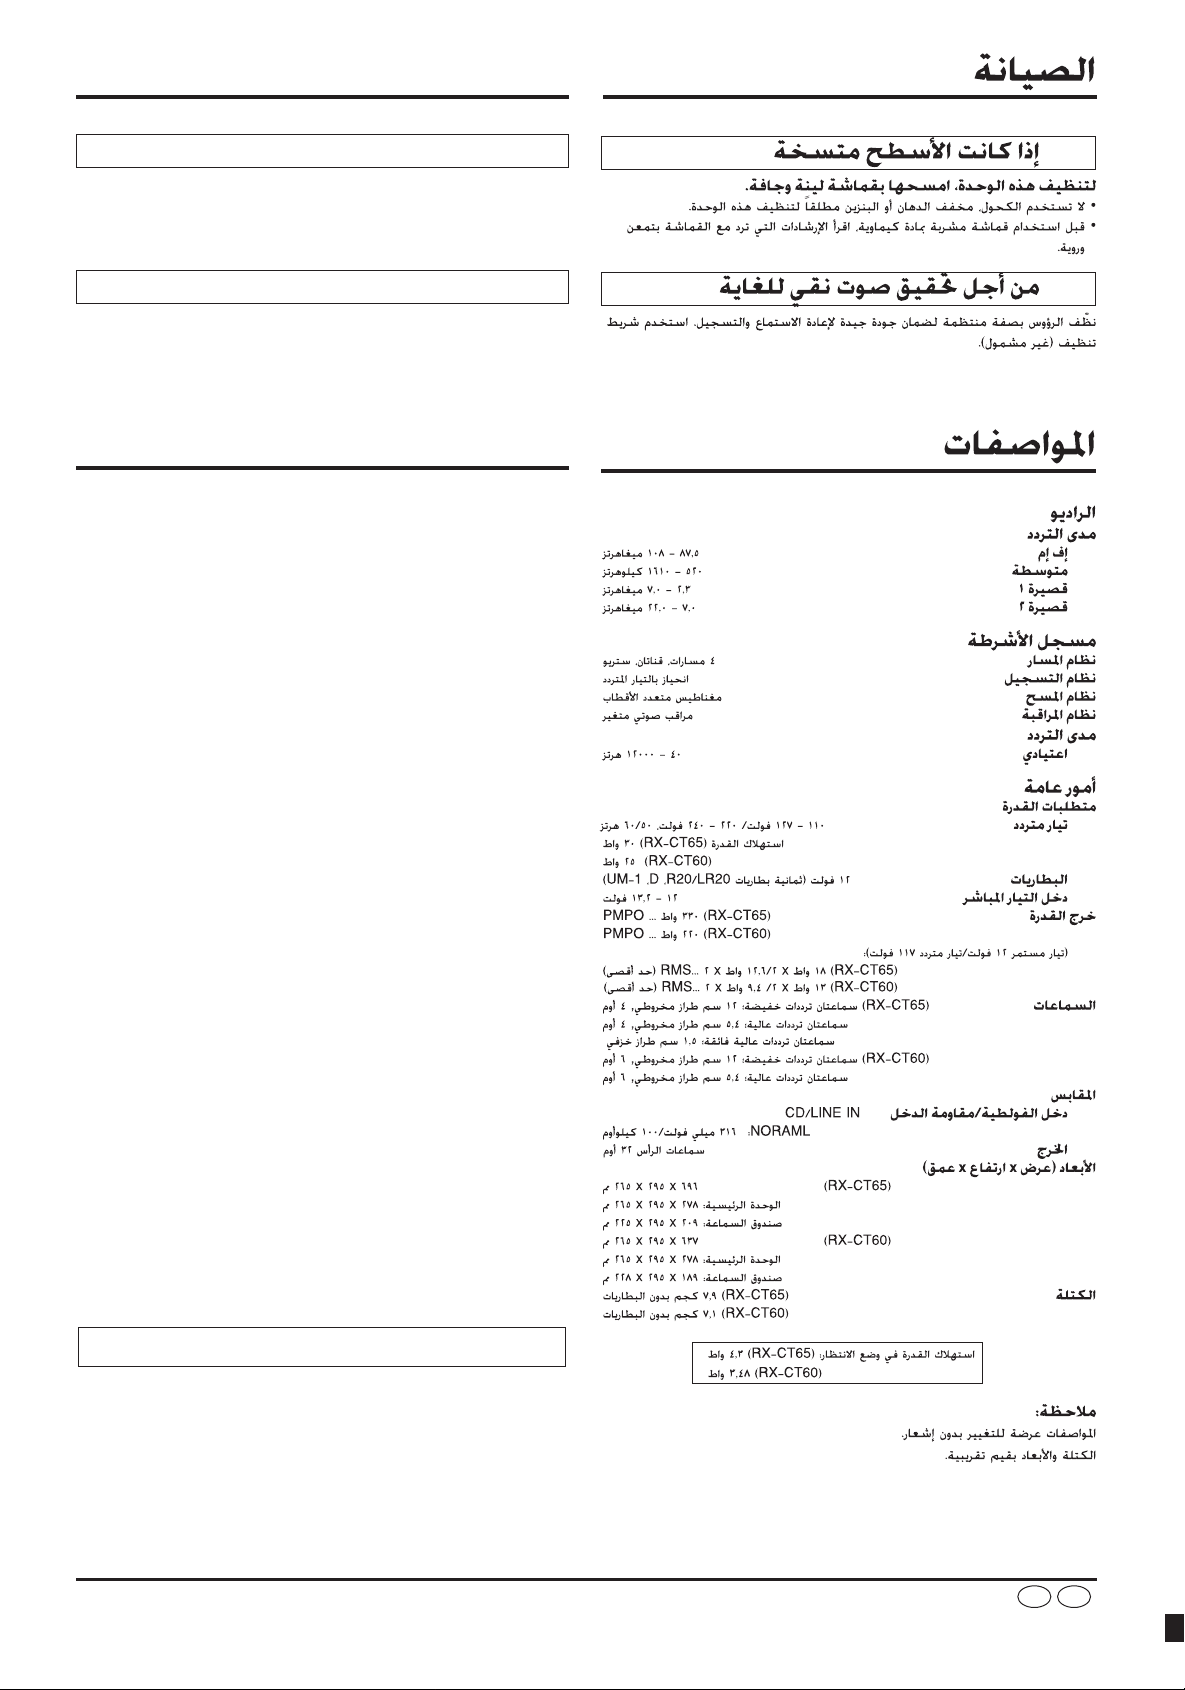
Maintenance
If the surfaces are dirty
To clean this unit, wipe with a soft, dry cloth.
• Never use alcohol, paint thinner or benzine to clean this unit.
• Before using chemically impregnated cloth, read the instructions
that came with the cloth carefully.
For a cleaner crisper sound
Clean the heads regularly to assure good quality playback and
recording. Use a cleaning tape (not included).
Specifications
Radio
Frequency range
FM
MW 520–1610 kHz
SW1 2.3–7.0 MHz
SW2 7.0–22.0 MHz
Tape recorder
Track system 4 track, 2 channel, stereo
Recording system AC bias
Erasing system Multi pole magnet
Monitor system Variable sound monitor
Frequency range
Normal
87.5–108 MHz
40–12000 Hz
General
Power requirement
AC
Battery 12 V (Eight R20/LR20, D, UM-1 batteries)
DC IN 12–13.2 V
Power output (RX-CT65) 330 W …PMPO
(DC 12 V/AC 117 V): (RX-CT65) 18 W x 2/12.6 W x 2...RMS (max.)
(RX-CT60) 13 W x 2/9.4 W x 2...RMS (max.)
Speakers (RX-CT65) 2 Woofer; 12 cm Cone type, 4Ω
(RX-CT60) 2 Woofer; 12 cm Cone type, 6Ω
Jacks
Input sensitivity / input impedance
Output Headphones: 32 Ω
Dimensions (WxHxD) (RX-CT65) 696 x 295 x 265 mm
(RX-CT60) 637 x 295 x 265 mm
Mass (RX-CT65) 7.9 kg without batteries
Power consumption in standby mode: (RX-CT65) 4.3 W
110–127 V/220–240 V, 50/60 Hz
Power consumption: (RX-CT65) 30 W
(RX-CT60) 220 W …PMPO
2 Tweeter; 5.4 cm Cone type, 4Ω
2 Super tweeter; 1.5 cm Ceramic type
2 Tweeter; 5.4 cm Cone type, 6Ω
CD/LINE IN
NORMAL: 316 mV, 100 kΩ
Main unit: 278 x 295 x 265 mm
Speaker box: 209 x 295 x 225 mm
Main unit: 278 x 295 x 265 mm
Speaker box: 189 x 295 x 228 mm
(RX-CT60) 7.1 k
(RX-CT60) 25 W
g without batteries
(RX-CT60) 3.48 W
Note:
Specifications are subject to change without notice.
Mass and dimensions are approximate.
Matsushita Electric Industrial Co., Ltd.
Web Site:
http://www.panasonic.co.jp/global/
ArEn
RQT7611-G
M0104YS0
 Loading...