


 Loading...
Operating Instructions
IC Recorder
Model No. RR-US470
RR-US450
RR-US430
|
If you have any questions contact |
|
In the U.S.A.:1-800-211-PANA(7262) |
The illustration shows RR-US470. |
In Canada:1-800-561-5505 |
|
Dear customer
Thank you for purchasing this product.
For optimum performance and safety, please read these instructions carefully.
Before connecting, operating or adjusting this product, please read the instructions completely. Please keep this manual for future reference.
P 
 PC
PC
For U.S.A. only
The warranty can be found on pages 40 and 41.
For Canada only
The warranty can be found on pages 42 and 43.
RQT8824-P
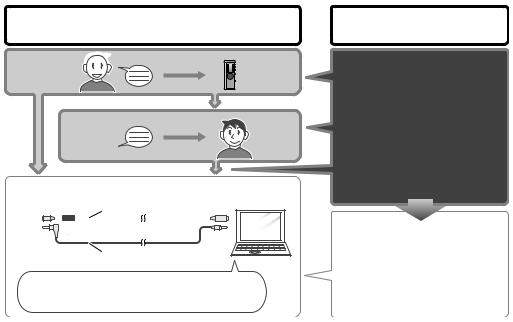
Instruction flow chart
Instruction flow chart
Recording 
This unit
Playback
Connecting IC Recorder to a computer for editing/saving
USB cable (included)
Dictation cord |
Computer |
(included for RR-US470) |
|
RQT8824 |
|
*Playback voice recording on computer *Save on computer (backup)
*Edit voice recording etc.
The correct instruction manual you should refer to
For IC Recorder operation… For instructions on connecting IC Recorder
to a computer, installing instructions etc…
These Operating
Instructions
For Voice Editing instructions…
Voice Editing Ver. 2.0 Operating Instructions (PDF file)
2

Table of contents
Preparation |
|
|
Instruction flow chart ....................................... |
2 |
|
Supplied accessories....................................... |
4 |
|
Inserting batteries ............................................ |
4 |
|
Before use ......................................................... |
5 |
|
|
Before operating, switch Hold off, |
|
Point 1 |
when finished, switch Hold on ....................... |
5 |
|
Recordings become audio files |
|
Point 2 |
and the files are stored in folders................... |
6 |
|
Choose a recording method |
|
Point 3 |
that best suits the situation............................ |
7 |
Part names ........................................................ |
8 |
|
How to use the quick search dial .................... |
9 |
|
List of menus .................................................... |
10 |
|
Setting the time................................................. |
11 |
|
Canceling the operation beep ......................... |
11 |
|
Basic use |
|
|
Recording.......................................................... |
12 |
|
Meeting recording....................................................... |
12 |
|
Display during recording............................................. |
12 |
|
Dictation recording...................................................... |
13 |
|
Stop and pause ......................................................... |
13 |
|
Confirming the remaining time.................................... |
13 |
|
Other recording methods ................................ |
14 |
|
Zoom recording (recording target voice clearly) ......... |
14 |
|
Recording through an external microphone ............... |
14 |
|
Listening to the recording in progress ........................ |
14 |
|
Preventing unnecessary recording (VAS)................... |
15 |
|
Timer recording .......................................................... |
15 |
|
Playing............................................................... |
16 |
While a file is being played |
|
* Adjusting the volume .............................................. |
16 |
* Moving forward/moving backward .......................... |
16 |
* Making recorded sounds easier to catch (reducing noise)... |
16 |
Other playing methods .................................... |
17 |
Searching points for listening (fast forward and fast backward) ..... |
17 |
Changing the playback speed .................................... |
17 |
Playing files successively ........................................... |
18 |
Listening with earphones............................................ |
18 |
Advanced use |
|
Organizing files................................................. |
19 |
Deleting ...................................................................... |
19 |
Moving ........................................................................ |
19 |
Lock (file protection) ................................................... |
19 |
Security functions ............................................ |
20 |
Security functions of this unit...................................... |
20 |
Folder S and password............................................... |
20 |
Setting the password .................................................. |
20 |
Playback using the password ..................................... |
21 |
When you forget the password ................................... |
21 |
Recording to / from a cassette tape................ |
22 |
Reference |
|
Using the unit with a computer ....................... |
23 |
Troubleshooting guide ..................................... |
30 |
Specifications ................................................... |
33 |
Maintenance...................................................... |
34 |
Care and use ..................................................... |
35 |
Product service................................................. |
38 |
Limited Warranty (ONLY FOR U.S.A.).............. |
40 |
Limited Warranty (ONLY FOR CANADA) ............ |
42 |
Preparation
RQT8824
3

RQT8824
4
Supplied accessories
Please check and identify the supplied accessories. Use numbers indicated in parentheses when asking for replacement parts.
(Product numbers correct as of December 2006. These may be subject to change.)
For the U.S.A. |
|
|
For Canada |
|
||||
|
|
|
|
|
|
|
||
RR-US470 |
RR-US450 |
RR-US470 |
RR-US450 |
|||||
1 CD-ROM |
|
|
|
2 CD-ROM |
|
|
||
(Voice Editing Ver.2.0 |
|
(Voice Editing Ver.2.0 |
||||||
Premium Edition) |
|
Premium Edition) |
||||||
RR-US430 |
|
|
|
|
RR-US430 |
|
||
1 CD-ROM |
|
|
1 CD-ROM |
|
||||
(Voice Editing Ver.2.0 |
|
(Voice Editing Ver.2.0 |
||||||
Standard Edition) |
|
Standard Edition) |
||||||
RR-US470 |
|
|
|
|
RR-US470 |
|
||
1 Dictation |
cord |
|
1 Dictation |
cord |
||||
[K2KC2CB00001] |
|
[K2KC2CB00001] |
||||||
All models |
|
|
|
|
All models |
|
||
1 USB cable |
|
1 USB cable |
||||||
[K2KZ4CB00010] |
|
[K2KZ4CB00010] |
||||||
Only for the U.S.A.: To order accessories, refer to “Accessory Purchases” ( page 41).
Only for Canada: To order accessories, call the dealer from whom you have made your purchase.
Inserting batteries
1 |
3 |
|
2 |
||
|
AAA (LR03) batteries (not included)
Make sure the batteries face the right directions.
*Replace the batteries within 30 seconds to preserve the settings. (Recordings remain intact.)
*The clock, however, will stop until the batteries have been inserted.
*If rechargeable batteries are to be used, rechargeable batteries manufactured by Panasonic are recommended.
*When batteries are inserted, “


 ” flashes on the display. Set Hold off (
 page 5) and set the time (
 page 11).
The battery indicator
(Displayed during recording/playback)
Replace the batteries.
“

 ” indicates flashing.
*When “

 ” is displayed, replace the batteries.

Before use
Point 1
Before operating, switch Hold off, when finished, switch Hold on.
Remove the seal from the display before use.
Hold (Slide up)
Hold off (Slide down)
Hold function
*This function prevents accidental operation when you put the unit in your pocket or bag. It also prevents battery loss from accidental unit operation.
When you set Hold on
*Button operations are ignored even if you press buttons by mistake.
*When you set Hold on while recording or playing, “ 


 ” appears for 2 seconds and the recording or playing display reappears.
*When you set Hold on while the unit is stopped, “ 


 ” appears for 2 seconds and the display turns off.
2seconds later
This unit has no power button.
*You can make batteries last longer by setting Hold on and turning the display off.
Preparation
RQT8824
5

Before use
Point 2
Recordings become audio files and the files are stored in folders.
A new audio file is created each time you record.
The created file is stored in a folder.
*A maximum of 99 files can be stored in each folder.
*Remaining recording time ( page 13) may become shorter than periods listed in this table.
Approximate total recording time of all folders
File
MEETING FOLDERS (A, B, C and S)
DICTATION  FOLDER File
(M)
|
Model |
RR-US470 |
RR-US450 |
RR-US430 |
|
Recording mode |
|||
|
|
|
|
|
RQT8824 |
HQ (High quality) |
39 hours |
19 hours 10 minutes |
9 hours 40 minutes |
FQ (Fine quality) |
78 hours 10 minutes |
38 hours 30 minutes |
19 hours 30 minutes |
|
|
|
|
|
|
6 |
SP (Standard play) |
134 hours |
66 hours |
33 hours 20 minutes |
|
|
|
|

Point 3
Choose a recording method that best suits the situation.
MEETING RECORDING
Using different combinations of recording modes and microphone sensitivity levels, you can adjust audio quality according to recording situations. Using the zoom function, you can also record target voice clearly ( page 14).
To record a low-level sound source…
•Place the unit on a desk etc. closer to the source.
•Use “L” microphone sensitivity for close proximity hand-held recording.
Meeting recording settings (no zoom recording for RR-US430)
Microphone sensitivity |
H (Far) |
L (Near) |
|
|
|
|
|
Zoom |
[OFF] |
A normal meeting |
A meeting held in a small room |
|
|
|
|
recording |
[ON] |
A lesson, lecture |
An interview during a meeting |
|
|||
|
|
|
|
Recording mode |
HQ (high quality)/ FQ (fine quality)/ SP (standard play) |
||
|
|
|
|
Preparation
DICTATION RECORDING
As the dictation recording settings are all factory-set, dictation can be recorded quickly and simply. Use this mode when computer voice recognition software is to be used.
Dictation recording settings
Microphone sensitivity |
Dictation Recording level (fixed) |
|
|
Recording mode |
HQ (high quality) (fixed) |
|
|
RQT8824
7

RQT8824
8
Part names |
|
bn |
|
|
|
1 |
|
|
|
|
|
|
|
|
|
|
|
bo |
|
|
2 |
MIC |
|
|
|
|
|
|
|
|
|
(PLUG IN |
|
|
|
3 |
POWER) |
|
|
|
|
|
|
|
|
4 |
|
|
|
|
|
|
|
Display |
|
5 |
MENU |
bp |
(during recording) |
|
6 |
|
Microphone sensitivity |
|
|
|
|
Recording mode |
|
|
7 |
|
|
|
|
|
|
Recording level |
|
|
8 |
|
|
Battery indicator |
|
9 |
|
|
Folder |
|
bk |
|
|
|
|
|
|
File |
|
|
|
|
bq |
|
|
|
|
|
|
|
bl |
|
|
|
bm |
|
|
|
Recording elapsed time |
1Built-in microphone |
6Display |
|
blSpeaker |
boHeadphone/ earphone jack |
2Recording indicator |
7Folder/menu |
|
bmUSB jack |
bpZoom microphone (dented area) |
3Record/ pause |
8Erase |
|
bnExternal |
Not on RR-US430 |
4Stop |
9Quick search dial |
microphone jack |
bqBattery cover |
|
5Zoom Not on RR-US430 |
bkHold |
|
|
|

How to use the quick search dial
Basic operations |
|
In this manual |
|
|
|
A: Dial:
Turn the dial to right or left to select an item.
B: Joystick:
Press to confirm the item.
A:Turn [ ].
].
B:Press [q/g] to confirm.
|
*Avoid pressing too much when you turn the quick search dial. |
|
|
|
|
Joystick operations (see above B for the confirming operation) |
|
|
|
|
|
Playback ( pages 16 and 17) |
ÚYou can also select items by tilting the joystick. This |
|
Password entry ( pages 20 and 21) |
manual explains dial operations in most sections. |
|
Preparation
C: Tilt the stick to left and right.
Volume control
D: Tilt the stick up and down.
C: Tilt the joystick to [p/ o].
D: Tilt the joystick to [[/ ]].
RQT8824
9

List of menus
[ |
] |
[ |
] |
|
HOLD |
ERASE FOLDER ZOOM |
STOP REC/PAUSE |
1 Press and hold [*FOLDER/ MENU] for 1 second or longer (while stopped) to display menus. 2 Turn [
 ] and press [q/g] to confirm.
 Press [STOP] to stop an operation midway/cancel the setting.
 If an operation is not started within 60 seconds, unfinished settings are canceled.
Recording modeÚ1 |
Microphone sensitivityÚ1 |
Security |
LockÚ2 |
Timer recordingÚ3 |
( page 12) |
( page 12) |
( page 20) |
( page 19) |
( page 15) |
Operation beep |
Successive play |
VAS |
Setting the time |
Remaining recording time |
||||||||||||||||
( page 11) |
( page 18) |
( page 15) |
( page 11) |
( page 13) |
||||||||||||||||
|
|
|
|
|
|
|
|
|
|
|
|
|
|
|
|
|
|
|
|
|
RQT8824
10
Ú1 Displayed only when a Meeting Recording folder (A, B, C or S) is selected. Ú2 Displayed only when there is a recorded file.
Ú3 Displayed only when the clock is set.
Setting the time
1 offSet Hold |
2 Display the menu |
( page 5) |
While stopped, press and |
|
|
|
hold [*FOLDER/ MENU] |
|
for 1 second or longer. |
3 Select “
 ”
”
Turn [  ] to select
“
 ” and press [q/g] to confirm.
4 Set the time
Turn [  ] and press [q/g] to confirm. (Press [STOP] after confirming 5.) 1Year 2Month 3Day 4Time display (12/24H) 5Time


 →
→ 


 →
→ 


 →
→ 


 →
→
*The clock operates with the monthly
e r r o r m a r g i n o f +/– 60 seconds at room temperature.
*Wh en the year is flashing (e.g. “
 ” on the display), begin from step 4.
*The clock returns to standby when you perform no time setting operation for 60 seconds. If this happens restart setting the time.
Preparation
Canceling the operation beep
1 theDisplaymenu |
2 Select “BEEP” |
3 Select “ |
” |
|
While stopped, |
Turn [ ] |
1 Turn [ |
] |
|
press and hold |
and press |
and press |
|
|
[*FOLDER/ |
[q/ g] to |
[q/g] to |
|
|
MENU] for 1 |
confirm. |
confirm. |
|
|
2 Press [STOP]. |
||||
second or longer. |
|
|||
|
|
|
||
*To use the operation beep, select “ ” in step 3.
RQT8824
11

RQT8824
12
Recording |
[ ] |
[ |
] |
|
HOLD |
ERASE FOLDER ZOOM |
STOP REC/PAUSE |
Meeting recording
Using different combinations of recording modes and microphone sensitivity levels, you can adjust audio
quality according to recording situations.
1 


 2
2
Press [*FOLDER/ |
|
1Press and hold |
||||||||||||
|
MENU]. |
[*FOLDER/ |
||||||||||||
Each time you |
|
MENU] for 1 |
||||||||||||
second or longer. |
||||||||||||||
press |
||||||||||||||
2After making sure |
||||||||||||||
|
|
|
|
|
|
|
|
|
|
|
|
|||
|
|
|
|
|
|
|
|
|
|
|
|
the display at |
||
|
|
|
|
|
|
|
|
|
|
|
|
|||
|
|
|
|
|
|
|
|
|
|
|
|
right, press |
||
|
|
|
|
|
|
|
|
|
|
|
|
|||
|
|
|
|
|
|
|
|
|
|
|
|
[q/ g] to confirm. |
||
Select the microphone |
5 |
Record |
||||||||||||
4 sensitivity level |
|
|||||||||||||
1Turn [ ].
].
2Press [q/g] to confirm.
HQ: High quality FQ: Fine quality SP: Standard play
*The factory setting is “HQ”.
Display during recording
Display changes depending on recording levels.
Press |
Light stays on |
|
[REC/PAUSE]. |
while recording. |
|
|
(Flashes while |
|
|
paused.) |
|
|
Recording |
|
|
elapsed time |
|
H: Far |
(Flashes while |
|
paused.) |
||
L: Near |
||
|

Dictation recording
As the dictation recording settings are all factory-set, dictation can be recorded quickly and simply. Use this mode when computer voice recognition software is to be used.
1 MSelect folder |
|
|
|
|
|
|
|
|
|
|
|
|
|
|
|
2 Record |
||||||||||
|
|
|
|
|
|
|
|
|
|
|||||||||||||||||
Press [*FOLDER/ |
|
|
|
|
|
|
|
|
|
Press |
||||||||||||||||
|
MENU]. |
|
|
|
|
|
|
|
|
|
[REC/PAUSE]. |
|||||||||||||||
|
|
|
|
|
|
|||||||||||||||||||||
Each time you |
|
|
|
|
|
|
|
|
|
|
||||||||||||||||
press. |
|
|
|
|
|
|
|
|
|
|
||||||||||||||||
|
|
|
|
|
|
|
|
|
|
|
|
|
|
|
|
|
|
|
|
|
|
|
|
|
|
|
|
|
|
|
|
|
|
|
|
|
|
|
|
|
|
|
|
|
|
|
|
|
|
|
|
|
|
|
|
|
|
|
|
|
|
|
|
|
|
|
|
|
|
|
|
|
|
|
|
|
|
|
|
|
|
|
|
|
|
|
|
|
|
|
|
|
|
|
|
|
|
|
|
|
|
|
|
|
|
|
|
Confirming the remaining time
When you press [*FOLDER/ MENU] while recording, the remaining recording time appears.
Basic use
Stop and pause
*Press [STOP] to stop recording.
*The following recording information is displayed when recording is stopped.
Recording |
Recording |
Recording |
The number of |
date |
start time |
time |
files in folder |
*While recording, press [REC/PAUSE] to pause. Press it again to resume recording. (Recording continues in the same file.)
*To return to the initial menu, press
[*FOLDER/ MENU] again.
*Remaining recording time also appears when the time becomes very short.
RQT8824
13

RQT8824
14
Other recording methods
g Zoom recording (recording target voice clearly)
Not on RR-US430
Zoom recording enables you to clearly record sounds coming from the direction this unit is aimed at. It is suitable for recording lectures and interviews. Select Meeting Recording folders ( page12).
Aim this unit to the sound you want to record and slide [ZOOM q] toward the arrow.
“ZOOM” is displayed when zoom recording is being used.
 Do not block the zoom microphone ( page 8) intentionally with your fingers or other items.
*Zoom recording can be switched on and off even when Hold is on.
*The zoom function does not work when you select folder M or when you use an external microphone.
g Recording through an external microphone
*When you attach an external microphone, the built-in microphone automatically goes off.
Plug type: ø3.5 mm (1/8 in.) monaural mini plug
Insert
securely 


 External
microphone (not included)
MIC (PLUGINPOWER)
g Listening to the recording in progress
Connect earphones (not included). (Sounds are monaural.)
Plug type: ø3.5 mm (1/8 in.) mini plug
* The volume is fixed for recording.
Insert securely
MIC (PLUGINPOWER)
Loading...