


Panasonic NR-F510GT-W7, NR-F510GT-XP, NR-F510GT-X6, NR-F510GT-X3, NR-F510GT-W3 User Manual
...Operating Instructions
Refrigerator (Household use)
Manual Penggunaan
Peti sejuk (Untuk kegunaan rumah)
Model No./ No. Model/
NR-F510GT-N3 NR-F510GT-W3 NR-F510GT-X3 NR-F510GT-W7 NR-F510GT-X7 NR-F510GT-N6 NR-F510GT-W6 NR-F510GT-X6 NR-F510GT-NP NR-F510GT-XP
English
Melayu Bahasa
Thank you for purchasing this Panasonic product.
Please read these instructions carefully before using this product. Please keep this manual for future reference.
Terima kasih kerana membeli produk Panasonic.
Sila baca arahan dengan teliti sebelum menggunakan produk ini. Sila simpan manual ini untuk rujukan.
Panasonic

Introduction
Contents
Introduction
Installation
Operation
Appendix
Safety instructions...................................................................................................... |
3 |
Installation................................................................................................................... |
6 |
Choosing the right location................................................................... |
6 |
To use all features....................................................................................................... |
8 |
Control panel......................................................................................... |
8 |
Foods stored......................................................................................... |
9 |
ECO NAVI Operation............................................................................ |
9 |
Refrigerator compartment................................................................... |
10 |
Prime Fresh/Chilled select room......................................................... |
12 |
Fresh Freezing compartment.............................................................. |
13 |
Ice compartment................................................................................. |
14 |
Freezer compartment.......................................................................... |
16 |
Vegetable compartment...................................................................... |
16 |
Cleaning and removing and re-installing................................................................ |
17 |
Cleaning.............................................................................................. |
17 |
In these cases?......................................................................................................... |
20 |
Setting to suit your preferences.............................................................................. |
22 |
Troubleshooting........................................................................................................ |
23 |
ECO NAVI Q&A.......................................................................................................... |
26 |
Specifications............................................................................................................ |
27 |
Separately sold parts................................................................................................ |
27 |
●●This appliance is intended to be used in household and similar applications such as
-staff kitchen areas in shops, offices and other working environments;
-farm houses and by clients in hotels, motels and other residential type environments;
-bed and breakfast type environments;
-catering and similar non-retail applications.
 ■■For saving energy
••Do not stuff food into the compartments.
That may interfere with the cold air flow. Provide sufficient space between foods.
••Open/close the doors minimum times.
Minimizing the number of times the door is opened/closed prevents cool air from escaping and reduces the amount of wasted electricity.
••Do not block the cold air outlet with food items.
If cool air does not spread into every corner of compartments, then the interior will not be sufficiently cooled and more electricity will be consumed.
••The cold air discharges out of the outlet of the duct at the back (P. 10).
Duct
••Store warm food and drinks after they have cooled.
Otherwise, they will not only raise the interior temperature, but also affect the freshness of other foods.
 ■■Disposing of the packaging
Please recycle where possible (e.g. cardboard, plastic bags, adhesive tape and polystyrene) and make sure you dispose of all other packing materials safely.
Keep the packaging out of the reach of babies and young children, to avoid injury or suffocation.
2

Introduction
Safety instructions
What the symbols mean.
Do not |
Indicates the appliance must be |
|
|
|
|
|
|
||
earthed to prevent electric shock |
|
|
|
|
|
|
|
|
|
|
|
|
|
|
Make sure you do this |
Do not take apart |
iso-butane |
||
|
|
|||
Indicates risk of death or serious injury.
This appliance is not intended for use by persons (including children) with reduced physical,
 sensory or mental capabilities, or lack of experience and knowledge, unless they have been given WARNING supervision or instruction concerning use of the appliance by a person responsible for their safety.
Children should be supervised to ensure that they do not play with the appliance.
English
For power plugs and cords...
●●Periodically remove dirt such as dust from the power plug.
●●Plug into a wall outlet of the rated voltage on its own with the rated current and insert plug fully. ●●When removing the power plug, hold the plug itself and not the cord.
●●Remove the plug when cleaning the refrigerator.
●●If you do not intend to use the refrigerator for an extended period of time, then disconnect it. (Otherwise it may cause a fire or electrical shock)
●●If the Power cord or plug of the appliance is damaged, it must be replaced by the manufacturer of its service agent or similarly qualified person in order to avoid a hazard.
●●Do not insert or disconnect the power plug into/from the wall socket with wet hands.
●●Do not damage the power plug or cord. Do not cut or process the plug or cord; do not expose them to high temperatures; do not excessively bend, twist or pull them; do not place heavy objects onto them; and do not arrange them in bunches.
→Contact your dealer for repairs to the plug or cord.
●●Do not push the rear of the refrigerator against the power plug.
●●Do not use while the cord or power plug is damaged, or while the plug is not fully inserted into the outlet.
Stop using the refrigerator immediately and pull out the plug, if there is an abnormality or failure.
(Otherwise it may cause smoke, a fire or electrical shock.)
Abnormality and failure examples ●●Power cord or plug is abnormally hot ●●Power cord is deeply cut or deformed ●●There is a burning smell
●●You can feel tingly electricity
Contact the dealer immediately for inspection and repair.
On top of the refrigerator...
●●Do not put anything.
Otherwise, it may fall due to vibration. ●●Do not put anything on the top cover.
(Otherwise parts may be deformed and may cause electrical shock.)
3

Introduction
When using...
●●Do not hang or ride on the door.
●●Do not apply water on the body or interior.
(Electrical insulation deteriorates and may cause shocks or fire.) ●●Do not damage the refrigerant circuit.
(The flammable refrigerant may catch fire and lead to an explosion.) ●●Do not touch the mechanisms above the ice-making tray.
●●Do not remove the ice-making tray when the ice making function is operating. ●●Do not store flammable items in the refrigerator.
●●Do not store explosive substances such as aerosol cans with a flammable propellant in this
appliance.
●●Do not store chemicals or scientific specimens.
●●Do not spray combustible chemicals near the refrigerator.
●●Do not use electrical appliances such as a deodorizer in the refrigerator.
(If the refrigerant leaks, then it may catch fire due to sparks on the contacts.)
●●Do not use the mechanical devices or other means to accelerate the defrosting process, other than those recommended by the manufacturer.
●●Do not add a high impact on glass doors. (Otherwise glass may be broken and cause injury.)
→If you find a crack, do not touch the glass and consult your dealer immediately.
●●Fill with potable water only.
●●Children should be supervised to ensure that the refrigerator should be used properly.
When installing...
●●Provide safety measures against overturning caused by earthquakes (P. 6)
●●WARNING - Keep ventilation openings, in the appliance enclosure or in the built-in structure, clear of obstruction.
●●Ensure that the refrigerator is plugged into an earthed mains socket. Do not plug into an unearthed mains socket. (3-pin plug)
●●Do not install the product in locations exposed to water. ●●Do not fill the gaps around the refrigerator.
(If the refrigerant leaks, then it may catch fire.)
When dispose and recycling the product...
●●When a concern exists for possible entry of a child during recycling, remove the door packing. ●●Flammable gas is used for refrigerant.
And Cyclo-Pentane is used for insulation of this refrigerator. When you throw away this unit, please discard it by proper method.
●●The warning labels mentioned above should be kept throughout the life of the refrigerator.
The user manual should be handed over to any person who would use or handle the refrigerator whenever the refrigerator would be transferred to another location and delivered to a recycling plant.
In case of emergency...
●●Absolutely do not open the top cover and the back cover. ●●Do not absolutely disassemble, repair or modify the refrigerator. (May cause injury, burn, or electrical shock.)
4

Introduction
●●If you detect a gas (such as city gas) leak, do not touch the refrigerator and open the windows to ventilate the kitchen.
●●A flammable refrigerant is used. If you have damaged the cooling circuit (piping), open the windows to ventilate the kitchen and contact your dealer.
●●Maintenance work must only be carried out at workshop by well-trained maintenance worker. (Otherwise it may cause an electrical shock, ignition or explosion.)
English
Indicates risk of injury or damage to property.
CAUTION
When storing food...
●●Do not add a high impact on glass trays.
(Otherwise, those glass trays may break and you may be injured.) ●●Do not allow foods to protrude from the glass tray.
●●Do not store food containers on the door shelves if they do not reach the bottom of the shelves. (Food may fall and cause an injury.)
●●Do not freeze bottles.
(If the liquid in a glass bottle is frozen, then the bottle may break and the liquid may leak out.) ●●Do not touch frozen food or containers (especially metal), aluminum plate with wet hands. (Otherwise, you may get frostbite.)
●●Do not eat food that has an unusual odor or is discolored. (Rotten food may cause illness.)
When opening/closing the doors...
●●Do not open/close it if others come into contact with the refrigerator.
●●Do not put your fingers in the gap on the side of the refrigerator compartment door when opening/closing the door.
●●Do not open/close the Ice compartment and the Fresh Freezing compartment with holding the top side of the drawer.
●●Do not place your feet under the bottom drawer. (Otherwise, your fingers may get caught.)
●●Do not open or close the door with excessive force. (Food may fall and cause an injury.)
When cleaning...
●●Please be careful when you fit or remove a glass tray.
(Dropping glass shelves may cause shelf damage or an injury due to bruising.)
●●Do not touch a metal rail directly.
●●Do not place your hands or feet beneath the bottom of the refrigerator. (The edges of the metal panel may cause an injury.)
When moving or transporting the refrigerator...
●●Fix the refrigerator with adjustable legs on the flat and stout floor. (Otherwise the refrigerator moves or overturns and may cause an injury.) ●●Apply protective covering, etc. to floors with a fragile surface.
●●Hold the carrying handles when transporting the refrigerator. (Otherwise your hands may slip and cause an injury.)
5

Installation
Installation
Choosing the right location
1.Place the refrigerator in the following locations. |
||||||||||
●●Locations free from heat and direct sunlight |
●●Locations that allow a heat to dissipate |
|||||||||
Minimize reduction of cooling power, and prevent |
The back surface may be fitted to the wall. |
|||||||||
electricity waste. |
(Leave a space when vibration noise or discoloration |
|||||||||
●●Well-ventilated locations with low humidity |
dirt of wall occurs.) |
|||||||||
Minimize rust and generation of condensation. |
|
|
|
40 mm or more above the refrigerator |
||||||
●●Sturdy and flat floors |
|
|
|
|
|
|
|
|
|
|
With carpet, tatami mats, or vinyl floors, |
|
|
|
|
5 mm or more left and right* |
|||||
deformation or discoloration may occur, so place a |
|
|
|
|
||||||
board underneath the refrigerator. |
*In case of installing by the wall. |
|||||||||
●●Place the refrigerator away from other devices |
||||||||||
|
(Figure as viewed from above.) |
|||||||||
Prevent noise and incorrect image display on TVs |
|
|
|
|
|
|
|
15 mm or more from the wall |
||
|
|
|
|
|
|
|
||||
and other devices. |
|
|
|
|
|
|
|
|||
|
|
|
|
|
|
|
|
|
||
●●Locations allowing the power plug to be cleaned |
|
|
|
|
|
|
|
If the clearance is less than 15 mm, |
||
easily |
|
|
|
|
|
|
|
the door can not be opened at more |
||
|
|
|
|
|
|
|
than 90 ° and glass trays, etc. may |
|||
Clean dust regularly. |
|
|
|
|
|
|
|
|||
|
|
|
|
|
|
|
not be removed. |
|||
(To prevent fire caused by dust.) |
|
|
|
|
|
|
|
|
|
|
|
|
|
|
|
|
|
|
|
||
■■Before using the refrigerator for the first time. (P. 17 ~ P. 19)
••Wipe the inside of the refrigerator with a wet, soft cloth.
••Rinse the water supply tank, purification filter, and ice-making tray.
2.Fix the refrigerator.
 Remove the leg cover.
Insert hands underneath the “ ” on both sides of the leg cover and pull it out.
 Turn the adjustable legs (right and left) until they reach the floor to stabilize the refrigerator.
 Reattach the leg cover.
●●If the refrigerator has not been stabilized completely, then you may hear knocking noises when the door is opened/closed. (This will not affect the performance.)
Install the refrigerator on sturdy and flat floors.
■■If the door is slanted downwards.
Turn the adjustable leg on the lower side, as shown in the diagram on the left, in order to adjust the level.
••The freezer/refrigerator doors may tilt within four to five days after installation due to the load of the food or adaptation to the floor surface. In this case turn the adjustable legs again to restore. ••If it does not help, then use an adjustment plates (separately sold parts). (P. 27)

 When the door is lowered.

Lower the right |
|
Lower the left |
adjustable leg for |
|
adjustable leg for |
the right door. |
|
the left door. |
■■Have any measures taken against tipping due to earthquakes?
In order to prevent the refrigerator from tipping, permanently fix it by using belts, etc.
6
Installation
3.Plug into a wall outlet.
Plug into a wall outlet of the rated voltage on its own with the rated current and insert plug fully. ●●The power plug can be plugged into an outlet immediately after installation.
●●The surroundings and surfaces (side surfaces) of the refrigerator may become hot
(approximately 50 °C to 60 °C when the ambient temperature is 30 °C) when the power is turned on, but this is not abnormal. (P. 24)
●●If the power plug is removed, wait at least 7 minutes before plugging it back in. (P. 20)
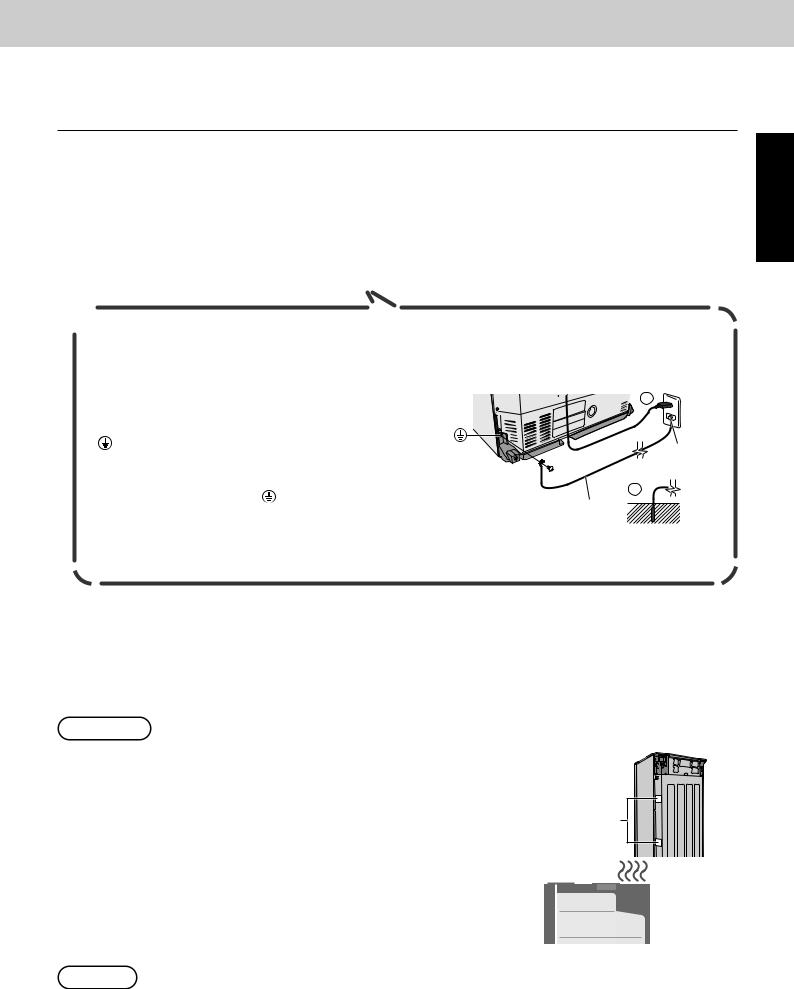
●●If there is no grounding wiring plug in refrigerator, it should be connected with grounding connection or prevent electrical hazard from electric leakage.
 For safety, the refrigerator should be grounded
(For refrigerators with ungrounded 2-pin plugs)
A ground connection will prevent danger from electric shock.
A ground connection can be made in either of the two following ways:
1.When using a socket with a grounding receptacle, connect the ground wire to it and the screw for the ground
on the rear of the refrigerator (please find the symbol) as shown in illustration  .
.
2.When using a socket without a grounding receptacle, connect the ground wire to the screw on the rear of the refrigerator (please find symbol), and then connect the other end to the ground rod as shown in illustration  .
.

 1
1
Grounding receptacle
2
Grounding wire 
Ground connections must not be made with the following
●●Gas pipes and water supply pipes (risk of electric shock or explosion) ●●Ground wires of telephone cords and lightning rods (risk of lighting strike)
4.Cool the refrigerator interior. |
|
●●It may take approximately four hours to cool down the interior. |
|
●●It may take 24 hours or more to cool down |
the interior and achieve equilibrium in the summer, etc. |
●●Ice-making starts only after the interior has |
been cooled down sufficiently. |
●●Do not open/close the doors until the interior has cooled down sufficiently. (Warm air flowing into the interior will block the cooling function.)
Requests
■■Do not peel the seal on the back.
They fill the openings of a thermal insulation material. Peeling them off causes a decrease in chilling.
If you have peeled it, then cut a cloth packing tape into a square and paste it.
■■Do not place objects on the top of the refrigerator.
It may become hot due to heat generated by the compressor at the top of the refrigerator.
If it is difficult to release heat, the cooling capacity may be lowered.
Seal
 Compressor
English
Notices
●●Immediately after the installation, the noise becomes larger a little because the interior of the refrigerator is not cooled yet and the compressor or the fan is operated with high-speed rotation, but it is not abnormal.
(Once the interior of the refrigerator is cooled, the noise becomes smaller.)
7
Operation
To use all features
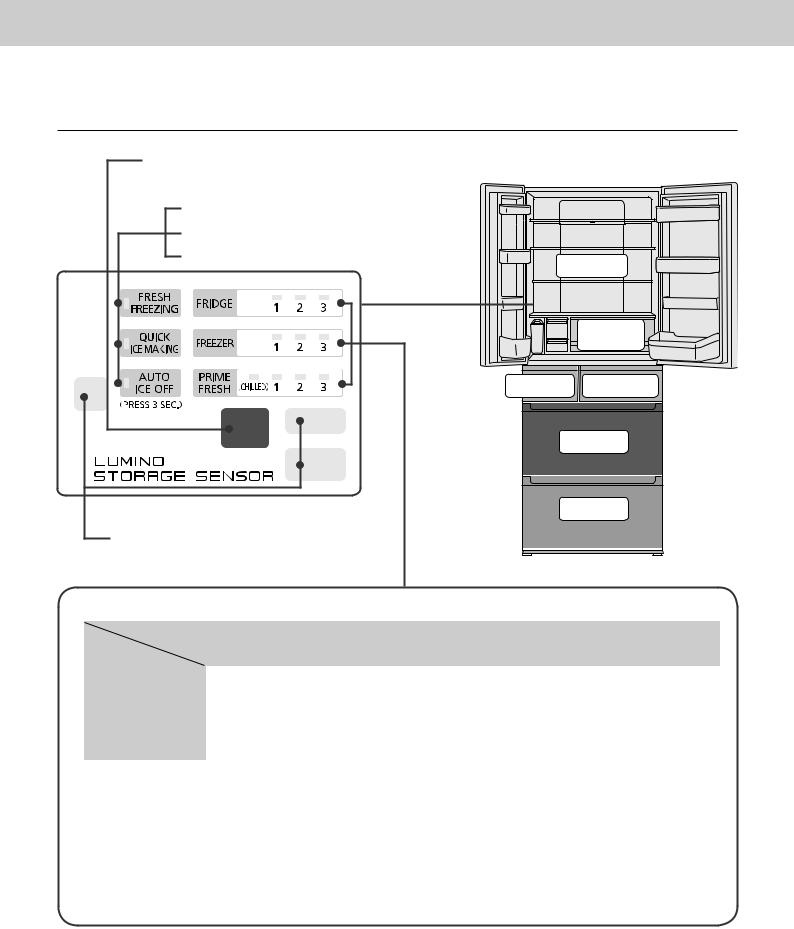
Control panel
Notice indicator (P. 21) ••Occurrence of abnormality, demo mode.
FRESH FREEZING (P. 13)
QUICK ICE MAKING (P. 15)
AUTO ICE OFF (P. 15)
●●Settings at time of purchase.
Storage sensor (P. 9, P. 26)
••The sensor automatically detects the change in the volume of storage.
Refrigerator |
|
compartment |
|
|
Prime Fresh/ |
|
Chilled |
|
select room |
Ice |
Fresh Freezing |
compartment |
compartment |
|
Freezer |
compartment |
|
|
Vegetable |
compartment |
|
■■Temperature setting and a guide of temperature
Temperature |
CHILLED |
1 |
2 |
|
setting |
3 |
|||
Button |
|
|
|
|
FRIDGE |
|
Approx. 2 °C ~ 3 °C |
Approx. 3 °C ~ 6 °C |
Approx. 2 °C ~ 3 °C |
|
higher than “ 2 ” |
lower than “ 2 ” |
||
|
|
|
||
FREEZER |
|
Approx. 2 °C ~ 3 °C |
Approx. -18 °C ~ -20 °C |
Approx. 2 °C ~ 3 °C |
|
|
higher than “ 2 ” |
|
lower than “ 2 ” |
PRIME FRESH |
Approx. 0 °C ~ 2 °C |
Approx. 1 °C ~ 2 °C |
Approx. -1 °C ~ -3 °C |
Approx. 1 °C ~ 2 °C |
higher than “ 2 ” |
lower than “ 2 ” |
(These are rough indications for when the ambient temperature is 30 °C, there is no food in the refrigerator, and the interior temperatures have stabilized. The temperatures may differ depending on the ambient temperature, food storage state, door opening/closing, and other usage conditions.)
Normally, use the refrigerator with the temperature set to “ 2 ”.
(If the temperature control of the freezer compartment or refrigerator compartment is set to other than “ 2 ” during ECO NAVI operation stops.)
●●Please see page 26 when the temperature setting lamp is flashing.
* The Prime Fresh/Chilled select room is set to [CHILLED] at the time of purchase.
●●Do not subject the control panel to a strong impact, or hit it with a hard object. (The surface may be cracked or scratched.)
8

Operation
Foods stored
Approx. |
3 |
°C ~ 6 °C |
Refrigerator |
For regular storage of food and drinks or |
|
compartment |
temporary storage of those to be served soon. |
||||
|
|
|
|||
|
|
|
|
|
|
Approx. |
0 |
°C ~ 2 °C |
Prime Fresh/ |
[Chilled] |
|
For processed food or dairy products. |
|||||
|
|
|
Chilled select |
||
|
|
|
[Prime Fresh] |
||
Approx. |
-3 |
°C ~ -1 °C |
room |
||
For storage of fresh food such as meat or fish. |
|||||
|
|
|
|
||
|
|
|
|
|
|
Approx. |
-19 |
°C ~ -17 °C |
Fresh Freezing |
For freezing ingredients or heated food such as |
|
hot rice instantly to keep the freshness of the |
|||||
compartment |
|||||
|
|
|
food. |
||
|
|
|
|
||
|
|
|
|
|
|
Approx. |
-20 |
°C ~ -18 °C |
Freezer |
For storage of frozen foods. |
|
compartment |
|||||
|
|
|
|
||
|
|
|
|
|
|
Approx. |
3 |
°C ~ 8 °C |
Vegetable |
High humidity keeps fruits and vegetables |
|
compartment |
fresh and juicy. |
||||
|
|
|
●●The temperatures above are when “ 2 ” is selected for the setting. The temperature may differ slightly depending on how the refrigerator is used.
ECO NAVI Operation
■■3 ECO functions detect the volume of storage and the lifestyle.
Energy is effectively and automatically saved.*1
ECO NAVI lamp is on during ECO NAVI operation.
ECO NAVI operates only when the temperature setting is “ 2 ” for both the freezer and refrigerator compartments.
Storage Eco |
The storage sensor (P. 8) detects the change in the |
|
volume of storage in the refrigerator compartment. |
||
|
||
Smart Eco |
3 weeks' worth of the number of door opening/ |
|
closing and the change in the volume of storage |
||
|
||
|
for each day of the week and every hour are |
|
|
memorized, analyzed and estimated. |
|
Night Eco |
The light intensity sensor*2 detects the brightness |
|
of the room. |
||
|
●●The ON/OFF pattern of the lamp may change after 4th week in which the learning function becomes effective.
●●The brightness of the lamp is lowered approximately 5 minutes after the lamp turns on. (The lamp can be turned off if it bothers you. (P. 22))
●●During detecting the change in the volume of storage, ECO NAVI lamp flashes slowly. (Approximately 15 seconds after closing the door of the refrigerator compartment.)
When the temperature setting of the refrigerator compartment and the freezer compartment is other than “ 2 ”, the lamp does not flash but is detecting the volume of storage.
●●ECO NAVI operation may not be performed depending on the usage state of the refrigerator.
Memory of 3 weeks’ worth of life pattern

 Period for learning

 Learning function Reflected after 4th week
ECO NAVI lamp
Light intensity sensor (Underside of the door)
ECO NAVI Q&A P. 26
*1Effectiveness differs depending on the ambient temperature, ambient brightness, number of times and when doors are opened and closed, and state in which food is stored.
*2Darkness is detected by the light intensity sensor at approximately 3 to 10 lux or less.
English
9

Operation
Refrigerator compartment
|
|
|
|
|
|
|
|
|
|
|
|
|
|
|
Tray (Two) |
|
|
|
|
|
|
|
|||||
|
|
|
|
|
|
|
|
|
|
|
|
|
|
|
|
|
|
|
|
|
|||||||
Room lamp (LED) |
|
|
|
|
|
|
|
|
1-2 convenient shelf |
|
|
|
Glass shelf |
||||||||||||||
|
|
|
|
|
|
|
|
|
|
|
|||||||||||||||||
|
|
|
|
|
|
|
|
Partition shelf |
|
|
|
|
|
|
|
||||||||||||
|
|
|
|
|
|
|
|
|
|
|
|
|
|
|
|
|
|
|
|
|
|
||||||
|
|
|
|
|
|
|
|
|
|
|
|
|
|
|
|
|
|
|
Room lamp (LED) |
||||||||
|
|
|
|
|
|
|
|
|
|
|
|
|
|
|
|
|
|
|
|||||||||
Rotary partition (P. 11) |
|
|
|
|
|
Duct |
|
|
|
|
Door shelf (Three) |
||||||||||||||||
|
|
|
|
|
|
|
|
|
|||||||||||||||||||
|
|
|
|
|
|
|
|
|
|
|
|
||||||||||||||||
|
|
|
|
|
|
|
|
|
|
|
|
|
|
|
|
|
|
|
|
||||||||
|
|
|
|
|
|
|
|
|
|
|
|
|
|
|
|
|
|
|
|
|
|
|
|
|
|
|
|
|
|
|
|
|
|
|
|
|
|
|
|
|
|
|
|
|
|
|
|
|
|
|
|
|
|
|
|
|
|
|
|
|
|
|
|
|
|
|
|
|
|
|
|
|
|
|
|
|
|
|
|
|
|
|
|
|
|
|
|
|
|
|
|
|
|
|
|
|
|
|
|
|
|
|
|
|
|
|
|
|
|
|
|
|
|
|
|
|
|
|
|
|
|
|
|
|
|
|
|
|
|
|
|
|
|
|
|
|
|
|
|
|
|
|
|
|
|
|
|
|
|
|
|
|
|
|
|
|
|
|
|
|
|
|
|
|
|
|
|
|
|
|
|
|
|
|
|
|
|
|
|
|
|
|
|
|
|
|
|
|
|
|
|
|
|
|
|
|
|
|
|
|
|
|
|
|
|
|
|
|
|
|
|
|
|
|
|
|
|
|
|
|
|
|
|
Left door |
Right |
|
door |
Door shelf 
 Bottle shelf (Two)
Mini-door shelf |
Prime Fresh/Chilled select room |
Egg case (for 12 eggs)
Bottle shelf
Control panel (P. 8) |
●●Temperature zone can be chosen |
|
between Prime fresh or Chilled to |
Small-item case |
fit the type of food. (P. 12) |
10
Operation
The “1-2 convenient shelf (the third shelf from the top)” can be split into front and rear parts.
■■Remove the front part and set it above.
■■Remove the front part and set it below.
English
●●You can easily place large pots or a small keg of |
●●You can store a lot of small food. |
beer.
Only the height of the second tray from the top can be changed.
 Lift up the back of the tray and pull it forward. Once the protrusions of the tray are unhooked from the rails, tilt the tray and remove it.
Protrusion

 Rail
Rail
 Insert the tray in the desired position by reversing the steps.
●●The position of the tray can be changed even when the door is not fully opened.
→Remove the front half of the 1-2 convenient shelf, then change the position by following the above steps.
The “door shelves” can be moved.
■■Replace the mini-door shelf with the bottle shelf.
Mini-door |
Bottle shelf |
shelf |
|
Egg tray can be pulled out fully!
Bottle shelf |
Mini-door shelf |
■■Move the door shelf to your favorite position.
 ••For the right door, only the
first shelf from the top.
••For the left door, only the second shelf from the top.
When the left door can be opened by 90 ° only, the egg cases, etc. can be easily taken out.
While holding one end of the shelf with one hand, lightly tap the other end to raise it.
●●If the mini-door shelf is replaced with the bottle shelf, the storage sensor is hidden behind the food in the bottle shelf and the sensor may not work properly.
Requests
●●If any food with a high water content is placed in front of the air outlet, then it may be cooled excessively or frozen. (P. 7)
(There is a risk of burst especially when canned beers, non-alcoholic beverages and sodas are frozen.)
●●The food shown below must be put into a hermetically sealed container or wrapped for storage in a refrigerator.
••Green onions or other strong smelling vegetables. |
••Cut citrus fruits. |
(→Odors will spread to other nearby food) |
(→The plastic will be discolored white) |
●●When the rotary partition is opened forward, put it back into place.
(The doors can not be closed and it may cause damage.)
Opened forward. |
Put it back into place. |
 Rotary
partition
11

Operation
Prime Fresh/Chilled select room
The selectable room is set to [CHILLED] at the time of purchase.
|
Using as the Prime Fresh room |
Approx. -3 °C ~ -1 °C |
■■When you want to extend the life of food with partially-freezing it. |
|
|
●●This room is suitable for storing fresh food such as meat or fish. |
|
|
••Compared to storing in the Chilled room or the refrigerator compartment, the |
|
|
storage life of meat or fish becomes longer. |
|
|
••Temperature can be set to either “ 1 ”, “ 2 ” or “ 3 ” to fit the volume and type of |
|
|
food. (P. 8) |
|
|
[Example of food to store] |
|
|
••Meat |
•Fish |
|
●●When food is frozen too much Sliced raw fish or sliced meat may be frozen too much.
Set the temperature setting to “ 1 ” to prevent food from over frozen.
●●When food is not partially-frozen Depending on the type of food such as a block of meat or a large fish, the storage conditions and the ambient temperature, food may not be partiallyfrozen as it intended. Set the temperature setting to “ 3 ”.
Easy to cut.
The partially-frozen food is easy to cut!
When you want to slice raw fish or a block of meat, freeze food a little in the prime fresh room. It comes in handy.
Using as the Chilled room |
Approx. 0 °C ~ 2 °C |
■■When you do not want to freeze food.
●●This room is suitable for storing chilled food or dairy products. [Example of food to store]
••Chilled food |
••Boiled noodle |
••Yogurt |
••Fresh cream |
••Cheese |
|
●●Depending on food, it may be frozen partly.
Change the position of food or set the temperature setting of the refrigerator compartment to “ 1 ”.
Tips for storing
■■What is the unsuitable food for the Prime Fresh/Chilled?
●Egg |
●Milk ●Water ●Juice ●Tofu |
In the refrigerator |
||
compartment |
||||
|
|
|
||
●Vegetable • Fruit |
|
In the vegetable |
||
|
compartment |
|||
|
|
|
||
●Ice |
●Ice cream |
●Frozen food |
In the freezer |
|
compartment |
||||
|
|
|
||
■■What is the duration of storing without plastic wrap?
(The selectable room is set to the [CHILLED].)
Example of food |
Time guidelines |
Sandwich |
Approx. 3 hours |
Sashimi (raw fish) |
Approx. 6 hours |
Salad |
Approx. 6 hours |
Omelet |
Approx. 9 hours |
Requests
●●Change the temperature setting of the selectable room to fit the purpose of storage or the type of food. ●●When you change the temperature setting, surely replace food to fit the set temperature.
Notices
●●The setting of prime fresh “ 1 ”, “ 2 ” and “ 3 ” consumes 10% more energy than the setting of [CHILLED].
12

Operation
Fresh Freezing compartment
With Fresh Freezing, food is quickly frozen by the blowing of cold air and the aluminum plate.
Using “FRESH FREEZING”
■■Freeze ingredients or heated food such as hot rice instantly to keep the freshness of them
1Wrap the food in plastic wrap or place it in freezer storage packs,
and put it on the aluminum plate.
2Press [FRESH FREEZING] button and start the Fresh Freezing operation.
(The lamp turns on.)
FRESH |
●●Fresh Freezing ends automatically after approximately |
FREEZING |
150 minutes. |
|
(If the food is not frozen adequately, run “FRESH FREEZING” again) |
Lamp is on:Operating
Lamp is off:Stopping
3When food is stored for long periods after Fresh Freezing, store it in the freezer compartment.
●●When you want to stop Fresh Freezing in the middle, press [FRESH FREEZING] button again.
(The lamp turns off.)
●●During Fresh Freezing, energy consumption increases more than usual.
●●If QUICK ICE MAKING is set during the Fresh Freezing operation, the Fresh Freezing operation will be stopped.
●●If Fresh Freezing is started during defrosting, the end time will be later because the Fresh Freezing operation will start after defrosting ends.
 Three conditions of delicious Fresh Freezing
 Tightly wrap the food. ••Wrap the food in plastic wrap, removing any air from inside.
••Divide the food into small packs with a thickness of about 2 cm. ••If, for example, polystyrene trays or sealed containers are used, temperature transmission will be poor, making the food difficult to freeze.
 Position the food flat and even on the aluminum plate.
••Keep a gap between the food. (Keep at least 5 mm space between food)
••Position the food packages flat and even on the aluminum plate and do not stack them on top of each other.
 Wrap hot food too. ••Tightly wrap hot food too.
••Using rice as an example, Fresh Freezing can be performed for about 2 rice bowls at one time.
Requests
●●Store ice creams which contain much milk fat etc. in the freezer compartment. ●●Do not insert bottles or cans. (They may split or burst.)
●●Do not insert food that is taller than the case.
(It will prevent the door from being closed properly, resulting in frost.)
Notices
●●Freezing may not be enough depending on types of food stored, packing conditions, amount stored and the frequency of door opening. In that case, run the “FRESH FREEZING” again.
●●The sound becomes slightly louder during the Fresh Freezing operation but this is not an indication of a malfunction.
●●ECO NAVI does not operate during the Fresh Freezing operation.
13
Operation
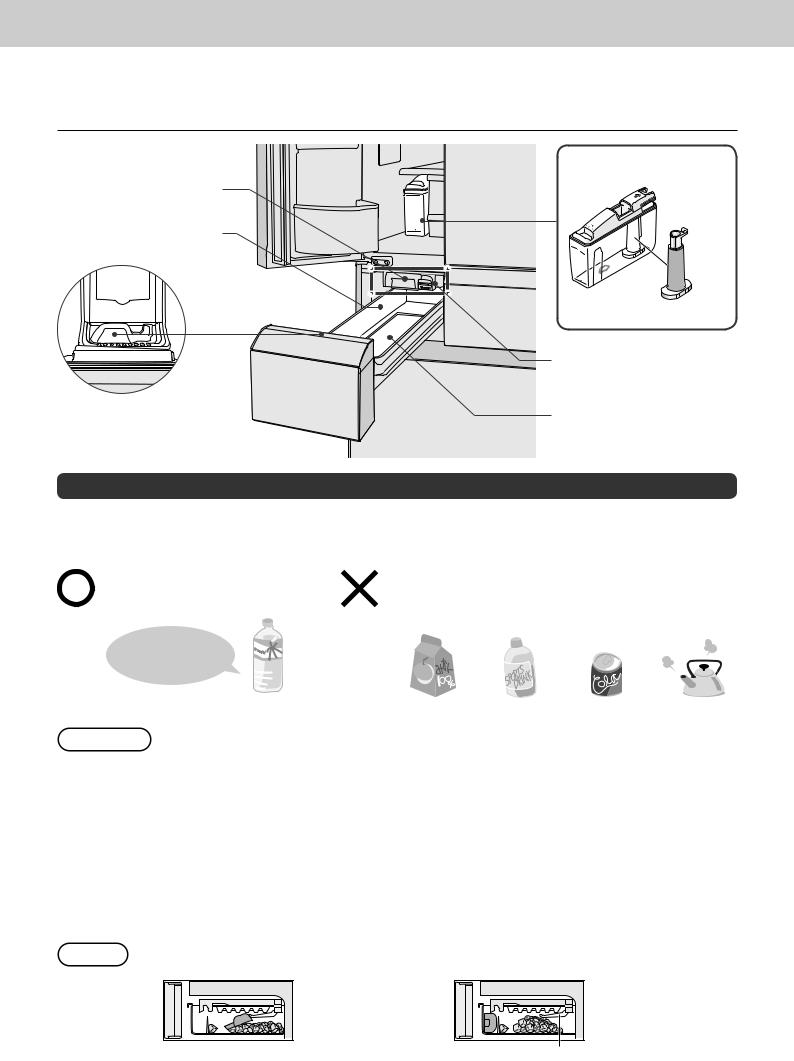
Ice compartment
Water supply tank
approx. 1.2 liters
Ice-making tray
Ice storage box
|
Purification filter |
|
|
Automatic ice maker |
|
Ice shovel |
Sound-proof mat |
|
(Provided in front of the case.) |
||
(Do not remove it.) |
||
|
To use the automatic ice maker in comfort
Please use only the drinking water for auto ice making.
If you use water other than tap water, bacteria may occur.
Clean the water supply tank and the ice-making tray with water frequently. (P. 19)
When the following water is used, wash the water supply tank frequently! (P. 19)
The hardness of water must be 100 mg/L or less.
Do not put liquids such as the following into the water supply tank.
(These may damage the ice compartment or cause ice cubes stick to each other.)
|
Drinking water |
Juice, etc. |
Sports drinks Carbonated |
Hot water |
|
●●Do not slam the ice compartment door open/close. |
drink |
|
|
Requests |
|
|
||
|
(Ice may drop to the freezer compartment case or into other places.) |
|
||
|
●●Do not pour water directly into the ice-making tray to make ice. |
|
||
|
(This may cause damage to the ice maker or ice cubes may stick together.) |
|
||
|
●●Do not pour water directly into the ice storage box to make ice. |
|
||
|
(Otherwise, the ice storage box may break.) |
|
|
|
|
●●Hardness of water must be 100 mg/L or less. |
|
|
|
|
The minerals may appear as white floating particles. They are not harmful. |
|
||
|
●●Do not put food or other items into the ice compartment. |
|
||
|
(Otherwise, the amount of ice cannot be correctly detected and auto ice making may be |
|||
|
stopped.) |
|
|
|
|
●●When you first use the ice compartment, odor or dust may be on the ice-making tray etc. |
|||
|
Please throw away the first lot of ice. |
|
|
|
Notice |
Auto ice making operation stops automatically when the box is filled with ice cubes. |
|
||
|
This condition cannot be detected in the following cases. |
|
||
The ice shovel left in the ice storage box hits the ice detection lever.
Ice cubes forming a mound hit the ice detection lever.
Ice detection lever
(When pressed, stops the auto ice making function.)
14

Operation
Ice can be made in approx. two hours!
To make ice
 Take out the water supply tank
Add water if the level is below the “ ” line.
(Replace the water in the water supply tank at least once a week.)
 Fill with water
Add water up to the “ ” line.
 Install the water supply tank
Push in the tank until this line is crossed.
(If it is not securely set, then water will not be supplied and ice will not be made.)
Water supply tank |
English |
|
|
Lid |
|
Do not add water over the line.
Put the lid back tightly.
Make sure that the tank is completely set 

 across the line.
However, it will take longer in the following cases. |
|
●●When the refrigerator is used for the first time. |
●●When a large quantity of food is stored at once. |
(It may take 24 hours or more because the auto ice |
●●When the ambient temperature is low in winter, or it |
making function will start only after the interior has |
is high in summer. |
cooled down sufficiently.) |
●●When a power failure occurs. |
●●When the doors are opened frequently. |
●●When the washable ice-making tray has been |
●●When the door is ajar. |
cleaned. (P. 19) |
To make ice quickly
■■When [QUICK ICE MAKING] is set, the speed of ice making is increased.
Ice can be made within 80 minutes* at the quickest.
●●After approximately 6 hours, it returns to normal auto ice making. ●●When you want to stop quick ice making in the middle, press
[QUICK ICE MAKING] button again. (The lamp turns off.) ●●When defrosting is on, the lamp flashes.
[QUICK ICE MAKING] re-starts automatically when defrost is completed. ●●During quick ice making, energy consumption increases more than usual. ●●If manual Fresh Freezing is performed during [QUICK ICE MAKING] , QUICK ICE MAKING is canceled.
●●ECO NAVI does not operate while QUICK ICE MAKING has been set. *Ambient temperature of 20 °C, temperature in each compartment set to “ 2 ”, doors not opened or closed.
To stop auto ice making off
■■Press [AUTO ICE OFF] button for 3 seconds if you do not want to make ice and before cleaning the icemaking tray.
AUTO
 ICE OFF
(PRESS 3 SEC.)
Lamp is on:Ice making is off Lamp is off:Auto ice making is on
15
Operation
Freezer compartment
Freezer case (Upper)
 Vertical


 space
space
Freezer case (Lower) [This is a storage example.]
●●A lot of frozen food and cooked meal can be stored.
Requests
●●For the upper case of the freezer, put your food within the height of the case.
●●For the lower case of the freezer, put your food below the upper limit line (↓ ↓) marked inside the case.
(The door may not close completely and frost may occur.)
Three conditions of delicious freezing
1. Quickly freeze food in thin and small portions!
2. Tightly wrap!
3. Do not re-
Food can be stored without plastic wrap.*
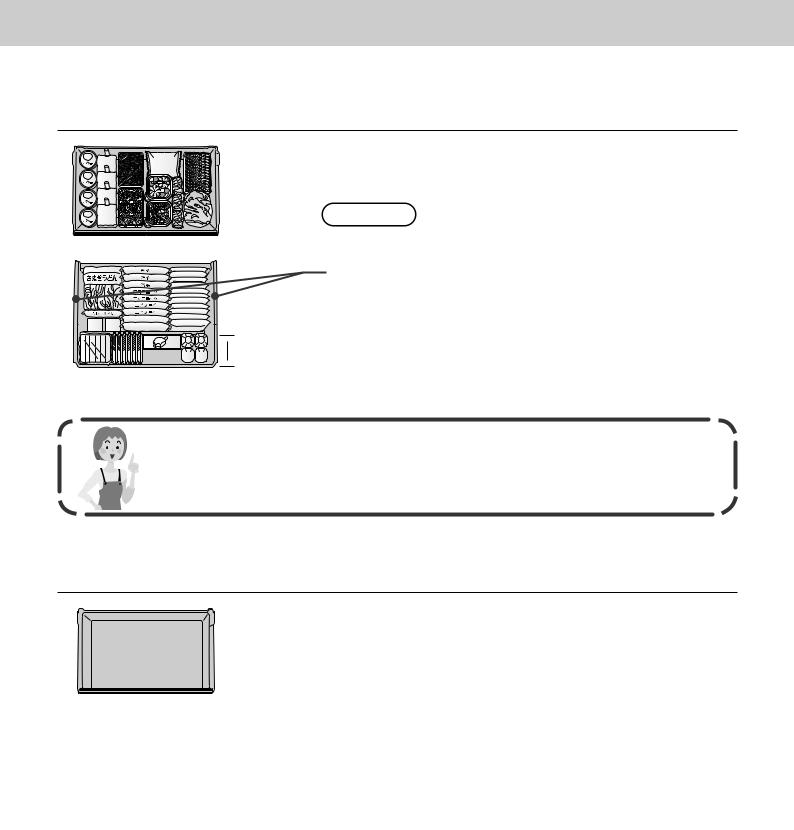
Vegetable compartment
green peppers in the small vegetable case. The main case (section excluding the bottle corner)
of the vegetable compartment where food hardly dries out is recommended for leafy vegetables.
Small-item vegetable case |
Requests |
|
|
|
*Cut vegetables or those to be stored for a long time |
|
wrapping. |
|
●●Tightly seal rice before storing it. |
|
●●The humidity in the vegetable compartment is high and |
|
condensation may occur. Just wipe off the water drops. |
|
Bottle corner ●●Put vegetables and fruits within the height of the case. |
Vegetable case |
|
[This is a storage example.] |
|
16

Appendix
Cleaning and removing and re-installing
Conduct periodic cleaning and maintenance to ensure that the refrigerator will be kept clean and that it will continue to operate for a long time to come.
Before cleaning or conducting maintenance, be absolutely sure to disconnect the power plug from the power outlet. Do not connect or disconnect the power plug with wet hands. Doing so may result in an electric shock or injury.
Cleaning
Clean the refrigerator immediately after it is stained.
Wipe off easily removable dirt using a cloth dipped in lukewarm water.
Wipe off stubborn dirt using a cloth dipped in some diluted neutral detergent used in the kitchen. Then take up the remaining detergent using a cloth dipped in lukewarm water.
To complete the cleaning, be absolutely sure to wipe the surfaces dry to take up the remaining moisture.
Clean hidden parts at least once a year.
Accumulated dust may lead to waste of electricity.
Remove dust accumulated on the wall outlet and in gaps around the refrigerator.
For the door packing, wipe with a wet soft cloth, then wipe with a dry cloth to finish up.
(Dirty packing gets damaged easily and it may cause leakage of cold air.)
When finger prints and stains can not be removed easily, wipe them with a cloth lightly soaked in neutral kitchen detergent and then with a wet cloth.
Wipe again with a dry cloth to finish up.
The fulcrum part of the rotation of the refrigerator compartment door has been
coated with lubricant. Do not wipe it off. →If you wiped it off, consult your dealer.
Wipe immediately!
If liquid trickles at the edge of the door, quickly press a dry cloth and wipe it.
English
Attention
●●Doors are made of glass. Do not add a impact on the surface and the edge when you clean them. ●●Do not use tools whose head is pointed (especially metal tools). (They may cause damage.) ●●Do not use the
Alkaline or faintly alkaline
Kitchen detergents, |
Scrubber, |
Cleanser, |
Benzine, Thinner, |
Hot water |
Glass detergents |
Polishing |
Soap powder |
Alcohol, Acid, |
|
(They crack plastic.) |
sponger |
|
Petroleum |
|
17

Appendix
Trays / 1-2 convenient shelf (made of glass) |
Once every three months |
■■Tray (Upper shelf in the refrigerator) |
■■Unhook the protrusion at the front of the 1-2 |
Unhook the protrusion at the back of the tray and pull it. |
convenient shelf and pull it. |
Hook
 Tray
Tray
■■Tray (2nd shelf from the top in the refrigerator)
Lift up the back of the tray and pull it forward. Once the protrusions of the tray are unhooked from the rails, tilt the tray and remove it.
Hook  Tray
Tray

 Rail
Rail
Rear part
Front part
■■Rear part of the 1-2 convenient shelf
 Remove the front part (refer to the upper figure).
 Slightly lift the rear part and pull it.
Fit the rear part of the 1-2 convenient shelf so that the hole on it is towards you.
Attention
●●The partition shelf is not removable. Do not remove the partition shelf when you clean it. ●●Trays, the 1-2 convenient shelf and the partition shelf are made of glass and heavy. Please handle them with care so that they do not fall and cause any damage or injury. For attaching trays, hold them with the protrusion side down and firmly insert.
Case (Prime Fresh/Chilled select room)/Egg case/Small-item case |
Once every three months |
■■Case (Prime Fresh/Chilled select room)
Attention |
Pull out the case as far as possible, lifting up the front and pull it out at angle with holding the flap above the case.
■■Egg case/Small-item case
Pull out the case as far as possible, and pull out at an angle while lifting up the front.
●●The partitions set to both side of the egg case and the small-item case are not removable. Do not remove the partitions when you clean them.
Door shelf/Bottle shelf
■■Remove
Tap the bottom of the small racks upward or slide alternately the left and right of the big racks upward, and raise them slowly. (Tightly attached)
••Remove the free rack before the bottle rack.
Slide the racks |
upward. |
Once every three months
■■Re-installing
Set each rack horizontally, with the mark [>PS<] on the right, and push it down to its proper position.
••Remove the free rack before the bottle rack.
18

Appendix
Water supply tank / Purification filter |
Once a week |
Remove the lid and clean |
Turn the water purification |
Gently rinse the water |
the water supply tank with |
filter to unhook and |
purification filter. |
water. |
remove it. |
|
 Lid Hook

 Remove the packing running on the edges from the back. Clean it with water.
 Fit the water purification filter and packing.
●●As a guide, replace the purification filter every three years. (Separately sold parts: CNR MJ-108850) (P. 27)
●●If there is water scale on the purification filter, ice may not be properly made.
Washable ice-making tray (Inside of the ice compartment)
■■Remove the ice-making tray and rinse it.
 Press [AUTO ICE OFF] button for 3 seconds and stop ice making. (The lamp turns on. P. 15)
 Turn the knob in the ice-making compartment to the unlock position.
 Pull forward the lever to pull out the ice-making tray.
 Clean it with water. Do not rub the surface with a sponge etc.
(If the ice-making tray is scratched, ice may not be properly released, leading to a malfunction.)
●●The ice-making tray and its frame can not be separated. ●●Do not use a dishwasher-dryer.
■■Installation
 Push in until it makes a locking sound.
 Turn the knob to the lock position.
Ice may not be made if the ice-making tray is not locked.
 Press [AUTO ICE OFF] button for 3 seconds and re-start ice making. (The lamp turns off. P. 15)
●●Ice is not made until [AUTO ICE OFF] is canceled.
●●Do not directly put water in the ice-making tray after cleaning. (That may cause ice cubes sticking together or a malfunction.)
Once or twice a year
Knob
Lock position |
Unlock position |
Lever
Unlock position |
Lock position |
CaseIce (Ice/Fresh Freezing/Freezer/Vegetable compartment) |
Once every three months |
Protrusion |
Pull out at an angle
Pull out the door as far as possible, and pull out at an angle while lifting up the front.
Remove the aluminum plate
When the plate is installed, set it in front side of the protrusion.
Requests
●●The contact sections of the drawer rails have been coated with lubricant. Do not wipe it off.
●●When the top case in the freezer compartment or the small-item vegetable case has been removed, install by positioning “ FRONT” that is written on the bottom of the case on the front side.
●●Do not touch the Fresh Freezing plate with wet hands, for example when cleaning the plate.
(It may cause a freezing injury)
●●When the case and the aluminum plate are washed, install them after draining water and wiping the remaining droplets.
English
19
Appendix
In these cases?
The power failed. |
●●Keep the doors closed and do not store additional food. |
|
|
|
|
|
|
●●[FRESH FREEZING] and [QUICK ICE MAKING] stop. Reset these functions to |
|||||
|
use them. |
|
|
|
|
|
The power plug was |
●●Wait at least 7 minutes, and then plug in the power plug. |
|||||
disconnected. |
(If it is plugged in immediately, the compressor will be overloaded, which may |
|||||
|
cause a malfunction.) |
|
|
|
|
|
The refrigerator is not |
●●Remove all foods and drinks and clean the refrigerator. |
|
|
|
|
|
used for a long time. |
Disconnect the power plug. |
|
|
|
|
|
|
Clean the compartments and the ice-making tray. (P. 18 to P. 19) |
|||||
|
Keep the doors opened for two to three days to dry the compartments. |
|||||
|
(When drying is insufficient, the compartment may get moldy or have a foul |
|||||
|
smell.) |
|
|
|
|
|
|
|
|
|
|
|
|
The room lamp does not |
●●When replace room lamp, please contact with your authorized dealer or service |
|||||
turn on. The lamp cover |
center. |
|
|
|
|
|
was broken. |
|
|
|
|
|
|
Glass was broken. |
●●When glass trays and glass doors were broken, do not touch the broken glass |
|||||
(Glass trays • doors) |
and contact with your authorized dealer or service center immediately. |
|||||
Moving the refrigerator |
Remove the leg cover, and then raise the adjustment legs. (P. 6) |
|||||
forward or backward. |
Remove the tipping protective devices. (P. 6) |
|
|
|
|
|
|
Disconnect the power plug. |
|
|
|
|
|
|
Move the refrigerator in the forward or backward direction. |
|||||
|
(Using excessive force to move the refrigerator or moving it in other than a |
|||||
|
forward or backward direction may damage the floor, so place a board or the like |
|||||
|
on the floor.) |
|
|
|
|
|
|
|
|
|
|
|
|
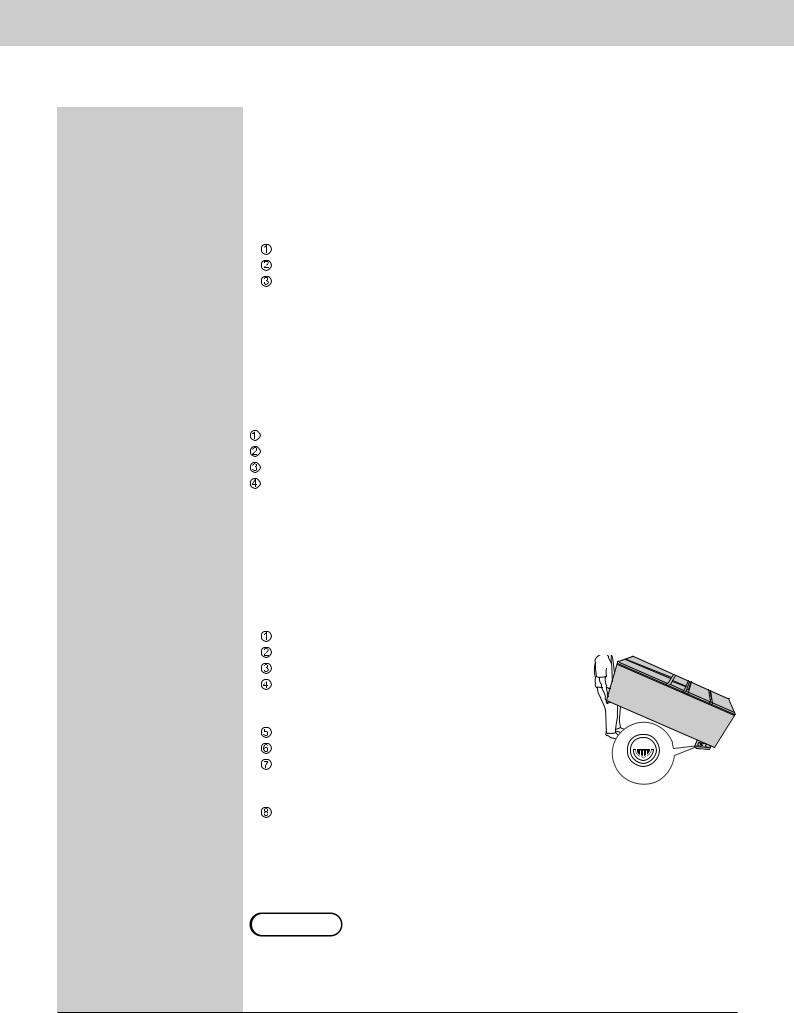
When you move or |
●●Do not transport refrigerators in a horizontal position. |
|
|
|
|
|
transport the refrigerator. |
(Doing so causes a failure of pipes around the compressor possible to be |
|||||
|
broken.) |
|
|
|
|
|
|
●●Remove the food and drinks in all compartments and discard the remaining |
|||||
|
water and ice. Then, move the refrigerator with at least two people. |
|||||
|
Remove the food and drinks and discard water in the water supply tank. |
|||||
|
Stop the auto ice making function. (P. 15) |
|
|
|
|
|
|
Clean the ice-making tray. (P. 19) |
|
|
|
|
|
|
Remove the leg cover screw in the adjustable |
|
|
|
|
|
|
legs. (P. 6) (Remove the leg cover before |
|
|
|
|
|
|
transporting the refrigerator.) |
|
|
|
|
|
|
Remove the tipping protective devices. |
|
|
|
|
|
|
Disconnect the power plug. |
|
|
|
|
|
|
|
|
|
|
|
|
|
Place a vessel underneath the drainage hole. |
|
|
|
|
|
|
Water may spill. Place a cloth, etc. below and in the |
|
|
|
|
|
|
vicinity of the vessel. |
(Container whose height is |
||||
|
Tilt the refrigerator backward to drain water from the |
|||||
|
|
2 cm or less) |
||||
drainage hole. (To prevent water from leaking out, tilt back the refrigerator slowly.)
 When moving the refrigerator, place a protective sheet, etc. on the passage because water may remain in the evaporating dish.
Attention
●●If frost remains on the cooling unit (not visible from the outside) in the refrigerator, then water may spill when it is moved.
(It takes approximately 15 hours for the frost on the cooling unit to melt after the refrigerator power plug is disconnected.)
20
Appendix
The automatic ice maker is not used for a long time.
→When starting to use the automatic ice maker again, switch off the “AUTO ICE OFF” function. (P. 15)
●●Stop ice making, with the water supply tank empty, and clean the ice maker.
 Discard water in the water supply tank.
 Press [AUTO ICE OFF] button for 3 seconds and stop ice making. (P. 15) (The lamp turns on.)
 Discard the stored ice in the ice-making tray and the ice storage box. ••When the ice is stored for a long time, ice cubes get round or connected by sublimation.
  Rinse the ice storage box, ice shovel, and water supply tank.
Wipe off the water and return them to their original positions. ••The water purification filter in the water tank contains water. Dry it properly.
English
If the following sounds or indications are generated
Alarm makes beep sound and the room lamp (LED) flashes, and the letter "U" and "10" are alternately indicated on the notice indicator area.
The letter “H” and a number are alternately indicated on the notice indicator area.
“Example”
“dd” is displayed on the notice indicator area.
The refrigerator compartment, ice compartment, or freezer compartment door is open.
An abnormality may have occurred.
The refrigerator is in demo mode.
••The cooling operation is stopped.
••The lights inside the refrigerator flash turn on for 5 seconds and turn off for 1 second.
Close the open door.
|
Alarm |
Room lamp (LED) |
|
1 minute later |
Double-beep |
Flashes once |
|
3 minutes later |
Two double- |
Flashes twice |
|
beep |
|||
5 minutes later |
Continuous |
Flashes three |
|
|
double-beep |
times |
|
More than |
Continuous |
Flashes three |
|
times every |
|||
5 minutes later |
double-beep |
||
2 minutes |
|||
|
|
If the indicator does appear, contact and consult your dealer.
Cancel the demo mode.
 Open the refrigerator compartment, ice compartment, and freezer compartment doors.
 Press [FREEZER] button in the control panel for at least 10 seconds.
 Close the refrigerator compartment, ice compartment, and freezer compartment doors.
21

Appendix
Setting to suit your preferences
To adjust the temperature in more detail
■■The temperature for refrigerator compartment and freezer compartment can be set in 9 stages, more detailed than as “ 1 ”, “ 2 ” and “ 3 ”.
(ECO NAVI does not operate when the temperature is adjusted in detail.)
For the refrigerator compartment
Setting Procedure
 Set the temperature of the refrigerator to setting “ 1 ”.
 Press [FRIDGE] button for at least 10 seconds.
(There is a beep sound and [2] lamp turns on, then [1] lamp (1st stage) turns on after 10 seconds.)
 Press [FRIDGE] button and select the stage of your choice. (The stage goes higher every one press of [FRIDGE] button.)
If [FRIDGE] button is pressed when the 9th stage is set ([3] lamp is on), the setting goes back to “ 1 ” ([1] lamp is on).
Canceling Procedure
 Set the temperature of the refrigerator to setting “ 1 ”
 Press [FRIDGE] button for at least 10 seconds.
(There is a beep sound, then [1] lamp turns on and [2] lamp flashes.)  The cancellation of the detailed temperature setting is completed.
Set the temperature to fit your usual use.
For the freezer compartment
Operate above  ~
~  steps with pressing [FREEZER] button instead of [FRIDGE] button.
Setting |
Stage |
|
Lamp |
|
“ 3 ” |
9 |
1 |
2 |
3 |
|
8 |
1 |
2 |
3 |
|
7 |
1 |
2 |
3 |
|
6 |
1 |
2 |
3 |
“ 2 ” |
5 |
1 |
2 |
3 |
|
4 |
1 |
2 |
3 |
|
3 |
1 |
2 |
3 |
|
2 |
1 |
2 |
3 |
“ 1 ” |
1 |
1 |
2 |
3 |
|
Lamp status |
|
|
|
On |
Flashing |
Off |
|
|
●●The temperature of the Prime Fresh/Chilled select room can not be adjusted in detail.
To turn off the ECO NAVI lamp
■■The ECO NAVI lamp can be turned off during ECO NAVI operation.
(Set this when there is no indication on the notice indicator area and the freezer compartment and refrigerator compartment are set to “ 2 ”.)
Setting Procedure
Open the left door of the refrigerator compartment and press [FRIDGE] button for at least 3 seconds.
A beep sounds, the ECO NAVI lamp flashes, and the setting is completed.
(After a short time, the ECO NAVI lamp turns off.)
●●ECO NAVI operation is performed even if the above setting is set.
Canceling Procedure
Open the left door of the refrigerator compartment and press [FRIDGE] button for at least 3 seconds.
There is a beep sound, then the ECO NAVI lamp is on for 3 seconds, and the cancellation is completed.
(After a short time, the ECO NAVI lamp turns off. However, it will remain on during ECO NAVI operation.)
22

Appendix
Troubleshooting
If you feel that the refrigerator is not working properly, check out the following points first.
If the trouble persists, disconnect the power plug and contact your dealer or an authorized service center.
The following sounds are not abnormal.
From inside the refrigerator. |
From upper part of back. |
|
●●Snapping sound |
●●Clicking sound |
|
The sound of parts expanding |
The sound produced when |
|
and contracting as a result of |
the electrical components and |
|
temperature changes. |
compressor are operating. |
|
●●Zooming sound |
●●Zooming sound |
|
The sound of the fan operating. |
The sound of the compressor |
|
●●Clattering sound |
operating. The sound pitch |
|
The sound of bottles in the door |
rises and falls because high- |
|
shelf being vibrating by operation |
speed operation is performed |
|
of the compressor. |
to match the variations in |
|
|
temperature. |
|
From the ice compartment and |
|
|
water supply tank. |
From back. |
|
●●Whirring, rattling, and bubbling |
●●Bubbling, hissing, and flowing |
|
sounds |
sounds |
|
The sounds produced when ice is |
The sounds of refrigerant |
|
released by the automatic ice maker |
(gas) flowing. |
|
and water is supplied. |
|
|
When the freezer compartment |
When the vegetable |
|
compartment door is opened. |
||
door is opened. |
||
●●Rapping sound |
||
●●Hissing sound |
●●Thudding sound |
|
The sound of water being |
The sound produced from the |
evaporated by the heater during |
drawer rails when the drawers |
|
defrosting. |
||
are opened/closed. |
||
●●Rapping sound |
||
|
||
●●Thudding sound |
|
|
The sound produced from the |
|
|
drawer rails when the drawers are |
|
|
opened/closed. |
|
|
Rattling noise |
●●Is the floor tough and horizontal? (P. 6) |
|
|
|
●●Do both the legs reach the floor and is the refrigerator properly |
|
|
|
fixed? (P. 6) |
|
|
|
●●Do the sides of the refrigerator not touch the walls or furniture |
|
|
|
around the refrigerator? (P. 6) |
|
|
|
●●Does the power cord of the refrigerator not touch the walls or |
|
Sound |
|
furniture around the refrigerator? (P. 6) |
|
Noise bothers me |
●●The compressor or the fan may make loud noise when the |
||
|
|||
|
|
refrigerator is being cooled, such as when the refrigerator is not still |
|
|
|
cooled soon after installation, the doors are frequently opened and |
|
|
|
closed, the temperature around the refrigerator is high, or Fresh |
|
|
|
Freezing is set ON. This is not abnormal. |
|
|
|
→When the refrigerator has been cooled, the noise becomes small. |
|
|
|
|
|
|
Rapping sound can be heard |
●●When the door is closed with a force or the floor is uneven, the |
|
|
|
refrigerator shakes and generates noise. Place a plate under the |
|
|
|
refrigerator to prevent it from shaking. (P. 6) |
|
|
|
|
English
23

Appendix
Door Display Hot
Ice making
Smell
The top of the refrigerator is hot |
●●The mechanical section releases heat. (P. 6) |
Front (or side) panel is hot |
●●The left and right side surfaces may become hot to let out heat |
|
generated when the refrigeration system operates. The temperature |
|
may become 50 °C to 60 °C (when the ambient temperature is |
|
30 °C) after installation or in the summer, but this is not abnormal. |
Temperature setting on the |
●●Has the temperature of the refrigerator compartment or the freezer |
operation panel is flashing. |
compartment been adjusted in detail? (P. 22) |
The door is heavy when |
●●Air taken into the interior is suddenly cooled. The inner pressure |
opening it immediately after |
becomes lower than the external air momentarily. The items in the |
closing. |
compartments seem to have been “sucked”. |
Magnets do not stick to the |
●●The doors are made of glass. Magnets do not stick. |
doors. |
|
Ice cannot be made |
●●When you use this refrigerator for the first time, ice will be made |
|
after the interior has cooled down sufficiently. |
|
(24 hours or more may be required.) |
|
●●Is the ice making function set to [AUTO ICE OFF] ? |
|
●●Are the water supply tank (P. 15) and ice-making tray (P. 19) set |
|
correctly? |
|
●●Is there any food etc. in the ice storage box? |
|
●●Do you frequently take in and out the ice-making tray? |
|
●●To confirm whether the ice maker is operating, press [AUTO ICE |
|
OFF] button for at least 10 seconds. If the water in the water supply |
|
tank decreases, the ice maker is operating. |
|
(If water has spilled into the ice storage box, wipe it off.) |
|
|
Ice cubes are not frozen inside |
●●Has the freezer compartment temperature control been set to “ 1 ” ? |
|
→Set it to “ 2 ” or “ 3 ”. (P. 8) |
The shape of ice is not “cubic” |
●●There are projections. |
|
→They are the connecting parts frozen in the ice-making tray. |
|
●●The ice cubes are round or connected to other ice cubes. |
|
→Is the ice stored for a long time? |
|
(Ice cubes get round or connected by sublimation.) |
|
●●The ice is small. |
|
→Small ice cubes sometimes produced when water in the tank is |
|
exhausted. |
Ice smells |
●●Do you clean the water supply tank and purification filter once a |
|
week? (P. 19) |
|
●●Is any cleaning agent, benzine, bleach used for caring? (P. 19) |
|
●●Is the water purification filter deteriorated? (P. 19) |
|
●●Have you put strong smelling foods into the other compartments? |
The interior smells |
●●Are strong smelling foods hermetically sealed? |
|
●●Odor often attaches to the interior walls. |
|
→Dip a soft cloth in lukewarm water and squeeze it. |
|
Wipe it with this cloth. |
24
 Loading...