


NV-DS55EG
Digital Video Camera
Bedienungsanleitung
NV-DS55EG
Operating Instructions
Model No. NV-DS55EG
Before use, please read these instructions completely.
VQT8416

DEUTSCH
Informationen für Ihre Sicherheit
Digital-Camerarecorder
≥Das Typenschild befindet sich an der Unterseite
des Camerarecorders.
Netzadapter
≥Das Typenschild befindet sich an der Unterseite
des Netzadapters.
≥Dieses Gerät an einem gut belüfteten Ort
betreiben, da es sich beim Betrieb erwärmt.
Es darf nicht an einem Ort aufgestellt werden, an
dem keine ausreichende Luftzirkulation
gewährleistet ist, z. B. in einem Bücherregal o. ä.
∫ Die Bedienungsanleitung sorgfältig durchlesen
und den Camerarecorder korrekt benutzen.
≥Für Verletzungen oder Sachschäden, die durch
unsachgemäße Benutzung entstehen, welche nicht den
Anweisungen in der Bedienungsanleitung entspricht, ist
der Benutzer allein verantwortlich.
Den Camerarecorder ausprobieren.
Bevor Sie Ihr erstes wichtiges Ereignis aufnehmen möchten,
den Camerarecorder ausprobieren und sich vergewissern,
daß er problemlos aufnimmt und korrekt funktioniert.
Der Hersteller übernimmt keine Haftung für den Verlust
von aufgezeichnetem Inhalt.
Unter keinen Umständen trägt der Hersteller irgendwelche
Haftung für den Verlust von Aufzeichnungen aufgrund von
Betriebsstörungen oder Defekten dieses Camerarecorders,
seines Zubehörs oder von Cassetten.
Urheberrechte sorgfältig beachten.
Das Aufnehmen von kommerziell vorbespielten Bändern oder
Platten bzw. von anderem veröffentlichten oder gesendeten
Material, außer für den privaten Gebrauch, kann
Urheberrechte verletzen. Selbst für den privaten Gebrauch ist
jedoch das Aufnehmen von gewissem Material nicht gestattet.
≥„Windows“ ist ein Warenzeichen oder eingetragenes
Warenzeichen von Microsoft Corporation U.S.A. „Mac OS“
ist ein Warenzeichen oder eingetragenes Warenzeichen von
Apple Computer Inc.
≥Bei allen anderen Firmen- oder Produktbezeichnungen
handelt es sich um Warenzeichen der betreffenden Firmen.
Auf der MultiMediaCard aufgezeichnete Standbilder
Für Bilder, die auf anderen Videogeräten aufgezeichnet
wurden und auf diesem Camerarecorder wiedergegeben
werden, oder umgekehrt, kann die Kompatibilität nicht
garantiert werden.
Inhalt
Vor dem Aufnehmen
Mitgeliefertes Zubehör . . . . . . . . . . . . . . . . . . . . . . . . . . . . . . 6
Bedienungselemente und Bauteile . . . . . . . . . . . . . . . . . . . . 7
Die 3 Arten der Stromversorgung . . . . . . . . . . . . . . . . . . . . 10
∫
Stromversorgung von
∫ Einsatz des Akku-Ladegerätes (Autobatterie) als
Stromquelle für den Camerarecorder . . . . . . . . . . . . . 10
∫ Stromversorgung mit dem Akku . . . . . . . . . . . . . . . . . 11
∫ Ladeanzeigelampe [CHARGE] . . . . . . . . . . . . . . . . . . 11
Einsetzen der Cassette . . . . . . . . . . . . . . . . . . . . . . . . . . . . 13
∫ LP-Modus . . . . . . . . . . . . . . . . . . . . . . . . . . . . . . . . . . . 14
Benutzen des Suchers . . . . . . . . . . . . . . . . . . . . . . . . . . . . . 15
Benutzen des LCD-Monitors . . . . . . . . . . . . . . . . . . . . . . . . 15
Handhaben des Objektivdeckels . . . . . . . . . . . . . . . . . . . . . 16
Verstellen des Handgriffriemens . . . . . . . . . . . . . . . . . . . . . 16
Befestigen des Schultertrageriemens . . . . . . . . . . . . . . . . . . .
Grundsätzliche Bedienung
Aufnehmen . . . . . . . . . . . . . . . . . . . . . . . . . . . . . . . . . . . . . . 17
Überprüfen des Endes einer aufgenommenen Szene
(Aufnahme-Prüfung) . . . . . . . . . . . . . . . . . . . . . . . . . . . . . 18
Aufnehmen von Szenen mit Gegenlicht
(Gegenlicht-Kompensation) . . . . . . . . . . . . . . . . . . . . . . . 18
Sich selbst aufnehmen (Aufnehmen mit nach vorne
gerichtetem LCD-Monitor) . . . . . . . . . . . . . . . . . . . . . . . . 19
Den Bildgegenstand oder den Aufnahmewinkel vergrößern
(Heran- und Zurückzoomen). . . . . . . . . . . . . . . . . . . . . . . 20
Noch stärkeres Vergrößern des Bildgegenstandes
(Digital-Zoom) . . . . . . . . . . . . . . . . . . . . . . . . . . . . . . . . . . 21
Benutzen des Camerarecorders als Digital-Fotokamera
(Photoshot) . . . . . . . . . . . . . . . . . . . . . . . . . . . . . . . . . . . . 22
∫ Progressive Photoshot . . . . . . . . . . . . . . . . . . . . . . . . 23
Aufnehmen im Kinoformat-Modus
(Kinoformat-Modus) . . . . . . . . . . . . . . . . . . . . . . . . . . . . . 25
Aufnehmen mit minimiertem Verwackeln
(Super-Bildstabilisator) . . . . . . . . . . . . . . . . . . . . . . . . . . . 26
Betrachten der soeben aufgenommenen Szenen auf dem
Camerarecorder (Wiedergabe) . . . . . . . . . . . . . . . . . . . . . 27
∫ Regeln der Lautstärke . . . . . . . . . . . . . . . . . . . . . . . . . 27
∫ Wiedergabe-Wiederholung . . . . . . . . . . . . . . . . . . . . . 27
Auffinden einer gewünschten Szene für die Wiedergabe . . 28
Wiedergabe in Zeitlupe (Zeitlupen-Wiedergabe) . . . . . . . . . 29
Wiedergabe von Standbildern und Einzelbild-Fortschaltung
(Standbild-/Einzelbild-Wiedergabe) . . . . . . . . . . . . . . . . . 30
Wiedergabe auf einem Fernseher (mit angesteckter Anschluß-
Box [AV ONE TOUCH STATION]). . . . . . . . . . . . . . . . . . 31
Nach dem Gebrauch . . . . . . . . . . . . . . . . . . . . . . . . . . . . . . 32
einer Netzsteckdose . . . . . . . . . 10
16
Seiten mit zusätzlicher Information
Seiten mit zusätzlicher Information sind mit einem Pfeil vor
der Seitennummer gekennzeichnet, z. B. (l 00).
∫ WICHTIGER HINWEIS
≥Um die Gefahr eines elektrischen Schlages oder
Störungen zu vermeiden, nur das empfohlene Zubehör
verwenden und dieses Gerät weder Regen noch
Feuchtigkeit aussetzen. Das Gehäuse nie öffnen; im
Geräteinneren gibt es keine Teile, die von Laien gewartet
werden können. Wenden Sie sich für Reparaturarbeiten
bitte an das Fachpersonal.
2

Fortgeschrittene Bedienung
Hinweise, andere Informationen
Betrachten der aufgenommenen Szenen während der
Aufnahmepause (Kamerasuchlauf) . . . . . . . . . . . . . . . . . 33
Auffinden des Endes des aufgezeichneten Bandabschnittes
auf der Cassette (Leerstellen-Suchlauf). . . . . . . . . . . . . . 34
Auffinden des Anfangs aufgezeichneter Szenen, die mit
Index-Signal markiert sind. (Index-Suchlauf) . . . . . . . . . . 35
Ein-und Ausblenden . . . . . . . . . . . . . . . . . . . . . . . . . . . . . . . 38
Aufnehmen in besonderen Situationen
(Belichtungsautomatik-Programme) . . . . . . . . . . . . . . . . . 39
Aufnehmen mit Spezial-Effekten (Digital-Effekte) . . . . . . . . 41
∫∫
∫ Stroboskop-Multibild-Modus . . . . . . . . . . . . . . . . . . . . 44
∫∫
∫∫
∫ Manueller Multibild-Modus . . . . . . . . . . . . . . . . . . . . . . 45
∫∫
∫∫
∫ Bild-im-Bild-Modus. . . . . . . . . . . . . . . . . . . . . . . . . . . . 47
∫∫
∫ Szenenübergänge mit Wischblende (Wipe) . . . . . . . . 48
∫ Szenenübergänge mit Mischblende (Mix). . . . . . . . . . 49
Aufnehmen mit natürlichen Farben (Weißabgleich) . . . . . . 50
Manueller Weißabgleich . . . . . . . . . . . . . . . . . . . . . . . . . . . . 51
Manuelle Scharfeinstellung des Bildgegenstands
(Manuelle Scharfeinstellung) . . . . . . . . . . . . . . . . . . . . . . 52
Manuelles Einstellen der Verschlußzeit. . . . . . . . . . . . . . . . 53
Manuelles Einstellen der Blende . . . . . . . . . . . . . . . . . . . . . 54
Wiedergabe mit Spezial-Effekten
(Wiedergabe-Digital-Effekte) . . . . . . . . . . . . . . . . . . . . . . 55
∫∫
∫ Stroboskop-Multibild-Modus . . . . . . . . . . . . . . . . . . . . 56
∫∫
∫∫
∫ Manueller Multibild-Modus . . . . . . . . . . . . . . . . . . . . . . 57
∫∫
∫∫
∫ Index-Multibild-Modus . . . . . . . . . . . . . . . . . . . . . . . . . 58
∫∫
∫∫
∫ Multibild-Suchlauf . . . . . . . . . . . . . . . . . . . . . . . . . . . . 60
∫∫
∫∫
∫ Wischblenden- und Mischblenden-Funktion . . . . . . . . 61
∫∫
Vergrößern des Wiedergabebildes(Wiedergabe-Zoom) . . . 62
Hinzufügen von neuem Ton auf einer aufgezeichneten
Cassette (Nachvertonung) . . . . . . . . . . . . . . . . . . . . . . . . 63
Benutzen der MultiMediaCard . . . . . . . . . . . . . . . . . . . . . . . 65
Aufnehmen von Standbildern auf der MultiMediaCard (Card-
Photoshot). . . . . . . . . . . . . . . . . . . . . . . . . . . . . . . . . . . . . 66
Wiedergeben der auf der MultiMediaCard aufgezeichneten
Bilder (Card-Wiedergabe). . . . . . . . . . . . . . . . . . . . . . . . . 68
Löschen von Bildern auf der MultiMediaCard . . . . . . . . . . . 70
Eine nicht verwendbare MultiMediaCard wieder verwendbar
machen (Formatieren) . . . . . . . . . . . . . . . . . . . . . . . . . . . 71
Kopieren von Bildern von der MultiMediaCard auf die
Cassette (Bildübertragung). . . . . . . . . . . . . . . . . . . . . . . . 72
Verwendung der auf der MultiMediaCard aufgezeichneten
Bilder auf dem Computer . . . . . . . . . . . . . . . . . . . . . . . . . 73
Fernbedienung . . . . . . . . . . . . . . . . . . . . . . . . . . . . . . . . . . . 74
∫ Einsetzen der Knopfzelle . . . . . . . . . . . . . . . . . . . . . . . 78
∫ Benutzen der Fernbedienung . . . . . . . . . . . . . . . . . . . 79
Benutzen des Menüs . . . . . . . . . . . . . . . . . . . . . . . . . . . . . . 94
Menü-Funktionen . . . . . . . . . . . . . . . . . . . . . . . . . . . . . . . . . 95
Einstellen von Datum und Uhrzeit . . . . . . . . . . . . . . . . . . . 100
Einstellen des LCD-Monitors/Sucher . . . . . . . . . . . . . . . . . 102
Vorsichtshinweise für den Betrieb . . . . . . . . . . . . . . . . . . . 103
∫ Kondensationsbildung . . . . . . . . . . . . . . . . . . . . . . . . 105
∫ Verschmutzte Köpfe und Abhilfe. . . . . . . . . . . . . . . . 106
∫ Optimale Benutzung des Akkus . . . . . . . . . . . . . . . . 107
∫ Vorsichtshinweise für die Aufbewahrung . . . . . . . . . 108
∫ Weitere nützliche Informationen . . . . . . . . . . . . . . . . 109
∫ Hören des Wiedergabetons über einen Kopfhörer . . 109
Glossar . . . . . . . . . . . . . . . . . . . . . . . . . . . . . . . . . . . . . . . . 110
∫ Digital-Video-System . . . . . . . . . . . . . . . . . . . . . . . . . 110
∫ Scharfeinstellung . . . . . . . . . . . . . . . . . . . . . . . . . . . . 111
∫ Weißabgleich . . . . . . . . . . . . . . . . . . . . . . . . . . . . . . . 113
∫ Farbtemperatur . . . . . . . . . . . . . . . . . . . . . . . . . . . . . 114
∫ Progressive Photoshot-Funktion . . . . . . . . . . . . . . . . 115
∫ Timecode . . . . . . . . . . . . . . . . . . . . . . . . . . . . . . . . . . 116
∫ Speicherstopp-Funktion . . . . . . . . . . . . . . . . . . . . . . . 116
Anzeigen auf dem LCD-Monitor/im Sucher . . . . . . . . . . . . 117
Vor Inanspruchnahme des Kundendienstes
(Probleme und Abhilfe) . . . . . . . . . . . . . . . . . . . . . . . . . . 124
Sonderzubehör . . . . . . . . . . . . . . . . . . . . . . . . . . . . . . . . . . 129
Technische Daten. . . . . . . . . . . . . . . . . . . . . . . . . . . . . . . . 130
Editieren
Benutzen der Anschluß-Box
[AV ONE TOUCH STATION] . . . . . . . . . . . . . . . . . . . . . . 80
Kopieren auf eine S-VHS- oder VHS-Cassette
(Kopieren) . . . . . . . . . . . . . . . . . . . . . . . . . . . . . . . . . . . . . 81
Kopieren mit Hilfe einer Schnittsteuereinheit. . . . . . . . . . . . 82
Benutzen des Camerarecorders mit einem
Video-Drucker . . . . . . . . . . . . . . . . . . . . . . . . . . . . . . . . . . 84
Benutzen der automatischen Druckfunktion (Autoprint) . . . 85
Benutzen des Camerarecorders mit einem Computer . . . . 87
3

ENGLISH
Information for Your Safety
Movie Camera
≥The rating plate is on the underside of the Movie
Camera
AC Adaptor
≥The rating plate is on the underside of the AC
Adaptor.
≥As this equipment gets hot during use, operate it
in a well-ventilated place; do not install this
equipment in a confined space such as a
bookcase or similar unit.
∫ Carefully read the Operating Instructions and
use the Movie Camera correctly.
≥Injury or material damage resulting from any kind of use
that is not in accordance with the operating procedures
explained in these Operating Instructions are the sole
responsibility of the user.
Try out the Movie Camera.
Be sure to try out the Movie Camera before recording your
first important event and check that it records properly and
functions correctly.
The manufacturer is not liable for loss of recorded
contents.
The manufacturer shall in no event be liable for the loss of
recordings due to malfunction or defect of this Movie Camera,
its accessories or cassettes.
Carefully observe copyright laws.
Recording of pre-recorded tapes or discs or other published or
broadcast material for purposes other than your own private
use may infringe copyright laws. Even for the purpose of
private use, recording of certain material may be restricted.
≥Windows is a trademark or registered trademark of Microsoft
Corporation U.S.A. Mac OS is a trademark or registered
trademark of Apple Computer Inc.
≥All other company and product names in the operating
instructions are trademarks or registered trademarks of their
respective corporations.
Still Pictures Recorded on the MultiMediaCard
Compatibility cannot be guaranteed for pictures recorded on
other video equipment and played back on this Movie
Camera, or vice versa.
Contents
Before Recording
Standard Accessories . . . . . . . . . . . . . . . . . . . . . . . . . . . . . . 6
Controls and Components . . . . . . . . . . . . . . . . . . . . . . . . . . . 7
The 3 Types of Power Supplies . . . . . . . . . . . . . . . . . . . . . . 10
∫ Supplying Power from an AC Mains Socket . . . . . . . . 10
∫ Using the Car Battery Charger as Power Source
for the Movie Camera . . . . . . . . . . . . . . . . . . . . . . . . . 10
∫ Supplying Power with the Battery . . . . . . . . . . . . . . . . 11
∫∫
∫ Charge Lamp [CHARGE]. . . . . . . . . . . . . . . . . . . . . . . 11
∫∫
Inserting the Cassette . . . . . . . . . . . . . . . . . . . . . . . . . . . . . 13
∫ LP Mode . . . . . . . . . . . . . . . . . . . . . . . . . . . . . . . . . . . . 14
Using the Finder . . . . . . . . . . . . . . . . . . . . . . . . . . . . . . . . . . 15
Using the LCD Monitor . . . . . . . . . . . . . . . . . . . . . . . . . . . . . 15
Handling the Lens Cap . . . . . . . . . . . . . . . . . . . . . . . . . . . . . 16
Adjusting the Grip Belt . . . . . . . . . . . . . . . . . . . . . . . . . . . . . 16
Attaching the Shoulder Strap . . . . . . . . . . . . . . . . . . . . . . . . 16
Basic Operations
Recording . . . . . . . . . . . . . . . . . . . . . . . . . . . . . . . . . . . . . . . 17
Checking If the Picture Is Recorded
(Recording Check) . . . . . . . . . . . . . . . . . . . . . . . . . . . . . . 18
Recording Backlit Scenes (Backlight Compensation) . . . . . 1 8
Recording Yourself
(Recording with the LCD Monitor Facing Forward) . . . . . 19
Enlarging Your Subject or Widening the Recording Angle
(Zooming In/Out) . . . . . . . . . . . . . . . . . . . . . . . . . . . . . . . . 20
Enlarging Your Subjects Even More (Digital Zooming) . . . . 21
Using the Movie Camera as a Digital Still Camera
(Photoshot) . . . . . . . . . . . . . . . . . . . . . . . . . . . . . . . . . . . . 22
∫ Progressive Photoshot . . . . . . . . . . . . . . . . . . . . . . . . 23
Recording in the Cinema Mode
(Cinema Mode) . . . . . . . . . . . . . . . . . . . . . . . . . . . . . . . . . 25
Recording with Minimised Camera Shake
(Super Image Stabilizer) . . . . . . . . . . . . . . . . . . . . . . . . . . 26
Viewing the Just Recorded Scenes on the Movie Camera
(Playback) . . . . . . . . . . . . . . . . . . . . . . . . . . . . . . . . . . . . . 27
∫ Adjusting the Sound Volume . . . . . . . . . . . . . . . . . . . . 27
Searching for a Scene That You Want to Play Back. . . . . . 28
Playing Back in Slow Motion (Slow Motion Playback). . . . . 29
Playing Back Still Pictures and Advancing Them One by
One (Still Playback/Still Advance Playback) . . . . . . . . . . 30
Playing Back on a TV (With the Output Terminal Box
[AV ONE TOUCH STATION] Attached) . . . . . . . . . . . . . . 31
After Use . . . . . . . . . . . . . . . . . . . . . . . . . . . . . . . . . . . . . . . . 32
Pages for reference
Pages for reference are indicated with an arrow, for
example: (l 00)
∫ WARNING
≥To reduce the risk of fire or shock hazard and annoying
interference, use only the recommended accessories
and do not expose this equipment to rain or moisture.
Do not remove the cover (or back); there are no user
serviceable parts inside.
Refer servicing to qualified service personnel.
4

Advanced Operations
Notes, Others
Viewing Recorded Scenes During Recording Pause
(Camera Search) . . . . . . . . . . . . . . . . . . . . . . . . . . . . . . . 33
Searching for the End of the Recorded Part on a Cassette
(Blank Search) . . . . . . . . . . . . . . . . . . . . . . . . . . . . . . . . . 34
Searching for the Beginning of Recorded Scenes Marked with
Index Signal (Index Search) . . . . . . . . . . . . . . . . . . . . . . . 35
Fading In/Out . . . . . . . . . . . . . . . . . . . . . . . . . . . . . . . . . . . . 38
Recording in Special Situations (Programme AE). . . . . . . . 39
Recording with Special Effects (Digital Effects) . . . . . . . . . 41
∫ Strobe Multi-Picture Mode . . . . . . . . . . . . . . . . . . . . . . 44
∫ Manual Multi-Picture Mode . . . . . . . . . . . . . . . . . . . . . 45
∫ Picture-in-Picture Mode . . . . . . . . . . . . . . . . . . . . . . . . 47
∫ Wipe Mode . . . . . . . . . . . . . . . . . . . . . . . . . . . . . . . . . . 48
∫ Mix Mode . . . . . . . . . . . . . . . . . . . . . . . . . . . . . . . . . . . 49
Recording with Natural Colours (White Balance) . . . . . . . . 50
Adjusting the White Balance Manually . . . . . . . . . . . . . . . . 51
Focusing on the Subject Manually
(Manual Focus) . . . . . . . . . . . . . . . . . . . . . . . . . . . . . . . . . 52
Adjusting the Shutter Speed Manually. . . . . . . . . . . . . . . . . 53
Adjusting the Iris (F Number) Manually . . . . . . . . . . . . . . . . 54
Playing Back with Special Effects
(Playback Digital Effects) . . . . . . . . . . . . . . . . . . . . . . . . . 55
∫ Strobe Multi-Picture Mode . . . . . . . . . . . . . . . . . . . . . . 56
∫ Manual Multi-Picture Mode . . . . . . . . . . . . . . . . . . . . . 57
∫ Index Multi-Picture Mode . . . . . . . . . . . . . . . . . . . . . . . 58
∫ Multi-Picture Search . . . . . . . . . . . . . . . . . . . . . . . . . . 60
∫ Wipe Function and Mix Function . . . . . . . . . . . . . . . . . 61
Enlarging the Playback Picture (Playback Zoom) . . . . . . . . 62
Adding New Sound on a Recorded Cassette
(Audio Dubbing) . . . . . . . . . . . . . . . . . . . . . . . . . . . . . . . . 63
Using the MultiMediaCard . . . . . . . . . . . . . . . . . . . . . . . . . . 65
Recording Still Pictures on the MultiMediaCard
(Card Photoshot). . . . . . . . . . . . . . . . . . . . . . . . . . . . . . . . 66
Playing Back Pictures Recorded on the MultiMediaCard (Card
Playback) . . . . . . . . . . . . . . . . . . . . . . . . . . . . . . . . . . . . . 68
Erasing Pictures Recorded on the MultiMediaCard. . . . . . . 70
Making the Unusable MultiMediaCard Usable (Formatting) 71
Copying Still Pictures from the MultiMediaCard onto
the Cassette . . . . . . . . . . . . . . . . . . . . . . . . . . . . . . . . . . . 72
Using the Pictures Recorded on the MultiMediaCard on
the Computer . . . . . . . . . . . . . . . . . . . . . . . . . . . . . . . . . . 73
Remote Controller . . . . . . . . . . . . . . . . . . . . . . . . . . . . . . . . 74
∫ Inserting the Button-type Battery. . . . . . . . . . . . . . . . . 78
∫ Using the Remote Controller . . . . . . . . . . . . . . . . . . . . 79
Using the Menu Screen . . . . . . . . . . . . . . . . . . . . . . . . . . . . 94
Menu Functions . . . . . . . . . . . . . . . . . . . . . . . . . . . . . . . . . . 95
Setting the Date and Time . . . . . . . . . . . . . . . . . . . . . . . . . 100
Adjusting the LCD Monitor/Finder . . . . . . . . . . . . . . . . . . . 102
Cautions for Use . . . . . . . . . . . . . . . . . . . . . . . . . . . . . . . . . 103
∫ Condensation . . . . . . . . . . . . . . . . . . . . . . . . . . . . . . . 105
∫ Video Head Clogging and Remedy . . . . . . . . . . . . . . 106
∫ Optimum Use of the Battery . . . . . . . . . . . . . . . . . . . 107
∫ Precautions for Storage. . . . . . . . . . . . . . . . . . . . . . . 108
∫ Other Useful Information . . . . . . . . . . . . . . . . . . . . . . 109
∫ Repeat Playback . . . . . . . . . . . . . . . . . . . . . . . . . . . . 109
∫ Listening to the Playback Sound via Headphones . . 109
Glossary . . . . . . . . . . . . . . . . . . . . . . . . . . . . . . . . . . . . . . . 110
∫ Digital Video System . . . . . . . . . . . . . . . . . . . . . . . . . 110
∫ Focus . . . . . . . . . . . . . . . . . . . . . . . . . . . . . . . . . . . . . 111
∫ White Balance Adjustment . . . . . . . . . . . . . . . . . . . . 113
∫ Colour Temperature. . . . . . . . . . . . . . . . . . . . . . . . . . 114
∫ Progressive Photoshot Function . . . . . . . . . . . . . . . . 115
∫ Time Code . . . . . . . . . . . . . . . . . . . . . . . . . . . . . . . . . 116
∫ Memory Stop Function . . . . . . . . . . . . . . . . . . . . . . . 116
Indications on the LCD Monitor/in the Finder . . . . . . . . . . 117
Before Requesting Service (Problems & Solutions) . . . . . 124
Optional Accessories . . . . . . . . . . . . . . . . . . . . . . . . . . . . . 129
Specifications . . . . . . . . . . . . . . . . . . . . . . . . . . . . . . . . . . . 130
Editing
Using the Output Terminal Box
[AV ONE TOUCH STATION] . . . . . . . . . . . . . . . . . . . . . . 80
Copying onto an S-VHS (or VHS) Cassette
(Dubbing) . . . . . . . . . . . . . . . . . . . . . . . . . . . . . . . . . . . . . 81
Copying with the Help of an Editing Controller . . . . . . . . . . 82
Using the Movie Camera with a Video Printer. . . . . . . . . . . 84
Using the Automatic Printing Function (Autoprint). . . . . . . . 85
Using the Movie Camera with a Computer . . . . . . . . . . . . . 87
5

1.
2.
3.
(VSK0565) (VJA0664)
4. 5. 6.
7.
DEUTSCH ENGLISH
Mitgeliefertes Zubehör
1. Netzadapter (l 10, 11, 104)
Zur Versorgung des Camerarecorders mit Strom.
Zum Aufladen des Akkus.
Gleichstrom-Eingangskabel und Netzkabel
(l 10, 11)
Zum Anschließen des Netzadapters an den
Camerarecorder und an eine Netzsteckdose.
(VEK8925)
ENGLISH
(VSK0561)
(VSB0418) (VEQ2289) (CR2025)
AB
(VJA0788)(VJA1028)
C
(VJA0658)
8. 9.
(VFK1451)
Standard Accessories
1. AC Adaptor (l 10, 11, 104)
To supply power to the Movie Camera.
To charge the Battery.
DC Input Lead and AC Mains Lead (l 10, 11)
To connect the AC Adaptor to the Movie Camera and to
an AC mains socket.
2. Battery Pack (l 11)
2. Akku (l 11)
Zur Versorgung des Camerarecorders mit Strom.
To supply the Movie Camera with power.
3. Remote Controller and Button-Type Battery
3. Fernbedienung und Knopfzelle (l 74, 78, 79)
(l 74, 78, 79)
(VFC2905)
(VFC1792)(VW-MMC4)
4. Anschluß-Box [AV ONE TOUCH STATION]
(l 31, 32, 80)
Ausgestattet mit analogen AV-Buchsen, Edit-Buchse,
Digital-Standbild-Buchse sowie Kopfhörerbuchse.
5. A. AV-Kabel (Cinch - M3)
(l 31, 81)
B. AV-Kabel (Cinch - Cinch)
(l 31, 81)
C. S-Video-Kabel
(l 31, 81, 82, 83, 84, 85)
6. Schultertrageriemen (l 16)
7. MultiMediaCard (l 65, 108)
8. Kopfreinigungs-Cassette (l 106)
9. Reinigungstuch
Zum Reinigen der Objektivlinse und des LCD-Monitors.
4. Output Terminal Box
[AV ONE TOUCH STATION]
Equipped with AV Sockets, Edit Socket, Digital Still
Picture Terminal, and Headphone Socket.
(l 31, 32, 80)
5. A. AV Cable (PHONO - M3) (l 31, 81)
B. AV Cable (PHONO - PHONO) (l 31, 81)
C. S-Video Cable (l 31, 81, 82, 83, 84, 85)
6. Shoulder Strap (l 16)
7. MultiMediaCard (l 65, 108)
8. Digital Video Head Cleaner (l 106)
9. Cleaning Tissue
To clean the Lens and the LCD Monitor.
6

MULTI /P-IN-P
S
ji
SEARCH
FADE
W.B
BLC
6
156
2 3
6
=
DEUTSCH
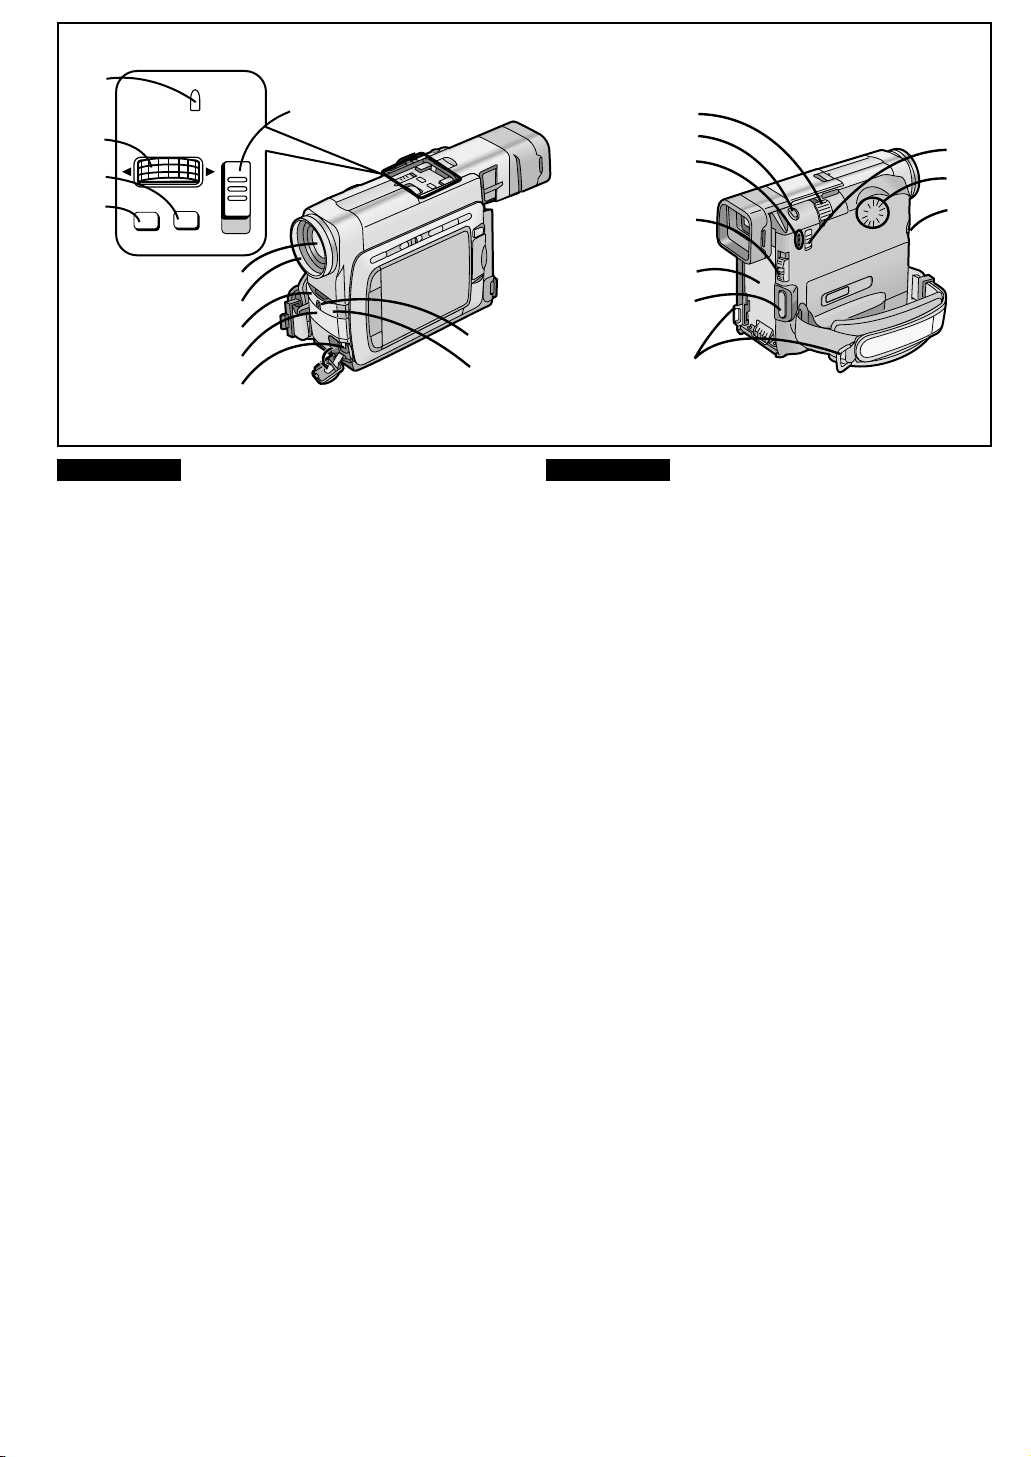
Bedienungselemente und Bauteile
1 Multibild-Taste [MULTI] (l 44, 45, 46, 57, 58, 59, 60)
Bild-im-Bild-Taste [P-IN-P] (l 47)
2 Rückwärts-Suchlauf-Taste [sSEARCH] (l 33, 68)
Rückspul-/Rückwärts-Bildsuchlauf-Taste [6]
(l 27, 28)
Aufnahmeprüf-Taste [S] (l 18)
3 Vorwärts-Suchlauf-Taste [SEARCHr] (l 33, 68)
Vorspul-/Vorwärts-Bildsuchlauf-Taste [5] (l 28)
4 Ein-/Ausblend-Taste [FADE] (l 38)
Stopp-Taste [∫] (l 27, 68)
5 Weißabgleichtaste [W.B] (l 50, 51)
Pausentaste [;] (l 30, 68)
6 Gegenlicht-Taste [BLC] (l 18)
Wiedergabe-Taste [1] (l 27, 68)
7 Okularkorrektur-Regler (l 15)
8 Akku-Entriegelungstaste [BATT. EJECT PUSH]
(l 11)
9 LCD-Monitor-Öffnungshebel [OPENL] (l 15)
: MultiMediaCard-Schlitzabdeckung
; MultiMediaCard-Schlitz (l 65)
< Audio-Video-Ausgangsbuchse [AV OUT]
(m 31, 81, 109)
Wenn ein Kabel an diese Buchse angeschlossen ist, wird
vom eingebauten Lautsprecher des Camerarecorders kein
Ton wiedergegeben.
= LCD-Monitor (l 15)
Aufgrund von technologisch bedingten Beschränkungen
in der LCD-Produktion können auf dem LCD-MonitorBildschirm u. U. einige winzige helle oder dunkle Punkte
sichtbar sein. Dies ist jedoch keine Funktionsstörung,
und diese Punkte werden nicht mit aufgezeichnet.
[CARD] (l 65)
4
π
;
1
7
8
9
:
;
<
ENGLISH
Controls and Components
1 Multi-Picture Button [MULTI]
(l 44, 45, 46, 57, 58, 59, 60)
Picture-in-Picture Button [P-IN-P] (l 47)
2 Reverse Search Button [sSEARCH] (l 33, 68)
Rewind/Review Button [6] (l 27, 28)
Recording Check Button [S] (l 18)
3 Forward Search Button [SEARCHr] (l 33, 68)
Fast Forward/Cue Button [5] (l 28)
4 Fade Button [FADE] (l 38)
Stop Button [∫] (l 27, 68)
5 White Balance Button [W.B] (l 50, 51)
Pause Button [;] (l 30, 68)
6 Backlight Button [BLC] (l 18)
Play Button [1] (l 27, 68)
7 Eyepiece Corrector Lever (l 15)
8 Battery Eject Button [BATT. EJECT PUSH] (l 11)
9 LCD Monitor Open Lever [OPENL] (l 15)
: MultiMediaCard Slot Cover
; MultiMediaCard Slot (l 65)
< Audio-Video Output Socket [AV OUT] (l 31, 81, 109)
When a cable is connected to this socket, the Movie
Camera’s built-in speaker is turned off.
= LCD Monitor (l 15)
Due to limitations in LCD production technology, there
may be some tiny bright or dark spots on the LCD
Monitor screen. However, this is not a malfunction and
does not affect the recorded picture.
[CARD] (l 65)
7
>
AUTO
B
?
@
A
PUSH
SHUTTER/IRIS
MF/VOL/JOG
FOCUS
MENU
AUTO
MNL
C
D
E
F
H
I
G
DEUTSCH ENGLISH
J
K
L
M
N
O
P
Q
R
S
> Automatikmodus-Anzeigelampe [AUTO] (l 17)
Diese Lampe leuchtet auf, wenn Sie den ModusWahlschalter auf [AUTO] einstellen.
? Multifunktions-Regler/Taste [PUSH]
(l 27, 28, 30, 52, 53, 54, 60, 68, 69, 70, 94, 100, 102)
@ Menü-Taste [MENU] (l 94)
A Scharfeinstelltaste [FOCUS] (l 52)
B Modus-Wahlschalter [AUTO/MNL]
(l 17, 39, 50, 51, 52, 53, 54)
C Objektiv
D Sonnenblende (l 109)
E Weißabgleich-Sensor (l 113)
F Mikrofon (eingebaut, Stereo)
G DV-Anschluß (i.LINK) [¥]
Für die Ausgabe von Digital-Signalen.
Diese Buchse mit einem Digital-Video-Gerät verbinden.
„i.LINK“ ist der Name des DV-Anschlusses gemäß
internationaler Norm IEEE1394-1995.
„¥“ ist das Logo auf Produkten, die den „i.LINK“Spezifikationen entsprechen.
Es ist nicht möglich, digitale Signale in diesen
Camerarecorder einzugeben.
H Aufnahme-Anzeigelampe (l 17)
I Fernbedienungs-Sensor (l 79)
J Zoomhebel [W/T] (l 20, 21)
K Standbild-Aufnahmetaste [PHOTO SHOT]
(l 22, 23, 66)
L Betriebsmodus-Lampen
[CAMERA/VCR/CARD P.B] (l 17, 27, 68)
M Aus/Ein- und Modus-Wahlschalter [OFF/ON/MODE]
(l 15, 17, 27, 32, 65, 66, 68)
N Akkuhalterung (l 11, 32)
O Aufnahme-Start-/Stopp-Taste (l 17)
P Halterungen für den Schultertrageriemen (l 16)
Q Band-/Card-Photoshot-Wahlschalter [TAPE/CARD]
(l 66, 72)
R Lautsprecher (l 27)
S Mikrofonbuchse [MIC] (l 109)
Zum Anschließen eines externen Mikrofons oder einer
Stereoanlage. (Durch Anschluß an diese Buchse wird das
eingebaute Mikrofon ausgeschaltet.)
> Auto Mode Lamp [AUTO] (l 17)
This lamp lights when you set the Mode Selector Switch to
[AUTO].
? Multi-Function Dial [PUSH]
(l 27, 28, 30, 52, 53, 54, 60, 68, 69, 70, 94, 100, 102)
@ Menu Button [MENU] (l 94)
A Focus Button [FOCUS] (l 52)
B Mode Selector Switch [AUTO/MNL]
(l 17, 39, 50, 51, 52, 53, 54)
C Lens
D Lens Hood (l 109)
E White Balance Sensor (l 113)
F Microphone (built-in, stereo)
G DV Terminal (i.LINK) [¥]
To output digital signals.
Connect it to digital video equipment.
“i.LINK” is the name of the connector in accordance with
the International Standard IEEE1394-1995.
“ ¥ ” is the logo marked on products conforming with the
“i.LINK” specifications.
Inputting digital signals into this Movie Camera is not
possible.
H Recording Lamp (l 17)
I Remote Control Sensor (l 79)
J Zoom Lever [W/T] (l 20, 21)
K Photoshot Button [PHOTO SHOT] (l 22, 23, 66)
L Operation Mode Lamps
[CAMERA/VCR/CARD P.B] (l 17, 27, 68)
M Off/On Mode Selector Switch [OFF/ON/MODE]
(l 15, 17, 27, 32, 65, 66, 68)
N Battery Holder (l 11, 32)
O Recording Start/Stop Button (l 17)
P Shoulder Strap Holders (l 16)
Q Tape/Card Photoshot Selector [TAPE/CARD] (l 66, 72)
R Speaker (l 27)
S Microphone Socket [MIC] (l 109)
To connect an external microphone or audio equipment.
(Connecting to this socket deactivates the built-in
microphone.)
8

W
T
U
V
]
X
Y
Z
[
\
DEUTSCH
T Handgriff-Riemen (l 16)
U Oberer Cassettenfachdeckel (l 13)
V Cassettenfach-Fenster (l 13)
W Augenmuschel
X Sucher (l 15)
Aufgrund von technologisch bedingten Beschränkungen
in der LCD-Produktion können auf dem Sucherbildschirm
u. U. einige winzige helle oder dunkle Punkte sichtbar
sein. Dies ist jedoch keine Funktionsstörung, und diese
Punkte werden nicht mit aufgezeichnet.
Y Cassettenauswurf-Hebel [OPEN/EJECT] (l 13, 32)
Z Unterer Cassettenfachdeckel (l 13)
[ Multi-Anschluß (l 31, 32, 80)
\ Stativanschluß
Zum Befestigen des Camerarecorders auf einem Stativ
(nicht im Lieferumfang).
] Cassettenhalterung (l 13)
^ Objektivdeckel (l 16, 32, 51)
_ Objektivdeckel-Halterung
^
_
ENGLISH
T Grip Belt (l 16)
U Upper Cassette Compartment Cover (l 13)
V Cassette Compartment Window (l 13)
W Eyecup
X Finder (l 15)
Due to limitations in LCD production technology, there
may be some tiny bright or dark spots on the Finder
screen. However, this is not a malfunction and does not
affect the recorded picture.
Y Cassette Eject Lever [OPEN/EJECT] (l 13, 32)
Z Lower Cassette Compartment Cover (l 13)
[ Multi Terminal (l 31, 32, 80)
\ Tripod Receptacle
To mount the Movie Camera on an optional tripod.
] Cassette Holder (l 13)
^ Lens Cap (l 16, 32, 51)
_ Lens Cap Holder
9
1
4
1
1
3
2
DEUTSCH ENGLISH
5
2
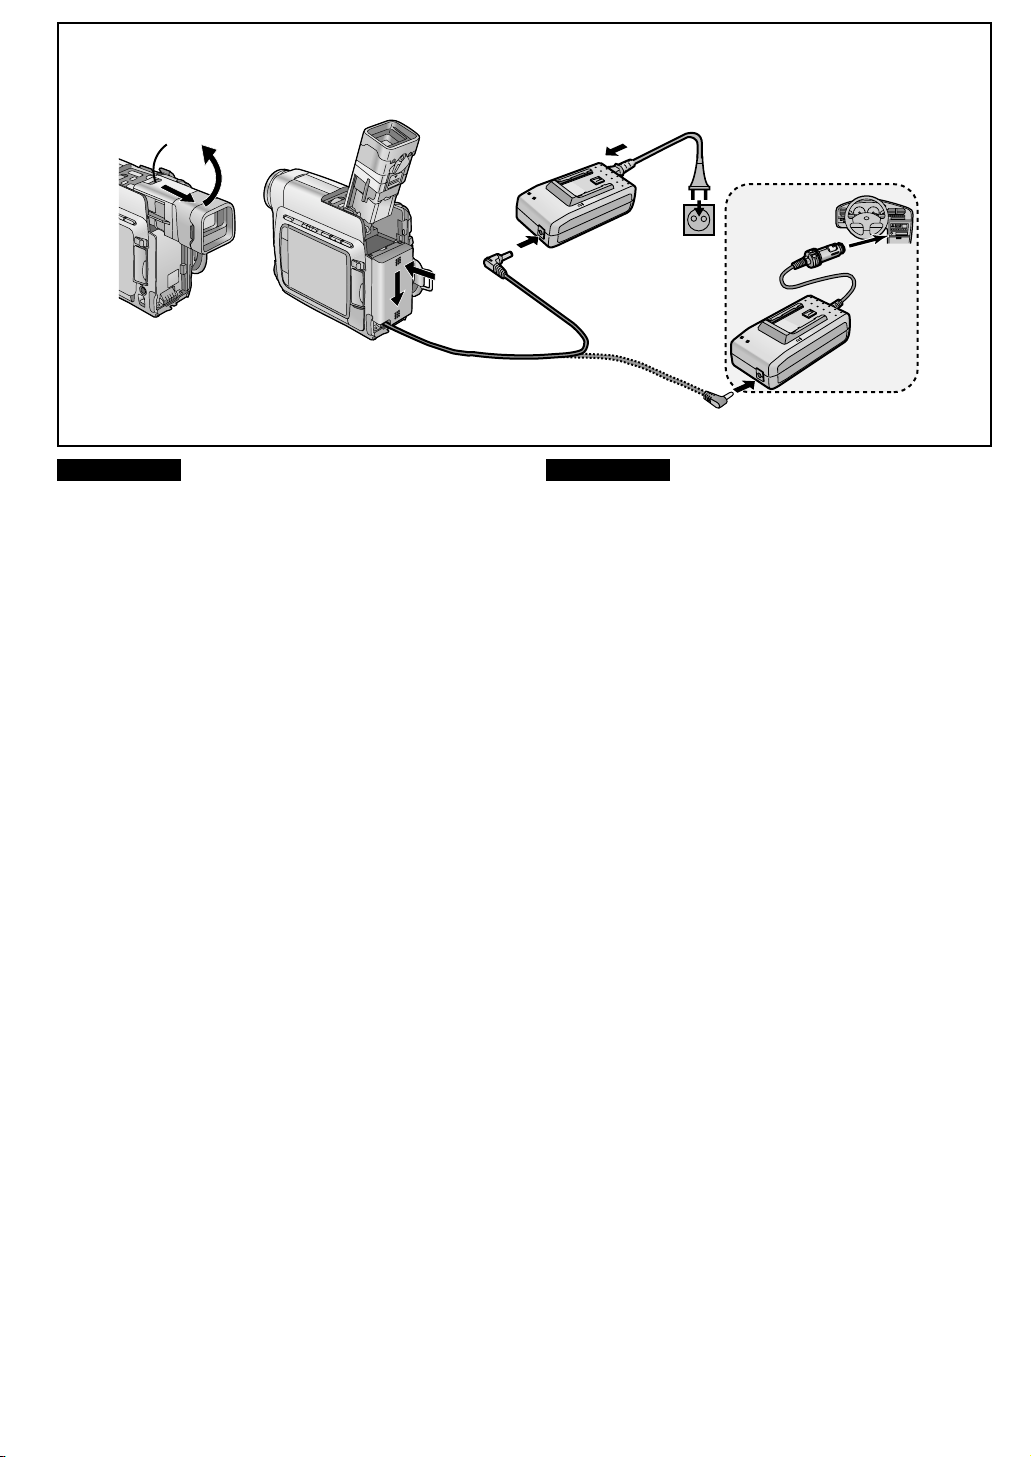
Die 3 Arten der Stromversorgung
1)
Netzadapter 1 (mitgeliefert) zur Stromversorgung von
einer Netzsteckdose
2) Akku-Ladegerät (Autobatterie) 2 (Sonderzubehör) für die
Stromversorgung von der Zigarettenanzünderbuchse
3) Akku (mitgeliefert) (l 11)
∫
Stromversorgung von
einer Netzsteckdose
1 An der leicht vorstehenden Vorderkante 1 des
Suchers mit dem Finger einhaken und den
Sucher bis zum Anschlag nach hinten schieben
und anschließend nach oben schwenken.
Zum Herausziehen des Suchers nicht an der
Augenmuschel ziehen.
2 Den akkuförmigen Stecker des Gleichstrom-
Eingangskabels in die Akkuhalterung am
Camerarecorder einsetzen und nach unten
schieben, bis er mit einem Klick einrastet.
3
Das andere Ende des GleichstromEingangskabels an den Netzadapter anschließen.
4 Das Netzkabel an den Netzadapter anschließen.
5 Das andere Ende des Netzkabels an eine
Netzsteckdose anschließen.
≥Vor dem Anschließen des Netzkabels den Schalter
[OFF/ON/MODE] am Camerarecorder auf [OFF]
einstellen.
≥Bei längerem Einsatz des Camerarecorders erhitzt er
sich; dies ist jedoch normal.
∫ Einsatz des Akku-Ladegerätes (Autobatterie) als
Stromquelle für den Camerarecorder
Der Einsatz des Akku-Ladegerätes (Autobatterie) (VWKBD2E, Sonderzubehör) ermöglicht die Stromversorgung des
Camerarecorders in einem Auto für Aufnahme und
Wiedergabe. Sie können damit auch den Akku des
Camerarecorders aufladen.
≥Nach Gebrauch das Akku-Ladegerät (Autobatterie) von
der Zigarettenanzünderbuchse abziehen.
≥Wenn das Akku-Ladegerät (Autobatterie) bereits vor dem
Anlassen des Motors in die Zigarettenanzünderbuchse
eingesteckt wird, könnte die Sicherung im Stecker u. U.
durchbrennen.
≥Auch die Bedienungsanleitung des Akku-Ladegerätes
(Autobatterie) durchlesen.
The 3 Types of Power Supplies
1) AC Adaptor 1 (supplied) to supply power from an AC
mains socket
2) Car Battery Charger 2
cigarette lighter socket in a vehicle
3) Battery (supplied) (l 11)
∫ Supplying Power from an AC Mains Socket
(optional) to supply power from the
1 Hook your finger on the protruding edge 1
the Finder, slide the Finder backward to its fully
extended position and then tilt it upward.
Do not pull on the Eyecup to extend the Finder.
2 Insert the battery-shaped connector of the DC
Input Lead as shown above into the Battery
Holder on the Movie Camera and slide it
downward until it locks with a click.
3 Connect the other end of the DC Input Lead to
the AC Adaptor.
4 Connect the AC Mains Lead to the AC Adaptor.
5 Connect the other end of the AC Mains Lead to
an AC mains socket.
≥Before disconnecting the AC Mains Lead, set the [OFF/
ON/MODE] Switch on the Movie Camera to [OFF].
≥If you use the Movie Camera for a long time, it
becomes warm. However, this is normal.
∫ Using the Car Battery Charger as Power Source
for the Movie Camera
The use of the Car Battery Charger (VW-KBD2E; optional)
makes it possible to supply power to the Movie Camera in a
car for recording and playback.
It also allows charging the Movie Camera’s Battery.
≥After use, be sure to disconnect the Car Battery Charger
from the cigarette lighter socket.
≥If the Car Battery Charger is already connected to the
cigarette lighter socket when you start the engine, the fuse in
the Car Battery Charger’s plug may blow out.
≥Also read the operating instructions of the Car Battery
Charger.
10
of
1
2
1
3
2
4
DEUTSCH
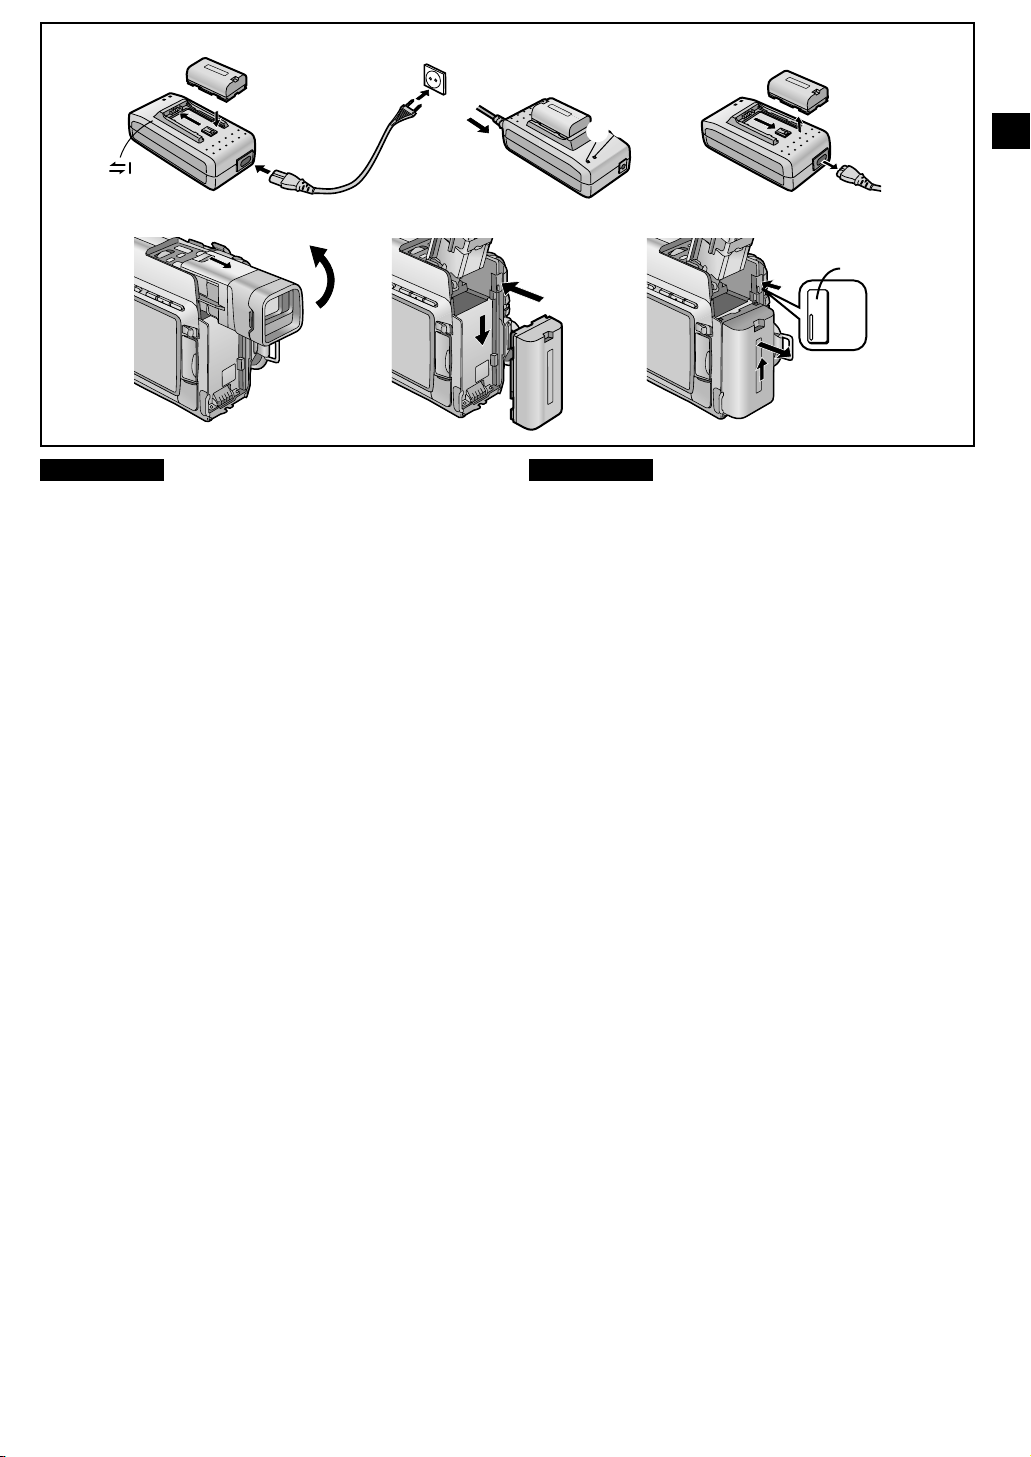
∫ Stromversorgung mit dem Akku
Vor dem Einsatz den Akku vollständig aufladen.
5
1 Den Akku waagerecht bis zum Anschlag
auf den Netzadapter aufschieben, wie oben
gezeigt.
¡Das Gleichstrom-Eingangskabel abziehen.
(Wenn das Gleichstrom-Eingangskabel an den
Netzadapter angeschlossen ist, kann der Akku
nicht aufgeladen werden.
2 Das Netzkabel an den Netzadapter und an eine
Netzsteckdose anschließen.
¡Die Lampe [POWER] 1 leuchtet auf, und die
Lampe [CHARGE] 2 blinkt zuerst für ein paar
Sekunden und leuchtet dann durchgehend, nach
dem der Ladevorgang begonnen hat.
¡Wenn die Ladeanzeigelampe [CHARGE] nicht
blinkt, auch wenn der Akku eingesetzt ist, den
Akku abnehmen und dann erneut anbringen.
¡Wenn die Lampe [CHARGE] erlischt, ist der
Ladevorgang beendet.
3 Zum Abnehmen des Akkus diesen in
entgegengesetzter Richtung zum obigen
Schritt 1 schieben.
≥Auch das Netzkabel aus der Netzsteckdose ziehen.
4 Den Sucher bis zum Anschlag nach hinten
schieben und dann nach oben schwenken.
5 Den Akku in die Akkuhalterung am
Camerarecorder einsetzen und nach unten
schieben, bis er mit einem Klick einrastet.
Abnehmen des Akkus vom Camerarecorder
Die Taste [
gleichzeitig
≥Darauf achten, daß der Akku nicht aus Versehen fallen
gelassen wird.
≥Vor dem Herausnehmen des Akkus den Schalter
[OFF/ON/MODE] auf [OFF] stellen.
»»
» Ladeanz eigelampe [CHARGE]
»»
Blinkt: Während der Akku-Ladezustand
Leuchtet: Während der Akku aufgeladen wird
Aus: Wenn der Akku vollständig aufgeladen ist.
¡Wenn Sie versuchen, einen Akku aufzuladen, der nicht
entladen ist, kann es vorkommen, daß die
Ladeanzeigelampe [CHARGE] kurz blinkt und dann erlischt.
Das bedeutet, daß der Akku vollständig aufgeladen ist und
stellt keine Funktionsstörung dar.
BATT. EJECT PUSH
den Akku nach oben schieben und
überprüft wird
] 3 gedrückt halten und
abnehmen.
3
BATT.
EJECT
PUSH
ENGLISH
∫ Supplying Power with the Battery
Before use, fully charge the Battery.
1 Place the Battery on the AC Adaptor as shown
above and slide it horizontally until it stops.
¡If the DC Input Lead is connected to the AC Adaptor,
disconnect it as charging is not possible otherwise.
2 Securely connect the AC Mains Lead to the AC
Adaptor and an AC mains socket.
¡The [POWER] Lamp 1 lights and then the [CHARGE]
Lamp 2 flashes for a few seconds before it remains lit
and charging starts.
¡If the [CHARGE] Lamp does not flash even though the
Battery is attached, remove the Battery and then reattach it.
¡When the [CHARGE] Lamp goes out, charging is
finished.
3 Remove the Battery by sliding it in the opposite
direction of Step 1 above.
≥Also disconnect the AC Mains Lead.
4 Slide the Finder backward to its fully extended
position and then tilt it upward.
5 Insert the Battery into the Battery Holder on
the Movie Camera and slide it downward until it
locks with a click.
Removing the Battery from the Movie Camera
While pressing the [BATT. EJECT PUSH] Button 3, slide the
Battery upward to remove it.
≥Be careful not to drop the Battery by accident.
≥Before removing the Battery, set the [OFF/ON/MODE]
Switch to [OFF].
»»
» Charge Lamp [CHARGE]
»»
Flashing: During checking of the Battery condition
Lit: During charging
Off: The Battery is fully charged.
≥If you charge the Battery when it is not yet discharged, the
[CHARGE] Lamp may flash briefly and then go out. This
indicates that the Battery is fully charged. Therefore, this is
not an indication of a malfunction.
11

VSB0418
CGR-D120
A
B
C
1 h.
1 h 20 min. (1 h 5 min.)
40 min. (35 min.)
CGP-D210
CGR-D220
CGP-D320
CGR-D815
A
B
C
A
B
C
A
B
C
A
1 h 50 min.
2 h 15 min. (1 h 55 min.)
1 h 10 min. (1 h.)
2 h.
2 h 50 min. (2 h 20 min.)
1 h 25 min. (1 h 10 min.)
3 h 15 min.
4 h 40 min. (4 h 5 min.)
2 h 20 min. (2 h 5 min.)
5 h 20 min.
B
C
4 h 35 min. (3 h 50 min.)
DEUTSCH ENGLISH
Aufladedauer und maximale Aufnahmedauer für
Daueraufnahme
A Aufladedauer
B
Maximale ununterbrochene Aufnahmedauer
CUnterbrochene Aufnahmedauer
(Die unterbrochene Aufnahmedauer gibt die ungefähr
mögliche totale Aufnahmedauer bei wiederholtem
Aufnahmestart und -stopp an.)
≥„1 h 10 min.“ bedeutet „1 Stunde und 10 Minuten“.
≥Das Akku-Modell VSB0418 ist mitgeliefert.
≥Bei den in der obigen Tabelle aufgeführten Zeiten handelt es
sich um Näherungswerte. Die Zeiten in Klammern gelten für
den Aufnahmebetrieb mit LCD-Monitor.
Die obigen zu Ihrer Information angegebenen Zeiten geben
die Aufnahmedauer bei einer Umgebungstemperatur von 20
xC und einer relativen Luftfeuchtigkeit von 60 % an. Bei
niedrigerer oder höherer Temperatur kann eine längere
Aufladedauer nötig sein.
≥Während des Betriebs und des Aufladens kann sich der
Akku erwärmen. Auch der Camerarecorder kann während
des Einsatzes warm werden.
≥Bei oft wiederholtem Aufnahmestart und -stopp ist die
mögliche Aufnahmedauer kürzer als oben angegeben.
≥Wenn Sie den Akku längere Zeit nicht benutzen, bitte
„Vorsichtshinweise für die Aufbewahrung“ (l 108)
durchlesen.
≥Die Akkus CGP-D110 und CGP-D105 können nicht mit
diesem Netzadapter benutzt werden.
Wenn die Lampe [CHARGE] durchgehend blinkt
Falls die Temperatur des Akkus extrem tief oder hoch ist,
blinkt die Lampe [CHARGE] am Netzadapter durchgehend.
Sie blinkt ebenfalls, wenn im Akku oder im Netzadapter ein
Defekt aufgetreten ist. Nähere Einzelheiten dazu finden Sie im
Abschnitt „Hinweise zum Netzadapter“ (l 104).
Benutzen von Sonderzubehör-Akkus, die mit einer
Ladezustands-Markierung ausgestattet sind
Mit Hilfe dieser Markierung lassen sich vollständig aufgeladene
Akkus problemlos von entladenen Akkus unterscheiden.
beispielsweise den geriffelten Schieber so verschieben, daß
für einen vollständig aufgeladenen Akku der rote Punkt (¥) 1
sichtbar ist. (Der mitgelieferte Akku VSB0418 ist jedoch nicht
mit einer Ladezustands-Markierung ausgestattet.)
Dazu
Charging Time and Maximum Time for Continuous
Recording
A Charging Time
B Maximum Continuous Recording Time
C Intermittent Recording Time
(The Intermittent Recording Time indicates the total
recording time possible when you start and stop recording
repeatedly.)
≥“1 h 10 min.” stands for “1 hour and 10 minutes”.
≥The Battery Model VSB0418 is supplied.
≥The times shown in the above chart are approximations. The
figures in parentheses show the recording time when using
the LCD Monitor.
The times listed above for your information indicate the
duration of recording performed at an ambient temperature of
20oC and 60% relative humidity. The charging time may be
longer when you charge the Battery at higher or lower
temperature.
≥During use and charging, the Battery becomes warm. The
Movie Camera, too, becomes warm during use.
≥When you repeatedly stop and restart recording, the
recording time per Battery is shorter than listed above.
≥If you do not use the Battery for a long time, please read
“Precautions for Storage” (l 108).
≥The Battery models CGP-D110 and CGP-D105 cannot be
charged with this AC Adaptor.
When the [CHARGE] Lamp Flashes Continuously
If the temperature of the Battery is extremely low or extremely
high, the [CHARGE] Lamp on the AC Adaptor flashes
continuously. It also flashes continuously when some
malfunction has occurred in the Battery or the AC Adaptor.
For details, read “Notes about the AC Adaptor” (l 104).
Using the Optional Batteries Equipped with Charge
Confirmation Marker
You can use this marker to easily distinguish between
charged and discharged Batteries.
For example, slide the knob so that the red dot (¥) 1 is
visible after the charging is completed. (The Supplied Battery
VSB0418 is not equipped with a Charge Confirmation Marker.)
1
9 h 10 min. (7 h 40 min.)
12
1
2
2
3
1
OPEN/EJECT
4
4
R E C
SAVE
DEUTSCH
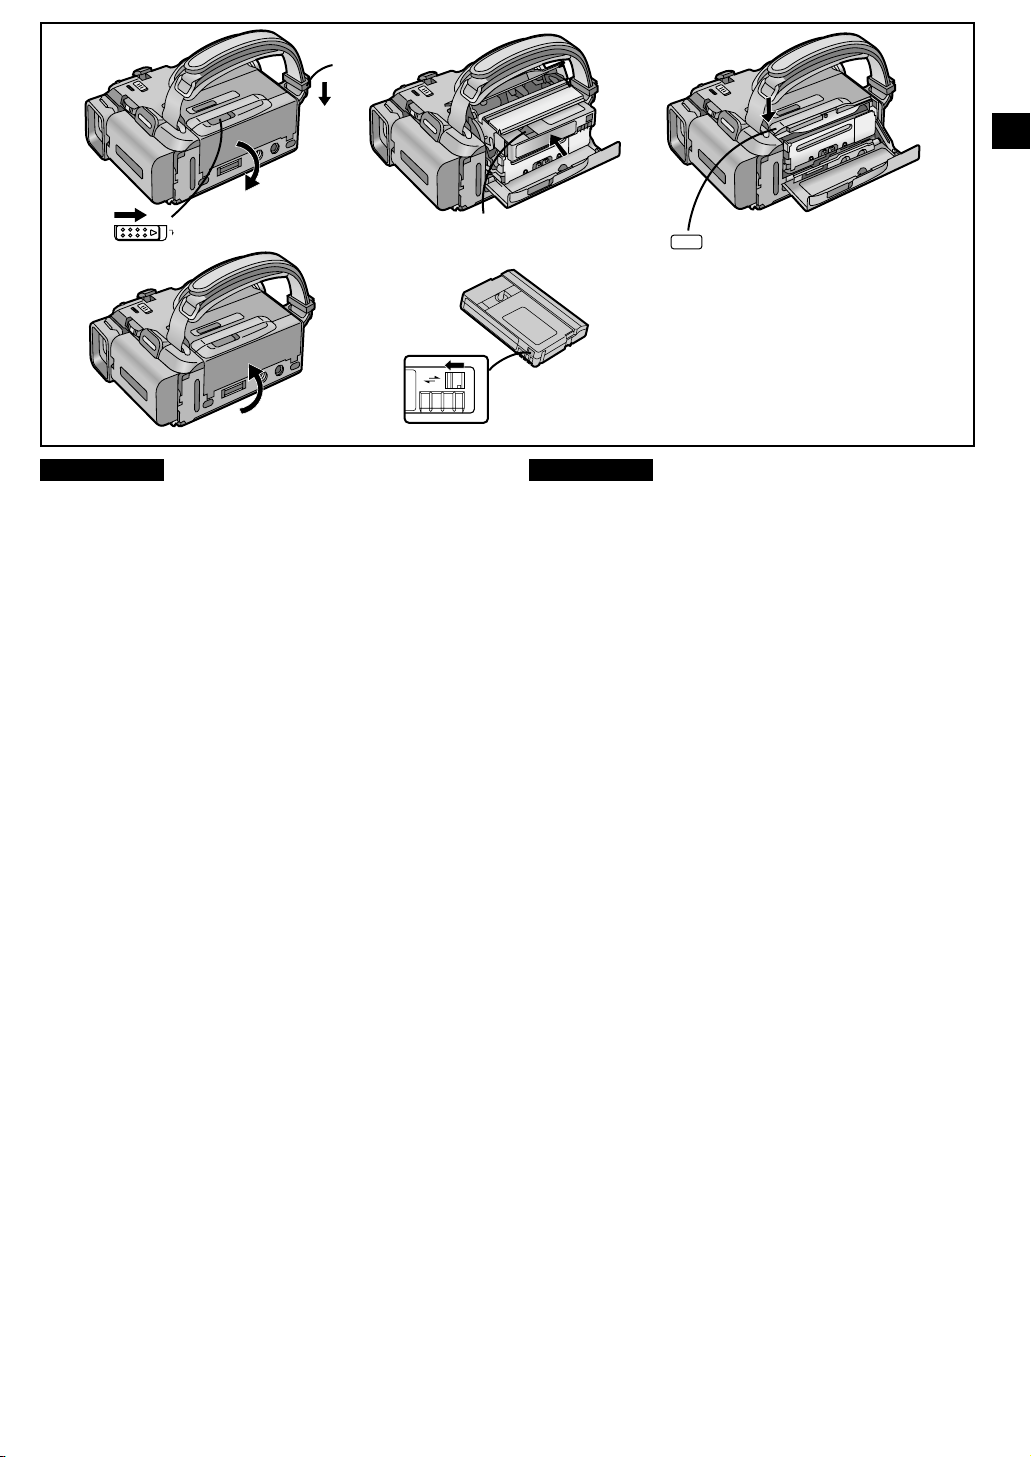
Einsetzen der Cassette
1 Den Hebel [OPEN/EJECT] 1 nach rechts
schieben, so daß er mit einem Klick einrastet,
und dabei gleichzeitig den unteren
Cassettenfachdeckel vollständig öffnen.
Die Cassettenhalterung gleitet heraus.
2 Die Cassette mit ihrem Fenster in der oben
gezeigten Position
Cassettenhalterung einsetzen.
3 in die
3 An der Markierung [PUSH CLOSE] drücken, um
den oberen Cassettenfachdeckel zu schließen.
Die Cassettenhalterung mit der darin eingesetzten
Cassette wird in den Camerarecorder hineingezogen.
Sicherstellen, daß die Cassettenhalterung vollständig
eingefahren ist.
4 Den unteren Cassettenfachdeckel schließen.
≥Wenn der Netzadapter oder der Akku für die
Stromversorgung verwendet wird, kann die Cassette auch
bei ausgeschaltetem Camerarecorder eingesetzt oder
herausgenommen werden.
≥Beim Öffnen oder Schließen des Cassettenfachs immer die
rechteckige Kunststoffschlaufe 2 am Handgriffriemen in
Pfeilrichtung nach unten drücken, damit sie das Öffnen und
Schließen des Cassettenfachs nicht behindert.
≥Beim Einsetzen der Cassette sicherstellen, daß sie richtig
ausgerichtet ist, und sie dann bis zum Anschlag gerade
nach innen schieben.
≥Beim Einsetzen einer Cassette, auf der bereits
aufgenommen wurde, zuerst mit der Funktion
Kamerasuchlauf (l 33) die Position auffinden, ab welcher
die neue Aufnahme gemacht werden soll.
≥Beim Einsetzen einer neuen Cassette das Band zum Anfang
zurückspulen, bevor Sie mit dem Aufnehmen beginnen.
Schutz einer Aufnahme vor unbeabsichtigtem
Löschen
Das Öffnen des Löschschutzschiebers an der Cassette 4 (in
Richtung des Pfeils [SAVE] schieben) verhindert das
Aufnehmen. Um auf eine so geschützte Cassette wieder
aufnehmen zu können, den Löschschutzschieber schließen
(in Richtung des Pfeils [REC] schieben).
3
PUSH
CLOSE
ENGLISH
Inserting the Cassette
1 Slide the [OPEN/EJECT] Lever 1 to the right
until it locks with a click and simultaneously
open the Lower Cassette Compartment Cover
completely.
The Cassette Holder slides out.
2 Insert the cassette with its window in position
3 shown above.
3 Press on the [PUSH CLOSE] mark to close the
Upper Cassette Compartment Cover.
The Cassette Holder with the cassette slides back inside.
Confirm that the Cassette Holder has retracted
completely.
4 Close the Lower Cassette Compartment Cover.
≥If the AC Adaptor or Battery is used to supply power, it is
possible to insert or eject the cassette without turning on the
Movie Camera.
≥When opening or closing the Cassette Compartment, push
down the buckle 2 of the Grip Belt in the direction of the
arrow so that it does not obstruct the opening and closing of
the Cassette Compartment.
≥When inserting the cassette, make sure it faces in the right
direction and then push it in until it stops.
≥When you insert a cassette onto which you have recorded
before, use the Camera Search Function (l 33) to search
for the position from which you want to continue recording.
≥When you insert a new cassette, rewind the tape to the
beginning before starting to record.
Preventing Accidental Erasure of Recordings
Opening the cassette’s erasure prevention slider 4 (sliding it
in the direction of the [SAVE] arrow) prevents recording. To
record again, close the erasure prevention slider (slide it in the
direction of the [REC] arrow).
13

DEUTSCH ENGLISH
ENGLISH
Falls die Cassettenhalterung nicht in den Camerarecorder
hineingezogen wird:
≥An der Markierung [PUSH CLOSE] drücken und den oberen
Cassettenfachdeckel sicher schließen.
≥Den Camerarecorder aus- und dann erneut einschalten.
≥Überprüfen, ob der Akku entladen ist.
Falls die Cassettenhalterung nicht herausgleitet:
≥Den unteren Cassettenfachdeckel vollständig schließen und
dann wieder öffnen.
If the Cassette Holder Does Not Slide Back in
≥Press on the [PUSH CLOSE] mark and close the Upper
Cassette Compartment Cover securely.
≥Turn the Movie Camera off and then on again.
≥Check if the Battery is discharged.
If the Cassette Holder Does Not Slide Out
≥Close the Lower Cassette Compartment Cover completely
and then open it again.
≥Check if the Battery is discharged.
≥Überprüfen, ob der Akku entladen ist.
∫ LP Mode
∫ LP-Modus
Die gewünschte Aufnahmegeschwindigkeit kann mit [REC
SPEED] im Untermenü [OTHER FUNCTIONS] gewählt
werden.
Wenn Sie den Modus LP wählen, ist die mögliche
Aufnahmedauer pro Cassette 1,5 mal so lange wie im SPModus.
Das Aufnehmen im LP-Modus hat keinen negativen Einfluß
auf die Bildqualität. Das Wiedergabebild kann jedoch
mosaikartige Muster enthalten und gewisse Funktionen
können nur beschränkt nutzbar sein.
≥In den folgenden Fällen können mosaikartige Muster im
Wiedergabebild auftreten oder normale Bildwiedergabe ist
nicht möglich:
≥ Wenn eine mit diesem Camerarecorder im LP-Modus
aufgezeichnete Cassette mit einem anderen Digital-VideoGerät wiedergegeben wird.
≥ Wenn eine mit einem anderen Digital-Video-Gerät im LP-
Modus aufgezeichnete Cassette mit diesem
Camerarecorder wiedergegeben wird.
≥ Wenn eine mit diesem Cassettenrecorder im LP-Modus
aufgezeichnete Cassette mit einem anderen Digital-VideoGerät wiedergegeben wird, das nicht mit LP-Modus
ausgestattet ist.
≥ Im Wiedergabe-Modus Zeitlupe oder Einzelbild. (l 29, 30)
≥Beim Einsatz der Kamerasuchlauf-Funktion. (l 33)
≥Da die Aufnahmespur im LP-Modus schmaler ist als die
Kopfbreite, ist es nicht möglich, eine bereits bespielte
Cassette nachzuvertonen (l 63).
The desired recording speed can be selected with [REC
SPEED] on the [OTHER FUNCTIONS] Sub-Menu.
If you select the LP Mode, the possible recording time is
1.5 times as long as in the SP Mode.
Recording in the LP mode does not deteriorate the picture
quality. However, the playback picture may contain mosaiclike patterns and certain functions may be restricted.
≥In the following cases, mosaic-like patterns may appear in
the playback picture, or the picture may not be played back
correctly:
≥ When a cassette recorded in the LP Mode on this Movie
Camera is played back on other digital video equipment.
≥ When a cassette recorded in the LP Mode on other digital
video equipment is played back on this Movie Camera.
≥ When a cassette recorded in the LP Mode on this Movie
Camera is played back on digital video equipment not
featuring the LP Mode.
≥ In the Slow Motion or Still Advance Playback Mode.
(l 29, 30)
≥ When using the Camera Search Function. (l 33)
≥As the recording track width in the LP Mode is smaller than
the head width, recording new sound onto an already
recorded cassette (audio dubbing) (l 63) is not possible.
14
12:30:45
12:30:45
12:30:45
15.10.2000
15.10.2000
15.10.2000
12:30:45
15.10.2000
2
CAMERA
VCR
CARD
P.B
MODE
ON
OFF
3
1, "
1
2
OPEN
#
3
180x
$
90x
4
DEUTSCH
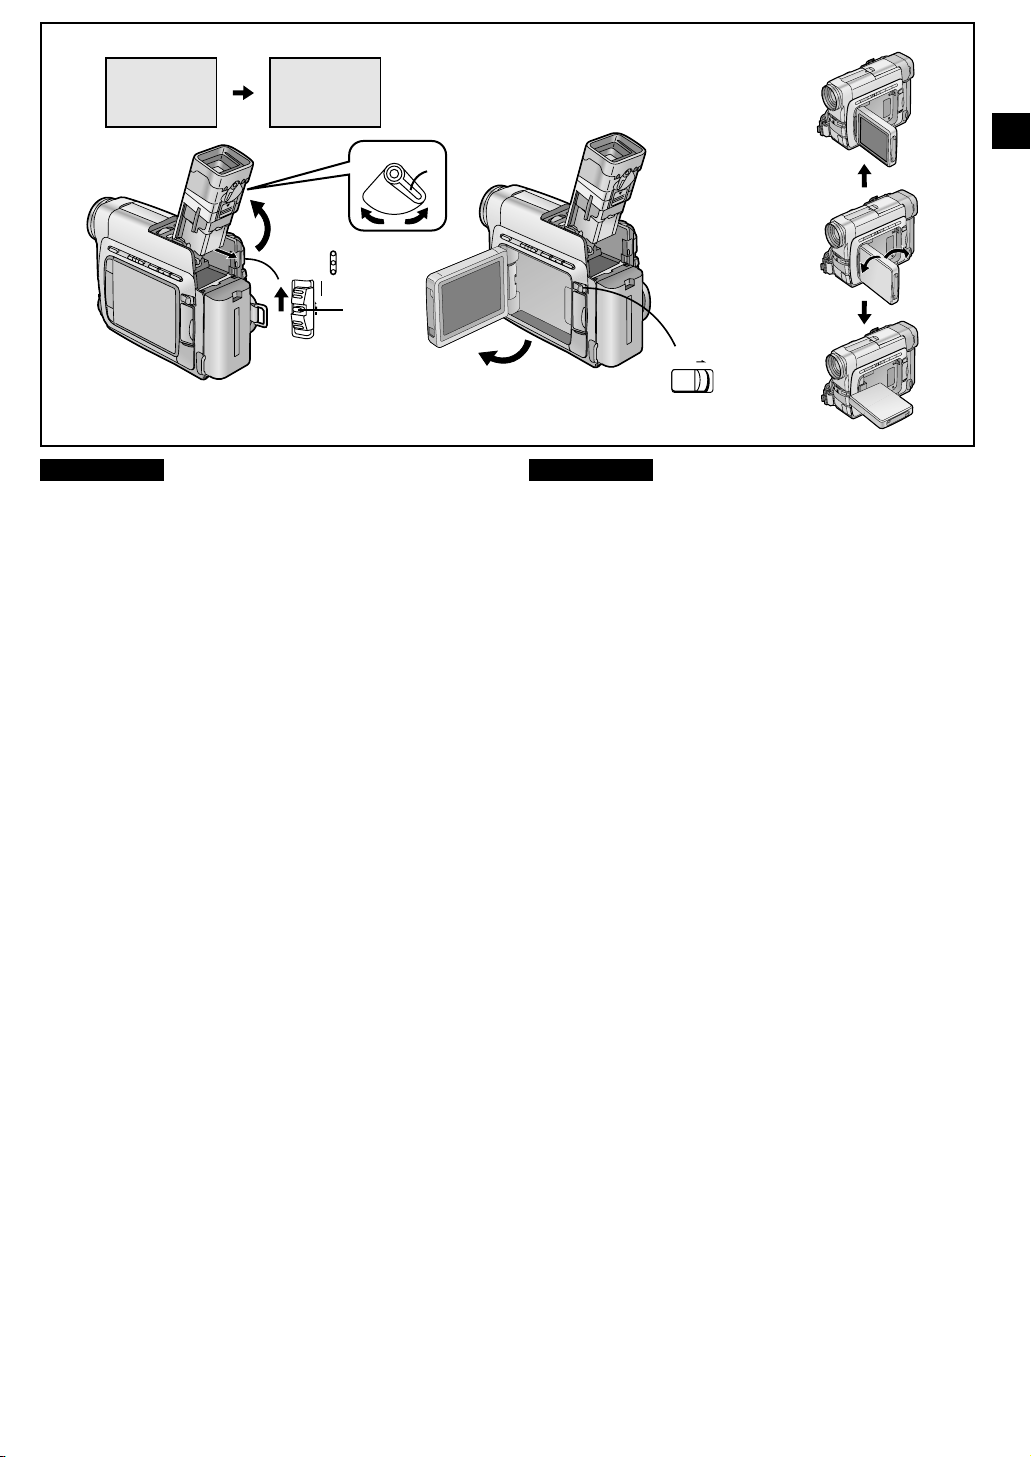
Benutzen des Suchers
Vor dem Benutzen des Suchers diesen präzis so auf die
Sehkraft Ihrer Augen abstimmen, daß die Anzeigen im Sucher
klar und deutlich sichtbar sind.
1 Den Schalter [OFF/ON/MODE] auf [ON] stellen.
Den Knopf 1 im Schalter gedrückt halten und ihn so
verschieben, daß die entsprechende Lampe aufleuchtet.
2 Den Sucher bis zum Anschlag nach hinten
schieben und dann nach oben schwenken.
3 Den Okularkorrektur-Regler 2 nach links oder
rechts drehen, bis die Anzeigen im Sucher klar
und deutlich sind.
Hinweis:
Darauf achten, daß der Sucher nicht direkter
Sonnenbestrahlung ausgesetzt wird. Die Vergrößerungslinse
wirkt wie ein Brennglas und kann den Sucher beschädigen.
Benutzen des LCD-Monitors
Sie können auch aufnehmen, während Sie das Motiv auf dem
geöffneten LCD-Monitor betrachten.
" Den Schalter [OFF/ON/MODE] auf [ON] stellen.
Den Knopf 1 im Schalter gedrückt halten und ihn so
verschieben, daß die entsprechende Lampe aufleuchtet.
# Den Hebel [OPENL] nach hinten schieben und
gleichzeitig den LCD-Monitor um ca. 90° in der
Pfeilrichtung nach außen schwenken.
Der Sucher schaltet automatisch ab.
$ Den Winkel des LCD-Monitors dem
gewünschten Aufnahmewinkel entsprechend
einstellen.
≥Der LCD-Monitor läßt sich aus seiner normalen
senkrechten Stellung um maximal 180° nach oben und
vorne 3 und 90° nach unten 4 drehen. Ein
gewaltsames Drehen über diesen Bereich hinaus
könnte den Camerarecorder ernsthaft beschädigen.
Schließen des LCD-Monitors
Den LCD-Monitor gegen das Camerarecorder-Gehäuse
schwenken, bis er mit einem Klick einrastet.
ENGLISH
Using the Finder
Before using the Finder, adjust it to your eyesight so that the
indications in the Finder are clear and easy to read.
1 Set the [OFF/ON/MODE] Switch to [ON].
While pressing the centre button 1, slide the switch so
that the corresponding Lamp lights.
2 Slide the Finder backward to its fully extended
position and then tilt it upward.
3 Adjust by turning the Eyepiece Corrector Lever
2.
Note:
Do not leave the Finder exposed to direct sunlight, as its
magnifying glass could bundle the light beams and seriously
heat-damage the Finder.
Using the LCD Monitor
You can also record while viewing the picture on the opened
LCD Monitor.
" Set the [OFF/ON/MODE] Switch to [ON].
While pressing the centre button 1, slide the switch so
that the corresponding Lamp lights.
# Slede the [OPENL] Lever and turn out the LCD
Monitor by approximately 90° in the direction of
the arrow.
The Finder turns off.
$ Adjust the angle of the LCD Monitor according
to the recording angle.
≥The LCD Monitor rotates upward a maximum of 180° 3
and downward by a maximum of 90° 4 from its normal
vertical position. Trying to forcefully rotate it beyond this
range could seriously damage the Movie Camera.
Closing the LCD Monitor
Push the LCD Monitor close until it locks with a click.
15

2134
DEUTSCH ENGLISH
1
Handhaben des Objektivdeckels
Bevor Sie mit dem Aufnehmen beginnen, den Objektivdeckel
vom Objektiv abnehmen.
1
Sie können den abgenommen Objektivdeckel
am Handgriffriemen befestigen.
Wenn Sie nicht aufnehmen, sollten Sie den
Objektivdeckel zum Schutz der Objektivlinse immer
aufsetzen.
Hinweis:
Darauf achten, daß das Objektiv nicht direkter
Sonnenbestrahlung ausgesetzt wird. Das Objektiv wirkt wie
ein Brennglas und kann den CCD-Sensor beschädigen.
Verstellen des Handgriffriemens
Sie können den Handgriffriemen auf die Größe Ihrer Hand
einstellen.
2 Die Hand unter dem Handgriffriemen
durchführen und seine Länge der Hand
anpassen. Anschließend das Ende des
Handgriffriemens wieder nach hinten falten und
den Haftbandverschluß sicher schließen.
Beim Öffnen und Schließen des Cassettenfachs die
Schnalle des Handgriffriemens nach unten drücken,
damit sie das Cassettenfach nicht behindert.
Befestigen des Schultertrageriemens
Bevor Sie zum Aufnehmen aus dem Hause gehen, empfiehlt
es sich, den Schultertrageriemen zu befestigen, um den
Camerarecorder gegen Stürze zu sichern.
3 Das Ende des Schultertrageriemens durch die
Halterung für den Schultertrageriemen am
Camerarecorder ziehen.
4 Das Ende des Schultertrageriemens
zurückbiegen und zuerst durch die Schlaufe
und anschließend durch die Schnalle für die
Längenverstellung führen.
Das Ende des Schultertrageriemens sollte mehr als 2 cm
1 über die Schnalle herausragen, so daß es nicht
herausrutschen kann.
Handling the Lens Cap
Before you start recording, remove the Lens Cap.
1 You can attach the removed Lens Cap to the
Grip Belt.
When not actually recording, always attach the Lens Cap
to the Lens to protect it.
Note:
Do not leave the Lens exposed to direct sunlight, as it could
bundle the light beams and seriously heat-damage the CCDSensor.
Adjusting the Grip Belt
You can adjust the Grip Belt to the size of your hand.
2 Pass your hand through the Grip Belt and
adjust its length. Fold back the end of the Grip
Belt to securely fasten the velcro tape closure.
When you open or close the Cassette Compartment,
push down the buckle of the Grip Belt so that it does not
prevent the Cassette Compartment from opening and
closing completely.
Attaching the Shoulder Strap
Before you go recording outside, we recommend that you
attach the Shoulder Strap to prevent the Movie Camera from
dropping accidentally.
3 Pull the end of the Shoulder Strap through the
Shoulder Strap Holder on the Movie Camera.
4 Fold the end of the Shoulder Strap back, pull it
first through the loop and then the Shoulder
Strap Length Adjuster.
Pull it out more than 2 cm 1 from the Shoulder Strap
Length Adjuster so that it cannot slip off.
16

PUSH
AUTO
AUTO
2
REC
RECORD
SHUTTER/IRIS
MF/VOL/JOG
FOCUS
MENU
MNL
2
DEUTSCH
Aufnehmen
Nachdem Sie den Camerarecorder durch Umschalten des
Schalters [OFF/ON/MODE] auf [ON] eingeschaltet und
anschließend den Modus-Wahlschalters auf [AUTO]
eingestellt haben, können Sie ganz einfach durch Drücken der
Aufnahme-Start-/Stopp-Taste mit dem Aufnehmen beginnen.
Der Camerarecorder erledigt dabei die Scharfeinstellung und
den Weißabgleich vollständig automatisch.
1 Den Schalter [OFF/ON/MODE] auf [ON] stellen.
Den Knopf 1 im Schalter gedrückt halten und ihn so
verschieben, daß die Lampe [CAMERA] aufleuchtet.
2 Die Start-/Stopp-Taste drücken.
Die Aufnahme beginnt.
Die Anzeige [RECORD] erscheint kurz und wechselt
dann auf [REC] 2.
Zum Umschalten auf Aufnahmepause:
Die Start-/Stopp-Taste erneut drücken.
Die Anzeige [PAUSE] erscheint. 3
Zum Beenden der Aufnahme:
Den Schalter [OFF/ON/MODE] auf [OFF] stellen.
Es ist nicht nötig, den Knopf im Schalter zu drücken, wenn sie
den Schalter auf [OFF] schieben.
≥Je nach Aufnahmesituation und Beleuchtung sind korrekte
automatische Scharfeinstellung und Weißabgleich u. U. nicht
möglich. In solchen Fällen sollten Sie diese manuell
durchführen.
Scharfeinstellung: (l 52); Weißabgleich: (l 50, 51)
≥Immer zuerst den Objektivdeckel abnehmen, bevor Sie den
Schalter [OFF/ON/MODE] auf [ON] stellen. Falls der
Objektivdeckel noch am Camerarecorder angebracht ist,
wenn die Lampe [CAMERA] leuchtet, ist der automatische
Weißabgleich (l 113) u. U. nicht präzise.
≥Wenn Sie den Camerarecorder länger als 6 Minuten im
Modus Aufnahmepause lassen, schaltet er sich
automatisch aus, um das Band zu schonen und
Akkustrom zu sparen. Um aus diesem Zustand erneut
aufzunehmen, den Schalter [OFF/ON/MODE] zuerst auf
[OFF] und dann wieder auf [ON] stellen.
Aufnahmeanzeigelampe
Die Aufnahmeanzeigelampe 4 leuchtet während der
Aufnahme, damit Ihre Akteure vor dem Camerarecorder
wissen, wann die Aufnahme läuft. Wenn Sie [REC LAMP] im
Untermenü [OTHER FUNCTIONS] auf [OFF] einstellen,
leuchtet die Aufnahmeanzeigelampe nicht mehr.
PAUSE
CAMERA
CARD
VCR
P.B
MODE
ON
OFF
3
PAUSE
1
1
1
4
ENGLISH
Recording
After setting the [OFF/ON/MODE] Switch to [ON] to turn the
Movie Camera on and setting the Mode Selector Switch to
[AUTO], you can start recording simply by pressing the
Recording Start/Stop Button. In this case, the Movie Camera
adjusts the focus and white balance fully automatically.
1 Set the [OFF/ON/MODE] Switch to [ON].
While pressing the centre button 1, slide the switch so
that [CAMERA] Lamp lights.
2 Press the Recording Start/Stop Button.
Recording starts. The [RECORD] Indication appears
briefly and then changes to [REC] 2.
To pause recording:
Press the Recording Start/Stop Button again.
The [PAUSE] Indication appears. 3
To finish recording:
Set the [OFF/ON/MODE] Switch to [OFF].
It is not necessary to press the centre button in order to slide
the switch to [OFF].
≥Depending on the light source and recording situation,
correct automatic focusing and white balance adjustment
may not be possible. In such cases, adjust them manually.
Focus: (l 52); White Balance: (l 50, 51)
≥Be sure to remove the Lens Cap before setting the [OFF/
ON/MODE] Switch to [ON]. If the Lens Cap is still attached
to the Lens when the [CAMERA] Lamp lights, the automatic
white balance adjustment (l 113) may not be precise.
≥If you leave the Movie Camera in the Recording Pause
Mode for more than 6 minutes, it automatically switches
off to protect the tape and to conserve battery power. To
resume recording from this condition, set the [OFF/ON/
MODE] Switch to [OFF] and then to [ON] again.
Recording Lamp (Tally Lamp)
The Recording Lamp lights 4 during recording to let the
people in front of the Movie Camera know that recording is
being performed. If you set [REC LAMP] on the [OTHER
FUNCTIONS] Sub-Menu to [OFF], the Recording Lamp does
not light.
17
S
j i
SEARCH
1
DEUTSCH ENGLISH
ENGLISH
1
6
6
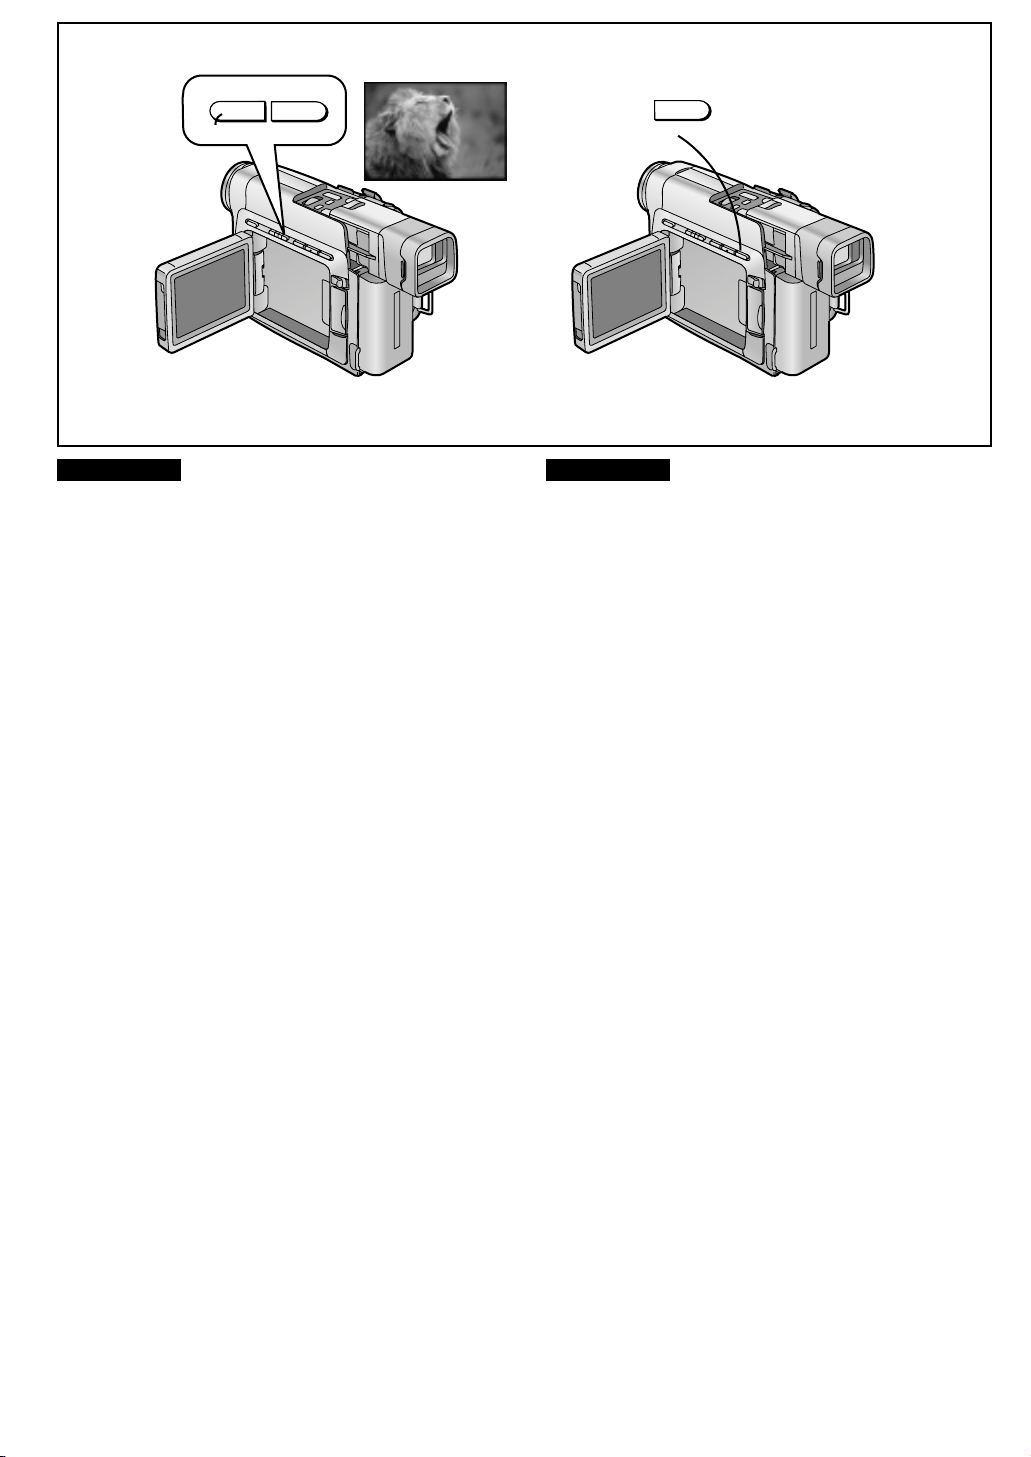
Überprüfen des Endes einer
aufgenommenen Szene
Zum Wiedergeben der letzten paar Sekunden einer eben
aufgenommenen Szene im Aufnahmepause-Modus.
(Aufnahme-Prüfung)
1 Im Aufnahmepause-Modus die Aufnahmeprüf-
Taste [S]
Die Anzeige [CHK] 2 erscheint.
Nach beendeter Aufnahme-Prüfung schaltet der
Camerarecorder wieder auf Aufnahmepause um.
≥Für die Aufnahme-Prüfung muß der Camerarecorder im
gleichen Modus (SP oder LP) sein, wie bei der Aufnahme,
sonst ist das Wiedergabebild gestört.
1 kurz drücken.
CHK
2
Checking If the Picture Is Recorded
(Recording Check)
To play back the final few seconds of the last recorded scene
in the Recording Pause Mode.
1 Press the Recording Check Button [S] 1
briefly in the Recording Pause Mode.
The [CHK] Indication 2 appears.
After checking, the Movie Camera returns to the
Recording Pause Mode.
≥For Recording Check, the Movie Camera must be in the
same mode (SP or LP) as used for recording, otherwise the
playback picture is distorted.
"
BLC
1
Aufnehmen von Szenen mit Gegenlicht
(Gegenlicht-Kompensation)
Zum Verhindern, daß der Bildgegenstand aufgrund von
Gegenlicht zu dunkel aufgenommen wird.
(Wenn sich der Bildgegenstand zwischen dem
Camerarecorder und einer starken Lichtquelle befindet, nennt
man dies Gegenlicht.)
" Die Gegenlicht-Taste [BLC] gedrückt halten.
Das Gegenlicht wird so lange kompensiert, wie Sie die Taste
gedrückt halten, und der Bildgegenstand wird dadurch heller
aufgezeichnet. (Das gesamte Bild wird heller.)
Zurückschalten auf normale Aufnahme
Die Gegenlicht-Taste [BLC] loslassen.
Recording Backlit Scenes
(Backlight Compensation)
To prevent the backlit subject from being recorded very dark.
(Backlight means that the light falls on the subject from
behind, i.e. the subject is between the light source and the
Movie Camera.)
" Keep the Backlight Button [BLC] pressed.
The backlight is being compensated as long as you keep the
Button pressed, and the subject is recorded more brightly.
(The picture brightens up as a whole.)
Returning to Normal Recording
Release the Backlight Button [BLC].
18
1
x
¥
°
DEUTSCH
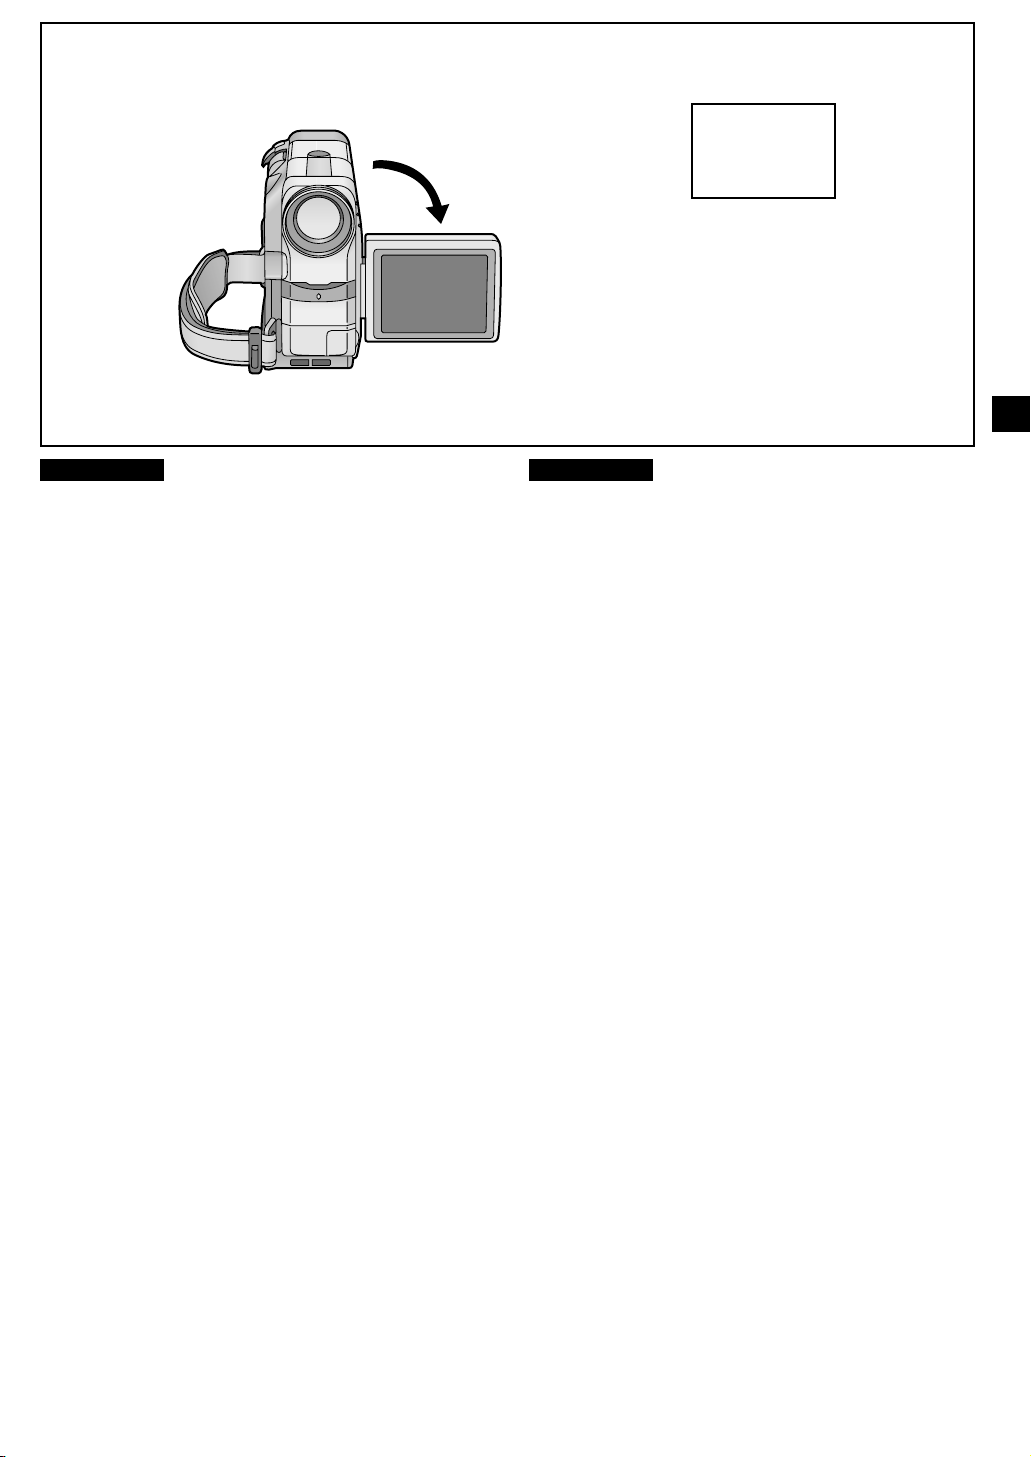
Sich selbst aufnehmen
(Aufnehmen mit nach vorne gerichtetem LCD-Monitor)
Dies ermöglicht es Ihnen, sich selbst aufzunehmen, während
Sie das Bild auf dem LCD-Monitor betrachten, oder den
Personen vor dem Camerarecorder das Bild zu zeigen, das
aufgenommen wird.
1 Den LCD-Monitor öffnen und so drehen, daß
der Bildschirm nach vorne (Objektivseite)
gerichtet ist.
Beim Öffnen des LCD-Monitors schaltet sich der Sucher
automatisch aus. Wenn Sie den LCD-Monitor jedoch
nach vorne richten, erscheint das Bild auch im Sucher.
Auf diese Weise können Sie beim Aufnehmen das Bild
im Sucher betrachten, während die Personen vor dem
Camerarecorder das Bild auf dem LCD-Monitor prüfen
können.
Spiegelbild-Modus für das Bild auf dem LCDMonitor
Da Sie daran gewöhnt sind, sich selbst nur im Spiegel zu
betrachten, kann für Sie das Bild (wie es aufgenommen wird)
ungewohnt und verwirrend wirken, wenn Sie mit nach vorne
gerichtetem LCD-Monitor aufnehmen. Wenn Sie sich lieber
auf dem LCD-Monitor genauso wie im Spiegel sehen
möchten, d. h. seitenverkehrt, [SELFSHOOT] im Untermenü
[DISPLAY SETUP] auf [MIRROR] einstellen. Das Bild wird
aber trotzdem seitenrichtig aufgezeichnet.
Der Spiegelbild-Modus für das Bild auf dem LCD-Monitor kann
nur während einer Aufnahme und im Aufnahmepause-Modus
und mit nach vorne gerichtetem LCD-Monitor benutzt werden.
Er unterscheidet sich auch vom Spiegelbild-Modus der DigitalEffekte 1 (l 41).
≥Im Spiegelbild-Modus werden nur die folgenden Anzeigen
angezeigt:
¥: Aufnahme
¥;: Aufnahmepause
x: Akkuspannung
Wenn die allgemeine Warn-/Alarm-Anzeige [°] erscheint,
sollten Sie den LCD-Monitor nach hinten richten, damit Sie die
effektive Warn-/Alarm-Anzeige überprüfen können.
ENGLISH
Recording Yourself
(Recording with the LCD Monitor Facing Forward)
This makes it possible to record yourself while viewing the
picture on the LCD Monitor or to show the persons in front of
the Movie Camera the picture being recorded.
1 Open the LCD Monitor and turn it so that it
faces forward (lens side).
Opening the LCD Monitor automatically turns off the
Finder. However, when you turn the LCD Monitor
forward, the picture also appears in the Finder.
This lets you aim the Movie Camera and view the picture
in the Finder, while the persons in front of the Movie
Camera can check the picture on the LCD Monitor during
recording.
Mirror Mode for the Picture on the LCD Monitor
You are used to looking at yourself in the mirror. Therefore,
when recording yourself with the LCD Monitor facing forward,
the picture (as it is being recorded) might look unusual and
distracting. If you prefer to see yourself on the LCD Monitor in
the same way as you see yourself in a mirror, i.e. with the
sides reversed, set [SELFSHOOT] on the [DISPLAY SETUP]
Sub-Menu to [MIRROR]. However, the picture will still be
recorded in the normal, non-reversed way.
This Mirror Mode for the picture on the LCD Monitor works
only during recording and in the Recording Pause Mode with
the LCD Monitor facing forward. Also, it is completely different
from the Mirror Mode of the Digital Effects 1 (l 41).
≥In the Mirror Mode, only the following indications are
displayed.
¥: Recording
¥;: Recording Pause
x: Remaining Battery Power
When the General Warning/Alarm Indication [°] appears,
turn the LCD Monitor backward so that you can confirm the
actual Warning/Alarm Indication.
19
1
WT
DEUTSCH ENGLISH
ENGLISH
Den Bildgegenstand oder den
Aufnahmewinkel vergrößern
(Heran- und Zurückzoomen)
Mit Großaufnahmen von Personen und Gegenständen sowie
mit Weitwinkel-Aufnahmen von Gruppen und Landschaften
geben Sie Ihren Videofilmen besondere Wirkung.
1 Den Zoomschieber [W/T] gegen [T] schieben,
um den Bildgegenstand zu vergrößern
(Heranzoomen), oder gegen [W] schieben, um
den Bildgegenstand zu verkleinern bzw. um
den Aufnahmewinkel zu verbreitern
(Zurückzoomen).
≥Die Zoom-Vergrößerungsanzeige erscheint für einige
Sekunden.
≥Je weiter Sie den Zoomhebel [W/T] gegen [W] oder [T]
schieben, desto ist die Zoomgeschwindigkeit.
≥Wenn Sie den Zoomhebel [W/T] im Aufnahmepause-
Modus so weit gegen [W] oder [T] schieben, bis Sie ein
Klicken bemerken, können Sie zwischen 1t und 15t
in extrem schnellen ca. 0,5 Sekunden zoomen.
(Jet-Zoom)
≥Während einer Aufnahme ist das Zoomen von 1t auf
15t in der kurzen Zeit von ungefähr 1,0 Sekunden
möglich. Aber, auch wenn Sie den Zoomhebel [W/T] so
weit schieben, bis Sie ein Klicken bemerken, ist es
nicht möglich, schneller als in 1,0 Sekunden zu
zoomen. Daher wird Ihnen empfohlen, den Zoomhebel
[W/T] nicht ganz bis zum Anschlag zu schieben, da in
diesem Fall ein Klicken aufgenommen werden könnte.
≥Beim extrem schnellen Zoomen kann das Bild u. U.
vorübergehend unscharf werden.
≥Wenn Sie auf Tele-Einstellung zoomen, kann der
Camerarecorder nur auf Gegenstände scharf
einstellen, die mindestens 1,2 Meter entfernt sind.
Aufnehmen von extrem kleinen Gegenständen in
Großaufnahme (Makro-Nahaufnahme)
Wenn die Zoomeinstellung 1t beträgt, kann der
Camerarecorder bis auf eine Mindestentfernung von
ca. 35 mm zwischen Objektiv und Bildgegenstand scharf
einstellen. Dies ermöglicht Großaufnahmen von Insekten,
Blumen und anderen kleinen Bildgegenständen.
Enlarging Your Subject or Widening
the Recording Angle
Recording close-ups of your subjects and recording wideangle shots add special effects to your videos.
1 To record a wider view (Zooming-out):
Push the [W/T] Zoom Lever toward [W].
To enlarge your subject (Zooming-in):
Push the [W/T] Zoom Lever toward [T].
≥The Zoom Magnification Indication appears for a few
seconds.
≥As a general rule, the further you push the [W/T] Zoom
Lever toward [W] or [T], the faster the zooming speed.
≥In the Recording Pause Mode, if you push the [W/T]
Zoom Lever toward [W] or [T] until you feel a click, you
can zoom between 1t and 15t in an extremely fast
0.5 second. (Jet Zoom)
≥During recording, zooming between 1t and 15t is
possible in as short a time as approximately 1.0
second. However, even if you push the [W/T] Zoom
Lever until you feel a click, it is not possible to zoom
faster than in 1.0 second. Therefore, we do not
recommend that you push the [W/T] Zoom Lever all the
way until you feel a click, as a click sound could be
recorded in this case.
≥During very fast zooming, the picture may temporarily
go out of focus.
≥When you have zoomed to the tele setting, precise
focusing is only possible on subjects no closer than
1.2 metres.
Recording Extra Close-up Shots of Small Subjects
(Macro Close-up Function)
When the zoom magnification is 1t, the Movie Camera can
focus on subjects down to a distance of approximately
35 mm between lens and subject. This allows recording very
small subjects such as insects.
1tW
T
5tW
T
15tW
(Zooming In/Out)
T
20

2, 3, 4, 5
AUTO
PUSH
SHUTTER/IRIS
MF/VOL/JOG
FOCUS
MENU
AUTO
MNL
1, 6
30tW
D.ZOOM
T
7
WT
CAMERA FUNCTIONS
1.
CAMERA SETUP
2.
DIGITAL EFFECT
3.
CARD SETUP
4.
MULTI-PICTURES
5.
DISPLAY SETUP
6.
OTHER FUNCTIONS
PRESS MENU TO EXIT
CAMERA SETUP
PROG.AE OFF
PROGRESSIVE
SIS
D.ZOOM
CINEMA
SHTR EFFECT
RETURN ---- YES
PRESS MENU TO EXIT
OFF
OFF
OFF 30 150
OFF
OFF
DEUTSCH
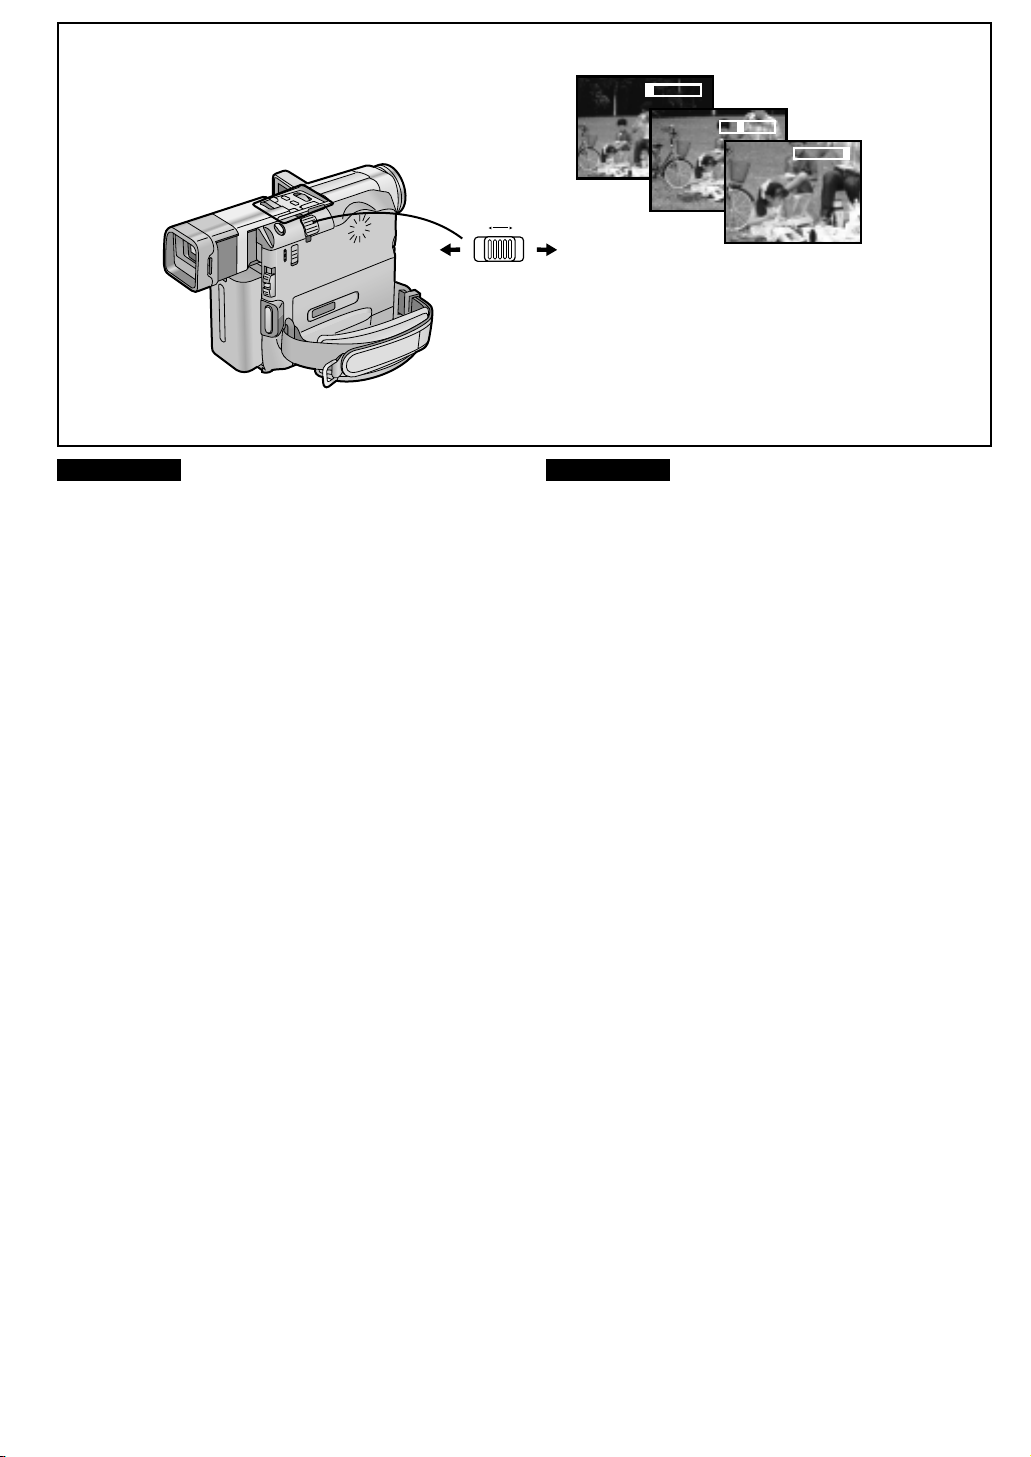
Noch stärkeres Vergrößern des
Bildgegenstandes
Diese Funktion ist praktisch, wenn Sie einen weit entfernten
Bildgegenstand noch weiter vergrößern möchten, als es mit
dem normalen (optischen) Zoom möglich ist, der einen
Vergrößerungsbereich von 1t–15t hat. Bei der Digital-ZoomFunktion haben Sie die Wahl zwischen zwei Bereichen:
entweder bis zu 30t oder bis zu 150t.
(Digital-Zoom)
1 Die Taste [MENU] drücken.
Das Hauptmenü [CAMERA FUNCTIONS] erscheint.
2 Den Regler [PUSH] drehen, um [CAMERA
SETUP] zu wählen.
3 Den Regler [PUSH] drücken.
Das Untermenü [CAMERA SETUP] erscheint.
4 Den Regler [PUSH] drehen, um [D.ZOOM] zu
wählen.
5 Den Regler [PUSH] drücken, um [30t] oder
[150t] zu wählen.
≥30t : Digitales Zoomen bis 30fach
≥150t:Digitales Zoomen bis 150fach
≥Wenn [PROGRESSIVE] im Untermenü [CAMERA SETUP]
auf [ON] eingestellt ist, kann keine dieser Einstellungen
vorgenommen werden.
6 Die Taste [MENU] drücken, um das Menü
auszublenden.
7 Den Zoomhebel [W/T] gegen [W] oder [T]
schieben, um den Bildgegenstand zu
vergrößern oder zu verkleinern.
≥Je höher der Digital-Zoom-Vergrößerungsgrad ist, desto
niedriger ist die Bildqualität.
Ausschalten der Digital-Zoom-Funktion
[D.ZOOM] im Untermenü [CAMERA SETUP] auf [OFF]
einstellen.
≥Wenn Sie auf 15t oder höher (Digital-Zoombereich)
zoomen, während [PROGRESSIVE] im Untermenü
[CAMERA SETUP] auf [AUTO] eingestellt ist, wird der
Progressive Photoshot-Modus automatisch ausgeschaltet.
≥Wenn Sie auf 15t oder höher (Digital-Zoombereich)
gezoomt haben, ist es nicht möglich, den Weißabgleich
manuell vorzunehmen oder einen der Preset-Modi zu
wählen.
ENGLISH
Enlarging Your Subjects Even More
(Digital Zooming)
This function is convenient when you want to enlarge a very
distant subject even more than is possible with the normal
(optical) zoom which offers a magnification range of
1t–15t. For the Digital Zoom Function, you can choose
between up to 30t and up to 150t magnification.
1 Press the [MENU] Button.
The [CAMERA FUNCTIONS] Main-Menu appears.
2 Turn the [PUSH] Dial to select [CAMERA
SETUP].
3 Press the [PUSH] Dial.
The [CAMERA SETUP] Sub-Menu appears.
4 Turn the [PUSH] Dial to select [D.ZOOM].
5 Press the [PUSH] Dial to select [30t] or [150
≥30t: Digital zooming up to 30t.
≥150t: Digital zooming up to 15 0t .
≥If [PROGRESSIVE] on the [CAMERA SETUP] Sub-Menu is
set to [ON], it is not possible to select either of these
settings.
6 Press the [MENU] Button to exit the menu.
7 Push the [W/T] Zoom Lever toward [W] or [T] to
zoom in or out on the subject.
≥The higher the Digital Zoom Magnification is, the lower is the
picture quality.
Cancelling the Digital Zoom Function
Set [D.ZOOM] on the [CAMERA SETUP] Sub-Menu to [OFF].
≥If you zoom to 15t or higher (digital zoom range) when
[PROGRESSIVE] on the [CAMERA SETUP] Sub-Menu is
set to [AUTO], the Progressive Photoshot Mode is
automatically cancelled.
≥When you have zoomed to 15t or higher (digital zoom
range), manually adjusting the white balance or selecting
any of the preset white balance modes is not possible.
21
tt
t].
tt
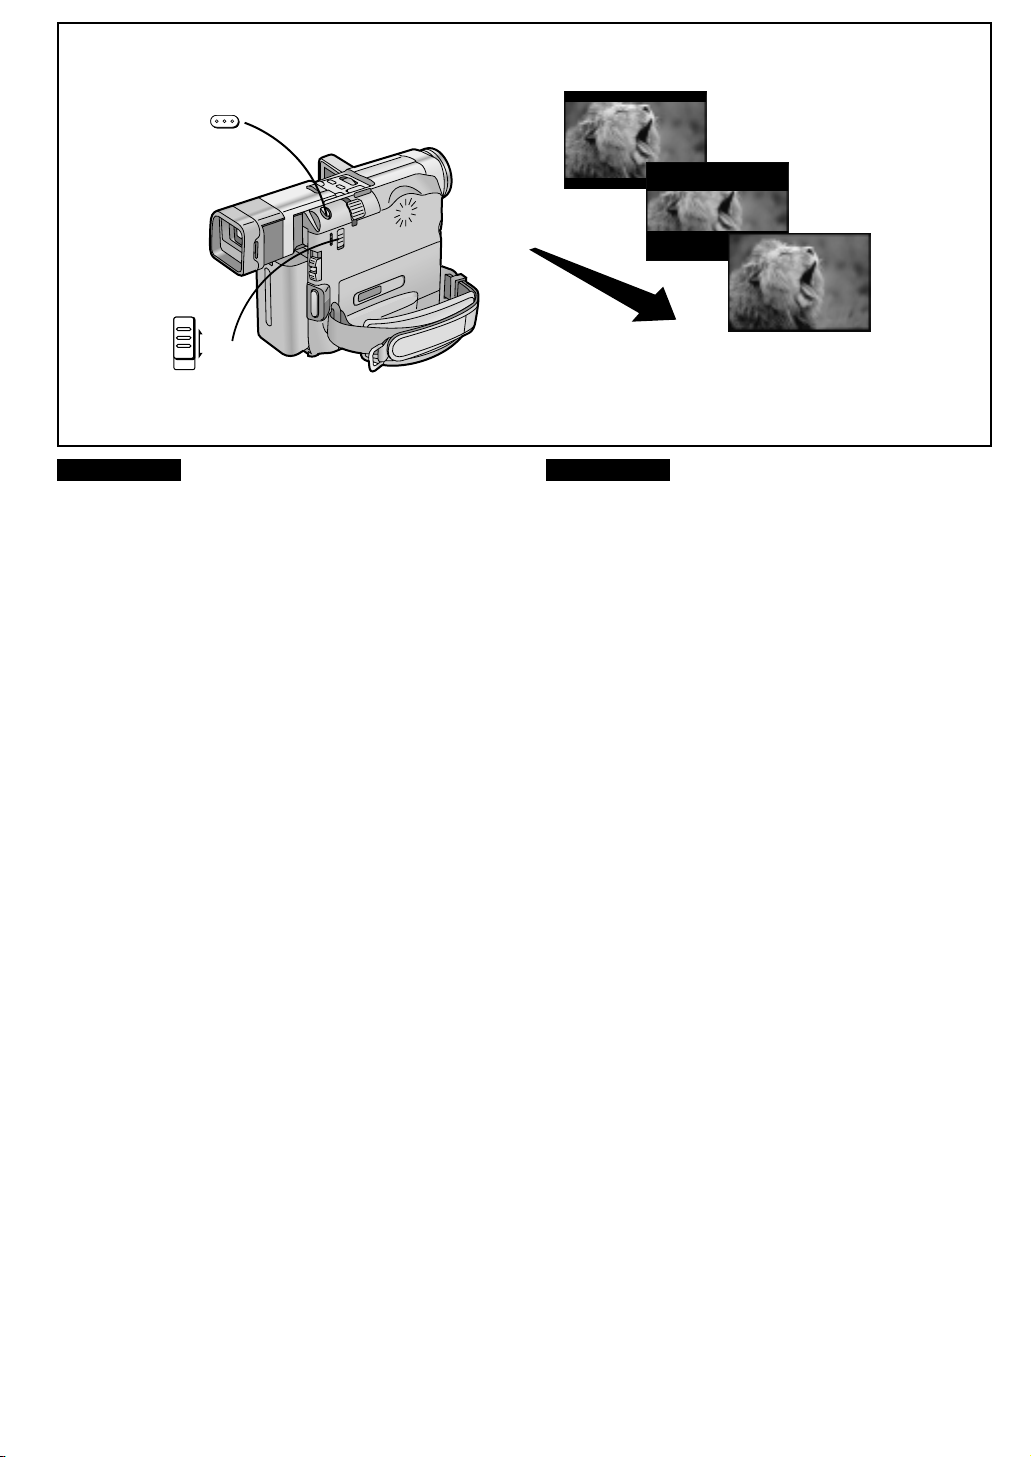
PHOTO
SHOT
1
TAPE
PHOTO
SHOT
CARD
DEUTSCH ENGLISH
ENGLISH
A ufnehmen von Standbildern auf der
Cassette
(Photoshot)
Recording Still Pictures on the
Cassette
PHOTO
(Photoshot)
PHOTO
PHOTO
PHOTO
Mit dieser Funktion können Sie Standbilder je ca. 7 Sekunden
lang zusammen mit laufendem Ton aufnehmen.
1 Im Modus Aufnahmepause die Taste
[PHOTO SHOT] drücken.
Der Camerarecorder nimmt ein Standbild ca. 7
Sekunden lang auf und schaltet dann auf
Aufnahmepause um.
≥Es ist nicht möglich, die Photoshot-Funktion während
einer laufenden Aufnahme zu aktivieren.
≥Wenn Sie [SHTR EFFECT] im Untermenü [CAMERA
SETUP] auf [ON] einstellen, blinkt der Bildschirm kurz,
und ein simuliertes Verschluß-Klickgeräusch ist hörbar,
wenn Sie die Taste [PHOTO SHOT] drücken. Dieser
audiovisuelle Effekt wird ebenfalls mit aufgezeichnet.
≥Mit den Standbildern, die Sie im Photoshot-Modus
aufgenommen haben, können Sie folgendes
durchführen:
≥Index-Suchlauf (l 35, 36, 37)
(Ganz nahe am Bandanfang aufgenommene
Bilder lassen sich damit u. U. nicht finden.)
≥Automatisches Drucken (l 85)
≥Der visuelle Verschlußeffekt und das Klickgeräusch
können u. U. mit geringer Verzögerung nach
Aufnahmebeginn auftreten.
≥Die Bildqualität ist etwas schlechter.
Dauer-Photoshot
Wenn Sie [SHTR EFFECT] im Untermenü [CAMERA SETUP]
auf [ON] einstellen und die Taste [PHOTO SHOT] im
Aufnahmepause-Modus gedrückt halten, nimmt der
Camerarecorder laufend Standbilder im Abstand von 0,7
Sekunden auf, bis Sie die Taste wieder loslassen.
≥Nach dem Loslassen der Taste [PHOTO SHOT] kann u. U.
ein weiteres Standbild aufgezeichnet werden.
≥Da die im Aufnahmemodus kontinuierliches Standbild
aufgenommenen Standbilder nicht mit Photoshot-IndexSignalen markiert sind, ist es nicht möglich, diese mit dem
Photoshot-Index-Suchlauf aufzufinden und mit der AutoPrint-Funktion zu drucken.
≥Wenn [PROGRESSIVE] im Untermenü [CAMERA SETUP]
auf [ON] oder [AUTO] eingestellt ist, kann die DauerPhotoshot-Funktion nicht benutzt werden.
With this function, you can record still pictures with sound for
approximately 7 seconds each.
1 Press the [PHOTO SHOT] Button in the
Recording Pause Mode.
The Movie Camera records a still picture for
approximately 7 seconds and then switches back to the
Recording Pause Mode.
≥It is not possible to use the Photoshot Function during a
normal recording.
≥If you set [SHTR EFFECT] on the [CAMERA SETUP]
Sub-Menu to [ON], the screen blinks briefly and a
simulated shutter click sound can be heard when you
press the [PHOTO SHOT] Button. This audiovisual
effect is also recorded.
≥With the still pictures that you have recorded in the
Photoshot Mode, you can do the following:
≥Index Search (l 35, 36, 37)
(However, searching for the picture(s) recorded
at the
beginning
≥Automatic printing (l 85)
≥The visual shutter effect and click sound may occur
with slight delay after recording of the still picture has
started.
≥The picture quality deteriorates slightly.
Continuous Photoshot
If you set [SHTR EFFECT] on the [CAMERA SETUP] SubMenu to [ON] and keep the [PHOTO SHOT] Button pressed in
the Recording Pause Mode, the Movie Camera automatically
records still pictures successively at intervals of approximately
0.7 seconds until you release the button.
≥One more still picture may be recorded after you release the
[PHOTO SHOT] Button.
≥As the still pictures recorded in the Continuous Photoshot
Mode are not marked with photoshot index signals, they
cannot be located by using the Photoshot Index Search
Function and printed with the Auto Print Function.
≥When [PROGRESSIVE] on the [CAMERA SETUP] Sub-
Menu is set to [ON] or [AUTO], the Continuous Photoshot
Function cannot be used.
22
of the tape may not be possible.)

2, 3, 4
AUTO
PHOTO
CAMERA FUNCTIONS
1.
CAMERA SETUP
2.
DIGITAL EFFECT
3.
CARD SETUP
4.
MULTI-PICTURES
5.
DISPLAY SETUP
6.
OTHER FUNCTIONS
PUSH
SHUTTER/IRIS
MF/VOL/JOG
FOCUS
MENU
AUTO
MNL
1, 5
PHOTO
SHOT
6
DEUTSCH
Aufnehmen von Standbildern auf der
Cassette
∫ Progressive Photoshot
Die Progressive Photoshot-Funktion ermöglicht Standbilder
mit einer höheren Auflösung als die normale PhotoshotFunktion. Dies ist ideal zum Beispiel für Bilder, die mit einem
digitalen Video-Drucker gedruckt oder in einen Computer
übertragen werden sollen.
(Fortsetzung)
TAPE
CARD
PHOTO
SHOT
1 Die Taste [MENU] drücken.
Das Hauptmenü [CAMERA FUNCTIONS] erscheint.
2 Den Regler [PUSH] drehen, um [CAMERA
SETUP] zu wählen, und dann den Regler
[PUSH] drücken.
Das Untermenü [CAMERA SETUP] erscheint.
3 Den Regler [PUSH] drehen, um
[PROGRESSIVE] zu wählen.
4 Den Regler [PUSH] drücken, um [ON] oder
[AUTO] zu wählen.
5 Die Taste [MENU] drücken, um das Menü
auszublenden.
Die Anzeige [æ] erscheint.
6 Die Taste [PHOTO SHOT] im Aufnahmepause-
Modus drücken.
Der Camerarecorder nimmt ein Standbild ca. 7
Sekunden lang auf und schaltet dann zurück auf
Aufnahmepause.
≥Mit der Progressive Photoshot-Funktion werden die
Standbilder mit Progressivabtastung aller Bildzeilen
eines Vollbildes aufgenommen, was ihnen deutlich
gesteigerte Auflösung verleiht. Die Progressive
Photoshot-Funktionen kann jedoch nicht für normale
Videoaufnahmen benutzt werden.
≥Wenn [PROGRESSIVE] im Untermenü [CAMERA
SETUP] auf [ON] oder [AUTO] eingestellt ist, kann die
Dauer-Photoshot-Funktion nicht benutzt werden..
≥Beim Drücken der Taste [PHOTO SHOT] ist ein
Klickgeräusch hörbar. Dies ist jedoch normal und keine
Funktionsstörung.
PRESS MENU TO EXIT
CAMERA SETUP
PROG.AE OFF
PROGRESSIVE
SIS
D.ZOOM
CINEMA
SHTR EFFECT
RETURN ---- YES
PRESS MENU TO EXIT
OFF ON AUTO
OFF
OFF
OFF
OFF
ENGLISH
Recording Still Pictures on the
Cassette
∫ Progressive Photoshot
The Progressive Photoshot Function lets you record still
pictures with higher resolution than the normal Photoshot
Function. This is ideal for example for pictures that you want
to print with a Digital Video Printer or import into a computer.
(Continued)
1 Press the [MENU] Button.
The [CAMERA FUNCTIONS] Main-Menu appears.
2 Turn the [PUSH] Dial to select [CAMERA
SETUP] and then press the [PUSH] Dial.
The [CAMERA SETUP] Sub-Menu appears.
3 Turn the [PUSH] Dial to select [PROGRESSIVE].
4 Press the [PUSH] Dial to select [ON] or [AUTO].
5 Press the [MENU] Button to exit the menu.
The [æ] Indication appears.
6 Press the [PHOTO SHOT] Button in the
Recording Pause Mode.
The Movie Camera records a still picture for
approximately 7 seconds and then switches back to the
Recording Pause Mode.
≥With this function, you can take still pictures that are
recorded as frames with higher resolution. However,
this Frame Mode cannot be used for normal recording
of motion pictures.
≥When [PROGRESSIVE] on the [CAMERA SETUP]
Sub-Menu is set to [ON] or [AUTO], the Continuous
Photoshot Function cannot be used.
≥When you press the [PHOTO SHOT] Button, the Movie
Camera emits a click sound. However, this is normal
and not a malfunction.
23

DEUTSCH ENGLISH
ENGLISH
Hinweise zu den Einstellungen für [PROGRESSIVE]
Wenn die Anzeige [æ] sichtbar ist, können Standbilder im
Progressive Photoshot-Modus aufgenommen werden.
≥Wenn beim Aufnehmen von Standbildern im Progressive
Photoshot-Modus der Einstellpunkt [PROG.AE] im
Untermenü [CAMERA SETUP] auf den Aufnahmemodus
Sport [5] (l 39) oder Porträt [7] (l 39) eingestellt ist,
kann die Bildhelligkeit von Bild zu Bild unterschiedlich sein.
Wenn [PROGRESSIVE] auf [ON] eingestellt ist:
Die Photoshot-Standbilder werden immer im Progressive
Photoshot-Modus aufgezeichnet.
Die folgenden Funktionen lassen sich dabei jedoch nicht
benutzen:
≥Digital-Effekte in [EFFECT1] (l 41)
≥Digital-Zoom [D.ZOOM] (l 21)
≥Verschlußzeiten von 1/750 s und schneller (l 53)
Wenn [PROGRESSIVE] auf [AUTO] eingestellt ist:
In den folgenden Fällen kann die Progressive PhotoshotFunktion nicht benutzt werden:
≥Bei einer Zoomvergrößerung von ca. 15t oder höher.
≥Bei einer Verschlußzeit von 1/750 s oder schneller.
≥Wenn der Einstellpunkt [EFFECT1] auf [WIPE], [MIX],
[STROBE], [GAINUP], [TRACER], [MOSAIC] oder
[MIRROR] eingestellt ist.
≥Wenn ein Bild im Multibild-Modus oder im Bild-im-Bild-
Modus eingeblendet ist.
Notes about the Settings for [PROGRESSIVE]
When the [æ] Indication is displayed, you can use the
Progressive Photoshot Function.
≥When you record a still picture in the Progressive Photoshot
Mode while [PROG.AE] on the [CAMERA SETUP] SubMenu is set to Sports Mode [5] (l 39) or Portrait Mode
[7] (l 39), the picture brightness may vary from picture to
picture.
When [PROGRESSIVE] Is Set to [ON]:
You can always use the Progressive Photoshot Function.
In this case, however, the following functions are deactivated:
≥Digital Effect Modes in [EFFECT1] (l 41)
≥Digital Zoom [D.ZOOM] (l 21)
≥Shutter Speeds of 1/750 s and faster (l 53)
When [PROGRESSIVE] Is Set to [AUTO]:
In the following cases, using the Progressive Photoshot
Function is not possible.
≥When the zoom magnification is approximately 15t or
higher.
≥When the shutter speed is 1/750 s or faster.
≥When [EFFECT1] is set to [WIPE], [MIX], [STROBE],
[GAINUP], [TRACER], [MOSAIC] or [MIRROR].
≥When a picture is displayed in the Multi-Picture Mode or in
the Picture-in-Picture Mode.
24
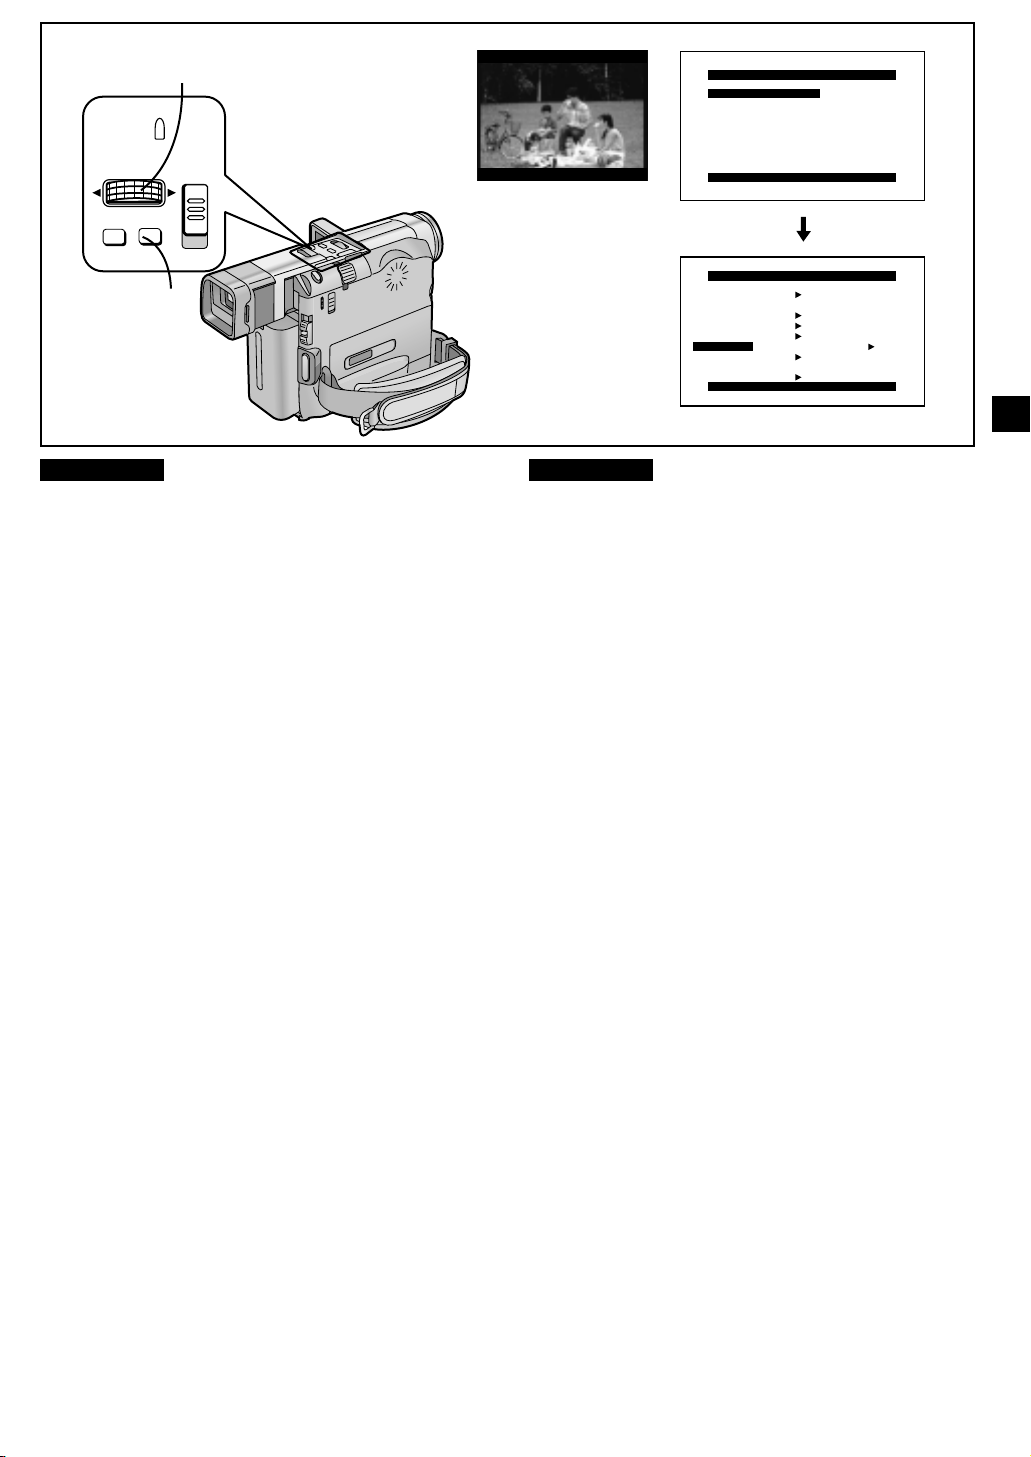
2, 3, 4
AUTO
PUSH
SHUTTER/IRIS
MF/VOL/JOG
FOCUS
MENU
1, 5
AUTO
MNL
1
CINEMA
CAMERA FUNCTIONS
1.
CAMERA SETUP
2.
DIGITAL EFFECT
3.
CARD SETUP
4.
MULTI-PICTURES
5.
DISPLAY SETUP
6.
OTHER FUNCTIONS
PRESS MENU TO EXIT
CAMERA SETUP
PROG.AE OFF
PROGRESSIVE
SIS
D.ZOOM
CINEMA
SHTR EFFECT
RETURN ---- YES
PRESS MENU TO EXIT
OFF
OFF
OFF
OFF ON
OFF
DEUTSCH
Aufnehmen im Kinoformat-Modus
(Kinoformat-Modus)
Dieser Modus ermöglicht das Aufnehmen in einem
kinobildschirm-ähnlichen Breitbild-Format.
1 Die Taste [MENU] drücken.
Das Hauptmenü [CAMERA FUNCTIONS] erscheint.
2 Den Regler [PUSH] drehen, um [CAMERA
SETUP] zu wählen, und dann den Regler
[PUSH] drücken.
Das Untermenü [CAMERA SETUP] erscheint.
3 Den Regler [PUSH] drehen, um [CINEMA] zu
wählen.
4 Den Regler [PUSH] drücken, um [ON] zu
wählen.
Schwarze Balken erscheinen oben und unten auf dem
Bildschirm 1.
5 Die Taste [MENU] drücken, um das Menü
auszublenden.
Ausschalten des Kinoformat-Modus
[CINEMA] im Untermenü [CAMERA SETUP] auf [OFF]
einstellen.
≥Der Aufnahmewinkel wird nicht durch das Benutzen des
Kinoformat-Modus vergrößert.
≥Ein im Multibild-Modus eingeblendetes Bild kann nicht im
Kinoformat-Modus eingeblendet werden.
≥Wenn Sie ein im Kinoformat-Modus aufgenommenes Bild
auf einem Fernseher im Breitbild-Format (16:9)
wiedergeben, wird die Größe des Wiedergabebildes
automatisch dem Fernsehformat angeglichen. Für nähere
Einzelheiten die Bedienungsanleitung des Fernsehgerätes
lesen.
ENGLISH
Recording in the Cinema Mode
(Cinema Mode)
This mode lets you record in the cinema-like wide-screen
format.
1 Press the [MENU] Button.
The [CAMERA FUNCTIONS] Main-Menu appears.
2 Turn the [PUSH] Dial to select [CAMERA
SETUP] and then press the [PUSH] Dial.
The [CAMERA SETUP] Sub-Menu appears.
3 Turn the [PUSH] Dial to select [CINEMA].
4 Press the [PUSH] Dial to select [ON].
Black bars appear at the top and bottom of the screen
1.
5 Press the [MENU] Button to exit the menu.
Cancelling the Cinema Mode
Set [CINEMA] on the [CAMERA SETUP] Sub-Menu to [OFF].
≥Using the Cinema Mode does not widen the recording angle.
≥A picture displayed in the Multi-Picture Mode cannot be
displayed in the Cinema Mode.
≥If you play back the picture recorded in the Cinema Mode on
a wide-screen (16:9) format TV, the size of the playback
picture is automatically adjusted to match the format of the
TV screen. For details, read the TV’s operating instructions.
25
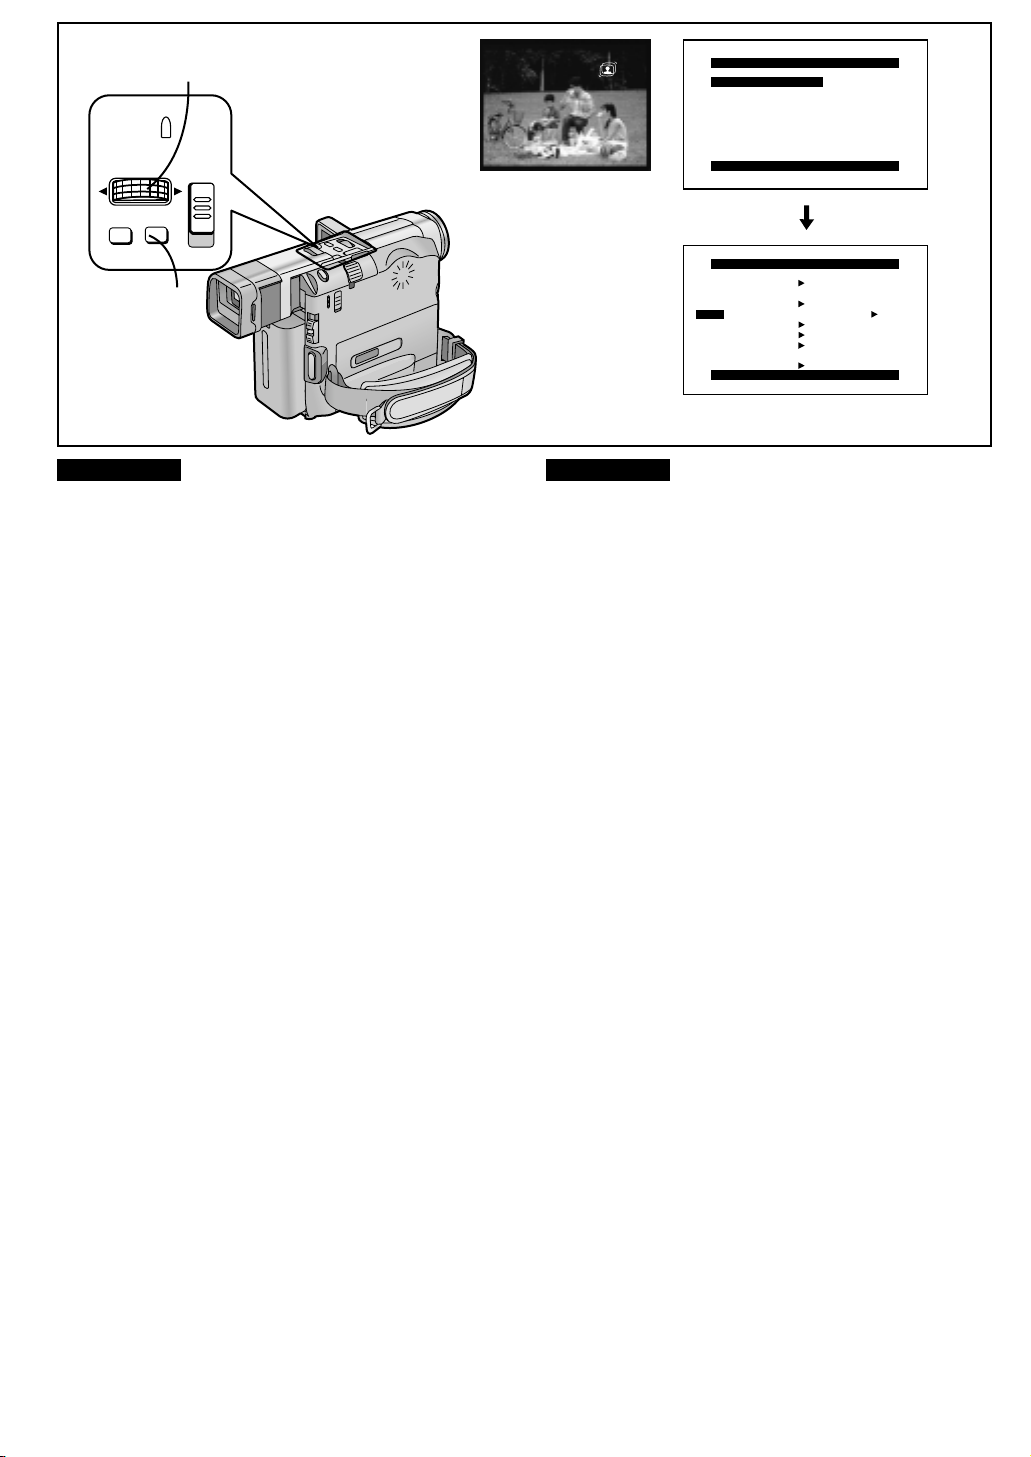
2, 3, 4
AUTO
1
CAMERA FUNCTIONS
1.
CAMERA SETUP
2.
DIGITAL EFFECT
3.
CARD SETUP
4.
MULTI-PICTURES
5.
DISPLAY SETUP
6.
OTHER FUNCTIONS
PUSH
SHUTTER/IRIS
MF/VOL/JOG
FOCUS
MENU
AUTO
MNL
1, 5
DEUTSCH ENGLISH
ENGLISH
Aufnehmen mit minimiertem
Verwackeln
In Aufnahmesituationen, wo Kamerawackeln oft auftritt,
beispielsweise bei Tele-Aufnahmen oder beim Aufnehmen im
Gehen, können Sie mit dieser Funktion das Bild stabilisieren.
¡Bei extrem starkem Kamerawackeln l äßt sich das Bild u. U.
nicht stabilisieren.
(Super-Bildstabilisator)
1 Die Taste [MENU] drücken.
Das Hauptmenü [CAMERA FUNCTIONS] erscheint.
Recording with Minimised Camera
Shake
In recording situations where shaking of the Movie Camera is
likely to happen, for example when you have zoomed in on a
distant subject or when you record while walking, you can use
this function to stabilize the image.
≥In case of very strong camera shake, it may not be possible
to stabilize the picture.
1 Press the [MENU] Button.
The [CAMERA FUNCTIONS] Main-Menu appears.
2 Den Regler [PUSH] drehen, um [CAMERA
SETUP] zu wählen, und dann den Regler
[PUSH] drücken.
Das Untermenü [CAMERA SETUP] erscheint.
3 Den Regler [PUSH] drehen, um [SIS] zu wählen.
4 Den Regler [PUSH] drücken, um [ON] zu
wählen.
5 Die Taste [MENU] drücken, um das Menü
auszublenden.
Die Anzeige [[] 1 erscheint.
≥An einem dunklen Ort funktioniert die Super-Bildstabilisator-
Funktion u. U. nicht. In diesem Fall blinkt die Anzeige [[].
≥Wenn [EFFECT1] im Untermenü [DIGITAL EFFECT] auf
[GAINUP] eingestellt worden ist, kann die SuperBildstabilisator-Funktion nicht benutzt werden. In diesem
Falle blinkt die Anzeige [[].
≥Unter Leuchtstofflampen-Beleuchtung schwankt die
Bildhelligkeit u. U., und die Farben sind möglicherweise
unnatürlich.
≥Das Wiedergabebild kann u. U. durch Nachziehen gestört
werden.
≥Beim Einsatz eines Stativs empfiehlt es sich, die Super-
Bildstabilisator-Funktion auszuschalten.
2 Turn the [PUSH] Dial to select [CAMERA
SETUP] and then press the [PUSH] Dial.
The [CAMERA SETUP] Sub-Menu appears.
3 Turn the [PUSH] Dial to select [SIS].
4 Press the [PUSH] Dial to select [ON].
5 Press the [MENU] Button to exit the menu.
The [[] Indication 1 appears.
≥In a dimly lit place, the Super Image Stabilizer Function may
not work. In this case, the [[] Indication flashes.
≥If [EFFECT1] on the [DIGITAL EFFECT] Sub-Menu has
been set to [GAINUP], the Super Image Stabilizer Function
cannot be used. In this case, the [[] Indication flashes.
≥Under fluorescent lamps, the picture brightness may
fluctuate and the colours may be unnatural.
≥After-image distortion may occur.
≥When you use a tripod, we recommend to turn the Super
Image Stabilizer Function off.
Cancelling the Super Image Stabilizer Function
Set [SIS] on the [CAMERA SETUP] Sub-Menu to [OFF].
PRESS MENU TO EXIT
CAMERA SETUP
PROG.AE OFF
PROGRESSIVE
SIS
D.ZOOM
CINEMA
SHTR EFFECT
RETURN ---- YES
PRESS MENU TO EXIT
(Super Image Stabilizer)
OFF
OFF ON
OFF
OFF
OFF
Ausschalten der Super-Bildstabilisator-Funktion
[SIS] im Untermenü [CAMERA SETUP] auf [OFF] einstellen.
26

2 342 34
S
ji
SEARCH
6
6
FADE
π
W.B
;
BLC
1
AUTO
AUTO
PUSH
PUSH
SHUTTER/IRIS
SHUTTER/IRIS
MF/VOL/JOG
MF/VOL/JOG
FOCUS
MENU
FOCUS
MENU
3
1
1
1
1
CAMERA
VCR
CARD
P.B
MODE
ON
OFF
AUTO
AUTO
MNL
MNL
2
DEUTSCH
Betrachten der soeben
aufgenommenen Szenen auf dem
Camerarecorder
Sie können aufgezeichnete Szenen sofort nach dem
Aufnehmen wiedergeben.
(Wiedergabe)
1 Den Schalter [OFF/ON/MODE] von der Position
[ON] schieben, um den Camerarecorder auf
den Videorecorder-Modus umzuschalten.
≥Die Lampe [VCR] leuchtet.
2 Die Rückspultaste [6] drücken, um das Band
zurückzuspulen.
≥Das Band bis zu der Bandstelle zurückspulen, an der
Sie mit dem Aufnehmen begannen.
≥
Am Bandanfang wird das Rückspulen automatisch gestoppt.
3 Die Wiedergabe-Taste [1] drücken, um die
Wiedergabe zu starten.
4 Zum Stoppen der Wiedergabe:
Die Stopp-Taste [∫] drücken.
∫ Regeln der Lautstärke
Den Regler [PUSH] 1 so lange gedrückt halten,
bis die Anzeige [VOLUME] 2 erscheint. Anschließend den
Regler [PUSH] drehen, um die Lautstärke zu regeln. Nach
beendeter Lautstärke-Einstellung den Regler [PUSH] drücken,
um die Anzeige [VOLUME] wieder auszublenden.
Zum Regeln der Lautstärke mit der Fernbedienung, die Taste
[T] oder [W] so lange drücken, bis die Anzeige [VOLUME]
erscheint. Anschließend die Lautstärke durch Drücken der
Taste [T] anheben, bzw. durch Drücken der Taste [W] senken.
Ein paar Sekunden nach beendeter Einstellung verschwindet
die Anzeige [VOLUME] wieder.
≥Es kann nur die Lautstärke 3 des mit dem eingebauten
Mikrofon aufgenommenen Tons geregelt werden.
≥Wenn die Wiedergabe-Zoom-Funktion benutzt wird, kann die
Lautstärke nicht geregelt werden.
∫ Wiedergabe-Wiederholung
≥Wenn Sie die Wiedergabe-Taste [
gedrückt halten, schaltet der Camerarecorder auf
Wiedergabe-Wiederholung um, und die Anzeige [R !]
erscheint. Zum Ausschalten des Modus WiedergabeWiederholung den Schalter [OFF/ON/MODE] auf [OFF]
drehen.
11
1] länger als 5 Sekunden
11
ENGLISH
Viewing the Just Recorded Scenes on
the Movie Camera
You can play back recorded scenes right after recording.
(Playback)
1 Slide the [OFF/ON/MODE] Switch from the [ON]
position to put the Movie Camera in the VCR
Mode.
≥The [VCR] Lamp lights.
2 Press the Rewind Button [6] to rewind the
tape.
≥Rewind the tape to the point where the recording was
started.
≥If the tape reaches the beginning, rewinding
automatically stops.
3 Press the Play Button [1] to start playback.
4 To stop playback:
Press the Stop Button [∫].
∫ Adjusting the Sound Volume
Keep the [PUSH] Dial 1 pressed until the [VOLUME]
Indication 2 appears. Then, turn the [PUSH] Dial to adjust
the volume. After adjusting, press the [PUSH] Dial to make
the [VOLUME] Indication disappear.
To adjust the volume with the Remote Controller, press the [T]
or [W] Button to make the [VOLUME] Indication appear. You
can then increase the volume by pressing the [T] Button or
decrease it by pressing the [W] Button. A few seconds after
finishing the adjustment, the [VOLUME] Indication disappears.
≥Only the volume of the sound from the Movie Camera’s built-
in speaker 3 can be adjusted.
≥When using the Playback Zoom Function, it is not possible
to adjust the sound volume.
∫ Repeat Playback
≥If you keep the Playback Button [
seconds, the Movie Camera switches over to the Repeat
Playback Mode and the [R !] Indication appears. To cancel
the Repeat Playback Mode, turn the [OFF/ON/MODE]
Switch to [OFF].
11
1] pressed for more than 5
11
27
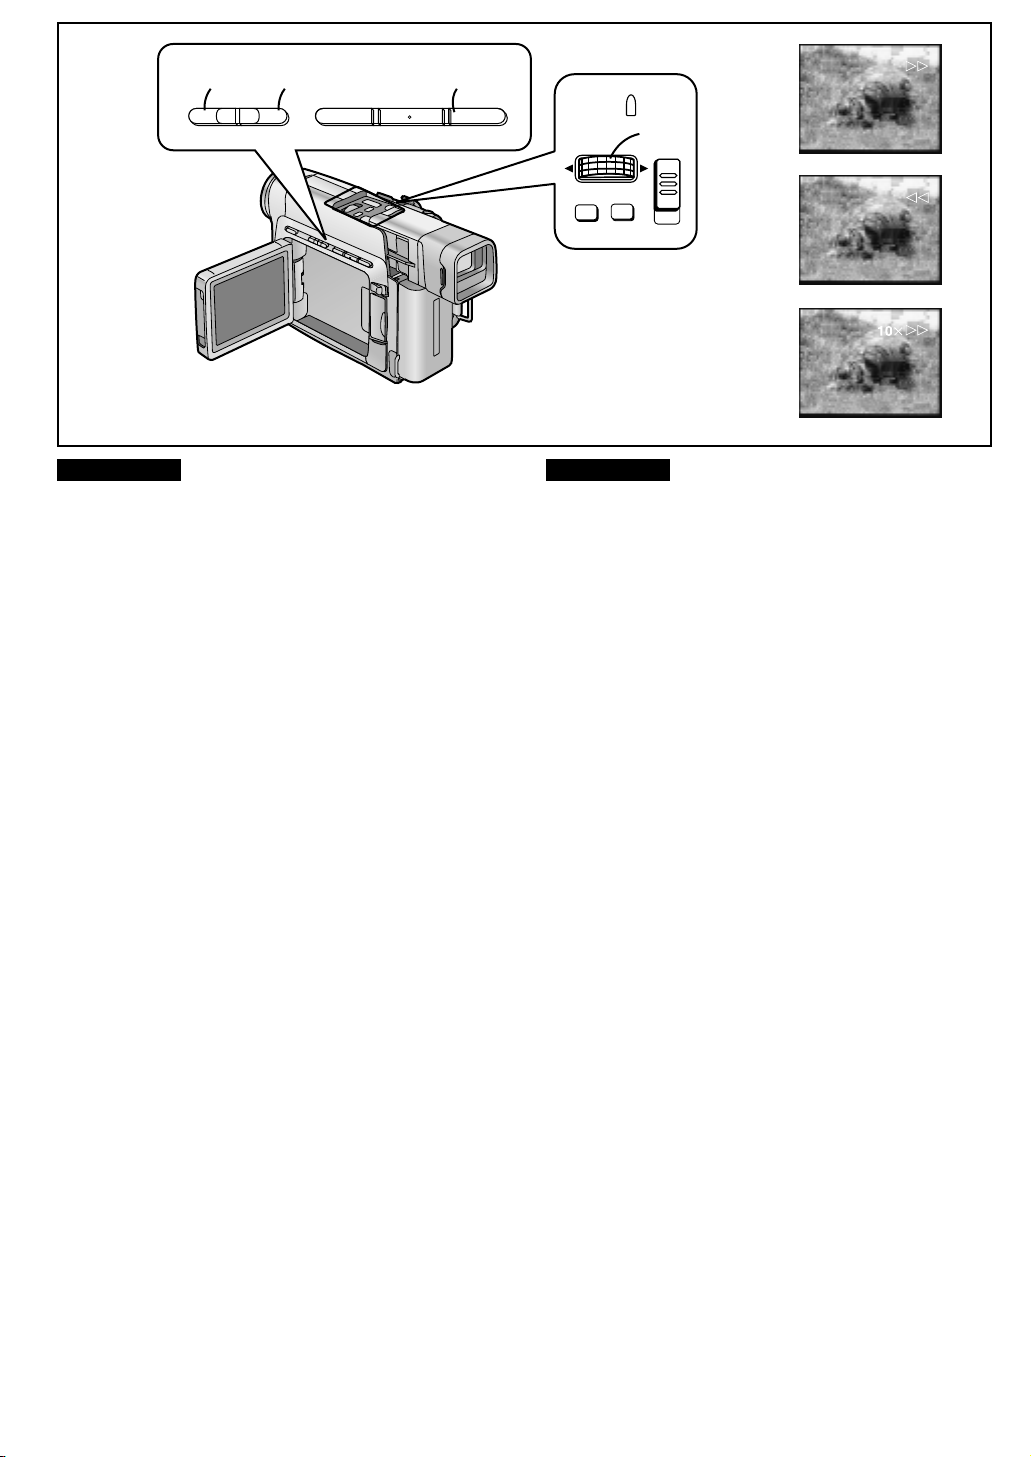
2
2 4 1
S
ji
SEARCH
1
FADE
W.B
BLC
AUTO
A
6
DEUTSCH ENGLISH
ENGLISH
Auffinden einer gewünschten Szene
für die Wiedergabe
Bildsuchlauf vorwärts (Cue) A
Die Vorwärts-Suchlauf-Taste [5] 1 während der
Wiedergabe gedrückt halten.
Bildsuchlauf rückwärts (Review) B
Die Rückwärts-Suchlauf-Taste [6] 2 während der
Wiedergabe gedrückt halten.
Suchlauf-Verriegelungs-Funktion
Für längeren Bildsuchlauf vorwärts (Cue) oder rückwärts
(Review) die Vorwärts-Suchlauf-Taste [5] bzw. die
Rückwärts-Suchlauf-Taste [6] nur kurz drücken. Dadurch
wird die entsprechende Funktion verriegelt, und die Taste
muß nicht dauernd gedrückt gehalten werden.
≥Zum Zurückschalten auf normale Wiedergabe, die
Wiedergabe-Taste [1] drücken.
≥Beim Bildsuchlauf vorwärts (Cue) und rückwärts (Review)
können Bilder mit schnellen Bewegungen mosaikartige
Muster enthalten.
Hyper-Check-Funktion
≥Wenn Sie während dem Vorspulen die Vorspultaste [5]
oder während dem Rückspulen die Rückspultaste [6]
drücken, schaltet der Camerarecorder so lange auf
Bildsuchlauf vorwärts (Cue) bzw. Bildsuchlauf rückwärts
(Review) um, wie Sie die Taste gedrückt halten.
≥Am Anfang und Ende des Bildsuchlaufs vorwärts oder
rückwärts treten u. U.
Bildsuchlauf mit variabler Geschwindigkeit C
Beim Bildsuchlauf vorwärts (Cue) und rückwärts (Review)
können Sie zwischen verschiedenen Geschwindigkeiten wählen.
1 Die Wiedergabe-Taste [1] während der
Wiedergabe drücken.
2
Den Regler [PUSH] drehen, um die
Suchlauf-Geschwindigkeit zu wählen.
Der Suchlauf mit variabler Geschwindigkeit bietet die
folgenden 6 Wiedergabe-Geschwindigkeiten sowohl in
Vorwärts- als auch in Rückwärtsrichtung: 1/5fache (Zeitlupe
nur im SP-Modus), 1/3fache (Zeitlupe nur im LP-Modus),
1fache, 2fache, 5fache, 10fache, 20fache Geschwindigkeit.
Zurückschalten auf normale Wiedergabe
Die Wiedergabe-Taste [1] drücken. Die Wiedergabe läuft mit
normaler Geschwindigkeit weiter.
≥Während des Bildsuchlaufs mit variabler Geschwindigkeit
erscheinen mosaikartige Muster im Bild.
≥Während des Bildsuchlaufs mit variabler Geschwindigkeit
bleibt der Ton abgeschaltet.
6
π
vorübergehend Bildstörungen
;
gewünscht
auf.
1
PUSH
SHUTTER/IRIS
MF/VOL/JOG
FOCUS
Searching for a Scene That You Want
to Play Back
Cue Playback A
Keep the Cue Button [5] 1 pressed during playback.
Review Playback B
Keep the Review Button [6] 2 pressed during playback.
Search Lock Function
For longer Cue or Review Playback, press the Cue Button
[5] or the Review Button [6] only briefly. As this locks the
search function, you do not need to keep the button pressed
for a long time.
≥To resume normal playback, press the Play Button [1].
≥In Cue and Review Playback, pictures with fast-moving
subjects may contain mosaic-like patterns.
Hyper Check Function
≥If you press the Fast-forward Button [5] during fast-
forwarding of the tape or the Rewind Button [6] during
rewinding of the tape, Cue Playback or Review Playback
continues for as long as you keep the Button pressed.
≥At the beginning and end of Cue Playback or Review
Playback, some momentary picture distortion may occur.
Variable Speed Search Function C
It is possible to change the speed of Cue Playback or Review
Playback.
1 Press the Play Button [1] during playback.
2 Turn the [PUSH] Dial to select the desired
search speed.
The Variable Speed Search Function offers the following 6
e
different playback speeds both in forward and reverse
directions: 1/5t (slow playback in SP Mode only), 1/3t (slow
playback in LP Mode only), 1t, 2t, 5t, 10t, 20t
Returning to Normal Playback
Press the Play Button [1].
Playback continues at normal speed.
≥During Variable Speed Search, mosaic-like patterns appear
in the picture.
≥When using the Variable Speed Search Function, the sound
is muted.
28
MENU
2
AUTO
MNL
B
C
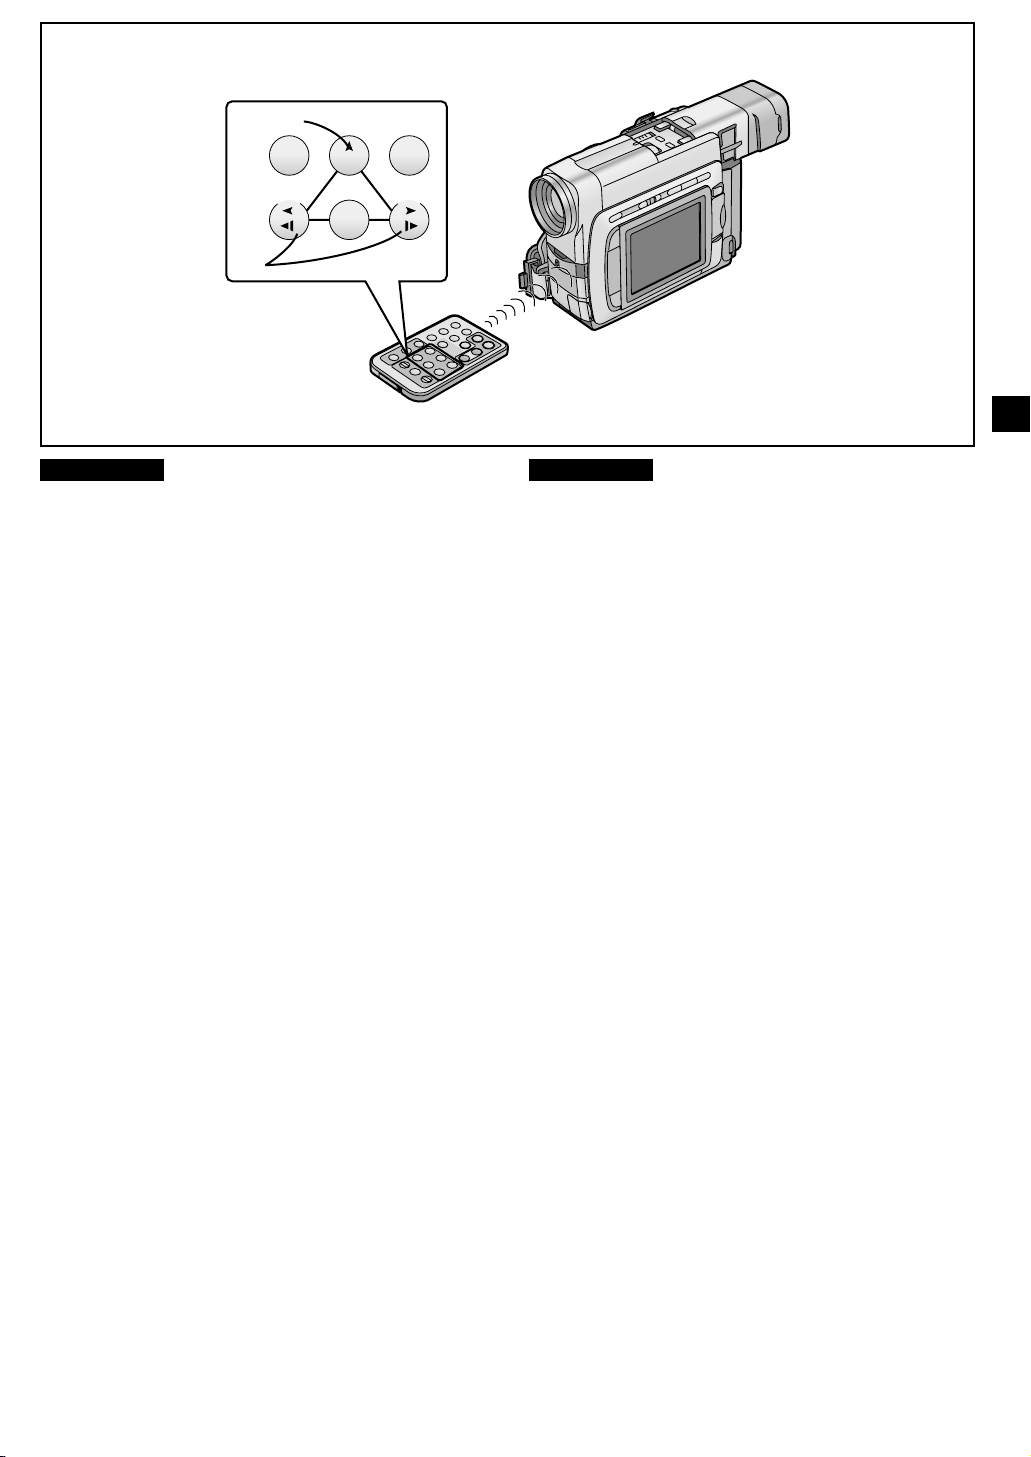
1
6
REW/
SLOW SLOW
STILL ADV STILL ADV
6
PLAY
PAUSE/ITEM
1
;
2
5
FF/
5
DEUTSCH
Wiedergabe in Zeitlupe
(Zeitlupen-Wiedergabe)
1 Die Wiedergabe-Taste [1] drücken.
2 Die Zeitlupen-/Einzelbild-Taste [E] oder [D] auf
der Fernbedienung drücken.
Beim Drücken der Taste [E] erfolgt die ZeitlupenWiedergabe in Rückwärtsrichtung und beim Drücken der
Taste [D] in Vorwärtsrichtung.
Im SP-Modus aufgenommene Szenen werden mit
ca. 1/5 der Normalgeschwindigkeit wiedergegeben.
Im LP-Modus aufgenommene Szenen werden mit
ca. 1/3 der Normalgeschwindigkeit wiedergegeben.
≥Während der Zeitlupen-Wiedergabe in Rückwärtsrichtung ist
die Timecode-Anzeige u. U. nicht präzise.
≥Wenn Sie im Bild-im-Bild-Modus (l 47) oder im Multibild-
Modus (l 44, 45) aufgenommene Bilder wiedergeben,
können sie vertikal schwanken.
Zurückschalten auf normale Wiedergabe
Die Wiedergabe-Taste [1] drücken.
Die Wiedergabe wird mit Normalgeschwindigkeit fortgesetzt.
ENGLISH
Playing Back in Slow Motion
(Slow Motion Playback)
1 Press the Play Button [1].
2 Press the Slow Motion/Still Advance Button [E]
or [D] on the Remote Controller.
Pressing the [E] Button starts slow motion playback in
reverse direction, and pressing the [D] Button starts slow
motion playback in forward direction.
Scenes recorded in the SP Mode are played back at
approximately 1/5th of the normal speed.
Scenes recorded in the LP Mode are played back at
approximately 1/3rd of the normal speed.
≥During slow motion playback in reverse direction, the Time
Code Indication may not be accurate.
≥When you play back the picture recorded in the Picture-in-
Picture Mode (l 47) or Multi-Picture Mode (l 44, 45), the
picture may shake vertically.
Resuming Normal Playback
Press the Play Button [1].
Playback continues at normal speed.
29
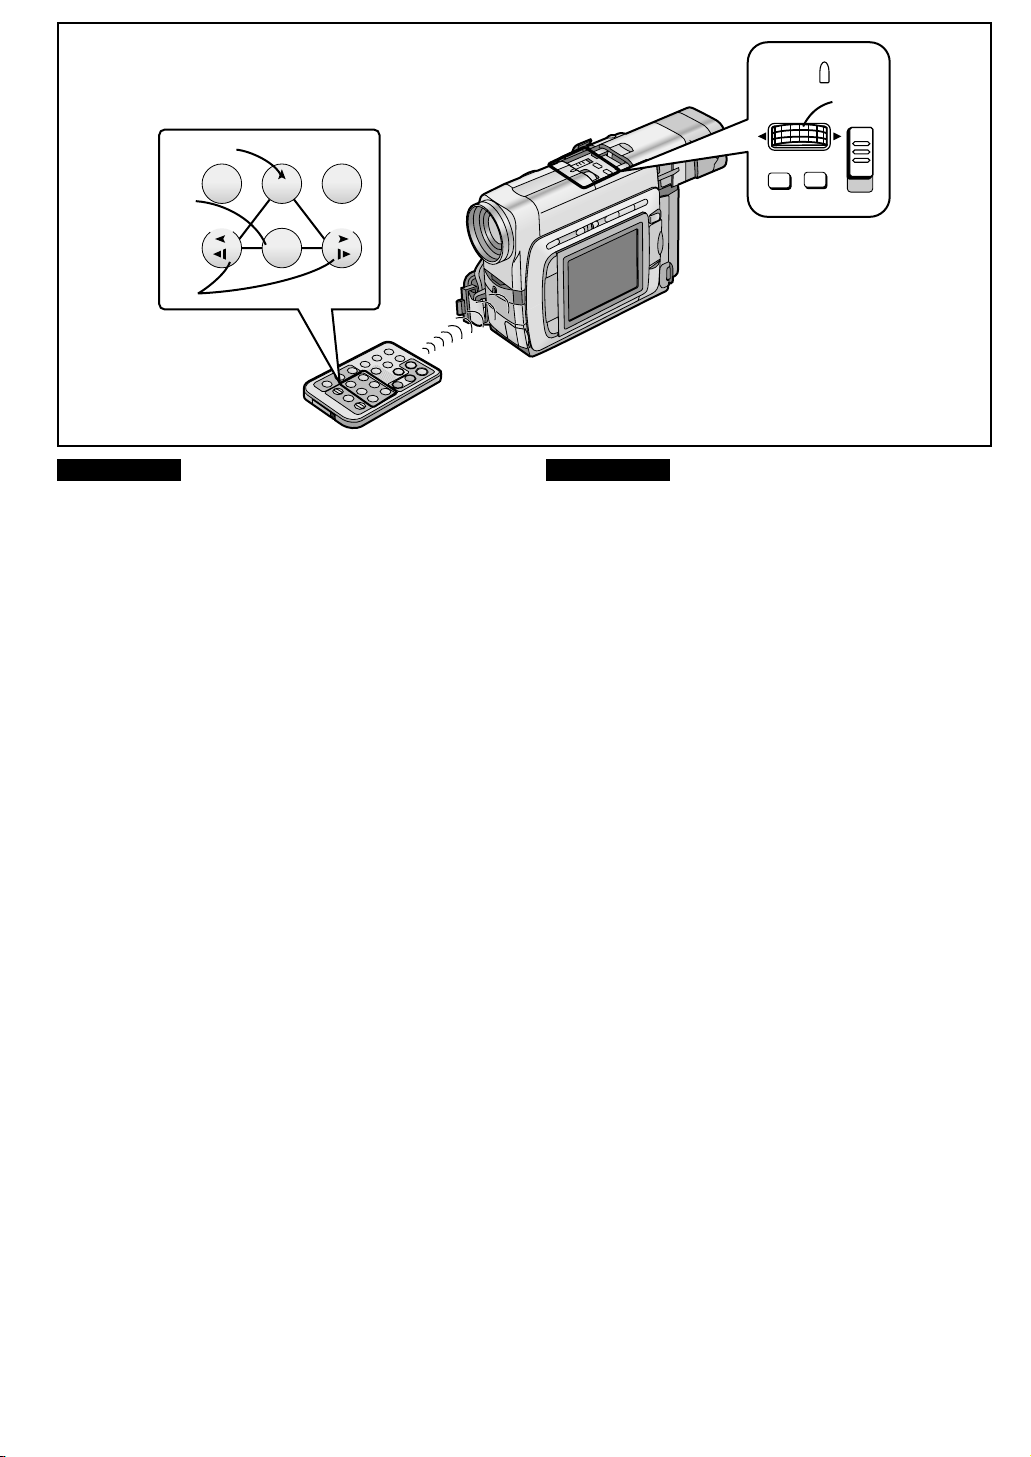
PUSH
AUTO
1
AUTO
1
6
2
6
REW/
STILL ADV STILL ADV
PLAY
SLOW SLOW
PAUSE/ITEM
1
;
5
FF/
5
3
DEUTSCH ENGLISH
ENGLISH
Wiedergabe von Standbildern und
Einzelbild-Fortschaltung
(Standbild-/Einzelbild-Wiedergabe)
Sie können das Geschehen auf dem Bildschirm während der
Wiedergabe stoppen und dann Standbilder Bild um Bild
wiedergeben.
Playing Back Still Pictures and
Advancing Them One by One
(Still Playback/Still Advance Playback)
You can freeze the action during playback and advance the
still pictures one by one.
1 Press the Play Button [1].
1 Die Wiedergabe-Taste [1] drücken.
2 Die Pausentaste [;] drücken.
Die Wiedergabe wird im Standbild-Modus gestoppt.
3 Die Zeitlupen-/Einzelbild-Taste [E] oder [D] auf
der Fernbedienung drücken.
Beim Drücken der Taste [E] wird Standbild um Standbild
in Rückwärtsrichtung und beim Drücken der Taste [D] in
Vorwärtsrichtung wiedergegeben.
2 Press the Pause Button [;].
The playback picture stops in the Still Playback Mode.
3 Press the Slow Motion/Still Advance Button [E]
or [D] on the Remote Controller.
Pressing the [E] Button advances the still picture one by
one in reverse direction. Pressing the [D] Button
advances the still picture one by one in forward direction.
SHUTTER/IRIS
MF/VOL/JOG
FOCUS
MENU
MNL
≥Bei jedem Druck auf die Taste [E] wird um ein Standbild
zurückgeschaltet. Bei jedem Druck auf die Taste [D] wird um
ein Standbild vorwärtsgeschaltet. Wenn Sie die
entsprechende Taste gedrückt halten, erfolgt kontinuierliche
Einzelbild-Wiedergabe in Rückwärts- bzw. Vorwärtsrichtung
so lange, bis Sie die Taste loslassen.
≥Wenn Sie den Camerarecorder länger als 6 Minuten im
Modus Standbild-Wiedergabe lassen, schaltet er
automatisch auf den Stopp-Modus um, damit die Videoköpfe
gegen übermäßige Abnutzung geschützt werden.
≥Während der Einzelbild-Wiedergabe ist die Timecode-
Anzeige u. U. nicht präzise.
≥Während der Standbild-Wiedergabe ist es nicht möglich, die
Lautstärke zu regeln.
Zurückschalten auf normale Wiedergabe
Die Wiedergabe-Taste [1] drücken.
Die Wiedergabe wird mit Normalgeschwindigkeit fortgesetzt.
Benutzen der Jog-Wiedergabe-Funktion
Durch Drehen des Jog-Reglers (Regler [PUSH]) 1 am
Camerarecorder im Standbild-Wiedergabe-Modus können Sie
ebenfalls Einzelbild-Wiedergabe in Vorwärts- oder
Rückwärtsrichtung durchführen.
≥Each press of the [E] Button advances to the next still
picture in reverse direction. Each press of the [D] Button
advances to the next still picture in forward direction.
Keeping either button pressed continuously advances the
still pictures one by one until you release the button.
≥If you leave the Movie Camera in the Still Playback Mode for
more than 6 minutes, it switches over to the Stop Mode to
protect the video heads against excessive wear.
≥During Still Advance Playback, the Time Code Indication
may not be accurate.
≥During Still Playback, adjusting the sound volume is not
possible.
Resuming Normal Playback
Press the Play Button [1].
Playback continues at normal speed.
Using the Jog Dial (Jog Playback)
By turning the Jog Dial ([PUSH] Dial) 1 on the Movie
Camera in the Still Playback Mode, you can advance the still
pictures one by one in forward or reverse direction.
30
 Loading...