

Panasonic dp-1810, dp1810f-ifax Operation Manual
Digital Imaging System
Your Machine
Getting to Know
Operating Instructions
(For Internet Fax)
Model No.
DP-1810F
Machine
Installing Your
Programming
Your Machine
Basic OperationsAdvanced
Features
Before operating this equipment, please read these instructions completely and keep these operating instructions for future reference.
English
Network FeaturesPrintout Journals
and Lists
Problem Solving Appendix
IMPORTANT INFORMATION
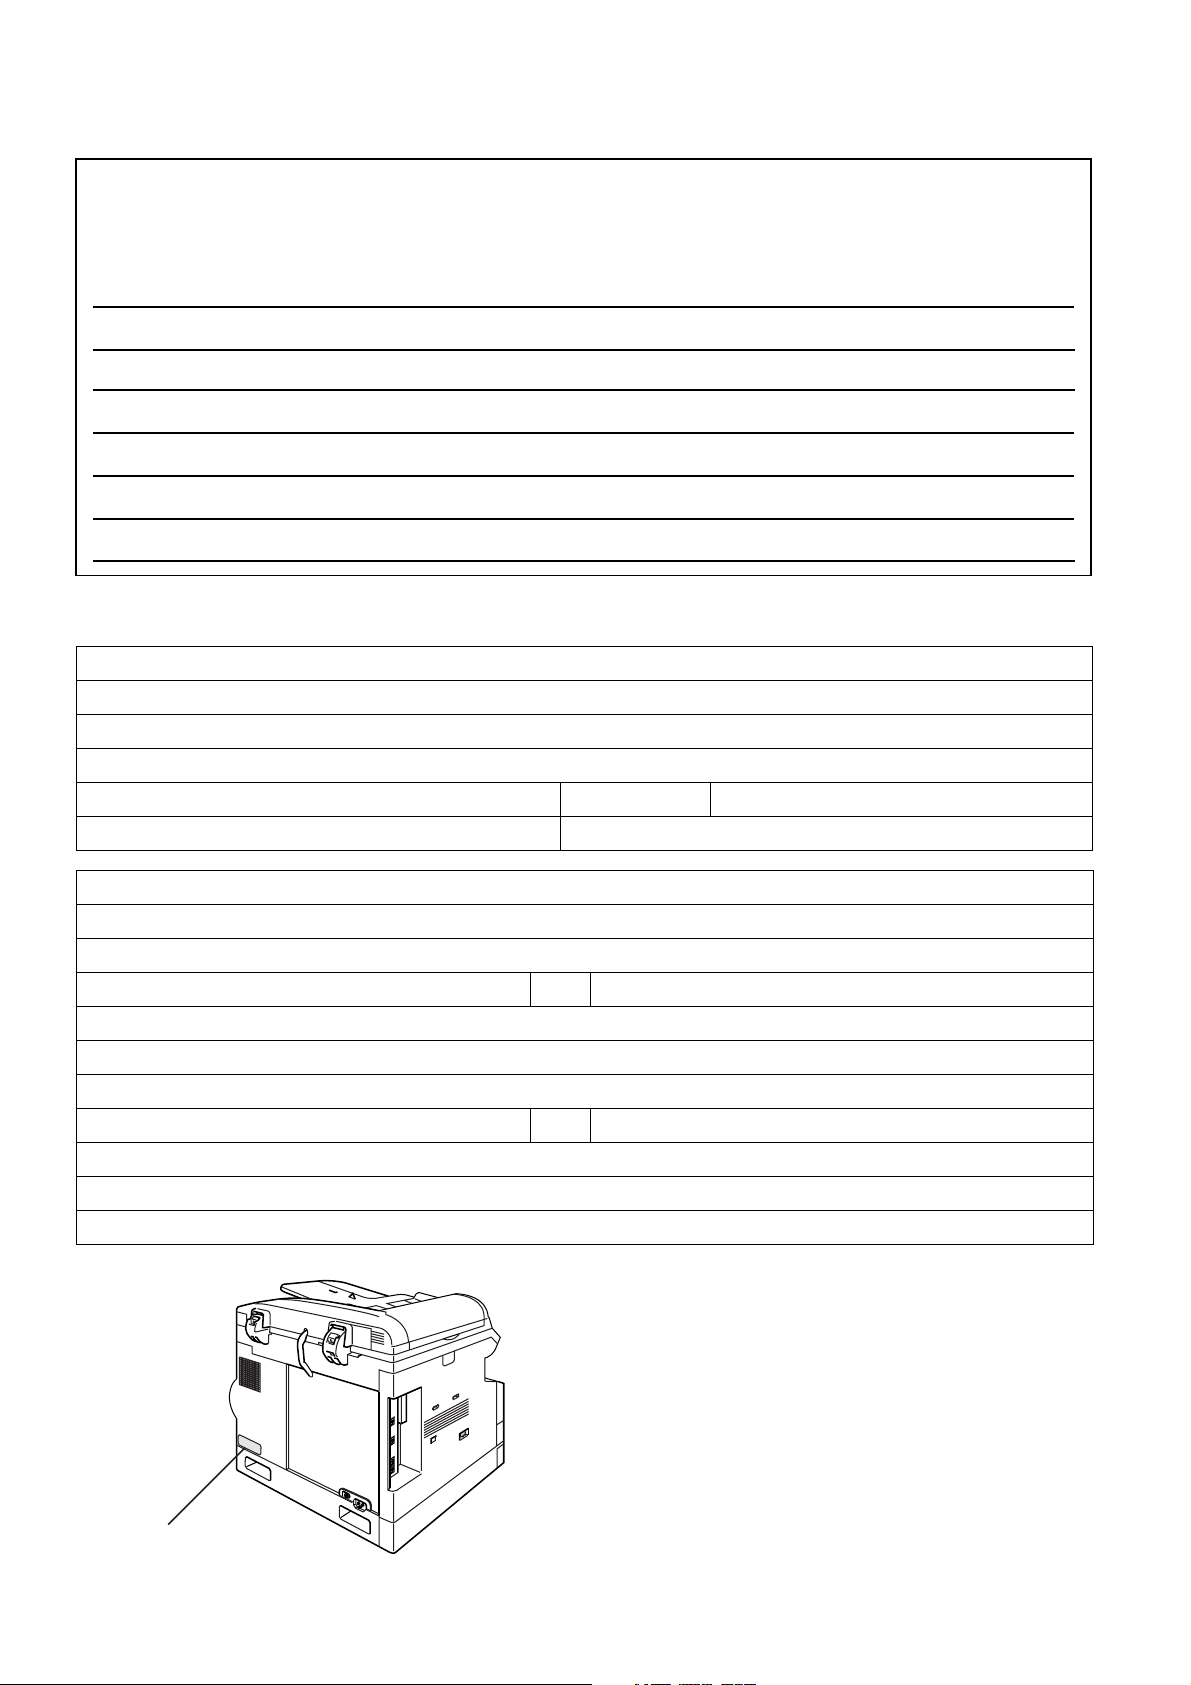
When requesting information, supplies or service, always refer to the model and serial number of your
machine. The model and serial number plate (Main Name Plate) is located on the machine as shown
below. For your convenience, space is provided below to record information you may need in the future for
reference or troubleshooting.
Model No. Serial No.
Date of Purchase
Dealer
Address
Telephone Number ( ) –
Supplies Telephone Number ( ) –
Service Telephone Number ( ) –
For the total system to work properly via LAN, certain information and additional parameters must be set. Please
contact your network administrator for the required information and connection to the LAN.
User Information
Company Name:
Address:
Dept.:
City: State: Zip Code:
Tel. No.: Fax No.:
Internet Parameters (See page 25)
IP Address:
Subnet Mask:
SMTP Server Name: or SMTP Server IP Address:
Default Router IP Address:
Email Address:
DNS Server IP Address:
POP Server Name: or POP Server IP Address:
POP User Name:
POP Password: (for security, do not write it in - but keep it in a safe place)
Host Name:
Model and
Serial Number
Copyright © 2002 by Matsushita Graphic Communication Systems, Inc.
All rights reserved. Unauthorized copying and distribution is a violation
of law. Printed in Japan.
The contents of these Operating Instructions are subject to change
without notice.

Table of Contents
Getting to Know Your Machine
Safety Information.......................................................................................................... 6
Function Key................................................................................................................... 9
Control Panel .................................................................................................................. 10
Pre Installation Information........................................................................................... 12
■ Setup as SMTP mail server............................................................................ 13
■ Setup as POP3 Client .................................................................................... 14
Internet Communication Features ................................................................................ 17
■ Internet Fax Transmission.............................................................................. 17
■ Internet Mail Reception .................................................................................. 17
■ Inbound Routing ............................................................................................. 18
■ Fax Forward ................................................................................................... 19
■ Network Scanner............................................................................................ 19
■ Network Printer............................................................................................... 20
■ Relayed Transmission.................................................................................... 21
Important Information.................................................................................................... 22
Connecting the LAN Cables .......................................................................................... 24
Installing Your Machine
User Parameters............................................................................................................. 25
■ Setting the User (Internet) Parameters .......................................................... 25
Setting the Internet Parameters .................................................................................... 26
■ Setting the User Parameters for the LAN Interface ........................................ 26
Programming or Retrieving Parameters via Email...................................................... 27
■ Using Email to Program or Retrieve Parameters ........................................... 27
■ Using a PC to Input the Internet Parameters Remotely ................................. 27
■ To Input the Internet Parameters for the First Time ....................................... 28
■ To Retrieve the Internet Parameters for Backup ............................................ 30
■ To Edit the Retrieved or Backup Internet Parameters File............................. 32
■ Using a PC to Update the Auto Dialer Remotely............................................ 35
■ Deleting the Entire Auto Dialer ....................................................................... 36
■ To Program One-Touch/ABBR. No. for the First Time ................................... 37
■ To Retrieve One-Touch/ABBR. No. Data for Backup..................................... 39
■ To Edit the Retrieved or Backup One-Touch/ABBR. No. Data File................ 41
■ Using Email to Retrieve the Journal ............................................................... 43
■ How To Enter Characters............................................................................... 44
Programming Your Machine
Programming Email Address and Telephone Numbers ............................................. 45
■ Programming the Auto Dialer ......................................................................... 45
■ Editing or Erasing the Auto Dialing Number / Email Address......................... 49
■ Printing Out Directory Labels ......................................................................... 52
Customizing Your Machine ........................................................................................... 53
■ General Description........................................................................................ 53
■ Setting the Fax Parameters............................................................................ 53
■ Fax Parameter Table...................................................................................... 54
3

Table of Contents
Basic Operations
Sending Documents via LAN ........................................................................................ 59
■ General Description ....................................................................................... 59
■ Manual Email Addressing .............................................................................. 60
■ One-Touch Email Addressing ........................................................................ 62
■ Abbreviated Email Addressing ....................................................................... 63
■ Directory Search Dialing ................................................................................ 64
■ Multi-Station Transmission (Broadcasting) .................................................... 66
■ Selectable Domains ....................................................................................... 68
■ Internet Fax Ledger Size Document Transmission........................................ 70
■ Returned Email .............................................................................................. 72
■ Using a Mailing List ........................................................................................ 73
Receiving Documents via LAN ..................................................................................... 74
■ General Description ....................................................................................... 74
■ Receiving Email from a POP Server .............................................................. 76
Advanced Features
Program Keys ................................................................................................................. 79
■ General Description ....................................................................................... 79
■ Entering an Email Address ............................................................................ 79
■ Entering a Telephone Number ....................................................................... 80
■ Setting for Group Dialing................................................................................ 81
■ Setting the POP Access Key ......................................................................... 82
■ Using the POP Access Key ........................................................................... 83
■ Changing or Erasing the Program Key Settings ............................................ 84
Sender Selection ............................................................................................................ 85
■ General Description ....................................................................................... 85
■ Setting the Sender Selection ......................................................................... 85
■ Sending Document with Sender Selection..................................................... 87
■ Printing the Sender Selection List .................................................................. 88
Subject Line Entry.......................................................................................................... 89
■ General Description ....................................................................................... 89
■ Sending Email with Subject Line Entry .......................................................... 89
Inbound Routing............................................................................................................. 91
■ Setting the Routing Parameters ..................................................................... 91
■ Entering One-Touch/Abbreviated Dialing Numbers for Inbound Routing ...... 93
Fax Forward .................................................................................................................... 95
■ Setting Fax Forward....................................................................................... 95
Ifax Return Receipt......................................................................................................... 96
■ General Description ....................................................................................... 96
4

Table of Contents
Network Features
Network Scanner ............................................................................................................ 97
■ General Description........................................................................................ 97
Network Printer............................................................................................................... 98
■ General Description........................................................................................ 98
Relayed Transmission ................................................................................................... 99
■ General Description........................................................................................ 99
■ Relay Network................................................................................................ 100
■ Setting up your machine as an Internet Relay Station ................................... 102
■ Setting Up Your Machine for Relayed Transmission...................................... 103
■ Sending Documents via Internet Relay .......................................................... 105
■ Sending Document(s) from a PC to a G3 Fax Machine ................................. 108
■ Printouts and Reports..................................................................................... 110
Printout Journals and Lists
Journals and Lists.......................................................................................................... 113
■ General Description........................................................................................ 113
■ Transaction Journal........................................................................................ 113
■ Communication Journal (COMM. JOURNAL) ................................................ 117
■ One-Touch/Abbreviated and Directory Search List........................................ 119
■ Program List................................................................................................... 122
■ FAX Parameter List ........................................................................................ 123
Problem Solving
Troubleshooting ............................................................................................................. 125
■ Information Codes .......................................................................................... 125
■ Email ABBR Programming Errors .................................................................. 126
Appendix
Specifications ................................................................................................................. 129
Glossary .......................................................................................................................... 130
Index ................................................................................................................................ 133
5
Getting to Know Your Machine
Safety Information
!
WARNING
• TO PREVENT FIRE OR SHOCK, DO NOT EXPOSE THIS PRODUCT TO RAIN OR ANY TYPE OF
MOISTURE.
• TO MINIMIZE THE POSSIBILITY OF SHOCK OR DAMAGE TO THE MACHINE, IT MUST BE PROPERLY
GROUNDED.
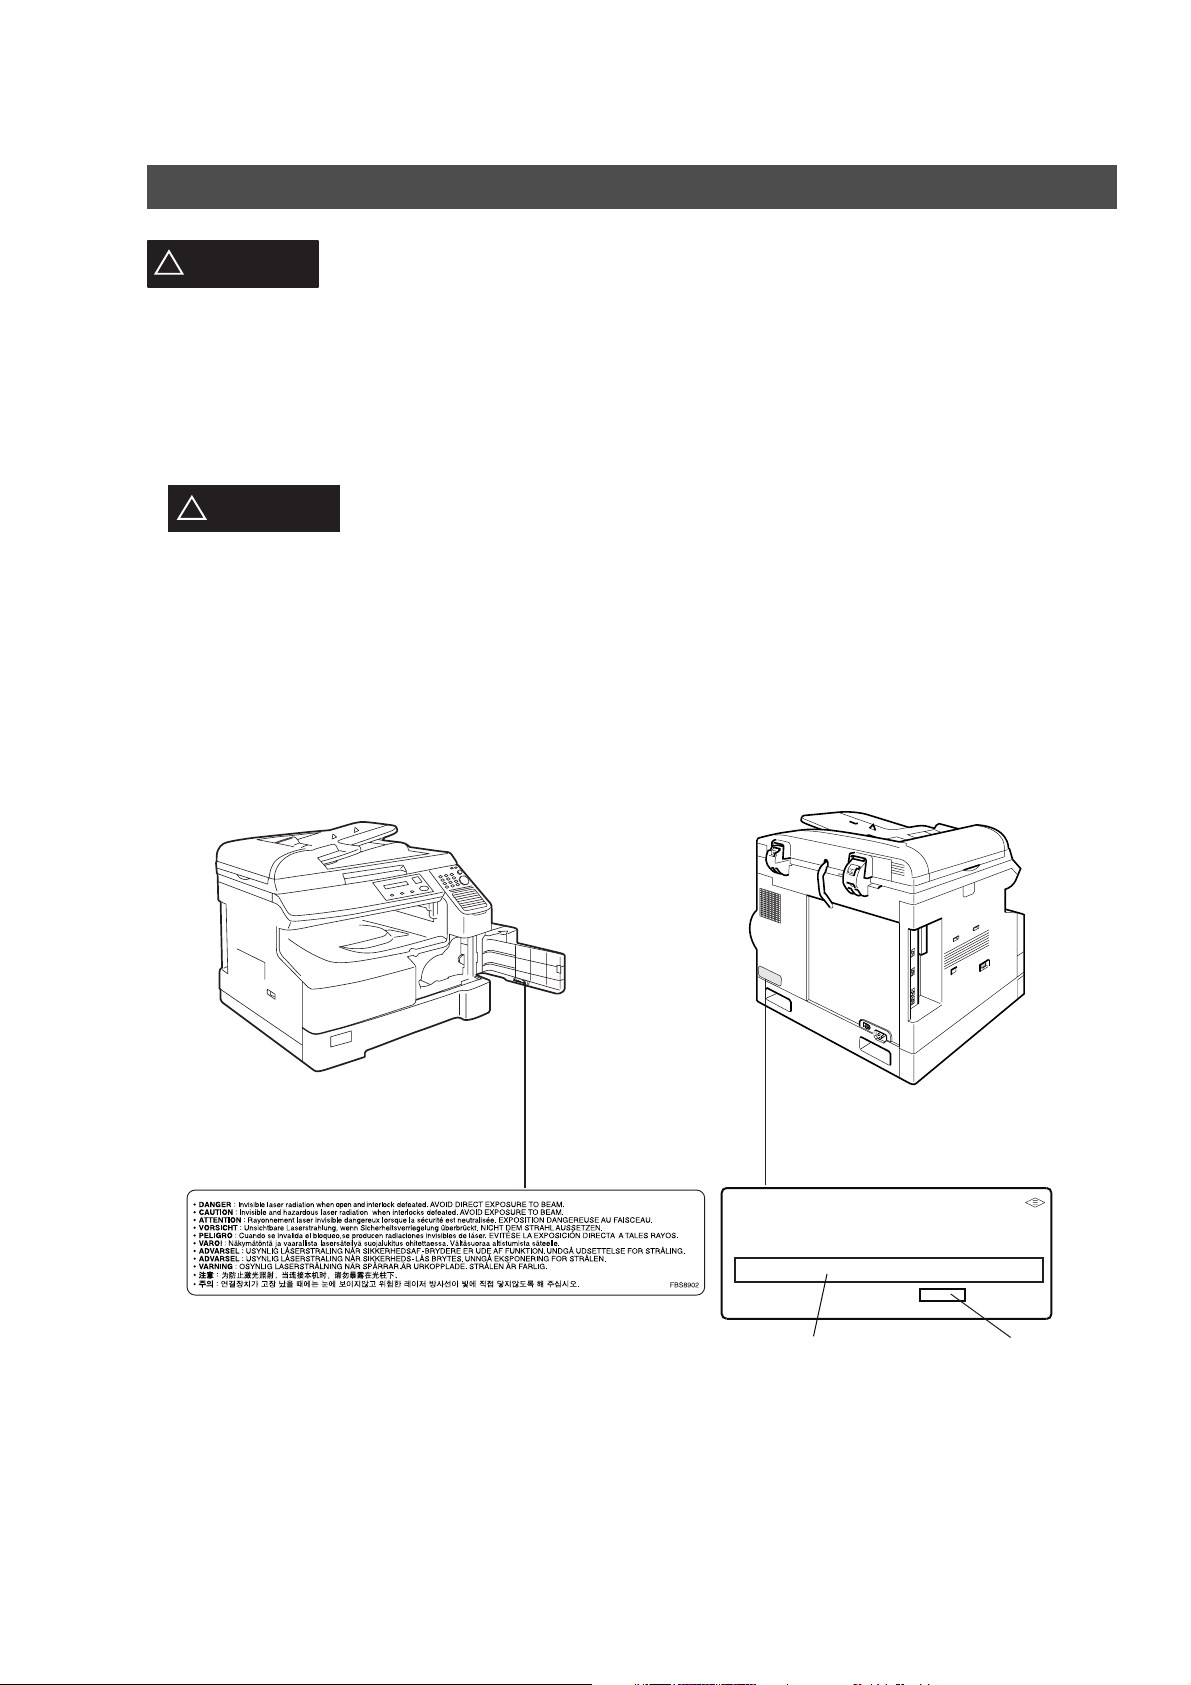
• THIS PRODUCT UTILIZES A LASER. ONLY QUALIFIED SERVICE PERSONNEL SHOULD ATTEMPT TO
SERVICE THIS DEVICE DUE TO POSSIBLE EYE INJURY.
CAUTION
!
OTHER THAN THOSE SPECIFIED HEREIN MAY RESULT IN HAZARDOUS
RADIATION EXPOSURE.
• THE POWER CORD ON THIS EQUIPMENT MUST BE USED TO DISCONNECT THE MAIN POWER.
PLEASE ENSURE THAT THE SOCKET OUTLET IS INSTALLED NEAR THE EQUIPMENT AND SHALL
BE EASILY ACCESSIBLE.
• MAKE SURE THAT THE MACHINE IS INSTALLED IN A SPACIOUS OR WELL VENTILATED ROOM SO
AS NOT TO INCREASE THE AMOUNT OF OZONE IN THE AIR. SINCE OZONE IS HEAVIER THAN AIR,
IT IS RECOMMENDED THAT AIR AT FLOOR LEVEL BE VENTILATED.
denotes a potential hazard that could result in serious injury or death.
- USE OF CONTROLS OR ADJUSTMENTS OR PERFORMANCE OF PROCEDURES
6
Product complies with DHHS Rules 21
CFR Subchapter J in effect at date
of manufacture.
Manufacturer's name and address
Factory ID

Safety Information
Getting to Know
Getting to Know
Your Machine
Your Machine
CAUTION
!
• THIS PRODUCT CONTAINS A LITHIUM BATTERY. DANGER OF EXPLOSION IF BATTERY IS
INCORRECTLY REPLACED.
REPLACE ONLY WITH THE SAME OR EQUIVALENT TYPE. DISPOSE OF USED BATTERIES
ACCORDING TO THE INSTRUCTIONS OF YOUR LOCAL SOLID WASTE OFFICIALS.
• TO REDUCE THE RISK OF SHOCK OR FIRE, USE ONLY NO. 26 AWG OR LARGER TELEPHONE LINE
CABLE.
• DISCONNECT ALL POWER TO THE MACHINE BEFORE COVER(S) ARE REMOVED. REPLACE THE
COVER(S) BEFORE THE UNIT IS RE-ENERGIZED.
IMPORTANT SAFETY INSTRUCTIONS
!
When using your telephone equipment, basic safety precautions should always be followed to reduce the
risk of fire, electric shock and injury to persons, including the following:
• DO NOT USE THIS PRODUCT NEAR WATER, FOR EXAMPLE, NEAR A BATH TUB, WASH BOWL,
KITCHEN SINK OR LAUNDRY TUB, IN A WET BASEMENT OR NEAR A SWIMMING POOL.
• AVOID USING A TELEPHONE (OTHER THAN A CORDLESS TYPE) DURING AN ELECTRICAL
STORM. THERE MAY BE A REMOTE RISK OF ELECTRIC SHOCK FROM LIGHTNING.
denotes hazards that could result in minor injury or damage to the machine.
• DO NOT USE THE TELEPHONE TO REPORT A GAS LEAK IN THE VICINITY OF THE LEAK.
• USE ONLY THE POWER CORD AND BATTERIES INDICATED IN THIS MANUAL. DO NOT DISPOSE
OF BATTERIES IN A FIRE, THEY MAY EXPLODE. CHECK WITH LOCAL CODES FOR POSSIBLE
SPECIAL DISPOSAL INSTRUCTIONS.
7
Safety Information
CAUTION
!
denotes hazards that could result in minor injury or damage to the machine.
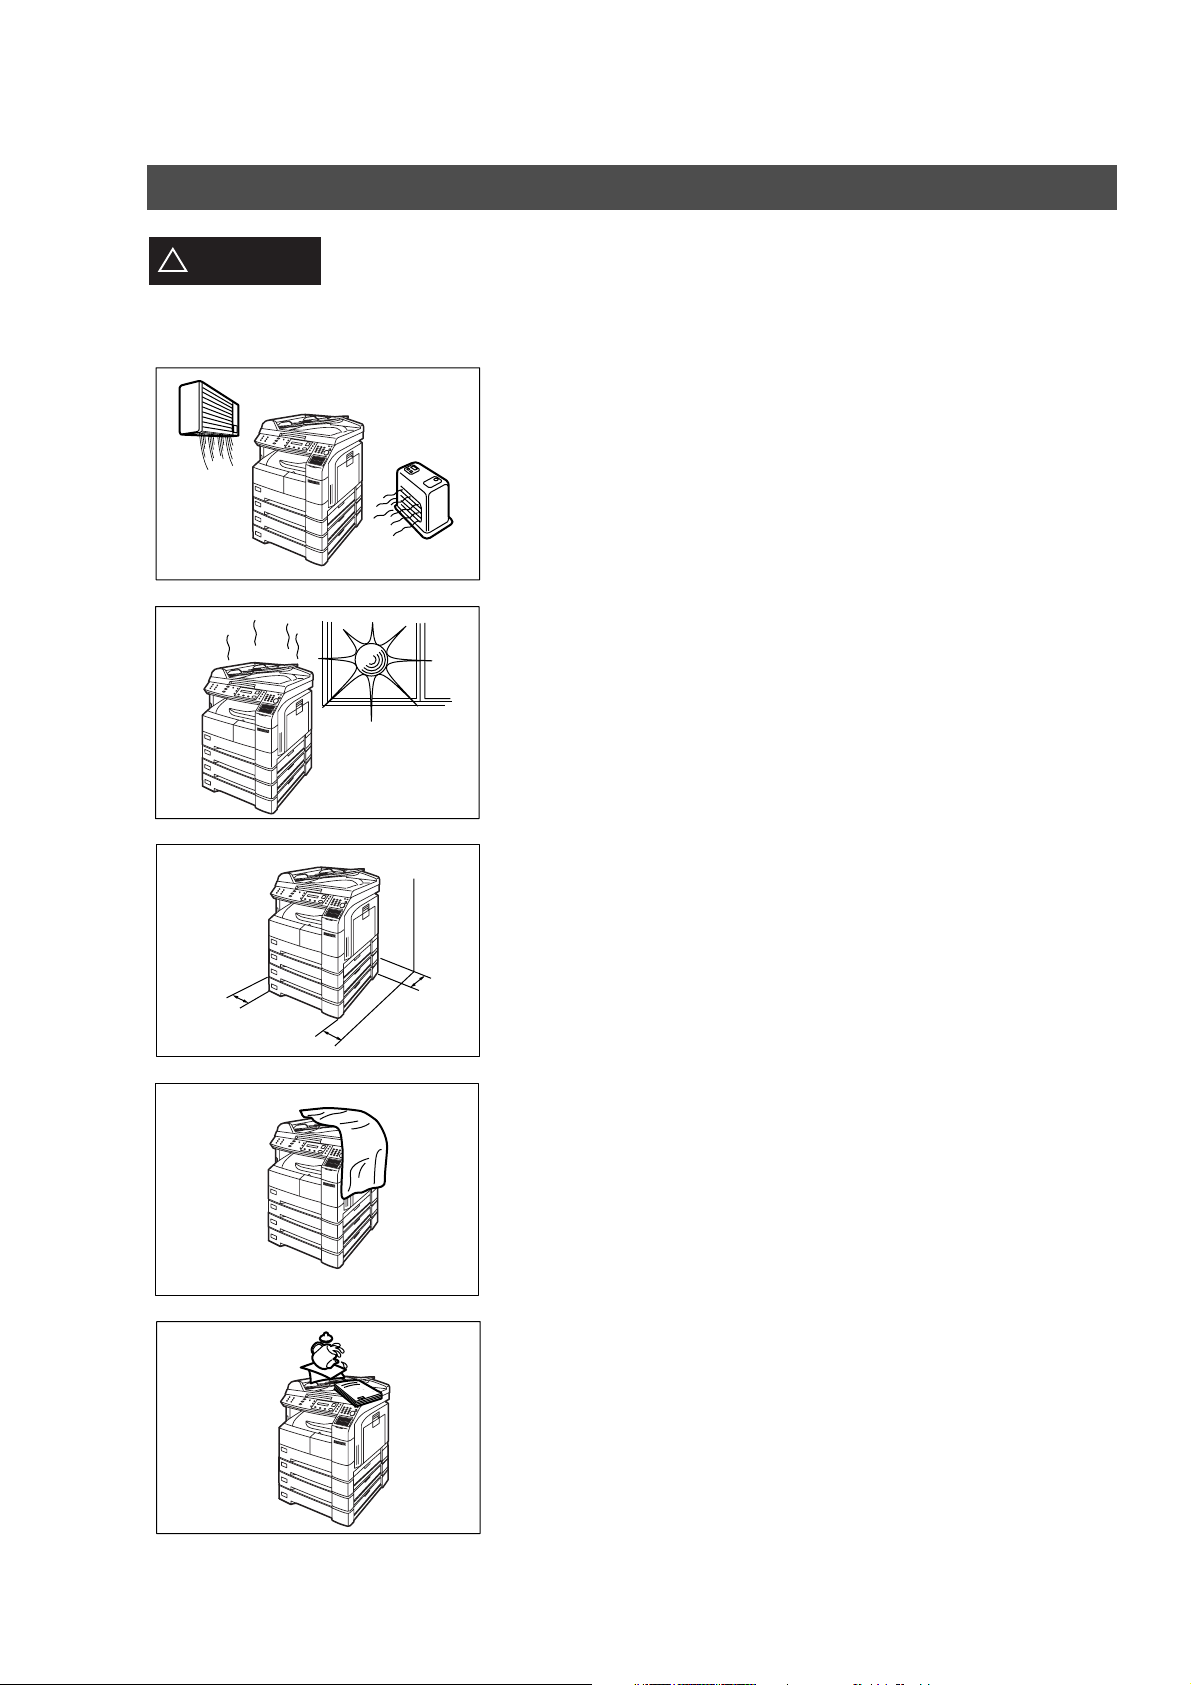
Do not install the machine near heating or an air conditioning unit.
Avoid exposure to direct sunlight.
Install the machine on a flat surface, leave at least 4 inches (10 cm) of space
between the machine and other objects.
Do not block the ventilation openings.
Do not place heavy objects or spill liquids on the machine.
8
Function Key
Getting to Know
Getting to Know
Your Machine
Your Machine
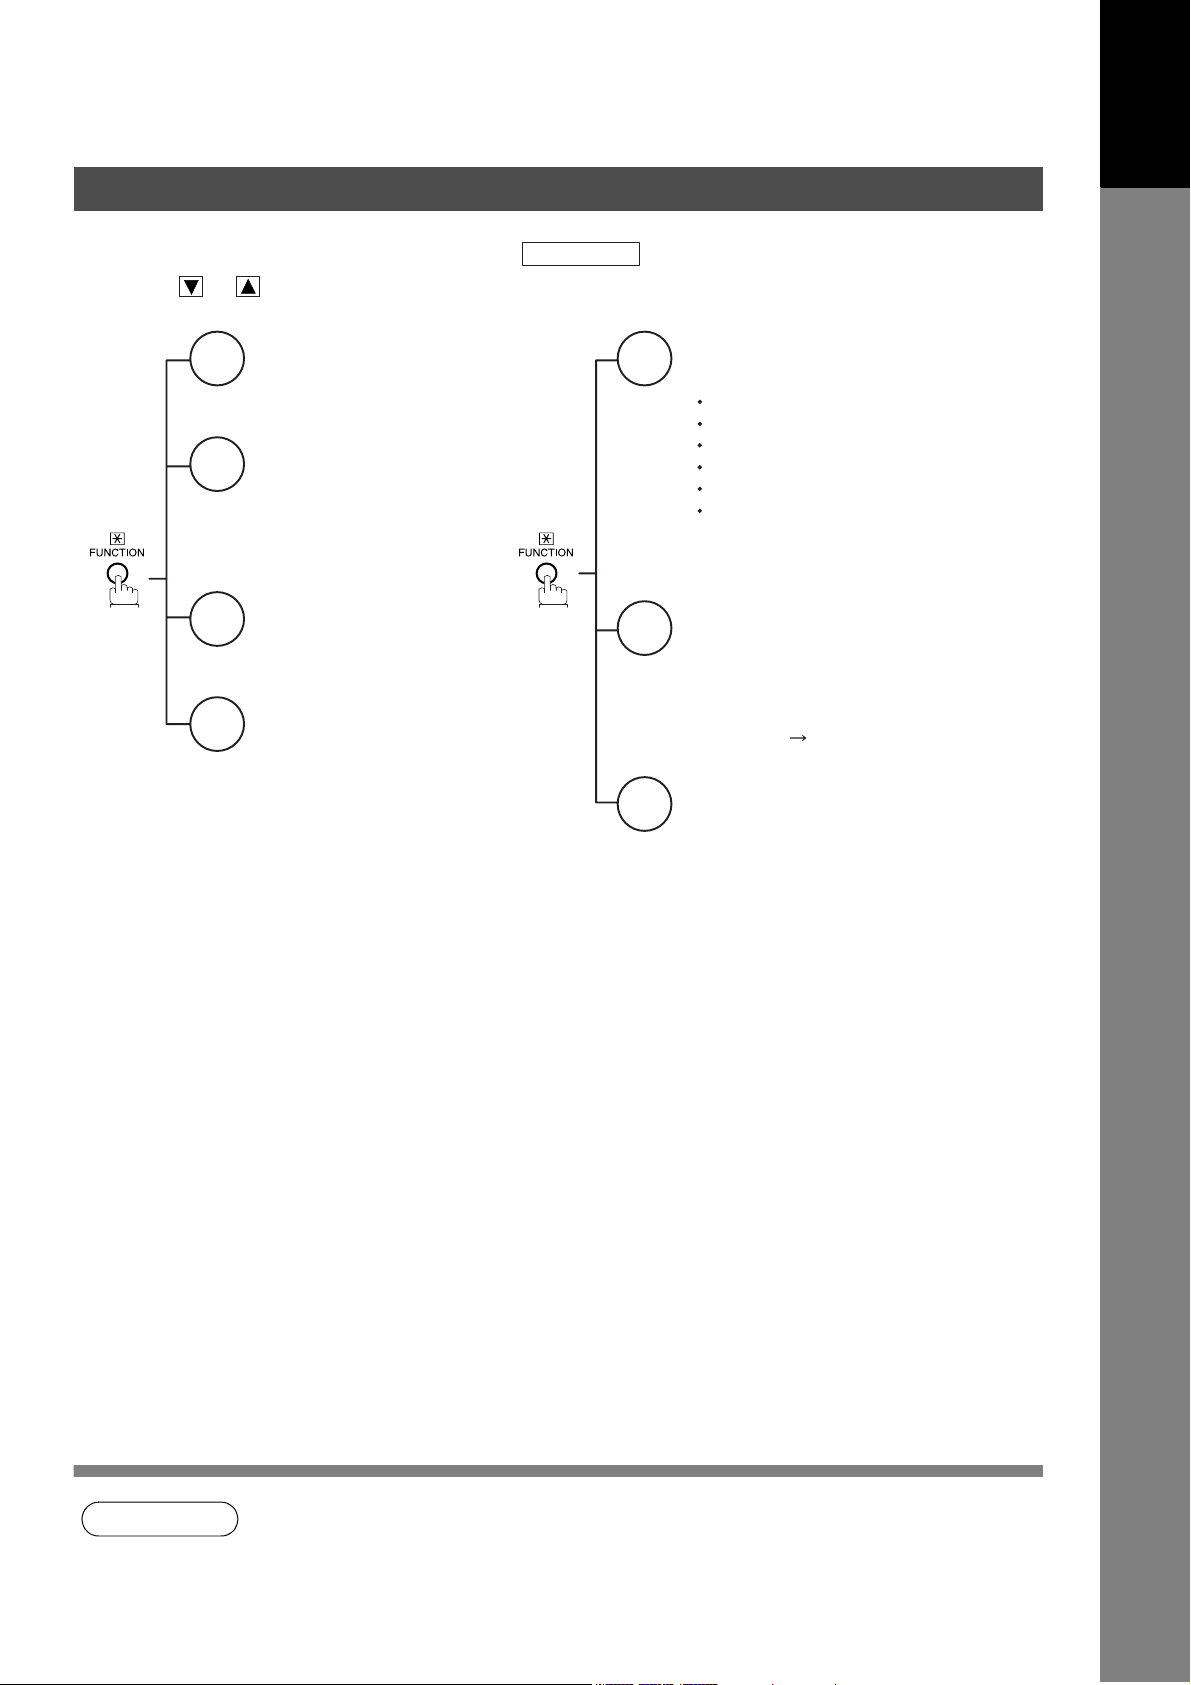
Any function can be started by first pressing and then enter the function number, or by
pressing or scroll key repeatedly until the desired function appears on the display.
Deferred Communication
1
1 = XMT
2 = Polling
3 = Advanced Communication
Advanced Communication
2
2 = Confidential Communication
4 = Sub-Address XMT
5 = LAN Relay XMT
Polling
3
1 = Polling
2 = Polled
Printout
6
1 = Journal (Print/View)
2 = One-Touch/Abbreviated/
Directory Search List
3 = Program List
4 = Fax Parameter List
5 = Not used
6 = Individual XMT Journal
7 = Directory Label
FUNCTION
Set Mode
7
1 = User Parameters
Date & Time
Logo
Character ID
ID Number (Fax Telephone Number)
Time Zone
Internet Parameters
2 = One-Touch/Abbreviated Numbers
3 = Program Keys
4 = Fax Parameters
Select Mode
8
1 = Communication Journal = OFF/ON/INC
4 = Password-XMT = OFF/ON (See Note 1)
5 = RCV to Memory = OFF/ON/PRINT
8 = LEDGER EMAILXMT
(LEDGER
Edit File Mode
9
1 = File List (Print/View)
2 = Change Time/Station
3 = Delete File
4 = Print File
5 = Add Document
6 = Retry Incomplete File
B4 Reduction)
NOTE
1. If Fax Parameter is not preset to a Valid position, which enables you to use the function, the
display will not show the function.
9
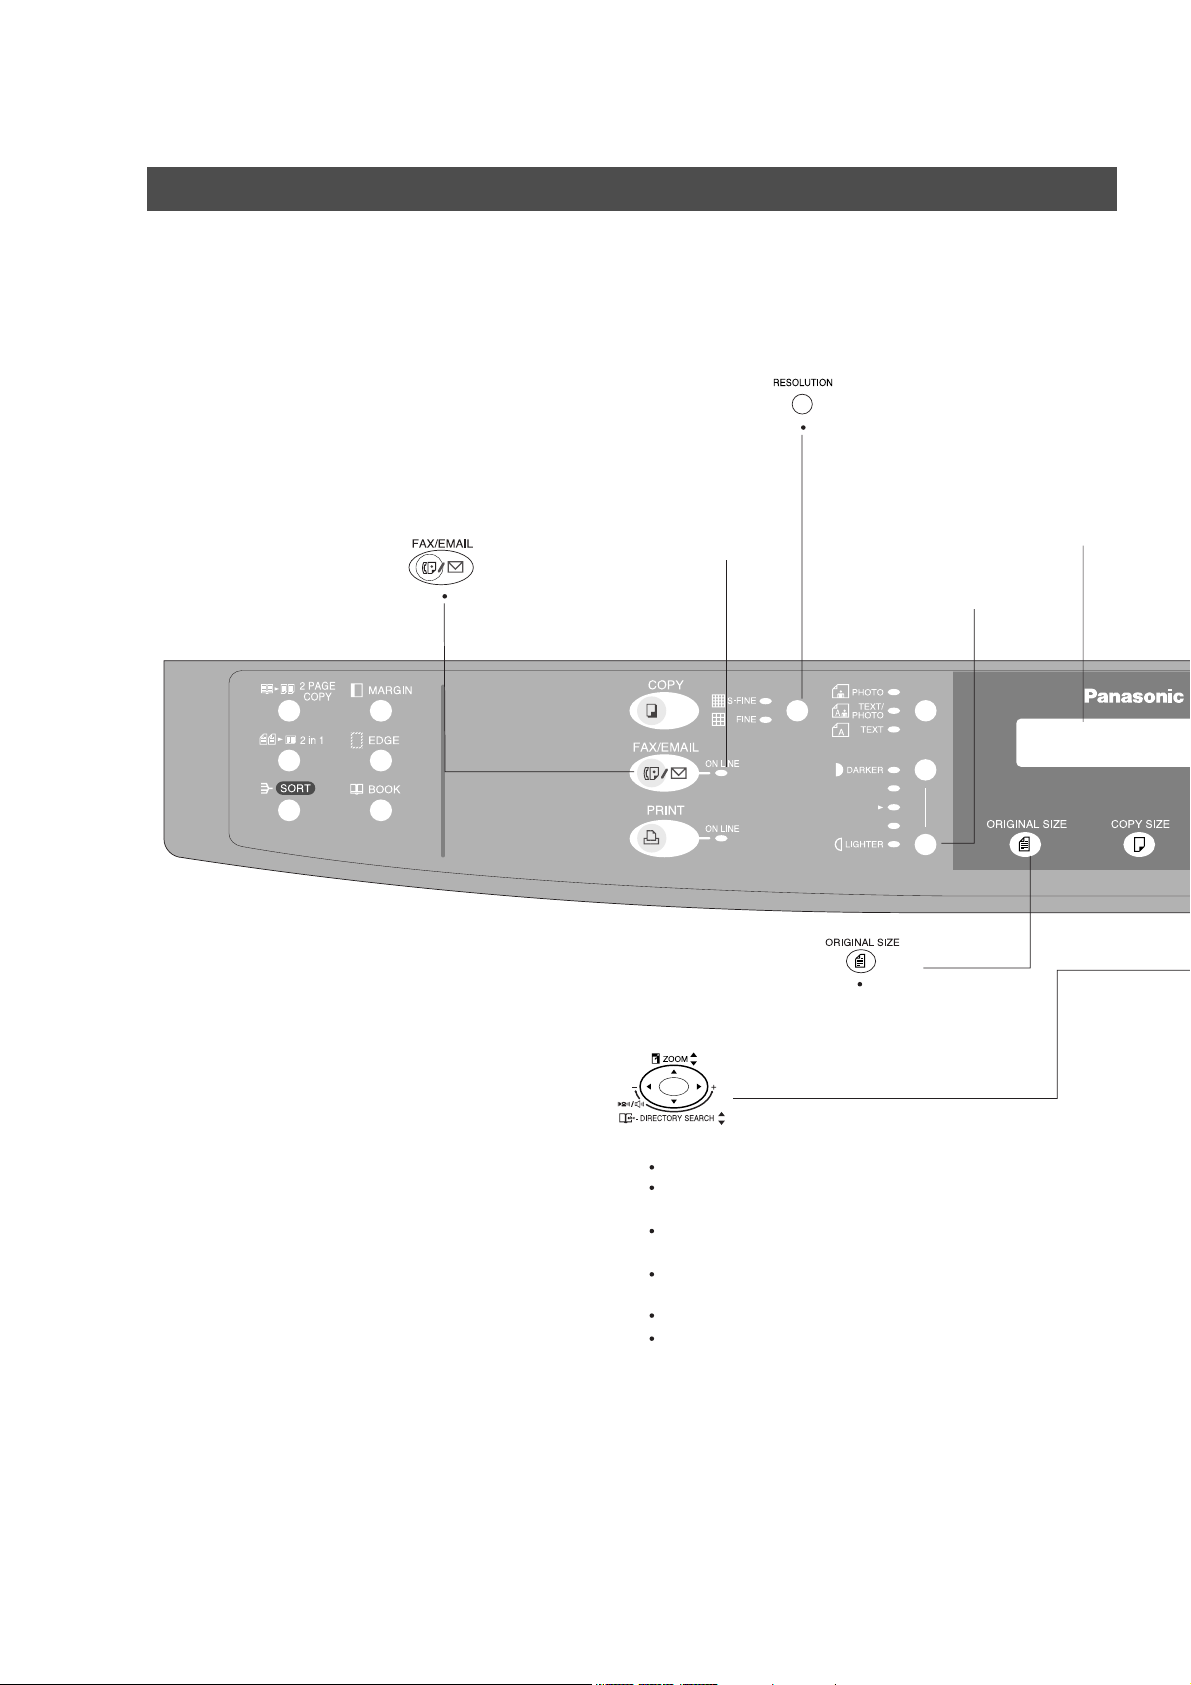
Control Panel
Used to set Standard,
Fine, Super-Fine resolution.
ON LINE Indicator
Blinks : When sending or
receiving faxes.
Used to select the FAX or
EMAIL mode.
LCD Display
Indicates date and time, or
the current operation.
Used to adjust the Contrast of
the Faxed/Emailed document.
Used to select the
original size
manually.
10
Used for the following:
Adjust the monitor and ringer volume.
Move the cursor while entering numbers and
characters.
Search the station name for Directory
Search Dialing.
Confirm the entered station for multi-station
communication.
Select functions.
Confirm the current communication modes
(e.g. Page number, ID, Dialed Telephone
number or Email address, File number)
when the unit is ON LINE.
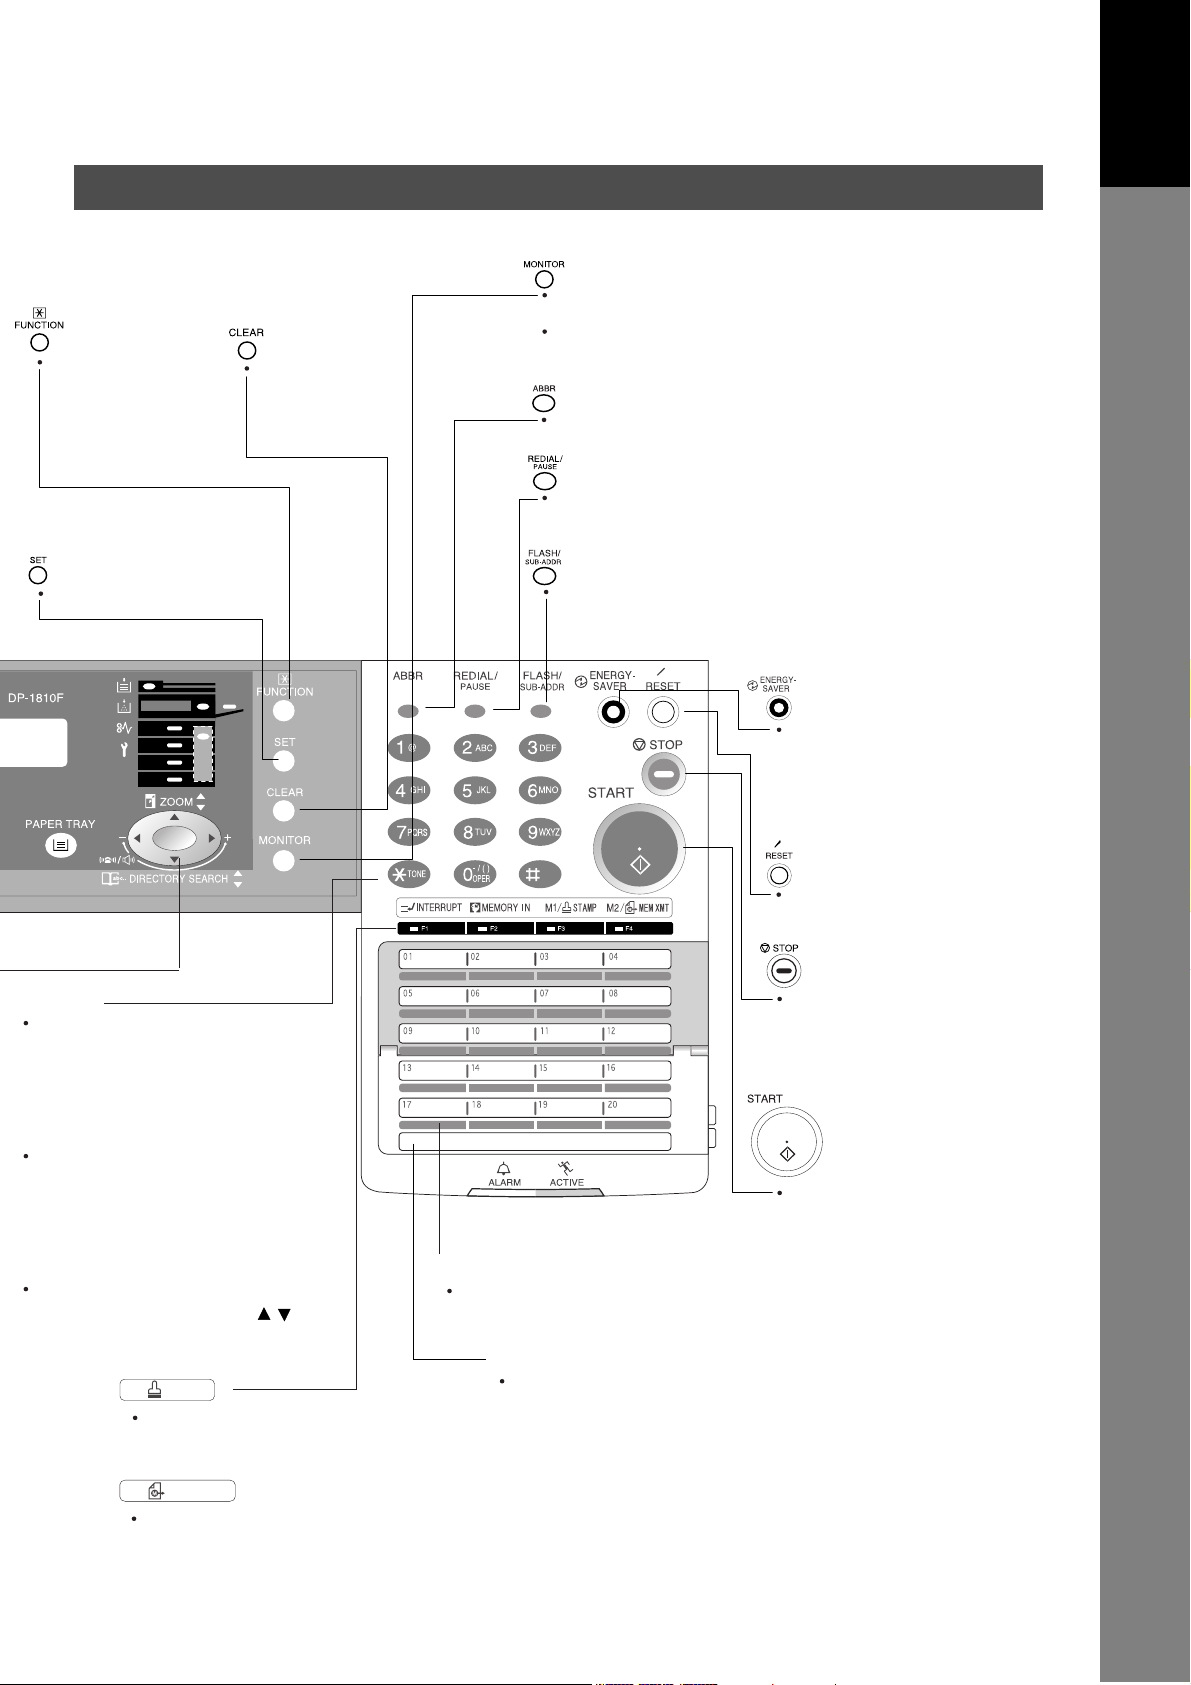
Used to start or
select the function
and subfunctions.
These functions are
explained in detail
on page 9.
Use this button
when correcting
entered numbers
or characters.
Control Panel
Used to start On-Hook Dialing or entering a space
between characters or numbers.
Used to insert a space while entering User and
Internet Parameters, such as LOGO, character ID,
station name and telephone numbers.
Used to start Abbreviated Dialing.
(See page 42 and 49)
Used to enter a pause when recording or dialing
a telephone number, or to redial the last
dialed number.
Getting to Know
Getting to Know
Your Machine
Your Machine
Used to set operations.
Keypad
Used for manual number dialing,
recording phone numbers, character
and symbols to record your LOGO,
Character ID, Station Name and
Email Address, and numerical entries.
Tone Key
Used to temporarily change the
dialing mode to Tone when Pulse
mode is set. Also can be used to
enter a period "." during email and
IP Address programming.
Directory Search
Used to search the station name for
Directory Search Dialing. ( )
Used to separate the Sub-Address from the telephone
number when dialing, or to access some features of
your PBX.
.
One-Touch Keys (01-52)
Used for One-Touch Dialing.
(See pages 45, 49 and 51)
Used to switch the
machine into energy
saving mode.
For more details, see
page 23 of the Operating
Instructions (For Copier.)
Used to reset all the
previously set functions.
Press this button when
you want to stop
the communication,
registration operation, or
audible tone.
Press this button to start
fax transmission or an
Email communication and
manual fax reception.
M1/ STAMP
Used to turn the verification
stamp ON or OFF.
(See page 54)
M2/ MEM XMT
Used to select either memory
or direct communication.
(See page 60 to 73)
Program Keys (P1-P8)
Used to record long dialing procedures or
Group Dialing Number keys.
11

Pre Installation Information
Before setting up your Panasonic machine on your network, please read this entire section to be familiar
with its functions.
Your machine is able to perform the following when connected to a 10Base-T/100Base-TX Ethernet LAN
(local area network):
• Send paper-based information as an Internet Email.
• Receive and print an Internet Email automatically.
• Forward received G3 fax message or Email automatically to the preprogrammed Email address or regular
G3 fax machine (see "Fax Forward" on pages 95).
• Route received G3 fax message automatically to the sender-specified Email address or G3 fax machine
using ITU-T SUB-Address (see "Inbound Routing" on pages 91 to 94).
• Route received G3 fax messages automatically to the preprogrammed Email address or G3 fax machine
using the sender’s fax ID code (see "Inbound Routing" on pages 91 to 94).
• Relay an Internet Email to a G3 fax machine via regular fax transmission (see "Relayed Transmission" on
pages 100 to 111).
• Network scanning and printing.
To utilize the above functions, your machine needs to be set up properly on your network. Please contact
your network administrator for actual network setup.
Copy the Pre-installation Information form found at the end of this section on page 15, record the MAC
Address on the form and ask your network administrator to complete the remaining information on the form.
The MAC Address of your machine can be found on the 2nd page of the Fax Parameter List printout (press
FUNCTION
Your machine can be set up as either SMTP mail server or POP3 client. Dependent on the type of setup,
different functions are available as follows.
Sending paper-based information as an Internet Email
Receive and print an Internet Email automatically
Receive and print an Internet Email manually
Forward received G3 fax message or Email automatically
Route received G3 fax message automatically
Relay an Internet Email to G3 fax machine
6
SET
4
).
Function SMTP Server Setup POP3 Client Setup
Yes Yes
Yes Yes
No Yes
Yes Yes
Yes Yes
Yes No
12
NOTE
1. To function as SMTP mail server, your machine's email address must include its unique Host
name within your company domain. This unique Host name must be registered within your
network’s DNS (Domain Name System) server. Example: Internet_Fax@fax01.panasonic.com
2. Automatically refers to immediate SMTP transfer or immediate POP3 retrieval. Manually
refers to manual retrieval of mail when configured as POP3 client.
3. Your machine will receive, print, forward or relay emails in text message format and TIFF-F
image file attachment only.
4. Dynamic Host Configuration Protocol (DHCP) is not supported.

Pre Installation Information
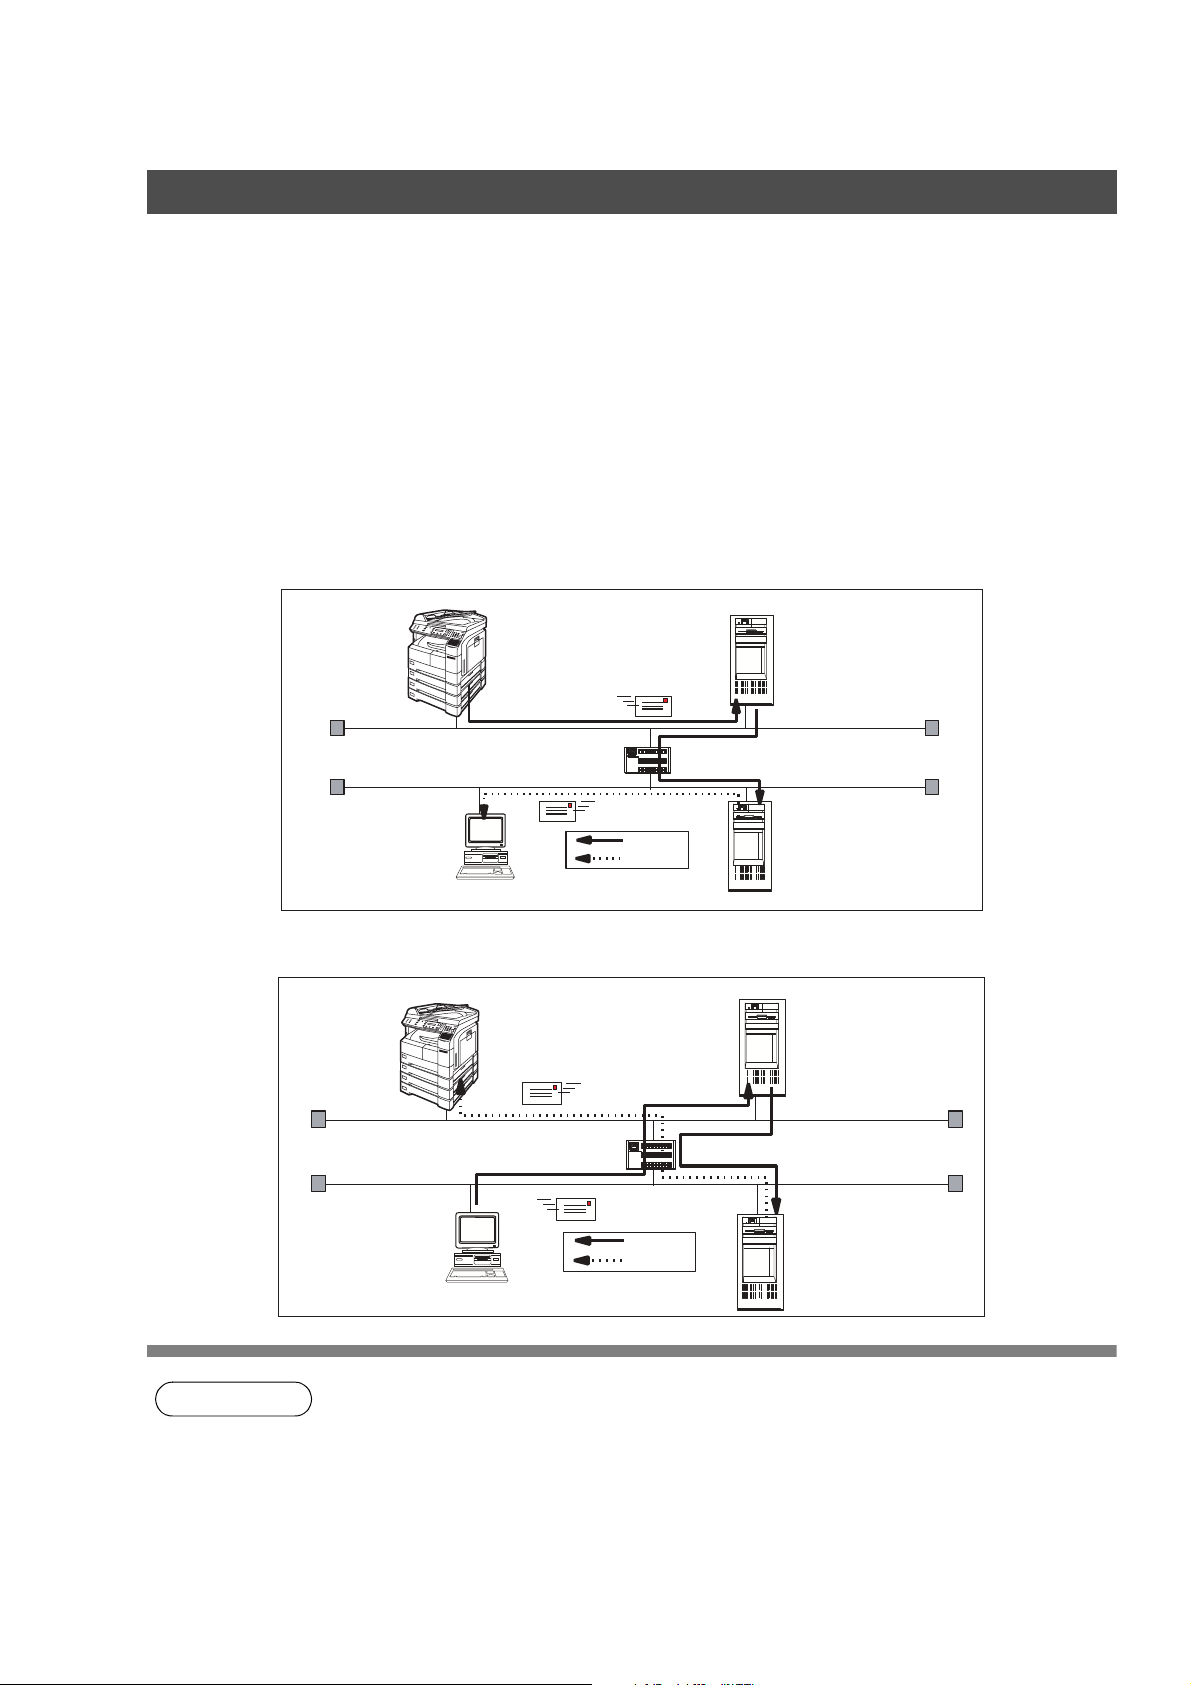
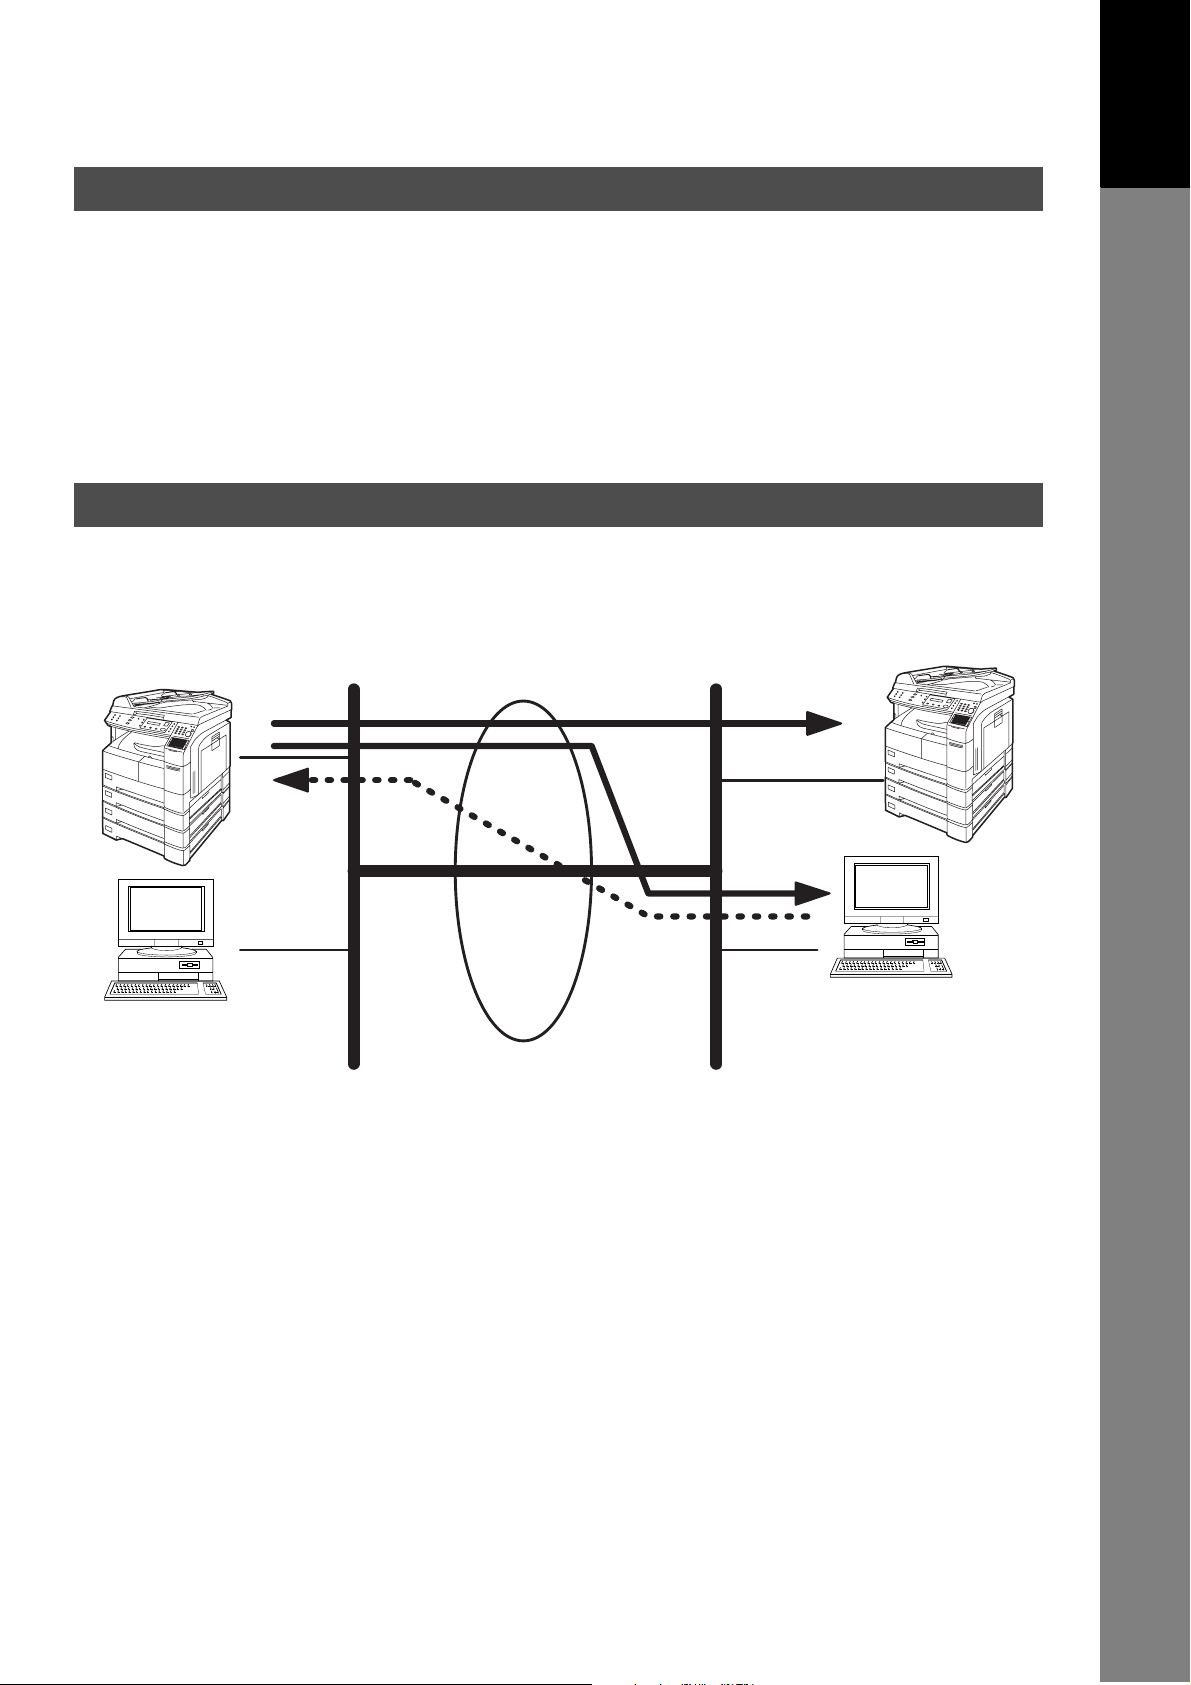
Setup as SMTP mail server
To install your machine as SMTP mail server, the following network parameters need to be programmed on
your network and on your machine.
• IP Address of the DNS Server (if not available, see Note 2)
• IP Address of your machine
• Subnet Mask of your machine
• Name or IP Address of the Default SMTP mail server
• IP Address of the Default Router
• Email Address of your machine (see Note 1)
•Host Name
Email Transmission (from your machine to a PC)
ifaxuser@fax01.panasonic.com
SMTP01.panasonic.com
(SMTP Mail Server)
Getting to Know
Getting to Know
Your Machine
Your Machine
(Router)
popuser001@panasonic.com
Email Reception (from a PC to your machine)
ifaxuser@fax01.panasonic.com
(Router)
popuser001@panasonic.com
SMTP
POP3
SMTP
POP02.panasonic.com
(POP Server)
SMTP01.panasonic.com
(SMTP Mail Server)
NOTE
1. To function as SMTP mail server, your machine's email address must include its unique Host
name within your company domain. This unique Host name must be registered within your
network’s DNS (Domain Name System) server. Example: Internet_Fax@fax01.panasonic.com
2. By default the machine requires the IP Address of the DNS Server and prompts you to enter
the SMTP Server Name. If the DNS Server is not available, change the Fax Parameter No.
161 (DNS SERVER) to "1:Invalid". Then the machine will prompt you to enter the IP Address
of the SMTP Server.
3. Dynamic Host Configuration Protocol (DHCP) is not supported.
13
Pre Installation Information
Setup as POP3 Client
To install your machine as POP3 Client, the following network parameters need to be programmed on your
network.
• IP Address of the DNS Server (if not available, see Note 2)
• IP Address of your machine
• Subnet Mask of your machine
• Name or IP Address of the Default SMTP mail server
• IP Address of the Default Router
• POP Server Name or IP Address
• POP User Account Name
•POP Password
• Email Address of your machine (see Note 1)
Email Transmission (from your machine to a PC)
ifaxuser@fax01.panasonic.com
SMTP01.panasonic.com
(SMTP Mail Server)
(Router)
popuser001@panasonic.com
Email Reception (from a PC to your machine)
ifaxuser@panasonic.com
(Router)
popuser001@panasonic.com
SMTP
POP3
SMTP
POP3
POP02.panasonic.com
(POP Server)
SMTP01.panasonic.com
(SMTP Mail Server)
POP02.panasonic.com
(POP Server)
14
NOTE
1. The email address format can be the same as your regular email address. If your email
address is popuser001@panasonic.com, your machine’s email address can be
Internet_Fax@panasonic.com.
2. By default the machine requires the IP Address of the DNS Server and prompts you to enter
the SMTP and POP Server Names. If the DNS Server is not available, change the Fax
Parameter No. 161 (DNS SERVER) to "1:Invalid". Then the machine will prompt you to enter
the IP Address of the SMTP and POP Servers.

Pre Installation Information
For the total system to work properly via LAN, certain information and additional parameters must be set.
Please contact your network administrator for the required information and connection to the LAN.
Important: Make a copy of this page and ask the Network Administrator to complete the required
information. After its returned, transfer the information to the back side of the front cover for future reference
and troubleshooting.
User Information
Company Name
Address
Dept.
City State Zip Code
Tel. No. Fax No.
Internet Parameters (See page 26)
(1) IP Address:
(2) Subnet Mask:
(3) *SMTP Server Name: or *SMTP Server IP Address:
(4) Default Router IP Address:
(5) Email Address:
(6) DNS Server IP Address:
(7) POP Server Name: or *POP Server IP Address:
(8) POP User Name:
(9) POP Password:
(10) Host Name:
(11) Default Subject:
(12) Default Domain:
(13) Selectable Domains:
1. 6.
2. 7.
3. 8.
4. 9.
5. 10.
(14) Remote Password:
(15) Relay XMT Password:
(16) Manager’s Email Address:
(17) Relay Domains (Domains Authorized for Relay Transmission):
1. 6.
2. 7.
3. 8.
4. 9.
5. 10.
Getting to Know
Getting to Know
Your Machine
Your Machine
NOTE
1. Items in Bold, depict information obtained from you Network Administrator.
2. By default the machine requires the IP Address of the DNS Server and prompts you to enter
the SMTP and POP Server Names (items 3 and 7 above). If the DNS Server is not available,
change the Fax Parameter No. 161 (DNS SERVER) to "1:Invalid". Then the machine will
prompt you to enter the IP Address of the SMTP and POP Servers.
3. If required, the MAC Address of your machine can be obtained from the 2nd page of the Fax
Parameter List printout, by pressing .
4. Dynamic Host Configuration Protocol (DHCP) is not supported.
Continued on the next page...
FUNCTION
6
SET
4
15

Pre Installation Information
Explanation of Contents
MAC Address : MAC Address from the 2nd page of the Fax Parameter List printout
(press ).
(1) IP Address : The Internet Protocol (IP) address assigned to your machine.
(2) Subnet Mask : The Subnet Mask number.
(3) SMTP Server Name or SMTP Server IP
Address
(4) Default Router IP Address : The Default Router’s IP Address.
(5) Email Address : The email address assigned to your machine. (Up to 60 characters)
(6) DNS Server IP Address : The IP address of the DNS Server.
(7) POP Server Name or POP Server IP
Address
(8) POP User Name : POP User Name. (Up to 40 characters)
(9) POP Password : POP Password. (Up to 10 characters)
(10) Host Name : The name assigned to your machine. (Up to 60 characters)
(11) Default Subject : The information to be added to the Subject Line for all outgoing
(12) Default Domain : Specify the Domain Name (up to 50 characters) to be added to
(13) Selectable Domains : Enter up to 10 Domain Names that can be selected during manual
(14) Remote Password : Enter a security password (up to 10 characters) to allow Remote
(15) Relay XMT Password : Enter a password to provide network security to your Relay Station
(16) Manager’s Email Address : Enter you Department Manager’s email address for notification of all
(17) Relay Domain (01 to 10) : Enter up to 10 Domain Names that are authorized to access your
: The SMTP Server Name (up to 60 characters). The SMTP Server
IP Address.
: The POP Server Name. (Up to 60 characters) The POP Server IP
Address.
emails. (Up to 40 characters)
frequently used or incomplete outgoing email addresses (i.e.
@yourcompany.com).
email addressing. (Up to 30 characters)
Programming of the Internet Parameters and Auto Dialer or the
retrieval of the Journal via email.
(for G3 relay purposes). (Up to 10 characters)
Internet relayed transmissions for supervision and cost control
purposes. (Up to 60 characters)
Internet Fax for Relayed Transmission Request. (Up to 30
characters)
Relay Domain, a.k.a. Domain Name in the DX-1000/2000.
FUNCTION
6
SET
4
16
NOTE
1. All IP Addresses consist of 4 parts separated by dots (i.e. 165.113.245.2).
Internet Communication Features
Internet Fax Transmission
Your machine allows you to transmit documents over the Internet to another Internet Fax or a PC. The
document is first scanned and converted into a TIFF-F formatted image file, and then transmitted to the
remote location as an attachment file to an email using MIME encoding.
The email system at the receiving end must support MIME. Otherwise, the attachment file will be detached
and lost.
When you send an email message to someone, your machine uses Simple Mail Transfer Protocol (SMTP)
to transfer your outgoing mail to your SMTP mail server, which in turn uses SMTP to send your mail to the
Internet.
Internet Mail Reception
Your machine allows you to receive and print a PC transmitted email automatically or manually, depending
on its setup configuration. However, if the received email includes file attachment in a format other than
TIFF-F, such as Word, Excel, Power Point, your machine prints an error message instead.
Getting to Know
Getting to Know
Your Machine
Your Machine
Internet Fax
PC
LAN LAN
Internet Fax
Internet Fax
Transmission
Internet
Internet Mail
Reception
PC
17
Internet Communication Features
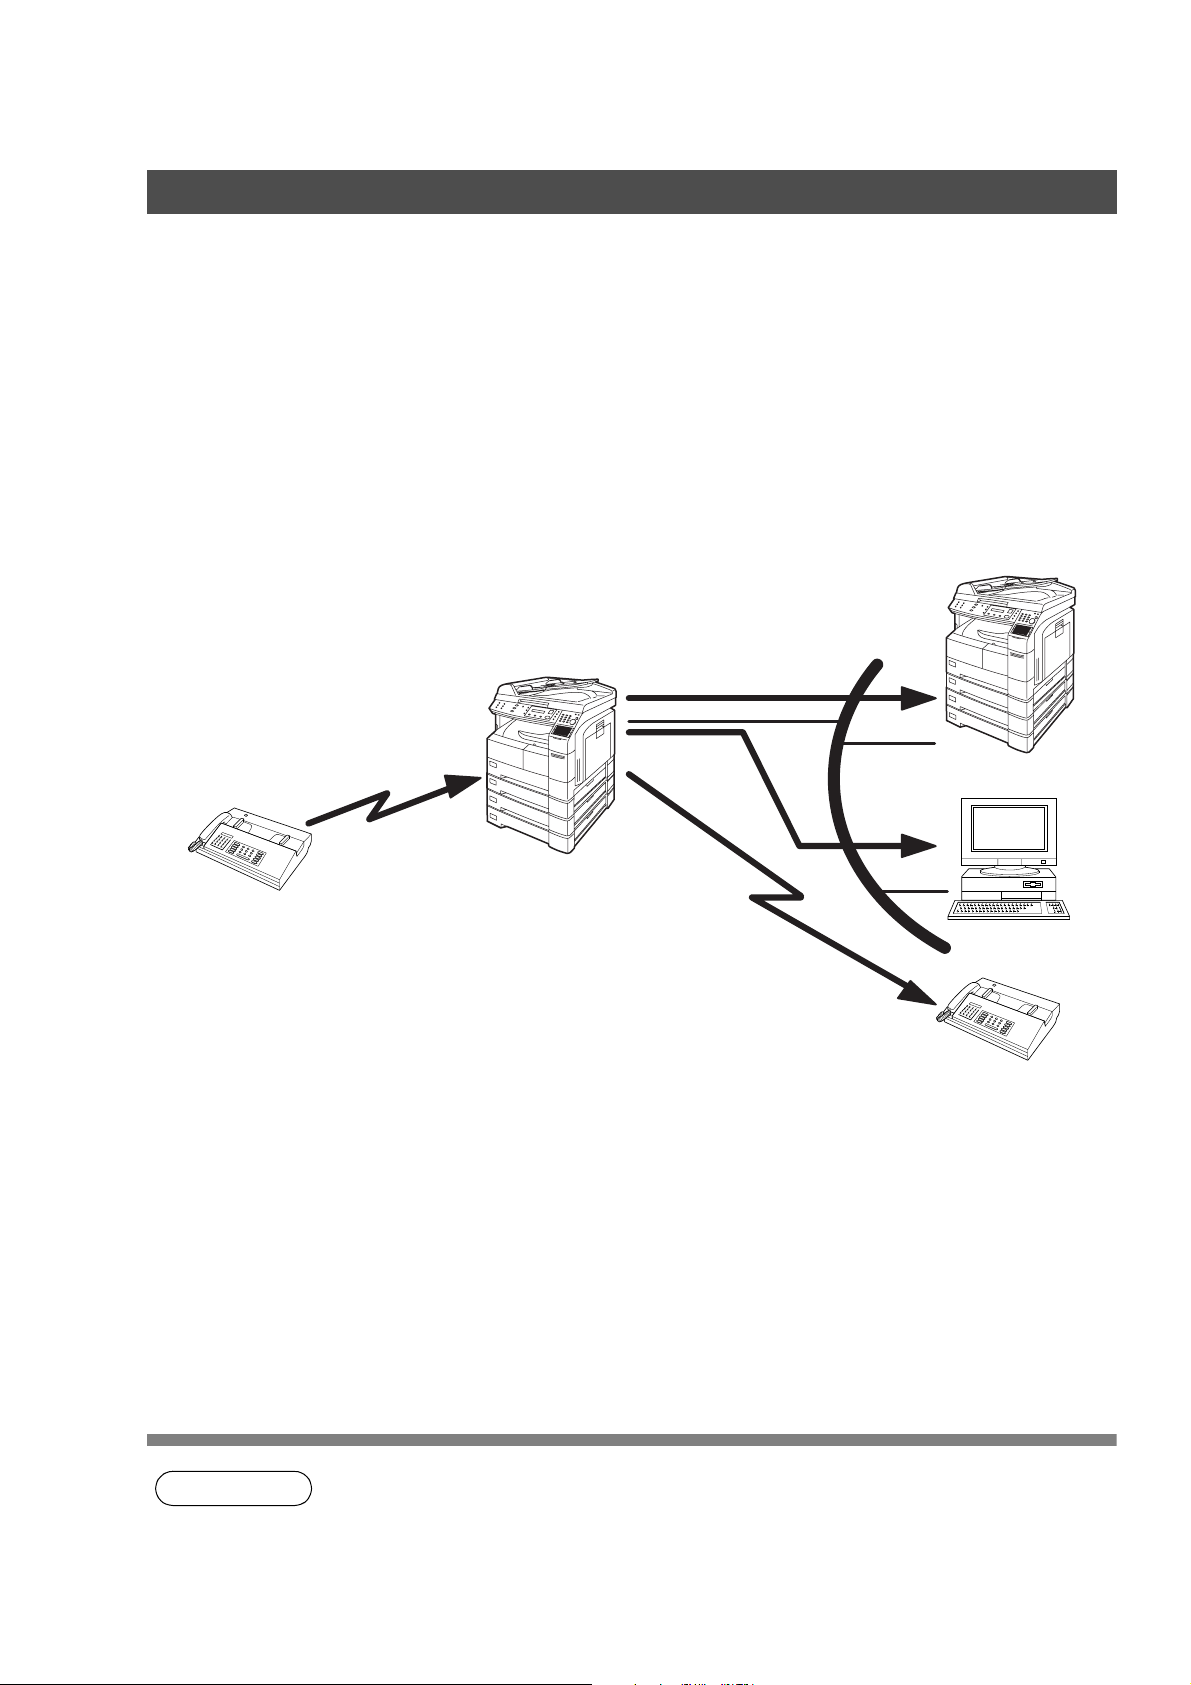
Inbound Routing
Using the Inbound Routing feature, your machine can route documents received from a G3 fax machine to
email address(s) or to Internet Fax machine(s) connected to a LAN as an email, as well as to other G3 fax
machine(s) over the telephone line.
When an incoming Internet Fax, email or a regular fax document is received, your machine, checks for the
following:
1. First, your machine checks whether a sub-address is included. If it is, it will look for a sub-address match
within its auto dialer and will route the documents to the corresponding stations email address(s) and/or
telephone number(s).
2. If no sub-address is specified, then your machine tries to match the originating fax machine’s Numeric ID
(TSI) with the TSI routing within its auto dialer and will route the documents to the corresponding stations
email address(s) and/or telephone number(s).
G3 Fax
Fax Reception
Internet Fax
Email
LAN
Transfer to
a G3 Fax
Internet Fax
PC
G3 Fax
18
NOTE
1. If the originating fax machine does not support the above sub-address function, sub-address
destination(s) cannot be selected.
2. Your machine will allow you to register the same sub-address number for an email address
and a telephone number.
Internet Communication Features
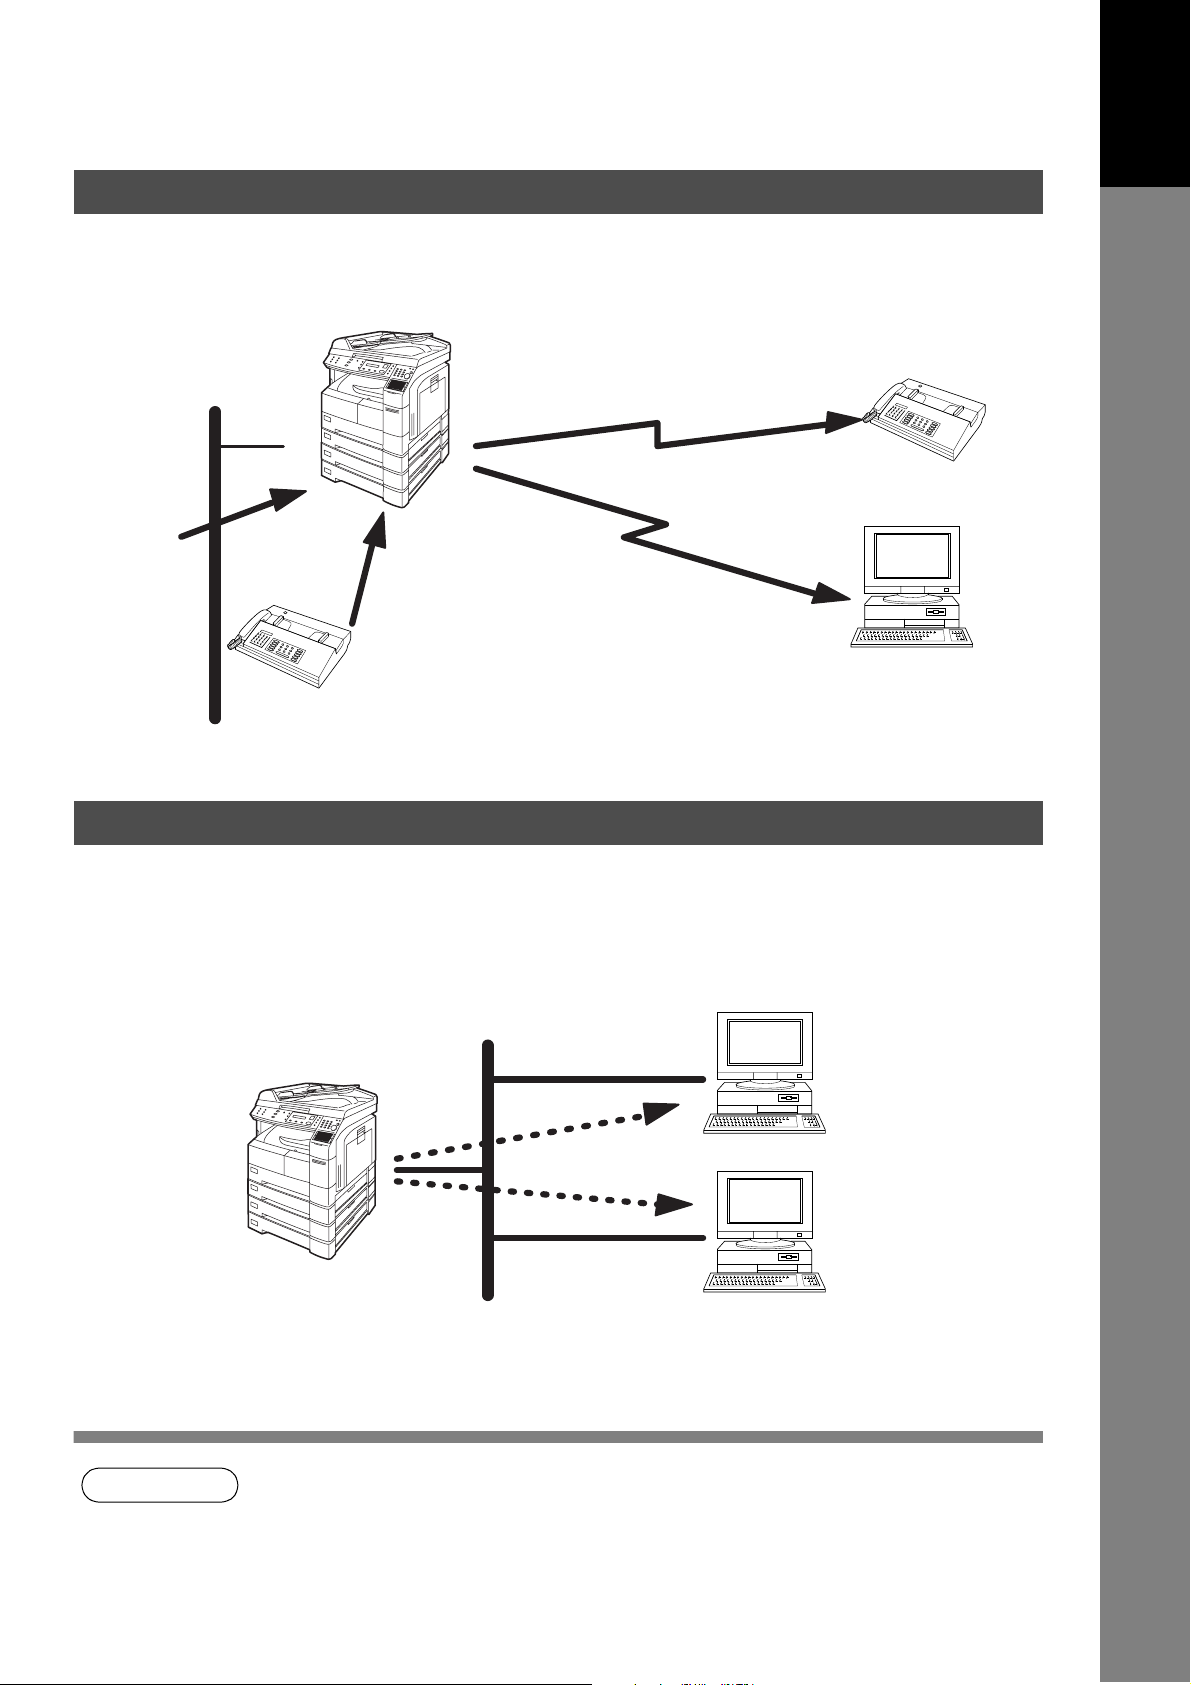
Fax Forward
Your machine is capable of transferring all received Internet email or regular G3 fax documents to a preprogrammed G3 fax or a PC destination.
Internet Fax
Getting to Know
Getting to Know
Your Machine
Your Machine
LAN
Email
Transfer to a PC
G3 Fax
Transfer to a G3 Fax
or
G3 Fax
PC
Network Scanner
Your machine can be utilized as a network scanner by simply transmitting an image to a PC as TIFF-F
attachment to an email.
This feature was enhanced with an addition of a new Fax Parameter No. 164 (IFAX XMT HEADER), giving
you a selection of whether to include the header when sending a document to an address in the same
Domain as specified in the Default Domain parameter. (See Note 1)
NOTE
LAN
Internet Fax
PC
PC
1. When sending to a Domain other than as specified in the Default Domain parameter, the
header will be included regardless of the selection.
19
Internet Communication Features
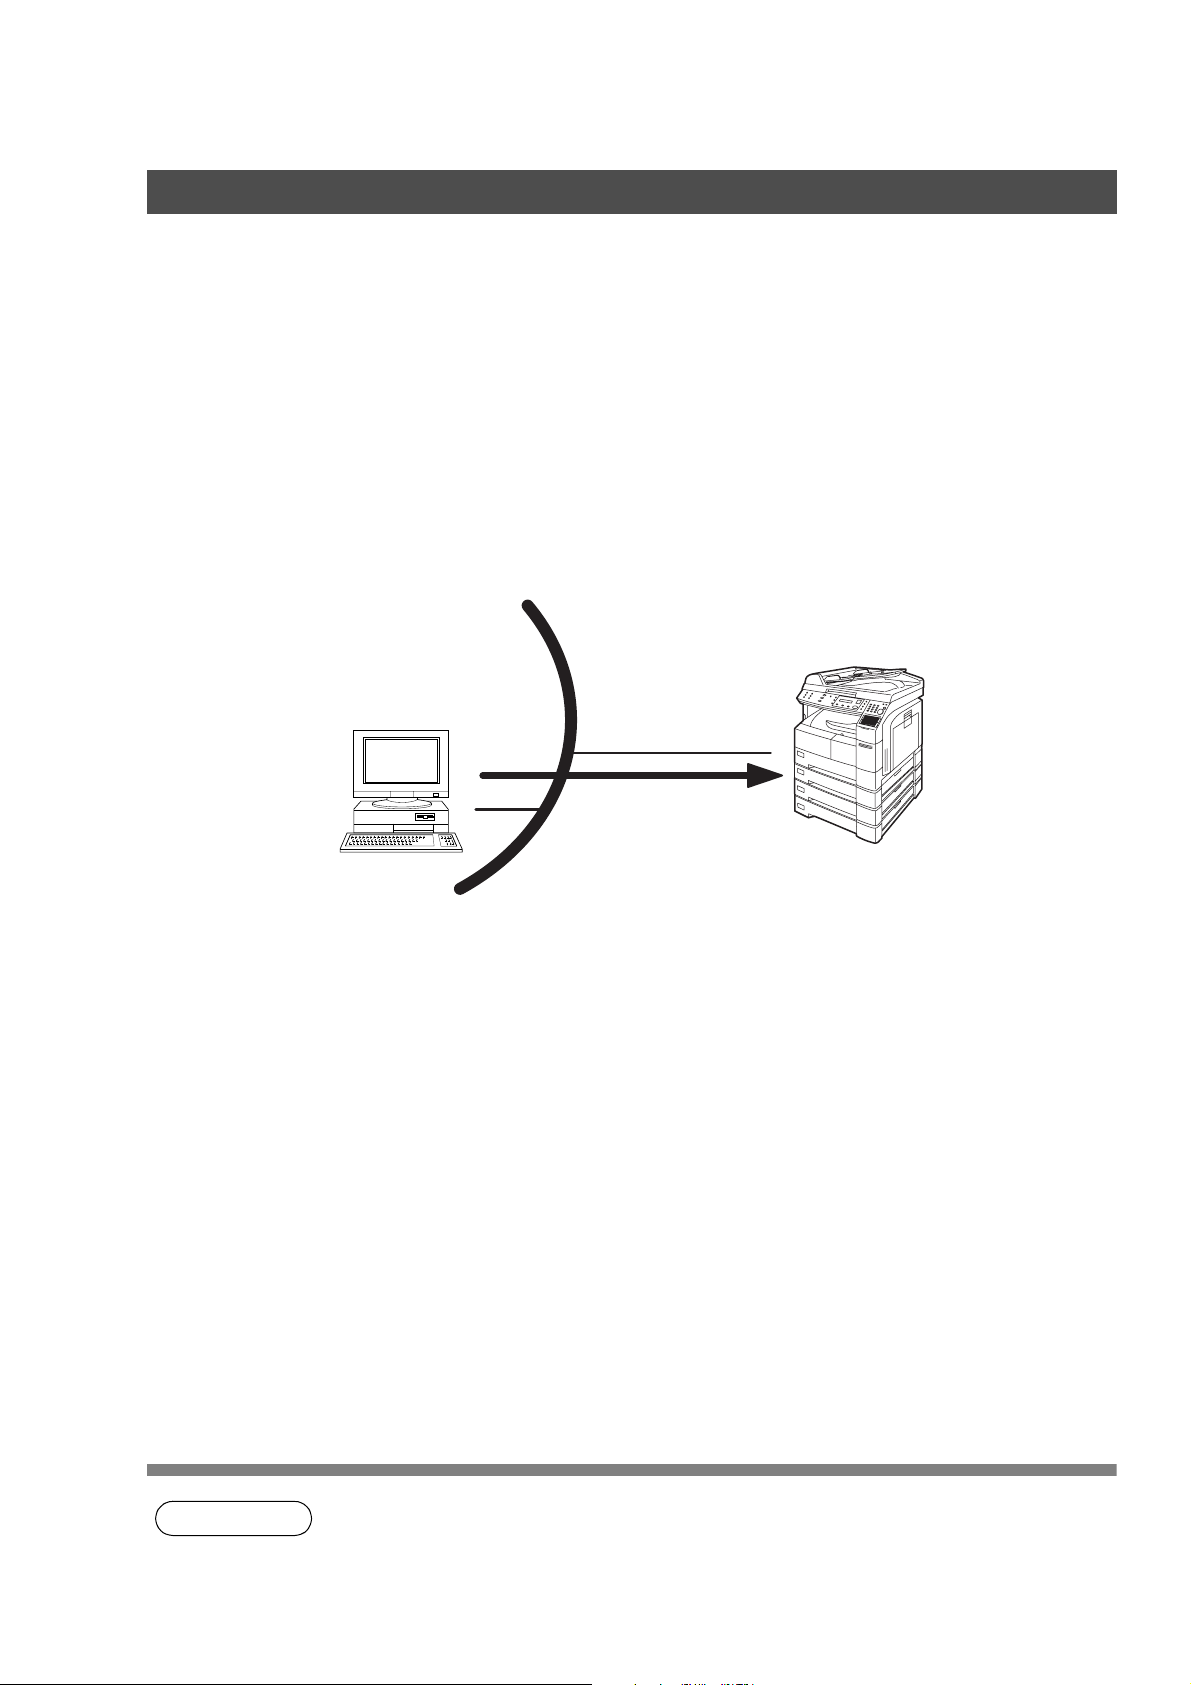
Network Printer
Your machine can be utilized as a network printer by simply sending the documents created on your PC
using various software applications to your machine via TCP/IP protocol.
There a two parts to setting up your machine as a network printer. Part 1 requires you to download the
software (printer driver and LPR) from the web site listed below.
The second part requires you to install and configure the software on your PC to work with your machine.
(See the web site for details about the printer driver installation and operation.)
You can download the Panasonic’s printer driver and LPR monitor from any of the following URL addresses:
http://www.panasonic.co.jp/mgcs/internetfax/
http://www.panasonic.com/internetfax
PC
LAN
Internet Fax
Print
20
NOTE
1. The IP Address, Subnet Mask and Default Router IP Address (TCP/IP Gateway Address) must
be programmed on your machine to use as a Network Printer.
Internet Communication Features
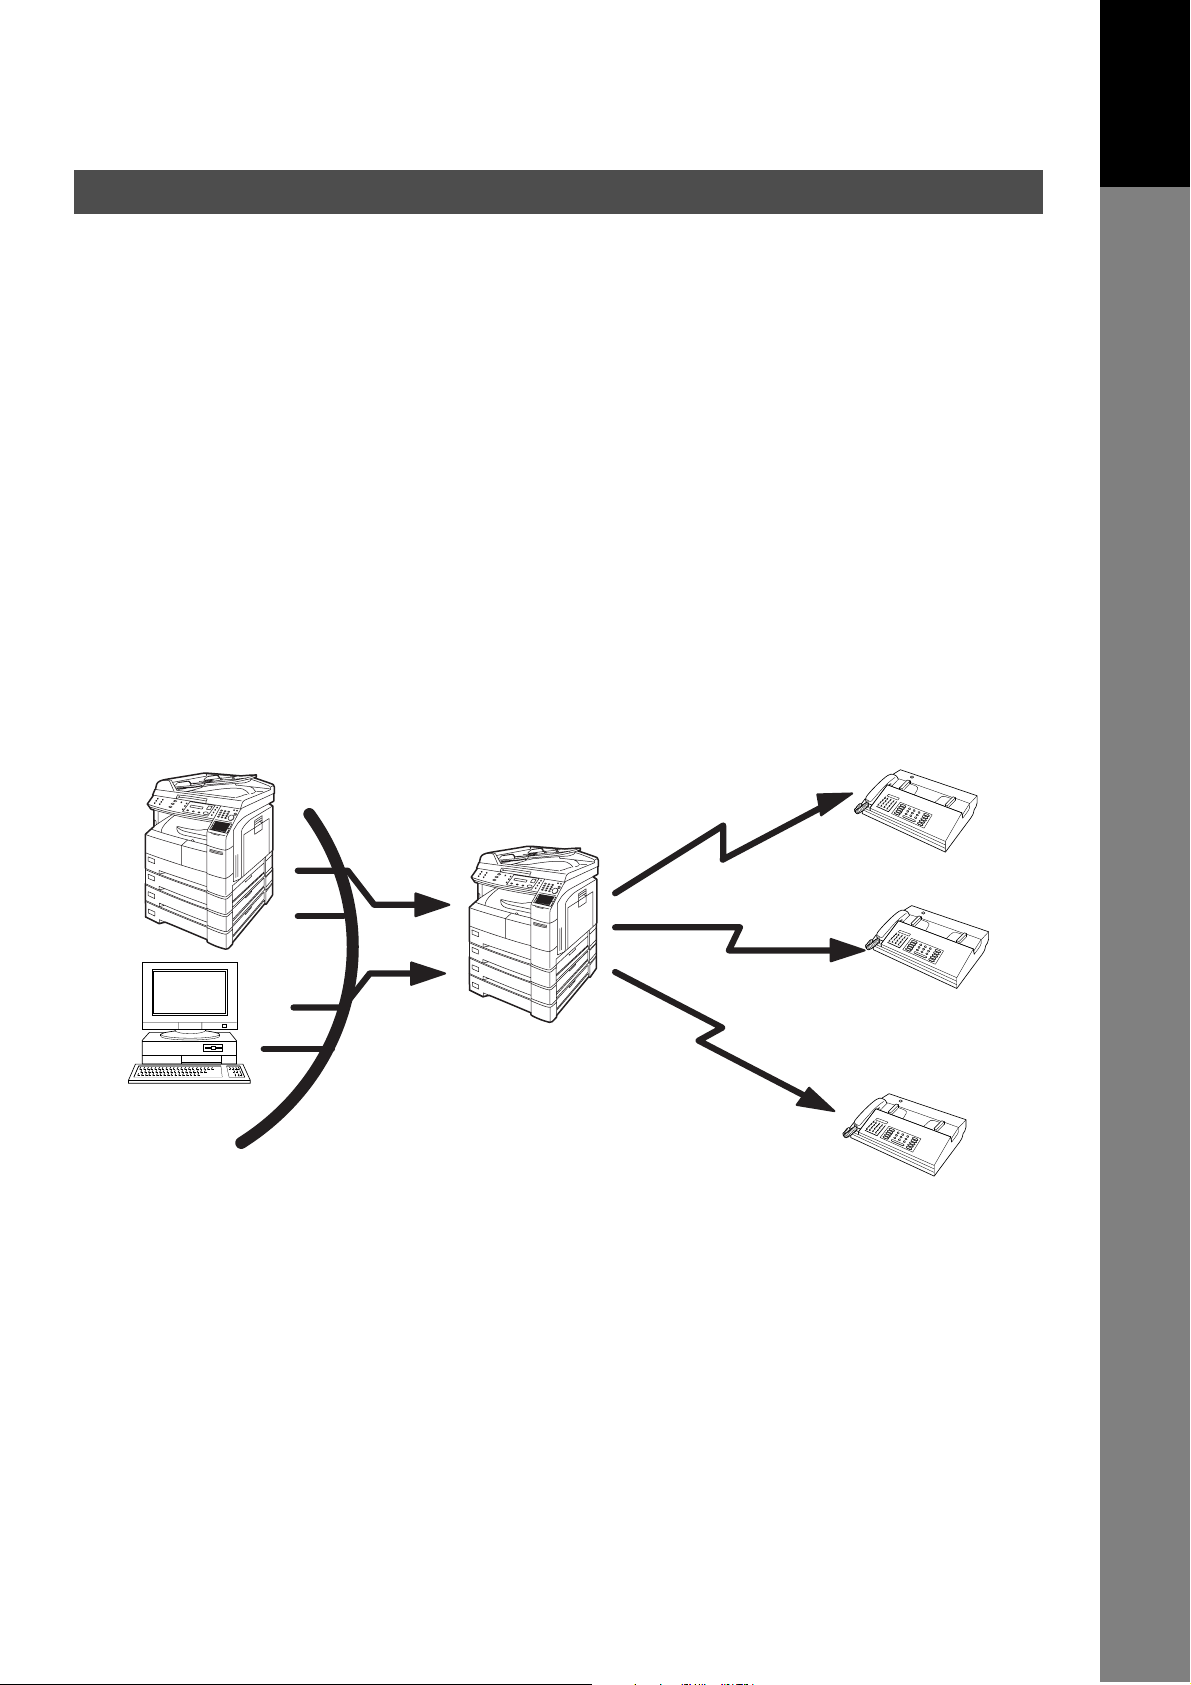
Relayed Transmission
Your machine allows you to transmit an email received from an Internet Fax or PC connected to the LAN to
multiple fax machines via a telephone line. You can attach files with the TIFF-F format to this email.
Using the Sub-address specified by the originating fax machine, your machine can then route the received
documents to the remote machine via an email, which can then relay these documents to final destinations
where the final recipient is a regular G3 fax machine.
Your machine also allows you to convert a data file from various application programs such as spreadsheet
into a TIFF-F format file and then transmit this file attached to an email.
To convert applications into a TIFF-F formatted file, however, requires you to first download the software
(printer driver) from the web site listed below. The second part requires you to install the software on your
PC.
(See the web site for details about the printer driver installation and operation.)
You can download the Panasonic’s printer driver from any of the following URL addresses:
http://www.panasonic.co.jp/mgcs/internetfax/
Getting to Know
Getting to Know
Your Machine
Your Machine
http://www.panasonic.com/internetfax
Internet Fax
LAN
Email
PC
Transfer to a G3 Fax
Internet Fax
G3 Fax
Transfer to a G3 Fax
G3 Fax
Transfer to
a G3 Fax
G3 Fax
21

Important Information
Your machine uses the same communication protocols as email: the Simple Mail Transfer Protocol (SMTP).
The differences from a standard G3 fax communication using the Public Telephone Network (PSTN) are as
follows.
Differences between Internet Fax and Regular Fax
A regular Fax machine goes off-hook, dials, and the phone network completes a circuit over phone lines to
the receiving fax. You pay for the circuit. The two faxes negotiate a connection, synchronize and exchange
image data.
The Internet Fax works like an email, the image data is broken down into packets and transmitted through
your Local Area Network (LAN) to the Internet or Intranet instead of using a telephone company’s network,
thus saving you long distance costs.
Transmitted Document Confirmation
1. Your machine does not directly connect to the final destination, but rather connects to a Mail Server via
LAN. Therefore, if a document cannot be correctly transmitted due to an error, the erroneous mail may
be returned from the Mail Server to your machine.
2. The erroneous mail may take a long time to return (20 to 30 minutes) depending on the destination
location, traffic on the network or LAN system configuration.
3. Depending on the Mail Server, it is also possible that erroneous mail is not returned at all. Therefore,
when transmitting important or time sensitive documents, it is recommended that you follow up with a
telephone call to confirm reception.
4. Documents cannot be transmitted correctly if the destination Mail Server does not conform to the MIME
protocol. Erroneous mail may not be returned depending on the Mail Server.
Your machine Cannot Make a Phone Call via LAN
Your Panasonic machine can only make a phone call using a regular telephone line (PSTN).
Transmission Resolution
In view of PC transmission, the factory default setting for the resolution is set to FINE mode. If required, this
setting can be changed to Normal.
Internet Mail Reception
1. Your machine can receive text email from a PC and print ANSI characters. It will print a "n" symbol if an
unrecognized character is received.
2. Received email font and character size are fixed and cannot be changed.
3. Text email will be printed at about 72 lines per page. It is recommended that you use A4/Letter size
recording paper.
4. If the received text email includes a file attachment in a format other than TIFF-F, such as Word, Excel,
Power Point, your machine prints an error message instead.
5. If the received email includes attached TIFF-F formatted image files, the text and TIFF-F formatted image
file will be printed on separate pages.
22

Important Information
Sending Document Size via LAN
When transmitting via LAN, the transmitter is incapable of identifying the receiver’s recording paper size
capability, and thus it will not reduce the document size. Therefore, when transmitting via LAN, it is
recommended that you use only A4/Letter size documents. If a Ledger/B4 size document is transmitted and
the receiver is only able to print A4/Letter size, the communication will fail when the Fax Parameter No. 141
(LAN XMT REDUCTION) is set to "1:Invalid" or the Select Mode "LEDGER EMAIL XMT" is set to "On".
Sending a Document to a PC via LAN
When transmitting a document to an email address, the following instructions are sent as text message in
addition to the TIFF-F formatted image file.
An Image data in TIFF-F format has been attached to this email. You can download the TIFF-F Image
Viewer from the following URL addresses:
http://www.panasonic.co.jp/mgcs/internetfax/
http://www.panasonic.com/internetfax
Getting to Know
Getting to Know
Your Machine
Your Machine
Internet Relayed Transmission
To prevent unauthorized stations from accessing your Relay Station for Internet Relayed Transmission, you
must set up your Network security. Enter a Relay Station Name, which is concealed from the final
destinations and a Manager’s Email Address for notification of all Internet Relayed Transmissions.
23
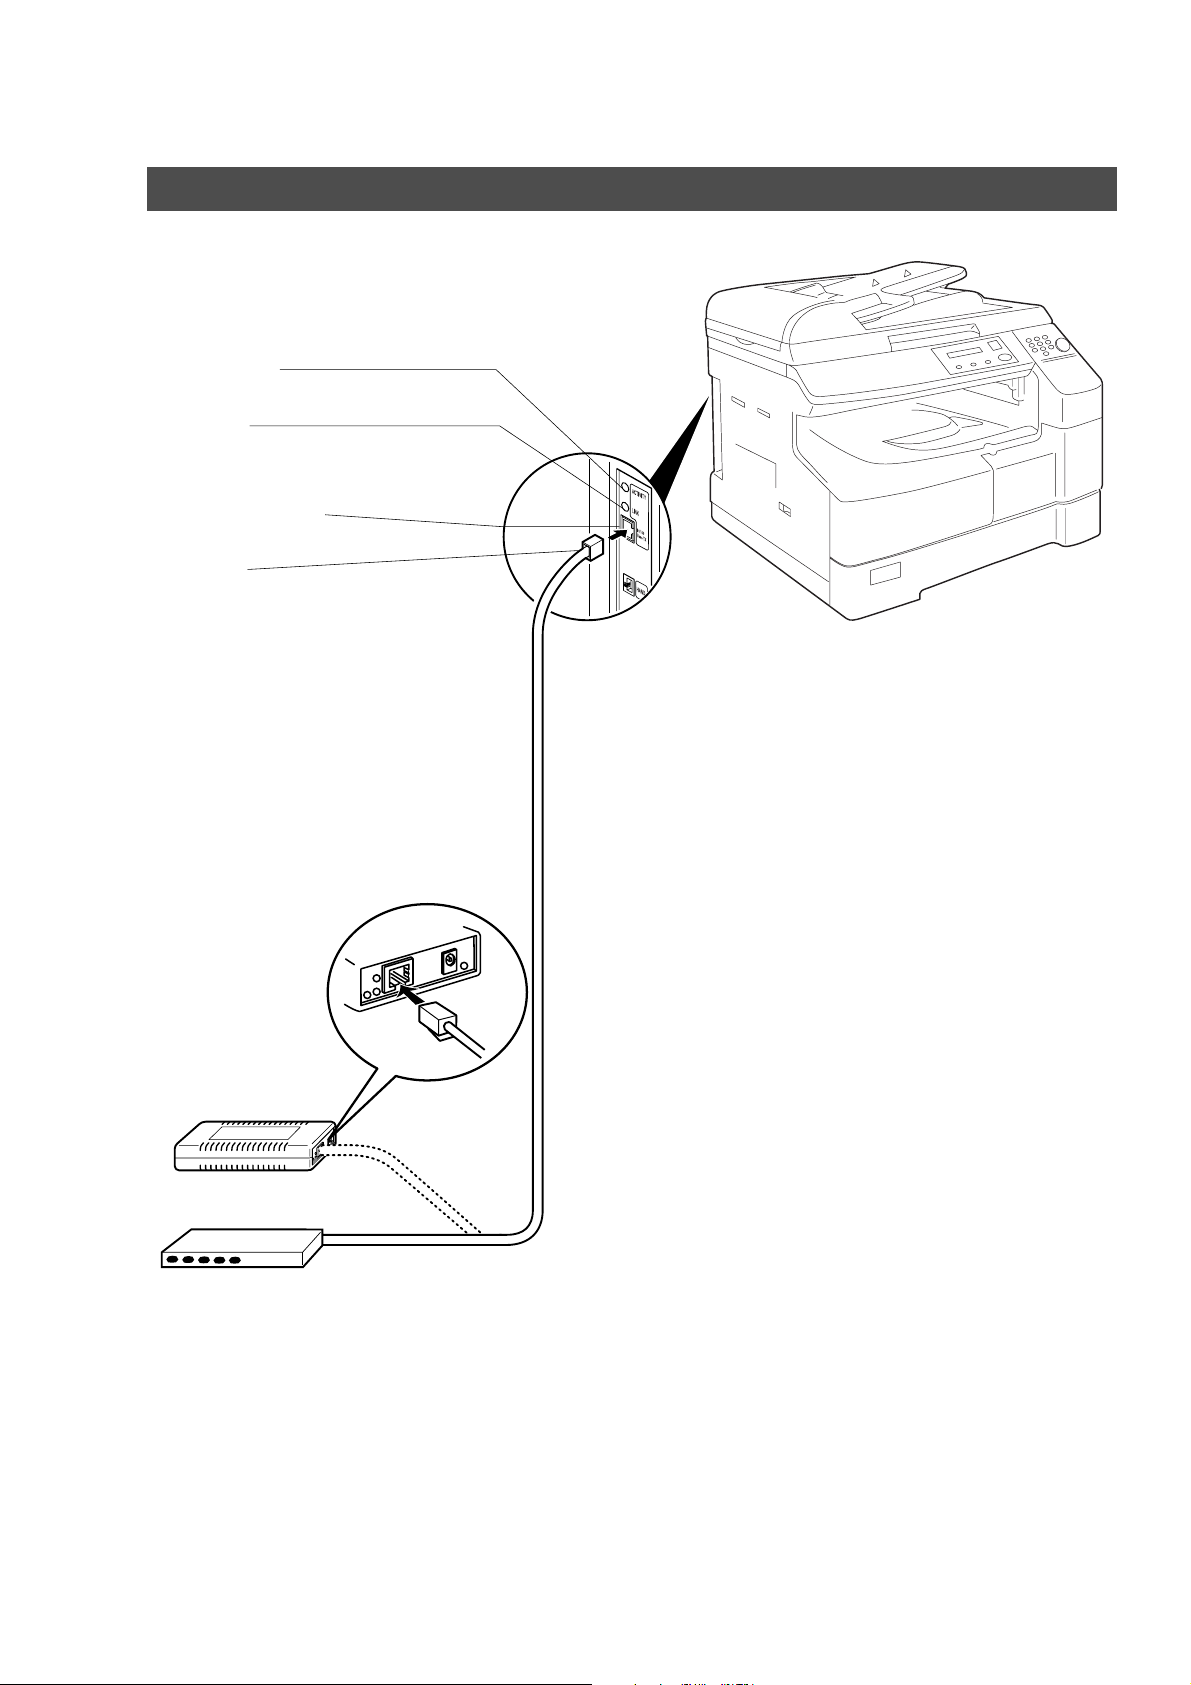
Connecting the LAN Cables
ACTIVITY Lamp
Blinks when there is data traffic on the LAN.
LINK Lamp
Illuminates when connected to the LAN. Lamp will
not turn ON if LAN cable is defective (contains
breaks).
LAN Connection Jack
(10Base-T/100Base-TX)
LAN Cable
(10Base-T/100Base-TX Cable)
Insert the plug until a click is heard.
(LAN cable is not included with the product.)
Purchase a Category 5 Cable, compliant with
EIA/TIA 568-A-5 standard.
Ethernet-Token-Ring
Bridge
(Optional Order
No. UE-204006)
10Base-T/100Base-TX Ethernet Hub
Ethernet LAN
(10Base-T/100Base-TX)
Cable (Not included)
24
Installing Your Machine
User Parameters
Setting the User (Internet) Parameters
See Operating Instructions (For Facsimile) if you wish to set the basic settings (User Parameters).
Before starting, you will need a completed copy of page 15 (Pre Installation Information). For your machine
to be able to operate on the Network properly, the following five (5) Basic Parameters must be preprogrammed into the machine.
• IP Address
• Subnet Mask
• SMTP Server Name or IP Address
• Default Router IP Address
• Email Address
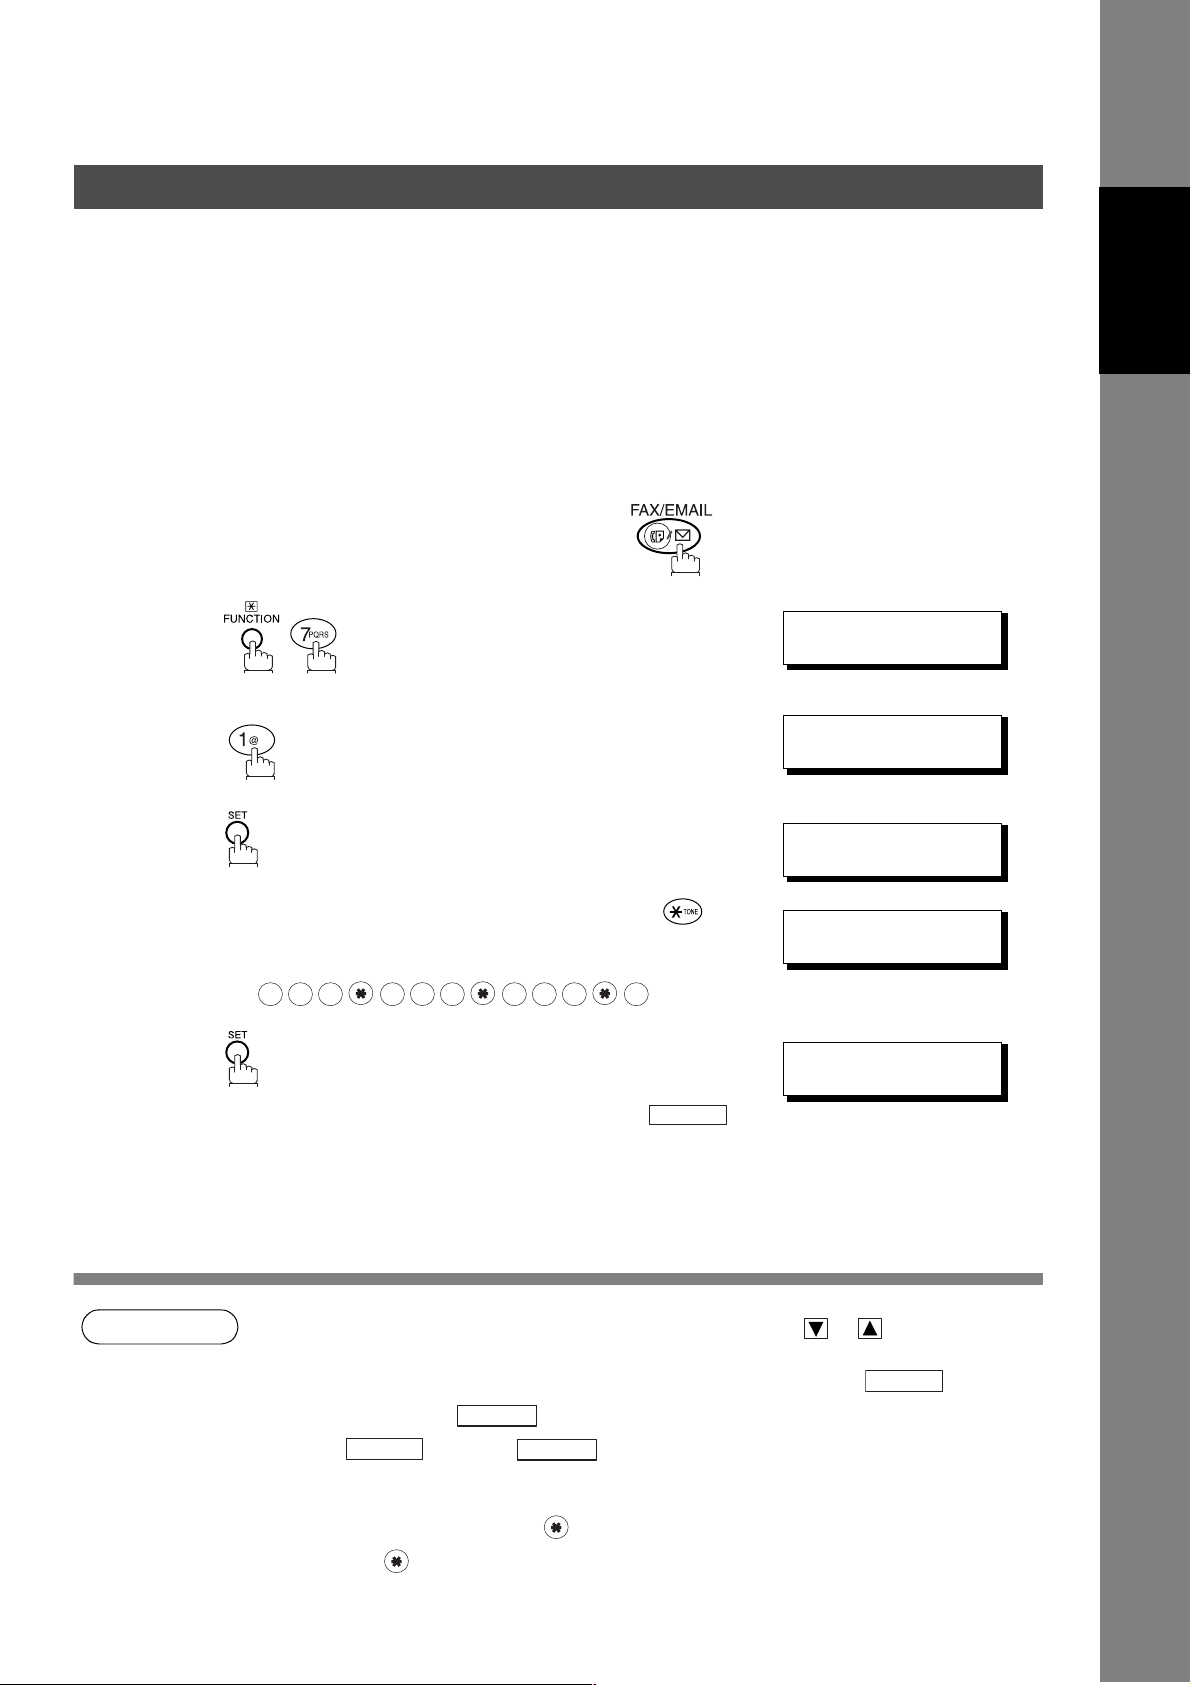
Make sure that the FAX/EMAIL lamp is ON. If not, press to select the "FAX/EMAIL" mode.
Machine
Installing Your
Installing Your
Machine
1
2
3
4
5
.
repeatedly until display shows;
Enter the IP Address using the keypad. Press to
enter the period ".". (See Note 4)
Ex:
1 2
3
To continue setting other parameters, or press
to return to standby.
1 7 8 2 4 0
3
STOP
SET MODE (1-4)
ENTER NO. OR
1:USER PARAMETERS?
PRESS SET TO SELECT
IP ADDRESS
❚
IP ADDRESS
123.178.240.3❚
SUBNET MASK
❚
∨∧
NOTE
1. To scroll the display to desired User Parameter in Step 3, press or .
2. The above IP Address fields require an entry to continue. If you wish to erase any of the above
IP Addresses (leave it Blank) and continue to the next Step, press , then enter
"0.0.0.0" and press . Other IP Addresses do not require an entry to continue, just
press and press to proceed.
CLEAR
3. If the DNS Server is not available, change the setting of the Fax Parameter No. 161 (DNS
Server) to "Invalid", then enter the IP Address instead.
4. For convenience, you can use to enter a period "." while programming IP Addresses only.
Otherwise is used to enter an asterisk in other condition.
SET
SET
CLEAR
25

Setting the Internet Parameters
Setting the User Parameters for the LAN Interface
Depending on how your machine will be configured to communicate on the LAN, the appropriate
parameters listed in the table below must be stored first. (See pages 12 to 16)
Parameter Comments
1 DATE & TIME Current Date and Time.
2 LOGO Up to 25 characters & digits.
3 CHARACTER ID Up to 16 characters & digits.
4 ID NO. Your Fax Telephone Number. (Up to 20 digits)
5 TIME ZONE The Time Zone is required as part of the Email header information when sending
Internet faxes.
6 MAC ADDRESS Hardware Address hard-coded into your machine. (If required, can be obtained from
the 2nd page of the Fax Parameter List printout, by pressing.
[FUNCTION] [6] [4] [SET])
7* IP ADDRESS IP Address assigned to your machine.
8* SUBNET MASK Subnet Mask assigned by the Network Administrator.
9* SMTP SERVER NAME The name of the SMTP Mail Server. (Up to 60 characters)
10* SMTP SERVER IP ADDR IP Address of the SMTP Mail Server.
11* DEF. ROUTER IP ADDR IP Address of your Default Router.
12* EMAIL ADDRESS The Email Address assigned to your machine for sending and receiving. (Up to 60
characters)
13* DNS SERVER IP
ADDRESS
14* POP SERVER NAME Name of the POP Mail Server.
15* POP SERVER IP ADDR IP Address of the POP Mail Server.
16* POP USER NAME User Name assigned to your machine. (Up to 40 characters)
17* POP PASSWORD Password assigned to your machine. (Up to 10 characters)
18* HOST NAME The Host Name assigned to your machine. (Up to 60 characters)
19 DEFAULT SUBJECT The default information to be added to the Subject Line for all outgoing Email (up to 40
20 DEFAULT DOMAIN When the outgoing email address is incomplete by SMTP standards, the Frequently
21 SELECTABLE DOMAINS
(01) ~ (10)
22 REMOTE PASSWORD This is a security password that allows Remote Programming of the Internet
23 RELAY XMT PASSWORD A password that provides Network security for your Relay Station (used exclusively for
24 MANAGER’S EMAIL
ADDR
25 RELAY DOMAIN
(01) ~ (10)
IP Address of the DNS Server. If the DNS Server is not available, change the setting
of the Fax Parameter No. 161 (DNS Server) to "Invalid", then enter the IP Address
instead.
characters). To manually input this information before transmission, change the Fax
Parameter No. 159 (SUBJECT LINE ENTRY) to "2:Valid".
Sent Domain specified here will be automatically added to the email address. This
feature is also useful as a shortcut when manually entering email addresses to a
frequently used Domain. (Up to 50 characters)
Enter up to 10 Domain Names that can be selected after the Domain "@" key is
pressed using the "\/ or /\" key during Manual email addressing. (Up to 30 characters)
Parameters and Auto Dialer or the retrieval of the Journal via an Email. (Up to 10
characters)
G3 relay purposes). (Up to 10 characters)
Department Manager’s Email Address for notification of all Internet relayed
transmissions for supervision and cost control purposes. (Up to 60 characters)
Enter up to 10 Domain Name(s) that have been authorized to access your Internet Fax
for Relayed XMT Request. (Up to 30 characters)
Relay Domain, a.k.a. Domain Name in the DX-1000/2000.
26
* Contact your Network Administrator for this Information.

Programming or Retrieving Parameters via Email
Using Email to Program or Retrieve Parameters
This feature is a powerful tool, which provides a convenient and easy way of retrieving or programming
Internet Parameters, One-Touch, ABBR Dialing Numbers, Program keys and Journal retrieval from your PC
by sending a text email message to your machine.
Using your email application’s "Subject:" line as a command-input field, you can request your machine to
perform the following commands:
"Subject:" Line Command Function
1 #set parameters(password)# Programs the Internet Parameters
2 #get parameters(password)# Retrieves the Internet Parameters
3 #set abbr(password)# Programs the Auto Dialer
4 #get abbr(password)# Retrieves the Auto Dialer Data
5 #get jnl(password)# Retrieves the current Journal data
Where: "set" is used to program the data
"get" is used to retrieve the data
"parameters" represents Internet Parameters
"abbr" represents Auto Dialer
"jnl" represents Journal
"password" is the Remote Password programmed in your machine’s User Parameters
(i.e. 123456789). Must be enclosed within the parenthesis "( )".
The command must be enclosed within the hash (#) signs.
Machine
Installing Your
Installing Your
Machine
Using a PC to Input the Internet Parameters Remotely
This feature provides a convenient and an easy way to input the Internet Parameters right from your PC by
sending a text email message to your machine.
The following parameters can be input remotely via a PC. The other parameters must be entered from the
machine in the User Parameters. (See page 25)
• Sender Selection (up to 24 User Names, see page 85)
• Default Domain
• Selectable Domains (up to 10 additional Domain Names)
• Remote Password
• Manager’s Email Address
• Relay XMT Password
• Relay Domain (up to 10 Domain Names authorized for Relay XMT Request)
Your machine interprets the command that you enter in the "Subject" line of your email message and
performs one of the following functions, it Retrieves or Stores data into the Internet Parameters (User
Parameters).
The two types of commands that can be entered in the "Subject" line of your email:
1) To Store
data, type
2) To Retrieve
data, type
:
#set parameters(password)#
:
#get parameters(123456789)#
: where the "password" is the Remote Password programmed in
your machine’s User Parameters (i.e. 123456789).
You can enter the Internet Parameters shown above with this
command the first time. However, if these fields already contain
data, do not use this command as the existing information will
be deleted and overwritten. Use the Retrieve command below
instead, refer to pages 30 to 34.
NOTE
1. To activate this feature, change the Fax Parameter No. 158 (PC REMOTE UPDATE) to "Valid".
(See page 57)
27
Programming or Retrieving Parameters via Email
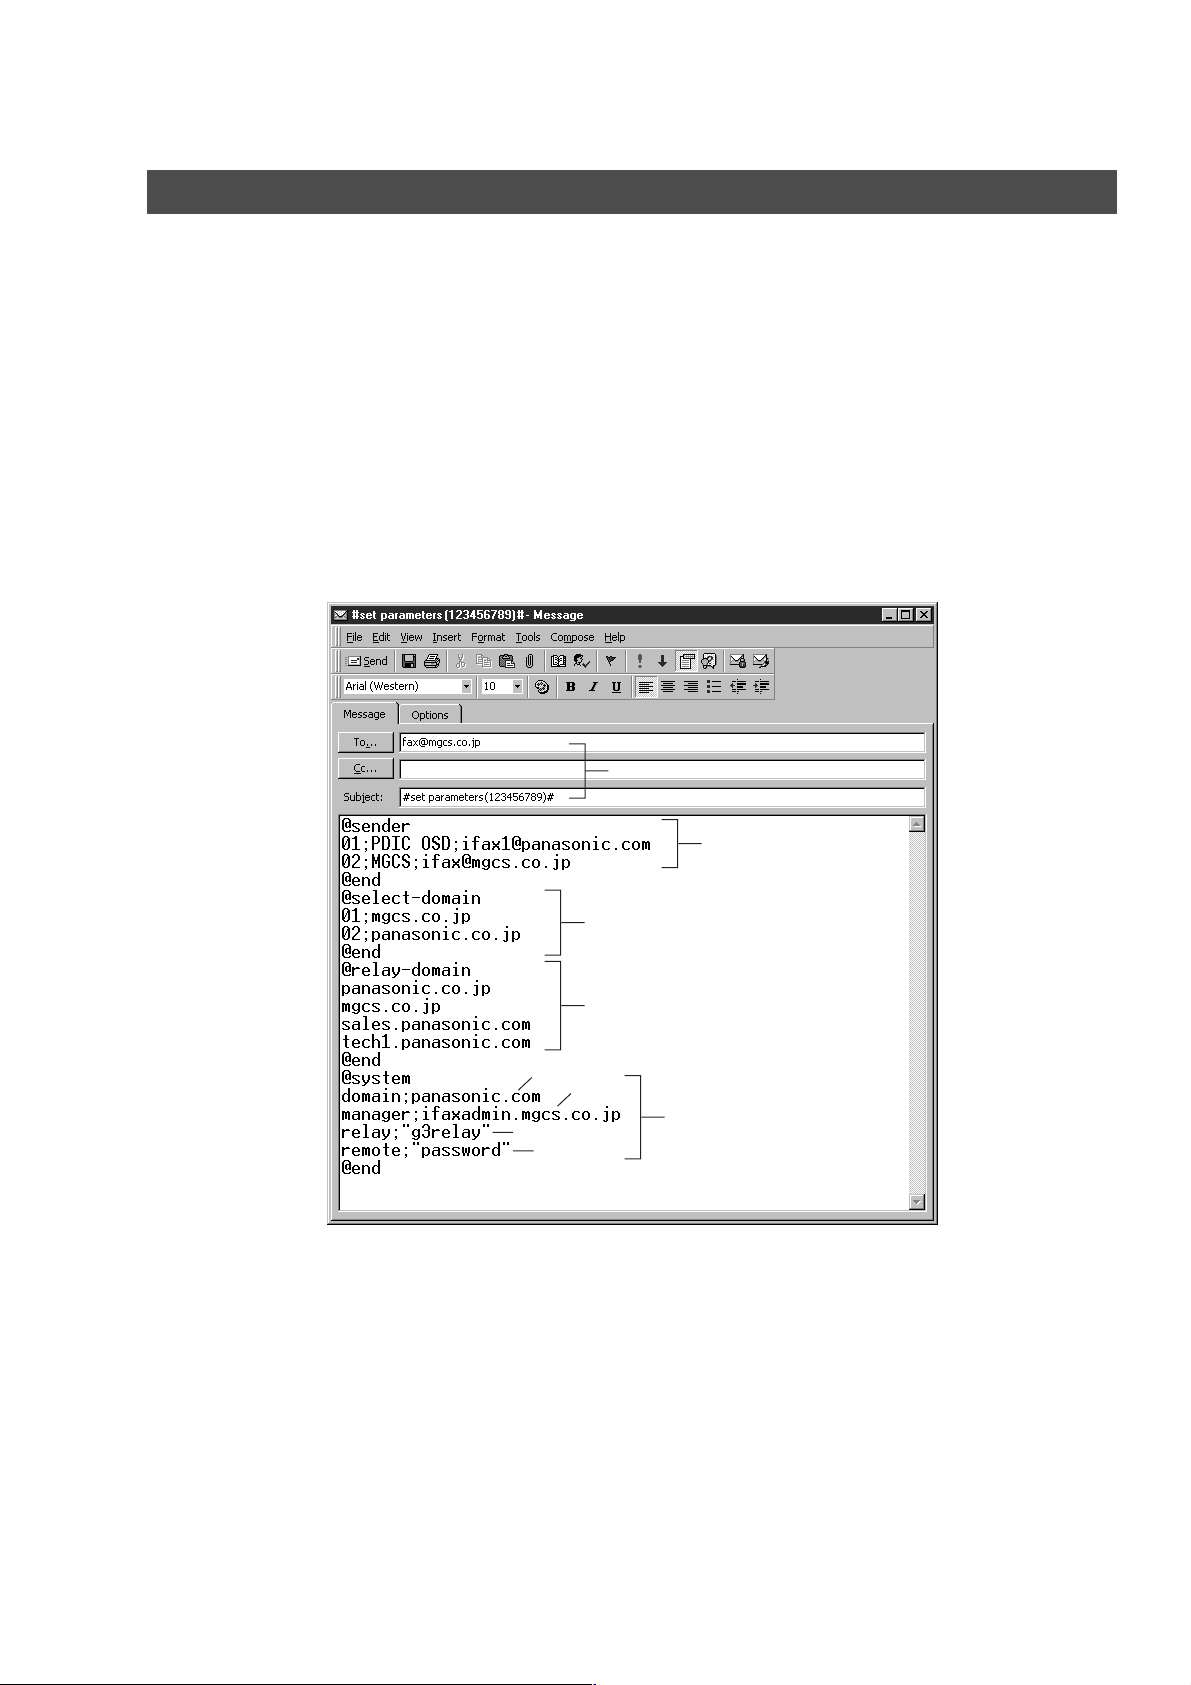
To Input the Internet Parameters for the First Time
Create a script in the message body of a plain text email and send it to your machine’s email address. The
"Subject" line of the email must be as follows:
#set parameters(password)#
Important : Do not use the above command if these fields already contain data,
The script sample to input the Internet Parameters is shown below.
: where the "password" is the Remote Password programmed in your
machine’s User Parameters. For security, always input a Remote
Password in the User Parameters. [If it was not programmed, signify
with "()" (i.e. #set parameters()#) and assign one now].
the existing information will be deleted and overwritten. Retrieve and
backup the existing data onto your PC first by following the
procedures for Retrieving and Editing the Internet Parameters on
pages 30 to 34.
(1)
(2)
(c)
(a)
(d)
(3)
(4)
(b)
(5)
28

Programming or Retrieving Parameters via Email
To Input the Internet Parameters for the First Time
Explanation of Contents
(1) To : Your machine’s email address.
From : This field is normally not visible when creating new email message(s).
It is your default email address (email application), for retrieving the Internet
Parameters and for error message notification.
(Can be programmed with the configuration tool of your email program.)
Subject : To Store data, type: #set parameters(password)#
(2) @sender to @end : Defines the Sender information to be set in section (2) between @sender to @end
block. Register up to 24 User Names and their Email Addresses for the Sender
Selection feature (See page 85).
Separate each data field with a semicolon (;). (If the remaining fields are to remain
blank, insert a semicolon (;) for each blank field)
The data string for each Sender Selection should be defined within a single line.
The syntax is: <Sender Selection Number>;<User Name>;<Email Address>
(a) 01 to 24: Indicates the Sender Selection Numbers
(b) User Name (25-characters maximum)
(c) Email Address (60-characters maximum)
(3) @select-domain to @end : Defines the Selectable Domains to be set in section (3) between @select-domain
to @end block. Register up to 10 Domain Names that can be selected during
manual email addressing. (30-characters maximum)
The syntax is: <Number>;<Domain>
(4) @relay-domain to @end : Defines the Domain Names to be set in section (4) between @relay-domain to
@end block. Register up to 10 Domain Names that have been authorized to
access your Internet Fax for Relayed XMT Request. (30-characters maximum)
(5) @system to @end : Defines the Internet Parameters to be set in section (5) between @system to
@end block. Register the following Internet Parameters.
(a) Default Domain (30-characters maximum).
The syntax is: domain; <Default domain name>
(b) Manager’s Email Address (60-characters maximum).
The syntax is: manager; <Manager’s Email Address>
(c) Relay XMT Password (10-characters maximum).
The syntax is: relay; <Relay XMT Password>. Quotation marks " " enclosing
the password, are required, as shown in the example above.
(d) Remote Password (10-characters maximum).
The syntax is: remote; <Remote Password>. Quotation marks " " enclosing the
password, are required, as shown in the example above.
Machine
Installing Your
Installing Your
Machine
NOTE
1. The machine cannot be programmed via email while it is communicating or printing.
2. Some email applications automatically insert a line feed in the middle of a line when the
number of characters in a line exceed a specific number. Turn "Off" the automatic line feed, or
define the number of characters per line to prevent a line feed, or the data will be ignored.
29

Programming or Retrieving Parameters via Email
To Retrieve the Internet Parameters for Backup
To retrieve the existing Internet Parameters, send a plain text email to your machine’s email address with
the following command in the "Subject" line:
#get parameters(password)#
(1) To : Your machine’s email address.
From : This field is normally not visible when creating new email message(s).
Subject : To Retrieve data, type: #get parameters(password)#
: where the "password" is the Remote Password programmed in your
machine’s User Parameters (i.e. 123456789). For security, always
input a Remote Password in the User Parameters. If it was not
programmed, signify with "()" (i.e. #get parameters()#).
Make sure that the CC..., Bcc... lines and the body of the email
message is Blank.
(1)
It is your default email address (email application), for retrieving the Internet
Parameters and for error message notification.
(Can be programmed with the configuration tool of your email program.)
30
 Loading...