

Page 1

Setting Up the Network Server
The Windows NT 4.0 hosts file provides compatibility with the
UNIX hosts file. The file is used a s a local Do main Name
Services (DNS) equivalent. It has the same format as the
/etc/hosts file on the UNIX servers:
IP Address<TAB>hostname<TAB>#comments
where <TAB> indicates that you press the Tab key.
To determine the IP Address and Server Name (host name) of
your system, print a configuration page from the DP-C106 control
panel.
Type the entry without any spaces, but substitute the values appropriate for
your environment. The hostname should be the same name you gave to the
DP-C106 in the Server Setup on the control panel.
A sample entry for the DP-C106 as the remote printer is
127.0.0.1<TAB>DP-C106<TAB>#Marketing_printer
If the printer has already been defined in an /etc/hosts file or equivalent host
name database on a UNIX workstation on our network, you should use the
same host name that is used for the remote printer in the /etc/printcap file.
2. Perform Printer Setup to support TCP/IP printing.
Enter the options in Protocol Setup. Enter the values for the IP
address of the printer, subnet mask and gateway address.
Installing the DP-C106 as a Shared Printer
The first step in creating a printer is installing the Adobe PostScript
printer driver files, which gives your applications access to some
printer features. For every workstation that will print directly and
independently to the DP-C106, refer to the chapter Installing user
software in a Windows environment for the appropri at e oper ating
system.
If you are an administrator running a Windows NT 4.0 server or
workstation, you can also create a printer and share it with Windows
NT 4.0 clients on the network. When a printer is shared, Windows NT
4.0 clients who are not able or who are not given permission to
establish an independent network connection to the printer can still
print through the server.
You can specify sharing of the printer at any time. If you have not yet
installed the DP-C106 printer files on the Windows NT 4.0 print server,
do so now.
6–10
If you have already installed the printer files on the Windows NT 4.0
server, refer to your Windows documentation for information about
sharing the server.
Page 2

Setting Up the Network Server
If more than one DP-C106 printing connection (for example, Print
queue and Hold Queue) is published, you may want to create a printer
for each print connection so that you and other users can print to each
queue directly.
Configuring Clients of a Windows NT 4.0 or Windows 2000 Server
Each client of a Windows NT 4.0 server is already using a network
protocol to communicate with the server. Each client can print to the
DP-C106 if the printer is shared by a Windows NT 4.0 or Windows
2000 server or workstation. In that case, the client workstation does
not have to use the same network protocol to connect to the Windows
NT 4.0 or Windows 2000 server as the server uses to communicate
with the printer.
1. For Windows NT 4.0 client workstations, before printing, connect
to the print server and select the printer.
2. Right-click the icon and select the Open option.
3. Select Yes to have Windows set up the printer.
After clients have selected the printer, they can choose it from Print
Setup, Page Setup or Print dialog box of their application. Clients can
change printing options for their own job, but printer properties are not
selectable. When a client selects Print, the job is transmitted to the
Windows NT 4.0 or Windows 2000 print server and on to the selected
queue on the DP-C106. The job is listed in the Print Manager on the
client workstation, and the administrator can track it in the DP-C106
window in the Print Manager on the Windows NT 4.0 or Windows 2000
print server.
6–11
Page 3

Setting Up the Network Server
Configuring the Server and Client Workstations for Fiery WebTools
Fiery WebTools provide access to many printer functions via the
Internet or corporate intranet, providing additional flexibility in remote
management. You can access the Fiery WebTools from a Windows
95/98/Me, Windows 2000, Windows NT 4.0 or Mac OS workstation.
Fiery WebSetup is supported for Windows 95/98/Me, Windows 2000, and
Windows NT 4.0 only.
Setting Up Fiery WebTools on the Printer
1. In Network Setup, enable TCP/IP.
2. Enter a valid, unique IP Address and Subnet Mask for the printer.
If necessary, enter a Gateway Address.
3. Enable Web Services.
4. In Printer Setup, confirm that the Print Queue is published.
Setting Up Fiery WebTools on a Client Workstation
1. Enable TCP/IP networking.
2. Enter a valid, unique IP Address for the printer and Subnet
Mask for the workstation. If necessary, enter a Gateway
Address.
3. Install an Internet browser that supports the Java language and
frames, such as Internet Explorer 4.x or higher or Netscape
Navigator 4.x or higher.
6–12
Page 4

Setting Up the Network Server
Accessing the Fiery WebTools
1. Start the Internet browser.
2. Enter the IP Address or DNS name of the printer.
3. Press Enter.
The Fiery home page is displayed. Select the name of a particular
WebTool to use. For more information, refer to the chapter that is
specific to the tool.
4. Select the Configure button and enter required information to
restrict user access to certain WebTools.
Changing the WebLink Destination
1. Start the Internet browser.
2. Enter the IP Address or DNS name of the printer.
3. Enter the Administrator password (if required) and select OK.
4. Press the Control key (Mac OS) or CTRL key (Windows) as you
select the WebLink button.
5. Enter the new WebLink address (URL) and select OK.
6–13
Page 5

Setting Up the Network Server
The Printer on a Network with UNIX Workstations
When a UNIX workstation is configured with the lpd protocol and
connected to the printer over a TCP/IP network, it can print directly to
the DP-C106.
Setting up UNIX workstations requires an administrator with root
privileges. After the initial configuration, UNIX users simply submit print
jobs to a named printer.
The job management tools, along with the other Fiery utilities and Fiery
WebTools, are not available on the UNIX platform. A Windows or Mac
OS computer on the same network as the UNIX computer that is setup
to use TCP/IP for printing to the DP-C106 can use the job
management tools to manage print jobs that originate from all
workstations on the network.
Setting up the printer in a UNIX environment has the same
requirements as setting up any printer or new device:
• A distinct IP address is needed for the printer and for each
workstation on the network.
• The printer is assigned a name that is associated with the IP
address.
• The IP address of the printer must be registered for the network in
a host database and also on the printer itself.
• The Print Queue or the Hold Queue (or both) must be published.
LPD printing to the Direct Connection is not supported.
6–14
Page 6

Setting Up the Network Server
The DP-C106 has a printer controller that understands lpd protocols.
The remote printer name (rp in the /etc/printcap file) must be used for
successful communication and must be either print or hold. The
remote printer name is also used in setting up Windows NT 4.0
workstations or servers that connect to the printer over TCP/IP. Enter
the remote printer name when you set up your printer in the Add LPR
Compatible Printer box.
Setting Up the Printer on TCP/IP Networks
Every host machine on a TCP/IP network, including the printer, must
have a unique 32-bit Internet address (IP address). Workstations on a
TCP/IP network can print directly to the DP-C106 as a remote printer,
or can print to a Windows NT 4.0 server or UNIX workstation acting as
a print server. Since the printer spools jobs and acts as a print server,
there is no advantage in placing another print server between a
workstation and the printer. If you choose to do so, however, there is
no difference in setup except that a client workstation does not have its
own spooling area.
Setting Up Printing on UNIX Systems
1. Specify the appropriate settings in Server Setup.
2. Specify the appropriate settings in Network Setup. Enter a valid
IP address, subnet mask and gateway address for the printer.
3. Specify the appropriate settings in Printer Setup. Publish the Print
Queue and/or Hold Queue.
6–15
Page 7

Setting Up the Network Server
Setting up TCP/IP for Communication with the Printer
1. The superuser (root login) must add the printer to the IP host
table of the network or other system database of network printers.
2. In the file or utility used by your network, specify the remote
printer name, the print server protocol, the queue, and the spool
file for the assigned printer name.
3. Make the printer available to other network users.
4. Verify the TCP/IP connection. From any workstation on the
network, access the command prompt and type the following:
ping <IP address>
After the printer is set up as a network printer, you can also type:
ping <host name>
The server should respond with a reply that includes the printer IP
address. Some systems will respond with a continuous display of
output from the IP address. To stop the output, press Control-C.
You can use the ping command at any time.
6–16
Page 8

7
Performing the Setup from the
Printer Control Panel
Initial printer setup for network printing must be performed at the
Printer Control Panel. The control panel on the top of the printer
enables you to set options and view the status of the printer and print
jobs. This chapter enables you to perform the following functions:
• Setup the Print Functions
• Specify Network Information and Network Protocol Options
• Perform Network Services Setup
• Print Information Pages
After network communication settings have been established, you can
specify additional Setup options from a client workstation using
WebSetup. Refer to Performing the Setup from WebSetup for more
information.
Set Up the Print Functions
Follow the procedures in this section for initial setup or to change setup
information at the printer.
1. Power On the printer and press the MENU button when the
message READY or POWER SAVER ON is displayed.
2. Before you change the setup, print the current Configuration page
in case you need to restore the original settings later.
a. Press the MENU button on the printer control panel until the
message PRINT PAGES FROM LIST is displayed.
b. Press the ITEM/ENTER button to display PRINT
CONFIGURATION.
c. Press ITEM/ENTER to print the page.
7–1
Page 9
Performing the Setup from the Printer Control Panel
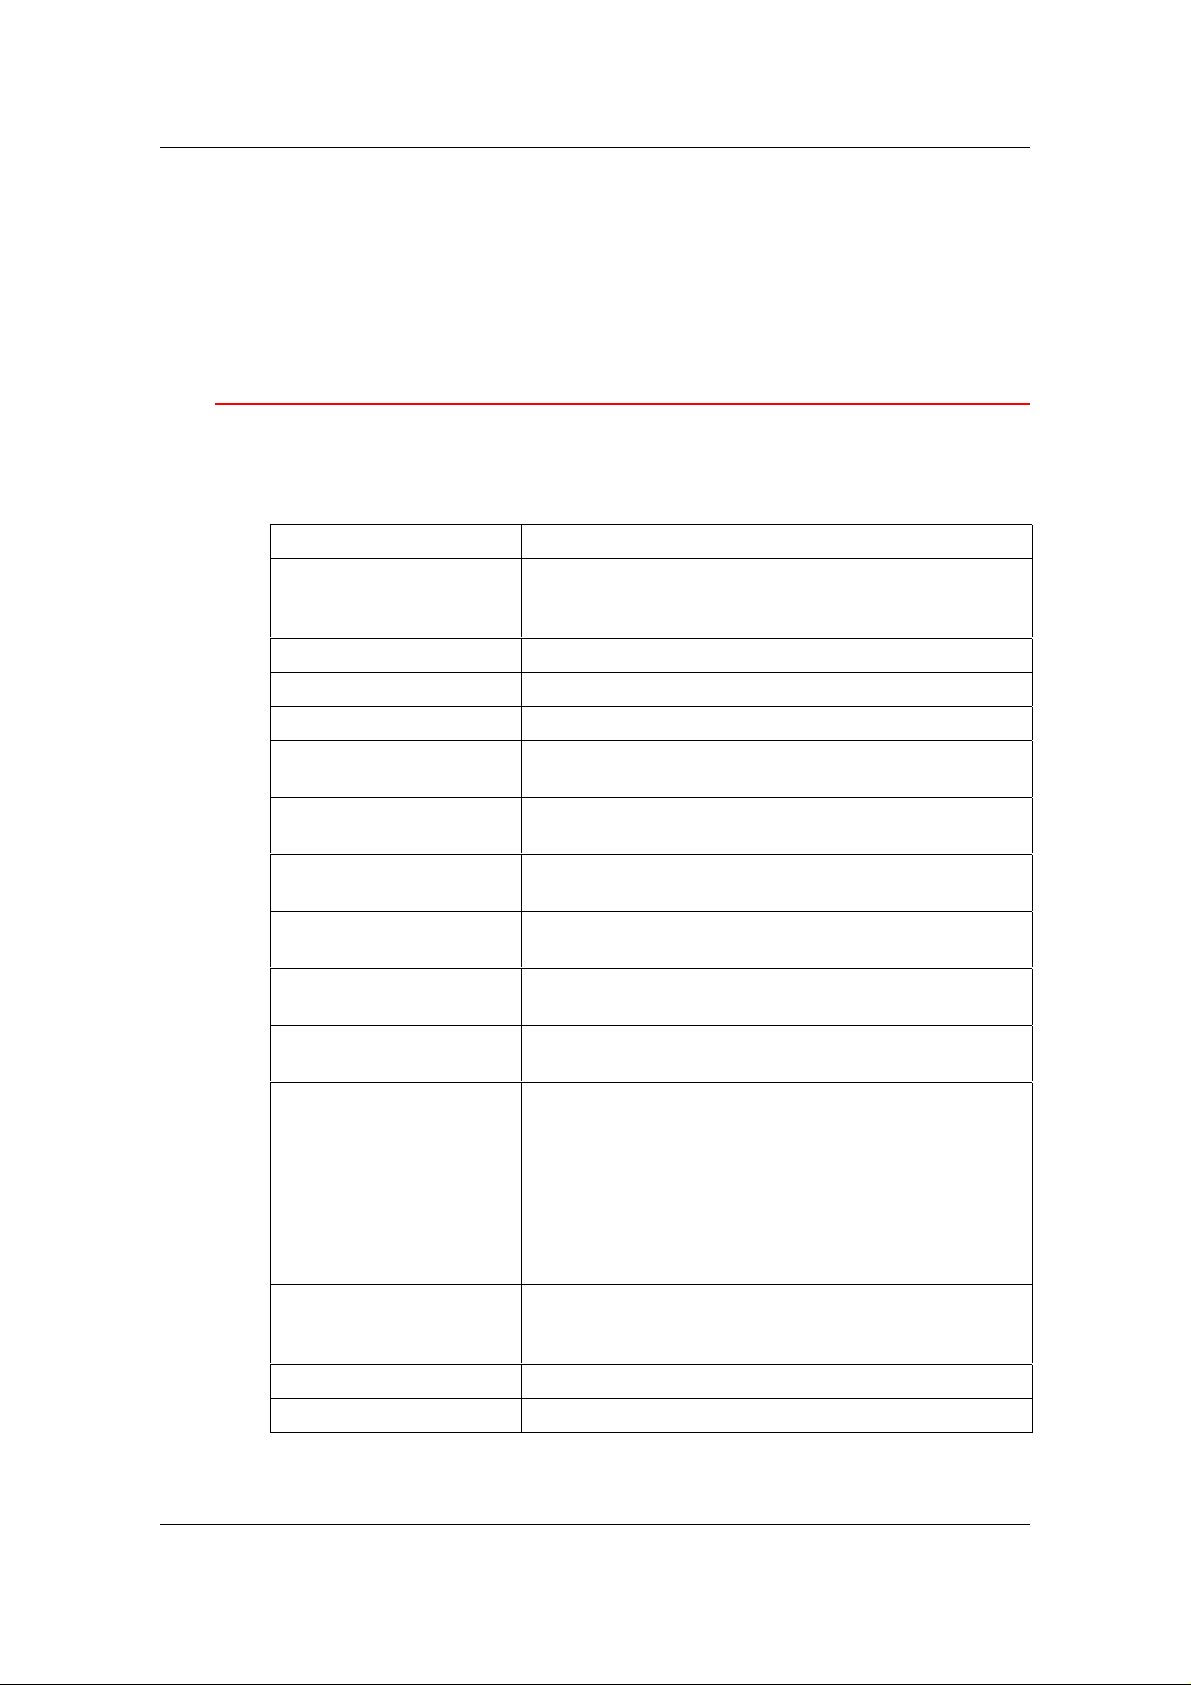
3. Perform one of the following:
• To advance through the menus, press the MENU button.
• To view submenus, press the ITEM/ENTER button.
• To accept a displayed option, press the ITEM/ENTER button.
Top-level Menus
When the printer is not processing or printing a job, the control panel
displays READY or POWER SAVER MODE. To view the top-level
menu choices, including the following, press the MENU button.
Select To Specify
SYSTEM SETUP System settings for the printer; set or change the
administrator password used to limit access to the
Setup menus.
PRINTER SETUP Printer settings.
PS SETUP PostScript settings for the printer.
PCL SETUP PCL settings for the printer.
I/O PORT SETUP Settings for the network and/or parallel connections to
the printer.
NETWORK PROTOCOL
SETUP
NETWORK SERVICES
SETUP
CHECK AND PRINT Print remaining copies or processed jobs stored on the
PRINT PAGES FROM
LIST
OTHER PANEL
LANGUAGE
RESETS Job Log and all print queue clearance (CLEAR
SYSTEM SETUP TO
NETWORK SERVICES
SETUP
Settings for the network protocols.
Settings for the printing services.
printer disk after first copy has been inspected.
The resident pages of the printer.
The Printer Control Panel disp lay language.
LOG/QUEUES disp layed)
Printer color calibration reset to factory settings
(RESET COLOR displayed)
Defaults of all modifiable settings (RESTORE
DEFAULTS displayed)
Restart of the printer (RESTART PRINTER displayed)
Information about the printer and to set a password to
limit access to printer Setup menus.
7–2
VISUALCAL Calibration of the printer color production.
COLOR ADJUSTMENT Adjustment of the density and brightness of Toner.
Page 10

Performing the Setup from the Printer Control Panel
System Setup
Use this procedure for first-time setup if no password has been set.
1. Press the OFFLINE button and press the MENU button until
SYSTEM SETUP is displayed.
2. Press the ITEM/ENTER button to display the following options.
Enter information as required:
• PRINTER NAME. Enter a printer name of up to 16
characters using the numeric keypad.
• PRINT START PAGE – YES/NO. (NO is the default.) Enter
YES if you want the printer to print a start page every time it
restarts to verify that it is working properly. The Start page
includes such information as printer name, enabled network
protocols, amount of memory installed, and options installed
on the printer.
• PUBLISH PRINTD Q – YES/NO. (YES is the default.) Enter
YES to enable recently printed jobs to be stored on the
printer. The Printed Queue makes it convenient to reprint
those jobs.
• JOBS TO SAVE (1-99). (10 is the default.) If PUBLISH
PRINTD Q is set to Yes, specify the number of jobs to be
stored in the Printed Queue.
• POWER SAVER – 30 MIN/60 MIN/120 MIN/180 MIN. (30
MIN is the default.) Specify the length of time before an
inactive printer goes into Power Saver mode. Full power is
restored when the printer receives a network print job or any
button on the printer or scanner control panel is pressed.
The scanner has its own power saver setting that is independent of the
printer.
• CHANGE PASSWORD – YES/NO (NO is the default.) Use
this option to change the administrator password for the
printer. In most cases, only the system administrator should
have access to this password. If you select YES, you are
prompted to enter the new printer password.
The scanner has its own password that is independent of the pr inter .
7–3
Page 11

Performing the Setup from the Printer Control Panel
To enter a new password, use the ( ) ARROW button to
scroll through characters and the ( ) ARROW button to
move from left to right, from character to character. To delete
a character, use the ( ) ARROW button. The password can
be any combination of letters and numbers up to 16
characters. When you are finished entering the password,
press the ITEM/ENTER button. Enter the password again for
verification. If you make a mistake, the system will prompt
you to enter the password again.
Printer Setup
The Printer Setup options set the printer page description language
(PDL), paper size, and ability to print under Low Toner conditions.
1. Press the OFFLINE button and press the MENU button until
PRINTER SETUP is displayed.
2. Press the ITEM/ENTER button to display the following options.
Enter information as required:
• PAGE DESC LANG—PS/PCL/AUTO. (AUTO is the default.)
Enter the default page description language for your printer.
If you select AUTO, the printer will automatically detect and
interpret the page description language used by the file.
• DEFAULT PAPER—LETTER/A4. Use this option to specify
the default paper size to use in printing. All information and
test pages are printed on the default paper size.
• TONER LOW—CONTINUE/STOP. (CONTINUE is the
default.) Specify the behavior of the printer when the Toner
is low. Select CONTINUE to print until there is no more
Toner or STOP to cease printing immediately until the Toner
has been replaced.
Replace Toner soon after the TONER LOW/REPLACE [Toner Color]
message is displayed.
7–4
Page 12

Performing the Setup from the Printer Control Panel
PostScript Setup
The PostScript Setup menus enable you to set PostScript printing
options.
1. Press the OFFLINE button and press the MENU button until PS
SETUP is displayed.
2. Press the ITEM/ENTER button to display the following options.
Enter information as required:
• PRINT TO PS ERR—YES/NO. (NO is the default.) Specify
whether to print the portion of a job that processed before a
PostScript error is encountered.
• COVER PAGE—BEFORE JOB/AFTER JOB/NO. (NO is the
default.) Specify whether a cover page will be printed at the
beginning or end of each print job. Select BEFORE JOB or
AFTER JOB to print a page with the name of the originator,
the number of pages printed, and the status of the job.
If a PostScript error occurred and PRINT TO PS ERR is set
to YES, the error message will be printed o n the Cover Page,
along with the job status.
7–5
Page 13

Performing the Setup from the Printer Control Panel
PCL Setup
The PCL setup menus enable you to set PCL printing options. PCL is
available only when printing from Windows workstations.
1. Press the OFFLINE button and press the MENU button until PCL
SETUP is displayed.
2. Press the ITEM/ENTER button to display the following options.
Enter information as required:
The following options apply to unformatted ASCII text files.
• DEF ORIENTATION—LANDSCAPE/PORTRAIT.
(PORTRAIT is the default.) Specify the default orientation of
the print job on the paper.
• FORM LENGTH—5-128 LINES (60 LINES is the default.)
Specify the number of lines of text per page. Form length
varies according to the orientation of the paper.
The following options apply to ASCII text files on a per job basis.
• FONT NUMBER—0 - 45. (0 is the default.) Specify the
default font. For a complete list of available PCL fonts and
their corresponding font numbers, refer to the Fonts List.
• PITCH—CHAR/IN, 0.44-99.99 (10.00 is the default) Specify
the pitch, or number of fixed-space, PCL characters per
horizontal inch to print
• SYMBOL SET Specify the PCL Symbol Set to print. A
symbol set is specific to a font and is generally designed for
a single application.
7–6
Page 14

Performing the Setup from the Printer Control Panel
Specify Network Information
1. Press the OFFLINE button and press the MENU button until the
I/O PORT SETUP option is displayed.
2. Press the ITEM/ENTER button to display the following options.
Enter information as required:
• ETHERNET—OFF/ON. (ON is the default.) Select ON to
enable Ethernet communication.
• ETHERNET SPEED—AUTO DETECT/10 TWISTED
PAIR/10 AUI/100. (AUTO DETECT is the default.) Select
AUTO DETECT to detect the speed at which data can be
transferred automatically over the Ethernet network or,
optionally, to specify the speed and cabling of the Ethernet
network.
• PARALLEL PORT—OFF/ON. (ON is the default.) In
addition to receiving print jobs over Ethernet, the printer can
receive jobs from a computer through the high-speed
parallel port. Select ON to enable printing through the
parallel port.
• I/O TIMEOUT—5-300 SECONDS. (30 SECONDS is the
default.) If the parallel port is On, use this option to specify
how long the printer waits without receiving data from the
parallel port before deciding that the current job is complete.
During the timeout, the printer cannot receive new jobs
through the parallel port, but it continues to receive network
print jobs.
• IGNORE EOF—YES/NO. (YES is the default.) If the parallel
port is On, use this option to specify that the printer should
ignore end-of-file (EOF) messages in a file. To print
PostScript files in binary format (not ASCII), set this option to
YES. When the option is set to YES, the printer uses the
value you entered for the parallel port timeout to determine
when it has reached the end of the file.
7–7
Page 15

Performing the Setup from the Printer Control Panel
Specify Network Protocol Options
Network Protocol Setup options are used to specify and set up TCP/IP
Ethernet, AppleTalk, and IPX (Novell) network protocols.
1. Press the OFFLINE button and press the MENU button until the
NETWORK PROTOCOL SETUP option is displayed.
2. Press the ITEM/ENTER button to display the following options.
Depending on the options you select, you should enter
information for the following options as required for your system:
• TCP/IP—ETHERNET—YES/NO (NO is the default.) Select
YES if you have a TCP/IP network connected to the printer
over Ethernet cabling. The following options are displayed if
TCP/IP—Ethernet is set to YES:
• ENABLE AUTO IP—YES/NO (YES is the default.)
AutoIP is the module that handles automatic TCP/IP
configuration for the system. It uses a set of standard
discovery protocols, RARP, BOOTP, and DHCP.
The following options are displayed if Enable Auto IP is
set to NO:
• ENABLE DHCP—YES/NO. The Dynamic Host
Configuration Protocol (specified in RC 2131) is an
extension to BOOTP that allows dynamic allocation of
IP addresses. DHCP assigns leases to the assigned
IP addresses. The client is required to renew its lease
with the server in order to keep its address. If a lease
expires, the DHCP server reclaims the address and
may assign it to another client. This protocol is used
widely by Windows workstations.
• ENABLE BOOTP—YES/NO. This protocol, specified
in RFC 1542, allows clients to query for IP addresses
and additional informatio n.
• ENABLE RARP—YES/NO. The Reverse Address
Resolution Protocol (RARP) is specified in RFC 903.
It enables a client to query for its IP address. This
protocol is rarely used.
7–8
Page 16

Performing the Setup from the Printer Control Panel
The following options are displayed if Enable Auto IP is
set to YES:
• AUTO GATEWAY —YES/NO. Enables the system to
automatically search for the gateway address.
• ENABLE APPLETALK —YES/NO. If YES is selected,
automatically reboots the system and enables
AppleTalk.
• ETH. IP ADDRESS (000.000.000.000 is the default.)
Use the ARROW buttons to assign the printer an
Ethernet IP address. Press ITEM/ENTER to accept the
selection.
• ETH. SUBNET MASK (000.000.000.000 is the default.).
Use this option to modify the subnet mask to one of the
following values for printing with TCP/IP over Ethernet:
• 255.000.000.000 if the IP address starts with a
number less than 128
• 255.255.000.000 if the IP address is within the
number range from 128 through 191
• 255.255.255.000 if the IP address starts with a
number greater than 191
• GATEWAY ADDRESS (000.000.000.000 is the
default.) If your network uses a gateway, type the
address in the gateway text boxes
• ENABLE APPLETALK — YES/NO (NO is the default.)
If Yes is selected, automatically reboots the system and
enables AppleTalk.
• ENABLE NOVELL— YES/NO. If YES is selected, select the
Ethernet frame type used for communication between your
NetWare file server (or NetWare file servers if you connect to
more than one) and the printer:
• AUTO FRAME TYPE—YES/NO (YES is the default.) Select
NO to manually determine the frame type.
• ETHERNET 802.3— YES/NO (NO is the default.) Select
YES to enable Ethernet 802.3.
• ETHERNET 802.2— YES/NO (NO is the default.) Select
YES to enable Ethernet 802.2.
• ETHERNET II— YES/NO (NO is the default.) Select YES to
enable Ethernet II.
• ETHERNET SNAP—YES/NO (NO is the default.) Select
YES to enable Ethernet SNAP.
7–9
Page 17

Performing the Setup from the Printer Control Panel
Perform Network Services Setup
When Novell is enabled in the network protocol opti ons, the Network
Services Setup menus allow you to establish network services for your
printer. These menus consist of NDS Setup, Bindery Setup, and SMB
setup.
1. Press the OFFLINE button and press the MENU button until the
NETWORK SERVICES SETUP option is displayed.
2. Press the ITEM/ENTER button until the ENABLE PSERVER
option is displayed.
3. Select YES or NO. (NO is the default.) PServer is a program on
the printer that services all the Novell print queues assigned to
the printer. Select YES if you have a Novell network connected to
the printer and if you have already configured a NetWare printer,
print server, and one or more print queue objects for print jobs.
PServer also enables you to enter the names of the Novell
objects that are concerned with printing to the printer. If you select
YES, proceed to configure NetWare Directory Services (NDS)
and/or Bindery services.
NDS Setup
1. Press the OFFLINE button and press the MENU button until the
NETWORK SERVICES SETUP option is displayed.
2. Press the ITEM/ENTER button until the ENABLE NDS option is
displayed.
3. Select YES or NO. (NO is the default.) NetWare Directory
Services (NDS) is used with NetWare 4.x and 5.x. Select YES to
enable NDS.
4. If you selected YES, the Change Settings? screen is displayed.
Select YES to specify or change NDS settings.
5. Use the ( ) ARROW buttons to select a tree from the NDS
tree list and press ITEM/ENTER. Navigation trees enable you to
find the server on the desired NDS tree.
If you select a tree for which earlier NDS settings exist, a
message is displayed warning you that previous Bindery settings
will be deleted. Select YES to delete Bindery settings.
Another message is displayed, asking if a login is required to
browse. Select NO if a login is not required. Select YES if a login
is required to browse the NDS tree.
7–10
Page 18

Performing the Setup from the Printer Control Panel
6. If you answered YES, you may start to browse when the FIND
LOGIN screen is displayed. Press ITEM/ENTER when you find
the desired object.
7. Use the ( ) ARROW buttons to scroll through options. To
display objects below the level of the selected object, press
ITEM/ENTER.
The current path of the previously selected object displays in the
top line of the display. The first item in the scrollable Object list
displays in the second line. Use the ( ) ARROW buttons to
browse the NDS objects listed in the display.
The .. option moves you up one level on the tree; pressing
ITEM/ENTER puts the previous second line object on the top line
and displays the next lower level object on the tree on the second
line. When you see the login object in the second line, press
ITEM/ENTER. From any screen, press ITEM/ENTER to accept an
object or MENU to escape.
8. Use the ( ) ARROW buttons to select a login name and press
ITEM/ENTER.
9. Use the ( ) ARROW buttons to enter the password. Press
ITEM/ENTER to accept the password.
10. After the message BROWSE TREE TO PRINT SERVER is
displayed, press ITEM/ENTER to begin navigating to the Print
Server.
The NDS tree name displays in the top line. The first item at a
level below the tree name displays in the second line.
11. Use the ( ) ARROW buttons to br owse the NDS objects listed
in the display. Press ITEM/ENTER to accept an object.
The current path of the previously selected object displays in the
top line. The first item in the list of objects at the next level down
displays in the second line.
12. Use the ( ) ARROW buttons to br owse the NDS objects listed
in the display. Select an object and press ITEM/ENTER to display
the objects on the next lower level.
Select .. and press ITEM/ENTER to move up the tree.
13. When you s ee the name of the desired print server, press
ITEM/ENTER. Print Server will display in the first line, indicating
that the listed entry has been selected.
7–11
Page 19

Performing the Setup from the Printer Control Panel
14. Use the ( ) ARROW buttons to scroll through the list of
available print servers. After selecting a server, press
ITEM/ENTER. If the print server login requires a password, the
Enter Password screen displays. Use the ( ) ARROW buttons
to enter the password. After you enter the password or if a
password is not required, the PRINT Q SEARCH screen displays.
15. Press ITEM/ENTER if you want the printer to search the entire
NDS tree for the print queue object. Use the ( ) ARROW
buttons to designate a subtree object. The printer will search for
queues below this object. Press ITEM/ENTER.
If you selected a Subtree, the BROWSE TO PRINT message is
displayed.
16. Press ITEM/ENTER to advance to the NDS browse screens.
Browse to the print queue root and press ITEM/ENTER.
17. Navigate the NDS objects as before. Press ITEM/ENTER to
display objects below the level of the selected object in the
second line of the previous screen.
18. When you see the print queue subtree object in the second line,
press ITEM/ENTER.
19. In the next screen, scroll to display the period in the second line
and press ITEM/ENTER to end the search.
The selected object is displayed.
20. Press ITEM/ENTER to accept the object.
7–12
Page 20

Performing the Setup from the Printer Control Panel
Bindery Setup
The following screens are used for Bindery setup. Ensure that the
printer is connected to the network and you have already configured
one or more NetWare 3.x file servers with a print server and a print
queue for print jobs.
You can also configure NetWare 4.x and 5.x servers to run in Bindery
emulation mode, but you cannot add a 4.x or 5.x server running in emulation
mode that is on the tree you selected in NDS Setup.
The NetWare server must be running. You need a login name and a
password, if one has been set.
Refer to the chapter Setting Up the Network Server for more
information about setting up printing using Novell NetWare.
1. Press the OFFLINE button and press the MENU button until the
NETWORK SERVICES SETUP option is displayed.
2. Press the ITEM/ENTER button until the ENABLE BINDERY
option is displayed. Use this option to enable bindery emulation
services.
The Bindery Settings screens displays.
3. Use the ( ) ARROW buttons to scroll through the menu
options. Select one of the following options :
• VIEW displays a list of Novell file servers already connected
to the printer.
• CHANGE displays a list of all available servers in order to
add one or change the print server setting.
• REMOVE FSERVER displays a list of connected servers
that you can disconnect.
• SKIP disregards bindery options and advances to the
POLLING INT screen.
Use the ( ) ARROW buttons to view the list of servers. Press
ITEM/ENTER to skip the remaining options and advance to the
POLLING INT Int screen.
7–13
Page 21

Performing the Setup from the Printer Control Panel
4. If a password is required to login to the server, the FILE SERVR
LOGIN screen is displayed.
Use the ( ) ARROW buttons to view the list of options. Press
ITEM/ENTER to accept an option.
5. When th e SERVER PASSWORD screen is displayed, use the
( ) ARROW buttons to enter the password.
6. When the PRINT SERVER screen is disp layed, use the ( )
ARROW buttons to scroll through the list of print servers defined
for the selected file server. After selecting a print server, press
ITEM/ENTER.
If a password is required to log in, the PSERVER PASSWORD
screen is displayed. Use the ( ) ARROW buttons and press
ITEM/ENTER to enter the password.
If fewer than eight file servers are connected, the ANOTHER FS?
screen is displayed. Select YES to redisplay a list of available
servers. Select NO to stop adding file servers and display the
POLL INT screen.
If the maximum number of file servers (eight) is connected, the
POSS INT (SEC) screen is displayed. Use the ( ) ARROW
buttons to specify the interval (from 1-999 seconds) at which the
printer communicates with the Novell Server. (15 is the default
interval.) If you select a short interval, the amount of network
traffic increases; this may slow down other network jobs. Press
ITEM/ENTER.
7–14
Page 22

Performing the Setup from the Printer Control Panel
SMB Setup
Server Message Block (SMB) is a point-to-point file sharing and
printing protocol and the default printing method of most Windows
applications. SMB runs on top of TCP/IP and does not require IPX.
When File and Printer Sharing for Microsoft clients is enabled, SMB
can be run on Windows 95/98/Me, Windows 2000, and Windows NT.
1. Press the OFFLINE button and press the MENU button until the
NETWORK SERVICES SETUP option is displayed.
2. Press the ITEM/ENTER button until the ENABLE SMB option is
displayed. Use this option to enable network communication
using SMB.
3. At the USE NAME SEVER screen, select YES or NO (NO is the
default). Select YES to designate a specific WINS (Name Server)
server as an SMB server.
A message prompts you to enter the IP address of the Name
Server.
4. Use the ( ) ARROW buttons to enter the IP Address of the
desired WINS server.
A message prompts you to enter the SERVER NAME (the default
is DP-C106).
5. Use the ( ) ARROW buttons to enter a name for the printer
(SMB server).
A message prompts you to enter any comment about the server.
6. Use the ( ) ARROW buttons to enter a comment about, or
name of the printer (SMB server), such as Production use only.
This comment will identify the printer in the Windows Network
Neighborhood. Once set, this comment will display in the second
line when the SERVER COMMENT screen is displayed. When
the printer is selected on a client machine, the server comment is
displayed under the Details section of the Server information
window.
7. Press ITEM/ENTER to display the DOMAIN NAME option (the
default is WORKGROUP). Use the ( ) ARROW buttons to
enter the workgroup or domain in which you want the printer to
display. Use only uppercase letters.
7–15
Page 23
Performing the Setup from the Printer Control Panel
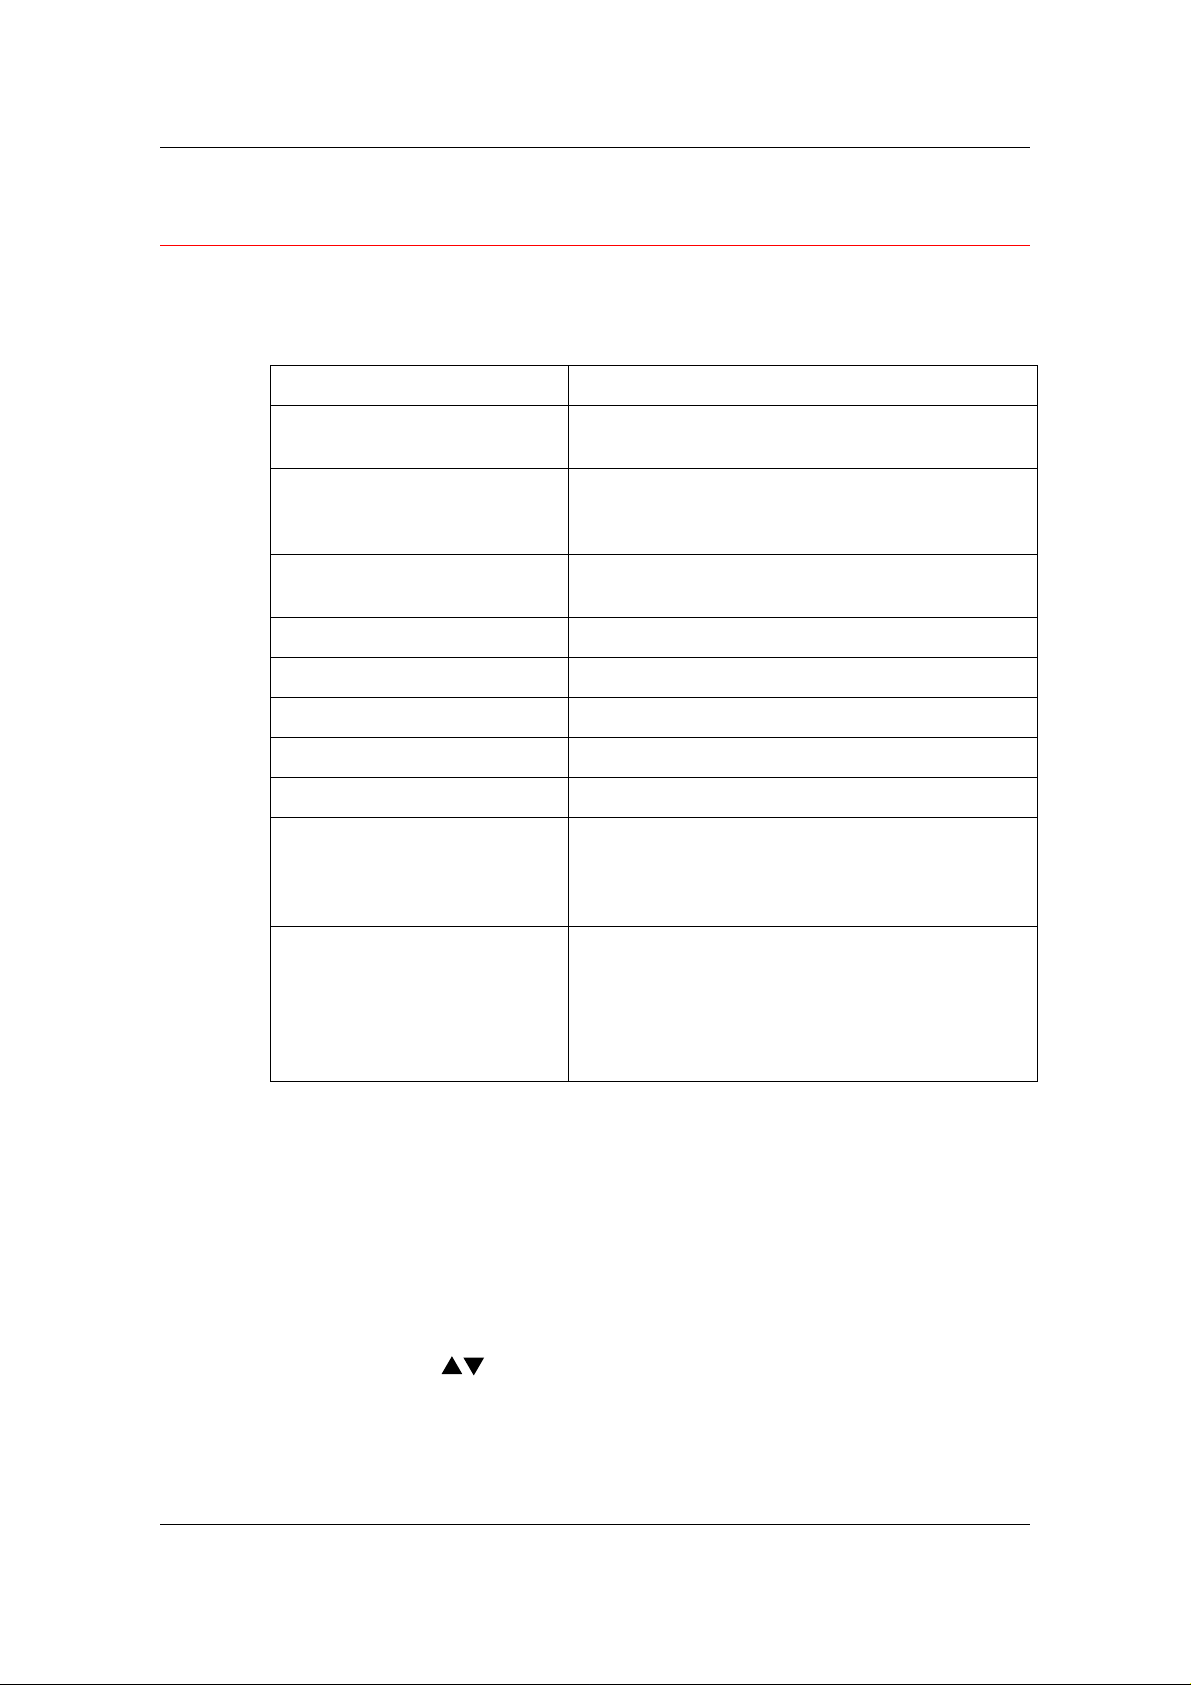
Print Information Pages
You can print several information and test pages at the Printer Control
Panel before you set up the printer or at other times from the Ready or
the Power Save On screen:
Option Description
PRINT CONFIGURATION
PAGE
PRINT SERVICE PRINTS Prints 4 CMYK pages with 22% saturation of each
PRINT TEST PATTERN A page that includes a test pattern used for engine
PRINT EVENT LOG A page that includes Print Event Log.
PRINT DEMO PAGE A page that includes a demo page.
PRINT JOB LOG A list of the most recently printed jobs.
PRINT PCL FONT LIST A list of PCL fonts resident on the printer.
PRINT PS FONT LIST A list of PostScript fonts resident on the printer.
PRINT MENU HELP A four-page overview of the control panel and its
PRINT TEST PAGE This page enables you to confirm that the printer
A page that gives the current device configuration
and lists the selected options for all Setup menus.
color and 1 Striped CMYK page with 22%
saturation.
diagnostic purposes.
components. It includes how they work, a list of
top-level menus and a brief explanation of each
menu.
is properly connected. The page includes samples
of color that you can use to troubleshoot printing
problems as well as such information as printer
name, enabled network protocols and amount of
memory.
7–16
1. Power On the printer and allow it to warm up.
Messages are displayed on the control panel as the printer runs
through its power-up tests.
2. From the Ready screen, press the MENU button on the printer
control panel until the message PRINT PAGES FROM LIST is
displayed.
3. Press the ITEM/ENTER button to display the first information
page option (the Print Configuration Page).
Press the ( ) ARROW buttons to see other information page
options to print. Press the ITEM/ENTER button to print the
desired page.
The printer prints your selection.
Page 24

8
Installing User Software in a
Windows 95/98/Me Environment
Use the following instructions to install software and set up printing
from Windows 95/98/Me systems. Ensure that your printer is properly
connected and configured for your network. For details, refer to
Connecting to the Network and Performing the Setup from the Printer
Control Panel
Use the contents of this chapter as follows:
• Depending on your configuration, use one of the following sections
to install printer drivers and set up appropriate connections:
• Parallel Port Printing
• IPX/SPX Printing
• SMB Printing
• Specify printer options with the section Setting the printer options.
• If necessary, refer to Inst al l ing Addi tional Software for Windows
95/98/Me.
All necessary files are included on the User Software CD.
In addition to using the User Software CD, you can download printer
drivers from the printer to your workstation with the Installer WebTool
(if the system administrator has enabled Internet access to the printer).
You can then install the drivers from your workstation. For instructions,
refer to Using the Installer WebTool in Using the Fiery WebTools. After
you download the printer files, the installation process is identical to
installing from the User Software CD.
8–1
Page 25

Installing User Software in a Windows 95/98/Me Environment
Overview of Installation
Installing the DP-C106 user software inclu des the following:
• Installing the PostScript or PCL printer driver and corresponding
printer description files and setting up the printer driver to
communicate with the printer through the Add Printer Wizard
• Setting the printer options
• Copying additional files from the User Software CD as needed
Do not install these files using the Installer WebTool.
Before You Begin
1. If your system administrator has not already done so, connect the
printer to the desired port on the workstation. For details, refer to
Connecting to the Network and Performing the Setup from the
Printer Control Panel.
If you are uncertain what type of network you have, contact your
system administrator.
2. Print a configuration sheet at the printer to obtain the name of the
printer and settings that will be used in the following procedures.
8–2
Page 26
Installing User Software in a Windows 95/98/Me Environment
Installing PostScript or PCL Print Drivers
Although the procedures for Windows 95 or 98/Me installations are
similar, they are not exactly alike. Ensure that you are using the correct
procedures for your operating system.
If you have previously installed a print driver for the DP-C106, perform the
uninstall procedure before installing the new driver. For more information,
refer to your Windows documentation.
Before you begin, print a Configuration Page for the printer. For
specific procedures, refer to Performing the Setup from the Printer
Control Panel.
Installing the PostScript or PCL Print Drivers (Windows 95/98/Me)
1. Insert the User Software CD in your CD-ROM drive.
2. Select the Start button, Settings, and Printers.
3. Double-click the Add Printer icon to display the Add Printer
Wizard. Select Next.
4. To install a printer locally, select the Local printer radio button
and select Next.
Local printer is available if you logged in to a workstation on
which you have Administrator privileges. If it is not available, add
a network printer and follow the procedure for adding a port.
Refer to Completing the Connection in this chapter.
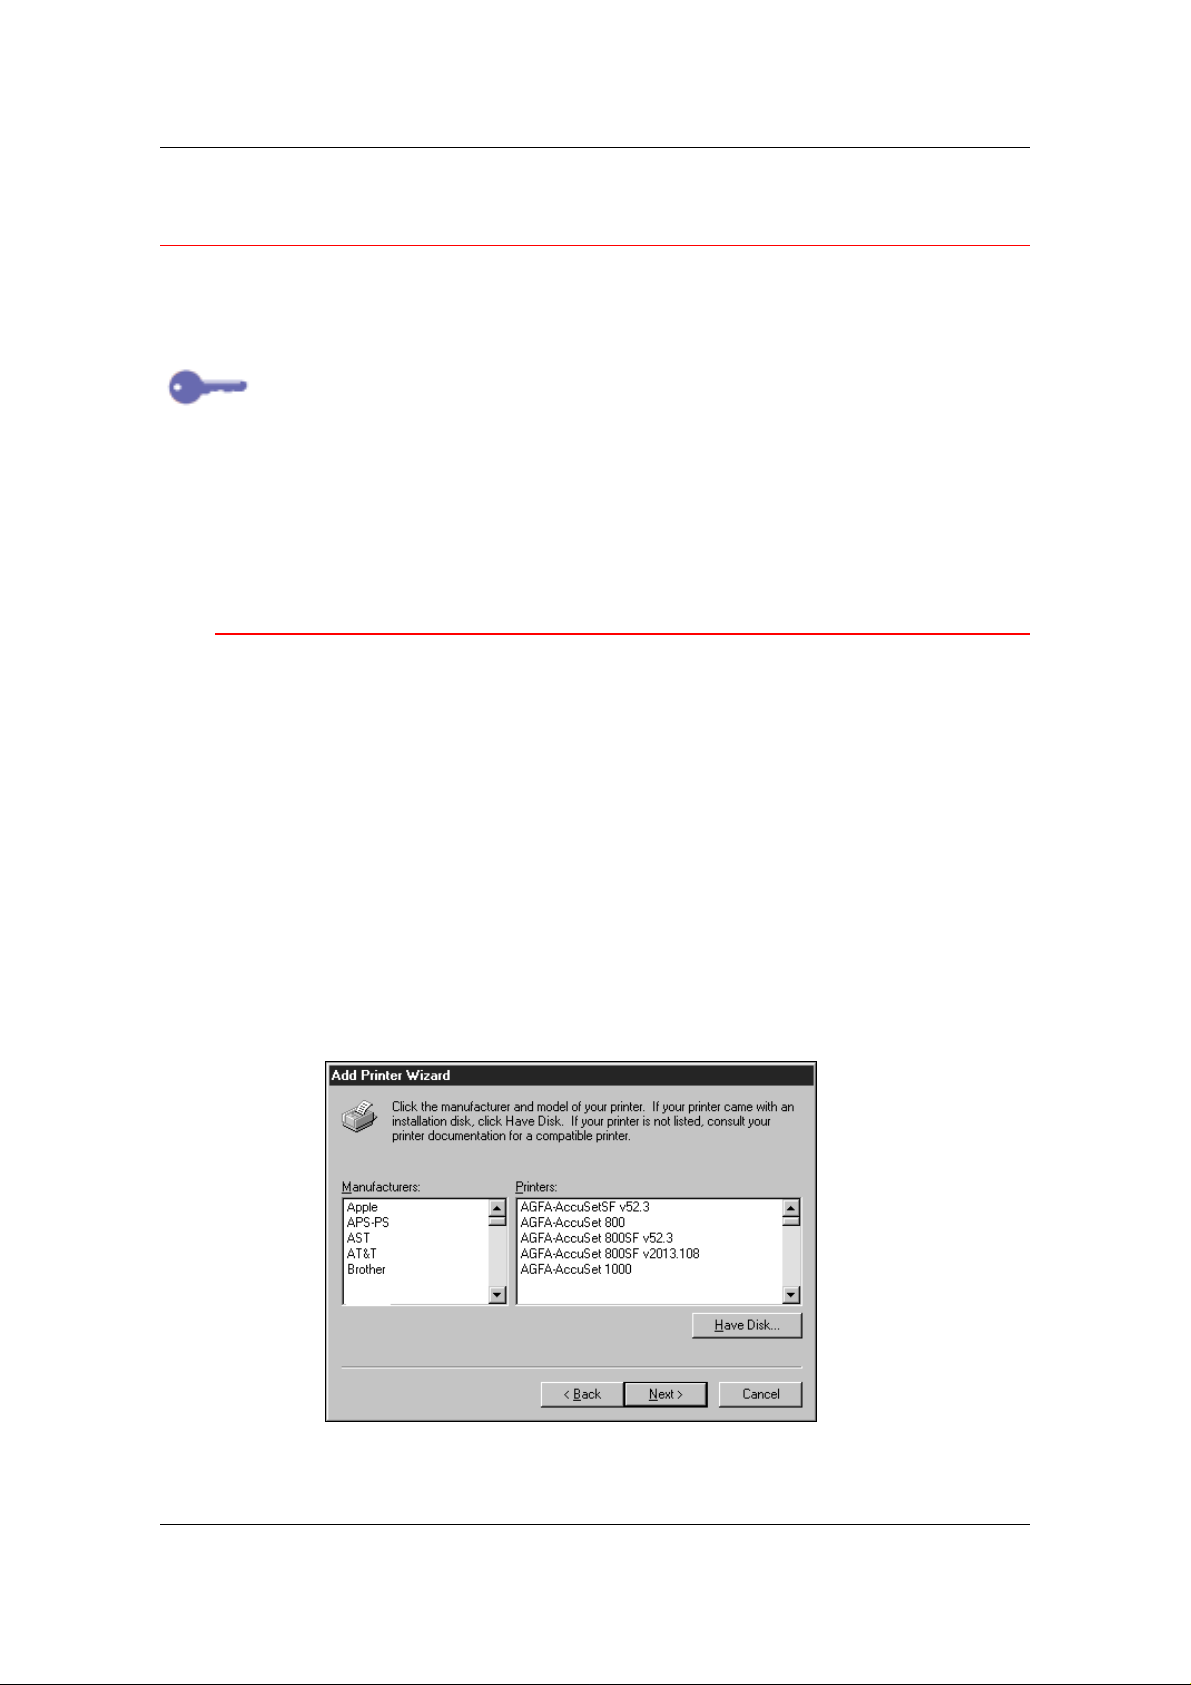
5. In the dialog box displaying lists of manufacturers and printers,
select the Have Disk button.
8–3
Page 27

Installing User Software in a Windows 95/98/Me Environment
The Install From Disk dialog box prompts you for the disk.
6. Perform one of the following:
• If you are installing from the CD, select the CD-ROM drive (fo r
example, D:\) from the drop-down box and select the Browse
button.
• If you are installing from files you downloaded using the
Installer WebTool, type the name of your hard disk drive (for
example, C:\) and select the Browse button.
7. Perform one of the following:
• If you are installing from the CD, browse to one of the
following folders:
• For PostScript printing: Driver_PS3\English\Win_9x_ME
• For PCL printing: Driver_ PCL5Ce\ English\Win_9x_ME
• If you are installing from files you downloaded using the
Installer WebTool, browse to one of the following folders
• For PostScript printing: Driver_PS3\English\Win_9x_ME
• For PCL printing: Driver_ PCL5Ce\ English\Win_9x_ME
Select OK and ensure that the oemsetup.inf or oemsetup option
is selected.
The path is copied to the Install From Disk dialog box.
8. Verify the path is correct and select OK.
In the Printers box, select the Panasonic DP-C106 option. Select
Next.
If you are adding a second printer or performing an upgrade, you will be
asked if you want to keep the existing driver or replace it. Select Replace
existing driver to ensure you are installing the latest version of the printer
driver.
8–4
Page 28
Installing User Software in a Windows 95/98/Me Environment
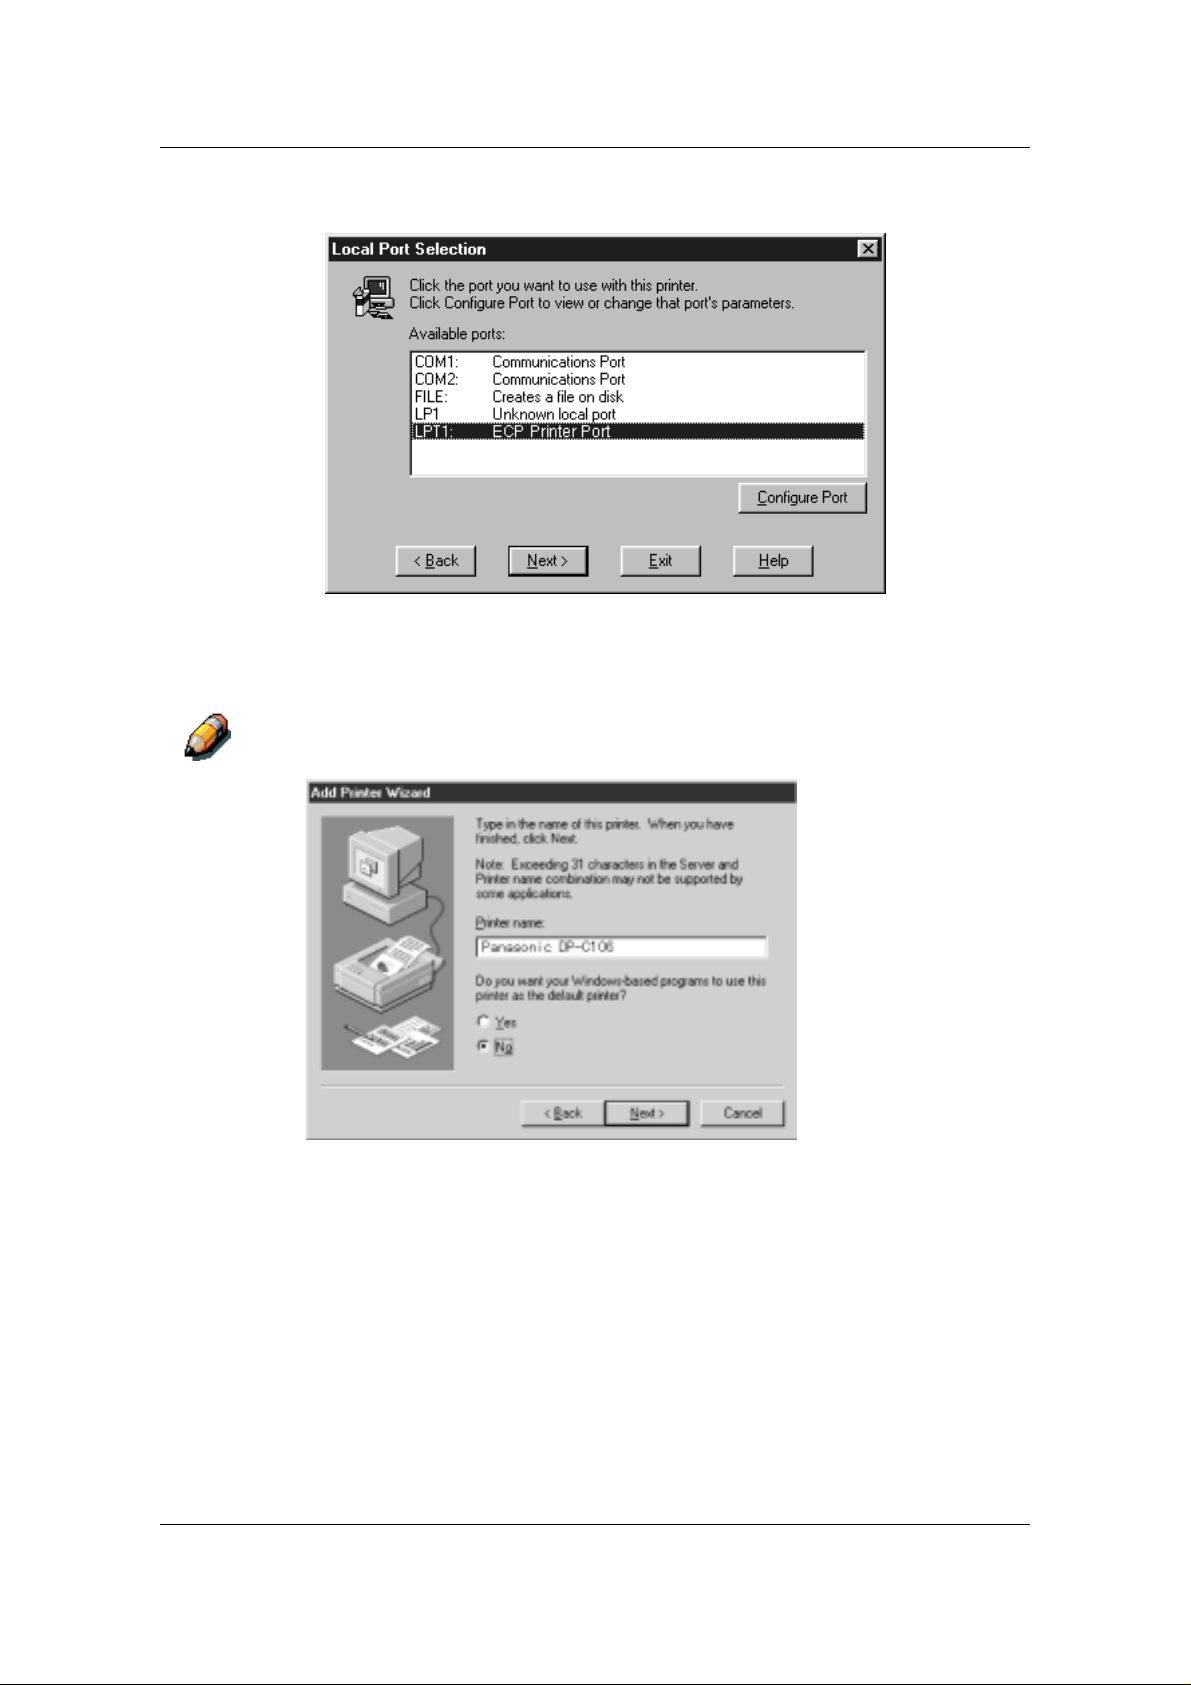
9. Select LPT1: ECP Printer Port and Next.
10. Using a maximum of 31 characters, enter a name for the printer
or leave the default name in the Printer name box.
This name will be used in the Printers and queue windows.
Entering more than 31 characters may cause printing problems with some
network applications.
8–5
Page 29

Installing User Software in a Windows 95/98/Me Environment
If you want the DP-C106 to be the default printer, select the Yes radio
button; if not, select No. Select Next.
11. Select No in the next dialog box to postpone printing a test page
and select Finish.
When installation is complete, the Printers window is displayed
with an icon for the newly installed printer.
8–6
Page 30

Installing User Software in a Windows 95/98/Me Environment
Completing the Connection
To print from Windows 95/98/Me, ensure the following tasks have been
completed:
• Set up network servers, if any
• Set up the printer to accept print jobs from the workstation
• Configure a port on each Windows workstation for the network
Parallel Port Printing
Although the procedures for preparing the parallel ports in Windows 95
or 98/Me are similar, they are not exactly alike, so ensure that you are
using the correct procedures for your operating system.
To Prepare the Port for Parallel Port Printing in Windows 95
Perform this procedure in Windows 95 only if the LPT1 port is not
currently set to ECP Printer Port.
1. Select the Start button, Settings, and Control Panel.
2. Double-click the System icon to display the System Properties
window.
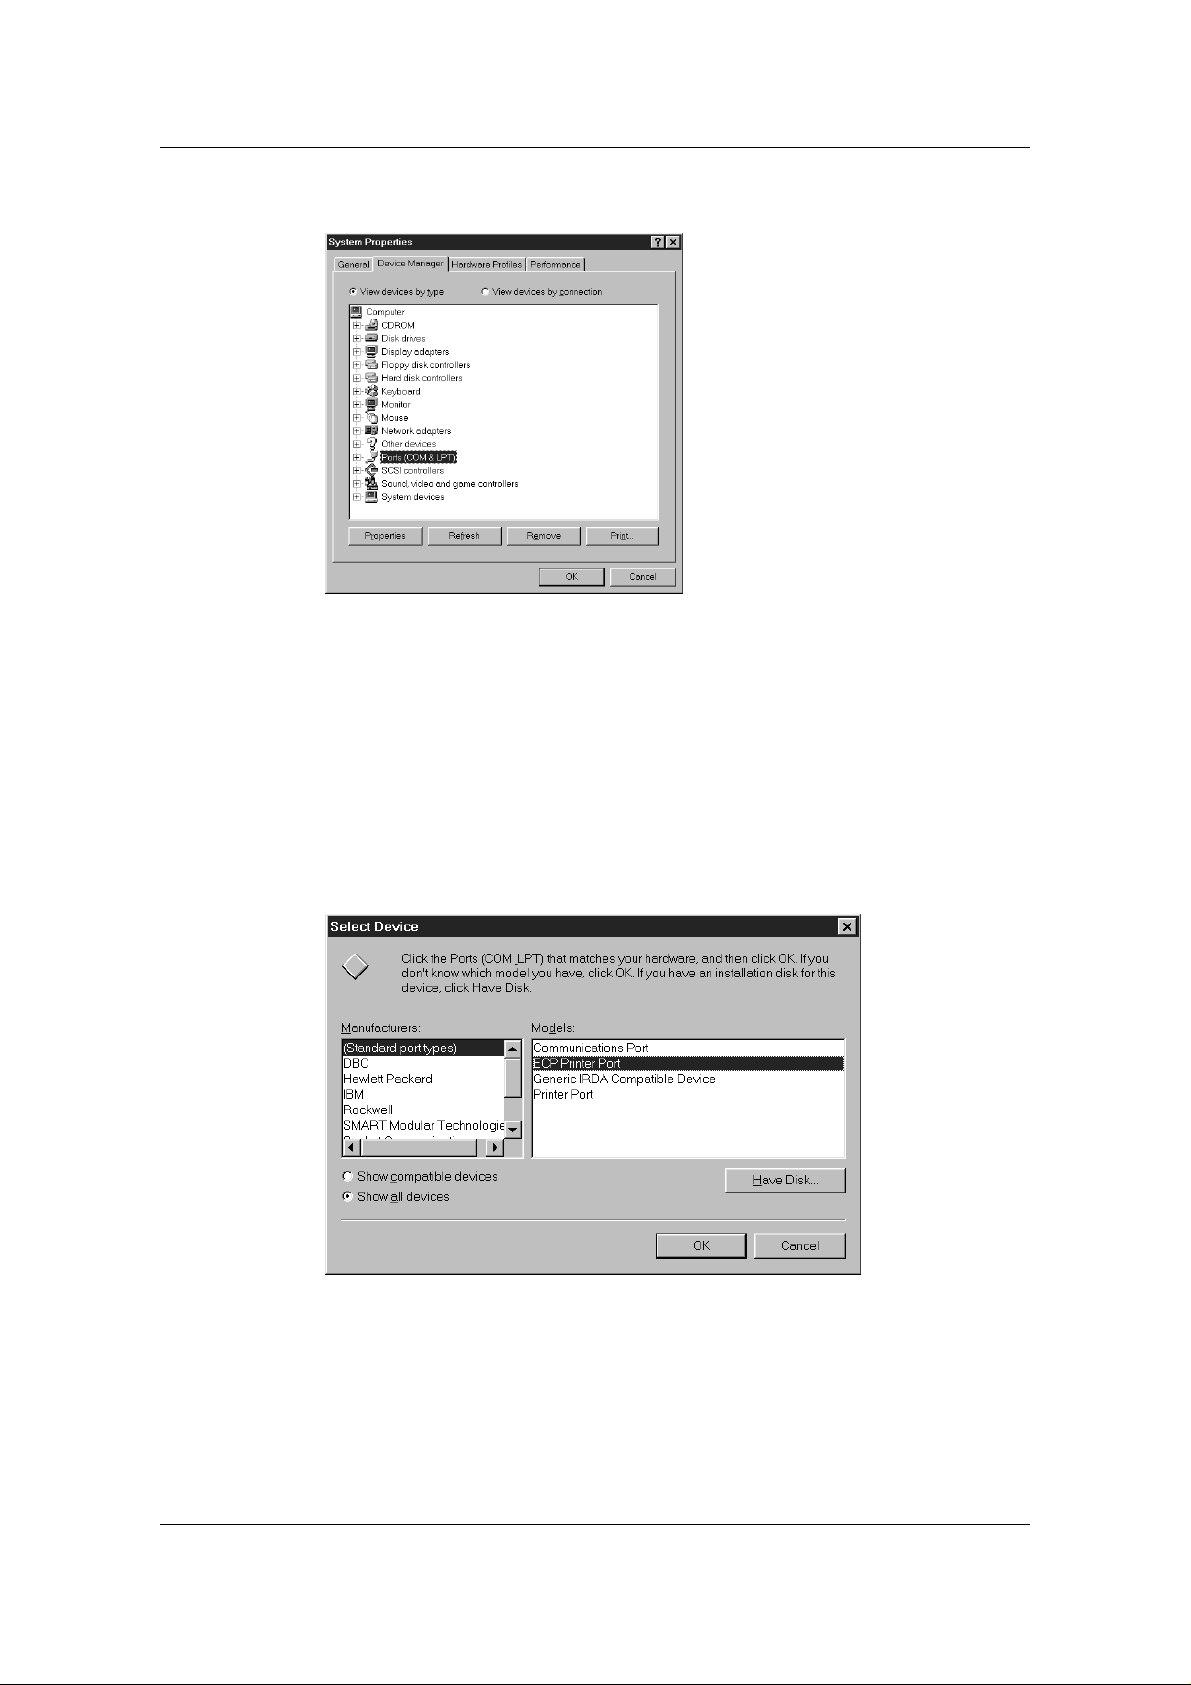
3. Select the Device Manager tab.
8–7
Page 31
Installing User Software in a Windows 95/98/Me Environment
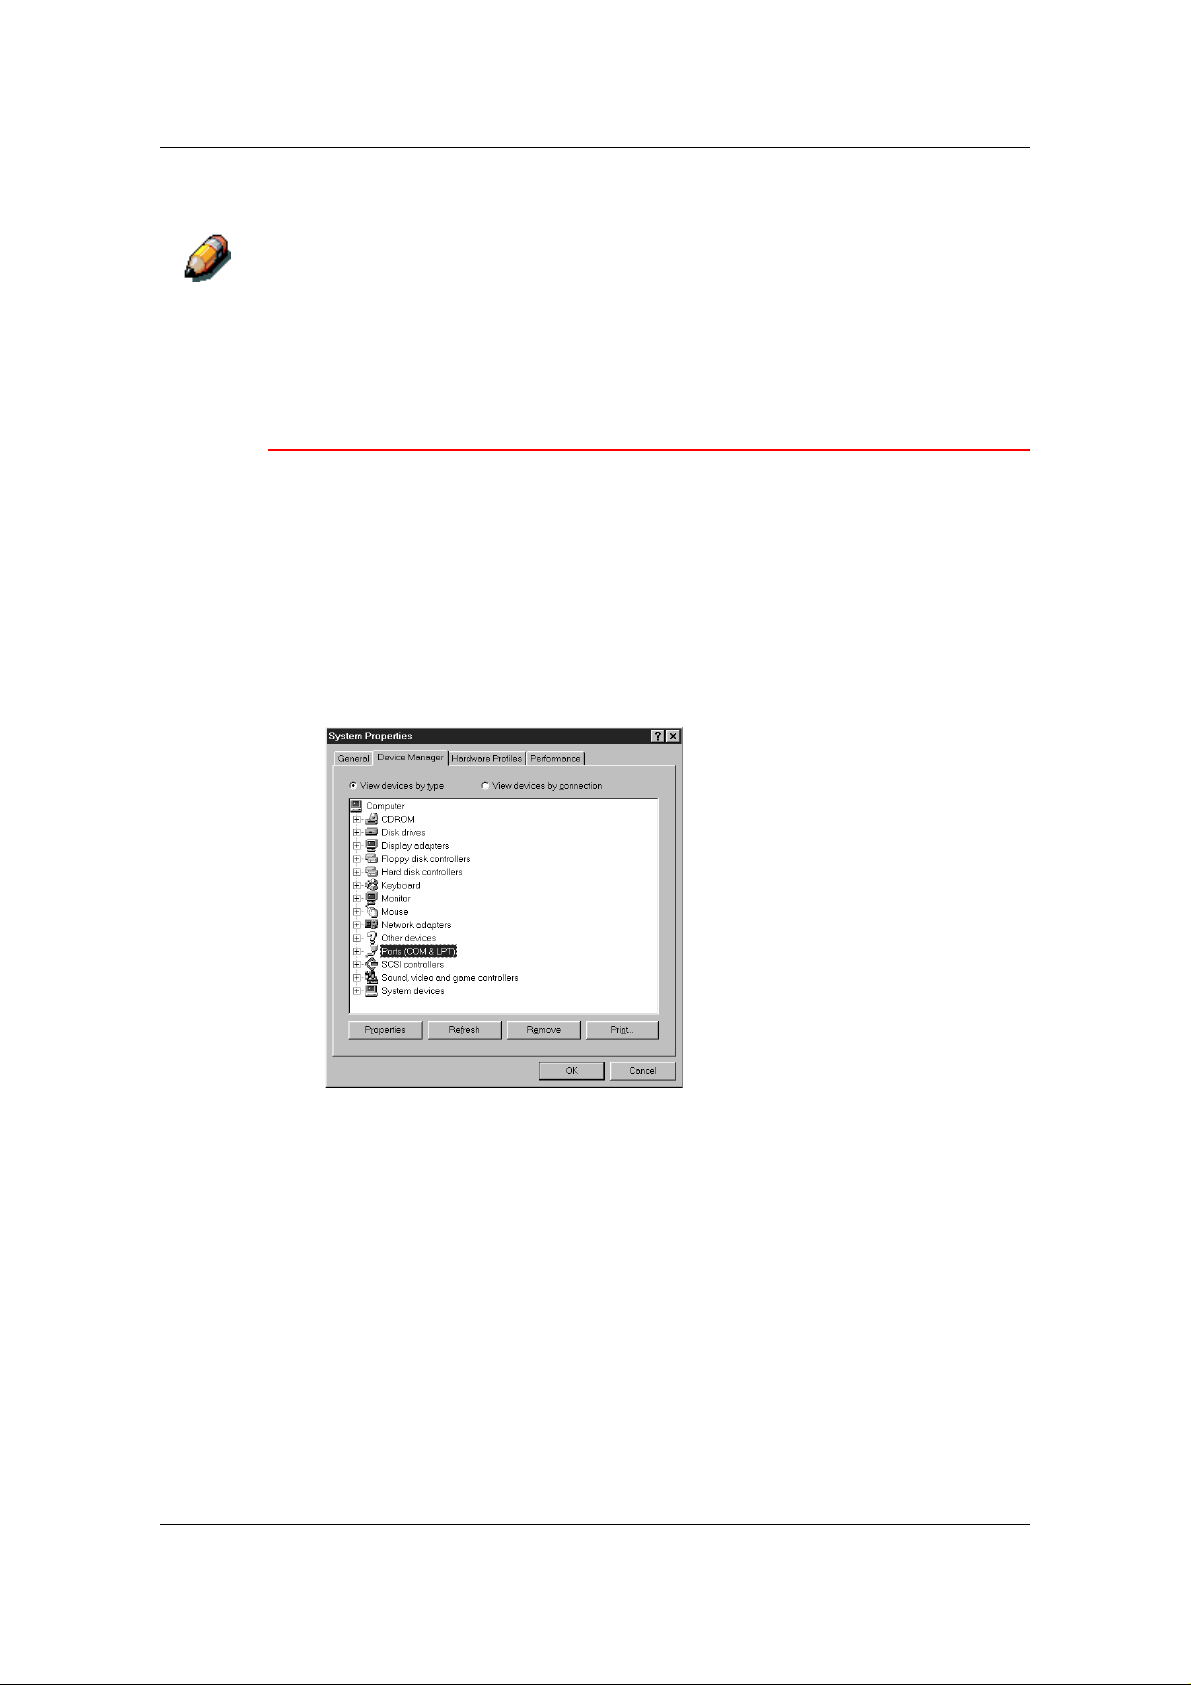
4. Double-click the Ports option.
5. Double-click the Printer Port (LPT1) option.
6. In the (LPT1) Properties dialog box, select the Driver tab and the
Update Driver option.
7. Select No when asked if you want windows to search for a driver.
Select Next.
8. Select the Show all hardware radio button.
9. From the Manufacturers list, select the (Standard port types)
option. From the Models list, select ECP Printer Port (not Printer
Port). Select OK and Finish.
8–8
Page 32
Installing User Software in a Windows 95/98/Me Environment
10. Select OK in the (LPT1) Properties dialog box.
You might need to insert the Windows 95 system CD to complete this step,
depending on whether the required files are on the hard disk.
11. When prompted to restart the wo rkstation, select the Yes button.
After Windows 95 restarts, complete the procedure described in
Setting Up Parallel Port Printing.
To Prepare the Port for Parallel Port Printing in Windows 98/Me
Perform this procedure in Windows 98/Me only if the LPT1 port is not
currently set to ECP Printer Port.
1. Select the Start button, Settings, and Control Panel.
2. Double-click the System icon to display the System Properties
window.
3. Select the Device Manager tab.
4. Double-click the Ports option.
8–9
Page 33
Installing User Software in a Windows 95/98/Me Environment
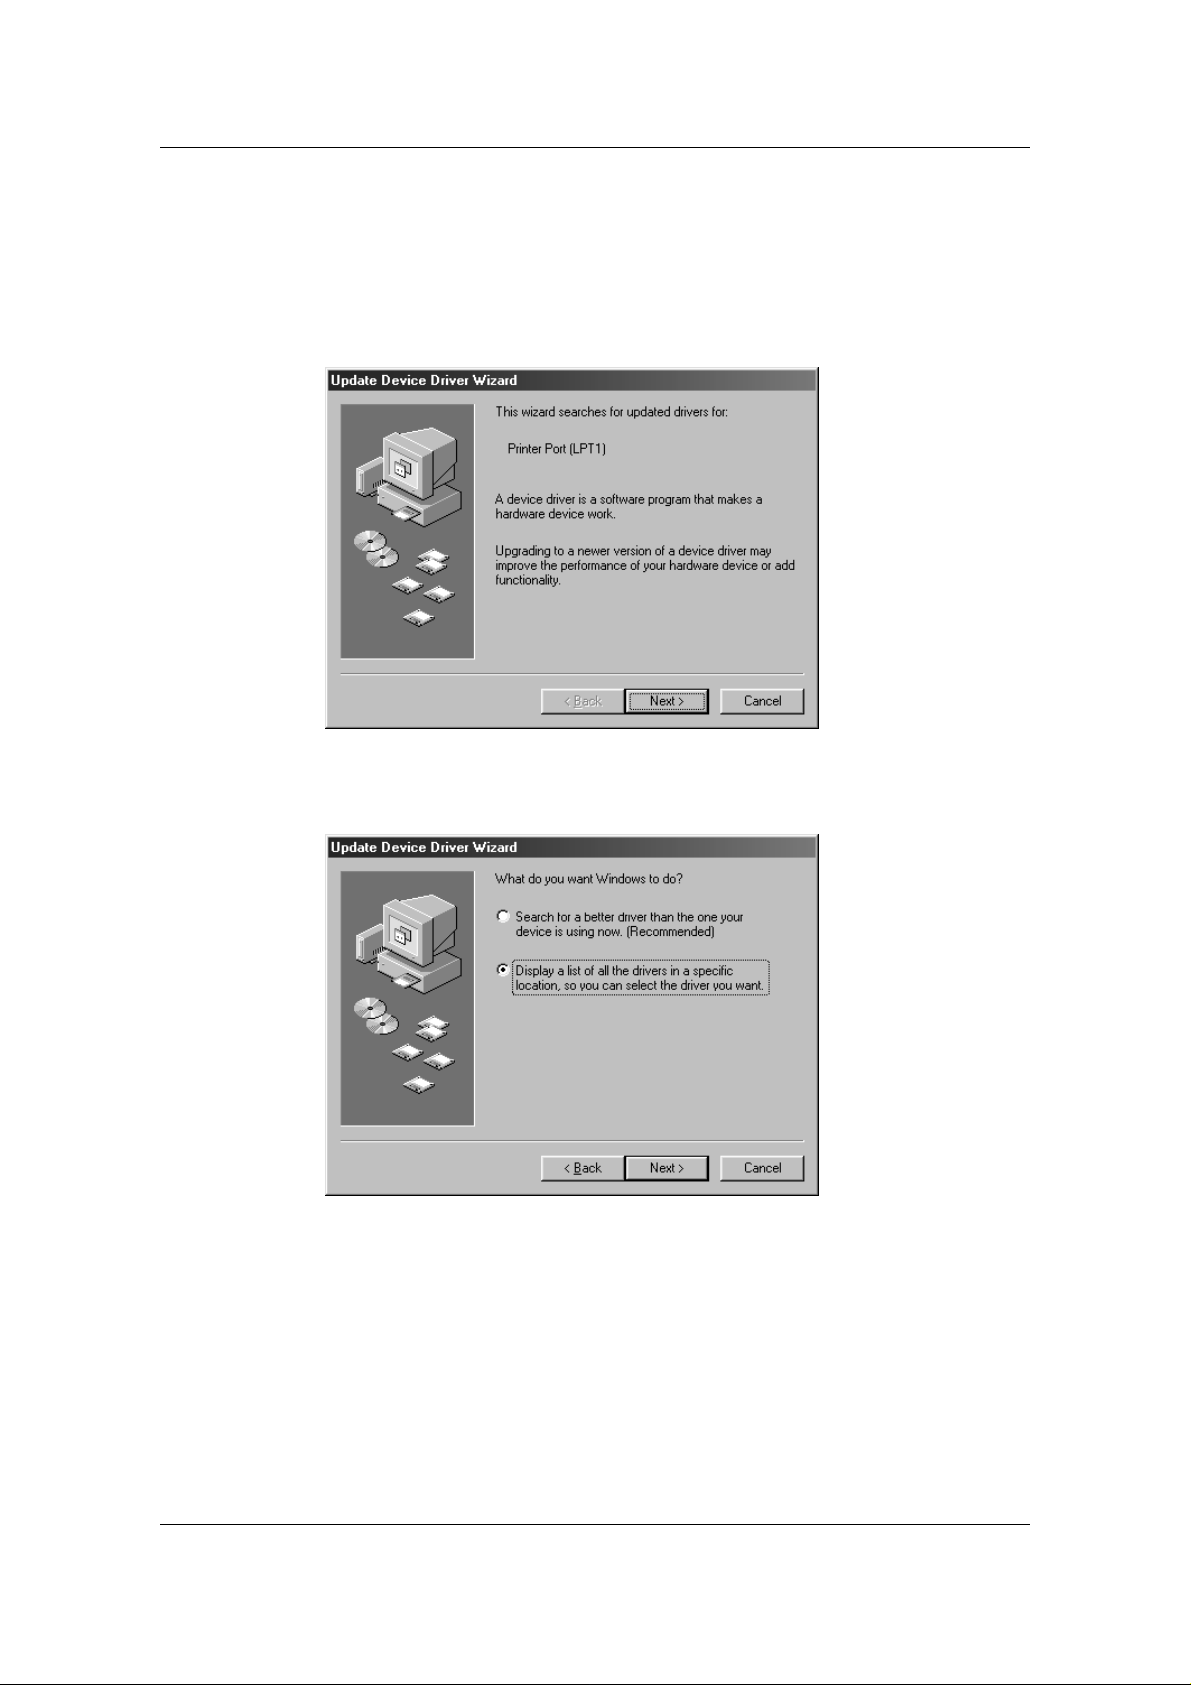
5. Double-click the Printer Port (LPT1) option.
6. In the properties dialog box, select the Driver tab and then the
Update Driver option. The Update Device Driver Wizard is
displayed.
7. Select Next.
8. Select the Display a list of all the drivers in a specific location,
so you can select the driver you want radio button and then
select Next.
8–10
Page 34
Installing User Software in a Windows 95/98/Me Environment
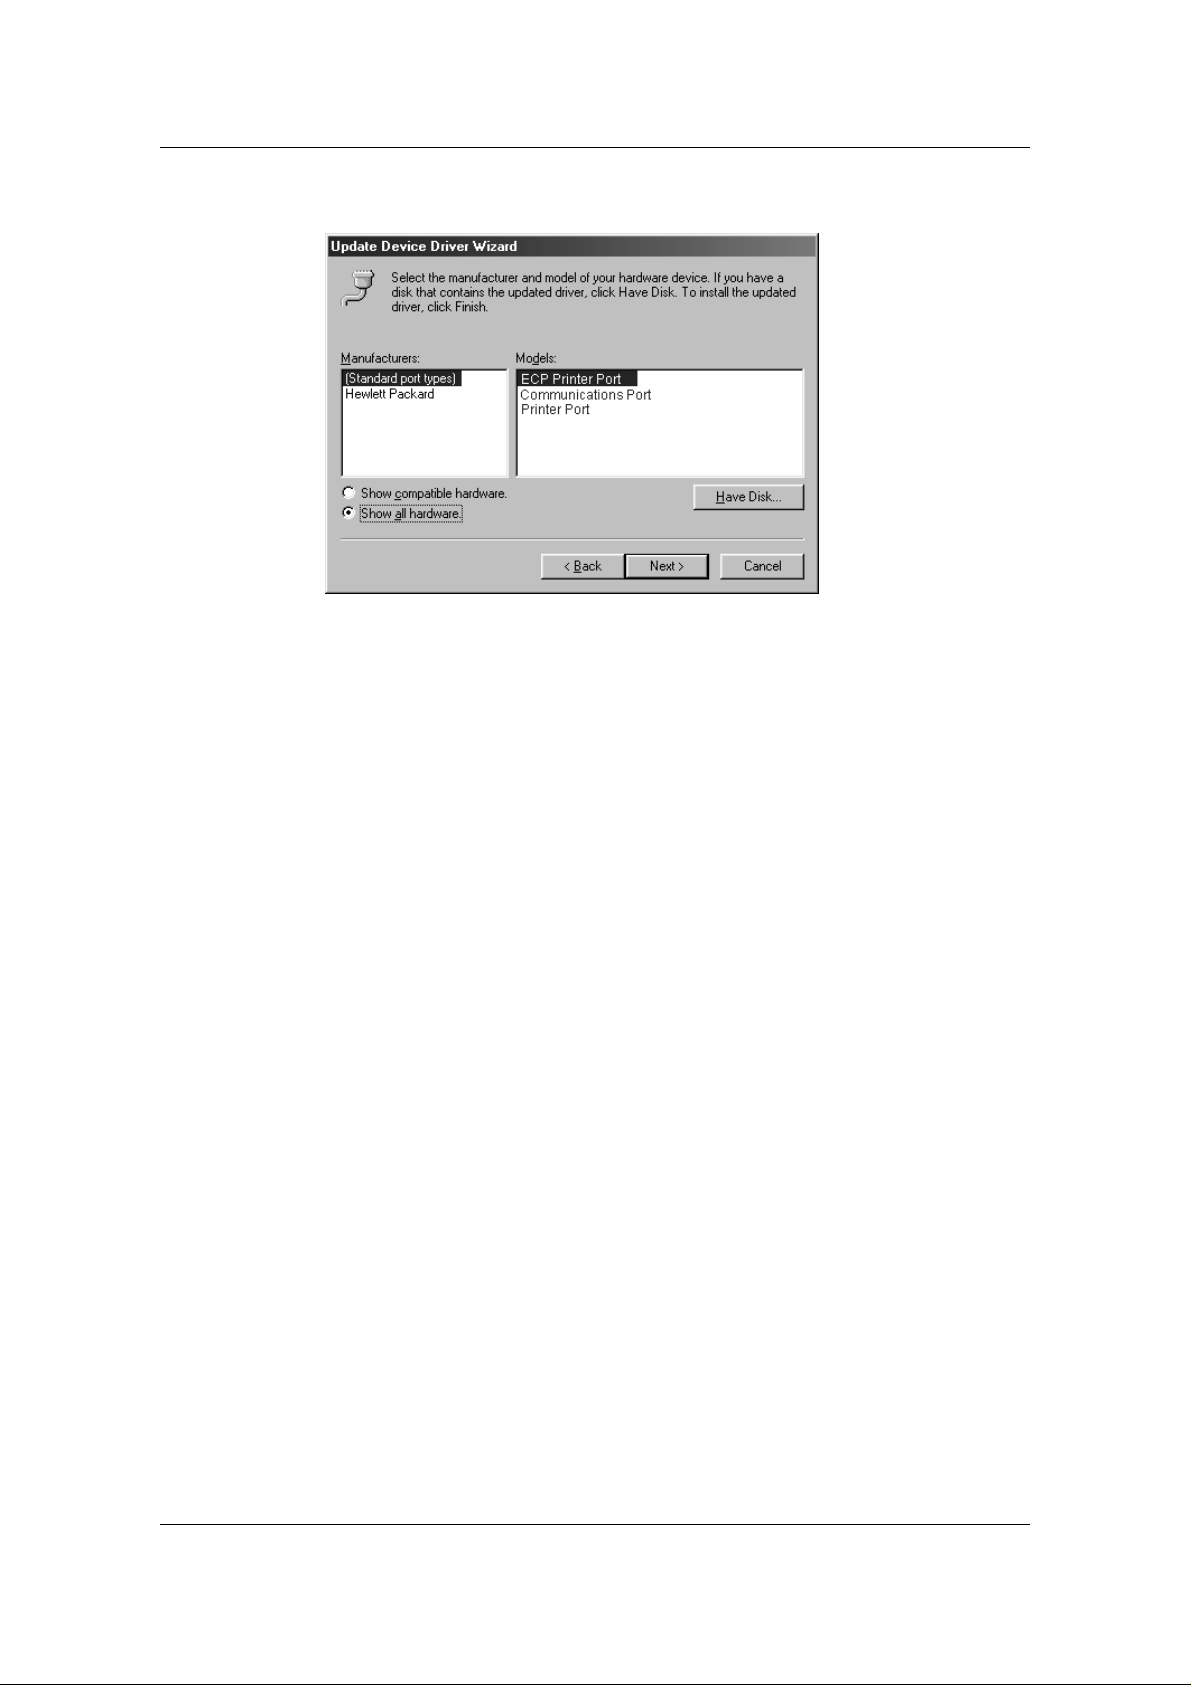
9. Select the Show all hardware radio button.
10. From the Manufacturers list, select (Standard port types). From
the Models list, select ECP Printer Port (not Printer Port). Select
Next.
11. Select Finish.
12. When prompted to restart the work station, select Yes.
After Windows 98/Me restarts, complete the procedure described
in the section Setting Up Parallel Port Printing.
8–11
Page 35

Installing User Software in a Windows 95/98/Me Environment
Setting Up Parallel Port Printing
1. Ensure that the printer is configured for parallel port printing. For
more information, refer to Connecting to the Network and
Performing the Setup from the Printer Control Panel.
2. At the workstation, perform the following to change the BIOS
settings:
a. Restart the workstation and press the key indicated on the
monitor as soon as the workstation starts up. You may have
to scroll through several screens to reach the parallel port
settings.
b. Set Parallel Port Mode to ECP.
c. Save the changed setting and exit.
3. Select the Start, Settings, and Printers.
4. Select the DP-C106 printer icon and select Properties from the
File menu.
5. Select the Details tab. In the Print to the following port drop down
list, select LPT1: (ECP Printer Port).
Check this selection carefully. It may read LPT1 (Printer Port), which is not
equivalent to LPT1: (ECP Printer Port).
If this box does not read LPT1: (ECP Printer Port), change the
port setting now, as described in To Prepare the Port for Parallel
Port Printing and then return to this step. You may need your
Windows 95/98/Me system CD.
8–12
Page 36

Installing User Software in a Windows 95/98/Me Environment
6. If you changed the selection in the Print to the following port
menu, select Apply.
A Warning dialog box may be displayed, stating that fonts you
downloaded to the previously select port may be lost. Select OK.
7. To confirm the connection, print a test page. Select the General
tab in the Properties dialog box. Select the Print Test Page
button and OK.
You are now ready to print from your applications through the
parallel port.
8–13
Page 37
Installing User Software in a Windows 95/98/Me Environment
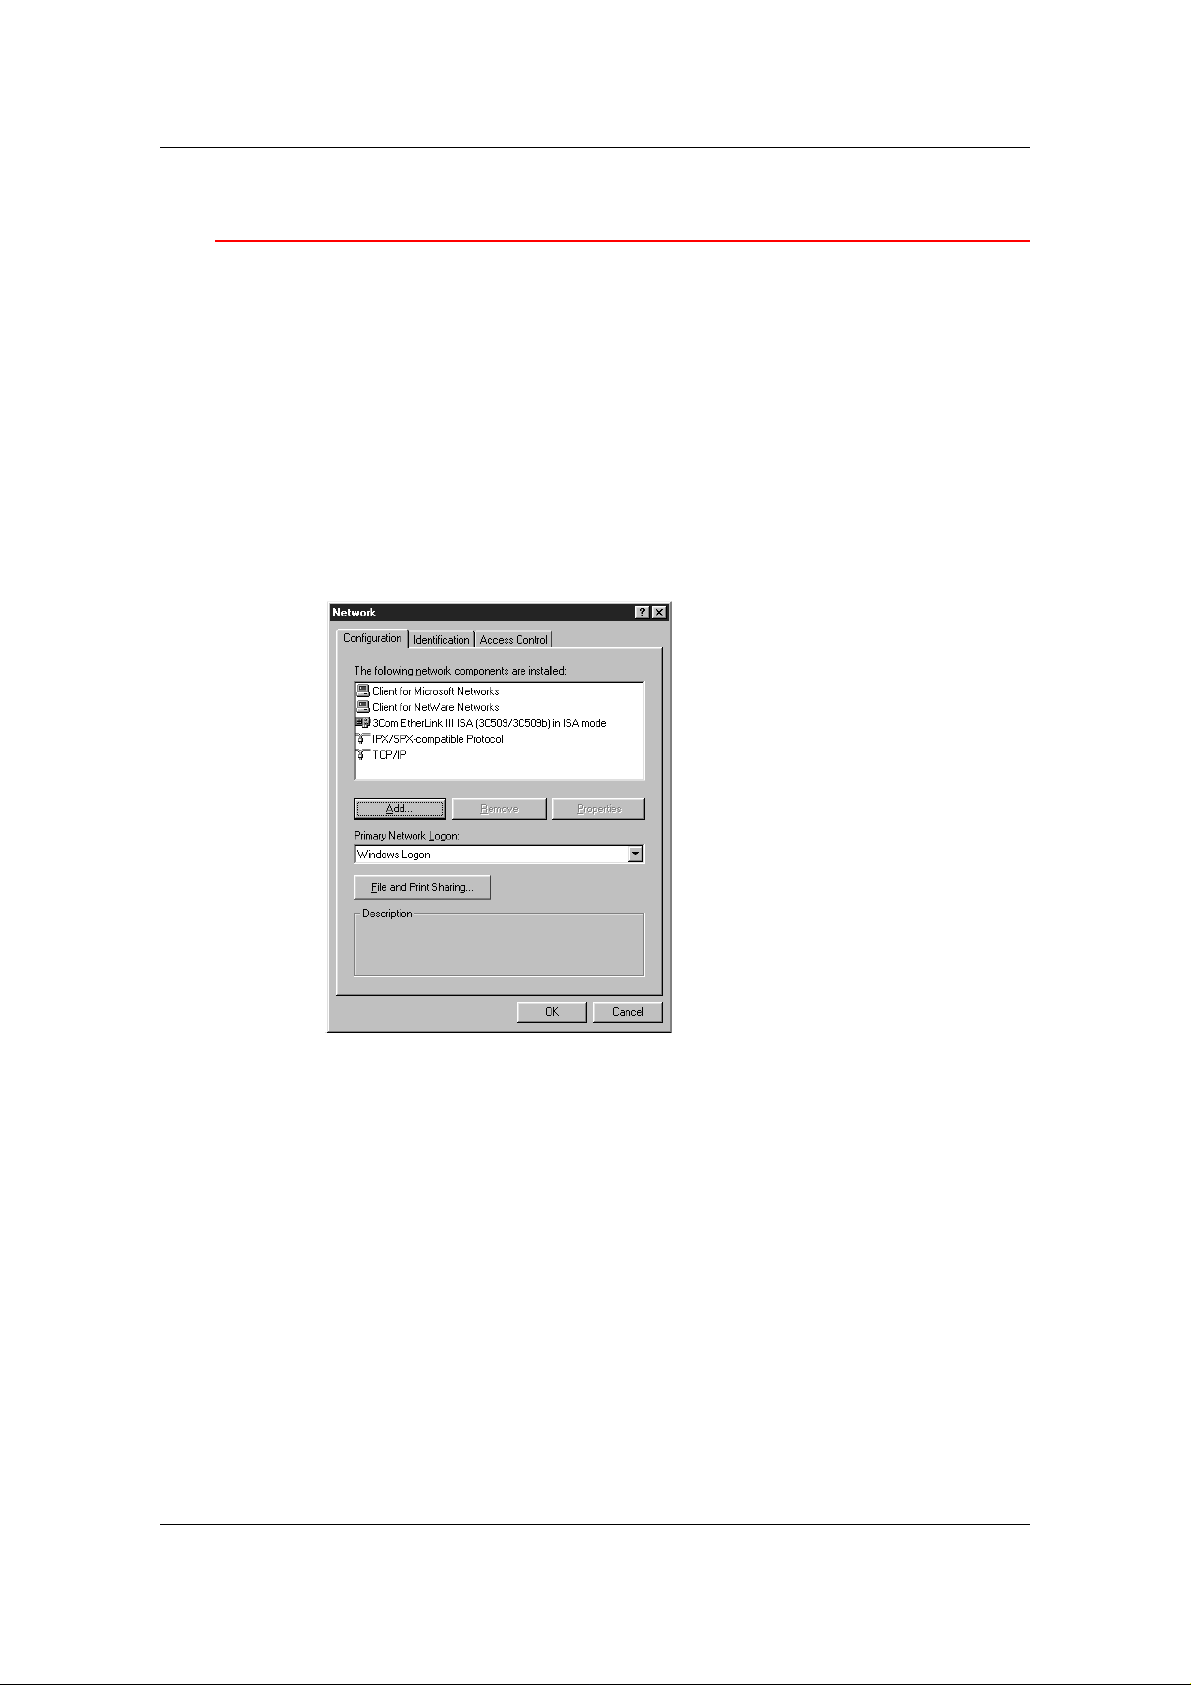
Setting Up IPX/SPX Printing with Windows 95/98/M e
To print from Windows 95/98/Me Workstations over IPX (Novell), you
must first set up IPX/SPX protocols, and then configure the printer by
selecting the IPX port type and entering the settings for the port you
use.
1. Select the Start button, Settings, and Control Panel.
2. Double-click the Network icon.
Ensure that an entry for IPX/SPX-compatible Protocol is listed in
the Installed Network Components section. For additional
information, refer to the Windows 95/98/Me documentation.
3. Double-click the IPX/SPX-compatible Protocol icon.
8–14
Page 38
Installing User Software in a Windows 95/98/Me Environment
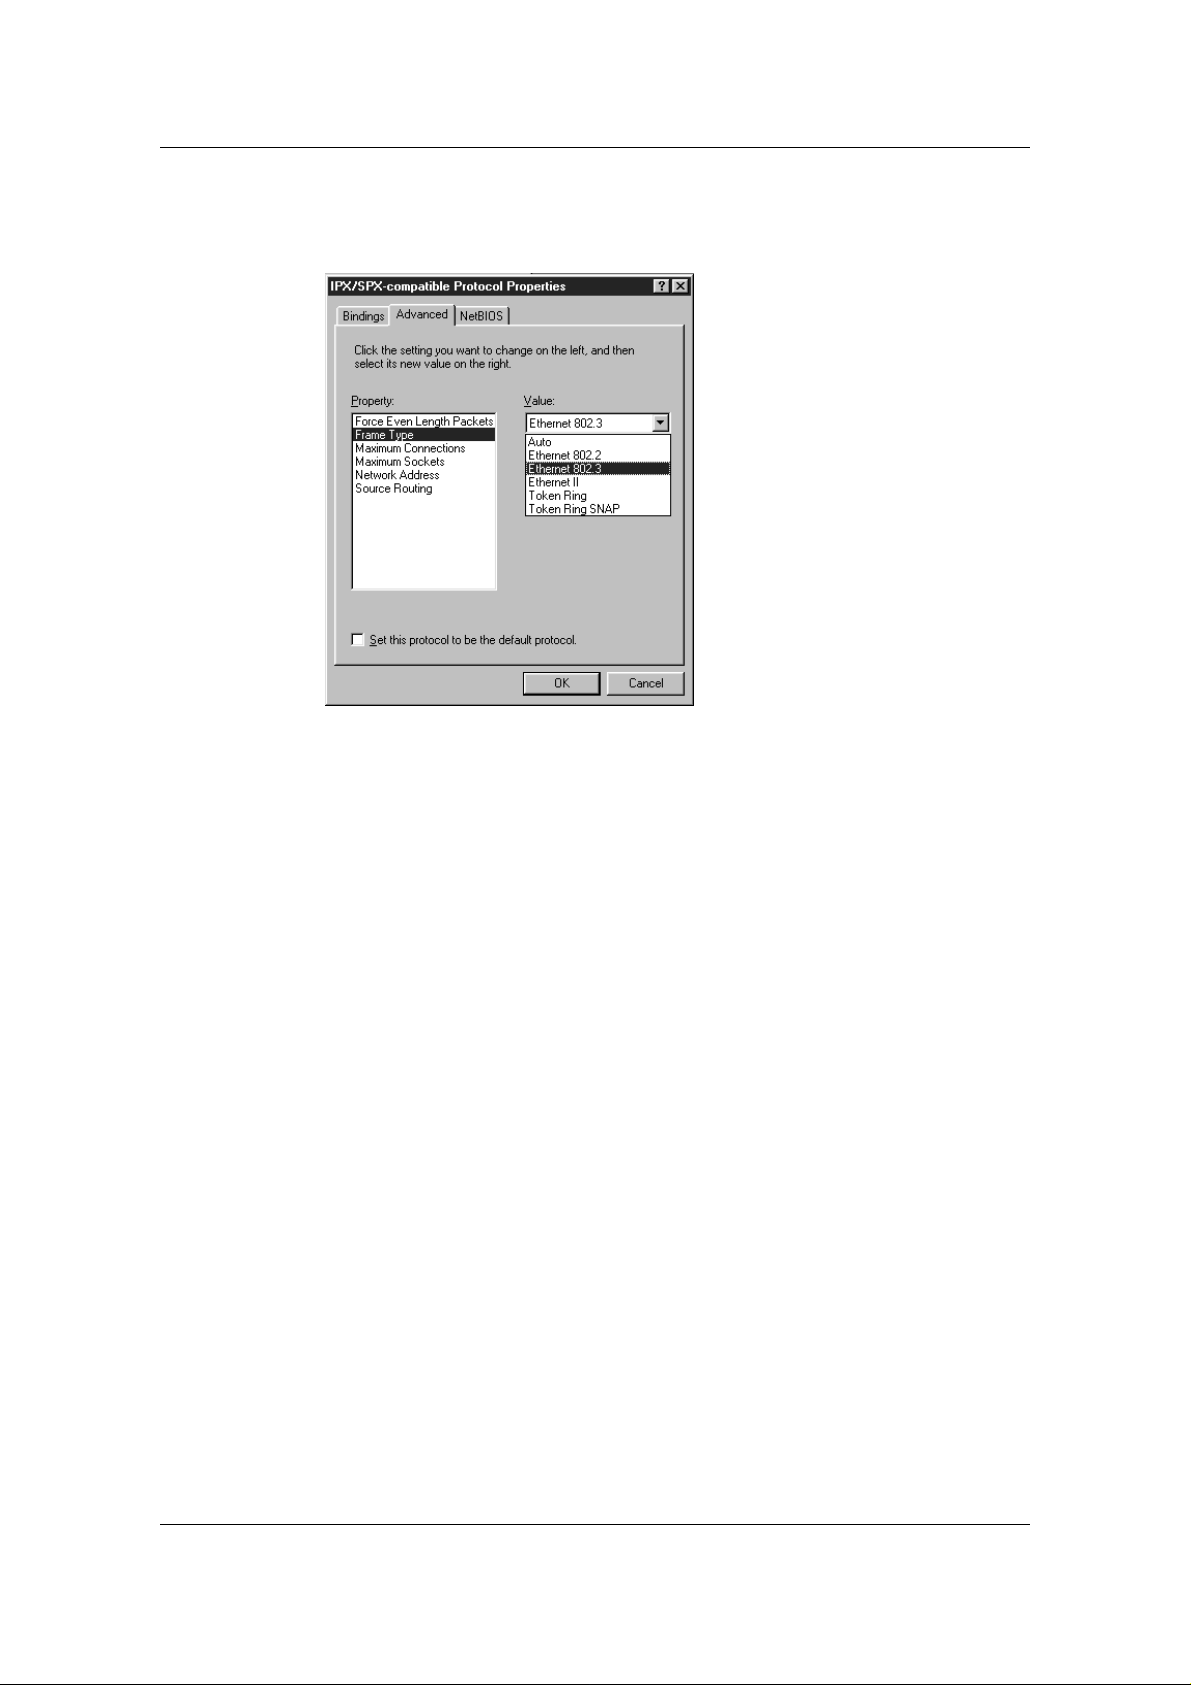
4. Select the Advanced tab.
5. In the Property list, select Frame Type.
6. In the Value drop-down list, select the Frame Type that
corresponds to the one set during the DP-C106 Network Setup.
If necessary, print the Configuration page from the Control Panel
to check which Frame Type(s) are configured.
Do not select Auto because you may not be able to select the
Frame Type specified on the DP-C106.
7. Select OK to close the window.
8. When p r ompted to restar t your workstatio n, select Yes.
8–15
Page 39

Installing User Software in a Windows 95/98/Me Environment
9. After restarting and logging on to the computer, select Start,
Settings, and then Printers.
10. Right-click the DP-C106 icon and select Properties.
11. Select the Details tab and the Add Port button to display the Add
Port dialog box.
12. Specify the network path or select the Browse button to display
the network environment.
For NetWare file servers, double-click the icon of the server to
use for printing to the DP-C106. If you are unsure of which server
to use, contact your system administrator.
13. Select the printer icon labeled with the NetWare print queue
(direct, hold, or queue) you will use and select OK.
14. In the Add Port dialog box, verify that the network path is updated.
Select OK.
Your print jobs are transmitted to the specified print queue on the
Novell file server. The printer polls the file server, and if jobs are
present, they are transmitted to the printer.
15. To confirm the connection, print a test page. Select the General
tab in the Properties dialog box. Select the Apply button and the
Print Test Page button.
Perform one of the following:
• Select Yes if the job printed normally.
• Select No if the page did not print or did not print correctly.
Follow the troubleshooting wizard to diagnose and solve the
problem.
When setup is complete, you are ready to prin t your jobs.
8–16
Page 40
Installing User Software in a Windows 95/98/Me Environment
Setting Up SMB Printing on Windows 95/98/Me
Use SMB or WINS printing if you do not have a Novell network.
Printing by this method enables printing from a workstation to a
particular print connection (Hold, Print, or Direct) on the DP-C106. The
following procedure assumes you have the TCP/IP protocol and Client
for Microsoft Networks installed.
To set up printing to a second or third print connection. Repeat this
procedure for each and assign each printer a descriptive name during
the printer driver installation for subsequent identification purposes.
SMB printing is referred to as Windows Printing in Setup, on the
Control Panel and on the Configuration page.
1. Ensure that the printer is configured for SMB printing. For more
information, refer to Performing the Setup from the Printer Control
Panel.
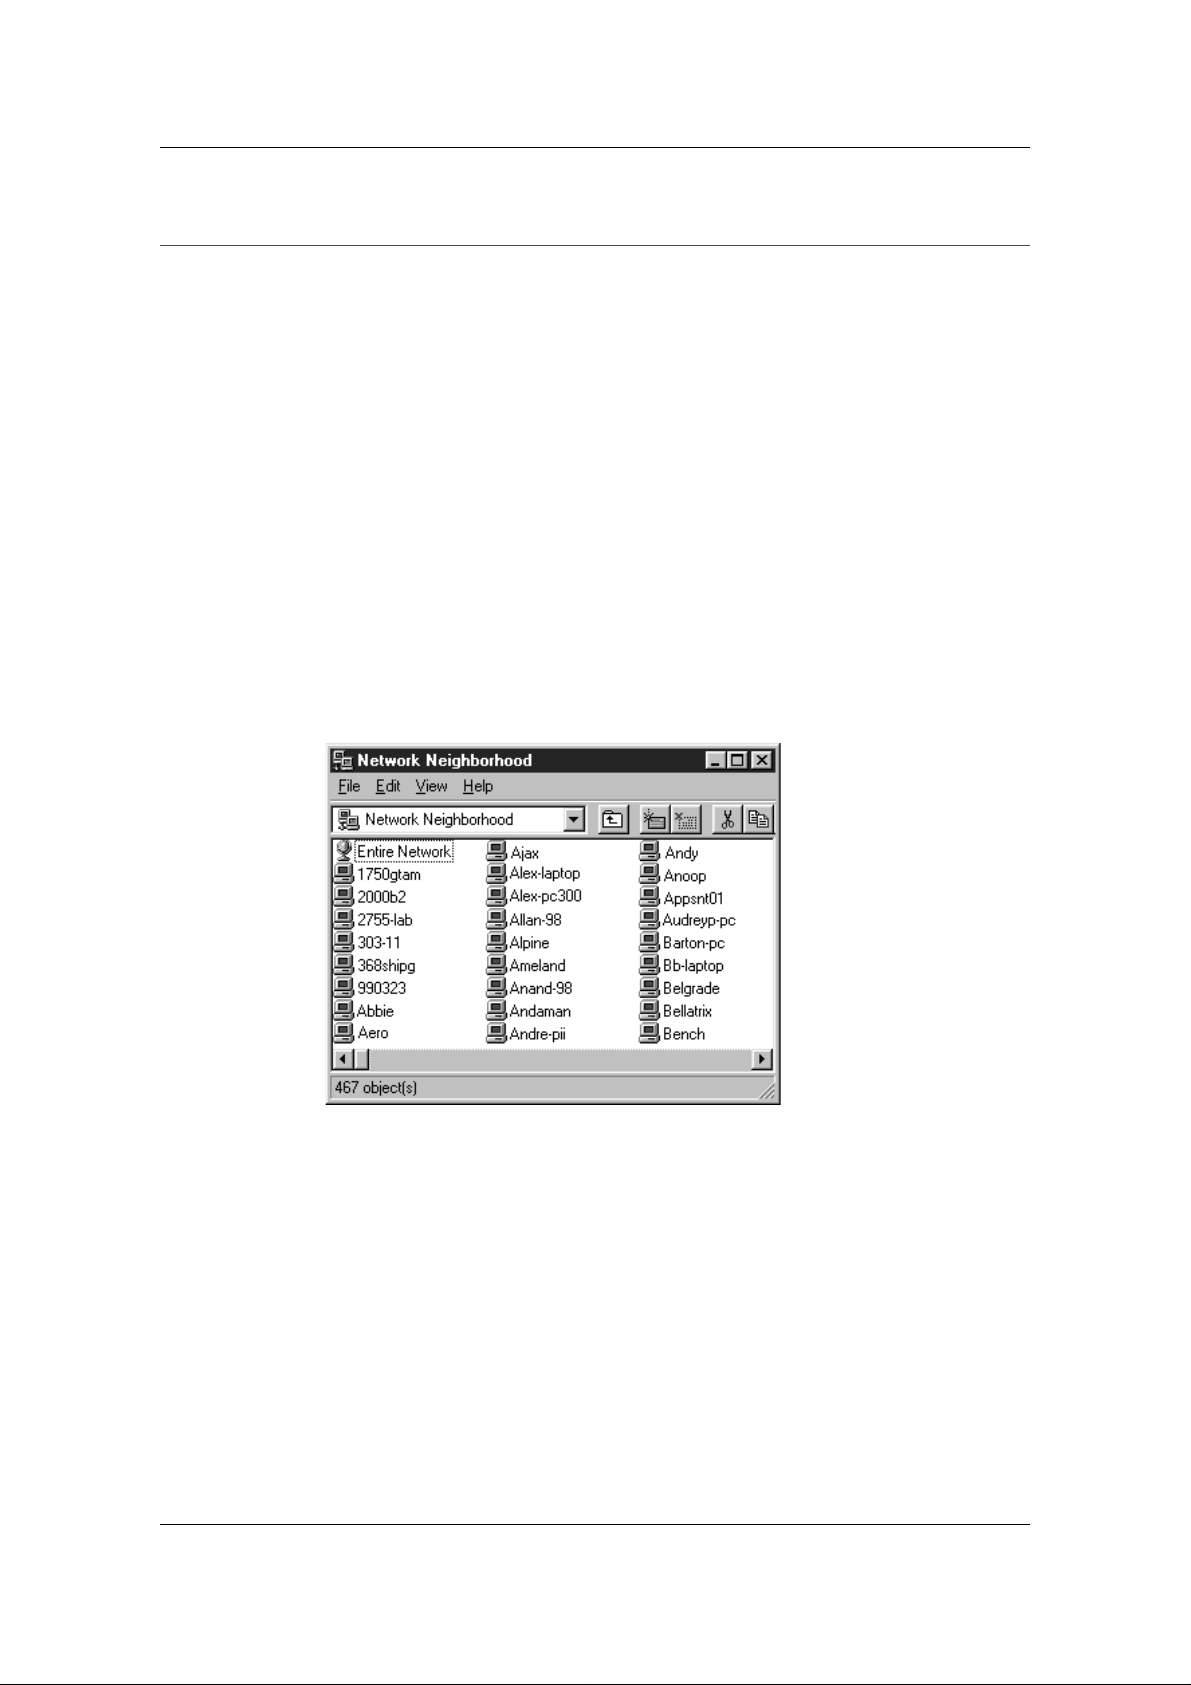
2. At the workstation, double-click the Network Neighborhood icon
to display your network environment.
8–17
Page 41
Installing User Software in a Windows 95/98/Me Environment
3. Browse for the printer name. Refer to the Configuration page for
this information. If you cannot locate your DP-C106, see your
system administrator.
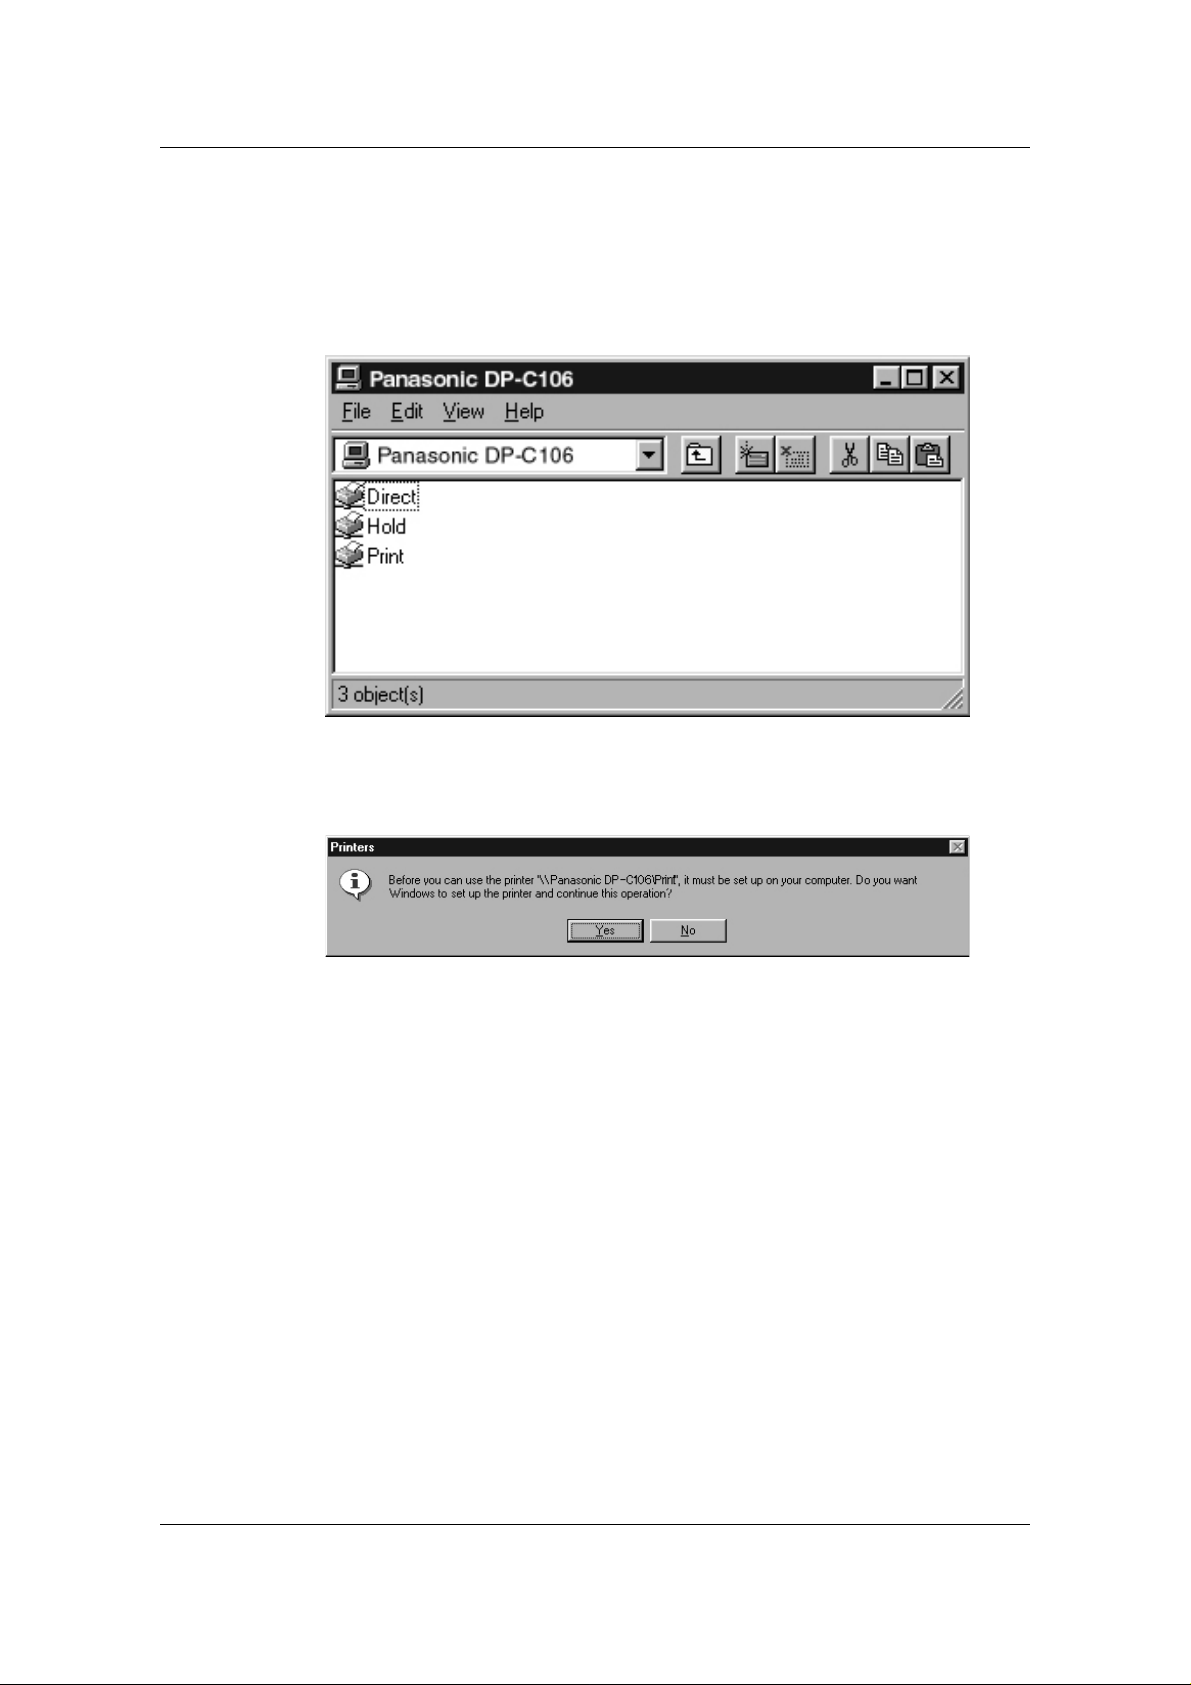
4. Double-click the name of the printer to display enabled print
connections.
5. Double-click the name of the desired printer connection.
The Printers dialog box is displayed, asking whether you would
like to set up the printer.
6. Select Yes to install the PostScript or PCL printer driver and
printer description file for the selected connecti o n.
The Add Printer Wizard is displayed.
8–18
Page 42
Installing User Software in a Windows 95/98/Me Environment
7. Specify whether you will be printin g from MS-DOS programs and
select Next.
If you select Yes, you will be prompted to capture a printer port
before proceeding with the installation. Refer to the Windows
documentation for details.
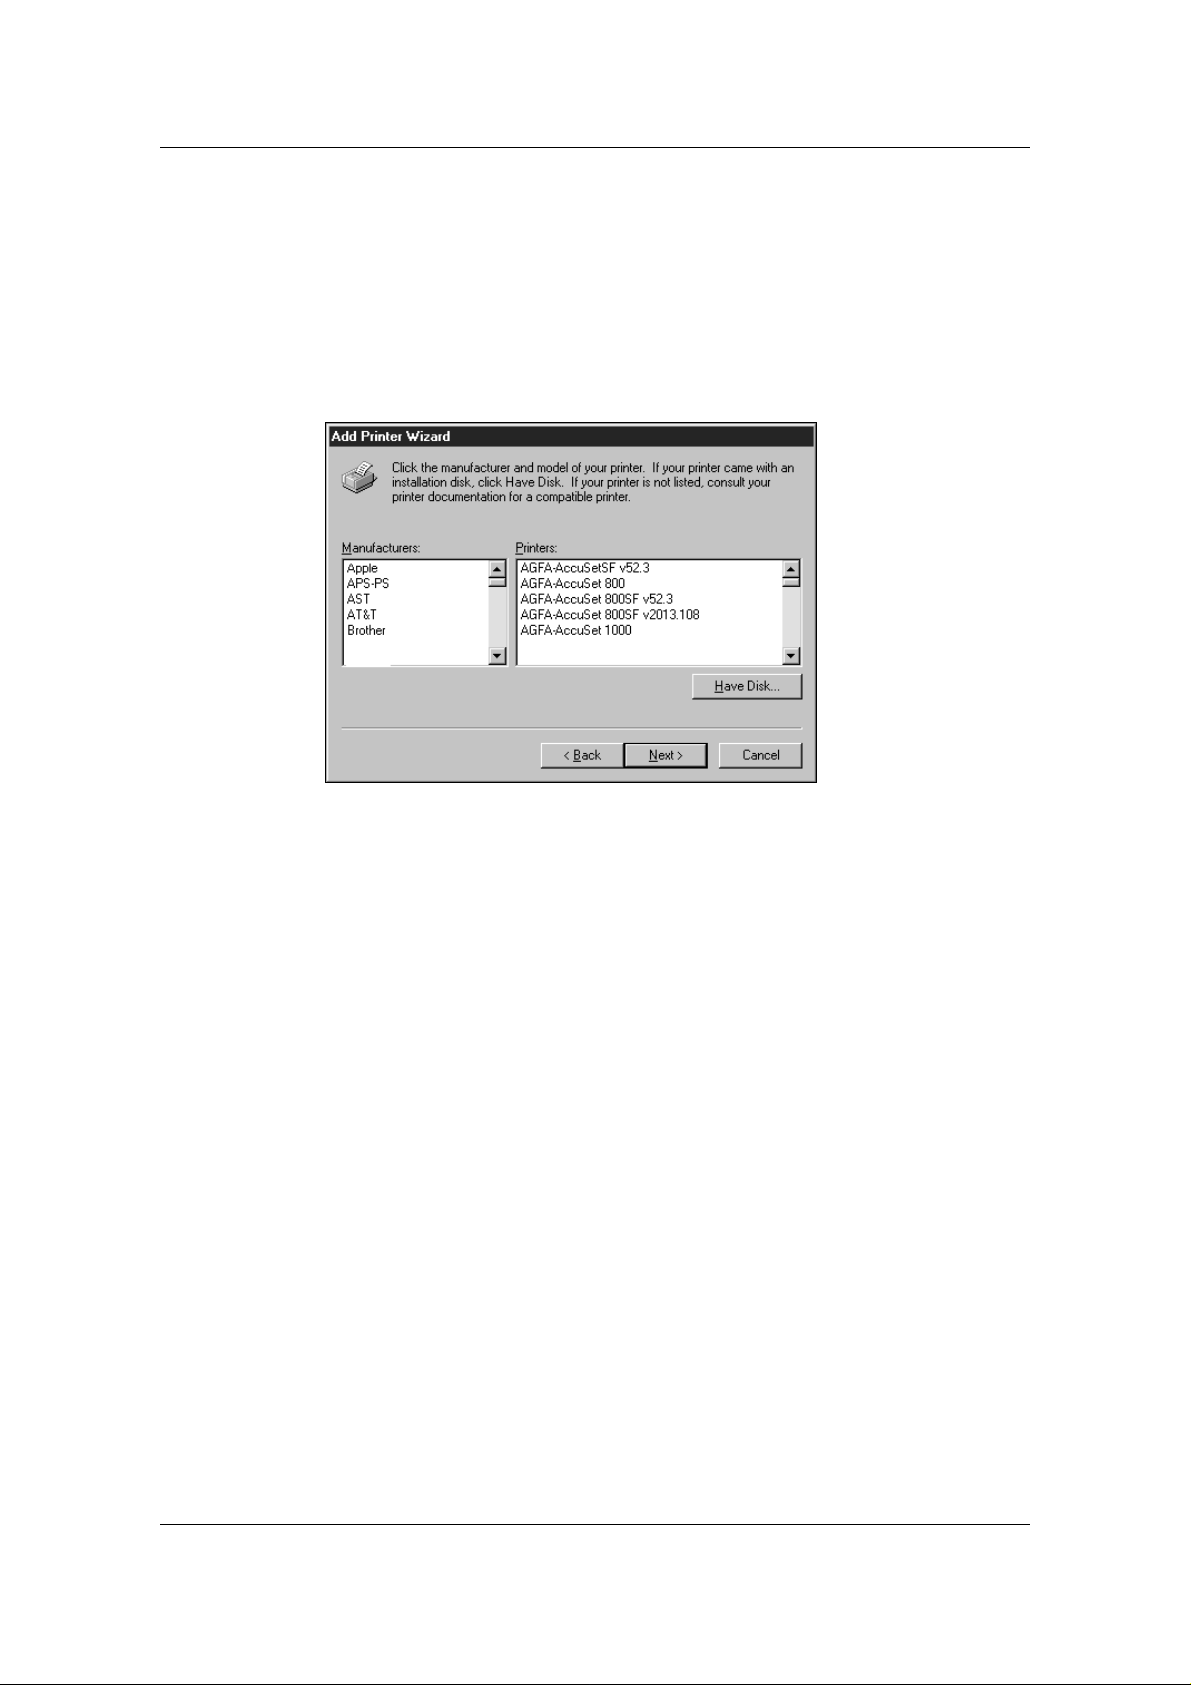
8. In the dialog box displaying lists of manufacturers and printers,
select the Have Disk button.
The Install From Disk dialog box prompts you for the disk.
9. Perform one of the following:
• If you are installing from the CD, select the CD-ROM drive (fo r
example, D:\) from the drop-down box and select the Browse
button.
• If you are installing from files you downloaded using the
Installer WebTool, type the name of your hard disk drive (for
example, C:\) and select the Browse button.
8–19
Page 43

Installing User Software in a Windows 95/98/Me Environment
10. Perform one of the following:
• If you are installing from the CD, browse to one of the
following folders:
• For PostScript printing: Driver_PS3\English\Win_9x_ME
• For PCL printing: Driver_ PCL5Ce\ English\Win_9x_ME
• If you are installing from files you downloaded using the
Installer WebTool, browse to one of the following folders
• For PostScript printing: Driver_PS3\English\Win_9x_ME
• For PCL printing: Driver_ PCL5Ce\ English\Win_9x_ME
Select OK and ensure that the oemsetup.inf or oemsetup option
is selected.
The path is copied to the Install From Disk dialog box.
11. Verify the path is correct and select OK.
In the Printers box, select the Panasonic DP-C106 option. Select
Next.
If you are adding a second printer or performing an upgrade, you will be
asked if you want to keep the existing driver or replace it. Select Replace
existing driver to ensure you are installing the latest version of the printer
driver.
8–20
Page 44
Installing User Software in a Windows 95/98/Me Environment
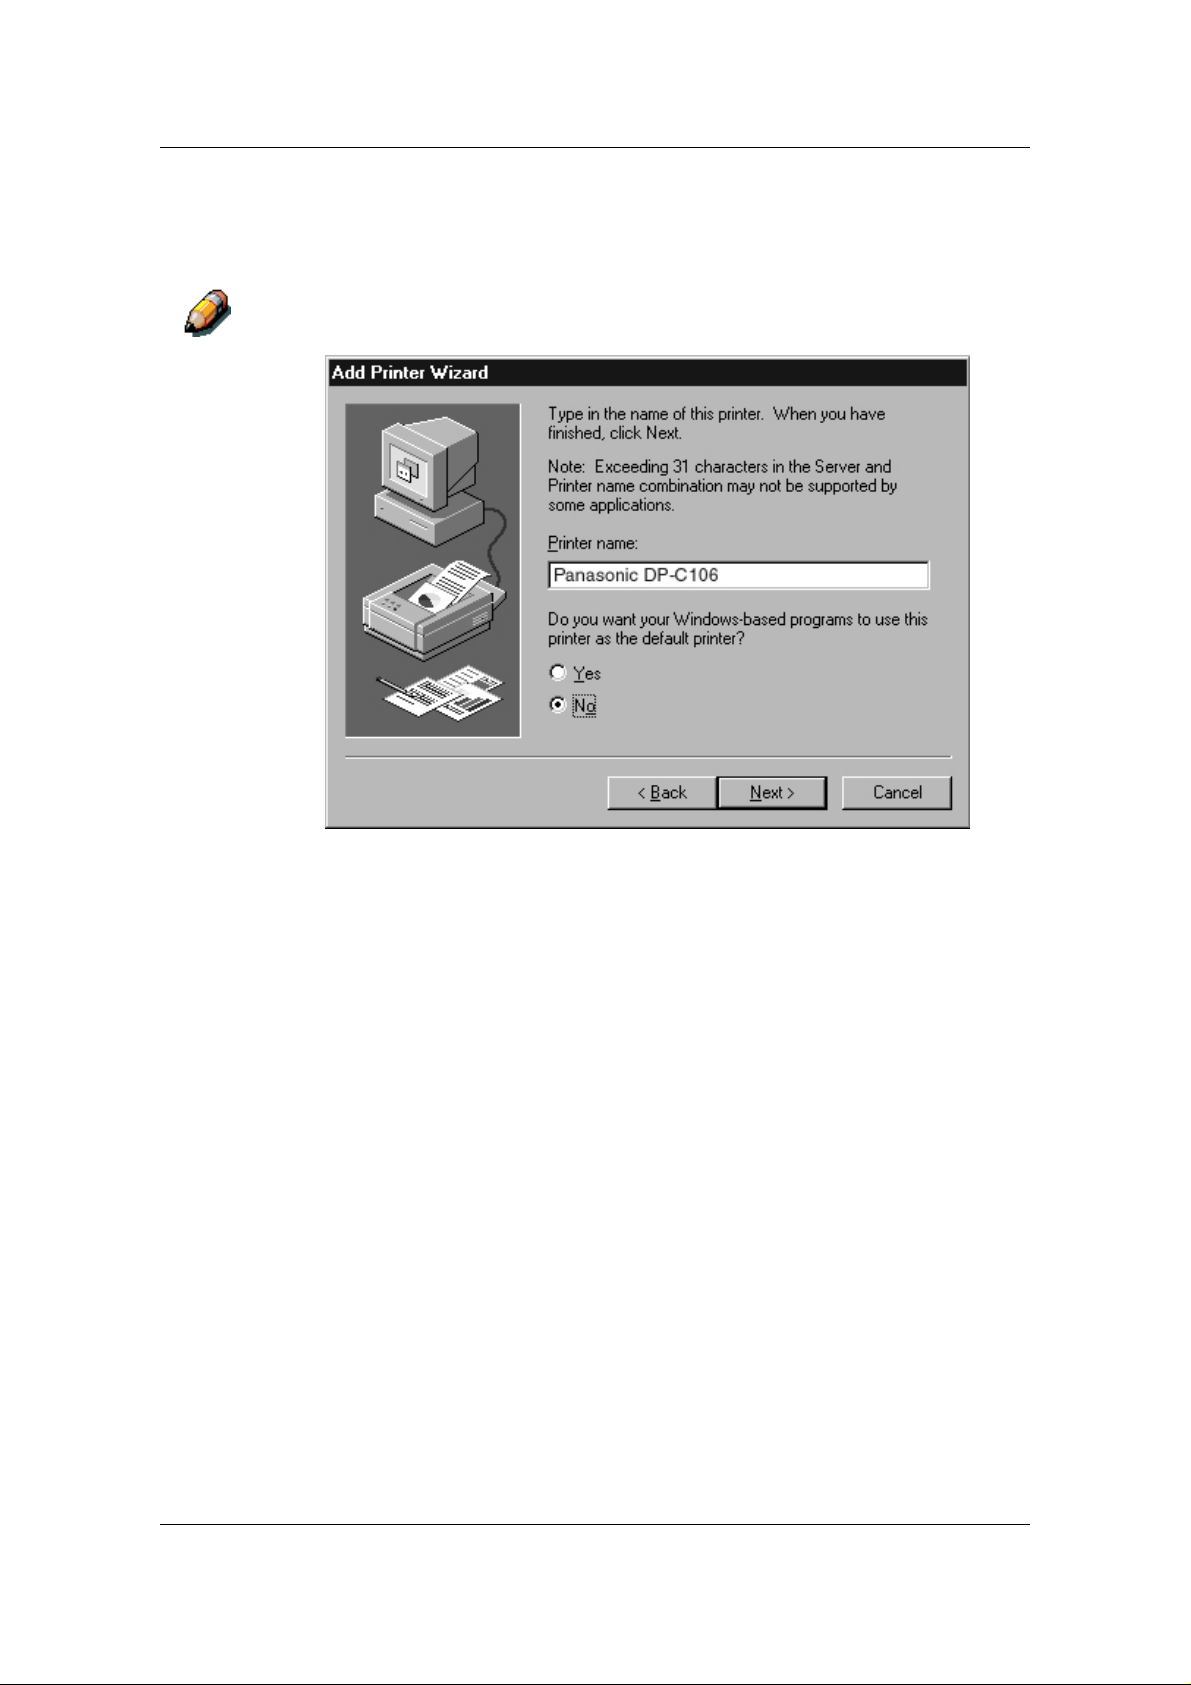
12. Using a maximum of 31 characters, enter a name for the printer
(or leave the default name) in the Printer name box. Indicate
whether you want the printer to be your default. Select Next.
Entering more than 31 characters may cause printing problems with some
network applications.
13. Select Yes to print a test page and select Finish. The DP-C106
will print a test page.
You are ready to print from your workstation.
8–21
Page 45

Installing User Software in a Windows 95/98/Me Environment
Setting Printer Options
1. Select the Start button, Settings, and then Printers.
2. Right-click the DP-C106 icon and select the Properties option.
3. Select the Configuration tab.
4. Highlight the option(s) installed on the printer and perform one of
the following:
• To add an option, select the desired option from the Availabl e
Options list and select the Add button.
• 64 (default), 128, 192, 256, 320, 384 or 512MB
• A3 Oversize Tray
• Duplex Unit
• To delete an option, select the desired option from the
Installed Options list and select the Remove button.
5. Select Apply to activate the current settings, and then select OK.
6. Close the printer window.
8–22
Page 46

Installing User Software in a Windows 95/98/Me Environment
Installing Additional Software for Windows 95/98/Me
You can copy additional color files from the User Software CD to your
hard disk. Many of the files are PostScript files that you can download
and print using the WebDownloader.
• ICM folder—ICM monitor setting file and device profiles specially
designed for use with this printer.
• Color_Sample folder—Cmyk.ps, an 11-pag e, letter -s ize
PostScript file to use for reference when defining CMYK colors in
applications. Pantone.ps, a 19-page, letter-size PostScript file that
indicates the closest equivalent of PANTONE coated colors that the
printer can produce. The method used to print the Pantone.ps file
differs depending on the Spot Color Matching setting.
You can print Rgb_01.doc from Microsoft Word 97 or later to view
RGB colors. You can print Rgb_02.ppt from PowerPoint 6.0 or later
to view available RGB colors.
• Calibrat folder (inside English folder)—Four PostScript
measurements files of color patches: Custom21.ps, Custom34.ps,
Stand21.ps, and Stand34.ps. The numbers in the file names refer
to the number of patches on the page. The Custom files are
provided to enable you to download measurement patches that
incorporate the current calibration set of the printer. The Standard
files are provided to enable you to dow nload standard
measurement patches that ignore the current calibration set for the
printer.
These files are provided for expert users and should not be used for day-today calibration.
8–23
Page 47

Installing User Software in a Windows 95/98/Me Environment
Copying Printer Description Files
The User Software CD contains printer description files for
popular Windows applicati ons. Pag e maker 5.0, 6.0,a nd 6.5 do not
support automatic installation of printer description files from the
Printer Control Panel. To make the DP-C106 available in the Print
and Page Setup dialog boxes of this application, copy printer
description files to the appropriate location.
1. Insert the User Software CD in your CD-ROM drive. Open the
Driver_ PS3\ English folder.
2. Copy the printer description file to the appropriate location. For
PageMaker 5.0 or later, copy the Ef3XC106.ppd to one of the
following locations:
• For PageMaker 5.0--\ALDUS\USENGLSH\PP D4
• For PageMaker 6.0--\PM6\RSRC\USENGLSH\PPD4
• For PageMaker 6.5--\ PM65\RSRC \USENGLSH\PPD4
Installing the ICM Profile
The Image Color Matching (ICM) profiles included in the Icm folder on
the User Software CD are for use with ColorWise ProTools. They can
also be used with applications that support ICC standards. For most
ICC aware applications, the files must be installed into a folder named
Color in the System folder. For use with ColorWise Pro Tools, the files
can be copied to a folder of your choice.
8–24
Page 48
Installing User Software in a Windows 95/98/Me Environment
Loading the Working Space Profile Using Photoshop 5.0
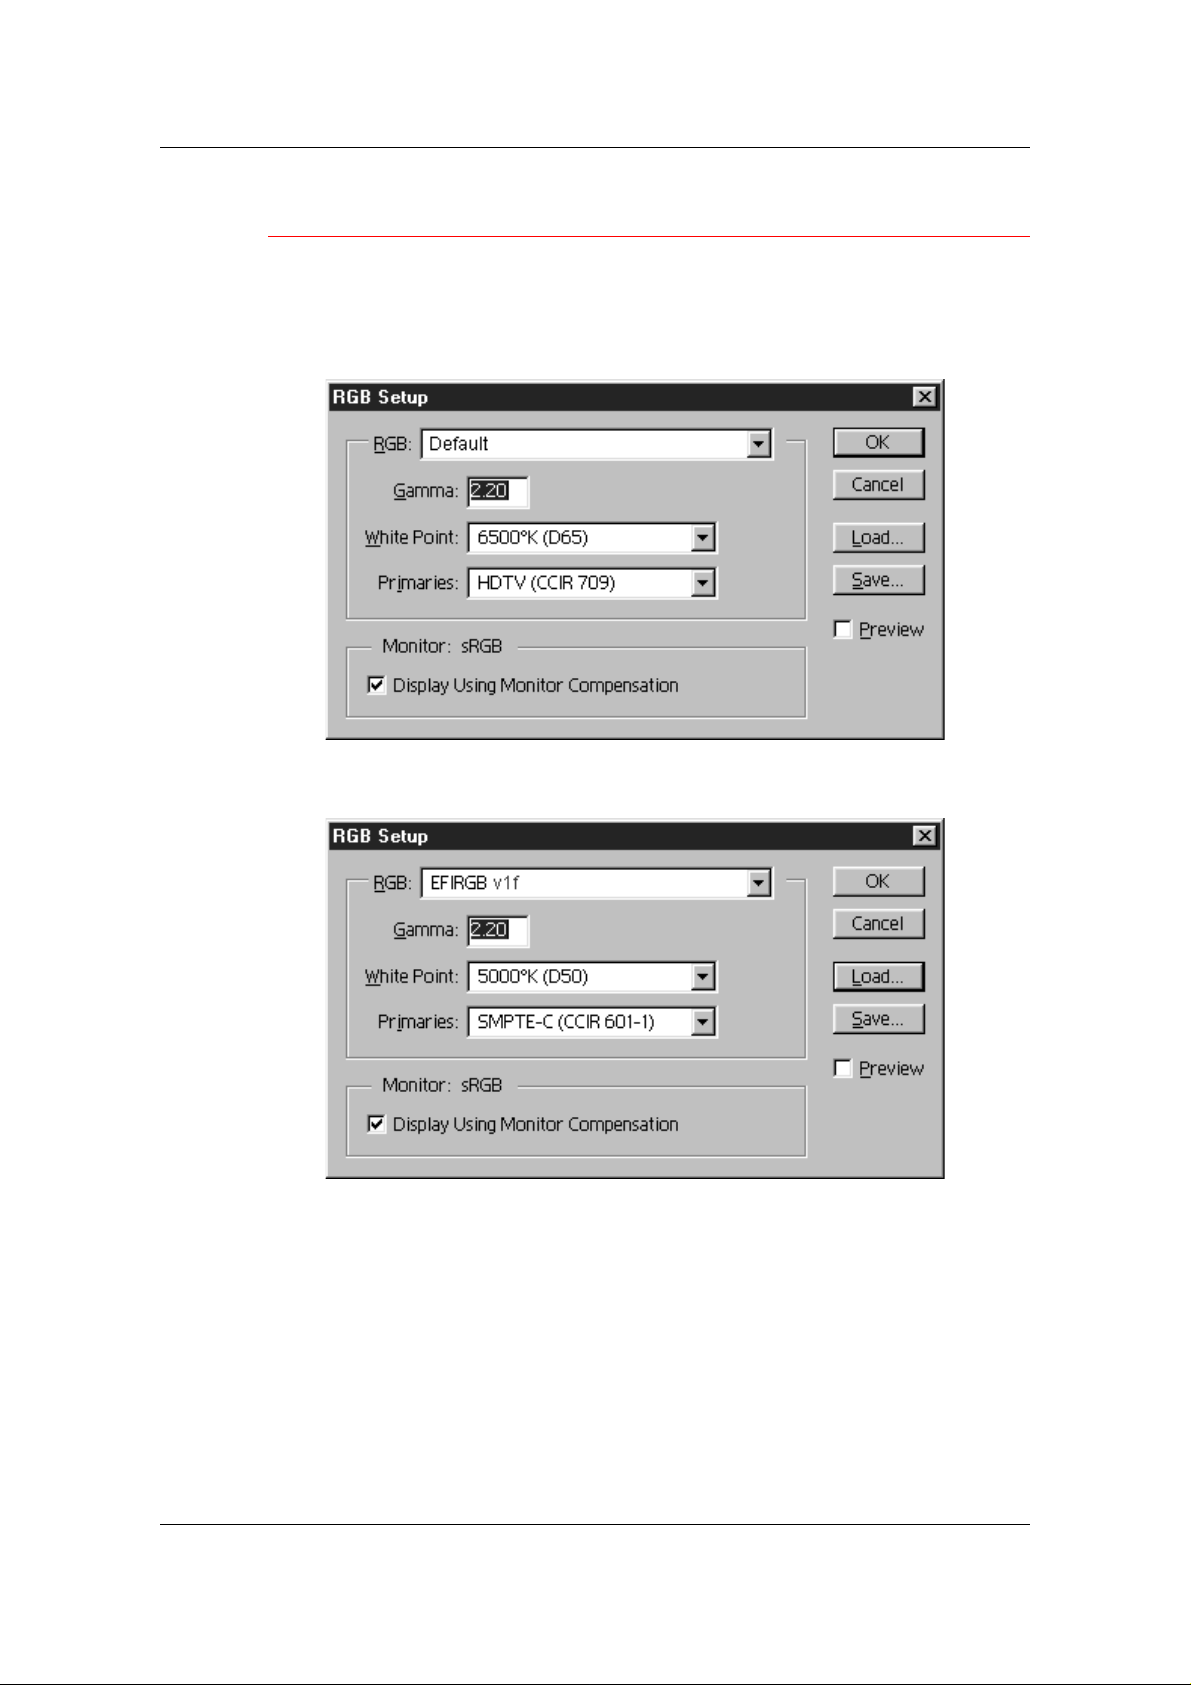
1. Launch Photoshop.
2. From the File menu, select Color Settings and RGB Setup.
3. In the RGB Setup dialog box, select the Load button.
4. Browse to the Windows\System\Color folder. Select the Efirgb
v1f file and the Load button.
5. Select OK.
For more information about ICM profiles, refer to the application
documentation.
8–25
Page 49
Installing User Software in a Windows 95/98/Me Environment
Loading the ICM Profile
The ICM printer profile enables RGB-to-CMYK conversions that are
specific to the printer you are using. The following procedure assumes
that you have installed the ICM profiles included on the User Software
CD.
The internal name of an ICM profile may vary slightly from its file name.
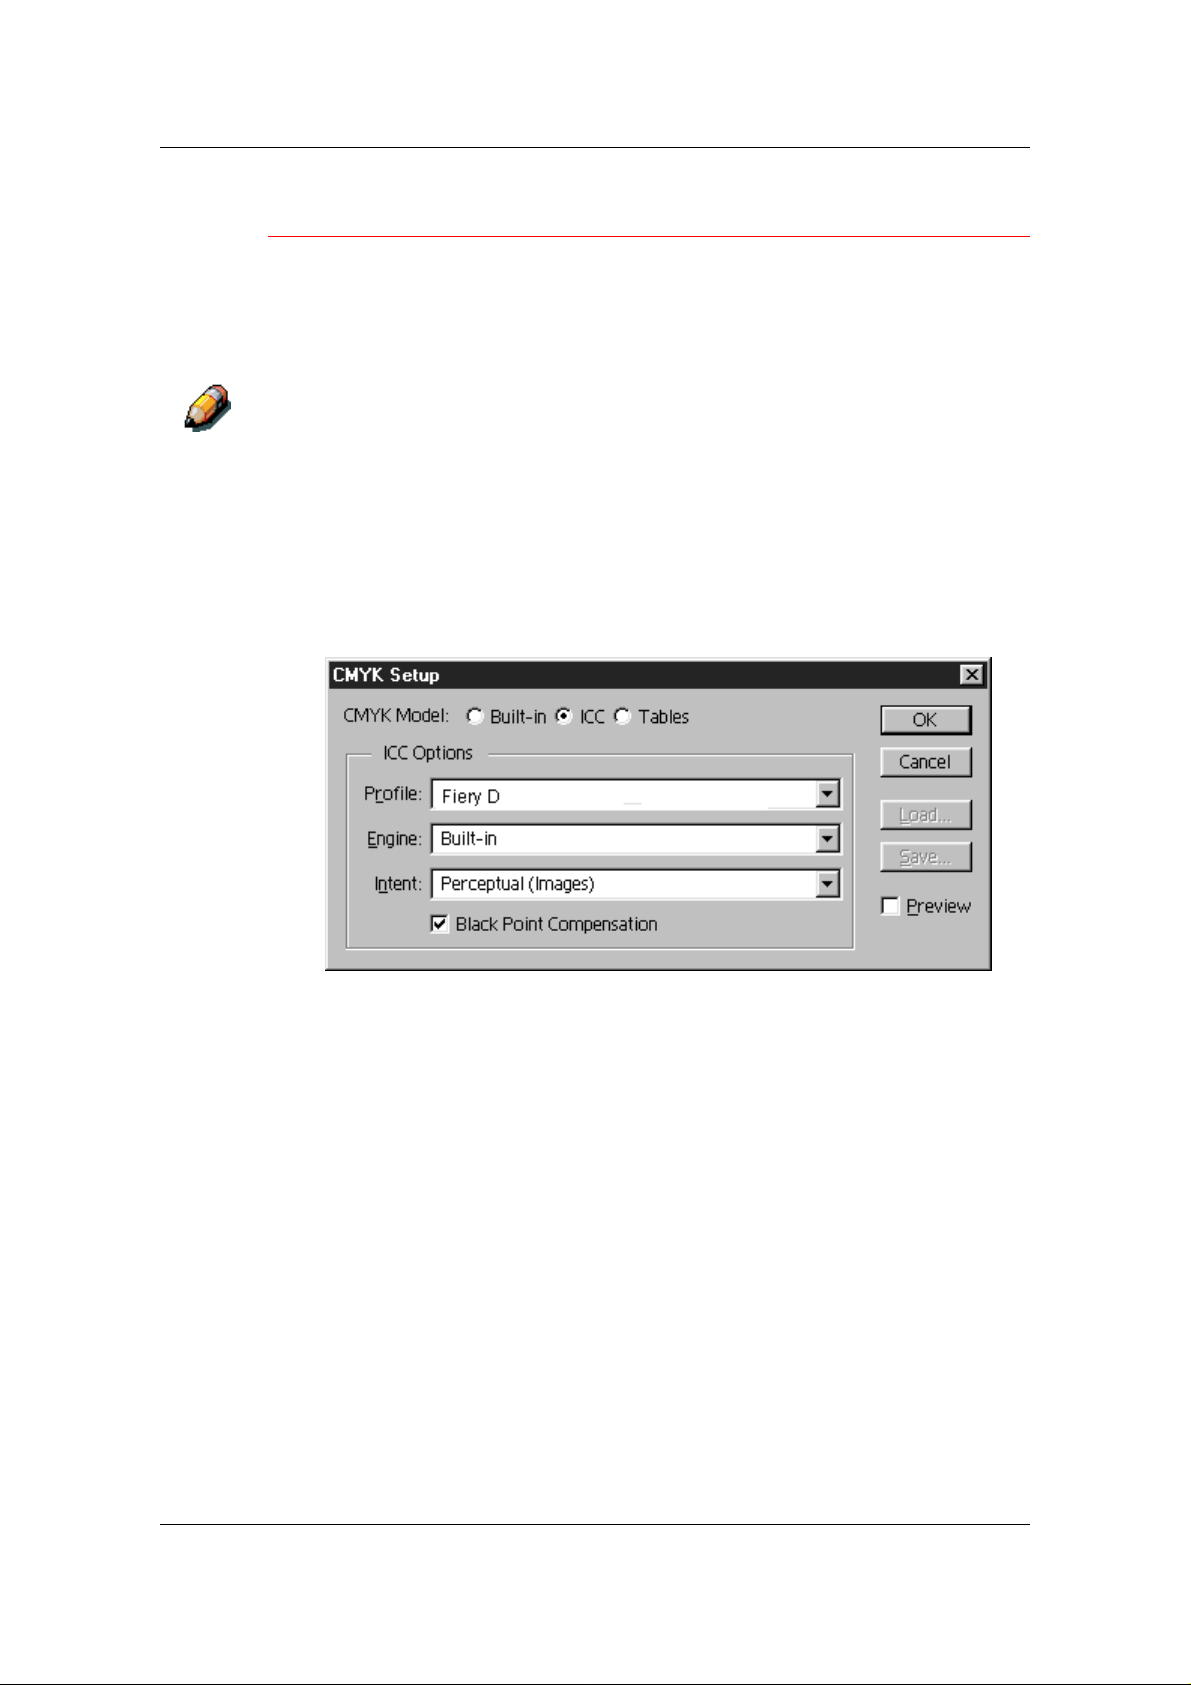
1. Launch Photoshop.
2. From the File menu, select Color Settings and CMYK Setup.
3. In the CMYK Setup dialog box, select the ICC radio button as the
CMYK Model.
4. Select the profile that corresponds to the printer or the device you
would like to simulate from the Profile drop-down menu.
8–26
5. Select OK.
Page 50

9
Installing User Software in a
Windows 2000 Environment
This chapter provides a brief overview and instructions for installing
software on Windows 2000 Workstations. Ensure that your printer is
properly connect and configured for your network. For details, refer to
Connecting to the Network and Performing the Setup from the Printer
Control Panel.
Use the contents of this chapter as follows:
• Depending on your configuration, use one of the following sections
to install printer drivers and set up appropriate connections:
• Parallel Port Printing
• TCP/IP and LPR Printing (for a new installation or an upgrade
of Windows NT 4.0 to Windows 2000)
• IPX/SPX Printing
• SPM Printing (Standard Port Monitor)
• SMB Printing
• Specify printer options with the section Setting the Printer Options,
• If necessary, refer to Inst al l ing Addi tional Software for Windows
2000.
All necessary files are included on the User Software CD.
9–1
Page 51

Installing User Software in a Windows 2000 Environment
Overview of Installation
Installing the DP-C106 User Software includes the following:
• Installing the PostScript or PCL printer driver and corresponding
printer description files and setting up the printer driver to
communicate with the printer through the Add Printer Wizard
• Setting the Printer Options
• Copying Additional Files from the User Software CD as Needed
Do not install these files using the Installer WebTool.
Before You Begin
1. If your system administrator has not already done so, connect the
printer to the desired port on the workstation. For details, refer to
Connecting to the Network and Performing the Setup from the
Printer Control Panel.
If you are uncertain what type of network you have, contact your
system administrator.
2. Print a configuration sheet at the printer to obtain the name of the
printer and settings that will be used in the following procedures.
9–2
Page 52
Installing User Software in a Windows 2000 Environment
Installing the User Software for Parallel Port Printing
Use this procedure to install the printer. It prepares your system for
local printing through the para llel port.
If you have previously installed a print driver for the DP-C106, perform the
uninstall procedure before installing the new driver. For more information,
refer to your Windows documentation.
Do not install the printer files using the Installer WebTool.
1. Select the Start button, Settings, and Printers.
2. Double-click the Add Printer icon to display the Add Printer
Wizard and select Next.
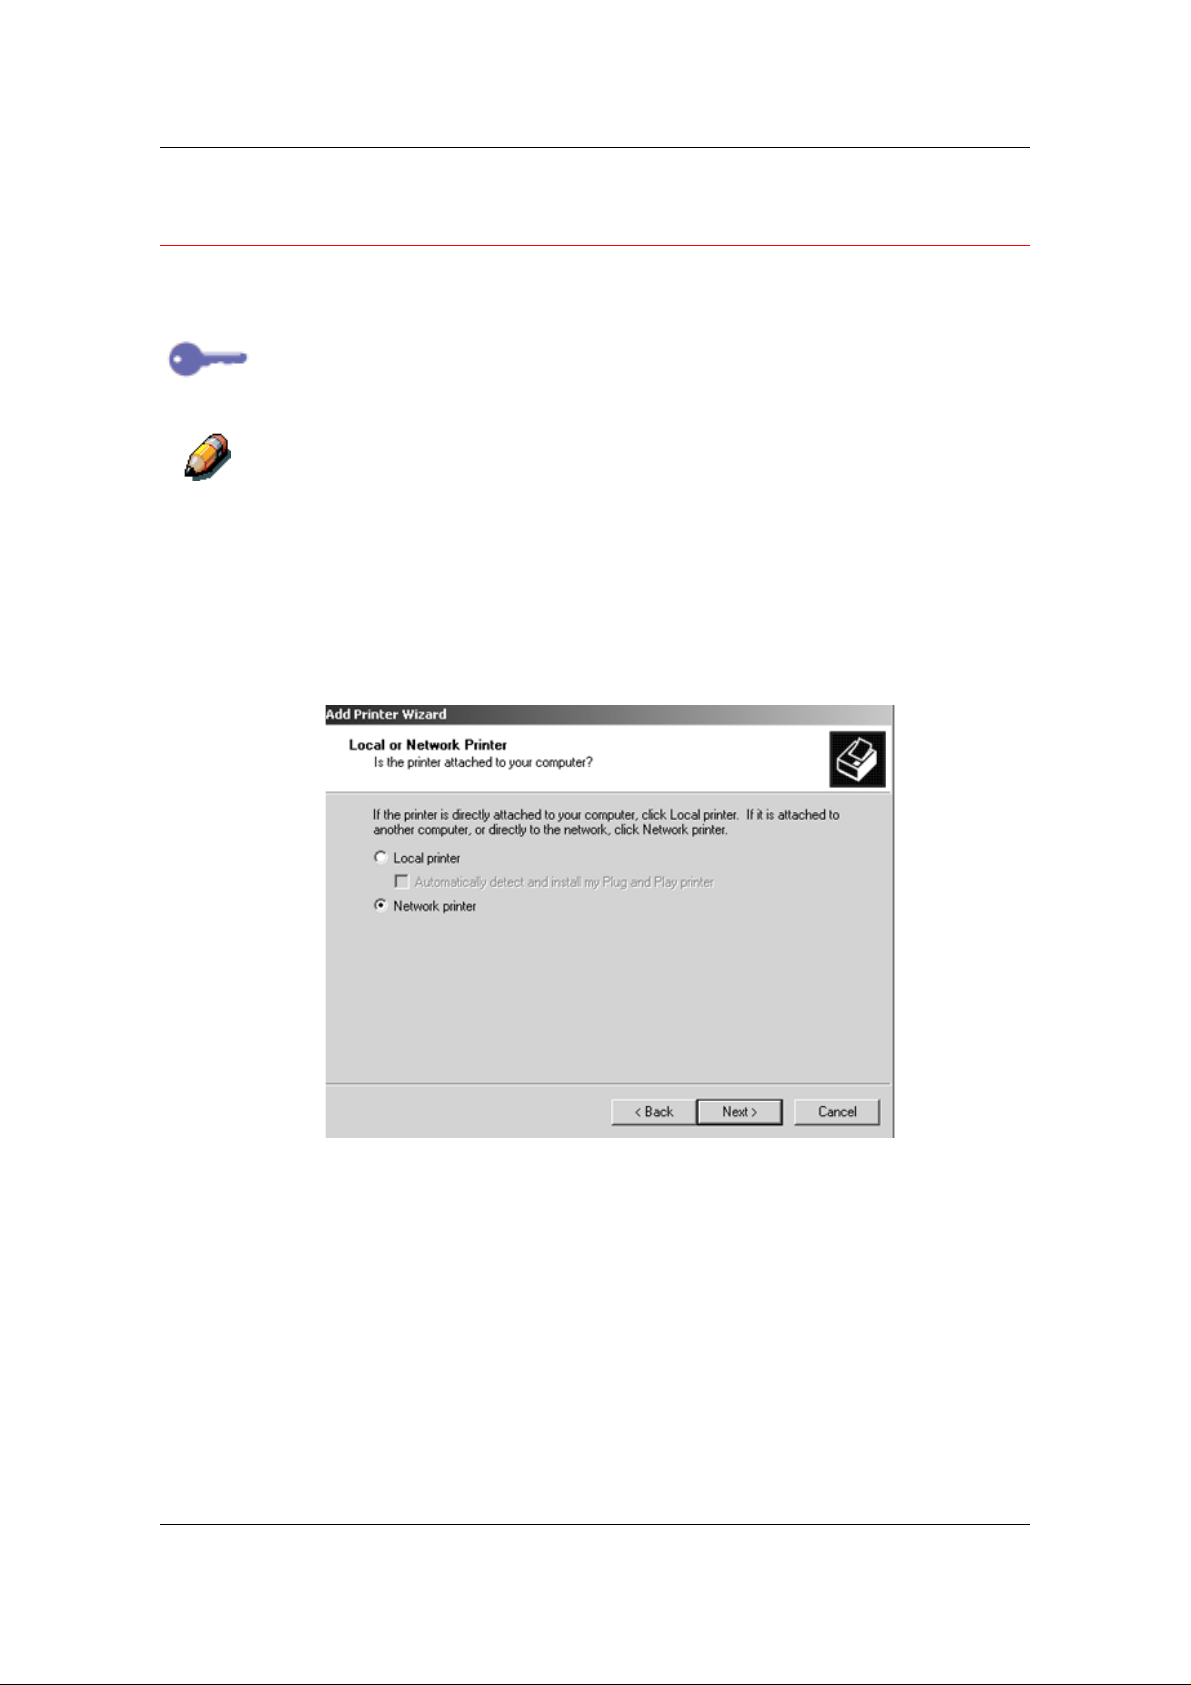
3. Select the Local printer radio button and Next.
Ensure that the Automatically detect and install my Plug and
Play printer check box is not selected.
9–3
Page 53
Installing User Software in a Windows 2000 Environment
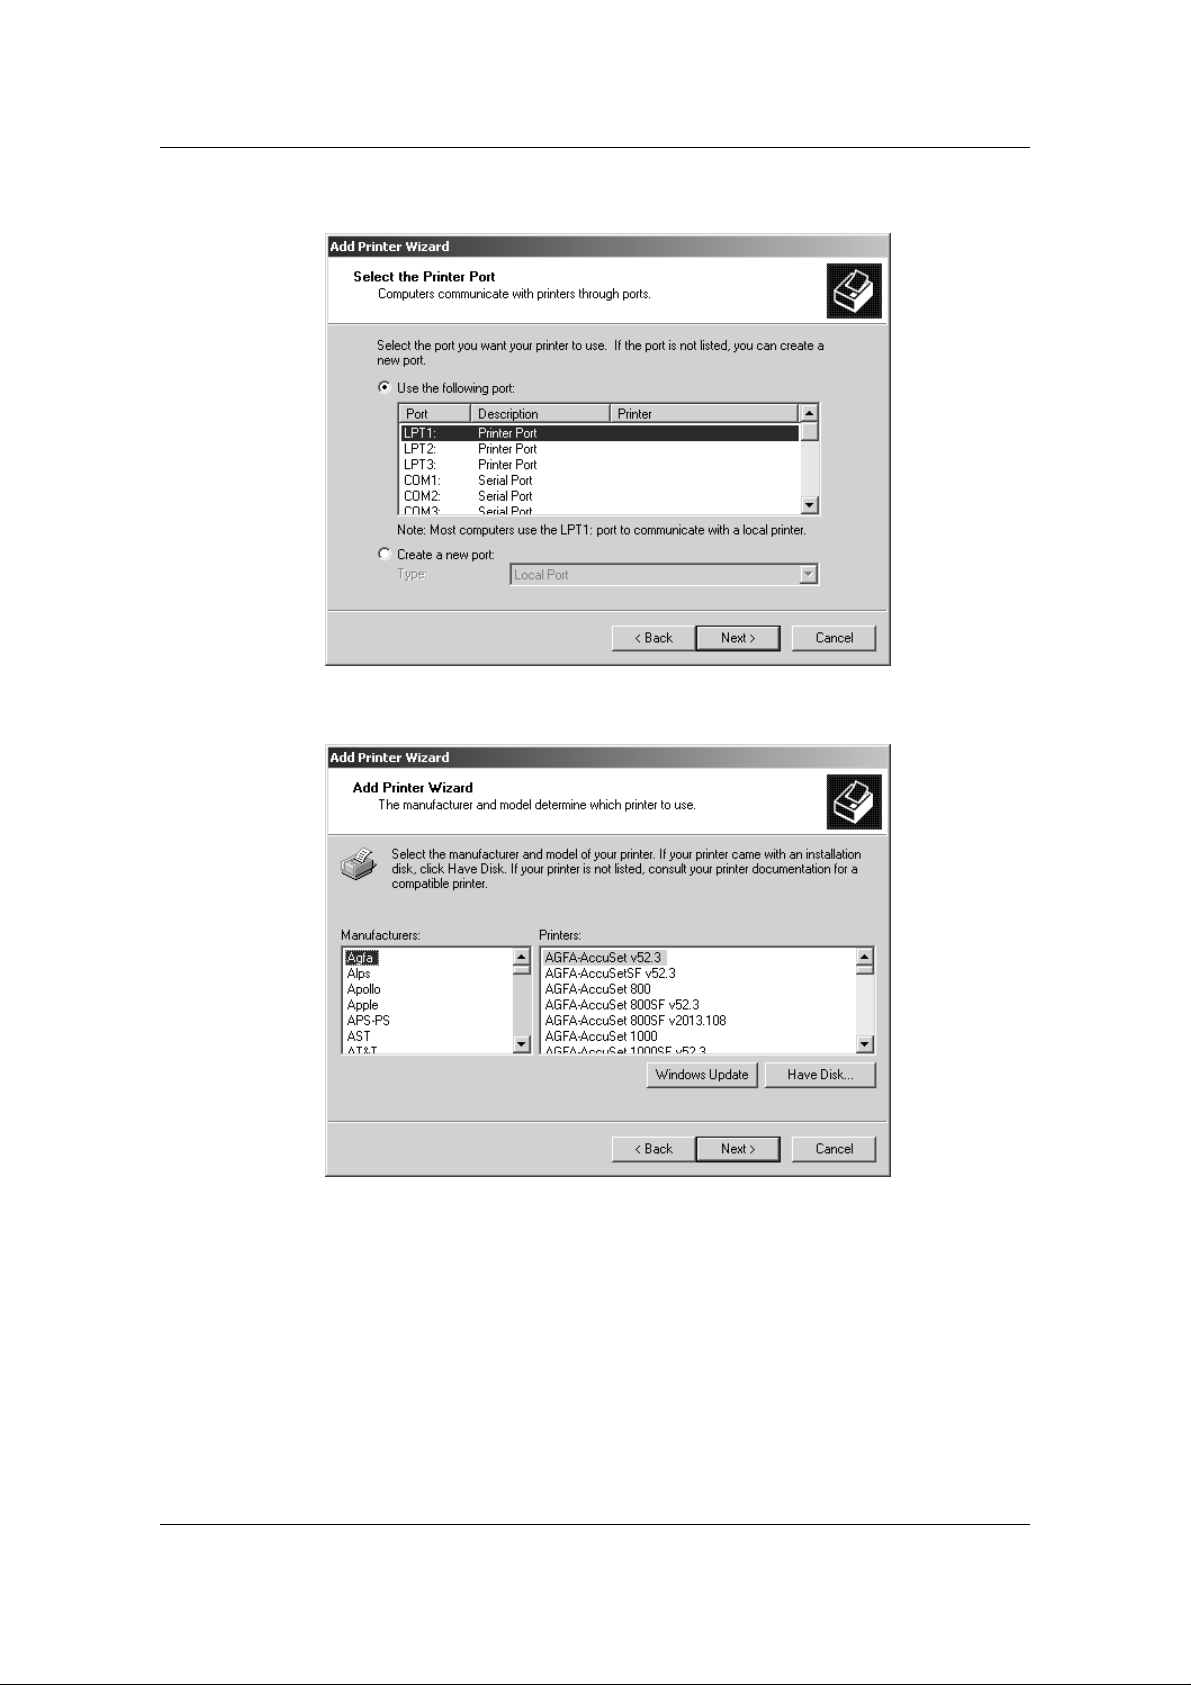
4. Select LPT1: Printer Port and Next.
5. In the dialog box displaying lists of manufacturers and printers,
select Have Disk.
9–4
Page 54
Installing User Software in a Windows 2000 Environment
6. Insert the CD in the CD-ROM drive, select the CD-ROM drive (for
example, D:\) from the drop-down box and select Browse.
The Install From Disk dialog box prompts you for the disk.
7. Browse to the Driver_PS3\English\Win_2000 folder and ens ure
that oemsetup.inf or oemsetup is selected.
8. Select Open.
The path is copied to the Install from Disk dialog box.
9. Verify the path is correct and select OK.
10. In the Printers box, select the Panasonic DP-C106 option and
select Next.
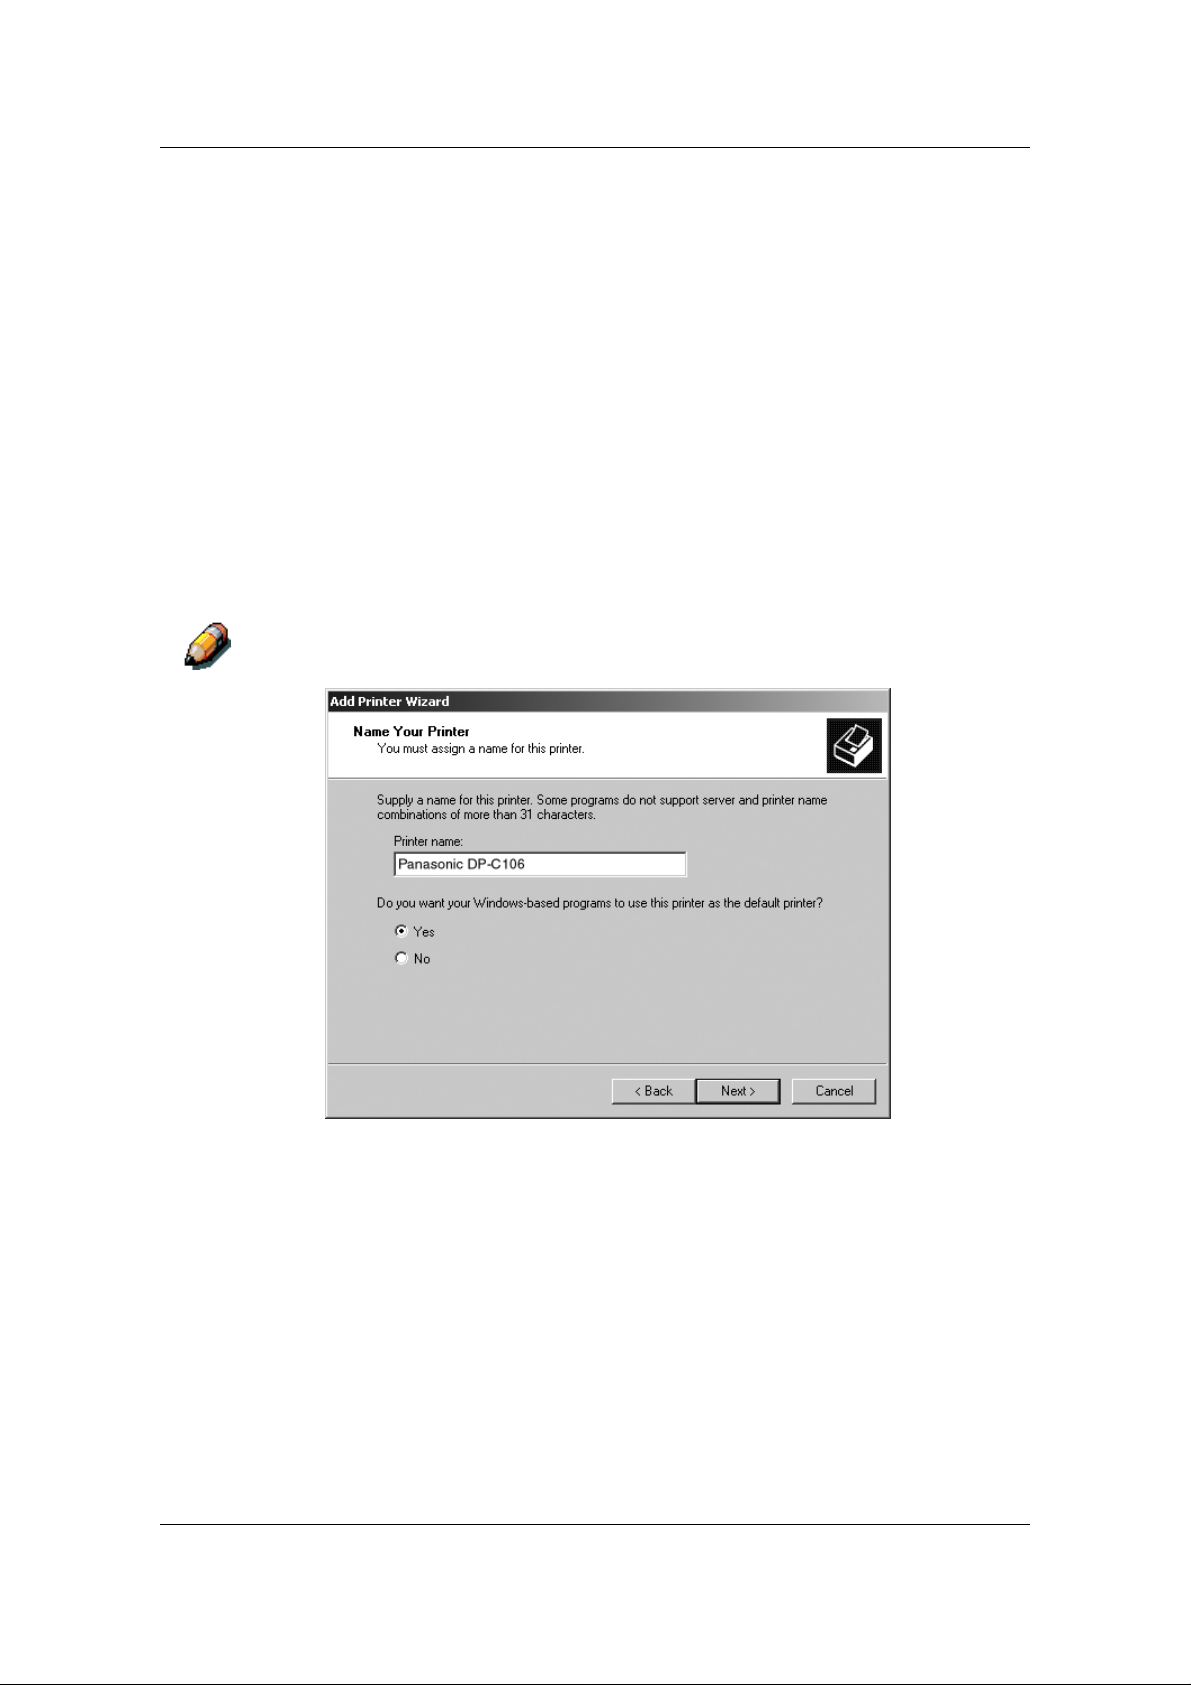
11. Using a maximum of 31 characters, enter a name for the printer
or leave the default name in the Printer Name box.
Entering more than 31 characters may cause printing problems with some
network applications.
12. If you want the DP-C106 to be the default printer, select the Yes
radio button; if not, select No. Select Next.
9–5
Page 55
Installing User Software in a Windows 2000 Environment
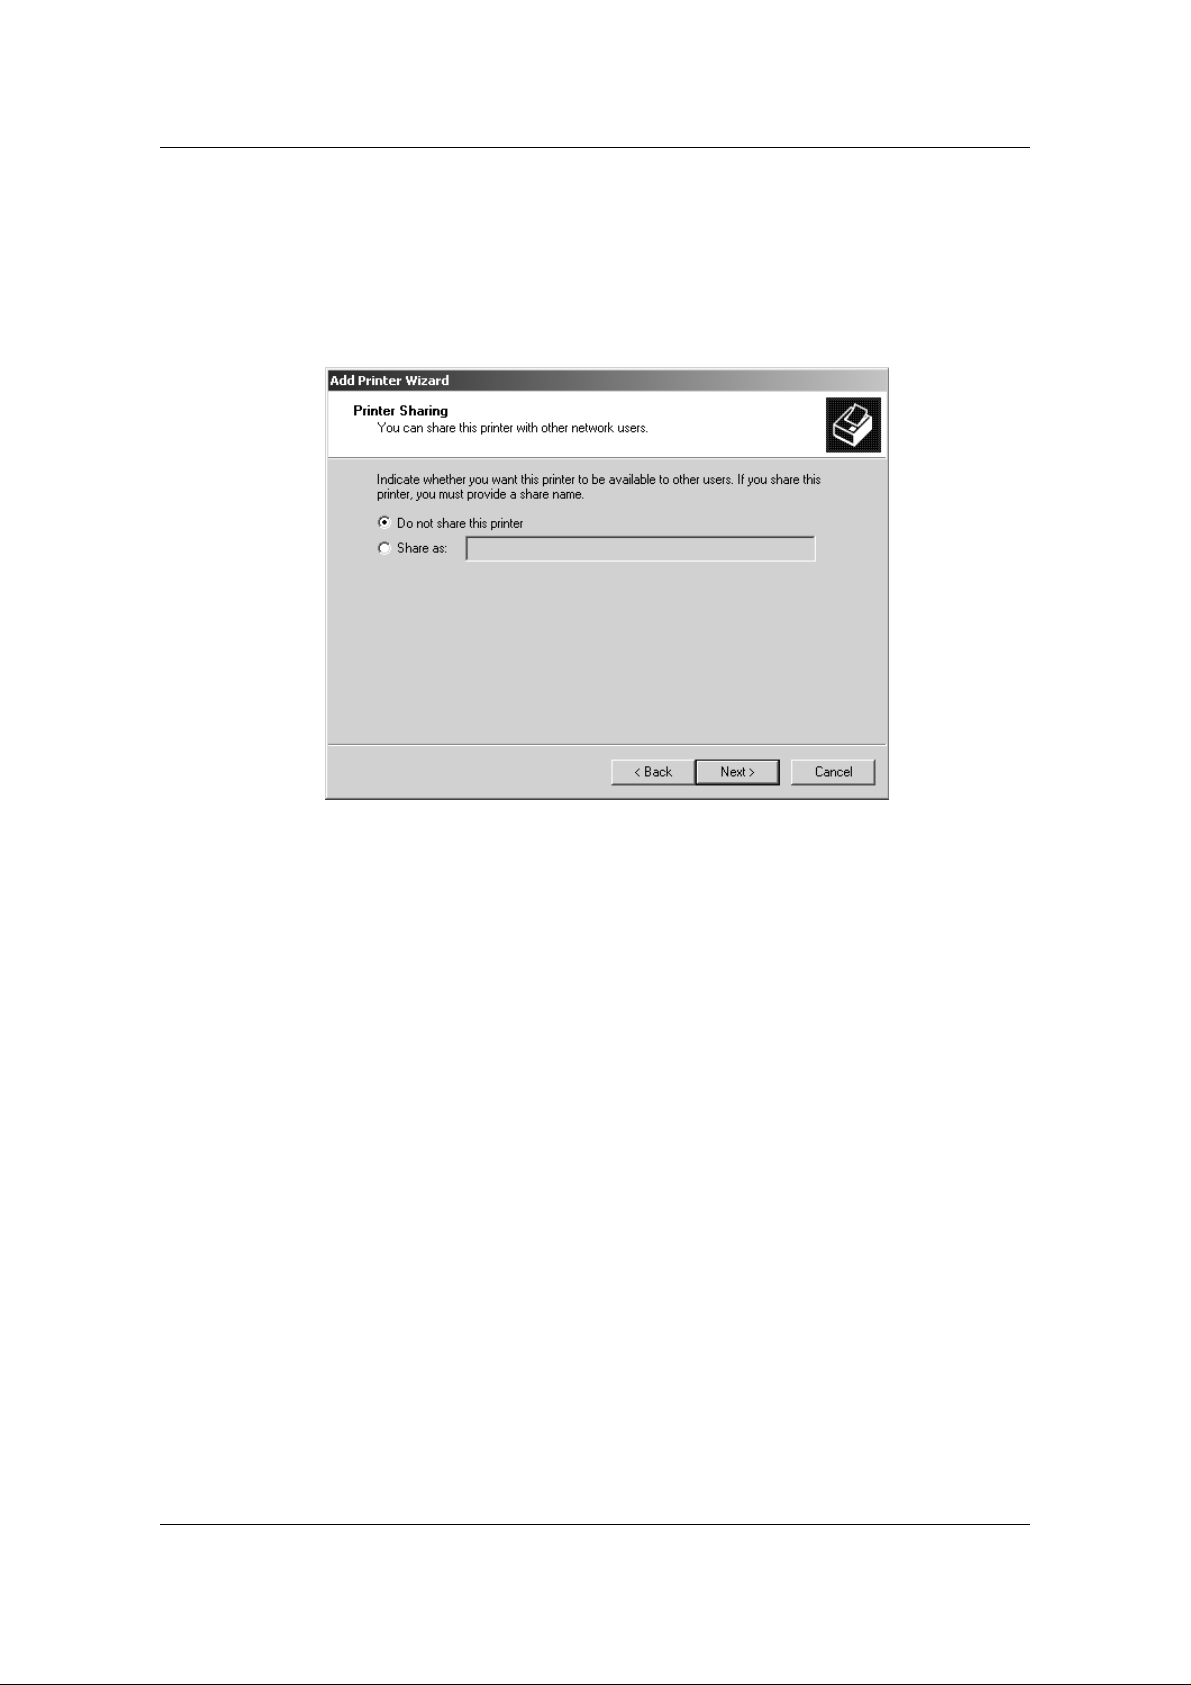
13. Indicate whether you want the printer installed as a shared printer.
If you select Share as, you must also enter a Share Name for the
printer (or leave the default name) and make selections from the
list of operating systems used by client workstations.
Select Next.
9–6
Page 56
Installing User Software in a Windows 2000 Environment
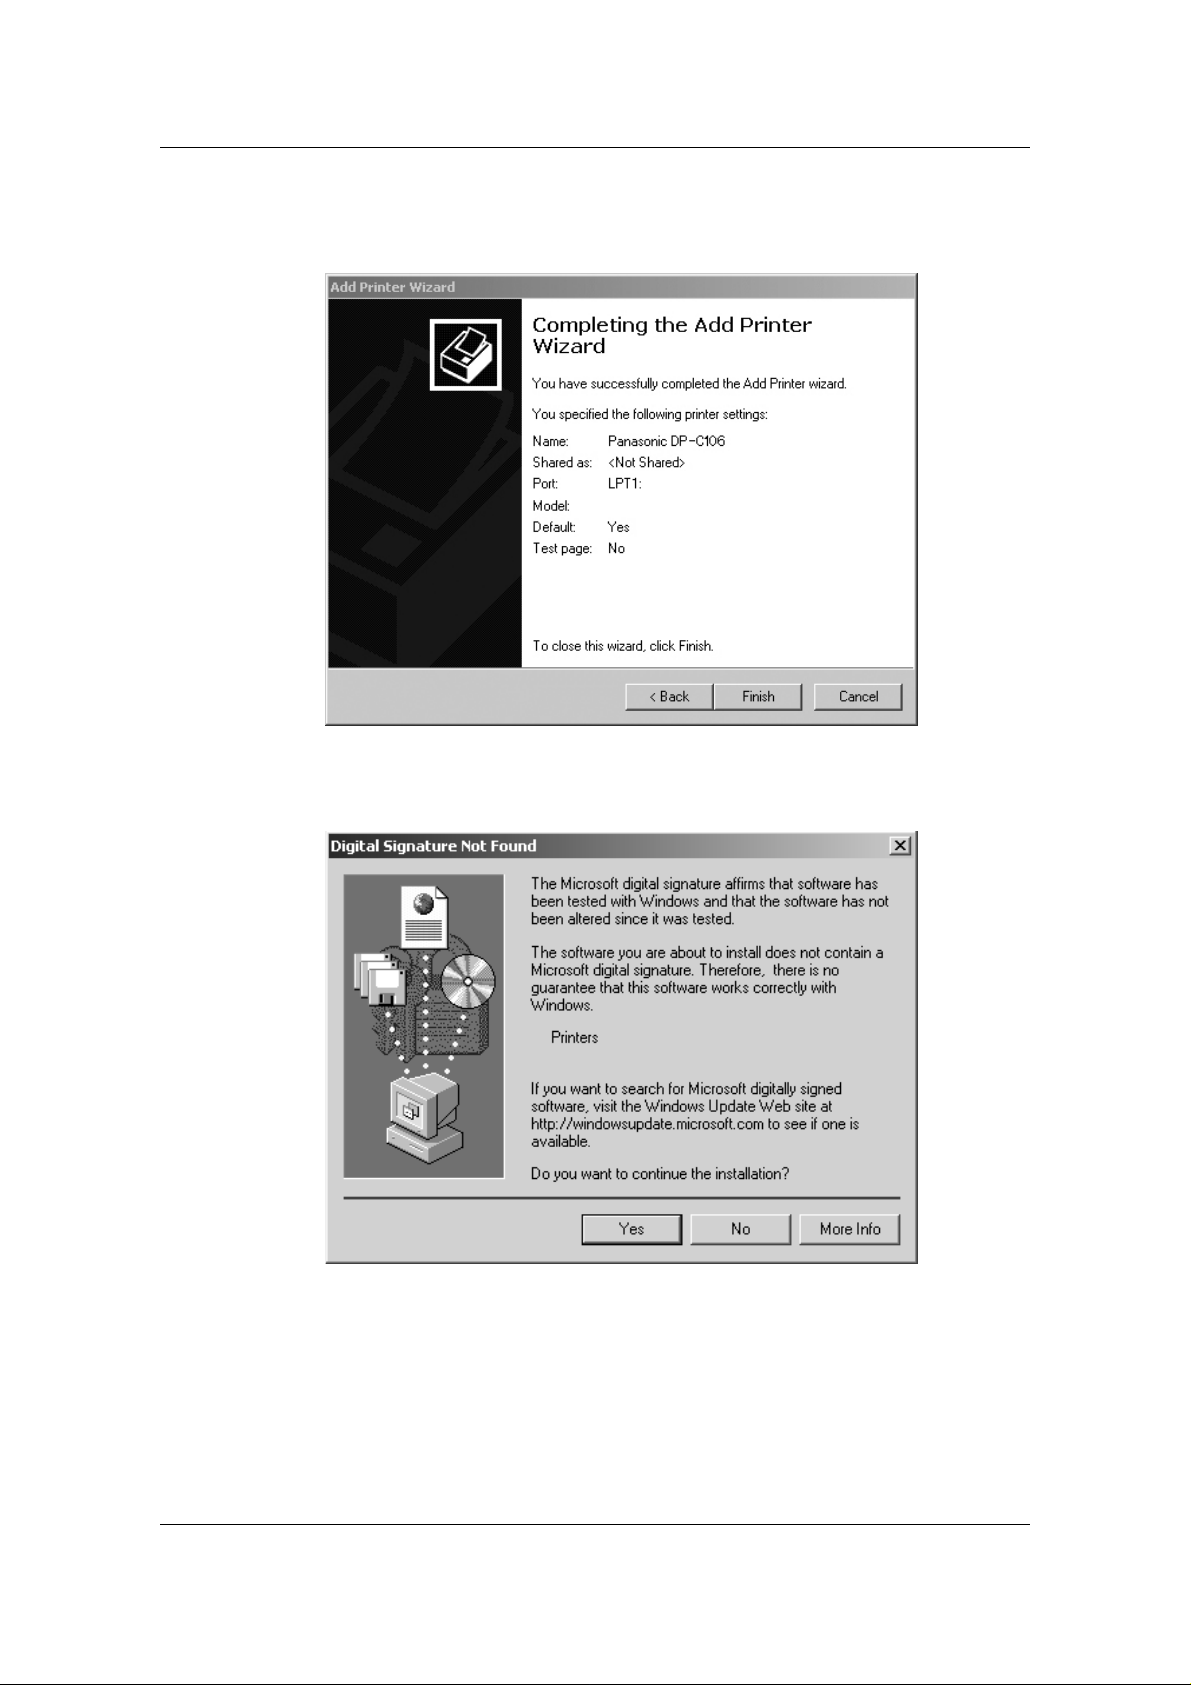
14. Select the No button to printing a test page and select Next.
15. Verify the printer settings specified, and select Finish.
The Digital Signature Not Found window indicates that the printer
driver for Windows 2000 does not have a Microsoft digital
signature. However, printing is processed correctly.
9–7
Page 57

Installing User Software in a Windows 2000 Environment
16. Select the Yes button.
If this is the first printer driver you are installing on the computer, you are
prompted to install additional files from the Windows 2000 CD. Insert it into
the CD-ROM drive, browse to the i386 folder, and then select OK.
When installation is complete, the Printers window is displayed
with an icon for the newly installed printer.
17. Right-click the DP-C106 icon and select Properties.
18. To confirm the connection, print a Windows test page. Select the
General tab. Select the Print Test Page button and OK.
You are now ready to print from your applications through the
parallel port.
Configure any options installed on your printer. Refer to Setting the
Printer Options.
9–8
Page 58
Installing User Software in a Windows 2000 Environment
Installing the Software for TCP/IP and LPR Printing (New Installation of Windows 2000)
Before you continue, print a configuration sheet at the printer to obtain
the IP address assigned to the DP-C106, as well as the subnet mask
and gateway address, if they are used.
1. Perform steps 1-17 of the procedure Installing the User Software
for Parallel Port Printing to Install the Printer Driver.
When installation is complete, the Printers window is displayed
with an icon for the newly installed printer.
2. Right-click the DP-C106 icon and select Properties. Select the
Ports tab to display the Printer Ports window.
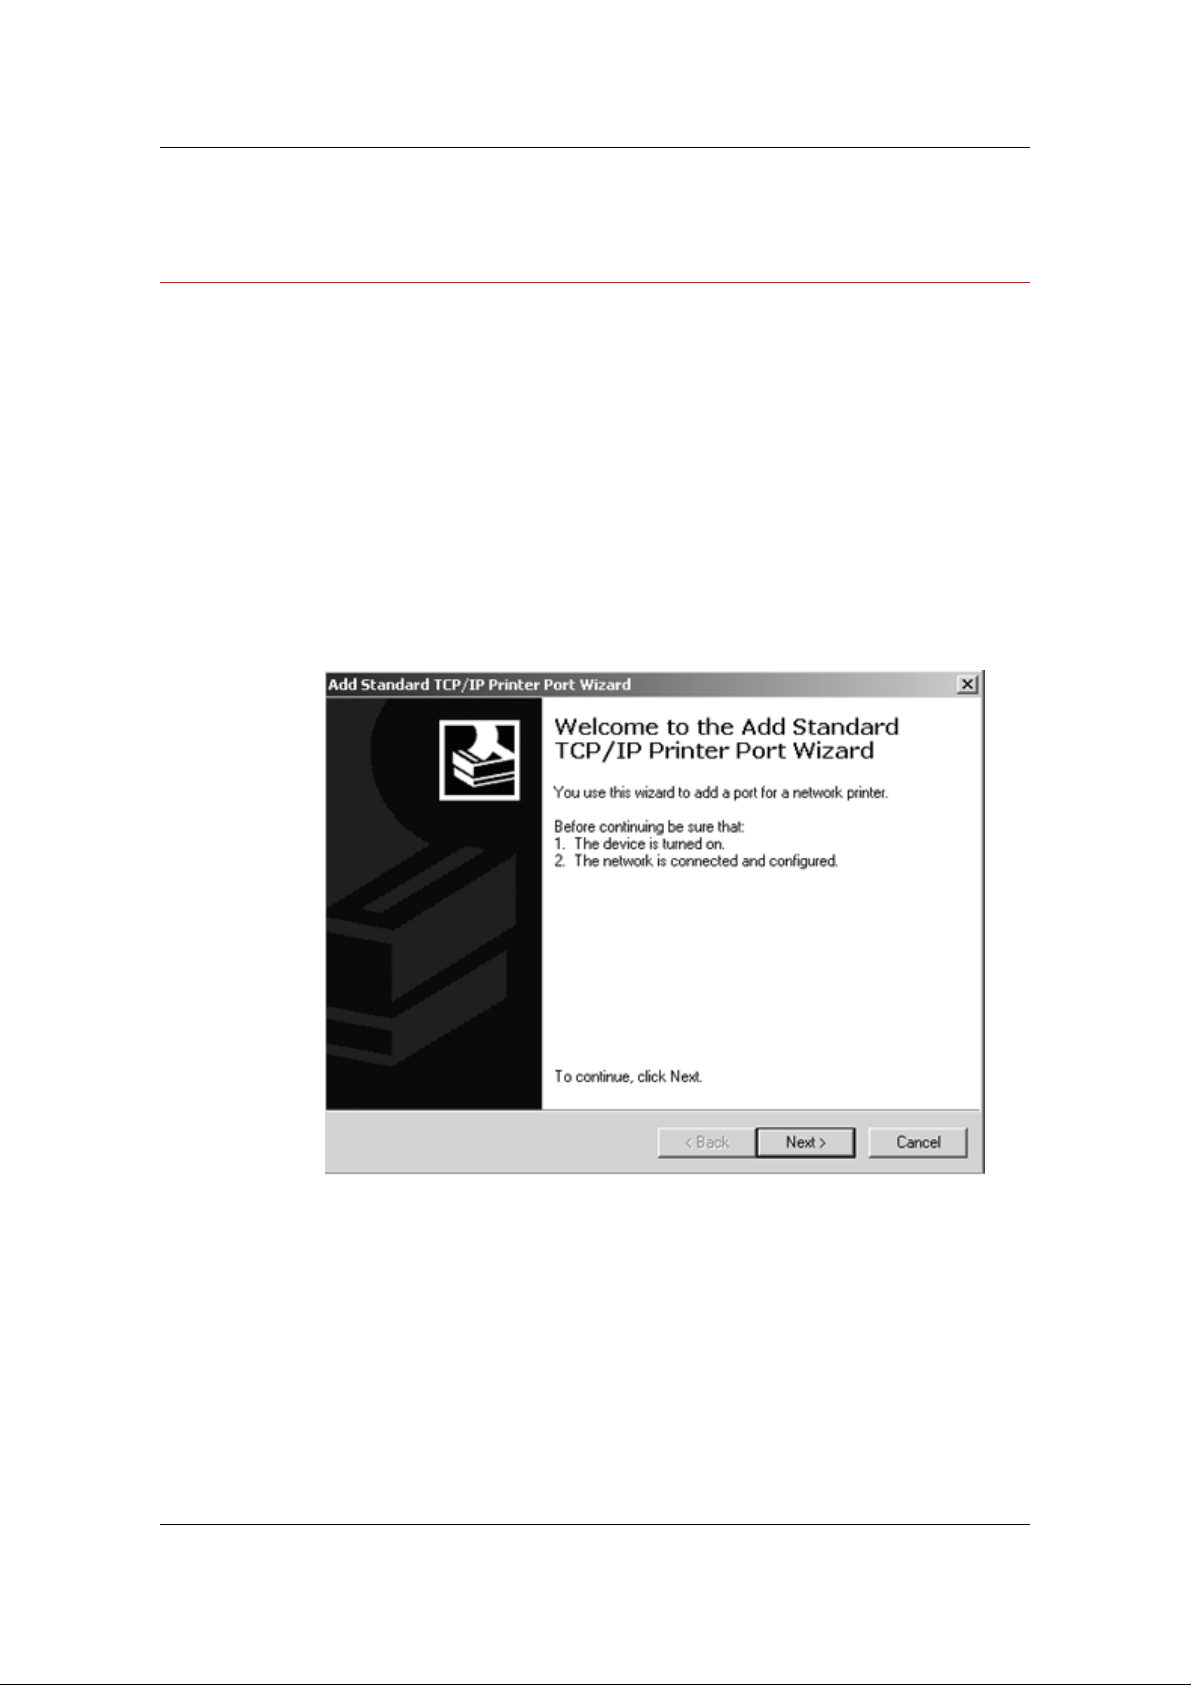
3. Select Standard TCP/IP Port and New Port to start the Add
Standard TCP/IP Printer Port Wizard.
9–9
Page 59
Installing User Software in a Windows 2000 Environment
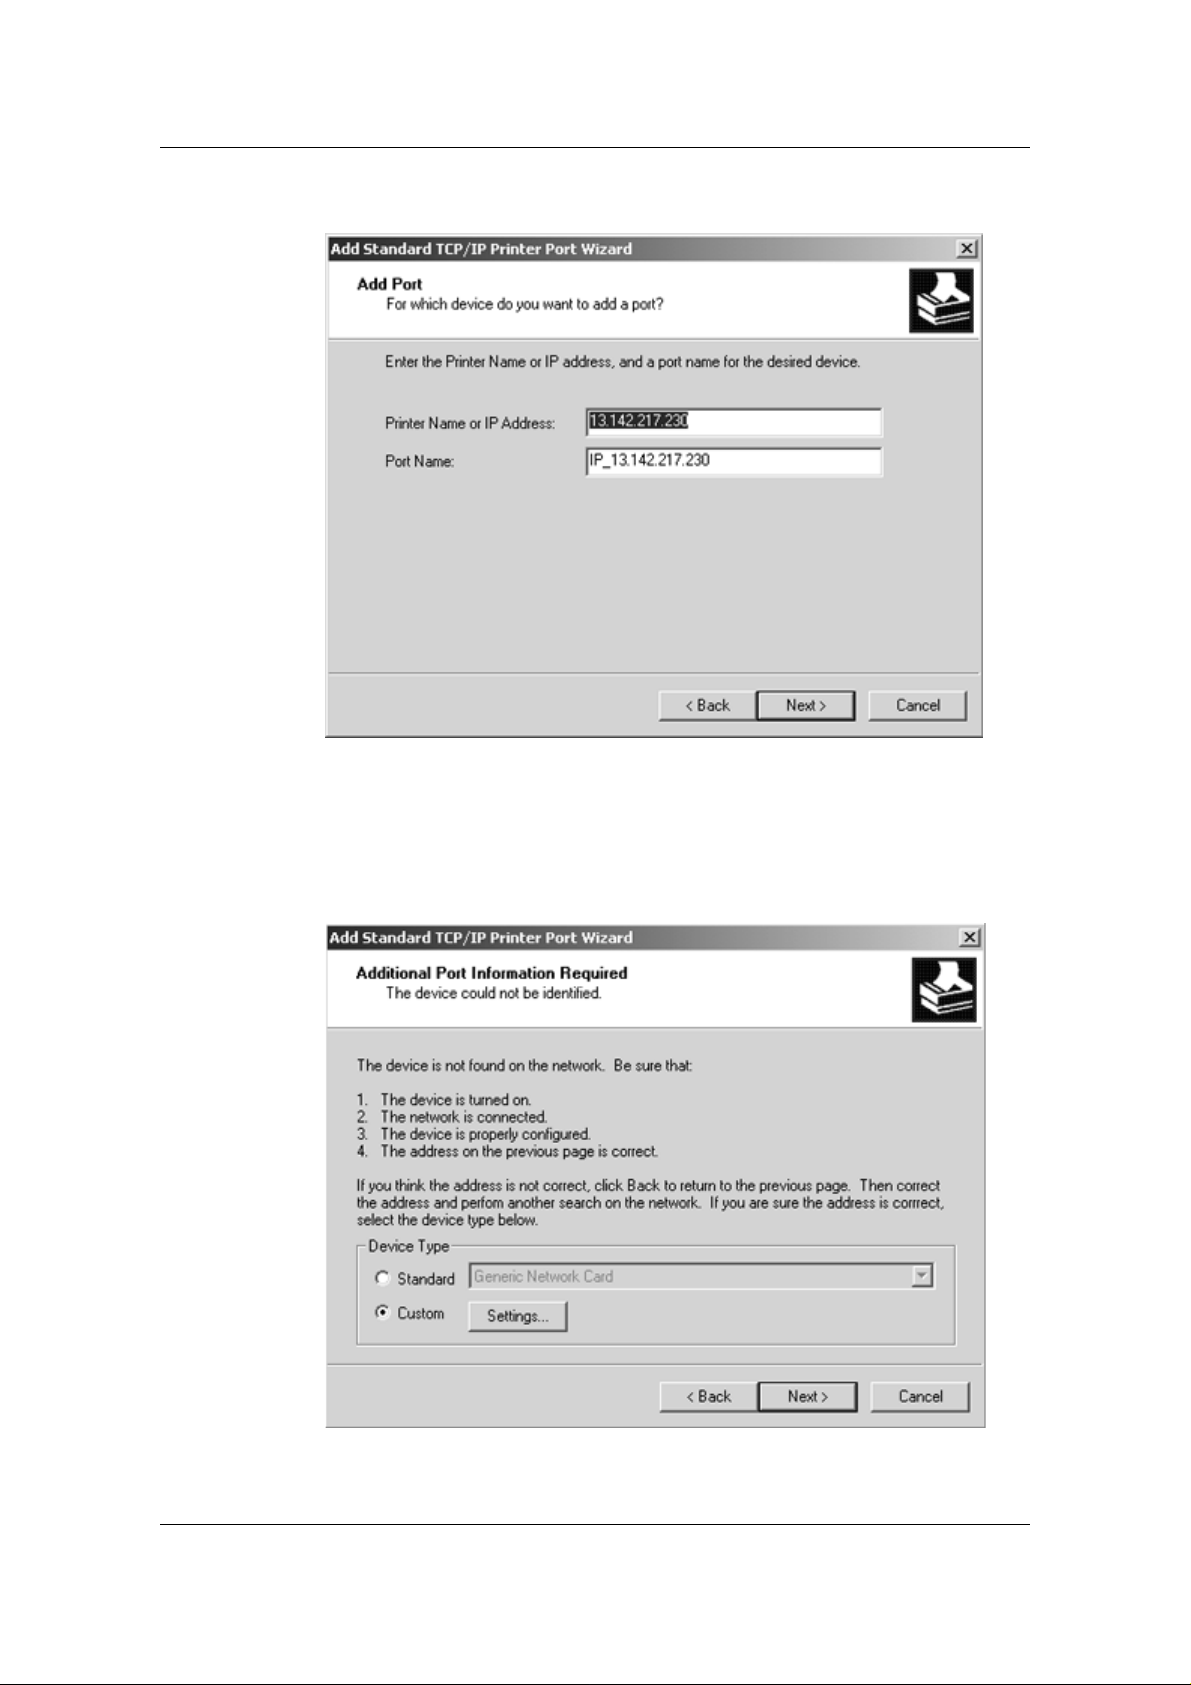
4. Select Next to display the Add Port screen.
5. Enter the Printer Name or IP A ddress. When you enter the
information, it is also displayed in the Port Name field. Select
Next to display the Additional Port Information screen.
6. Select the Custom radio button and the Settings button.
The Configure Standard TCP/IP Port Monitor screen is displayed.
9–10
Page 60
Installing User Software in a Windows 2000 Environment
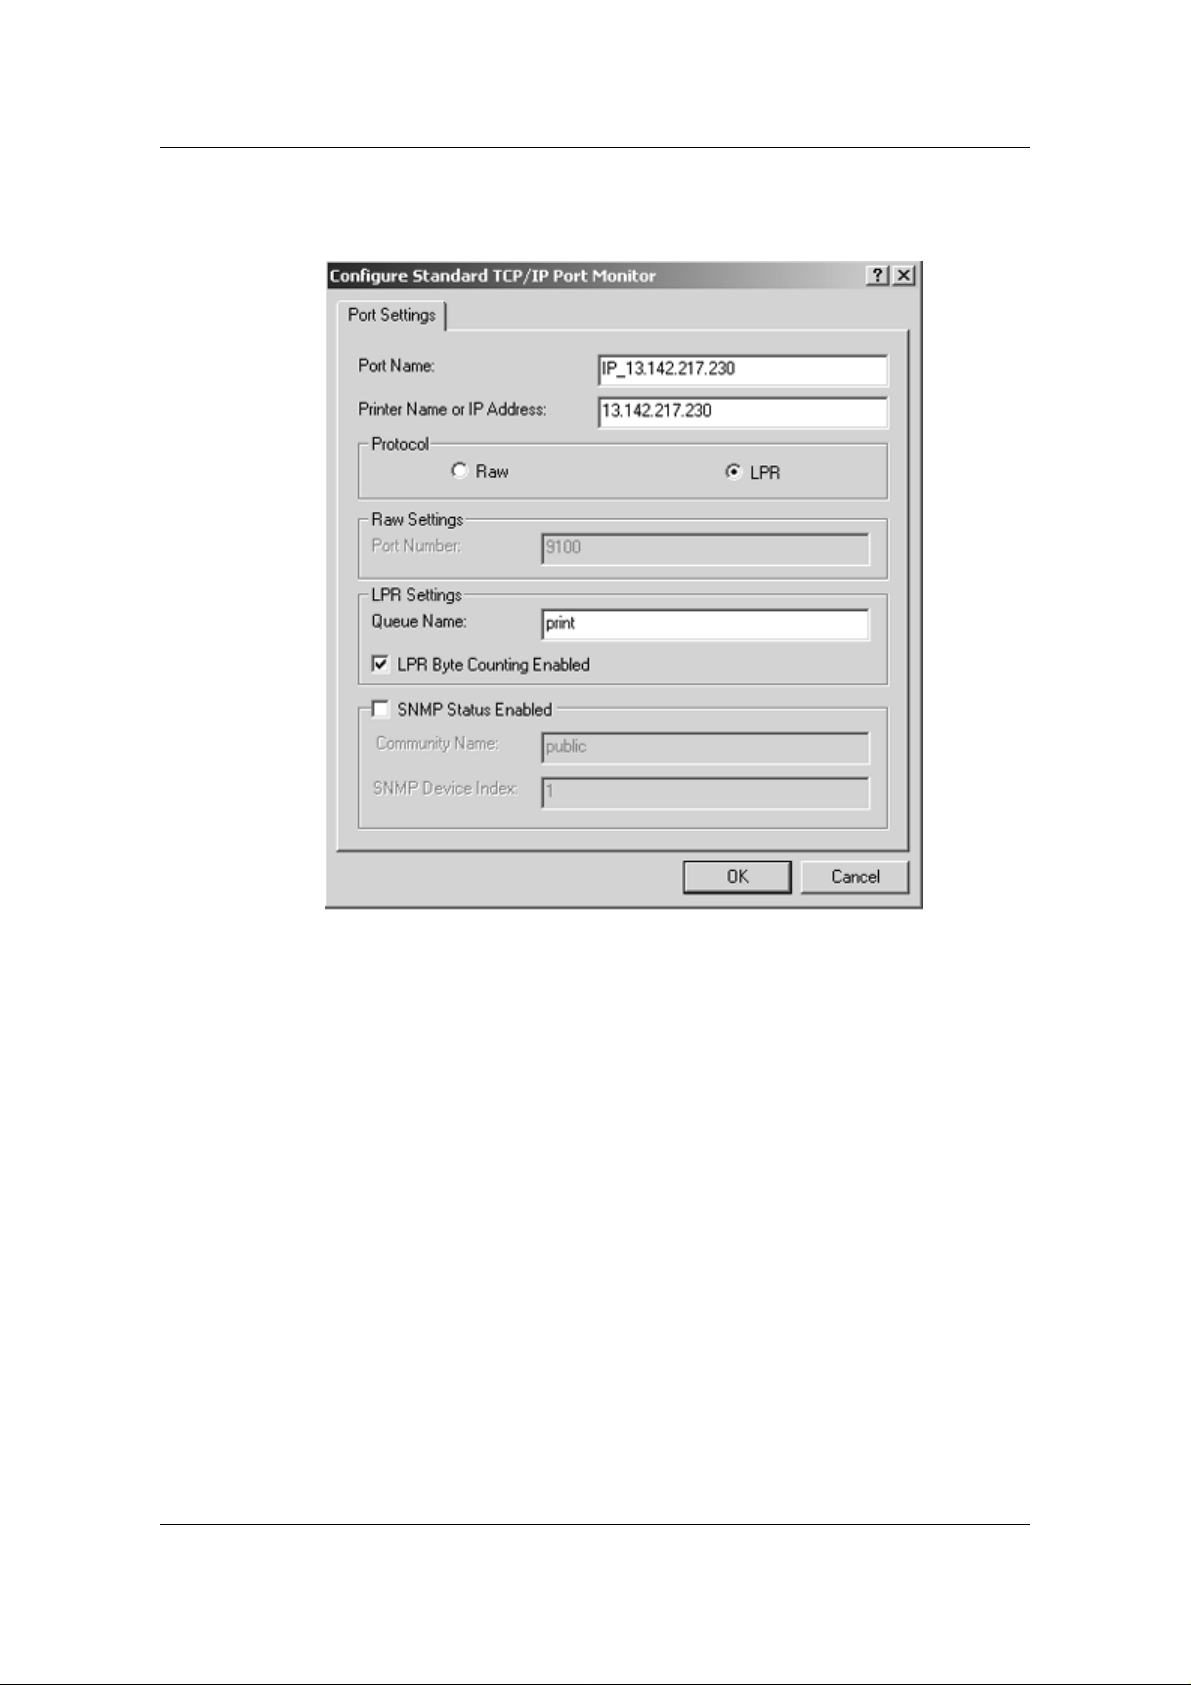
7. Select the LPR radio button in the Protocol section to activate the
LPR Settings fields.
8. Enter one of the names listed below in lowercase letters in the
Queue Name field:
• print (generally used)
• hold
• direct
9–11
Page 61

Installing User Software in a Windows 2000 Environment
9. Select the LPR Byte Counting Enabled checkbox.
10. Select OK to redisplay the Additional Port Information screen.
11. Select Next to display the wizard completion screen.
12. Select Finish. The Ports property tab shows the new port
configuration. Sele ct Close, then Apply and then select OK to
close the Printer Properties window.
13. Right-click the DP-C106 icon and select Properties.
14. To confirm the connection, print a Windows test page. Select the
General tab. Select the Print Test Page button and OK.
15. Perform one of the following:
• Select OK if the job printed normally.
• Select the Troubleshoot button if the page did not print or did
not print correctly. Follow the Troubleshooting wizard to
diagnose and solve the problem.
16. Select Close to exit the Printer Properties dialog box.
Configure any options installed on your printer. Refer to Setting the
Printer Options.
After setup is complete, you are ready to print your jobs.
9–12
Page 62
Installing User Software in a Windows 2000 Environment
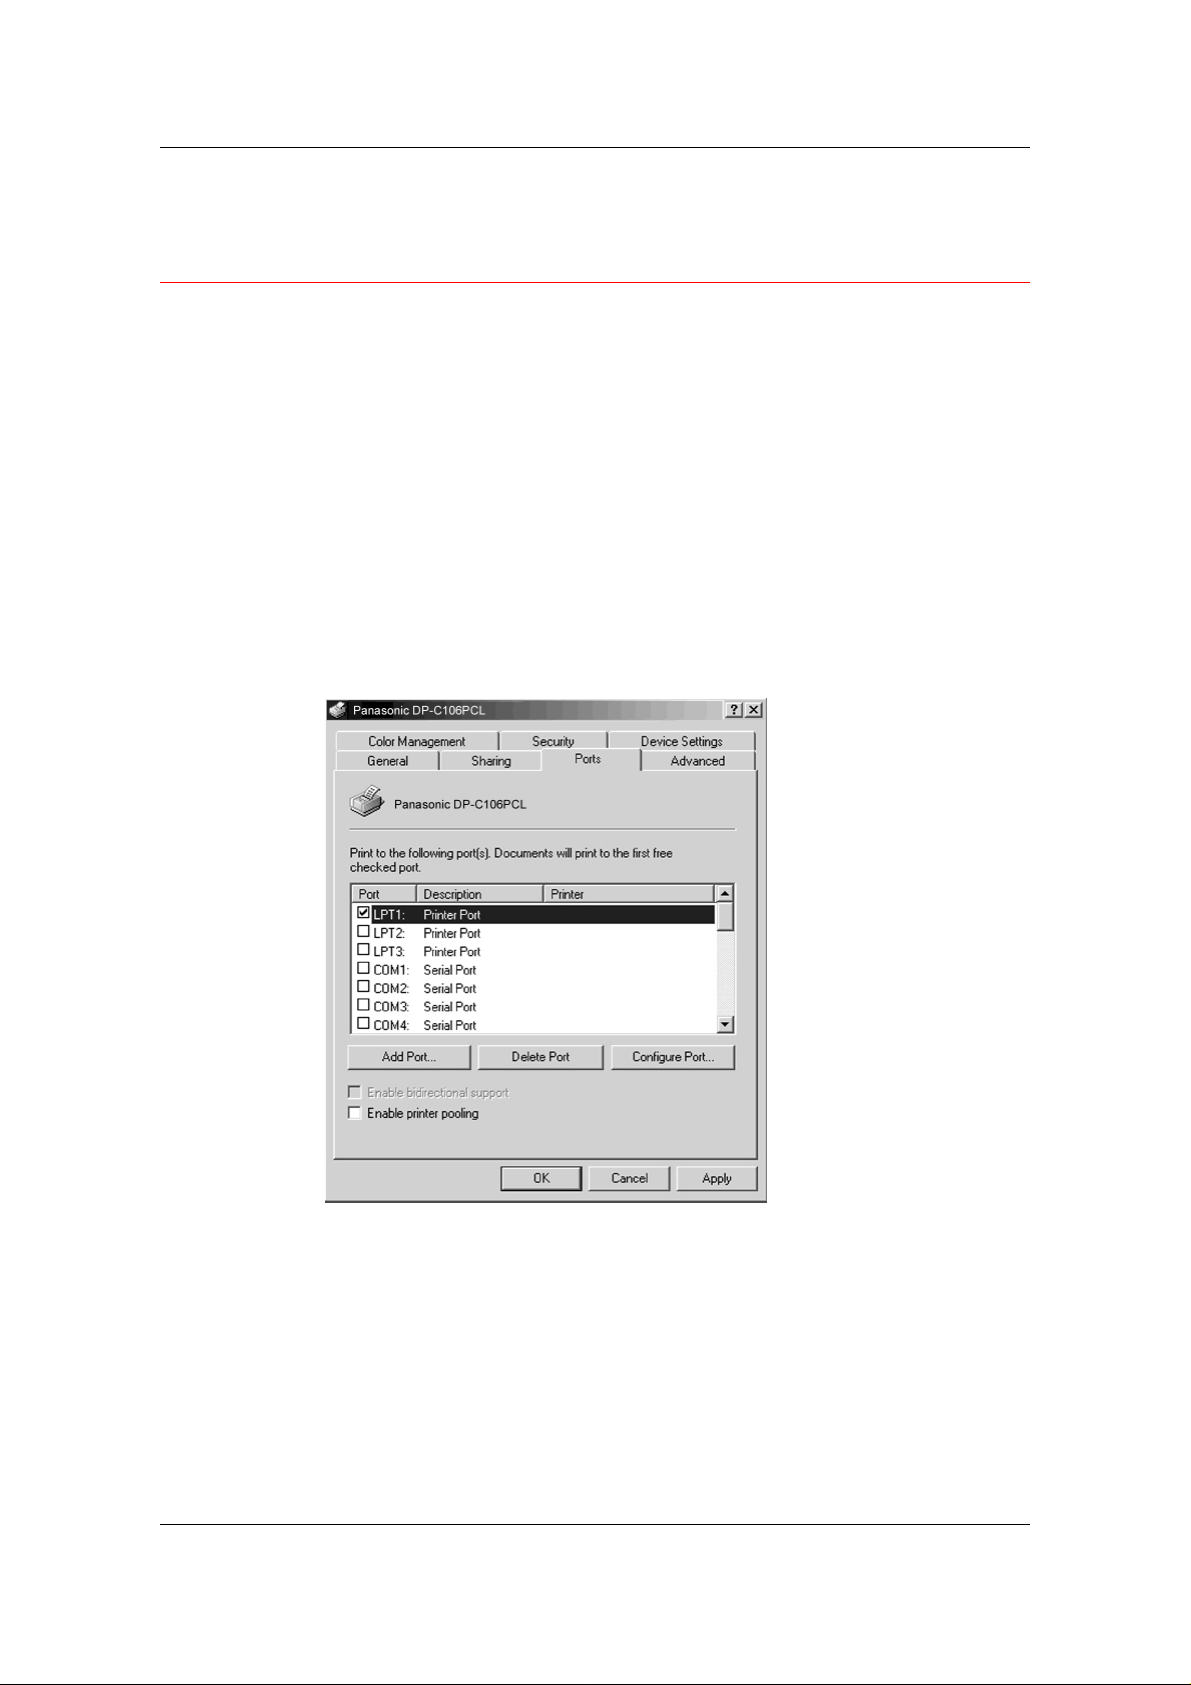
Installing TCP/IP and LPR Printing (Upgrade Installation of Windows NT 4.0 to Windows 2000)
Before you continue, print a configuration sheet at the printer to obtain
the IP address assigned to the DP-C106, as well as the Subnet mask
and gateway address, if they are used.
1. Perform steps 1-17 of the procedure Installing the User Software
for Parallel Port Printing to Install the Printer Driver.
When installation is complete, the Printers window is displayed
with an icon for the newly installed printer.
2. Right-click the DP-C106 icon and select Properties to open the
PPD window. Select the Ports tab to display the Printer Ports
window.
3. Ensure that you are connected to LPT1 and select the Add Port
option to display a list of available ports.
9–13
Page 63
Installing User Software in a Windows 2000 Environment
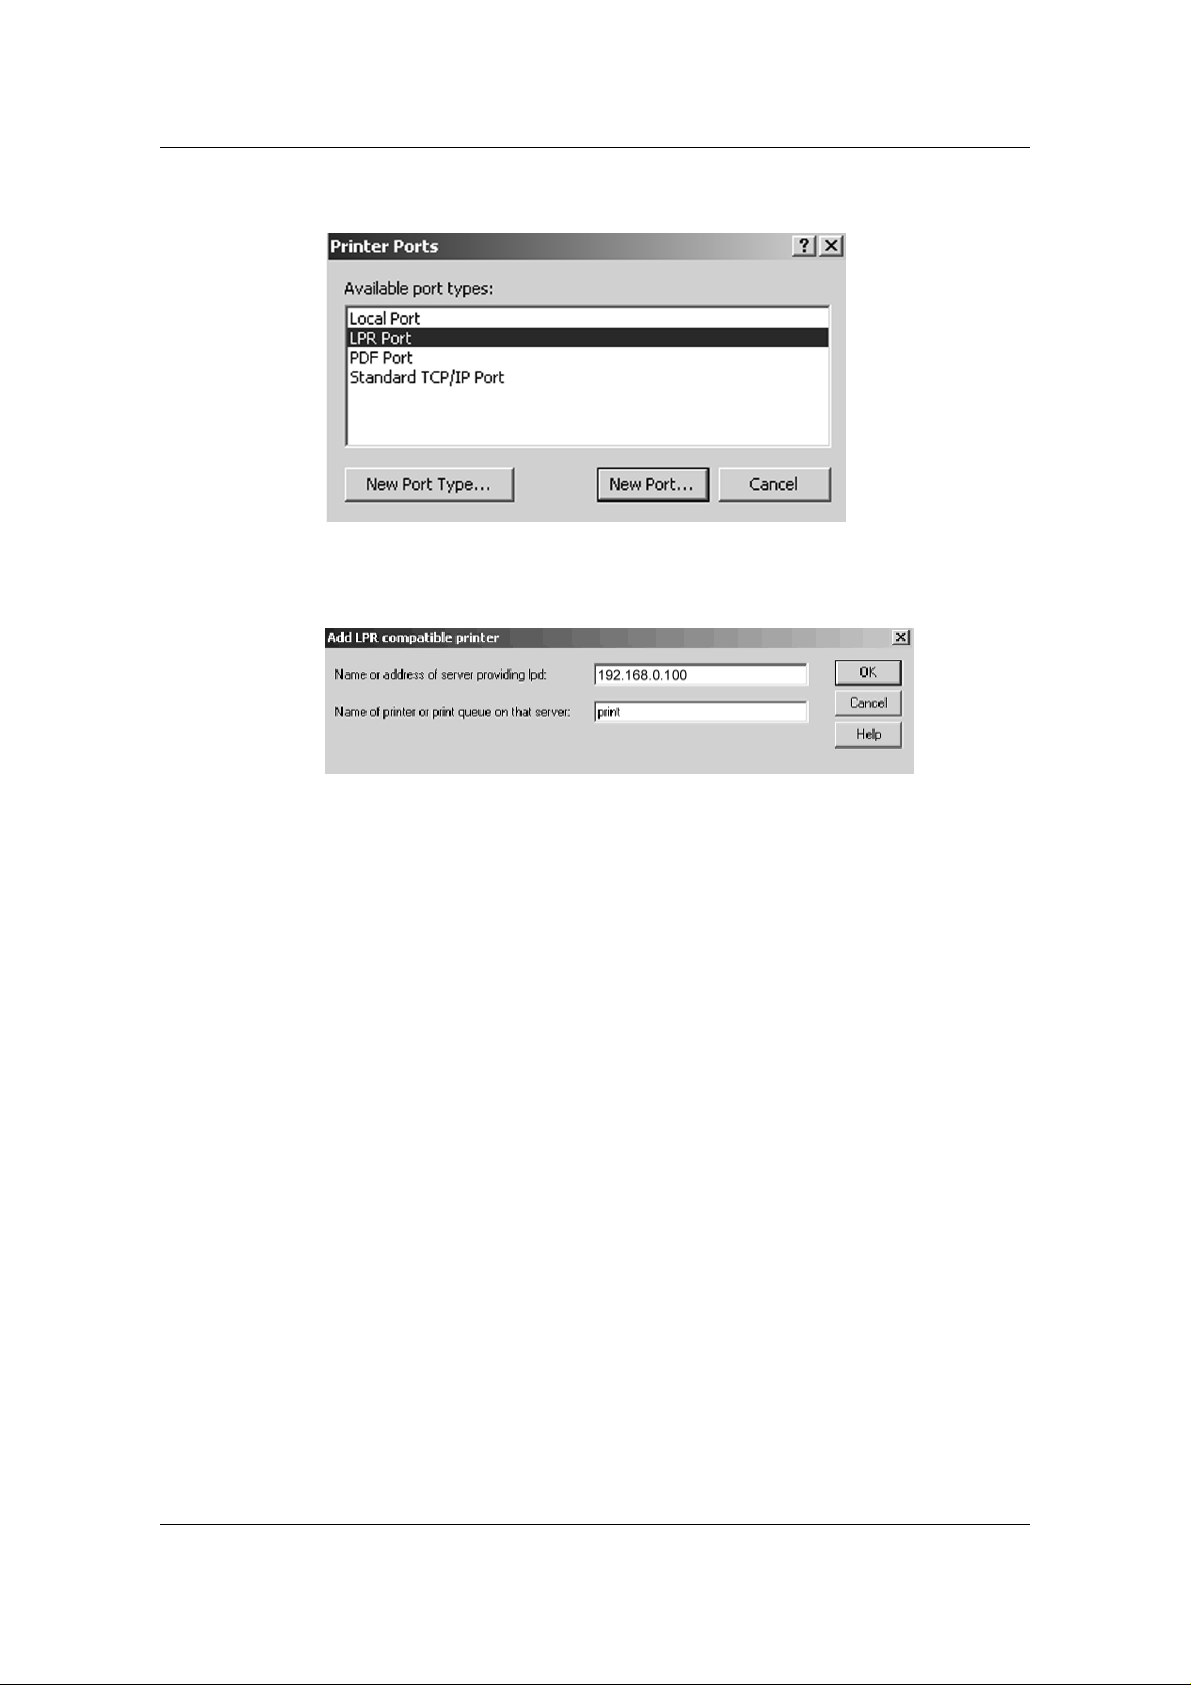
4. Select the LPR Port option and select the New Port button.
5. In the Name or address of server providing lpd field, enter the
Ethernet TCP/IP IP Address or Domain Name Services (DNS)
name assigned to the DP-C106 printer.
6. In the Name of Printer or print queue on that server field, enter
one of the names listed below in letters:
• Print (generally used)
• Hold
• Direct
7. Select OK. The workstation checks the address or DNS name
that you entered and notifies you if it cannot resolve the address.
8. Select Close in the Printer Ports dialog box. The Ports property
tab show the new port configuration.
9. To confirm the connection, print a test page. Select the General
tab and select the Print Test Page button.
When you print, your files are transmitted over the LPR Port
connection to the printer. With setup complete, you are ready to
print your jobs.
10. Select Close to exit the Printer Properties dialog box.
9–14
Page 64
Installing User Software in a Windows 2000 Environment
Installing the User Software for IPX/SPX Printing
To print from Windows 2000 workstations over IPX (Novell), you must
first set up IPX/SPX protocols, and then configure the printer by
selecting the IPX port type and entering the settings for the port you
use.
1. Select the Start button, Settings, and Control Panel.
2. Double-click the Network and Dial Up icon to display the
Network and Dial-up Communications screen.
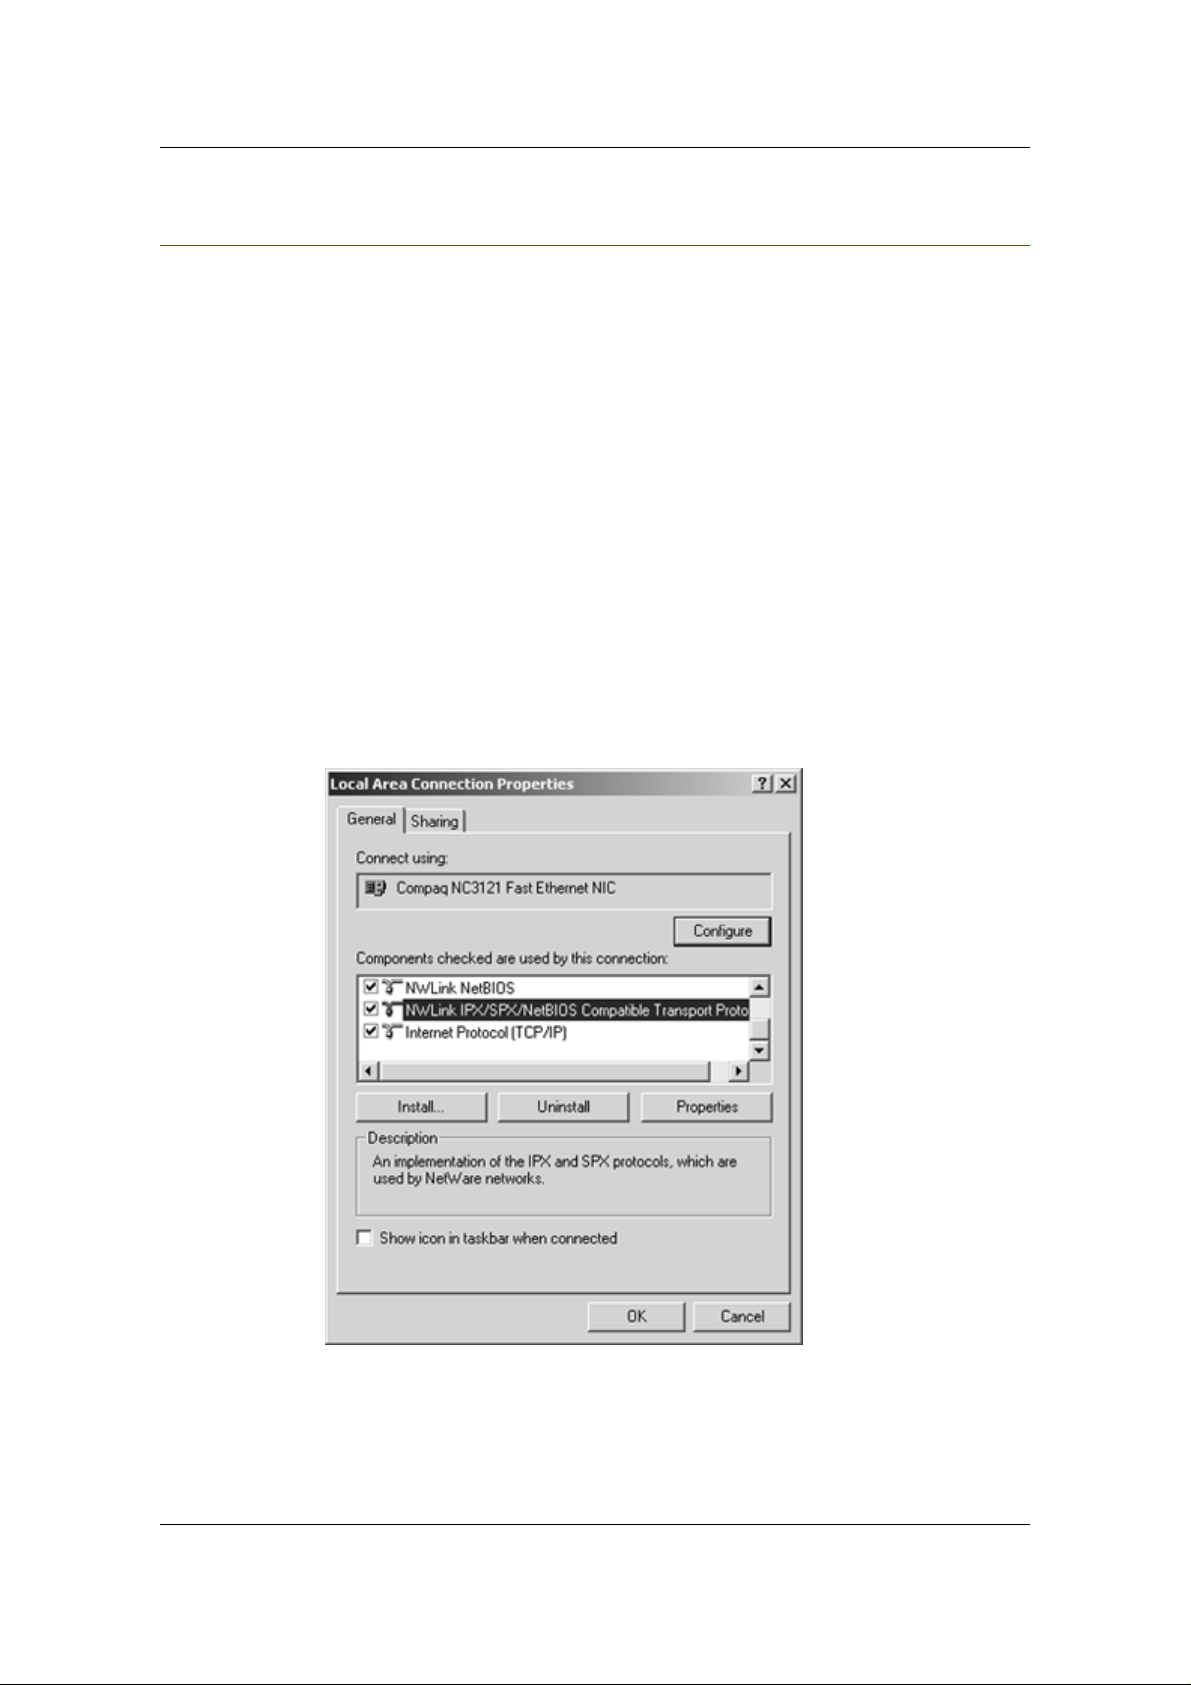
3. Double-click the Local Area Connection icon and select
Properties.
The Local Area Connection Properties screen is displayed.
Ensure that IPX/SPX-compatible Protocol is listed in the network
components section. For additional information, refer to the
Windows 2000 documentation.
4. Double-click the NWLink IPX/SPX/NetBIOS Compatible
Transport Protocol icon.
9–15
Page 65
Installing User Software in a Windows 2000 Environment
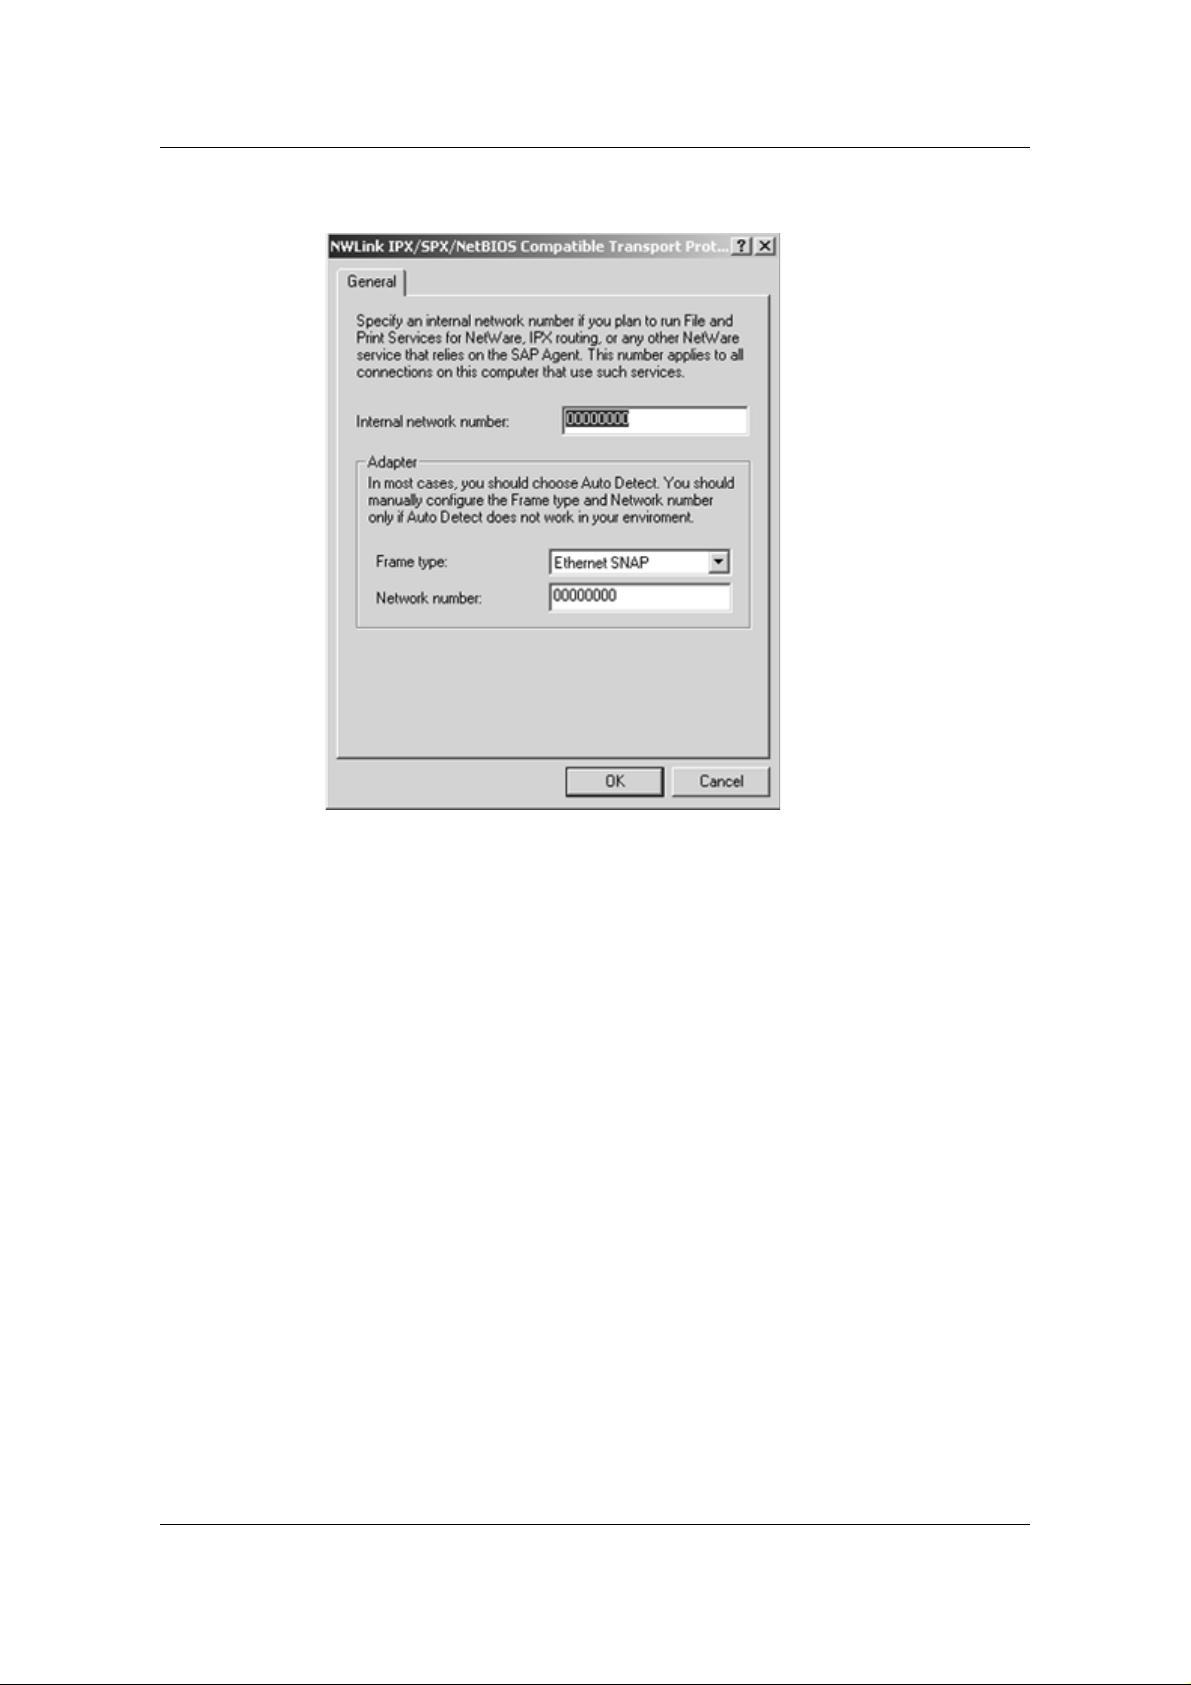
5. Select the Properties button.
6. Select the Frame type option fro m the drop- down menu.
If necessary, print the Configuration page from the Printer Control
Panel to check which Frame Type(s) are configured.
Do not select Auto because you may not be able to select the
Frame Type specified on the DP-C106.
7. Select OK.
8. Select OK to close the Local Area Connection Properties screen
9. Restart your workstation.
After your workstation reboots, ensure that your workstation is
connected to the Novell Network servers required for your
configuration.
9–16
Page 66
Installing User Software in a Windows 2000 Environment
10. Select the Start button, Settings, and Printers.
11. Double-click the Add Printer icon to display the Add Printer
Wizard and select Next.
12. Select the Network printer radio button and Next.
13. Perform one of the following:
• Enter the Printer Name.
• Select Next and browse for the printer. For NetWare file
servers, double-click the icon of the server to use for printing
to the DP-C106. Double-click the printer icon labeled with the
NetWare print queue you will use.
A message is displayed indicating that you do not have the
correct printer driver.
14. Select OK.
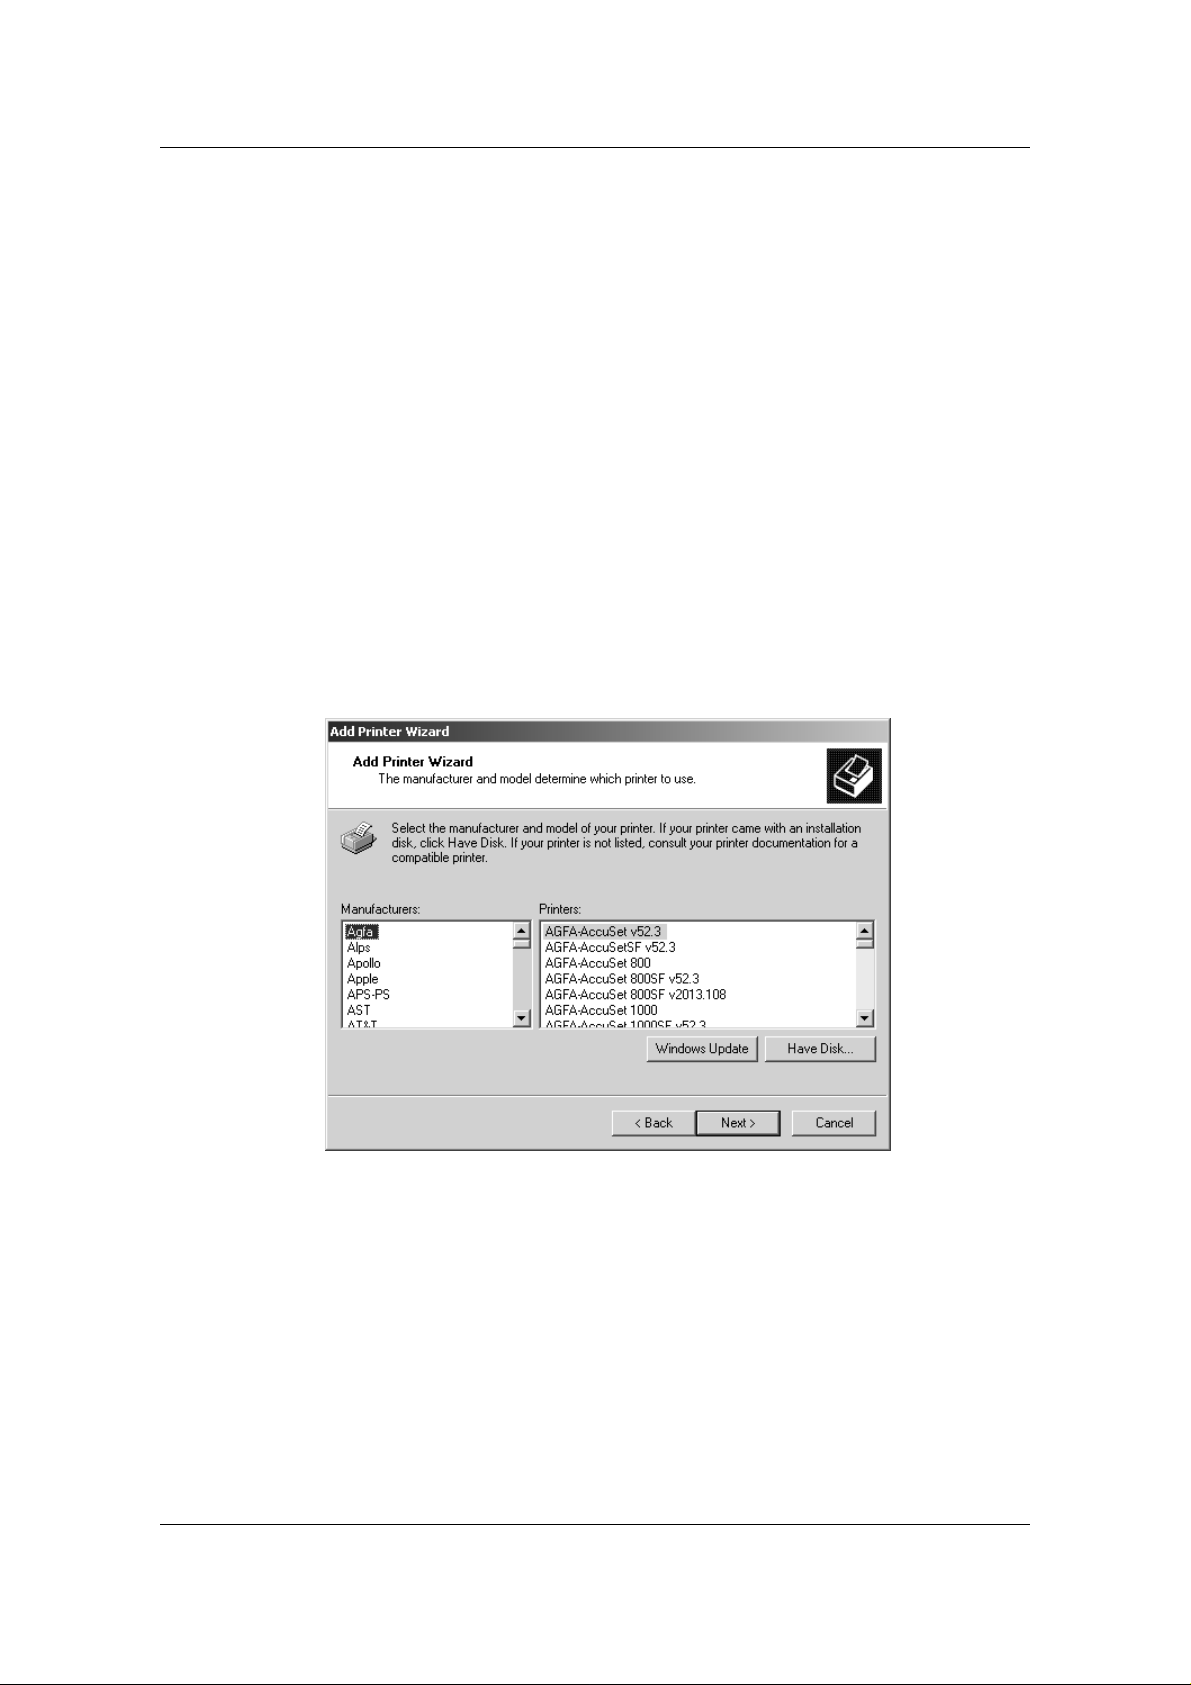
15. In the dialog box displaying lists of manufacturers and printers,
select Have Disk.
16. Insert the CD in the CD-ROM drive, select the CD-ROM drive (for
example, D:\) from the drop-down box and select Browse.
The Install From Disk dialog box prompts you for the disk.
9–17
Page 67
Installing User Software in a Windows 2000 Environment
17. Browse to the Driver_PS3\English\Win_2000 folder and ensure
that oemsetup.inf or oemsetup is selected.
18. Select Open.
The path is copied to the Install from Disk dialog box.
19. Verify the path is correct and select OK.
20. In the Printers box, select the Panasonic DP-C106 option and
select Next.
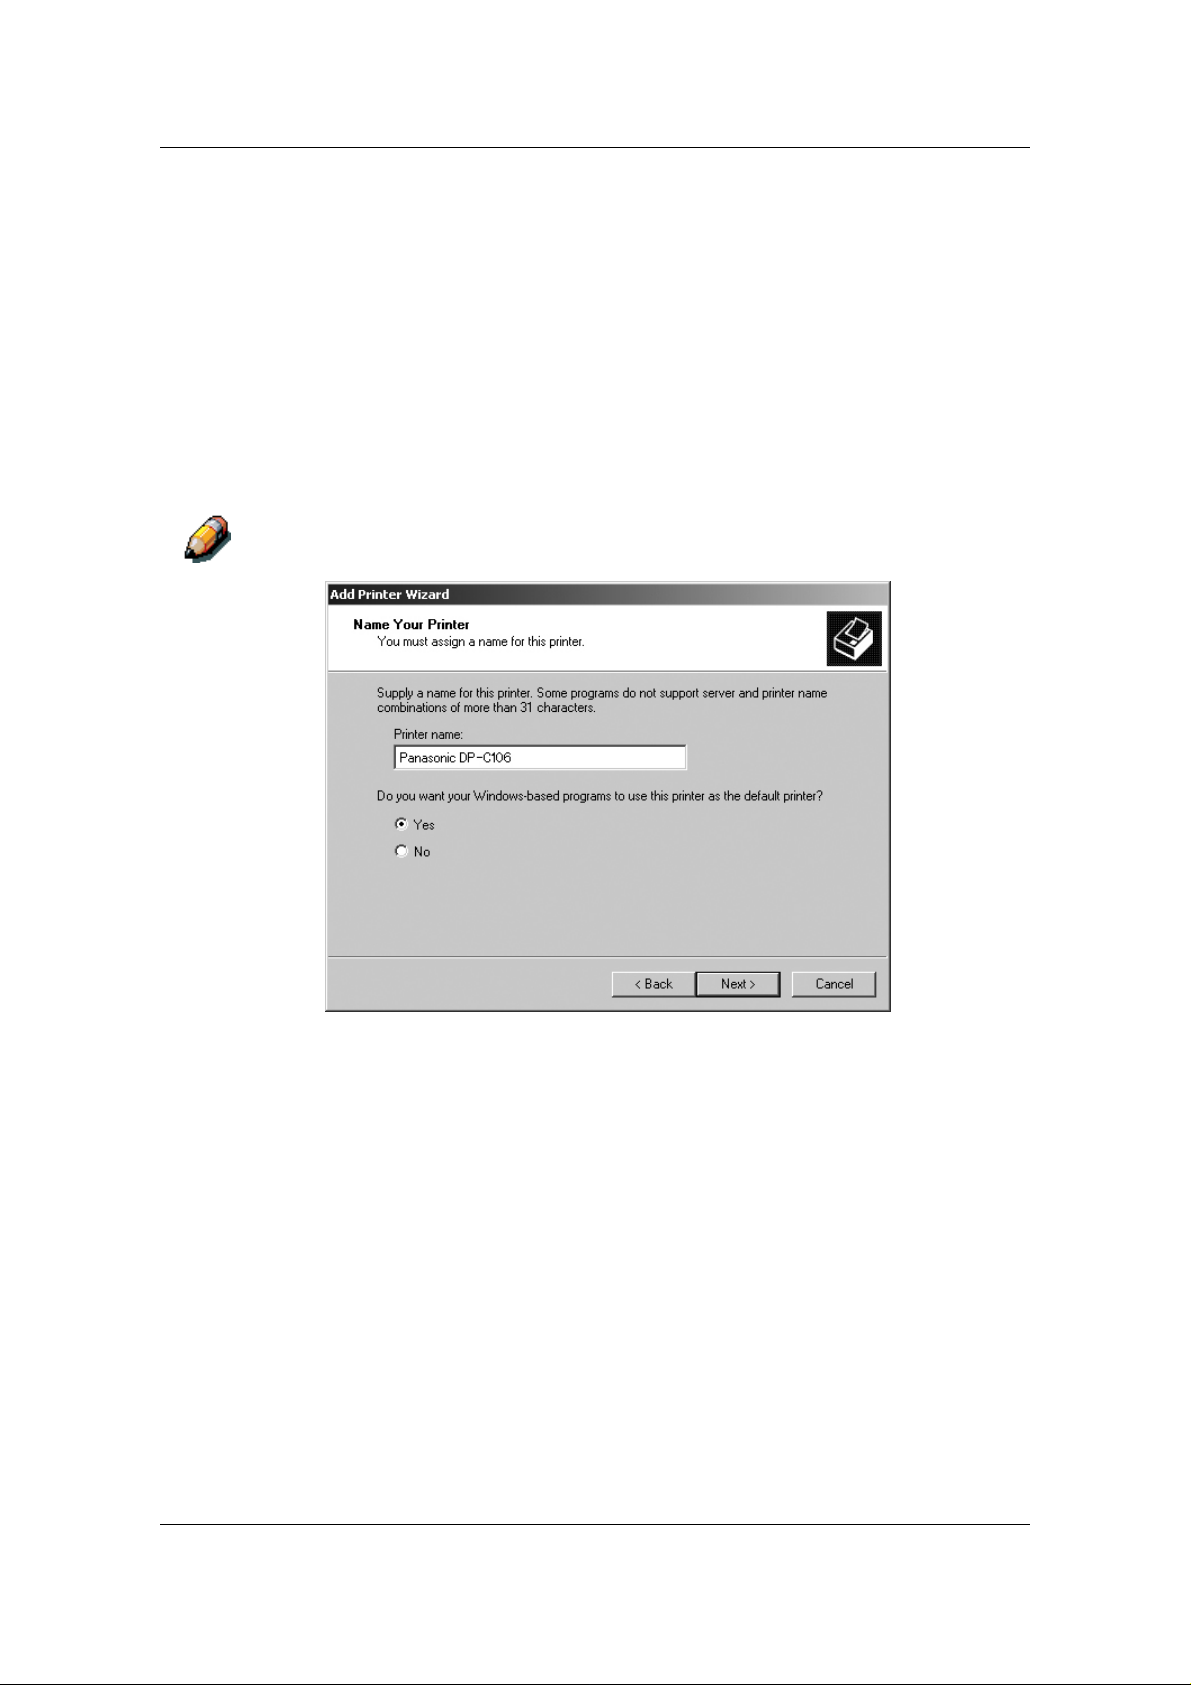
21. Using a maximum of 31 characters, enter a name for the printer
or leave the default name in the Printer Name box.
Entering more than 31 characters may cause printing problems with some
network applications.
9–18
22. If you want the DP-C106 to be the default printer, select the Yes
radio button; if not, select No. Select Next.
Page 68
Installing User Software in a Windows 2000 Environment
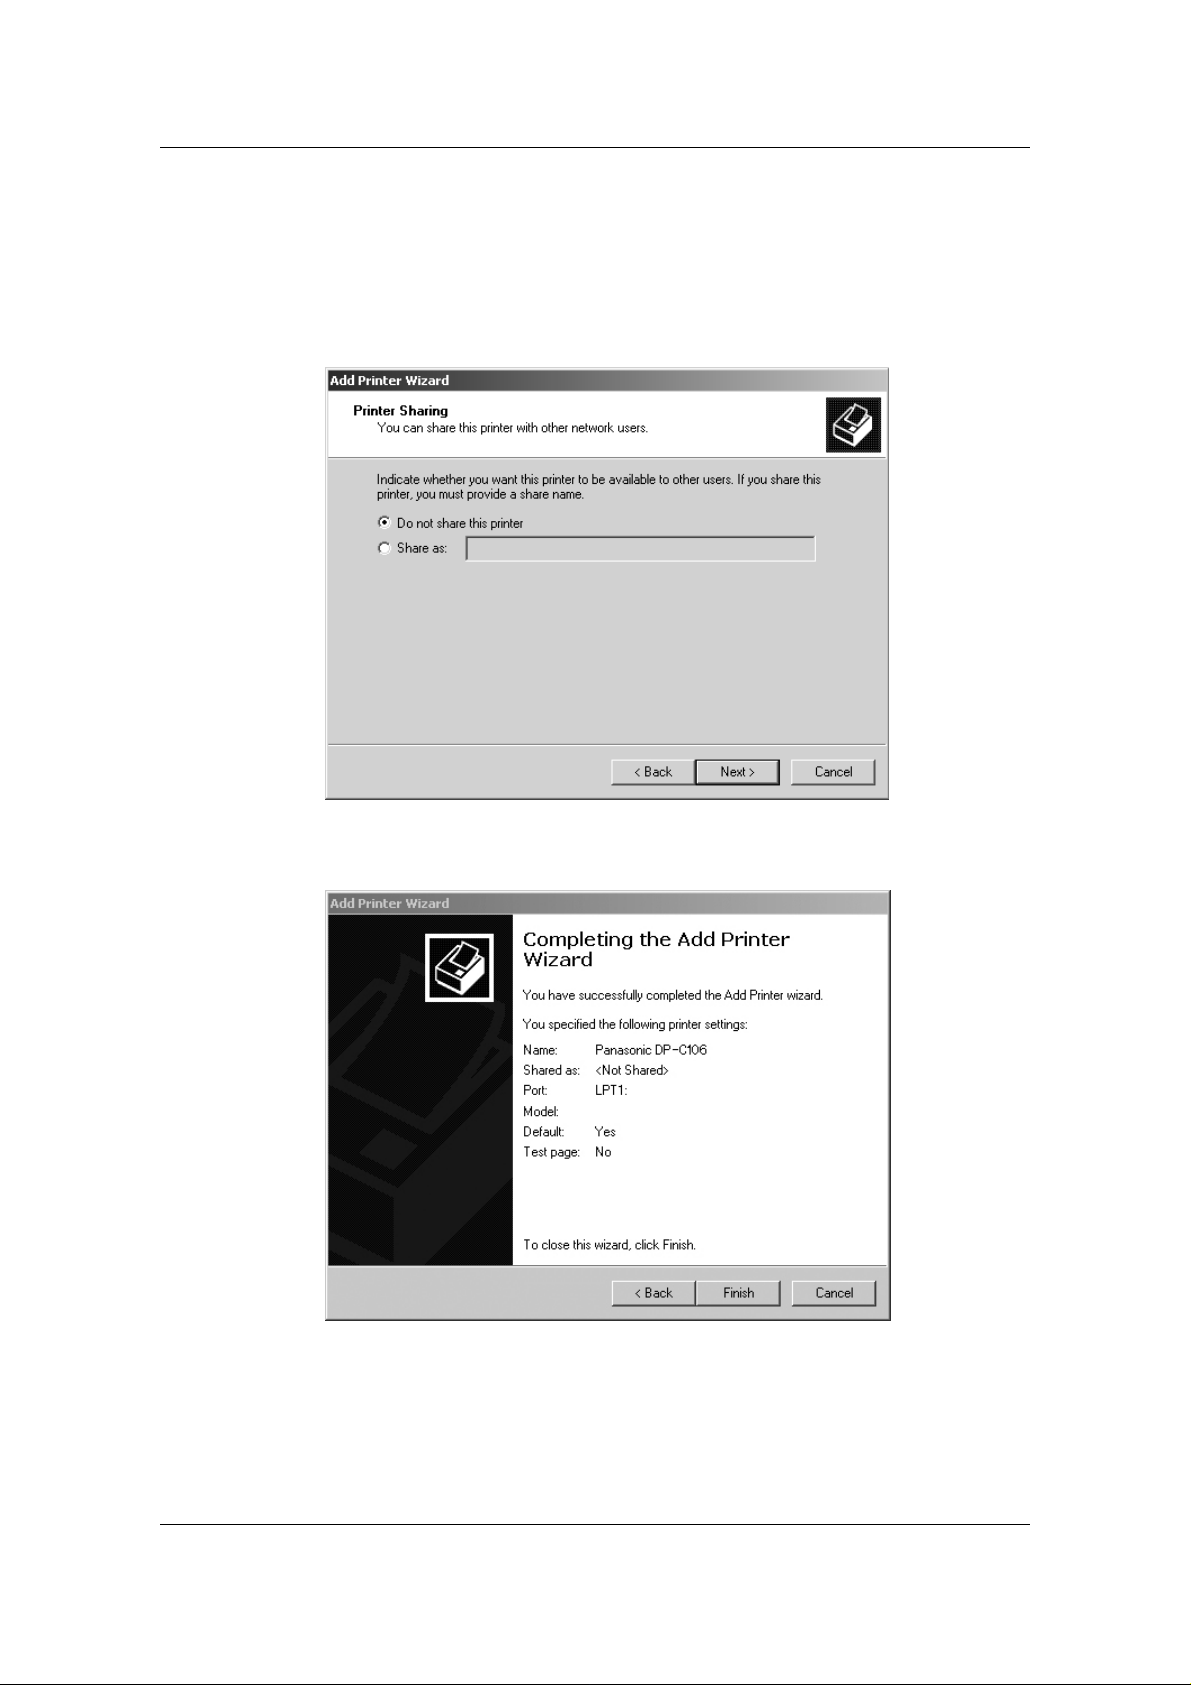
23. Indicate whether you want the printer installed as a shared printer.
If you select Share as, you must also enter a Share Name for the
printer (or leave the default name) and make selections from the
list of operating systems used by client workstations.
Select Next.
24. Select the No button to printing a test page and select Next.
25. Verify the printer settings specified, and select Finish.
9–19
Page 69
Installing User Software in a Windows 2000 Environment
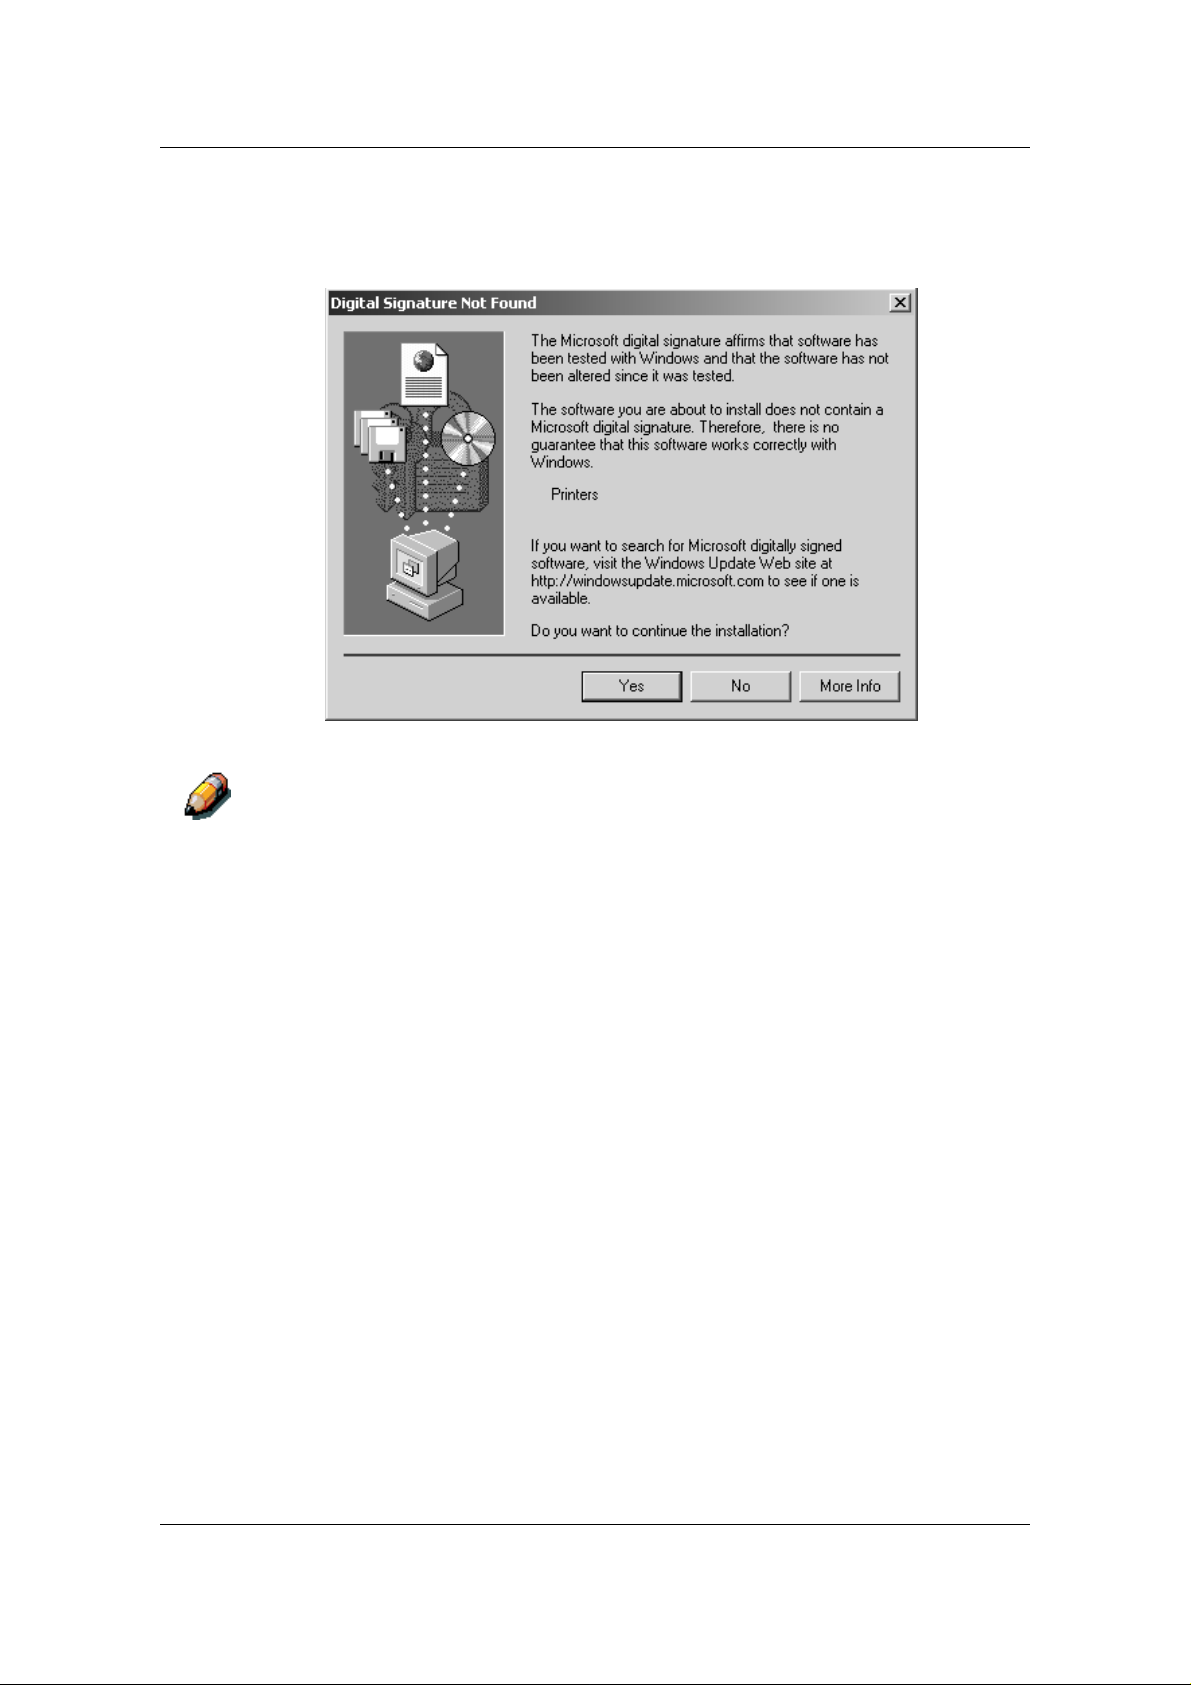
The Digital Signature Not Found window indicates that the printer
driver for Windows 2000 does not have a Microsoft digital
signature. However, printing is processed correctly.
26. Select the Yes button.
If this is the first printer driver you are installing on the computer, you are
prompted to install additional files from the Windows 2000 CD. Insert it into
the CD-ROM drive, browse to the i386 folder, and then select OK.
When installation is complete, the Printers window is displayed with an
icon for the newly installed printer.
27. Right-click the DP-C106 icon and select Properties.
9–20
Page 70

Installing User Software in a Windows 2000 Environment
28. To confirm the connection, print a test page. Select the General
tab in the Properties dialog box. Select the Print Test Page
button.
29. Perform one of the following:
• Select OK if the job printed normally.
• Select the Troubleshoot button if the page did not print or did
not print correctly. Follow the Troubleshooting wizard to
diagnose and solve the problem.
30. Select Close to exit the Printer Properties dialog box.
Configure any options installed on your printer. Refer to Setting the
Printer Options.
After setup is complete, you are ready to print your jobs.
9–21
Page 71
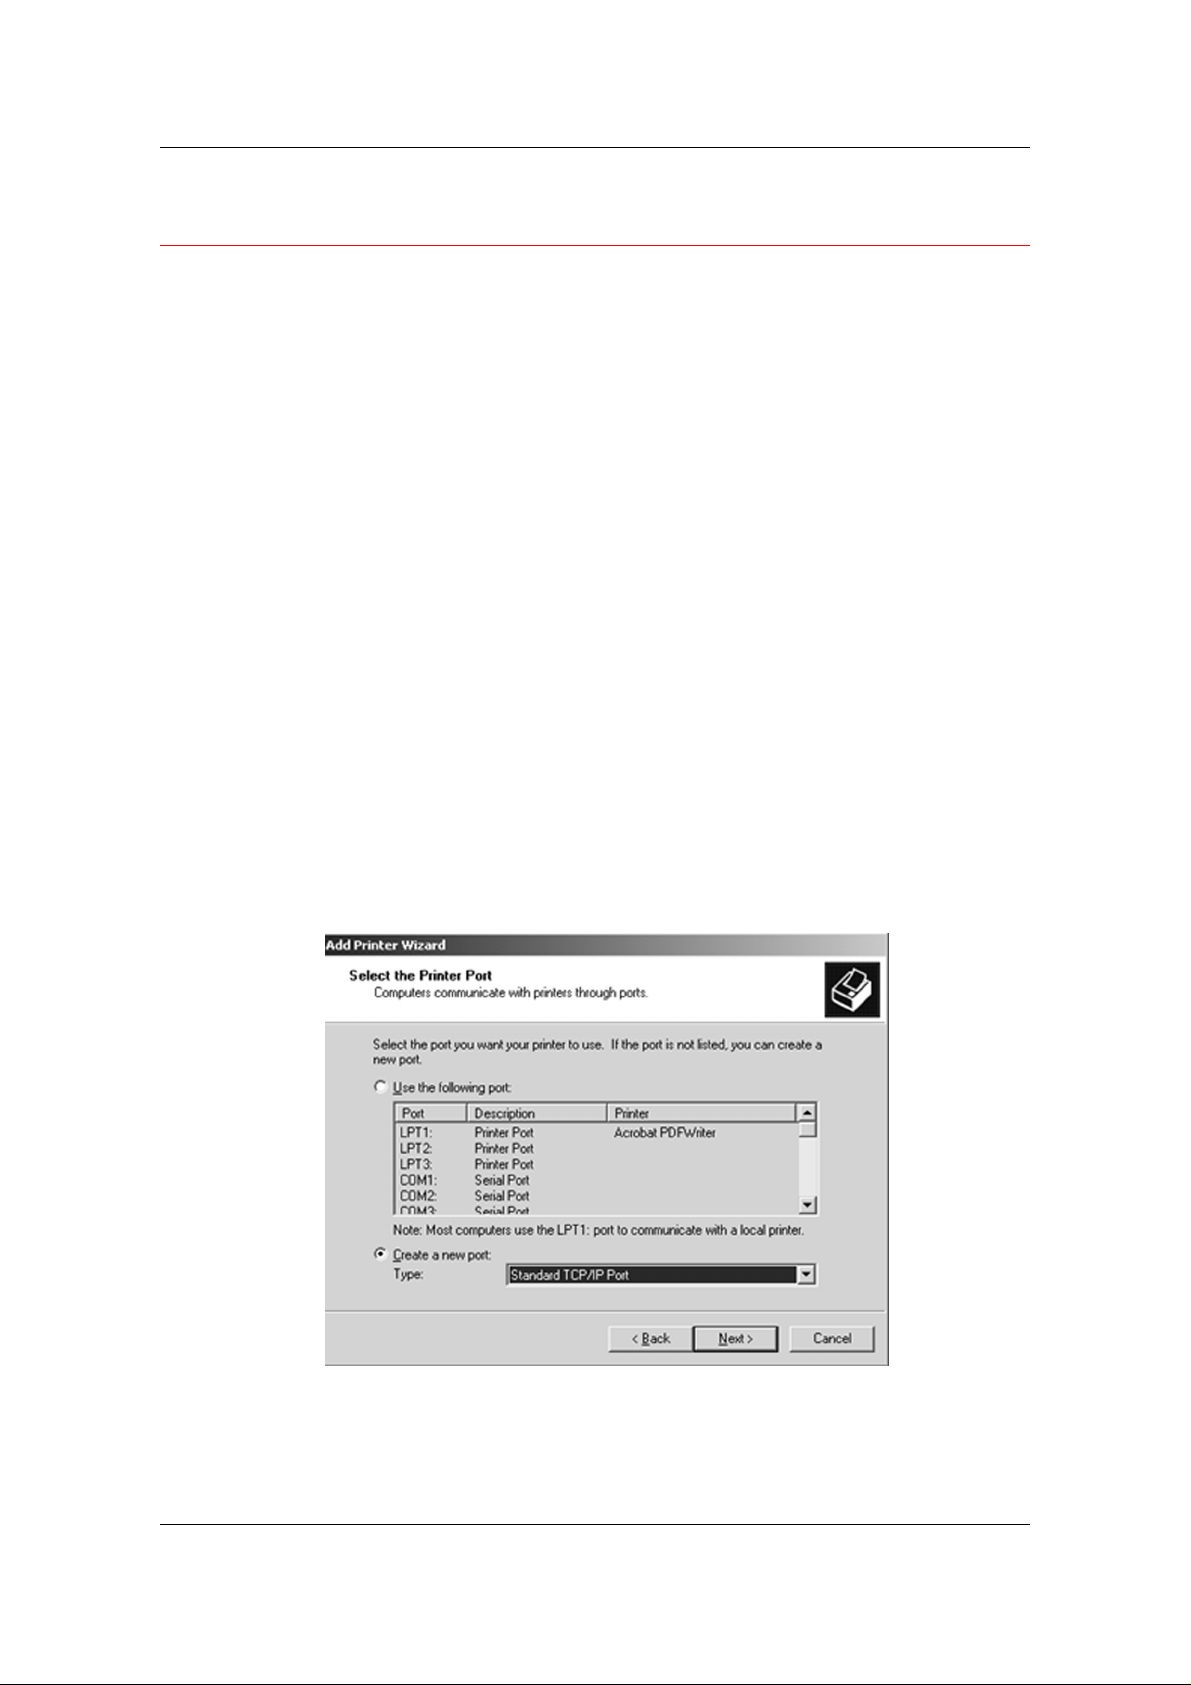
Installing User Software in a Windows 2000 Environment
Installing the User Software for SPM Printing
Standard Port Monitor (SPM) printing offers an alternative to LPR ports
when you want to send jobs to network printers over TCP/IP. SPM is
installed by default when TCP/IP is installed in Windows 2000.
SPM is more robust than LPR because it uses Simple Network
Management Protocol (SNMP) to read the configuration of the target
printer and determine its status. If SPM cannot configure the target
printer using SPM default TCP ports and SNMP, it uses the LPR
protocol, if this protocol is provided by the printer. However, the
installation will still be as an SPM port.
Unlike LPR, SPM uses port 9100 as the default destination port and
randomly selects any open source port greater than 1023 as the
source port.
Before you continue, print a configuration sheet at the printer to obtain
the IP address assigned to the DP-C106, as well as the Subnet mask
and gateway address, if they are used.
1. Perform steps 1-17 of the procedure Installing the User Software
for Parallel Port Printing to Install the Printer Driver.
When installation is complete, the Printers window is displayed
with an icon for the newly installed printer.
2. Double-click the Add Printer icon to display the Add Printer
Wizard and select Next.
9–22
Page 72

Installing User Software in a Windows 2000 Environment
3. Select the Create a new port radio button.
4. Select the TCP/IP Port option.
The TCP/IP Printer Port wizard is displayed.
5. Select Next.
6. Enter the Printer Name or IP Address. When you enter the
information, it is also displayed in the Port Name field. Select
Next to display the Additional Port Information.
7. Select the Custom radio button and the Settings button.
The Configure Standard TCP/IP Port Monitor screen is displayed.
8. Select the LPR radio button in the Protocol section to activate the
LPR Settings fields.
9. Enter one of the names listed below in lowercase letters in the
Queue Name field:
• print (generally used)
• hold
• direct
10. Select the SNMP Status Enabled check box .
11. Select OK to redisplay the Additional Port Information screen.
12. Select Next to display the wizard completion screen.
13. Select Finish. The Ports property tab shows the new port
configuration.
The SPM searches for the printer and configures the printer,
based on the SNMP response s.
14. To confirm the connection, print a test page. Select the General
tab and select the Print Test Page button.
When you print, your files are transmitted over the SNMP
connection to the printer. With setup complete, you are ready to
print your jobs.
9–23
Page 73
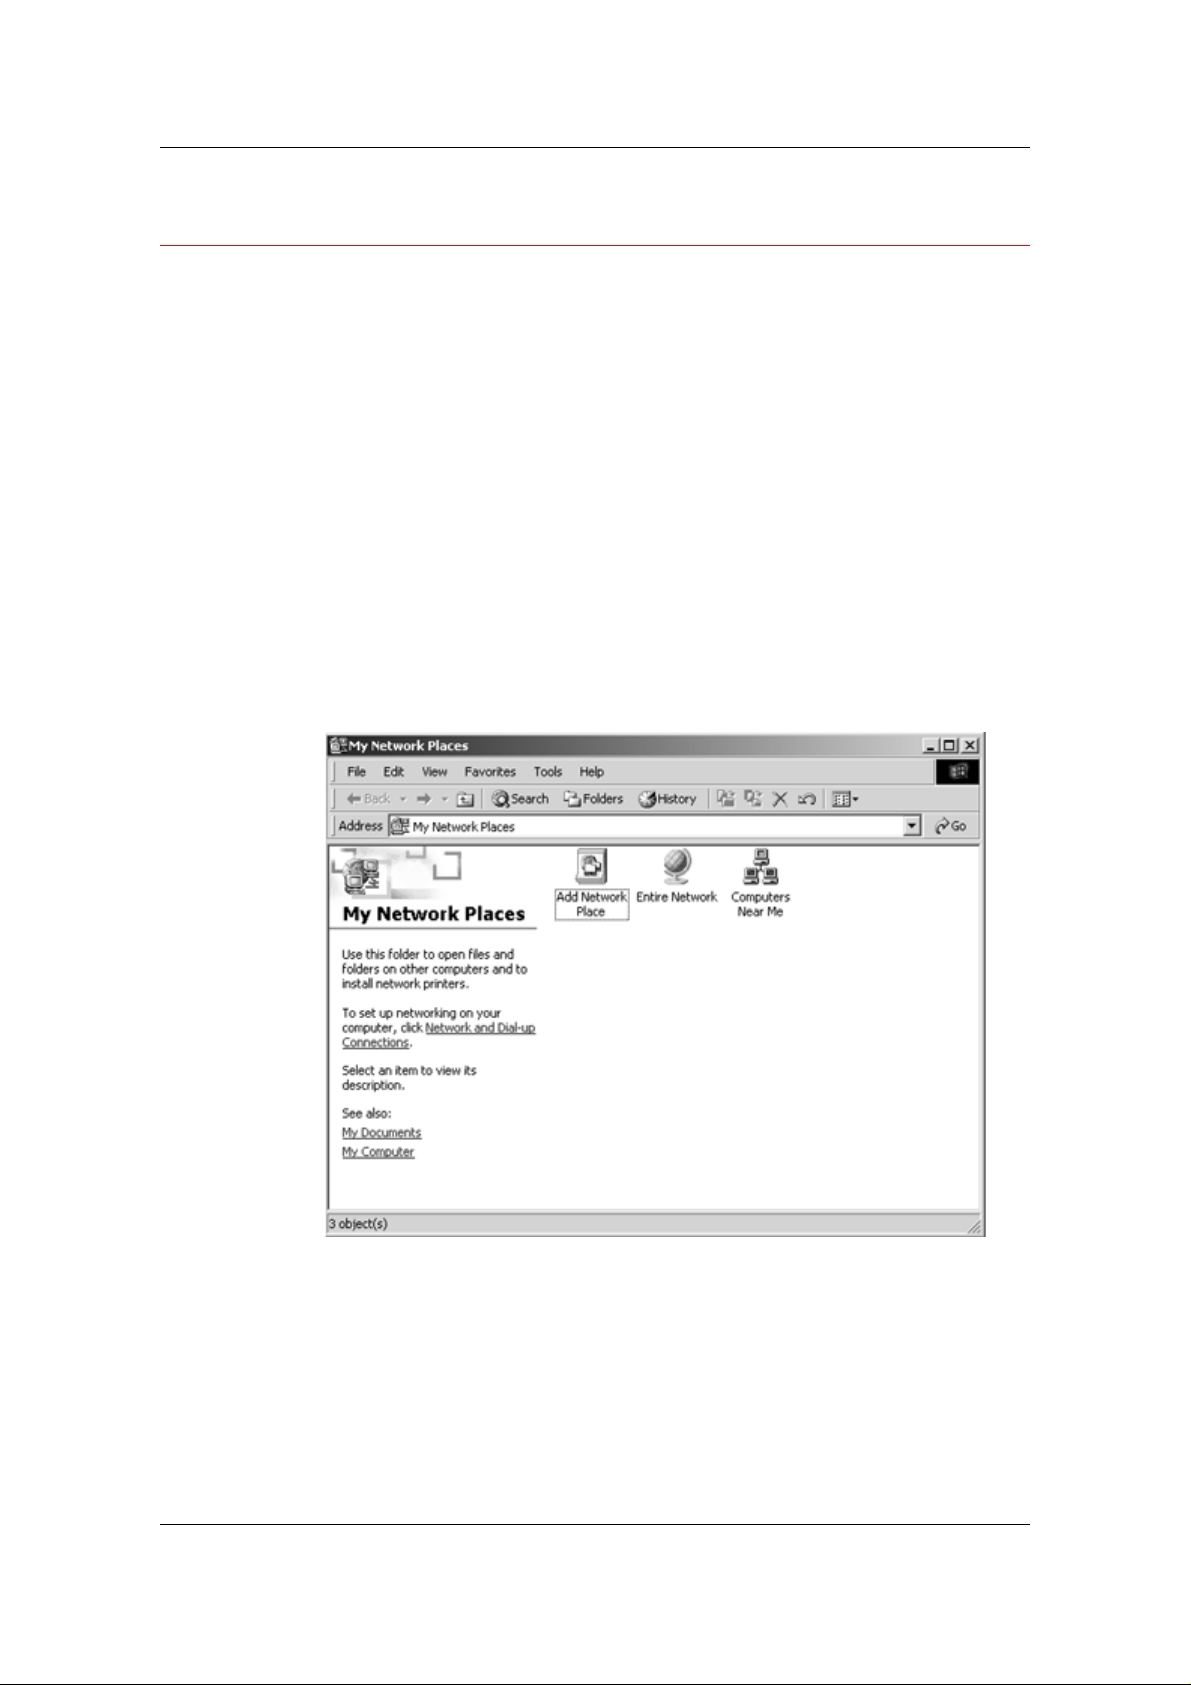
Installing User Software in a Windows 2000 Environment
Installing the User Software for SMB Printing
Use SMB or WINS printing if you do not have a Novell network.
Printing by this method enables printing from a workstation to a
particular print connection (hold, print, or direct) on the DP-C106. The
following procedure assumes you have the TCP/IP protocol and Client
for Microsoft Networks installed.
To set up printing to a second or third print connection, repeat this
procedure for each and assign each printer a unique descriptive name
during the printer driver installation for subsequent identification
purposes.
1. If the system administrator has not already done so, go to the
printer and configure the DP-C106 for SMB printing. Specify
whether to install the PostScript or PCL driver. Refer to
Performing the Setup from the Printer Control Panel.
2. At the workstation, double-click the My Network Places icon to
display your network environment.
9–24
Page 74
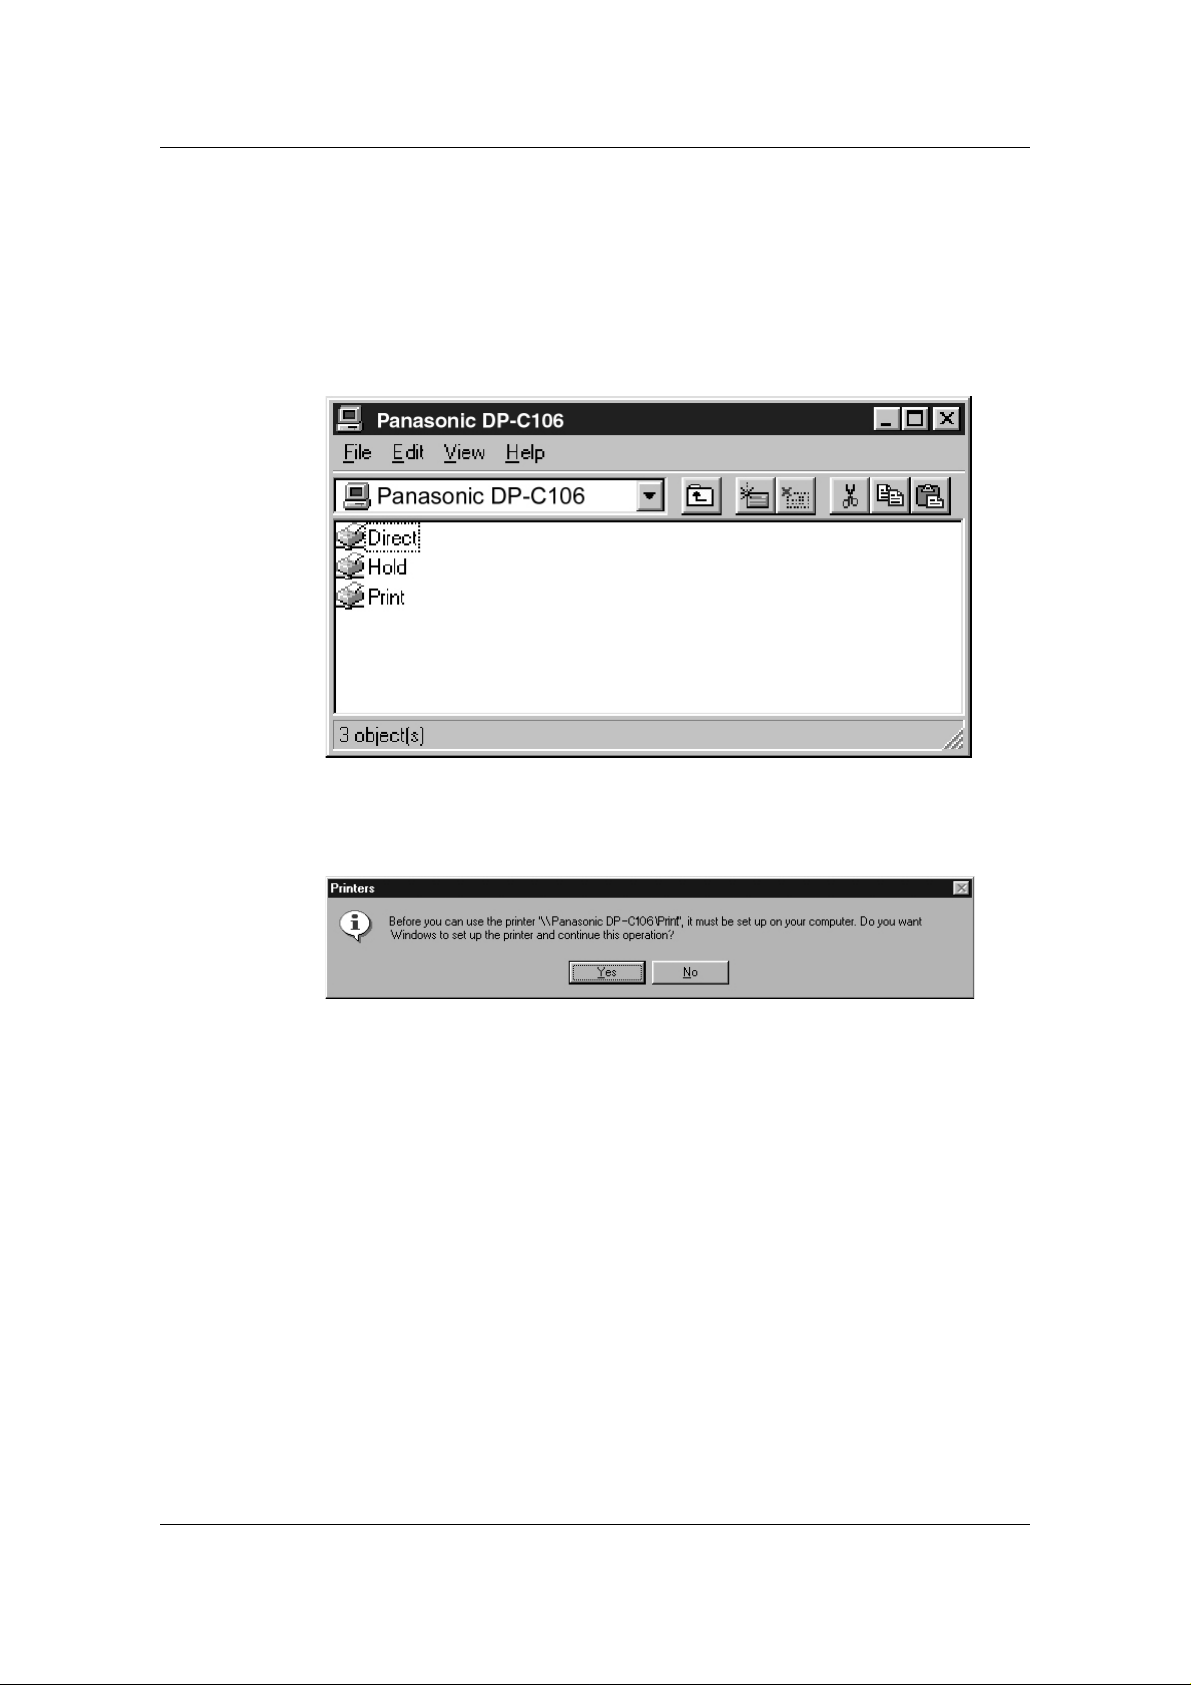
Installing User Software in a Windows 2000 Environment
3. Double-click the Computers Near Me icon.
4. Browse for the printer. Refer to the Configuration page for this
information. If you cannot locate your DP-C106, see your system
administrator.
5. Double-click the name of the printer to display enabled print
connections.
6. Double-click the name of the desired printer connection.
The Printers dialog box is displayed, asking whether you would
like to set up the printer.
7. Select Yes to install the PostScript or PCL printer driver and
printer description file for the selected connecti o n.
The Add Printer Wizard is displayed.
9–25
Page 75
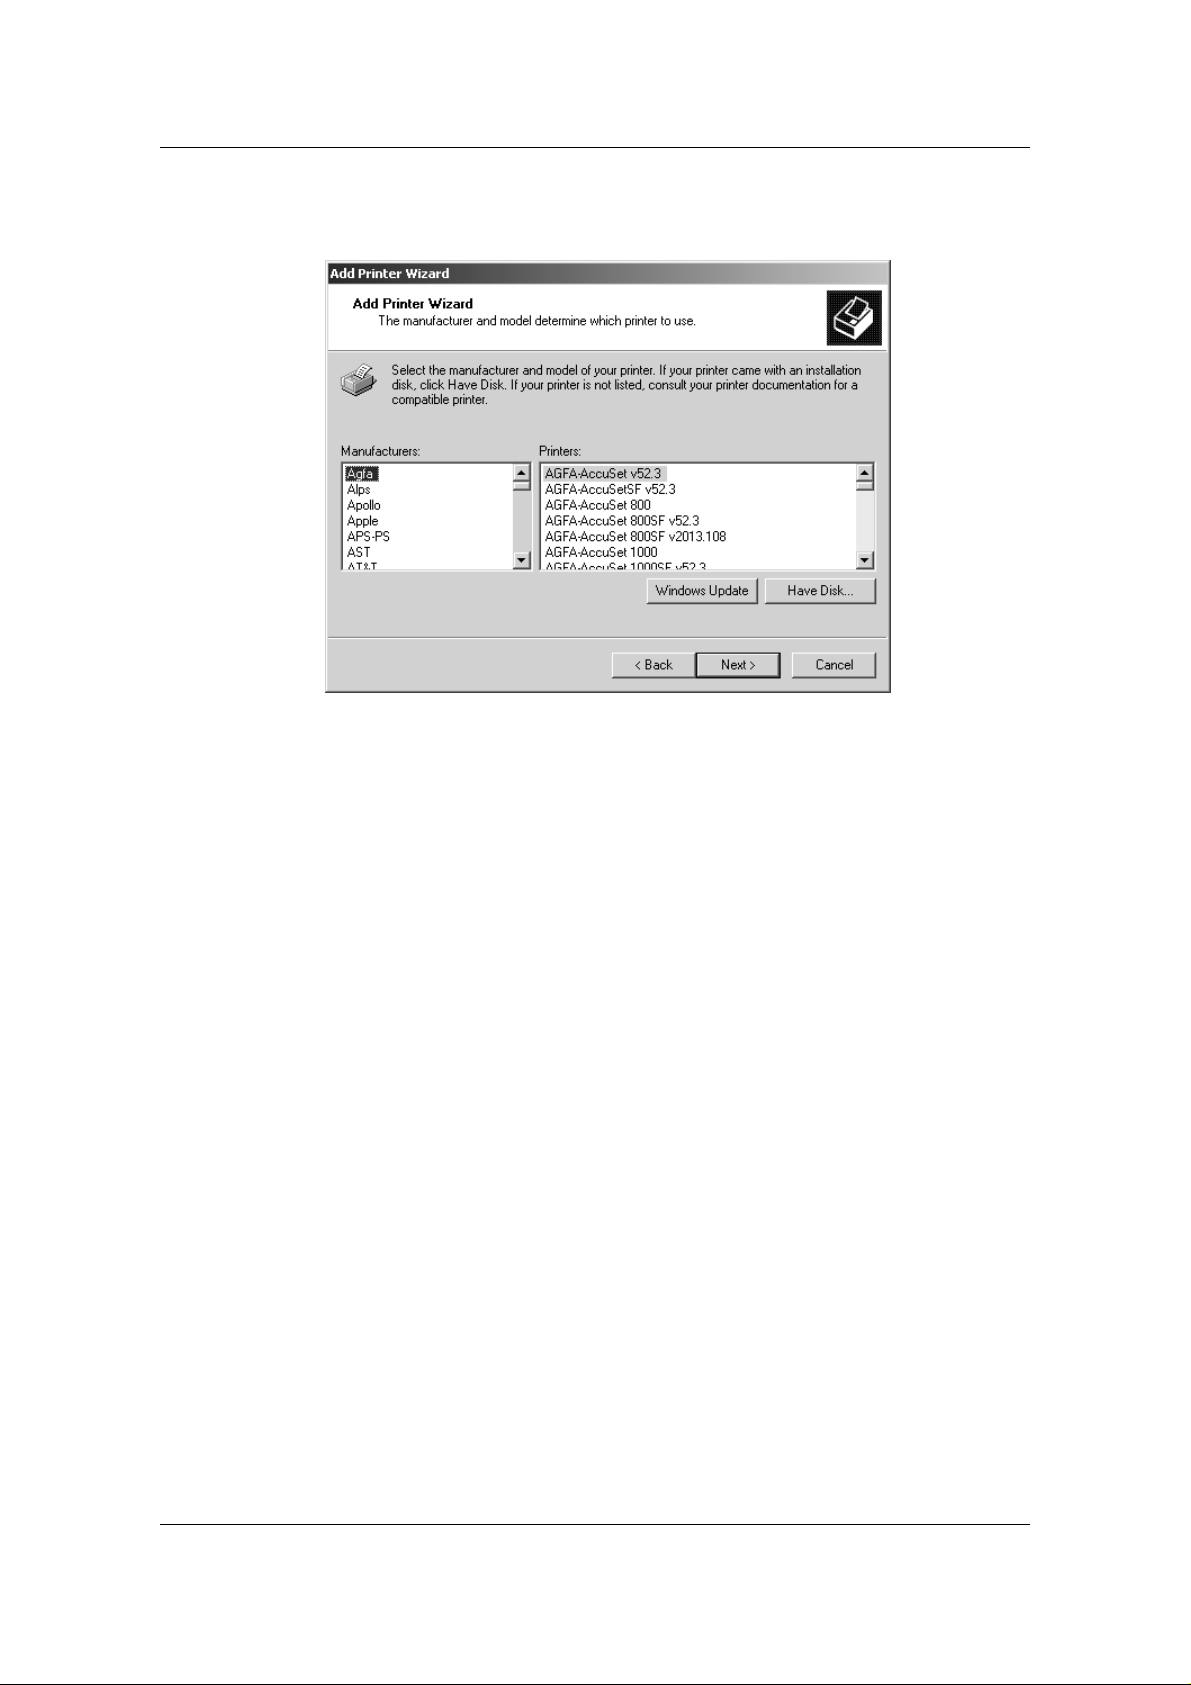
Installing User Software in a Windows 2000 Environment
8. In the dialog box displaying lists of manufacturers and printers,
select Have Disk.
9. Insert the CD in the CD-ROM drive, select the CD-ROM drive (fo r
example, D:\) from the drop-down box and select Browse.
The Install From Disk dialog box prompts you for the disk.
10. Browse to the Driver_PS3\English\Win_2000 folder and ensure
that oemsetup.inf or oemsetup is selected.
11. Select Open.
The path is copied to the Install from Disk dialog box.
9–26
Page 76
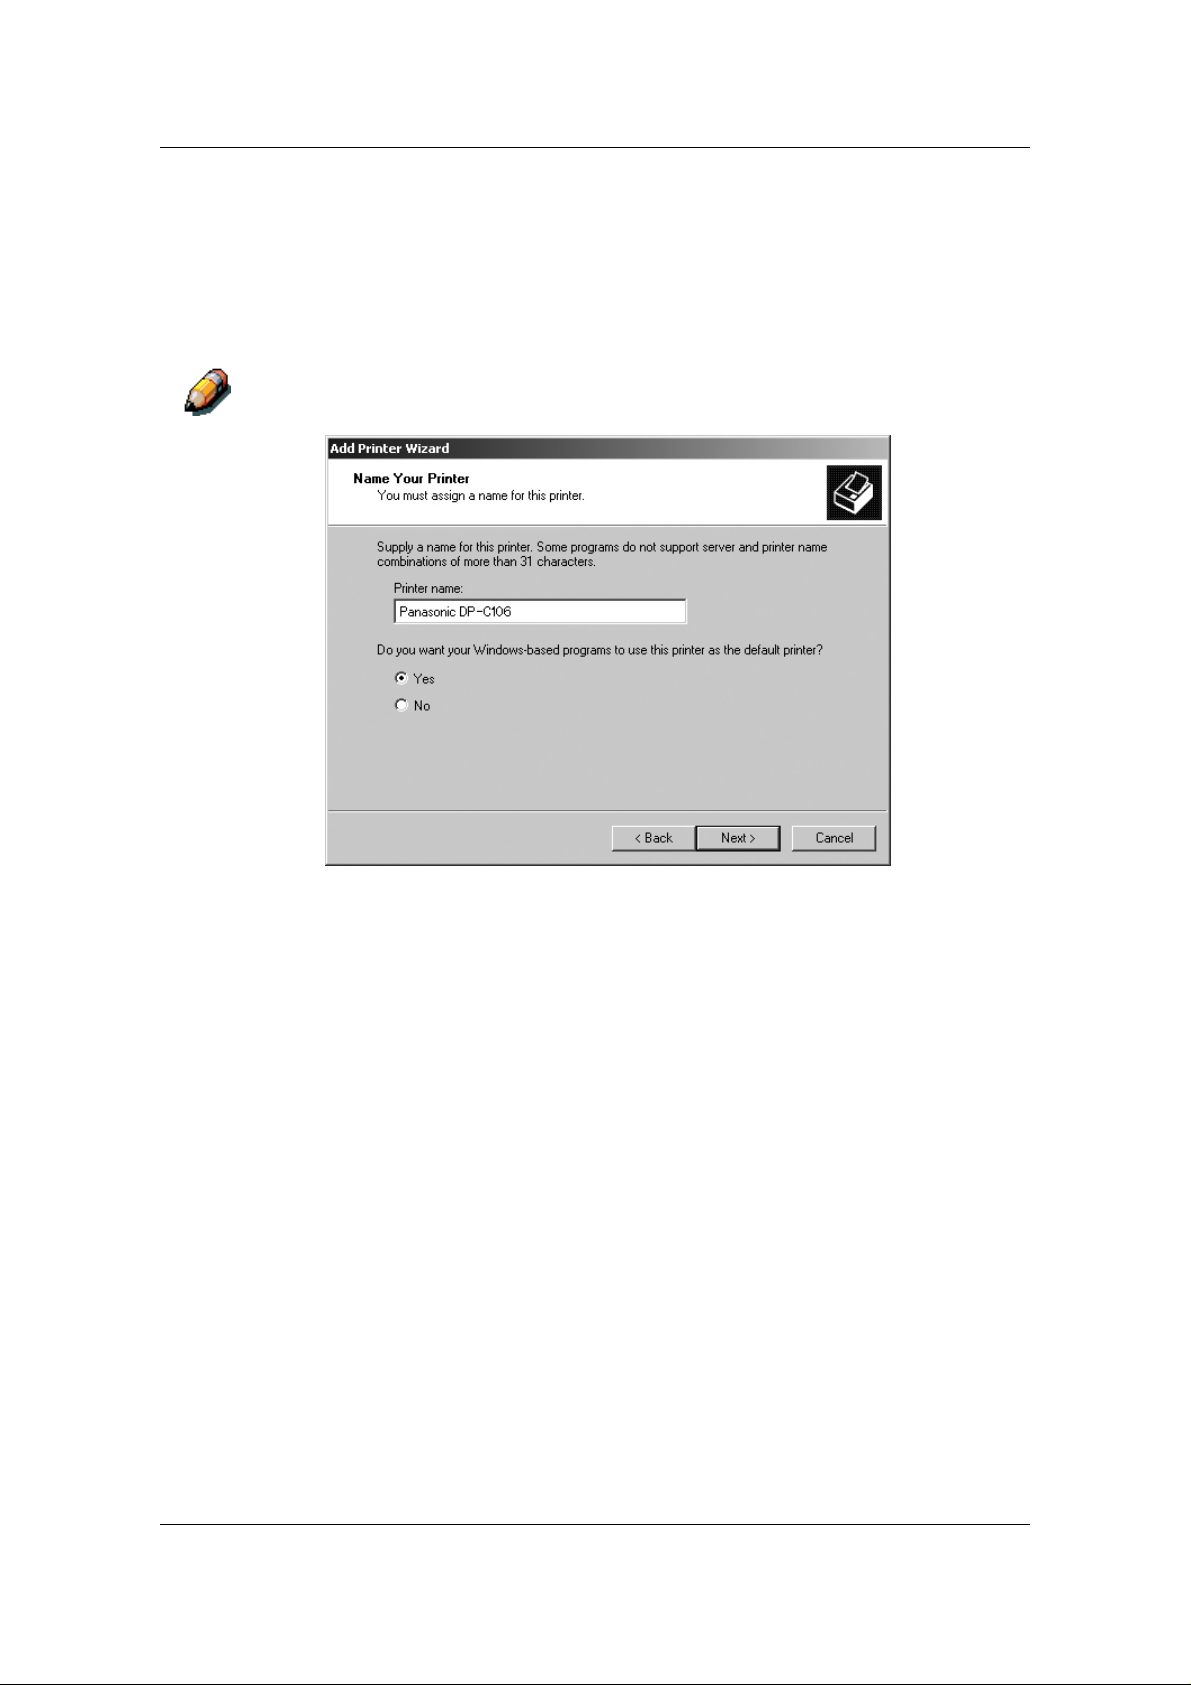
Installing User Software in a Windows 2000 Environment
12. Verify the path is correct and select OK.
13. In the Printers box, select the Panasonic DP-C106 option and
select Next.
14. Using a maximum of 31 characters, enter a name for the printer
or leave the default name in the Printer Name box.
Entering more than 31 characters may cause printing problems with some
network applications.
15. If you want the DP-C106 to be the default printer, select the Yes
radio button; if not, select No. Select Next.
9–27
Page 77
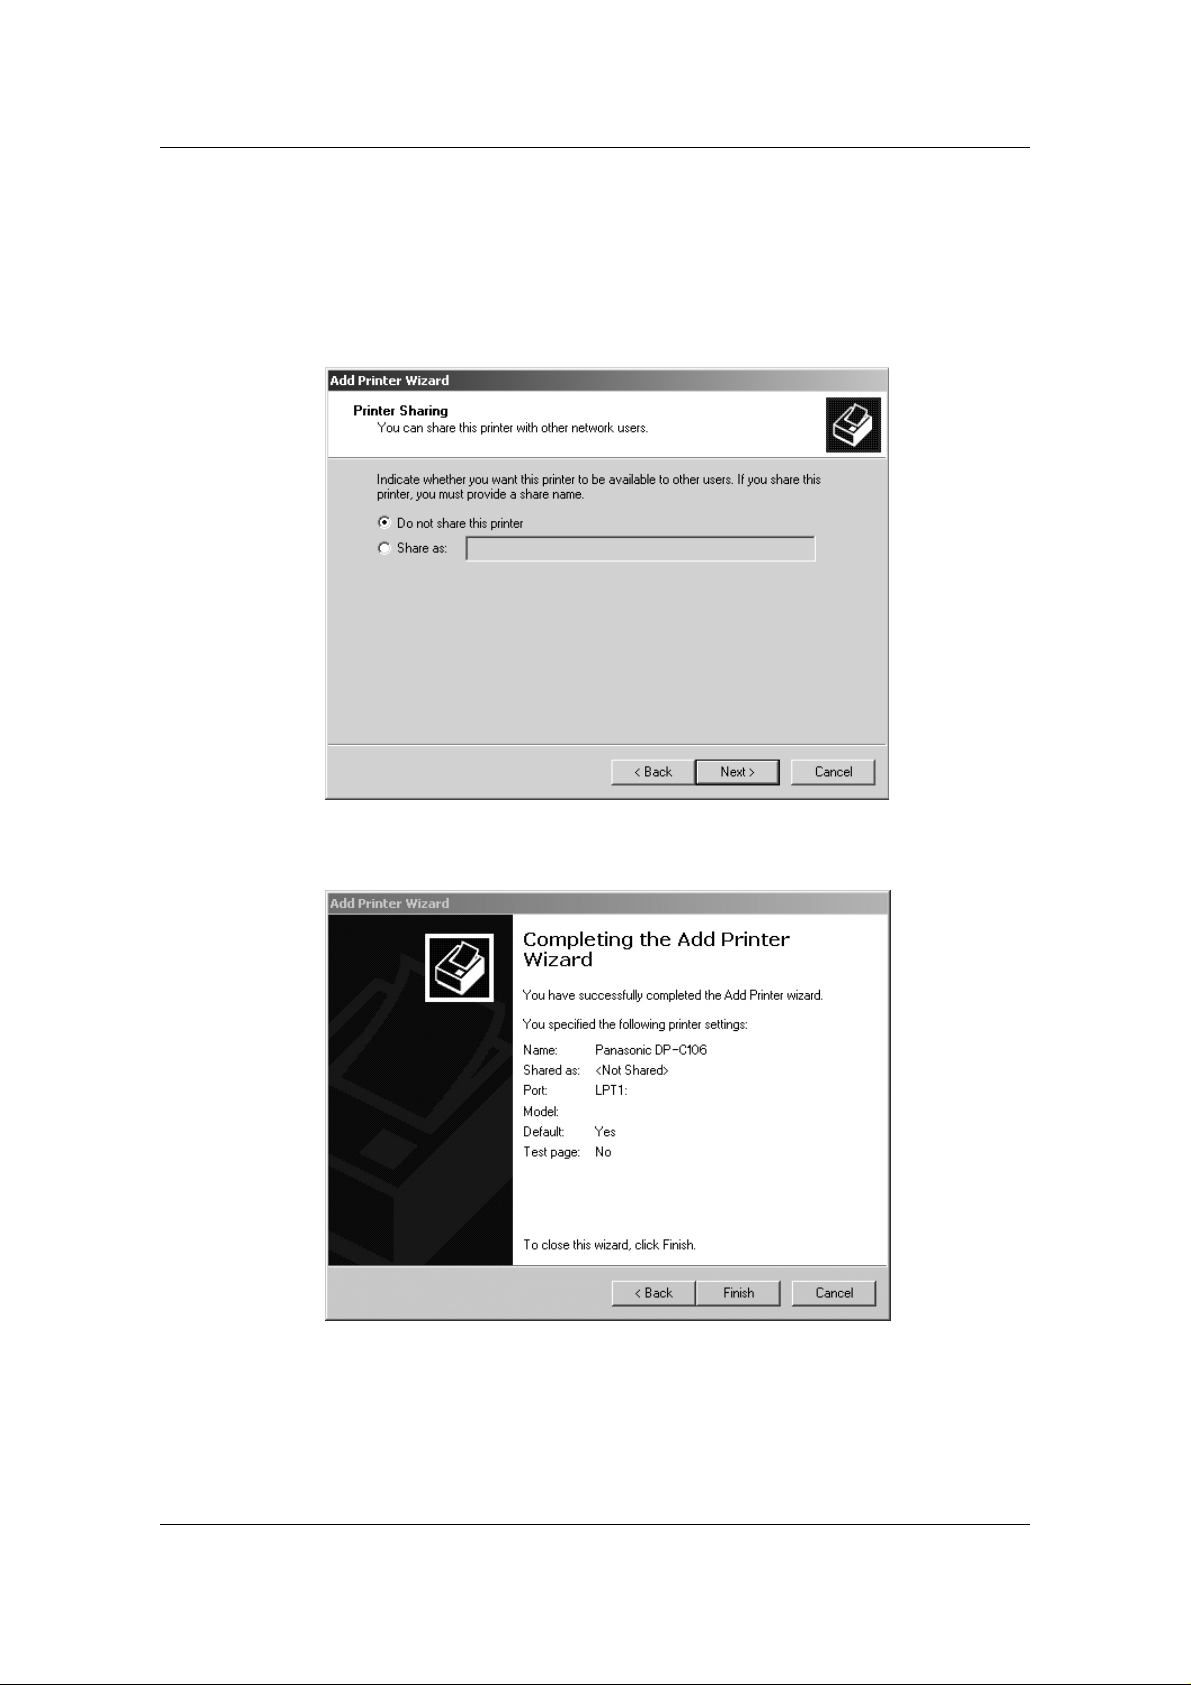
Installing User Software in a Windows 2000 Environment
16. Indicate whether you want the printer installed as a shared printer.
If you select Share as, you must also enter a Share Name for the
printer (or leave the default name) and make selections from the
list of operating systems used by client workstations.
Select Next.
17. Select the No button to printing a test page and select Next.
18. Verify the printer settings specified, and select Finish.
9–28
Page 78
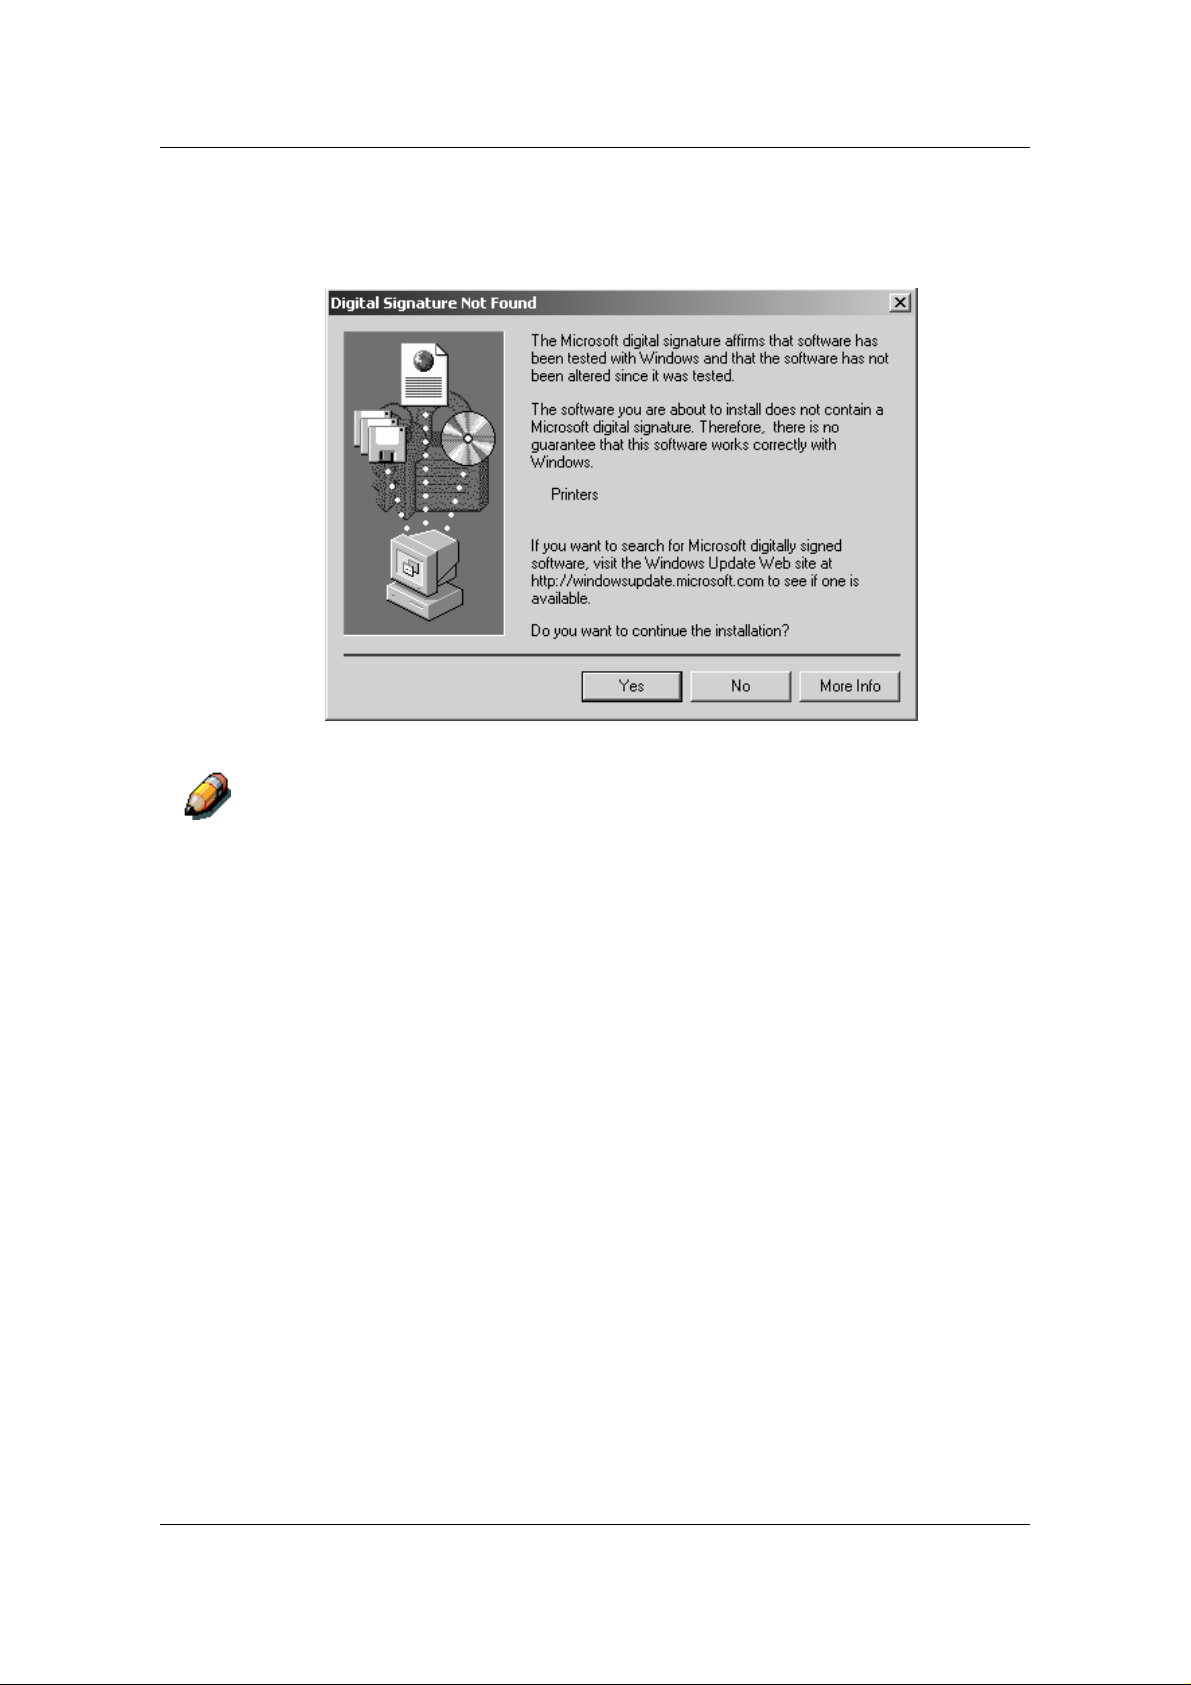
Installing User Software in a Windows 2000 Environment
The Digital Signature Not Found window indicates that the printer
driver for Windows 2000 does not have a Microsoft digital
signature. However, printing is processed correctly.
19. Select the Yes button.
If this is the first printer driver you are installing on the computer, you are
prompted to install additional files from the Windows 2000 CD. Insert it into
the CD-ROM drive, browse to the i386 folder, and then select OK.
When installation is complete, the Printers window is displayed with an
icon for the newly installed printer.
20. Right-click the DP-C106 icon and select Properties.
21. To confirm the connection, print a Windows test page. Select the
General tab. Select the Print Test Page button and OK.
You are now ready to print from your applications through the
SMB connection.
Configure any options installed on your printer. Refer to Setting the
Printer Options.
9–29
Page 79
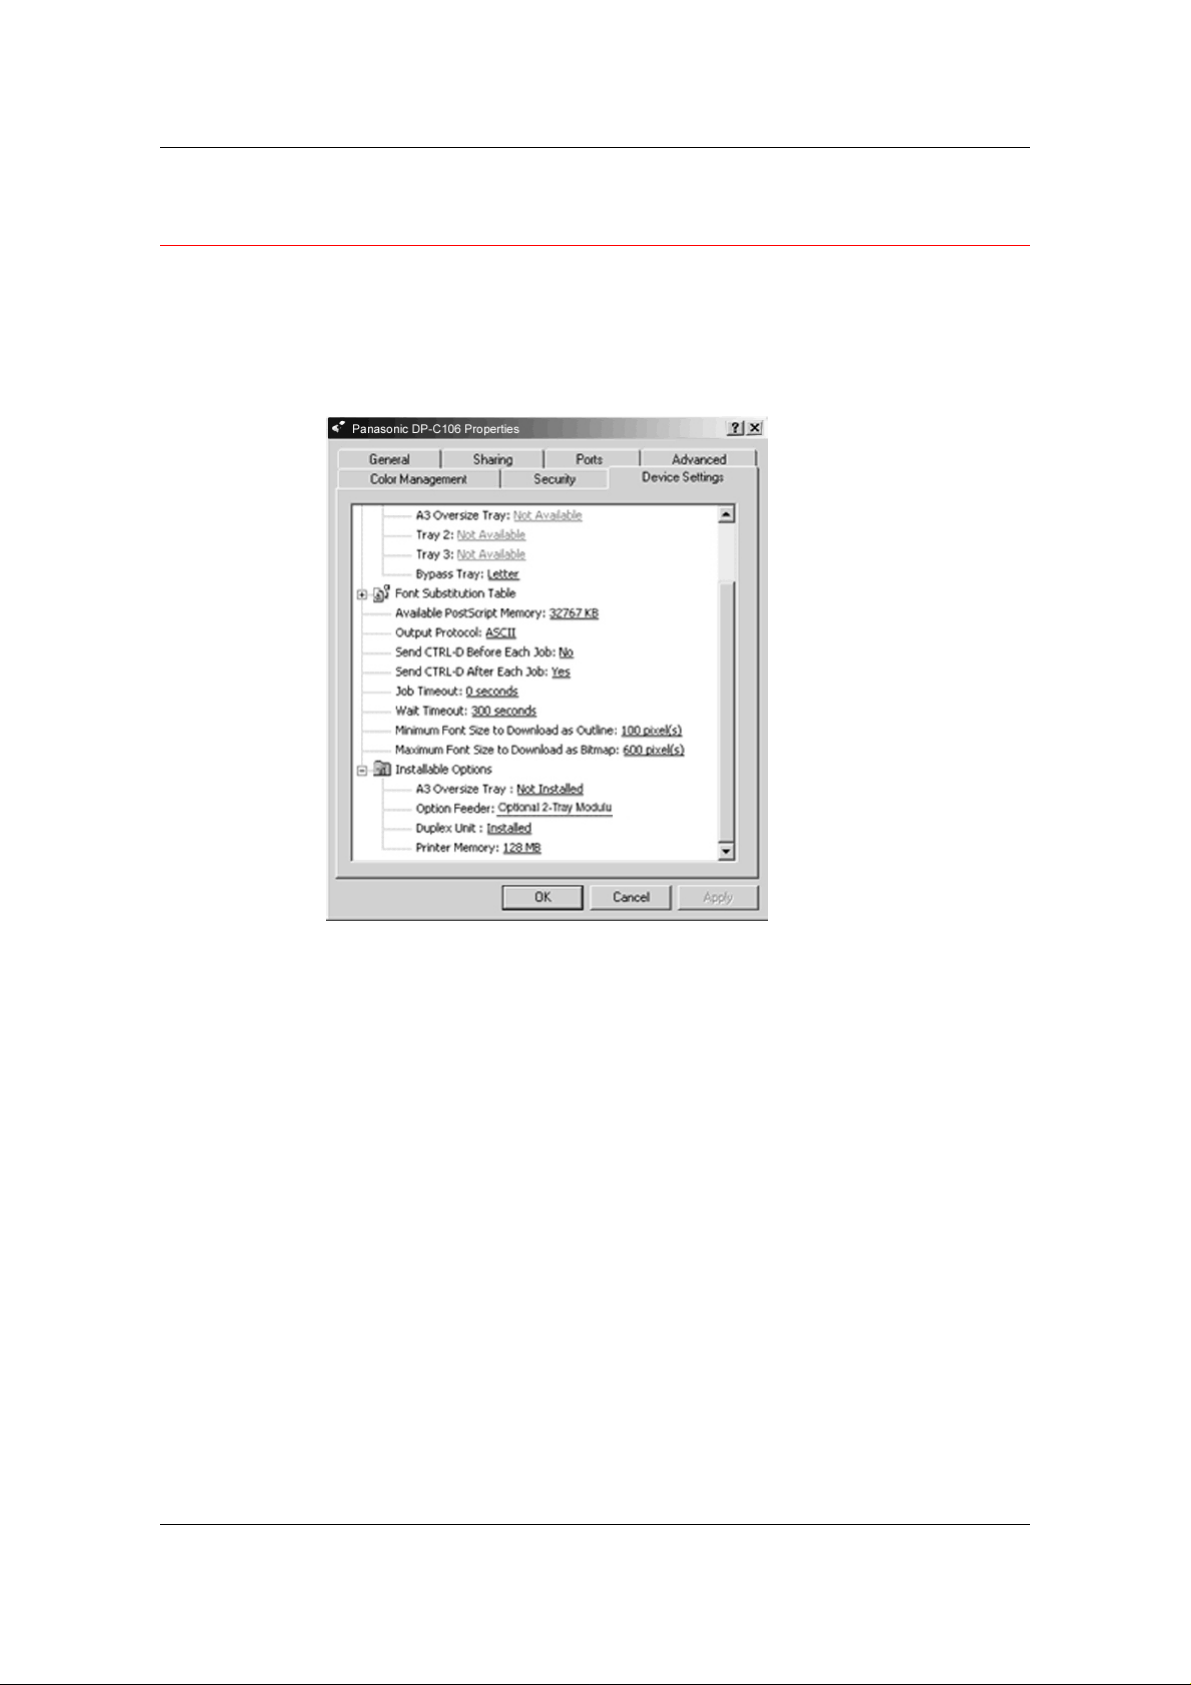
Installing User Software in a Windows 2000 Environment
Setting Printer Options
1. Select the Start button, Settings, and Printers.
2. Right-click the DP-C106 icon and select Properties.
3. Select the Device Settings tab, and scroll to the Installable
Options option.
4. Specify the options installed on the printer. Select an installable
option and select the setting of Installed or Not Installed.
• A3 Oversize Tray
• Option Feeder
• Duplex Unit
For the Printer Memory option, select the amount of memory
installed in the printer: 64 (default), 128, 192 or 256MB.
5. Select Apply to activate the current settings, and then select OK.
9–30
Page 80

Installing User Software in a Windows 2000 Environment
Installing Additional Software for Windows 2000
You can copy additional color files from the User Software CD to your
hard disk. Many of the files are PostScript files that you can download
and print using WebDownloader .
• ICM folder—ICM monitor setting file and device profiles specially
designed for use with the Fiery and particular copier models.
• Color_Sample folder—Cmyk.ps, an 11-pag e, letter -s ize
PostScript file to use for reference when defining CMYK colors in
applications. Pantone.ps, a 19-page, letter-size PostScript file that
indicates the closest equivalent of PANTONE coated colors that the
Fiery and your particular printer can produce. The method used to
print the Pantone.ps file differs depending on the Spot Color
Matching setting.
You can print Rgb_01.doc from Microsoft Word 97 or later to view
RGB colors. You can print Rgb_02.ppt from PowerPoint 6.0 or later
to view available RGB colors.
• Calibrat folder (inside English folder)—Four PostScript
measurements files of color patches: Custom21.ps, Custom34.ps,
Stand21.ps, and Stand34.ps. The numbers in the file names refer
to the number of patches on the page. The Custom files are
provided to enable you to download measurement patches that
incorporate the current calibration set of the printer. The Standard
files are provided to enable you to dow nload standard
measurement patches that ignore the current calibration set for the
printer.
These files are provided for expert users and should not be used for day-today calibration.
9–31
Page 81

Installing User Software in a Windows 2000 Environment
Copying Printer Description Files
The User Software CD contains printer description files for popular
Windows applications. Pagemaker 5.0, 6.0,and 6.5 do not support
automatic installation of printer description files from the Printer Control
Panel. To make the Fiery available in the Print and Page Setup dialog
boxes of this application, copy printer description files to the
appropriate location.
1. Insert the User Software CD in your CD-ROM drive. Open the
Driver_PS3\ English folder.
2. Copy the printer description file for your Fiery to the appropriate
location. For PageMaker 5.0 or later, copy the Ef3XC106.ppd to
one of the following locations:
• For PageMaker 5.0--\ALDUS\USENGLSH\PP D4
• For PageMaker 6.0--\PM6\RSRC\USENGLSH\PPD4
• For PageMaker 6.5--\ PM65\RSRC \USENGLSH\PPD4
Installing the ICM Profile
The Image Color Matching (ICM) profiles included in the Icm folder on
the User Software CD are for use with ColorWise ProTools. They can
also be used with applications that support ICC standards. For most
ICC aware applications, the files must be installed into a folder named
Color in the System folder. For use with ColorWise Pro Tools, the files
can be copied to a folder of your choice.
9–32
Page 82
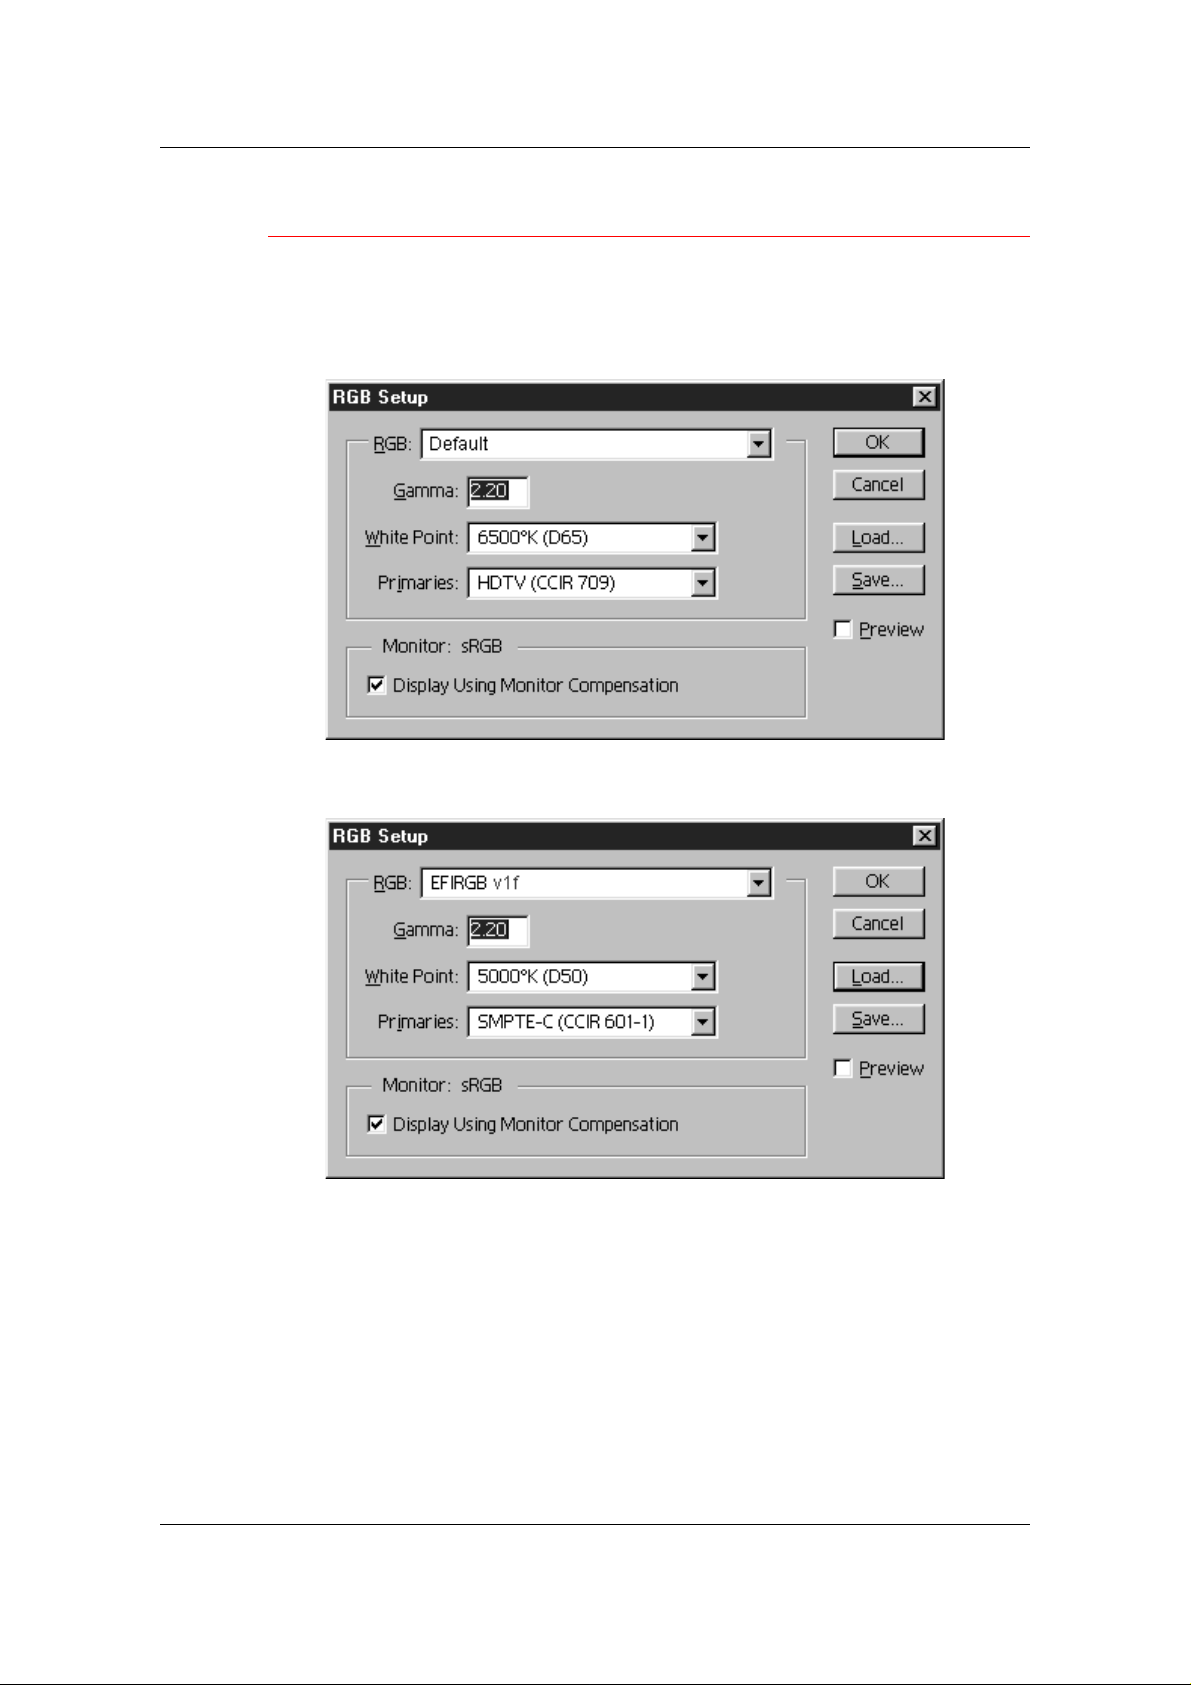
Installing User Software in a Windows 2000 Environment
Loading the Working Space Profile Using Photoshop 5.0
1. Launch Photoshop.
2. From the File menu, select Color Settings and RGB Setup.
3. In the RGB Setup dialog box, select the Load button.
4. Browse to the Windows\System\Color folder. Select the Efirgb
v1f file and the Load button.
5. Select OK.
For more information about ICM profiles, refer to the application
documentation.
9–33
Page 83
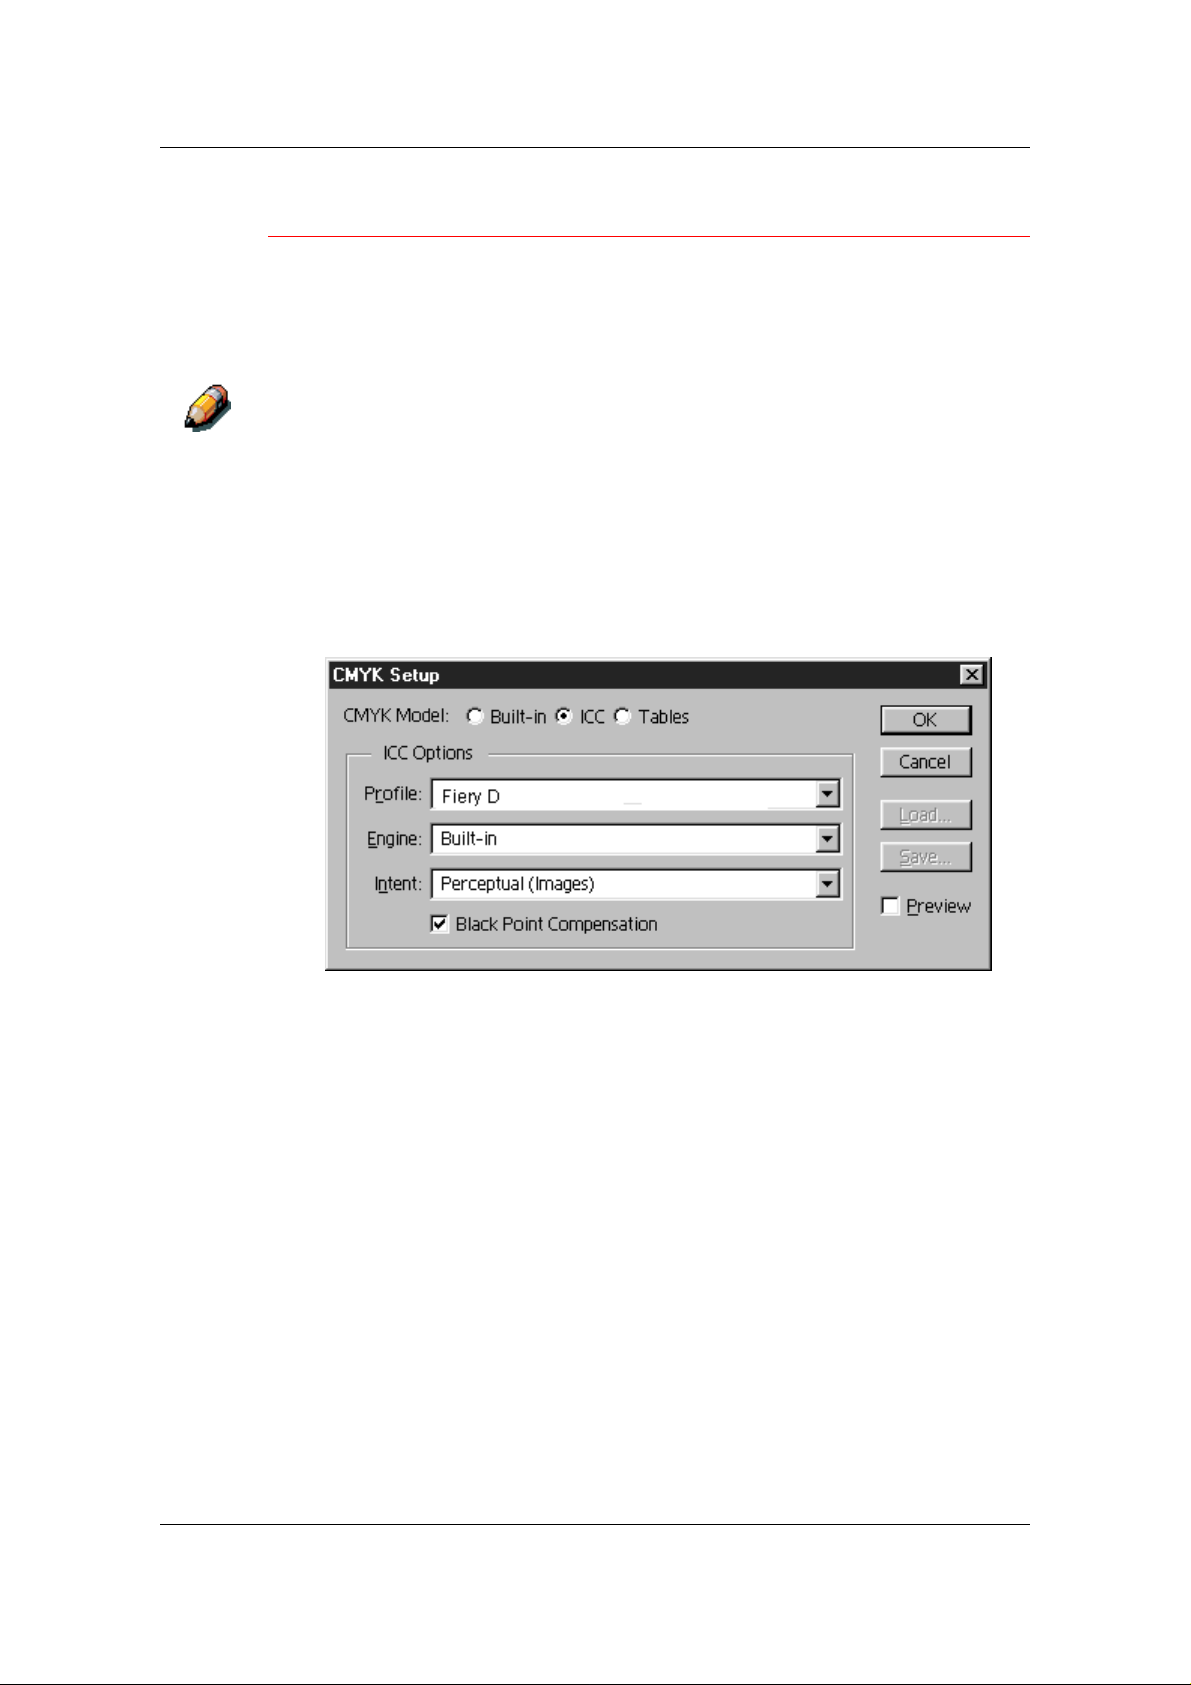
Installing User Software in a Windows 2000 Environment
Loading the ICM Profile
The ICM printer profile enables RGB-to-CMYK conversions that are
specific to the printer you are using. The following procedure assumes
that you have installed the ICM profiles included on the User Software
CD.
The internal name of an ICM profile may vary slightly from its file name.
1. Launch Photoshop.
2. From the File menu, select Color Settings and CMYK Setup.
3. In the CMYK Setup dialog box, select the ICC radio button as the
CMYK Model.
4. Select the profile that corresponds to the printer or the device you
would like to simulate from the Profile drop-down menu.
9–34
5. Select OK.
Page 84

10
Installing User Software in a
Windows NT 4.0 Environment
Use the following instructions to install software and set up printing
from Windows NT 4.0. Ensure that your printer is properly connect and
configured for your network. For details, refer to Connecting to the
Network and Performing the Setup from the Printer Control Panel
Use the contents of this chapter as follows:
• Depending on your configuration, use one of the following sections
to install printer drivers and set up appropriate connections:
• Parallel Port Printing
• TCP/IP and LPR Printing
• IPX Printing
• SMB Printing
• Specify printer options with the section Setting the Printer Options.
• If necessary, refer to Inst al li ng Addi tional Software for Windows NT
4.0.
All necessary files are included on the User Software CD.
In addition to using the User Software CD, you can download printer
drivers from the printer to your workstation with the Installer WebTool
(if the system administrator has enabled Internet access to the printer).
You can then install the drivers from your workstation. For instructions,
refer to Using the Installer WebTool in Using the Fiery WebTools. After
you download the printer files, the installation process is identical to
installing from the User Software CD.
10–1
1
Page 85

Installing User Software in a Windows NT 4.0 Environment
Overview of Installation
Installing the DP-C106 user software inclu des the following:
• Installing the PostScript or PCL printer driver and corresponding
printer description files and setting up the printer driver to
communicate with the printer through the Add Printer Wizard
• Setting the printer options
• Copying additional files from the User Software CD as needed
To print from over the network from a Windows NT 4.0 workstation,
ensure the following tasks have been completed:
• Set up network servers, if any.
• Set up the printer to accept print jobs from the workstation.
• Configure a port on each Windows NT 4.0 workstation for the
network type.
Before You Begin
1. If your system administrator has not already done so, connect the
printer to the desired port on the workstation. For details, refer to
Connecting to the Network and Performing the Setup from the
Printer Control Panel.
If you are uncertain what type of network you have, contact your
system administrator.
2. Print a configuration sheet at the printer to obtain the name of the
printer and settings that will be used in the following procedures.
10–2
Page 86

Installing User Software in a Windows NT 4.0 Environment
Installing the User Software for Parallel Port Printing (Windows NT 4.0)
Use this procedure to install the printer. It prepares your system for
local printing through the parallel port.
Before you begin, print a Configuration Page for the printer. For
specific procedures, refer to Performing the Setup from the Printer
Control Panel.
If you have previously installed a print driver for the DP-C106, perform the
uninstall procedure before installing the new driver. For more information,
refer to your Windows documentation.
1. Insert the User Software CD in your CD-ROM drive.
2. Select Start, Settings, and Printers.
3. Double-click Add Printer to display the Add Printer wizard.
Select Next.
4. To install a printer locally, select My Computer and select Next.
My Computer is available if you logged in to a workstation on
which you have Administrator privileges. If it is not available, add
a network printer and follow the procedure for adding a port.
Refer to Installing the User Software for TCP/IP and LPR Printing
for Windows NT 4.0.
10–3
Page 87
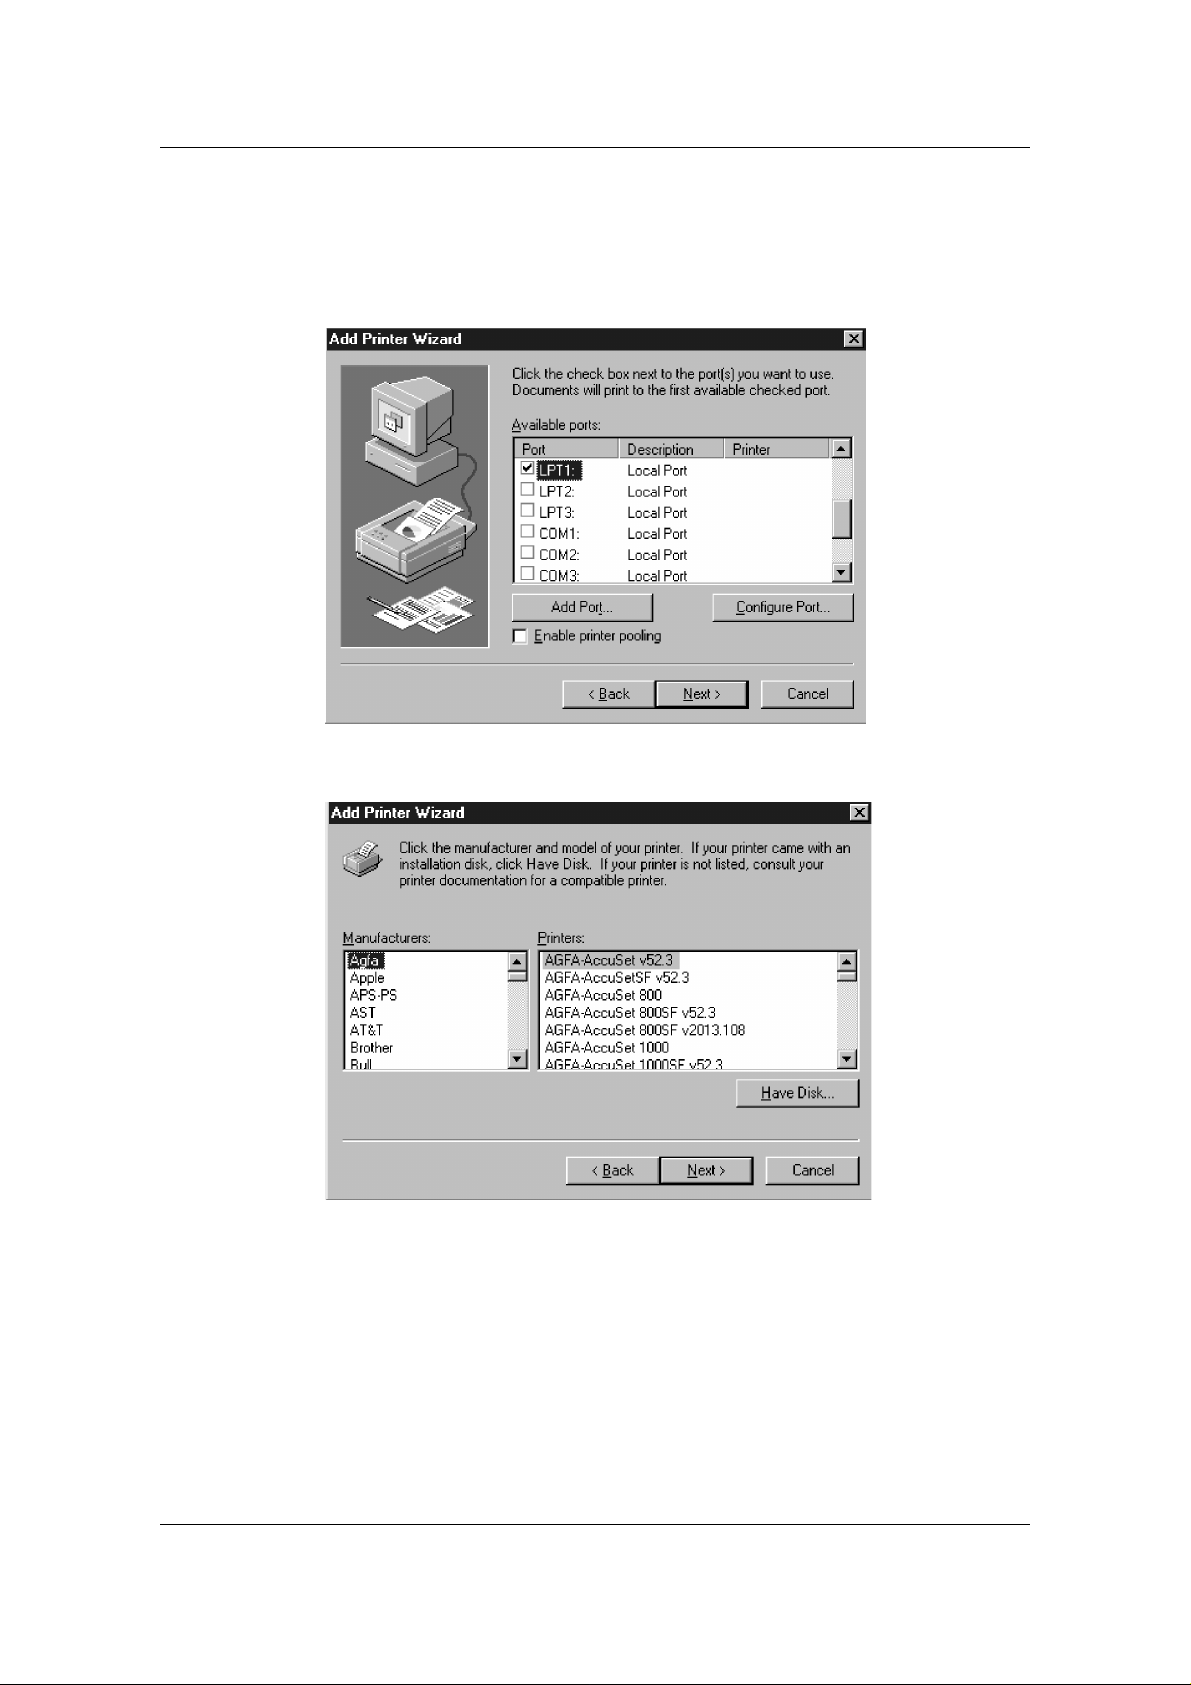
Installing User Software in a Windows NT 4.0 Environment
5. Select LPT1 and Next.
This is a general installation that works for the parallel port
connection. You can add a network port later, according to your
network type.
6. In the dialog box displaying lists of manufacturers and printers,
select Have Disk.
10–4
Page 88
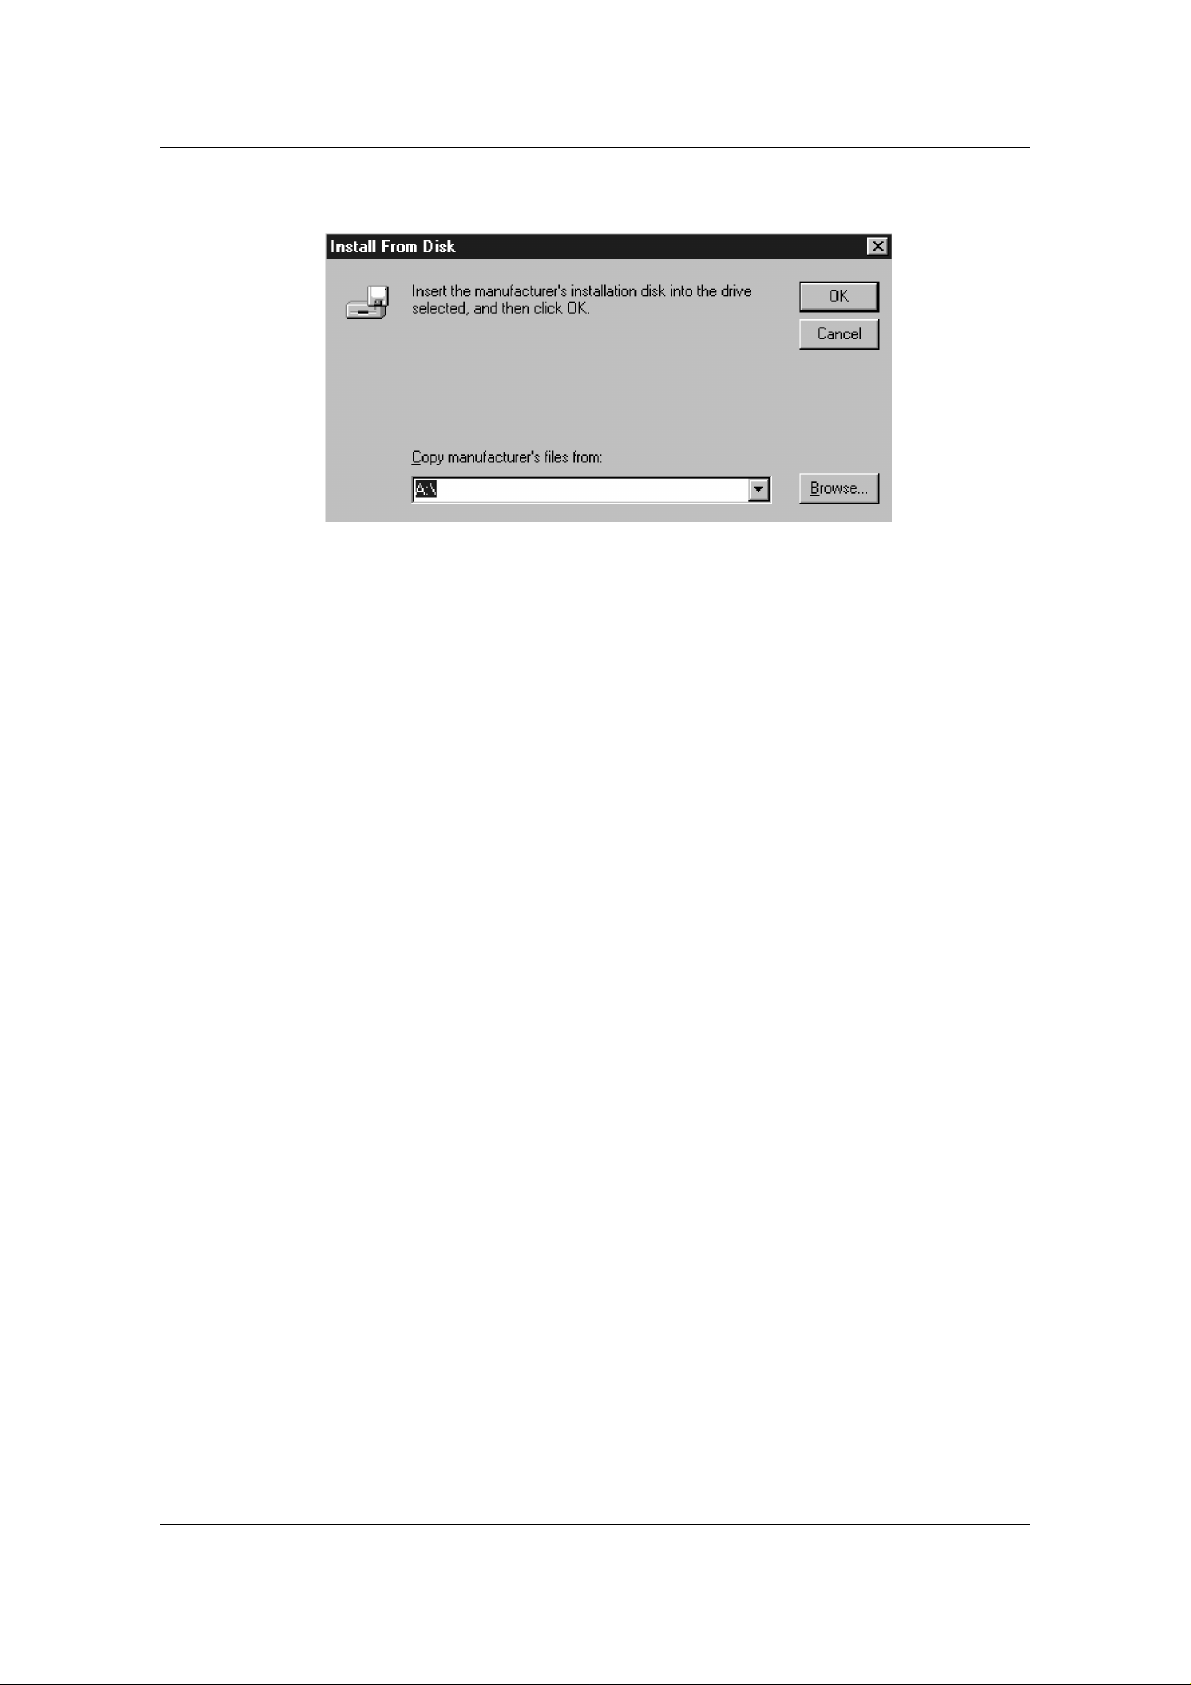
Installing User Software in a Windows NT 4.0 Environment
The Install from Disk dialog box prompts you for the disk.
7. Perform one of the following:
• If you are installing from the CD, select the CD-ROM drive
(for example, D:\) from the drop-down box and select the
Browse button.
• If you are installing from files you downloaded using the
Installer WebTool, type the name of your hard disk drive (for
example, C:\) and select Browse.
8. Perform one of the following:
• If you are installing from the CD, browse to one of the
following folders:
• For PostScript printing: Driver_PS3\English\Win_NT4x
folder
• For PCL printing: Driver_PCL5Ce\English\Win_NT4x
folder
• If you are installing from files you downloaded using the
Installer WebTool, browse to the Prntdrvr folder.
Select OK and ensure that oemsetup.inf or oemsetup is
selected.
The path is copied to the Install from Disk dialog box.
10–5
Page 89
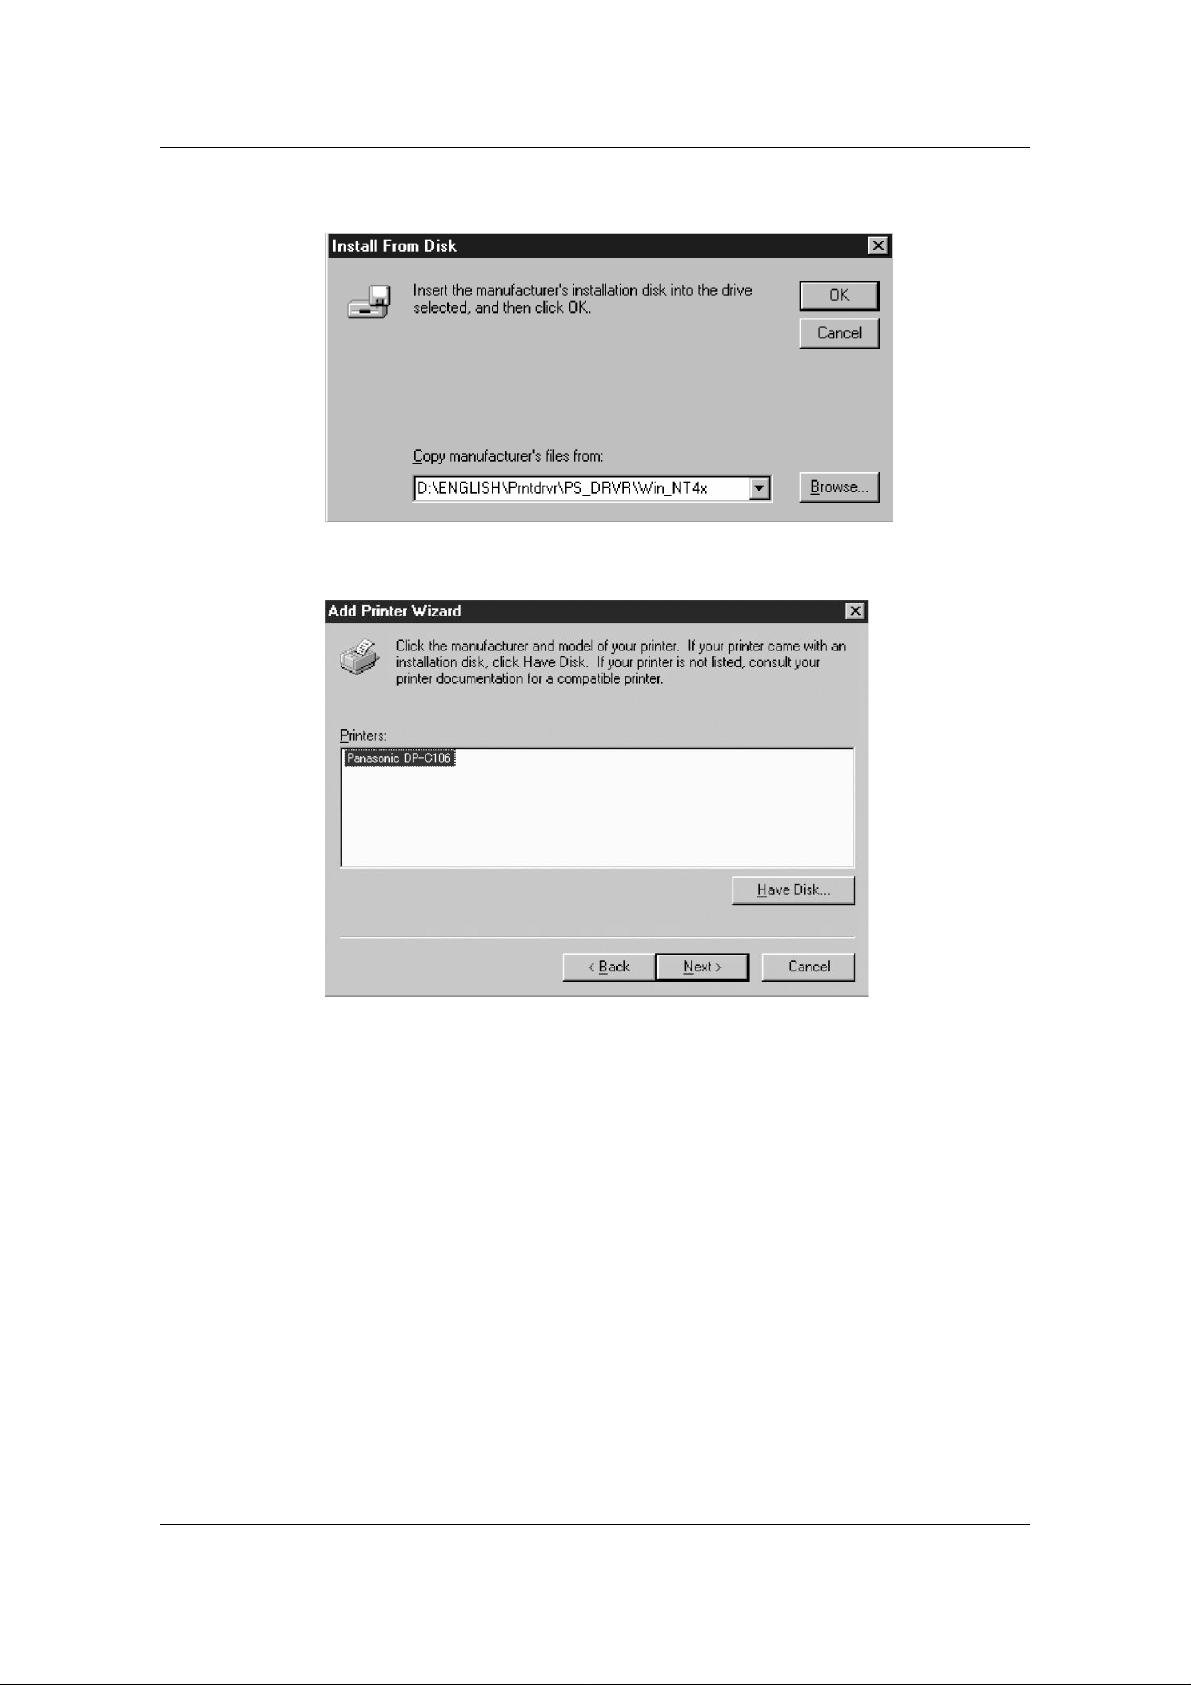
Installing User Software in a Windows NT 4.0 Environment
9. Verify the path is correct and select OK.
10. In the Printers box, select the Panasonic DP-C106 printer. Select
Next.
10–6
Page 90
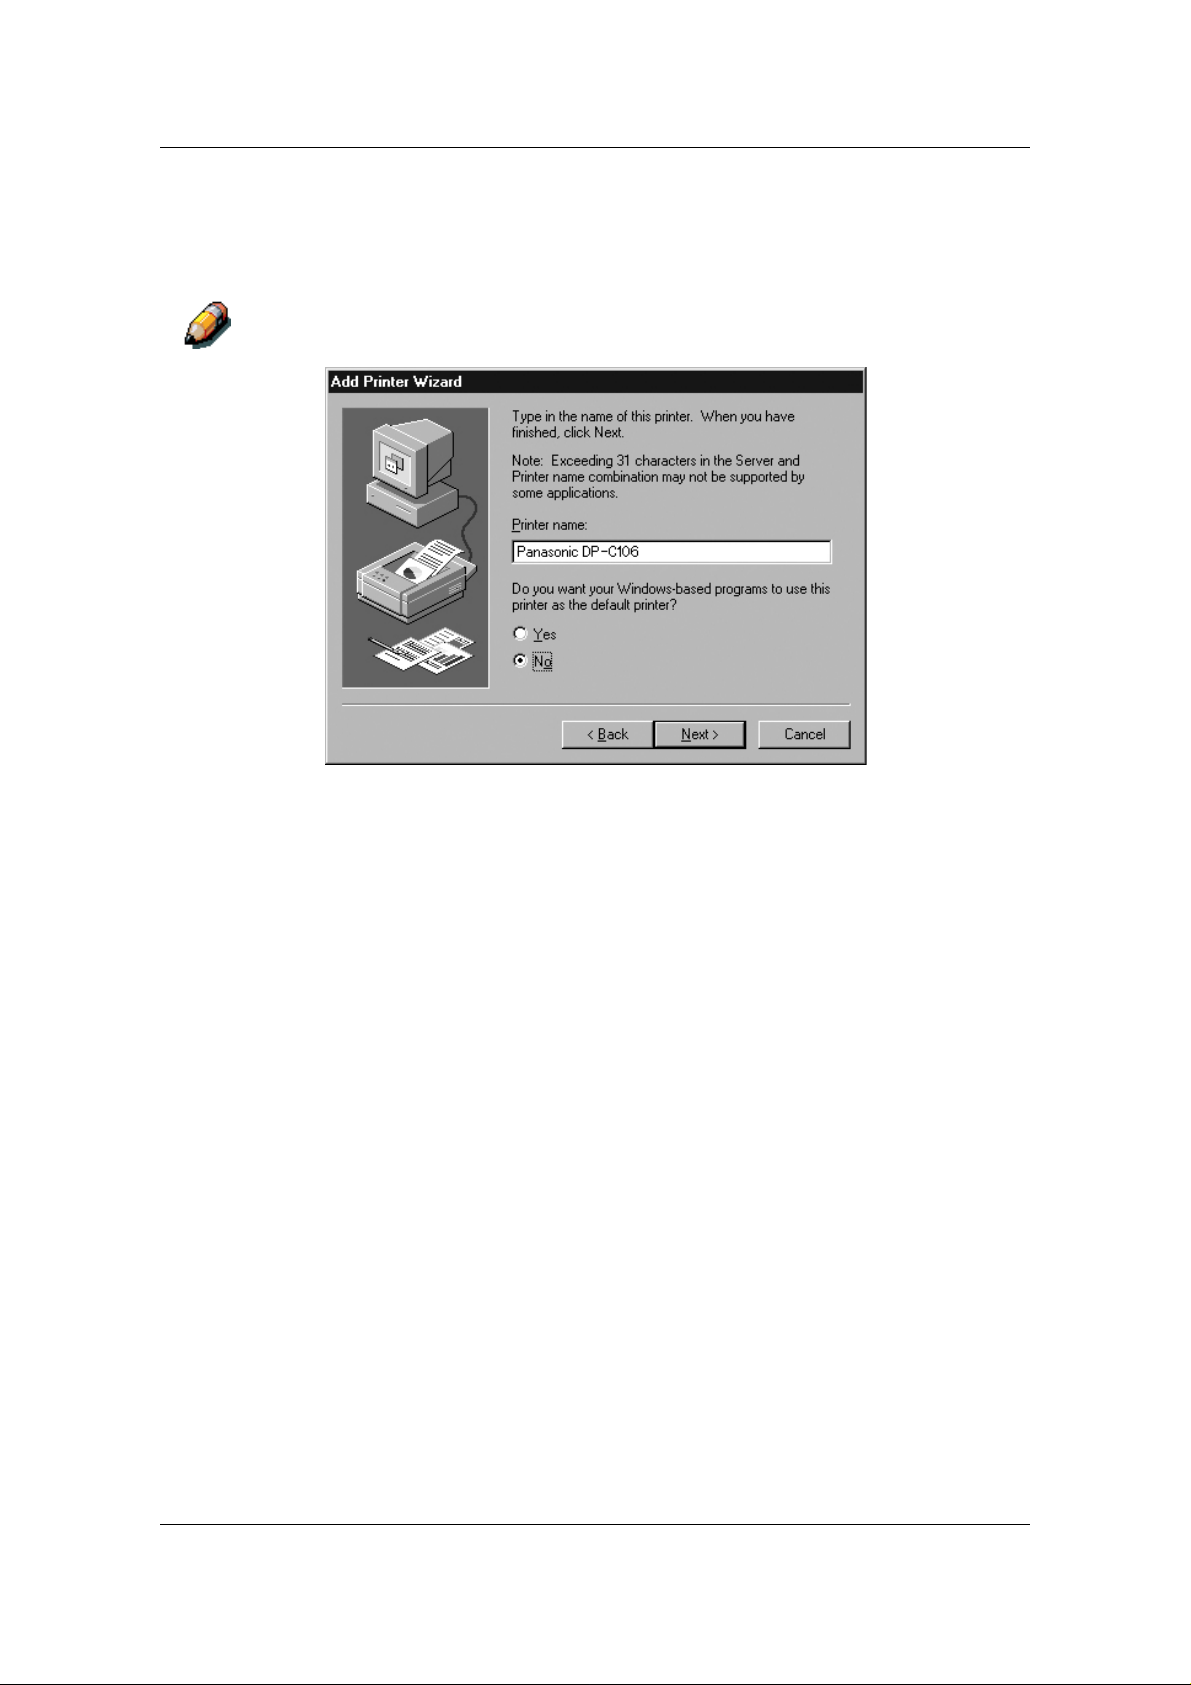
Installing User Software in a Windows NT 4.0 Environment
11. Using a maximum of 31 characters, enter a name for the printer
or leave the default name in the Printer Name box.
This name will be used in the Printers and queue windows.
Entering more than 31 characters may cause printing problems with some
network applications.
12. If you want the DP-C106 to be the default printer, select Yes; if
not, select No. Select Next.
10–7
Page 91
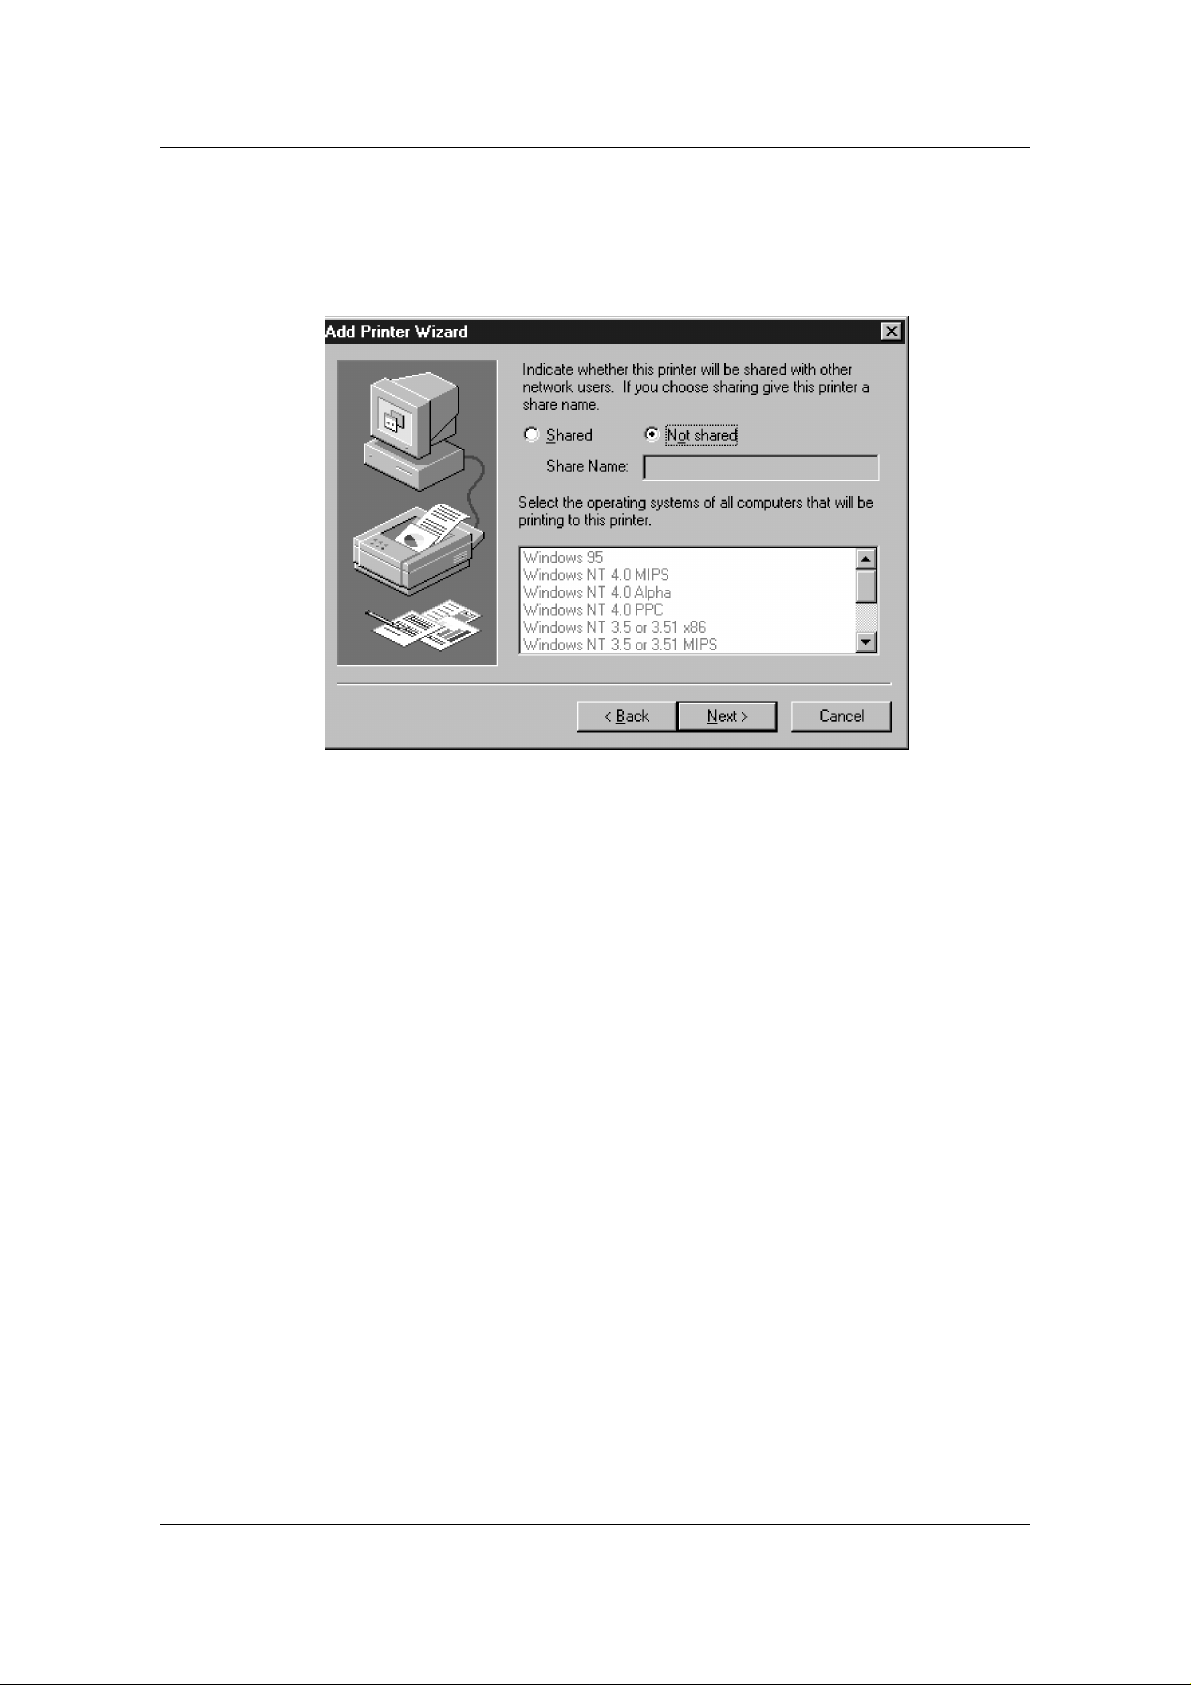
Installing User Software in a Windows NT 4.0 Environment
13. Indicate whether you want the printer installed as a shared printer.
If you select Shared, enter a Share Name for the printer (or leave
the printer default name) and make selections from the list of
operating systems used by client workstations. Select Next.
14. Select Yes in the next dialog box to postpone printing a test page
and select Finish.
When installation is complete, the Printers window is displayed
with an icon for the newly installed printer. When you select print,
your files are transmitted over the parallel port connection to the
printer.
10–8
Page 92
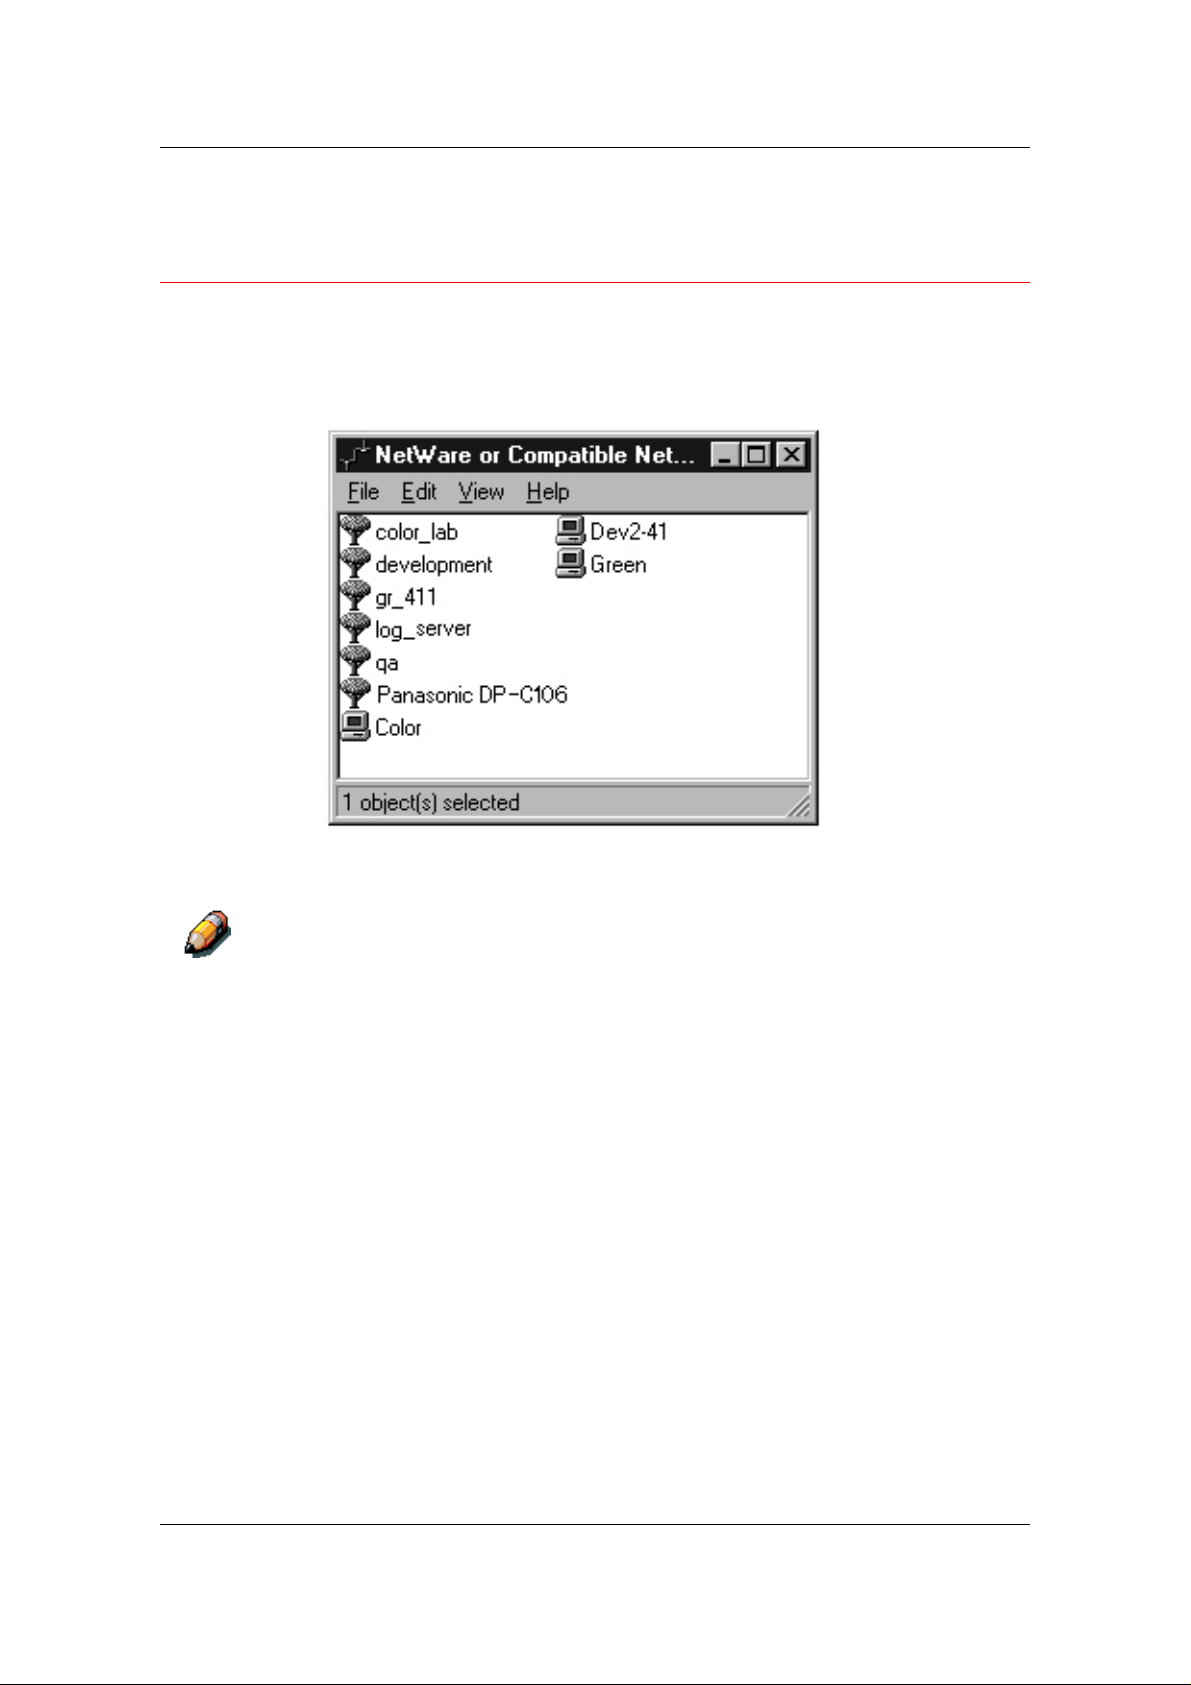
Installing User Software in a Windows NT 4.0 Environment
Installing the User Software for IPX Printing (Windows NT 4.0)
1. Open the Windows NT Network Neighborhood.
2. Browse for your NetWare compatible network.
A list of NetWare servers is displayed.
3. Double-click the File Server or NetWare Tree that provides a
print connection for the DP-C106.
Check with your system administrator to ensure the printer is set up to
accept this type of printing.
You may have to log in to the file server to view the print
connections.
4. Double-click the print connection defined for the DP-C106.
10–9
Page 93
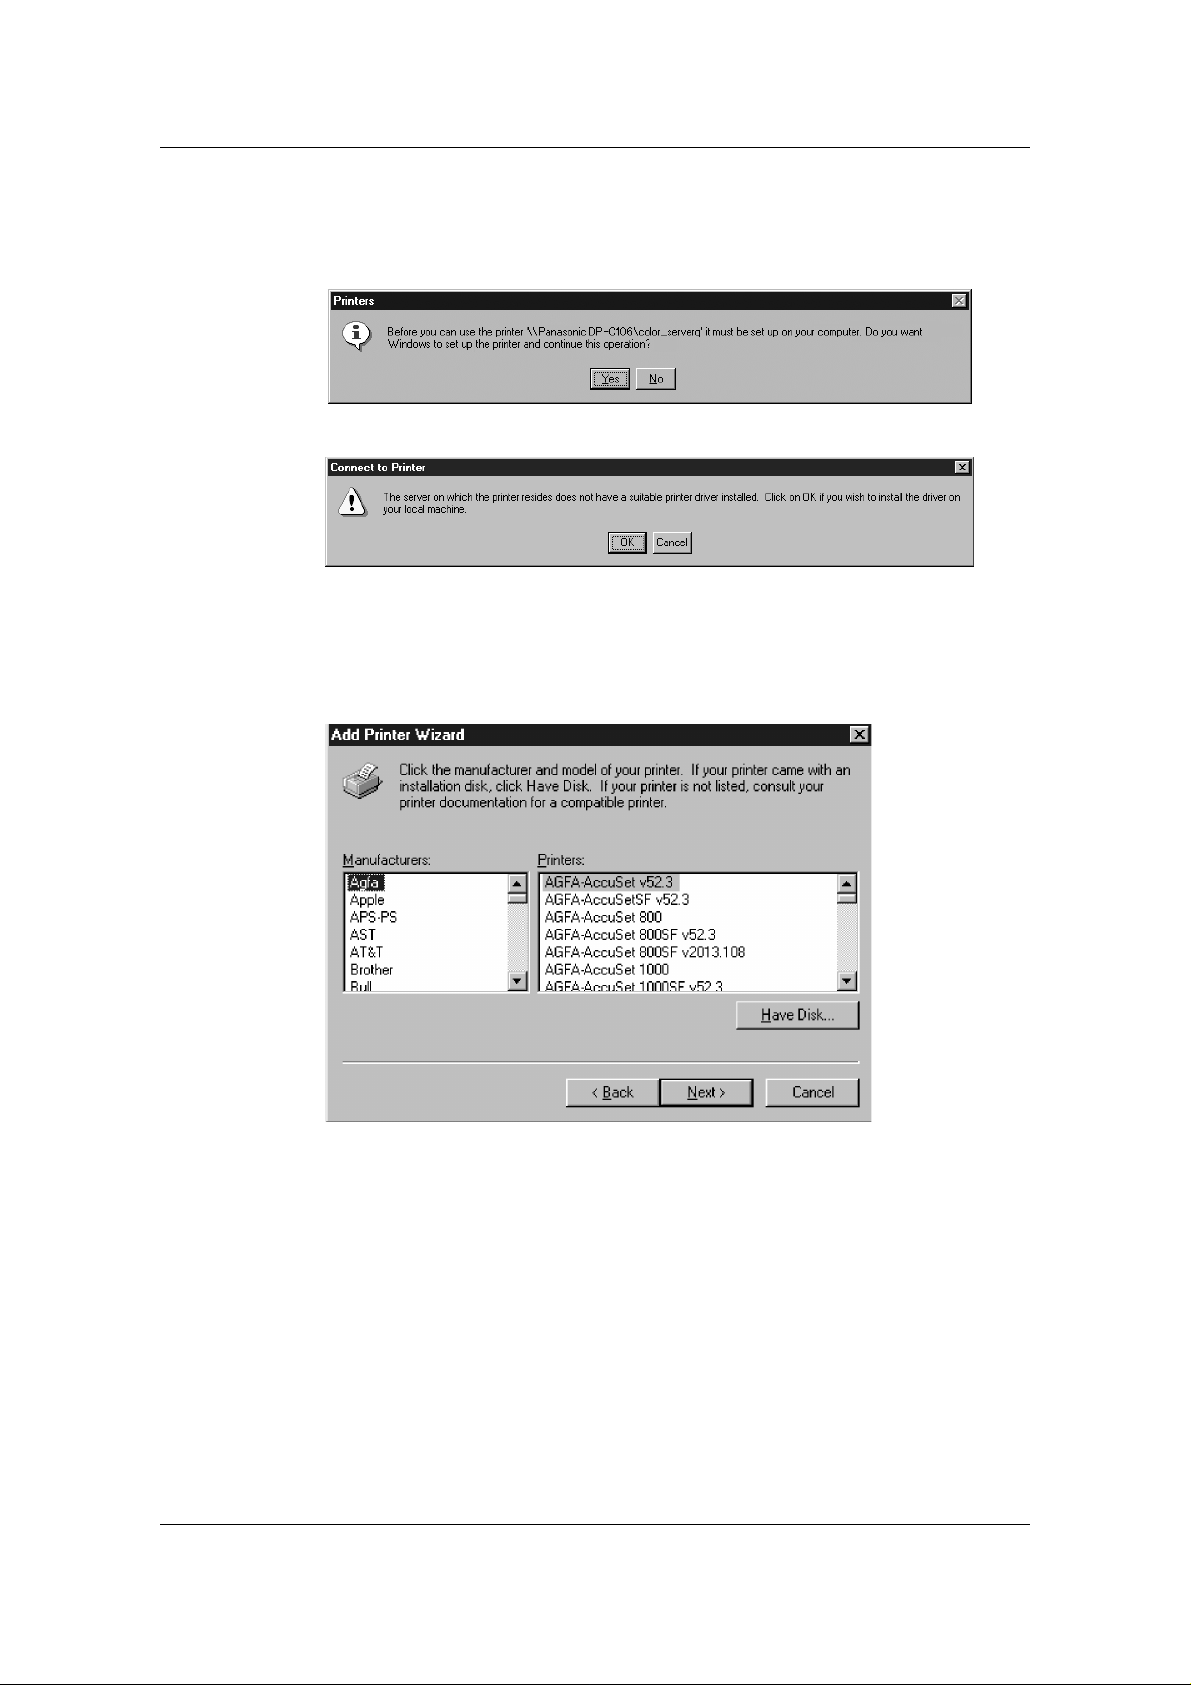
Installing User Software in a Windows NT 4.0 Environment
5. If the NetWare server does not have a suitable driver for the
DP-C106, you may be asked if you want to set up the printer on
your workstation.
Select Yes.
Select OK.
The Add Printer Wizard displays.
6. In the dialog box displaying lists of manufacturers and printers,
select Have Disk.
10–10
Page 94
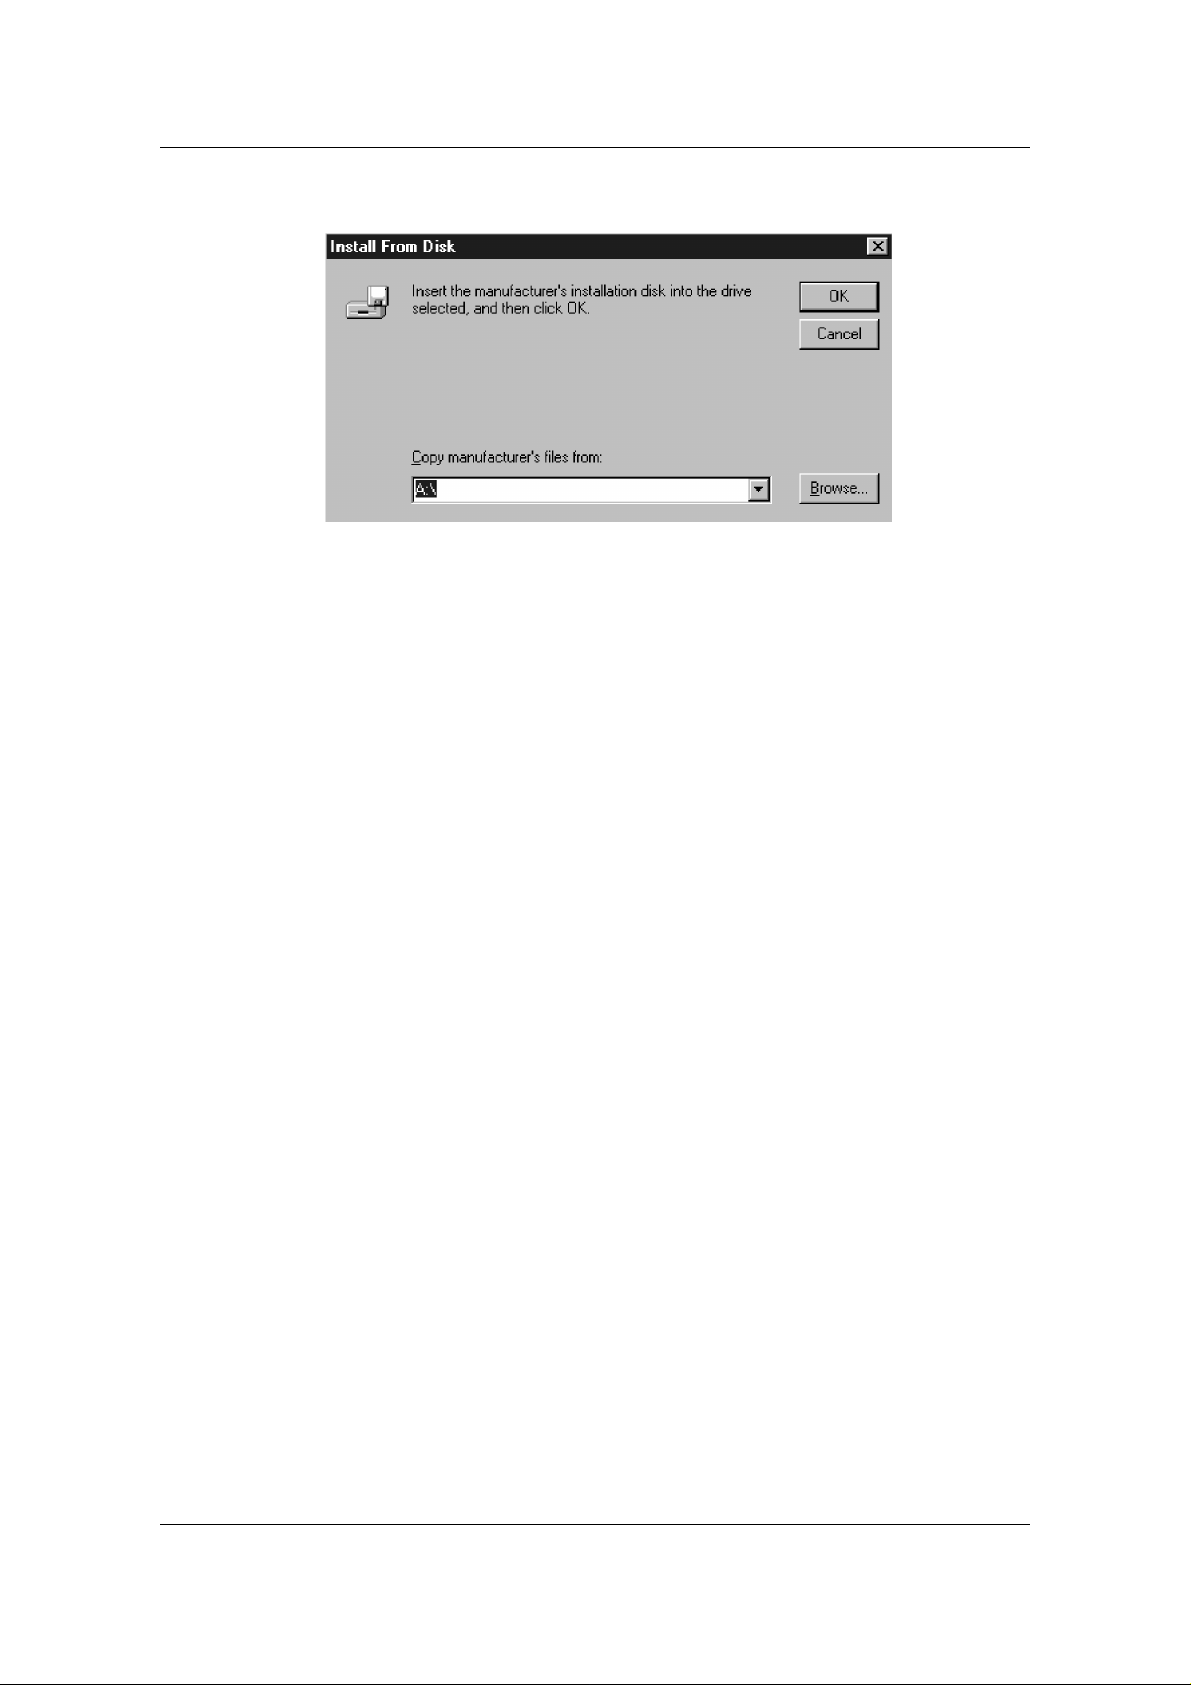
Installing User Software in a Windows NT 4.0 Environment
The Install from Disk dialog box prompts you for the disk.
7. Perform one of the following:
• If you are installing from the CD, select the CD-ROM drive
(for example, D:\) from the drop-down box and select the
Browse button.
• If you are installing from files you downloaded using the
Installer WebTool, type the name of your hard disk drive (for
example, C:\) and select Browse.
8. Perform one of the following:
• If you are installing from the CD, browse to one of the
following folders:
• For PostScript printing: Driver_PS3\English\Win_NT4x
folder
• For PCL printing: Driver_PCL5e\English\Win_NT4x
folder
• If you are installing from files you downloaded using the
Installer WebTool, browse to the Prntdrvr folder.
Select OK and ensure that Oemsetup.inf or Oemsetup is
selected.
The path is copied to the Install from Disk dialog box.
10–11
Page 95
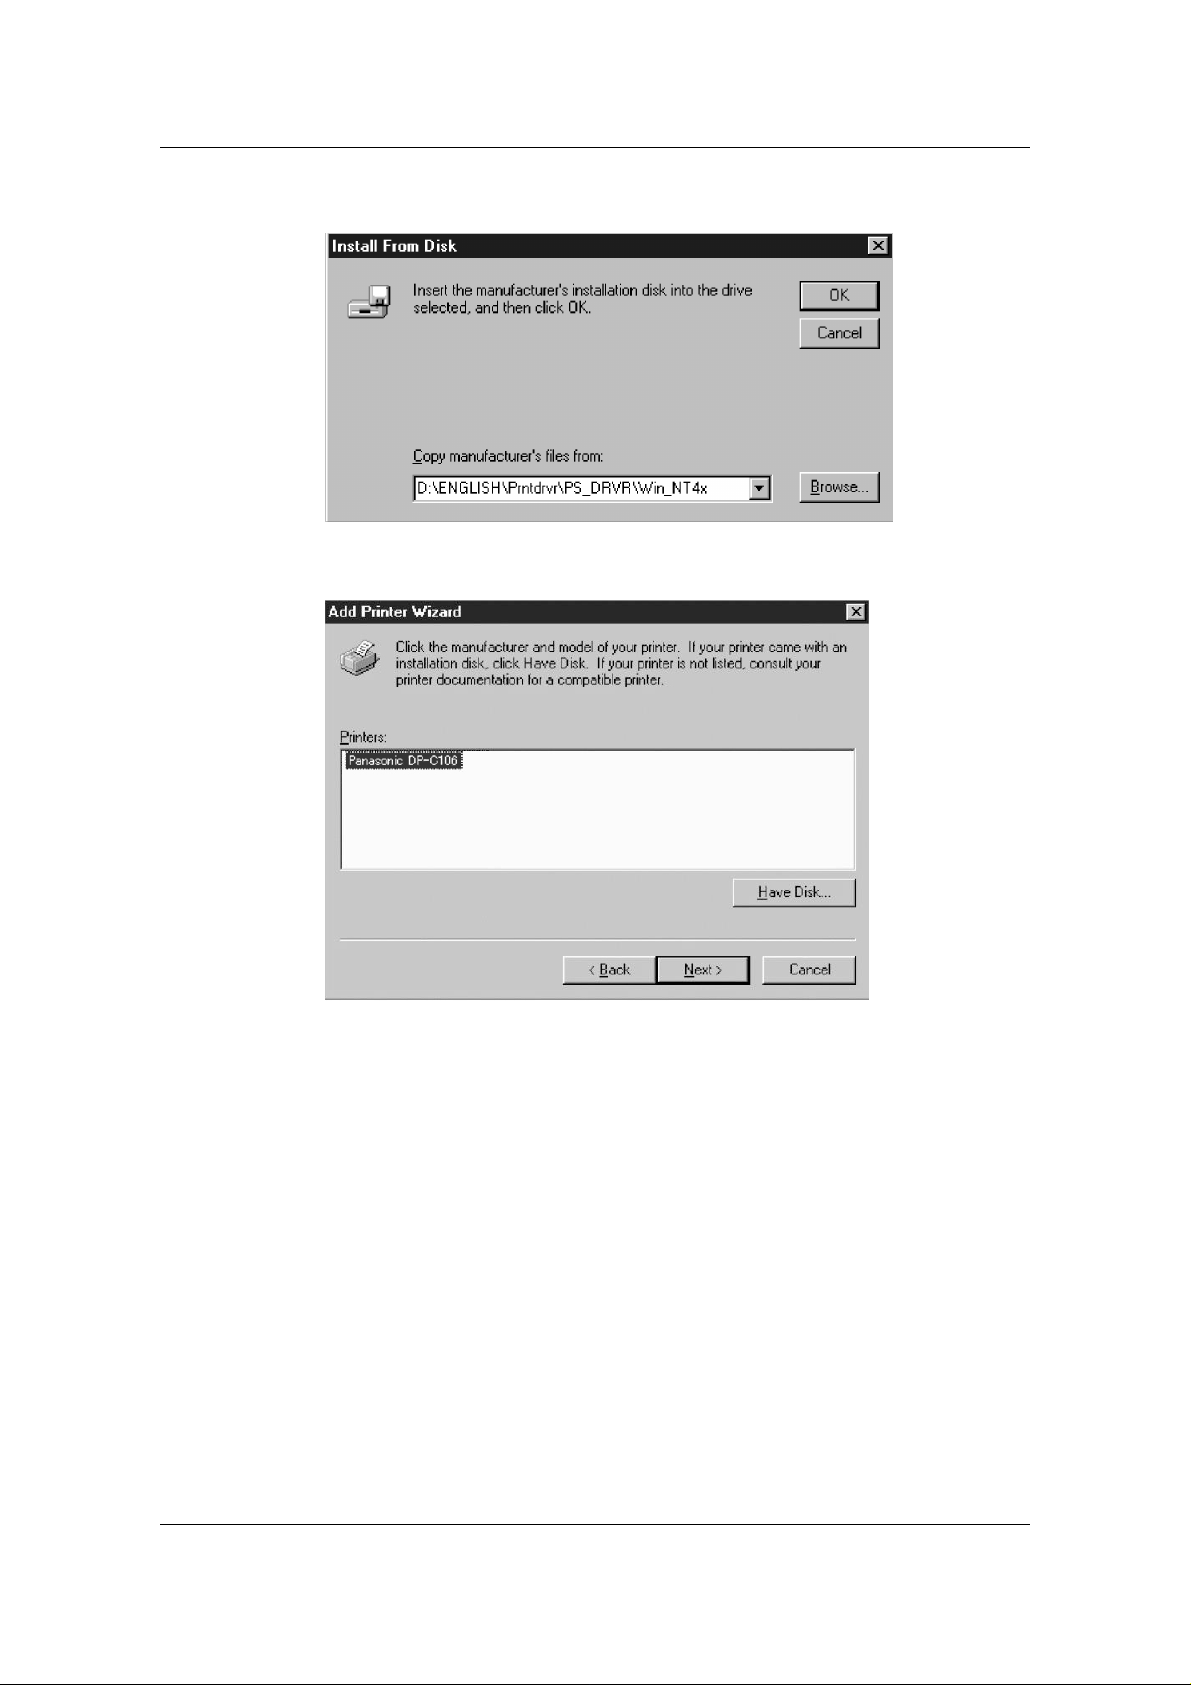
Installing User Software in a Windows NT 4.0 Environment
9. Verify the path is correct and select OK.
10. In the Printers box, select the Panasonic DP-C106 printer. Select
Next.
10–12
Page 96
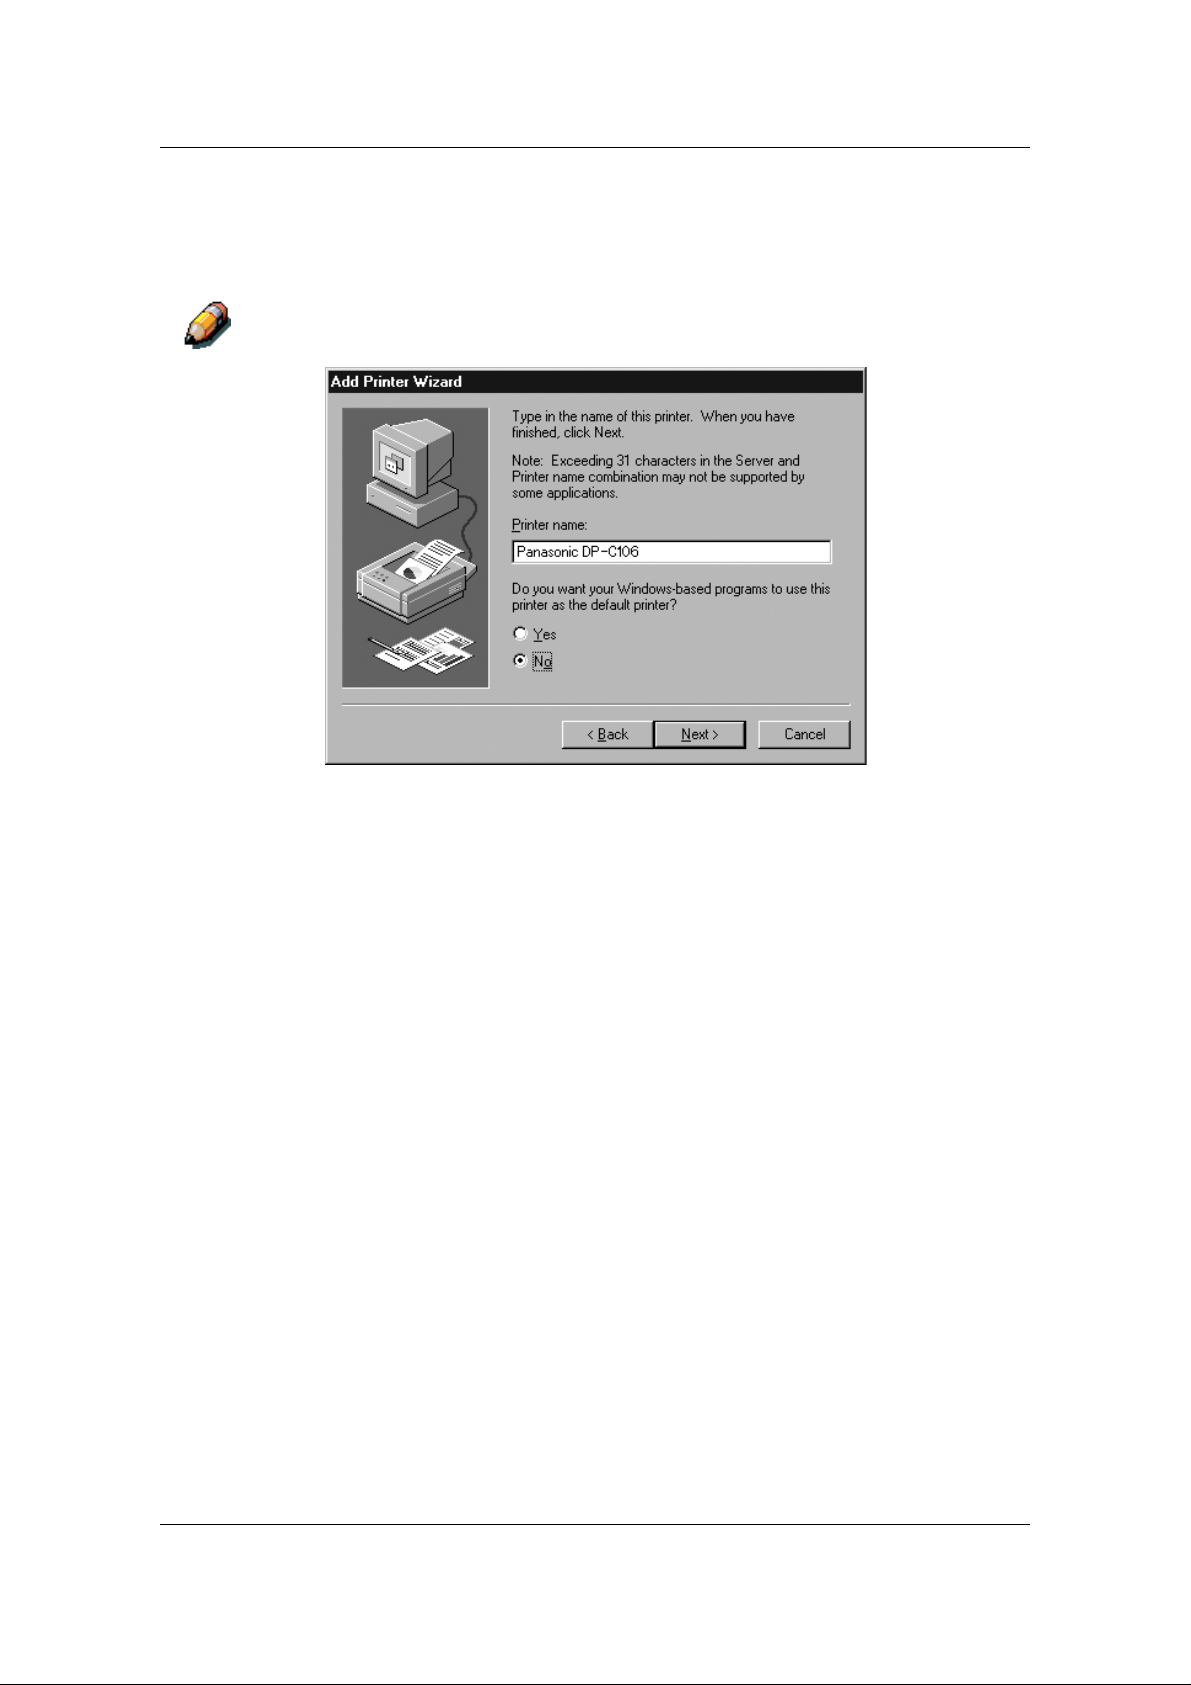
Installing User Software in a Windows NT 4.0 Environment
11. Using a maximum of 31 characters, enter a name for the printer
or leave the default name in the Printer Name box.
This name will be used in the Printers and queue windows.
Entering more than 31 characters may cause printing problems with some
network applications.
12. If you want the DP-C106 to be the default printer, select Yes; if
not, select No. Select Next.
10–13
Page 97
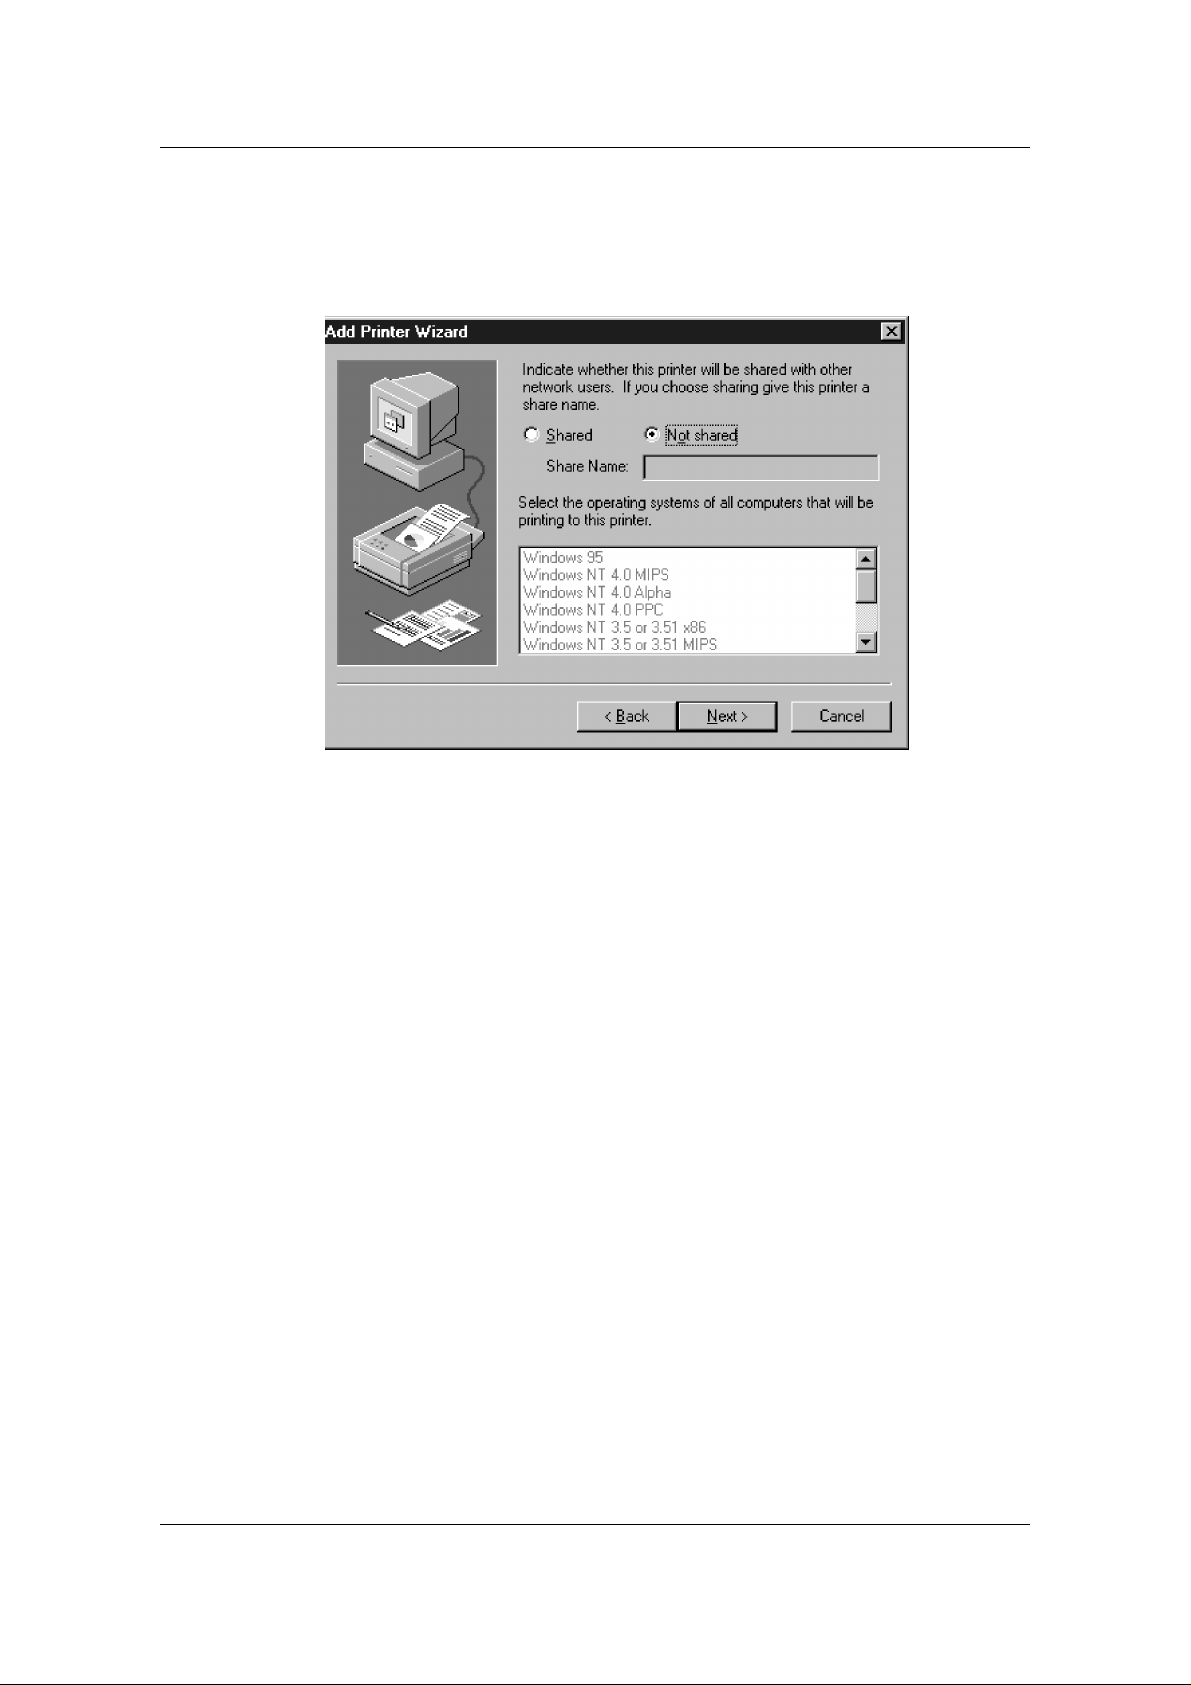
Installing User Software in a Windows NT 4.0 Environment
13. Indicate whether you want the printer installed as a shared printer.
If you select Shared, enter a Share Name for the printer (or leave
the printer default name) and make selections from the list of
operating systems used by client workstations. Select Next.
14. Select Yes in the next dialog box to postpone printing a test page
and select Finish.
When installation is complete, the Printers window is displayed
with an icon for the newly installed printer. When you select print,
your files are transmitted over the IPX connection to the printer.
10–14
Page 98
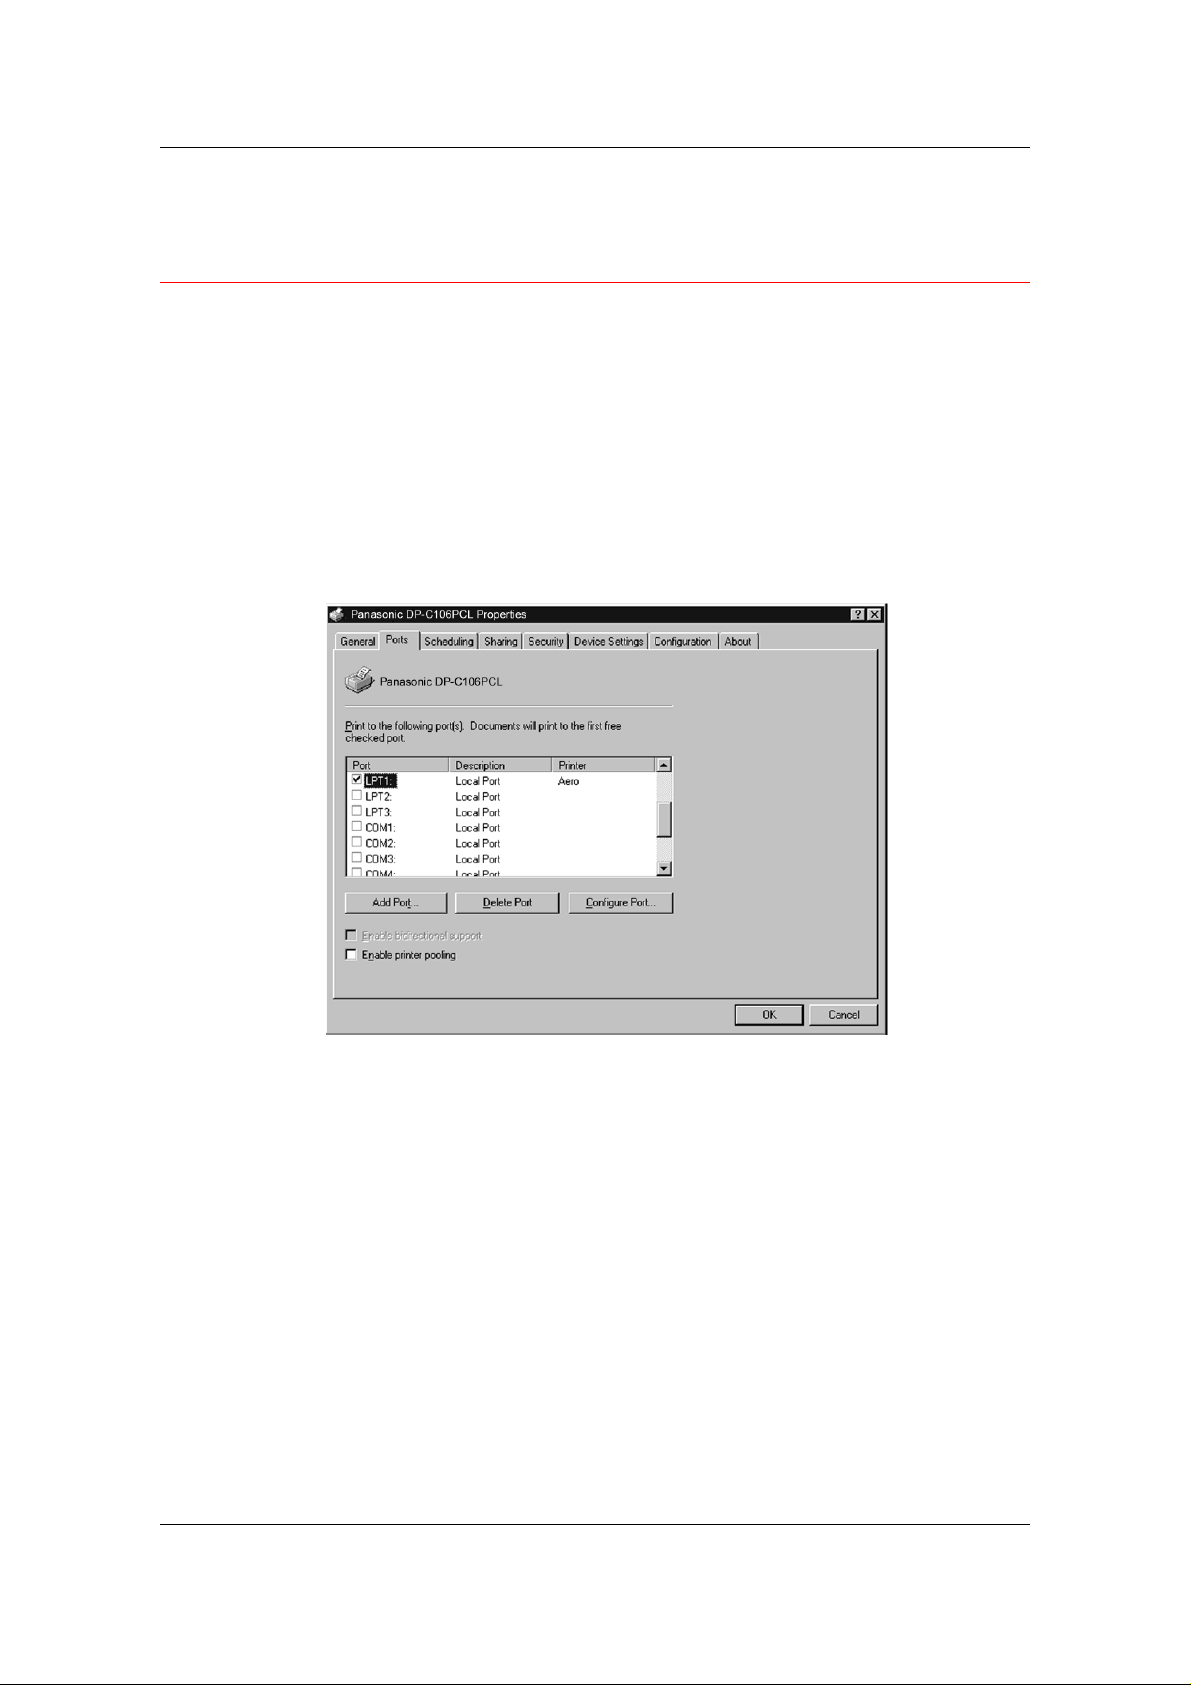
Installing User Software in a Windows NT 4.0 Environment
Installing the User Software for TCP/IP and LPR Printing for Windows NT 4.0
Before you continue, print a configuration sheet at the printer to obtain
the IP address assigned to the DP-C106, as well as the subnet mask
and gateway address, if they are used.
1. Perform steps 1-14 of the procedure Installing the User Software
for Parallel Port Printing to Install the Printer Driver.
When installation is complete, the Printers window is displayed
with an icon for the newly installed printer.
2. Right-click the DP-C106 icon and select Properties to open the
ppd window. Select the Ports tab to display the Ports properties.
10–15
Page 99
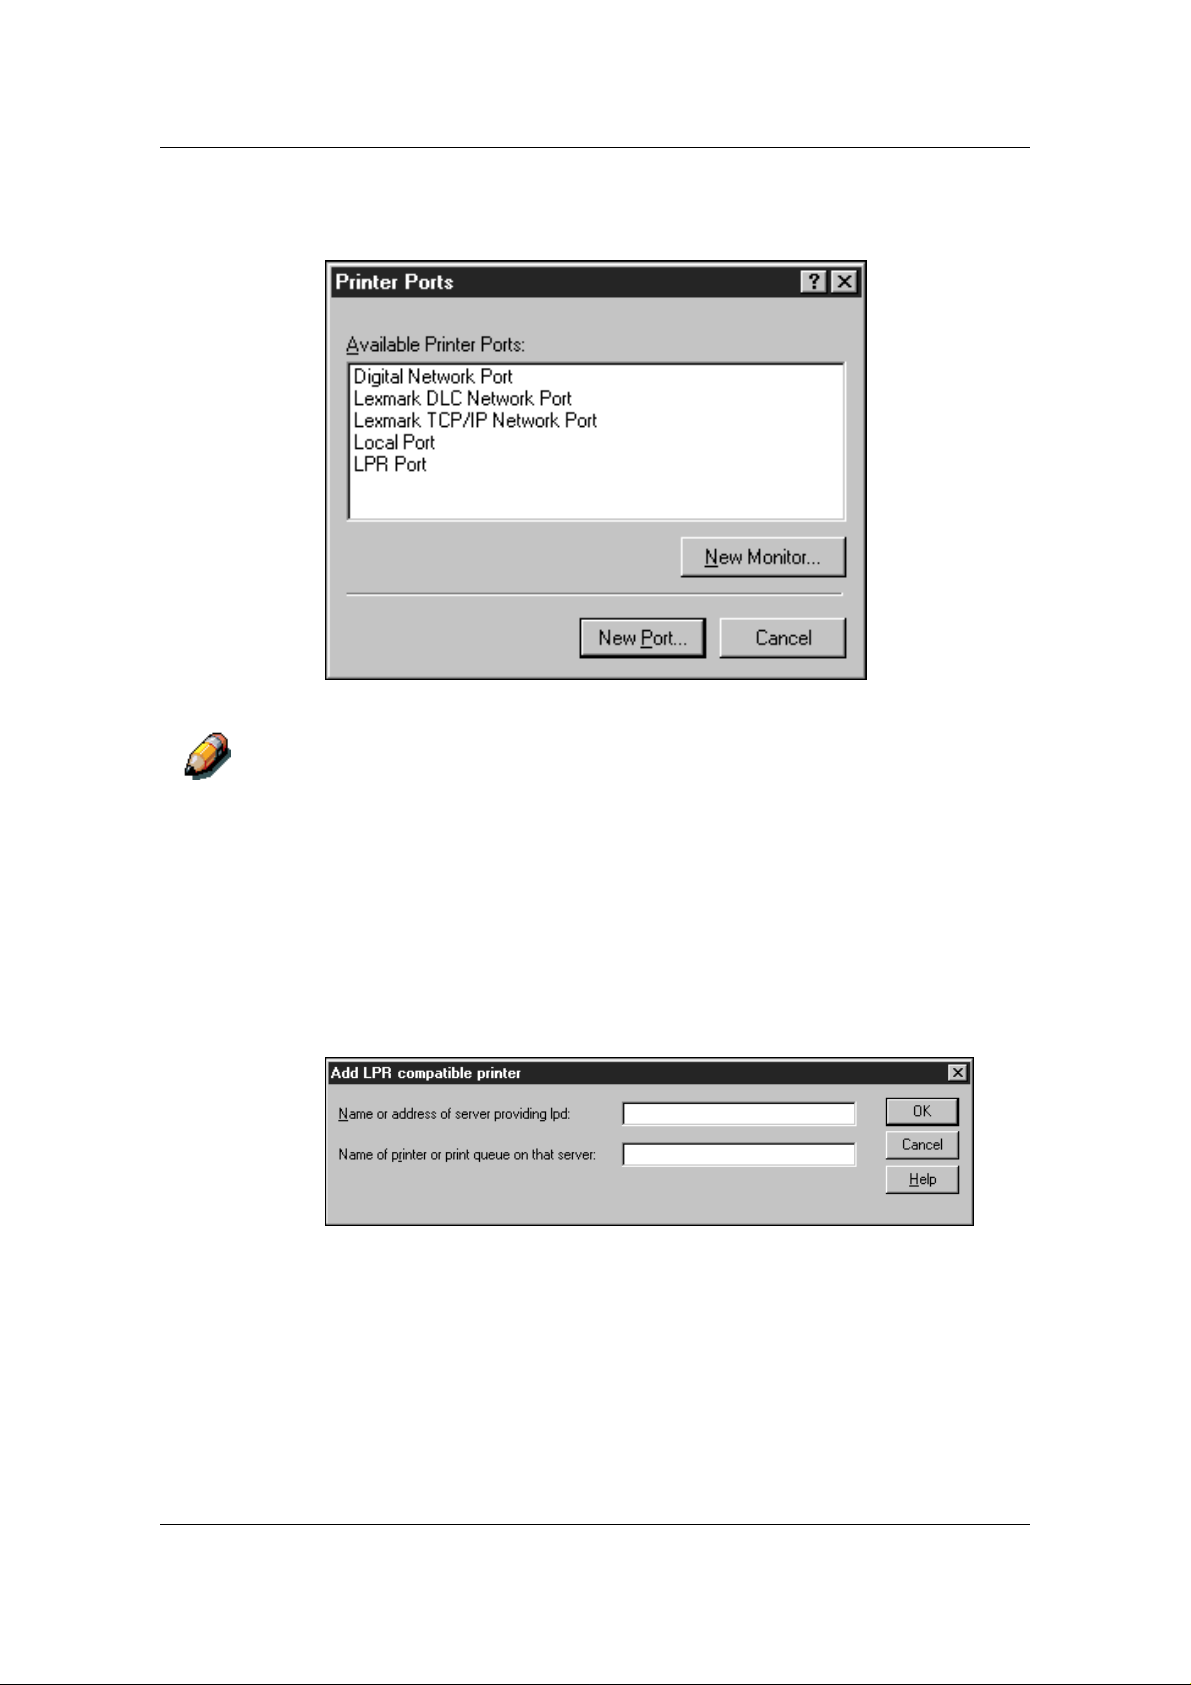
Installing User Software in a Windows NT 4.0 Environment
3. Ensure that you are connected to LPT1 and select the Add Port
option to display a list of available ports.
4. Select the LPR Port option and select the New Port button.
If the LPR port is not listed, install the TCP/IP network protocol and Microsoft
TCP/IP Printing software. (Access the software through My Computer/
Control Panels/Network/Services. Select the Microsoft TCP/IP Printing
icon.). Refer to your Windows NT documentation for details.
5. Perform one of the following:
• If your network uses IP addresses, enter the Ethernet IP
Address of the DP-C106 in the Add LPR compatible printer
dialog box.
• If your network uses Domain Name Services (DNS), enter
the DNS name assigned to the printer.
10–16
Page 100

Installing User Software in a Windows NT 4.0 Environment
6. Press Tab and type one of the names listed below in lowercase
letters. These names must be typed exactly as shown.
• print (generally used)
• hold
• direct
7. Select OK. The workstation checks the address or DNS name
that you entered and notifies you if it cannot resolve the address.
8. Select Close in the Printer Ports dialog box. The Ports property
tab shows the new port configuration.
9. To confirm the connection, print a Windows NT 4.0 test page.
Select the General tab and select the Print Test Page option.
When you print, your PostS cript or PCL files are transmitted ove r
the LPR Port connection to the printer. With setup complete, you
are ready to print your jobs on the DP-C106.
10. Select OK to close the Printer Properties dialog box.
10–17
 Loading...