


1
Reference Manual
Personal Computer
Model No. CF-F8 Series
CF-W8 Series
CF-T8 Series
We recommend that this Reference Manual be printed.

|
Read Me First |
2 |
|
|
|
|
||||||||||||||||||
|
|
|
|
|
|
|
|
|
|
|
|
|
|
|
|
|
|
|
|
|
|
|
|
|
|
|
|
|
|
|
|
|
|
|
|
|
|
|
|
|
|
|
|
|
|
|
|
|
|
|
Illustrations and Terminology in this Reference Manual |
|||||||||||||||||||||||
|
|
|
|
|
|
|
|
|
|
|
|
|
|
|
|
|
|
|
|
|
|
|
||
|
|
NOTE |
NOTE provides a useful fact or helpful information. |
|
|
|||||||||||||||||||
|
|
CAUTION |
CAUTION indicates a condition that may result in minor or moderate injury. |
|
|
|||||||||||||||||||
|
|
Enter |
|
|
This illustration means to press the |
Enter |
key. |
|
||||||||||||||||
|
|
Fn |
+ |
F5 |
|
This illustration means to press and hold the |
Fn |
key, then press the |
F5 |
key. |
|
|||||||||||||
|
|
|
|
|
|
|
When using with the |
Fn |
key and the |
Ctrl |
key functions interchanged, read with the |
Fn |
|
|
||||||||||
|
|
|
|
|
|
|
key and the |
Ctrl |
key reversed. |
|
|
|
|
|
|
|
|
|
|
|
|
|
||
|
|
|
(Start) - [All Programs] |
This illustration means to click |
(Start), then to click [All Programs]. |
|
|
|||||||||||||||||
|
|
|
|
|
||||||||||||||||||||
|
|
Î or |
These symbols indicate related pages. |
|
|
|||||||||||||||||||
|
|
|
|
|
|
|
Î : If this is clicked, it will jump to the page corresponding Reference Manual. |
|
||||||||||||||||
|
|
|
|
|
|
|
: Refer to the Operating Instructions. |
|
||||||||||||||||
|
|
xxxx*1 |
If *1 is clicked, it will jump to a related topic. |
|
|
|||||||||||||||||||
z“Windows Vista® Business with Service Pack1” is indicated as “Windows” or “Windows Vista”.
z<Only for CF-F8/CF-W8 Series>
The following software package is described as follow:
• “WinDVD™ 8 (OEM Version)” as “WinDVD”
User Account Control
User Account Control is a new security component of Windows Vista to stop unauthorized changes to your computer. The User Account Control message will pop up every time you try making an important change to your computer.
Windows Sidebar
The Windows Sidebar does not appear in the default setting. To display it, click  (Start) - [All Programs] - [Accessories] - [Windows Sidebar].
z To always display the sidebar:
ARight-click the sidebar icon  on the notification area, and click [Properties].
BAdd a check mark for [Start Sidebar when Windows starts] and click [OK].

Read Me First |
3 |
|
|
Sound and Video
zSound (e.g. MP3, WMA) and video (e.g. MPG, WMV) recorded in PC Cards and SD Memory Cards may be interrupted during playback. If this happens, copy them to the hard disk drive and play back.
zSound and video in AVI files may be interrupted or produce a time-lag during playback. If this happens, click or on the notification area, and click [High performance]. This may remedy the problem.
zDepending on the processing status on Windows, sound may be interrupted at Windows startup. You can mute the sound at startup.
ARight-click the desktop and click [Personalize] - [Sounds].
BRemove the check mark from [Play Windows Startup sound], and click [OK].
Entering hibernation suddenly
The thermal control may set the computer to hibernation if you use the computer in a high ambient temperature and use an application that uses a lot of CPU power.
Wait a few minutes (at least 5) before turning the computer on again if this occurs.

Using the Touch Pad
Use the Touch Pad to move the cursor on the screen and perform computer operations.
A.Work Surface (Touch Pad)
B.Left Button
C.Right Button
Function |
Operation |
Moving the Cursor |
<CF-F8 Series> |
<CF-W8/CF-T8 Series>
Move the tip of your finger lightly over the work surface.
Tapping/Clicking |
<CF-F8 Series> |
<CF-W8/CF-T8 Series>
tapping or clicking
To right-click: Can only be performed by clicking the right button.
4
CF-F8 Series
A
B C
CF-W8/CF-T8 Series

Using the Touch Pad |
5 |
|
Function |
|
Operation |
Double-Tapping/ |
<CF-F8 Series> |
|
Double-Clicking |
|
|
<CF-W8/CF-T8 Series>
double-tapping |
or |
double-clicking |
Dragging |
<CF-F8 Series> |
<CF-W8/CF-T8 Series>
|
Two quick taps, but on the second tap leaving your finger |
|
down (applying pressure) and moving it on the work surface. |
|
or |
|
While holding down the button, moving your finger on the work |
|
surface. |
Scroll |
Trace a circle around the Touch Pad. (Î page 6) |
NOTE
zYou can change the speed of the double-click or the operations of mouse buttons by clicking  (Start) - [Control Panel] - [Mouse].

Using the Touch Pad |
6 |
|
|
Scroll
There are two ways of scrolling with the Touch Pad: the Touch Pad utility, and the Virtual Scrolling Function. You cannot use both functions at the same time.
The Touch Pad utility is enabled in the default setting.
zThe Touch Pad utility (below)
You can scroll continuously by tracing a circle on the Touch Pad.
Vertical scroll |
It can be used in the default setting. |
|
|
Horizontal scroll |
A setting is required to use the horizontal scroll. |
|
|
zThe Virtual Scrolling function (Î page 11)
You can scroll vertically (or horizontally) by tracing repeatedly in the desired direction.
Vertical scroll |
The Virtual Scrolling function must be set to enable. |
|
|
Horizontal scroll |
|
|
|
You can use separate settings for each account regarding whether to use the Touch Pad utility or the Virtual Scrolling function.
Using the Touch Pad Utility
You can scroll easily by tracing a circle on the Touch Pad.
NOTE
z External mouse drivers cannot be used at the same time as the Touch Pad utility. (Î page 80)
1 Make the following settings to use the horizontal scroll.
Once the settings have been made, it is not necessary to make the same settings the next time.

Using the Touch Pad |
7 |
|
|
AClick  on the notification area, and click [Settings]. When
  is not displayed:
Click  (Start) - [All Programs] - [Panasonic] - [Touch Pad Utility settings].
If a message appears indicating that the Touch Pad utility is not running, click  (Start) - [All Programs] - [Panasonic] - [Touch Pad Utility], and display
  .
.
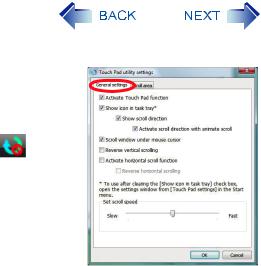
BAdd a check mark for [Activate horizontal scroll function] in the [General settings] screen, and click [OK].
2 Display the scrollable screen.
3 Place the cursor over the area that you want to scroll, and tap (click).
4 Remove your finger from the pad, then place your finger in the appropriate area to begin scrolling.
The finger position on the Touch Pad can be changed using the Touch Pad utility. (Î page 9) This explanation assumes in the default setting.
|
Vertical scroll*1 |
Horizontal scroll |
Position where finger is |
<CF-F8 Series> |
<CF-F8 Series> |
placed |
|
|
<CF-W8/CF-T8 Series> |
<CF-W8/CF-T8 Series> |
||||||
|
|
|
|
|
|
|
|
|
|
|
|
|
|
|
|
|
|
|
|
|
|
|
|
|
|
|
|
|
|
|
|
|
|
|
|
|
|
|
|
Icon on the notification area |
When you place your finger on the Touch Pad, the icon changes. |
||||
|
|
|
|
|
|
|
|
|
|
|
|
*1 If the horizontal scroll function has not been enabled, the segment shown in the figure above (A) is also included in the area to begin vertical scrolling.

Using the Touch Pad |
8 |
|
|
5 Trace a circle around the Touch Pad without lifting your finger from the pad.
The scroll direction can be changed using [Reverse vertical scrolling] or [Reverse horizontal scrolling] in the Touch Pad utility. (Î page 9)
|
Vertical scroll |
Horizontal scroll*2 |
Trace clockwise |
To scroll down |
To scroll right |
|
<CF-F8 Series> |
<CF-F8 Series> |
<CF-W8/CF-T8 Series> |
<CF-W8/CF-T8 Series> |
||||
|
|
|
|
|
|
|
|
|
|
|
|
Trace counter-clockwise |
To scroll up |
To scroll left |
|
<CF-F8 Series> |
<CF-F8 Series> |
<CF-W8/CF-T8 Series> |
<CF-W8/CF-T8 Series> |
||||
|
|
|
|
|
|
|
|
|
|
|
|
*2 When the horizontal scroll function has not been enabled, any scrolling will be vertical scrolling.
zThe screen will not scroll if you trace toward the center of the Touch Pad.
zOn screens that cannot be scrolled (e.g., desktop screen), if you scroll, the computer may try to scroll the screen, causing the cursor to freeze. If this happens, remove your finger from the Touch Pad and begin again, this time starting from the center of the Touch Pad.
zFor example, on a screen that will only scroll horizontally, even if you execute a vertical scroll, the screen will scroll horizontally.

Using the Touch Pad |
9 |
|
|
6 Once scrolling has begun, continue to trace a circle on the Touch Pad without removing your finger from the pad.
zAs long as you are tracing a circle, you can continue scrolling using any position on the Touch Pad.
zTo scroll in the opposite direction, trace a circle in the opposite direction without removing your finger from the Touch Pad.
7 When you finish scrolling, remove your finger from the Touch Pad.
Change the settings for the Touch Pad utility
1 Click  on the notification area, and then click [Settings].
When  is not displayed:Î page 7, step1-A
Using the Touch Pad |
10 |
|
|
2 |
Change the settings. |
|
|
|
z General settings |
|
|
|
Activate Touch Pad |
If you add a check mark, you can use the Touch Pad |
|
|
function (On/Off) |
function (screen scroll). If you remove the check mark, |
|
|
|
the Touch Pad function will be disabled, and |
will be |
|
|
displayed on the notification area. |
|
|
|
|
|
|
Show icon in task tray |
If you add a check mark, the icon will be displayed in the |
|
|
(On/Off) |
notification area. |
|
|
|
|
|
|
Show scroll direction |
If you add a check mark, the icon will change while |
|
|
(On/Off) |
scrolling and the finger located within the region which |
|
|
|
starts scrolling. |
|
|
|
|
|
|
Activate scroll direction |
If you add a check mark, the icon will rotate while you |
|
|
with animate scroll (On/ |
are scrolling. |
|
|
Off) |
|
|
|
|
|
|
|
Scroll window under |
If you add a check mark, scroll the region where the |
|
|
mouse cursor (On/Off) |
mouse cursor is located within the active window. |
|
|
|
If you remove the check mark, scroll the selected region |
|
|
|
within the active window. In either case, if the mouse |
|
|
|
cursor is outside the active window, scroll the selected |
|
|
|
region. |
|
|
|
|
|
|
Reverse vertical scroll- |
You can change the direction in which the screen scrolls |
|
|
ing (On/Off) |
when you trace the Touch Pad clockwise. |
|
|
|
• When check mark is added: Upwards |
|
|
|
• When check mark is removed: Downwards |
|
|
|
|
|
|
Activate horizontal |
If you add a check mark, you can use the horizontal |
|
|
scroll function (On/Off) |
scroll. |
|
|
|
|
|
|
Reverse horizontal |
When you add a check mark for [Activate horizontal |
|
|
scrolling (On/Off) |
scroll function], you can change the direction in which |
|
|
|
the screen scrolls when you trace the Touch Pad clock- |
|
|
|
wise. |
|
|
|
• When check mark is added: Scroll left |
|
|
|
• When check mark is removed: Scroll right |
|
|
|
|
|
|
Set scroll speed |
You can change the scroll speed. |
|
|
|
|
|
Using the Touch Pad |
11 |
|
|
z Scroll area
A. Width of the scroll |
By dragging the inner circumference of the starting area, |
area |
you can change the width of the scroll area (A) in five |
|
stages. |
|
You can also change the width by sliding the [Scroll acti- |
|
vation area] slide bar. |
|
|
B. Vertical and |
You can change the scroll area (B) by dragging border |
horizontal scroll |
of the vertical and horizontal scroll scroll area. The max- |
scroll area |
imum starting area for the horizontal scroll is half the cir- |
|
cumference. |
|
|
3 Click [OK].
Using the Virtual Scrolling Function
Set the Virtual Scrolling function using the following procedure. The Touch Pad utility will be disabled.
1
2
3
4
5
6
Click  on the notification area, and click [Settings].
When  is not displayed:Î page 7, step 1-A
Remove the check mark from [Activate Touch Pad function] in [General settings], and then click [OK].
Click  (Start) - [Control Panel] - [Mouse] - [Device Settings].
Click the device name (e.g., Synaptics TouchPad) in [Devices], then click [Settings].
Click [Virtual Scrolling], add a check mark for the scroll functions you want to use, then click [OK].
Click [OK] at [Mouse Properties].

Using the Touch Pad |
12 |
|
|
NOTE
zBecause the Touch Pad utility and the Virtual Scrolling function both offer scrolling functions that use the Touch Pad, these two features cannot be used simultaneously. If you try to use them at the same time, a message may be displayed asking you if you want to enable the Touch Pad utility.
•To use the Touch Pad utility: Click [Yes]. The Virtual Scrolling function will be disabled.
•To use the Virtual Scrolling function: Click [No].
You can uninstall the Touch Pad utility using the following procedure.
AClick  or
or  on the notification area, and then click [Exit].
BClick  (Start) - [Control Panel] - [Uninstall a program] - [Touch Pad Utility], and then click [Uninstall] to remove the program.
zTo begin using the Touch Pad utility again:
A Click  (Start) and input [c:\util\wheelpad] in [Start Search], and then press Enter. B Right-click [setup] in [wheelpad] folder and click [Run as administrator].
If there are two or more “setup” files, right-click the file whose [Type] is [Application]. C Conduct steps 3 to 4 (Î page 11).
D Click [Virtual Scrolling], remove a check mark from [Enable vertical scrolling] and [Enable horizontal scrolling], then click [OK].
E Click [OK] at [Mouse Properties].
F Click  or
or  on the notification area, and click [Settings].
When  or
or  is not displayed:Î page 7, step 1-A
G Click [General settings], add a check mark for [Activate Touch Pad function], then click [OK].

Using the Touch Pad |
13 |
|
|
Adjusting the Sensitivity when Touching the Touch Pad
Adjust [PalmCheck] and [Touch Sensitivity] using the following procedure:
1 |
Click (Start) - [Control Panel] - [Mouse] - [Device Settings]. |
2 |
Click the device name (e.g., Synaptics TouchPad) in [Devices], then click [Settings]. |
3 |
Double-click [Sensitivity], then click [PalmCheck] or [Touch Sensitivity]. |
4 |
After making the adjustment, click [OK]. |
PalmCheck™
z When operating the keyboard, if your hand touches the Touch Pad unintentionally causing the cursor to move, adjust the sensitivity using “PalmCheck™.”
• By dragging slide bar to the [Maximum] position, you can prevent the cursor from moving unintentionally.
• By dragging slide bar to the [Minimum] position, you can enable the cursor to move even with a light touch of the palm on the Touch Pad.
Touch Sensitivity
zWhen operating the Touch Pad, if your finger touches the Touch Pad, unintentionally causing the cursor to move; or if the cursor does not move even when you move your finger on the Touch Pad, adjust the sensitivity using the “Touch Sensitivity”.
•By dragging slide bar to the [Heavy Touch] position, the cursor will only move with a strong touch on the Touch Pad.
•By dragging slide bar to the [Light Touch] position, the cursor will move even with a light touch on the Touch Pad.
Handling the Touch Pad
zBy design, the Touch Pad is to be used with a fingertip only. Do not place any object on the work surface or press down forcefully with sharp-pointed objects (e.g., nails) or hard objects that can leave marks (e.g., pencils and ball point pens).
zTry to avoid having any harmful substances, such as oil, come in contact with the Touch Pad. The cursor may not work properly in such cases.
zWhen the Touch Pad becomes dirty:
Wipe to remove dirt by using a dry soft cloth such as gauze or a soft cloth first applied with detergent diluted with water and then thoroughly wrung.
Do not use benzene or thinner, or rubbing alcohol. Doing so may adversely affect the surface, e.g., discoloration. In addition, do not use commercially available household cleaners and cosmetics, as they may contain components harmful to the surface.

Using the Touchscreen |
14 |
|
|
<Only for CF-T8 Series>
Your computer is equipped with a touchscreen function allowing you to perform the same operations as the Touch Pad or mouse by touching the surface of the display with the stylus (included). The following explanation gives one example (for the default settings).
The operation settings can be changed. (Î page 15)
Functions |
Operation |
Moving the cursor |
The cursor is moved to the location pointed by the stylus. |
|
Clicking (Tapping)
One tap
Double-clicking (Double-tapping)
Two quick taps
Dragging
Touch and hold the object (i.e. file or icon), move the stylus on the surface (dragging the object to the desired location), then release the stylus.
To right-click
z You can choose either of the two ways below.
zTouch and hold the object (i.e. file or icon).
zTouch the object (i.e. file or icon), and tap the right button of the mouse image on the display.
•To Display the mouse image
AClick [Control Panel] - [Hardware and Sound] - [Pen and Input Devices].
BClick [Touch], and add a check mark for [Show the touch pointer when I’m interacting with items on the screen].

Using the Touchscreen |
15 |
|
|
Change the settings for the Touchscreen
zWhen needed, the Touchscreen settings can be configured using the following procedure.
ATo Display [Pen and Input Devices] screen.
Right-click  on the notification area, and then click [Pen flicks] - [Customize your pen flicks settings].
When  is not displayed:
Click  (Start) - [Control Panel] - [Hardware and Sound] - [Pen and Input Devices].
BMake necessary changes and click [OK].
CAUTION
zWhen the internal LCD is used alone or with an external display simultaneously, the touchscreen function cannot be used when the area of either display is set larger than default setting of the display resolution.
zIf a change is made to the display resolution, or the cursor cannot be pointed correctly with the stylus, be sure to perform [Tablet Calibration]. (Î page 16)
zWhen mouse drivers are installed (e.g., IntelliMouse), the touchscreen function may not be used.
zWhen the operation of panning (only the internal LCD) is performed while the display resolution is set higher than the resolution of the internal LCD, the touchscreen function will not work properly.
zEven when only an external display is in use, the cursor will move on the external display if the surface of the internal LCD is touched when the touchscreen driver is active. Therefore, do not touch the internal LCD when only an external display is in use.
zThe touchscreen function does not work in the Setup Utility.
NOTE
z Do not move the stylus too quickly. If the stylus moves too quickly, the cursor may be unable to follow its movement.

Using the Touchscreen |
16 |
|
|
Install the touchscreen driver
z If the touchscreen driver not installed, you can install the touchscreen driver using the following procedure.
1 Set [Touchscreen Mode] to [Auto] or [Tablet Mode] in the [Main] menu of the Setup Utility. 2 Press F10.
3 Click  (Start) and input [c:\util\drivers\tscreen\TPSetUp.exe] in [Start Search], and then press Enter.
z Follow the on-screen instructions.
4 Perform the touchscreen calibration (below).
Calibrating the Touchscreen
When you cannot point correctly with the stylus (include), calibrate the Touchscreen by following the steps below.
NOTE
zConfigure the Touchscreen for each account created.
zRotate the display to 0 degree before performing the calibration. (Î page 18)
1 |
Click (Start) - [Control Panel] - [Additional Options] - [Tablet Calibration]. |
2 |
If [User Account Control] is displayed, click [Continue], or input password and click [OK]. |
3 |
Touch each “+” using the stylus. |
|
“+” is displayed in order at 9 locations. |

Using the Touchscreen |
17 |
|
|
Handling the Touchscreen
zUse the stylus included with the computer. Do not use pencils, implements with sharp tips or hard objects for screen operations. The screen may be damaged as a result.
zDo not place any object on the surface or press down forcefully with sharp-pointed objects (e.g., nails), or hard objects that can leave marks (e.g., pencils and ball point pens).
zDo not apply pressure to the perimeter of the display panel. The cursor may move to the edge of the display.
zDo not operate the computer when such things as dust are on the screen. Do not allow contact with substances that could dirty the touchscreen, such as oil.
zDo not apply too much pressure when operating the touchscreen.
Only a light touch is required to operate the touchscreen. Applying too much pressure may damage the surface.
zDo not touch the screen outside of the LCD display area.
The touchscreen input area is defined by the LCD display screen. Touching the screen outside of the display area may result malfunctions or damage to the touchscreen.
zWhen the touchscreen becomes dirty:
•Wipe to remove dirt by using a dry soft cloth included with the computer.
•Do not use benzene or thinner, or rubbing alcohol.
•For more information, refer to “Suggestions About Cleaning the LCD Surface” that comes with the soft cloth.
Handling the Stylus
zClean the stylus tip and screen prior to operation. Foreign particles can scratch the screen and impede the operation of the stylus.
zUse the stylus only for the computer screen. Using it for any other purpose may damage the stylus and scratch the screen.

Display Rotation |
18 |
|
|
<Only for CF-T8 Series>
After Windows is started up, you can rotate the display and perform the Touch Pad and touchscreen operations in the rotated mode.
Rotating the Display
1 Double-click |
on the notification area or press |
|
+ |
|
. |
Alt |
X |
Each time this operation is performed, the screen display switches between the landscape mode (0 degree) and the previously set angle (below).
To select the angle and rotate the display
1 Right-click  on the notification area, and then select the angle.
You can select rotation angles of 90, 180, or 270 degrees from the landscape mode.
NOTE
z Be sure to use the above procedures to rotate the display.
Changing the Settings
By using the Display Rotation Tool, you can change the settings of the display rotation.
1
2
3
Right-click |
on the notification area, and then click [Setting... |
]. |
|
|
|
|
Change the settings. |
|
|
|
|
|
|
A. Changing the key combination |
|
|
|
|
A |
|
|
|
|
|
|||
B. Changing the angle |
|
|
|
|
|
|
|
|
|
|
|
||
|
|
|
|
|
B |
|
(Default: 180 degrees) |
|
|
|
|
||
|
|
|
|
|||
Click [OK].
NOTE
zIf you shut down Windows when you rotate the display, the Touch Pad and touchscreen do not match the display angle next time you start up Windows for a few seconds.

Display Rotation |
19 |
|
|
zWhen you rotate the display, the Touch Pad and the touchscreen may not match the display angle if you change display settings or settings of Intel(R) Graphics Media Accelerator Driver for Mobile.
zWhen some applications are running, the display may not be rotated and the operation of the Touch Pad and the touchscreen may not match the display angle. Press Alt+X to rotate the display to the landscape mode. After exiting the application, rotate the display, then start up the application again.
zThe computer’s performance will decrease somewhat.
zWhile the display is rotated:
•Do not use the Extended Desktop (The Touch Pad or touchscreen may fail to operate properly).
•Do not calibrate the touchscreen.
•Do not set the display resolution larger than the resolution of the internal LCD.
zIf motion video is played while the display is rotated, the picture may not be displayed properly or the sound may be broken up. This problem can be corrected by rotating the display to 0 degree.
zThe Touch Pad scroll function does not work while the display is rotated.
zIf the display is rotated when the resolution is set to 800 x 600 pixels, depending on the Windows specifications, incorrect values may be shown for the resolution displayed in [Screen resolution] of [Display Settings]. Continue using these settings, without changing [Screen resolution].
zExit the tool with the following procedure:
A Right-click  on the notification area, and then click [Exit].
•In the default mode, the Display Rotation Tool will start up when Windows starts up.
•To restart the tool after exiting:
Click  (Start) - [All Programs] - [Panasonic] - [Display Rotation Tool].

Key Combinations |
20 |
|
|
NOTE
zDo not repeatedly press the keys in quick succession.
zDo not use the key combinations together with Touch Pad (external mouse), touchscreen (only for CF-T8 series) or other key operations.
zDo not use the key combinations before you log on to Windows. Wait until the hard disk drive indicator  turns off. On the Setup Utility screen, you can use the key combinations of Fn+F1, Fn+F2 and Fn+F3. By using the key combinations of Fn+F3, the display is switched between the internal LCD and the external display.
zThe key combinations may not work with some applications.
zThe pop-up icon appears after logging on to Windows. It may not appear in some application conditions.
|
|
|
Key |
|
|
|
|
|
|
Functions |
|
Pop-up Icon |
||
|
|
+ |
|
|
|
|
LCD brightness |
|
|
|||||
|
Fn |
F1 |
|
|
||||||||||
|
|
|
|
|
|
|
(Fn+F1= down / |
Fn |
+ |
F2 |
= up) |
|
|
|
|
Fn |
+ |
F2 |
|
|
You can select a different brightness level setting for when the AC adaptor is con- |
|
|
||||||
|
|
|
|
|
|
|
nected and for when it is not connected. |
|
|
|||||
|
|
|
|
|
|
|
(In the default setting, the LCD brightness is set to be darker when the AC adaptor is |
|
|
|||||
|
|
|
|
|
|
|
not connected.) |
|
|
|||||
|
|
|
|
|
|
|
|
|
|
|
||||
|
|
|
|
|
|
|
NOTE |
|
|
|
|
|
|
|
|
|
|
|
|
|
|
z When you change the LCD brightness, the [Display power saving function] |
|
|
|||||
|
|
|
|
|
|
|
setting of Panasonic Power Plan Extension Utility. |
|
|
|||||
|
|
|
|
|
|
|
|
|
|
|
|
|
|
|
|
|
|
|
|
|
|
|
|
|
|
|
|
|
|
Key Combinations |
21 |
|
|
|
|
|
Key |
|
|
Functions |
Pop-up Icon |
|||
|
|
+ |
|
|
Display switching (Î page 75) |
|
__ |
|||
|
Fn |
F3 |
|
|||||||
|
|
|
|
|
(When an external display is connected) |
|
|
|||
|
|
|
|
|
Internal LCD |
|
Simultaneous display |
|
External display |
|
|
|
|
|
|
|
|
|
|||
NOTE
<Only for CF-F8 Series>
zWhen an external display is connected to an optional mini port replicator (CFVEBU08U), the display switching may work differently from the above. For further information, refer to the Operating Instructions of the mini port replicator.
CAUTION
zDo not press any keys until the display has finished switching.
zDo not use this function:
•When an external display is not connected.
•When playing motion video such as DVD or MPEG.
•When using the Extended Desktop.
Key Combinations |
22 |
|
|
|
|
|
|
Key |
|
|
|
|
|
|
|
|
Functions |
|
Pop-up Icon |
|||||||||||||
|
|
+ |
|
|
|
|
|
|
|
|
|
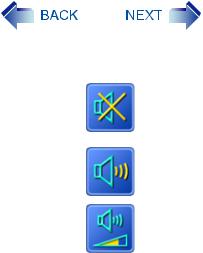
Speaker on/off |
|
|
||||||||||||||
|
Fn |
F4 |
|
OFF |
||||||||||||||||||||||||
|
|
|
|
|
|
|
|
|
|
|
|
|
|
|
|
|
|
|
|
|
|
|
|
|
|
|
|
|
|
|
|
|
|
|
|
|
|
|
|
|
|
|
NOTE |
|
|
|
|
|
|
|
|
|
|
|
|||
|
|
|
|
|
|
|
|
|
|
|
|
|
|
|
|
|
|
|
|
|
|
|
|
|
|
(MUTE) |
||
|
|
|
|
|
|
|
|
|
|
|
|
|
|
z Beeps do not sound if you turn off the speaker sound. |
|
|||||||||||||
|
|
|
|
|
|
|
|
|
|
|
|
|
|
|
|
|||||||||||||
|
|
|
|
|
|
|
|
|
|
|
|
|
|
|
|
|
|
|
|
|
|
|
|
|
|
|
|
ON |
|
|
|
|
|
|
|
|
|
|
|
|
|
|
|
|
|
|
|
|
|
|
|
|
|
|
|
|
|
|
|
|
|
|
|
|
|
|
|
|
|
|
|
|||||||||||||||
|
|
+ |
|
|
|
|
|
|
|
|
|
Volume |
|
|
||||||||||||||
|
Fn |
F5 |
|
|
||||||||||||||||||||||||
|
|
+ |
|
|
|
|
|
|
|
|
|
( |
Fn |
+F5= down / |
Fn |
+ |
F6 |
= up) |
|
|
||||||||
|
Fn |
F6 |
|
|
|
|
|
|
|
|
|
|
|
|
|
|
|
|
|
|
|
|
|
|||||
|
|
|
|
|
|
|
NOTE |
|
|
|
|
|
|
|
|
|
|
|
|
|
||||||||
|
|
|
|
|
|
|
|
|
|
|
|
|
|
|
|
|
|
|
|
|
|
|
||||||
|
|
|
|
|
|
|
|
|
|
|
|
|
|
z When fine-tuning the sound volume, press and hold |
|
, and press |
|
or |
|
|
|
|
||||||
|
|
|
|
|
|
|
|
|
|
|
|
|
|
Fn |
F5 |
F6 |
|
|
||||||||||
|
|
|
|
|
|
|
|
|
|
|
|
|
|
|
intermittently. |
|
|
|||||||||||
|
|
|
|
|
|
|
|
|
|
|
|
|||||||||||||||||
|
|
|
|
|
|
|
|
|
|
|
|
|
||||||||||||||||
|
|
+ |
|
|
|
|
|
|
|
Activate sleep (Î page 42) |
|
__ |
||||||||||||||||
|
Fn |
F7 |
||||||||||||||||||||||||||
|
|
|
|
|
|
|
|
|
|
|
|
|
||||||||||||||||
|
|
|
+ |
|
|
|
|
|
|
|
|
|
Remaining battery power |
|
Î page 25 |
|||||||||||||
|
Fn |
F9 |
||||||||||||||||||||||||||
|
|
|
+ |
|
|
|
|
|
|
|
|
|
Activate hibernation (Î page 42) |
|
__ |
|||||||||||||
|
Fn |
F10 |
||||||||||||||||||||||||||
|
|
|
|
|||||||||||||||||||||||||
<Only for CF-W8/CF-T8 Series> |
|
|
||||||||||||||||||||||||||
|
|
|
|
|
|
|
|
|
|
|
|
|
|
|
|
|
|
|
||||||||||
|
|
|
|
Key |
|
|
|
|
|
|
|
|
Functions |
|
Pop-up Icon |
|||||||||||||
|
|
+ |
|
|
|
|
|
|
|
|
|
Run the ScrLk (Scroll Lock) function |
|
__ |
||||||||||||||
|
Fn |
NumLk |
||||||||||||||||||||||||||
|
|
|
|
|
|
|
|
|
|
|
|
|
The functions differ depending on the application software. |
|
|
|||||||||||||
|
|
|
|
|
|
|
|
|
|
|||||||||||||||||||
|
|
+ |
|
|
|
|
|
|
|
|
Lead to the last page or move the cursor to the end of the current line (End) |
|
__ |
|||||||||||||||
|
Fn |
Home |
||||||||||||||||||||||||||
|
|
|
|
|
|
|
|
|
||||||||||||||||||||
|
|
|
+ |
|
|
|
Move the back page (PgUp) |
|
__ |
|||||||||||||||||||
|
Fn |
Ï |
||||||||||||||||||||||||||
|
|
|
|
|
|
|
|
|
||||||||||||||||||||
|
|
+ |
|
|
|
Move the next page (PgDn) |
|
__ |
||||||||||||||||||||
|
Fn |
Ð |
||||||||||||||||||||||||||
|
|
|
|
|
|
|
|
|
|
|
|
|
|
|
|
|
|
|
|
|
|
|
|
|
|
|
|
|
Key Combinations |
23 |
|
|
Hotkey Settings
You can make two settings:
•Fn key lock
When you press Fn, the key is locked (pressed-down) until you press another key. Use this when pressing difficult key combinations.
•Pop-up icon on/off
1 Start up the Hotkey Settings.
Click  (Start) - [All Programs] - [Panasonic] - [Hotkey Settings].
2 Make the settings.
[Use Fn key lock]
z When using an Fn key combination
APress Fn once. (Locked)
BPress another key. (Lock released)
z When using successive Fn key combinations
APress Fn twice. (Locked)
BPress another key.
Fn key remains locked until you press Fn again.
[Notification]
[Make sounds when Fn key is pressed]*1
[Show status on screen]: Displays the Fn key status on the notification area.
• : Fn is locked.
• : Fn is not locked.
[Disable popup]
The Pop-up icon will not be displayed.
3 Click [OK].
NOTE
z You can have different settings for each user.
*1 If the speakers are muted, beeps do not sound.
Battery Power |
24 |
|
|
Tips about the Battery Pack
[Important Tips] (On-Line Manual)
z[Important Tips] provides information on how to maximize use of the battery pack, which is necessary for computing away from your home or office.
See [Important Tips] using one of the following methods.
•Double-click  on the desktop.
•Using the  (Start) menu.
AClick  (Start) - [All Programs] - [Panasonic].
BSelect [On-Line Manuals] or [Battery], and click [Important Tips].
Checking the Battery Status
Battery Indicator |
Battery Status |
Not lit |
Battery pack is not connected or no charging. |
Orange light on / |
Charging in progress. |
flashing*1*2 |
If [Battery Charging Indicator] in the [Main] menu of the Setup |
|
Utility is set to [Flashing], the indicator will alternately become |
|
lighter and darker (Flashing) (Î page 103). |
Green*1 |
Fully charged. |
Red |
The remaining battery power is approximately 9% or less. |
Blinking red*1 |
Battery pack or charging circuit may not be working properly. |
|
Quickly save your data and power off your computer. |
|
Remove the battery pack and disconnect the AC adaptor, |
|
then connect them again. If the problem persists, contact |
|
your technical support office. The battery pack or charging |
|
circuit may be defective. |
Blinking orange*1*2 |
The battery cannot be charged temporarily due to the follow- |
|
ing reasons: |
|
z Its internal temperature is out of the acceptable range. |
|
z The power supply is not enough because software appli- |
|
cations or peripheral devices are consuming a large |
|
amount of power. |
CF-F8 Series
CF-W8 Series
CF-T8 Series
Battery Power |
25 |
|
|
*1 |
When the AC adaptor is connected. |
*2 |
The orange display light has three modes: on, flashing and blinking. Note the difference between flashing and blinking. |
NOTE
zOnce the battery is fully charged, the computer performs recharging only when the remaining battery power becomes less than approximately 95% (75% when the battery’s Economy Mode (ECO) is enabled), so overcharging is avoided.
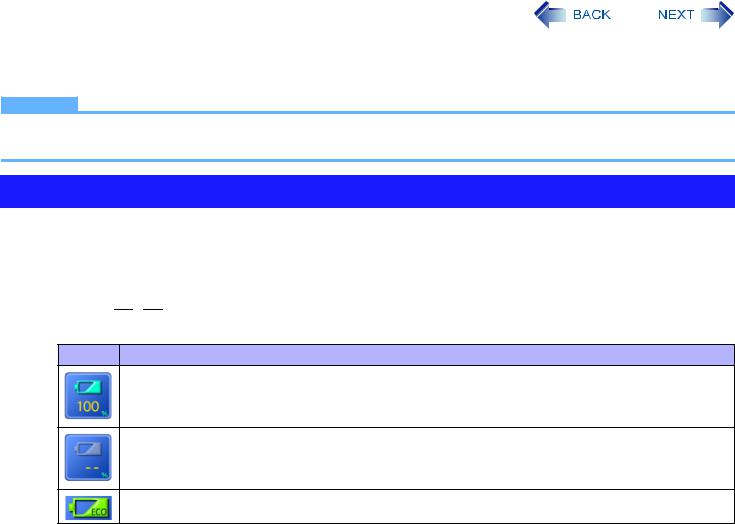
Checking the Remaining Battery Power
There are three methods to check the remaining battery power.
To check the remaining battery power on the screen
(After logging on to Windows)
1 Press Fn+F9.
Display Condition
When the battery pack is inserted. (example)
When the battery pack is not inserted.
[ECO] is displayed when the battery’s Economy Mode (ECO) is enabled.
To check the remaining battery power and remaining time using the Windows Battery Meter
(After logging on to Windows)
1 Click  or
or  on the notification area.
Battery Power |
26 |
NOTE
zThe battery display may not correspond to the actual remaining battery power in the cases as below. To correct the display, perform the Battery Recalibration (Î page 28).
•The battery indicator remains red.
•The battery indicator lights orange and the display shows 99% for a long time (79% when Economy Mode (ECO) is enabled).
•Low battery warning appears soon after a short time of use.
zThe battery display may not be the same as that of Battery Meter. This is not a malfunction.
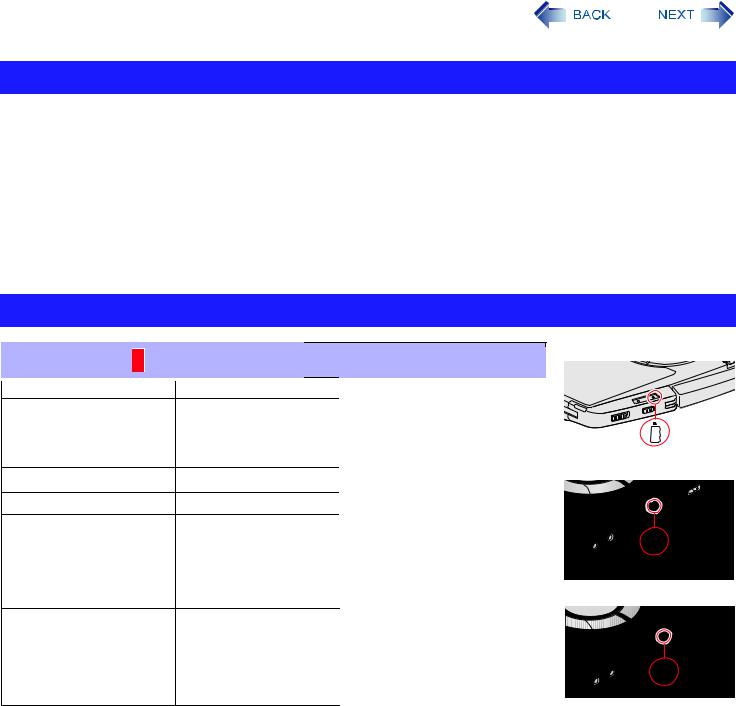
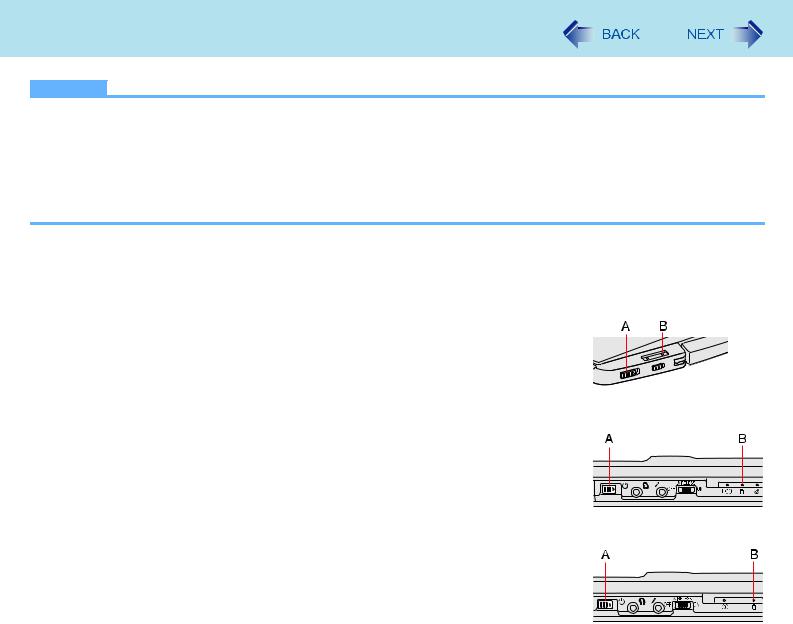
To check the remaining battery power using the battery indicator
(When the power is off or in sleep or hibernation)
1 <CF-F8 Series>
Close the display and confirm that the latch is locked.
<CF-W8/CF-T8 Series>
Close the display completely. 2 Disconnect the AC adaptor.
3 Slide the power switch (A) and confirm the battery indicator (B).
Battery Indicator (B) |
Remaining Battery Power |
Red |
0 % - 4 % |
|
|
Blinking orange |
5 % - 19 % |
|
|
Orange |
20 % - 49 % |
|
|
Blinking green |
50 % - 94 % |
|
|
Green |
95 % - 100 % |
|
|
CF-F8 Series
CF-W8 Series
CF-T8 Series
|
Battery Power |
27 |
|
|
|
|
|
|
Computer behavior with low battery |
|
|
|
|
|
|
|
The default settings are as follows. |
|
|
|
|
|
|
|
When the remaining battery power becomes 10% |
When the remaining battery power becomes 5% |
|
|
[Low battery level] |
[Critical battery level] |
|
|
z Displays a message that the remaining battery power is |
z The computer enters hibernation. |
|
|
low. |
|
|
|
↓ |
↓ |
|
|
|
|
|
|
Charge the battery. |
Connect the AC adaptor or replace the battery to start up |
|
|
|
the computer. |
|
|
|
|
|
|
z Connect the AC adaptor immediately. If you do not |
z Connect the AC adaptor and charge the battery. |
|
|
have the AC adaptor, exit the running programs and |
z If you have a fully charged spare battery, turn off the |
|
|
Windows, then confirm that the power indicator is off. |
computer, replace the battery and turn the computer on |
|
|
z If you have a fully charged spare battery, turn off the |
again. |
|
|
computer, replace the battery and turn the computer on |
|
|
|
again. |
|
|
|
|
|
|
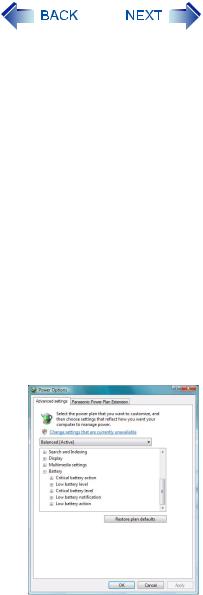
We recommend that you become familiar with alarm settings to become aware when battery power is low.
1 Click  (Start) - [Control Panel] - [System and Maintenance] - [Power Options].
2 Click [Change plan settings] of the power plan you want to change.
3
4
Click [Change advanced power settings].
Double-click [Battery], and double-click the item you want to change.
5 Change the settings.
zSet the value for [Critical battery level] to 5% or more.
This is necessary for the sleep or hibernation to be completed (assuring data is saved) when the remaining battery power is low.
6 Click [OK].

Battery Power |
28 |
|
|
Correcting the Battery Display (Battery Recalibration)
The “Battery Recalibration” function measures and memorizes the battery capacity. To correct the battery display, use this function to fill the battery and then discharge it completely. Perform the procedure at least once immediately after purchasing the computer. Normally the interval of “Battery Recalibration” is three months. The battery display may not be correct when the battery pack deteriorates after a long time use. In this case, perform the procedure again.
1
2
3
Connect the AC adaptor.
Close all the applications.
Perform “Battery Recalibration”.
AClick  (Start) - [All Programs] - [Panasonic] - [Battery] - [Battery Recalibration].
BWhen the confirmation message appears, click [Start].
z Frequent recalibration of the battery can degrade the battery. A caution message appears when the “Battery Recalibration” is performed at the shorter interval than approximately a month. In this case, cancel the “Battery Recalibration”.
CWhen the message requests shut down of Windows, click [Yes]. The “Battery Recalibration” starts.
After the battery pack is fully charged, discharging starts. When the discharging is completed, the power goes off automatically.
After the “Battery Recalibration” is finished, normal charging starts.
CAUTION
z Do not close the LCD while “Battery Recalibration” is being executed.
NOTE
zThe temperature range should be 10°C to 30°C {50°F to 86°F}.
If “Battery Recalibration” is executed at low temperatures, recalibration may not be performed properly.
zThe “Battery Recalibration” may take a long time due to the large battery capacity. This is not a malfunction. <CF-F8 Series>
•Full charge: Approximately 5 hours [MAX]
•Complete discharge: Approximately 4 hours
<CF-W8/CF-T8 Series>
When using the battery pack (CF-VZSU51W)
•Full charge: Approximately 5 hours [MAX]
•Complete discharge: Approximately 5 hours

Battery Power |
29 |
|
|
When using the battery pack (CF-VZSU52W)
•Full charge: Approximately 4 hours [MAX]
•Complete discharge: Approximately 3 hours
z“Battery Recalibration” does not increase the battery’s capacity. If “Battery Recalibration” is executed frequently, deterioration of the battery may result.
zIf you have two or more battery packs, perform the “Battery Recalibration” for each battery pack.
zIf the computer is turned off during the “Battery Recalibration” (e.g., due to power failure, or accidental removal of the AC adaptor and battery pack), the “Battery Recalibration” will not be completed.
zYou can also perform the “Battery Recalibration” with the following procedure.
A Restart the computer.
B Press and hold F9 while the [Panasonic] boot screen is displayed just after the computer starts the startup proce-
dure.
C When the remaining battery power is displayed, press Enter. D Follow the on-screen instructions.
Switching between Long Battery Life and Extended Operating Time (The battery’s Economy Mode (ECO))
The battery pack is a consumable item, and deteriorates gradually each time it is used.
Use effective switching of the battery’s Economy Mode (ECO) to reduce battery pack deterioration, and enable the battery pack to last a little longer. Switch the battery’s Economy Mode (ECO) in accordance with the way you use your computer.
|
The battery’s Economy Mode (ECO) |
||
|
|
|
|
|
Disabled |
Enabled |
|
Recommended usage |
Mobile |
Desktop |
|
Using your computer while on the move |
AC adaptor is connected most of the time |
||
|
|||
Operation time |
Extended |
Normal |
|
Lifetime of battery |
Normal |
Extended |
|
|
|
|
|
zThe battery’s Economy Mode (ECO) disabled:
In the default setting, the battery’s Economy Mode (ECO) is set to “Disabled”.
Charge the battery to 100% (fully charged). We recommend that you disable the battery’s Economy Mode (ECO) if you use the battery pack frequently.

Battery Power |
30 |
|
|
zThe battery’s Economy Mode (ECO) enabled:
Stop the battery recharging at 80% of fully charged. By stopping the battery recharging before 100% (fully charged), the burden on the battery is reduced and deterioration is prevented, so the lifetime of battery pack will be extended. The computer will not operate as long on the battery as when the battery’s Economy Mode (ECO) is disabled.
If you often use the computer with the AC adaptor connected, and if you want to prevent deterioration of the battery pack, we recommend that you enable the battery’s Economy Mode (ECO).
Switching the battery’s Economy Mode (ECO)
1
2
Click  on the notification area.
Click [Enabled] or [Disabled] in [The battery’s Economy Mode (ECO)].
|
|
[Enabled] |
[Disabled] |
||
|
|
|
|
|
|
|
|
Remaining battery power: |
Remaining battery power: |
|
|
|
|
81% or more. |
80% or less. |
|
|
|
|
Blink |
|
|
|
Economy Mode (ECO) |
(The battery will discharge |
Light |
off |
||
Indicator |
until the remaining battery |
||||
|
|
||||
|
|
power is 80% or less.) |
|
|
|
|
|
|
|
|
|
AWhen the confirmation message is displayed, read the message on the screen carefully, and click [OK].
BUse the computer with the AC adaptor unplugged until the remaining battery power is 80% or less.
When the remaining battery power falls to 80% or less, battery discharge ends, and the Economy Mode (ECO) indicator lights.
If you continue using the computer with the AC adaptor, it may take about a day until the remaining battery power falls to 80%.
CWhen the confirmation message is displayed, read the message on the screen carefully, and click [OK].
DConnect the AC adaptor.
If you do not click [OK] at step C, the computer will go into forced sleep after about three minutes to prevent the remaining battery power from dropping.
•The computer will go into forced sleep even while application software is running or data is being sent or received, or when the hard disk is being accessed, so be sure to connect the AC adaptor.
NOTE
zAfter disconnecting the battery pack, if you connect it to a computer on which the battery’s Economy Mode (ECO) settings differ, the battery will either recharge or discharge until the next time the computer is turned on, giving priority to the battery pack setting on that computer.
 Loading...