


HT-R494
AV RECEIVER
Basic Manual
This manual includes information needed when starting up and also instructions for frequently used operations. The Advanced Manual is published on the web for ecological reasons and has more detailed information and advanced settings.
Advanced Manual found here
http://www.onkyo.com/manual/htr494/adv/en.html En

Features |
Contents |
●● Equipped with 7 ch amplifier
●● Supports playback in Dolby Atmos format which provides 360-degree placement and movement of sounds including overhead sound
●● Dolby Surround listening mode expands 2 ch, 5.1 ch or 7.1 ch source to available speaker configurations
●● Equipped with 4K compatible HDMI IN/OUT jacks (To play 4K or 1080p video, use a high speed HDMI cable or high speed HDMI with Ethernet cable)
●● Supports the HDMI Standby Through function which allows signal transmission from players to the TV in standby state
●● Supports HDCP2.2, a strict copy-protection for providing high quality content
●● Supports ARC (Audio Return Channel) ●● Supports Bluetooth® connection
●● A/V Sync Function to correct deviation of audio and video
●● 32 bit DSP (Digital Signal Processor) with excellent calculation performance
●● Music Optimizer™ for compressed digital music files ●● Phase Matching Bass System
●● Automatic speaker setup available using supplied calibrated microphone (AccuEQ Room Calibration)
●● Supports multi-language on-screen displays English, German, French, Spanish, Italian, Dutch, Swedish, Russian1, Chinese1, 2
1 European, Australian and Asian models only
2 OSD is not displayed when the input selector is "BLUETOOTH".
Refer to the back cover for supplied accessories.
Basic Manual (this manual)
Front Panel 3 Rear Panel 4
Step 1: Connections 5
1 |
Connecting the TV and Players |
5 |
|
|
Connection to TV |
5 |
|
|
Connection with a player that has a HDMI jack ..... |
6 |
|
|
Connection with a player that does not have a |
|
|
|
HDMI jack |
6 |
|
2 |
Connecting the AM/FM Antenna |
|
6 |
3 |
Connecting Speakers |
7 |
|
|
Speaker layout ....................................................... |
|
7 |
|
Instructions on how to connect speakers ............... |
8 |
|
Step 2: Setting Up |
|
9 |
|
1 |
Turning the Power On |
9 |
|
2 |
Making Automatic Speaker Setting |
9 |
|
3 |
HDMI Setup |
10 |
|
|
HDMI CEC (RIHD) |
10 |
|
|
HDMI Standby Through ....................................... |
|
10 |
|
ARC (Audio Return Channel)...................................... |
|
10 |
Step 3: Playing Back |
|
11 |
|
1 |
Basic Operations |
11 |
|
|
Part names and functions of the remote controller ..... |
11 |
|
|
Display ........................................................................ |
|
12 |
2 |
Bluetooth® |
12 |
|
3 |
AM/FM Radio ................................................................. |
|
12 |
4 |
Quick Setup Menu |
13 |
|
5 |
Other useful functions |
14 |
|
Troubleshooting................................................................. |
|
15 |
|
Specifications |
16 |
||
Table of display resolutions |
17 |
||
Resolutions supported by HDMI |
17 |
||
Supplied Accessories |
Back cover |
||
Advanced Manual (on the web)
The Advanced Manual, published as an e-manual on the web, has more detailed information and advanced settings. The Advanced Manual is created in a format that makes
it easy to read on a PC or Smartphone. The Advanced Manual has the following content:
●● Details on AM/FM reception
●● Operating Music Files with the Remote Controller ●● Using the Listening Modes
●● Advanced Settings
●● Operating Other Components with the Remote Controller
●● Advanced Speaker Connection
●● Connecting and Operating Onkyo RI Components ●● Troubleshooting
●● Reference Information
Advanced Manual found here
http://www.onkyo.com/manual/htr494/adv/en.html
En-2
1 |
|
23 |
45 6 |
7 |
8 |
9 |
F |
|
G |
|
|
|
|
(European, Australian |
|
|
|
|
|
|
|
|
|
and Asian models) |
|
|
|
|
|
H |
I |
J |
|
K |
|
L |
|
M |
N |
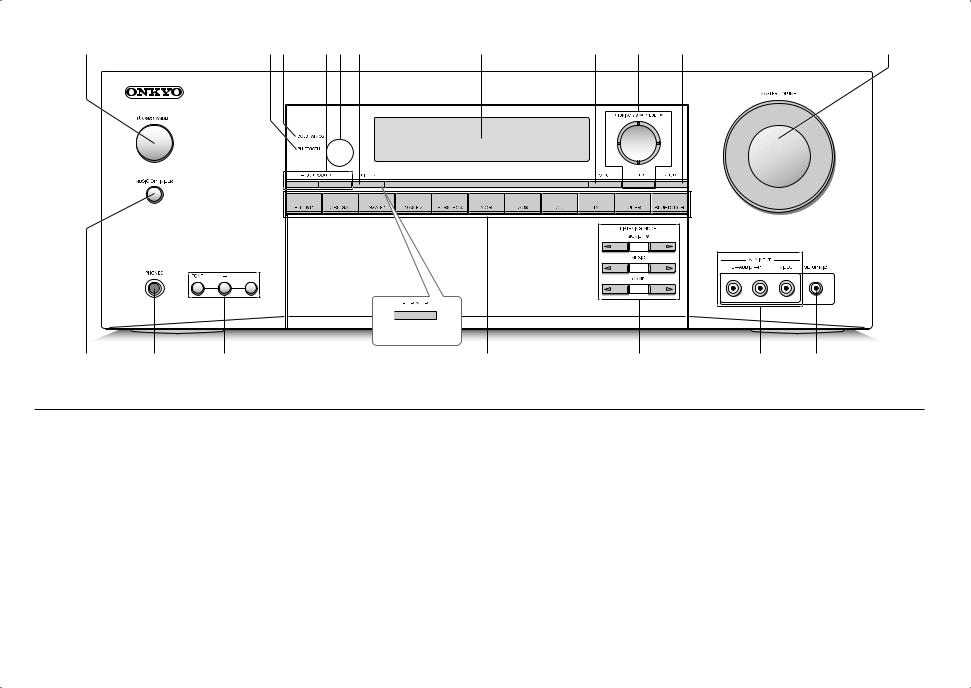
Front Panel
1 zON/STANDBY button: Turns the unit on or into |
9 Cursor buttons, lTUNINGj button, dPRESETc |
M AUX INPUT VIDEO/AUDIO jacks: A video camera or |
standby mode. |
button and ENTER button: Move the cursor and |
such other device is connected. |
2 BLUETOOTH indicator: Flashes while pairing with a |
confirms the selection. When listening to AM/FM |
N SETUP MIC jack: The supplied speaker setup |
Bluetooth-enabled device is in progress and stays lit |
broadcasting, tune in to the station with lTUNINGj or |
microphone is connected. |
when pairing is completed. |
select the registered station with dPRESETc. |
|
3 DOLBY ATMOS indicator: Lights when playing Dolby |
F RETURN button: Returns the display to the previous |
|
Atmos. |
state. |
|
4 SUBWOOFER Level buttons: Adjust the volume of the |
G MASTER VOLUME: Allows you to adjust the volume. |
|
Subwoofer. |
H MUSIC OPTIMIZER button: Turns on/off the MUSIC |
|
5 Remote control sensor: Receives signals from the |
OPTIMIZER function that improves the quality of the |
|
remote controller. |
compressed audio. |
|
6 DIMMER button (North American and Taiwanese |
I PHONES jack: Stereo headphones with a standard plug |
|
models): Switches the brightness of the display. |
are connected. |
|
RT/PTY/TP button (European, Australian and Asian |
J TONE and Tone Level buttons: Adjust the high tone |
|
models): Can be used when receiving the station |
and low tone. |
|
transmitting text information. |
K Input selector buttons: Switch the input to be played. |
|
7 Display: Refer to page 12 for details. |
L LISTENING MODE buttons: Allow you to select the |
|
8 SETUP button: Used when making settings. |
listening mode. |
|
En-3

1 |
|
2 |
|
|
|
|
3 |
4 |
|
5 |
|
6 |
|
|
|
|
7 |
||||||||||||||||||||||||||||||||||||||||||||||||||||||||||
|
|
|
|
|
|
|
|
|
|
|
|
|
|
|
|
|
|
|
|
|
|
|
|
|
|
|
|
|
|
|
|
|
|
|
|
|
|
|
|
|
|
|
|
|
|
|
|
|
|
|
|
|
|
|
|
|
|
|
|
|
|
|
|
|
|
|
|
|
|
|
|
|
|
|
|
|
|
|
|
|
|
|
|
|
|
|
|
|
|
|
|
|
|
|
|
|
|
|
|
|
|
|
|
|
|
|
|
|
|
|
|
|
|
|
|
|
|
|
|
|
|
|
|
|
|
|
|
|
|
|
|
|
|
|
|
|
|
|
|
|
|
|
|
|
|
|
|
|
|
|
|
|
|
|
|
|
|
|
|
|
|
|
|
|
|
|
|
|
|
|
|
|
|
|
|
|
|
|
|
|
|
|
|
|
|
|
|
|
|
|
|
|
|
|
|
|
|
|
|
|
|
|
|
|
|
|
|
|
|
|
|
|
|
|
|
|
|
|
|
|
|
|
|
|
|
|
|
|
|
|
|
|
|
|
|
|
|
|
|
|
|
|
|
|
|
|
|
|
|
|
|
|
|
|
|
|
|
|
|
|
|
|
|
|
|
|
|
|
|
|
|
|
|
|
|
|
|
|
|
|
|
|
|
|
|
|
|
|
|
|
|
|
|
|
|
|
|
|
|
|
|
|
|
|
|
|
|
|
|
|
|
|
|
|
|
|
|
|
|
|
|
|
|
|
|
|
|
|
|
|
|
|
|
|
|
|
|
|
|
|
|
|
|
|
|
|
|
|
|
|
|
|
|
|
|
|
|
|
|
|
|
|
|
|
|
|
|
|
|
|
|
|
|
|
|
|
|
|
|
|
|
|
|
|
|
|
|
|
|
|
|
|
|
|
|
|
|
|
|
|
|
|
|
|
|
|
|
|
|
|
|
|
|
|
|
|
|
|
|
|
|
|
|
|
|
|
|
|
|
|
|
|
|
|
|
|
|
|
|
|
|
|
|
|
|
|
|
|
|
|
|
|
|
|
|
|
|
|
|
|
|
|
|
|
|
|
|
|
|
|
|
|
|
|
|
|
|
|
|
|
|
|
|
|
|
|
|
|
|
|
|
|
|
|
|
|
|
|
|
|
|
|
|
|
|
|
|
|
|
|
|
|
|
|
|
|
|
|
|
|
|
|
|
|
|
|
|
|
|
|
|
|
|
|
|
|
|
|
|
|
|
|
|
|
|
|
|
|
|
|
|
|
|
|
|
|
|
|
|
|
|
|
|
|
|
|
|
|
|
|
|
|
|
|
|
|
|
|
|
|
|
|
|
|
|
|
|
|
|
|
|
|
|
|
|
|
|
|
|
|
|
|
|
|
|
|
|
|
|
|
|
|
|
|
|
|
|
|
|
|
|
|
|
|
|
|
|
|
|
|
|
|
|
|
|
|
|
|
|
|
|
|
|
|
|
|
|
|
|
|
|
|
|
|
|
|
|
|
|
|
|
|
|
|
|
|
|
|
|
|
|
|
|
|
|
|
|
|
|
|
|
|
|
|
|
|
|
|
|
|
|
|
|
|
|
|
|
|
|
|
|
|
|
|
|
|
|
|
|
|
|
|
|
|
|
|
|
|
|
|
|
|
|
|
|
|
|
|
|
|
|
|
|
|
|
|
|
|
|
|
|
|
|
|
|
|
|
|
|
|
|
|
|
|
|
|
|
|
|
|
|
|
|
|
|
|
|
|
|
|
|
|
|
|
|
|
|
|
|
|
|
|
|
|
|
|
|
|
|
|
|
|
|
|
|
|
|
|
|
|
|
|
|
|
|
|
|
|
|
|
|
|
|
|
|
|
|
|
|
|
|
|
|
|
|
|
|
|
|
|
|
|
|
|
|
|
|
|
|
|
|
|
|
|
|
|
|
|
|
|
|
|
|
|
|
|
|
|
|
|
|
|
|
|
|
|
|
|
|
|
|
|
|
|
|
|
|
|
|
|
|
|
|
|
|
|
|
|
|
|
|
|
|
|
|
|
|
|
|
|
|
|
|
|
|
|
|
|
|
|
|
|
|
|
|
|
|
|
|
|
|
|
|
|
|
|
|
|
|
|
|
|
|
|
|
|
|
|
|
|
|
|
|
|
|
|
|
|
|
|
|
|
|
|
|
|
|
|
|
|
|
|
|
|
|
|
|
|
|
|
|
|
|
|
|
|
|
|
|
|
|
|
|
|
|
|
|
|
|
|
|
|
|
|
|
|
|
|
|
|
|
|
|
|
|
|
|
|
|
|
|
|
|
|
|
|
|
|
|
|
|
|
|
|
|
|
|
|
|
|
|
|
|
|
|
|
|
|
|
|
|
|
|
|
|
|
|
|
|
|
|
|
|
|
|
|
|
|
|
|
|
|
|
|
|
|
|
|
|
|
|
|
|
|
|
|
|
|
|
|
|
|
|
|
|
|
|
|
|
|
|
|
|
|
|
|
|
|
|
|
|
|
|
|
|
|
|
|
|
|
|
|
|
|
|
|
|
|
|
|
|
|
|
|
|
|
|
|
|
|
|
|
|
|
|
|
|
|
|
|
|
|
|
|
|
|
|
|
|
|
|
|
|
|
|
|
|
|
|
|
|
|
|
|
|
|
|
|
|
|
|
|
|
|
|
|
|
|
|
|
|
|
|
|
|
|
|
|
|
|
|
|
|
|
|
|
|
|
|
|
|
|
|
|
|
|
|
|
|
|
|
|
|
|
|
|
|
|
|
|
|
|
|
|
|
|
|
|
|
|
|
|
|
|
|
|
|
|
|
|
|
|
|
|
|
|
|
|
|
|
|
|
|
|
|
|
|
|
|
|
|
|
|
|
|
|
|
|
|
|
|
|
|
|
|
|
|
|
|
|
|
|
|
|
|
|
|
|
|
|
|
|
|
|
|
|
|
|
|
|
|
|
|
|
|
|
|
|
|
|
|
|
|
|
|
|
|
|
|
|
|
|
|
|
|
|
|
|
|
|
|
|
|
|
|
|
|
|
|
|
|
|
|
|
|
|
|
|
|
|
|
|
|
|
|
|
|
|
|
|
|
|
|
|
|
|
|
|
|
|
|
|
|
|
|
|
|
|
|
|
|
|
|
|
|
|
|
|
|
|
|
|
|
|
|
|
|
|
|
|
|
|
|
|
|
|
|
|
|
|
|
|
|
|
|
|
|
|
|
|
|
|
|
|
|
|
|
|
|
|
|
|
|
|
|
|
|
|
|
|
|
|
|
|
|
|
|
|
|
|
|
|
|
|
|
|
|
|
|
|
|
|
|
|
|
|
|
|
|
|
|
|
|
|
|
|
|
|
|
|
|
|
|
|
|
|
|
|
|
|
|
|
|
|
|
|
|
|
|
|
|
|
|
|
|
|
|
|
|
|
|
|
|
|
|
|
|
|
|
|
|
|
|
|
|
|
|
|
|
|
|
|
|
|
|
|
|
|
|
|
|
|
|
|
|
|
|
|
|
|
|
|
|
|
|
|
|
|
|
|
|
|
|
|
|
|
|
|
|
|
|
|
|
|
|
|
|
|
|
|
|
|
|
|
|
|
|
|
|
|
|
|
|
|
|
8 9 F G H I J
Rear Panel
1 TUNER AM/FM (75Ω) terminals: The supplied |
6 STRM BOX jacks: Connect to a Streaming Media |
G GAME 2 jacks: Connect a game console that has |
antennas are connected. |
Player. When a power supply is required, connect using |
component video jacks. This corresponds with the |
2 to TV jack: Connect to a TV using a HDMI cable. |
a USB cable to the POWER OUT port. This corresponds |
"GAME 2" input selector. |
Change the input selector to "TV" to hear audio from the |
with the "STRM BOX" input selector. |
H VCR jacks: Connect to a Video Cassette Recorder. This |
TV. |
7 Power cord |
corresponds with the "VCR" input selector. |
¼¼If your TV does not support ARC, you need connection F in addition to |
8 RI REMOTE CONTROL jack: An Onkyo product with RI |
I SUBWOOFER jack : A subwoofer with built-in amplifier |
this connection. |
jack can be connected and synchronized with this unit. |
is connected. |
3 BD/DVD jacks: Connect to a Blu-ray Disc Player or |
9 CD jacks: Connect to audio equipment such as a CD |
J SPEAKERS jacks : Speakers are connected. Up to 7 |
DVD Player using a HDMI cable. This corresponds with |
Player using a digital optical cable. This corresponds |
channels of speakers can be connected. |
the "BD/DVD" input selector. |
with the "CD" input selector. |
|
4 CBL/SAT jacks: Connect to a Cable Set-top box using |
F TV jacks: If your TV does not support ARC, you need |
|
a HDMI cable. This corresponds with the "CBL/SAT" |
to connect this jack to the audio output jack on the TV, |
|
input selector. |
in addition to connection 2. This corresponds with the |
|
5 GAME 1 jack: Connect to a Game console using a |
"TV" input selector. |
|
HDMI cable. This corresponds with the "GAME 1" input |
|
|
selector. |
|
|
En-4

Step 1: Connections
 1 Connecting the TV and Players
HDMI |
HDMI |
AV OUT |
IN |
OUT |
|
Connection example
Before Start
●Connect this unit between the TV and player.
●To select the source to play, select the input selector button with the same name as the jack to which it is
connected. Input switches automatically when you have connected equipment that conforms to the CEC (Consumer Electronics Control) standard to this unit using a HDMI cable. ()
●This allows audio and video signal transmission from players to the TV even if this unit is in standby. (HDMI Standby Through function) ()
●The power cord must be connected only after all other connections are
completed.
It is necessary to make appropriate settings to enable this function. See "3 HDMI Setup" of "Step 2: Setting Up".
Cable used for connection (sold separately)
HDMI cable
Component video cable
Composite video cable
Digital coaxial cable
Digital optical cable
Analog audio (RCA) cable
Connection to TV
Connect the "to TV" jack and the HDMI IN jack of the TV with a HDMI cable. This is the only connection necessary with a TV that supports ARC. If your TV does not support ARC, you need to connect the "TV" jack to the audio output jack on the TV with a digital optical cable or an RCA cable, in addition to this connection to the "to TV" jack.
This function enables you to play the audio from the TV through the speakers of this unit just by connecting this unit and the TV with a single HDMI cable. To use the ARC function, connect to the ARC compatible HDMI jack of the TV and make
appropriate settings on this unit. See "3 HDMI Setup" of "Step 2: Setting Up".
Audio connection with a TV not supporting ARC
Select an appropriate connection for your TV.
TV
AUDIO
DIGITAL
OPTICAL
OUT
OUT
En-5
Connection with a player that has a HDMI jack
Connect to the "BD/DVD", "CBL/SAT", "GAME 1", and "STRM BOX" jacks using a HDMI cable. Connect the equipment to the corresponding jack, for example a Blu-ray Disc Player to "BD/DVD", so that it is easy for you when selecting with the input selector. Connect a Streaming Media Player to the "STRM BOX" jack. When a power supply is required, connect using a USB cable to the POWER OUT port. ()
¼¼The POWER OUT jack supports a 5V/1A power supply.
Connection with a player that does not have a HDMI jack
Connect equipment with video output jacks to the "BD/ DVD", "CBL/SAT", "GAME 2", and "VCR" jacks. Connect with component video cable or composite video cable for video signals and digital coaxial cable or RCA cable for audio signals.
Connect audio equipment such as a CD Player using a digital optical cable or an RCA cable to the "CD" jack. ●● Video signals input to the component video input or
the composite video input will be upconverted to HDMI signals and then output from the "to TV" jack. When upconverting video signals input to the component video input for output from the HDMI OUT jack, set the output resolution of the player to 480i or 576i. If the input has 480p/576p or higher resolution, a message prompting you to change the resolution setting will appear. If your player does not support 480i or 576i output, use the composite video jack.
●● Connection with a digital coaxial cable or digital optical cable is necessary for playback of digital surround sources such as Dolby Digital. The digital in optical jack of the unit has a cover, push in the cable against the cover as it is turned inside.
Step 1: Connections
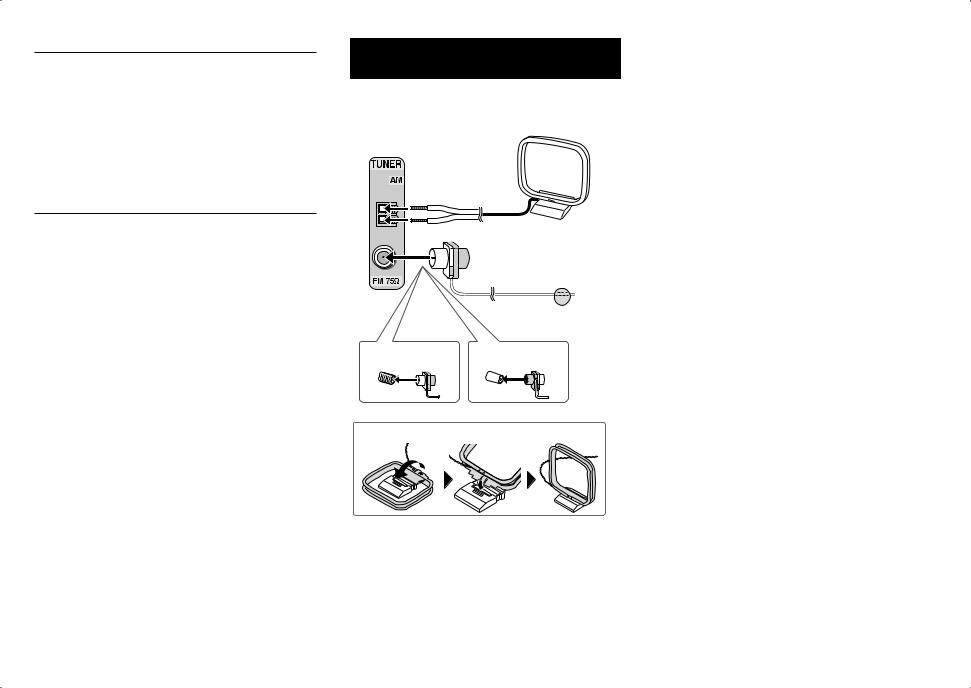
 2 Connecting the AM/FM Antenna
Connect the antennas to listen to AM/FM broadcast. When listening to the broadcast for the first time, adjust the antenna position and orientation to get the best reception.
AM loop antenna (supplied)
Indoor FM antenna (supplied)
Fix with a tack on the wall.
(North American models) |
(European, Australian |
|
and Asian models) |
Assemble the AM loop antenna (supplied).
En-6
 Loading...