


WS-331M
Table of contents
 Loading...
II'ltroduction0
J
• The contents of this document may be changed in the future without
advanced notice. Contact our Customer Support Center for the latest
information relating to product names and model numbers.
• The utmost care has been taken to ensure the integrity of the contents of this
In
document.
found, please contact our Customer Support Center.
• Any liability for passive damages or damage of any kind occurred due to data
loss incurred by a defect of the product, repair performed by the third party
other than Olympus or an Olympus authorized service station, or any other
reasons is excluded from the Olympus's liability.
[J
Trademarks
the unlikely event that a questionable item, error, or omission is
IBM and PC/AT are the trademarks or registered trademarks of International
Business Machines Corporation.
Microsoft, Windows and Windows Media are registered trademarks of Microsoft
Corporation.
XT,
WOW
WOW XT technology is incorporated under license from SRS Labs, Inc.
MPEG Layer-3 audio coding technology licensed from Fraunhofer
Thomson.
The product was developed based
from NEC Corporation.
Other product and brand names mentioned herein may be the trademarks or
registered trademarks of their respective owners.
,,~
SRS and
_Pla_ys_----t
Ce)
symbol are trademarks of SRS Labs, Inc.
on
noise-canceling technology under license
liS
and
SRSCe)
~=
-'.TM
Windows
Media™
2
Safe and Proper Usage
Before using
you know how
easily accessible location
• The warning symbols indicate important safety related information.
others from personal injury or damage to property, it is essential that you always read the
warnings and information provided.
General
• Do
• Do
not
closed
not
dust.
your
new recorder, read
to
operate
Precautions
leave
automobile
store
the
the
recorder
it
for
recorder
under
direct
this
safely and correctly. Keep
future reference.
in
in
places
hot,
sunlight
humid
manual carefully
locations
or
on
the
exposed
to
beach
excessive
to
ensure that
this
To
such
manual in an
protect yourself and
as
inside
in
the
summer.
moisture
a
or
• Do
• Do
•
•
•
• Do
• Do
• Keep
not
clean
as
Avoid
equipment,
noise,
such
Avoid
Avoid
motorcycle,
the
not
TVs
equipment.
not
not
the
use
place
or
recording
move
sand
strong
disassemble,
operate
organic
unit.
the
refrigerators.
or
as
they
to
another
or
dirt.
vibrations
the
or
go-cart).
unit
out
solvents
recorder
playing
may
These
of
cause interferenceand noise.Ifyou experience
place,
or
repair
unit
the
while
reach
such
on
top
back
or
can
cause
shocks.
or
modify
operating
of
as
of
or
near
move
cellular
irreparable
children.
alcohol
near
the
recorder
the
unit
a
vehicle
and
electric
phones
damage.
yourself.
(such
lacquer
appliances
or
other
further
away
asabicycle,
thinner
such
wireless
from
to
3
<Warning regarding data loss>
Recorded
mistakes,
It
is
recommended
such
Any
data
party
other
as a
liability
loss
other
reasons
content
unit
computer
incurred
malfunction,
for
than Olympus
is
Batteries
~Warning
•
Batteries
should
in
memory
to
back
hard disk.
passive damages
by
a defect
or
excluded from
never
be
may be destroyed
or
during
up
and save
of
an Olympus authorized service station,
the
exposed
or
erased by
repair work.
important
or
damage
the product, repair performed by the
Olympus's liability.
to
flame,
of
content
any
heated,
kind
to
occurred
short-circuited
operating
other
due
media
to
third
or
any
or
disassembled.
•
Do
rechargeable
•
Never
•
•
If
abnormal
CD
not
Keep
you
attempt
use
batteries
any
notice
noise,
to
recharge
batteries.
battery
out
anything
of
heat,
the
with
smoke,
a
reach
unusual
alkaline,
torn
or
or
of
when
a
lithium
cracked
children.
using
burning
outer
odor:
this
or
any
cover.
product
remove the batteries immediately while being careful not to burn yourself,
and;
® call your dealer or local Olympus representative for service.
other
such
non-
as
4
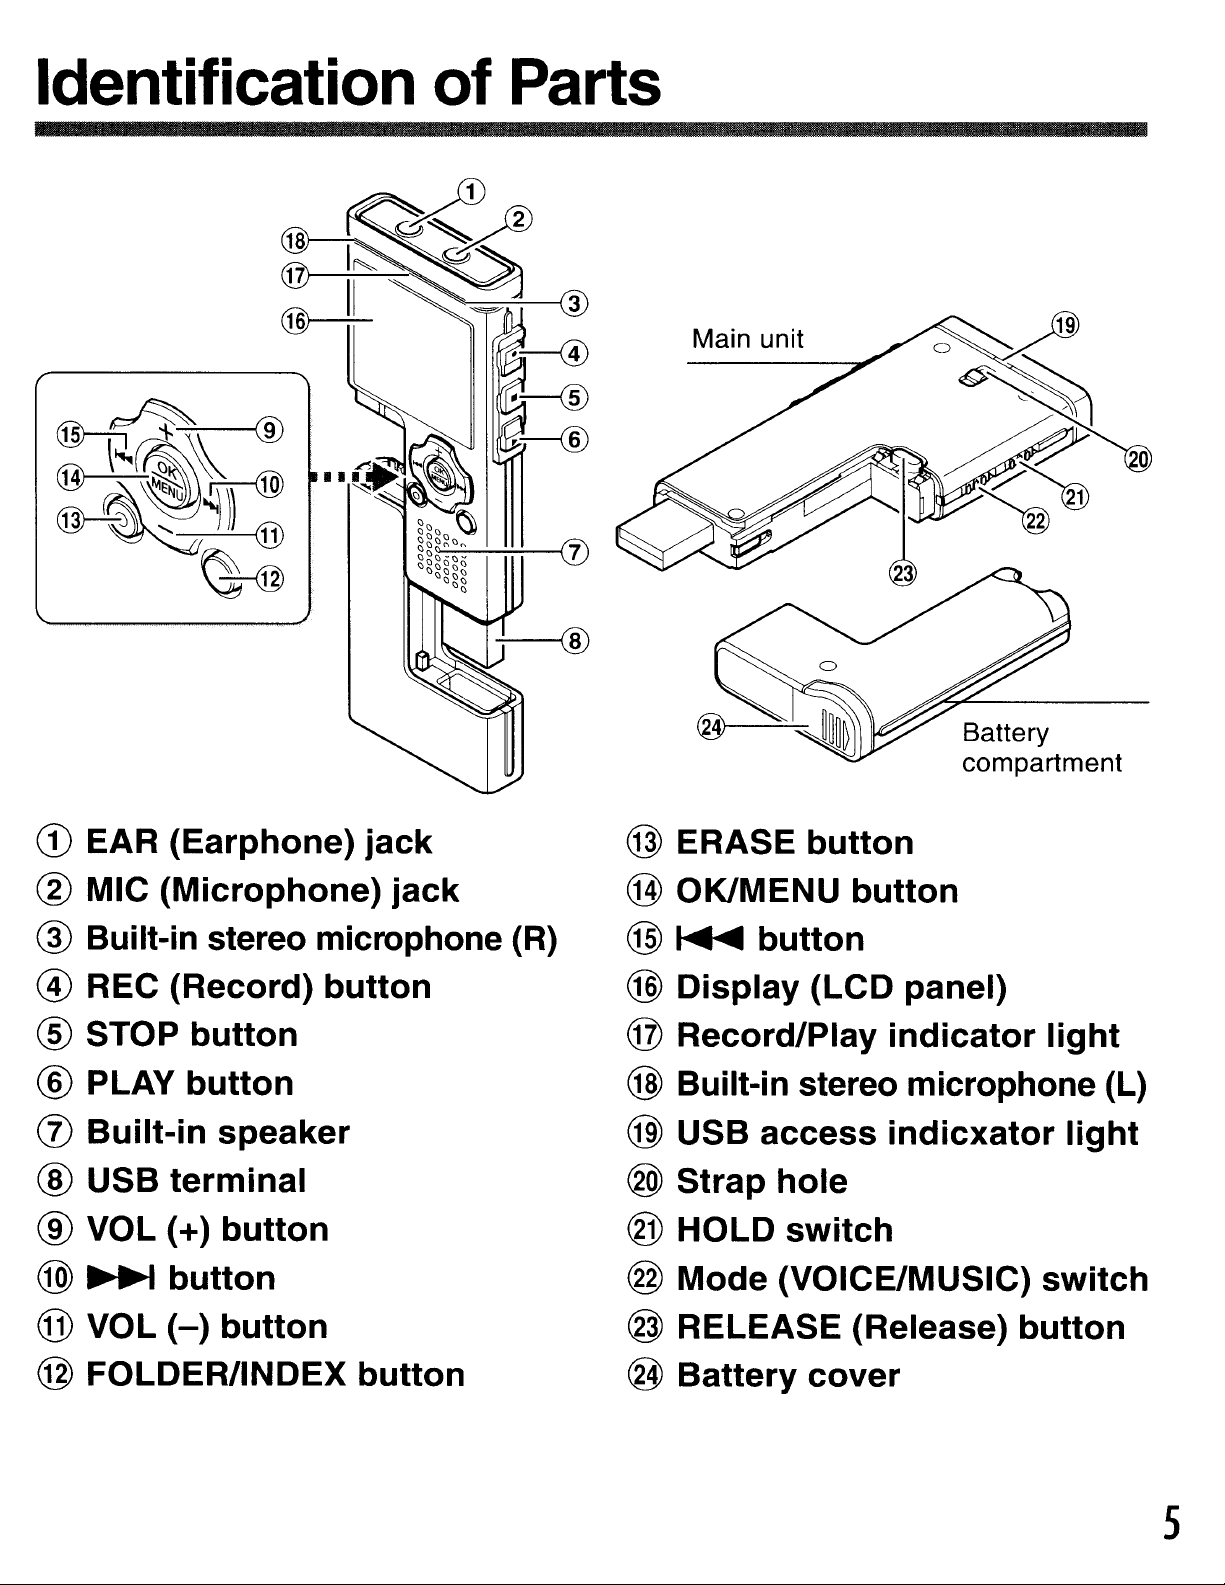
Identification of Parts
CD
EAR
(Earphone)
jack
---=------i
3
@ ERASE
Main unit
Battery
compartment
button
® MIC
(Microphone)
jack
® Built-in stereo microphone (R)
@ REC
® STOP
® PLAY
(j)
Built-in
® USB
® VOL (+)
@
~
@ VOL
@ FOLDER/INDEX
(Record)
button
button
speaker
terminal
button
button
(-)
button
button
button
@ OK/MENU
@
~
@
Display
@
Record/Play
button
button
(LCD
panel)
indicator
light
@ Built-in stereo microphone (L)
@)
USB
®
Strap
® HOLD
@
Mode
@ RELEASE (Release)
@
Battery
access
hole
switch
(VOICE/MUSIC)
cover
indicxator
light
switch
button
5
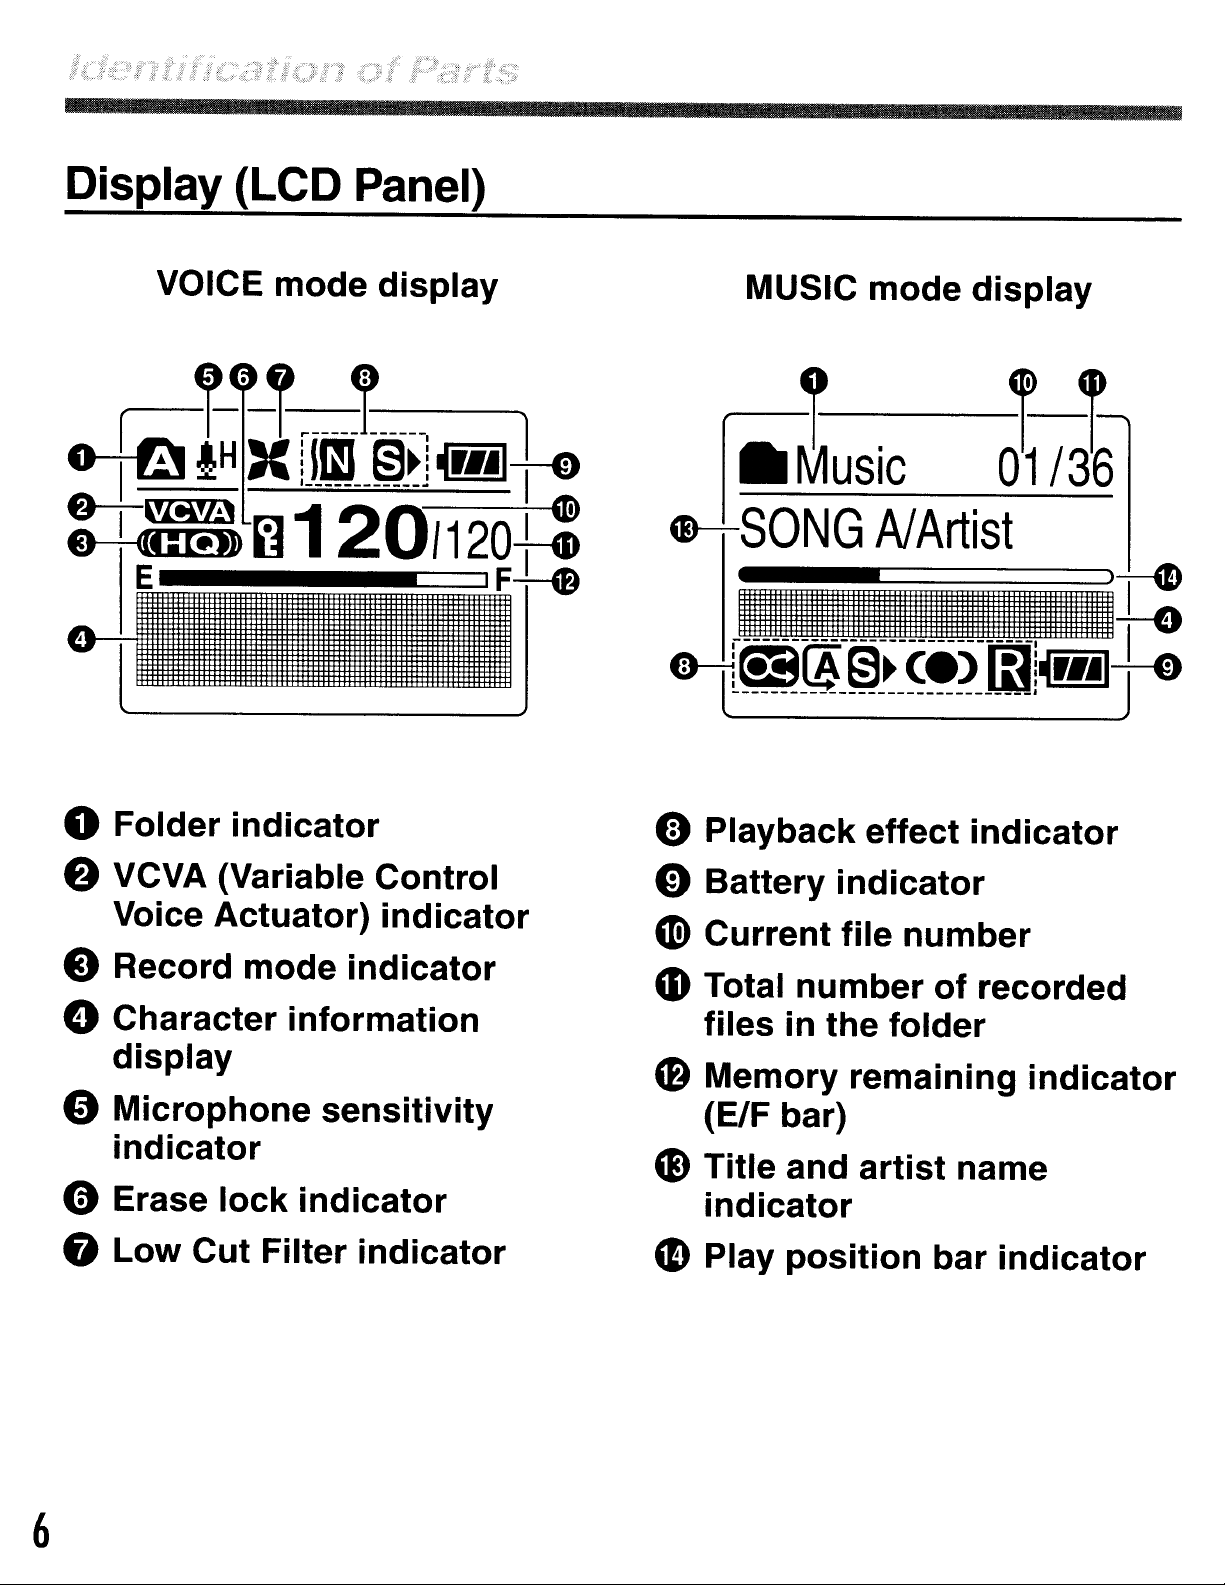
Display (LCD Panel)
VOICE
~r-·-1.----~-----
o-tB
IH
mode
display
1
X
!Jl~L~~j
mf0
MUSIC
GH-SONG
mode
AI
Artist
display
:+=~120/120t:
o
E
Folder
indicator
'F+-0
_i
iiIIII
o-tl~~-~~-~'~-mj~r
o Playback
effect
I.
.'t:
••
indicator
lr
e VCVA (Variable
Voice
o Record
o Character
display
"
Microphone
indicator
o Erase
8
Low
Actuator)
mode
information
lock
Cut
indicator
Filter
indicator
sensitivity
Control
indicator
indicator
o
Battery
CD)
Current
CD
Total
files
C8
Memory
(ElF bar)
CD
Title and
indicator
CD
Play
indicator
file
number
in
the
position
folder
remaining
artist
number
of
recorded
name
bar
indicator
indicator
6
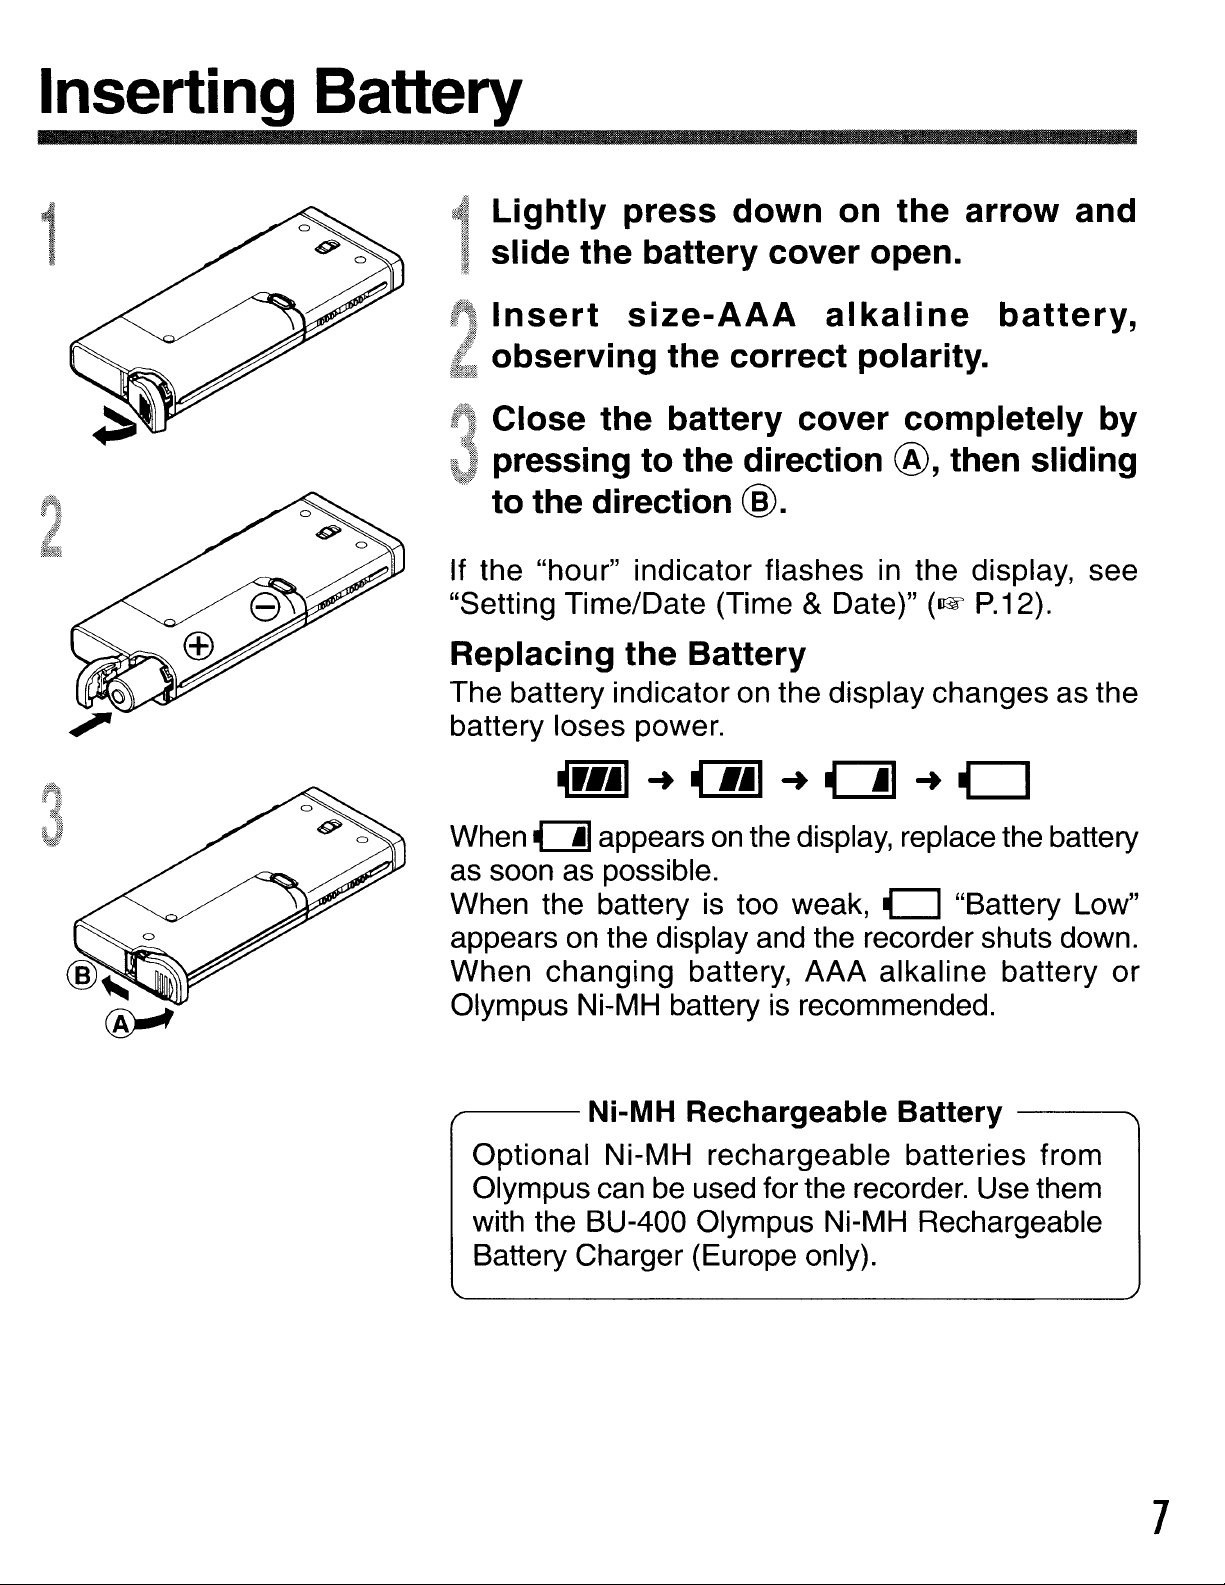
Inserting Battery
Lightly press down on the arrow and
1
slide the battery cover open.
Insert
observi
Close the battery cover completely
pressing to the direction @, then sliding
to the direction
If the "hour" indicator flashes
"Setting Time/Date (Time
Replacing the Battery
The battery indicator on the display changes as the
battery loses power.
~r.jl~~
size-AAA
ng
the correct polarity.
alkaline
@.
& Date)"
.jl
~
a
battery,
in
the display, see
(lIE
P.12).
~
0
by
When a appears
as
as soon
When the battery is too weak,
appears
When changing battery, AAA alkaline battery
Olympus Ni-MH batteryisrecommended.
.,.---
Optional Ni-MH rechargeable batteries from
Olympus can
with the BU-400 Olympus Ni-MH Rechargeable
Battery Charger (Europe only).
possible.
on
the display and the recorder shuts down.
Ni-MH Rechargeable Battery
on
the display, replace the battery
0 "Battery Low"
be
used for the recorder. Use them
-------....
or
7
R
• Manganese battery may not be usedinthis recorder.
• Be sure to stop the recorder before replacing the battery. Unloading the battery while the recorder is in
use may corrupt the file. If you are recording into a file and the battery runs out, you will lose your currently
recorded file because the file header will not be able to close. It
see only one hash mark in the battery indicator.
• If it takes longer than 15 minutes to replace the dead battery or if you take the battery
at short intervals, you may have to reset the time when you have loaded a fresh battery.
• Remove the battery if you are not going to use the recorder for
• When playing a voice/music file, the recorder may be reset due to the reduction of the voltage output of
on
the battery depending
lower the volume of the recorder.
the volume level even if
~r
••
1is displayed
is
crucial to change the battery once you
in
and out repeatedly
an
extended period of time.
in
the battery indicator.Inthis case,
8
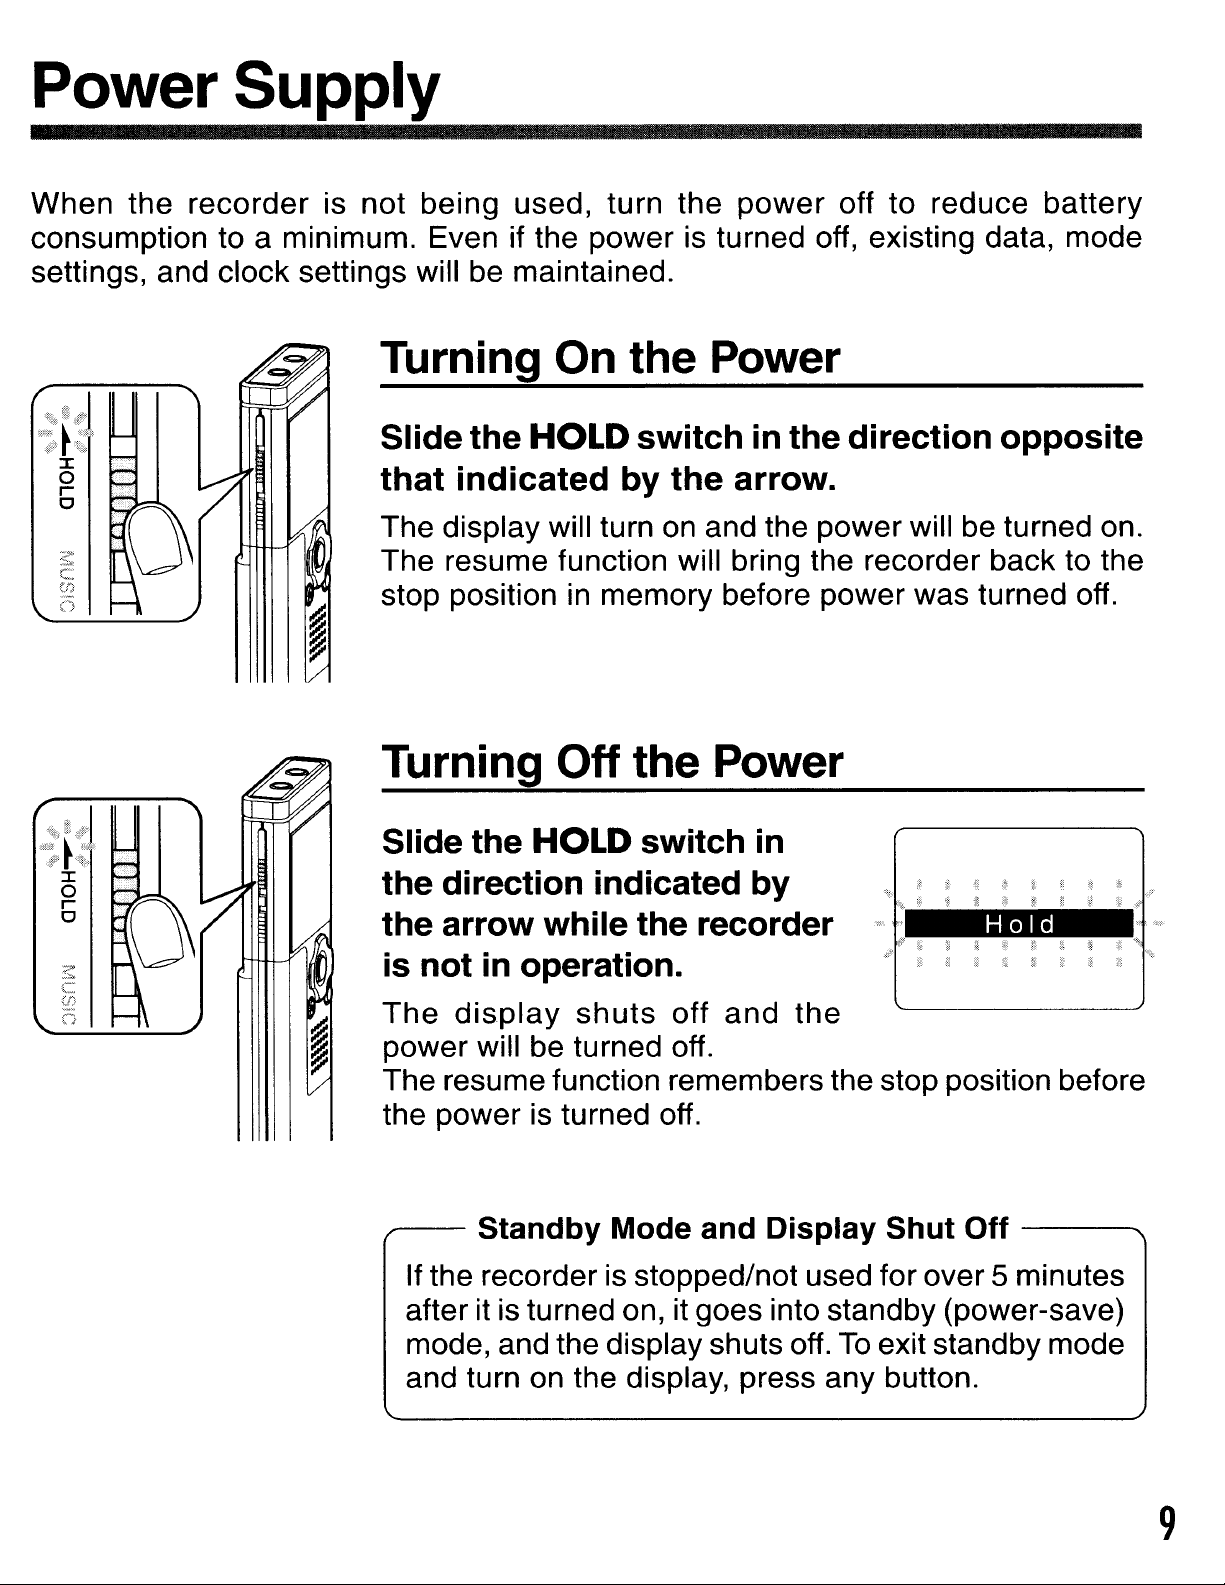
Power Supply
When
consumption to a minimum. Even if the power is turned off, existing data, mode
settings, and clock settings will be maintained.
the
recorder
is
not
being
used, turn
the
power
off
to
reduce
battery
Turning On the Power
Slide the
that indicated
The
The
stop position in memory before
display will turn on and the
resume function will bring the recorder back to the
HOLD
switch
in
the direction opposite
by the arrow.
power
power
will be turned on.
was turned off.
Turning Off the Power
Slide the
HOLD
switch
in
the direction indicated by
the arrow while the recorder
in
is not
The
power
The resume function remembers the stop position before
the
--
display
power
If the recorder is stopped/not used for
after it is turned on, it goes into standby (power-save)
mode, and the display shuts off.
and turn on the display, press any button.
operation.
shuts
will be turned off.
is turned off.
Standby Mode and Display Shut Off
off
and
the
over
To
exit standby mode
Hold
-----....
5 minutes
9
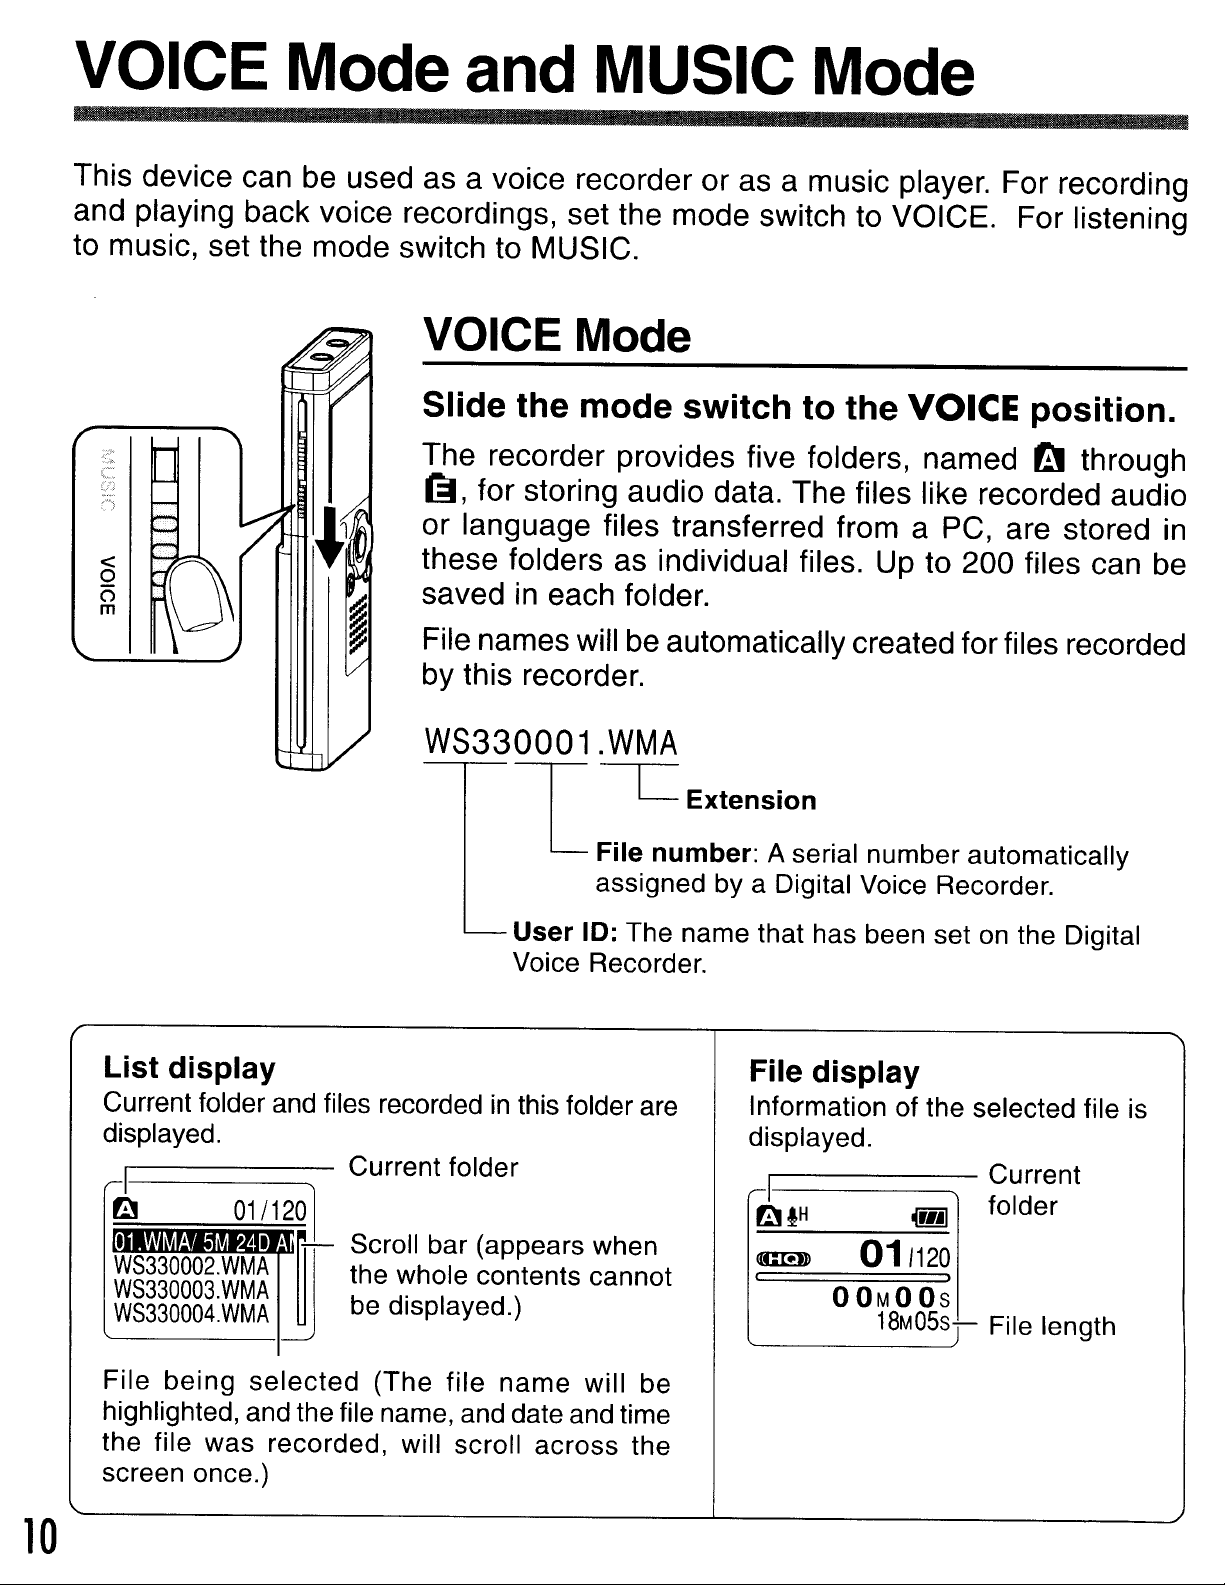
VOICE Mode
This device can be used as a voice recorder or as a music player. For recording
and playing back voice recordings, set the mode switch to VOICE. For listening
to music, set the mode switch to MUSIC.
and
MUSIC Mode
VOICE Mode
<
o
o
m
Slide
The recorder provides five folders, named
(]J, for storing audio data. The files like recorded audio
or language files transferred from a PC, are stored in
these folders as individual files. Up to 200 files can be
saved
File names will
by this recorder.
the
in
mode
each folder.
be
switch
automatically created for files recorded
to
the
VOICE
position.
~
through
WS330001.WMA
L
User
Voice Recorder.
----c=
File
assigned by a Digital Voice Recorder.
10: The name that has been set
Extension
number:
A serial number automatically
on
the Digital
10
List
Current folder and files recordedinthis folder are
displayed.
~I
File
highlighted, and the file name, and date and time
the file was recorded, will scroll across the
screen once.)
display
WS330003.WMA
WS330004.WMA
being
selected
Current folder
Scroll bar (appears when
the whole contents cannot
be displayed.)
(The file
name
will be
File
Information of the selected file is
displayed.
~I
rl'1l
CIDll
«
display
H
011120
o
OM0Os
~
...
I
•
18M05s
Current
folder
File length
j
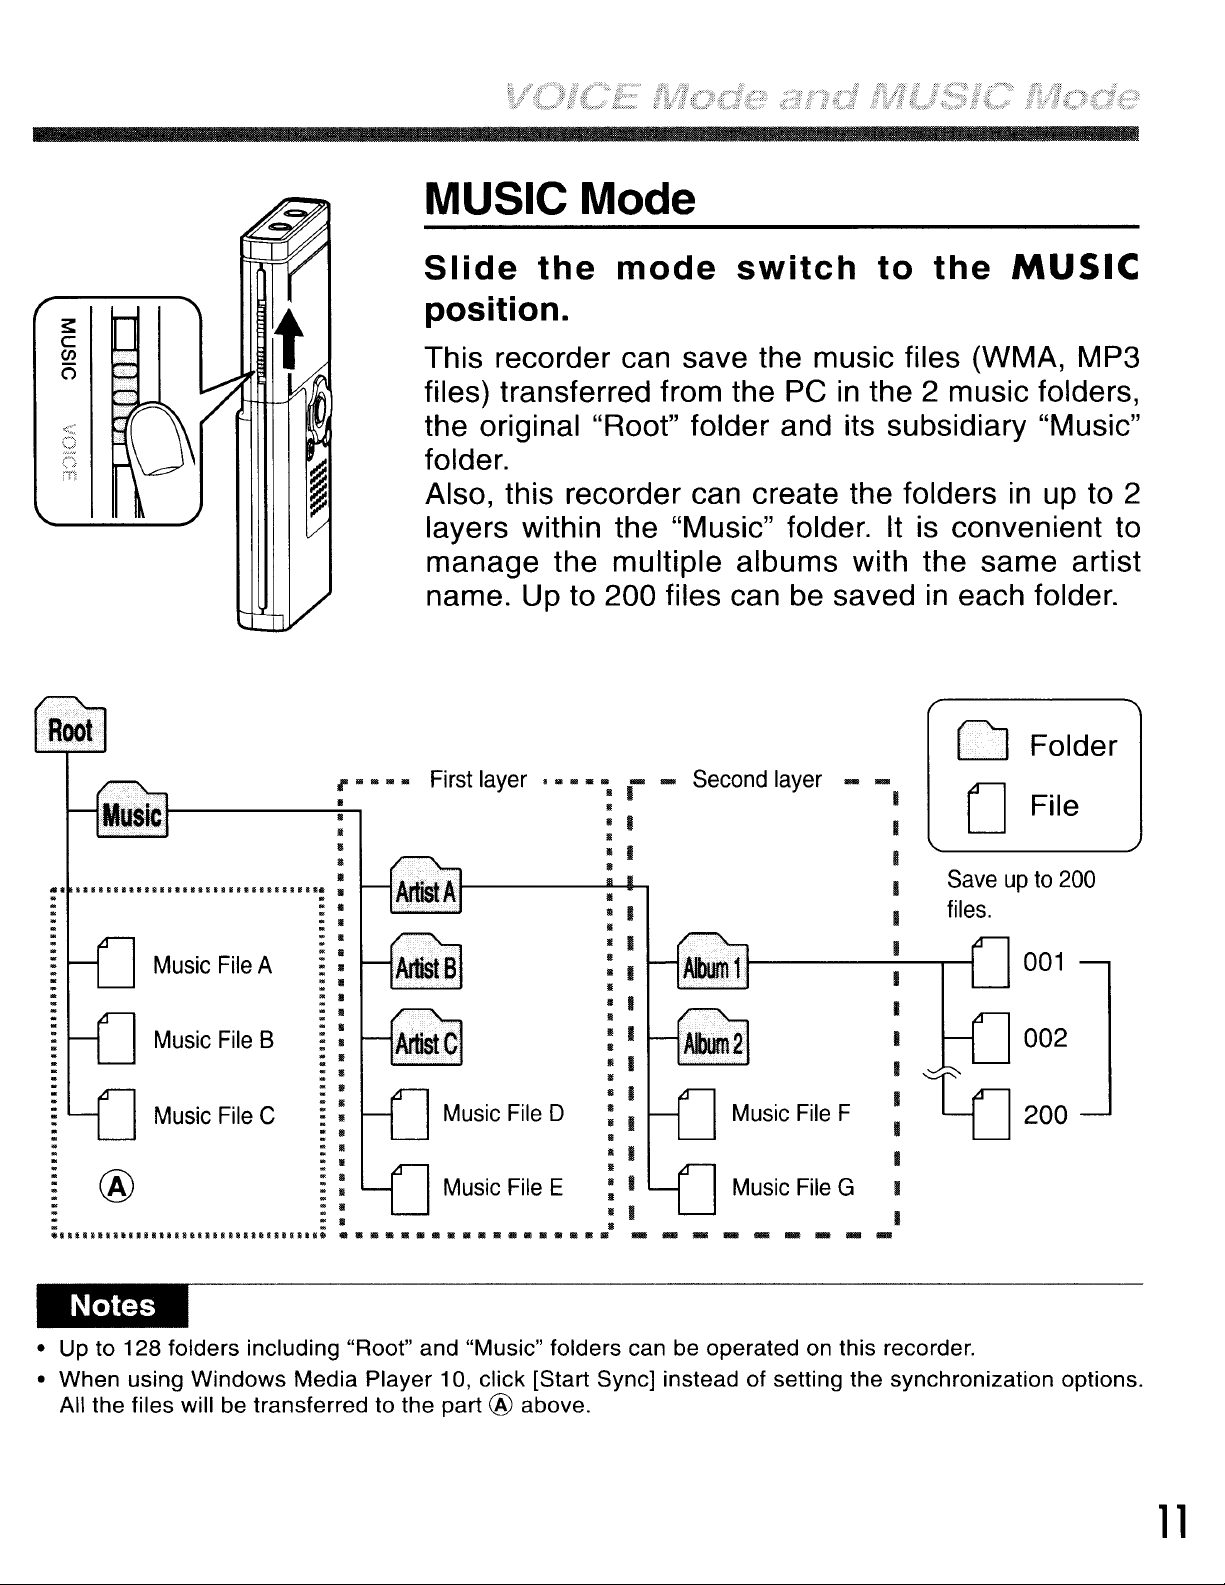
MUSIC Mode
t
,.
........
II
•
•
•
•
Slide
the
mode
switch
to
the
MUSIC
position.
This recorder can save the music files (WMA, MP3
PC
in
files) transferred from the
the original "Root" folder and its subsidiary "Music"
folder.
Also, this recorder can create the folders
layers within the "Music" folder. It is convenient to
manage the multiple albums with the same artist
name. Up to 200 files can be saved
First
layer
.........
II
•
• I
•
• I
•
....
I
....
Second
layer ........
the 2 music folders,
in
up to 2
in
each folder.
C1J
Folder
oFile
Saveupto
files.
200
Music
Music
.
. : .
lit
Music
®
: : . .
w,III;IIJIIIIIJllmlllllllllllllllll
File
File
File
A
B
C :
·
·
·
::
.
II
:
II
:
\I
::.
: .
: .
••••••••••••
Music
Music
File
File
g
•••
0
•
E
•
•
B
••
Music
Music
File
File
G
F
~200
---------
• Up to 128 folders including "Root" and "Music" folders can be operated on this recorder.
• When using
All the files will be transferred to the part @ above.
Windows
Media Player 10, click [Start Sync] instead of setting the synchronization options.
001
002
11
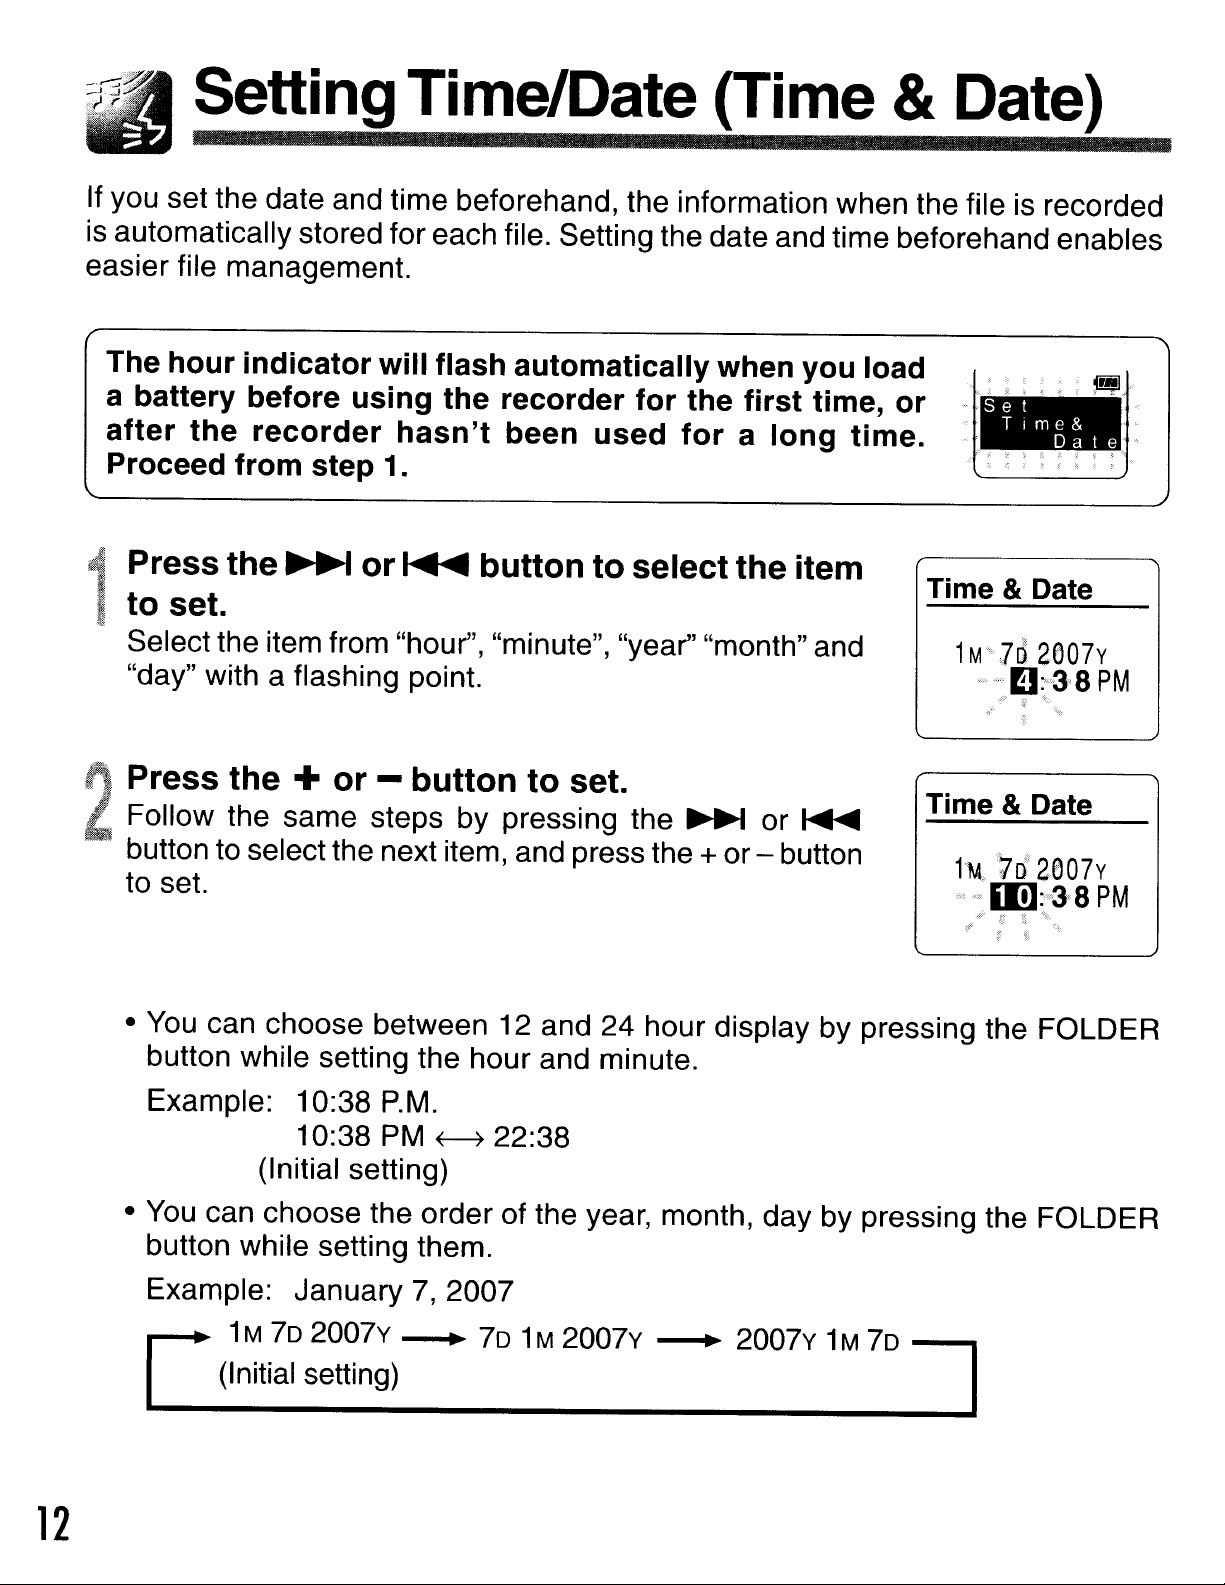
SettingTime/Date (Time &Date)
If you set the date and time beforehand, the information when the file is recorded
is automatically stored for each file. Setting the date and time beforehand enables
easier file management.
The
a
after
~
I
@
'
, Follow the same steps by pressing the
2
hour
battery
Proceed
Press
to
set.
Selectthe item from "hour", "minute", "year" "month" and
"day" with a flashing point.
Press
button to select the next item, and press the +or- button
to set.
indicator
before
the
from
the
the
using
recorder
step 1.
~
+
or
will
hasn't
or
-
flash
the
~
button
automatically
recorder
been
button
to
used
to
set.
for
the
for
select
~
when
first
a
the
or
you
time,
long
item
~
load
or
time.
Set
Tlme&
Dale
Time & Date
Time
&Date
12
• You can choose between 12 and 24 hour display by pressing the FOLDER
button while setting the hour and minute.
Example: 10:38
10:38 PM
(Initial setting)
•
You
button while setting them.
C
can choose the order of the year, month, day by pressing the FOLDER
Example: January
1M
70 2007v • 70
(Initial setting)
P.M.
7,
~
2007
22:38
1M
2007v
• 2007v 1M
70
=:J
.·
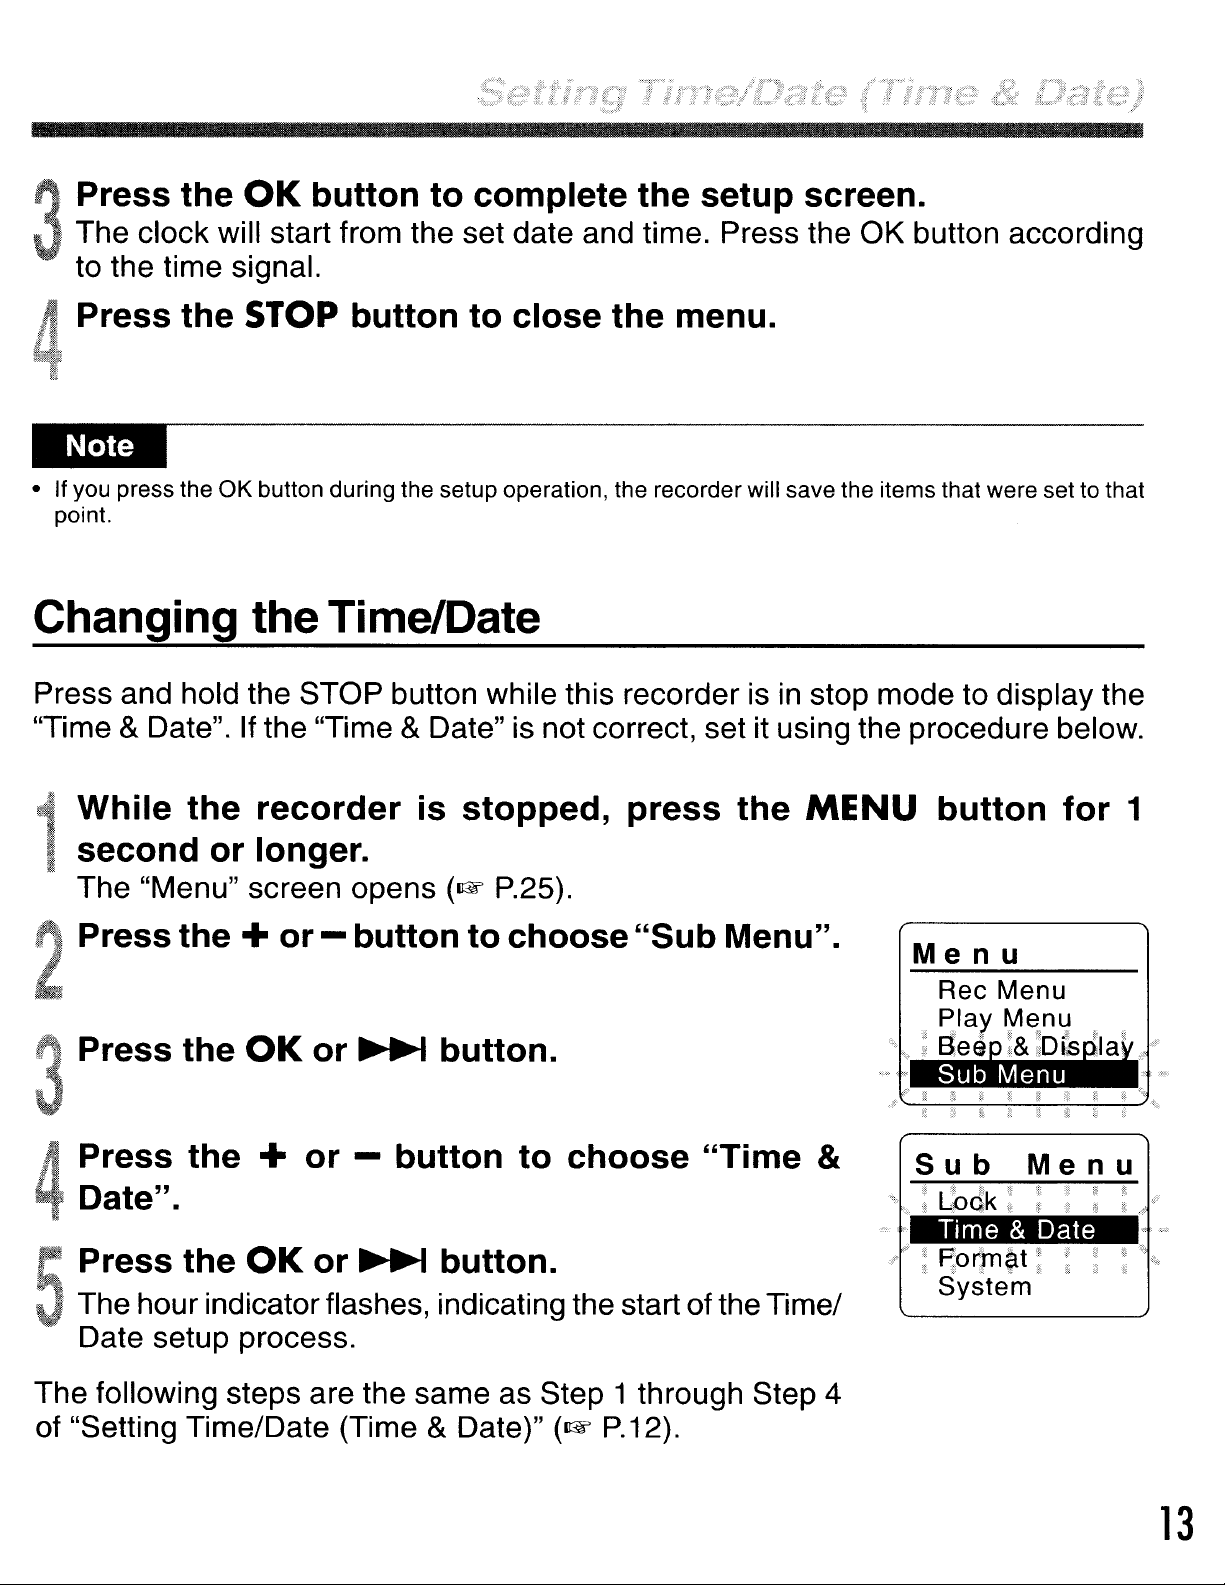
Press the
. The clock will start from the set date and time. Press the OK button according
OK
button to complete the setup screen.
3
to the time signal.
Press the
• If you press the
point.
STOP
OK
button during the setup operation, the recorder will save the items that were
button to close the menu.
Changing the Time/Date
Press and hold the STOP button while this recorderisin
"Time
&Date". If the "Time &Date" is not correct, set it using the procedure below.
While the recorder is stopped, press the
second or longer.
The "Menu" screen opens
(row
P.25).
settothat
stop mode to display the
MENU button for 1
Press the + or - button to choose "Sub Menu".
Press the
OK
or
~
button.
Press the + or - button to choose "Time &
Date".
Press the
The hour indicator flashes, indicating the start of the Time/
Date setup process.
The following steps are the same as Step 1 through Step 4
of "Setting Time/Date (Time
OK
or
~
button.
& Date)"
(row
P.12).
Menu
Sub
i Lbdk;
Time & Date
" "
Porm?lt
System
Menu
?
13
Recording
Before starting recording, select a folder between Folder
be
five folders can
Folder
dedicated to holding business information.
Newly recorded audio will
til
..•..
·.
n
,~
JJt,
ih.
tll might
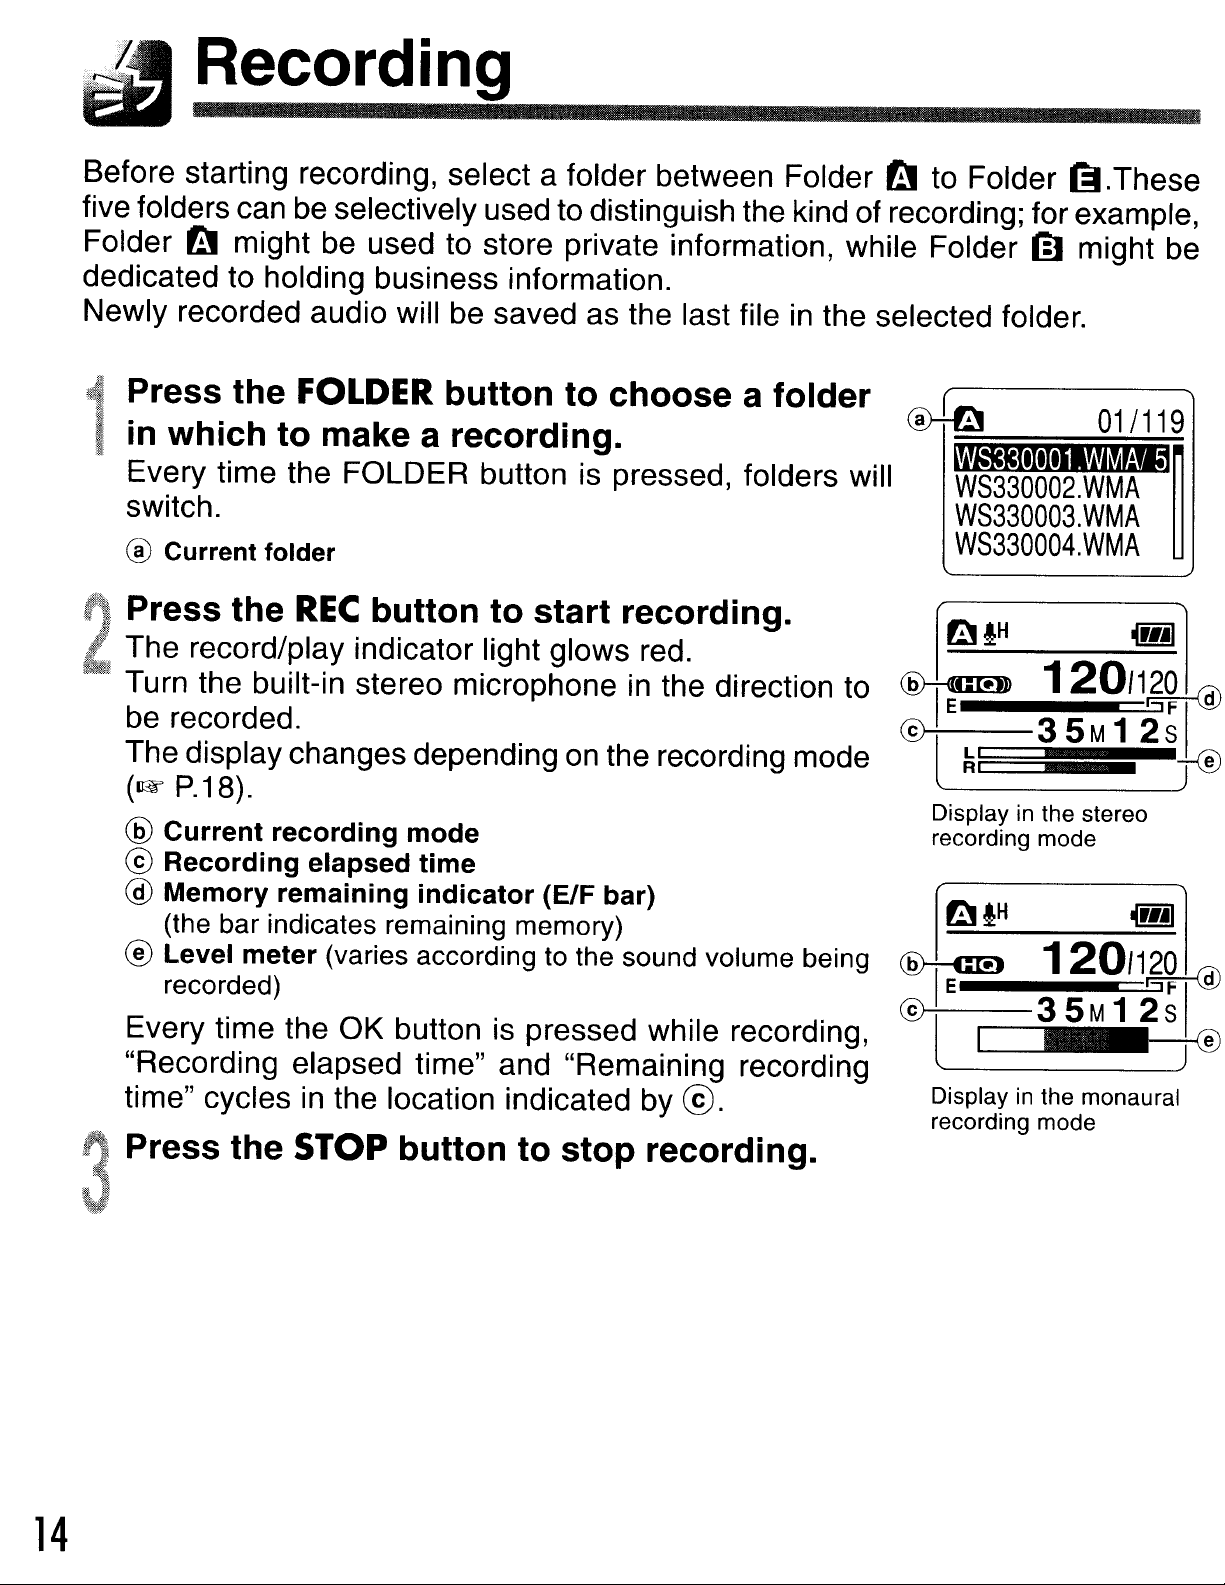
Press
in
which
Every time the FOLDER button is pressed, folders will
switch.
®
Current
Press
The record/play indicator light glows red.
Turn the built-in stereo microphone
be recorded.
The display changes depending
(1&
®
Current
©
Recording
@
Memory
(the bar indicates remaining memory)
® Level
recorded)
Every time the OK button is pressed while recording,
"Recording elapsed time" and "Remaining recording
time" cycles
the
folder
the
P.18).
meter
selectively used to distinguish the kind of recording; forexample,
be
used to store private information, while Folder mmight be
be
saved as the last file
FOLDER
to
make a
REC
recording
elapsed
remaining
in
button
(varies according to the sound volume being
the location indicated by
button
recording.
to
mode
time
indicator
to
choose
start
on
the recording mode
(ElF bar)
recording.
in
the direction
@.
in
a
folder
the selected folder.
to
III
to Folder £;I.These
~
WS330002.
WS330003.
-~
WS330004.WMA
Displayinthe stereo
recording mode
~
fH
~
®l
WMA
WMA
120/1,~~
35M12s1
.~
Displayinthe monaural
recording mode
01/119
I(gj)
@
14
I)
Press
'
...
',
..
-,'
.
....
J
the
STOP
button
to
stop
recording.
•
To
ensure recording from the beginning, start speaking after you see the red record/play indicator light on.
• A beep will sound when remaining recording time reaches 60 seconds, 30 seconds, and 10 seconds while
recording.
• When remaining recording time is less than 60 seconds, the record/play indicator light starts flashing in
red. When the recording time is decreasing to 30 or 10 seconds, the light flashes faster.
• "Memory Full" or "Folder Full" will be displayed when the memory or folder capacity is full. Delete any
unnecessary files before recording any further
• Ifthe REC button is pressed while the mode switch is set to MUSIC, "Music Mode" will flash on the screen.
Set the mode switch to VOICE before recording
(1rW
(1&
P.35).
P.1
0).
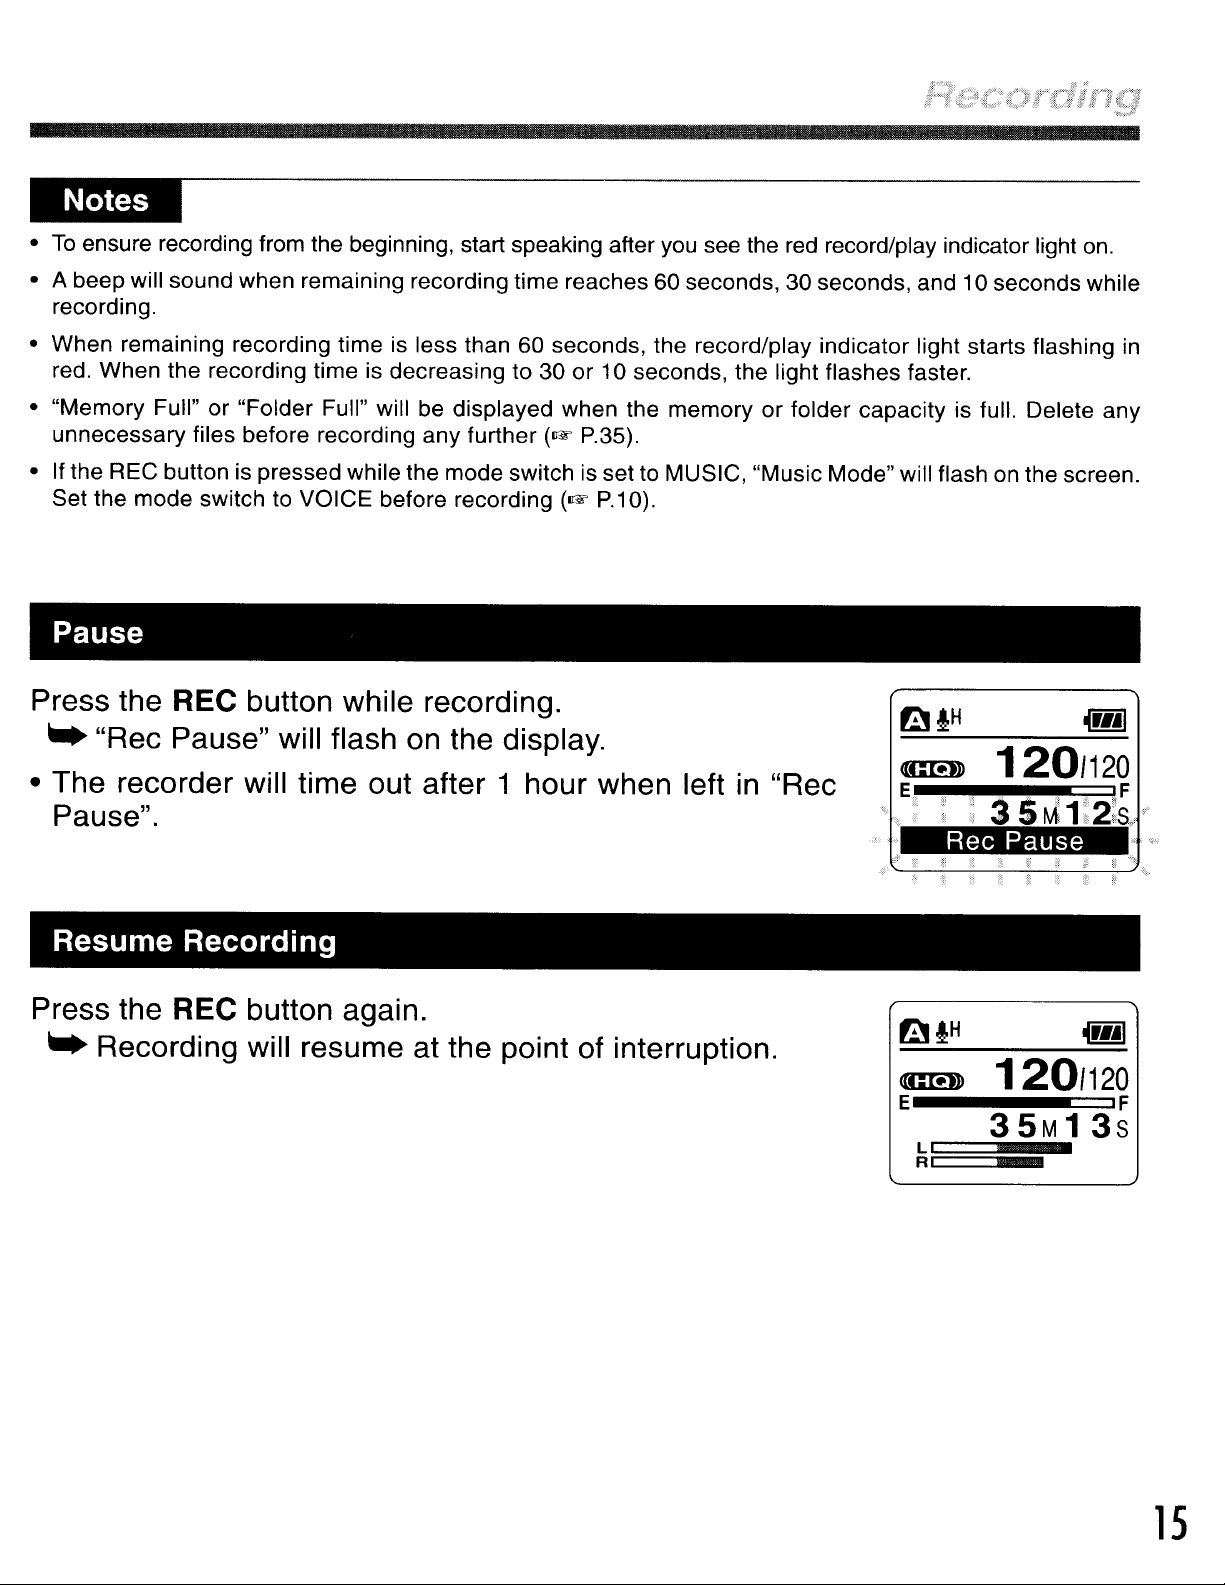
Pause
Press the REC button while recording.
..
"Rec Pause" will flash on the display.
• The recorder will time out after 1 hour when left
Pause".
Resume
Recording
Press the REC button again.
..
Recording will resume at the point of interruption.
in
"Rec
Rec
Pause
~fH
([CID)
E iF
120/120
g
35M13s
LCI
RI=
5
=
15
Using
the
Variable
Control
Voice
Actuator(VCVA)
When the microphone senses that sounds have reached a preset threshold volume
level, the built-in Variable Control Voice Actuator (VCVA) starts recording
automatically, and stops when the volume drops below the threshold level.
The VCVA feature extends recording time and conserves memory by stopping
recording during silent periods, which helps the playback to be more efficient.
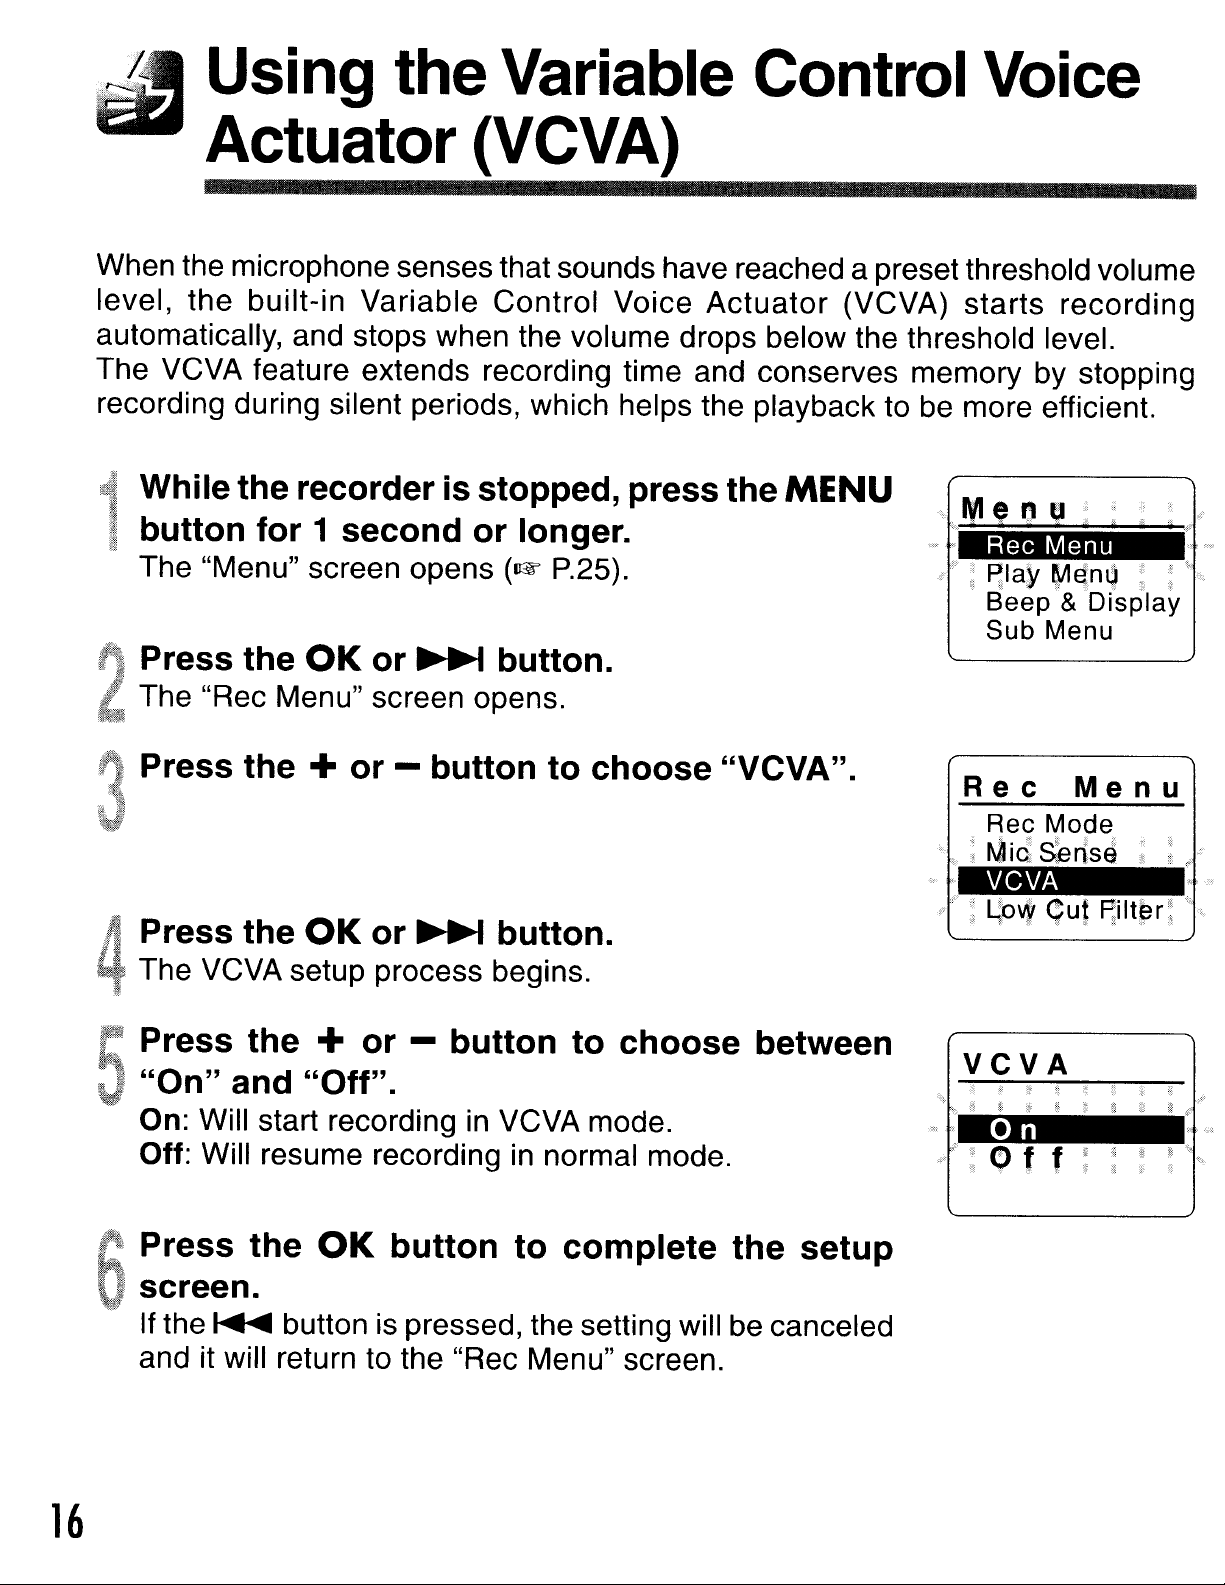
While
button
The "Menu" screen opens
Press
The "Rec Menu" screen opens.
Press
Press
The VCVA setup process begins.
CPress
J
"On"
the
for
the
the
the
the
and
recorder
1
second
OK
+
OK
"Off".
+
or
or
or
or
~
-
-
is
stopped,
or
button
~
button
longer.
(1lW
P.25).
button.
to
choose
button.
to
press
"VCVA".
choose
the
MENU
between
Rec Menu
4J:
~Ia¥
,
Beep'&
Sub Menu
Rec
Rec Mode
+
~
Mid
VCVA
F
t
@
~b'4'
VCVA
M~no:~"
D(splay
Menu
S~rlsa
quI
: :
F;ilt~r~
,"
".
On: Will start recording
Off: Will resume recording
.
f:.~
Press
oscreen.
If the
and it will return to the "Rec Menu" screen.
16
~
in
VCVA mode.
in
normal mode.
the
OK
button is pressed, the setting will be canceled
button
to
complete
the
setup
···
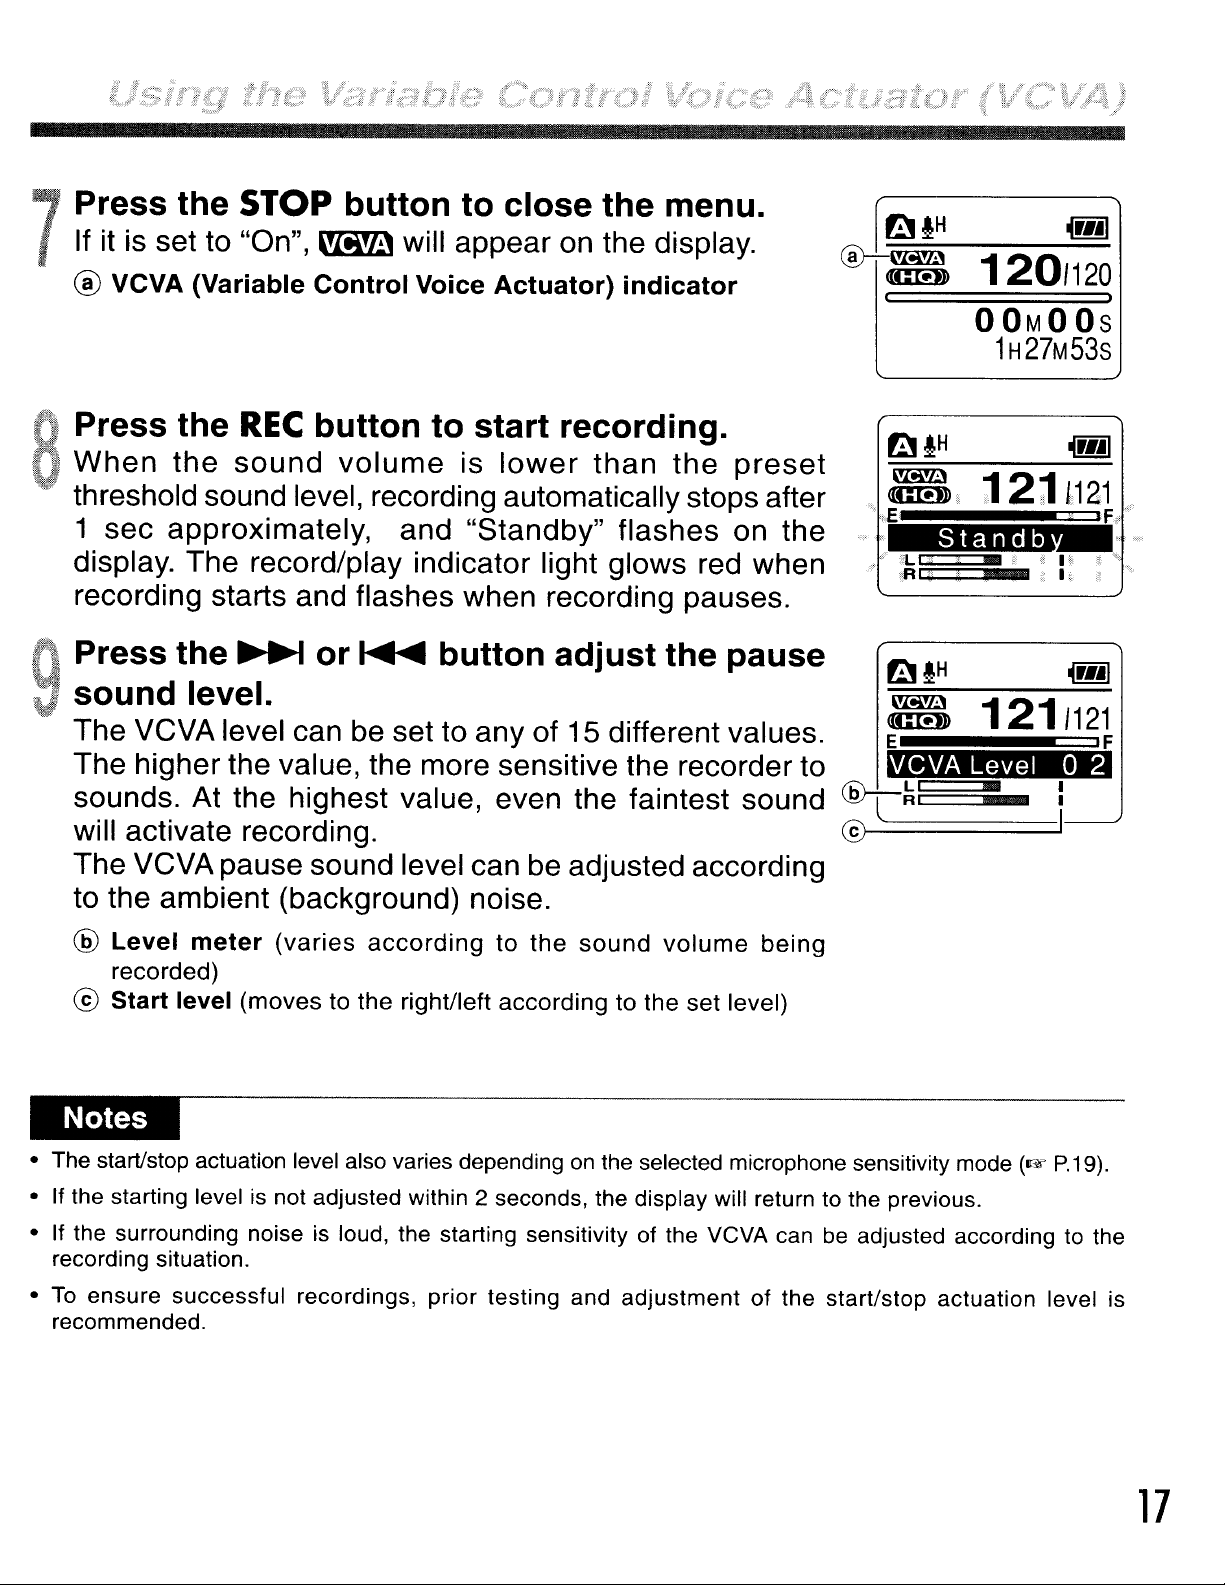
'Press the STOP button to close the menu.
•.
If it is set to "On",
7
® VCVA
(Variable
~
Control
will appear on the display.
Voice
Actuator)
indicator
1201120
•
OOMOOS
1H27M53s
oPress the
o
When
..
threshold sound level, recording automatically stops after
1 sec approximately,
display. The record/play indicator light glows red when
recording starts and flashes when recording pauses.
QPress the
the
REC
sound
~
button to start recording.
volume
or
~
and
is
lower
"Standby"
than
the
flashes on the
button adjust the pause
V sound level.
The VCVA level can be set to any of 15 different values.
The higher the value, the more sensitive the recorder to
sounds. At the highest value, even the faintest sound
will activate recording.
The VCVA pause sound level can be adjusted according
to the ambient (background) noise.
@
Level
recorded)
®
Start
meter
level
(varies
(moves to the right/left according to the set level)
according
to
the
sound
volume
preset
being
Standb
3:1:11
E!!!!!!!!!!!!!!!!!!!!!!!!!!!!!!!!!!!!!!!!!!!!!!!!!!!!!!!!~~IF
VCVA
ILl
ii"
~RI
1211121
Level
•
a2
©.....=========.
• The start/stop actuation level also varies dependingonthe selected microphone sensitivity mode
• If the starting level is not adjusted within 2 seconds, the display will return to the previous.
• If the surrounding noise is loud, the starting sensitivity of the VCVA can be adjusted according to the
recording situation.
ensure
• To
recommended.
successful
recordings,
prior
testing
and
adjustment
of
the
start/stop
actuation
(1lW
level is
P.19).
17
Loading...