

Page 1
DIGITAL VOICE
RECORDER
DETAILED
INSTRUCTIONS
Thank you for purchasing an Olympus
Digital Voice Recorder.
Please read these instructions for information
about using the product correctly and safely.
Keep the instructions handy for future reference.
To ensure successful recording, we recommend that
you test the record function and volume before use.
EN
Page 2
Introduction
• The contents of this document are subject to change without notice. Contact our
Customer Support Center for the latest information relating to product names and model
numbers.
• Illustrations of the screen and the recorder shown in this manual may differ from the
actual product. The utmost care has been taken to ensure the integrity of this document
but should you happen to find a questionable item, error or omission, please contact our
Customer Support Center.
• Olympus does not accept any liability for passive damages or damage of any kind incurred
due to data loss resulting from a defect of the product, repair performed by a third party
other than Olympus or an Olympus authorized service station, or for any other reason.
Trademarks and registered trademarks
• IBM and PC/AT are trademarks or registered trademarks of International Business
Machines Corporation.
• Microsoft, Windows and Windows Media are registered trademarks of Microsoft
Corporation.
• Macintosh and iTunes are trademarks of Apple Inc.
• microSD and microSDHC are trademarks of SD Card A ssociation.
• MPEG Layer-3 audio coding technology is licensed from Fraunhofer IIS and Thomson.
• The product was developed based on noise-canceling technology under license from NEC
Corporation.
• Voice Activity Detection technology is licensed from NTT Electronics Corporation.
Other product and brand names mentioned herein are the trademarks or registered
trademarks of their respec tive owners.
EN
2
Page 3

Table of contents
Introduction
Safet y precaut ions ............................................ 4
1 Getting started
Main fe atures .................................................... 8
Identi ficatio n of parts ......................................10
Display (LC D panel) .................................................. 11
Power sup ply ....................................................14
Inser ting the bat tery ............................................... 14
Batte ry setti ngs .......................................................15
Chargin g by connecti ng to a computer v ia USB ......16
Connec ting the USB-t ype AC adapter
(optiona l) to charge ..........................................17
Turning on/o ff the power ........................................19
HOLD ................................................................20
Setti ng the time an d date [Time & D ate] ...........21
Changin g the time and dat e ....................................22
Inser ting and ej ecting a mic roSD card ...............23
Inser ting a microSD c ard .........................................23
Eject ing a microSD car d ...........................................24
[Home] dis play operat ions ................................25
Notes on t he folders .........................................26
About th e folders fo r voice record ings ....................26
About th e folders fo r music playba ck .....................27
Selec ting fold ers and fi les ................................28
2 About recording
Record ing .........................................................29
Changin g the recordi ng scene [Rec Sc ene] .............32
Recomme nded sett ings accordi ng to
the reco rding condi tions ...................................33
Record ing from an ex ternal micr ophone or
other dev ice .......................................................34
3 About playback
Playback ..........................................................36
Search ing for a file ..................................................40
Changin g the playback s ound .................................41
Sett ing an index mar k or a temp mark ................... 42
How to beg in segment rep eat playback .................43
Changin g the playback s cene [Play Scene] .............44
Erasi ng .............................................................45
Erasing f iles .............................................................45
Erasing a f older ........................................................45
4 About the FM radio
(WS-813 only)
Using th e FM radio ............................................47
FM radio mo de operati ons ............................... 48
Preset ting radio s tations aut omatically
[Auto-pr eset] ....................................................49
Changin g the recepti on mode ................................50
Adding a r adio statio n .............................................51
Record ing from th e FM radio.............................52
5 Menu setting
Menu set ting meth od .......................................53
+ File Menu ............................................................55
, Rec Menu ............................................................56
- Play Menu ...........................................................61
. LCD/Sound M enu................................................64
/ Device Me nu .......................................................65
FM Menu .............................................................67
Extr act voice po rtions fro m file [Voice D etect] .......68
Rearra nging file s [Replace] .....................................6 9
Moving /Copying fil es [Move/Copy] ........................70
Dividi ng files [Fil e Divide] .......................................72
Changin g the USB class [USB Se ttings] ...................73
Format ting the rec order [Forma t] ..........................74
6 Using the recorder on your PC
Opera ting envir onment ....................................77
Connec ting to your P C .......................................79
Discon necting f rom your PC ....................................80
Transfe r voice file s to your PC ...........................81
Usage as e xternal m emory of th e PC .................82
7 Other information
Alarm m essage lis t ...........................................83
Trouble shooti n g ...............................................8 5
Access ories (optio nal) ...................................... 88
Speci ficatio ns...................................................89
Technic al assist ance and sup port ......................94
1
2
3
4
5
6
7
EN
3
Page 4

Safety precautions
Before using you r new recorder, rea d this
manual c arefully to ens ure that you know
how to operate it safely and correc tly.
Keep thi s manual in an easily accessible
location for future reference.
• The warning symbols indicate important
safety related information. To protect
yourself and others from personal injury
or damage to property, it is essential
that you always read the warnings and
information provided.
f Danger
If the product is used without
observing the information given
under this symbol, serious injury
or death may result.
f Warning
If the product is used without
observing the information given
under this symbol, injury or
death may result.
f Caution
If the product is used without
observing the information
given under this symbol, minor
personal injury, damage to the
equipment, or loss of valuable
data may result.
EN
4
Cautions relating to the operating
environment
• To protect the high-precision
technology contained in this
product, never use or store the
recorder in any of the following
environments:
• Places where temperatures and/or
humidit y are high or undergo extreme
changes, such as direct sunlight,
beaches, locked cars, or near other
heat sources (stove, radiator, etc.) or
humidifiers.
• In sandy or dusty environments.
• Near flammable items or explosives.
• In wet places, such as bathrooms or in
the rain.
• In places prone to strong vibration.
• Never drop the recorder or subject
it to severe shock or vibration.
• The recorder may malfunction
if it is used in a location where
it is subject to a magnetic/
electromagnetic field, radio waves,
or high voltage, such as near a
TV set, microwave, video game,
loud speakers, large monitor unit,
TV/radio tower, or transmission
towers. In such cases, momentarily
turn the recorder off before further
operation.
• Avoid recording or playing back
near cellular phones or other
wireless equipment, as they may
cause interference and noise. If
you experience noise, move the
recorder further away from such
equipment.
• Do not use organic solvents such
as alcohol and lacquer thinner to
clean the unit.
Page 5

Safety precautions
Precautions rel ating to reception:
• Radio reception will vary substantially
depending on where you are using the
radio. If the reception is poor, try moving
the recorder near to a window and away
from electrical products such as cellular
phones, televisions, fluorescent lights etc.
Warning reg arding data loss:
• Recorded content in memory may be
destroyed or erased by operating errors,
unit malfunction, or during repair work.
It is recommended to back up and save
important content to other media such as
a computer hard disk.
• Olympus does not accept any liability for
passive damages or damage of any kind
incurred due to data loss resulting from a
defect of the product, repair per formed
by a third par ty other than Olympus or an
Olympus authorized service station, or
for any other reasons.
Handling the recorder
f Warning:
• Do not use the recorder near
flammable or explosive gases.
• Keep young children and infants
away from the recorder.
Always use and store the recorder out of
the reach of young children and infants
to prevent the following dangerous
situations which could cause serious
injury:
1 Becoming entangled in the recorder
strap, causing strangulation.
2 Accidentally swallowing the battery,
cards or other small parts.
3 Accidentally being injured by the
moving par ts of the recorder.
• Do not use or store the recorder in
dusty or humid places.
• Do not disassemble, repair or
modify the unit yourself.
• Use microSD/microSDHC memory
cards only. Never use other types
of cards.
If you accidentally insert another type
of card into the recorder, contact an
authorized distributor or ser vice center.
Do not try to remove the card by force.
• Do not operate the unit while
driving or riding a vehicle (such as
a bicycle, motorcycle, or car).
f Caution:
• Stop using the recorder
immediately if you notice any
unusual odors, noise, or smoke
emanating from it.
Never remove the batteries with bare
hands. Doing so may cause a fire or burn
your hands.
• Be careful with the strap.
Be careful with the strap when carrying
the recorder. It could easily catch on
something and cause serious damage.
• Do not leave the recorder where it
may be subject to extremely high
temperatures.
Doing so may cause parts to deteriorate
and, in some circumstances, cause the
recorder to catch fire. Do not cover (such
as with a blanket) the charger or AC
adapter while it is being used. This could
cause overheating, resulting in fire.
• Handle the recorder with care to
avoid getting a low-temperature
burn.
• If the recorder contains metal parts,
overheating can result in a lowtemperature burn. Note the following:
• When used for a long period, the
recorder will get hot. If you hold the
recorder while it is hot, you may suffer
a low-temperature burn.
EN
5
Page 6

Safety precautions
• In places subject to ex tremely cold
temperatures, the temperature of
the recorder may be lower than the
ambient temperature. If possible, wear
gloves when handling the recorder in
cold temperatures.
Battery handling precautions
Follow these important guidelines
to prevent batter ies from leaking,
overheating, burning, exploding, or
causin g electrical shock or burns.
f Danger:
• Do not attempt to recharge
alkaline, lithium or any other nonrechargeable batteries.
• Batteries should never be exposed
to flame, heated, short-circuited or
disassembled.
• Never heat or incinerate batteries.
• Take precautions when carrying or
storing batteries to prevent them
from coming into contact with any
metal objects such as jewelry, pins,
fasteners, etc.
• Never store batteries where they
will be exposed to direct sunlight,
or subjected to high temperatures
in a hot vehicle, near a heat source,
etc.
• To prevent causing battery leaks
or damaging their terminals,
carefully follow all instructions
regarding the use of batteries.
Never attempt to disassemble a
battery or modify it in any way by
soldering it, etc.
• Do not connect the battery directly
to a power outlet or the cigarette
lighter in an automobile.
EN
• If battery fluid gets into your eyes,
flush your eyes immediately with
clean, cold running water and seek
medical attention immediately.
f Warning:
• Keep batteries dry at all times.
• If rechargeable batteries have
not been recharged within the
specified time, do not use them.
• Do not use a battery if it is cracked
or broken.
• Never subject batteries to strong
shock or continuous vibration.
• If a battery leaks, becomes
discolored or deformed, or
becomes abnormal in any other
way during operation, stop using
the recorder.
• If a battery leaks fluid onto your
clothing or skin, remove the
clothing and flush the affected
area with clean, cold running water
immediately. If the fluid burns
your skin, seek medical attention
immediately.
• Keep batteries out of the reach of
children.
• If you notice anything unusual
when using this product, such as
abnormal noise, heat, smoke, or a
burning odor:
1 remove the batter y immediately,
taking care not to burn yourself, and;
2 call your dealer or local Olympus
representative for service.
6
Page 7

f Caution:
• Please recycle batteries to help
save our planet’s resources. When
disposing of dead batteries, be
sure to cover their terminals and
always observe local laws and
regulations.
• Always charge a rechargeable
battery before using it for the first
time, or if it has not been used for a
long period.
• Rechargeable batteries have a
limited life. When the recorder's
operating time becomes
notably shorter even after the
rechargeable battery is fully
charged under the specified
conditions, replace the battery
with a new one.
Safety precautions
EN
7
Page 8

Getting started
Main features
s The Built-in Stereo FM tuner
means you can use the recorder
as a radio (WS-813 only) ( ☞ P. 47).
s It supports the linear PCM format,
which is capable of recording
1
sound quality equivalent to
Main features
that of CDs (WS-813, WS-812 only)
( ☞ P. 5 6 ) .
s It supports a wide range of
recording formats, including the
MP3 format (MPEG-1/MPEG-2
Audio Layer 3) and the Windows
Media Audio (WMA) format
( ☞ P. 5 6 ) .
s You can play back WAV*, WMA,
and MP3 format files transferred
from a computer in addition to
files recorded by the device itself.
This allows you to use this recorder as a
music player.
* WS-813, WS-812 only.
s It supports high capacity
recording media. Besides the
internal memory, you can also
record into a microSD card
( ☞ P. 2 3 ) .
s A directional microphone feature
has been included that allows
switching between broad stereo
recording and recording with a
highly directional quality
(WS-813 only) ( ☞ P. 5 7 ).
s It is equipped with a variety
of features that support audio
recording.
With this recorder you can customize a
variety of recording functions such as the
recording sensitivity to suit the recording
conditions and personal preferences
( ☞ P. 5 6 ).
s It has a built-in Variable Control
Voice Actuator (VCVA) function
( ☞ P. 5 7 ) .
s The Low Cut Filter minimizes air
conditioner noise and similar
noises while recording ( ☞ P. 5 7 ).
s It has recording scene setting and
playback scene setting functions
to register the best setting
according to the use ( ☞ P.32,
P.4 4, P. 59, P. 63 ).
s It is equipped with the [
Search
] function, convenient for
searching for files ( ☞ P. 4 0 ) .
s It features a [
function, which extracts just the
voice portions from a recorded
audio file, and a [
function, which plays back just
the extracted voice portions
( ☞ P. 61, P.6 8).
s It also features a [
function, which compensates
for the low-volume portions of a
recorded audio file, making them
louder and therefore easier to
understand ( ☞ P. 61) .
Voice Detect
Calendar
]
Voice Play back
Voice Balance r
]
]
EN
8
Page 9

s A Noise Cancel function ( ☞ P.61)
and a Voice Filter function*
( ☞ P.61) cut noise and enable
clear audio playback.
* WS-811 only.
s It features various repeat
functions ( ☞ P. 43 , P. 62).
s You can change the playback
equalizer settings ( ☞ P. 6 2 ) .
s You can move or copy files
between the internal memory
and microSD card, and within the
folders in the memory (WS-813,
WS-812 only) ( ☞ P.70 ) .
s You can divide files (PCM*, MP3)
that have been recorded with this
recorder into two files ( ☞ P. 7 2).
* WS-813, WS-812 only.
s Index mark and temp mark
features allow you to quickly find
desired locations ( ☞ P. 4 2 ).
s The playback speed and tone*
can be controlled ( ☞ P. 4 1) .
* WS-813, WS-812 only.
s This recorder is compatible
with USB 2.0, enabling fast data
transfer to a computer.
s It has a USB charging function
(WS-813, WS-812 only) ( ☞ P.1 6).
s It has a backlight full-dot display
(LCD panel).
Main features
1
Main features
EN
9
Page 10
Identification of parts
1
6
7
8
1
Identification of parts
$
%
^
&
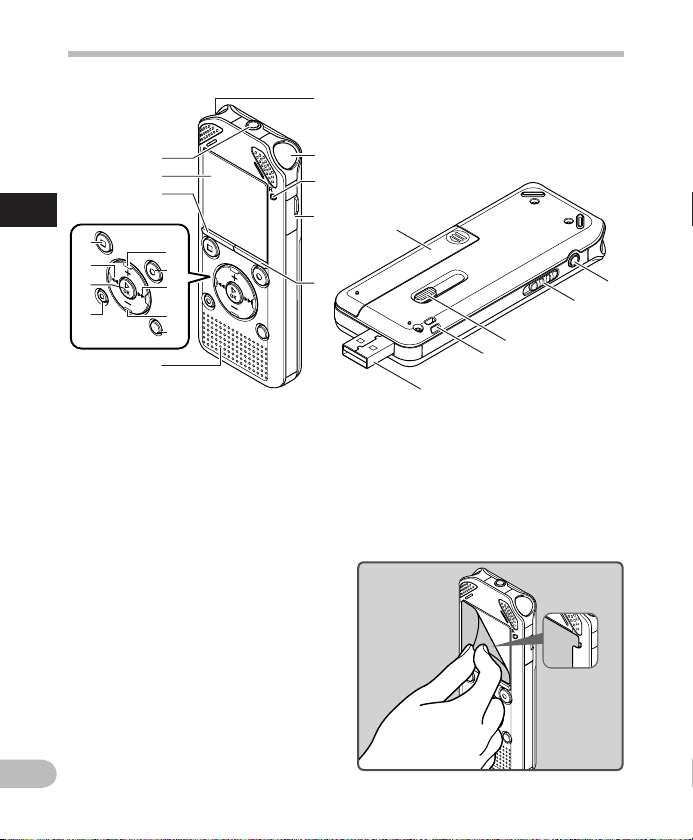
1 Built-in stereo microphone (L)
2 Built-in stereo microphone (R)
3 LED indicator light (LED)
4 Card cover
5
LIST
6
MIC
7 Display (LCD panel)
8
MENU
9
+
button
0
REC
! 9 button
@
–
button
#
SCENE
$
STOP
% 0 button
^ `
OK
&
ERASE
9
0
!
@
#
*
button
(Microphone) jack
button
( s ) (Record) button
/
INDEX
button
( 4 ) button
button
button
2
3
4
5
(
w
* Built-in speaker
( Battery cover
)
EAR
(Earphone) jack
-
POWER
/
= USB connector slide lever
q Strap hole
w USB connector
HOLD
=
q
switch
)
-
EN
10
• Remove the screen protector from the
display.
Page 11
12 3
12 3
12 3
Display (LCD panel)
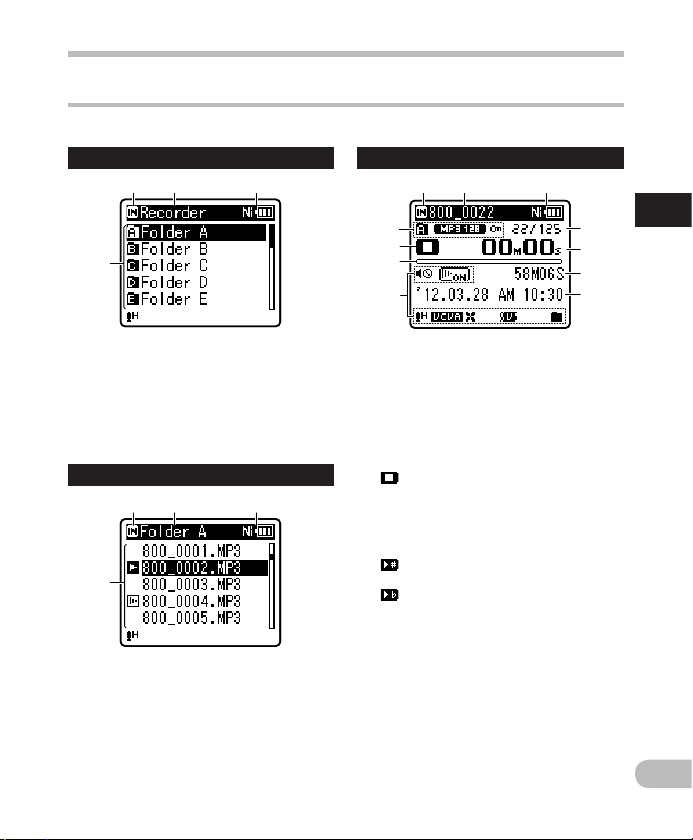
4 [
Recorder
Folder list display
] mode display:
Identification of parts
File display
4
1 Recording media indicator
[ l ]: Internal memory
[ m ]: microSD card
2 Current folder name
3 Battery indicator
4
Folder name
File li st display
4
1 Recording media indicator
2 Current folder name
3 Battery indicator
4
File name
4
5
6
7
8
9
0
!
1 Recording media indicator
2 Current file name
3 Battery indicator
4 Folder indicator, Recording mode
indicator, File Lock indicator
5 Recorder status indicator
[ K ]: Record indicator
[ ≠ ]: Pause indicator
[
]: Stop indicator
[ • ]: Play indicator
[ ß ]: Forwarding indicator
[ ™ ]: Rewinding indicator
[ N ]: F. Play indicator
[ M ]: S. Play indicator
[
]: Change playback tone indicator
(sharp)
]: Change playback tone indicator
[
(flat)
6 Remaining memory bar indicator,
Playback position bar indicator
7 Icon display ( ☞ P.13)
8 Current file number/ Total
number of recorded files in the
folder
9 Elapsed recording time,
Elapsed playback time
0 Remaining recording time,
File length
! Level meter,
Recording date and time
1
Identification of parts
EN
11
Page 12
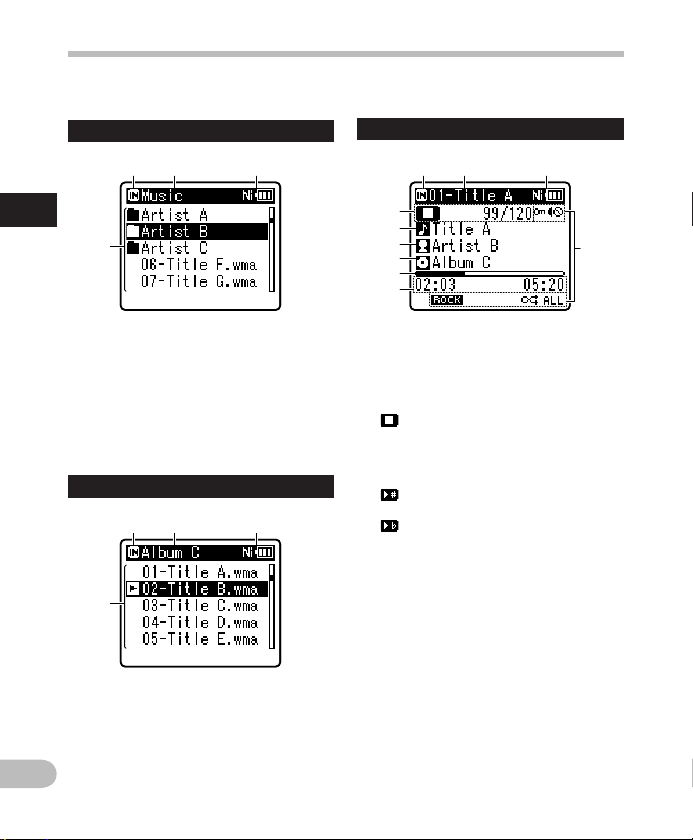
12 3
12 3
4 [
Music
] mode display:
Identification of parts
List di splay 1
1
Identification of parts
EN
4
When ther e are files and
folder s in the folder
1 Recording media indicator
[ l ]: Internal memory
[ m ]: microSD card
2 Current folder name
3 Battery indicator
4
Folder name, File name
List di splay 2
4
When ther e are only file s in
the folder
1 Recording media indicator
2 Current folder name
3 Battery indicator
4 File name
12
File display
12 3
4
5
6
7
8
9
0
1 Recording media indicator
2 Current file name
3 Battery indicator
4 Recorder status indicator
[ • ]: Play indicator
[
]: Stop indicator
[ ß ]: Forwarding indicator
[ ™ ]: Rewinding indicator
[ N ]: F. Play indicator
[ M ]: S. Play indicator
[
]: Change playback tone indicator
(sharp)
[ ]: Change playback tone indicator
(flat)
Current file number/ Total
number of recorded files in the
folder
5 T i t l e n a m e
6 Artist name
7 Album name
8 Playback position bar indicator
9 Elapsed playback time,
File length
0 Icon display ( ☞ P.13)
Page 13
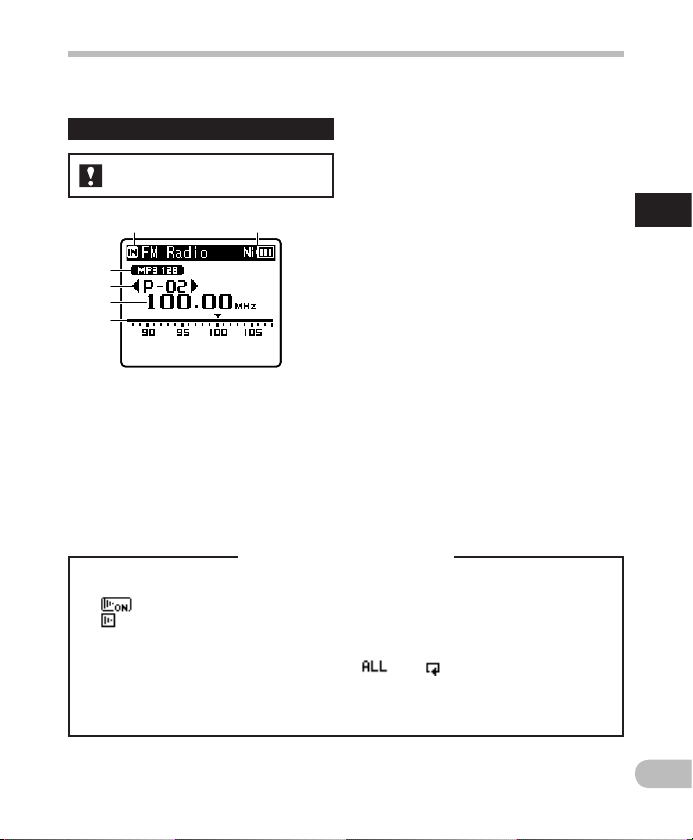
4 [ FM Radio ] mode display:
Radio r eceptio n display
For WS-813:
Identification of parts
1 2
3
4
5
6
1 Recording media indicator
2 Battery indicator
3 Recording mode indicator
4 Preset number
5 Tuning frequency
6 Frequency bar indicator
Icon display (For all modes)
[ Ø ]: Speaker muting
[
]: Voice Playback *1
]: Voice Detect *1
[
[ ? ]: Rec Level
[ û ]: VCVA
[ Æ ]: Voice sync
[ ù ]: Equalizer
*1 WS-813, WS-812 only. *2 WS- 813 onl y. *3 WS- 811 only.
[ 0 ]: Low Cut Filter
[ ≤ ]: Zoom Mic *2
[ % ]: Noise Cancel
[ $ ]: Voice Balancer *1
Voice Filter *3
[
] [ á ] [ ]: Playback mode
1
Identification of parts
EN
13
Page 14
Power supply
Inserting the battery
This recorder can be used with either a
Ni-MH rechargeable battery or AAA alkaline
battery.
1
Power supp ly
For WS-813, WS-812:
• When charging the recorder, make
sure that the supplied Ni-MH
rechargeable battery (BR404) is in
place.
• The supplied rechargeable batter y
is not fully charged. Before using
the recorder or after long periods of
disuse, it is recommended that you
continuously charge the batter y until
full ( ☞ P.1 6).
For WS-811:
This recorder cannot charge the
rechargeable battery.
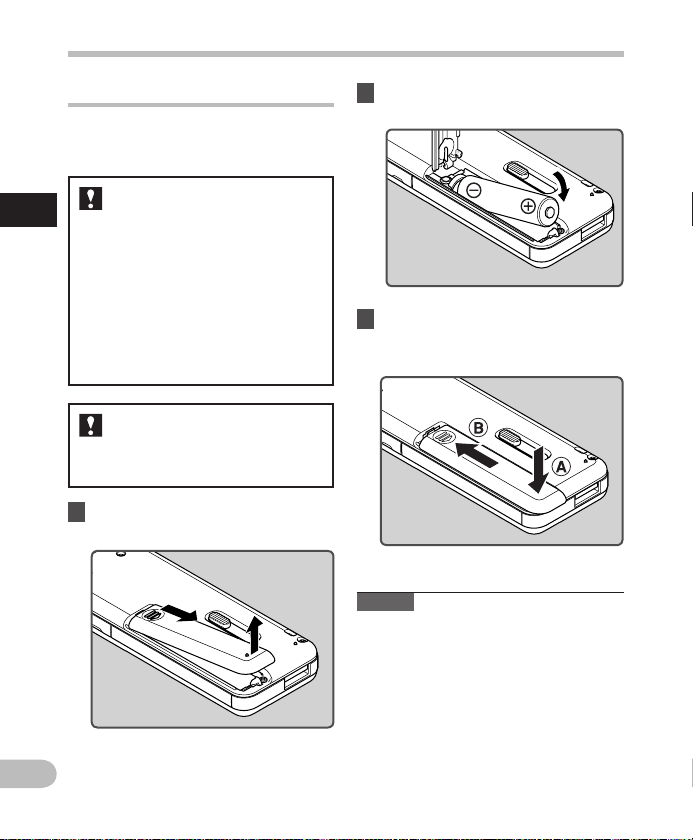
1 Lightly press down on the arrow
and slide the battery cover open.
EN
14
2 Insert the battery, observing the
= and - polarities.
3 Close the battery cover completely
by pressing down at A , then
sliding the cover towards B .
Notes
• A manganese batter y cannot be used in
this recorder.
• When the battery is changed, a AAA
alkaline batter y or Olympus Ni-MH
rechargeable battery is recommended.
• Be sure to stop the recorder before
replacing the battery. Unloading the
batter y while the recorder is in use may
cause a malfunction resulting in the
corruption of the file, etc. If you take out
the battery during recording, you will
lose your currently recorded file because
the file header will not be able to close.
Page 15
Power supply
• If it takes longer than 15 minutes to
replace the dead battery or if you take
the battery in and out repeatedly at shor t
intervals, you may have to re -enter the
batter y and time settings. In this case,
[ Battery ] screen will appear. For more
details, see “ Battery settings ”.
• Remove the battery if you are not going
to use the recorder for an extended
period of time.
• When replacing the rechargeable battery,
be sure to use a Ni-MH rechargeable
batter y (optional). The use of other
manufac turers’ products can damage the
recorder and should be avoided.
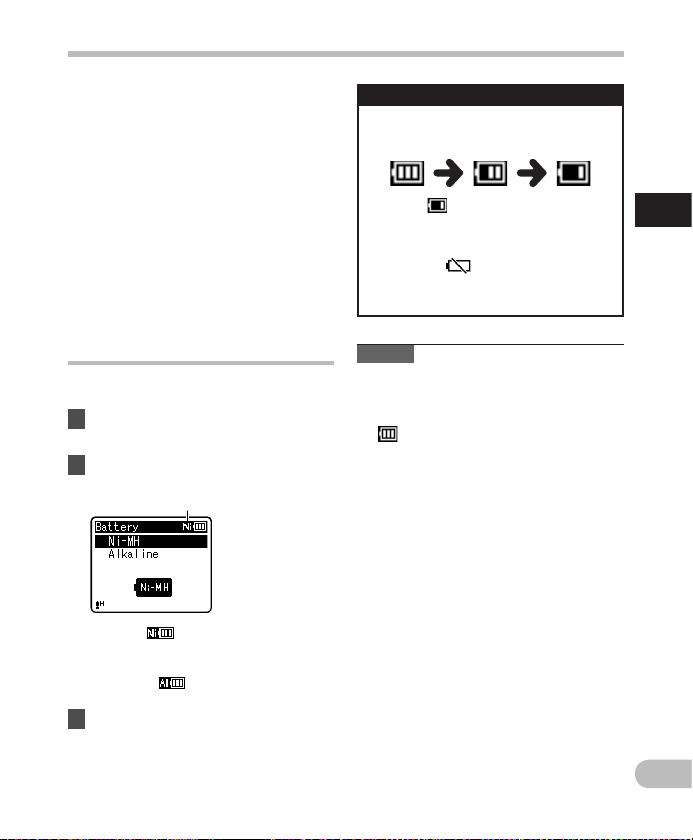
Battery settings
Select the battery type to match the battery
you are using.
1 Replace the battery and turn on
the recorder ( ☞ P.14 , P.19).
2 Press the + or − button to change
the setting.
Battery type
[ Ni-MH ] ( ):
Select when using the Olympus
Ni-MH rechargeable battery (BR404).
[ Alkaline ] (
Select when using an alkaline batter y.
3 Press the ` OK button to
complete the setting.
• If the “ Hour ” indicator flashes in the
display, see “ Setting t he time and
date [ Time & Date ] ” ( ☞ P. 21) .
):
Battery indicator
The battery indicator on the display
changes as the batter y loses power.
• When [ ] appears on the display,
charge or replace the battery as soon
as possible. When the batter y has
insuff icient power to operate the
recorder, [
appear on the display and the
recorder shuts down.
Note
• When a voice/music file is played,
depending on the volume level the
recorder may be reset due to a drop in
the voltage output of the batter y even if
[
] is displayed in the battery indicator.
In this case, lower the volume of the
recorder.
] and [ Battery low ]
1
Power supp ly
EN
15
Page 16
Power supply
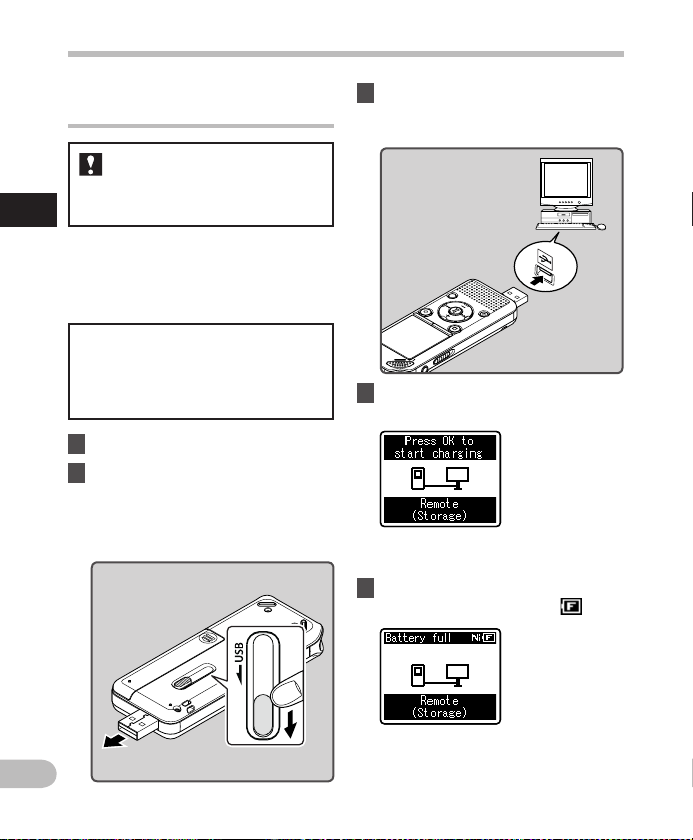
Charging by connecting to a
computer via USB
For WS-813, WS-812:
Before connecting via USB, exit HOLD
mode ( ☞ P. 2 0 ) .
1
Power supp ly
You can charge the battery by connecting
to a PC’s USB port. When charging, be sure
to place the rechargeable battery (supplied)
correctly into the recorder ( ☞ P.14) .
Do not cha rge a primary batter y such
as an alka line or lithium batter y. It
may cause b attery leakage or heating,
which may c ause the recorder to
malfunction.
1 Boot the PC.
2 Slide the USB connector slide
lever in the direction indicated
by the arrow so that the USB
connector protrudes from the
recorder.
3 Make sure that the recorder is in
stop mode, and connect to the
PC’s USB port.
4 Press the ` OK button to start
charging.
• While [ Press O K to start charg ing ] is
flashing, press the ` OK button.
5 Charging is completed when the
battery indicator shows [ ].
EN
16
Charging time: approximately 3 hours *
* This is the approximate time when
charging the rechargeable battery
fully from flat at room temperature.
Page 17
Power supply
The charging time dep ends on the
amount of remaining power and the
state of the batter y.
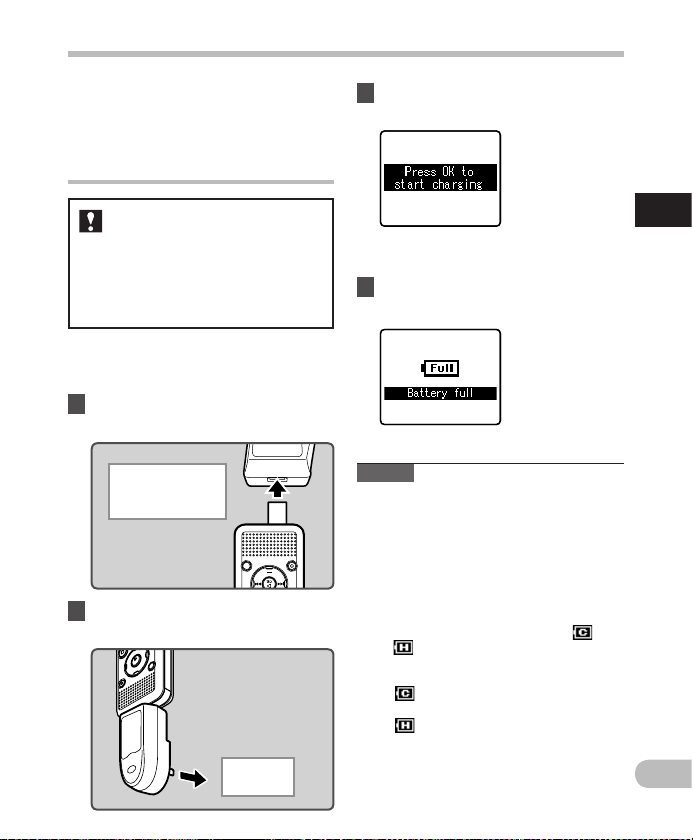
Connecting the USB-type AC
adapter (optional) to charge
For WS-813, WS-812:
• Before connecting the AC adapter,
switch the USB connection setting to
[ AC Ad apte r ] ( ☞ P.73) .
• Before connecting via USB, exit HOLD
mode ( ☞ P. 2 0 ) .
You can charge the recorder by connecting
it to the USB-t ype AC adapter (A514)
(opti onal).
1 Plug the recorder into the AC
adapter’s USB port.
To the USB-t ype AC
adapter ’s (A514)
USB connector
2 Plug the AC adapter into the AC
outlet.
To the AC
outlet
3 Press the ` OK button to start
charging.
• While [ Press O K to start charg ing ] is
flashing, press the ` OK button.
4 Charging is completed when
[
Batter y full
Notes
• The recorder cannot be charged if the PC
is not turned on, or if the PC is in standby,
hibernate, or sleep mode.
• Do not charge the recorder with the USB
hub connected.
• Insert the supplied rechargeable battery
and set [ Battery ] to [ Ni-MH ]. If [ Battery ]
is set to [ Alkaline ], you cannot recharge
( ☞ P.15 , P. 65 ).
• You cannot charge the battery if [
or [
at a temperature in the range of 5°C to
35°C (41°F to 95°F).
*1 [
*2 [ ]: The surrounding temperature is
• When the recorder’s operating time
becomes notably shorter even af ter
the battery is fully charged, replace the
batter y with a new one.
] is displayed.
] *2 is blinking. Charge the batter y
]: The surrounding temperature is
too low.
too high.
] *1
1
Power supp ly
EN
17
Page 18

Power supply
• Use the dedicated USB cable. If any other
company’s cable is used, it may lead to
malfunc tion of the recorder. Also, never
use this dedicated cable with any other
company’s products.
• If you would like to charge the recorder
using the [ Composite ] setting, select
[ Optional ] in the USB connection
settings, then connect the recorder to a
1
PC. Selecting [ AC Adapter ] in the
Power supp ly
[ USB Connection ] display will enable you
to charge the recorder ( ☞ P. 7 3) .
EN
Cautions concerning the rechargeable
battery
Read the following descriptions carefully
before using the Ni-MH rechargeable
battery.
Discharging:
The rechargeable battery self-discharges
while not in use. Be sure to charge it fully
before use.
Operating temperature:
The rechargeable battery is a chemical
product. The efficiency of the rechargeable
batter y may fluctuate even when
the battery is operating within the
recommended temperature range. This is an
inherent nature of such products.
Recommen ded temperature range :
When operating the recorder:
0°C - 42°C/ 32°F - 107.6°F
Charging:
5°C - 35°C/ 41°F - 95°F
Storage f or a long period:
–20°C - 30°C/ – 4°F - 86°F
Using the rechargeable bat tery outside
the above temperature range may result in
declining efficiency and a shorter battery
life. In order to prevent battery leakage or
rust, remove the rechargeable battery from
the recorder when you will not be using it
for a long time, and store it separately.
Notes
• This recorder is designed to fully charge
the battery regardless of its energy level.
However, for best results when charging
a newly purchased rechargeable battery
or a battery that has not been used for
a long time (more than one month), it
is recommended to repeat the process
of fully charging the battery and then
letting it discharge 2 to 3 times.
18
Page 19
Power supply
• When disposing of the rechargeable
batter y, always obser ve the local laws and
regulations. Contact your local recycling
center for proper disposal methods.
• If the Ni- MH rechargeable battery is not
fully discharged, protect against shortcircuiting (e.g. by taping the contac ts)
before disposal.
For custome rs in Germany:
Olympus has a contract with the GRS (Joint
Batter y Disposal Association) in Germany to
ensure environmentally friendly disposal.
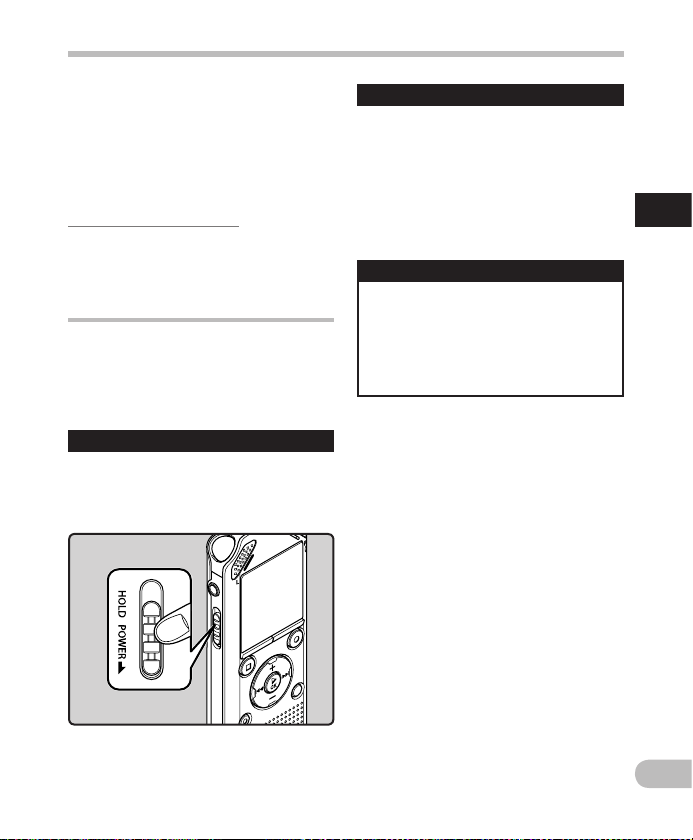
Turning on/off the power
When the recorder is not being used,
turn the power off to reduce battery
consumption. Existing data, mode settings,
and clock settings are not lost when the
power is turned off.
Turnin g on the power
While the recorder is turned off,
slide the
direction of the arrow.
POWER
/
HOLD
switch in the
Turnin g off the powe r
Slide the
POWER
/
HOLD
switch in the
direction of the arrow, and hold it
for 0.5 seconds or longer.
• The power turns off.
• The resume function remembers the stop
position before the power is turned off.
Power save mode
If the recorder is on but is not used for 10
minutes or longer (default), the display
shuts of f and the recorder goes into
power save mode ( ☞
• To exit power save mode, press any
button.
P.65) .
1
Power supp ly
• The power turns on.
EN
19
Page 20
HOLD
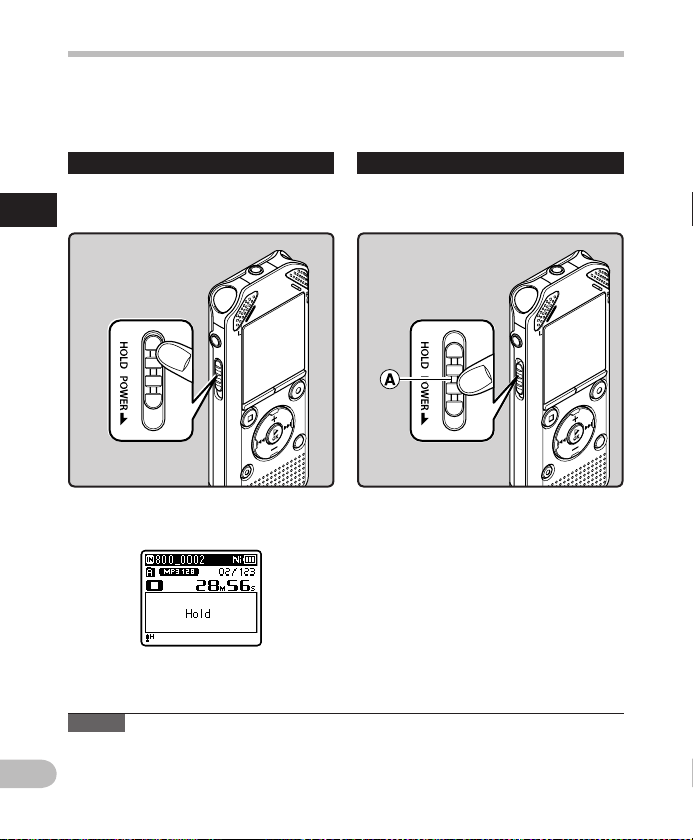
If you set the recorder to HOLD mode, the current settings will be preserved and all buttons
will be disabled. This feature is useful when the recorder has to be carried in a bag or pocket.
This mode can also prevent you from accidentally stopping recording.
Sett ing the reco rder to HOLD mod e
Slide the
[
HOLD
1
HOLD
• After [ Hold ] appears on the display, the
Notes
• If you press any button while the recorder is in HOLD mode, the clock display lights for 2
• If HOLD is applied during playback (recording), operation is disabled with the playback
EN
20
POWER
/
HOLD
] position.
recorder is set to HOLD mode.
seconds, but the recorder does not operate.
(recording) state unchanged (When playback has ended or recording has ended due to
the remaining memor y being used up, the recorder stops).
switch to the
Exit ing HOLD mode
Slide the
A position.
POWER
/
HOLD
switch to the
Page 21
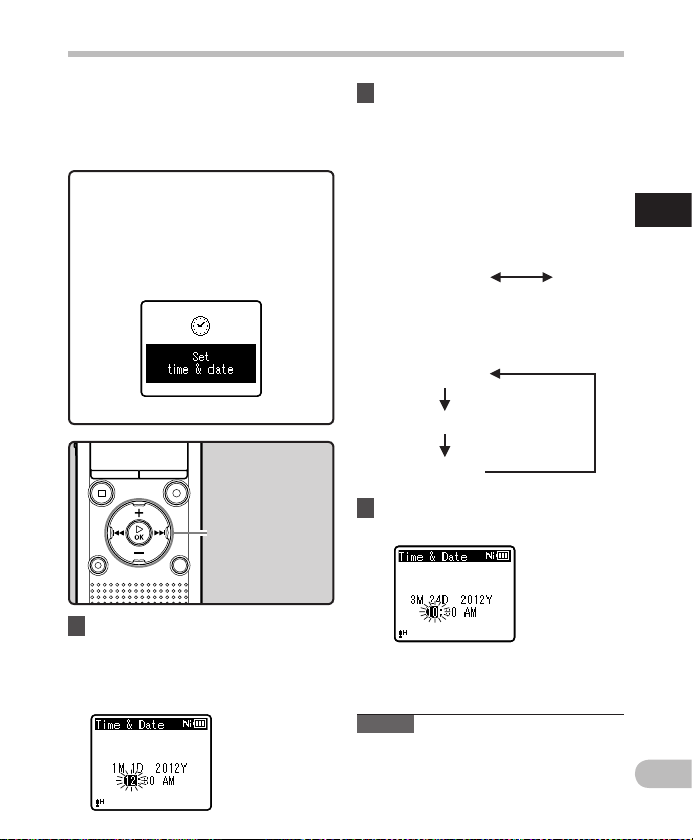
Setting the time and date [ Time & Date ]
If you set the time and date before using
the recorder, recording time and date
information is automatically stored for each
file. Setting the time and date beforehand
enables easier file management.
When you use the recorder for the
first t ime, or when the batter y is
inser ted after the recorde r has not
been used for a long time, [
& date
] will app ear. When “
flashing, conduct se tup from Step 1.
Set time
Hour
” is
+ − button
9 0 button
`
OK
button
1 Press the 9 or 0 button to
select the item you want to set.
• Select “ Hour ”, “ Minute ”, “ Ye ar ”,
“ Month ” or “ Day ” by moving the
flashing position.
2 Press the + or − button to change
the value.
• Follow the same steps by pressing the
9 or 0 button to select the next
item, and pressing the
to change the value.
• You can selec t between 12 and 24
hour display by pressing the LIST
button while setting the hour and
minute.
E xample: 10:38 P.M
10:38 PM
(Initial sett ing)
• You can selec t the order of “ Month ”,
“ Day ” and “ Yea r ” by pressing the
LIST button while setting these items.
E xample: March 24, 2012
3 M 24D 2012Y
(Initial sett ing)
2 4D 3M 2012Y
2 012Y 3M 24 D
+
or − button
22:38
3 Press the ` OK button to
complete the setting.
• The clock will star t from the set date
and time. Press the ` OK button when
you want the clock to star t.
Note
• If you press the ` OK button during the
setup operation, the recorder will save
the items that were set to that point.
1
Setti ng the time and d ate
EN
21
Page 22
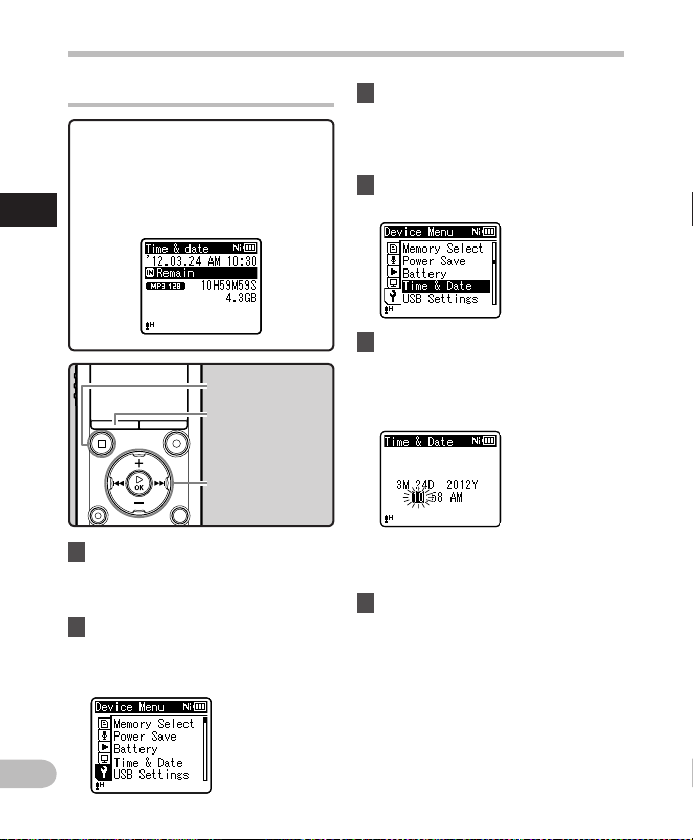
Setting the time and date [Time & Date]
Changing the time and date
While the recorder is in stop mode,
press and hold the STOP ( 4 ) button to
display [ Time & date ] and [ Remain ].
If the current time and date are not
correct, set them using the procedure
1
below.
Setti ng the time and d ate
STOP
MENU
+ − button
9 0 button
`
OK
1 While the recorder is in stop
mode, press the
• The menu will appear on the display
( ☞ P. 5 3).
2 Press the + or − button to select
[
Device Menu
• You can change the menu display by
moving the settings tab cursor.
MENU
] tab.
( 4 ) button
button
button
button.
3 Press the ` OK button to move
the cursor to the item you want
to set.
• [ Device Menu ] appears on the
display.
4 Press the + or − button to select
[
Time & Date
].
5 Press the ` OK button.
• [ Ti me & Date ] appears on the display.
• “ Hour ” f lashes on the display,
indicating the start of the Time and
Date setup process.
The following steps are the same as
Step 1 through Step 3 of “ Setting the
time and d ate [ Time & Date ] ” ( ☞ P. 21 ).
6 Press the
STOP
( 4 ) button to
close the menu screen.
EN
22
Page 23
Inserting and ejecting a microSD card
The “microSD” indicated in the instruction
manual refers to both microSD and
microSDHC. This recorder enables you to
store data not only to the internal memory
but also to a commercially available microSD
card.
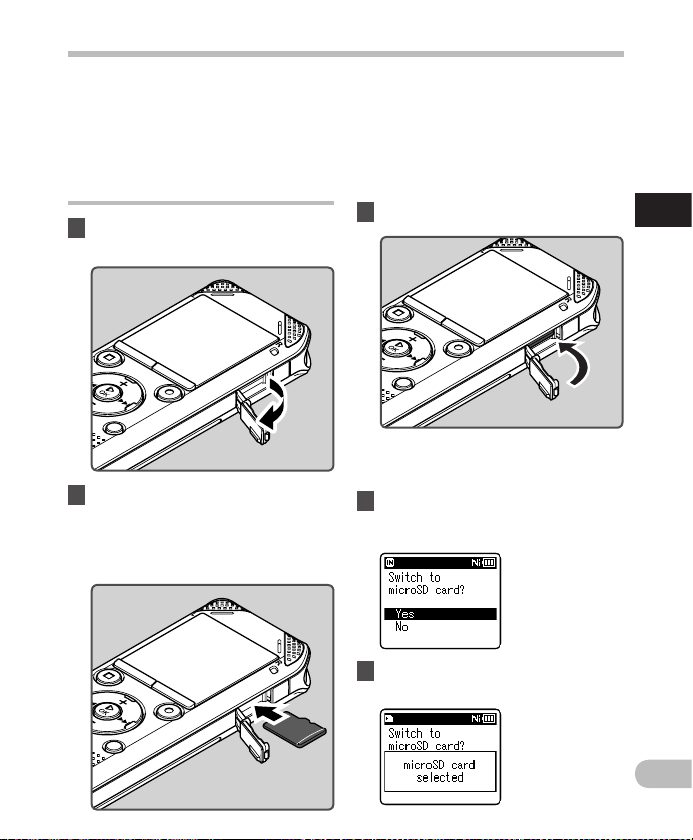
Inserting a microSD card
1 While the recorder is in stop
mode, open the card cover.
2 With the microSD card facing the
correct way, insert it into the card
slot as shown in the diagram.
• Insert the microSD card, keeping it
straight.
• Inserting the microSD card in the
wrong way or at an angle could
damage the contact area or cause the
microSD card to jam.
• If the microSD card is not inserted all
the way, data may not be recorded on
the microSD card.
3 Close the card cover securely.
• When you insert the microSD card,
the recording media changeover
display will appear.
4 To record on a microSD card,
press the + or − button and
select [
Yes
].
5 Press the ` OK button to
complete the setting.
1
Inser ting and ejec ting a micr oSD card
EN
23
Page 24
Inserting and ejecting a microSD card
Notes
• It is possible to switch the recording
media over to the internal memory
( ☞ P. 6 5 ).
• In some cases microSD cards that have
been formatted (initialized) by another
device, such as a computer, may not be
recognized. Be sure to format microSD
1
cards with this recorder before using
Inser ting and ejec ting a micr oSD card
them ( ☞ P. 74 ) .
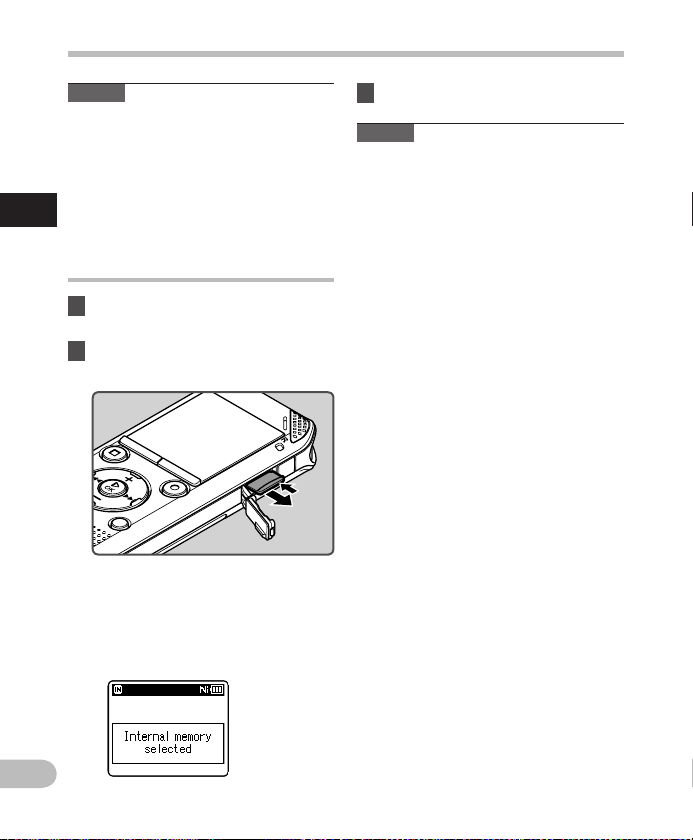
Ejecting a microSD card
1 While the recorder is in stop
mode, open the card cover.
2 Push the microSD card inward to
unlock it, and let it eject partially.
• The microSD card is visibly out of the
slot and can b e removed safely.
• If you ejec t the microSD card when
[ Memory Select ] is set to
[ microSD card ], [ Memory Select ]
will automatically change to
[ Internal memory selected ].
3 Close the card cover securely.
Notes
• Quickly moving your f inger away after
pushing the microSD card inward may
cause it to eject forcefully out of the slot.
• Some microSD cards or microSDHC
cards may not be recognized correc tly
depending on the manufacturer or type
of card due to compatibility issues with
this recorder.
• See the Olympus website for a list
of microSD cards that have been
confirmed to operate with this recorder
in conditions prescribed by Olympus.
The website http://olympus-imaging.
jp/ introduces manufacturers and
types of microSD cards confirmed to be
compatible. Please note, however, this
is not meant to guarantee that microSD
cards will operate. Some microSD cards
may not be recognized correctly due
to circumstances such as changes in
manufacturer specifications.
• If a microSD card is not recognized,
remove the microSD card and then inser t
it again to see if the recorder recognizes
the microSD card.
• Always read the instructions that come
with your microSD card before using.
• Processing speed may be slower with
some types of microSD cards. Processing
performance may also be reduced due
to repeated writing and deleting. If that
happens, reformat the microSD card
( ☞ P. 74 ) .
EN
24
Page 25
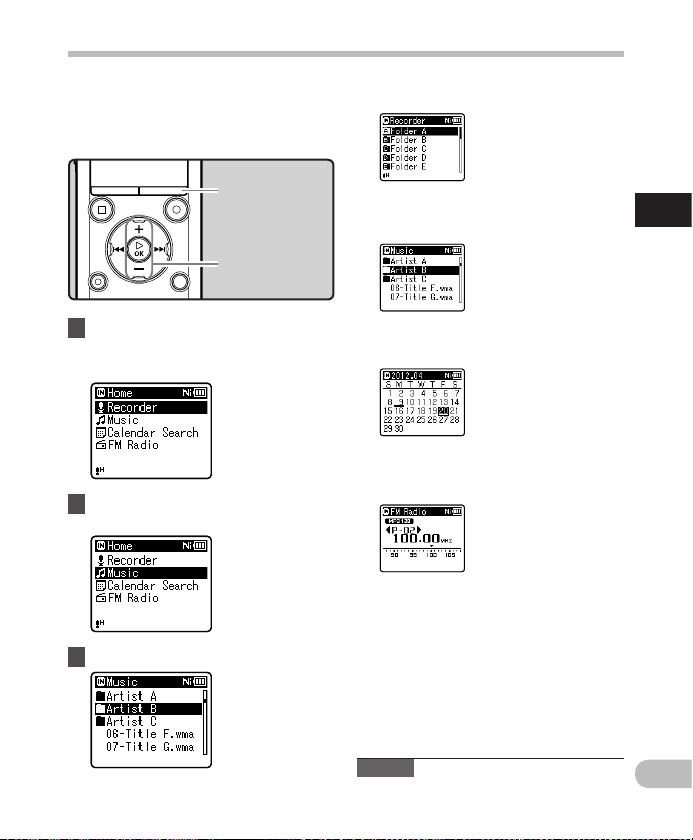
[Home] display operations
recorder and a music player but also as a
radio * .
* WS-813 only.
LIST
button
+
− button
`
OK
button
1 Press the
to set the [
• [ Home ] appears on the display.
2 Press the + or − button to select
the mode.
LIST
button repeatedly
Home
] display.
When [
When [
When [
When [
Recorder
] is selected: You can use the recorder not only as a voice
T he recorder wil l go into
[ Recorder ] mode . You wi ll
be able to r ecord and play
back fi les recorded by th e
recorder ( ☞ P. 2 9, P. 36) .
Music
] is selected:
T he recorder wil l go into
[ Music ] mod e, and you will
be able to p lay back music
files t ransferred to t he
recorder ( ☞ P. 3 6) .
Calendar Search
T he recorder wil l go into
[ Calendar Search ] mode,
and you can s earch for
files a ccording to the
recording date ( ☞ P. 40) .
* WS -813, WS-812 only
FM Radio
]* is selec ted:
T he recorder wil l go into
[ FM Radio ] mod e, and you
will be ab le to receive FM
radio ( ☞ P. 47 ) .
* WS -813 only
1
[Home] display operations
]* is selec ted:
3 Press the ` OK button.
Note
• During recording, you cannot switch the
mode without stopping the recorder.
EN
25
Page 26
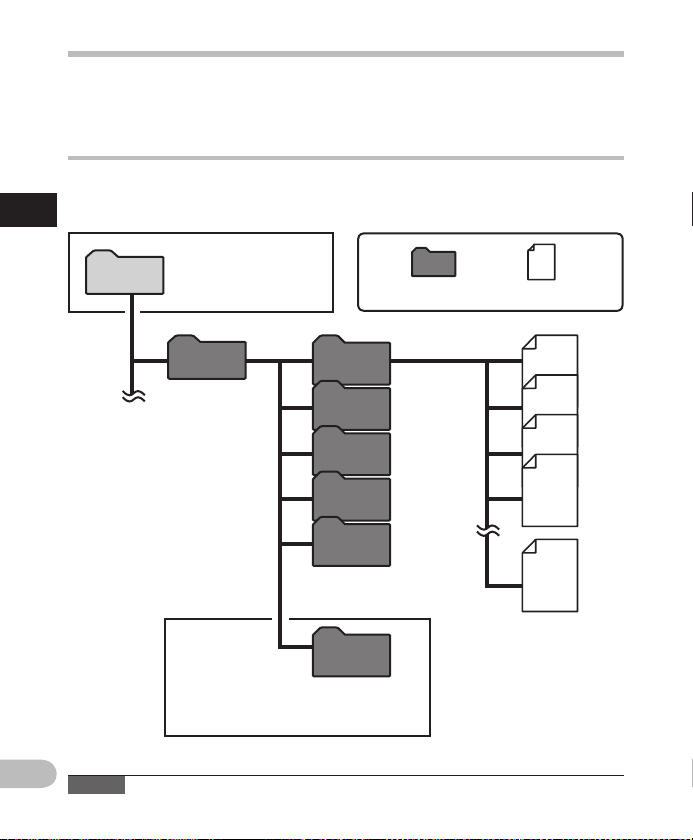
Notes on the folders
The internal memory or a microSD card can be used as the recording media. Voice f iles and
music files are separated into folders for voice recordings and folders for music playback that
are organized and saved in a branching tree.
About the folders for voice recordings
[ Folder A ] - [ Folder E ] within the [ Recorder ] folder are the folders for voice recordings. When
recording with this recorder, select any one of the five folders and then record.
1
Notes on th e folders
You ca n change the mode
Home
on the [ Home ] display.
Folder File
Recorder
Folder A
Folder B
Folder C
Folder D
Folder E
B ecomes the dest ination for
microphone recording.
E ach folder can s tore up to
Radio
200 files .
Folder
W hen you record fr om the radio, the re corded
file
will be st ored automatic ally in the
[ Radio Folder ] fol der (WS-813 only).
EN
Note
• Files or folders located under the [ Recorder ] folder will not be indicated on the recorder.
26
001
002
003
004
200
Page 27
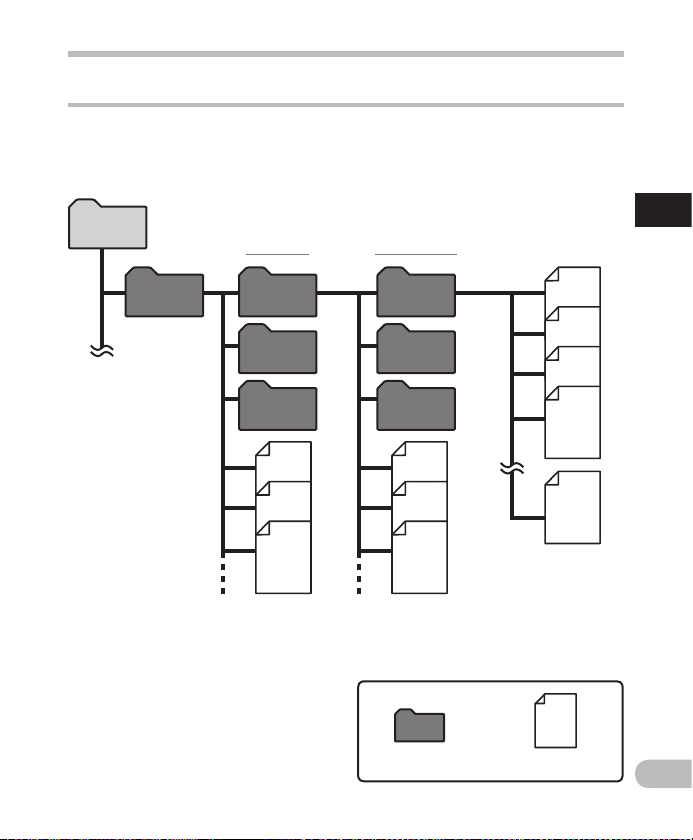
Notes on the folders
About the folders for music playback
When music files are transferred to the device using Windows Media Player, a folder is
automatically created within the music playback folder which has a layered structure as
shown in the diagram below. Music files that are in the same folder can be rearranged in
preferential order and replayed ( ☞ P. 6 9 ) .
Home
Music
First layer Second layer
Artist 01
Artist 02
Artist 03
Album 01
Album 02
Album 03
Up to 300 * f olders can be cr eated under the [ Music ]
folder, including [ Music ].
* Fo r WS-811: 128 fold ers.
Folder
001
002
003
004
200
E ach folder can s tore
up to 200 f iles.
File
1
Notes on th e folders
EN
27
Page 28
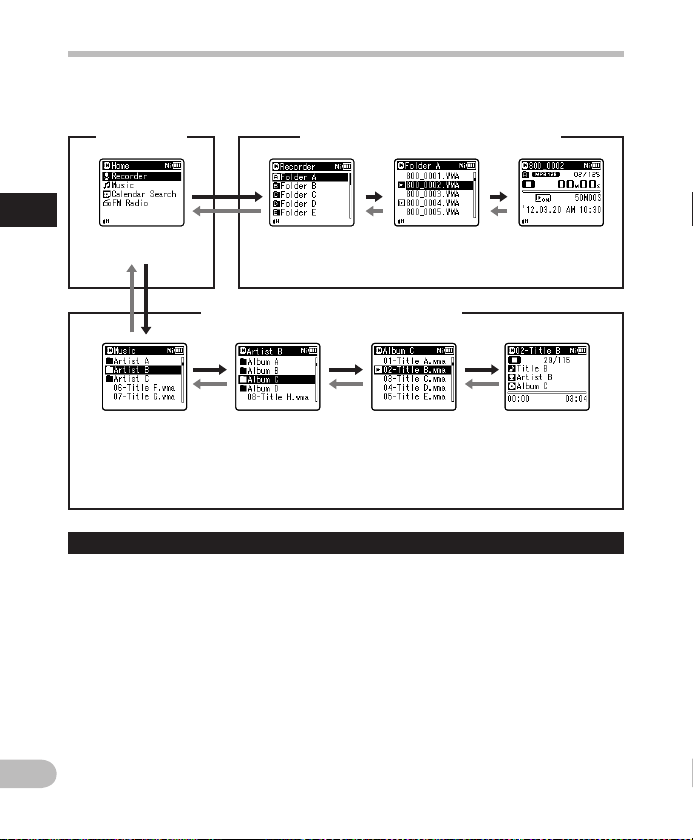
Selecting folders and files
Change folders while the recorder is stopped or during play. For information on the layered
structure of the folders, see the sec tion entitled “
[
Home
] display
1
Selec ting folde rs and files
Example:
WS-813
O peration o f the folders f or music play back
Folder list
display
Notes on the fold ers ” ( ☞ P.26) .
O peration o f the folder s for voice reco rdings
File list displ ay File display
Folder list
display
(First layer)
When [ Music ] folder is selected.
Movin g through t he levels
}
Return
:
LIST
Each time you press this button, you
move up one level. The 0 button can
also ser ve as the LIST button on a list
display.
• If you press and hold the LIST button
while moving in a hierarchy of folders,
you will return to the file display.
{
Proceed
Each time you press this button, you
open the folder or f ile selected in the list
display and proceed down one level.
• The 9 but ton can also serve as the
EN
` OK button on a list display.
button
: ` OK button
28
Folder list
display
(Second l ayer)
File list displ ay File disp lay
+ or – button
Select a folder or file.
[
Home
] display:
This display allows the mode of the
recorder to be changed ( ☞ P. 2 5).
List display:
The folders and files stored in the
recorder are displayed.
File display:
Information about the selected file is
displayed. The recorder is in playback
standby mode.
Page 29
About recording
Recording
Before star ting recording, select a folder
among [ & ] to [ * ]. These five folders can be
used to categorize recorded information
according to t ype; for example, Folder [ & ]
might be used to store private information,
while Folder [ ' ] might be dedicated to
holding business information.
STOP
( 4 ) button
REC
( s ) bu tton
• [ Rec Mode ] cannot be changed in
recording standby mode or while
recording. Configure this while the
recorder is stopped ( ☞ P. 5 6 ) .
• The proper position of the built-in
stereo microphone for performing
stereo recording is over the display. If
the microphone is below the display
during recording, proper stereo
recording is impossible because the
original sound will be recorded in
reverse phase.
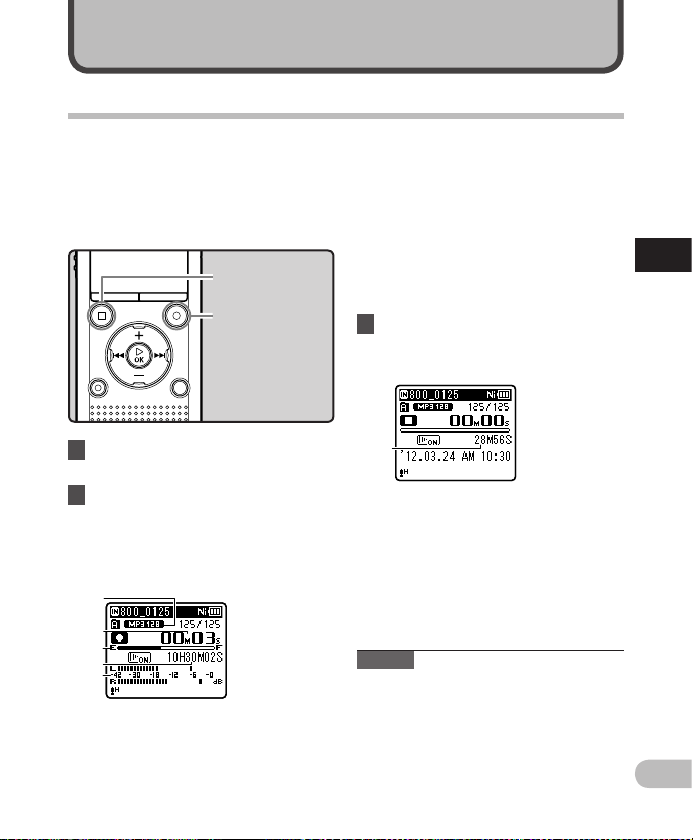
3 Press the
STOP
( 4 ) button to stop
recording.
• [ L ] appears on the display.
2
Recording
1 Select a recording folder
( ☞ P. 2 6 ) .
2 Press the
REC
( s ) button to start
recording.
• The LED indicator light turns on and
[ K ] appears on the display.
• Turn the microphone in the direction
of the source to be recorded.
aca
b
d
e
a Recording mode indicator
b Elapsed recording time
c Remaining memory bar indicator
d Remaining recording time
e Level meter (changes according to
the recording level and recording
function settings)
f
f File length
Notes
• To ensure that you do not lose the
beginning of the recording, verify that
the LED indicator light or the mode
indicator is lit on the display.
• When the remaining recording time is
less than 60 seconds, the LED indicator
light starts flashing. When the remaining
recording time drops to 30 and then 10
seconds, the light flashes faster.
EN
29
Page 30
Recording
• [ Folder full ] will appear when recording
cannot be continued. Select another
folder or delete unnecessary files before
recording ( ☞ P. 4 5).
• [ Memory full ] will appear when the
memory is full. Delete unnecessary f iles
before recording any further ( ☞ P. 4 5 ).
• When a microSD card is inserted into the
recorder, be sure to confirm the recording
media as either [ Internal memory ]
or [ microSD card ] so that there is no
mistake ( ☞ P. 6 5 ).
2
• If the REC ( s ) but ton is pressed when a
Recording
function other than the record function is
specified, [ Canno t record in this folder ]
is displayed. Selec t a folder from
[ Folder A ] through [ Folder E ] and start
recording again.
• Processing speed may be slower with
some types of microSD cards. Processing
performance may also be reduced due
to repeated writing and deleting. If that
happens, reformat the microSD card
( ☞ P. 74 ) .
• We recommend formatting the recording
media in the recorder before recording
( ☞ P. 74 ) .
For WS- 813:
• You can record FM radio in [ FM Radio ]
mode ( ☞ P. 47).
• This recorder is designed to be able to
record cleanly and evenly, even when
the volume of the source sound changes
significantly. However, even higher sound
quality recordings can be achieved by
adjusting the recording level manually
( ☞ P. 5 6 ) .
4 It is possible to record data
exceeding 2GB:
For WS-813, WS-812:
Recording will continue even if the
volume of a single file exceeds 2 GB in
linear PCM format recording.
• The data is saved every 2 GB in
separate f iles. It is treated as multiple
files during playback.
• If the recording exceeds 2 GB, the
number of f iles in the folder may
exceed 200. The 201st and later files
are not recognized by the recorder,
so check by connecting the recorder
to a PC.
EN
30
Page 31
Recording
Settings relating to recording
[ Rec Level ]
( ☞ P.56)
[ Rec M ode ] *1
( ☞ P.56)
[ Zoom Mic ] *2
( ☞ P.57)
[ Low Cut Filter ]
( ☞ P.57)
[ VCVA ]
( ☞ P.57)
[ V-Sync . Re c ]
( ☞ P.58)
[ Rec Scene ]
( ☞ P.59)
*1 Th is function wi ll be fixed to the f ollowing
config urations whil e the recorder is in
[ FM Radio ] mod e (WS-813 only).
• [ PCM ]: 44.1 k Hz/16bit
• [ MP3 ] : 128 kb ps
• [ WMA ]: 128 kbps
*2 WS-813 only
S ets the recordi ng sensitivit y.
S ets the recordi ng rate for
each recording format.
Set s the directiv ity of the
built-in stereo microphone.
T his function c an reduce
noise fr om air condition s and
projectors and other similar
noises.
S ets the thresho ld level for
the Varia ble Control Voice
Actuator (VCVA).
S ets the start l evel for voice
sync recording.
S ets recording s ettings to suit
the recording co nditions or
environment.
Pause
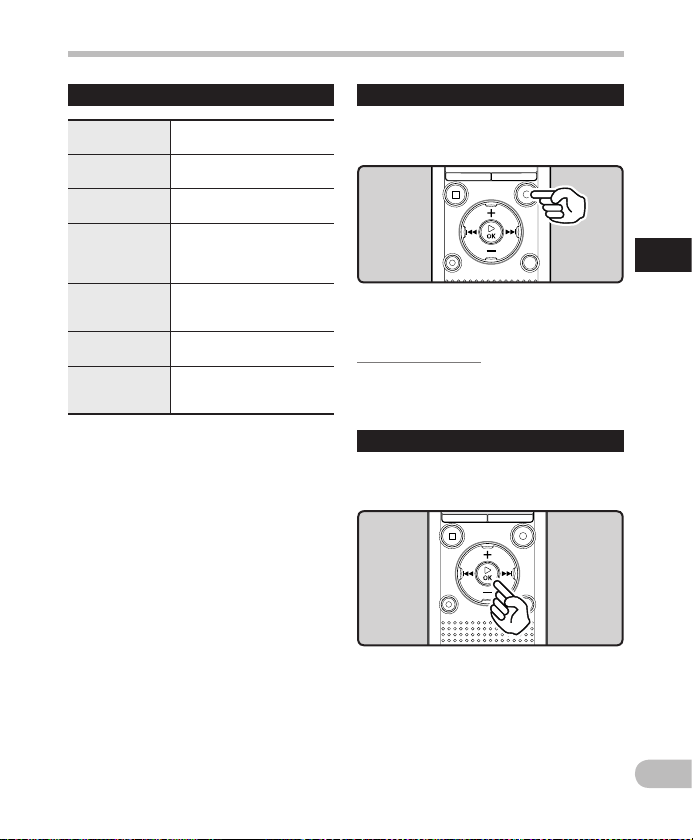
While the recorder is in recording
mode, press the
• [ ≠ ] will appear on the display.
• The recorder will stop if left on pause for
more than 60 minutes.
Resume Recording:
Press the
• Recording will resume at the point of
interruption.
To quick ly check r ecorded co ntents
REC
( s ) button.
REC
( s ) button again.
While the recorder is in recording
mode, press the ` OK button.
• [ • ] will appear on the display.
• Recording will stop, and the file that was
just recorded will be played back .
For WS-813:
• When the ` OK button is pressed while
audio is being recorded in [ FM Radio ]
mode, the recorder automatically enters
[ Recorder
recorded from the FM radio is played
back.
] mode, and the last file
2
Recording
EN
31
Page 32
Recording
Liste ning whil e audio is rec orded
If you start recording af ter inserting the
earphones into the EAR jack on the recorder,
you can hear the audio being recorded. The
recording monitor volume can be adjusted
by pressing the + or
− button.
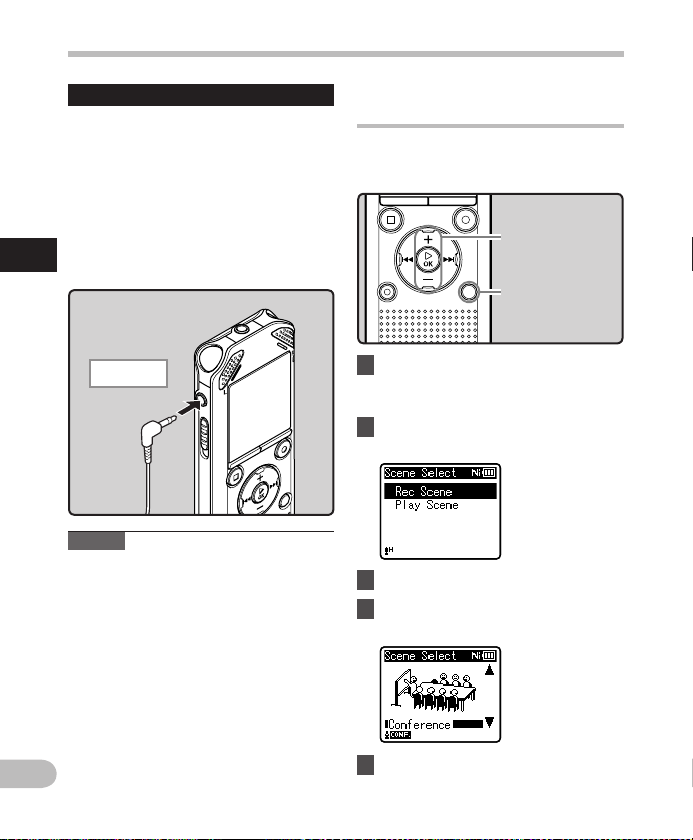
Connect the earphones to the
jack on the recorder.
• After recording has started, you can hear
the audio being recorded through the
2
earphones.
Recording
To EAR jack
Notes
• You cannot control the recording level
using the volume button.
• To avoid hurting your ears, turn down the
volume before inser ting the earphones
into your ears.
• Do not place earphones near a
microphone as this may cause feedback.
• If an external speaker is connected
while recording, there is a risk that audio
feedback will occur.
EAR
Changing the recording scene
[ Rec Scene ]
You can easily change the recording settings
by selecting the scene which best matches
your usage ( ☞ P. 5 9 ) .
+ − button
`
SCENE/INDEX
button
1 While the recorder is in stop
mode, press and hold the
SCENE
/
INDEX
button.
2 Press the + or − button to select
[
Rec Scene
3 Press the ` OK button.
4 Press the + or − button to select
the recording environment.
].
OK
button
EN
32
5 Press the ` OK button.
Page 33
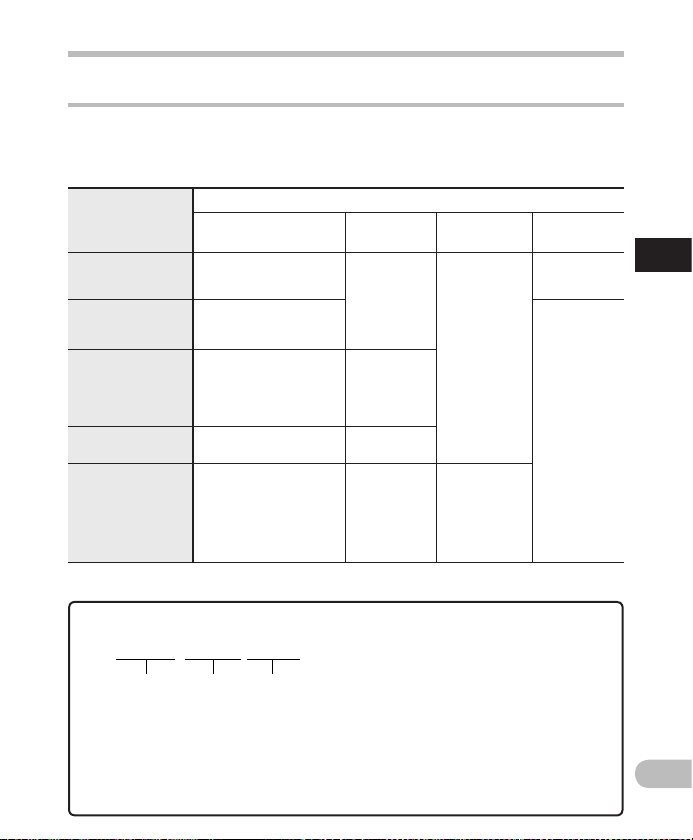
Recommended settings according to the recording conditions
123
The recorder is initially set to [ WMA 128kbps ] mode so that you can make high quality stereo
recordings immediately after purchase. The various recording functions can be configured in
detail to suit the recording conditions. The following table shows the recommended set tings
for some example recording conditions.
Recording
conditions
L ectures i n large
rooms
Conferences wit h
a large nu mber of
people
Meetings
and business
negotiations with
a small nu mber of
people
D ictatio n with a lot
of background noise
Music playing, wild
birds s inging, and
railway s ounds
*1 WS -813 only. *2 WS- 813, WS -812 on ly.
File names are automatically created for files recorded by this recorder.
813_ 0001 .WMA
1 User ID:
This is the user ID name that has been
set on the Digital Voice Recorder.
2 File number:
A file number is consecutively
assigned regardless of changes in the
selected recording media.
Recommended settings
[ Rec Mode ] ( ☞ P.56)
[ PCM]: [44.1kHz/16bit] *2
[M P3]: [128kbps] or more
[WMA]: [128kbps]
[M P3]: [128kbps] or more
[WMA]: [128kbps]
[MP3]: [128k bps]
[WMA]: [128kbps]
[WMA]: [64k bps] [ Low ]
[PCM]: [44.1kHz/16bi t]*2
[ Rec Level ]
( ☞ P.56)
[ High ]
[ Middl e ]
Set the
recording
sensitivity
accordin g to
the volume
being
recorded.
3 Extension:
This is the file name extension
* WS-813, WS-812 only.
[ Low Cut Fi lter ]
( ☞ P.57)
[ On ]
[ Off ]
indicating the recording format used
when recording with this recorder.
• Linear PCM format * .WAV
• MP3 format . MP3
• WMA format .WMA
Recording
[ Zoom Mic ] *1
( ☞ P.57)
[+6]
[ Off ]
2
Recording
EN
33
Page 34
Recording
Recording from an external
microphone or other device
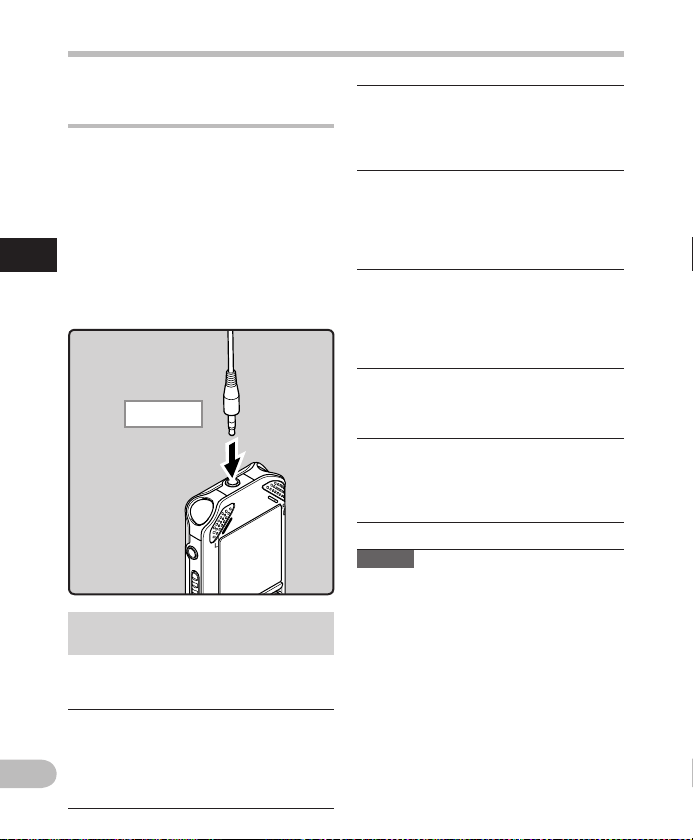
An ex ternal microphone or other device can
be connec ted and audio can be recorded.
Connect as follows according to the device
to be used.
• Do not plug/unplug devices into the
recorder ’s jack while it is recording.
4 Recording with an external
2
microphone:
Recording
Connect an external microphone to
the
MIC
jack of the recorder.
To MIC jack
Applicable external microphones
(optional) ( ☞ P.88)
Stereo microphone: ME51S
The built-in large-diameter microphone
enables sensitive stereo recording.
2 channel microphone
(omni-directional): ME30W
These highly sensitive omni-directional
microphones are supported by plug-in
EN
power and are well-suited to recording
34
musical performances.
Compact G un Microphone
(unid irecti onal): ME 31
This directional microphone is useful
for various types of recording such as
outdoor recording of wild birds singing.
Compact zoom microphone
(unid irecti onal): ME 32
This microphone is integrated with a
tripod, making it suitable to place on
a table for recording conferences or
lectures at a distance.
Highly sensitive noise-cancellation
monaural microphone (unidirectional):
ME52W
This microphone is used to record
audio at a distance while minimizing
surrounding noise.
Tie clip microp hone (omni-directional):
ME15
This small unobtrusive microphone
comes with a tie-clip.
Telephone pickup microphone: TP8
This earphone-type microphone can
be placed into your ear while you are
phoning. The voice or conversation
from the phone can be recorded clearly.
Notes
• The built-in microphone becomes
inoperable when an external microphone
is plugged into the recorder’s MIC jack.
• Microphones supported by plug-in
power can also be used.
• When an external monaural microphone
is used while [ Rec Mode ] is set to a stereo
recording mode, audio is recorded to the
L channel only ( ☞ P. 56) .
• When an external stereo microphone
is used while [ Rec Mode ] is set to a
monaural recording mode, audio is
recorded to the L channel only ( ☞ P. 5 6).
Page 35
Recording
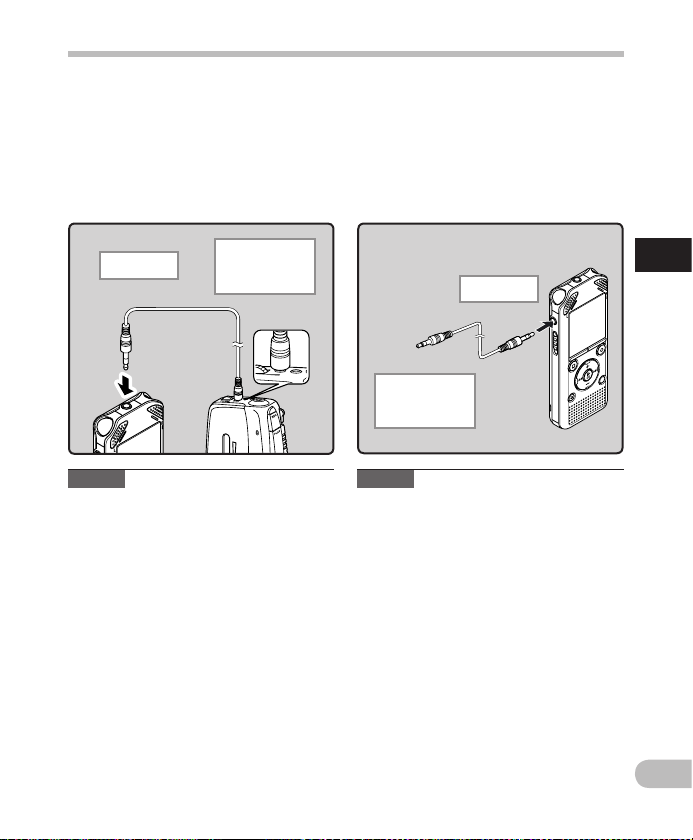
4 Recording audio from another
device with this recorder:
Audio can be recorded when you have
connected the audio output terminal
(earphone jack) of another device and
the MIC
jack of the recorder using the
connecting cord KA333 (optional) for
dubbing.
To MIC jack
Note
For WS- 813:
• If you are unable to produce a clear
recording with this recorder even af ter
adjusting the recording level( ☞ P.56), this
could potentially be because the output
level for the connected devices is too
high or too low. When external devices
are connected, per form a test recording
and then adjust the output level for the
external devices.
For WS- 812, WS-811:
• The recording level cannot be adjusted
on this recorder. When an external device
is connected, perform a test recording
and then adjust the output level on the
external device.
To audi o out put
terminal of other
device
4 Recording audio from this
recorder with another device:
Audio from this recorder can be recorded
to another device by connec ting the
audio input terminal (microphone jack) of
the other device and the EAR jack of this
recorder using the connecting cord KA333
(opti onal).
To EAR jack
To audio input
terminal of other
device
Note
• When you adjust the various sound
quality settings related to playback on
the recorder, the audio output signal sent
out from the EAR jack is also adjusted
( ☞ P. 61, P. 6 2).
2
Recording
EN
35
Page 36
About playback
Playback
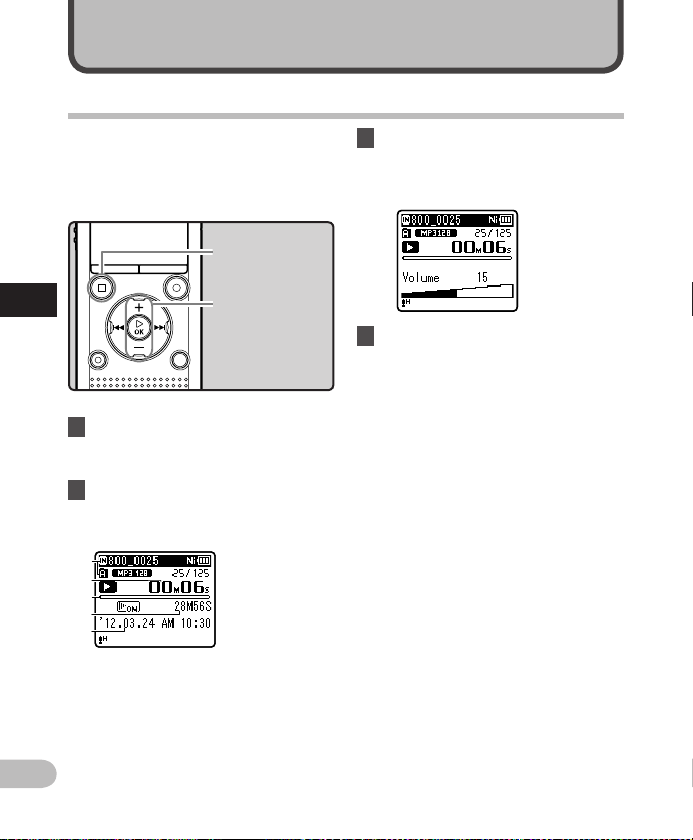
The recorder can play back WAV * , MP3
and WMA format files. To play back a file
recorded with another machine, you need to
transfer (copy) it from a computer.
* WS -813, WS-812 only.
STOP
( 4 ) button
+ −
3
Playback
1 Select the file to be played back
from the folder that contains
it ( ☞ P. 2 8 ) .
2 Press the ` OK button to start
playback.
• [ • ] appears on the display.
a
b
c
d
e
`
button
OK
button
3 Press the + or − button to adjust
the volume.
• The volume can be adjusted within
the range of [ 00 ] to [ 30 ].
4 Press the
STOP
( 4 ) button at any
point where you want to stop
playback.
• [ L ] appears on the display.
• Pressing this button stops the file
being played back. If the resume
function has been activated, the stop
location is registered, even if the
power is turned off. The next time
the power is turned on, playback is
resumed from the registered stop
location.
EN
36
a Recording media indicator, File name
Folder indicator
b Elapsed playback time
c Playback position bar indicator
d File length
e Recording date and time
Page 37
Playback
Settings relating to playback
[ V o i c e P l a y b a c k ]
*1 *3
( ☞ P.61)
[ N o i s e C a n c e l ] * 3
( ☞ P.61)
[ V o i c e B a l a n c e r ]
*1 *3
( ☞ P.61)
[ Voice Filter ] *2 *3
( ☞ P.61)
[ P l a y M o d e ]
( ☞ P.62)
[ Equalize r ] *4
( ☞ P.62)
[ S k i p S p a c e ]
( ☞ P.63)
[ P l a y S c e n e ]
( ☞ P.63)
*1 WS -813, WS-812 only.
*2 WS -811 only.
*3 Function active only in [
*4 Function active only in [ Music ] mode .
O nly the voice por tions
from a rec orded audio fi le
are playe d back.
I f recorded audi o is difficu lt
to under stand becaus e of
noisy su rroundings, a djust
the Nois e Cancel settin g
level.
W hen playing bac k a
record ed audio file, t he
recorder compensates for
any low-volume portions
in the fi le.
T he recorder has a Voi ce
Filter Fun ction to cut low
and high frequency tones
during n ormal, fast, or s low
playback, playback tone,
and enab le clear audio
playback.
You ca n select the
prefer red playback mo de.
When listening to music,
you can se t your favorite
sound qu ality by adjust ing
the equa lizer settin g.
T he skip interv al can be set.
Pl ayback settin gs of your
choice ca n be saved to suit
different sound qualities
and playback methods.
Recorder ] mod e.
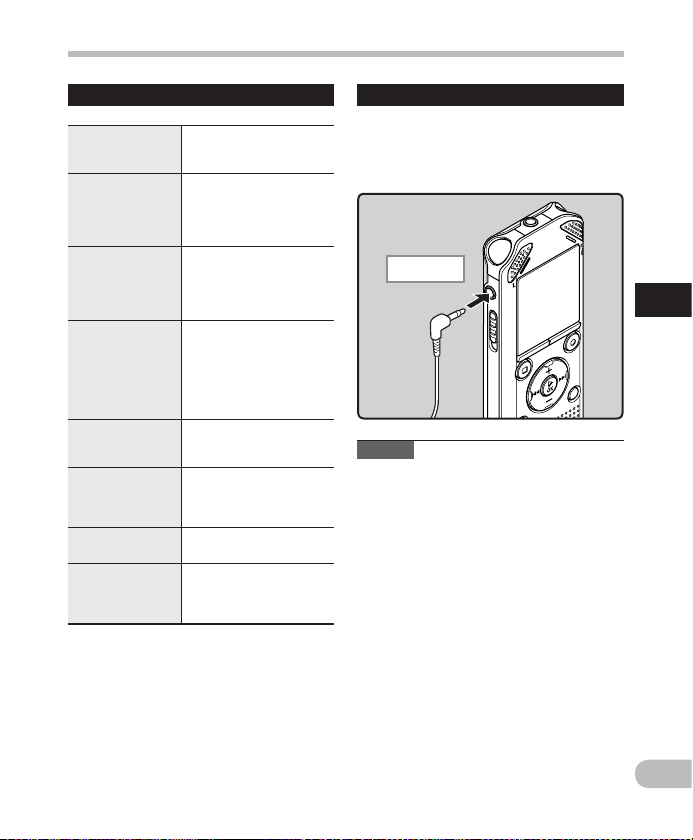
Playb ack throu gh the earph ones
The earphones can be connected to the EAR
jack of the recorder for listening.
• When the earphones are used, the
recorder speaker is switched off.
To EAR jack
Notes
• To avoid hurting your ears, turn down the
volume before inser ting the earphones
into your ears.
• When using the earphones, do NOT set
the volume too high. Listening at very
high volume may lead to hearing loss.
3
Playback
EN
37
Page 38
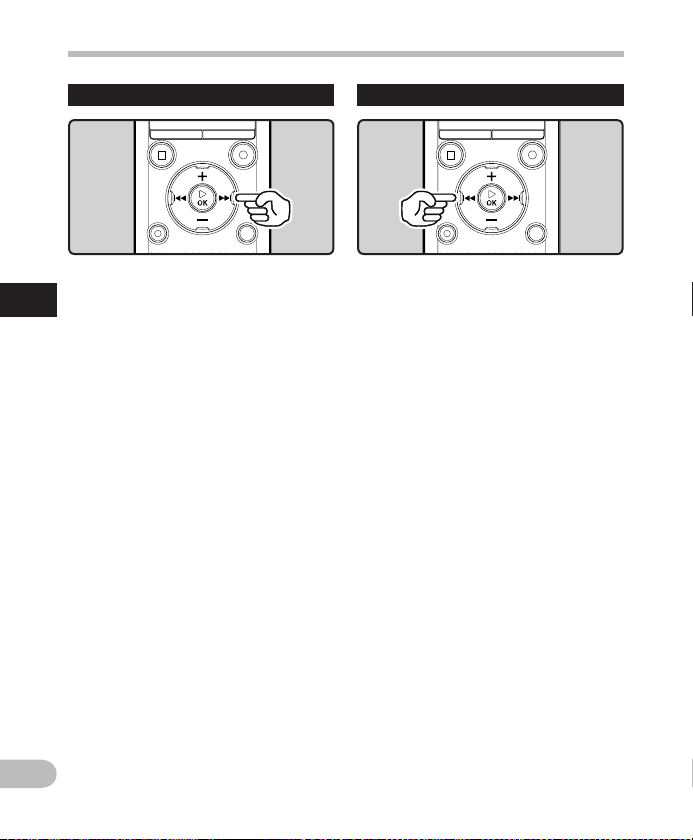
Forwarding Rewinding
Playback
While the recorder is in stop mode in
the file display, press and hold the
3
9 button.
Playback
• [ ß ] appears on the display.
• When you release the 9 button,
forwarding stops. Press the ` OK button
to start playback from where forwarding
stopped.
While the recorder is in playback
mode, press and hold the 9
button.
• When you release the 9 button, the
recorder resumes normal playback.
• If there is an index mark or temp mark
within the f ile, the recorder stops at that
location ( ☞
• The recorder stops when it reaches the
end of the file. Continue pressing the
9 button to continue for warding from
the beginning of the next file.
P.42 ) .
EN
38
While the recorder is in stop mode in
the file display, press and hold the
0 button.
• [ ™ ] appears on the display.
• When you release the 0 button,
rewinding stops. Press the ` OK button
to start playback from where rewinding
stopped.
While the recorder is in playback
mode, press and hold the 0
button.
• When you release the 0 button, the
recorder resumes normal playback.
• If there is an index mark or temp mark
within the f ile, the recorder stops at that
location ( ☞ P.42 ) .
• The recorder stops when it reaches the
beginning of the file. Continue pressing
the 0 button to continue rewinding
from the end of the previous file.
Page 39
Playback
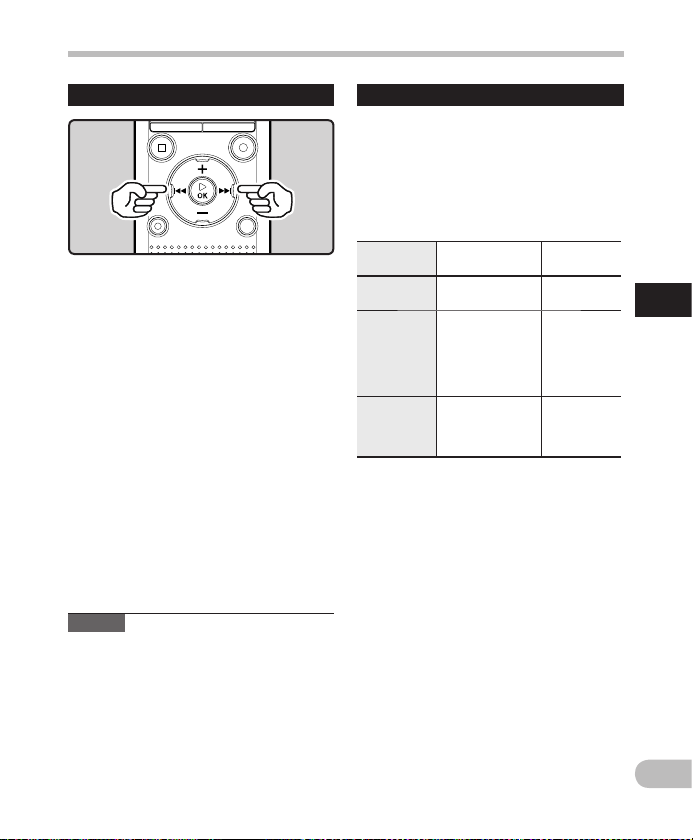
Locat ing the beg inning of a f ile
While the recorder is in stop mode
or playback mode, press the 9
button.
• The recorder skips to the beginning of
the next file.
While the recorder is in playback
mode, press the 0 button.
• The recorder skips to the beginning of
the current file.
While the recorder is in stop mode,
press the 0 button.
• The recorder skips to the beginning of
the previous file. If the recorder is in
the middle of a file, it will return to the
beginning of the file.
While the recorder is in playback
mode, press the 0 button twice.
• The recorder skips to the beginning of
the previous file.
Notes
• When you skip to the beginning of the
file during playback, the recorder stops
at the position of the index mark or temp
mark. Index marks and temp marks are
skipped when you perform this operation
in stop mode ( ☞ P. 4 2).
• When [ Skip Space ] is set to a setting
other than [ File Skip ], the recorder skips
forward/reverse by the specif ied time
and then starts playback ( ☞ P.63).
About m usic file s
In cases where the recorder is unable to play
back music f iles that have been transferred
to it, check to make sure that the sampling
rate and bit rate are in the range where
playback is possible. Combinations of
sampling rates and bit rates for music f iles
which the recorder can play back are given
below.
File f ormat
WAV form at * 4 4 . 1 k H z 16 b i t
MP3 f ormat
WMA format
*
WS -813, WS-812 only.
• Variable bit rate MP3 files (in which
conversion bit rates can vary) may not be
played back properly.
• For WAV files, this recorder can only
play back those in the linear PCM format.
WAV files other than these cannot be
played back.
• Even if the file format is compatible for
playback on this recorder, the recorder
does not support every encoder.
Sampling
frequency
MPEG1 Layer3:
32 kHz, 44.1 kHz,
48 kHz
MPEG2 Layer3:
16 kH z, 22.05 kHz,
24 kHz
8 k Hz, 11 k Hz,
16 kHz, 22 kHz,
32 kHz, 44.1 kHz,
48 kHz
Bit rate
Fro m 8 kbps
up to 320
kbps
Fro m 5 kbps
up to 320
kbps
3
Playback
EN
39
Page 40
Playback
Searching for a file
For WS-813, WS-812:
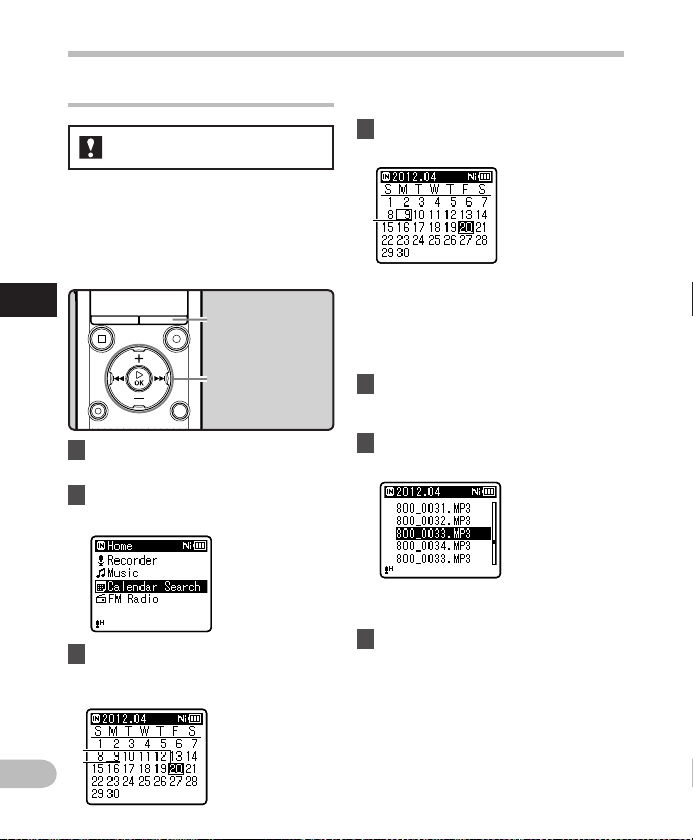
You can search for voice files by the date
they were recorded. A s long as you know the
date, you can quickly find a file even if you
have forgotten what folder it is in. It is only
possible to search for files saved in the voice
recordings folder ( & to * ).
3
Playback
1 Press the
to set the [
2 Press the + or − button to select
[
Calendar Search
3 Press the ` OK button.
• [ Calendar Search ] will appear on the
display.
a
b
EN
LIST
button
+ − button
9 0 button
`
OK
button
LIST
button repeatedly
Home
] display.
].
a Cu rrent date
b D ate when a file
was recorded
• Dates with recorded files are shown
with underbars.
4 Press the + , − , 9 or 0
button to select the date.
c Selec ted date
c
9 , 0 buttons:
Move to the previous/next day.
+
, − buttons:
Move to the previous/next week.
• Press the STOP ( 4 ) button to return
to the [ Home ] display.
5 Press the ` OK button.
• Files recorded on the date selected
are displayed in a list.
6 Press the + or − button to select
a file.
• Press the 0 button to return to the
previous screen.
7 Press the ` OK button to start
playback.
40
Page 41
Playback
Changing the playback sound
You can change the playback speed and
tone * . Changing the playback speed is
useful when you want to speed-listen to
the contents of a lecture or slow down the
speed of a foreign-language phrase that you
couldn’t catch.
* WS -813, WS-812 only.
+ − button
`
OK
button
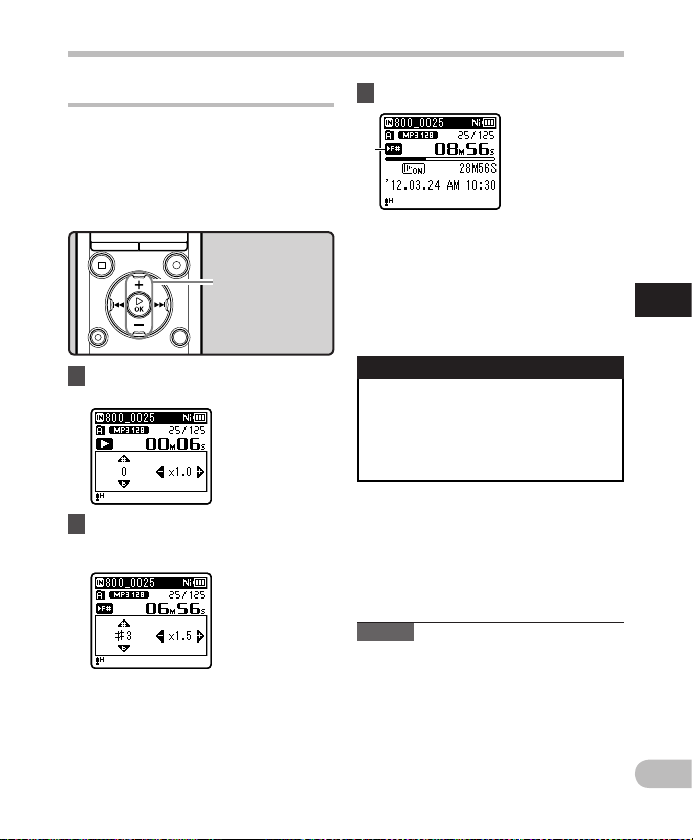
1 While the recorder is in playback
mode, press the ` OK button.
2 Press the + or − button or the
9 or 0 button to make it
easier to catch what is being said.
9 , 0 buttons:
Change the playback speed.
+ ,
−
buttons*:
Change the playback tone.
* WS-813, WS-812 only.
• If you are still having trouble catching
the words af ter changing the
playback speed, you can make the
voice clearer by changing the tone.
3 Press the ` OK button.
a
a Playback speed/ playback tone
indicator
• Even if playback is stopped, the
modified playback speed and tone
are retained.
Limits of fast playback
Normal operation may not b e available
depending on the sampling frequency
and the bit rate of the file to be played
back. In such a case, reduce the speed
of fast playback.
Notes
• As in normal playback mode, you can
stop playback, cue a f ile, or insert an
index or temp mark in playback speed/
playback tone* modes as well ( ☞ P. 42 ) .
* WS-813, WS-812 only.
• When using the playback speed/ tone
function, the following functions are not
available.
• [ Voic e Playback ] (WS-813, WS-812
only) ( ☞ P.61)
• [ Noise Cancel ] ( ☞ P.61)
3
Playback
EN
41
Page 42
Playback
Setting an index mark or a temp
mark
If index marks and temp mark s have been
placed into your files, you can quickly find
a location you want to listen to when you
are fast forwarding, fast rewinding, or cuing
a file. Index mark s can only be placed into
files created by Olympus voice recorders,
but temp mark s can be used to temporarily
remember desired locations.
3
Playback
+ − button
`
OK
SCENE/INDEX
button
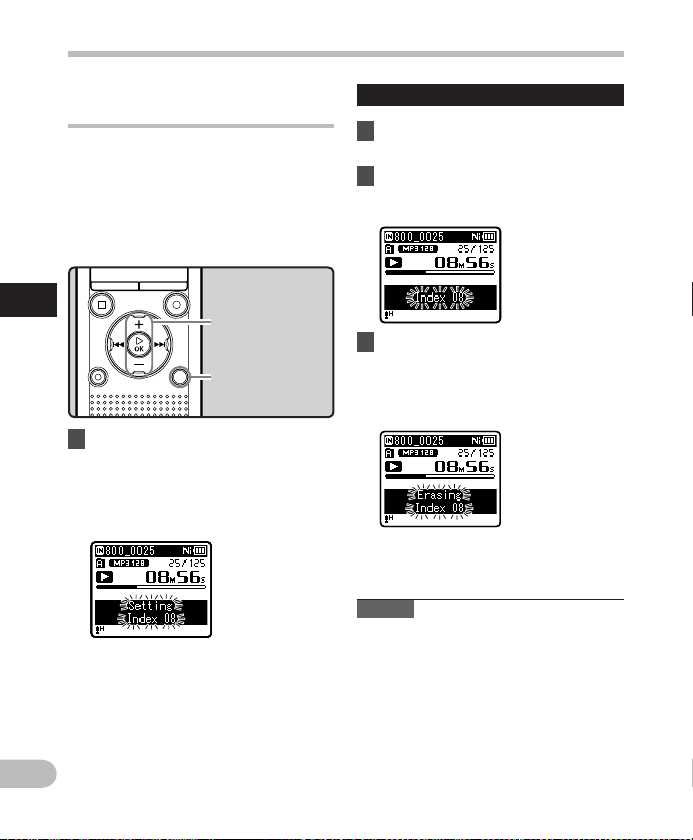
1 While the recorder is in recording
mode or playback mode, press
the
SCENE
/
INDEX
button.
• A number appears on the display and
an index mark or temp mark is placed
into the file.
• Even after an index or temp mark has
been placed into a file, recording or
playback will continue so you can
place index or temp mark s in other
locations in a similar manner.
EN
42
button
Clear ing an inde x mark or a temp m ark
1 Select a file that contains index
or temp marks you wish to erase.
2 Press the 9 or 0 button to
select the index or temp mark to
be erased.
3 While the index or temp number
is displayed for approximately 2
seconds on the display, press the
ERASE
button.
• The index or temp mark is erased.
• Index or temp numbers after the
erased index or temp number
automatically decrement by 1.
Notes
• Temp marks are temporary markings, so
if you transmit a file to a PC or move it
using a PC, the marks will automatically
be erased.
• Up to 9 9 index and temp mark s can be set
in a file. I f you try to set more th an 99 index
or temp mark s, the [ No mo re can be set ]
message a ppears for inde x marks and the
[ No m ore can be set ] messag e appears for
temp marks .
• Index or temp marks cannot be set or
erased in a locked file ( ☞ P. 55 ) .
Page 43
Playback
How to begin segment repeat
playback
This function enables repeated playback of
part of the file being played.
REC
( s ) bu tton
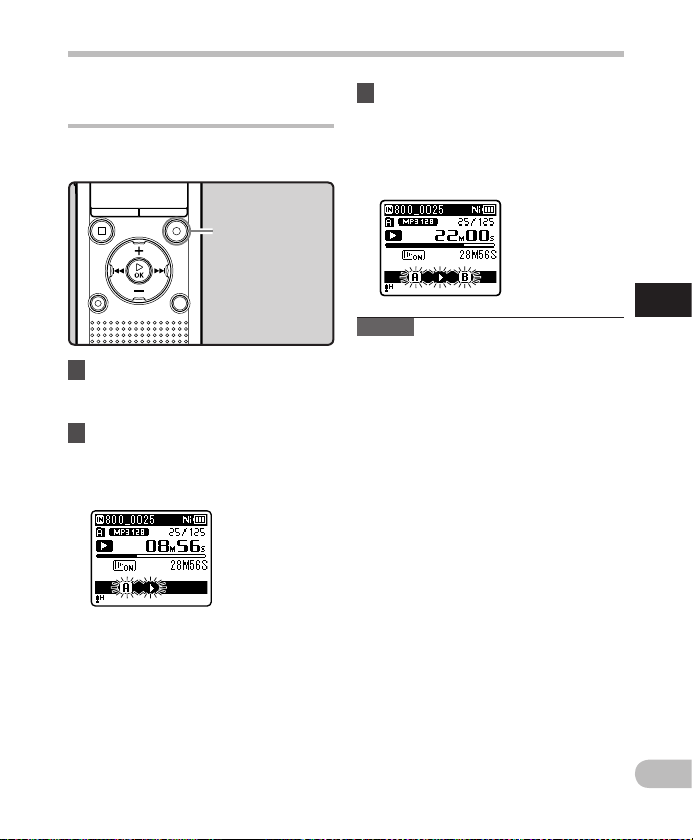
1 Select a file that has a segment
you would like to play back
repeatedly, and start playback.
2 Press the
position where you want to start
segment repeat playback.
• [ w ] flashes on the display.
• While [ w ] is f lashing, you can fast
• If the recorder reaches the end of
REC
( s ) button at the
forward, rewind, or change the
playback speed in the same way as in
normal mode to find the end position
( ☞ P. 41 ).
the file while [ w ] is flashing, point
[ x ] becomes the end of the file, and
repeat playback starts.
3 Press the
REC
( s ) button again at
the position where you want to
end segment repeat playback.
• The recorder continuously plays back
the segment until segment repeat
playback is canceled.
Note
• As in normal playback mode, the
playback speed can b e changed during
segment repeat playback as well ( ☞ P. 41).
If an index mark or temp mark is set or
cleared during segment repeat playback ,
segment repeat playback is canceled and
the recorder returns to normal playback
mode ( ☞ P. 4 2) .
3
Playback
EN
43
Page 44
Playback
Cance ling the se gment repe at playbac k
function
3
Playback
Pressing any of the following
buttons releases segment repeat
playback.
STOP
a Press the
Pressing the STOP ( 4 ) button releases
segment repeat playback and stops
playback.
b Press the
Pressing the REC ( s ) button releases
segment repeat playback, and it will
return to normal playback mode.
c Press the 9 button
Pressing the 9 button releases
segment repeat playback, and makes
the recorder skip to the beginning of the
next f ile.
d Press the 0 button
Pressing the 0 button releases
segment repeat playback, and makes
the recorder skip to the beginning of the
current f ile.
( 4 ) button
REC
( s ) button
Changing the playback scene
[ Play Scene ]
If you register your preferred playback
settings for the playback scenes, you can
easily select the setting later ( ☞ P.63).
+ − button
`
OK
button
SCENE/INDEX
button
1 While the recorder is in stop
mode or playback mode, press
and hold the
2 Press the + or − button to select
[
Play Scene
].
SCENE
/
3 Press the ` OK button.
4 Press the + or − button to select
the playback scene.
INDEX
button.
EN
44
5 Press the ` OK button.
Page 45
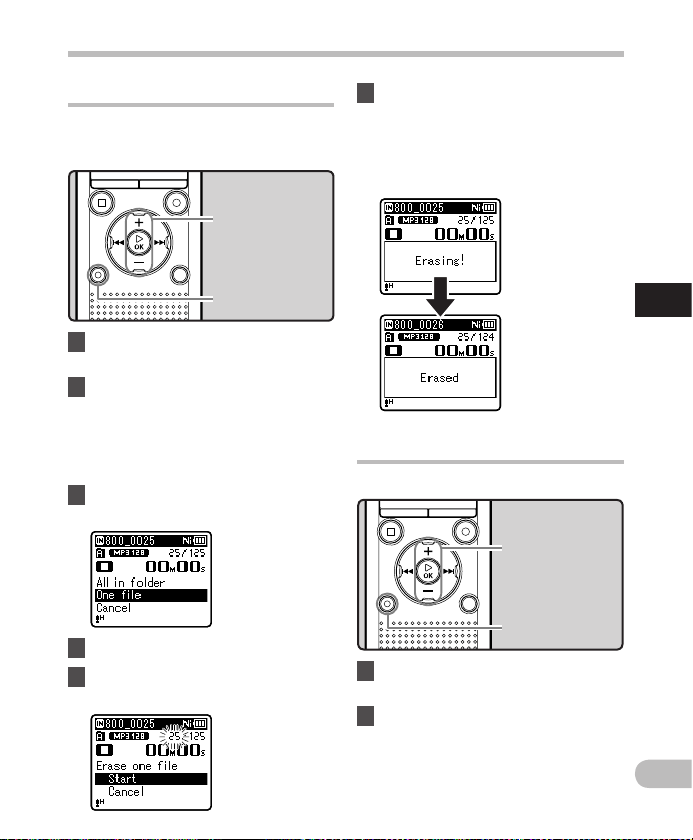
Erasing
Erasing files
A selected f ile can be erased from a folder.
Also, all files in a folder can be erased
simultaneously.
+ − button
`
OK
button
ERASE
button
1 Select the file you want to erase
( ☞ P. 2 8 ) .
2 While the recorder is in stop
mode in the file display, press the
ERASE
button.
• If an action is not selected within 8
seconds, the recorder returns to stop
mode.
3 Press the + or − button to select
[
A ll in folder
4 Press the ` OK button.
5 Press the + button to select
[
Start
] or [
One file
].
].
6 Press the ` OK button.
• The display changes to [ Erasing! ] and
erasing starts.
• [ Erased ] is displayed when the f ile is
erased. File numbers are reassigned
automatically.
Erasing a folder
You can erase files by deleting folders.
+
button
`
OK
button
ERASE
button
1 Select the folder you want to
erase ( ☞ P.2 8 ) .
2 While the recorder is in stop
mode in the folder list display,
press the
• If an action is not selected within 8
ERASE
button.
seconds, the recorder returns to stop
mode.
3
Erasing
EN
45
Page 46
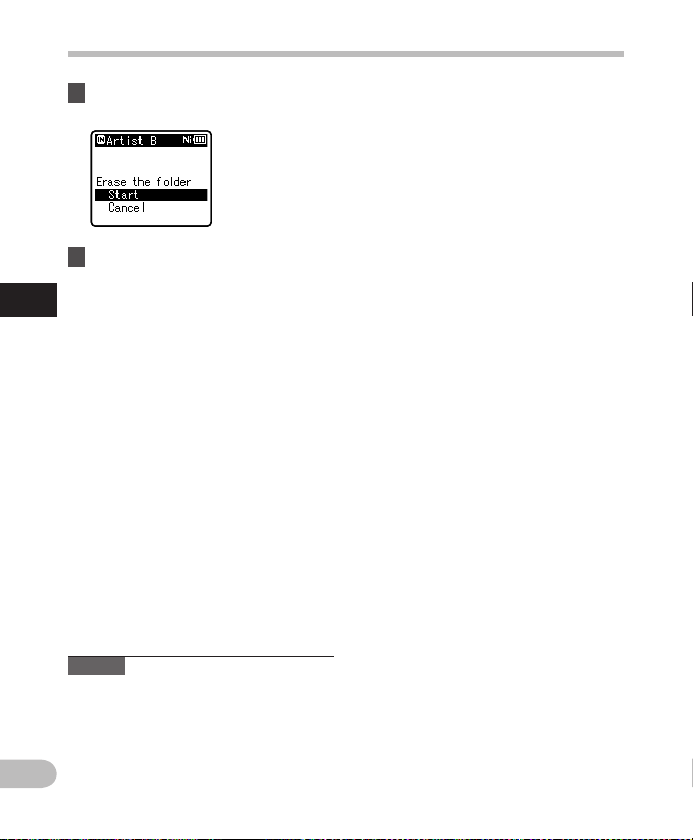
Erasing
3 Press the + button to select
[
Start
].
4 Press the ` OK button.
• The display changes to [ Erasing! ] and
3
Erasing
EN
erasing starts.
• [ Erased ] is displayed when the f ile is
erased.
Notes
• You cannot recover a f ile once it has been
erased. Please check carefully before
erasing.
• When a microSD card is inserted into the
recorder, be sure to confirm the recording
media as either [ Internal memory ]
or [ microSD card ] so that there is no
mistake ( ☞ P. 6 5 ).
46
• Locked files and files set as read-only
cannot be erased ( ☞ P. 5 5).
• The default folders of the recorder,
namely [ Recorder ] (including [ Folder A ]
to [ Folder E ] and [ Radio Folder ] * ) and
[ Music ] cannot be erased.
* WS-813 only.
• In the [ Music ] folder, all folders except
[ Music ] can be deleted.
• If there is a f ile that cannot be recognized
by the recorder, the file and the folder
which contains that file will not be
erased. Please connect the recorder to
your PC to erase the file.
• Replace the battery with a new one in
order to ensure that the bat tery does not
go flat during processing. In addition, it
may take over 10 seconds to complete
processing. Never perform operations
such as the following during processing,
as such operations may damage the data.
1 Disconnect the AC Adapter during
processing.
2 Remove the battery during processing.
3 Remove the microSD card during
processing when [ microSD card ] is
selected as the recording media.
Page 47
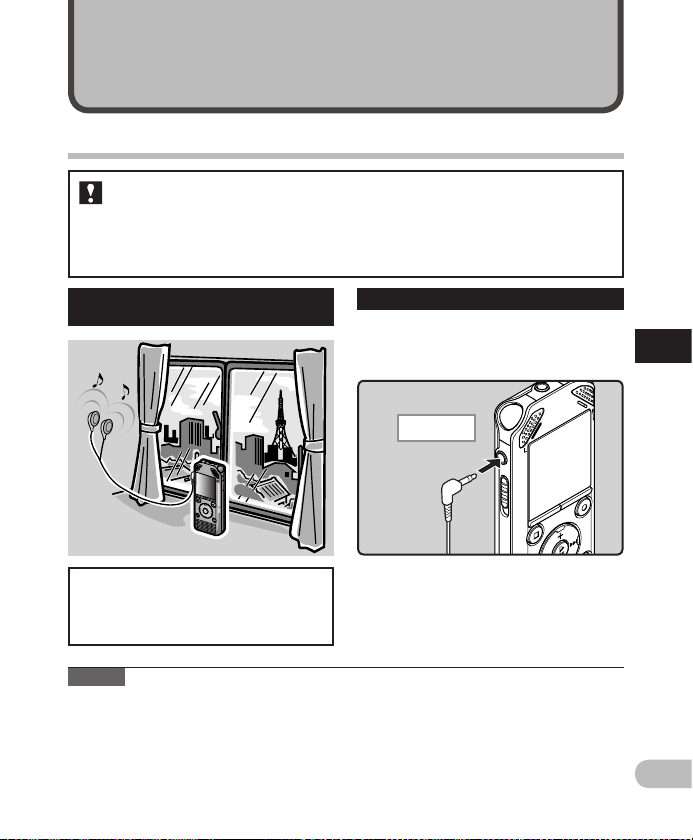
About the FM radio
(WS-813 only)
Using the FM radio
For WS-813:
Radio reception varies substantially depending on where you are using the radio.
If the reception is poor, adjust the antenna position or orientation, or place the
recorder in a location where a radio signal can be easily received, such as by a
window.
The rec order may no t be able to rec eive an
FM signa l within or c lose to buil dings
Move to a location where the signal
can be eas ily received. I nside a
building, bro adcast signal s are more
easily received near windows.
Notes
• Even within the broadcast region, radio signals may be dif ficult to receive in tunnels or
underground roads, inside or in the shadow of buildings and apartment blocks that have a
concrete structure, and other similar locations. You may not be able to get radio reception
in these locations.
• For best reception, avoid using the radio at the same time as a cellular phone, PC,
television or other electrical product. Such products may cause noise.
• If you use the radio while the recorder is connected to the AC adapter (A514 etc.), noise
may be generated. Always power the FM radio from the battery.
Conne cting the e arphone s
The supplied earphones function as an
FM antenna. You cannot receive FM radio
signals if the earphones are not connected.
To EAR jack
• Also note that you cannot receive radio
signals in locations not reached by
radio waves, such as areas outside the
broadcast region and areas surrounded
by mountains.
4
Using the FM radio
EN
47
Page 48
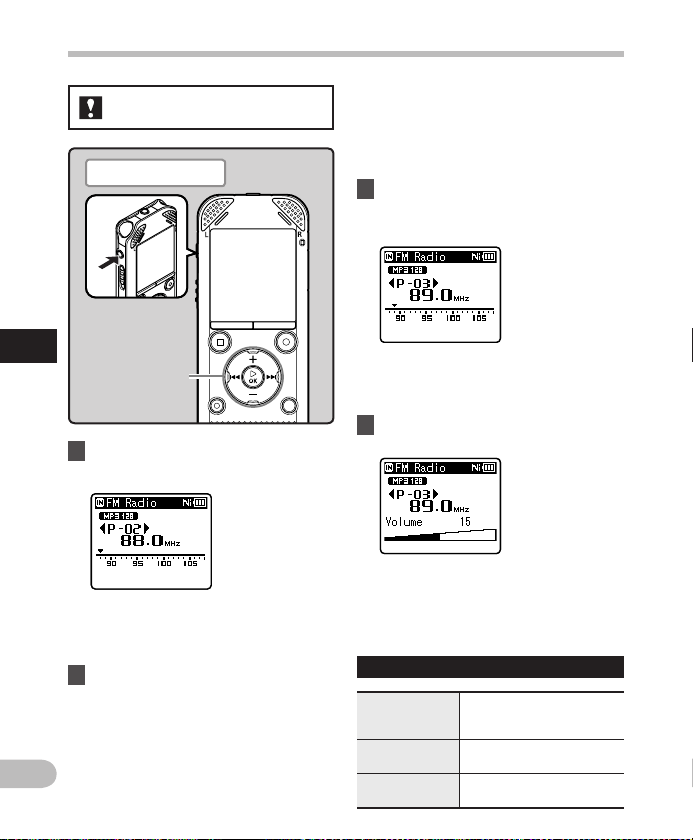
FM radio mode operations
For WS-813:
P lug in the earp hones
3 Press the 9 or 0 button to
Adding a ra dio station to t he preset
stations:
Change the reception mode to
manual reception, and adjust the
frequency. The station you are tuned
to can then be added ( ☞ P. 5 0 , P. 51).
select a station.
• You can selec t a preset station.
4
+ − button
FM radio mode operations
9 0 button
1 Set to [
FM Radio
• Change the mode to [ FM Radio ].
• To stop FM radio reception, press
the LIST button to go to the [ Home ]
display. From the [ Home ] display, you
can change to a different mode.
2 Presetting radio stations.
Presetting radio stations
automatically:
Automatically preset stations to
make it easy to tune. For details,
see “ Registeri ng radio statio ns
EN
automatically [ Auto-preset ]”
( ☞ P. 4 9).
48
] mode ( ☞ P. 2 5 ) .
• You can also select a station which
has not been preset. For details, see
“ Chan ging the reception mode ”
( ☞ P. 5 0 ) .
4 Press the + or − button to adjust
the volume.
• The volume can be adjusted within
the range of [ 00 ] to [ 30 ].
Settings relating to FM radio
[ Auto -pr ese t ]
( ☞ P.49)
[ Scan Level ]
( ☞ P.67)
[ Outp ut ]
( ☞ P.67)
Automati cally adds
receiv able stations to t he
preset stations.
A llows you to set the sc an
sensiti vity for auto pr eset.
A llows you to set the au dio
output o f the FM radio.
Page 49
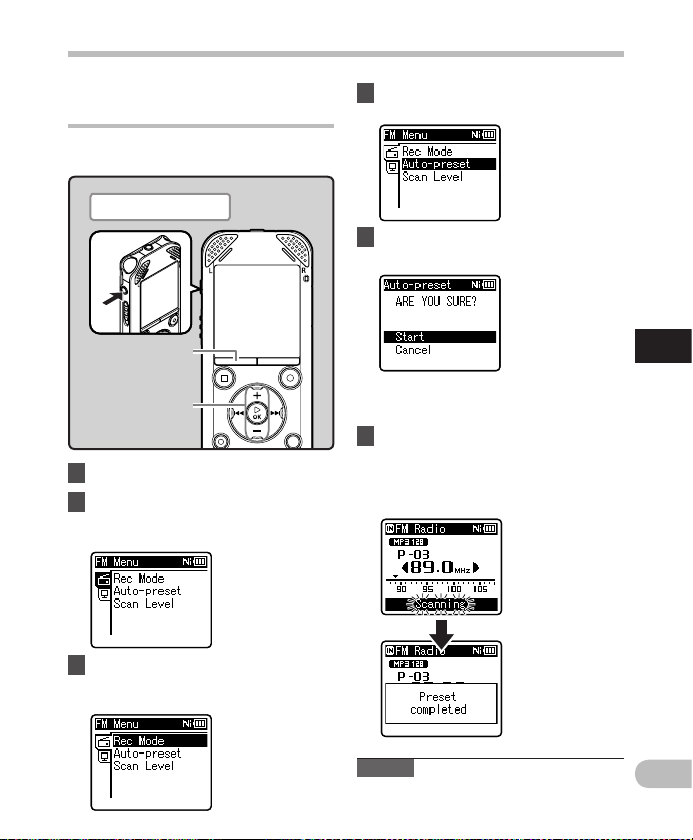
FM radio mode operations
Presetting radio stations
automatically [Auto-preset]
Presetting radio stations makes it easy to
find your desired station.
P lug in the earp hones
MENU
button
+ − button
`
OK
button
1 Set to [
2 Press the
3 Press the ` OK button to move
FM Radio
• The menu appears on the display
( ☞ P.53)
] mode ( ☞ P. 2 5 ) .
MENU
button.
the cursor to the item you want
to set.
4 Press the + or – button to select
[
Auto-preset
].
5 Press the ` OK button.
• [ Auto-preset ] appears on the display.
• Select [ Cancel ] and press the ` OK
button to return to the previous
display.
6 Press the ` OK button again.
• [ Scanning ] appears on the display
and scanning starts.
When [ Preset completed ] appears,
the scan is complete.
4
FM radio mode operations
Note
• The preset numbers are automatically
assigned according to the frequency.
EN
49
Page 50
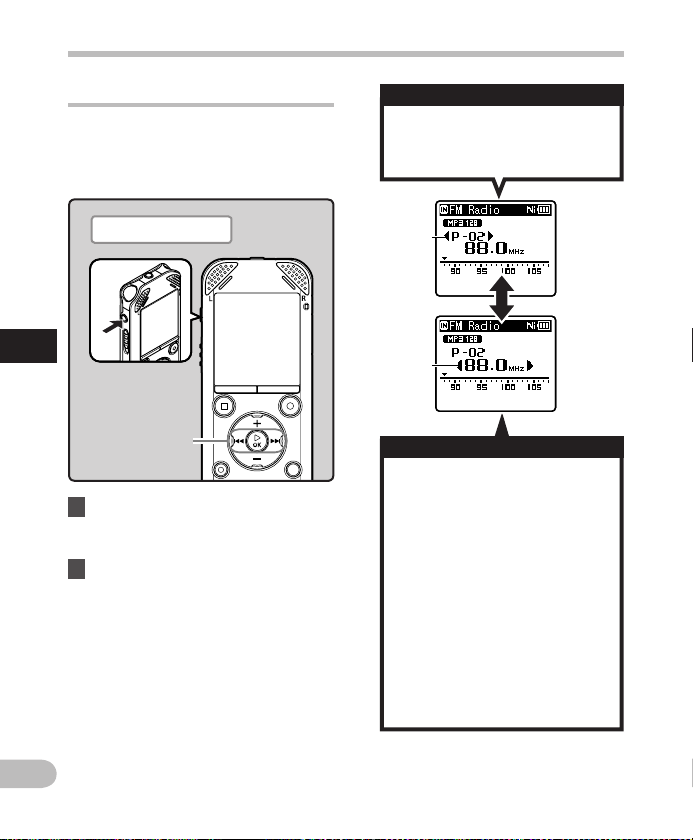
FM radio mode operations
Changing the reception mode
It is possible to fine tune the channels
manually if the station you are looking for
has a weak signal and couldn't be detected
using the Auto Preset function.
P lug in the earp hones
4
FM radio mode operations
9 0 button
`
OK
button
1 Perform Steps 1 through 3 from
“FM radio mode operations”
( ☞ P. 4 8 ) .
2 Press the ` OK button to select a
reception mode.
• If you have preset stations, the
reception mode changes at each
press of the ` OK button.
Prese t call mode
• Press the 9 or 0 button to
select a preset station.
a Preset number
a
b
Auto/Manual mode
• Press the 9 or 0 button
to adjust the frequency and
tune to a radio signal (Manual
reception).
• Press and hold the 9 or 0
button to scan through the
receivable radio stations (Auto
reception).
b Tuning frequency
• If you press the ` OK button
while a frequency that you have
not preset is being received,
the recorder will tune in to the
station whose preset number
is closest to the frequency that
was being received.
EN
50
Page 51
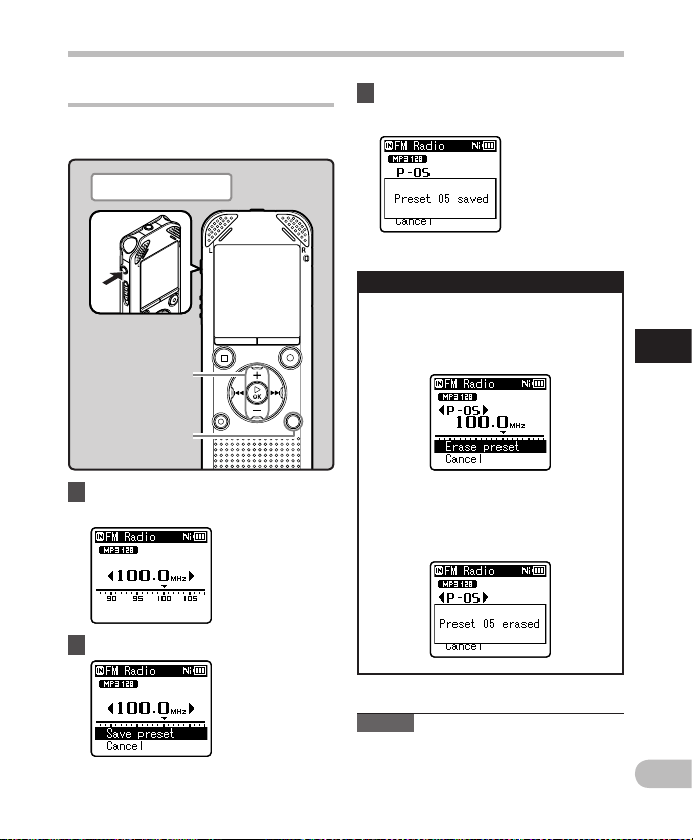
FM radio mode operations
Adding a radio station
You can add radio stations from Auto/
Manual reception to the preset stations.
P lug in the earp hones
+ −
button
`
OK
button
SCENE/INDEX
button
1 Tune to the radio station you
want to preset.
2 Press the
SCENE
/
INDEX
button.
3 Press the ` OK button.
• Up to 30 radio stations can be preset.
Delet ing a prese t radio stat ion
1 Tune to the preset radio
station you wish to erase.
2 Press the
• Select [
ERASE
button.
Cancel ] and press the ` OK
button to return to the previous
display.
3 Press the ` OK button.
4
FM radio mode operations
• Select [ Cancel ] and press the ` OK
button to return to the previous
display.
Note
• The preset numbers are automatically
assigned according to the frequency.
EN
51
Page 52
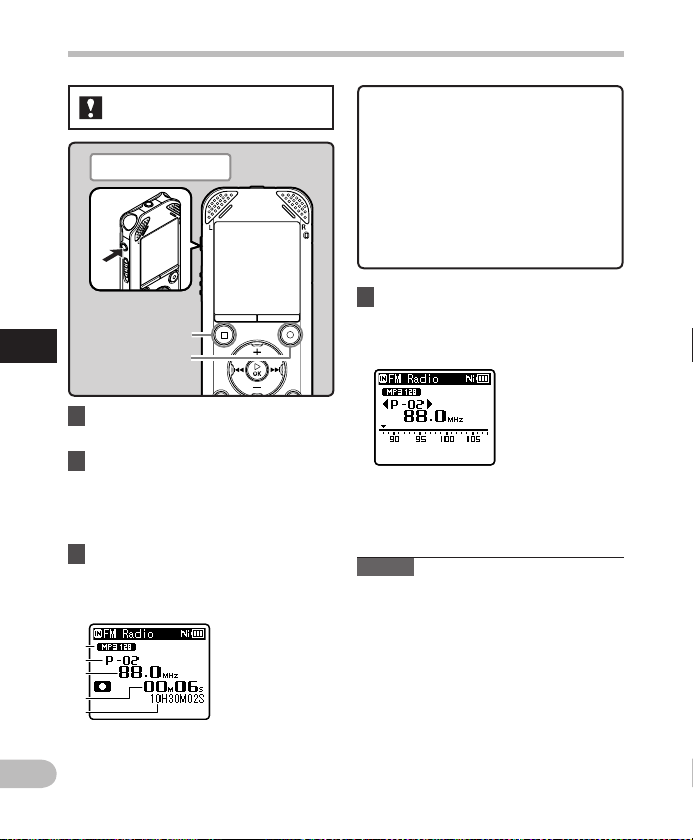
Recording from the FM radio
For WS-813:
P lug in the earp hones
STOP
4
Recording from the FM radio
( 4 ) button
REC
( s ) bu tton
1 Tune to the broadcast program
you wish to record ( ☞ P. 25 , P. 48).
2 In menu settings relating to FM
radio, set [
Output
] to [
( ☞ P. 67).
• If [ Output ] is set to [ Speaker ], you
cannot record.
3 Press the
REC
( s ) button to start
recording.
• The LED indicator light turns on and
[ K ] appears on the display.
a
b
c
d
e
a Recording mode indicator
b Preset number
c Tuning frequency
EN
d Elapsed recording time
52
e Remaining recording time
Earphone
When recording from the
FM radio:
Even if the sound of the FM radio is
clear, in certain conditions there may
be cases of electric interference when
the recording starts.
To avoid such a problem, perform a
recording test before recording. Also,
be sure to record in places with good
reception.
4 Press the
STOP
( 4 ) button to stop
recording.
• [ K ] disappears and the reception
display re-appears.
]
• When you record FM radio, the
recording is stored automatically
in the [ FM Radio ] folder in the
[ Recorder ] folder.
Notes
• When recording from the FM radio, be
sure to connect the earphones to the EAR
jack.
• When FM radio is recorded, the file name
assigned to the recording ( ☞ P.33) is
appended with a date and time.
813_0001_120715_0915.WMA
Date : [120715] (2012, July 15)
Time : [0915] (9.15 am)
Page 53
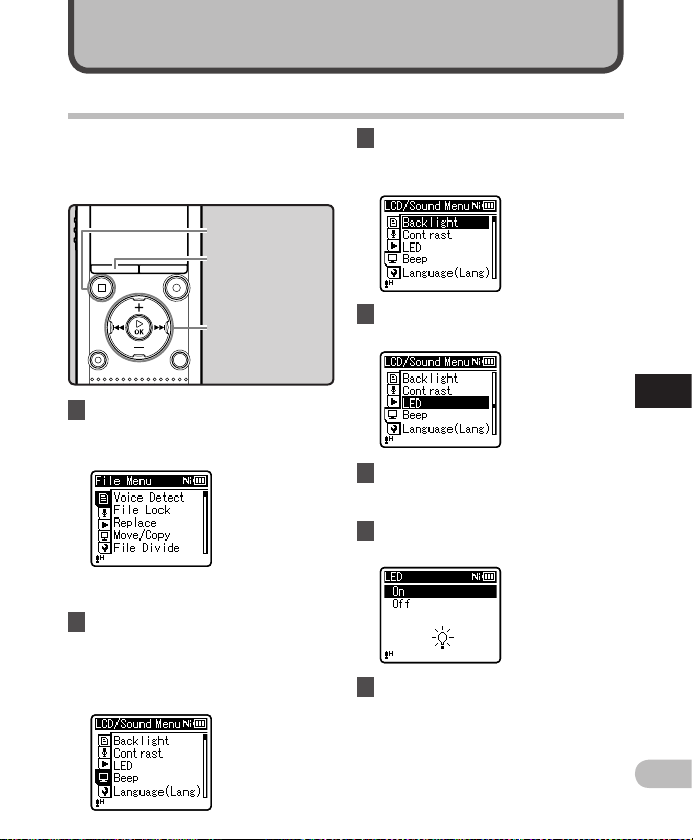
Menu setting
Menu setting method
Items in menus are categorized by tabs, so
select a tab first and move to the desired
item to set it. You can set each menu item
as follows.
STOP
( 4 ) button
MENU
button
3 Press the ` OK button to move
the cursor to the item you want
to set.
+ − button
9 0 button
`
OK
button
1 While the recorder is in stop
mode, press the
• The menu appears on the display.
• Menu items can be set during
recording or playback.
MENU
button.
2 Press the + or − button to move
to the tab that contains the item
you want to set.
• You can change the menu display by
moving the settings tab cursor.
4 Press the + or − button to move
to the item you want to set.
5 Press the ` OK button.
• The display shows the setting of the
selected item.
6 Press the + or − button to change
the setting.
7 Press the ` OK button to
complete the setting process.
• A message appears on the screen to
inform you that the set ting has been
entered.
5
Menu setting method
EN
53
Page 54
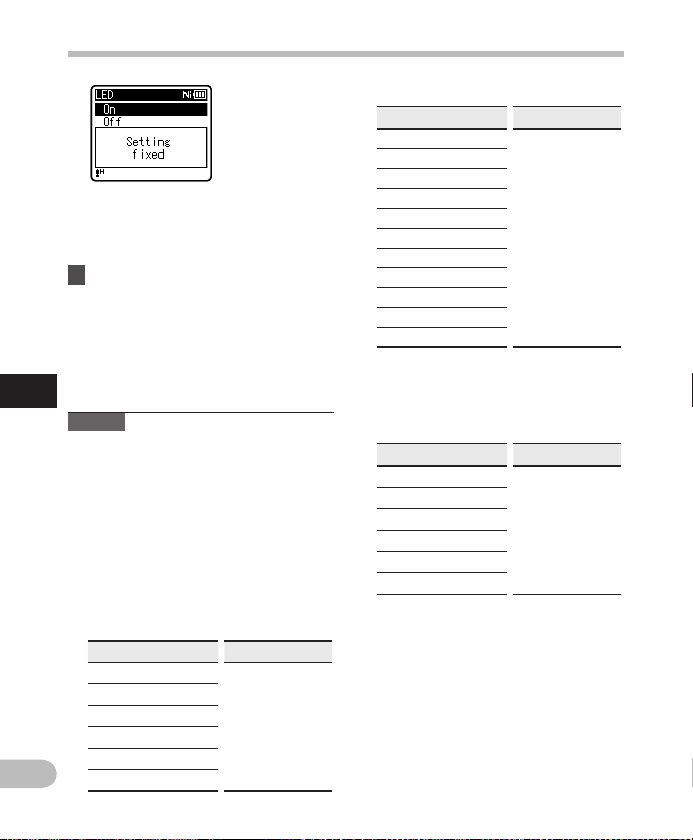
• Pressing the 0 button without
pressing the ` OK button cancels the
setting process and returns you to the
previous screen.
8 Press the
STOP
( 4 ) button to
close the menu screen.
• If the menu screen is open during
recording or playback, pressing the
STOP ( 4 ) button allows you to return
to the recording or playback screen
without interrupting recording or
5
Menu setting method
playback.
Notes
• The recorder stops if you leave it idle for 3
minutes during a menu setup operation
and do not set a selected item.
• When menu settings are entered during
recording or playback, the menu settings
are canceled if 8 seconds elapse with no
buttons being pressed.
4 Setting menu during recording:
Function Setting
[ Rec Level ]
[ Zoom Mic ] *1
EN
[ Low Cut Filter ]
[ VCVA ]
[ Backlight ]
[ LED ]
To menu it em
options
54
Menu setting method
4 Setting menu during playback:
Function Setting
[ Propert y ]
[ Voice Playbac k ] *2 *4
[ Noise Can cel ] *4
[ Voice Bala ncer ] *2 *4
[ Voice Filter ] *3 *4
[ Play Mode ]
[ Equal izer ] *5
[ Skip Space ]
[ Play Scene ]
[ Backlight ]
[ LED ]
4 Setting menu during FM radio
reception (WS-813 only):
• During recording in [ FM Radio ]
mode, only the [ Backlight ] and [ LED ]
settings are available.
Function Setting
[ Rec Mode ]
[ Auto -pr ese t ]
[ Scan Level ]
[ Backlight ]
[ LED ]
[ Output ]
*1 WS-813 only.
*2 WS- 813, WS -812 on ly.
*3 WS-811 only.
*4 Function active only in [ Recorder ] mode .
*5 Function active only in [ Music ] mode.
To menu it em
options
To menu it em
options
Page 55
Menu setting method
+ F i l e M e n u
V o i c e D e t e c t
For WS-813, WS-812:
This function extracts voice portions from a
recorded voice file.
See “ Extract voice p ortions from f ile
[ Voice Detect ] ” ( ☞ P.68) .
F i l e L o c k
Lock ing a file keeps important data from
being accidentally erased. Locked files are
not erased when you select to erase all files
from a folder ( ☞ P. 4 5 ) .
[ Lock ]:
Locks the file and prevents it from being
erased.
[ Unlock ]:
Unlocks the file and allows it to b e erased.
Replace
You can move a f ile in a folder to change the
order of playback.
See “ Rearranging files [ Replace ] ” ( ☞ P. 6 9 ).
Move/Copy
For WS-813, WS-812:
Files saved in the internal memor y or the
microSD card can be moved or copied
within the memory.
See “ Moving/Copying files [ Move/Copy ] ”
( ☞ P. 70).
F i l e D i v i d e
Files with large capacities and long
recording times can be divided so that they
are easier to manage and edit.
See “ Dividing Files [ File Divide ] ” ( ☞ P.72 ) .
P r o p e r t y
File and folder information can be
confirmed from the menu screen.
When a file is selec ted:
[ Name ] (File name), [ Date ] (Time stamp),
[ Size ] (File size), [ Bit Rate ] *1 (File format),
[ Artist ] *2 (Artist name) and [ Album ] *2
(Album name) appear on the display.
*1 When a linear PCM format file has been
selected, the [ Bit Rate ] area displays the
sampling frequency and bit rate.
*2 When a f ile contains no tag information,
[ UNKNOWN_ARTIST ],
[ UNKNOWN _ALBUM ] appear on the
display.
When a folder is selec ted:
[ Name ] (Folder name), [ Folder ] *1 (Folder
number) and [ File ] *2 (File number) appear
on the display.
*1 When [ Recorder ] is selected, [ Folder ]
does not appear on the display.
*2 Files which cannot be recognized by this
recorder are not included in the number
of files.
• Select a file for which you would like to
verify information in advance before
operating the menu.
5
Menu setting method
EN
55
Page 56
Menu setting method
, Rec Menu
Rec Level
Recording sensitivity is adjustable to meet
recording needs.
[ High ]: Highest recording sensitivity suitable
for recording at a distance or a low
volume source, such as conferences with
a large number of people.
[ Middle ]: Suitable for recording meetings
and seminars with a small number of
people.
[ Low ]: Lowest recording sensitivity suitable
for dictation.
[ Manual ] * :
The recording level must be adjusted
manually during recording. The level can
be adjusted from [ 01 ] to [ 30 ].
* WS-813, WS-812 only.
5
• When you want to record a speaker’s
Menu setting method
voice clearly, set [ Rec Level ] to [ Low ]
and hold the recorder ’s built-in stereo
microphone close to the speaker’s mouth
(5-10 cm) while recording.
• The recording level is automatically
adjusted when the recording level is set
to [ High ], [ Middle ] or [ Low ].
Inputting a very loud sound may produce
noise even when the recording level is set
to [ High ], [ Middle ] or [ Low
4 Adjust the recording level:
For WS-813:
1 Press the 9 or 0 button while
the reco rder is recording or pause d
to adjust t he recording leve l.
• To adjust the recording level, set both
[ VCVA ] and [ V-Sync. Rec ] to [ Off ] .
• The higher the number, the higher the
EN
level and the larger the indicator position
on the level meter.
56
• When the recording level is set to
[ Manual ], the limiter function is disabled.
When [ OV ] appears on the screen, it
indicates that the sound being recorded
is affected by distortion. Adjust the
recording level so that [ OV ] is not
displayed.
Rec Mode
Th e recorder can recor d in the linear PCM
format ( WS-813, WS-812 only). High resol ution
recordin g at a high sampling rate an d high bit
rate equiv alent or superior to th at of a music
CD is possibl e. Moreover, the recorder a lso
suppor ts the MP3 and WMA format s.
1 Select the recording format.
[ PCM ] * : This is an uncompressed audi o
format which is used for music CDs etc.
[ MP3 ]: MPEG is an international standard
established by a working group of the
ISO (International Organization for
Standardization).
[ WMA ]: This is an audio compression
encoding method that was
developed by Microsoft Corporation
in the US.
* WS -813, WS-812 only.
2 Select the recording rate.
When [
PCM
].
When [
W h e n [
*1 WS -813, WS-812 only.
*2 WS -811 onl y.
*3 Monaural recording.
• To record a meeting or lecture clearly,
set [ Rec Mode ] to a position other than
[ 8kbps ].
• When an external monaural microphone
is used while [ Rec Mode ] is set to a stereo
recording mode, audio is recorded to the
L channel only.
]*1 is s elected:
[ 44.1 kHz/16 bit ]
MP3
] is selected:
[ 2 5 6 k b p s ] * 1 , [ 1 9 2 k b p s ] * 2 ,
[ 1 2 8 k b p s ]
WMA
] is selected:
[ 128 kbps ], [ 64 kbps ]
[ 32 kbps ] *3 , [ 16 k bp s ] *3 , [ 8 kbps ] *3
Page 57
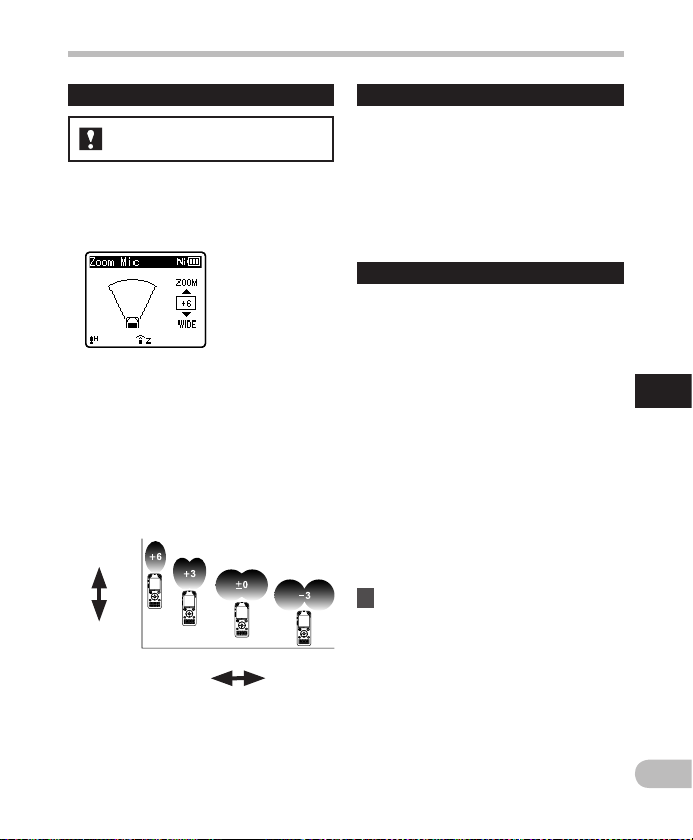
Zoom Mic Low Cut Filter
The recorder has a Low Cut Filter function to
For WS-813:
This function can be switched using the
built-in stereo microphone from expansive
stereo recording to high directivity
recording.
• Increasing the value narrows the
directivity.
• Decreasing the value widens the
directivity, enabling you to record in an
expansive stereo sound.
• If you reduce the direc tivity and widen
the recording range, the recorded sound
has an expansive stereo feeling.
4 About the Zoom Mic function:
Directivity
(high)
minimize low-frequency sounds and record
voices more clearly. This function can reduce
noise from air conditioners and projectors
and other similar noises.
[ On ]:
Enables the Low Cut Filter function.
[ Off ]:
Disables the Low Cut Filter function.
V C V A
When the microphone senses that
sounds have reached a preset threshold
volume level, the built-in Variable Control
Voice Actuator (VCVA) starts recording
automatically, and stops when the volume
drops below the threshold level. The
VCVA feature ex tends recording time and
conserves memory by stopping recording
during silent periods, which helps playback
to be more efficient.
[ On ]:
Enables the VCVA function. Star ts
recording in VCVA mode.
[ Off ]:
Disables the VCVA func tion. Resumes
recording in normal mode.
4 Adjust the start/stop actuation
level:
1 Press the
Directivity
(low)
Sound
collecti on
(narrow)
Sound
collecti on
(wide)
recording.
• When the sound volume is lower
than the preset threshold sound
level, recording automatically stops
after approximately 1 second, and
[ Standby ] flashes on the display. The
LED indicator light turns on when
recording starts and flashes when
recording pauses.
Menu setting method
REC
( s ) button to start
5
Menu setting method
EN
57
Page 58
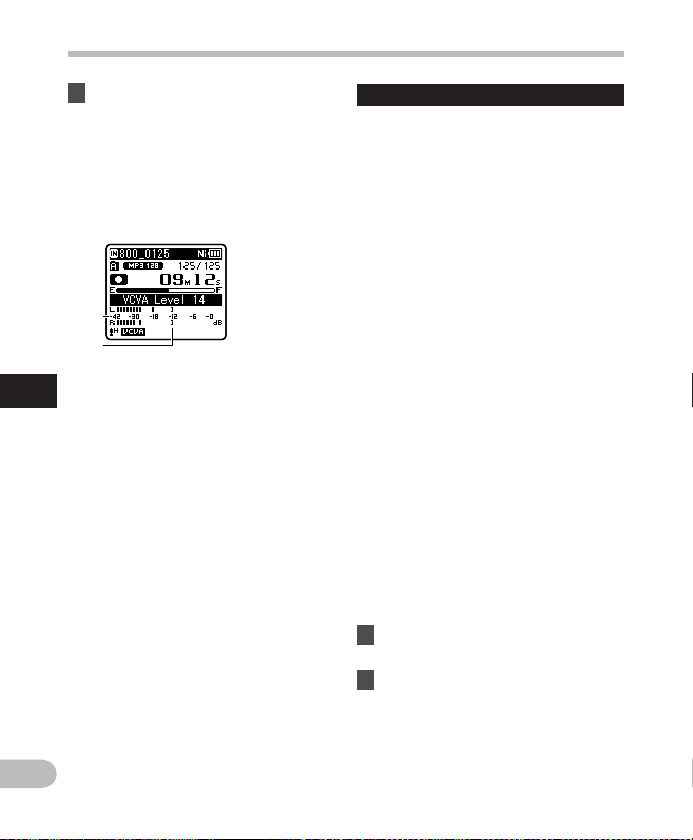
Menu setting method
b
2 Press the 9 or 0 button to
5
Menu setting method
• When the [ VCVA ] function is being used,
• If the start/stop actuation level is not
• If the surrounding noise is loud, the star t/
• To ensure successful recording, prior
EN
58
adjust the start/stop actuation
level.
• The VCVA level can be set to any of 28
different values.
• The higher the value, the more
sensitive the recorder is to sounds. At
the highest value, even the faintest
sound activates recording.
a
a Level meter (varies according to the
sound volume being recorded)
b Start level (moves to the right/left
according to the set level)
the following func tion is not available.
• [ V-Sync. Rec
adjusted within 2 seconds, the display
returns to the previous one.
stop actuation sensitivit y of the VCVA can
be adjusted according to the recording
conditions.
testing and adjustment of the start/stop
actuation level is recommended.
]
V-Sync. Rec
Voice sync recording starts when a voice
louder than the voice sync level (detection
level) is detected. When the voice becomes
low, recording automatically stops.
When voice sync recording is on and the
input level is equal to or below the voice
sync level (detection level) for a period of
at least the specified detec tion time, the
recorder returns to the standby mode or
stop mode.
When [
On/Off
[ On ]:
Enables the Voice sync recording
function.
[ Off ]:
Disables the Voice sync recording
function.
When [
[ 1 sec. ] [ 2 sec. ] [ 3 sec. ] [ 5 sec. ] [ 10 sec. ]
When [
[ One time ]:
Closes the f ile after recording and returns
to stop mode.
[ Continuous ]:
Closes the f ile after recording and returns
to recording standby mode. If sound is
subsequently detected, recording will
start with a new file.
] is selected:
V-Sync. time
Mode
] is selected:
] is selected:
4 Adjust the voice sync level:
1 Press the
REC
( s ) button to start
recording.
2 Press the 9 or 0 button to
adjust the voice sync level.
• The voice sync level can be set to any
of 28 different values.
• The higher the value, the more
sensitive the recorder is to sounds. At
the highest value, even the faintest
sound activates recording.
Page 59
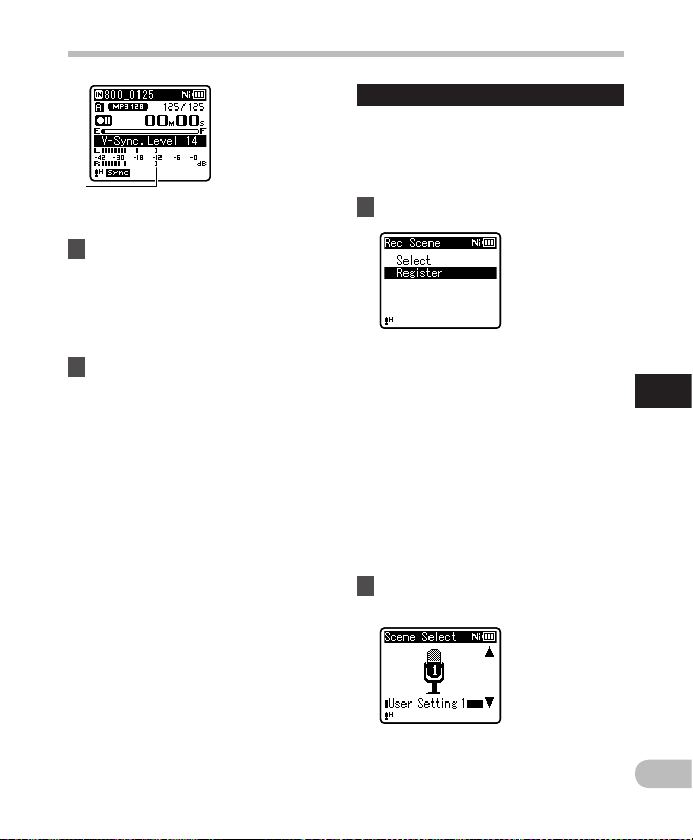
a
a Voice sync level (moves to the
right/left according to the set level)
3 Press the
• The recorder goes into standby.
• When the input is at or above the
REC
( s ) button again.
[ Standby ] flashes on the display and
the LED indicator light flashes.
voice sync level, recording starts
automatically.
4 Voice sync recording stops
automatically.
• If sound at a volume equal to or
below the voice sync level continues
for the specified time, voice sync
recording ends automatically, and
the recorder returns to the recording
standby mode or stop mode. Every
time the recorder enters standby
mode, the current file is closed and
recording continues in a new file.
• To stop the recorder during voice
sync recording, press the STOP ( 4 )
button.
• When the [ V-Sync. Rec ] function is
being used, the following function is not
available.
• [ VCVA ] ( ☞ P.57)
Menu setting method
Rec Scene
The recording setting can be selected from
the [ Lecture ], [ Conference ], [ Meeting ],
[ Dictation ] or [ DNS ] templates to suit the
recording conditions. You can also save a
recording setting of your choice.
1 Select [
4 When [
2 Set the recording settings
Select
] or [
Register
[ Select ]: From the templates, select
a recording scene that suits the
recording conditions. For details,
see “ Te mplat e set tin gs ” ( ☞ P. 6 0 ) .
Alternatively, select a recording
scene that has been customized for a
particular purpose.
[ Register ]: You can save up to 3 sets of
menu settings relating to a current
recording.
• If you select [ Select ], proceed to
Step 4.
Register
] is selected:
].
according to your preferences.
5
Menu setting method
EN
59
Page 60
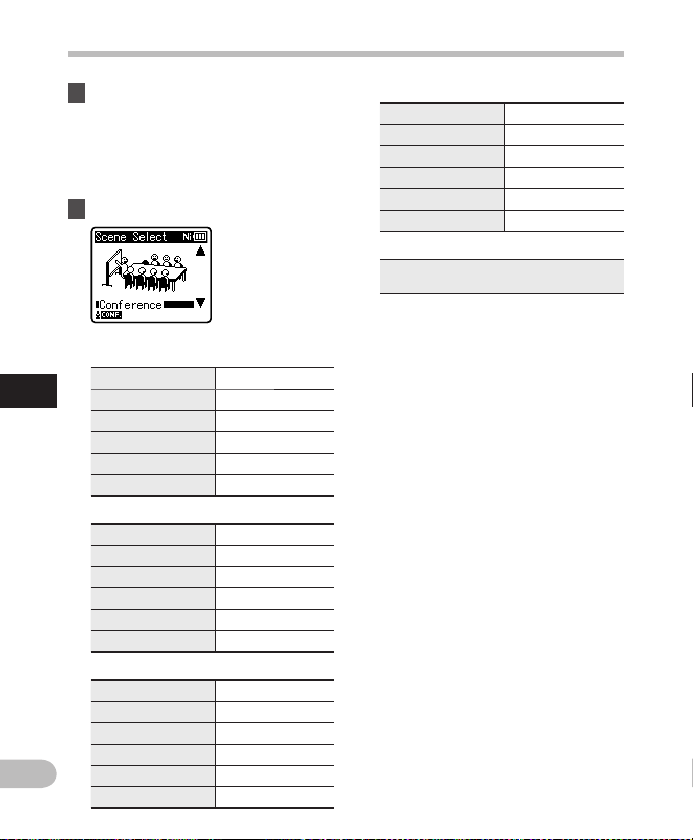
Menu setting method
3 Specify a save destination.
• You can select the save destination
from [ User Setting 1 ],
[ User Setting 2 ] and
[ User Setting 3 ].
4 When [
Select
] is selected:
4 Select a recording scene.
Tem plat e set tin gs:
[ Lecture ]:
5
Menu setting method
EN
60
[ Rec Level ] [ High ]
[ Rec Mode ] [MP3]: [128 kbp s]
[ Zoom Mic] * [+6]
[ Low Cut Filter ] [ On ]
[ VCVA ] [ Off ]
[ V-Sync . Re c ] [ Off ]
[ Conference ]:
[ Rec Level ] [ High ]
[ Rec Mode ] [MP3]: [128 kbp s]
[ Zoom Mic] * [ Off ]
[ Low Cut Filter ] [ On ]
[ VCVA ] [ Off ]
[ V-Sync . Re c ] [ Off ]
[ Meeting ]:
[ Rec Level ] [ Middl e ]
[ Rec Mode ] [MP3]: [128 kbp s]
[ Zoom Mic] * [ Off ]
[ Low Cut Filter ] [ On ]
[ VCVA ] [ Off ]
[ V-Sync . Re c ] [ Off ]
[ Dictation ]:
[ Rec Level ] [ Low ]
[ Rec Mode ] [WMA]: [64kbps]
[ Zoom Mic] * [ Off ]
[ Low Cut Fi lter ] [ On ]
[ VCVA ] [ Off ]
[ V-Sync. Rec ] [ Off ]
[ DNS ]:
F or Dragon Nat urally Spea king
(Nuance Communications Inc.)
* WS- 813 onl y.
• When a recording scene is selected,
recording-related menu settings
cannot be changed. If you wish to use
these functions, set [ Rec Scene ] to
[ Off ].
To check the settin gs:
On the [ Scene Select ] display, select
a recording scene using the + and
– buttons, and press the 9 button.
Press the 0 button to return to the
[ Scene Select ] display.
Page 61
Menu setting method
- P l a y M e n u
V o i c e P l a y b a c k
For WS-813, WS-812:
You can play back just the voice portions
from a recorded audio file. Before using this
function, extract the voice portions from the
file ( ☞ P. 6 8).
[ On ]:
Automatically skips silent portions of
the file and plays back only the voice
portions.
[ Off ]:
Disables the Voice Playback function.
• [ Voice Playback ] only works in
[
Recorder ] mode.
• When the [ Voice Playback ] function is
being used, the following functions are
not available.
• Change playback speed/tone ( ☞ P.41)
• [ Noise Cancel ]
N o i s e C a n c e l
If recorded audio is unclear because of
noisy surroundings, adjust the Noise Cancel
setting level.
[ High ] [ Low ]: Enables the Noise Cancel
function. For bet ter sound quality, noise
is reduced when the file is played back.
[ Off ]: Disables the Noise Cancel function.
• [ Noise Cancel ] only works in [ Recorder ]
mode.
• When the [ Noise Cancel ] function is
being used, the following functions are
not available.
• Change playback speed/tone ( ☞ P.41)
• [ Voice Playback ]
• [ Voice Balancer ]
• [ Voice Filter ]
V o i c e B a l a n c e r
For WS-813, WS-812 :
This function compensates for the lowvolume portions of a recorded audio file,
making them louder. It makes soft sounds
such as conversation much more distinct.
You can use this function with files saved in
folders for voice recordings ([ & ] to [ * ]).
[ On ]:
Compensates for the low-volume
portions of a voice file during playback ,
making them louder.
[ Off ]:
Disables the Voice Balancer func tion.
• [ Voic e Balancer ] only works in
[
Recorder ] mode.
• When the [ Voice Balancer ] function is
being used, the following functions are
not available.
• [ Noise Cancel ]
V o i c e F i l t e r
For WS-811:
The recorder has a Voice Filter Function to
cut low and high frequency tones during
normal, fast, or slow playback , and enable
clear audio playback .
[ On ]:
Enables the Voice Filter function.
[ Off ]:
Disables the Voice Filter function.
• [ Voic e Fil ter ] only works in [ Recorder ]
mode.
• When the [ Voice Filter ] function is
being used, the following function is not
available.
• [ Noise Cancel
]
5
Menu setting method
EN
61
Page 62

Menu setting method
P l a y M o d e
You can select the playback mode that best
suits the t ype of audio.
4 When the recorder is in
[
Recorder
1 Select [
[ File ]:
[ Folder ]:
] mode:
File
] or [
Folder
Stop after playing back the current
file.
Continuously play files in the current
folder until the last f ile and then stop.
4 When the recorder is in [
mode:
Se lect the desi red playback range:
5
1 Select [
Menu setting method
2 Select [
Se lect the desired playback mode:
1 Select [
2 Select [
• In [ File ] mode, when the recorder comes
EN
62
Playback range
File
], [
Folder
] or [
[ File ]:
Selects the current file.
[ Folder ]:
Selects the current folder.
[ All ]:
Selects all files currently in memory.
Repeat
] or [
Random
[ Repeat ]:
Sets to repeat playback mode.
[ Random ]:
Sets to random playback mode.
On
] or [
Off
].
[ On ]: Sets the playback range to be
played back repeatedly or randomly.
[ Off ]: Disables the playback mode
function.
to the end of the last file in the folder,
[ End ] f lashes for two seconds on the
display and the recorder stops at the start
of the last f ile.
• In [ Folder ] mode, when the recorder
comes to the end of the last f ile in the
folder, [ End ] flashes for two seconds on
the display and the recorder stops at the
start of the first file in the folder.
• In [ All ] mode, after playing the last file
in the current folder, the recorder starts
].
Music
]
].
All
].
playing from the first file in the nex t
folder. When it comes to the end of the
last file in the recorder, [ End
for two seconds on the display and the
recorder stops at the start of the first f ile
in the recorder.
Equalizer
When listening to music, you can set your
favorite sound qualit y by adjusting the
equalizer setting.
] flashes
1 Select the desired equalizer
characteristics.
[ Off ]: Disables the equalizer function.
[ Rock ] [ Pop ] [ Jazz ]: Enables the
equalizer function.
[ User ]: Select [ User ] to save your own
custom equalizer settings. If [ User ] is
selected, proceed to Step 2.
2 Select the frequency band.
].
[ 60 Hz ] [ 250 Hz ] [ 1 kHz ] [ 4 kHz ] [ 12 kH z ]:
Select the frequenc y bandwidth
setting.
3 Select the equalizer level.
• You can select the equalizer level from
[ –6
] to [ +6 ] in 1dB increments.
• The higher the decibel value, the louder
the sound.
• To change the settings again, press the
9 or 0 button and repeat the
procedure from step 2.
• [ Equalizer ] only work s in [ Music ] mode.
Page 63
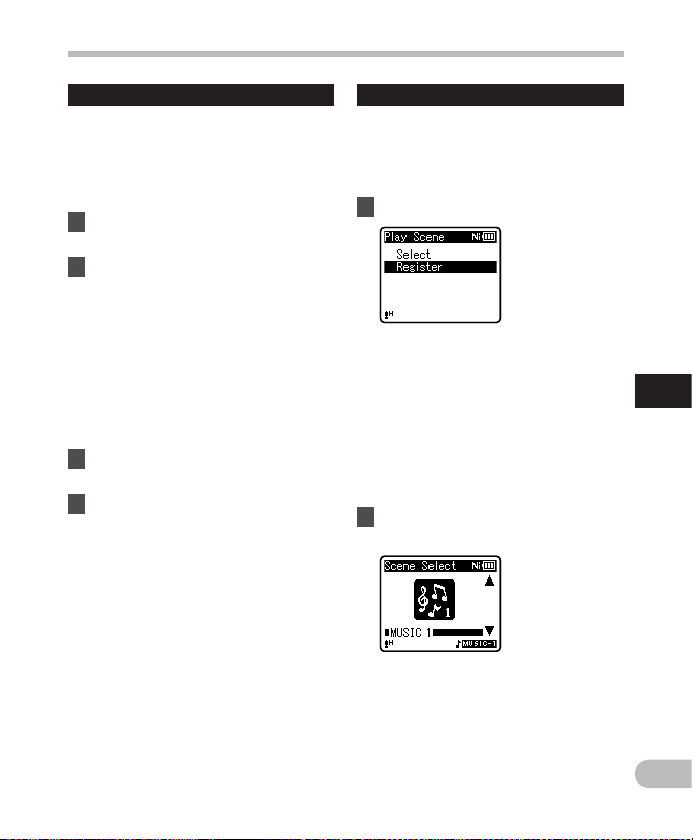
Menu setting method
Skip Space
This function enables you to skip (forward)
or reverse skip (rewind) a small por tion
of the file being played. This function is
convenient for quickly skipping to another
playback position or repeatedly playing
back shor t phrases.
1 Select [
2 Set the skip space.
Forward/Reverse Skip Playback:
1 Press the ` OK button to start
Forward Skip
[
Reverse Skip
When [
Forward Skip
[ File Skip ] [ 10 sec. Skip ]
[ 30 sec. S kip ] [ 1min. Skip ]
[ 5min. Skip ] [ 10min. Skip ]
When [
Reverse Skip
[ File Skip ] [ 1 se c. Skip ] – [ 5 sec. Skip ]
[ 10 sec. Skip ] [ 30 sec. Skip ]
[ 1 min. S kip ] [ 5 min. Skip ]
[ 10 min. Sk ip ]
] or
].
] is selected:
] is selected:
playback.
2 Press the 9 or 0 button.
• The recorder skips (forward) or
reverse skips (rewind) a set space and
starts playing back.
• If there is an index mark/temp mark or
a cue closer than the skip space, the
recorder forward skips/reverse skips to
that position.
Play Scene
Voice files recorded in the recorder and
music files downloaded from a PC can be
saved with the playback settings of your
choice to suit the different sound qualities
and playback methods.
1 Select [
4 When [
2 Set the playback settings
Select
] or [
Register
[ Select ]:
Select a playback scene customized
to suit your preferences.
[ Register ]:
You can save up to 5 sets of menu
settings relating to a current
playback.
• If you select [ Select ], proceed to
Step 4.
Register
] is selected:
].
according to your preferences.
5
Menu setting method
EN
63
Page 64
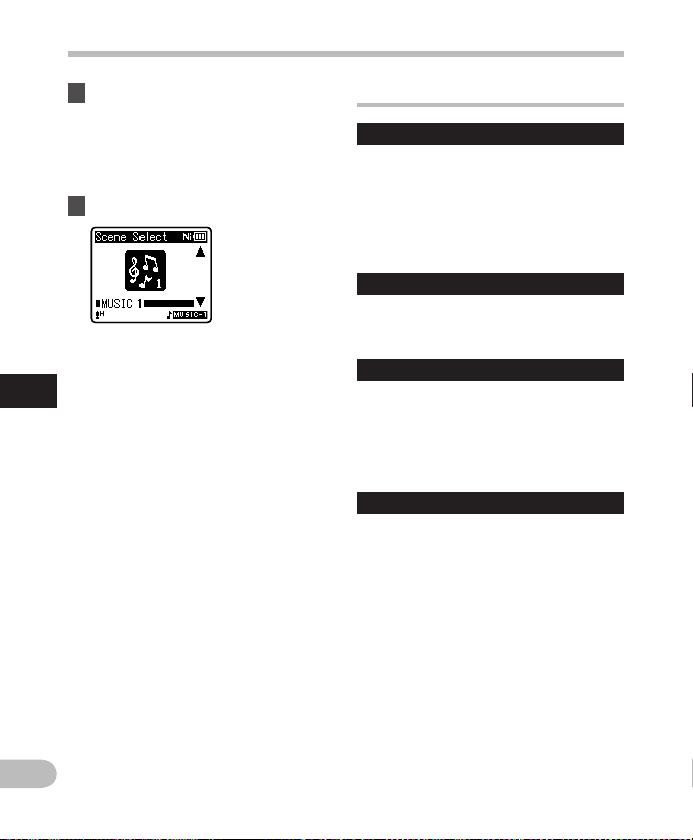
Menu setting method
3 Specify a save destination for the
settings.
• You can select the save destination
from among [ VOICE 1 ] to [ MUSIC 3 ].
4 When [
4 Select a playback scene.
5
Menu setting method
Select
] is selected:
To check the settin gs:
On the [ Scene Select ] display, select
a playback scene using the + and
– buttons, and press the 9 button.
Press the 0 button to return to the
[ Scene Select ] display.
. LCD/Sound Menu
Backlight
The display will remain lit for about 10 (Initial
setting) seconds when a button on the
recorder is pressed.
[ Off ]:
Disables the Backlight func tion.
[ 5 sec. ] [ 10 se c. ] [ 30 sec. ] [ 1 min. ]:
Enables the Backlight function.
C o n t r a s t
Display contrast can be adjusted in 12 levels.
• You can adjust the LCD display contrast
level from [ 01 ] to [ 12 ].
LED
You can set the recorder so the LED indicator
light does not turn on.
[ On ]:
Enables the LED light function.
[ Off ]:
Disables the LED light function.
B e e p
The recorder beeps to aler t you to button
operations or warn you of errors. System
sounds may be turned off.
[ On ]:
Enables the Beep function.
[ Off ]:
Disables the Beep function.
EN
64
Page 65
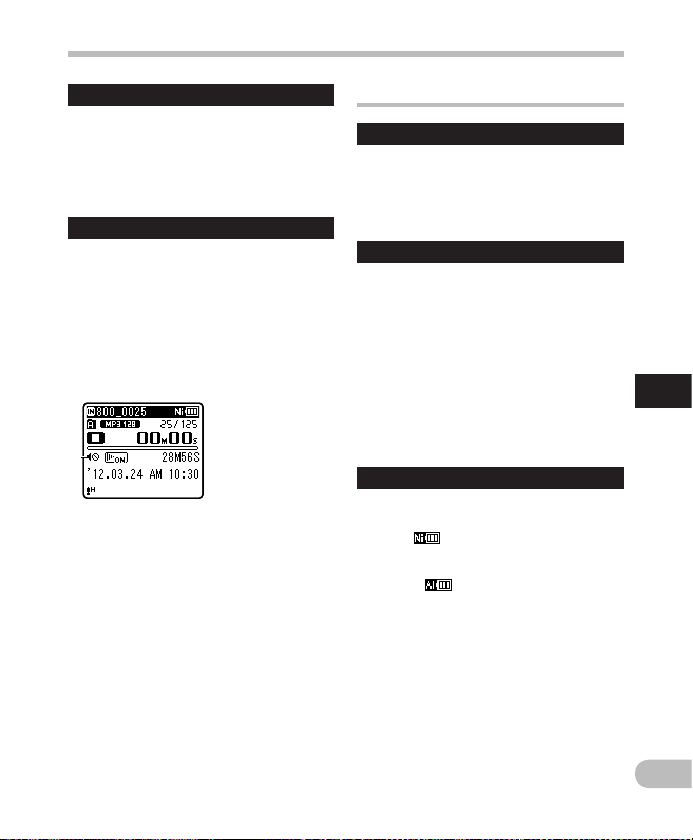
Menu setting method
Language(Lang)
You can select the display language for this
recorder.
[ English ] [ Deutsch ] [ Français ] [ Español ]
[ Italiano ] [ Polski ] [ Русский ]
• The selectable languages differ
depending on the region.
Speaker
You can use the built-in speaker when the
earphones are unplugged.
[ On ]:
Output sound from the built-in speaker.
If the earphones are plugged in, sound is
not output from the built-in speaker.
[ Off ]:
Do not output sound from the built-in
speaker.
a
a Speaker muting indicator (Appears
when [ Speaker ] is set to [ Off ].)
WS-813 only:
• This is a dif ferent function from
[ Output ] in [ FM Menu ]. Irrespective of
the [ Speaker ] set ting, if you have set
[ Output ] to [ Speaker ] when listening to
the FM radio, sound from the radio is still
output from the speaker ( ☞ P. 6 7 ) .
/ D e v i c e M e n u
M e m o r y S e l e c t
When a microSD card is inserted, you
can select to record to either the internal
memory or to the microSD card ( ☞ P. 2 3) .
[ Internal memory ]: Internal memory.
[ microSD card ]: microSD card.
P o w e r S a v e
If you forget to turn off power to the
recorder, it is turned off automatically. If the
recorder remains in stop mode for over 10
minutes (Initial setting) while the power is
turned on, the power will be turned off.
[ 5 min. ] [ 10 min. ] [ 30 min. ] [ 1 hr. ]:
Set the length of time that is to elapse
before the power is turned off.
[ Off ]: Disables the Power Save function.
• If any button is pressed, the elapsed time
count before the power turns off starts
over again.
Battery
Select the battery type to match the battery
you are using.
[ Ni-MH ] (
Select when using the Olympus Ni-MH
rechargeable bat tery (BR404).
[ Alkaline ] (
Select when using an alkaline batter y.
):
):
5
Menu setting method
EN
65
Page 66

Menu setting method
T i m e & D a t e
Set ting the time and date beforehand
enables easier file management.
See “ S etting the ti me and date [ T ime &
Date ] ” ( ☞ P. 21).
U S B S e t t i n g s
You can switch the USB class according to
your usage.
See “ Changing t he USB class
[ USB Settings ] ” ( ☞ P. 7 3).
R e s e t S e t t i n g s
This function returns all other functions to
their initial settings (factory default).
[ Start ]:
Returns the settings to their initial values.
[ Cancel ]:
5
Takes you back to [ Device Menu ].
Menu setting method
• After the settings have been returned
to their initial values, the time settings
and file numbers are preser ved, without
being returned to their initial settings.
Menu settings after resetting (initial
settings):
, Rec Menu :
[ Rec Level ] [ Middle ]
[ R ec M ode ]
[ WMA ] [ 12 8k bps ]
[ Zoom Mic ] *1 [ Off ]
[ Low Cut Filter ] [ Off ]
[ VC VA ] [ Off ]
[ V-Sync. Rec ]
[ On/Off ] [ Off ]
[ V-Sync. time ] [ 1 sec . ]
[ Mode ] [ Continuous ]
[ Rec Scene ] [ Off ]
- Play Menu :
[ Vo ice Pl ayba ck ] *2 *4 [ On ]
[ Noise Cancel ] *4 [ Off ]
[ Vo ice Ba lancer ] *2 *4 [ Off ]
EN
[ Voice Filter ] *3 *4 [ Off ]
[ Play Mode ] *4 [ File ]
66
[ Play Mode ] *5
[ Playback range ] [ Folder ]
[ Repeat ] [ Off ]
[ Random ] [ Off ]
[ Equalizer ] *5 [ Off ]
[ Skip Space ]
[ Forwar d Sk ip ] [ File Skip ]
[ Reverse Ski p ] [ File Skip ]
[ Play Scene ] [ Off ]
. LCD/Sound Menu :
[ Backlight ] [ 10 se c. ]
[ Contrast ] [ Level 06 ]
[ LE D ] [ On ]
[ Beep ] [ On ]
[ Language(Lang) ] [ English ]
[ Speaker ] [ On ]
/ Device Menu :
[ Memor y Select ] [ Internal memory ]
[ Powe r Save ] [ 10 min. ]
[ Battery ] [ Ni-MH ] *2
[ Alkaline ] *3
[ USB Settings ]
[ USB Connec tion ] [ PC ]
[ USB Class ] [ Storage Class ]
FM Menu (WS-813 only):
[ R ec M ode ] [ WMA ]
[ Scan Level ] [ High ]
[ Output ] [ Earphone ]
*1 WS -813 onl y.
*2 WS- 813, WS- 812 only.
*3 WS-811 only.
*4 Function active only in [ Recorder ] mode.
*5 Function active only in [ Music ] mo de.
F o r m a t
When the recorder is formatted, all the
saved data, including locked files and readonly files, are erased.
See “ Formatt ing the recorde r [ Format ] ”
( ☞ P. 74 ) .
Memor y Info.
The recordable capacit y remaining and
overall capacity of the recording media can
be seen from the menu.
Page 67
Menu setting method
• The recorder uses some of its memory
capacity to maintain a management
file. For a microSD card, the indicated
remaining capacity is less than the total
capacit y of the card due to characteristics
of the microSD card, but this is not a
malfunction.
System Info.
You can check information about the
recorder on the menu screen. [ Model ]
(Model Name), [ Version ] (System version)
and [ Serial No.
the display.
] (Serial Number) appear on
F M M e n u
For WS-813:
Can be operated only in [ FM Radio ]
mode.
R e c M o d e
You can change the recording mode when
recording from the FM radio. Select a
recording mode to suit your purpose.
[ PCM ]:
The recording rate is automatically set to
[ 44.1kHz/16bit ].
[ MP3 ]:
The recording rate is automatically set to
[ 12 8k bps ].
[ WMA ]:
The recording rate is automatically set to
[ 12 8k bps ].
Auto-preset
Automatically adds receivable radio stations
to the presets.
See “ Presetting radio stations
automatically [ Auto-preset ] ” (
☞ P.49 ) .
Scan Level
You can change the scan sensitivity when
scanning for radio stations with auto preset.
Select the sensitivity to suit the reception
conditions.
[ High ]:
Receive radio station signals using high
sensitivity. You should normally select
this setting.
[ Low ]:
Receive radio station signals using
reduced sensitivit y. Try this setting when
signals from unwanted stations are
causing interference.
O u t p u t
You can change the audio output of the FM
radio.
[ Earphone ]:
Output sound from the earphones. Sound
is not output from the built-in speaker
even if you unplug the earphones.
[ Speaker ]:
Always output sound from the built-in
speaker. Sound is not output from the
earphones even if you plug them in.
• This is a different function from [ Speaker ]
in [ LCD/Sound Menu ]. Irrespective of
the [ Speaker ] set ting, if you have set
[ Output ] to [ Speaker ] when listening to
the FM radio, sound from the radio is still
output from the speaker ( ☞ P. 6 5 ) .
5
Menu setting method
EN
67
Page 68
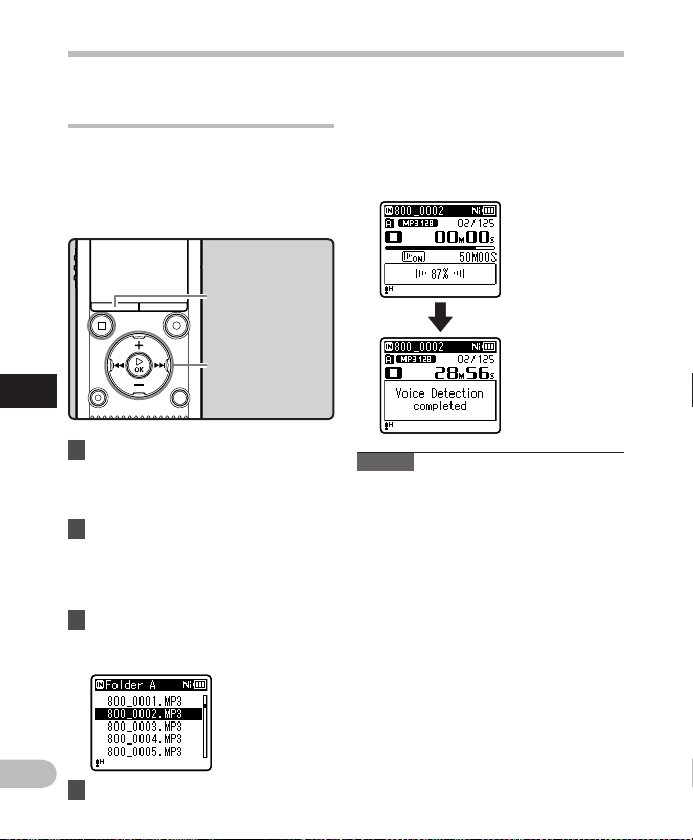
Menu setting method
Extract voice portions from file
[ Voice Detect ]
This function extracts voice portions from a
recorded voice file. During playback of the
file following extraction, the silent por tions
are automatically skipped.
•
The voice e xtractio n function can b e operated
only in [ Recorder ] m ode.
MENU
+ − button
9 0 button
`
OK
5
Menu setting method
1 Select a folder that contains
the file from which you want
to extract the voice portions
( ☞ P. 2 8 ) .
2 Select [
Voice Detect
menu on the [
• For details on how to enter the menu
settings, see “ Menu setting method ”
( ☞ P. 5 3).
] from the
File Menu
3 Press the + or − button to select
the file from which you want to
extract the voice portions.
EN
4 Press the ` OK button.
68
button
button
].
• Extraction of voice portions starts.
During the process, the progress
status is shown as a percentage on
the display.
• The process is completed when
[ Voic e Detection completed ] is
displayed.
Notes
• When extraction of voice portions ends,
the [ Voice P layback ] setting in the
[ Play Menu ] switches ON.
• If you have selected a folder that does not
contain the processed file, [ Select a file ]
appears on the display. Select the folder
in which the f ile has been saved and then
perform the process again.
• Voice portions may not be extrac ted
properly from a file in which you
have recorded the sound of musical
instruments playing or similar sounds.
• Voice p ortions may not b e properly
extra cted if the voice level was l ow (the level
meter in und er -12 dB) and/or the amb ient
noise was hi gh at the time of the reco rding.
• The larger a recorded voice file, the more
time extraction processing will take.
Before starting extraction, charge the
batter y or replace it with a new one in
order to ensure that the bat tery does not
go flat during processing.
Page 69
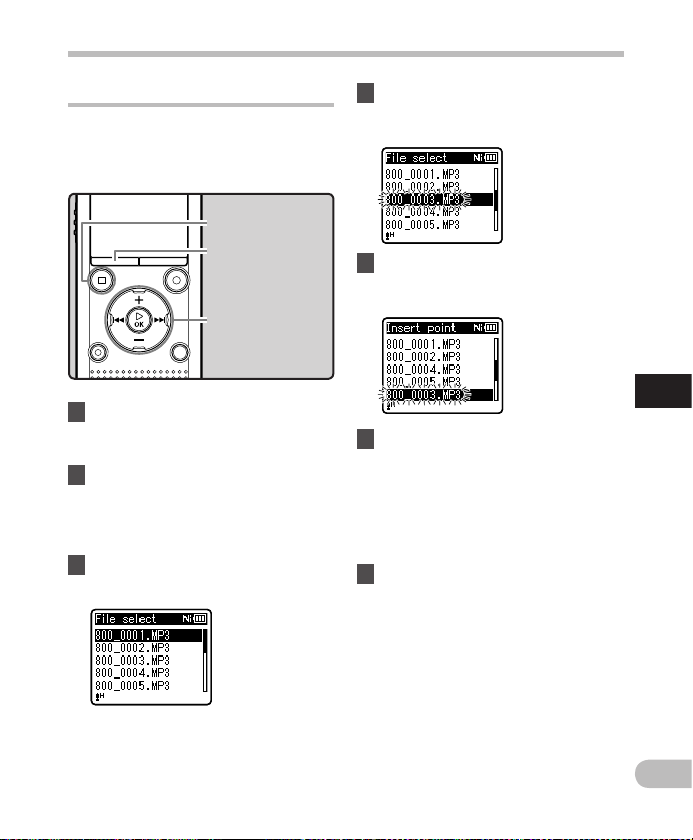
Menu setting method
Rearranging files [ Replace ]
You can move a f ile in a folder to change the
order of playback. First select the folder (file)
for which you want to change the playback
order.
STOP
( 4 ) button
MENU
button
+ −
button
9 0 button
`
OK
button
1 Select the folder for which you
want to rearrange the file order
( ☞ P. 2 8 ) .
2 Select [
3 Press the + or − button to select
Replace
File Menu
] from the menu
].
on the [
• For details on how to enter the menu
settings, see “ Menu setting method ”
( ☞ P. 5 3).
the file you want to move.
4 Press the ` OK button.
• The cursor will flash to confirm that
the file can be moved.
5 Press the + or − button to select
the location to which you want to
move the file.
6 Press the ` OK button to
complete the setting.
• If you want to move more files, repeat
Steps 3 through 6.
• Pressing the 0 button without
pressing the ` OK button cancels the
setting process and returns you to the
previous screen.
7 Press the
STOP
( 4 ) button to close
the menu screen.
5
Menu setting method
EN
69
Page 70
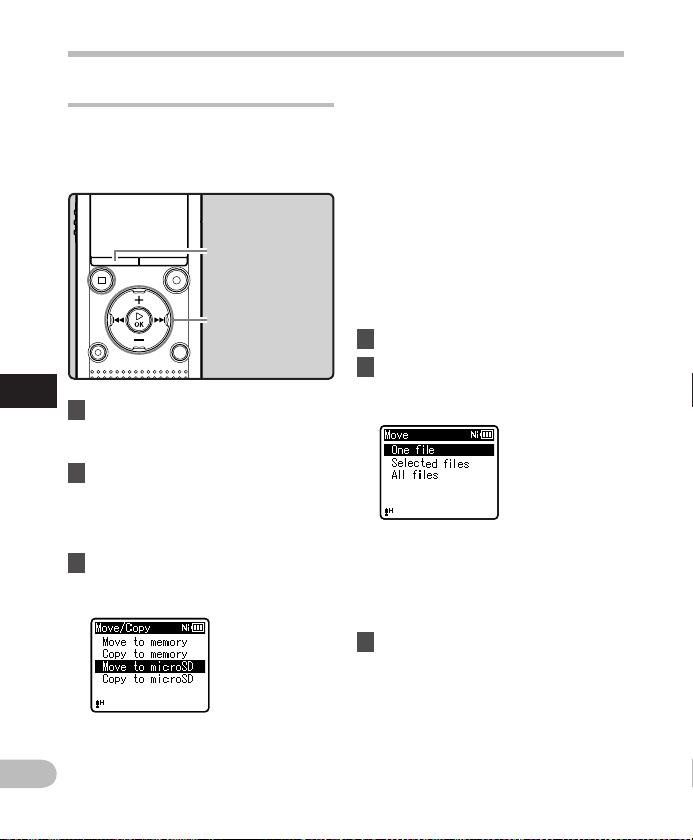
Menu setting method
Moving/Copying files [ Move/Copy ]
Files saved in the internal memor y or a
microSD card can be moved or copied
within the memory. Files can also be moved
or copied between memory.
MENU
+ − button
9 0 button
`
OK
button
5
1 Select the folder where the file
Menu setting method
you want to move or copy is
saved ( ☞ P. 28) .
2 Select [
3 Press the + or − button to select
Move/Copy
menu on the [
• For details on how to enter the menu
settings, see “ Menu set ting method ”
( ☞ P. 5 3).
] from the
File Menu
the location to which you want to
move or copy the file.
button
].
[ Move to memory ]:
Move a file from the internal memor y
or microSD card to another folder
within the internal memory.
[ Copy to memory ]:
Copy a file from the internal memor y
or microSD card to another folder
within the internal memory.
[ Move to microSD ]:
Move a file from the internal memor y
or microSD card to another folder in
the microSD card.
[ Copy to microSD ]:
Copy a file from the internal memor y
or microSD card to another folder in
the microSD card.
4 Press the ` OK button.
5 Press the + or − button to select
the number of files you want to
move or copy.
[ One file ]:
Select only the specified file.
[ Selected files ]:
Select multiple files.
[ All files ]:
Select all files in the folder.
6 Press the ` OK button to move to
the respective setting.
EN
70
Page 71
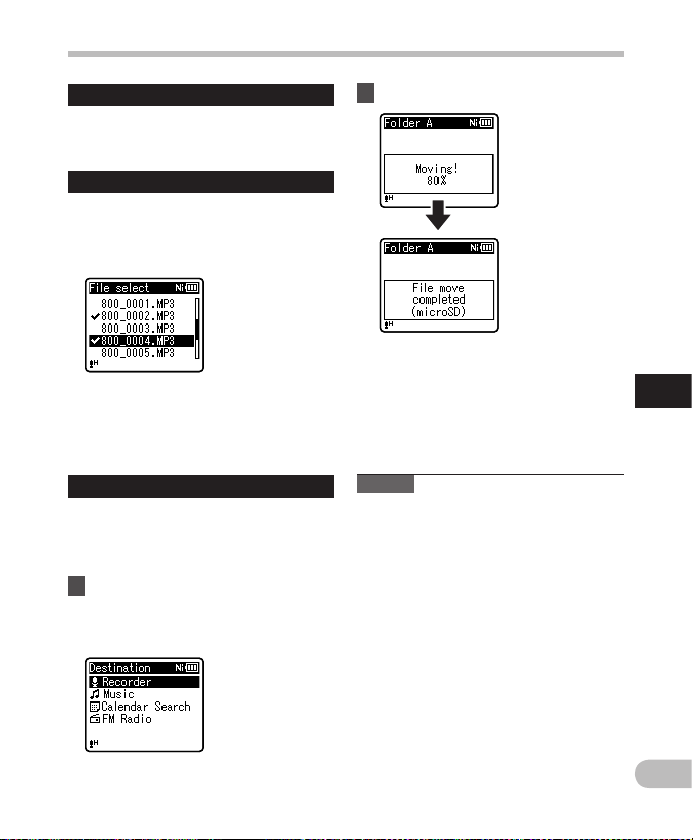
Menu setting method
When you select [ One file ]:
1 Press the + or − button to select the file
you want to move or copy.
2 Press the ` OK button to select the file.
When you select [ Selected files ]:
1 Press the + or − button to select the file(s)
you want to move or copy.
2 Press the 9 button to check the f ile(s)
selected.
3 Repeat steps 1 and 2 until all the f iles
you want to move/copy are selec ted, then
press the ` OK button.
When yo u select [ Al l files ]:
When you select [ All files ], all the f iles in the
folder are automatically selected and the
recorder moves to the [ Destination ] screen.
7 Press the 9 , 0 or + , −
button to select the folder to
which you want to move or copy
the file.
8 Press the ` OK button.
• File move or file copy star ts if
[ Moving! ] or [ Copying! ] appears
on the display. During the process,
the progress status is shown as a
percentage. The process is completed
when [ File move completed ] or
[ File copy completed
Notes
• The recorder cannot copy when the
memory capacit y is not sufficient.
• The recorder cannot move or copy when
the number of files exceeds 200.
• Do not remove the batter y during
moving or copying. Doing so may
damage the data.
• A file cannot be moved or copied to the
same folder.
• When operation is canceled during
moving or copying, only the files for
which the move or copy process has
already been completed are saved at the
new location. The move or copy process
is canceled for all other files.
• Files which are locked remain so even
after they are moved or copied.
• DRM files cannot be moved or copied.
• Files cannot be moved or copied direc tly
under the [ Recorder
] is displayed.
] folder.
5
Menu setting method
EN
71
Page 72
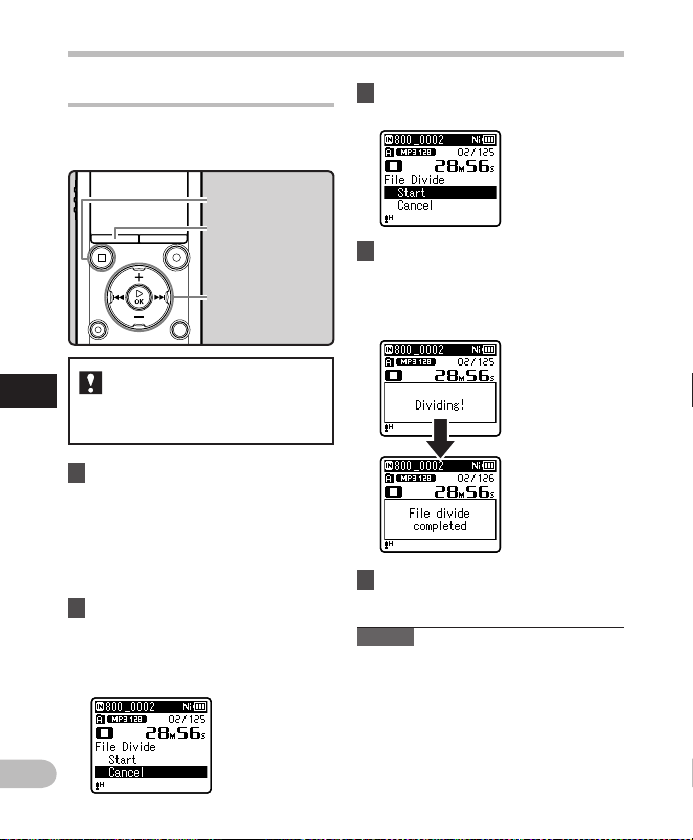
Menu setting method
Dividing files [ File Divide ]
Files with large capacities and long
recording times can be divided so that they
are easier to manage and edit.
STOP
MENU
+ − button
9 0 button
`
OK
Only MP3 files and PCM * files
5
Menu setting method
recorded on this recorder can be
divided.
* WS -813, WS-812 only.
1 Stop playback at the divide
position.
• While the recorder is in playback
mode, press and hold the 9
or 0 button to fast-forward or
rewind.
• It is useful to mark the divide position
in advance by setting an index mark.
2 Select [
File Divide
on the [
File Menu
• For details on how to enter the menu
settings, see “ Menu setting method ”
( ☞ P. 5 3).
] from the menu
].
EN
72
( 4 ) button
button
button
3 Press the + button to select
[
Start
].
4 Press the ` OK button.
• [ Dividing! ] appears and file dividing
starts.
• File dividing is completed when
[ File divide completed ] appears.
5 Press the
STOP
( 4 ) button to
close the menu screen.
Notes
• File dividing can be performed only when
the file list is displayed.
• The recorder cannot divide files when the
number of f iles in the folder exceeds 199.
• Locked files cannot be divided ( ☞ P. 55 ) .
• After the f ile is split, the front part of the
file is renamed [ File name_1.MP3 ] and
the latter part of the file is named
[ File name_2.MP3 ].
Page 73
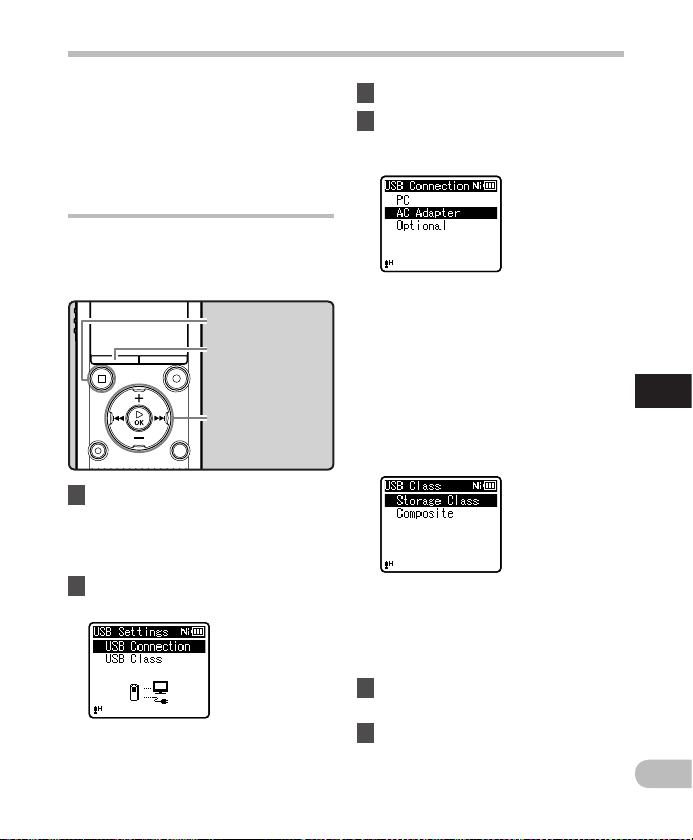
Menu setting method
• If a file has an extremely short recording
time, it may not be divided even if it is an
MP3 file or PCM file.
• Do not remove the batter y while dividing
a file. Doing so may damage the data.
Changing the USB class
[ USB Settings ]
Besides selecting [ PC ] (Connect to PC to
transfer files) or [ AC Adapter ] (Connect to
AC adapter to recharge the battery), you can
switch the USB class to suit your usage.
STOP
( 4 ) button
MENU
button
+ − button
9 0 button
`
OK
button
1 Select [
2 Press the + or − button to select
USB Settings
menu on the [
• For details on how to enter the menu
settings, see “ Menu setting method ”
( ☞ P. 5 3).
[
USB Connection
[ USB Connection ]:
Setting for connecting to a PC.
[ USB Class ]:
Setting for USB class.
] from the
Device Menu
] or [
USB Class
].
].
3 Press the ` OK button.
4 Press the + or − button to change
the setting.
When [
USB Conne ction
[ PC ]: Setting for when the recorder
is connected to a PC and used as a
storage device or composite device.
Connected as storage or composite.
[ AC Adapter ]: Setting for when the
recorder is connected to a PC for
charging or to the AC Adapter (A514)
(opti onal).
[ Optional ]: Setting to confirm the
connection method each time a USB
connection is made.
When [
USB Clas s
[ Storage Class ]: Recognized by a PC as
an external memory device.
[ Composite ]: Setting when connected
to a PC and used as an external
memory device, USB speaker or
microphone.
] is selected:
] is selected:
5 Press the ` OK button to
complete the setting.
6 Press the
STOP
( 4 ) button to
close the menu screen.
5
Menu setting method
EN
73
Page 74
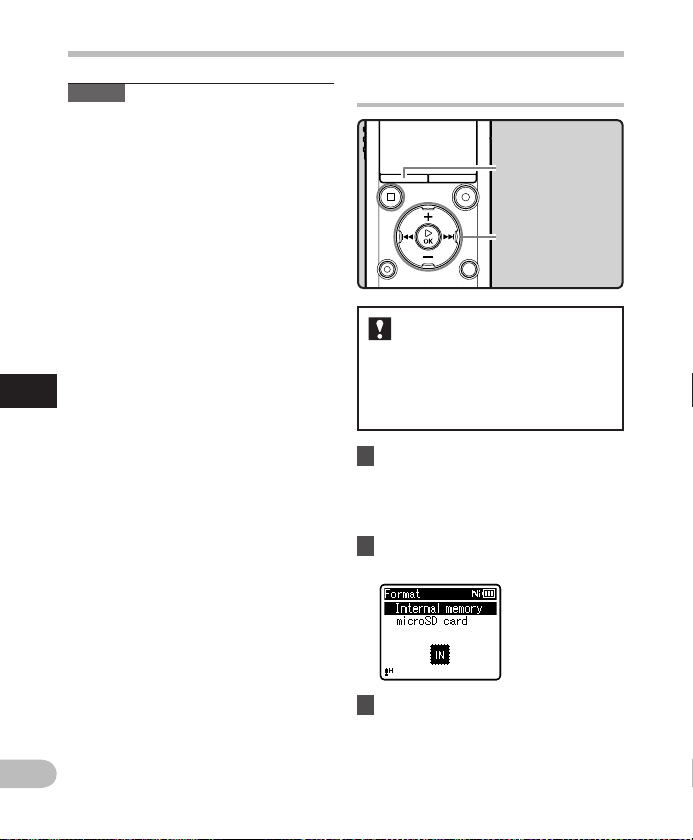
Menu setting method
Notes
• When you first connect the recorder to
your PC as an ex ternal storage device,
the driver for the recorder will be
automatically installed in your PC.
• The PC cannot recognize that the
recorder is connected to the PC if
[ USB Connection ] is set to [ AC Adapter ].
• If the recorder is not recognized by the PC
as an external storage device, change the
[ USB Class ] set ting to [ Storage Class ].
5
Menu setting method
Formatting the recorder [ Format ]
MENU
button
+ − button
9 0 button
`
OK
button
If you format the re corder,
all files will be erased and all
function settings will return
to the defaults e xcept the date
and time settings. Transfer any
impor tant files to a computer
before formatting the recorder.
1 Select [
2 Press the + or − button to select
Format
the [
Device Menu
• For details on how to enter the menu
settings, see “ Menu setting method ”
( ☞ P. 5 3).
] from the menu on
].
the recording media to format.
EN
74
3 Press the ` OK button.
Page 75
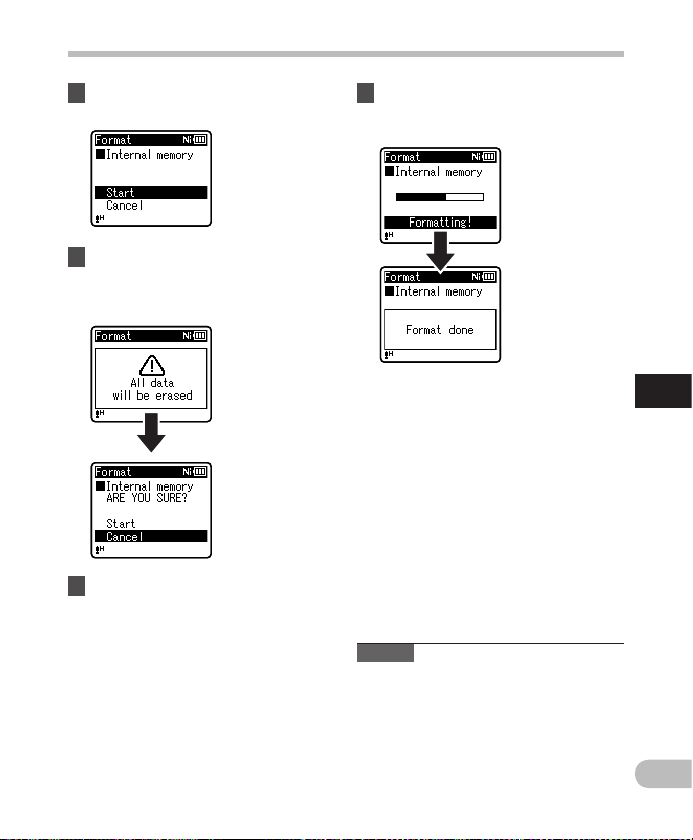
Menu setting method
4 Press the + button to select
[
Start
].
5 Press the ` OK button.
• After the [ A ll data will be erased ]
message displays for t wo seconds,
[ Start ] and [ Cancel ] appear.
6 Press the + button again to select
[
Start
].
7 Press the ` OK button.
• Formatting begins and [ Formatting! ]
flashes on the display.
• [ Format done ] appears when
formatting ends.
Notes
• Never format the recorder from a PC.
• When the recorder is formatted, all the
saved data, including locked files and
read-only files, is erased.
• After formatting, recorded voice file
names may start from [ 0001 ].
• To restore the function’s settings to
their initial values, use [ Reset Settings ]
( ☞ P. 6 6 ) .
5
Menu setting method
EN
75
Page 76

• When a microSD card is inserted into the
recorder, be sure to confirm the recording
media as either [ Internal memory ]
or [ microSD card ] so that there is no
mistake ( ☞ P. 6 5 ).
• Replace the battery with a new one in
order to ensure that the bat tery does not
go flat during processing. In addition, it
may take over 10 seconds to complete
processing. Never perform operations
such as the following during processing,
as such operations may damage the data.
1 Disconnect the AC Adapter during
processing.
2 Remove the battery during processing.
3 Remove the microSD card during
processing when [ microSD card ] is
selected as the recording media.
• Formatting on the recorder is Quick
Format. If you format the microSD card,
5
file management information is refreshed
and the data inside the microSD card is
Menu setting method
not deleted completely. When giving
someone or disposing of the microSD
card, be careful of data leakage from the
microSD card. We recommend that the
microSD card be destroyed when you
dispose of the microSD card.
Menu setting method
EN
76
Page 77
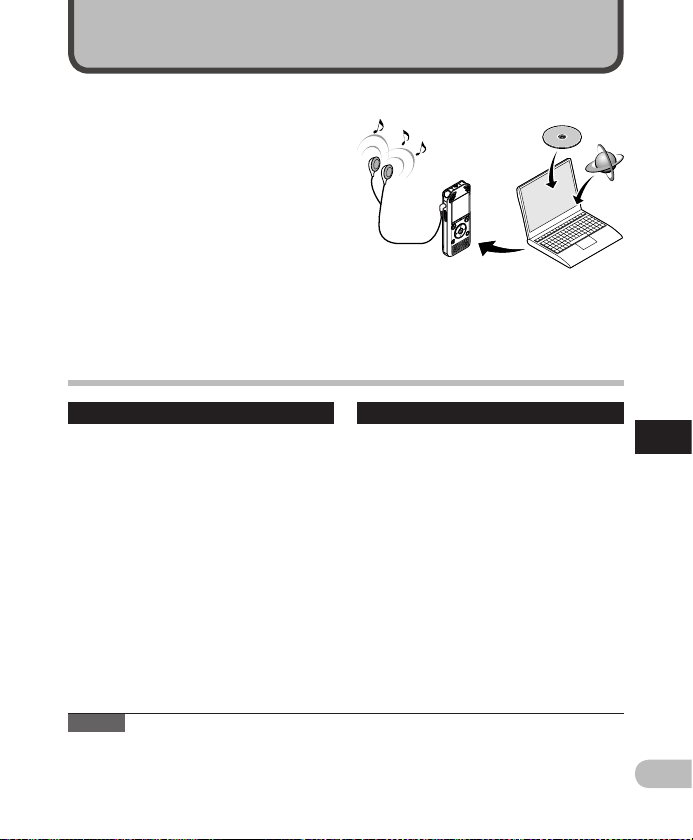
Using the recorder on your PC
When con nected to a PC, t he recorder enables you to do the fo llowing:
• You can transfer files recorded with this
recorder to a computer, play them back,
and manage them by using Windows
Media Player or iTunes.
• The recorder is compatible with WMA,
MP3 and WAV * language content.
* WS-813, WS-812 only.
• In addition to its uses as a voice recorder
and a music player, this recorder can
also be used as external memor y for
a computer by storing data from a
computer and reading it back out
( ☞
P. 82) .
Operating environment
Windows
Operating System:
Microsoft Windows XP/Vista/7 (Standard
Installation)
Compatible PC’s:
Windows PC’s equipped with more than
one free USB p ort
Notes
• This is the operating environment required for saving files recorded by this recorder to
your PC via the USB connection.
• The support ser vice does not cover you if your PC has been up dated from Windows 95/98/
Me/2000 to Windows XP/Vista/7.
• Any failure on a self-modified PC will not b e covered under the operational warranty.
Macintosh
Operating Syste m:
Mac OS X 10.4.11 - 10.7 (Standard
Installation)
Compatible PC’s:
Apple Macintosh series equipped with
more than one free USB port
6
Operating environment
EN
77
Page 78

Operating environment
Prec autions on u sing the rec order con nected to a PC
• When you are downloading a file from the recorder or uploading a f ile to the recorder,
do not remove the USB cable even if the screen is indicating you can. Data is still being
transferred while the LED indicator light is blinking. When removing the USB cable, be sure
to follow the description in ☞ P.80. If the USB cable is removed before the drive is stopped,
data may not be successfully transferred.
• On a PC, do not format the drive of the recorder. Initialization is not successfully achieved
on a PC. For initialization, follow the instructions in the [ Format ] display of the recorder
( ☞ P. 74 ) .
• Folder (directory) names that appear in file management tools such as E xplorer in
Microsoft Windows and Finder in Macintosh are different from the folder names that can
be set with the recorder.
• If folders or files stored on the recorder are moved or renamed by using a file management
tool in Windows or Macintosh, the order of files may change or f iles may become
unrecognizable.
• Data can be written or uploaded to the recorder even though the attribute of the recorder
drive is shown as Read- only by the operating system of the PC.
• As noise may cause adverse effects on electronics devices near the recorder, unplug the
external microphone and earphones when you connec t the recorder to a PC.
6
Operating environment
EN
78
Page 79
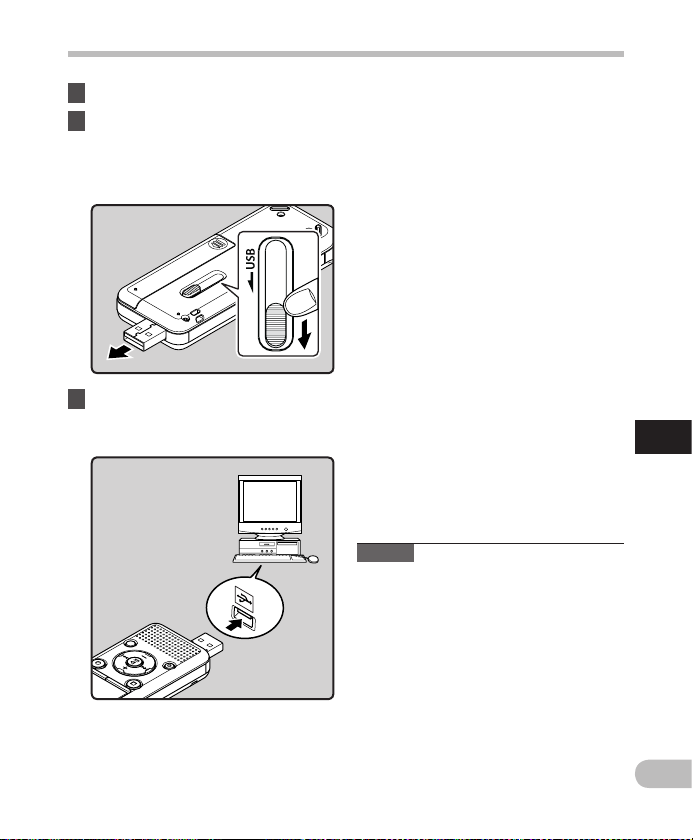
Connecting to your PC
1 Boot the PC.
2 Slide the USB connector slide
lever in the direction indicated
by the arrow so that the USB
connector protrudes from the
recorder.
3 Make sure that the recorder is in
stop mode, and connect to the
PC’s USB port.
• [ Remote (Storage) ] is displayed on
the recorder if the USB connector is
connected.
• The recorder does not establish a
connection with a PC if [ AC Adapter ]
is selected in the USB connection
setting. Select [ PC ] in the USB
connection setting ( ☞ P. 7 3 ) .
Windows:
When you connect the recorder to
Windows and open [ My Computer ], it
is recognized by the drive name of the
product. Inser ting a microSD card will
allow you to use it as [ Removable Disk ].
Macintosh:
When you connect the recorder to
Mac OS, it is recognized by the drive
name of the product on the desktop. If
a microSD card is inserted, [ Untitled ] is
displayed.
Notes
• Before connecting via USB, exit HOLD
mode.
• Refer to the user’s manual for your PC
regarding the USB por t on your PC.
• Be sure to push the cable connector all
the way in. Otherwise, the recorder may
not operate properly.
• When the recorder is connected through
a USB hub, operation may become
unstable. In such cases, refrain from using
a USB hub.
• Use the dedicated USB cable. If any other
company’s cable is used, it may lead to
malfunc tion of the recorder. Also, never
use this dedicated cable with any other
company’s products.
6
Connecting to your PC
EN
79
Page 80
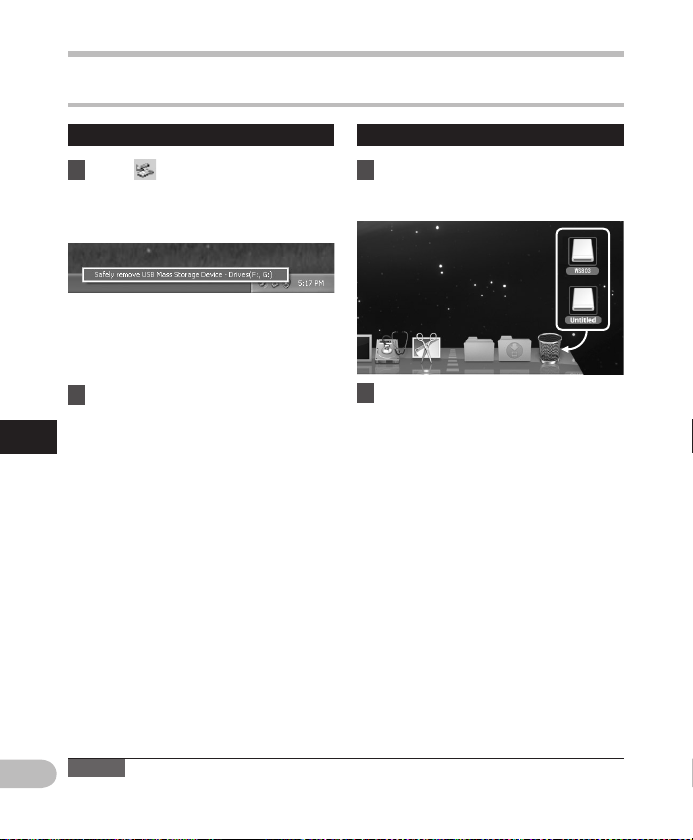
Disconnecting from your PC
Connecting to your PC
Windows
1 Click [ ] on the task bar located
at the lower-right corner of the
screen. Click [
Mass Stora ge Device
• The drive letter will differ depending
on the PC being used.
• When the window indicating that it
is safe to remove hardware appears,
close the window.
2 Confirm that the recorder LED
indicator light has turned off
before disconnecting the USB
6
cable.
Connecting to your PC
S afely remove USB
].
Macintosh
1 Drag and drop the recorder’s
drive icon on the desktop to the
Recycle Bin icon.
2 Confirm that the recorder LED
indicator light has turned off
before disconnecting the USB
cable.
Note
EN
• NEVER disconnect the USB while the LED indicator light is flashing. If you do, the data may
be destroyed.
80
Page 81
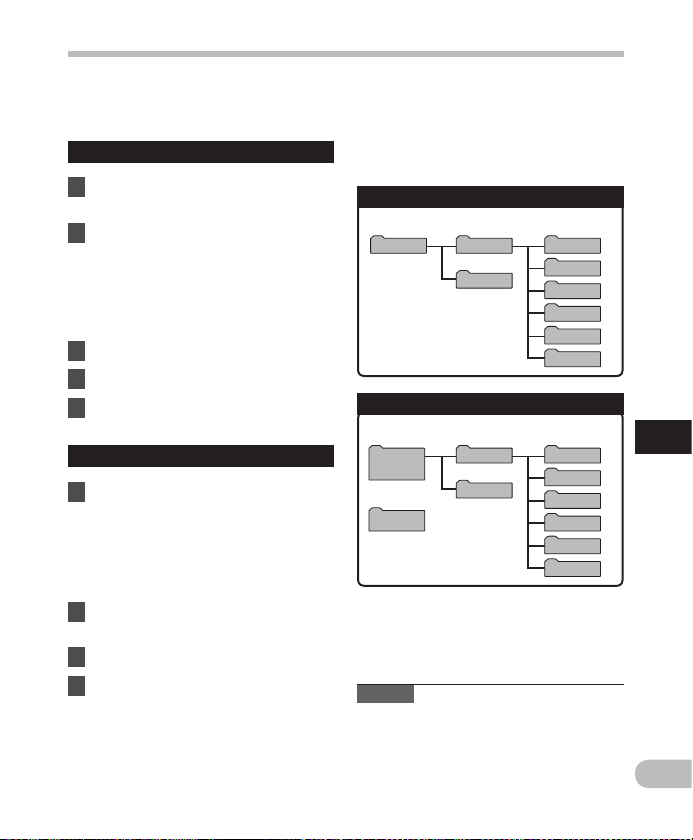
Transfer voice files to your PC
The 5 voice folders of this recorder are named [ Folder A ], [ Folder B ], [ Folder C ], [ Folder D ]
and [
Folder E ]. Recorded voice files are saved in these folders (On the WS-813, FM radio
recordings are saved in [ FLD_FM ]).
Windows
1 Connect the recorder to your PC
( ☞ P. 79).
2 Open the Explorer window.
• When you connect the recorder to
Windows and open [ My Computer ],
it is recognized by the drive name of
the product.
If you insert a microSD card, it is
recognized [ Removable Disk ].
3 Open the product name folder.
4 Copy the data.
5 Disconnect the recorder from the
PC ( ☞ P. 8 0 ) .
Macintosh
1 Connect the recorder to your PC
( ☞ P. 79).
• When you connect the recorder to
Mac OS, it is recognized by the
drive name of the product on the
desktop. If a microSD card is inserted,
[ Untitled ] is displayed.
2 Double-click the product name
icon on the desktop.
3 Copy the data.
4 Disconnect the recorder from the
PC ( ☞ P. 8 0 ) .
4 Drive names and folder names
when a PC is connected:
Built-in flash memory
Drive name Folder name
WS813
*1 RECORDER
MUSIC
microSD card
Drive name Folder name
Removable
Disk
Windows
Untitled
Macintosh
*1 Re cognized by the dr ive name of the pro duct.
*2 WS-813 only
RECORDER
MUSIC
Notes
• While data is being transmitted, [ Busy ]
is displayed and the LED indicator light
flashes. NEVER disconnect the USB while
the LED indicator light is f lashing. If you
do, the data may be destroyed.
• WMA format f iles cannot be played back
in the Mac OS operating environment.
Folder A
Folder B
Folder C
Folder D
Folder E
FLD_FM*2
Folder A
Folder B
Folder C
Folder D
Folder E
FLD_FM*2
6
Transfer voice fi les to your PC
EN
81
Page 82

Usage as external memory of the PC
In addition to its uses as a voice recorder and a music player, this recorder can also be used as
external memor y for a computer by storing data from a computer and reading it back out.
With the recorder connected to your PC, you can download data from the memor y to your PC
and upload data stored on your PC to the memory.
Windows
1 Connect the recorder to your PC
( ☞ P. 79).
2 Open the Explorer window.
• When you open [ My Computer ], the
recorder is recognized by the drive
name of the product.
3 Open the product name folder.
4 Copy the data.
5 Disconnect the recorder from the
PC ( ☞ P. 8 0 ) .
Macintosh
1 Connect the recorder to your PC
( ☞ P. 79).
• When you connect the recorder to
Mac OS, it is recognized by the drive
name of the product on the desktop.
2 Double-click the product name
icon on the desktop.
3 Copy the data.
4 Disconnect the recorder from the
PC ( ☞ P. 8 0 ) .
6
Usage as e xternal mem ory of the PC
Note
EN
• While data is being transmitted, [ Busy ] is displayed and the LED indicator light f lashes.
NEVER disconnect the USB while the LED indicator light is flashing. If you do, the data may
be destroyed.
82
Page 83
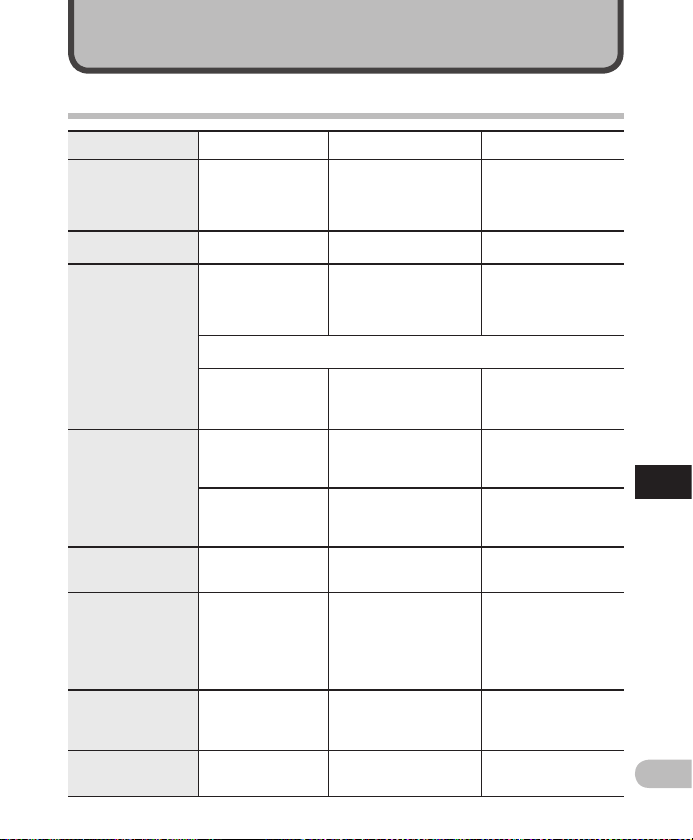
Other information
Alarm message list
Message Meaning Explanation Action
[ Batte ry low ] Low bat tery power.
[ File locked ] E rase-lock ed. Tried to d elete a locked f ile.
N ot an audio recor ding
folder.
[ Cannot re cord in this
folder ]
[ No mor e can be set ]
[ Folder full ] Fol der full.
[ Memor y e rror ] Er ror in the memor y. Err or in the memory.
[ Card erro r ] Err or in the memor y.
[ Illeg ally copi ed f ile ] Illegally copied file.
WS-813 only:
N ot an audio recor ding
folder.
Index full.
Temp ma rk f ull.
B attery powe r is getting
low.
R ecording has be en
attempted with a [ Music ]
folder.
Trie d to record in the
[ FM Radio ] fold er.
T he file is full of i ndex
marks (ma ximum of 99
marks).
T he file is full of Temp
marks (ma ximum of 99
marks).
T he folder is ful l of files
(maximu m of 200 files).
m icroSD card is not
recognized co rrectly.
T he music file wa s copied
illegally.
Ch arge the batter y
(WS- 813, WS- 812 onl y)
or repla ce with a new
battery ( ☞ P.1 4 , P.1 6).
Unlock the file ( ☞ P. 5 5) .
S elect a folde r from
among [ & ] to [ * ] and try
to record again ( ☞ P.25,
P. 28 ) .
Re -select from [ Folder A ]
through [ Fold er E ] and
record.
Er ase unnecessa ry index
marks ( ☞ P. 4 2) .
Er ase unnecessa ry Temp
marks ( ☞ P. 4 2) .
Er ase unnecessa ry files
( ☞ P. 45) .
T his is a malfunc tion, so
go to the sto re where
you purchased the
recorder or an Olympus
serv ice station for re pair
( ☞ P. 9 4) .
R emove the microSD
card and i nsert it again
( ☞ P.23 to P.24).
Eras e the file ( ☞ P.4 5 ).
7
Alarm message list
EN
83
Page 84
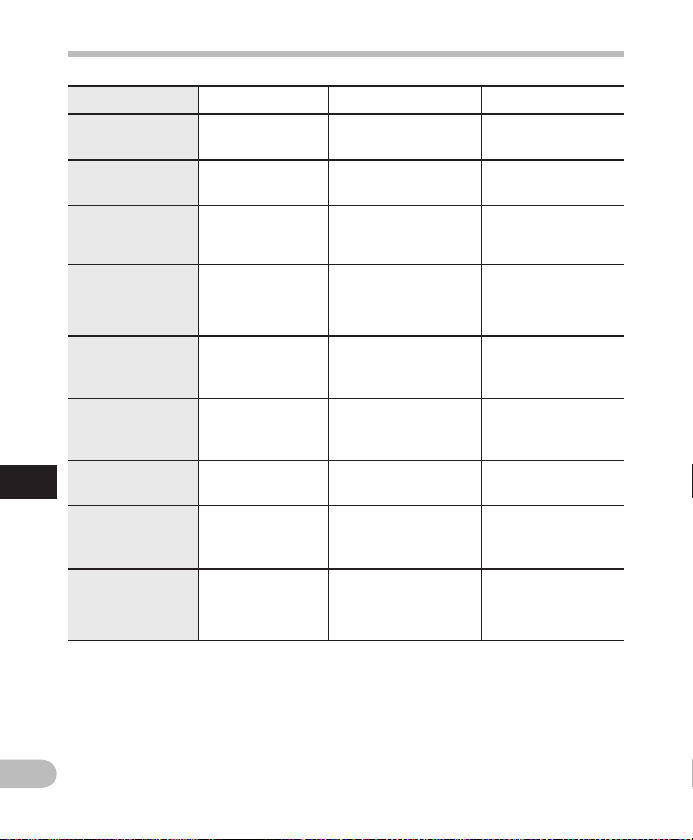
Alarm message list
Message Meaning Explanation Action
[ Memor y full ]
[ No file ] No fi le.
[ Format error ] Formatting error.
[ Can't create t he
syste m file. Conne ct
to PC and e rase
unnecessary file ]
Zero remaining
memory.
T he management f ile
cannot be created.
No remaining memory.
N o files were fou nd in the
folder.
T here was an error w hile
formatting the recorder’s
memory.
The f ile for management
cannot b e created due to
a shortage of remaining
memory.
Er ase unnecessa ry files
( ☞ P. 45) .
Selec t another folder
( ☞ P.26 to P.28).
R eformat the mem ory
( ☞ P. 74 ).
Co nnect the reco rder to
a compute r and delete
unnecessary files.
[ Cannot play th is f ile ] File can not be played. Incomp atible format .
[ Select a file ] Unselected File. File is not selected.
[ Same folder. Can ’t
7
be moved (co pied) ]
Alarm message list
[ Some files ca n’t be
moved (cop ied) ]
[ This fil e ca n’t be
divided ]
Folder cannot be
moved (copied).
Fi le cannot be move d
(copie d).
File cannot be split.
At tempting to move (copy)
into the sa me folder.
At tempting to move (copy)
a file to d estination fol der
in which a f ile with the
same file name exists.
At tempting to spli t a file
other than an MP3 or
PCM fil e recorded by this
recorder.
EN
84
Confir m which files
can be pla yed on this
recorder ( ☞ P. 3 9) .
Pl ease select a f ile then
carry o ut the operati on
( ☞ P.26 to P.28).
Selec t another folder.
Selec t another file.
Selec t another file.
Page 85
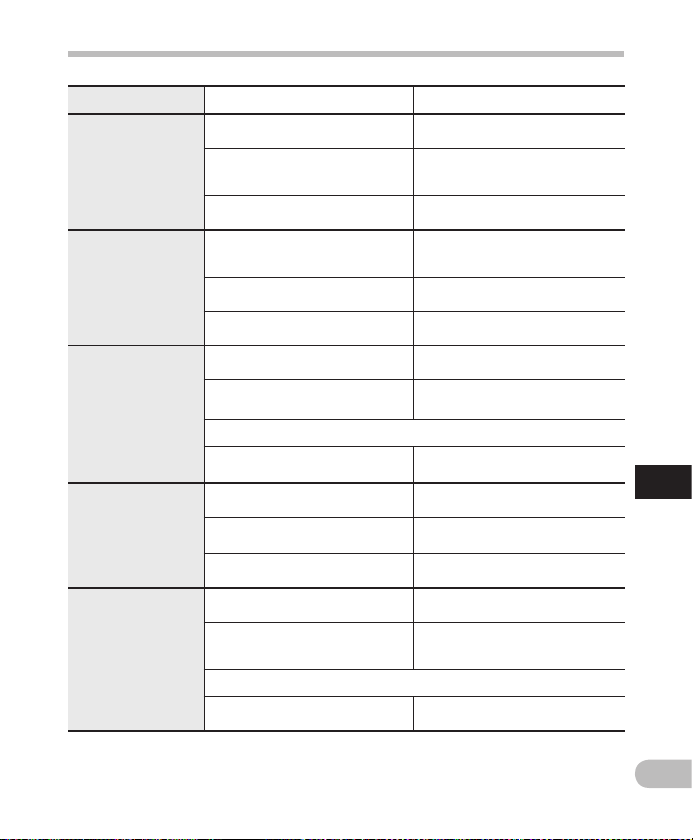
Troubleshooting
Symptom Probable cause Action
Ver ify that the bat tery polar ities = and
- ar e correct ( ☞ P.14 ) .
Ch arge the batter y (WS-813, WS-812
only) or re place with a new bat tery
( ☞ P.1 4 , P.1 6) .
Turn t he power on ( ☞ P. 19 ) .
Ch arge the batter y (WS-813, WS-812
only) or re place with a new bat tery
( ☞ P.1 4 , P.1 6) .
Turn t he power on ( ☞ P. 19 ) .
R elease the reco rder from HOLD
( ☞ P. 2 0) .
Er ase unnecessa ry files ( ☞ P. 45 ) .
Ch ange to another fo lder
( ☞ P. 26 to P.2 8).
Set [ Output ] to [ Earphone ] ( ☞ P.6 7 ) .
U nplug the earph ones to use the
built-in speaker.
To out put from the buil t-in speaker,
set [ Speaker ] to [ On ] ( ☞ P. 65 ) .
Ad just the volume l evel ( ☞ P. 3 6) .
Set [ Rec Level ] to [ High ] or [ Middle ]
( ☞ P. 5 6) .
Ad just the output l evel for the
connected dev ices.
Ad just the record ing level and then t ry
recording once more ( ☞ P. 56 ) .
Nothi ng a ppears on
the display
Won’t star t
Unable to record
No playback sound
heard
R ecording l evel too
low
T he battery is n ot loaded prop erly.
Battery power is getting low.
T he power is off.
Battery power is getting low.
T he power is off.
T he recorder is in H OLD mode.
L ow remaining mem ory.
T he maximum numb er of files has
been reached.
WS-813 only:
[ Output ] in the [ FM Rad io ] settings is
set to [ Speaker ].
T he earphones ar e connected.
[ Speaker ] is se t to [ Off ].
T he volume level is s et to [ 00 ].
T he microphone s ensitivity i s too low.
T his could potenti ally be becaus e
the outp ut level for the con nected
external devi ces is too low.
WS-813 only:
T he recording le vel has not been
adjusted.
7
Troubleshooting
EN
85
Page 86
Symptom Probable cause Action
WS-813 only:
T he recording le vel has not been
R ecording l evel too
high
Vo ice files are n ot
recor ded in stereo
Cannot find the
recorded Voice File
N oise heard d uring
playback
7
Troubleshooting
Silent portions not
skipp ed during
playback
adjusted.
T his could potenti ally be becaus e
the recor ding level and ou tput level
for conne cted exter nal devices is
too high.
T he connected e xternal micr ophone
is monaural.
[ Rec Mode ] is se t to a monaural
recording mode.
WS-813 only:
[ Zoom Mic ] is set to t he + s ide.
Wrong folde r.
T he recorder was s haken during
recording.
T he recorder was p laced near a cell
phone or f luorescent l amp while
recordi ng or during play back.
WS-813, WS-812 only:
The [ Voice Det ect ] p rocess has not
been performed.
[ Voice Pl ayba ck ] is se t to [ Off ]. Set [ Voice Pl ayba ck ] to [ On ].
Tro ubl esh ooti ng
Ad just the record ing level and then t ry
recording once more ( ☞ P. 56 ) .
I f you cannot recor d clearly even
after a djusting the re cording level,
then adju st the output lev el for the
connected dev ices ( ☞ P. 56 ) .
When an external monaural
microphone is connected for
recording audio, audio is recorded to
the L chann el only.
Set [ Re c Mo de ] to the ster eo
recordi ng mode ( ☞ P. 5 6 ).
Set [ Zoom Mic ] to [ Off ] ( ☞ P. 5 7).
Sw itch to the correc t folder
( ☞ P. 26 to P.2 8).
———
Move the recorder.
E xtract voi ce portions usi ng
[ Voi ce Detect ].
U nable to eras e the
file
U nable to eras e the
folder
EN
86
The file is locked.
The file is read -only.
The fol der contains a fi le which cannot
be recog nized by the recor der.
Unlock the file ( ☞ P. 5 5) .
U nlock the file o r cancel the fil e’s readonly setting on the PC.
Co nnect the reco rder to your PC and
erase the folder ( ☞ P. 7 9 ).
Page 87
Symptom Probable cause Action
I f the built-in spe aker amps are used
to monito r recording, the re is a risk
that audi o feedback will o ccur while
recording. It is recommended that
Noise is audible
through the recording
monitor
U nable to set in dex
marks, temp marks
Cannot receive
FM radio s ignal
Cannot recharge
T he PC is unable
to reco gnize the
recorder
Acousti c feedb ack is occurring.
T he maximum numb er of marks has
been reached.
The file is locked.
The file is read -only.
WS-813 only:
The earphones are not plugged into
the EAR jack.
[ Output ] is set t o [ Earphone ].
WS-813, WS-812 only:
[ Battery ] is s et to [ Alkaline ].
You hav e not pressed the
` OK button.
[ USB Class ] is set to [ Composite ].
[ USB Connec tion ] is se t to
[ AC Ada pter ].
you use ear phones as the rec ording
monitor.
M ake adjustment s, such as furth er
distancing the earphones from
the microphones, not pointing the
microphones at the earphones, or
lowerin g the volume of the r ecording
monitor.
Er ase unnecessa ry marks ( ☞ P. 42 ).
Unlock the file ( ☞ P. 5 5) .
U nlock the file o r cancel the fil e’s readonly setting on the PC.
T he supplied ear phones also fu nction
as an antenna. When using the
record er as a radio, be sure t o plug in
the earphones.
To out put from the bu ilt-in speake r, set
[ Output ] to [ Speaker ] ( ☞ P. 67 ) .
W hen using the supp lied recharg eable
batter y, set the batter y setting
to [ Ni-MH ]. A lso, avoid using the
batter y outside the r ecommended
temper ature range ( ☞ P.1 5, P. 18, P.6 5).
W hen using the USB con nection,
follow the confirmation display and
press the ` OK button.
Set [ USB Class ] to [ Storage Class ]
( ☞ P. 73 ) .
Set [ USB Connecti on ] t o [ PC ] ( ☞ P. 7 3) .
Tro ubl esh ooti ng
7
Troubleshooting
EN
87
Page 88

Accessories (optional)
Accessories exclusive to the Olympus voice recorder can be purchased directly from Online
Shop on our company’s website. Availability of accessories differs depending on the country.
s Stereo microphone: ME51S
The built-in large-diameter microphone
enables sensitive stereo recording.
s 2 channel microphone (omni-
directional): ME30W
Two ME30 monaural microphones
come in a set with a miniature tripod
and a connec tion adapter. These highly
sensitive omni-directional microphones
are supported by plug-in power and
are well-suited to recording musical
performances.
s Compact Gun Microphone
(unidirectional): ME31
This directional microphone is useful
for various types of recording such as
outdoor recording of wild birds singing.
The metal body provides sturdiness and
high rigidity.
s Compact zoom microphone
(unidirectional): ME32
This microphone is integrated with a
7
tripod, making it suitable for recording
Accessories (optional)
audio at a distance, such as from your
table at a meeting or conference.
s Highly sensitive noise-
cancellation monaural
microphone (unidirectional):
ME52W
This microphone is used to record
audio at a distance while minimizing
surrounding noise.
s Tie clip microphone
(omni-directional): ME15
This small unobtrusive microphone
comes with a tie-clip.
s Telephone pickup microphone:
TP8
This earphone-type microphone can
be placed into your ear while you are
phoning. The voice or conversation from
the phone can be recorded clearly.
s Ni-MH rechargeable battery and
charger set: BC400 (For Europe)
BC400 comes with an Ni-MH
rechargeable battery charger (BU-400)
and 4 Ni-MH rechargeable bat teries
(BR401). This charger can quick charge
Olympus AA or AAA Ni-MH rechargeable
batteries.
s Ni-MH rechargeable battery:
BR401
High-efficiency rechargeable long life
battery.
s USB connecting AC adapter: A514
5VDC AC Adapter for USB connection.
s Connecting cord: KA333
This connecting cord has stereo miniplugs (ø3.5) with resistance at both ends.
Use it to connec t from the earphone
jack output of the recorder to the
microphone input jack when recording.
Converting plug adapters (PA331/PA231)
which conver t to the monaural mini plug
(ø3.5) or monaural mini plug (ø2.5) are
also included.
s USB cable: KP-19
EN
88
Page 89
Specifications
General
4 Recording format:
Linear PCM * (Pulse Code Modulation)
MP3 (MPEG -1 Audio L ayer3)
WMA (Windows Media Audio)
* WS-813, WS-812 only.
4 Sampling frequency:
Linear PCM format
4 4.1 kHz/16 bit *1 4 4 . 1 k H z
MP3 format
256 kbps *1 4 4 . 1 k H z
192 kbps *2 4 4 . 1 k H z
128 kbp s 44.1 kHz
WMA format
128 kbp s 44.1 kHz
64 kbps 44.1 k Hz
32 kbps 44.1 kHz
16 kbps 22.05 kHz
8 k bps 8 kHz
*1 WS-813, WS-812 only
*2 WS- 811 only
4 Maximum working output:
150 mW (8 Ω speaker)
4 Maximum headphone output:
â 150 mV (according to EN 50332-2)
4 Wide band characteristic
headphone output:
75 mV â (according to EN 50332-2)
4 Recording media:
Built-in NAND FLASH memory:
WS-813 : 8 GB/ WS-812 : 4 GB/
WS-811 : 2 GB
microSD card:
2 GB to 32 GB
4 Speaker:
Built-in ø 18 mm round dynamic speaker
4
MIC
jack:
ø 3.5 mm mini-jack, impedance 2 kΩ
4
EAR
jack:
ø 3.5 mm mini-jack, impedance 8 Ω or
more
4 Input power requirement:
Battery:
AAA battery (LR03) or
Olympus Ni-MH rechargeable battery
External power supply:
USB connecting AC adapter (A514) 5 V
4 External dimensions:
100.2 mm × 40 mm × 14.8 mm
(without protrusions)
4 Weight:
57 g (including bat tery)
4 Operating temperature:
0°C - 42°C/ 32°F - 107.6°F
4 Tuning frequency range
(WS-813 only):
FM radio: 87.50 MHz to 108.00 MHz
7
Specifications
EN
89
Page 90
Freque ncy response
4 During recording mode
(Microphone jack):
Linear PCM format
4 4.1 kHz/16 bit *1 4 0 Hz to 21 kHz
MP3 format
256 kbps *1 40 Hz to 20 kH z
192 kbps *2 4 0 Hz to 19 kHz
128 kb ps 40 H z to 17 kHz
WMA format
128 kb ps 40 Hz to 19 kH z
6 4 kbps 40 Hz to 16 kHz
32 k bps 40 Hz to 13 kHz
16 kb ps 40 Hz to 8 k Hz
8 k bps 40 Hz to 3 k Hz
*1 WS-813, WS-812 only
*2 WS- 811 only
7
4 During recording mode
(Built-in stereo microphone):
Specifications
70 Hz to 20 kHz
(However, for recording in the MP3
format or the WMA format, the upper
limit value of the frequency response
depends on the recording mode)
4 During playback mode:
20 Hz to 20 kHz
Specifications
EN
90
Page 91
Guide t o battery l ife
The following values are strictly for reference only.
4 In recording mode (Internal memory):
Recording mode
L inear PCM format 44.1 kH z/16 bit * 20 h. 15 h.
MP3 f ormat 128 kb ps 22 h. 18 h.
WMA format
128 kbp s 21 h. 17 h.
8 k bps 27 h . 2 2 h.
B uilt-in st ereo microp hones
Alkaline battery
Ni-MH Rechargeable
4 In voice file playback mode (All Playback Mode):
Recording mode
L inear PCM format 44.1 kH z/16 bit * 19 h. 15 h.
M P3 format 128 kbps 21 h. 17 h.
WMA format
Recording mode
L inear PCM format 44.1 kH z/16 bit * 22 h. 17 h.
M P3 format 128 kbps 29 h. 21 h.
WMA format
128 kb ps 21 h. 17 h.
8 k bps 24 h. 20 h.
128 kb ps 30 h . 22 h .
8 k bps 30 h. 22 h .
Alkaline battery
Alkaline battery
Built- in speake r
Ni-MH Rechargeable
Earphone playback
Ni-MH Rechargeable
4 In FM radio mode (Internal memory) (WS-813 only):
Recorder status
During FM radio rec eption 12 h. 11 h.
During FM radio recording 7 h. 7 h.
Alkaline battery
* WS-813, WS-812 only.
Earphone playback
Ni-MH Rechargeable
Specifications
battery
battery
battery
battery
7
Specifications
Note
• Batter y life is measured by Olympus. It varies greatly according to the type of battery used
and the conditions of use.
EN
91
Page 92
Guide t o recordi ng times
The following values are strictly for reference only.
4 Linear PCM format:
Recording media
Internal memory
microSD card
WS -813 (8 GB) 12 h. 5 min .
WS -812 (4 GB) 6 h .
8 G B 12 h. 5 min .
4 GB 6 h.
2 GB 3 h.
4 MP3 format:
Recording media
Internal memory
7
4 WMA format:
Specifications
Internal memory
microSD card
microSD card
WS -813 (8 GB) 6 6 h. 30 min.
WS -812 (4 GB) 33 h.
WS -811 (2 GB)
8 G B 6 6 h. 30 min. 89 h. 133 h.
4 GB 33 h. 44 h. 66 h.
2 GB 16 h. 30 min. 22 h. 33 h.
Recording media
WS-813 (8 GB) 132 h. 261 h. 522 h. 1028 h. 2043 h.
WS -812 (4 GB) 65 h. 129 h. 259 h. 511 h. 1016 h.
WS -811 (2 GB)
8 GB 130 h. 261 h. 522 h. 1027 h. 2042 h.
4 GB
2 GB
Specifications
Recording mode
4 4.1 kHz/16 bit
256 kbps 192 kbps 128 kbps
----
128 kbps 64 kbps 32 kbps 16 kbps 8 kbps
32 h .
30 min.
64 h.
30 min.
32 h .
30 min.
Recording mode
----
133 h.
----
22 h. 33 h. 30 min.
65 h.
30 min.
129 h. 259 h. 510 h. 1014 h.
65 h. 129 h. 255 h. 508 h.
66 h. 30 min.
Recording mode
131 h. 258 h. 514 h.
Notes
• Available recording time may be shorter if numerous shor t recordings are made
(The displayed available recording time and recorded time are approximate indications).
EN
• Variations in the available recording time will arise as there may be differences in the
available memory depending on the microSD card.
92
Page 93
Specifications
Maxi mum recor ding time pe r file
• The maximum capacity for a single file
is approx. 4 GB for WMA and MP3, and
approx. 2 GB for Linear PCM *1 format
(WAV).
• Regardless of the amount of remaining
memory, the longest sound recording
time per f ile is restricted to the following
value.
Linear PCM format
4 4.1 kHz/16 bit *1 a pprox. 3 h. 20 min.
MP3 format
256 kbps *1 approx. 37 h. 10 min.
192 kbps *2 approx. 49 h. 30 min.
128 k bps approx. 74 h. 30 min.
WMA format
128 kb ps approx . 26 h. 40 min.
6 4 kbps a pprox. 26 h. 40 min .
32 k bps ap prox. 26 h. 40 min.
16 kb ps app rox. 53 h. 40 min.
8 k bps ap prox. 148 h. 40 min.
*1 WS-813, WS-812 only
*2 WS-811 only
Guide to recordable number of songs
WS -813 : 2,000 songs
WS -812 : 1,000 songs
WS -811 : 500 songs
(At 128 kbps, 4 minutes per song)
7
Specifications
Specifications and design are subject to
change without notice.
EN
93
Page 94
Technical assistance and support
The following contact information relates to technical support for Olympus recorders and
software only.
s Technical Hotline Number in the U.S. and Canada
1-888-553-4448
s User Support E-mail address in the U.S. and Canada
s Technical Hotline Number in Europe
Toll free number: 0 0800 67 10 83 00
available for Austria, Belgium, Denmark, Finland, France, Germany, Italy, Luxemburg,
Netherlands, Norway, Portugal, Spain, Sweden, Switzerland, United Kingdom
Charged numbers for the Rest of Europe
+ 49 180 567 1083
+ 49 40 23773 4899
s User Support E-mail address in Europe
7
Technical assistance and support
For customers in Europe:
The “CE” mark indicates that this product complies with the European
requirements for safety, health, environment and customer protection.
This s ymbol [crossed-out wheeled bin WEEE Annex IV] indicates separate
collection of waste electrical and electronic equipment in the EU
countries. Please do not throw the equipment into the domestic refuse.
Please use the return and collection systems available in your country for
the disposal of this product.
Applicable Product: WS-813/WS-812/WS-811
EN
94
This symbol [crossed-out wheeled bin Directive 2006/66/EC Annex II]
indicates separate collection of waste batteries in the EU countries. Please
do not throw the batteries into the domestic refuse. Please use the return
and collection systems available in your country for the disposal of the
waste batteries.
Page 95

Shinjuku Monolith, 3-1 Nishi-Shinjuku 2-chome, Shinjuku-ku, Tokyo 163-0914, Japan.
Tel. +81 (0)3-3340-2111
http://www.olympus.com
OLYMPUS EUROPA HOLDING GMBH
OLYMPUS IMAGING CORP.
(Premises/Goods delivery) Wendenstrasse 14-18, 20097 Hamburg, Germany.
(Letters) Postfach 10 49 08. 20034 Hamburg, Germany.
Tel. +49 (0)40-237730
http://www.olympus-europa.com
EN-BD3512-01
AP1112
 Loading...