


2010 Maxima Quick Reference Guide

|
|
|
|
17 |
|
|
|
|
01 |
02 |
03 |
04 |
05 |
06 |
|
|
|
|
|
|
|
|
|
18 |
|
07 |
|
|
08 |
|
|
|
|
09 |
10 |
11 |
12 |
19
16
13 14
20
15
01 |
TRIP COMPUTER* |
02 |
HEADLIGHT AND TURN SIGNAL |
|
CONTROL |
03LOW TIRE PRESSURE WARNING LIGHT
04 |
VEHICLE INFORMATION DISPLAY |
05 |
INSTRUMENT BRIGHTNESS CONTROL* |
06 |
WINDSHIELD WIPER/WASHER |
|
SWITCH |
07STEERING WHEEL SWITCHES FOR
AUDIO CONTROL/BLUETOOTH®
08 |
CRUISE CONTROL |
09 |
VEHICLE DYNAMIC CONTROL (VDC) |
10 |
OFF SWITCH |
Outside Mirror Control Switch |
11 |
HEATED STEERING WHEEL SWITCH* |
12 |
TRUNK LID RELEASE SWITCH |
13 |
REAR AUDIO/CLIMATE CONTROLS |
|
ON/OFF SWITCH |
14INTELLIGENT KEY PORT
15HOOD RELEASE*
16 |
TILT AND TELESCOPIC |
|
STEERING COLUMN |
17 |
CONTROL PANEL DISPLAY |
18 |
FRONT PASSENGER AIR BAG |
|
STATUS LIGHT |
19 |
AUDIO SYSTEM |
20 |
AUTOMATIC CLIMATE CONTROL |
*See your Owner’s Manual for more information.

TABLE OF CONTENTS
NISSAN Intelligent Key™. . . . . . . . . . . . . . . . . . . . . . . . . . . . . . . . . . . . . . . . . . . . . 2 Automatic Door Locks.. . . . . . . . . . . . . . . . . . . . . . . . . . . . . . . . . . . . . . . . . . . . . . . 3 Windshield Wiper/Washer Switch. . . . . . . . . . . . . . . . . . . . . . . . . . . . . . . . . . . . . 4 Headlight and Turn Signal Control. . . . . . . . . . . . . . . . . . . . . . . . . . . . . . . . . . . . . 4 Steering Wheel Switches for Audio Control/Bluetooth®. . . . . . . . . . . . . . . . . . 5 Cruise Control. . . . . . . . . . . . . . . . . . . . . . . . . . . . . . . . . . . . . . . . . . . . . . . . . . . . . . 6 Automatic Climate Control.. . . . . . . . . . . . . . . . . . . . . . . . . . . . . . . . . . . . . . . . . . . 6 Rear Automatic Climate Control (if so equipped). . . . . . . . . . . . . . . . . . . . . . . . 8 FM/AM/XM®* Radio with CD Player (if so equipped).. . . . . . . . . . . . . . . . . . . . 9 USB Interface (if so equipped). . . . . . . . . . . . . . . . . . . . . . . . . . . . . . . . . . . . . . 10 Rear Audio Controls (if so equipped).. . . . . . . . . . . . . . . . . . . . . . . . . . . . . . . . 11 Music Box Hard Drive Audio System (if so equipped). . . . . . . . . . . . . . . . . . 11 Control Panel Display with Navigation System (if so equipped). . . . . . . . . . 12 Vehicle Information Display. . . . . . . . . . . . . . . . . . . . . . . . . . . . . . . . . . . . . . . . . 13 Clock Set/Adjustment (Navigation System Only).. . . . . . . . . . . . . . . . . . . . . . 13 RearView Monitor (if so equipped).. . . . . . . . . . . . . . . . . . . . . . . . . . . . . . . . . . 14 Twin Trip Odometer.. . . . . . . . . . . . . . . . . . . . . . . . . . . . . . . . . . . . . . . . . . . . . . . 14 Automatic Drive Positioner (if so equipped). . . . . . . . . . . . . . . . . . . . . . . . . . . 14 Continuously Variable Transmission (CVT). . . . . . . . . . . . . . . . . . . . . . . . . . . . 15 Vehicle Dynamic Control (VDC) OFF Switch.. . . . . . . . . . . . . . . . . . . . . . . . . 16 Front Passenger Air Bag Status Light.. . . . . . . . . . . . . . . . . . . . . . . . . . . . . . . . 17 Tire Pressure Monitoring System (TPMS).. . . . . . . . . . . . . . . . . . . . . . . . . . . . . 17 Seat Belt Warning Light and Chime.. . . . . . . . . . . . . . . . . . . . . . . . . . . . . . . . . . 17 Child Safety Rear Door Locks . . . . . . . . . . . . . . . . . . . . . . . . . . . . . . . . . . . . . . . 17 Fuel-Filler Door . . . . . . . . . . . . . . . . . . . . . . . . . . . . . . . . . . . . . . . . . . . . . . . . . . . 18 Fuel-Filler Cap .. . . . . . . . . . . . . . . . . . . . . . . . . . . . . . . . . . . . . . . . . . . . . . . . . . . 18 Trunk Lid Release Switch.. . . . . . . . . . . . . . . . . . . . . . . . . . . . . . . . . . . . . . . . . . 18 Trunk Lid Cancel Switch . . . . . . . . . . . . . . . . . . . . . . . . . . . . . . . . . . . . . . . . . . . 18 Tilt/Telescopic Steering. . . . . . . . . . . . . . . . . . . . . . . . . . . . . . . . . . . . . . . . . . . . 19 Outside Mirror Control Switch.. . . . . . . . . . . . . . . . . . . . . . . . . . . . . . . . . . . . . . 19 Moonroof Controls (if so equipped).. . . . . . . . . . . . . . . . . . . . . . . . . . . . . . . . . 19 Dual Panel Moonroof (if so equipped) . . . . . . . . . . . . . . . . . . . . . . . . . . . . . . . 20 Front Seat Adjustments. . . . . . . . . . . . . . . . . . . . . . . . . . . . . . . . . . . . . . . . . . . . 21 Folding Down the Rear Seats (if so equipped).. . . . . . . . . . . . . . . . . . . . . . . . 21 HomeLink® Universal Transceiver (if so equipped) .. . . . . . . . . . . . . . . . . . . . 22 Bluetooth® Hands-free Phone System (Without Navigation System).. . . . . 23 Bluetooth® Hands-free Phone System (Navigation System Only).. . . . . . . . 25 NISSAN Voice Recognition System (if so equipped). . . . . . . . . . . . . . . . . . . 29 Navigation System (if so equipped). . . . . . . . . . . . . . . . . . . . . . . . . . . . . . . . . . 34
This easy-to-use Quick Reference Guide is intended to help you more fully appreciate some of the unique features and functions of your new vehicle. However, it is not intended to replace your Owner’s Manual. The Owner’s Manual contains more detailed information to help you better understand the important safety warnings, features, operation and maintenance of your vehicle. All information, specifications, photographs and illustrations in this publication are those in effect at the time of printing. NISSAN reserves the right to change specifications or design without notice and without obligation.
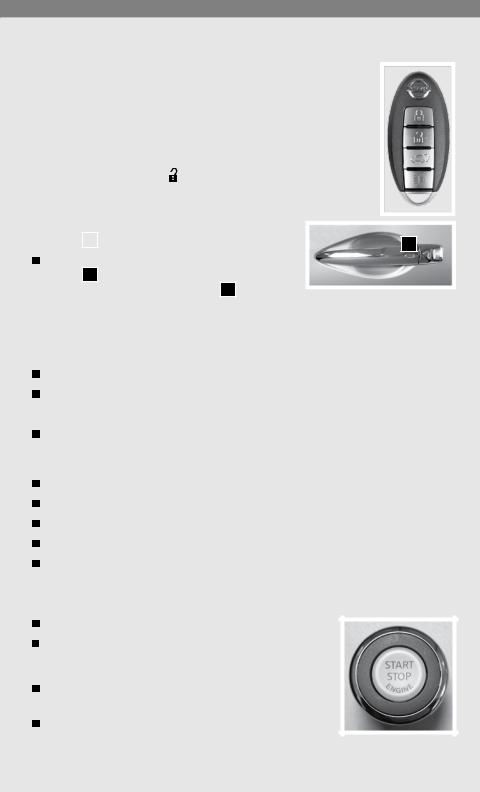
NISSAN INTELLIGENT KEY™
The NISSAN Intelligent Key™ allows you to lock or unlock your vehicle, open your trunk and start the engine.
NOTE: It is important to make sure the Intelligent Key is with you (that is, in your pocket or purse).
|
The operating range of the door and trunk lock/unlock function is |
|
||
|
|
|||
|
approximately 31 in (80 cm). |
|
||
|
Open windows - Press the button longer than 3 seconds after all |
|
||
|
|
|||
|
the doors are unlocked to open the front windows. (The keyfob is not |
|
||
|
able to close the windows after opening them.) |
|
||
|
Locking the vehicle - Push any door handle Request |
|
||
|
|
|||
|
|
|
||
|
Switch |
01 |
once. |
01 |
|
Unlocking the vehicle - Push any door handle Request |
|
||
|
Switch 01 once. The corresponding door will unlock. |
|
||
|
Push the door handle Request Switch 01 again within |
|
||
|
1 minute; all other doors will unlock. |
|
||
SILENCING THE HORN BEEP FEATURE
For vehicles without Navigation system:
To deactivate: Press and hold the  and
and  buttons for at least 2 seconds.
To activate: Press and hold the  and
and  buttons for at least 2 seconds.
For vehicles with Navigation system:
If you change the horn beep feature with the keyfob, the display screen will not show the current mode. Use the keyfob to return to the previous mode and set the horn beep feature using the control panel.
Press the SETTING button on the control panel.
Select “Comfort & Convenience.”
Press ENTER.
Select “Remote Key Response Horn.”
Set operation conditions to turn horn beep ON or OFF when unlocking the vehicle with the keyfob.
STARTING THE ENGINE
Depress the brake pedal.
Push the ignition switch START/STOP button to start the engine.
TURNING THE ENGINE OFF
Shift the shift lever to the P (Park) position and apply the parking brake.
Push the ignition switch START/STOP button to turn the engine off.
2
ACCESSORY MODE
Press the START/STOP button once without depressing the brake pedal to access the ACC mode. This position activates electrical accessories such as the radio.
Press the START/STOP button a second time to ON without depressing the brake pedal. This position turns on the ignition switch and all electrical accessories.
NISSAN INTELLIGENT KEY™ BATTERY DISCHARGE
If the battery of the Intelligent Key is almost discharged, the guide light on the Intelligent Key port blinks and the Intelligent Key insertion indicator is displayed in the vehicle information display.
To start the engine under these circumstances, insert the Intelligent Key into the key port in the direction indicated until it latches into place.
To remove the Intelligent Key from the port, push the
ignition switch to turn the engine off and pull the Intelligent Key out of the port.
The Intelligent Key port does not charge the Intelligent Key battery. If you see the low battery indicator, replace the battery in the Intelligent Key.
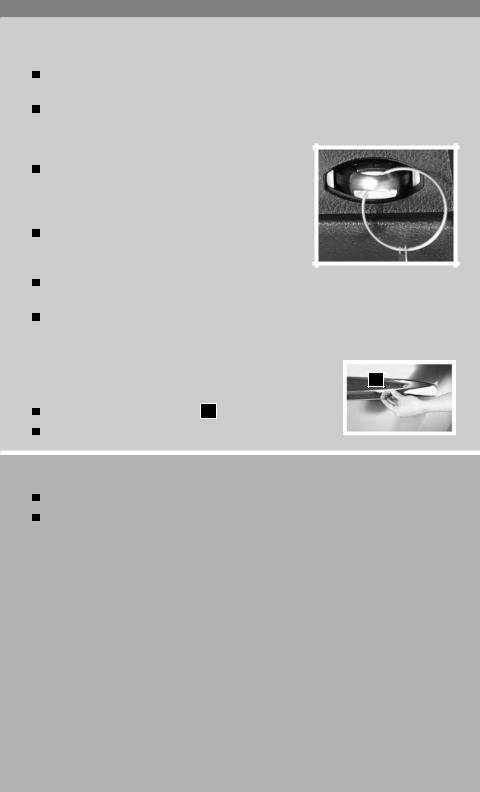
OPENING THE TRUNK
|
To open the trunk using the request switch, your Intelligent |
02 |
|
||
|
Key must be with you.
Push the Request/Release switch 02 under the trunk handle.
Lift up on the trunk lid to open.
AUTOMATIC DOOR LOCKS
All doors lock automatically when the vehicle speed reaches 15 MPH (24 km/h). All doors unlock automatically when the ignition is placed in the OFF position.
The automatic lock and unlock functions can be deactivated or activated independently of each other. To deactivate or activate the automatic door lock or unlock system, perform the following procedure:
1.Close all doors.
2.Place the ignition in the ON position.
3.Do one of the following within 20 seconds of performing Step #2:
•To change AUTO UNLOCK settings: push and hold the power door lock switch to the  position (UNLOCK) for more than 5 seconds.
•To change AUTO LOCK settings: push and hold the power door lock switch to the  position (LOCK) for more than 5 seconds.
4.When activated, the hazard indicator will flash twice. When deactivated, the hazard indicator will flash once.
5.The ignition switch must be placed in the OFF and ON position again between each setting change.
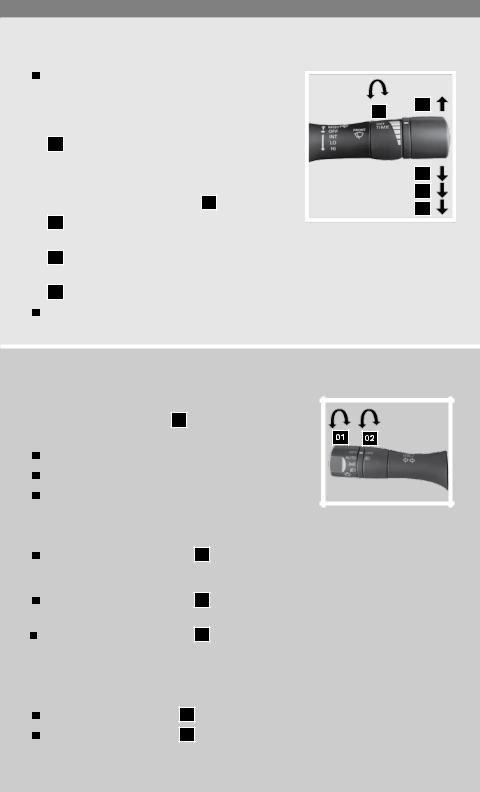
WINDSHIELD WIPER/WASHER SWITCH
The ignition switch must be in the ON position to activate the windshield wipers.
|
Move the lever to the following positions to operate |
1B |
04 |
|
|
||
|
the windshield wipers: |
|
|
1A
02
Intermittent (INT) – Push the lever down. Front wipers operate intermittently and vary in
accordance with vehicle speed. The intermittent operation speed can be further adjusted by twisting the time control ring 1B .
Low Speed (LO) – Push the lever down for continuous low-speed operation of front wipers.
1A
02
03
03High Speed (HI) – Push the lever down for continuous high-speed operation of front wipers.
04 Mist (MIST) – Lift the lever up for one sweep of the front wipers.
Pull the lever toward you to activate front washer fluid and several sweeps of the wipers.
HEADLIGHT AND TURN SIGNAL CONTROL
TO ACTIVATE THE AUTOLIGHT SYSTEM:
Turn the headlight control switch 01 to the AUTO position to activate the autolight system. The autolight system can:
Turn the headlights on automatically when it is dark.
Turn the headlights off automatically when it is light.
Keep the headlights on for 45 seconds after you place the ignition in the OFF position and all doors are closed.
TO DEACTIVATE THE AUTOLIGHT SYSTEM:
Turn the headlight control switch 01 to the OFF,  or
or  position.
HEADLIGHT CONTROL SWITCH
Turn the headlight control switch 01 to the  position to turn on the front parking, tail, license plate and instrument panel lights.
Turn the headlight control switch 01 to the  position to turn on the headlights. All other lights remain on.
FOG LIGHT OPERATION (if so equipped)
NOTE: The headlights must be on and the low beams  selected for the fog lights to operate.
Turn the switch (inside collar) 02 to the  position to turn on the fog lights.
Turn the switch (inside collar) 02 to the OFF position to turn off the fog lights.
4

HIGH BEAM
Push the headlight control switch forward A to select the high beam function. The blue  indicator light illuminates. Pull the headlight switch back to the original position to select low beam. The blue
  indicator light goes off.
Pull and release the headlight control switch B to flash the headlight high beams on and off.
STEERING WHEEL SWITCHES FOR AUDIO CONTROL/BLUETOOTH®
Press the SOURCE button to turn the radio system on.
To choose AM, FM, XM® (if so equipped), CD/DVD (if so equipped), Music BoxTM (if so equipped), USB/iPod®* (if so equipped), Bluetooth® Audio (if so equipped) or AUX, press the SOURCE button repeatedly.
The ENTER up or down switch can be used to perform the following:
•Tilt the ENTER switch for less than 1.5 seconds to change to a preset station.
•Tilt and hold the ENTER switch for more than 1.5 seconds to seek the next or previous broadcasting radio station.
•Tilt the ENTER switch up or down while playing a CD, Music BoxTM (if so equipped) or USB device (if so equipped) for less than 1.5 seconds to change tracks.
•If the vehicle is equipped with a USB Interface, tilt and hold the ENTER switch up or down for more than 1.5 seconds to fast forward or rewind.
•If the vehicle is equipped with a Music BoxTM, tilt and hold the ENTER switch up or down for more than 1.5 seconds to change between playlists.
Press the volume control switch + or – to increase or decrease the volume.
Press the  button to activate the Voice Recognition System.
If a compatible Bluetooth®-enabled cellular phone has been connected to the vehicle and is selected, push the  switch to initiate, answer or hang up a call.
*iPod® is a trademark of Apple Inc., registered in the U.S and other countries.
5
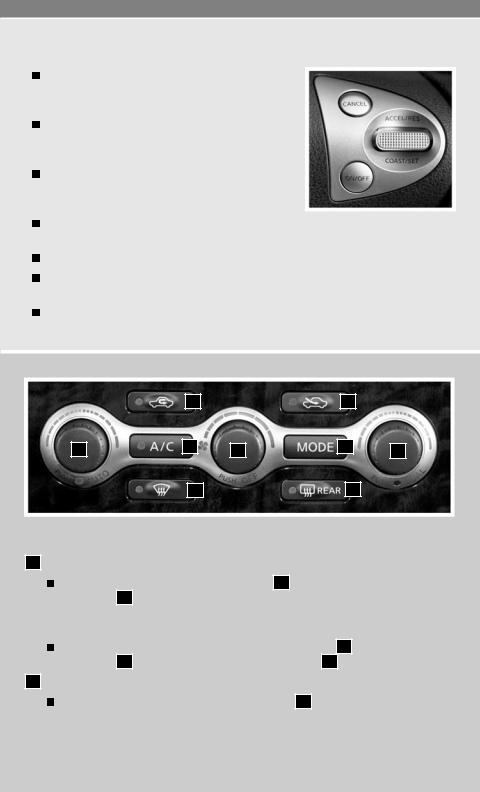
CRUISE CONTROL
To activate the cruise control, push the ON·OFF switch. The cruise indicator light in the instrument panel will illuminate.
To set cruising speed, accelerate the vehicle to the desired speed, push the COAST/SET switch and release.
To reset at a faster cruising speed, push and hold the ACCEL/RES switch. When the vehicle attains the speed you desire, release the switch.
To reset at a slower cruising speed, push and hold
the COAST/SET switch. Release the switch when the vehicle slows to the desired speed. To cancel cruise control, push the CANCEL switch or tap the brake pedal.
To resume a preset speed, push up and release the ACCEL/RES switch. The vehicle returns to the last set cruising speed when the vehicle speed is over 25 MPH (40 km/h).
To turn off cruise control, push the ON·OFF switch. The CRUISE indicator light in the instrument panel will go out.
|
08 |
|
09 |
|
01 |
05 |
03 |
04 |
02 |
|
|
|||
|
06 |
|
07 |
|
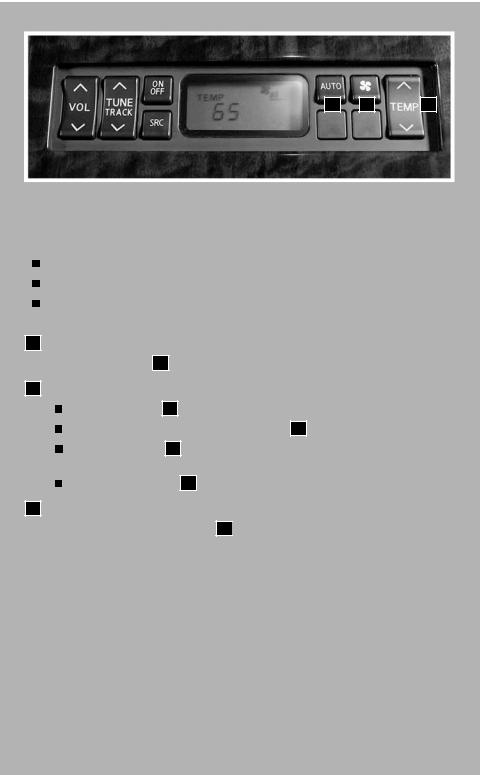
AUTOMATIC CLIMATE CONTROL
01
02
6
DRIVER’S SIDE TEMPERATURE CONTROL DIAL/AUTO MODE
Press the driver’s side temperature control dial 01 . Turn the driver’s side temperature control dial 01 to the desired temperature. AUTO and the selected temperature will be displayed on the control panel display. This will allow the fan speed, air flow distribution and temperature to be automatically maintained at the selected temperature.
To disable auto mode, press the air flow mode control button 04 , turn the fan speed control dial 03 or press the front defroster control button 06 .
PASSENGER’S SIDE TEMPERATURE CONTROL DIAL/DUAL MODE
Press the passenger’s side temperature control dial 02 to turn the passenger’s side temperature controls on or off. This will allow the passenger’s side temperature to be adjusted independently from the driver’s side control by turning the passenger’s side temperature control dial. DUAL and the selected passenger’s temperature will be displayed on the control panel display.

03 FAN SPEED CONTROL DIAL
Turn the dial to the left to decrease fan speed or to the right to increase fan speed. Press the dial in to turn off the climate control.
04 AIR FLOW MODE BUTTON
05
06
07
Press to select the following air flow outlets. The selected mode will display on the control panel display.
Air flows from the center and side vents.

 Air flows from the center, side, and foot vents.

 Air flows mainly from the foot vents.
 Air flows from the defroster and foot vents.
 Air flows mainly from the defroster vents.
A/C ON/OFF BUTTON
Press the A/C button to manually turn the A/C on or off.
DEFROSTING/DEMISTING FRONT AND SIDE WINDOWS
Press the defroster control button  to turn the system on. The A/C automatically turns on when the defroster mode is selected.
Turn the driver’s side temperature control dial 01 left or right to set the desired temperature.
To set the defroster on high, turn the fan speed control dial 04 to the right until fan speed increases.
DEFROSTING REAR WINDOW AND OUTSIDE HEATED MIRROR
Push the rear window defroster switch  rear on.
Push the switch again to manually turn the defroster off.
This function automatically turns off in approximately 15 minutes.
08 AIR RECIRCULATION BUTTON
Press the air recirculation button  to recirculate air inside the vehicle.
To switch from air recirculation to fresh air intake, press the fresh air button  .
.
The air recirculation mode can only be selected if the air flow control mode is in the following positions:  or
or 
 .
.
09 FRESH AIR BUTTON
Press the fresh air button  to draw fresh air into the vehicle.
To switch from fresh air intake to the air recirculation mode, press the air recirculation button  .
.
7
|
|
|
01 |
02 |
03 |
REAR AUTOMATIC CLIMATE CONTROL (if so equipped)
The rear seat passengers can adjust the climate control system using the climate controls in the rear armrest panel.
The rear seat climate control allows control over the front passenger’s side climate controls.
Driver’s side climate controls are not affected by the rear controls.
To disable the rear climate controls, push the rear control cancel switch located on the instrument panel to the left of the steering wheel.
01AUTO BUTTON
Press the AUTO button 01 to activate the automatic climate control for the rear passengers.
02
03
FAN CONTROL BUTTON
Press the  button 02 to manually control the fan speed for the rear passengers. The fan speed increases each time the
  button 02 is pressed.
When the  button 02 is pressed while on the maximum speed, the speed returns to the lowest fan speed.
Press the AUTO button 02 to return to automatic control of the fan speed.
TEMPERATURE CONTROL SWITCH
Press the temperature control switch 03 
 or
or  to select the desired temperature for the rear passengers.
8
01
02
03 |
04 |
|
05 |
|
|
|
06 |
07 |
08 |
09 |
10 |
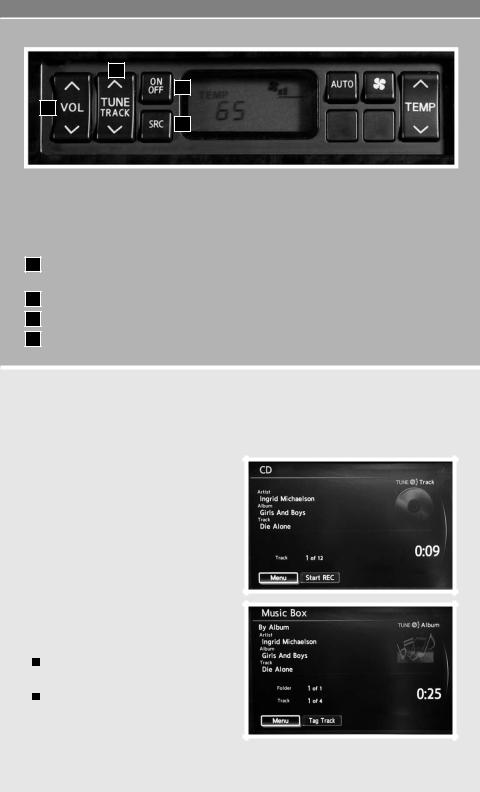
FM/AM/XM®* RADIO WITH CD Player (if so equipped)
01EJECT BUTTON
Press the  button, the CD will eject.
02STATION PRESET BUTTONS
 To store a station in a preset you must first select a radio band by pressing the FM/AM or SAT button, then tune to the desired AM, FM or XM® station. Then press and hold the desired station preset button for at least 2 seconds. When the preset indicator illuminates, a beep will sound, indicating memorization is complete. To retrieve a previously set station, select the radio band where the preset was set, then press the corresponding station preset button.
03FM/AM BUTTON
 Pressing the FM/AM button will change the band to FM1, FM2 or AM radio stations.
04SAT BUTTON
 Pressing the SAT button will change the radio band to XM1, XM2 or XM3 channels.
05DISC•AUX BUTTON
 Press the DISC AUX button to cycle through the USB device (including iPod®), CD or DVD, Music BoxTM, Bluetooth® Audio device and the auxiliary input jacks. As you change from one audio source to another, the previous audio source will be stopped. The USB and auxiliary input jacks are located in the center console.
06TUNE/FOLDER AND AUDIO CONTROL KNOB (Bass, Treble, etc.)
 To manually tune the radio, turn the TUNE/FOLDER/AUDIO knob. If playing a CD that is formatted with MP3/WMA folders, turn the TUNE/FOLDER/AUDIO knob to scroll through the available folders.
 Adjust the Bass, Treble, Balance and Fade by pressing the TUNE/FOLDER/AUDIO knob until the desired mode appears in the display. Then turn the TUNE/FOLDER/AUDIO knob to adjust to the desired level.
9

07 SCAN BUTTON
Press the SCAN button while listening to a radio station (FM1, FM2 or AM). The radio will stop at each station that has significant signal strength for 5 seconds. Pressing the SCAN button again during this 5-second period will stop scan tuning and the radio will remain tuned to that station. If the SCAN button is not pressed within 5 seconds, scan tuning moves to the next station.
08 RPT/RDM BUTTON
To change the play pattern of a CD or Music Box Hard-Disk Drive Audio System (if so equipped), press the RPT/RDM button.
09 SEEK/CAT 10 TRACK BUTTONS
To skip quickly through each broadcasting station, press the SEEK/CAT or TRACK button.
To skip from one track to another on a CD, press the SEEK/CAT or TRACK button. Each time the button is pressed, the CD will advance or skip back one track.
When the SEEK/CAT or TRACK button is pressed and held while a CD is playing, it will rewind or fast forward. When the button is released, the CD will play at normal speed.
NOTE:
For vehicles equipped with a color display, video playback from the auxiliary audio/video input jacks is only available while the vehicle is parked and the parking brake engaged.
You may need to adjust the volume on any compatible device plugged into the auxiliary jack to find the most desired sound level of the audio system.
*XM® Satellite Radio is only available on vehicles equipped with optional XM® satellite subscription service.
USB INTERFACE (if so equipped)
The USB input jack is located in the center console. Remove the protective cover from the USB jack, then insert the USB device into the jack. When a storage device is plugged into the jack, such as an iPod®, compatible audio files on the storage device will be played through the vehicle’s audio system.
For vehicles equipped with the navigation system, compatible video files can be played through the vehicle’s audio system and viewed on the vehicle’s display screen with the vehicle in the
P (PARK) position and the parking brake engaged.
Audio Main Operation
Press the DISC•AUX button to switch to the USB input mode. Depending on how the audio files are encoded, information about the audio files (Folder, Song, Artist, Track Number and Number of Total Tracks in the Folder) being played will be shown on the display screen of the vehicle.
10
02
03
01
04
REAR AUDIO CONTROLS (if so equipped)
The rear audio controls are located on the rear seat center armrest. To unlock or lock audio controls, push the REAR CONT switch to the ON position or to the CANCEL position. The switch is located on the left hand side of the instrument panel.
01VOL (volume) CONTROL SWITCH – This switch allows the rear passengers to adjust the volume of the audio system.
02 TUNE/TRACK SWITCH – This switch allows the rear passengers to tune the audio system.
03 ON/OFF BUTTON – This button allows the rear passengers to turn the audio system on or off.
04 SRC (Source) BUTTON – This button allows the rear passengers to change the audio source.
MUSIC BOX HARD DRIVE AUDIO SYSTEM (if so equipped)
The Music Box Hard Drive Audio System can store songs from CDs being played. The system has a 9.3 gigabyte (GB) storage capacity and can record up to 200 hours (approximately 2,900 songs).
RECORDING CDS
The system will not record MP3 or WMA files, only regular CDs.
1.Turn on the audio system and insert a CD.
2.Touch the “START REC” key. The system starts recording and playing the first track on the CD and REC CD appears on the screen.
PLAYING RECORDED SONGS
Select the Music BoxTM audio system by using one of the following methods:
Push the SOURCE select switch on the steering wheel.
Press the DISC•AUX button repeatedly.
11
SEEK/CAT AND TRACK BUTTONS
Press the SEEK/CAT button or the TRACK button while a track is being played; the next track or the beginning of the current track will be played.
Press and hold the SEEK/CAT (rewind) button or the TRACK (fast forward) button for more than approximately 1.5 seconds; the track will play while rewinding or fast forwarding. When the SEEK/CAT (rewind) button or the TRACK (fast forward) button is released, the track will return to normal playing speed.
Turn the TUNE/FOLDER knob, to change to another album or track.
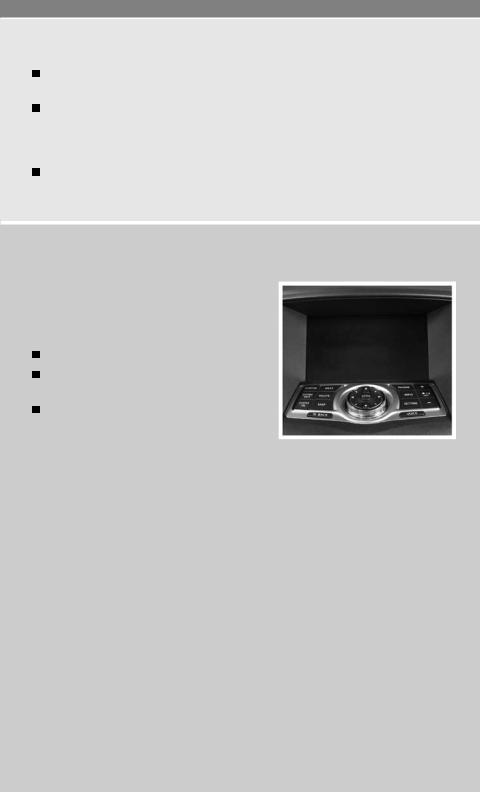
CONTROL PANEL DISPLAY WITH NAVIGATION SYSTEM (if so equipped)
INFO BUTTON
When the INFO button is pressed, the following information modes will display on the screen:
Weather and Traffic*
Fuel Economy (Distance to Empty, Average Fuel Economy, Fuel Economy Record)
Maintenance (Customize up to four maintenance intervals)
MAINTENANCE ITEMS
You can set up to four different maintenance interval items. To display the setting of the maintenance interval, select one of the four “Reminder” keys using the NISSAN controller and press the ENTER button. To set the maintenance interval, select the “Interval” key using the NISSAN controller and press the ENTER button. Use the NISSAN controller to change the interval and press the BACK button to accept the changes. To reset the maintenance interval, select the “Reset Distance” key using the NISSAN controller and press the ENTER button.
DISPLAY SCREEN SETTINGS
The SETTINGS screen will appear when the SETTING button is pressed. Select the “Display” key using the NISSAN controller and press the ENTER button to choose from various display screen options. The “Display” key will allow you to adjust the appearance of the display screen, such as the brightness or contrast.
*XM NavWeather® and XM NavTraffic® is only available on vehicles equipped with optional XM® satellite subscription service.
12
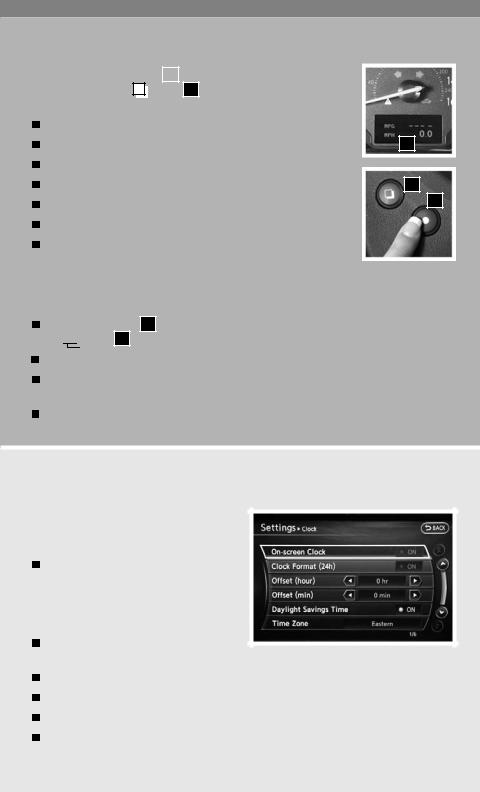
VEHICLE INFORMATION DISPLAY
The vehicle information display |
01 |
|
is located on the bottom of the |
|
|||
speedometer. Press the |
|
|
button |
02 to cycle through the following |
|
||
|
|
|
|||||
|
|
|
|
|
|
|
|
modes on the vehicle information display: |
|
||||||
MPG (instant fuel economy) |
|
|
|||||
MPG/MPH (average fuel economy and speed) |
01 |
||||||
Time/Miles (elapsed time since last reset) |
|
||||||
Range (average distance to empty) |
02 |
||||||
Exterior temperature |
|
|
|
|
|
|
03 |
|
|
|
|
|
|
|
|
Setting |
|
|
|
|
|
|
|
Warnings (if there are any) |
|
|
|||||
SETTING MODE
When the setting mode is selected, you are able to set reminders for alerts and maintenance intervals or change the language and units used in the system.
Press the  button 03 to cycle through the various setting modes and press the
 button 02 to choose the selected mode.
The ALERT mode allows you to set alerts notifying yourself of time to rest or icy traveling conditions.
The MAINTENANCE mode allows you to set alerts as a reminder for maintenance intervals for engine oil, oil filter, tires and others.
The DISPLAY mode allows you to change the language and unit of measurement (English or Metric).
CLOCK SET/ADJUSTMENT
NAVIGATION SYSTEM ONLY (if so equipped)
Press the SETTING button, then select the “Clock” key and press the ENTER button to access the following clock settings:
On-screen Clock – When this item is turned to ON, a clock is always displayed in the upper right corner of the screen. The clock is automatically adjusted
by the GPS system.
Clock Format – Choose either the 12-hour clock display or the 24-hour clock display.
Offset Hour – Adjust the time by increasing or decreasing the hour.
Offset Minute – Adjust the time by increasing or decreasing the minutes.
Daylight Savings Time – Turn this item to ON for daylight savings time application. Time Zone – Choose the time zone.
13
 Loading...