


Silentwriter
SuperScript 660i
User's Guide

PROPRIETARY NOTICE AND LIABILITY DISCLAIMER
The information disclosed in this document, including all designs and related materials, is the valuable property of NEC Corporation (NEC) and/or its licensers. NEC and/
or its licensers, as appropriate, reserve all patent, copyright and other proprietary rights
to this document, including all design, manufacturing, reproduction, use, and sales
rights thereto, except to the extent said rights are expressly granted to others.
The NEC product(s) discussed in this document are warranted in accordance with the
terms of the Warranty Statement accompanying each product. However, actual
perfomance of each such product is dependent upon factors such as system configuration, customer data, and operator control. Since implementation by customers of
each product may vary, the suitability of specific product configurations and applications must be determined by the customer and is not warranted by NEC.
To allow for design and specification improvements, the information in this document
is subject to change at any time, without notice. Reproduction of this document or
portions thereof without prior written approval of NEC is prohibited.
Silentwriter is a U.S. registered trademark of NEC Corporation. SuperScript is a trademark of NEC
Corporation. All other product, brand, or trade names used in this publication are the trademarks or
registered trademarks of their respective owners.
© NEC Technologies, Inc., 1994.
© Copyright, WinStyler™/Phase II, 1992-1994, Destiny Technology Corp. Ver. 2.0
© Copyright, WinRefs™/Phase II, 1994, Destiny Technology Corp. Ver. 2.0
© Copyright, DTIR™, 1992-1994, Destiny Technology Corp. Ver. 1.0
© Copyright, LaserAct®/Phase II, 1990-1994, Destiny Technology Corp, Ver. 4.5
© Copyright, PageStyler®/Phase II, 1989-1994, Destiny Technology Corp. Ver. 1.0
© Copyright, 1992, Microsoft Corporation
First Printing — November 1994
Copyright 1994
NEC Technologies, Inc.
1414 Massachusetts Avenue
Boxborough, MA 01719
All Rights Reserved
Copyright 1994
NEC Corporation
7-1 Shiba 5-Chome, Minato-ku
Tokyo 108-01, Japan
All Rights Reserved

Contents i
Contents
Using this Guide vii
1 Introduction 1-1
How the Printing Process Works 1-3
Standard Features 1-3
Options 1-7
Ordering Supplies and Accessories 1-7
2 Setting Up 2-1
Unpacking 2-2
Locating the Printer Items 2-3
Operating Requirements 2-4
Printer Dimensions 2-5
System Requirements 2-7
External Printer Parts 2-8
Internal Printer Parts 2-12
Installing the 200-sheet Hopper 2-13
Installing Paper 2-14
Toner Cartridge 2-17
Setting Up the Toner Cartridge 2-17
Installing the Toner Cartridge 2-21
Interface Cable 2-24
Power Cord 2-26
Printing a Test Page 2-27
Installing SuperScript 660i DOS Software 2-28
Installing SuperScript 660i Windows Software 2-31
3 Printing with Your SuperScript 660i 3-1
SuperScript 660i Print Modes 3-2
PCL Print Mode 3-2
SuperScript PCL Control Panel 3-2
Printing From a Windows Application 3-4
Printing From a DOS Window 3-5

ii Contents
Printing PCL Files From DOS Command Line 3-5
Print Navigator Software Kit 3-5
Print Navigator Default Setup Program 3-6
Print Navigator Page Setup Screen 3-7
Print Navigator Font Setup Screen 3-10
Print Navigator Quality Setup Screen 3-11
Print Navigator Memory Setup Screen 3-12
Print Navigator Options Setup Screen 3-13
The Reporter 3-14
Print Navigator Printer Status Display 3-15
GDI Mode 3-16
GDI Setup Screen 3-16
2Up/4Up Screen 3-20
GDI Options Screen 3-20
Advanced Options 3-21
Manual Duplex Printing 3-21
Scaling 3-24
Print to File 3-24
Density Button 3-25
Forms Window 3-26
4 NEC SuperScript 660i Print Manager 4-1
5 Print Status Window 5-1
Overview 5-2
Print Status in DOS 5-2
Displaying the Print Navigator Print Status Screen 5-2
Print Status in Windows 5-5
6 Selecting Paper and Media 6-1
Paper Properties 6-3
Print Areas 6-4
Paper and Media Use 6-5
Preprinted Forms 6-6
Heavy Print Stock 6-7
Envelopes 6-7
Adhesive Labels 6-9

Contents iii
Transparency Film 6-10
Media Purchasing Specifications 6-10
Sheet Paper 6-11
Envelopes 6-13
Adhesive Labels 6-14
Transparency Film 6-15
Storage Guidelines 6-16
7 Using Fonts 7-1
Printer Resident Fonts 7-2
Default Font 7-3
Fonts in GDI Mode 7-3
Installing TrueType Fonts 7-5
Selecting LaserJet 4P Fonts 7-6
By Attribute 7-6
By Number 7-15
An Example Using BASIC 7-15
Using the Control Panels 7-16
8 Choosing Print Options 8-1
How to Print Using Various Media 8-2
The 200-sheet Hopper 8-4
Installing the 200-sheet Hopper 8-4
Installing and Removing the Legal Guide 8-5
200-sheet Hopper Feed 8-6
Manual Feed 8-9
Removing the 200-sheet Hopper 8-11
Output Paths 8-12
Face-up Tray 8-13
Face-down Door 8-13
9 Maintaining Your Printer 9-1
Redistributing the Toner 9-3
Cleaning the Printer 9-8
Replacing the Toner Cartridge 9-9
Cleaning the Printer Mechanism 9-9
Installing the Toner Cartridge 9-17

iv Contents
Transporting the Printer 9-23
Removing the Toner Cartridge 9-23
Removing the Paper Hopper 9-25
Removing the Interface Cable 9-25
Removing the Power Cord 9-26
Check List Before Transporting the Printer 9-27
10 Troubleshooting 10-1
Print Quality Maintenance 10-4
Paper Jam 10-4
Locations of Potential Paper Jams 10-5
Removing the Jammed Paper 10-5
Paper Jams in the Hopper 10-6
Paper Jams in the Fuser Unit 10-7
Points to Check to Avoid Paper Jams 10-9
Testing the Printer 10-10
DOS Test Print 10-10
Windows Test Print 10-10
SuperScript Status Messages 10-12
Installation Problems 10-12
Operating Problems 10-16
Print Navigator Status Messages 10-27
Output Quality 10-29
Light Page 10-29
Blank Page 10-30
Black Page 10-31
Streaked Page 10-32
Spots on Back of Paper 10-33
Blank Spots 10-34
Solid White Vertical Lines 10-35
Incomplete Page 10-35
Text Appears Jagged or Low Resolution in GDI Mode 10-36
Unexpected Font in Either GDI or PCL Mode 10-37
Unexpected Font in PCL Mode 10-38

Contents v
Shifted or Broken Image 10-38
Allocating Virtual Memory 10-39
Commonly Asked Questions 10-41
11 Getting Service and Support (For U.S. only) 11-1
Assistance 11-2
Getting Help from Your Company 11-2
Getting Help from NEC 11-3
Silentwriter SuperScript 660i Printer Limited Warranty 11-4
Warranty 11-5
Warranty Length 11-5
Warranty Coverage 11-5
Warranty Support 11-7
Getting Warranty Service 11-7
Limitation of Damages and Implied Warranties 11-8
A Character Sets and Code/Sequence/Commands
for HP LaserJet 4P A-1
Character Sets A-2
PCL Character Set Charts A-2
ISO Substitution Table A-16
Code/Sequence/Commands A-23
Control Codes and Escape Sequences A-23
B Optimizing Printer Performance B-1
What to Do B-2
C Specifications C-1
D Interface Cable Specifications D-1
Cable Configurations D-4
Pin Assignment of the Printer Side Connector D-5
E Removing SuperScript Files from Your System E-1
F Installing the Memory Expansion Module F-1
Glossary
Index

vi Contents

Using this Guide
This guide provides an introduction to the NEC
SuperScript 660i printer and includes information
about set up, features, operation, and maintenance.
If you are a new user, you may want to read this
entire user’s guide to familiarize yourself with the
printer. If you have been using the printer for some
time, you can scan the Contents for specific
information that you need.
vii

viii

1 Introduction
1
Introduction 1–1

1–2 Introduction
This guide provides complete instructions for operating your new NEC Silentwriter® SuperScript 660i
printer. All printer features are explained and
illustrated in detail.
The Silentwriter SuperScript 660i is a new laser
printer which sets the standard by incorporating true
600 dpi resolution and complete HP LaserJet 4P
functionality in an affordable, simple to use printer.
Combining the best of both worlds, this printer has
been optimized for fast printing in both PCL5e and
Windows mode.
For PCL printing, the SuperScript 660i has a fast
intelligent controller using an Intel i960 controller
and complete HP LaserJet 4P emulation. Therefore,
this printer can be used with any computer which has
an HP LaserJet 4P driver and a standard PC parallel
printer port.
The printer default settings can easily be changed by
using the DOS based Print Navigator software
included with your printer.
For Windows printing, this printer is provided with
the SuperScript 660i software which offers GDI
printing and on-line printer status information. GDI
printing offers the full performance of the total
Windows printing system and takes advantage of the
available power of the CPU in your computer.
Your computer and the Silentwriter SuperScript 660i
communicate bi-directionally to exchange operating
status information (i.e., warm-up, paper out, paper
jam, etc.) and display messages requiring your
attention, if necessary. Hence, you can focus on your
work without periodically referring to the printer
operator panel, a benefit of the SuperScript software.

Introduction 1–3
The SuperScript 660i is designed as a personal laser
printer to conserve desk space and it features low
power consumption.
HOWTHE
PRINTING
PROCESS
WORKS
STANDARD
FEATURES
Whenever you send a job to the printer, an “image”
of that page is temporarily written to the rotating
surface of an electrophotographic (EP) drum. This
image acts like a magnet that attracts toner to the
drum. (The toner and the drum are grouped in one
self-contained cartridge.)
At the same time, paper (or transparency film or an
envelope) passes through the printer and near the
drum. The paper is electrostatically charged as it
reaches the drum.
Toner, previously attracted to the drum as image
areas, is transferred to the charged paper. The paper
then passes between two rollers where a combination
of heat and pressure bonds the toner to the paper.
The paper is then moved to the output tray.
The following list highlights Silentwriter SuperScript
660i features.
Two Printing Modes
The Silentwriter SuperScript 660i software
allows you to select from two different modes of
printing:
• PCL5e emulation mode provides compatibility
with the popular printer language used in the
LaserJet® 4P.
• GDI mode provides WYSIWYP (What You
See Is What You Print) output in Windows.
Print speed: up to 6 pages per minute.
1–4 Introduction
Print resolution: 600×600 dots per inch.
300×300 dots per inch.
Sharp Edge Technology
Silentwriter SuperScript 660i features the pat-
ented Sharp Edge Technology (SET). This
feature detects and smoothes the jagged edges of
raster images by dividing one full dot into
several subdots set in the same area. The print
quality of both text and line graphics is thus
improved.

Introduction 1–5
Paper input: from a 200-sheet hopper supporting:
Paper:
1 Letter
2 A4
3 Executive
4 B5 (GDI Only)
5 Legal
Envelope:
1 Monarch
2 Commercial 10
3 DL
4 C5
5 B5 (PCL Only)
Paper output: face-up tray with a maximum
capacity of 50 sheets (at 17 lb), or face-down
door.
Toner cartridge: clean, efficient printer operation centered around one easily replaceable
cartridge. The Starter Toner Cartridge shipped
with your printer will print 2,000 pages (at 5%
coverage). Replacement toner cartridges will
print up to 4,000 pages (at 5% coverage).
Power Saving Mode
This printer has Power Saving Mode. In this
mode, if the printer is idle for a specified time
(default 15 minutes), the fuser unit pauses and
power consumption will be decreased. However, the next job requires a warm up time. The
printer is in Power Saving Mode when it is
turned on. You can also turn Power Saver Mode
OFF in the Print Status Window (See Chapter 5,
Print Status Window).

1–6 Introduction
Toner Saving Mode
This feature allows you to save toner by control-
ling print density. You can enable this mode in
Print Status Window (See Chapter 5, Print Status
Window).
Print Darkness
This feature allows you to control the darkness of
any page as required. You can set this mode to
light, medium, or dark in Print Status Window
(See Chapter 5, Print Status Window).
Density Adjustment (GDI Only)
This feature allows you to adjust the contrast and
brightness of the output when printing. This
feature is useful for making adjustments to
produce the best quality when printing.
Manual Duplex Printing (GDI Only)
When selected, you can print on both sides of a
page in either of two binding styles (Book style binding in the middle, or Report style - binding
at the top and bottom).
Cover Page (GDI Only)
When selected, a customized page of either text,
graphics, or a combination will automatically
print at the beginning of a print job.
Trailer Page (GDI Only)
When selected, a customized page of either text,
graphics, or a combination will automatically
print at the end of a print job.

Introduction 1–7
Print Overlay (B/W) (GDI Only)
When selected, a customized overlay of either
text, graphics, or combination will print on either
the first page or all pages of a print job. Now you
can print your logo and text together without
having to import your logo into every print job.
This can also be used to add your own custom
watermark to your documents.
Print Overlay (Color) (GDI Only)
When selected you can print a customized
overlay of either text, graphics, or combination in
one of three colors. For example, you could print
your company logo in red and your correspondence in black. This feature requires a color toner
cartridge (purchased separately).
OPTIONS
ORDERING
SUPPLIES AND
ACCESSORIES
The options available for the Silentwriter SuperScript
660i include the following.
SuperScript PS2 Upgrade Kit
This option upgrades your SuperScript 660i to
include support for PostScript Level 2 printing,
in addition to the standard GDI and PCL modes.
To order any of the following printer supplies or
accessories, contact your NEC printer dealer or call
1–800–NEC–INFO to locate a supplies dealer
nearest you.

1–8 Introduction
Table 1-1 Supplies and Accessories
PRODUCT ORDER NUMBER
Toner Cartridge 20-061
SuperScript PS2 Upgrade Kit 660i PS
Blue Toner Cartridge 20-062
Red Toner Cartridge 20-063
Yellow Toner Cartridge 20-064
For a detailed description of the PCL printer language, the LaserJet 4P Printer Technical Reference
Manual is available through the Hewlett Packard
Company. Call Hewlett Packard’s Direct Marketing
Division toll free at 1-800-538-8787 or direct at 408720-2428. In Canada call 416-671-8383.

2Setting Up
2
Setting Up 2–1
2–2 Setting Up
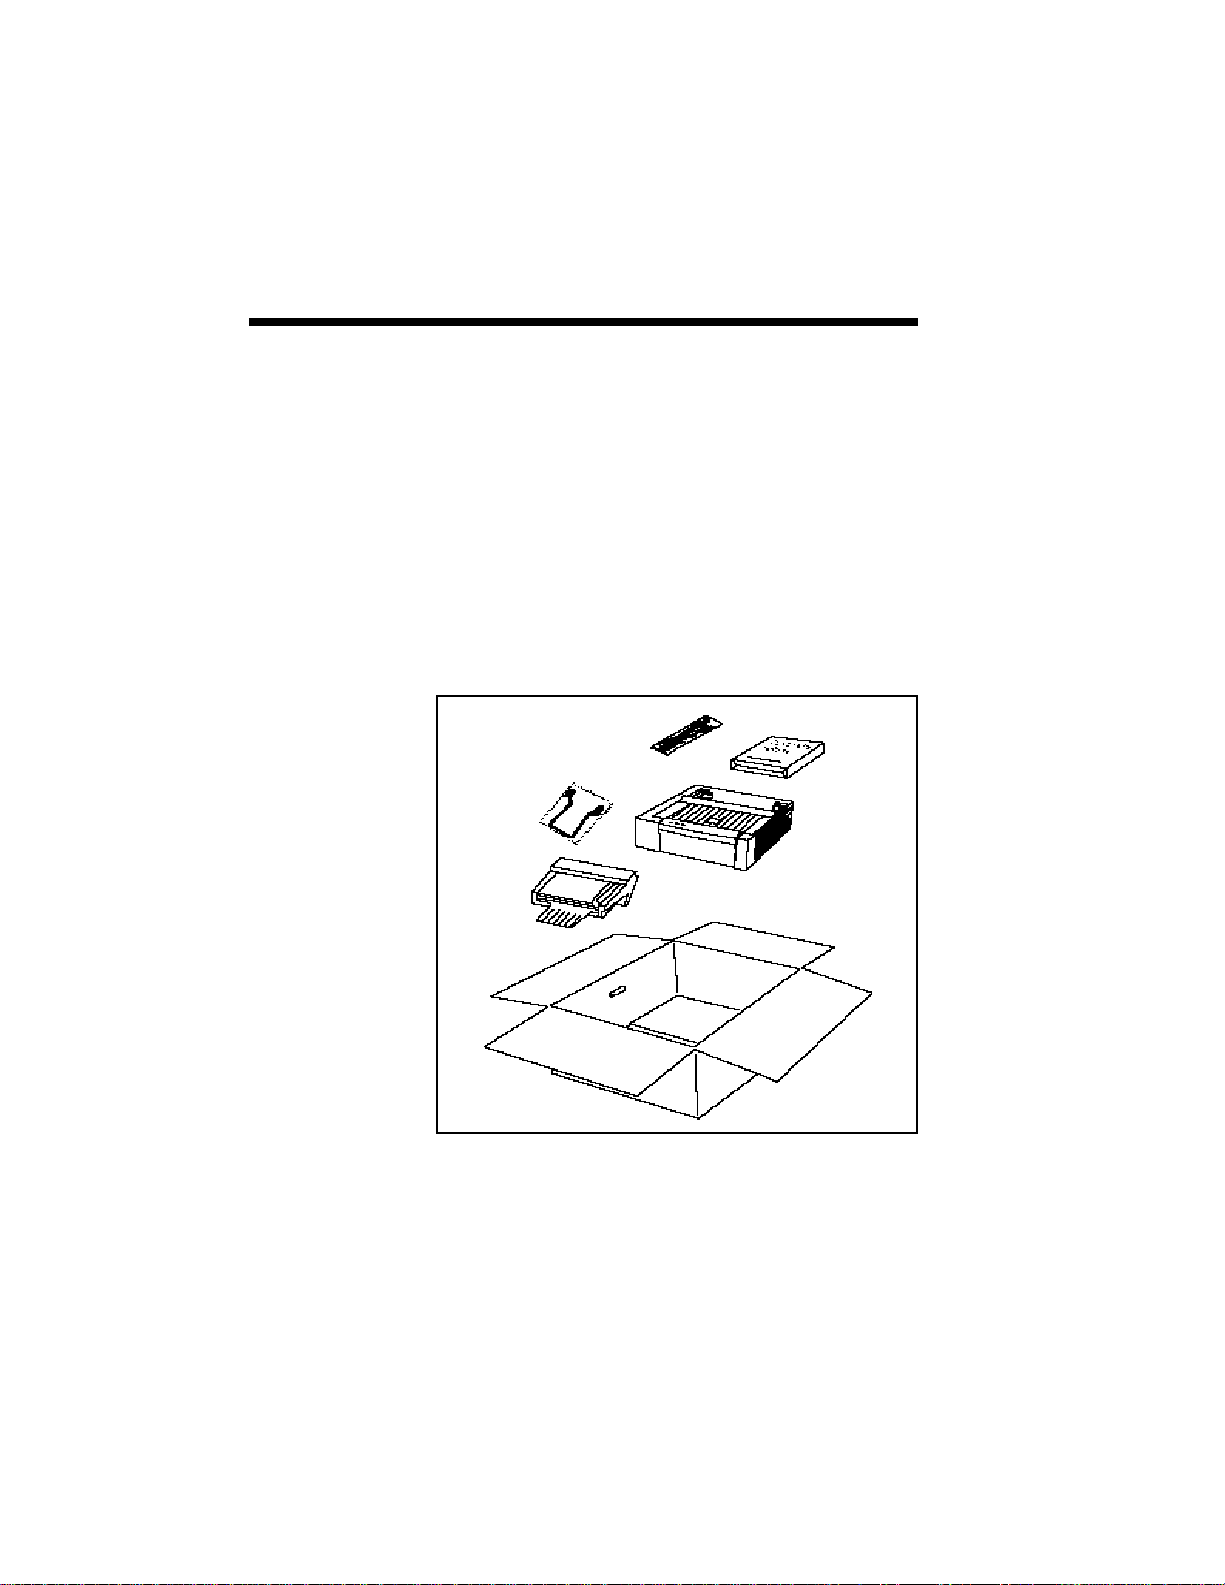
UNPACKING
Perform the following procedures to set up your
SuperScript printer.
1. Open the box.
2. Take out the documents (including software
diskettes), the 200-sheet hopper, and the power
cord from the box.
3. Lift the printer together with the packing materi-
als. (The legal guide is attached to the printer
with adhesive tape.)
Setting Up 2–3
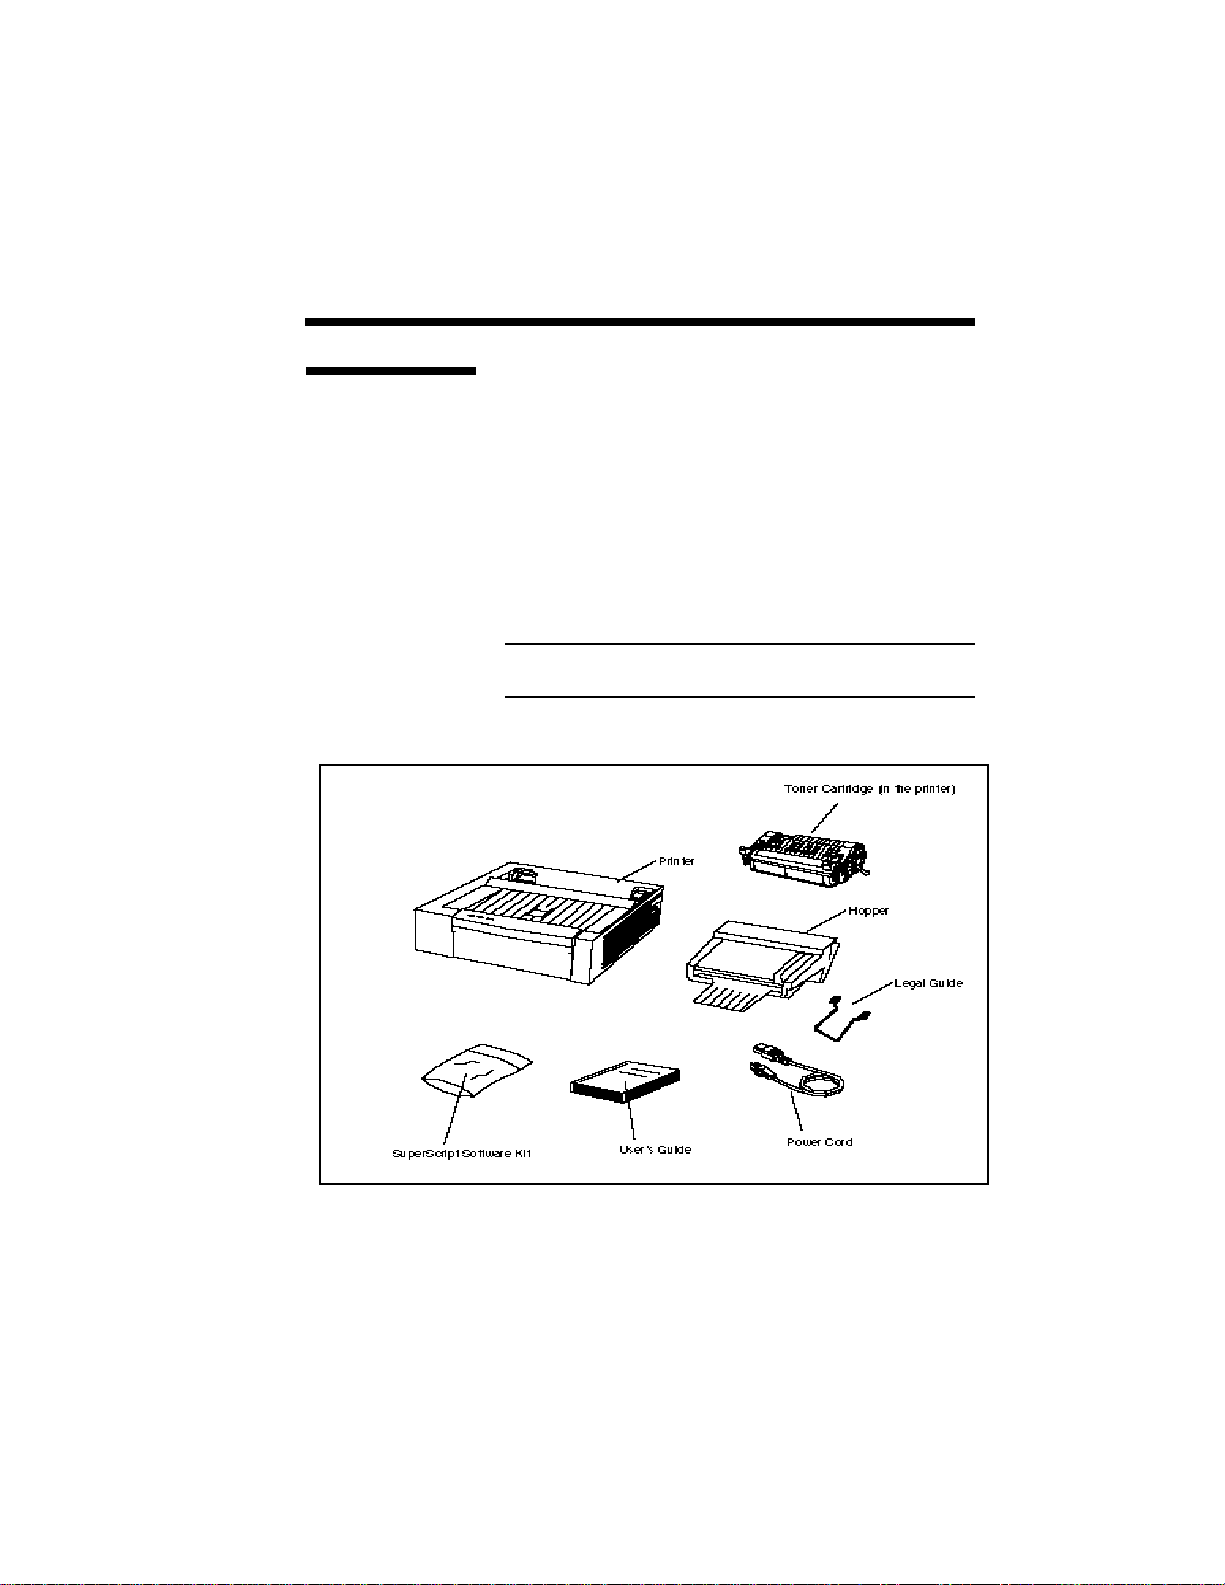
Locating the
Printer Items
Locate the following items:
• NEC Silentwriter SuperScript 660i Printer
• SuperScript 660i software kit
• User’s guide
• Hopper
• Legal Guide
• Power cord
• Starter Toner Cartridge (in the printer)
• Packing material (not shown)
NOTE: Save this user’s guide and all packing
materials in case the printer needs to be repacked.

2–4 Setting Up
OPERATING
REQUIREMENTS
The following operating environment requirements
should be satisfied:
Place the printer on a sturdy, flat surface.
Keep the room well ventilated with a relative
humidity between 20% and 80% and temperature
between 50˚F and 90.5˚F (10˚C to 32.5˚C).
Leave adequate space around the printer for easy
access (see the following figure).
WARNING: Do not place objects near the printer
that may cover the ventilation holes on its sides.
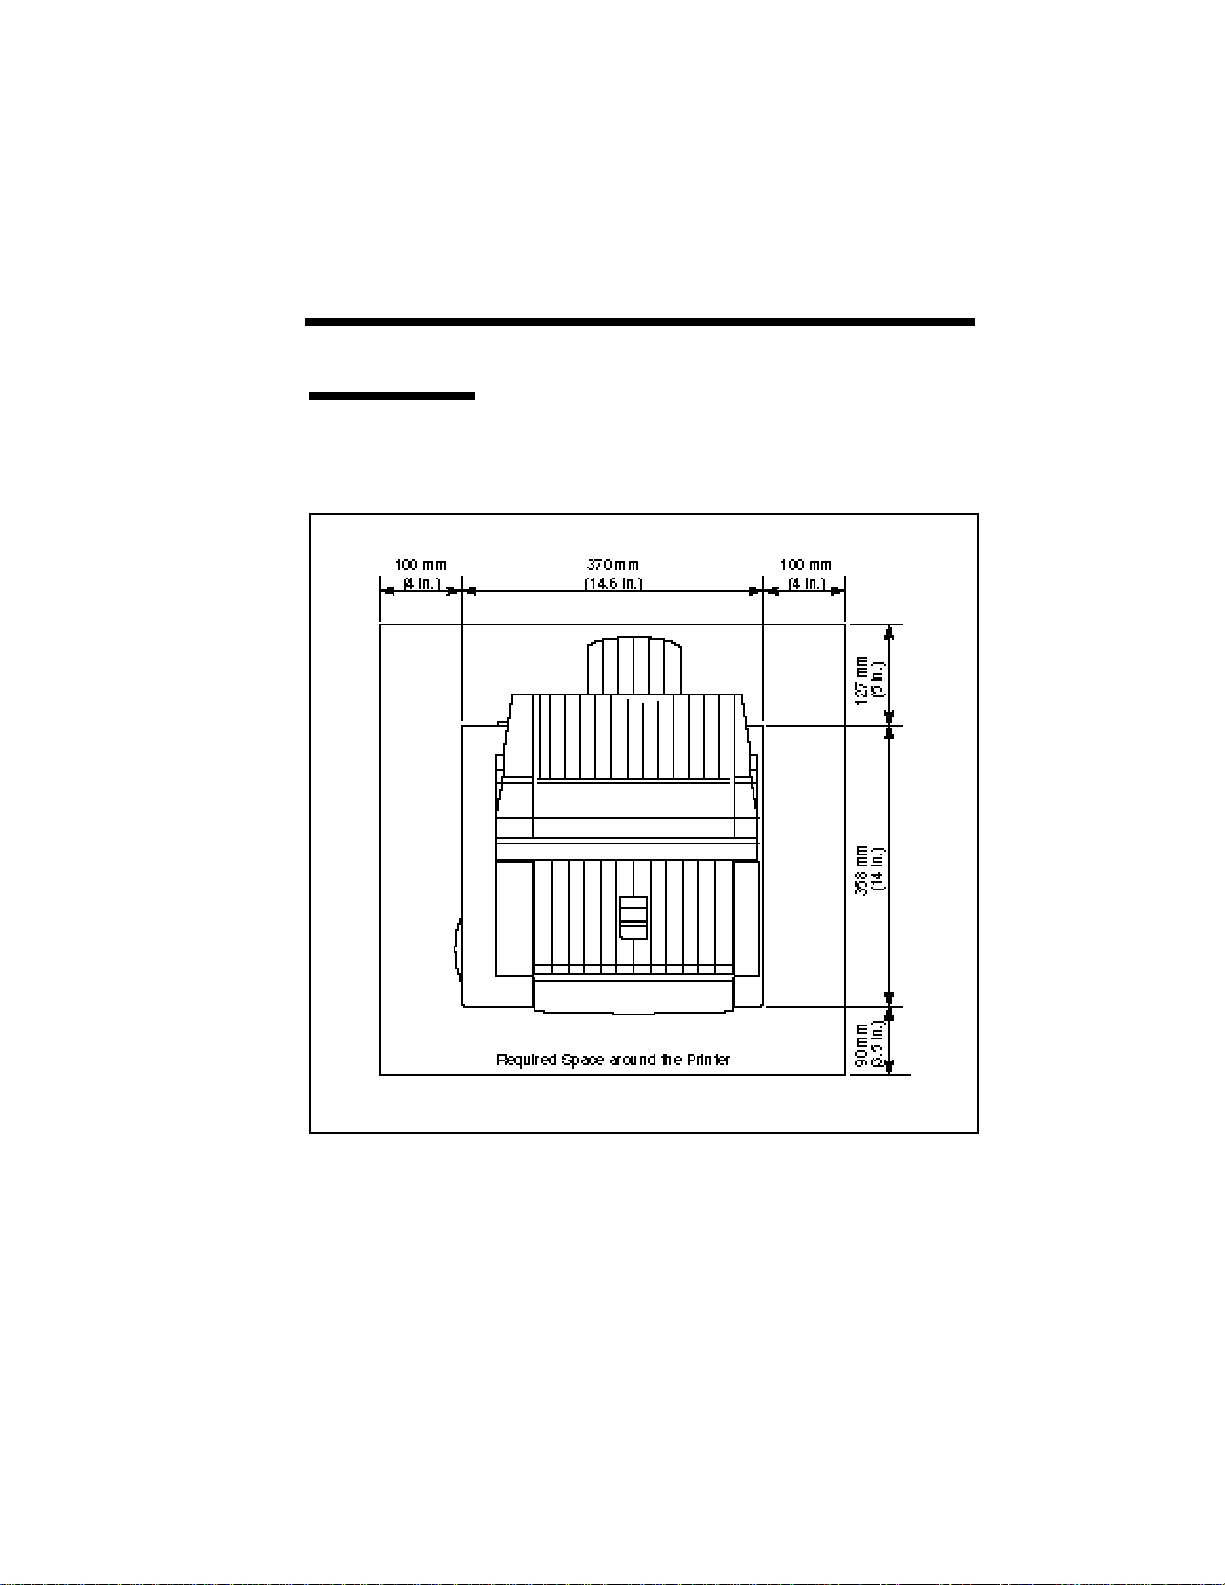
Setting Up 2–5
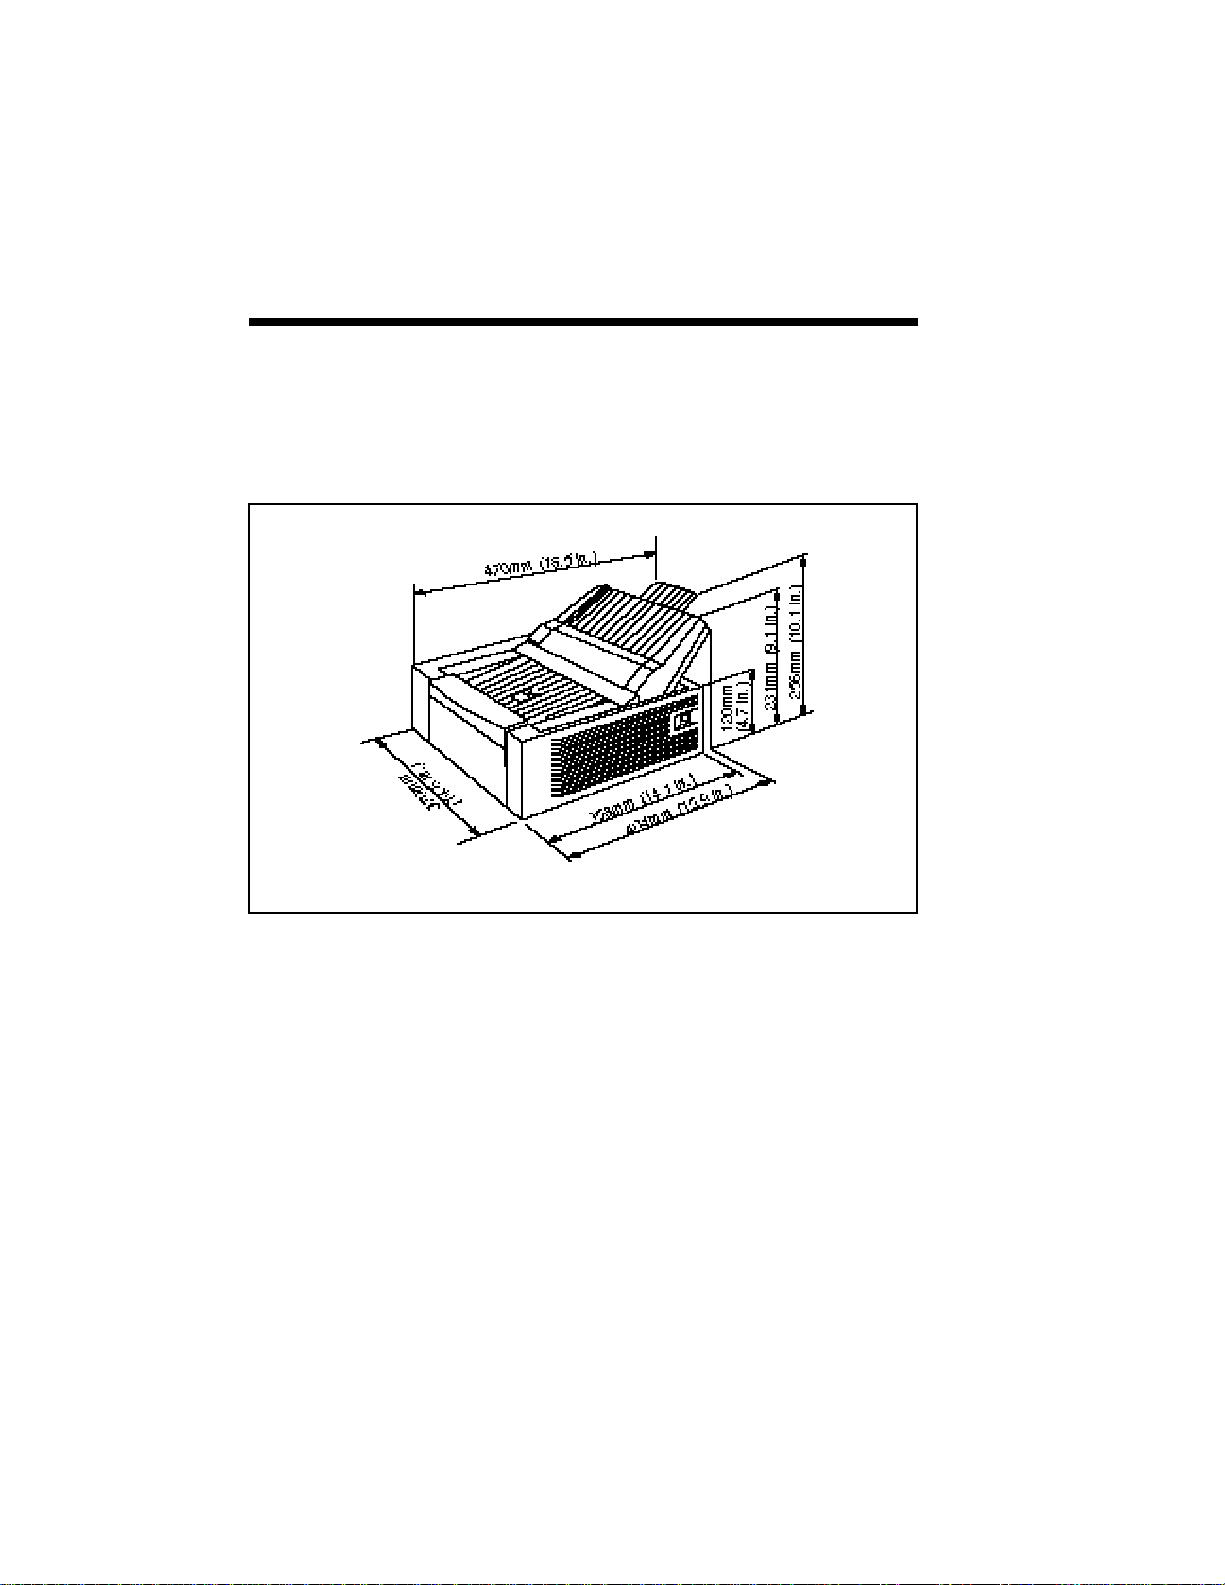
Printer
Dimensions
The following illustration shows the standard dimensions of a Silentwriter SuperScript 660i printer.
2–6 Setting Up

Setting Up 2–7
SYSTEM REQUIREMENTS
The SuperScript 660i has an intelligent controller
with a full PCL5e emulation resident and is
compatible with the LaserJet 4P. Therefore, this
printer can be used with any computer which has a
LaserJet 4P driver and a standard PC parallel port.
Included with the SuperScript 660i software kit is
Print Navigator software and SuperScript 660i
software. Print Navigator is a software control panel
for the printer and reports printer status from DOS.
The Print Navigator minimum system requirements
are as follows:
1. DOS 3.1 or later
2. 80286 PC
3. 640K RAM
4. 900KB hard disk space
5. bidirectional parallel printer cable (not included)
The SuperScript 660i software is for Windows 3.1
and allows printing in Windows native mode (GDI)
or PCL mode and supports additional features such
as printer status reporting, 2Up/4Up printing, and
color overlays. The minimum system requirements
for the SuperScript 660i GDI software are as
follows:
1. at least a 386SX 16MHz CPU (Windows 3.1
Enhanced Mode)
2. MS DOS 3.3 or later
3 4 MB RAM
4. 8.5 MB Swap File
5. 8.6 MB hard disk space
6. bidirectional parallel printer cable (not included)
2–8 Setting Up
NOTE: Because of the NEC SuperScript 660i’s high
speed interface, it is important to use a properly
manufactured parallel cable. Use of a poor quality
parallel cable may affect your output. See Interface
Cable specification, Appendix D.
EXTERNAL
PRINTER
PARTS
The following two illustrations show external printer
parts.
Setting Up 2–9
Upper Cover (also functions as a face-up tray)
Provides access to the inside of the printer and
stacks printed sheets with printed side facing up.
Maximum capacity: 50 sheets.
Lock Release Lever
Unlocks and opens the upper cover.
Status Panel
There are three indicator lights to show the
operating status of the printer.
- Ready indicator: the left panel light is used to
show that the printer is ready (steady green),
warming up, job process (rapid blinking), or in
power saving mode (slow blinking).
- Paper indicator: the middle panel light is used
to show that the printer detects paper empty
(steady yellow), manual feed (blinking).

2–10 Setting Up
- Attention indicator: the right panel light is used to
show that the printer detects cover open, no
cartridge (steady red), or a paper jam, data error
(blinking).
All indicators light when the printer is powered on
or when a printer hardware error occurs.
Front Panel Button
Pressing this button can clear memory overflow
and print overrun. For more details, see Table 10-2
in Chapter 10.
200-sheet Hopper
Holds up to 200 sheets of paper (at 17 lbs).
Face-down Door
Ejects the printed sheets with printed side facing
down.
Power Switch
Turns the printer off or on.
Model Number
Indicates the model number of your printer.
Serial Number
Indicates the serial number of your printer.
(You need to enter this number on the warranty
registration).
Setting Up 2–11
Memory Cover
Provides access to the inside of the printer for the
optional memory expansion module. The printer's
memory can be expanded by adding up to 2 Single
In-Line Memory Modules (SIMM). These are
available from your local dealer.
The specifications for the memory expansion
module are as follows:
SIMM, 72 pin, 70 nsec, DRAM module with gold
finger 1, 2, 4, 8, 16 or 32 MB. The maximum
memory that can be installed in the printer is
48MB (one 32 MB SIMM and one 16 MB SIMM).
NOTE: Please do NOT install two optional 32 MB
SIMMs in the printer. Installing two 32 MB SIMMs
will cause the printer to malfunction.
Parallel Interface
Provides connection to the Centronics-type
parallel interface connector of your computer.
Power Outlet
Connects the power cord to a power outlet.
2–12 Setting Up
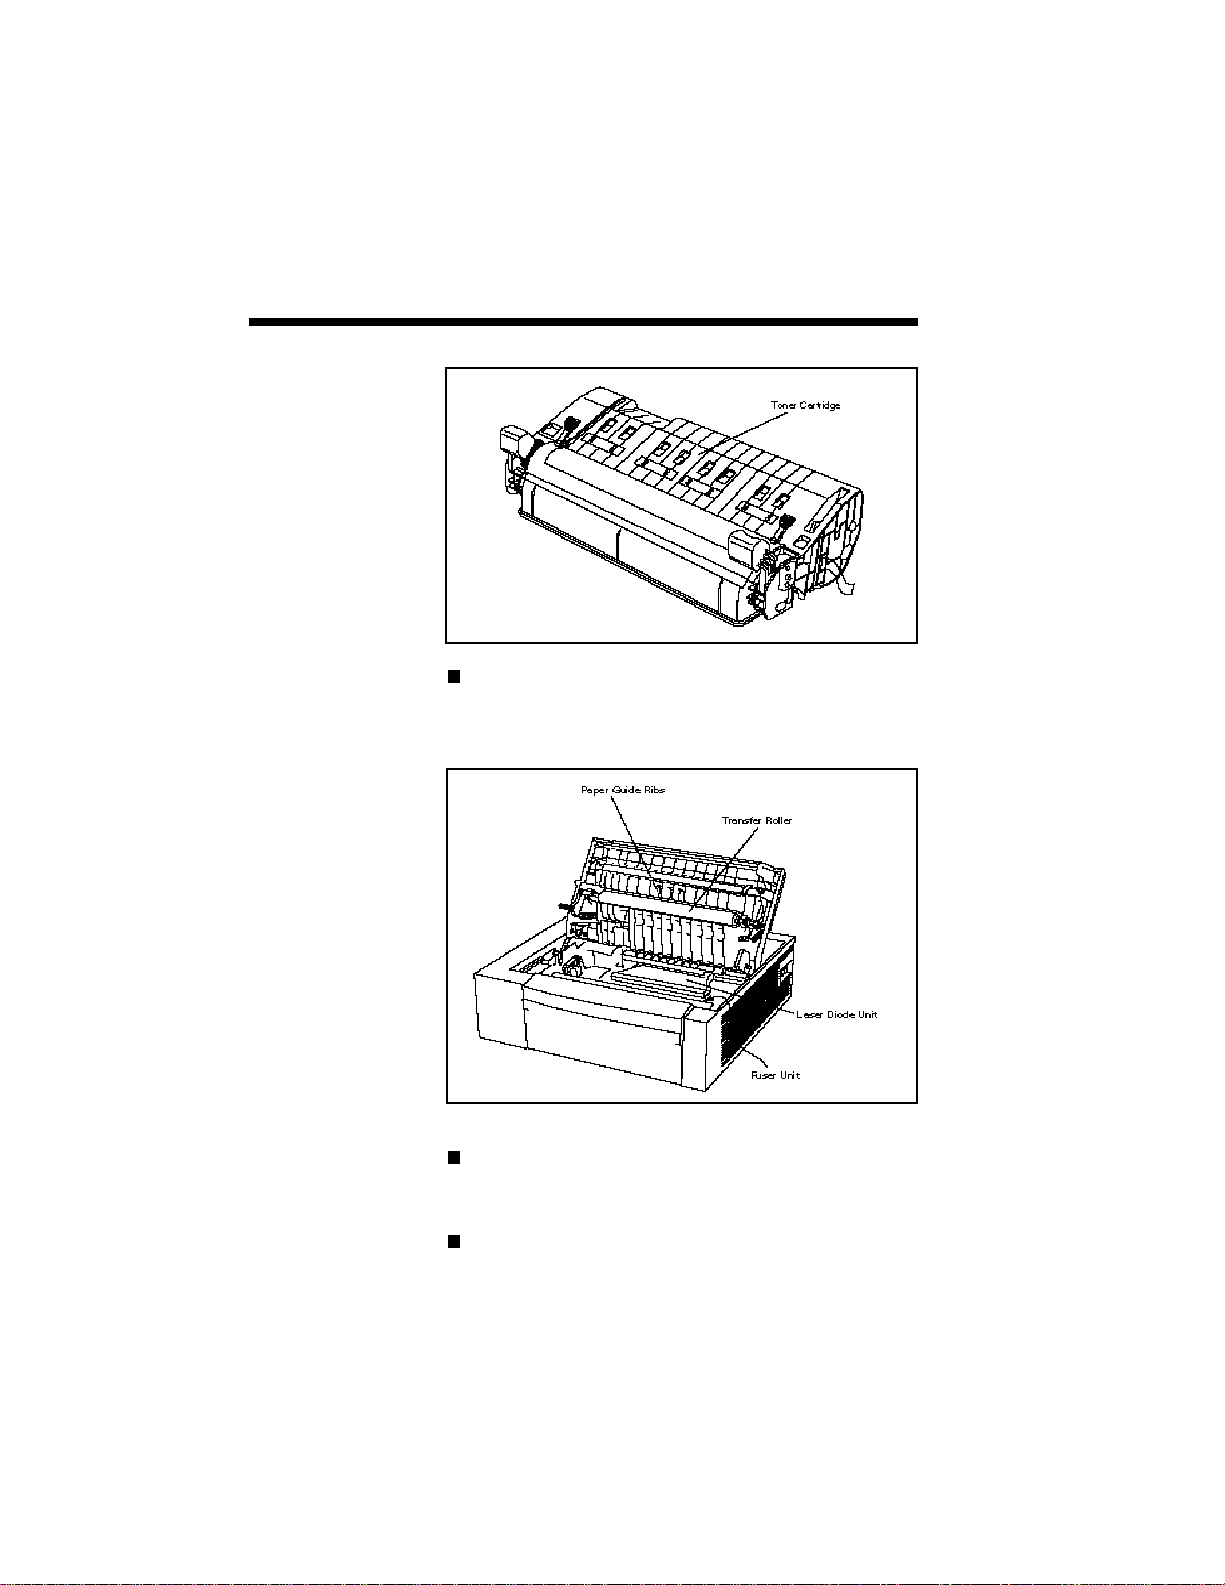
INTERNAL
PRINTER
PARTS
Toner Cartridge
Contains the toner used in the printing process
and the electrophotographic (EP) drum.
Paper Guide Ribs
Guides the sheets to the fuser unit.
Transfer Roller
A high voltage roller that attracts the toner to the
sheets.

Setting Up 2–13
Laser Diode Unit
Exposes and generates the print image on the EP
drum surface.
Fuser Unit
Fixes the toner to the paper.
INSTALLING
THE 200SHEET
HOPPER
Attach the 200-sheet hopper as described below:
1. Hold the 200-sheet hopper with both hands as
illustrated and push the lock release levers.
2. Carefully set the hopper on the printer and
release the lock release lever.
3. Check that the 200-sheet hopper is securely set
and that the lock release levers have returned to
their original position.
NOTE: If you use legal size paper, install the Legal
Guide on 200-sheet hopper (refer to Chapter 8
“Installing and Removing the Legal Guide”).

2–14 Setting Up
INSTALLING
PAPER
Up to a maximum of 200 sheets (17 lb) can be
loaded in the hopper at once.
1. Open the manual feed cover of the 200-sheet
hopper by pulling forward. The manual feed
cover clicks into 2 different positions. See
diagram below. Stop at the second click. Do not
try to pull the manual feed cover beyond this
point as it might break.

Setting Up 2–15
2. Pull up the paper guide lever and move the paper
guide in the direction indicated by the arrow.
Flip up the hopper guide.
3. Insert paper with the left edge evenly touching
the left side of the hopper.

2–16 Setting Up
4. Adjust the paper guide until it touches the paper
and then press down on the paper guide lever to
lock it in place.
5. Carefully return the manual feed cover to its
original position.
NOTE: It is not possible to print with the manual
feed cover open. Return the manual feed cover to its
original position. Do not open the manual feed cover
while printing.

Setting Up 2–17
TONER
CARTRIDGE
Setting Up the
Toner
Cartridge
The toner cartridge contains toner (a dry ink substance) and an EP drum that transfers the toner to
paper. The starter toner cartridge shipped in your
printer has a sealing tape and drum protection pins
that must be removed prior to printing.
1. Lift up the toner cartridge gently by holding the
two green handles.

2–18 Setting Up
2. Hold the cartridge horizontally and gently rock it
five or six times to distribute the toner evenly.
NOTE: Rock the cartridge in the direction indicated
in the illustration. While rocking, take care not to
touch the drum protection shutter (red transparent
plastic) of the toner cartridge.
NOTE: Do not touch the drum protection shutter.

Setting Up 2–19
3. Grasp the transparent toner sealing tape and pull the
tape out. The toner sealing tape is approximately
20 inches long when completely removed.
NOTE: Be sure to pull the tape straight and slowly out
of the cartridge to prevent it from being broken in the
middle. Be careful not to get toner from the tape on
your hands. If you get toner on your hands, wash with
cold water.

2–20 Setting Up
4. Carefully remove the yellow drum protection
pins of the toner cartridge (2 pieces).
NOTE: Do not touch the drum protection shutter.

Setting Up 2–21
Installing the
Toner
Cartridge
1. Check that the power switch is off.
2. Pull the lock release lever of the upper cover and
carefully open it.

2–22 Setting Up
3. Hold the toner cartridge by its two green handles
and gently release it bottom first into the printer.
NOTE: Check that the toner cartridge is securely
seated inside the printer.

Setting Up 2–23
4. Carefully push down the upper cover to close it.
NOTE: Check that the lock release lever has securely returned to its locked position.

2–24 Setting Up
INTERFACE
CABLE
Use a good quality parallel cable to connect this
printer to a computer. See Appendix D for the
parallel cable specifications.
Connect the interface cable as described below.
1. Switch off power to the printer and the computer.
NOTE: To protect your printer and computer from
possible damage, make sure they are powered down
prior to connection.

Setting Up 2–25
2. Plug the interface cable connector into the printer
and then secure the lock springs.
3. Connect the other end of the cable to the compu-
ter. Refer to your computer manual for details
about selection of a proper interface connector.

2–26 Setting Up
POWER CORD
Use the power cord provided and connect it to an
outlet.
NOTE: Do not connect the power cord to the
auxiliary outlet of your computer.
Connect the power cord as described below.
1. Switch off power to the printer.
NOTE: Check that the power switch is off.
2. Plug the power cord into the power connector on
the rear panel of the printer.

Setting Up 2–27
3. Plug the other end of the power cord into an
outlet.
PRINTING A
TEST PAGE
To print a test page from your SuperScript 660i, do
the following:
1. Turn the printer ON.
2. Press the front panel button briefly. After the
printer warms up, the test page will print.

2–28 Setting Up
INSTALLING
SUPERSCRIPT
660I DOS
SOFTWARE
If you print from DOS a great deal of the time, you
should load this software. The DOS software is
called Print Navigator and controls two programs:
Navigate and Reporter.
To install this software:
• Insert the SuperScript 660i Print Navigator disk
into Drive A:\ (or whatever drive is designated
onyour PC).
• Type a:\SETUP and press ENTER. The following
header screen is displayed:
Pressing any key or clicking the mouse button will
continue the installation.
At this point the software will check to see if the host
system has sufficient memory including RAM and
hard disk space. If insufficient space exists, a message will appear.
This screen defines what drive and directory the
Print Navigator software will be installed on. The
default is C:\PRTNAV. The directory will be created
automatically if not found.

Setting Up 2–29
If the drive or directory is invalid or there is not
enough hard disk space for the installation, an error
message will be displayed.
The setup program is fairly automatic. Follow the
instructions on the screen. You need to decide the
input destination path to set the printer's settings; the
default printer port (LPT1,2 or 3), the hot key
designation to run Reporter, display mode (either
graphic or text), and whether you want the report to
be added to the autoexec.bat file. This means that the
Reporter will be loaded automatically whenever you
turn on your computer or run autoexec.bat. Reporter
monitors the printer status in real-time and automatically displays error and warning messages directly
on your PC screen whenever the printer status
changes. Examples of printer status messages are:
printer warming up, paper empty, paper jam, etc.
To activate the printer status software type:
C:\PRTNAV\REPORTER.
You are now ready to print from your favorite DOS
application. Simply open your application, select an
HP LaserJet 4P driver and print.

2–30 Setting Up
To print a Test Page from Print Navigator:
1. Select Utility from the Print Navigator Screen.
2. Click on Print SelfTest Page. After the printer
warms up, the test page will print.

Setting Up 2–31
INSTALLING
SUPERSCRIPT
660I WINDOWS
SOFTWARE
The Silentwriter SuperScript 660i includes a software installation program to make setup easier. The
installation program analyzes your system configuration, installs the SuperScript 660i software and fonts,
and makes any necessary changes to Windows
startup files.
Once you have started the NEC SuperScript 660i
setup program, you can cancel the installation at any
time. Just click on the Cancel button that appears in
the setup program window.
NOTE: You must have a minimum of 4 megabytes
of RAM and sufficient disk space for SuperScript.
(See “System Requirements”.) SuperScript software
checks your system and will report if an adjustment
is required.
To install the SuperScript 660i software:
1. Place the NEC SuperScript 660i software dis-
kette #1 into the appropriate disk drive of your
computer, for example A:. Close the drive door
or lever if the drive has one.
2. To start Microsoft Windows, type WIN/3 at the
DOS prompt.
Windows will start up as usual, after which the
Program Manager window should be displayed
on your screen. If the Program Manager appears
as an icon, restore it by double-clicking on the
icon.
3. From the Program Manager menu, click on File.
Then click on the Run... Option. The Run
Program dialog box appears.

2–32 Setting Up
4. At the prompt, type:
A:\NECSETUP
where [A:] is the letter of the drive containing
the SuperScript 660i software diskette. The first
setup screen appears as shown in the following
figure.
Click the mouse or press any key to continue.

Setting Up 2–33
5. If you have a previously installed version of the
SuperScript 660i Software installed on your
system you will be prompted to delete this
software before installing the new software.
Select Delete to delete the older version of
software and continue installing the new software.
6. Tell the setup program which parallel port you
wish to use: LPT1, LPT2, or LPT3. The setup
program only shows you the port names available on your system. The default is LPT1.
Later, after the installation, you can select a
different port by using the NEC SuperScript
660i Print Status Display (see Chapter 5).
7
. Tell the setup program which drive and direc-
tory you want to install the NEC SuperScript
660i software. You can accept the default
supplied by the setup program, or give it the
name of another drive on your PC on which to
install the software. You should select a drive
with at least the amount of free disk space (6.5
megabytes) required for the NEC SuperScript
660i installation.
2–34 Setting Up
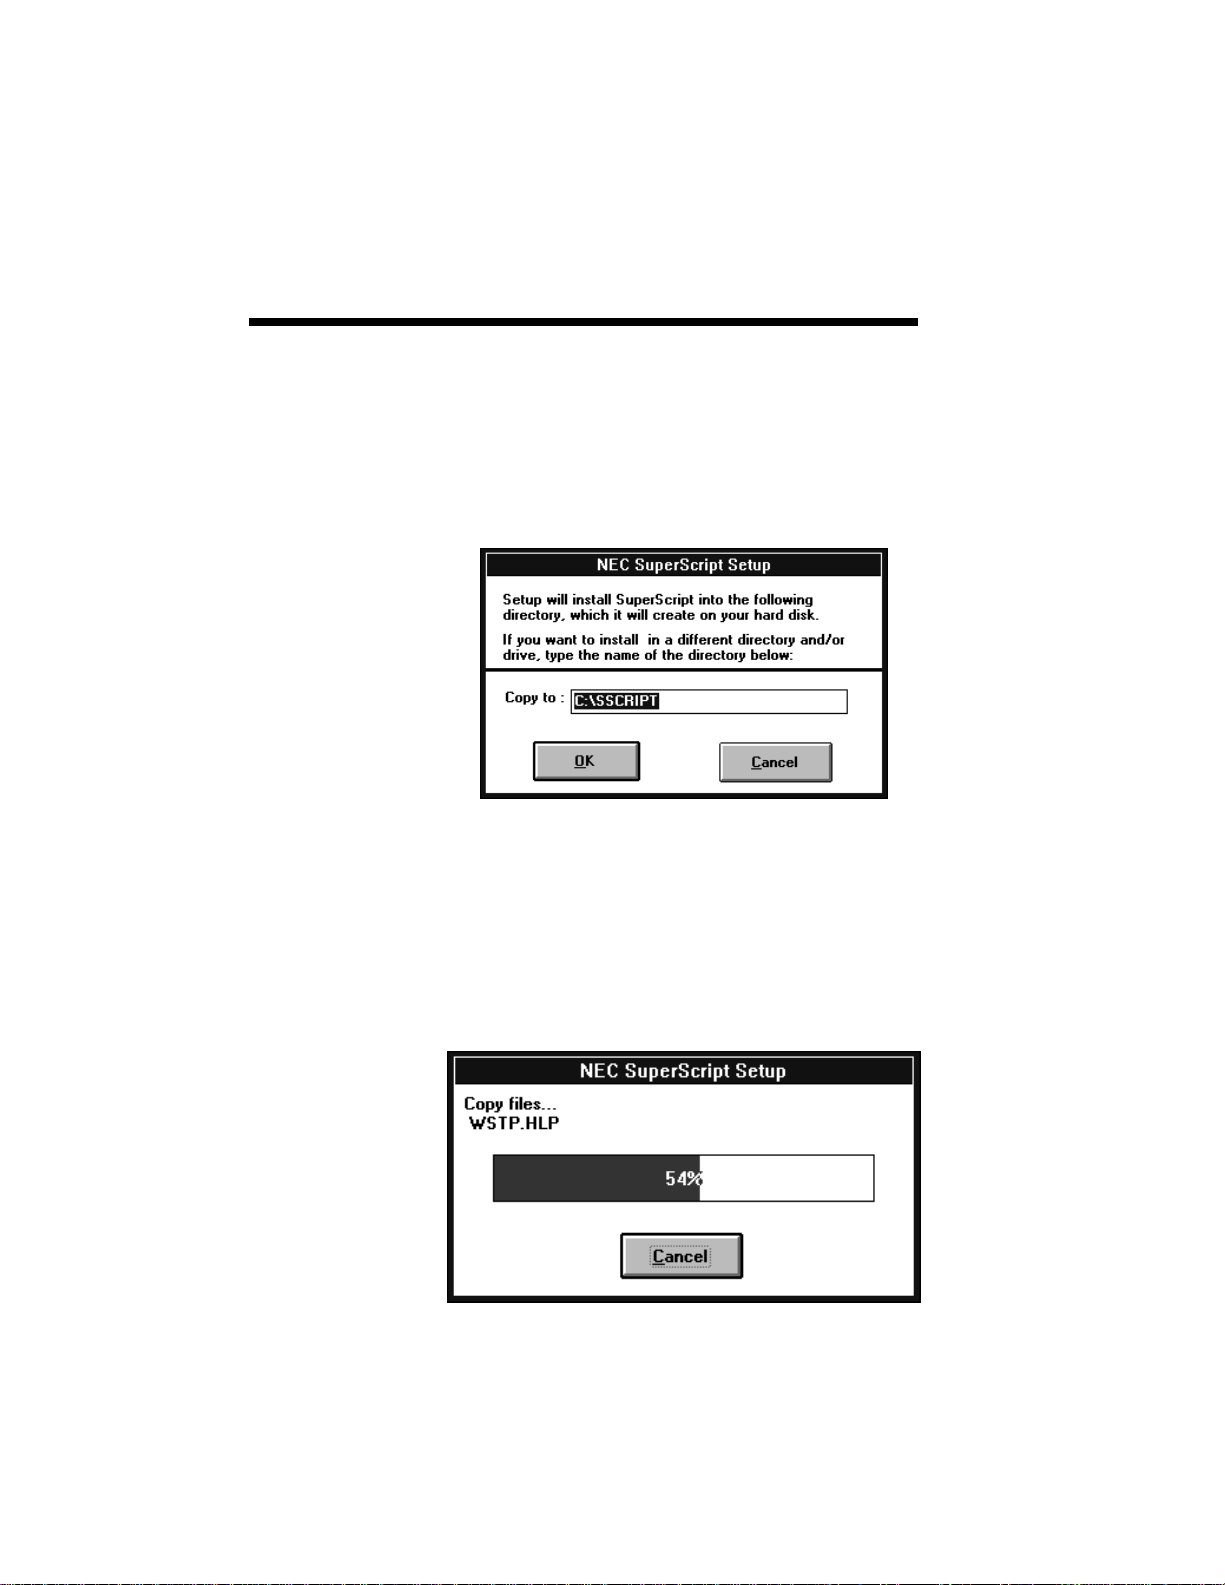
8. As shown in the next figure, “Setup Directory
Selection”, the setup program will create and set
up the directory “C:\SSCRIPT” as the default
installation directory. You can change the
default directory at this time by specifying a
different directory.
Click on the OK button. The installation
program then copies the NEC SuperScript 660i
software to the specified directory.
9. During the installation, NEC SuperScript 660i
shows you progress and status messages, as
shown in the next figure.

Setting Up 2–35
10. The installation program will prompt you to
insert the NEC SuperScript 660i Software
diskette #2and #3. The installation program will
then continue to copy the NEC SuperScript 660i
software to the specified directory.
11.There are 31 TrueType fonts bundled with your
SuperScript 660i printer. These fonts are located
on NEC SuperScript 660i Software Disk #3 and
#4. You may choose to install all or none of the
fonts or do a custom install. A custom install
allows you to install only the fonts you want.
The default directory for the fonts to be installed
to is C:/Windows/System directory. You can
change the default directory at this time by
specifying a different path. When you select OK
the installation program will copy the fonts to
the directory and install them in Windows
automatically. This requires approximately 2.1
MB of hard disk space.

2–36 Setting Up
If you select Cancel you will skip this step and
continue with the SuperScript installation. You
can install the fonts individually later from the
standard Windows Control Panel Font Utility.
See chapter 7 Installing TrueType Fonts or your
Windows documentation for more information.
NOTE: If you do not install the TrueType fonts in
Windows, what you see may not match what you
print. Also in GDI mode the printer resident fonts
will not be available.
Click on OK to proceed with the font installation.

Setting Up 2–37
The installation program will prompt you to insert
the NEC SuperScript 660i Software diskette #4.
12.The installation program automatically modifies
the Windows initialization files so that NEC
SuperScript Software runs properly when you
start Windows.

2–38 Setting Up
13. The setup program also creates the NEC
SuperScript Tools group. This group contains
icons for NEC SuperScript programs, including
the Print Manager, Test Utility, Printer Status
Window and the PCL Control Panel. Once NEC
SuperScript is active, you will be able to run
these programs by double-clicking on their icons.
14.The installation program now displays a message
telling you that the setup is complete. Choose
Restart Windows to run SuperScript, or Exit to
quit the setup program.
NOTE: You will have to restart Windows before
SuperScript 660i will run.

Setting Up 2–39
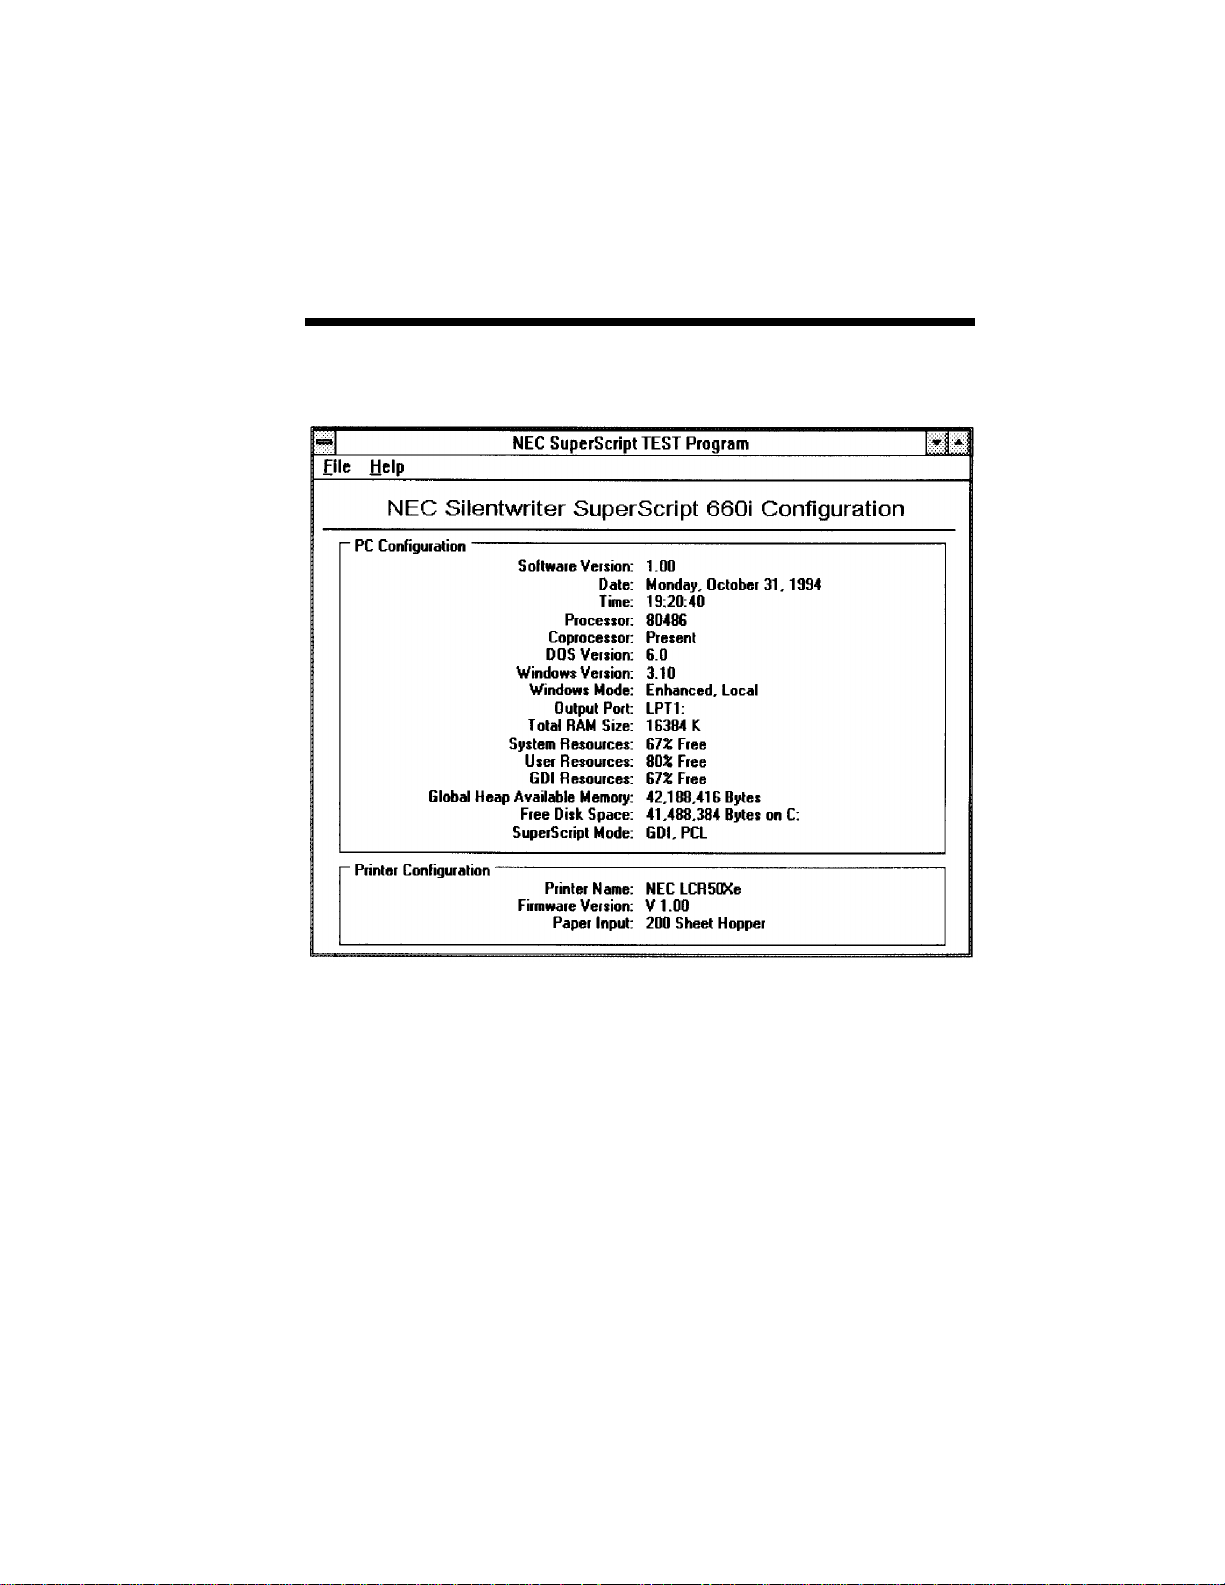
15.
When Windows is restarted, NEC SuperScript
Test Utility will check to make sure all the print
modes work correctly. The test utility will print
several pages, including a configuration page
containing information about your system and
printer.
NOTE: It is a good idea to save a copy of the most
recent configuration page with your manual. It may
be useful if you ever need to call Customer Support.
16.The following notice will appear:

2–40 Setting Up
NOTE: This program performs some time-consuming test operations. Before continuing, make sure the
printer is ready. The power switch should be turned
on, and the hopper should have paper in it. Press OK
to continue with the print tests, Cancel to exit to the
program's main menu.
17.Before printing starts, you will see the following
message as SuperScript sets up the tests.
18.The Test Utility will now prompt you to print the
configuration page that shows information about
your PC and printer. Save a copy of the most
recent configuration page. You may find it
useful if you ever need to call Customer Support.
Setting Up 2–41

2–42 Setting Up
19.SuperScript will now ask to print one test page in
each print mode. Click on Yes to continue, No
to bypass the current test.
Setting Up 2–43
20.After you have made all your selections the NEC
SuperScript Test Program will inform you that
all test pages have been sent to the SuperScript
Print Manager for printing. You can use the
SuperScript Print Manager to monitor print job
progress.
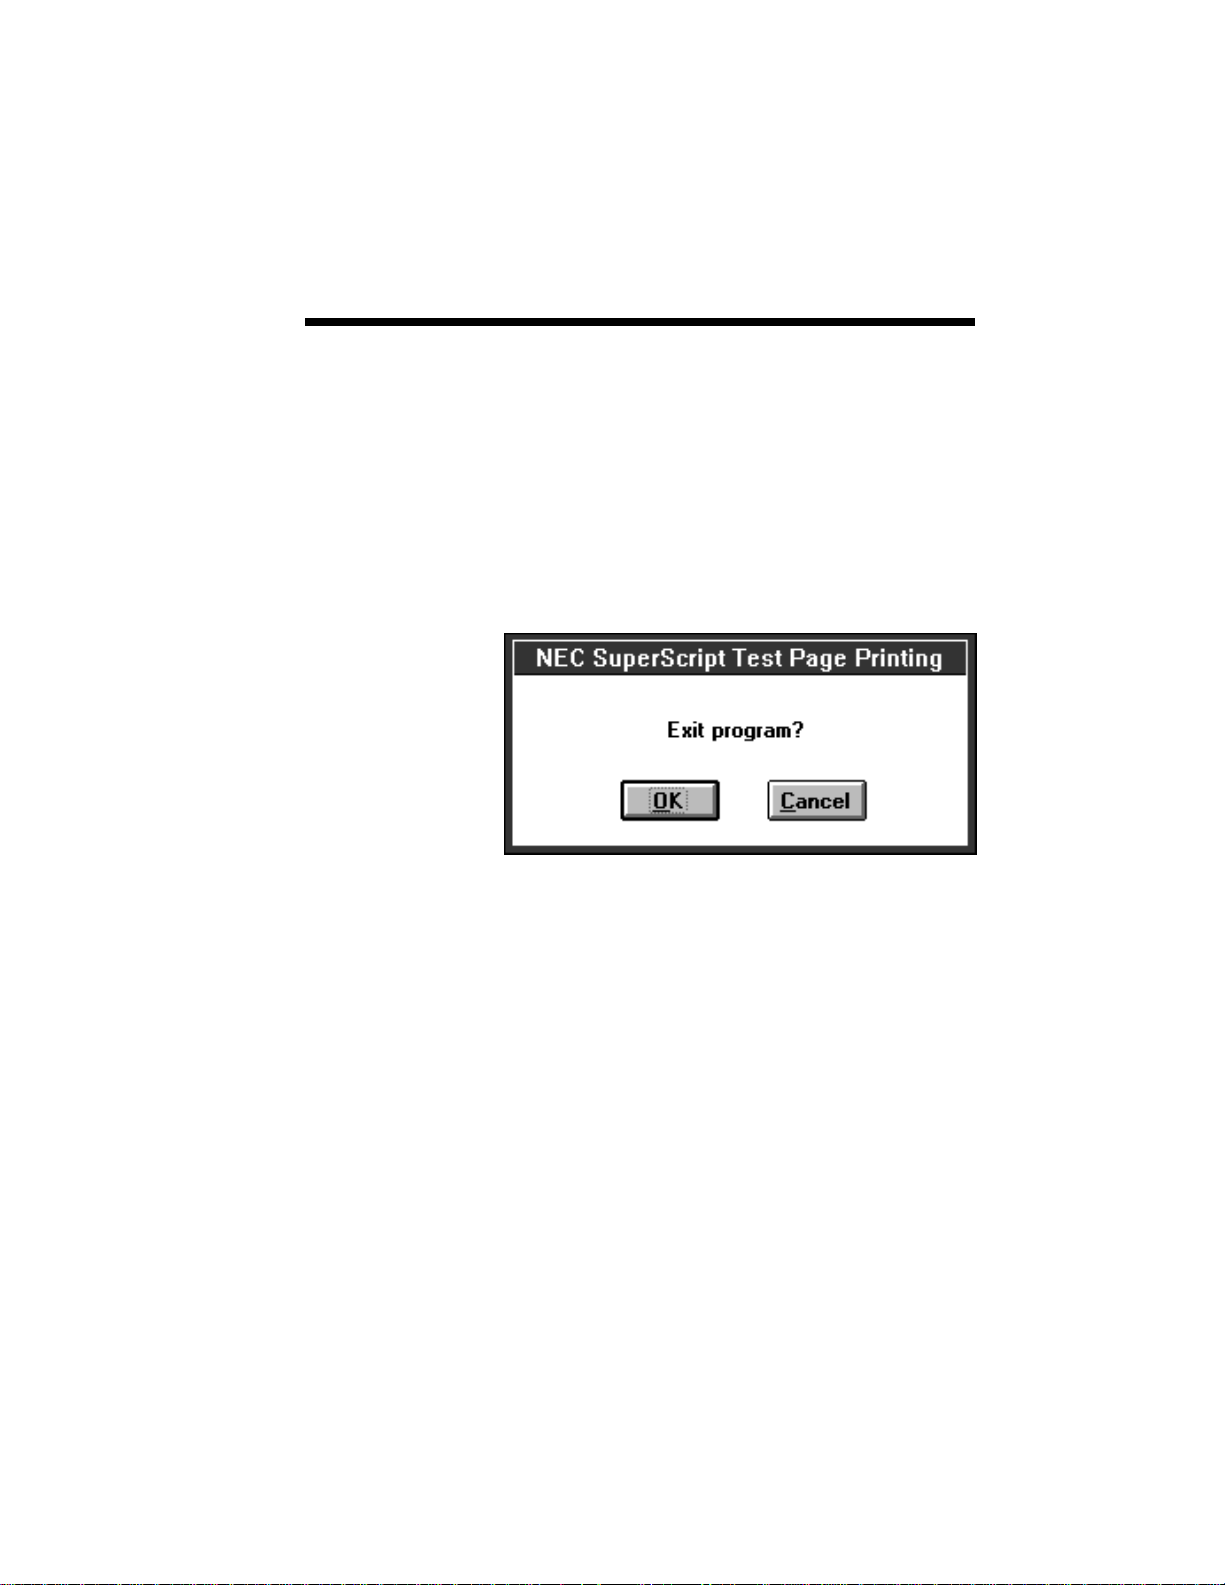
21.After printing all test pages, the Test Utility will
ask if you want to exit. Click OK to quit the
program.
Clicking Cancel instead of OK will return you to the
Test Utility's main screen. The File pull-down menu
gives you the choice of repeating the test sequence or
exiting the program.

2–44 Setting Up
Once SuperScript software is installed, NEC
SuperScript 660i device names appear in the Print-
ers window of your Control Panel (see the next
figure).

Printing with Your SuperScript 660i 3–1
3 Printing with Your
3
SuperScript 660i

3–2 Printing with Your SuperScript 660i
SUPERSCRIPT
660i PRINT
MODES
PCL PRINT
MODE
The SuperScript 660i lets you choose between two
print modes, PCL and GDI emulation. The PCL5e
emulation is resident in the printers’ i960 based
controller. GDI, on the other hand, is the native
language of Windows and is therefore resident in
your computer. When printing from DOS
applications, you will be printing using the PCL
emulation since Windows, and therefore GDI, is not
active.
The SuperScript 660i software kit includes both Print
Navigator and SuperScript 660i software. Print
Navigator software allows you to print in PCL mode
from DOS. SuperScript 660i software allows you to
print in GDI mode from Windows. Both allow you to
change the printer settings from your computer and
receive printer status.
When printing in Windows, you can choose to print
in either PCL or GDI mode. To print in PCL emulation mode, select “NEC SuperScript 660i PCL on
NEC.PCL”. To print in GDI mode, select “NEC
SuperScript 660i GDI on NEC.GDI” as the current
printer.
The NEC SuperScript 660i has a PCL5e emulator
which is compatible with the HP LaserJet 4P. This
gives you the ability to print from any application
which has a LaserJet 4P driver.
SuperScript
PCL Control
Panel
The NEC SuperScript 660i PCL Control Panel
allows you to set up default values for the printer that
would be normally made from the printer’s control
panel. Any page setup information that is
downloaded by your application will override these
default settings. To activate the SuperScript 660i
PCL Control Panel open the SuperScript 660i Tools
Group and click on the SuperScript 660i PCL Control Panel Icon.

Printing with Your SuperScript 660i 3–3
NOTE: Changes to your printer configuration will
be reset when the printer is powered off.
Paper Source: Hopper Feed
Manual Feed
Orientation: Portrait
Landscape
Paper Size: Letter 8-1/2 × 11 in
A4 210 × 297 mm
Executive 7-1/4 × 10-1/2 in
Legal 8-1/2 × 14 in
Envelope
Monarch 3-7/8 × 7-1/2 in
Commercial 10 4-1/8 × 9-1/2 in
Envelope DL 110 × 220 mm
Envelope C5 162 × 229 mm
Envelope B5 176 × 250 mm
Number of copies: 1 to 999
Default Font -- The default font can only be
selected from resident fonts. You cannot make a
downloaded font the default from the PCL
Control Panel.
Form length: 5 to 128

3–4 Printing with Your SuperScript 660i
Printing From a
Windows Appli c ati on
Printer resolution: 600 or 300 dpi
Form Feed -- Select Form Feed to print any data
in the PCL Interpreter memory.
Reset -- Press RESET to have the current PCL
Control Panel settings take effect with the next
print job.
Once you have selected your printer mode (GDI or
PCL emulation), just print from your Windows
application as you would to any other printer.

Printing with Your SuperScript 660i 3–5
Printing From a
DOS Window
Printing PCL
Files From
DOS Command
Line
Enter MS-DOS from Windows by clicking on the
MS-DOS icon in the Main window from the Program Manager screen.
When ready to print, start your DOS application and
print as you normally would. Set up your application
to print to the parallel port LPT1 (or LPT2 or LPT3
if you have SuperScript 660i set to print to one of
these ports instead). Be sure the NEC SuperScript
660i driver is the default driver in Windows and the
DOS application is using an HP LaserJet 4P driver.
If an HP LaserJet 4P driver is not available in the
application, you can select one of the following:
LaserJet IIIP, LaserJet IIP, or LaserJet.
If you have a file in PCL or ASCII (text) format, you
can print it from the MS-DOS command line. At the
command line prompt, type
COPY /B <filename.ext> LPT1
where <filename.ext> is the name of your PCL- or
ASCII-formatted file. (If you have configured
SuperScript 660i to print to a different parallel port,
give its name instead of LPT1.)
Print Navigator
Software Kit
Print Navigator
The Print Navigator supplies the printer configuration settings and status feedback features of your
printer. The Print Navigator only works under DOS
with the printer directly connected to your PC. The
Print Navigator software consists of two programs:
Navigate and Reporter.
The Print Navigator lets you update your printer
configuration settings (printer profiles) conveniently
from your PC screen. You can also save current
settings for use at a later time.

3–6 Printing with Your SuperScript 660i
NOTE: Changes to your printer configuration will
be reset when the printer is powered off. You can
save your printer configuration settings as a printer
profile and export it to the printer from Print Navigator at any time to restore your settings.
The Print Navigator can handle five kinds of configuration settings: Page, Font, Quality, Memory,
and Options.
• The page screen lets you determine page
layout, orientation, and paper source.
• The font screen lets you select a font used to
print text by typeface, pitch or point size, and
symbol set.
• The quality screen lets you adjust the quality
of your printout with settings such as Toner
Saver, resolution, Sharp Edge Technology,
and toner darkness.
• The memory screen lets you control page
protection and image compression.
Print Navigator
Default Setup
Program
• The options screen lets you control Power
Save mode.
This section discusses how to use the Print Navigator. Since the printer only has 3 LEDs and a push
button on the control panel these software screens
are the main point of interaction with the user.
To launch the Print Navigator application and
modify the printer settings type
“C:\PRTNAV\NAVIGATE” at the DOS prompt.
Each Print Navigator screen contains the items
below.

Printing with Your SuperScript 660i 3–7
Menu Sub-Menu Items
File Open Profile
Save Profile
Save as
Import Profile from printer
Export Profile to printer
Exit
View Displays the current printer
configuration.
Utilities Print self test page
Print Status Page
Print Demo Page
Reset Printer
Connect
Help Help Index, About
Print Navigator
Page Setup
Screen
The following section is a description of the items
found on the Print Navigator Page Setup Screen.

3–8 Printing with Your SuperScript 660i
Paper Source
Allows you to select the source of the paper. Choices
are Hopper, which selects the standard 200-sheet
hopper, and Manual, which selects the manual feed
slot.
Paper Size
Allows you to select the size of paper or envelope
which you wish to use. The default is letter. The
choices are:
Letter 8-1/2 × 11 in
A4 210 × 297 mm
Executive 7-1/4 × 10-1/2 in
Legal 8-1/2 × 14 in
The paper sizes available for Envelopes are:
Monarch 3-7/8 × 7-1/2 in
Commercial 10 4-1/8 × 9-1/2 in
Envelope DL 110 × 220 mm
Envelope C5 162 × 229 mm
Envelope B5 176 × 250 mm
Orientation
Sets the orientation of the print job. Clicking on the
appropriate button sets the orientation to either
Portrait or Landscape. The default is Portrait.
Copies
Allows you to select the number of copies of the
document that you want printed. Selections are from
1 to 999. The default is 1.
Lines/page
Selects the number of lines to be printed on a page.

Printing with Your SuperScript 660i 3–9
Auto Continue
Auto Continue on, if the printer experiences a nonfatal error, the printer will resume printing the job.
OK button
Sends the current settings to the printer.
Cancel button
Ignore any changes and restore original settings.
Form Feed
Prints a page with whatever printable data is in the
buffer. If no printable data is in the buffer, a blank
page will print.
Default button
Returns settings on this screen to the factory default.
Memory is not affected. These settings take effect
after the next reset or the next print job after OK has
been selected.
Reset
Stop the current job, clear all buffers, and revert back
to the last saved configuration.

3–10 Printing with Your SuperScript 660i
Print Navigator
Font Setup
Screen
The following section is a description of the items
found on the Print Navigator Font Setup Screen.
Typeface
Select the default typeface.
Pitch/ Point
Select the type size. For proportional fonts, the
increments will be in points, for fixed pitch fonts the
size will be in characters per inch.
Symbol Set
Select the symbol set for the typeface.
OK Button
Send the current settings to the printer.
Cancel button
Ignore any changes and restore orignal settings.

Printing with Your SuperScript 660i 3–11
Print Navigator
Quality Setup
Screen
The following section is a description of the items
found on the Print Navigator Quality Setup Screen.
Toner Saver
Allows you to save the amount of toner by controlling print density.
Sharp Edge Technology
Detects and smoothes the jagged edges of raster
images by dividing one full dot into several subdots
set in the same area. The print quality of both text
and line graphics is thus improved. (Select OFF for
photographic or grayscale images.)
Resolution
Allows you to select the default resolution. The
default is 600 x 600 dpi.
3–12 Printing with Your SuperScript 660i
Toner Darkness
Allows you to adjust the darkness of the output when
printing.
OK Button
Send the current settings to the printer.
Cancel Button
Ignore any changes and restore original settings.
Print Navigator
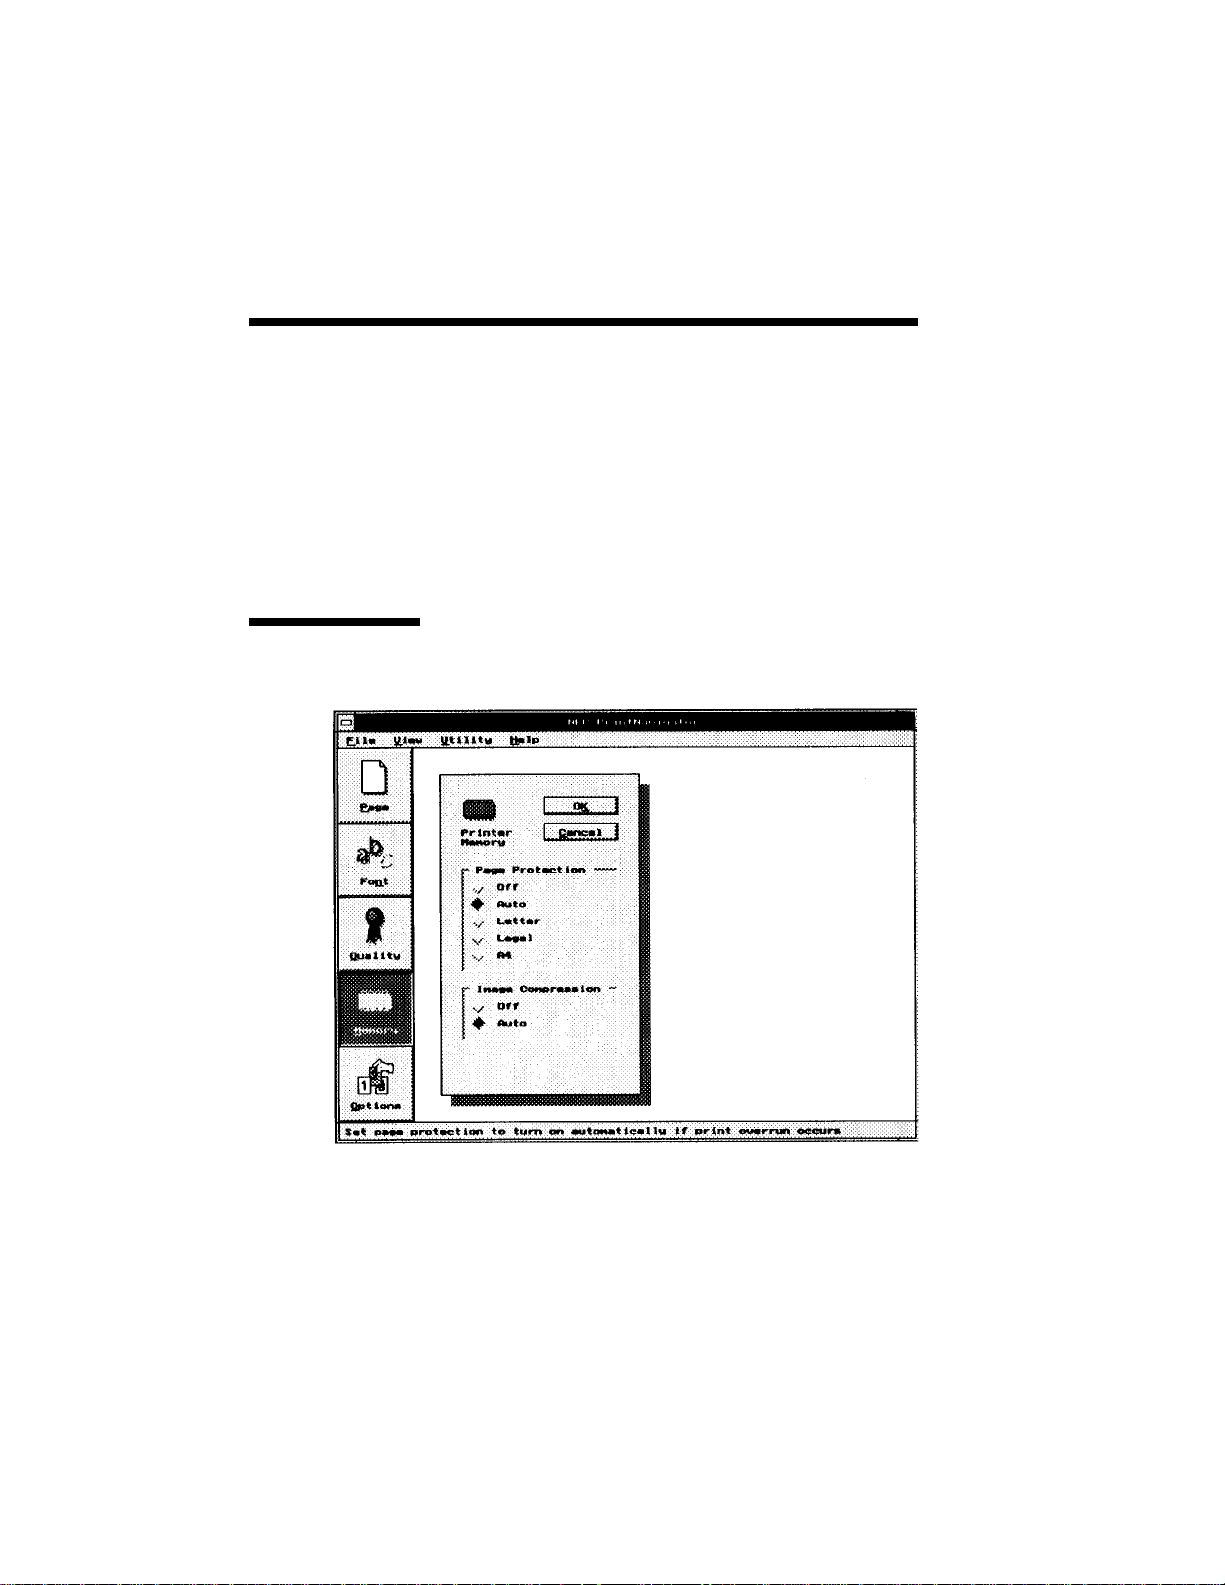
Memory Setup
Screen
The following section is a description of the items
found on the Print Navigator Memory Setup Screen.
Page Protection
The following selections are available: Off, Auto,
Letter, Legal, A4.

Printing with Your SuperScript 660i 3–13
Image Compression
Selecting Auto allows the system to automatically
compress the data to conserve memory. Selecting
Off disables the feature. The default is Auto.
OK Button
Send the current settings to the printer.
Cancel Button
Ignore any changes and restore original settings.
Print Navigator
Options Setup
Screen
The following section is a description of the items
found on the Print Navigator Options Setup Screen.
Power Save
When on is selected, the printer goes into reduced
power consumption mode once the printer has been
idle for the defined time period. The default is on
with a time period of 15 minutes.

3–14 Printing with Your SuperScript 660i
Power Save Interval
Select the time interval the printer must wait prior to
going into Power Save Mode.
OK Button
Send the current settings to the printer.
Default Button
Returns settings on this screen to the factory default
after the next reset or the next print job after OK has
been selected. Memory is not affected.
Cancel Button
Ignore any changes and restore original settings.
The Reporter
The Reporter is a terminate and stay resident (TSR)
program that only works under DOS. The software
was loaded when you installed Print Navigator. If
you did not choose to add the Reporter to your
autoexec.bat file when you loaded the software, type
C:\PRTNAV\REPORT to activate. If you wish to
add Reporter to your autoexec.bat file at this time,
you may reload the Print Navigator software.
• Insert the SuperScript 660i Print Navigator disk
into Drive A:\ (or whatever drive is designated on
your PC).
• Type a:\SETUP and press ENTER. The setup
program is fairly automatic. You need to decide
the input destination path to set the printer's
settings; the default printer port (LPT1, 2 or 3),
the hot key designation to run Reporter, display
mode (either graphic or text), and whether you
want the report to be added to the autoexec.bat
file. This means that the Reporter will be loaded
automatically whenever you turn on your computer or run autoexec.bat.

Printing with Your SuperScript 660i 3–15
Once loaded into PC memory, Reporter monitors the
printer status in real-time and automatically displays
error and warning messages directly on your PC
screen whenever the printer status changes. Examples of printer status messages are: printer warming
up, paper empty, paper jam, etc.
Once loaded into PC memory, Reporter can be
accessed by a hot key (Control/Alt/R) at any time.
This brings up the Print Navigator Printer Status
Display.
Print Navigator
Printer Status
Display
The Print Navigator Printer Status Display is the key
interface between the user and the printer. All errors
are reported here and changes to the printer default
settings are made from this screen.
The Print Navigator Printer Status Screen is automatically activated when a print error occurs.

3–16 Printing with Your SuperScript 660i
GDI MODE
GDI Setup
Screen
GDI mode takes advantage of Windows’ own
internal design to produce documents faster than
most conventional printers can. Other printers
require Windows to translate a document into a
printer language, such as PCL on LaserJet printers.
GDI mode reduces overhead by eliminating this
translation step before starting to print. This results
in faster printing. SuperScript 660i GDI mode
includes some additional features such as manual
duplex printing, density control, scaling, and forms
overlay.
Your Windows based application might duplicate
some SuperScript 660i GDI Setup settings such as
number of copies. In general, for faster and more
accurate printing you should use the SuperScript
660i Setup screen instead of your application to
choose print settings.
In general, the method you use to open the GDI
Setup screen determines whether your settings are
applied to the current print job, stored with the
document you’re printing, or applied to all print jobs.
However, this may vary from application to application, verify these conditions with your application
documentation.
If you open the Printer Setup dialog box from the
Control Panel or Print Manager, the settings you
choose apply to all print jobs until you change the
settings.

Printing with Your SuperScript 660i 3–17
If you open the Setup dialog box from an application’s Print Setup command, the application stores
the settings with your document. The Setup document prints with the settings until you change them.
You may wish to do this for documents that do
not follow your standard setup.
If you open the Setup dialog box from an application’s Print command, your choices apply only to
that print job. The next time you print this document
or any other document you will have to choose the
print settings again.
To make certain the settings are the same for all your
Windows based applications, use the Control Panel
to open the Printer Setup screens and change your
settings.
You can set options for GDI mode by using the
Control Panel in Windows:
1. Switch to the Program Manager. You should see
a window titled Main. If this window has been
minimized, restore it.
2. Double-click on the Control Panel icon in the
Main window.
3. Double-click on the Printers icon in the Control
Panel window.
4. Select NEC SuperScript 660i GDI on
NEC.GDI
5. Click on the Setup button.

3–18 Printing with Your SuperScript 660i
NOTE: You can also set options for GDI mode from
the File menu of many Windows-based applications.
Typically there are one or two commands to take you
to the Print Setup dialog box, please refer to the
application documentation for specific details, and
be aware of the above conditions.
The setup screen lets you select:
Paper Source: Hopper Feed
Manual Feed
Orientation: Portrait
Landscape

Printing with Your SuperScript 660i 3–19
Paper Size: Letter 8-1/2 × 11 in
A4 210 × 297 mm
Executive 7-1/4 × 10-1/2 in
Legal 8-1/2 × 14 in
B5 182 × 257 mm
Envelope Monarch
3-7/8 × 7-1/2 in
Commercial 10 4-1/8 × 9-1/2 in
Envelope DL 110 × 220 mm
Envelope C5 162 × 229 mm
Number of copies: 1 to 99
Use NEC SuperScript 660i Print Manager
Page 1 on TOP (With Print Manager enabled,
reverse order printing)
Resolution: 600 × 600 or 300 × 300
The OPTIONS button takes you to the Advanced
Options screen, described below.
Press the OK button if you are satisfied with the
selections shown in each box in the Options dialog
window. The changes you have made will take
effect, and you will leave this window. If you press
the CANCEL button, you will leave the window, and
any changes you made will not take effect.

3–20 Printing with Your SuperScript 660i
2Up/4Up
Screen
Draw Frame
Border
GDI Options
Screen
This feature is used to print 2-page or 4-page data on
one sheet.
This allows you to draw a Frame or Border around
multiple images on the same page when the 2Up or
4Up feature is selected.
Putting an X in the box marked NEC SuperScript
660i Print Manager turns the SuperScript 660i Print
Manager on when you use GDI mode. (The
SuperScript 660i Print Manager is always on for
PCL compatible mode.) The SuperScript 660i Print
Manager lets you use some additional features in
GDI mode, including manual duplexing and the use
of the SuperScript 660i Print Manager control screen
(see Chapter 4).
NOTE: Turn off the NEC SuperScript 660i Print
Manager to get the fastest printing (but not necessarily the fastest return to application).

Printing with Your SuperScript 660i 3–21
ADVANCED
OPTIONS
Manual Duplex
Printing
If you put an X in the box marked Manual
Duplexing, NEC SuperScript 660i, with a little help
from you, will print your file on both sides of the
paper. Here’s how double-sided printing works.
1. Specify "Manual Feed."
2. Open the manual feed cover and insert print
sheets into the printer one by one (refer to
Chapter 8 "Manual Feed" page 8-9).

3–22 Printing with Your SuperScript 660i
SuperScript 660i prints every odd-numbered page
of your document, starting with the last oddnumbered page.
3. Pick up the printed sheets of paper, straighten*
them, then reinsert them one by one into the
Silentwriter SuperScript 660i printer, starting
with the sheet having the smallest page number.
The reinserting direction is shown in this page.
4. SuperScript 660i prints every even-numbered
page on the back of the odd-numbered pages.

Printing with Your SuperScript 660i 3–23
* : Curled printed sheets may cause jamming.
Straighten the sheets before reinserting them
into the hopper.
Formatting
Styles
When finished, you should have a complete, doublesided document. You can also choose one of two
formatting options:
• Book Style prints out so that if you open the
document in the manner of a book, pages 2 and 3
would face each other.
• Report Style prints the even-numbered pages
upside down, so that if you open the document in
the manner of a report bound at the top, pages 2
and 3 would face the same way.
You can also put an X in the box marked Print
Instructions. If you do this, then the Silentwriter
SuperScript 660i printer will print out detailed
instructions every time you print in manual duplex
mode.
NOTE: If an error occurs during duplex printing,
please recover as follows:
• If an error (e.g. paper jam) occurs while printing
the front side of the page (odd numbered pages),
clear the error as instructed in Chapter 5, Print
Status Window .
• If an error occurs while printing the back side of
the page (even numbered pages), clear the error
as instructed in Chapter 5, Print Status Window.
If the page being printed when the error occurs is
damaged insert a new piece of paper in the

3–24 Printing with Your SuperScript 660i
printer. Press the Front Panel button to continue
the print job.
After all pages are finished, re-print the corresponding odd numbered page on the reverse side
to complete the duplex print job.
Scaling
Print to File
Sets the percent value to scale the print job. The
default value is 100. The range is 10% to 200%, and
depending on the application this may also affect the
margins.
NOTE: You may notice some difference in the way
an image is scaled in different applications. Some
Windows applications orient the document from the
center of the page while others begin at the upper left
corner. The orientation of the document affects the
placement of the image during scaling.
Selecting this item will result in the print job being
printed to a GDI file specified in the File Name.
File Name
Allows the user to enter the new file name and
directory to save the print job to. The default file
name and directory is
C:\SSCRIPT\DEFAULT.GDI.
Browse Button
Selecting the Browse button opens a window
which allows the user to select the file name,
drive, and directory of choice for the print job.

Printing with Your SuperScript 660i 3–25
Density Button
Opens the Print Density Window.
Brightness Control
Use this control to lighten or darken an image.
Contrast Control
This control is used to adjust the difference in the
light and dark areas of an image, to improve a
flat image.
Image Box
The Image Box shows an image which demonstrates how the brightness and contrast settings
will affect output.
NOTE: The effect of a particular density setting
(brightness or contrast) is dependent on how your
Windows application handles various graphical
formats. Be sure to test the density setting by printing some test copies to see the effect.

3–26 Printing with Your SuperScript 660i
Forms Window
This window allows you to set up a Cover or Trailer
Page, or Print Overlay.
Print Cover Page
When selected a cover page will be printed at the
beginning of each print job. The File Name
designates the GDI file to be used as the cover
page. (See page 3-27 for more information.)
Print Trailer Page
When selected a trailer page will be printed after
each print job. The File Name designates the
GDI file to be used as the trailer page. (See page
3-27 for more information.)

Printing with Your SuperScript 660i 3–27
Print Overlay
When selected this feature will overlay a GDI
file on the print job. The File Name designates
the GDI file to be used as the overlay.
• B/W Overlay
This will print the overlay file (e.g. WaterMark)
and the print job in a single pass in a single color
merging the overlay and print job. (See page 328 for more information.)
• Color Overlay
This will print the overlay file in the first pass
after prompting the user to change the Toner
Cartridge to the appropriate color cartridge. Then
the user is prompted to reload the paper and
change the toner cartridge back. The File Name
designates the GDI file to be used as the overlay.
This feature is useful for users who wish to print
a spot color, such as printing the company logo
in color. NEC does not recommend the use of
this feature to print overhead transparencies, or
to use this feature multiple times on the same
document to produce additional colors. (See page
3-30 for more information.)
• Overlay Page 1
Specifies page one of the print job will have the
overlay. This is the default.
• Overlay All Pages
Specifies that all pages will have the overlay.
• Print Instruction Page
Selecting this item will print an instruction sheet
indicating how to use the color overlay feature.
This item is not selectable for B/W overlay.

3–28 Printing with Your SuperScript 660i
Create a Cover/Trailer Page
1. Open the Control Panel and then choose the
Printers icon. Check to be sure the printer selected is the SuperScript 660i GDI.
2. Click on the Setup Button to open the
SuperScript 660i GDI Setup screen.
3. Click on the Options button to open the Ad-
vanced Options screen.
4. Click on the Print to File checkbox. The default
file name is C:\SSCRIPT\DEFAULT.GDI. This
can be changed by typing in the desired name
provided the extension remains .GDI.
5. Select OK for each screen and close the Control
Panel.
6. Create or open an existing document to use for
the Cover/Trailer in an application.
7. Print the document. It will create a file rather
than an actual output to the printer.
8. Close the application and go back through
Control Panel to the Advanced Options screen
and click on the Print to File checkbox to deselect it.
9. Select OK for each screen to close Control Panel.
You are now ready to print using your Cover/Trailer
Page.

Printing with Your SuperScript 660i 3–29
Create an Overlay File
1. Open the Control Panel and then choose the
Printers icon. Check to be sure the printer selected is the SuperScript 660i GDI.
2. Click on the Setup Button to open the
SuperScript 660i GDI Setup screen.
3. Click on the Options button to open the Advanced Options screen.
4. Click on the Print to File checkbox. The default
file name is C:\SSCRIPT\DEFAULT.GDI. This
can be changed by typing in the desired name
provided the extension remains .GDI.
5. Select OK for each screen and close the Control
Panel.
6. Open the image to use for the overlay in an
application.
NOTE: If you are creating a file to be used as a color
overlay, make sure the image is defined as black. If
you create the image as a color image, when it is
printed if will produce a dithered output and not
produce a solid color.
7. Print the image. It will create a file rather than
actually output to the printer.
8. Close the application and go back through
Control Panel to the Advanced Options screen
and click on the Print to File checkbox to deselect it.

3–30 Printing with Your SuperScript 660i
9. Select OK for each screen to close the Control
Panel.
You are now ready to print using your overlay.
Print with an Overlay, Cover, or Trailer File
1. Open the Control Panel and then choose the
Printers icon. Check to be sure the printer selected is the SuperScript 660i GDI.
2. Click on the Setup Button to open the
SuperScript 660i GDI Setup screen.
3. Click on the Options button to open the Ad-
vanced Options screen.
4. Click on the SuperScript 660i Print Manager
checkbox if it is not enabled.
5. Click on the Forms button to open the Print
Forms window.
6. Click on the Print Overlay, Print Cover, or Print
Trailer checkbox to enable the feature.
7. Type in the name of the file you wish for the
Overlay, Cover, or Trailer. If you are not sure of
the file name you can select the browse button to
search and add the file name by selecting it and
clicking OK.
8. If you are printing an Overlay, select “every
page” or “only on the first page”.
9. Select OK for each screen to close Control Panel.

Printing with Your SuperScript 660i 3–31
10. Print your file from any windows application as
you normally would. The Overlay, Cover, or
Trailer file will be printed automatically.
NOTE: All files printed will continue to have the
Overlay, Cover, or Trailer printed until the feature is
disabled from the Print Forms screen.
Print with a Color Overlay File
1. Open the Control Panel and then choose the
Printers icon. Check to be sure the printer selected is the SuperScript 660i GDI.
2. Click on the Setup Button to open the
SuperScript 660i GDI Setup screen.
3. Click on the Options button to open the Advanced Options screen.
4. Click on the SuperScript 660i Print Manager
checkbox if it is not enabled.
5. Click on the Forms button to open the Print
Forms window.
6. Click on the Print Overlay checkbox to enable
the feature.
7. Type in the name of the file you wish for the
Overlay. If you are not sure of the file name you
can select the browse button to search and add
the file name by selecting it and clicking OK.
8. Select if you would like the Overlay printed on
every page or only on the first page.
9. Click on the Color checkbox to print the overlay
in a second color.

3–32 Printing with Your SuperScript 660i
10. Select Instruction Page to print an instruction
page after the first color indicating how to reinsert the paper.
11. Select OK for each screen and close Control
Panel.
12.Print your document from any windows applica-
tion as you normally would. The first color will
be printed and then you will be prompted to
change the Toner Cartridge.
Pick up the printed sheets and reinsert them one
by one into the printer. Some sheets may be
curled and could cause jamming. To lessen
curling, straighten edges before reinserting pages
into the printer. Make sure that the printed side
faces down.
If the instruction page is enabled it will print out
with the document and indicate how to reinsert
the paper.
13.Select Resume in the Color Overlay Printer
Status window.
14.The second color will now be printed.
Take note of the following points when creating
documents with color.
NEC recommends the use of sheets that are
20 pounds (75 g/m2) or thicker.
NEC does not recommend printing on OHT
films.
NEC does not recommend creating documents
with more than two colors for use with this
printer.

Printing with Your SuperScript 660i 3–33
The alignment of the print on the page will vary
with each pass through the printer therefore if
colors are overlapping or very close the output
may be affected.
Observe the following precaution when printing
overlapping solid objects to prevent paper jams
or wrinkling: Minimize overlapping areas and
position them at some distance (minimum 1 1/2
in. recommended) from the top edge of the sheet
as follows.

3–34 Printing with Your SuperScript 660i
NOTE: When the toner cartridge is removed from
the printer be sure to store it in the packing box.
When removing and installing the toner cartridge,
toner may fall on the laser beam window, causing
solid white vertical lines to appear during printing.
If this occurs, clean the laser beam window with a
soft cloth. To prevent toner from falling, be sure to
handle the toner cartridge gently.
After printing with a color, some color toner remains
on the transfer roller inside the printer. This small
amount of toner should not affect performance.
All files printed will continue to have the Overlay
printed until the feature is disabled from the Print
Forms screen.

NEC SuperScript Print Manager 4–1
4 NEC SuperScript 660i
4
Print Manager

4–2 NEC SuperScript Print Manager
The NEC SuperScript 660i Print Manager is a
Windows-based program which helps you manage
the output flow and operation of your SuperScript
660i printer. You can see files waiting to be printed,
and change their order. You also can see how much
of the current print job has been processed. You can
control the priority setting for printing relative to
other applications running at the same time.
Furthermore, when the SuperScript 660i Print
Manager is in use, you can print double-sided pages
in GDI mode.
When minimized, the SuperScript 660i Print
Manager appears as an icon at the bottom of your
screen.

NEC SuperScript Print Manager 4–3
File
1. Exit
Selecting Exit from the file menu lets you exit
from the SuperScript 660i Print Manager.
Exiting Windows will also close the
SuperScript 660i Print Manager.
Options
1. Priority
Windows lets you run several applications at
the same time. This helps productivity, but it
also means that you are sharing your PC’s
resources among several activities.

4–4 NEC SuperScript Print Manager
When you print in GDI mode, you are sharing
your PC’s resources between printing and
other applications. SuperScript 660i’s priority
settings let you control the priority of the
printing activity relative to other applications
running at the same time.
The Options menu lets you select high,
medium, or low priority processing when you
print. High priority produces output faster,
but it may slow down your system as well.
On the other hand, printing at a lower priority
lets other applications run faster, but also
means your document will take longer to
print. (For more information, see Appendix B
Optimizing Printer Performance.)
2. Show Toolbar Titles
When checked the software will add titles to
the icons in the SuperScript 660i Print Manager screen. The default is ON.
3. Time Format
This option allows you to change the display
format: 12 hour or 24 hour. (01:30 PM is an
example of 12 hour format. The same time
appears as 13:30 in 24 hour format.) The
time stamp is provided by your system clock.
Size
The Size menu lets you change the size of the
display window for the SuperScript 660i Print
Manager. “Normal” shows the full display.
“Reduced” takes up less space on your screen.
 Loading...