

Page 1

Table of Contents
Index
SUPERSCRIPT 1800
USER’S GUIDE
July, 1999
808-878290-012A
Page 2

Proprietary Notice and Liability Disclaimer
The information disclosed in this document, including all
designs and related materials, is the valuable property of
NEC Technologies and/or its licensors, as appropriate
reserve all patent, copyright and other proprietary rights to
this document, including all design, manufacturing,
reproduction, use and sales rights thereto, except to the
extent said rights are expressly granted to others.
The NEC T echnologies product(s) discussed in this document
are warranted in accordance with the terms of the Limited
Warranty Statement accompanying each product. However,
actual performance of each such product is dependent upon
factors such as system configuration, customer data and
operator control. Since implementation by customers of each
product may vary, the suitability of specific product
configurations and applications must be determined by the
customer and is not warranted by NEC Technologies.
To allow for design and specification improvements, the
information in this document is subject to change at any time
without notice. Reproduction of this document or portions
thereof without prior approval of NEC Technologies is
prohibited.
© NEC Technologies, Inc., 1999
Microsoft, Windows, Windows 95, Windows 98,
Windows NT, Windows for Workgroups, and MS-DOS are
registered trademarks of Microsoft Corporation.
PostScript
®
is a trademark of Adobe Systems Incorporated.
All other product, service, brand, or trade names used in this
publication are the trademarks or registered trademarks of
their respective companies or organizations. NEC disclaims
any responsibility for specifying which marks are owned by
which companies or organizations.
Copyright 1999
NEC Technologies, Inc.
1250 N. Arlington Heights Rd.
Itasca, IL 60143
All Rights Reserved.
Copyright 1999
NEC Corporation
7-1 Shiba 5-Chome, Minato-Ku
Tokyo 108-01, Japan
All Rights Reserved.
ii SuperScript 1800 — User’s Guide
Page 3

To view a subject, click on its heading or page number.
CONTENTS
CHAPTER 1: INTRODUCTION
Overview 1
SuperScript 1800 Highlights 1
Printer Options 1
System Requirements 2
Hardware Requirements 2
SuperScript 1800 Features 2
Printer Driver Features 2
Energy Saving 3
Operator Panel Features 3
CHAPTER 2: GETTING STARTED
Overview 5
Safety Instructions 5
Selecting a Location 5
Unpacking 6
Checking Printer Contents 7
Identifying Printer Parts 8
Front View 8
Back View 8
Top Internal View 8
Back Internal View 8
Installing the Toner Cartridge 10
Loading The 500-sheet Cassette 11
Connecting the Printer Locally 13
Connecting the Printer to a Network 14
CHAPTER 3: INSTALLING THE SOFTWARE
Overview 15
Software for Windows 95 and 98 15
Installing the Software 15
Removing Printer Software 17
Software for Windows NT 4.0 17
Installing the Software 17
Removing Printer Software 17
Software for Windows 3.1x 18
Installing the Software 18
Removing the Software 18
Software for the Macintosh 18
Software Requirements 18
Hardware Requirements 18
Installing the Software 19
CHAPTER 4: PRINTER SOFTWARE
Overview 21
Windows 95 and 98 Operating Systems 21
Opening the Driver Properties Window 21
NEC SuperScript 1800 PCL6 Properties 22
NEC SuperScript 1800 PCL5e Properties 24
Windows 95 and 98 PostScript Properties 26
The SuperScript 1800 Status Monitor 28
Windows NT 4.0 Operating Systems 29
Opening the Driver Properties Window 29
PCL6 Printer Driver 30
PCL5e Printer Driver 34
Windows PostScript Printer Driver 37
Windows 3.1x Operating Systems 40
Opening the Driver Properties Window 40
NEC SuperScript 1800 PCL6 Properties 40
NEC SuperScript 1800 PCL5e Properties 42
Macintosh Operating Systems 44
Opening the
Page Setup and Print Dialog Boxes 44
The Page Setup Dialog Box 44
The Print Dialog Box 46
iii
Page 4

CHAPTER 5: THE OPERATOR PANEL
Overview 47
Using the Operator Panel Buttons 48
Indicator Light 48
Operator Panel Buttons 48
Using the Menu Tree 49
Operator Panel Tasks 50
Taking the Printer Offline and Online 50
Setting Media Type 50
Stopping a Print Job 50
Cleaning the Fuser Unit 50
Restoring Factory Defaults 50
Printing Information Pages 51
The Status Display 51
Overview of Operator Panel Menus 54
Operator Panel Menus 55
CHAPTER 6: USING THE PRINTER
Overview 63
Using the Multipurpose Tray 63
Loading Paper
in the Optional 500-sheet 2nd Cassette 64
Duplex Printing 66
Manual Printing 67
Printing Envelopes 68
Loading Envelopes into the Multipurpose Tray 68
Loading Envelopes
into the 500-sheet 2nd Cassette 69
Printing Envelopes
From the Printer Driver 71
Printing Envelopes
Manually From the Operator Panel 71
Printing Transparencies 72
For Best Results 72
Printing Labels 73
CHAPTER 7: MAINTAINING YOUR PRINTER
Overview 75
Precautions 75
Replacing the Toner Cartridge 76
Cleaning the Printer 77
Moving the Printer 79
CHAPTER 8: PRINTER OPTIONS
Overview 81
Installing the 500-sheet 2nd Cassette 82
Accessing the Printer Controller Board 83
Printer Memory Upgrade 84
PostScript Level 2 Upgrade 85
IrDA and Serial Interface Upgrade 86
System Requirements 86
IrDA Card Installation 86
IrDA and Serial Connection 86
Apple LocalTalk and Serial Interface Upgrade 88
Hardware Requirements 88
Software Requirements 88
Interface Card Installation 88
LocalTalk and Serial Connection 88
10/100Base-TX Network Interface Upgrade 90
NIC Installation 90
CHAPTER 9: TROUBLESHOOTING
Overview 91
Print Quality Maintenance 91
Simple Troubleshooting 91
Paper Jam Problems 92
Jam Recovery feature 92
Understanding the Paper Path 92
Clearing Paper Jams 93
Paper Jams in the Multipurpose Tray Area 94
Paper Jams in 500-sheet Cassette Area 95
Duplex Paper Jam in the Input Tray Area 96
iv SuperScript 1800 — User’s Guide
Page 5

Duplex Paper Jam in the Back Area 97
Paper Jams in the Output Area 98
Paper Jams in the Back of the Printer 99
Operator Panel Messages 100
Print Quality 102
PostScript Problems 105
CHAPTER 10: TECHNICAL SUPPORT
Overview 107
Assistance Nearby 107
Help From Within Your Company 107
Help From Your Dealer 107
NEC Technical Support 107
How to Contact NEC 107
Ordering Supplies 108
NEC Warranty and Service 109
NEC Service Contracts 109
SuperScript 1800 Printer Limited Warranty 109
Warranty Period 109
Warranty Coverage 109
Warranty Support 110
Obtaining Warranty Service 110
Limitation of
Damages and Implied Warranties 110
APPENDIX A: PRINTER SPECIFICATIONS
Operating Specifications 111
APPENDIX B: MEDIA SPECIFICATIONS
Media Specifications 113
APPENDIX C: SAFETY INFORMATION
Laser Safety 119
CDRH Regulations 119
Ozone Emission 119
FCC Statement 120
APPENDIX D:
STATUS MONITOR MESSAGES
Status Monitor Messages 121
Index
v
Page 6

vi SuperScript 1800 — User’s Guide
Page 7
CHAPTER 1
INTRODUCTION
VERVIEW
O
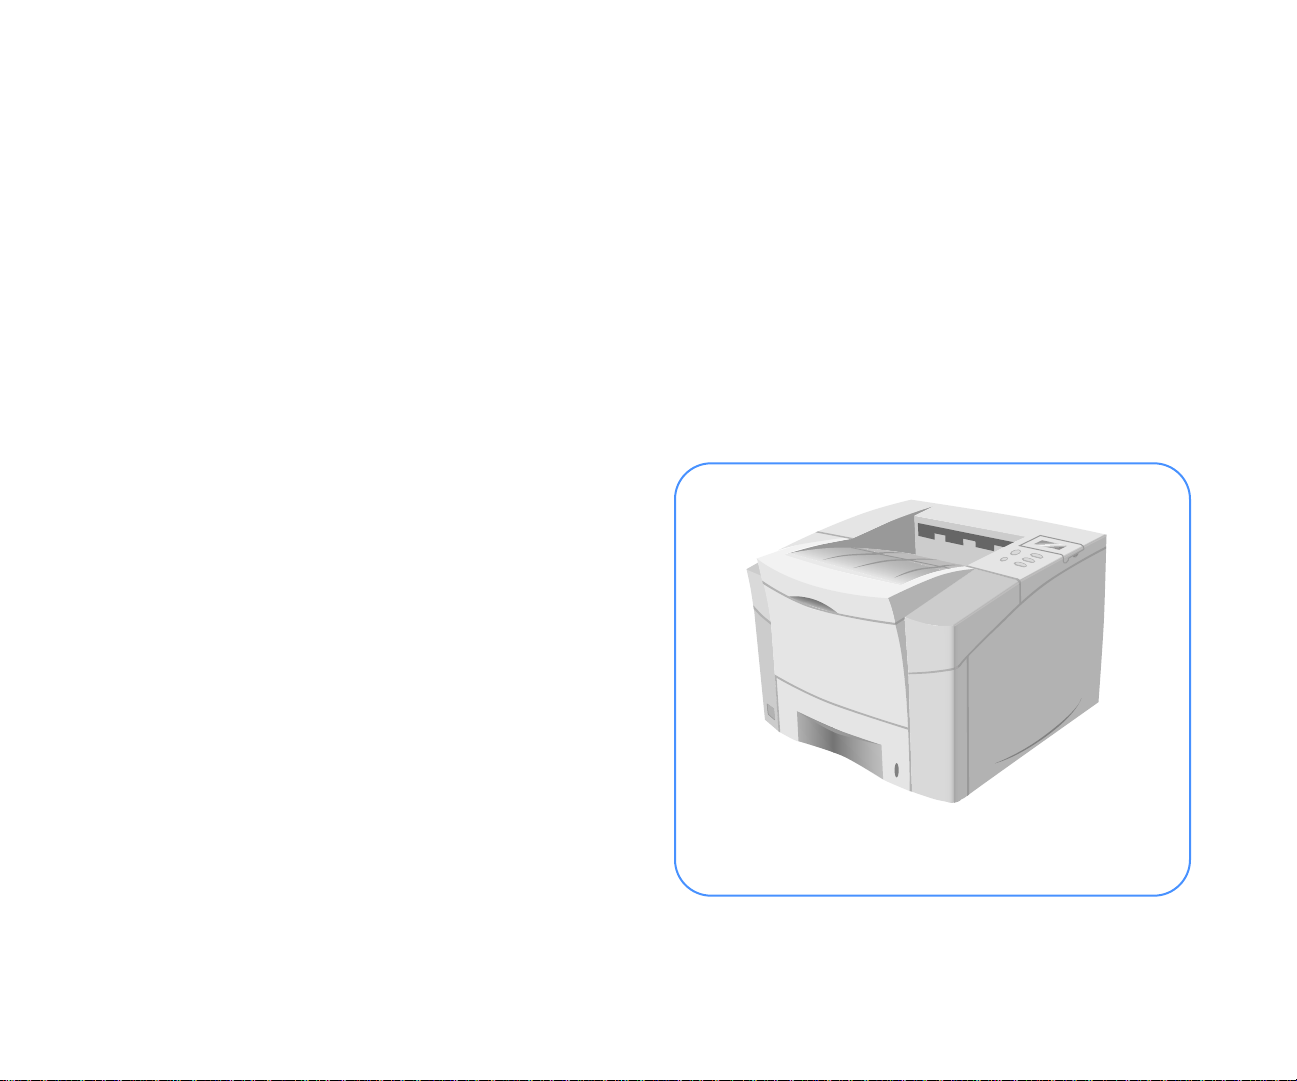
The fully-featured NEC SuperScript™ 1800 laser printer
offers the best value today for fast monochrome duplex
printing. The 1800 delivers high resolution, laser output for
business presentations and reports. The Multipurpose Tray,
500-sheet Cassette, and optional 500-sheet 2nd Cassette
combine to hold 1,100 sheets of paper.
The SuperScript 1800 has been designed to support all major
personal computer operating systems, including: DOS,
Windows
Macintosh System 7.x and 8.x are supported with the
optional 10/100Base-TX network interface card (NIC), or the
Apple
networking features allow users or workgroups on a TCP/IP,
Novell
to share the printer.
The following section reviews the features and options that
will allow you to take full advantage of your SuperScript
1800 capabilities.
®
3.1x, Windows
®
LocalTalk
®
Netware
®
95/98, and Windows NT
®
and serial interface card. These
®
, DLC/LLC, or Apple EtherTalk
®
4.0.
®
network
Printer Options
You can add these options to increase productivity and
performance.
• 500-sheet/40-envelope 2nd
• Industry standard 72-pin SIMM’s
• PostScript
• Apple
®
Level 2 Upgrade Kit
®
LocalTalk
®
and Serial Upgrade Kit
• IrDA and Serial Interface Upgrade Kit
• 10/100Base-TX internal Network Interface Card
note:
familiar with your computer and/or network
configuration, and that your system is configured and
operating properly.
The instructions in this guide assume that you are
Cassette
SuperScript 1800
NEC
SuperScript 1800 Highlights
• Prints up to 17 pages per minute
• Internal duplexer allows printing on both sides of the
page
• PCL6 and PCL5e printer languages
• 1,200 dpi quality with NEC Sharp Edge Technology
(SET)
• A 100MHz 64-bit PowerPC RISC processor
• 12 MB of RAM standard, expandable to 132 MB
• Year-2000 compliant
The SuperScript 1800 Laser Printer
1
Page 8
System Requirements
Your SuperScript 1800 printer and software can operate using
the following minimum system configurations.
Windows Operating System
• Microsoft Windows 3.1x, Windows 95/98,
or Windows NT 4.0
• 486 or higher CPU
• CD-ROM drive
• 5 MB of free hard disk space
• 8 MB or more of RAM
Macintosh Operating System
• MacOS 7.1 or higher
• CD-ROM drive
Hardware Requirements
You need to provide the following additional hardware to
setup and connect your printer.
• For a direct connection, an IEEE 1284-compliant parallel
cable.
• If you are connecting a SuperScript 1800N printer or if
you have installed the optional 1800 NIC, you will need a
Category 5 twisted pair cable with RJ-45 connectors for
10/100Base-TX Ethernet.
note:
card (NIC) automatically detects whether you have a
10 Mbps or 100 Mbps Ethernet connection. For better
performance, NEC recommends that you use shielded
cable when connecting to 100 Mbps Ethernet.
The SuperScript 1800 with a network interface
UPER
S
SuperScript 1800 printer features give you many ways to
customize your print jobs. There is often more than one place
to change the same printer setting. These include:
• PCL 5e and PCL6 printer drivers and the optional
SuperScript 1800 PostScript Level 2 driver
• The printer’s operator panel
CRIPT
S
1800 F
EATURES
Printer Driver Features
Duplex Printing
Duplex printing or “duplexing” allows you to print on both
sides of the paper. This can speed up the print time and help
conserve paper. You can use duplex printing two ways.
Choosing Long Edge lets you have the
binding orientation along the long edge of
the paper as in a magazine.
Choosing
binding orientation along the short edge of
the paper as in a calendar.
The duplexing feature can be accessed from
the printer driver’s Properties pages or from
the Operator Panel.
Proof Sheets
This layout mode allows you to print out a
reduced version of your document or
booklet. It lets you scan multiple pages at a
glance and is accessible through the Layout
Mode area of the Finishing tab in your
Window’s driver.
Short Edge lets you have the
2 SuperScript 1800 — User’s Guide
Page 9
Watermarks
With the watermark feature found in the
Window’s printer driver you can superimpose
a line of text diagonally across your final
output. Typical examples of watermarks are
ORIGINAL
the words “Draft” or “Confidential.”
Scale to Paper Size
This feature allows you to scale your print job
to any supported paper size regardless of the
digital document size. This can be useful when
you want to check the detail in a small file.
Energy Saving
The SuperScript 1800 printer meets the
requirements of the Environmental
Protection Agency’s Energy Star
Computers program for printers. The
purpose of this program is to promote
the manufacturing and marketing of energy-efficient office
automation equipment, thereby potentially reducing
combustion-related pollution. (The Energy Star emblem does
not represent EPA endorsement of any product or service.)
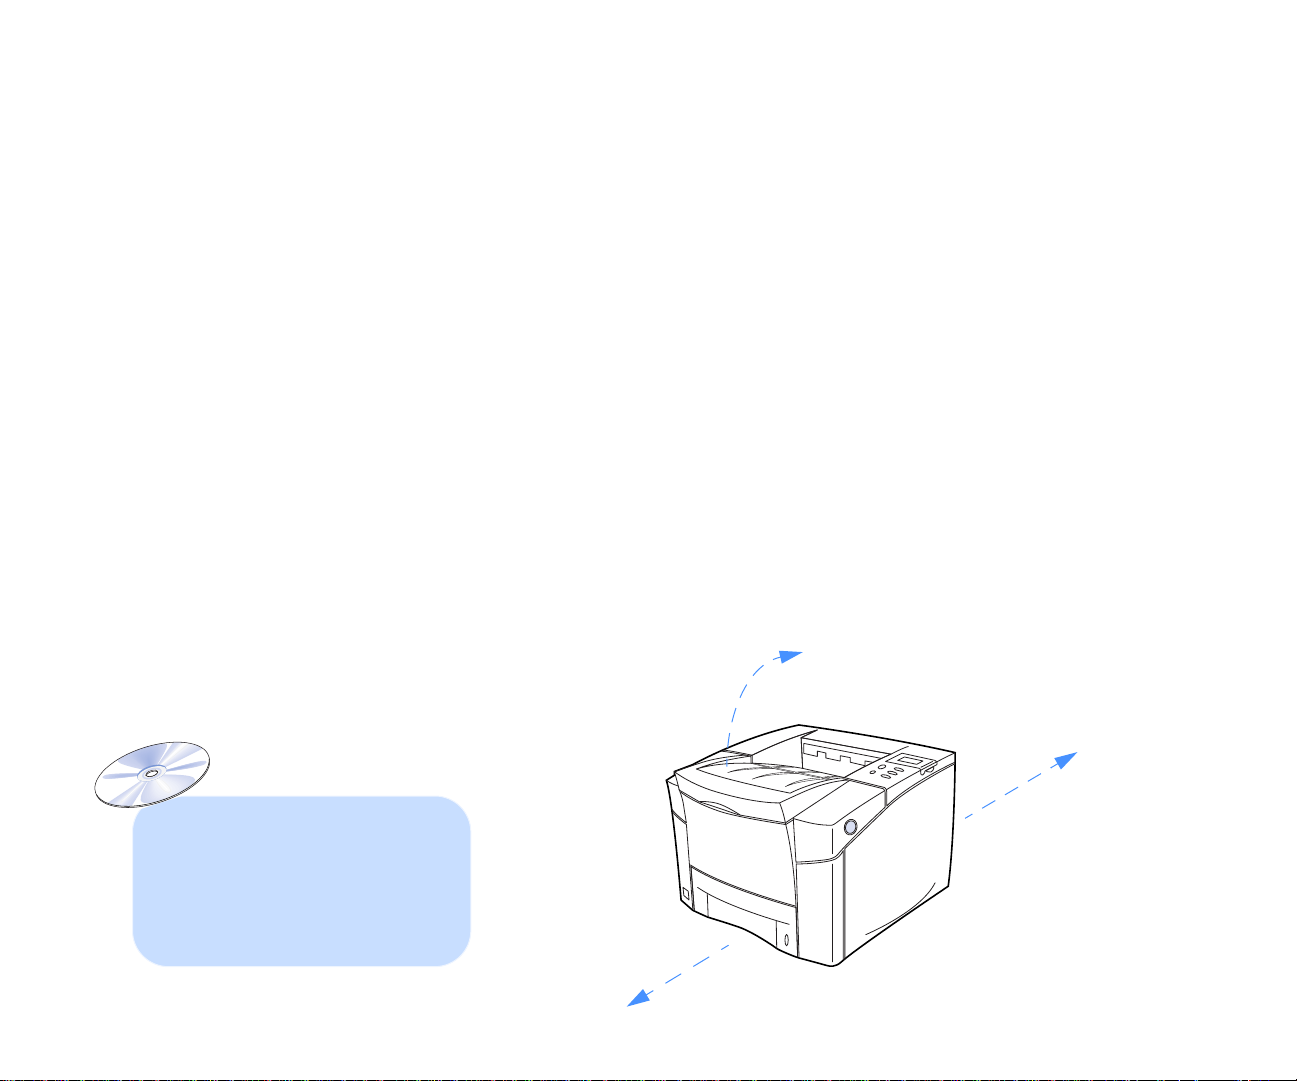
Operator Panel Features
You can use the Operator Panel to quickly cancel a print job
or change settings. If you do not have an on screen printer
driver because you are using DOS or UNIX operating
systems, use the Operator Panel to set up your print jobs.
You can view messages on the Operator Panel to help
diagnose printing problems. In addition, the Operator Panel
allows you to print out informational pages. These pages
include font lists and test pages that show you things like the
total page count. If you have a networked printer you can
also set the printer’s TCP/IP address or r econfigure network
settings. Chapter 5, “The Operator Panel,” provides
instructions for using the printer’s Operator Panel.
NEC
SuperScript 1800
GO
Continue
Select/Cancel
Menu
Item
Value
note: The LCD
message display tilts
up for easy viewing.
INTRODUCTION
SuperScript 1800 Features 3
Page 10

4 SuperScript 1800 — User’s Guide
Page 11
CHAPTER 2
GETTING STARTED
VERVIEW
O
This chapter tells you how to safely set up your printer and
begin printing right away. Included are instructions for
• Selecting a location and unpacking
• Checking printer contents and identifying printer parts
• Installing the standard 500-sheet Cassette and the Toner
Cartridge
• Loading the 500-sheet Cassette
• Connecting the printer to your computer or network
S
AFETY
To protect yourself and your equipment from possible
damage, always follow these precautions.
• Protect the printer from dampness or spills.
• Save the printer box and all packing materials that came
with your printer in case you need to ship it later.
I
NSTRUCTIONS
• Do not block or cover the ventilation holes on the side
and back of the printer.
• Unless otherwise indicated in this guide, do not attempt
to repair or modify the printer yourself.
• Read the installation instructions carefully before you
plug in your printer, and follow all warnings.
• Keep this User’s Guide handy for reference.
• The fuser area, under the Top and Back Covers is very
hot. Let the printer cool at least 15 minutes before
touching these areas.
WARNING!
grounded. It comes with a three-wire grounding plug. This
plug will only fit a grounded AC outlet or pow er strip. This
is a safety feature. Do not defeat the purpose of the
grounding plug by removing the third pin.
ELECTING
S
Select a level, stable place with adequate space for air
circulation and opening covers and trays. The area should be
well ventilated and away from direct sunlight or sources of
heat, cold, and humidity. See image below for clearance
space. Do not set the printer close to the edge of your desk or
table!
This printer is intended to be electrically
A
OCATION
L
note: In order for this printer to
work, it is very important to
properly install the printer driver
software after the printer is
connected. See Chapter 3 for
specific installation instructions for
your operating system.
20”
12”
Keep printer vents
unobstructed
12”
For more details on printer
dimensions see Appendix A,
“Printer Specifications.”
5
Page 12
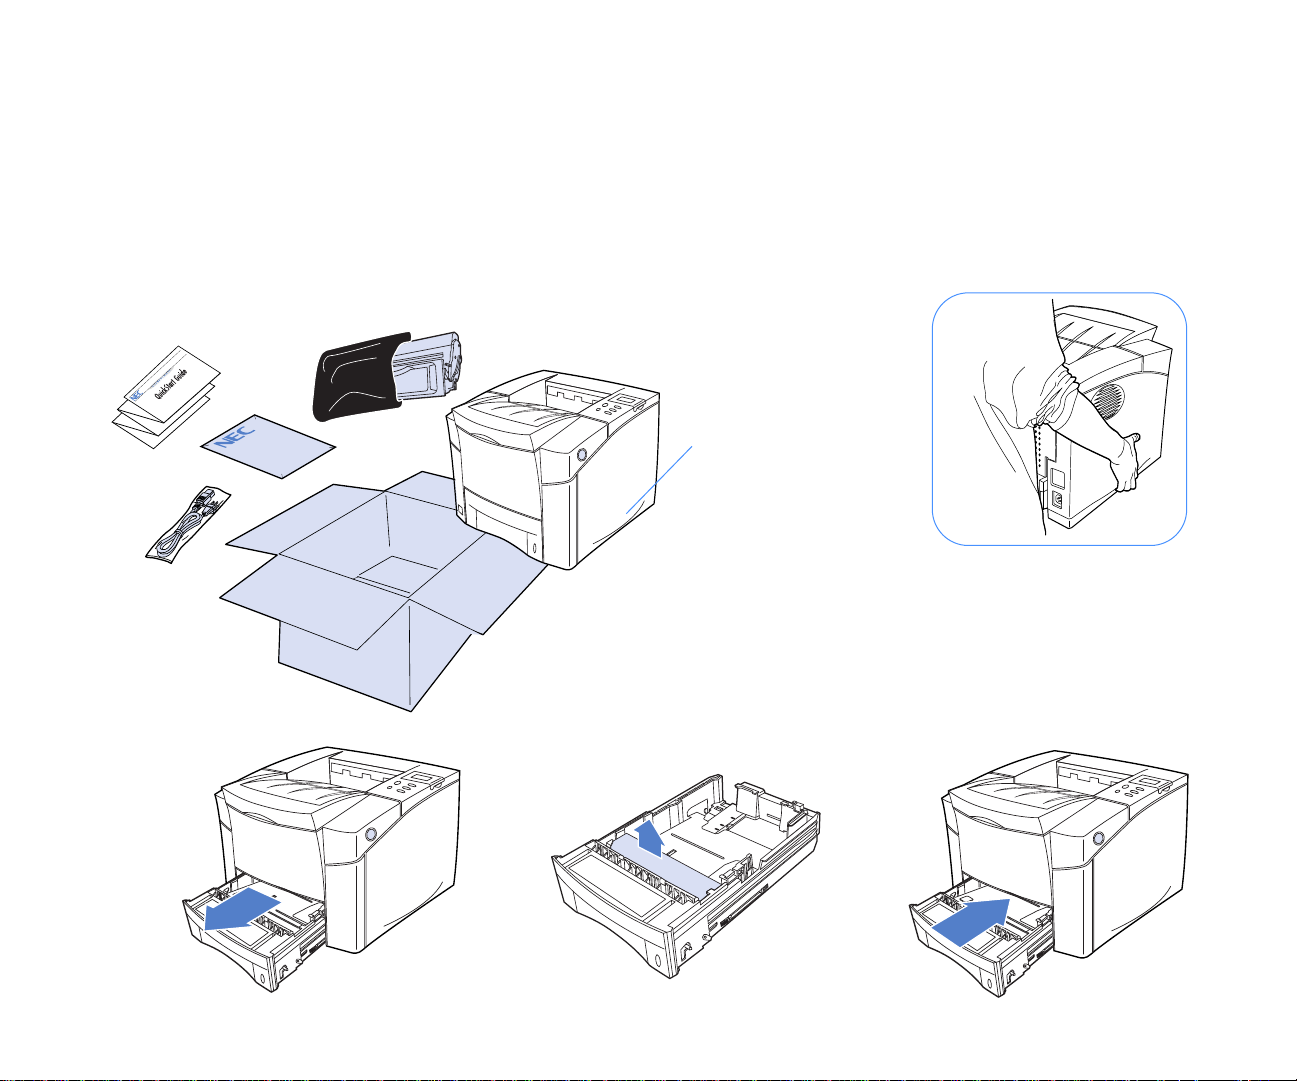
NPACKING
U
Follow these steps to safely unpack the printer.
1. Open the top cover of the packing box and remove the
Accessory Kit, QuickStart Guide, Toner Cartridge, and
Power Cord (A) .
2. Carefully lift the printer out of the box. Use the hand
grips on both sides of the printer (B) .
Unpacking the Printer
A
1800
note: Do not discard the box and
packing material.
3. Make sure all items are included in your box (see the list
on the next page).
4. Remove any packing tape from the printer.
5. Remove the 500-sheet Cassette from the printer (C) and
remove the packing material from inside (D) .
6. Insert the tray into the printer (E) .
B
Hand Grip
The back of the printer should
be facing you when you lift it!
This printer weighs about
36 lbs.
C
6 SuperScript 1800 — User’s Guide
D
E
Page 13
C
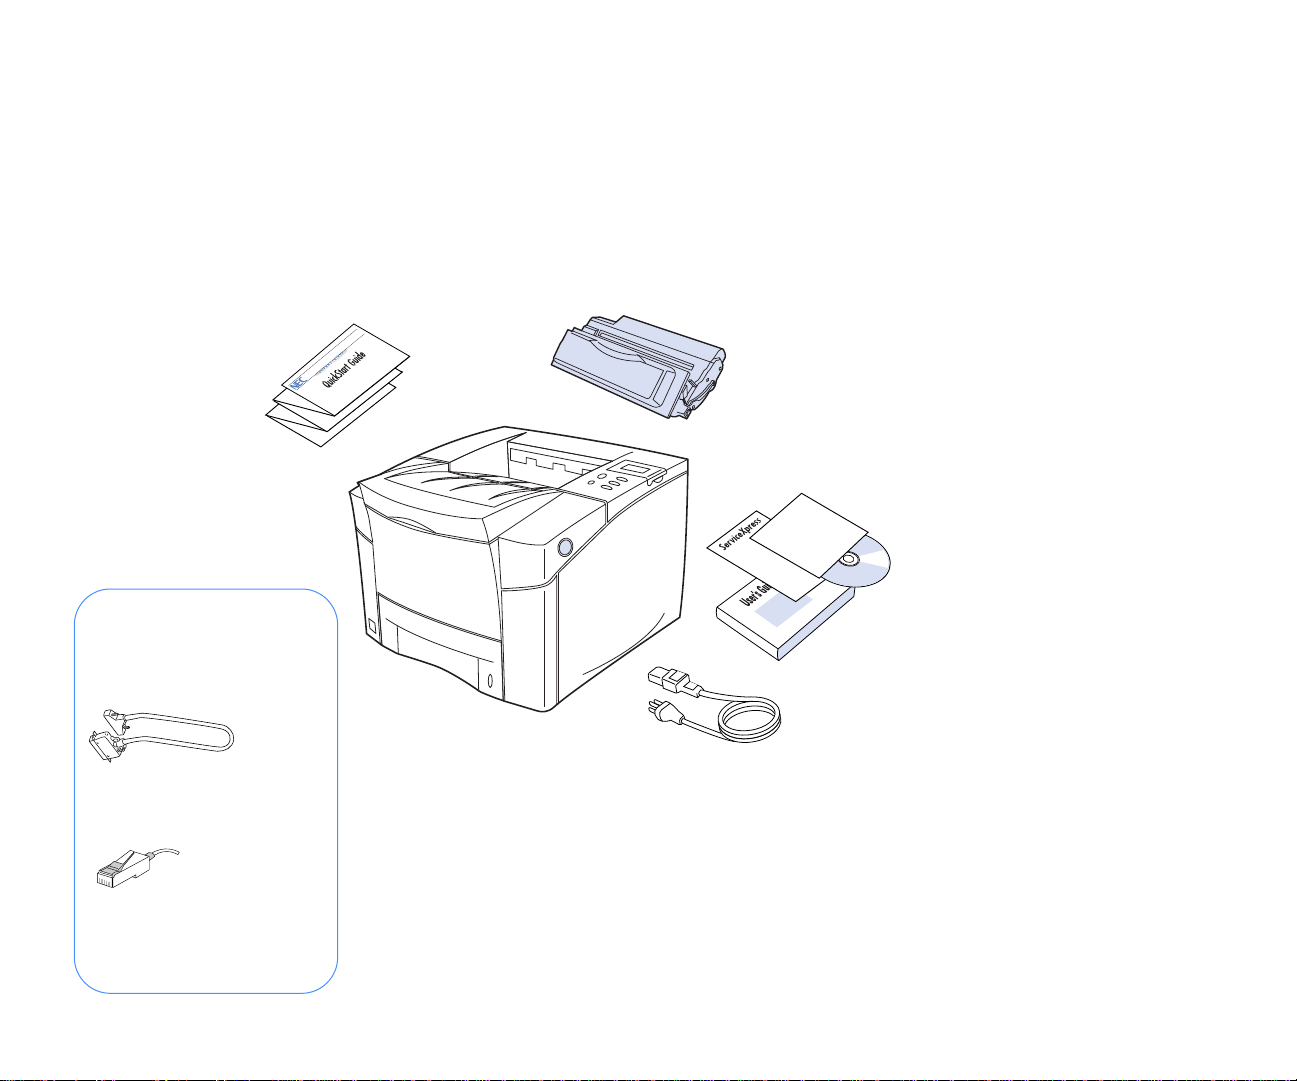
HECKING PRINTER CONTENTS
Take a moment to verify that the following items were
included in your printer box.
• SuperScript 1800 Printer
• 500-sheet Cassette (already installed in printer)
• QuickStart Guide
• Accessory Kit (contained in an envelope)
• Power Cord
• Toner Cartridge
GETTING STARTED
If any items are missing or damaged, contact the store where
you purchased the printer.
QuickStart Guide
Not Included …
To connect your printer,
you need to provide the
proper parallel and/or
network cable.
For local connection:
IEEE 1284-compliant
Bidirectional Parallel Cable
For network connection:
Category 5 Twisted Pair
Cable with RJ-45 Connectors
for 10/100Base-TX Ethernet
1800
Toner Cartridge
SuperScript 1800
Solutions CD
Power Cord
Accessory Kit
• SuperScript 1800 User’s Guide
• SuperScript 1800 Solutions CD
• ServiceXpress Brochure
note: Save the box and packing
material.
Checking Printer Contents 7
Page 14

I
DENTIFYING PRINTER PARTS
Use the illustrations on the facing page to identify standard
parts for the SuperScript 1800.
Front View
• Operator Panel —for displaying messages and
configuring the printer. The LCD message area pops up
for easy viewing.
• Power Button —for turning on and off the printer.
• Hand Grips —used for lifting printer.
• Top Cover —provides access to the Toner Cartridge (also
serves as the Output Tray).
• Output Tray (Bin) —holds up to 250 printed sheets.
Referred to as output bin on the Operator Panel.
• Paper Sensor (internal)—senses when the Output tray
has reached its limit of printed sheets. Operator Panel
will display a message when this happens.
• Top Cover Release Button —unlocks and opens the Top
Cover .
• Multipurpose Tray —drops open to hold various
amounts of paper, envelopes, labels, or transparencies.
Referred to as T ray 1 in the printer driver and Operator
Panel.
• 500-sheet Cassette —standard input tray . Referred to as
T ray 2 in the printer driver or Operator Panel.
• Paper Level Indicator —a see through window showing
paper level.
Top Internal View
• Transfer Roller —transfers image to paper.
• Toner Cartridge Area —holds Toner Cartridge.
• Laser Brush —used to clean the laser beam window.
Back Internal View
• Back Cover —opens to facilitate clearing paper jams
occurring in the back area.
• Fuser Unit —uses heat and pressure to adhere image to
the paper.
• Duplex Unit —prints double-sided documents.
Back View
• Back Label —contains the printer’s serial number
necessary for warranty registration.
• Interface Panel —contains the Controller Board and any
added options such as a network interface card (NIC).
• Power Cord Connector —for attaching the Power Cord.
• Back Vent —allows ventilation.
• Side Vent —holds ventilation fan.
8 SuperScript 1800 — User’s Guide
Page 15
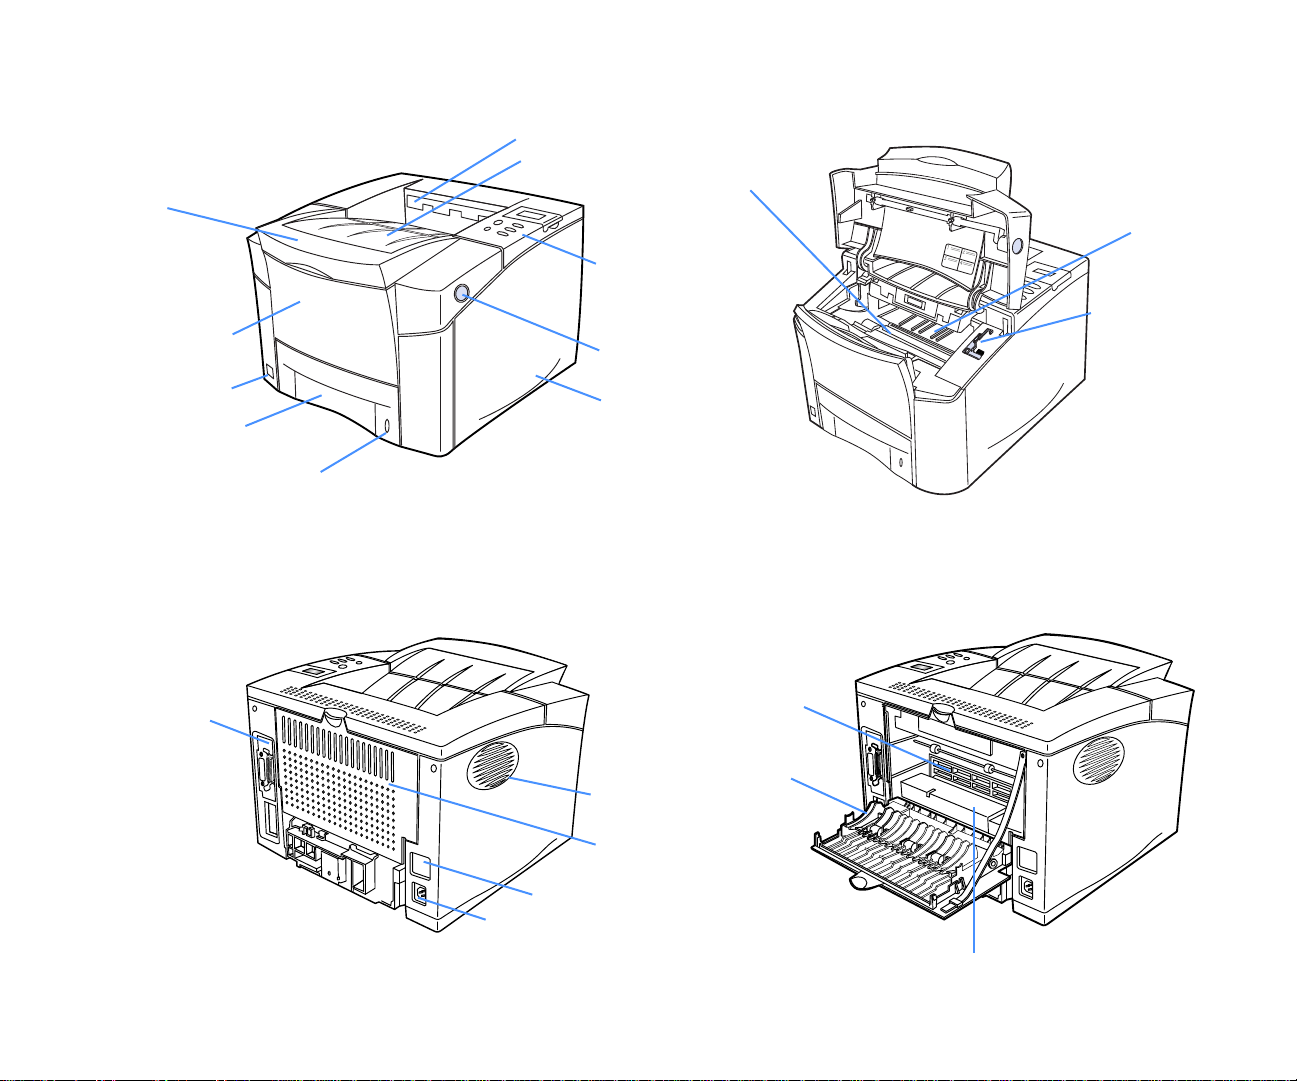
Important Printer Parts
GETTING STARTED
FRONT VIEW
Top Cover
Multipurpose Tray
(Tray 1)
Power Button
500-sheet Cassette
(Tray 2)
Paper Level Indicator
BACK VIEW
Interface Panel
Paper Sensor
Output Tray
Operator Panel
Top Cover
Release Button
Hand Grip
TOP INTERNAL VIEW
Transfer Roller
Toner Cartridge
Area
Laser Brush
BACK INTERNAL VIEW
Duplex Unit
Back Label
Power Cord
Connector
Back Cover
Side Vent
Back Vent
Fuser Unit
Identifying Printer Parts 9
Page 16
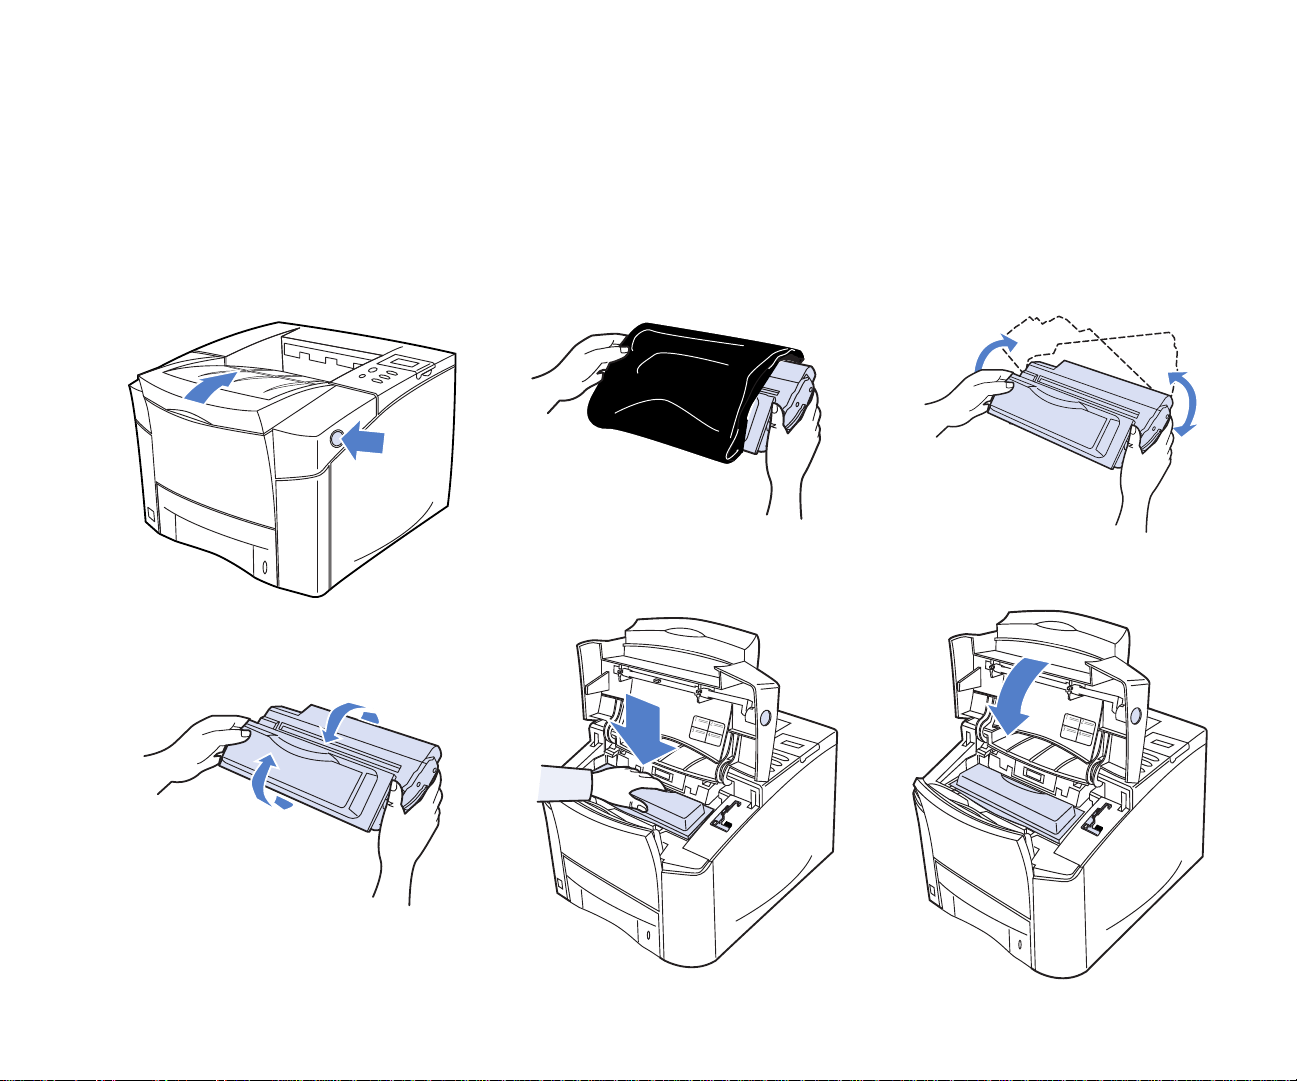
I
NSTALLING THE TONER CARTRIDGE
1. Press the Top Cover Release Button, then lift the Top
Cover (A).
2. Remove the Toner Cartridge from its bag (B). Do not
open the shutter or touch the shiny green material on the
underside of the Toner Cartridge.
3. Hold the cartridge horizontally and shake as shown
about 10 times (C).
4. Rock the Toner Cartridge forward and back several times
(D).
note:
loosen and distribute the toner inside, which may have
settled during storage.
Please shake the Toner Cartridge thoroughly to
5. Facing the front of the printer, gently place the Toner
Cartridge inside (E). Make sure the arrow on top of the
Toner Cartridge points to the back of the printer.
6. Close the Top Cover of the printer (F).
A
D
B
E F
C
10 SuperScript 1800 — User’s Guide
Page 17
L
D
Lever
C
note:
The 500-sheet Cassette
will be referred to as Tray 2 in the
printer driver and Operator Panel.
B
A
Back Paper Guide
Print-side down
E F
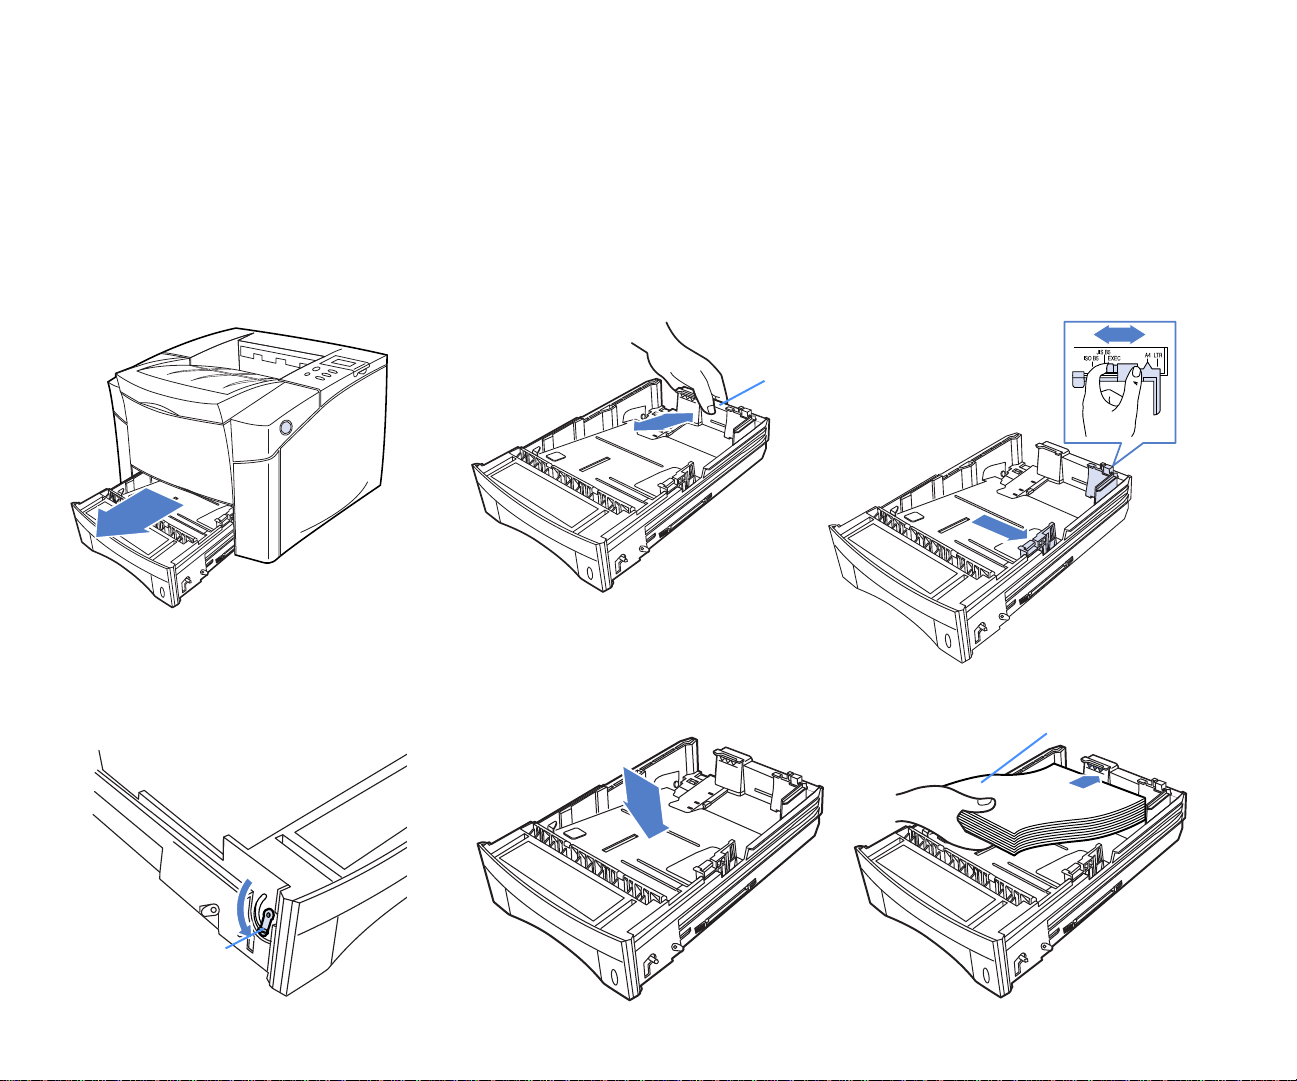
OADING THE
The 500-sheet Cassette (Tray 2) can hold up to 500 sheets of
medium weight paper—letter size (U.S.), legal, folio or A4.
See Appendix B, “Media Specifications,” for a complete list of
paper that can be used.
1. Pull the 500-sheet Cassette tray out of the printer (A).
2. Squeeze the metal plate on the Back Paper Guide and
slide it to the desired paper length. It will click into place
(B). Paper size markings are embossed on the inside
bottom of the tray.
500-
SHEET CASSETTE
3. Pinch the top of the Right Corner Guide, lift slightly, and
slide the guide to the width of your paper (C). Paper size
widths are embossed on top of the Back Paper Guide.
4. To load legal or folio size paper, make sure the lever on
the front left side of the cassette is locked (D). If it is not
all the way down as shown, pull the lever out slightly
and snap it into the small hole under the slot.
5. Push down metal plate in bottom of tray (E).
6. Load the paper stack against the back left corner of the
cassette tray (F). Directions continued on next page.
GETTING STARTED
Loading The 500-sheet Cassette 11
Page 18
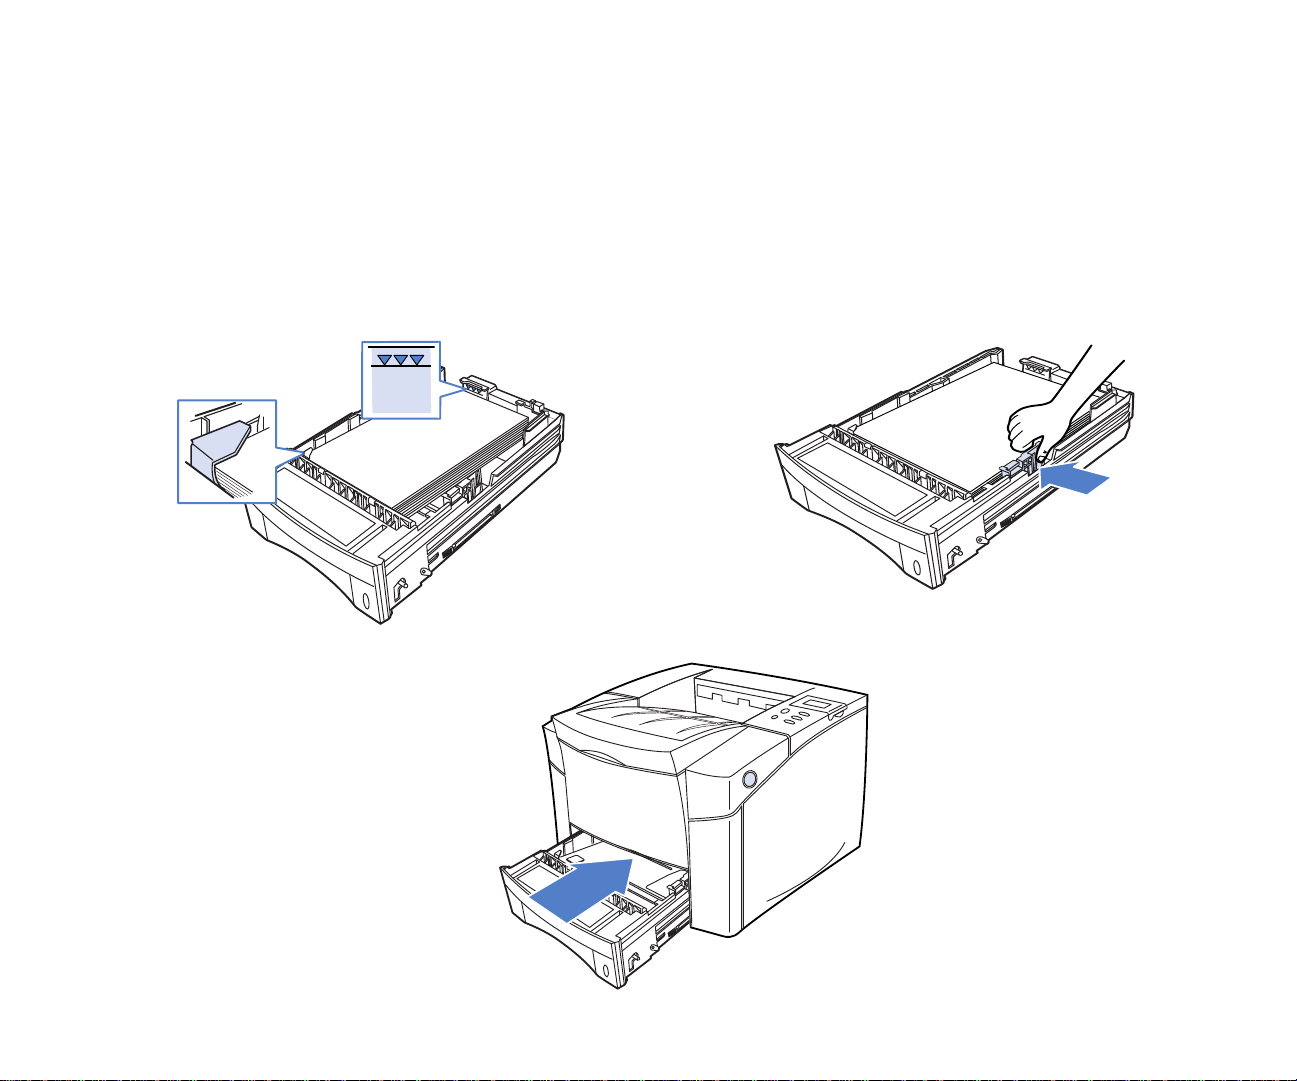
7. Make sure the bottom of the paper stack is under the
metal tab (G).
note:
Load paper in this cassette print-side down.
8. Squeeze the Paper Width Guide and slide it lightly
against the paper as shown (H).
9. Gently insert the 500-sheet Cassette into the printer (I).
Paper Limit Line
G
Metal Tab
Do not overfill the cassette!
note: The directions for loading paper into the optional
500-sheet 2nd Cassette differ from these directions (see
Chapter 6, “Using the Printer”).
H
12 SuperScript 1800 — User’s Guide
I
Page 19
C
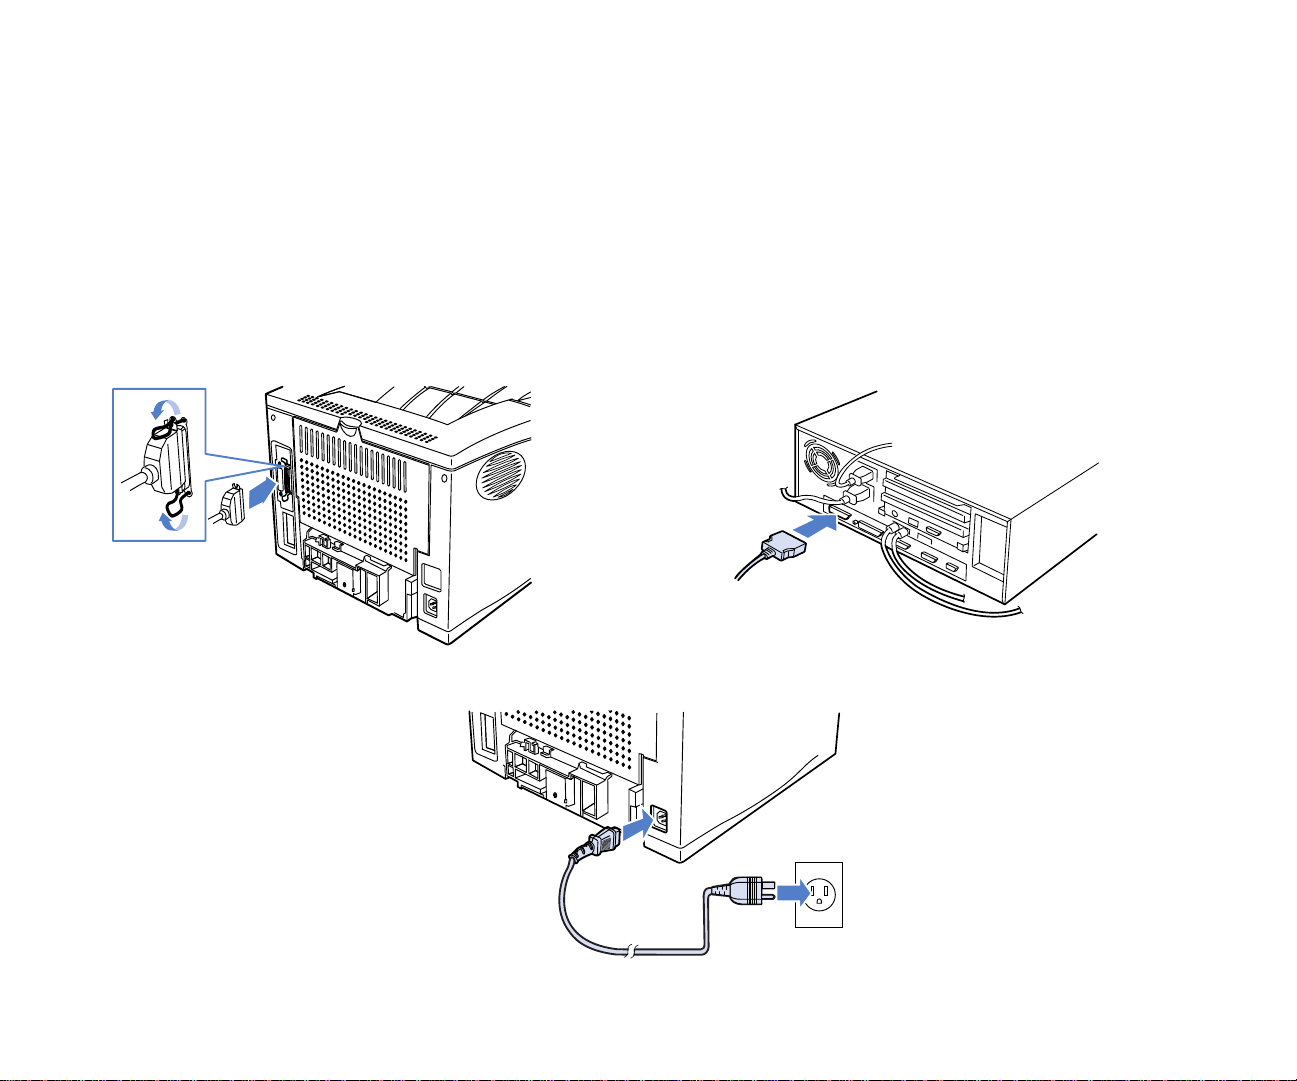
ONNECTING THE PRINTER LOCALLY
To connect the SuperScript 1800 printer locally we
recommend using an IEEE 1284-compliant bidirectional
parallel cable that is no more than 6 feet in length. If you use
a cable that is longer than 6 feet, it should be certified as 1284
bidirectional. Make sure the printer and computer are both
turned off and disconnected from the power.
1. Plug the appropriate end of the parallel cable into the
connector on the back of the printer. Fasten the clips at
the end of the connector into the notches on the plug (A).
2. Plug the other end of the cable into the appropriate
parallel connector on your computer (B).
3. Connect the Power Cord to the rear of the printer. Plug
the other end of the Power Cord into a properly
grounded outlet (C).
note:
computer, make sure both the computer and the printer
are turned off before you install the printer software. See
Chapter 3, “Installing the Software,” for printer driver
installation instructions.
If you are running Windows 95 or 98 on your
GETTING STARTED
A
C
B
Connecting the Printer Locally 13
Page 20
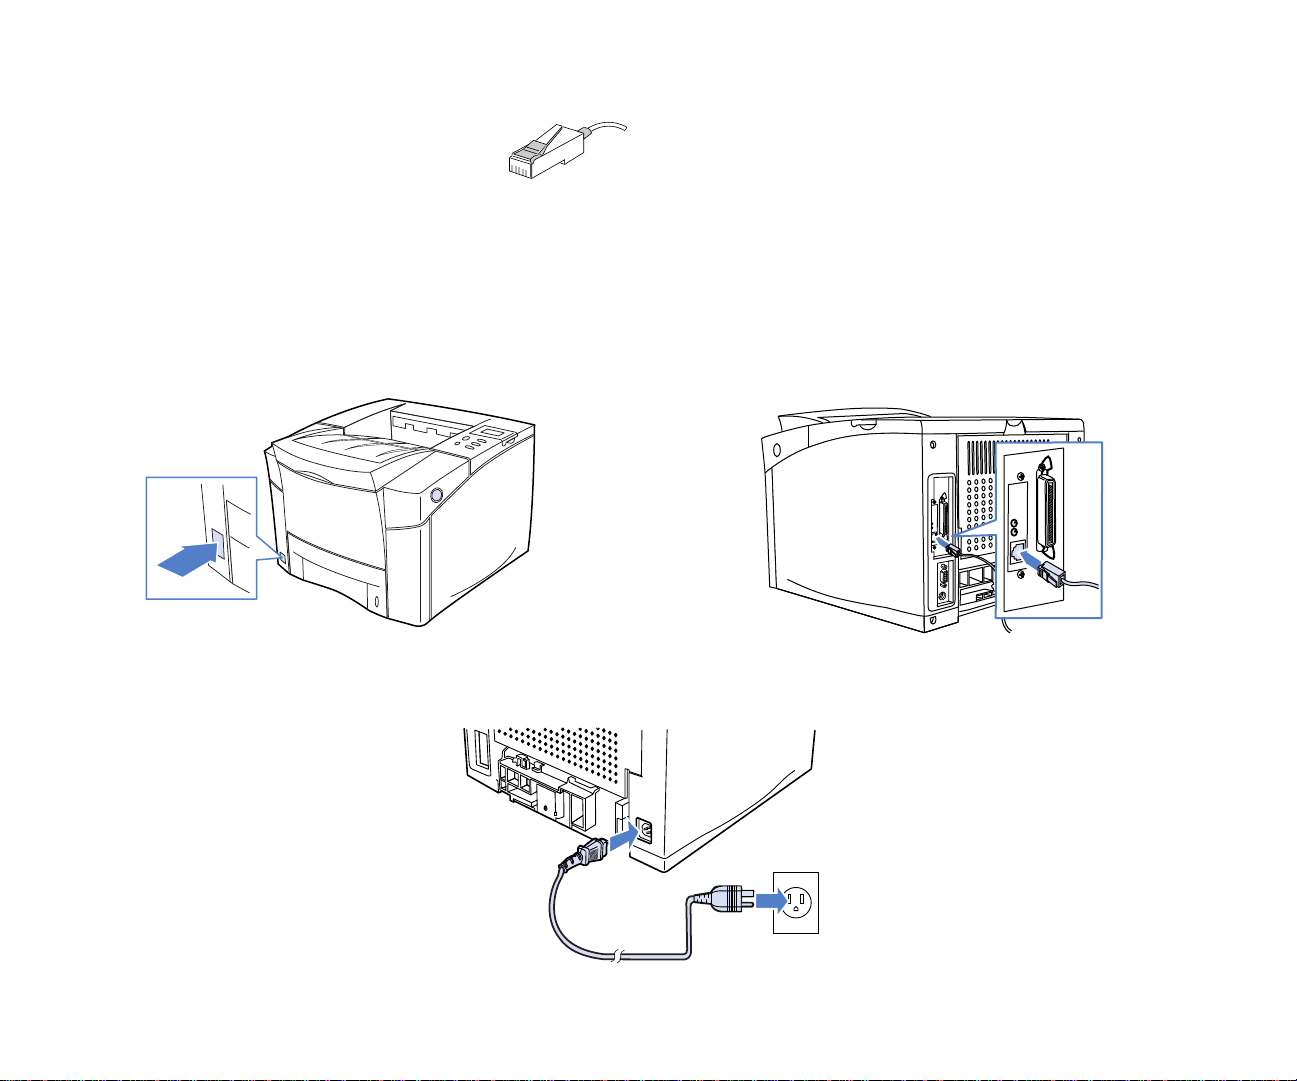
C
ONNECTING THE PRINTER TO A
N
ETWORK
If you have a SuperScript 1800 with a NIC
installed, you can connect to an Ethernet
network. Use a Category 5 twisted pair cable
with RJ-45 connectors for
10/100Base-T Ethernet.
Follow these basic steps to connect the printer and verify that
it is communicating with the network.
1. Make sure your computer and printer are turned off (A).
2. Connect the network’s twisted pair cable with RJ-45
connectors to the network port on your printer (B).
3. Attach the power cord to the printer and plug it in (C).
4. Turn on the printer. It may take up to a few minutes to
warm up.
5. A network settings page will print out showing the
network status of the printer.
6. For more details about configuring your printer for the
network refer to the SuperScript 1800 Network User’s
Guide.
note:
computer, turn off both the computer and the printer
before you install the printer software. See Chapter 3,
“Installing the Software,” for printer driver installation
instructions.
If you are running Windows 95 or 98 on your
A
C
B
14 SuperScript 1800 — User’s Guide
Page 21

CHAPTER 3
INSTALLING
THE SOFTWARE
O
VERVIEW
This chapter describes how to install the SuperScript 1800
printer software onto a W indows or Macintosh computer . For
detailed information about the software features, see
Chapter 4, “Printer Software.”
S
OFTWARE FOR
Printer software for computers running Windows 95 or 98 is
listed below.
• PCL6 printer driver
• PCL5e printer driver
• PostScript Printer Description (PPD)
• SuperScript 1800 Status Monitor
NEC recommends using the PCL6 driver because of it’s
advanced features. Use the PCL5e driver for legacy
applications that cannot communicate with the PCL6 driver.
Windows 95 and 98 come with a standard PostScript printer
driver. In order to send print jobs to the printer , the PostScript
driver must use the PPD.
note:
NEC PostScript Level 2 Upgrade Kit (Order No. 1802) must
be installed in the printer. See Chapter 8, “Printer
Options,” for more information.
Use the Status Monitor for monitoring the connection
between the computer and printer and the status of a print
job. The Status Monitor cannot be used to monitor a printer
connected to a network.
To use the Windows PostScript printer driver, the
W
INDOWS
95 & 98
Installing the Software
note: If installing the printer software for the first time,
assure that the printer and computer are both turned off
before performing the following procedures!
The printer software can be installed using the Windows
Plug-N-Play feature or by using the NEC Meta Installer.
note:
method to install the printer software.
Using Windows Plug-n-Play
Windows Plug-N-Play is a feature of W indows 95 and 98 that
automatically recognizes when new hardware is connected to
the computer . If the printer is connected to the computer with
an IEEE 1284-compliant parallel cable, Windows will be
aware of it and begin asking you for information so it can
install the printer software. This procedure will only install
the PCL6 printer driver.
note:
canceled out of the Windows Plug-N-Play installation, use
the NEC Meta Installer method.
To install a PCL6 driver using Windows Plug-N-Play:
1. Turn on the printer and wait until READY appears on the
Operator Panel display.
2. Turn on your computer and while it starts, it will become
aware of the new printer connected to it.
3. Follow the instructions displayed on your monitor.
4. If asked to locate any files, they can be found on the
SuperScript 1800 Solutions CD in one of the following
directories, depending if you are running
Windows 95 or 98.
• SS1800\DISKETTE\WIN95\PCL6\DISK1
• SS1800\DISKETTE\WIN98\PCL6\DISK1
Once Step 4 is completed, the NEC SuperScript 1800 PCL6
printer driver can be used for printing.
NEC recommends using the Meta Installer
If you started your system at an earlier time, then
15
Page 22

Using the NEC Meta Installer
The NEC Meta Installer is a program that installs all the
printer software without having to use Windows Plug-NPlay. During the install, you can choose which software you
want to install.
To install the printer software using the NEC Meta Installer:
1. Turn on your computer and wait until the desktop
appears.
2. Turn on the printer and wait until READY appears on the
Operator Panel display.
3. Insert the SuperScript 1800 Solutions CD into your
computer.
note:
appears on the monitor shortly after the disk is inserted,
go to Step 6, if not, go to Step 4.
If the NEC SuperScript 1800 Solutions CD Installer
4. From the desktop, double-click My Computer to open
the My Computer window.
5. Double-click the NEC SS1800 icon to start the installer.
As an alternative, right mouse button click on NEC
SS1800 then select Open or Autoplay to start the
installer. If neither one of these methods work, doubleclick Setup.exe which is located on the CD.
6. Follow the instructions that appear on your monitor to
complete the installation.
note:
NEC 1800 PS Printer Driver when the Select Components
dialog box appears. Later, when the Add Printer Wizard
appears, click the Have Disk button then navigate the
SuperScript 1800 Solutions CD
directory to get the PostScript installation file. Depending
on your operating system, navigate to one of the
following directories.
• \Ss1800\Win95\Ps
• \Ss1800\Win98\Ps
To install a PostScript printer driver, select
to the appropriate
Installing Additional Software
If you have already added some printer software, you can
add the remaining programs at anytime.
To install additional printer software:
1. Insert the SuperScript 1800 Solutions CD into your
computer.
note:
after the disk is inserted, go to Step 4, if not, go to Step 2.
If the NEC Installer appears on the monitor shortly
2. From the desktop, double-click My Computer to open
the My Computer window.
3. Double-click the NEC SS1800 icon to start the installer.
As an alternative, right mouse button click on NEC
SS1800 then select Open or Autoplay to start the
installer. If neither one of these methods work, doubleclick Setup.exe which is located on the CD.
4. Follow the instructions that appear on your monitor to
complete the installation.
note:
NEC 1800 PS Printer Driver when the Select Components
dialog box appears. Later, when the Add Printer Wizard
appears, click the Have Disk button then navigate the
SuperScript 1800 Solutions CD
directory to get the PostScript installation file. Depending
on your operating system, navigate to one of the
following directories.
• \Ss1800\Win95\Ps
• \Ss1800\Win98\Ps
To install a PostScript printer driver, select
to the appropriate
16 SuperScript 1800 Series — User’s Guide
Page 23

Removing Printer Software
Different methods are used for removing the printer drivers
and Status Monitor from computers running Windows 95 or
98.
To remove a printer driver:
1. Click the Windows Start button, point to Settings , then
select Printers to open the Printers window.
2. Select the printer driver you want to remove.
3. From the File menu, select Delete , and a confirmation
will appear.
4. Click Yes to confirm.
To remove the Status Monitor, PCL6, and PCL5e driver:
1. Click the Windows Start button, point to Programs , then
to NEC SuperScript 1800 , then select
NEC SuperScript 1800 Uninstaller and a confirmation
message will appear.
2. Click Yes to begin removing the software from your
computer.
S
OFTWARE FOR
Software for computers running Windows NT 4.0 is in the
form of three printer drivers: the PCL6, PCL5e, and the
Windows PostScript printer driver. All three can be installed
from the SuperScript 1800 Solutions CD.
NEC recommends using the PCL6 driver because of it’s
advanced features. Use the PCL5e driver for legacy
applications. If the PostScript 2 Upgrade Kit has been
installed in the printer, use the Windows Postscript driver.
W
INDOWS
NT 4.0
Installing the Software
Installing a PCL6, PCL5e, or Windows PostScript driver
involves inserting the SuperScript 1800 Solutions CD into your
computer and following the instructions displayed on the
monitor. During the install, you can choose which driver you
want to install.
note:
NEC PostScript Level 2 Upgrade Kit (Order No. 1802) must
be installed into the printer. See Chapter 8, “Printer
Options,” for more information.
To use the Windows PostScript printer driver, the
To install printer software for Windows NT 4.0:
1. Turn on your computer and wait until the desktop
appears.
2. Turn on the printer and wait until READY appears on the
Operator Panel display.
3. Insert the SuperScript 1800 Solutions CD into your
computer.
note:
appears on the monitor shortly after the disk is inserted,
go to Step 6, if not, go to Step 4.
4. From the desktop, double-click My Computer to open
the My Computer window.
5. Double-click the NEC SS1800 icon to start the installer.
As an alternative, right mouse button click on NEC
SS1800 then select Open or Autoplay to start the
installer. If neither one of these methods work, doubleclick Setup.exe which is located on the CD.
note:
1800 PS Printer Driver when the Select Components
dialog box appears. Later, when the Add Printer Wizard
appears, click the Have Disk button then navigate the
SuperScript 1800 Solutions CD
directory to get the PostScript installation file. Depending
on your operating system, navigate to the following
directory:
• \Ss1800\Winnt4\Ps
6. Follow the instructions that appear on your monitor to
complete the installation.
If the NEC SuperScript 1800 Solutions CD Installer
To install a PostScript printer driver, select NEC
to the appropriate
Removing Printer Software
To remove a printer driver from Windows NT 4.0:
1. Click the Windows Start button, point to Settings , then
select Printers to open the Printers window.
2. Select the printer driver you want to remove.
3. From the File menu, select Delete , and a confirmation
will appear.
4. Click Yes to confirm.
INSTALLING THE SOFTWARE SOFTWARE FOR WINDOWS NT 4.0
Software for Windows NT 4.0 17
Page 24

S
OFTWARE FOR
Software for computers running Windows 3.1x is in the form
of two printer drivers: the PCL6 and PCL5e printer driver.
Both can be installed from the SuperScript 1800 Solutions CD.
NEC recommends using the PCL6 driver because of it’s
advanced features. Use the PCL5e driver for legacy
applications.
W
INDOWS
3.1
X
Installing the Software
Installing a PCL6 and PCL5e driver involves inserting the
SuperScript 1800 Solutions CD into your computer and
starting the Setup program located on the CD. Both drivers
will be installed simultaneously.
To install printer software for Windows 3.1x:
1. Insert the SuperScript 1800 Solutions CD into your
computer.
2. Open the Program Manager window.
3. From the File menu, select Run to open the Run dialog
box.
4. Click Browse to open the Browse dialog box.
5. From the Drives drop-down list, select the item assigned
to your CD drive. Once selected, the directories and files
located on the SuperScript 1800 Solutions CD will appear.
6. Select Setup.exe , then click OK to return to the Run
dialog box.
7. Click OK to begin installing the printer software.
When the Select Components dialog box appears, select
the Printer Driver check box then continue to follow the
instructions displayed on your monitor to finish the
install.
When the installation is complete, it is not necessary to restart
your computer.
Removing the Software
Removing the printer software involves using an uninstaller
program to simultaneously remove all the SuperScript 1800
printer software.
To remove the printer software from Windows 3.1x:
1. Open the Program Manager window.
2. Double-click the NEC SuperScript 1800 icon to open the
NEC SuperScript 1800 window.
3. Double-click the NEC SuperScript Uninstaller icon to
begin the removal process.
When the removal is complete, it is not necessary to restart
your computer.
S
OFTWARE FOR THE
This section describes the hardware and software
requirements for Macintosh computers, and how to install
the printer software.
M
ACINTOSH
Software Requirements
For Macintosh computers to connect to the printer , they must
meet three software requirements:
• The operating system must be Mac OS 7.1 or higher.
• The standard Macintosh LaserWriter printer driver must
be installed.
• The NEC SuperScript 1800 PPD must be installed.
Hardware Requirements
Hardware requirements are categorized into requirements
for the Macintosh and requirements for the printer.
Macintosh Hardware Requirements
The hardware required by your Macintosh is based on how
you plan on connecting it to the printer. The connection can
be made by using Apple LocalTalk or by using a network.
• To directly connect to the printer using LocalTalk, your
Macintosh must have a LocalTalk port. A LocalTalk cable
is then used for connecting the port directly to the
printer. The cable is not supplied with the printer, but is
available at your local computer hardware store.
• If using a network to connect to the printer, your
Macintosh must has a Network Interface Card (NIC) and
the appropriate cable to connect the NIC to your
network.
18 SuperScript 1800 Series — User’s Guide
Page 25

Printer Hardware Requirements
To receive print jobs from a Macintosh computer, the printer
must be upgraded so that it can process the PostScript printer
language, and also be upgraded to use either a LocalTalk or a
network connection.
For detailed information about the following upgrades, see
Chapter 8, “Printer Options.” For ordering information, see
Chapter 10, “Technical Support.”
P
OSTSCRIPT LEVEL
2 U
PGRADE
(O
RDER NO
. 1802)
Since Macintosh computers send their print jobs to printers
in the PostScript language, the SuperScript 1800 must be
upgraded with the PostScript Level 2 Upgrade Kit.
A
PPLE LOCALTALK INTERFACE UPGRADE
(O
RDER NO
. 1804)
Apple LocalTalk involves connecting the computer and
printer directly to each other using a LocalTalk cable. If you
plan on using this connection method, the LocalTalk and Serial
Interface Upgrade Kit must be installed in the printer.
N
ETWORK INTERFACE UPGRADE
(O
RDER NO
. 1805)
If you plan on connecting your Macintosh to the printer
through a network, the 10/100Base-TX Network Interface Kit
must be installed in the printer.
Installing the Software
Software installation involves installing the LaserWriter
printer driver and SuperScript 1800 PPD.
Installing the LaserWriter Printer Driver
The LaserWriter printer driver is standard to the Mac OS 7.1
and higher. Check the Macintosh Chooser to assure that it is
installed. If it isn’t, use the Mac OS help system for
information about installing it.
Installing the SuperScript 1800 PPD
The SuperScript 1800 PPD is installed from the SuperScript
1800 Solutions CD.
To install the SuperScript 1800 PPD:
1. Insert the SuperScript 1800 Solutions CD into your
Macintosh and the SS1800 window will appear.
2. Double-click the SuperScript 1800 Installer icon to begin
installing the PPD. Follow the instructions presented on
the monitor.
3. From the Apple menu, point to Control Panels then click
AppleT alk to open the AppleTalk dialog box.
4. From the Connect Via drop-down list, select Printer Port
if connecting with a LocalTalk cable, or select Ethernet if
using a network connection.
note:
selecting Printer Port will disconnect communication with
the network.
If the computer is connected to a network,
5. From the Apple menu, select Chooser to open the
Chooser window.
6. From the left pane of the Chooser window, select
LaserWriter and the NEC SuperScript 1800 will appear
in the right pane of the window.
7. Click Create to setup the printer . When cr eated, the NEC
SuperScript 1800 icon will appear on the desktop.
8. Close the Chooser window.
INSTALLING THE SOFTWARE SOFTWARE FOR THE MACINTOSH
Software for the Macintosh 19
Page 26

20 SuperScript 1800 Series — User’s Guide
Page 27

CHAPTER 4
PRINTER SOFTWARE
O
VERVIEW
Your SuperScript 1800 Solutions CD comes with two PCL
printer drivers and a PostScript Printer Description (PPD) for
creating and sending print jobs to the SuperScript 1800. This
chapter describes those printer drivers and the PPD. This
chapter divides the printer software based on the operating
system used by your computer . Listed below is an outline for
this chapter.
• Windows 95 and 98 Operating Systems
• Windows NT 4.0 Operating Systems
• Windows 3.1x Operating Systems
• Macintosh Operating Systems
Most printing functions are controlled through the Page
Setup and Print dialog boxes, that can be opened from the
File menu within a software application.
note:
for a specific print job, it is better to change them from
within the software application. Properties you change
from within an application will affect the open document
only and not all documents printed afterward.
W
INDOWS
O
PERATING SYSTEMS
Listed below is printer software that can be used by
computers running Windows 95 or 98 operating systems.
• NEC SuperScript 1800 PCL6 printer driver
• NEC SuperScript 1800 PCL5e printer driver
• Windows PostScript printer driver
• SuperScript 1800 Status Monitor
When you need to change the driver properties
95
AND
98
note:
of it’s advanced features. Use the PCL5e driver for legacy
applications that require PCL5e support.
Each driver has a properties window where all the controls for
the driver are located. When printing a document, the default
values can be used, or the values can be adjusted to meet
your needs for a specific print job.
NEC recommends using the PCL6 driver because
Opening the Driver Properties Window
The properties windows for the PCL6, PCL5e, and Windows
PostScript printer drivers can be opened from the Printers
Folder or an application.
To open the properties window from the Printers Folder:
1. Click the Windows Start button.
2. Select Settings then Printers to open the Printers
window.
3. Select NEC SuperScript 1800 . The drivers will be
identified using PCL6, PCL5e, or PS in their name.
4. Click the right mouse button and select Properties to
open the properties window.
To open the properties window from inside an application:
1. From the File menu, select Print to open the Print dialog
box.
2. Assure that NEC SuperScript 1800 is selected in the
Name drop-down list. The drivers will be identified
using PCL6, PCL5e, or PS in their name.
3. Click Properties to open the properties window.
21
Page 28
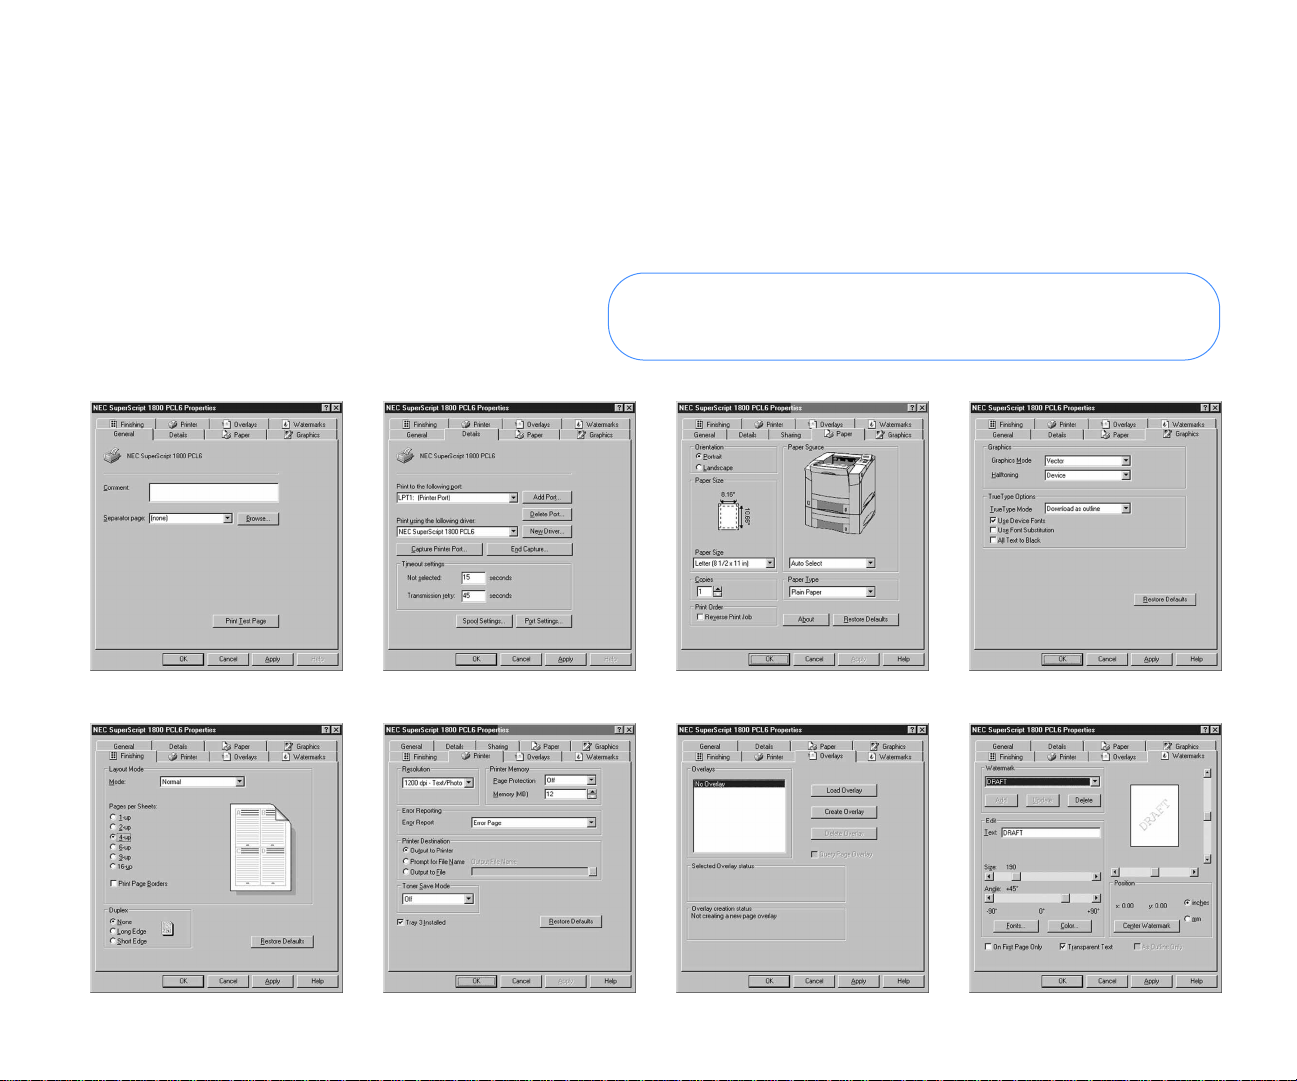
NEC SuperScript 1800 PCL6 Properties
The NEC SuperScript 1800 PCL6 Properties window contains
tabs that divide the PCL6 driver properties into eight
categories.
• General
• Details
• Paper
• Graphics
• Finishing
• Printer
• Overlays
• Watermarks
The figures shown below display each tab in the
NEC SuperScript 1800 PCL6 properties window.
NEC SuperScript 1800 PCL6 Properties Window
for Windows 95 and 98
General Tab
Finishing Tab Printer Tab Overlays Tab Watermarks Tab
Details Tab Paper Tab Graphics Tab
Click the Help button to start the help system. From the upper
right hand corner, click ? then click on a setting for more
information. Click Restore Defaults to return the setting values to
their default.
22 SuperScript 1800 — User’s Guide
Page 29

G
ENERAL PROPERTIES
The general properties provides commands for adjusting the
most basic options for the driver and a print job.
Use the Comment text box for creating a description for the
printer. The description will be displayed in the Printers
window.
A page separater can be selected so that your print job has its
own title page and identifies it from other jobs that were sent
to the same printer.
A test page can be printed to test the connection from the
computer to the printer.
D
ETAILS PROPERTIES
Use the details properties for managing printer ports and
drivers used by your computer. If your computer has more
than one port or driver, they can be selected from here.
Timeout and Spool options can also be set from here. Timeout
controls how much time should pass before the print job
must be resent or cancelled. The spool options control how
the job should be sent to the printer—in small pieces, or as a
single file. When sent as a single file, your computer can
focus on other tasks after the job is sent.
P
APER PROPERTIES
Use the paper properties for setting the basic paper handling
options.
G
RAPHICS PROPERTIES
Use the graphics properties for optimizing the print job for
specific types of graphics and fonts.
Graphic option settings can be used for configuring the
driver to process graphics as raster or vector images. Another
graphic option can be used for configuring the halftone of the
printed graphic.
sheet of paper. In scale mode you can shrink or enlarge the
printed image.
P
RINTER PROPERTIES
There are five options available from the printer properties.
Printing resolution: A printing resolution of 1200 dpi
quality can be selected which uses NEC Sharp Edge
Technology (SET).
Printer memory: The printer memory must be set equal
to how much memory is installed in the printer.
Error reporting: If printing problems are occurring,
error reporting can be selected so a report of the
problems will be printed.
Printing to a file: Saves the print job as a file.
Toner Save Mode: For draft documents this option can
be selected to save on toner usage by printing text as
normal and dimming the graphics.
O
VERLAYS PROPERTIES
The overlays properties is very similar to watermarks. An
existing file can be selected as an overlay to be printed on
every page of the print job. For example, an overlay with
your company’s trademark in the header and its address in
the footer can be used. Overlays can only be used by word
processors.
W
ATERMARKS PROPERTIES
A watermark is text, such as “draft” or “confidential,” that is
added to the printed page. Use these properties to apply
watermarks to your print job, create new ones, or modify
existing ones. A preview area is provided so that you can see
how the watermark will appear on the printed page.
PRINTER SOFTWARE WINDOWS 95 AND 98 OPERATING SYSTEMS
F
INISHING PROPERTIES
The finishing properties provides options for adjusting the
page Layout for your print job.
With layout options the print job can be produced in normal
mode or scaled mode. In normal mode you can select how
many pages of your document must be printed on a single
Windows 95 and 98 Operating Systems 23
Page 30

NEC SuperScript 1800 PCL5e Properties
The NEC SuperScript 1800 PCL5e Properties window
contains tabs that divide the PCL5e driver properties into six
categories.
• General
• Details
• Paper
• Printer Quality
• Fonts
• Device Options
Figures on the next page display each tab in the
NEC SuperScript 1800 PCL5e properties window.
G
ENERAL PROPERTIES
Use the Comment text box for creating a description for the
printer. The description is displayed in the Printers window.
A page separater can be selected so that your print job has its
own title page and identifies it from other jobs that were sent
to the printer.
A test page can be printed to test the connection from the
computer to the printer.
D
ETAILS PROPERTIES
Use the details properties for managing printer ports and
drivers used by your computer. If your computer has more
than one port or driver, they can be selected from here.
P
APER PROPERTIES
Use the paper properties for selecting how many copies to
make, which tray to use for paper, and the orientation of the
print.
Use Paper Size to tell the printer what size of paper is loaded
in the tray you want to use, and use Paper T ype for telling the
printer the type of paper.
P
RINTER QUALITY PROPERTIES
Use the printer quality properties for adjusting the graphic
mode, printer resolution, graphic quality, and grayscale of
your print job. Using NEC Sharp Edge Technology, the
printer resolution can be set to 1200 dpi quality.
Use Toner Save for saving printer toner by normally printing
all text in a print job, but dimming all the graphics.
F
ONTS PROPERTIES
Fonts can be sent to the printer as TrueType or as Bitmaps.
D
EVICE OPTIONS PROPERTIES
Use the device options properties for setting the amount of
memory installed in the printer, or whether duplex printing
must be used
24 SuperScript 1800 — User’s Guide
Page 31

NEC SuperScript 1800 PCL5e Properties Window for Windows 95 and 98
Click the Help button to start the help system. From the upper right
hand corner, click ? then click on a setting for more information.
Click Restore Defaults to return the setting values to their default.
PRINTER SOFTWARE WINDOWS 95 AND 98 OPERATING SYSTEMS
General Tab
Printer Quality Tab
Details Tab Paper Tab
Device Options TabFonts Tab
Windows 95 and 98 Operating Systems 25
Page 32

Windows 95 and 98 PostScript Properties
note: To use the Windows PostScript driver the
PostScript Level 2 Upgrade Kit must be installed in the
printer.
The Windows PostScript properties window contains eight
tabs that divide the properties into eight categories.
• General
• Details
• Paper
• Graphics
• Fonts
• Device Options
• PostScript
• Sharing
Figures on the next page display each tab in the Windows
PostScript properties window.
G
ENERAL PROPERTIES
The general properties provides commands for adjusting the
most basic options for the driver and a print job.
Use the Comment text box for creating a description for the
printer. The description is displayed in the Printers window.
A page separater can be selected so that your print job has its
own title page and identifies it from other jobs that were sent
to the printer.
A test page can be printed to test the connection from the
computer to the printer.
focus on other tasks after the job is sent.
P
APER PROPERTIES
Use the paper properties for setting the basic paper handling
settings.
S
HARING PROPERTIES
If your computer is connected to the printer using a local
connect, and if it also connected to a network, use the sharing
properties to let other computers on the network use the
printer.
G
RAPHICS PROPERTIES
Use the graphics properties for optimizing the print job for
specific types of illustrations. Resolution, halftoning and
scaling options are available from here.
F
ONTS PROPERTIES
Use the fonts properties for adjusting how fonts must be used
in the print job. Options for True Type and PostScript fonts
are available.
D
EVICE OPTIONS PROPERTIES
Use the device options properties for telling the driver what
options have been installed in the printer. For example, the
optional 500-sheet Cassette and amount of memory (DRAM
in the form of SIMMs).
P
OSTSCRIPT PROPERTIES
Use the PostScript properties for selecting how the basic
properties for a PostScript print job must be managed.
Properties such as output format and error reports for a print
job can be configured. Although PostScript timeout controls
are available, they are not recognized by the printer.
D
ETAILS PROPERTIES
Use the details properties for managing printer ports and
drivers used by your computer. If your computer has more
than one port or driver, they can be selected from here.
Timeout and Spool settings can also be set from here. Timeout
controls how much time should pass before the print job
must be resent or cancelled. The spool settings control how
the job should be sent to the printer—in small pieces, or as a
single file. When sent as a single file, your computer can
26 SuperScript 1800 — User’s Guide
Page 33

Windows 95 and 98 PostScript Properties Window
PRINTER SOFTWARE WINDOWS 95 AND 98 OPERATING SYSTEMS
Click the Help button to start the help system. From the upper right
hand corner, click ? then click on a setting for more information.
Click Restore Defaults to return the setting values to their default.
General Tab
Fonts Tab Device Options Tab PostScript Tab
Details Tab Paper Tab Graphics Tab
Sharing Tab
Windows 95 and 98 Operating Systems 27
Page 34

The SuperScript 1800 Status Monitor
The SuperScript 1800 Status Monitor is an option that can be
installed during or after the installation of any driver for
computers running the Windows 95 and 98 operating
systems. It communicates with the printer to determine the
state of the connection, print job, and whether paper must be
added. The Status Monitor cannot be used to monitor
printers connected to a network.
For information about installing the SuperScript 1800 Status
Monitor, see Chapter 3, “Installing the Software.”
Opening the Status Monitor
The Status Monitor can be opened at any time.
To open the Status Monitor From the Windows Start button:
1. Click the Windows Start button.
2. Point to Programs then NEC SuperScript 1800 .
3. Click Status Monitor and the Status Monitor will appear .
SuperScript 1800 Status Monitor for Windows 95 and 98
The figures shown below display each tab in the
SuperScript 1800 Status Monitor window.
While the Status Monitor is running, its icon can be seen in
the status area of the Windows Task Bar.
Status Monitor icon
If the Status Monitor is hidden behind a window, click the
icon and the monitor will appear.
Current State Tab
28 SuperScript 1800 — User’s Guide
Preferences Tab About Tab
Page 35

Status Monitor Window
The Status Monitor has a Current State tab, Preferences tab,
About tab, and a status bar for displaying information.
The Current State tab displays information, in a visual way,
about the connection between the computer and printer, and
the status of the printer.
The Preferences tab contains options for displaying the Status
Monitor .
The About tab displays what version of the Status Monitor is
installed and how to contact NEC.
W
INDOWS
O
PERATING SYSTEMS
Listed below is printer software for computers running the
Windows NT 4.0 operating system.
• NEC SuperScript 1800 PCL6 printer driver
• NEC SuperScript 1800 PCL5e printer driver
• Windows PostScript printer driver
NEC recommends using the PCL6 driver. Use the PCL5e
driver for legacy applications. If the PostScript 2 Upgrade Kit
has been installed in the printer, use the Windows PostScript
driver.
NT 4.0
To open the general properties window:
1. Click the Windows Start button.
2. Select Settings then Printers to open the Printers
window.
3. Select NEC SuperScript 1800 . The drivers will be
identified using PCL6, PCL5e, or PS in their name.
4. Click the right mouse button and from the pop-up menu
select Properties to open the properties window.
To open the document default properties window:
1. Start the software application.
2. Open the document (file) you want to print.
3. From the File menu, select Print to open the Print dialog
box.
4. Assure that NEC SuperScript 1800 is selected in the
Name drop-down list.
5. Click Properties to open the properties window.
PRINTER SOFTWARE WINDOWS NT 4.0 OPERATING SYSTEMS
Opening the Driver Properties Window
The properties window for the PCL6, PCL5e, or Windows
PostScript driver can be opened from the Windows Start
button, a word processor, spreadsheet, drawing, or other
software application.
Driver properties that are opened from the Printers window
are known as general properties, and affect all applications.
Driver properties opened from an application, known as
Document Defaults, affect only the open document.
Windows NT 4.0 Operating Systems 29
Page 36

PCL6 Printer Driver
There are two PCL6 property windows for computers
running the Windows NT 4.0 operating system.
• The NEC SuperScript 1800 PCL6 Properties window
• The NEC SuperScript 1800 PCL6 Default window
The PCL6 Properties window contains driver properties that
are used by all software applications on your computer. It can
be opened from the Windows NT 4.0 Printers window.
The PCL6 Default window can only be opened from inside a
software application. The default properties only affect the
open document within the software application.
NEC SuperScript 1800 PCL6 Properties Window
The NEC SuperScript 1800 PCL6 Properties window contains
tabs that divide the PCL6 driver properties into six
categories.
• General
• Ports
• Scheduling
• Sharing
• Security
• Printer
Figures shown on the next page display each tab in the NEC
SuperScript 1800 PCL6 Properties window.
P
ORTS PROPERTIES
Use the ports properties for setting and configuring the port
on your computer that the printer. uses
S
CHEDULING PROPERTIES
Use the scheduling properties for setting a time when the
computer will process the print job.
Spool settings can also be set from here. The spool settings
control how the job should be sent to the printer—in small
pieces, or as a single file. When sent as a single file, your
computer can focus on other tasks after the job is sent.
S
HARING PROPERTIES
If your Windows NT 4.0 computer is connected to a network,
these properties can be set so that the printer can be used by
computers connected to the same the network. This will only
work if the printer is directly connected to your computer.
S
ECURITY PROPERTIES
If sharing has been activated, use the security properties for
controlling access to the printer.
P
RINTER PROPERTIES
Use printer properties for setting the printing resolution for
the print job, setting the amount of memory installed in the
printer, for generating error reports if there are printing
problems, or for creating a file out of the print job.
G
ENERAL PROPERTIES
The general properties provides commands for adjusting the
most basic options for the driver and a print job.
Use the Comment text box for creating a description for the
printer. The description will be displayed in the Printers
window.
A page separater can be selected so that your print job has its
own title page and identifies it from other jobs that were sent
to the same printer.
A test page can be printed to test the connection between the
computer and the printer.
30 SuperScript 1800 — User’s Guide
Page 37

NEC SuperScript 1800 PCL6 Properties Window for Windows NT 4.0
Click the Help button to start the help system. From the upper right hand
corner, click ? then click on a setting for more information. Click Restore
Defaults to return the setting values to their default.
PRINTER SOFTWARE WINDOWS NT 4.0 OPERATING SYSTEMS
General Tab
Sharing Tab
Ports Tab Scheduling Tab
Printer TabSecurity Tab
Windows NT 4.0 Operating Systems 31
Page 38

NEC SuperScript 1800 PCL6 Default Window
The NEC SuperScript 1800 PCL6 Default window contains
tabs that divide the PCL6 driver properties into six
categories.
• Printer
• Overlays
• Watermarks
• Paper
• Graphics
• Finishing
Driver properties in the PCL6 Default window can only be
adjusted from inside a software application and only affect a
document opened by that application.
Figures shown on the next page display each tab in the NEC
SuperScript 1800 PCL6 Default window.
P
RINTER PROPERTIES
Use printer properties for setting the printing resolution, the
amount of memory is installed in the printer, for generating
error reports if there are printing problems, or for printing
the print job as a file.
O
VERLAYS PROPERTIES
The overlays properties is very similar to watermarks. An
existing file can be selected as an overlay to be printed on
every page of the print job. For example, an overlay with
your company’s trademark in the header and its address in
the footer can be created. Overlays can only be used by word
processors.
G
RAPHICS PROPERTIES
Use the graphics properties for optimizing the print job for
specific types of graphics and fonts.
Graphic option settings can be used for configuring the
driver to process graphics as raster or vector images. Another
graphic option can be used for configuring the halftone of the
printed illustration.
Graphic properties provides options for configuring the use
of True Type Fonts in a print job. Also, Sharp Edge Technology
(SET) can be selected for increasing the resolution quality by
smoothing the printed edges of each character.
The specific weight or type of paper (media) can be selected,
for example, thick, thin, or transparency.
F
INISHING PROPERTIES
The finishing properties provides options for adjusting the
page Layout for your print job.
With layout options the print job can be produced in normal
mode or scaled mode. In normal mode you can select how
many pages of your document must be printed on a single
sheet of paper. In scale mode you can shrink or enlarge
printed image.
W
ATERMARKS PROPERTIES
A watermark is text, such as “draft” or “confidential,” that is
added to the printed page. Use these properties to apply
watermarks to your print job, create new ones, or modify
existing ones. A preview area is provided for viewing how
the watermark will appear on the page.
P
APER PROPERTIES
Use the paper properties for setting the basic paper handling
settings.
32 SuperScript 1800 — User’s Guide
Page 39

NEC SuperScript 1800 PCL6 Default Window for Windows NT 4.0
Click the Help button to start the help system. From the upper right
hand corner, click ? then click on a setting for more information. Click
Restore Defaults to return the setting values to their default.
PRINTER SOFTWARE WINDOWS NT 4.0 OPERATING SYSTEMS
Printer Tab
Paper Tab
Overlays Tab Watermarks Tab
Finishing TabGraphics Tab
Windows NT 4.0 Operating Systems 33
Page 40

PCL5e Printer Driver
There are two PCL5e property windows for computers
running the Windows NT 4.0 operating system.
• NEC SuperScript 1800 PCL5e Properties window
• NEC SuperScript 1800 PCL5e Document Default
Properties window
The PCL5e Properties window contains driver properties that
are used by all software applications on your computer. It can
be opened from the Windows NT 4.0 Printers window.
The PCL5e Document Default Properties window can only be
opened from inside a software application. The default
properties only affect the open document within the software
application.
NEC SuperScript 1800 PCL5e Properties Window
The NEC SuperScript 1800 PCL5e Properties window
contains tabs that divide the PCL5e driver properties into six
categories.
• General
• Ports
• Scheduling
• Sharing
• Security
• Device Settings
Figures shown on the next page display each tab in the
NEC SuperScript 1800 PCL5e Properties window.
computer and the printer.
P
ORTS PROPERTIES
Use the ports properties for setting and configuring the port
on your computer that the printer uses.
S
CHEDULING PROPERTIES
Use the scheduling properties for setting a time when the
computer will process the print job.
Spool settings can also be set from here. The spool settings
control how the job should be sent to the printer—in small
pieces, or as a single file. When sent as a single file, your
computer can focus on other tasks after the job is sent.
S
HARING PROPERTIES
If your Windows NT 4.0 computer is connected to a network,
these properties can be set so that the printer can be used by
computers connected to the same the network. This will only
work if the printer is directly connected to your computer.
S
ECURITY PROPERTIES
If sharing has been activated, use the security properties for
controlling access to the printer.
D
EVICE SETTINGS PROPERTIES
Use printer properties for setting the printing resolution for
the print job, setting the amount of memory installed in the
printer, for generating error reports if there are printing
problems, and for printing to a file.
G
ENERAL PROPERTIES
The general properties provides commands for adjusting the
most basic options for the driver and a print job.
Use the Comment text box for creating a description for the
printer. The description will be displayed in the Printers
window.
A page separater can be selected so that your print job has its
own title page and identifies it from other jobs that were sent
to the printer.
A test page can be printed to test the connection between the
34 SuperScript 1800 — User’s Guide
Page 41

NEC SuperScript 1800 PCL5e Properties Window for Windows NT 4.0
From the upper right hand corner, click ? then click on a setting for
more information. Click Restore Defaults to return the setting values to
their default.
PRINTER SOFTWARE WINDOWS NT 4.0 OPERATING SYSTEMS
General Tab
Sharing Tab
Ports Tab Scheduling Tab
Device Settings TabSecurity Tab
Windows NT 4.0 Operating Systems 35
Page 42

NEC SuperScript 1800 PCL5e Document Default
Properties Window
The PCL5e Document Default Properties window contains two
tabs that divide the driver properties into two categories.
SuperScript 1800 PCL5e Document Default Properties
window.
P
AGE SETUP PROPERTIES
Use printer properties for setting the paper size and source,
• Page Setup
• Advanced
Driver properties in the PCL5e Document Default window can
only be adjusted from inside a software application and only
the number of copies, and printing orientation.
A
DVANCED PROPERTIES
Advanced properties provide the same options as Page
Setup, but with some additional options.
affects the document opened by that application.
Figures shown below display each tab in the NEC
NEC SuperScript 1800 PCL5e Document Default Properties Window for Windows NT 4.0
From the upper right hand corner, click ? then click on a setting for
more information. Click Restore Defaults to return the option values to
their default.
Page Setup Tab
36 SuperScript 1800 — User’s Guide
Advanced Tab
Page 43

Windows PostScript Printer Driver
note: To use the Windows PostScript driver the
PostScript Level 2 Upgrade Kit must be installed in the
printer.
There are two PostScript property windows for computers
running the Windows NT 4.0 operating system.
• NEC SuperScript 1800 PS Properties window
• NEC SuperScript 1800 PS Document Default Properties
window
The PS Properties window contains driver properties that are
used by all software applications on your computer. It can be
opened from the Windows NT 4.0 Printers window.
The PS Document Default Properties window can only be
opened from inside a software application. The default
properties only affect the open document within the software
application.
NEC SuperScript 1800 PostScript Properties Window
The NEC SuperScript 1800 PS Properties window contains
tabs that divide the driver properties into six categories.
• General
• Ports
• Scheduling
• Sharing
• Security
• Device Settings
Figures shown on the next page display each tab in the
NEC SuperScript 1800 PS Properties window.
A test page can be printed to test the connection between the
computer and the printer.
P
ORTS PROPERTIES
Use the ports properties for setting and configuring the
computer port used by the printer.
S
CHEDULING PROPERTIES
Use the scheduling properties for setting a time when the
computer will process the print job.
Spool settings can also be set from here. The spool settings
control how the job should be sent to the printer—in small
pieces, or as a single file. When sent as a single file, your
computer can focus on other tasks after the job is sent.
S
HARING PROPERTIES
If your Windows NT 4.0 computer is connected to a network,
these properties can be set so that the printer can be used by
computers connected to the same the network. This will only
work if the printer is directly connected to your computer.
S
ECURITY PROPERTIES
If sharing has been activated, the security properties can
control access to the printer.
D
EVICE SETTINGS PROPERTIES
Use printer properties for setting the printing resolution,
setting the amount of memory installed in the printer, for
generating error reports if there are printing problems, and
for printing a document to a file.
PRINTER SOFTWARE WINDOWS NT 4.0 OPERATING SYSTEMS
G
ENERAL PROPERTIES
The general properties provides commands for adjusting the
most basic options for the driver and a print job.
Use the Comment text box for creating a description for the
printer. The description is displayed in the Printers window.
A page separater can be selected so that your print job has its
own title page and identifies it from other jobs that were sent
to the same printer.
Windows NT 4.0 Operating Systems 37
Page 44

NEC SuperScript 1800 PS Properties Window for Windows NT 4.0
Click the Help button to start the help system. From the upper right
hand corner, click ? then click on a setting for more information. Click
Restore Defaults to return the setting values to their default.
General Tab
Sharing Tab
Ports Tab Scheduling Tab
Device Settings TabSecurity Tab
38 SuperScript 1800 — User’s Guide
Page 45

NEC SuperScript 1800 PS Default Document
Properties Window
The PS Default Document Properties window contains two tabs
that divide the driver properties into two categories.
• Page Setup
• Advanced
Driver properties in the PS Default Document Properties
window can only be adjusted from inside a software
application and only affects a document opened by the same
Figures shown below display each tab in the
NEC SuperScript 1800 PS Default Document Properties
window.
P
AGE SETUP PROPERTIES
Use printer properties for setting the paper size and source,
the number of copies, and printing orientation.
A
DVANCED PROPERTIES
Advanced properties provide the same options as Page
Setup, but with some additional options.
application.
NEC SuperScript 1800 PS Default Document Properties Window for Windows NT 4.0
Click the Help button to start the help system. From the upper right
hand corner, click ? then click on a setting for more information. Click
Restore Defaults to return the option values to their default.
PRINTER SOFTWARE WINDOWS NT 4.0 OPERATING SYSTEMS
Page Setup Tab
Advanced Tab
Windows NT 4.0 Operating Systems 39
Page 46

W
INDOWS
O
PERATING SYSTEMS
Listed below is printer software for computers running
Windows 3.1x operating systems.
• NEC SuperScript 1800 PCL6 printer driver
• NEC SuperScript 1800 PCL5e printer driver
note:
of it’s advanced features. Use the PCL5e driver for legacy
applications that require PCL5e support.
Each driver has a properties window where all the controls
for the driver are located.
3.1
NEC recommends using the PCL6 driver because
X
Opening the Driver Properties Window
The properties window for the PCL6 or PCL5e driver can be
opened from the Program Manager window or from inside a
word processor, spreadsheet, drawing, or other software
application.
To open the properties window from the Program Manager
window:
1. Double-click the Main program icon to open the Main
program window.
2. Double-click the Control Panel icon to open the Control
Panel window.
3. Double-click the Printers icon to open the Printers dialog
box.
4. From the Installed Printers List, select NEC SuperScript
1800. The drivers will be identified with PCL6 or PCL5e in
their name.
5. Click Setup to open the properties window.
To open the properties window from inside a software application:
1. Start the software application.
2. Open the document you want to print.
3. From the File menu, select Print to open the Print Setup
dialog box.
4. Assure that NEC SuperScript 1800 is selected in the
Printers list.
5. Click Properties to open the properties window.
NEC SuperScript 1800 PCL6 Properties
The NEC SuperScript 1800 PCL6 properties window contains
tabs that divide the PCL6 driver properties into six
categories.
• Paper
• Graphics
• Finishing
• Printer
• Overlays
• Watermarks
Figures shown on the next page display each tab in the
NEC SuperScript 1800 PCL6 properties window.
P
APER PROPERTIES
Use the paper properties for adjusting the orientation of the
print onto the page, what paper size is loaded in the printer,
the source for the paper, and how many copies you want to
print.
G
RAPHICS PROPERTIES
Use the graphics properties for optimizing your print job for
documents that use bitmap or vector graphics and the type of
halftoning to apply to them. Font and paper type can also be
set.
TrueType Fonts can be sent to the printer during the print job,
or those stored on the printer can be used.
40 SuperScript 1800 — User’s Guide
Page 47

NEC SuperScript 1800 PCL6 Properties Window for Windows 3.1x
Click the Help button to start the help system. Click Restore Defaults to
return the setting values to their default.
PRINTER SOFTWARE WINDOWS 3.1X OPERATING SYSTEMS
Paper Tab
Printer Tab
Graphics Tab FInishing Tab
Watermarks TabOverlays Tab
Windows 3.1x Operating Systems 41
Page 48

F
INISHING PROPERTIES
Use the finishing properties for scaling the printed image to a
specific size. When in Normal mode, two or more pages can
be shrunk to fit on a single page, and when in scale mode, the
image of a single page can be stretched or shrunk to fit on a
sheet of paper.
P
RINTER PROPERTIES
Use the printer properties for adjusting the printer resolution,
memory , and destination of your print job. A printing
resolution of 1200 dpi quality can be selected which uses SET .
Error reporting, and Toner Save Mode can also be controlled.
Use Toner Save Mode for saving printing toner by normally
printing all text in a print job, but dimming all the graphics.
O
VERLAYS PROPERTIES
The overlays properties is very similar to watermarks. An
existing file can be selected as an overlay to be printed on
every page of the print job. For example, an overlay with
your company’s trademark in the header and its address in
the footer can be used. Overlays can only be used by word
processors.
W
ATERMARKS PROPERTIES
A watermark is text, such as “draft” or “confidential,” that is
added to the printed page. Use these properties to apply
watermarks to your printed pages, create new ones, or
modify existing ones. Use the preview area viewing how the
watermark will appear on the printed page.
NEC SuperScript 1800 PCL5e Properties
The NEC SuperScript 1800 PCL5e properties window
contains tabs that divide the PCL6 driver properties into six
categories for computers running Windows 3.1x.
• Paper
• Printer Quality
• Fonts
• Device Options
Figures shown on the next page display each tab in the
NEC SuperScript 1800 PCL5e properties window.
P
APER PROPERTIES
Use the paper properties for selecting how many copies to
make, which tray to use for paper, and the orientation of the
print.
Use Paper Size to tell the printer what size of paper is loaded
in the tray you want to use, and use Paper T ype for telling the
printer the type of paper loaded in the tray.
P
RINTER QUALITY PROPERTIES
Use the printer quality properties for adjusting the graphic
mode, printer resolution, graphic quality, and grayscale of
your print job. Using NEC Sharp Edge Technology, the
printer resolution can be set to 1200 dpi quality.
Use Toner Save for saving printing toner by normally
printing all text in a print job, but dimming all the graphics.
42 SuperScript 1800 — User’s Guide
F
ONTS PROPERTIES
Fonts can be sent to the printer as TrueType or as Bitmaps.
D
EVICE OPTIONS PROPERTIES
Use the device options properties for setting the amount of
memory installed in the printer, or whether duplex printing
must be used.
Page 49

NEC SuperScript 1800 PCL5e Properties WIndow for Windows 3.1x
Click the Help button to start the help system. Click Restore Defaults
to return the setting values to their default.
PRINTER SOFTWARE WINDOWS 3.1X OPERATING SYSTEMS
Paper Tab
Fonts Tab
Printer Quality Tab
Device Options Tab
Windows 3.1x Operating Systems 43
Page 50

M
ACINTOSH OPERATING SYSTEMS
The SuperScript 1800 comes with an NEC SuperScript 1800
PPD (PostScript Printer Description) that works with the
standard Macintosh LaserWriter printer driver . The PPD and
driver work together when creating a print job.
note:
to receive print jobs from Macintosh computers. For more
information, see “Printer Hardware Requirements” on
Page 19.
The printer requires hardware upgrades in order
Opening the
Page Setup and Print Dialog Boxes
The Page Setup and Print dialog boxes can be opened from
inside a software application. Use them both for configuring
the basic printing properties. Use the Print dialog box for
starting a print job.
Opening the Page Setup Dialog Box
To open the Page Setup dialog box:
1. Start the software application.
2. Open the document you want to print.
3. From the File menu, select Page Setup to open the Page
Setup dialog box.
4. Assure that NEC SuperScript 1800 is selected in the
Format for drop-down list.
The Page Setup Dialog Box
The Page Setup dialog box contains three categories of page
setup properties. Listed below is the name of each property.
• Page Attributes
• PostScript Options
• Custom Page Default
Figures on the next page display each property in the Page
Setup dialog box.
Opening the Print Dialog Box
To open the Print dialog box:
1. Start the software application.
2. Open the document you want to print.
3. From the File menu, select Print to open the Print dialog
box.
4. Assure that NEC SuperScript 1800 is selected in the
Printer drop-down list.
44 SuperScript 1800 — User’s Guide
Page 51

The Macintosh Page Setup Dialog Box
Page Attributes
PRINTER SOFTWARE MACINTOSH OPERATING SYSTEMS
PostScript Options
Custom Page Default
Macintosh Operating Systems 45
Page 52

The Print Dialog Box
The Print dialog box contains nine categories of printing
properties.
The figures shown below display each property in the Print
dialog box.
The Macintosh Print Dialog Box
General Properties
Cover Page Properties
Error Handling Properties
Application Properties Background Print Properties
Layout PropertiesColor Matching Properties
Printer Specific Options PropertiesSave as File Properties
46 SuperScript 1800 — User’s Guide
Page 53

CHAPTER 5
THE OPERATOR PANEL
O
VERVIEW
Most printer settings can be changed through the SuperScript
1800 printer driver. But the printer Operator Panel allows
you to read printer messages and change printer settings
directly at the printer. The illustration below identifies the
different areas of the Operator Panel.
This chapter describes:
• Operator Panel features, including the Indicator Light,
Status Display, and Menu Panel Buttons.
• Using the Operator Panel menu tree.
• Important tasks you perform using the Operator Panel
and menu tree settings.
note:
can configure the printer from the Operator Panel.
Paper must be present in the printer before you
NEC
SuperScript 1800
Menu
GO
Continue
Select/Cancel
Item
Value
Status Display (LCD)
Indicator Light—(Go/Continue Button)
Menu Panel Buttons
note: The LCD
message display tilts
up for easy viewing.
47
Page 54

U
SING THE OPERATOR PANEL
B
UTTONS
The Operator Panel consists of five buttons and an LCD
Status Display.
Operator Panel Buttons
The Operator Panel buttons perform different functions
depending on whether the printer is online, offline, or in
menu mode.
Indicator Light
The Go/Continue button on the Operator Panel also
functions as an Indicator Light and communicates the status
of the printer.
Light Mode Status
Ready
(Green)
Error
(Amber)
On
Off
Blinking
On
Blinking
Printer is in the online state.
Printer is in the offline state.
Printer is busy processing a print job
or waiting for more data to complete
the current print job.
Printer has detected an error
condition requiring immediate user
intervention to correct.
Printer has detected an alert
condition which, if ignored, could
become more serious.
Button Function
Go/Continue Toggles the printer between the online and
offline states.
Provides the printer with an indication that the
user has reacted to a specific LCD prompt
message.
Select/Cancel In the offline state this button is used to save a
parameter setting for a specific item in the
menu.
In the online state this button is used to cancel
a print job.
Menu Cycles through the first level of menu
selections. The right arrow moves you forward
through the menu. The left arrow moves you
backward through the menu.
Item Cycles through the second level of menu
selections. The right arrow moves you forward
and the left arrow moves you backward
through the selected menu’s items.
Value Scrolls to the next or previous value for the
currently displayed menu item.
The “+” sign moves you to the ne xt v alue of the
selected item’s values.
The “-” sign moves you to the pre vious v alue of
the selected item’s values.
An asterisk (*) at the right of the selection on
the Status Display is used to indicate the sav ed
value.
48 SuperScript 1800 Series — User’s Guide
Page 55

Using the Menu Tree
You can use the Operator Panel to set communications
channels, print forms or pages, view usage reports, use
special features, or change printer settings. (However, in
most cases, you will use your printer drivers to change
printer settings.) Follow these basic steps to enter menu
mode and navigate through the menu tree
• Turn on the printer, if necessary.
• Take the printer offline by pressing the Go button.
• Cycle through the first level menus using the Menu
button.
• For second level choices use the Item button, then the
Value (- +) button to cycle through the values for each
item.
• Press the Select button to save your selection.
THE OPERATOR PANEL
GO
Continue
Pressing
GO/Continue
takes printer
offline
OFFLINE
Menu
Pressing Menu
cycles forward or
backward through
the main menus
PRINTING PAPER
CONFIG
Item
Pressing Item
cycles forward or
backward through
the Item sub-menu
RESOLT
PERSONAL
Value
Pressing Value
cycles forward or
backward through
the Item Value sub-menu
LETTER
LEGAL
FOLIO
300
600
AUTO
PCL
Select/Cancel
Pressing
Select/Cancel
activates the item
or value choice
Selects LETTER as the default paper size for
the Cassette Tray.
Selects LEGAL as the default paper size for
the Cassette Tray.
Selects FOLIO as the default paper size for
the Cassette Tray.
Selects 300 as the default print resolution.
Selects 600 as the default print resolution.
Printer selects emulation type for printing.
Selects PCL as the default emulation.
GO
Continue
Pressing
GO/Continue
takes printer
back online
Using the Operator Panel Buttons 49
Page 56

O
PERATOR PANEL TASKS
This section describes important tasks you perform using the
Operator Panel buttons and menu selections.
Taking the Printer Offline and Online
Press the Go/Continue button to switch between the online
and offline states.
note:
any printer settings. It must be online to print.
While the printer is offline, it continues to receive data until
its input buffer is full. If you press the Go/Continue button
while the printer is printing, it finishes the current page, and
then waits for you to bring it online again.
The printer must be offline before you can change
Setting Media Type
When you load a new paper type into the tray, you should set
the Media type. By default the printer is set to handle
medium weight (16–28 lb) paper. If you do not specify the
correct media type print quality may be poor because the
printer will move the paper at the wrong speed. To change
the Media type, on the Operator Panel press the Go/
Continue button to take the printer offline. Then, press the
Menu button to display JOB MENU. Then press the Item
button to display P-TYPE PLAIN. Press the Value button to
display THICK or THIN. Choose the correct paper type and
press the Select button, then the Go/Continue button to
bring the printer online again.
note:
high heat (90.5° F / 32.5° C) or humidity (over 80%)
weather conditions.
Choose “Thin” only if you are using 16lb. paper in
Cleaning the Fuser Unit
If random spots are appearing on the back of your print outs
use the following steps to clean the internal fuser unit.
1. Press Go/Continue . OFFLINE appears on the display.
2. Press Menu until SERVICE MENU appears on the display.
3. Press Select until FUSER CLEAN appears on the display.
4. Press Select and the printer will print out a double-sided
page. The panel displays READY.
Restoring Factory Defaults
To restore factory default settings to the printer
1. Press Go/Continue . OFFLINE appears on the display.
2. Press Menu until JOB MENU appears on the display.
3. Press Item until FACTORY SETTINGS appears on the
display.
4. Press Select and READY appears on the display. All
settings will be reset to factory defaults. The page
counter will be not be reset.
Stopping a Print Job
If you wish to stop a print job before it is complete, simply
press the Cancel button while the printer is online.
50 SuperScript 1800 Series — User’s Guide
Page 57

Printing Information Pages
You can use the Operator Panel to print out important
information pages described below.
PRINT MENU MAP
If you select this item from the Operator Panel menu, under
the Info Menu, the printer will print a page showing the
layout and current settings of the Operator Panel menu
items.
PRINT CONFIG (Printer Configuration)
If you select this item from the Operator Panel menu, under
the Info Menu, the printer will print information about
printer’s current configuration.
PRINT PCL FONT List
If you select this item from the Operator Panel menu, under
the PCL Menu, the printer will print a list of resident fonts
available for PCL emulation.
PRINT NET CFG (Printer Network Configuration)
This page is only available if the Network Interface Card is
installed in your printer. If you select this item from the
Operator Panel menu, under the Network Menu, the printer
will print information about the printer’s current network
configuration.
PRINT PS FONT List
This page is only available if the PostScript Option is
installed in your printer. If you select this item from the
Operator Panel menu, under the PS Menu, the printer will
print a list of resident fonts available for PostScript
emulation.
The Status Display
The Operator Panel status display is an LCD panel that
shows status messages, media types, and menu selections.
When the printer is performing a job, the Status Display
indicates a printer status message. The standard message
display is READY, meaning the printer is ready to use. The
tables below list Status, Error and Service messages with
their explanations. See Chapter 10 for information about
getting service and technical support.
Status Messages
Status messages report normal operating conditions. No
action is necessary.
Status Message
READY Printer is ready to accept print jobs.
OFFLINE Printer is offline. Press the Go button
INITIALIZING
POWER
SA VE
READY
TONER LO
OFFLINE
TONER LO
PRINTING
PCL
PRINTING
PS
CANCELING JOB
Explanation
to continue the current print job.
Printer is preparing to accept printing
jobs.
Printer is in Power Save mode. The
printer will return to a normal state
when it receives data, a button is
pressed or a tray is pulled out.
Toner Cartridge needs to be replaced
soon.
Printer is processing data. PCL is
interpreting the data.
Printer is processing data. PS is
interpreting the data.
Appears when the Cancel button has
been pressed.
THE OPERATOR PANEL
Operator Panel Tasks 51
Page 58

Error Messages
If a printer problem occurs, the Operator Panel will display
an error message. The standard error messages listed below
require that you take the specific action displayed in the LCD
panel before normal printer operations can continue.
Error Message
Explanation
TONER LOW Toner Cartridge needs to be replaced
soon.
INVALID
CARTRIDGE
The wrong toner cartridge has been
placed in the printer. Replace with an
NEC SuperScript 1800 Toner
Cartridge.
CLOSE
COVERS
Amber light is on steady. Top Cover
and/or Back Cover needs to be closed
before printing can continue.
This message will also be displayed if
the Toner Cartridge is not installed,
even if the covers are closed.
JAM
(L)
JAM
DPX-(L)
TRAY(N)
EMPT (P)
A paper jam has occurred at the (L)
area. (L)= TRAY, TOP, BACK.
A paper jam has occurred at the (L)
area. (L)= TRAY, TOP, BACK.
Tray indicated by “N”(1, 2, 3) is empty
and needs to be refilled with paper size
specified by “P”*.
READY
CLOSE T(N)
INSERT
TRAY (N)
Green light is on. Tray 2 or 3 is open.
(N) indicates tray number. Close tray.
Tray 2 or 3 has been removed and must
be inserted before printing can
continue. Amber light is on steady.
Insert tray, (N) indicates tray number.
TRAY(N)
LOAD (P)
Tray indicated must be re-loaded with
user-specified paper which is different
from the paper currently in tray.
Error Message
TRAY1-M
EMPT (P)
Explanation
Tray is empty and must be refilled
with the specified paper. (P) is
specified paper.
MANUAL
FEED (P)
Amber light is blinking. User must
load the specified paper in
Multipurpose Tray in order for print
job to continue. (P) is specified paper.
OUTPUT
BIN FULL
INSUFFIC
MEMORY
PAGE TOO
COMPLEX
The Output Tray is full and the paper
must be removed from the tray.
Printer received more data than can fit
in its available memory.
Data sent to the printer is too complex.
Printer will automatically try to rerender the data only one time.
SERIAL
ERROR
Printer encountered an error while
transferring data from the computer
through its serial interface.
*When paper source is set to AUTO and another tray has
paper, the amber LED is blinking. When paper source is set to
AUTO and all trays are empty, the amber LED is on.
52 SuperScript 1800 Series — User’s Guide
Page 59

Service Messages
If a major problem occurs, the Operator Panel will display
the CALL SERVICE message preceded by an error message.
The amber light will be on. You must call an authorized
service representative to resolve this problem. Report the
code when you call. This will assist in diagnosing the
problem. See Chapter 10 for more information about getting
service.
THE OPERATOR PANEL
Service Message
PRG ERR
CALL SVC
IDP ERR
CALL SVC
LSU ERR
CALL SVC
FSR ERR
CALL SVC
EIF ERR
CALL SVC
Explanation
While booting up the ROM’s
checksum fails and the message
INITIALIZING appears on the Operator
Panel. The printer needs to be turned
off and then on again. If the problem
persists, contact customer service and
support.
The printer controller’s program has a
problem. This occurs when some data
processing error is found by the
printer controller’s firmware. The
printer needs to be turned off and then
on again. If the problem persists,
contact customer service and support.
The laser scan unit has a problem. The
printer needs to be turned off and then
on again. If the problem persists,
contact customer service and support.
The fuser unit has a problem. The
printer needs to be turned off and then
on again. If the problem persists,
contact customer service and support.
The interface between the printer
controller and the engine has a
problem. The printer needs to be
turned off and then on again. If the
problem persists, contact customer
service and support.
Operator Panel Tasks 53
Page 60

Overview of Operator Panel Menus
Several menus are available on the SuperScript 1800 to make
it easy for you to change printer settings. Some menus are
displayed only if a specific option is installed in the printer.
note:
override the user default settings made from the printer
Operator Panel.
Changes made from a software application
PRINTING MENU
PAPER
T1 SIZE
COPIES
ORIENT
SOURCE
TOP-MGN
LEFT-MGN
DUPLEX
AUTO CR
RESOLT
CONFIG
MENU
PERSONAL
T-SWITCH
T-LOCK
PWR SAVE
AUTO CON
TON-SAVE
JAM RECV
TONER LO
I/O MENU
If the Serial/LocalTalk Card is installed in
your printer.
BAUDRATE
ROBU.XON
JOB
MENU
SET
TIMEOUT
DENSITY
P-TYPE
FACTORY
m SETTING
MEM OPTM
DP-T-MGN
DP-L-MGN
L-BIND
S-BIND
INFO
MENU
PRINT MENU MAP
PRINT CONFIG
NETWORK MENU
If the Network Interface Card is installed in
your printer.
RESET NETWORK
CFG ADRS
TCP/IP on/off
IP BYTE1~4
SM BYTE1~4
GW BYTE1~4
BOOT SVR
SV-IPB1~4
BOOTP
RARP
FACTORY DEFAULT
PRINT NET CFG
.
.
.
PCL
MENU
PRINT PCL
m FONT
NUMBER
SYMBOL
LINES
PITCH
(available if font
size is between 1 and 7)
HEIGHT (available if
font size is between 8 and
54)
COURIER
SERVICE MENU
FUSER CLEAN
PS MENU
If the PostScript Option is installed in your
printer.
PRINT PS FONT
54 SuperScript 1800 Series — User’s Guide
Page 61

Operator Panel Menus
The Operator Panel has seven main menus, described below.
Factory default selections for each menu item setting are
indicated in blue.
For Windows 95/98 and Windows NT users, many of the
menus and menu items listed below can be accessed through
their software driver. Any selection changes made in the
software driver will have precedence over the settings
selected in the Operator Panel.
DOS users will need to make any changes in settings through
the Operator Panel.
Some of the menu items are for the use of network system
administrators and need only be set once to assure network
compatibility.
Other menu items may be reset as needed.
note:
any printer settings. It must be online to print.
The printer must be offline before you can change
PRINTING MENU
Use this menu to define settings related to printer input and
output, as well as the specific print materials you are using
with your printer.
Item Value Explanation
PAPER Letter
Legal
A4
Executive
JIS B5
ISO B5
Folio
Letter
Legal
A4
Executive
JIS B5
ISO B5
COM-10
Monarch
DL
C5
Folio
Letter
Legal
A4
Folio
TRAY2 (standard 500-sheet
Cassette tray) default paper size
choices.
note:
setting identifies the default
media size for each tray. It is
important to select the
correct paper size from the
menu when using trays.
The PAPER SIZE
TRAY3 (optional 500-sheet 2nd
Cassette tray) default paper size
choices.
Duplex printing default paper
size choices.
THE OPERATOR PANEL
Operator Panel Tasks 55
Page 62

Item Value Explanation
Item Value Explanation
T1 SIZE Letter
Legal
A4
Executive
JIS B5
ISO B5
COM-10
Monarch
DL
C5
J Post
C6
Folio
A5
A6
STMS
COPIES 1 to 999
ORIENT PORT
LAND
TRAY1 / TRAY1-M
(Multipurpose Tray) default
paper size choices.
note:
setting identifies the default
media size for each tray. It is
important to select the
correct paper size from the
menu when using trays.
The PAPER SIZE
This menu item determines the
number of copies printed for
each page. The printer does not
automatically collate the copies.
For example, if you send three
pages to print and set COPIES to
2, the printer prints page 1, page
1, page 2, page 2, page 3, page 3.
This menu item determines how
the printing is oriented on the
page.
PORT (Portrait) means the
printing is parallel to the short
edge of the paper.
LAND (Landscape) means the
printing is parallel to the long
edge of the paper.
SOURCE AUTO
TRAY2
TRAY1
TRAY3
TRAY1-M
TOP-MGN 0.0” ~ 9.9”
Portrait
0.0” ~ 6.5”
Landscape
This menu item identifies the
default paper tray.
AUTO means the printer feeds
print material from another tray
when one tray is empty. If you
are using the same size and type
of printer material in all the
trays, the trays are automatically
linked.
TRA Y1 means the printer feeds
from the Multipurpose Tray
unless it is empty or closed.
TRAY1-M is used when
manually feeding envelopes or
other media through the
Multipurpose Tray.
TRAY2 means the printer feeds
from the standard Cassette Tray
unless it is empty.
TRAY3 is available only it the
500-sheet 2nd Cassette is
installed.
This menu item lets you select
the top margin of the print
materials. Units are in inches.
note:
margin does not affect the
maximum printable area.
Instead it shifts where the
printable area begins and
ends.
Adjusting the top
56 SuperScript 1800 Series — User’s Guide
Page 63

Item Value Explanation
LEFT-MGN 0.0” ~ 9.9”
Landscape
This menu item lets you select
the left margin of the print
materials. Units are in inches.
0.0” ~6.5”
Portrait
DUPLEX OFF
LONG
SHORT
note:
margin does not affect the
maximum printable area.
Instead it shifts where the
printable area begins and
ends.
Adjusting the top
This menu item is used to
choose the binding edge when
duplexing.
Use the OFF selection when
printing one sided.
AUTO CR NO
YES
note:
automatically print on both
sides of the paper.
This menu item allows the user
to append the required carriage
The printer can
return to each line feed.
RESOLT 300
600
The QUALITY setting
determines the print resolution
while printing the page.
CONFIG MENU
Use this menu to configure a variety of printer features.
Item Value Explanation
PERSONAL AUTO
PCL
PS
T-SWITCH ON
OFF
Use to select the default
interpreter or emulator for
printing a document.
note:
available if the
PostScript Option is
installed.
PS is only
Tray Switch, if enabled,
will cause a job being
printed to switch to a tray
containing the same
media characteristics, if
the current tray runs out
of media.
T-LOCK OFF
TRAY1
TRAY2
TRAY3
note:
source is set to AUTO
this parameter is not
displayed.
Used to define the tray
that should not be used in
the case of Tray Switch.
note:
only available if the
2nd Cassette Tray is
installed and the TSWITCH menu item is
set to ON.
When paper
This setting is
THE OPERATOR PANEL
Operator Panel Tasks 57
Page 64

Item Value Explanation
Item Value Explanation
PWR SAVE OFF
15 MIN
30 MIN
45 MIN
60 MIN
AUTO CON ON
OFF
This menu item lets you
reduce power usage when
the printer is idle. The
PWR SAVE setting
determines the length of
time (in minutes) the
printer waits after a job is
printed before it goes to a
reduced power state.
This menu item controls
how the printer behaves
when it notices a paper
mismatch or
communication error.
Paper Mismatch:
If ON is selected, the print
job will continue after a
60-second delay, even if
the wrong paper size is
used. If OFF is selected,
the print job will not
continue until the correct
paper size is loaded. Only
Tray 2 or Tray 3 can
determine what paper size
is loaded.
Communication Stops:
If ON is selected, the print
job will not be completed,
and an error page will be
printed for PCL6 and
PostScript jobs (not PCL5).
If OFF is selected, the
printer will behave as if it
is processing the job, but
nothing is printed. In this
case, cancel the job and
then re-send it.
TON-SAVE ON
OFF
JAM RECV ON
OFF
TONER LO CONT
STOP
This menu item helps
conserve the toner
cartridge by controlling
how much toner the
printer uses for a print job.
Select OFF if toner
conservation is not a
concern.
note:
images will print
lighter than text.
Graphic
When JAM RECV is set to
ON, the printer keeps the
printed page in memory
until the printer signals
that the page has
successfully exited the
printer. The printer then
reprints the jammed page.
When JAM RECV is set to
OFF, the printer does not
reprint a page that has
been jammed after all the
image has been drawn on
the page.
This setting determines
whether the printer
continues printing after
the printer detects that the
toner is low.
If the toner is low and
TONER LO is set to STOP,
press the Continue button
to print.
58 SuperScript 1800 Series — User’s Guide
Page 65

JOB MENU
Use this menu to configure the settings that affect the PCL
emulation.
Item Value Explanation
SET TEXT
OFF
PHOTO
Use the printer’s Sharp Edge
Technology to enhance the
print quality of text and grey
scale.
Use TEXT for better text
images.
Use PHOTO for better photo
images.
TIMEOUT 0 ~ 300
15 SEC
The TIMEOUT setting
determines the amount of time
(in seconds) the printer waits
before printing the last page of
a print job that does not end
with a command to print the
page. When a print timeout
occurs, the printer prints the
data in the print buffer.
0 = No timeout
DENSITY LIGHT
MEDIUM
DARK
Lighten or darken the print on
the page by changing the
DENSITY setting.
The MEDIUM setting usually
produces the best results.
note: Paper must be present in the printer before you
can configure the printer from the Operator Panel.
Item Value Explanation
P-TYPE PLAIN
THICK
THIN
TRANSP.*
The P-TYPE setting lets you
specify the type of print
material installed in each tray.
Select PLAIN if the print
material is between 16 and
28lb.
Select THICK if the media is
thick paper over 28lb. or
envelopes over 24lb. or when
printing 90lb. index cards.
Select THIN if paper is 16 lb.
and temperature is over
90.5° F or 80% humidity.
*Select TRANSP. if you want
to print transparencies. This
choice is displayed only if
Tray1 or T ray1-M is selected as
paper source.
FACTORY
SETTINGS
Select this parameter to return
to factory (default) settings.
The page counter is not reset
by this action.
MEM OPTM ON
OFF
This setting makes the printer
process more data by
optimizing the memory.
If the value is set to ON,
complex data can be processed
more efficiently.
DP-T-MGN 4.0
0 ~ 9.9 mm
This setting lets you select the
top margin of the print
material when the DUPLEX
menu item is set to SHORT.
THE OPERATOR PANEL
The margin can be changed in
increments of 0.1 millimeters.
Operator Panel Tasks 59
Page 66

Item Value Explanation
DP-L-MGN 4.0
0 ~ 9.9 mm
This setting lets you select the
left margin of the print
material when the DUPLEX
menu item is set to LONG.
The margin can be changed in
increments of 0.1 millimeters.
L-BIND 0
0 ~ 2.2 cm
This setting lets you select the
left margin for binding when
long edge duplexing.
The margin can be changed in
increments of 0.1 centimeters.
S-BIND 0
0 ~ 2.2 cm
This setting lets you select the
left margin for binding when
short edge duplexing.
The margin can be changed in
increments of 0.1 centimeters.
I/O MENU
This menu is only available when the Serial/LocalTalk Card
is installed in your printer.
Item
BAUDRATE 300
ROBU.XON ON
Value Explanation
This menu item is used to
600
1200
2400
4800
9600
19200
38400
57600
115200
select the printer’s baud
rate (speed at which
information is transferred)
for communicating from
the computer to the
printer.
This menu item is used to
OFF
select the method for
generating XONs.
When it is set to ON, the
printer sends an XON
when sufficient buffer
space is available. If the
host does not receive data
within approximately one
second, the printer will
transmit additional XONs
at one second intervals
until the host receives
data.
When it is set to OFF, the
printer sends one XON
when it can accept more
data or when it is online.
The printer does not send
XONs every second while
the printer is online and
ready for more data.
60 SuperScript 1800 Series — User’s Guide
Page 67

INFO MENU
Use this menu to print a variety of listings relating to
available printer resources, printer settings, and print jobs.
PCL MENU
Use the PCL MENU to change printer settings that only affect
jobs printed using the PCL emulation printer language.
THE OPERATOR PANEL
Item
PRINT
MENU MAP
Value Explanation
This menu item is used to print
the layout and current settings for
the Operator Panel menu items.
Pressing the Select button when
this menu item is displayed
causes the internal PCL program
describing the menu map page to
be printed.
PRINT
CONFIG
This menu item is used to print
the printer’s current
configuration. Pressing the Select
button when this menu item is
displayed causes the internal PCL
program describing the printer
configuration page to be printed.
NETWORK MENU
This menu is only available when the Network Interface
Card is installed in your printer. The individual menu items
are explained in the SuperScript 1800 Network Guide.
Item
PRINT
PCL FONT
NUMBER PCL 1 ~
SYMBOL
Value Explanation
PCL 54
PCL 0
ROMAN-8
LINES 5 ~ 128
60
PITCH
(available if font
size is between 1
and 7)
HEIGHT
(available if font
size is between 8
and 45)
0.44 ~
99.99
10.00
4.00 ~
99.75
12.00
COURIER REGULAR
DARK
This menu item is used to print
the PCL font list page. Press the
Select button when this menu
item is displayed to print the
PCL font list page.
This menu item selects the
default PCL font by number.
This menu item selects the
default 8-bit code page. There is
no selection possibility for
bitmap fonts or fonts with a
fixed symbol set.
This menu item controls the
maximum number of text lines
that can be printed on a PCL
page before that page is
automatically printed. The
number of lines can range from
5 to 128 lines per page.
This menu item selects the
default font size for
monospaced PCL fonts. There is
no selection possibility for
bitmap fonts.
This menu item selects the
default font size for
proportional PCL fonts. Ther e is
no selection possibility for
bitmap fonts.
This menu item selects the
version of Courier font to be
used.
Operator Panel Tasks 61
Page 68

PS MENU
This menu is only available if the SuperScript 1800 PostScript
2 Upgrade Kit is installed in your printer.
Item
PRINT
PS FONT
Value Explanation
This menu item is used to print
the PostScript font list page. Press
the Select button when this menu
item is displayed to print a page
describing the installed PostScript
fonts.
SERVICE MENU
Use this menu to print a Fuser Cleaning page.
Item
FUSER
CLEAN
Value Explanation
This menu item represents the
fuser clean feature that is used to
clear any contamination on the
Fuser Unit. Print this sheet out
when spots occur on the back of a
printed sheet.
Pressing the Select button when
this menu item is displayed
causes the printer to produce a
one sheet double-sided print that
is designed to clean the Fuser
Unit.
62 SuperScript 1800 Series — User’s Guide
Page 69

CHAPTER 6
USING THE PRINTER
O
VERVIEW
This chapter gives you the information you need to load
paper and begin printing from any of the paper trays. Topics
include:
• Using the Multipurpose Tray (Tray 1)
• Loading paper in the 500-sheet 2nd Cassette (Tray 3)
• Duplex printing
• Manual printing
• Printing envelopes
• Printing transparencies
• Printing on label sheets
U
SING THE
The Multipurpose Tray (Tray 1) can hold up to 100 sheets of
medium weight paper. Label sheets, transparencies, and
envelopes can also be loaded into the Multipurpose Tray.
Instructions for loading these other media are provided later
in this chapter.
To load paper in the Multipurpose Tray, follow the
instructions below:
1. Open the Multipurpose Tray and extend the tray as
shown (A).
2. Flex the paper stack and fan the sheets (B).
3. Place the paper print-side-up against the left side of the
Multipurpose Tray (C).
4. Push the MP Paper Guide to the left so that it rests
against the side of the paper (D).
5. To print continuously from the Multipurpose Tray , set the
paper source to Tray 1.
6. To print manually from the Multipurpose Tray, set the
paper source to Tray 1 (Manual) in the printer driver or
Operator Panel. See page 67
M
ULTIPURPOSE TRAY
A
The Multipurpose Tray provides a
convenient way to print envelopes,
transparencies, or other media types without
having to unload the 500-sheet Cassette.
B C
D
Do not overfill the paper tray!
63
Page 70

L
OADING PAPER IN THE OPTIONAL
500-
The 500-sheet 2nd Cassette (Tray 3) accommodates 500 sheets
of medium weight paper . It can also hold several other paper
and envelope types. See Appendix B for a complete list of
paper sizes and weights. The 500-sheet 2nd Cassette adjusts
to fit your desired paper size. For directions on loading
envelopes into this tray see page 69
Please note that the directions for loading paper, found in
Chapter 2, differ from loading paper into the 500-sheet 2nd
Cassette.
SHEET 2ND CASSETTE
1. Remove the tray from the 2nd cassette unit (A).
2. Make sure the lever on the left front of the cassette tray is
released into the hole under the slot (B).
3. Squeeze and adjust the Back Paper Guide to the desired
paper length embossed on the inside tray bottom (C).
4. Make sure the Envelope Guide is adjusted to its back
position (D).
5. Lift the tab on the top of Side Guide 1 and slide it to the
paper size indicated on the tray bottom. You may need to
use both hands for this step (E). Match the left side of
Side Guide 1 to the paper size markings on the bottom of
the tray. Directions continued on next page.
A
D
B
Envelope
Guide
Lever
Tray Front
E
C
Side Guide 1
Caution! There is a tight
spring attached to the tab on
Side Guide 1. Avoid accidents
by not pulling up too hard on
the tab.
64 SuperScript 1800 — User’s Guide
Page 71

6. Place the paper into the tray (F).
note:
down! This is opposite of the Multipurpose Tray (Tray 1).
Load the paper with the side to be printed facing
7. Do not overfill tray. Use the label inside the tray as a
guide (G).
8. Move Side Guide 2 to fit against the paper stack (H).
9. Reinsert the tray into the 500-sheet 2nd Cassette unit (I).
USING THE PRINTER
F
Print-side down!
H
I
G
Do not overfill tray
Loading Paper in the Optional 500-sheet 2nd Cassette 65
Page 72
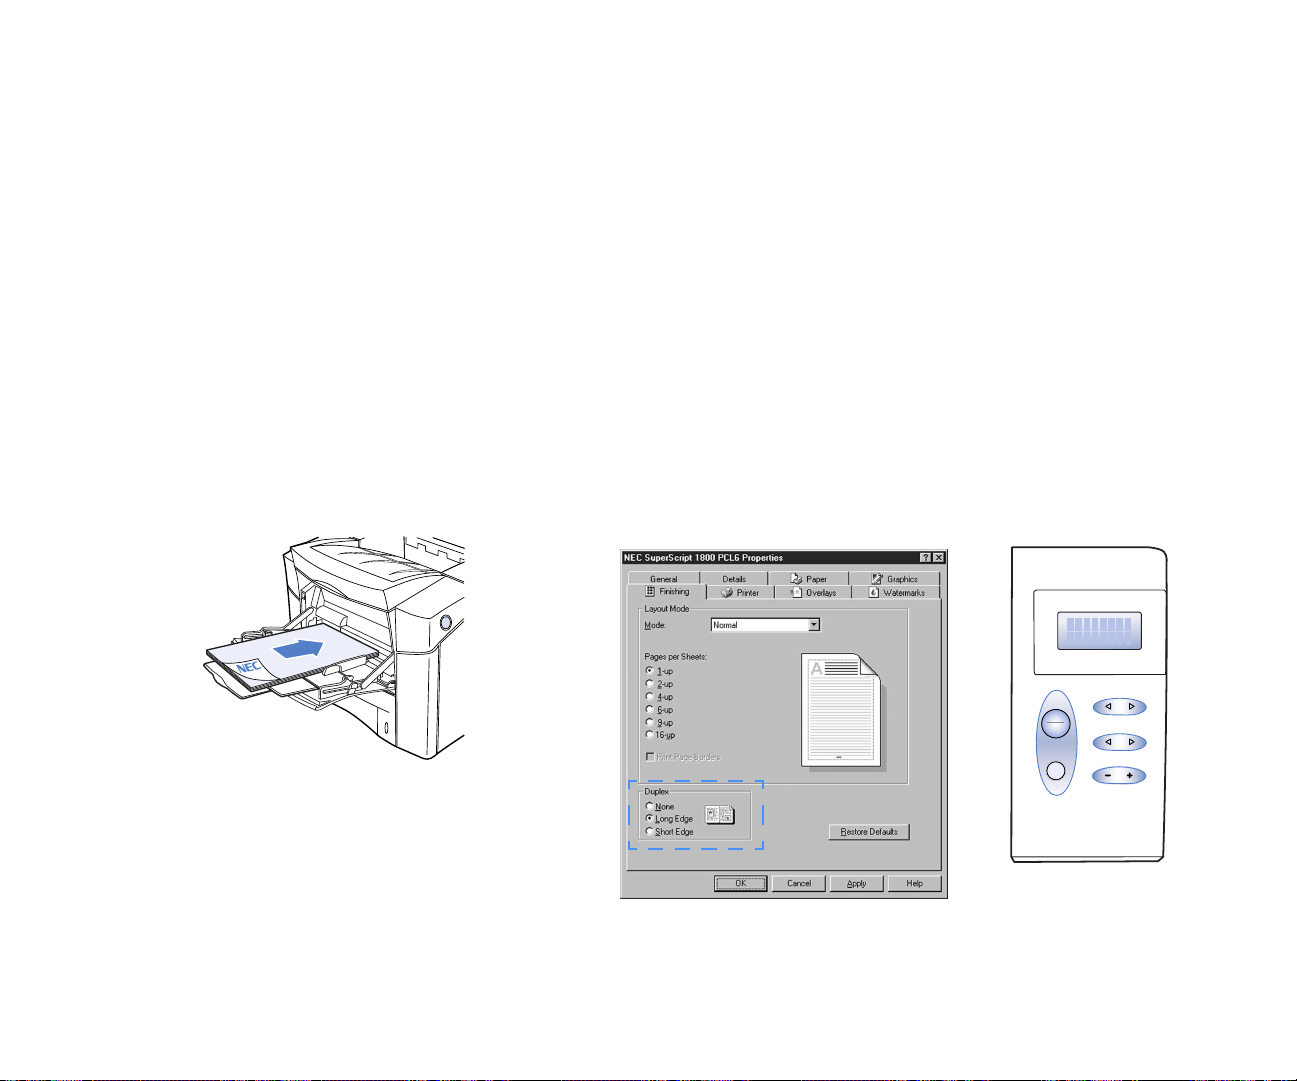
D
UPLEX PRINTING
You can print double-sided from any paper tray or cassette.
For duplex printing from the Multipurpose Tray load the first
sheet face down with the top of the sheet facing you (A). For
all other cassettes, load the first sheet facing up with the top
facing toward the printer. Set up duplex printing from the
printer driver or from the Operator Panel.
Follow these steps to set up the printer from the printer
driver:
1. From the Properties dialog box choose the Finishing
tab (B).
2. In the duplex area of the Paper tab select Long or Short
edge. Choose Long Edge if you want the binding
orientation along the left edge of the paper as in a
magazine. Choose Short Edge if you want the binding
orientation along the top edge of the paper as in a
calendar. Click on the OK button.
If you do not have access to the Properties dialog box you
may choose duplex printing from the Operator Panel (C).
1. Make sure the READY message appears on the display.
2. Press the Go/Continue button. The OFFLINE message
appears on the display.
3. Press the Menu button until you see PRINTING MENU.
4. Press the Item button until you see DUPLEX.
5. Press the Value button until the setting, long or short,
you need appears on the display. (For more information,
see Chapter 5.)
6. Press the Select/Cancel button to save your selection.
note:
application override Operator Panel settings.
Settings in the printer driver and software
A
For duplex printing from the
Multipurpose Tray (Tray 1) load the first sheet face
down. The top of the sheet must be toward you.
66 SuperScript 1800 — User’s Guide
B
C
NEC
DUPLEX
SuperScript 1800
Menu
GO
Continue
Select/Cancel
Item
Value
Page 73

M
ANUAL PRINTING
If you want to print manually, one piece of media at a time,
you can either set up your specifications through the printer
driver or through the Operator Panel. You can print on
several types of media such as envelopes, label sheets, or
regular paper . See Appendix B of this user’s guide for a list of
media that can be used. You must load your media from the
Multipurpose Tray (referred to as Tray 1 in your printer
driver or Operator Panel).
If you are going to print on thick or thin paper stocks, specify
these from the printer driver or the Operator Panel (see page
113 of Appendix B).
To set up your print job from the Properties dialog box follow
these instructions:
1. Click on the Paper tab.
2. Choose Tray 1 (Manual) from the Paper source drop-
down menu (A).
3. Press the Go/Continue button on the Operator Panel
when you are prompted (B).
To set up your print job from the Operator Panel (DOS or
UNIX users) follow these instructions:
1. From the factory default READY state press the Go/
Continue button to take the printer offline.
2. Press the Menu button until the message PRINTING
MENU
appears on the display.
3. Press the Item button until SOURCE AUTO* appears on
the display.
4. Press the Value + button until the message SOURCE
TRAY 1-M
appears on the display.
5. Press the Select button. An asterisk appears after the
selection: SOURCE TRAY 1-M*.
6. Press the Go/Continue button to bring the printer back
online.
7. Feed paper into the Multipurpose Tray one at a time (C).
Press the Go/Continue button every time you want to
print another sheet.
Paper sizes specified in the printer driver and on the
Operator Panel should match.
USING THE PRINTER
A
B
NEC
SuperScript 1800
Menu
GO
Continue
Select/Cancel
Item
Value
To manually print a sheet of paper from the
Multipurpose Tray, choose Tray 1 (Manual) from
the Paper menu or select SOURCE TRAY 1-M
from the Printing menu on the Operator Panel.
C
Manual Printing 67
Page 74

P
RINTING ENVELOPES
You may print envelopes from the Multipurpose Tray or the
500-sheet 2nd Cassette (Tray 3). You cannot print envelopes
from the standard 500-sheet Cassette (Tray 2). In the printer
driver and Operator Panel the Multipurpose Tray is called
Tray 1 and the optional 500-sheet 2nd Cassette is called Tray
3. Load no more than 10 envelopes in the Multipurpose Tray
and 40 envelopes in the 500-sheet 2nd Cassette at one time.
See Appendix B for a list of all supported envelope sizes. If
you wish to print envelopes one at a time, see page 71.
note:
into the Multipurpose Tray and the 500-sheet 2nd Cassette
(Tray 3). Please read directions carefully.
A
note: The Multipurpose Tray is referred to as Tray 1 in
the printer driver and Operator Panel. Choose Thick
Paper in the printer driver or on the Operator Panel if the
envelope is made of paper above 24lb.
There are differences between loading envelopes
B
Preparing the Envelopes
If envelopes are wrinkling, try envelopes made from a
different kind of paper. Generally, textured envelopes do not
print well in laser printers.
1. Shuffle the envelope stack (A).
2. Then press down on the stack as shown (B).
Loading Envelopes into the Multipurpose
Tray
1. Open and extend the Multipurpose Tray (C).
2. Load the envelopes with the address side facing up
against the left side of the tray. The envelope flaps should
be on the left, facing down (D).
3. Adjust the MP Paper Guide to the envelope stack (E).
C
D
MP Paper Guide
68 SuperScript 1800 — User’s Guide
E
Caution! Do not use envelopes
that have fasteners, snaps, or
windows. Also, do not use envelopes
that seal with peel-off strips or
pressure-sensitive adhesives.
Printing on such envelopes can
damage the printer.
Page 75

Loading Envelopes into the 500-sheet 2nd
Cassette
1. Remove the tray from the cassette unit (A).
2. Lift the lever on the left front of the cassette and release it
into the slot (B).
3. Press down on the bottom metal plate (C).
4. Make sure the Back Guide is positioned to the LTR index
mark. Otherwise, lift up on the back side of the guide and
move it forward (D).
5. Lift the tab on the top of Side Guide 1 and slide it to the
envelope size indicated on the tray bottom. You may
need to use both hands for this step (E). Match the right
side of Side Guide 1 to the index markings on the bottom
of the tray.
USING THE PRINTER
A
Back Guide
D
Side Guide 1
B
Tray Front
Lever
E
C
Caution! There is a tight
spring attached to the tab on
Side Guide 1. Avoid accidents
by not pulling up too hard on
the tab.
Printing Envelopes 69
Page 76
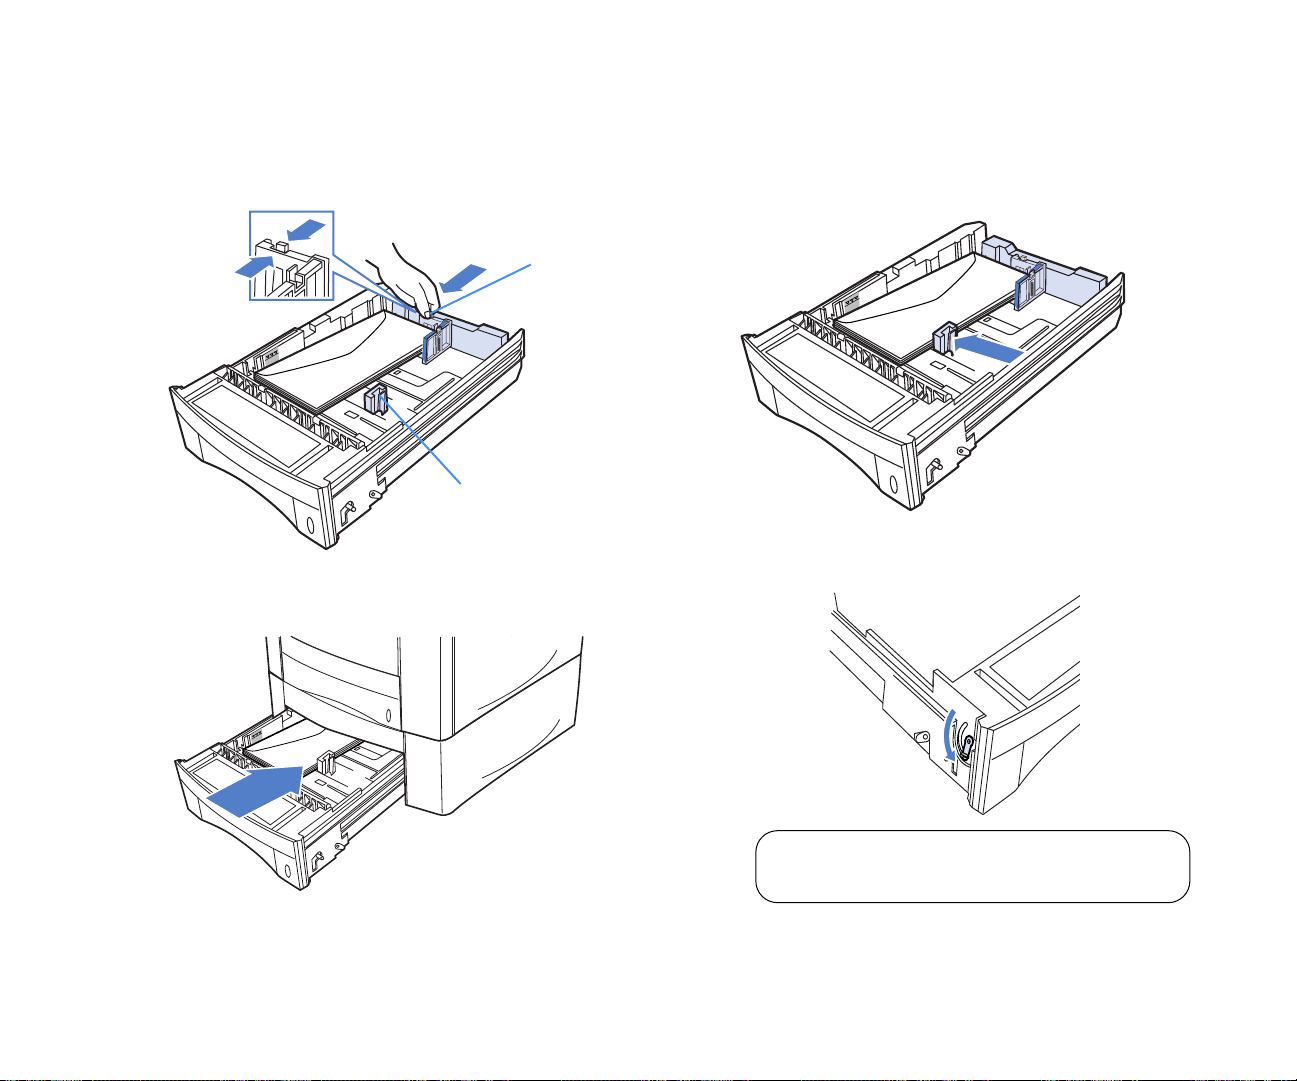
6. Place envelope stack into the tray address side down and
flaps to the left. Load no more than 40 envelopes at a
time.
7. Squeeze the tab on the Envelope Guide and lift slightly
adjusting to the envelopes’ length (F).
8. Squeeze the tab on the Side Guide 2 and slide to secure
the envelope stack (G).
9. Reinsert the tray into the 500-sheet 2nd Cassette unit (H).
F
Side Guide 2
H
Envelope Guide
G
70 SuperScript 1800 — User’s Guide
Remember to reset the lever back into its locked
position before you print regular paper!
Page 77

Printing Envelopes From the Printer Driver
1. Format your envelopes in your computer application.
2. Set your application to print width-wise on the envelope
and select the Multipurpose T ray (Tray 1) or optional 500sheet 2nd Cassette (Tray 3) as your destination. You
cannot print envelopes from the standard 500-sheet
Cassette (Tray 2).
note:
envelope. Nor can you print 10mm from the top, bottom
or right edge.
From Windows 95/98 —open the print Properties dialog
box and select Landscape in the Paper tab. Then select
Tray 1 or 3 from the Paper Source option in the Paper tab.
From Windows NT —open the print Properties dialog
box and select Landscape in the Paper tab. Select the
Advanced tab and select Tray 1 or 3 from the Paper
Source options.
From Windows 3.X —open the Printer Setup dialog box
and select Landscape in the Orientation option. Select
Tray 1 or 3 from the Paper source options. Click OK to
close the Setup dialog box. Choose the Print command
from the File menu and click OK.
From the Macintosh OS —choose Page Setup from the
file menu, select the Landscape orientation icon, and
click OK. Select Print from the File menu, choose Tray 1
(Manual), Tray 1 or Tray 3 from the Paper source pop-up
menu, and click Print. If you select T ray 1 (Manual) as the
paper source, you will be alerted to insert an envelope
each time you print.
note:
Operator Panel if the envelope is made of paper above
24lb.
You cannot print 15mm from the left edge of the
Choose Thick Paper in the printer driver or on the
Printing Envelopes Manually From the
Operator Panel
Follow the directions below to print envelopes manually
from the Multipurpose Tray.
1. From the default Ready state Press the Go/Continue
button to take the printer offline.
2. Press the Menu button until the message PRINTING
MENU
appears on the display.
3. Press the Item button until SOURCE AUTO* appears on
the display.
4. Press the Value + button until the message SOURCE
TRAY 1-M
5. Press the Select/Cancel button. An asterisk appears after
the selection: SOURCE TRAY 1-M*.
6. Press the Item button until the message PAPER LETTER*
appears.
7. Press the Value+ button until the message PAPER COM
10
(or chosen envelope size) appears.
8. Press the Select/Cancel button. An asterisk appears after
the selection: PAPER COM 10*
9. Press the Go/Continue button to bring the printer back
online.
10. Feed the envelopes in the Multipurpose Tray one at a
time. Press the Go/Continue button for every envelope.
appears on the display.
USING THE PRINTER
Printing Envelopes 71
Page 78

P
RINTING TRANSPARENCIES
1. Create the information you need printed on the
transparencies within your application. Try printing on a
plain sheet of paper first for proper placement.
2. Specify Transparency in the printer driver (A) or on the
Operator Panel (the Operator Panel can only show a
selection for tranparencies if T ray 1 or Tray 1-M is already
selected as your paper source).
3. Load up to 30 sheets in the Multipurpose Tray
(Tray 1) (B).
note:
Multipurpose Tray.
You can only print transparencies from the
4. Adjust the MP Paper Guide to the transparencies.
A
For Best Results
• Use transparencies in letter or A4 size only.
• Transparencies must be able to withstand temperatures
of 392°F (200°C) for at least 0.1 second.
• Keep the paper path clean. Transparencies are especially
sensitive to dirt. If shadows appear on either the top or
bottom of the sheets, refer to Chapter 7, “Maintaining
Your Printer,” for instructions on how to clean the
printer.
• Do not fan transparencies. The generated static electricity
may cause transparencies to stick together and result in a
paper jam.
• The best quality printing will be inside a 10 mm border
around the edge of the transparency.
72 SuperScript 1800 — User’s Guide
Do not fan transparencies!
MP Paper Guide
10mm
Best Print Area
Page 79

P
RINTING LABELS
Print labels as you would paper from the Multipurpose Tray
(Tray 1). Keep in mind that printing labels, envelopes, thick
paper, or transparencies takes slightly longer than plain
paper.
Use letter or A4 size label sheets. Make sure all labels are
attached to the backing sheet.
exposed backing sheet
AVOID
Avoid label sheets that have the backing sheet material
exposed. Do not use label sheets with some labels already
removed.
Be careful to align the label sheets in the Multipurpose Tray.
When adding more label sheets, remove the ones already in
the tray first and carefully stack them together. Load no more
than 30 label sheets at a time into the Multipurpose Tray.
USING THE PRINTER
OK
Printing Labels 73
Page 80

74 SuperScript 1800 — User’s Guide
Page 81

CHAPTER 7
MAINTAINING YOUR
PRINTER
O
VERVIEW
The SuperScript 1800 printer is designed for easy use and
maintenance.This chapter explains basic maintenance and
cleaning procedures that must be followed in order to
maintain high print quality and efficient operation. Included
are instructions for the following maintenance tasks:
• Replacing the Toner Cartridge
• Cleaning the printer
• Moving the printer
note: See page 108, for information about ordering
printer supplies.
P
RECAUTIONS
Please take the following precautions when performing
maintenance tasks
• Do not work inside the T op or Back Covers of the printer
until it has cooled at least 15 minutes.
• Do not use ammonia-based cleaners. They may react
with the toner in the cartridge.
• Do not use alcohol-based cleaners on the printer exterior.
They may damage the plastic case.
• Do not expose the Toner Cartridge to direct sunlight or
bright room light.
• Do not spill any liquid inside the printer or in the power
cord connector.
• Turn off and unplug the printer while working inside the
covers.
• Follow all directions carefully. Save this user’s guide for
future reference.
• Do not attempt to service the printer yourself since
opening some internal parts may expose you to high
voltage or other hazards. Refer all servicing not
explained in this user’s guide to qualified technicians.
Call NEC Technical Support at 800-632-4650 for help.
75
Page 82

R
EPLACING THE TONER CARTRIDGE
Part # 20-140
Replace the Toner Cartridge when you start seeing print
quality problems such as light images or white streaks across
the page. The Operator Panel will display the TONER LOW
message when the toner level is getting low.
The SuperScript 1800 Toner Cartridge will print
approximately 8,000 pages before it needs to be replaced. To
order another Toner Cartridge contact your NEC printer
dealer or call 800-632-2326.
Follow these directions to replace the Toner Cartridge
A
B
note: Please shake the Toner Cartridge
thoroughly to loosen and distribute the toner
inside, which may have settled during storage.
1. Open the Top Cover (A).
2. Pull out the used Toner Cartridge (B).
3. Remove the new Toner Cartridge from its bag and shake
it thoroughly, as shown, to distribute the toner (C).
4. Then rock the Toner Cartridge forward and back several
times (D).
5. Facing the front of the printer, gently place the new Toner
Cartridge inside (E) and close the printer (F).
When the printer does not contain a Toner Cartridge the
message CLOSE COVERS may appear on the Operator Panel,
even if the printer covers are closed.
C
D
76 SuperScript 1800 — User’s Guide
E
F
Page 83

C
LEANING THE PRINTER
Clean the printer about every month. A thorough cleaning
consists of wiping out the inside Toner Cartridge area,
cleaning the internal laser scanning unit, and cleaning the
outside of the printer.
Carefully follow these directions.
1. Turn off the printer. Open the Top Cover (A).
2. Remove the Toner Cartridge (B).
3. Using a soft lint-free cloth, gently wipe the internal toner
cartridge area (C).
4. Detach the Laser Brush (D) and slide it horizontally
across the laser scanning unit track as shown (E).
5. Replace the Laser Brush.
MAINTAINING YOUR PRINTER
A
D
B
E
C
Directions continued on next page
Cleaning the Printer 77
Page 84

6. Close the Top Cover (F).
7. Using a clean soft cloth, wipe off any stains or dust from
the printer’s exterior (G).
note:
on plastic parts of the printer.
Do not use strong solvents or abrasive cleansers
8. If toner marks have been appearing on the back of your
printouts you should also print out a Fuser cleaning
sheet from the Operator Panel (see page 50).
F
G
78 SuperScript 1800 — User’s Guide
Page 85

M
OVING THE PRINTER
Follow the procedure below when moving the printer.
1. Turn off the printer (A).
2. Unplug the Power Cord and any connecting cables from
the printer (B).
3. If applicable, remove the printer from the 500-sheet 2nd
Cassette and place it on a sturdy surface or cart (C).
4. If you are shipping your printer, repack it in its original
packaging and box.
MAINTAINING YOUR PRINTER
A
C
B
Lift the printer properly!
Moving the Printer 79
Page 86

80 SuperScript 1800 — User’s Guide
Page 87

CHAPTER 8
PRINTER OPTIONS
O
VERVIEW
There are six available options for upgrading your
SuperScript 1800 printer to help meet your printing needs
and requirements.
• 500-sheet 2nd Cassette
• Printer Memory Upgrade
• PostScript Level 2 Upgrade Kit
• IrDA and Serial Interface Upgrade Kit
• Apple LocalTalk and Serial Interface Upgrade Kit
• 10/100Base-TX Network Interface Kit
Except for the optional 500-sheet 2nd Cassette, the printer
must have its side cover removed because the options must
be installed on the printer Controller Board. This is a simple
procedure and is described in this chapter.
note:
options, see Chapter 10, “Technical Support.”
Printer memory modules are available at your local
computer retailer.
For information about ordering SuperScript 1800
Printer Options
500-sheet 2nd Cassette
Order Number: 20-140
PostScript Level 2 Upgrade Kit
Order Number: 1802
IrDA (Infrared) and
Serial Interface Upgrade Kit
Order Number: 1803
Apple LocalTalk and
Serial Interface Upgrade Kit
Order Number: 1804
10/100Base-TX
Network Interface Kit
Order Number: 1805
81
Page 88

I
NSTALLING THE
500-
(Order No.1801)
The optional 500-sheet 2nd Cassette can be used for
increasing the overall paper capacity of the printer and for
print jobs that require printing on many envelopes.
To install the 500-sheet 2nd Cassette:
1. Turn the printer off.
2. Remove all cables (A).
3. Assure there is plenty of room around and above the
4. Put the 500-sheet 2nd Cassette next to the printer.
Installing the 500-sheet 2nd Cassette
A
SHEET 2ND CASSETTE
printer to work. Remove the 500-sheet 2nd Cassette from
its packaging.
B
5. Keeping the printer level, lift the printer up and onto the
500-sheet Cassette as shown (B).
6. Reconnect all cables.
7. Turn on the printer (C).
8. Assure “READY” appears on the Operator Panel display.
9. If you are using the Windows PostScript printer driver,
open the properties window for the driver, view the
Device Options (if using Windows 98 or 98) or Device
Settings (if using Windows NT 4.0), and assure that the
optional cassette is selected.
10. Confirm the installation by printing a printer
configuration page as described on page 51.
C
82 SuperScript 1800— User’s Guide
Connector
note: The Operator Panel and the
Properties Window for each printer
driver refers to the 500-sheet 2nd
Cassette as Tray 3.
Page 89

A
CCESSING THE
P
RINTER CONTROLLER BOARD
The printer Controller Board manages and controls all
printer functions. It is also the place where all the upgrade
kits, described later in this chapter, are installed.
Use this procedure to get access to the Controller Boar d when
installing the following upgrades.
• Printer Memory Upgrade
• PostScript Level 2 Upgrade
• IrDA and Serial Interface Upgrade
• LocalTalk and Serial Interface Upgrade
• 10/100Base-TX Network Interface Upgrade
Accessing the Printer Controller Board
To access the Controller Board:
1. Turn off the printer.
2. Pull out the 500-sheet Cassette tray (A).
3. Disconnect all cables from printer.
4. Position the printer so the right side of the printer can be
worked on.
5. Remove screws from the side cover then open
back cover (B).
6. Pull tab to release the side cover (C).
7. Slide side cover towards the back of the printer (D).
8. Rotate the side cover away from printer (assure wiresnaps on the parallel port are not in the way), then lift the
side cover away (E).
9. Loosen top screw of controller board cover, remove
remaining 4 screws, then remove the metal cover (F).
PRINTER OPTIONS
A
D E
B C
F
Accessing The Printer Controller Board 83
Page 90

P
RINTER
One of the uses for printer memory is for temporarily storing
a print job while it is being processed. The more memory
installed in the printer , the more efficiently it can process one
or more print jobs.
Your SuperScript 1800 printer comes with 12MB of memory,
and can be upgraded to 132MB using 60ns, or faster, 72-pin
EDO DRAM SIMMs.
The printer has a Controller Board with two SIMM slots for
memory. The SIMM slots can be upgraded with 8MB, 16MB,
32MB, and 64MB SIMMs. If both slots are going to contain
SIMMs, they must be of the same size.
The 12MB of memory that comes with your printer is in the
form of 4MB built into the controller board and 8MB installed
in the SIMM slots.
Installing Printer Memory
M
EMORY UPGRADE
To install a SIMM:
1. Remove the printer side cover and access the printer
controller board as described on page 83.
2. Position the printer so you have access to the controller
board.
3. Figure (A) shows the controller board and the location of
2 SIMM slots used for printer memory.
4. Locate the notch on the SIMM (B).
5. Position the SIMM into a slot so that the notch is at the
bottom (C).
6. Snap the SIMM into position (D).
7. Use the procedure in Step 1 as guide to replace printer
side cover, 500-sheet Cassette tray, and printer cables.
8. If your computer is running Windows 3.1x, 95, 98, or
NT 4.0, adjust the printer driver properties so the new
printer memory size is recognized. Typically, the
adjustment is made in the Device Options tab. The See
Chapter 4, “Printer Software,” for more information.
9. Confirm the installation by printing a printer
configuration page as described on page 51.
A
2 slots for memory SIMMs
84 SuperScript 1800— User’s Guide
B
Notch
C
D
Page 91

P
OSTSCRIPT LEVEL
(Order No. 1802)
Install the PostScript Level 2 Upgrade for computers that
must send their print jobs as PostScript files. Macintosh
computers send their print jobs as PostScript files. Windows
computers send print jobs as PostScript files if they are using
the Windows PostScript printer driver.
Installing the kit involves gaining access to the printer
Controller Board and installing a single PostScript SIMM.
To install the PostScript Level 2 SIMM:
1. Remove the printer side cover and access the printer
controller board as described on page 83.
2. Position the printer so you have access to the printer
controller board.
3. Figure (A) shows the controller board and the location of
the PostScript SIMM slot.
4. Locate the notch on the SIMM (B).
Installing a PostScript Level 2 Upgrade
2 U
PGRADE
5. Position the SIMM into the slot so that the notch is at the
bottom (C).
6. Snap the SIMM into position (D).
7. Use the procedure in Step 1 as guide to replace printer
side cover, 500-sheet Cassette tray, and printer cables.
8. If not already done, perform the following tasks:
• For computers running Windows, install a Windows
PostScript printer driver as described by Chapter 3,
“Installing the Software.”
• For Macintosh computers, install the LocalTalk and
Serial Interface Upgrade as described on page 88,
then configure your Macintosh as described in
Chapter 3, “Installing the Software,” on page 18.
9. Confirm the installation by printing a printer
configuration page as described on page 51.
PRINTER OPTIONS
A
Install the PostScript module into the first slot
B
Notch
C
PostScript Level 2 Upgrade 85
D
Page 92

IRDA
A
U
PGRADE
(Order No. 1803)
An IrDA Interface Card is a device that uses infrared light to
transmit a print job from your computer to the printer. It can
be used to substitute the parallel printer cable. The IrDA
Interface Card also has a serial port for making a serial
connection between your computer and the printer.
AND SERIAL INTERFACE
System Requirements
To use IrDA, your computer must be running Windows 95 or
98, have an IrDA interface, have an IrDA driver, and the NEC
IrDA Interface Upgrade Kit.
IrDA Card Installation
To install the IrDA Interface Card:
1. Remove the printer side cover and access the printer
Installing the IrDA and Serial Interface Upgrade
Controller Board as described on page 83.
2. Position the printer so you have access to the back.
3. Remove screw from the metal back plate (A).
4. Insert IrDA Interface Card into printer (B).
5. Connect card with socket on Controller Board (C).
6. Use screw, removed in Step 3, to fasten the card (D).
7. Use the procedure in Step 1 as guide to replace the
printer side cover, 500-sheet Cassette tray, and cables.
IrDA and Serial Connection
This section describes how to connect your computer to the
printer’s IrDA and serial ports, and how to configure your
computer’s operating system for using these connections.
To complete the IrDA connection:
1. Connect the IrDA adapter to IrDA port (E).
2. Aim the adapter at your computer’s IrDA sensor. Do not
allow more than three feet of separation (F).
B
D
86 SuperScript 1800— User’s Guide
E
C
Connect to
socket on
controller
board
F
3 feet or less
Page 93

3. Follow the instructions supplied with your computer’s
infrared adapter to configure your computer for use.
4. Open the Details tab of your printer driver properties
window (see Chapter 4, “Printer Software,”for more
information).
5. From the Print to the following port drop-down list,
select Infrared Serial (COM) Connection Port or
Infrared Printer (LPT) Port .
6. Confirm the installation by printing a printer
configuration page as described on page 51.
To complete the serial connection:
1. Connect one end of a 9-pin shielded serial cable (not
included with the upgrade kit or printer) to the serial
port on the interface card.
2. Connect the other end of the cable to your computer’s
serial port.
3. Open the properties windows for your printer driver:
• From the Windows Start button, point to Settings ,
then click on Printers .
• Right-button click on your computer’s default
printer driver.
• Select Properties to open the printer properties
window.
• Click on the Details tab.
4. From the Print to the following port drop-down list,
select COM 1 or COM 2. The selection is based on which
port the serial cable is connected to.
5. Click OK.
6. Confirm the installation by printing a printer
configuration page as described on page 51.
PRINTER OPTIONS
IrDA and Serial Interface Upgrade 87
Page 94

A
PPLE LOCALTALK AND
S
ERIAL INTERFACE UPGRADE
(Order No. 1804)
A LocalTalk interface is a device that uses an AppleTalk cable
to connect a Macintosh computer with the printer . Other than
a network connection, this is the only method for connecting
the printer to a Macintosh.
The interface card also has a 9-pin serial port, but it is only for
connecting to computers running Windows 95 or 98.
Hardware Requirements
Since Macintosh computers send their print jobs in the
PostScript language, the printer must be upgraded to
interpret the PostScript language. This requires the PostScript
Level 2 Upgrade Kit (Order No. 1802) be installed in the
printer. For more information about this kit, see page 85.
Apple LocalTalk involves connecting the computer and
printer directly to each other using a LocalTalk cable. The
cable is supplied by Apple and your local computer retailer.
Software Requirements
The SuperScript 1800 printer can receive print jobs from
Macintosh computers running Mac OS 7.1 and higher.
Interface Card Installation
To install the Interface Card:
1. Remove the printer side cover and access the printer
Controller Board as described on page 83.
2. Position the printer so you have access to the back.
3. Remove screw from the metal back plate (A).
4. Insert the Interface Card into the printer (B).
5. Connect card with socket on Controller Board (C).
6. Use screw, removed in Step 2, to fasten the card (D).
7. Use the procedure in Step 1 as guide to replace printer
side cover, 500-sheet Cassette tray, and printer cables.
LocalTalk and Serial Connection
This section describes how to connect your Macintosh to the
interface card’s LocalTalk port, and how to configure your
Macintosh for using this connection.
The serial port on the interface card is reserved for computers
running Windows 95 or 98.
To complete the LocalTalk connection:
note:
from a local area network.
1. Connect one end of a LocalTalk cable (not included with
the upgrade kit or printer) to the LocalTalk port on the
interface card (E).
2. Connect the other end of the LocalTalk to your Macintosh
computer .
3. Insert the SuperScript 1800 Solutions CD into your
Macintosh and the SS1800 window will appear.
4. Double-click the SuperScript 1800 Installer icon to begin
installing the printer software. Follow the instructions
presented on the monitor to complete the install.
5. From the Apple menu, select Chooser to open the
Chooser window.
6. From the left pane of the Chooser window, select a
LaserWriter 8 printer driver and the NEC SuperScript
1800 will appear in the right pane of the window.
If no driver is available, see the Mac OS Help for
information about installing a LaserWriter 8 driver.
7. Click Create to setup the printer . When cr eated, the NEC
SuperScript 1800 icon will appear on the desktop.
8. Close the Chooser window.
9. From the Apple menu, point to Control Panels then
click AppleTalk to open the AppleTalk dialog box.
10. From the Connect Via drop-down list, select Printer
Port.
11. Confirm the installation by printing a printer
configuration page as described on page 51.
This procedure will disconnect your Macintosh
88 SuperScript 1800— User’s Guide
Page 95

To complete the serial connection:
A
note:
for computers running Windows 95 or 98.
The serial port on the interface card is reserved
1. Connect one end of 9-pin shielded serial cable (not
included with the upgrade kit or printer) to the serial
port on the interface card.
2. Connect the other end of the cable to your computer’s
serial port.
3. From your computer, open the properties windows for
your printer driver.
• From the Windows Start button, point to Settings ,
then click on Printers .
• Right-button click on your computer’s default
printer driver icon.
• Select Properties to open the printer properties
window.
• Click on the Details tab.
Installing the LocalTalk and Serial Interface Upgrade
4. From the Print to the following port drop-down list,
select COM 1 or COM 2. The selection is based on which
port the serial cable is connected to.
5. Click OK.
6. Confirm the installation by printing a printer
configuration page as described on page 51.
PRINTER OPTIONS
B
C
Connect to
socket on
controller
board
D
E
Apple LocalTalk and Serial Interface Upgrade 89
Page 96

10/100B
A
N
ETWORK INTERFACE UPGRADE
(Order No. 1805)
A 10/100Base-TX Network Interface Card (NIC) is a device
for connecting the printer to an Ethernet network. A
Category 5 network cable is used for interconnecting the NIC
with the network. The NIC can automatically determine if it
is connected to a 10-MB or 100-MB network.
The procedure in this section only describes how to install
the NIC. For information about configuring the printer for
the NIC, see the NEC SuperScript 1800 Network Configuration
Guide.
Installing the 10/100Base-TX Network Interface Upgrade
ASE
-TX
NIC Installation
To install the Network Interface Card:
1. Remove the printer side cover and access the printer
Controller Board as described on page 83.
2. On the back of the printer, remove the two screws from
the metal back plate (located on Interface Panel), then
remove plate (A).
3. Insert NIC into socket on controller board (B).
4. Use screw, removed in Step 2, to fasten the card (C).
5. Use the procedure in Step 1 as guide to replace printer
side-panel, 500-sheet Cassette, and printer cables.
6. Connect Category 5 network cable to NIC.
7. Configure the printer for the NIC as described in the
NEC SuperScript 1800 Network Configuration Guide.
8. Confirm the installation by printing a printer
configuration page as described on page 51.
B
Connect to
socket on
controller board
90 SuperScript 1800— User’s Guide
C
Interface Panel
D
Page 97

CHAPTER 9
TROUBLESHOOTING
S
IMPLE TROUBLESHOOTING
Here are some simple resolutions to occasional printer
problems.
O
VERVIEW
This chapter tells you how to resolve problems with your
printer’s operation.The following subjects are explained:
• Print quality maintenance
• Simple troubleshooting
• Clearing paper jams
• Output quality problems
• PostScript problems
P
RINT QUALITY
Here are some suggestions for maintaining the highest print
quality from your printer.
• Replace the Toner Cartridge as soon as the display
indicates that replacement is necessary.
• Use high-quality paper or transparencies to obtain sharp,
crisp characters and maximum contrast.
• Follow the cleaning procedures described in Chapter 7,
“Maintaining Your Printer.”
M
AINTENANCE
Problem
Power light is off Check that the power cord is plugged
into a live power outlet and the
printer power switch is turned on.
Power light is on
but printer does
not print
Printer does not
operate by
pressing the GO
button
Printer does not
print from
software
application
Printed data is
not sent to the
printer
• Verify that the Ready indicator
light is on (if it is not, press the Go
button).
• V erify that all interface cable
connections are tightly secured.
Turn the printer off, and then on
again.
• From the Windows Start button,
point to Settings , then select
Printers .
• Select PCL6, PCL5e, or PS printer
icon.
• From the File menu, select
Default Printer .
• Check the printer cable
connections (See page 13 and14.)
• Check the printer port on your
computer.
Solution
Paper does not
print to the output
tray
Paper does not
stack correctly
Check for paper jam or misfeed.
Make sure that the paper weight is
between 16 and 43 lb.
91
Page 98

P
APER JAM PROBLEMS
This section explains how to prevent and remove paper jams.
There are several things you can do to prevent paper jams.
• Make sure the paper in not folded, wrinkled, or curled.
• Do not overfill the paper trays.
• Use paper, envelopes, labels, and transparencies that
match the printer’s media specifications
(see Appendix B).
• Store all media in a dry location.
Jam Recovery feature
One of the SuperScript 1800 Operator Panel options is Jam
Recovery. The default setting for Jam Recovery is Off.
If Jam Recovery is set to On, the printer will attempt to
reprint lost pages of a PostScript print job after a jam is
cleared, as long as you do not turn off the printer. There may
be some sacrifice to memory while the printer attempts to
recover from a paper jam. This is especially true when
printing in duplex mode.
The ability of the printer to reprint jammed pages will
depend on the complexity and number of pages involved in
the original print job. If more than two pages are involved in
the jam, the likelihood of recovery will diminish.
Jam Recovery can only be set in the Operator Panel menu
tree (see page 58).
note:
jam. If the Jam Recovery setting is “On,” the printer will
automatically reprint lost pages after a jam is cleared.
Do not turn the printer off before clearing a paper
Understanding the Paper Path
The following illustration shows the printer’s paper path.
Understanding this path will help you locate paper jams. The
paper is picked up from the Multipurpose T ray, Cassette T ray,
or 2nd Cassette Tray and passed under the Transfer Drum. It
then passes through the Fuser Unit and is delivered to the
Output Tray on the top of the printer . Paper jams occur in the
following three areas:
1. The input tray feed area. Error message on the Operator
Panel will report JAM– TRAY.
2. The engine area. Error message on the Operator Panel
will report JAM–TOP or JAM–BACK.
3. The duplex area. Operator Panel will report
JAM DPX–TRAY or JAM DPX–BACK.
note:
that the area should be checked, repaired, or cleaned.
Frequent jams occurring in a specific area indicate
SuperScript 1800 Paper Path
JAM–TOP
JAM–BACK
92 SuperScript 1800 — User’s Guide
JAM –TRAY
JAM DUPLEX– TRAY
JAM DUPLEX–BACK
Page 99

Clearing Paper Jams
Follow these suggestions when attempting to clear paper
jams.
• To avoid damage to rollers, always remove jammed
paper gently.
• Try to remove jammed paper without tearing it. Any
pieces of paper left in the printer, whether large or small,
can obstruct the paper path and cause further jams.
.
Message Explanation
Indicates the paper has jammed as it
was being fed into the printer from
either the Multipurpose T ray or one of
the Cassette Trays. Access is through
the tray area. (See pages 94 and 95 for
information on removing this jam.)
Indicates the paper has jammed as it
was moving under the Toner
Cartridge. Access is through the Top
Cover. (See page 98 for information on
removing this jam.)
Indicates the paper has jammed after
the first side was printed. Access is
through the Back Cover. (See page 97
for information on removing this jam.)
note:
on the Operator Panel persists, open and close the Top
Cover. This should clear the jam message.
If, after clearing the paper jam, the jam message
TROUBLESHOOTING
Indicates the paper has jammed in the
Duplex Unit. Access is through
removing the Cassette Tray. (See page
96 for information on removing this
jam.)
Indicates the paper has jammed after
the first side was printed. Access is
through the Back Cover. (See page 97
for information on removing this jam.)
Paper Jam Problems 93
Page 100

Paper Jams in the Multipurpose Tray Area
Follow these directions to clear paper jams that occur when a
misfeed happens in the Multipurpose Tray (Tray 1) area.
When this happens the Operator Panel will display
JAM-TRAY.
1. If a paper edge is visible in the feed area, use both hands
to gently pull the paper out of the printer (A).
2. Remove any remaining paper from the Multipurpose
Tray (B).
3. Reload the paper back into the Multipurpose Tray (C).
4. Open the Top Cover (D).
5. Close the Top Cover (E).
note:
order to clear the paper jam message from the Operator
Panel display.
The Top Cover must be opened and closed in
A B
D
C
E
94 SuperScript 1800 — User’s Guide
 Loading...