

Page 1
MANUAL
Page 2

The information in this document is subject to change without notice and does not represent a
commitment on the part of Native Instruments GmbH. The software described by this document is subject to a License Agreement and may not be copied to other media. No part of this
publication may be copied, reproduced or otherwise transmitted or recorded, for any purpose,
without prior written permission by Native Instruments GmbH, hereinafter referred to as Native
Instruments.
“Native Instruments”, “NI” and associated logos are (registered) trademarks of Native Instruments GmbH.
Mac, macOS, GarageBand, Logic, iTunes and iPod are registered trademarks of Apple Inc.,
registered in the U.S. and other countries.
Windows, Windows Vista and DirectSound are registered trademarks of Microsoft Corporation
in the United States and/or other countries.
All other trade marks are the property of their respective owners and use of them does not imply any affiliation with or endorsement by them.
Document authored by: Daniel Scholz, Samuel Dalferth
Software version: 1.1 (01/2017)
Disclaimer
Special thanks to the Beta Test Team, who were invaluable not just in tracking down bugs, but
in making this a better product.
Page 3

NATIVE INSTRUMENTS GmbH
Schlesische Str. 29-30
D-10997 Berlin
Germany
www.native-instruments.de
NATIVE INSTRUMENTS North America, Inc.
6725 Sunset Boulevard
5th Floor
Los Angeles, CA 90028
USA
www.native-instruments.com
NATIVE INSTRUMENTS K.K.
YO Building 3F
Jingumae 6-7-15, Shibuya-ku,
Tokyo 150-0001
Japan
www.native-instruments.co.jp
Contact
NATIVE INSTRUMENTS UK Limited
18 Phipp Street
London EC2A 4NU
UK
www.native-instruments.co.uk
© NATIVE INSTRUMENTS GmbH, 2017. All rights reserved.
Page 4

Table of Contents
Table of Contents
1 Welcome to STRUMMED ACOUSTIC ............................................................................
2 Using STRUMMED ACOUSTIC .....................................................................................
2.1 Pattern Selection and Playback .................................................................................................. 7
2.2 Playing Endings and Pickups ..................................................................................................... 9
2.3 Blending between Low and High Voicings .................................................................................. 10
2.4 Controlling the Accents of Patterns ............................................................................................ 10
2.5 Loading/Saving Sound Presets ................................................................................................... 11
2.6 Locking Parameters When Loading Snapshots or Songs ............................................................. 12
2.7 Defining the Downbeat after Signature Changes ........................................................................ 13
3 The Pattern Page .......................................................................................................
3.1 The Song Browser ....................................................................................................................... 16
3.2 The Pattern Browser ................................................................................................................... 17
3.3 The Info Panel .............................................................................................................................20
3.4 The Auto Chords Panel ................................................................................................................22
4 The Sound Page ........................................................................................................
5 The Playback Page ....................................................................................................
6 Tips and Tricks .........................................................................................................
5
7
15
24
27
30
7 Credits ......................................................................................................................
SESSION GUITARIST - STRUMMED ACOUSTIC - Manual - 4
34
Page 5

Welcome to STRUMMED ACOUSTIC
1 Welcome to STRUMMED ACOUSTIC
Thank you for purchasing SESSION GUITARIST – STRUMMED ACOUSTIC, an acoustic guitar
strumming sample library powered by KONTAKT. This document will provide you with instructions and advice on how to use the library, as well as some additional information.
We hope that you will be truly inspired by using SESSION GUITARIST – STRUMMED ACOUSTIC.
About SESSION GUITARIST – STRUMMED ACOUSTIC
SESSION GUITARIST – STRUMMED ACOUSTIC, or STRUMMED ACOUSTIC, as we will call it
in this manual, is a pattern-based guitar strumming library designed for ease of use in musical
productions. Its samples originate from a carefully hand-picked vintage Martin D-35 guitar
from 1973. Thanks to careful selection and placement of microphones, superb room acoustics
and an audio signal path consisting only of high-end vintage microphone pre-amplifiers and
pristine A/D converters, no additional signal processing was required to capture the pure, larger-than-life sound you can hear in the final instrument. You will find that the STRUMMED
ACOUSTIC sound sits perfectly in virtually any mix with hardly any EQ or compression necessary.
Patterns can be selected via keyswitches and be played as chords on your MIDI keyboard. The
playback will always stay in sync to your host project. In regard to sound options, STRUMMED
ACOUSTIC offers stereo mode, true doubling mode, as well as the possibility to blend between
a low and a high voicing. With a selection of easy-to-use audio effects, you will be able to
tweak your sound within seconds.
The STRUMMED ACOUSTIC library contains 102 patterns, which were all performed live by
professional studio guitarist Floryan Kœrber. In addition to that, STRUMMED ACOUSTIC features 31 songs, each of which represents a group of several patterns that go together well.
The key feature of STRUMMED ACOUSTIC is its revolutionary playback engine. You can seamlessly switch between different patterns to create fluid musical performances and alter the dynamics in real-time. In contrast to most pattern-based instruments, the number of available
chord types is virtually endless. Because all nuances of the original performance, such as exact
timing and dynamics, are preserved, you will notice that the instrument feels very natural and
organic. Last, but not least, the engine does not employ traditional time-stretching, but is
SESSION GUITARIST - STRUMMED ACOUSTIC - Manual - 5
Page 6
Welcome to STRUMMED ACOUSTIC
based on a far more sophisticated technical backbone and recordings in multiple tempos. As a
result, all the integrated patterns can be played over a huge tempo range in an outstanding
sound quality.
This document uses particular formatting to point out special facts and to warn you of potential issues. The icons introducing the following notes let you see what kind of information can
be expected:
The speech bubble icon indicates a useful tip that may often help you to solve a task
more efficiently.
The exclamation mark icon highlights important information that is essential for the given context.
The red cross icon warns you of serious issues and potential risks that require your full
attention.
Furthermore, the following formatting is used:
▪ Text appearing in (drop-down) menus (such as Open…, Save as… etc.) in the software and
paths to locations on your hard disk or other storage devices is printed in italics.
▪ Text appearing elsewhere (labels of buttons, controls, text next to checkboxes etc.) in the
software is printed in blue. Whenever you see this formatting applied, you will find the
same text appearing somewhere on the screen.
▪ Important names and concepts are printed in bold.
▪ References to keys on your computer’s keyboard you’ll find put in square brackets (e.g.,
“Press [Shift] + [Enter]”).
Single instructions are introduced by this play button type arrow.
►
Results of actions are introduced by this smaller arrow.
→
SESSION GUITARIST - STRUMMED ACOUSTIC - Manual - 6
Page 7
Using STRUMMED ACOUSTIC
Pattern Selection and Playback
2 Using STRUMMED ACOUSTIC
The STRUMMED ACOUSTIC instrument is designed to be played using a MIDI keyboard. The
patterns are triggered and selected by MIDI, allowing for fast arranging.
Patterns will automatically sync to the master, or host tempo. The patterns in this library can
be played at any tempo between ca. 60-65bpm and up to 180bpm and even above. Since
there is no time-stretching involved in the process, you will always hear the patterns in the
highest possible quality.
The patterns are based on actual recordings by a professional studio guitarist, so they
sound best in the typical tempo range preferred by most guitarists.
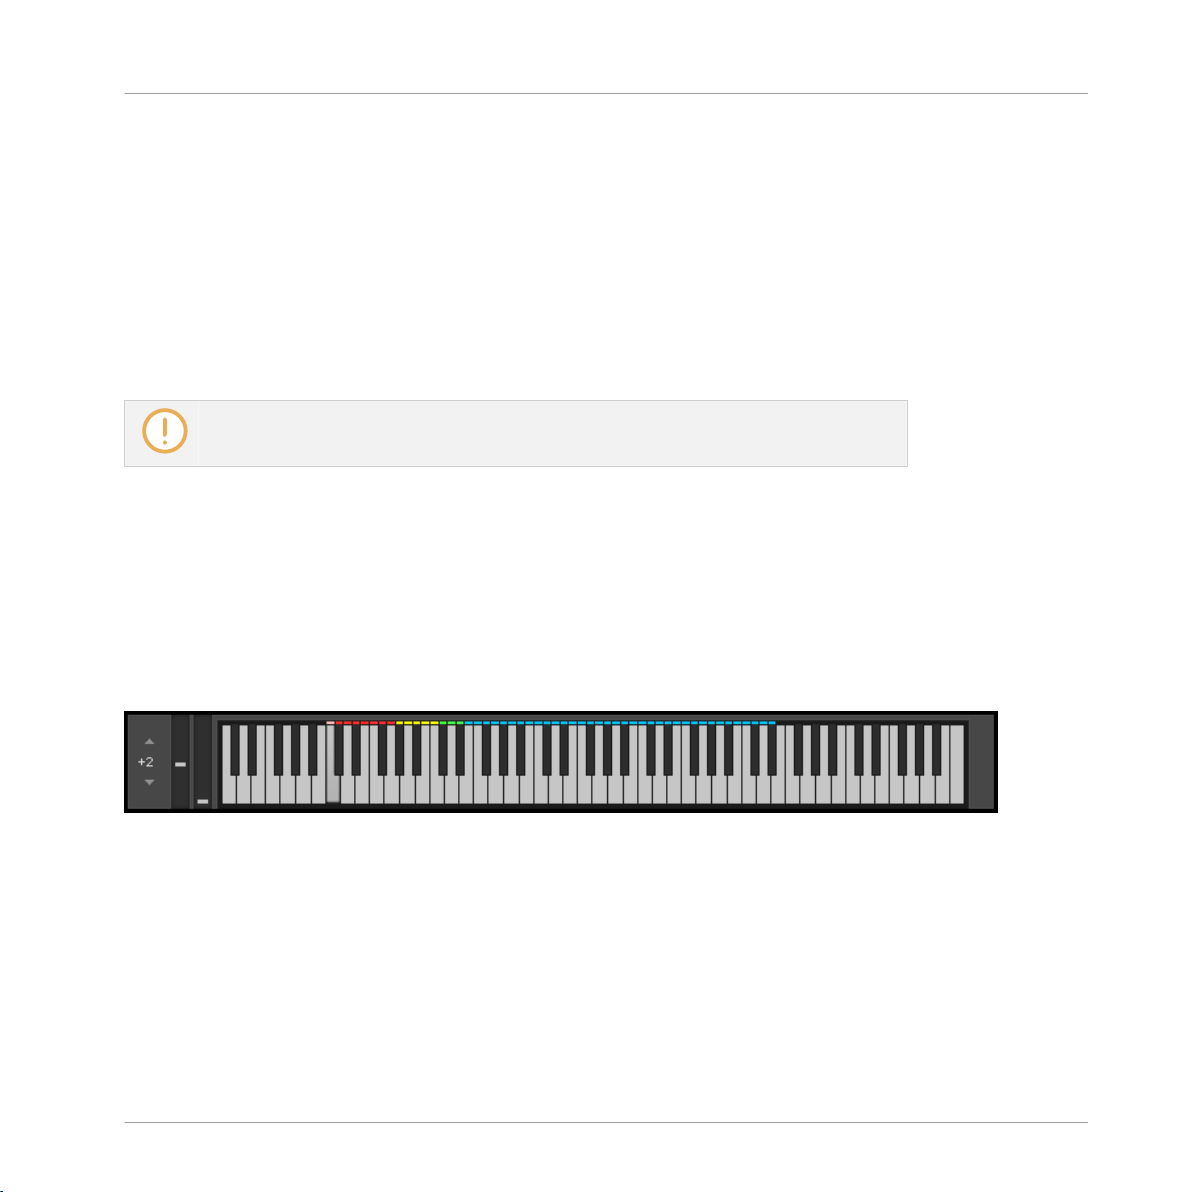
2.1 Pattern Selection and Playback
Up to eight patterns can be assigned to chromatic keyswitches from C1 to G1 (this process is
described in section ↑3.2, The Pattern Browser). These keyswitches are displayed as red keys
in the KONTAKT on-screen keyboard. If no pattern is assigned to a slot, the corresponding key
will have no color.
The KONTAKT on-screen keyboard displaying the keyswitches for patterns (red), endings (yellow) and pickups (green).
Chords can be played in the blue key range.
To select a pattern using your MIDI keyboard, press the corresponding keyswitch MIDI note.
►
SESSION GUITARIST - STRUMMED ACOUSTIC - Manual - 7
Page 8
Using STRUMMED ACOUSTIC
Pattern Selection and Playback
To select a pattern via the user interface, click on the pattern you wish to use.
►
To play a pattern, play chords on your MIDI keyboard. If Latch mode is enabled (see chap-
►
ter ↑5, The Playback Page), playback will continue even if you release the keys.
About chords: STRUMMED ACOUSTIC recognizes a great variety of chords, including
major, minor, no third, diminished, augmented, half-diminished, various suspensions,
options and alterations, and even some slash chords (e.g. G/C, Gmi/C, G7/C, Gmi7/C,
Bb/C). You can also hold a chord or a 5th interval with your left hand while playing a top
note melody line with your right hand. The instrument even tries to play such lines, any
thirds or options in the very register you play them. So there are at least two different
tonal variants of let's say a simple major or minor chord, regarding the register of the
third.
To stop the playback, either trigger one of the five endings (see section ↑2.2, Playing End-
►
ings and Pickups) via keyswitch or, if Latch mode is disabled (see chapter ↑5, The Playback Page), release the keys on your keyboard.
Because transition from one pattern/chord to another is always legato (without breaks), it is
best to make changes a little before the intended position, so that the engine is able to anticipate and add any requested effects (e.g. fret noise). The switch will occur seamlessly at the
nearest possible position. Find more information in chapter ↑6, Tips and Tricks.
If available, “Chase Events” should be enabled in your DAW settings; this will ensure
that the engine gets proper note information on sequencer start or cycle jumps.
SESSION GUITARIST - STRUMMED ACOUSTIC - Manual - 8
Page 9
Using STRUMMED ACOUSTIC
Playing Endings and Pickups
2.2 Playing Endings and Pickups
In addition to the actual patterns, STRUMMED ACOUSTIC provides a variety of endings as well
as pickup sounds and additional palm hits on the corpus/strings of the guitar. The corresponding sets of keys are marked yellow and green on the KONTAKT on-screen keyboard.
To trigger an ending with the current chord, play any of the five keyswitches from G#1 up to
►
C2 with the intended intensity (i.e. velocity). These ending keys are marked yellow in
KONTAKT's on-screen keyboard. When an ending is played back, the current pattern
playback will be stopped.
To trigger an ending with a different chord, hit the new chord just before triggering the de-
►
sired ending keyswitch. As a result, only the ending chord will be played back with the
new chord.
Depending on the current pattern, the pickups and ending sets will differ from each other to fit the playing style of the current pattern (e.g. open vs. muted, plectrum vs. finger). If you need a certain ending that is not included in the currently selected pattern,
you can select a different pattern just before triggering the desired pickup or ending and
switch back to another pattern afterwards.
To play a pickup sound, play any of the three keyswitches from C#2 up to D#2, marked as
►
green keys, with the intended intensity (i.e. velocity).
Only the volume of Pickups and Endings can be altered via input velocity. To alter the
dynamics of patterns, use the Pitch Wheel (see section ↑2.4, Controlling the Accents of
Patterns).
SESSION GUITARIST - STRUMMED ACOUSTIC - Manual - 9
Page 10

Using STRUMMED ACOUSTIC
Blending between Low and High Voicings
2.3 Blending between Low and High Voicings
For STRUMMED ACOUSTIC, all patterns have been recorded in a (default) low voicing as well
as in a higher voicing. You can seamlessly blend between the two voicings, allowing for the impression of two players playing simultaneously, but with different voicings. Alternatively, you
can achieve a sudden change of character from 100% low to 100% high, or vice versa, with
the impression of only one player playing, but changing voicings.
The Voicing, Accent and Chord box in the top left corner of the instrument
For both low and high voicing, you have versatile stereo, doubling and panning options
at hand. These are located on the Sound page (see chapter ↑4, The Sound Page)
To adjust the voicing with the mouse, drag the Voicing slider. The exact center position
►
(50% low, 50% high) can be recalled via [Cmd] + click.
To adjust the voicing via MIDI, move the modulation wheel (Mod Wheel, MIDI CC#1) on
►
your MIDI keyboard.
The Voicing slider position is always mirrored by the Voicing slider position of the Sound
page (see chapter ↑4, The Sound Page), and vice versa.
2.4 Controlling the Accents of Patterns
The looped patterns included in STRUMMED ACOUSTIC ignore the velocity information coming from your MIDI keyboard or host software/DAW. Instead, you can continuously control the
dynamics of the performance with the bipolar (i.e. positive and negative) Accent slider.
SESSION GUITARIST - STRUMMED ACOUSTIC - Manual - 10
Page 11
Using STRUMMED ACOUSTIC
Loading/Saving Sound Presets
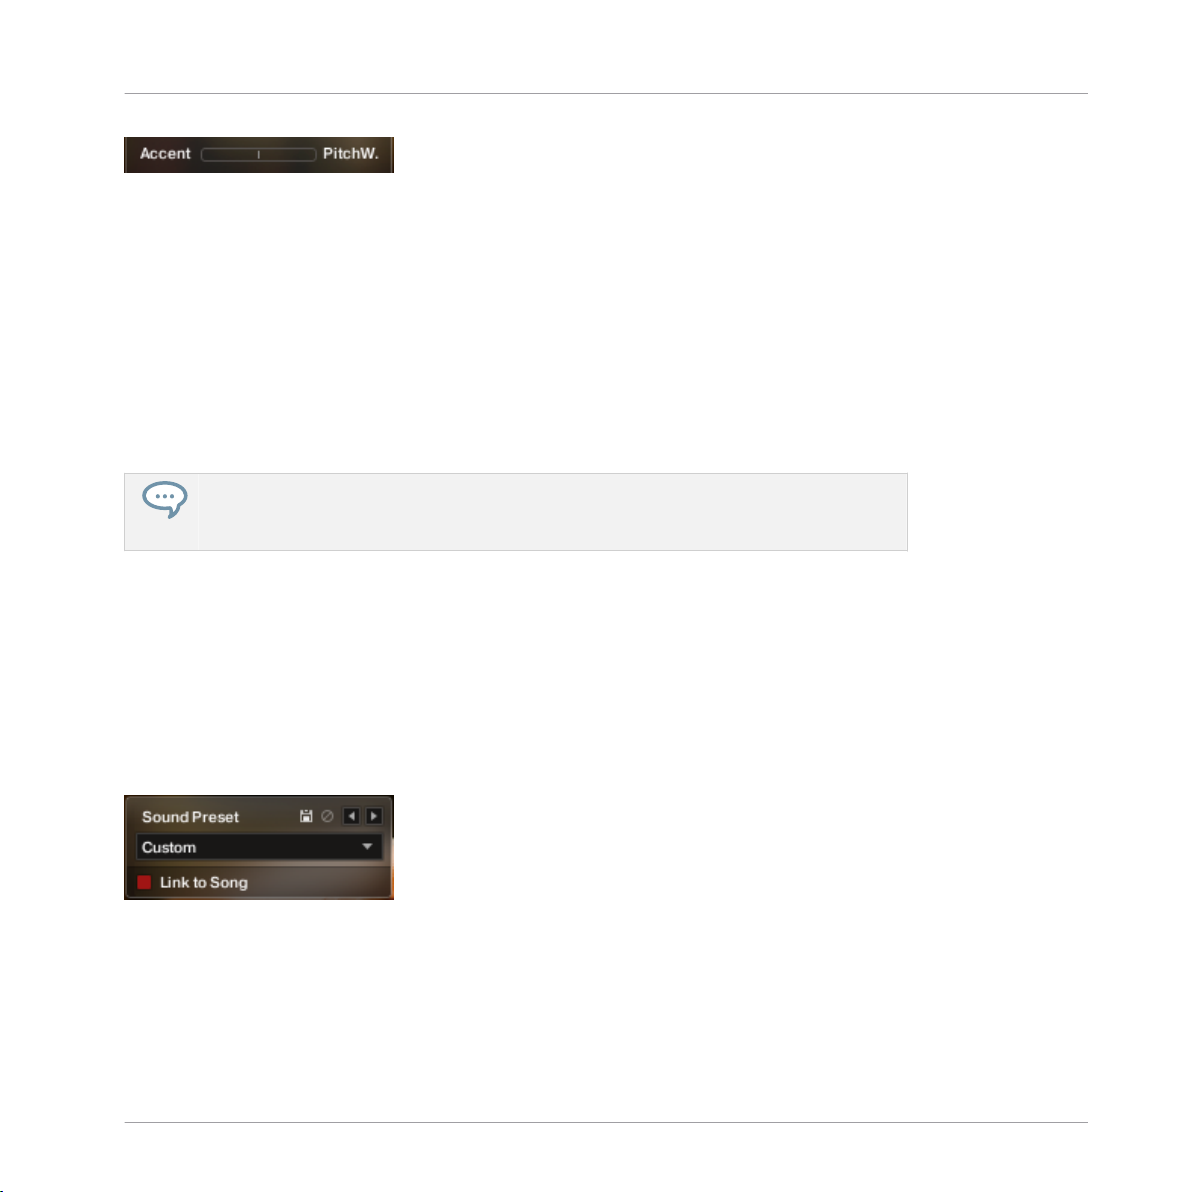
The Accent feature
It works like this: With positive Accent settings, the guitarist will play more intensely, whereas
negative Accent values will produce softer results. Using this feature, you can add a lot to the
overall musicality of the performance.
To adjust the accent slider with the mouse, drag the Accent slider. The default center posi-
►
tion can be recalled via [Cmd] + click.
To adjust the accent slider via MIDI, move the pitchbend wheel on your MIDI keyboard. The
►
default center position of the slider should correspond with the default center position of
your pitchbend wheel.
The Accent slider, respectively the pitch wheel automation in your sequencer, can also
be used to smooth out transitions between patterns with differing overall dynamic in order to create a more natural performance.
2.5 Loading/Saving Sound Presets
With STRUMMED ACOUSTIC, you can customize the sound both easily and effectively. All
sound parameters are located on the Sound page (see chapter ↑4, The Sound Page). Even
without actually adjusting any sound parameter, you can recall various sound presets from the
Sound Preset drop-down menu in the top right corner of the instrument.
The Sound Preset box in the top right corner of the instrument
To load a factory or user sound preset, either select a preset from the drop-down menu, or
►
cycle through all presets by clicking the little triangular left and right arrow buttons.
SESSION GUITARIST - STRUMMED ACOUSTIC - Manual - 11
Page 12

Using STRUMMED ACOUSTIC
Locking Parameters When Loading Snapshots or Songs
To save a new user sound preset, enter a preset name into the field and click on the floppy
►
disk icon. This will store the current sound settings (see chapter ↑4, The Sound Page),
including the voicing and accent slider positions, into a new user preset.
To overwrite a user sound preset, click on the floppy-disk icon again, after you've changed
►
sound settings, but not the preset name itself.
To delete a user sound preset, select it from the drop-down menu, then click the circular
►
delete button.
Linking sound presets to Song presets: When you check the Link to Song checkbox, each
►
loading of a Song preset (see section ↑3.1, The Song Browser) will recall and apply a specific factory sound preset.
Any modification or deletion of user sound presets is being performed on a global level.
This means that all these changes will be persistent, even if you close the instrument
without saving it.
2.6 Locking Parameters When Loading Snapshots or Songs
Normally, when you load snapshots or Songs (see section ↑3.1, The Song Browser) of the instrument, all parameters will be set accordingly. Thus, snapshots and Songs are stored and recalled globally. To prevent the Playback and/or Auto Chords parameters from being changed by
loading snapshots or Songs, click the lock icon on the Playback tab.
When the Playback parameters are locked, they will not be changed by snapshots or Songs.
SESSION GUITARIST - STRUMMED ACOUSTIC - Manual - 12
Page 13

Using STRUMMED ACOUSTIC
Defining the Downbeat after Signature Changes
2.7 Defining the Downbeat after Signature Changes
Since there is no way for the instrument to recognize signature changes or insertions of half a
bar etc. present in your DAW session, its pattern playback would get out of sync in those cases. To solve this problem, you can use the global transport offset feature to compensate for a
change of signature or bar length during playback.
To define a global transport offset in ticks, send MIDI CC#111.
►
The value you send (ranging from 0 to 127) will be multiplied by 80 ticks and added as an
offset to the host transport. 80 Ticks is the length of a 32th triplet, which is the greatest common divisor for all note values available in the instrument. Twelve 32th triplets equal a quarter
note. Therefore, to insert half a 4/4th bar (i.e. shift the playback by two quarters, or 2 × 12
32th triplets), you would need to send MIDI CC#111 with value 24 etc. The following table
shows typical values needed for common offsets:
Offset
CC#111 value
No offset 0
One quarter 12
Two quarters 24
Three quarters 36
Four quarters (= one 4/4 bar) 48
Five quarters 60
Six quarters 72
Seven quarters 84
Two 4/4 bars (= no offset) 96
Minus one quarter 84
Minus two quarters 72
Minus three quarters 60
SESSION GUITARIST - STRUMMED ACOUSTIC - Manual - 13
Page 14

Offset CC#111 value
One eighth note 6
One triplet 4
Using STRUMMED ACOUSTIC
Defining the Downbeat after Signature Changes
SESSION GUITARIST - STRUMMED ACOUSTIC - Manual - 14
Page 15

The Pattern Page
3 The Pattern Page
Clicking on the Patterns tab (at the bottom of the instrument) will not only display the currently loaded patterns, but will also display controls that allow you to modify pattern parameters, or
load different patterns or songs.
The Pattern Page
To select a pattern for playback, click on the according pattern slot or press the according
►
keyswitch on your MIDI keyboard.
To load a different pattern into a slot, click on the magnifying glass icon in the current slot
►
or double-click the slot. This will open the pattern browser (see section ↑3.2, The Pattern
Browser).
To cycle through all patterns within one slot, click on the little left or right arrow buttons in
►
the current slot.
To remove a pattern (i.e. clear a slot), [Alt] + click a slot.
►
SESSION GUITARIST - STRUMMED ACOUSTIC - Manual - 15
Page 16

The Pattern Page
The Song Browser
3.1 The Song Browser
In STRUMMED ACOUSTIC, a Song is a preset that contains up to eight related patterns along
with a factory sound preset (see section ↑2.5, Loading/Saving Sound Presets) as well as some
settings of the Playback page (see chapter ↑5, The Playback Page). The patterns contained in
a Song are loaded into the pattern slots.
If you want preset Songs to apply their specific sound settings, activate the Link to Song
feature in the top right box (see section ↑2.5, Loading/Saving Sound Presets). If you deactivate this feature, the current sound settings won't be changed on loading a Song.
To browse songs and then load a Song:
1. Click on the current song name; this will open the Song Browser. Alternatively, you can
click on the magnifying glass icon to the right of the Song title.
2. Use the three attribute buttons at the top of the browser to refine the list of displayed
Songs by including or excluding different signatures. To show all Songs, deselect all attribute buttons.
3. To load a Song, double-click its name or click on the tick button. (If you wish to exit the
Song Browser without changing anything, click on the X button instead).
Alternatively, you can cycle through the included Songs, without entering the Song
Browser, by clicking on the triangular arrows to the left and right of the current Song
name.
SESSION GUITARIST - STRUMMED ACOUSTIC - Manual - 16
Page 17

The Pattern Page
The Pattern Browser
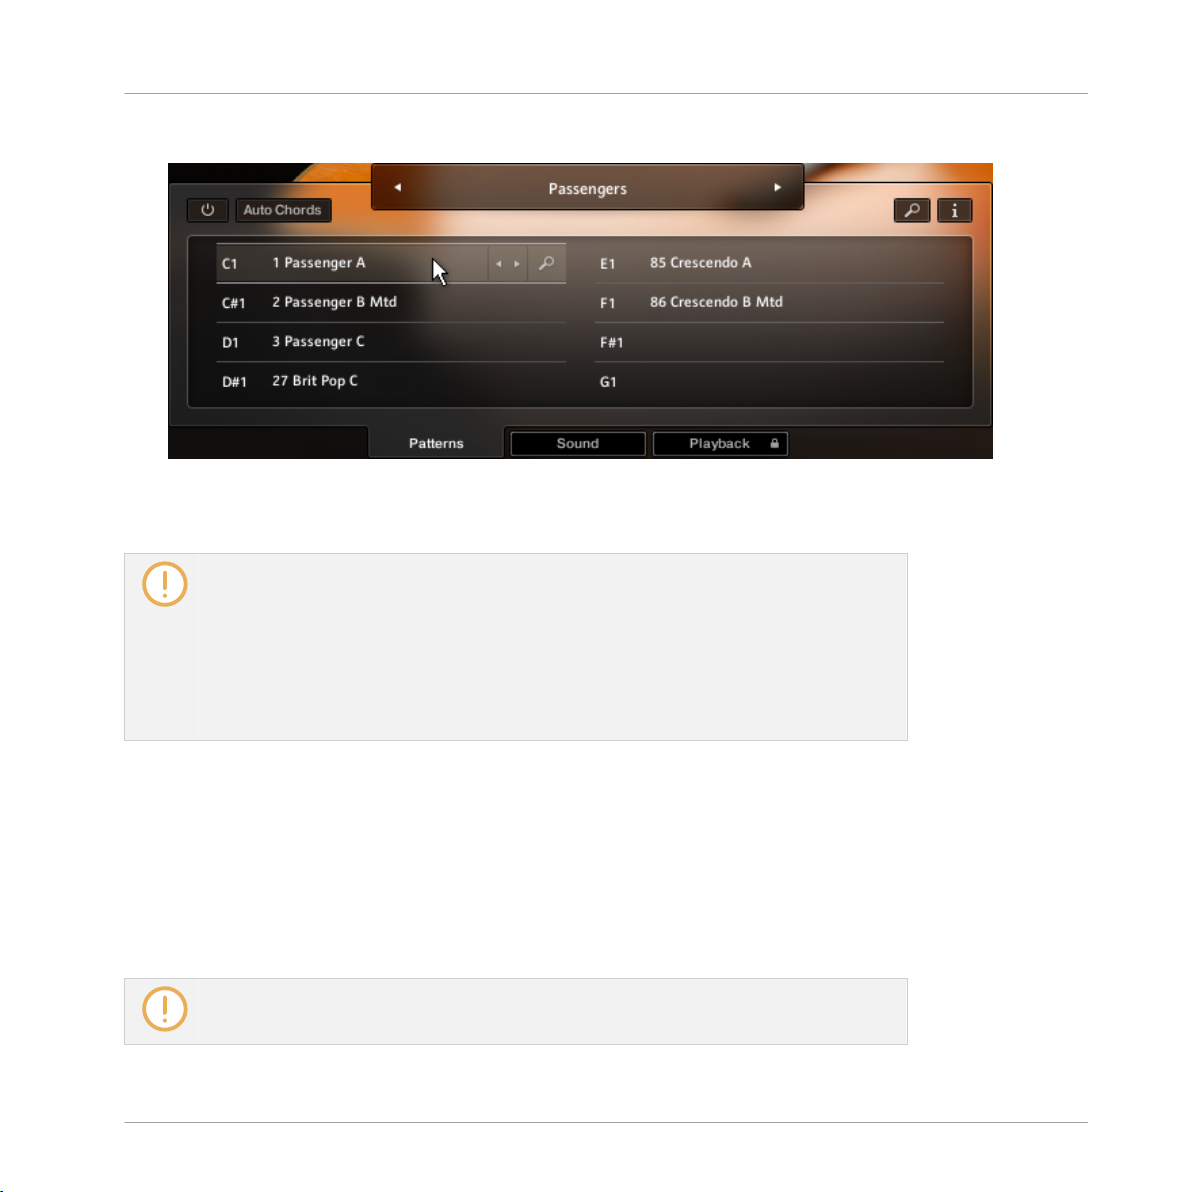
3.2 The Pattern Browser
Since a preset Song may not meet your exact needs, you may wish to change a slot's pattern,
or load additional patterns into specific slots.
To open the Pattern Browser, double-click a pattern slot or click on its magnifying glass
►
icon.
Clicking the magnifying glass icon will open the Pattern Browser
The top area of the Pattern Browser holds a series of buttons that you can use to refine your
search, including a Rhythm Search strip, which is a very powerful tool to find patterns matching your custom rhythm. The body of the Pattern Browser contains a list of the all patterns
matching the current search criteria. If the list is too long to fit the screen, you can scroll
through the list by dragging up or down the scroll handle at the right.
To avoid misconceptions: The Rhythm Search strip is merely a tool to find pre-recorded
patterns in the pattern library. It is technically impossible to create your own patterns by
entering a certain rhythm, so, despite its look, the Rhythm Search strip should not be
confused with a step sequencer.
To search a pattern by attributes (and not by rhythm), make sure the Rhythm Search strip is
►
cleared. If it's not, click the Clear button next to the strip. Then refine your search by selecting any of the attributes, such as Muted, Soft, 4/4 etc. If you want to bypass a category (such as Hard/Soft), deselect all attributes of that category. Consequently, you would
need to deselect all attributes to display all recorded patterns.
SESSION GUITARIST - STRUMMED ACOUSTIC - Manual - 17
Page 18

The Pattern Page
The Pattern Browser
To search a pattern by attributes and rhythm, first select/deselect the desired attributes as
►
described above. Then, enter a rhythm on a 16ths note basis into the Rhythm Search
strip. With each new rhythm snippet that you enter, the pattern list will be refreshed in
real-time, sorted by the similarity of the desired rhythm to the rhythm of all patterns
available in the library, in descending order.
There is a powerful shortcut feature to quickly enter a repeating pattern into the Rhythm
Search strip: enter the beginning of the pattern and then [Alt] + click on the position of
the first repetition. Furthermore, if you [Alt] + click on the first snippet, all other snippets will be activated/deactivated.
To 'tap in' a desired rhythm, press the Record button; you will hear a metronome count-in.
►
Then start playing a rhythm on your MIDI keyboard or click on the 'Tap' button. You can
start any time, so you can also start with a pickup beat. After 2 bars the recording will
automatically stop, and the search results will be listed.
The rhythm search algorithm is very powerful. It will compare the rhythm defined in the
Rhythm Search strip not only to the rhythm of the other patterns from start, but also from any
possible shifted starting position. This way, patterns with specific start shift offsets might be
revealed as musically matching-patterns which otherwise would simply be overlooked. If the
perfect start shift offset is different from 0, the value is appended to the pattern name. Upon
loading a pattern, that offset will automatically be applied and entered into the Info Panel (see
section ↑3.3, The Info Panel). Also, the rhythm search algorithm will rate accents higher than
non-accentuated snippets. So, if you're searching for accents following a certain rhythm, try
entering the accents only.
If you cannot find a desired rhythm straight away, chances are that you can create that
particular rhythm by separately searching for the first and second half of the rhythm of a
desired pattern, loading the two halves into two different slots and combining them during playback. Alternatively, you can load the same pattern into two different slots and
adjust the Start Shift (see section ↑3.3, The Info Panel) of one of them, in order to shift
accents to the desired positions.
SESSION GUITARIST - STRUMMED ACOUSTIC - Manual - 18
Page 19

To search for patterns similar to the selected one, you would need to search for patterns
►
with a rhythm similar to the selected pattern's rhythm. Instead of entering and copying
the rhythm manually, you can simply transfer the rhythm of the selected pattern into the
Rhythm Search strip by clicking on the Similar button.
This will start a search and put the selected pattern at the very top of the listed results,
since that pattern matches its own rhythm a 100 percent, of course. Rhythmically similar
patterns will be listed subsequently.
To play a preview of a pattern, click on any of the listed patterns. This will also display the
►
pattern's rhythm structure in the second strip. The preview playback will even sync to the
host tempo and transport position, if the transport is running. However, only one selectable chord and pitch can be previewed; incoming MIDI chords will be ignored.
At higher tempos, the preview quality will not be as good as the full quality of the pattern actually being loaded. That's because, in order to reduce the memory footprint, a
minimum set of samples are being held in the memory for preview purposes only.
The Pattern Page
The Pattern Browser
To stop the preview playback, simply click on the playing pattern again or, if the host
►
transport is running, stop it.
To change the preview chord, select a pitch and a chord type in the top drop-down menus.
►
This will load new samples and remove the old ones from memory, so some loading time
may be required.
1. To load a pattern, select one of the eight pattern slots you want to load the pattern into.
The according drop-down menu is located at the top right.
2. Double-click any pattern's name or click the tick button. (If you want to cancel the process, click the X button instead.)
SESSION GUITARIST - STRUMMED ACOUSTIC - Manual - 19
Page 20

The Pattern Page
The selected pattern will now be loaded into the selected slot; a previous pattern of that
→
slot will be replaced. The pattern browser will be closed.
3.3 The Info Panel
With the Info Panel, you have access to various parameters that will modify the length, start
position, volume or tempo of any pattern. The values of the Info Panel will always refer to the
selected pattern. In other words, if you select a different pattern, the Info Panel will change its
content according to the new pattern.
To show or hide the Info Panel, click on the i button.
►
The Pattern and Mapping tabs are sitting at the top of the Info Panel.
The Info Panel
The Info Panel, Pattern Tab
The Pattern Tab
▪ Start Shift: Use this value edit control to shift the selected pattern's start (entry) position.
Alternatively, you can drag the pattern's rhythm display left or right.
▪ End Step: Use this value edit control to reduce the selected pattern's length so that it will
loop earlier. Alternatively, you can drag the terminating flag left or right.
SESSION GUITARIST - STRUMMED ACOUSTIC - Manual - 20
Page 21

The Pattern Page
You can use this End Step feature very creatively. For example, you can trim a 4/4 signature pattern by eight 16th snippets, so that it will perfectly fit a 3/4 signature. You
can even trim any pattern to odd signatures, such as 5/8 or 7/8. Combined with the
Start Shift feature, you have very powerful tools to create whole new patterns and feels
(e.g. start-shift a constant eighths pattern from on-beats to off-beats etc.). Be creative!
▪ Volume: Change this value to adjust the volume of the selected pattern, ranging from -12
dB up to +6 dB in 0.1 dB steps.
▪ Tempo: With the three tempo buttons, you can switch the selected pattern's tempo from
normal (1:1) to half time (1⁄2) or double time (×2). Please note that there is also a global
time scaling feature on the Playback page (see chapter ↑5, The Playback Page). Its tempo
factor will be multiplied by each pattern's individual tempo factor.
With slow host tempos, switching a pattern to half time may not work if the actual relative tempo falls below the limit of ca. 60 bpm.
The Mapping Tab
On the Mapping tab, you are presented with a graphical overview of the keyboard layout. The
selected pattern slot is highlighted by a red dot that will change its position as you select different pattern slots. If you play an ending or a pickup sound, a yellow or green dot on the corresponding key will light up briefly.
The Info Panel
The Info Panel, Mapping Tab
SESSION GUITARIST - STRUMMED ACOUSTIC - Manual - 21
Page 22

The Pattern Page
The Auto Chords Panel
3.4 The Auto Chords Panel
STRUMMED ACOUSTIC is designed to recognize and play a great variety of chords that you
can simply play on your MIDI keyboard, including major, minor, no third, diminished, augmented, half-diminished, various suspensions, options and alterations, and even some slash
chords (e.g. G/C, Gmi/C, G7/C, Gmi7/C, Bb/C). You can also hold a chord or simply a 5th interval with your left hand while playing a top note melody line with your right hand. The instrument even tries to play such lines, any thirds or options in the very register you play them. So
there are at least two different tonal variants of let's say a simple major or minor chord, regarding the register of the third.
However, if you're not so familiar with playing chords on a piano or keyboard, you can switch to
the Auto Chords mode, which provides the most basic chords (major and minor as well as some
options), auto-mapped and auto-transposed on the white keys.
The Chords Panel with the key set to D minor. Thus, the root pitch D is mapped to the original A key; all other pitches are
mapped (transposed) consequently.
To show or hide the Auto Chords Panel, click on the Auto Chords button.
►
To enable or disable the Auto Chords mode, click on the power button.
►
SESSION GUITARIST - STRUMMED ACOUSTIC - Manual - 22
Page 23

To set the key of your song, select the key and mode from the drop-down menus. This will
►
transpose/shift the chord layout such that, in case of a major key, the root pitch will always be assigned to the original C key; in case of a minor key, the root pitch will always
be mapped to the original A key.
To play chords in the Auto Chords mode, simply click or play a single white key anywhere in
►
the chord range (see keyboard layout of section ↑2.1, Pattern Selection and Playback).
This will play the chord labeled on that key. In other words, no matter which key and
mode you choose, you can always play the seven diatonic pitches (plus the popular diminished seventh pitch) with the white keys from C to B (plus the B flat key, which is
represented as a white key as well).
To add options or suspensions, click, or play and hold, any of the labeled black keys. To
►
remove an option or suspension, click the corresponding key again or release that key on
your MIDI keyboard.
To exclude the Auto Chords settings from Songs or snapshots, click the lock icon in the top
►
left corner of the Auto Chords Panel (see section ↑2.6, Locking Parameters When Loading
Snapshots or Songs).
The Pattern Page
The Auto Chords Panel
In contrast to the more powerful standard chord mode, where you can intentionally play
thirds or options in a specific register, the auto chords mode does not get any register
information from you simply playing the seven (plus one) white keys. Thus, a default
register will be applied to the thirds and options.
SESSION GUITARIST - STRUMMED ACOUSTIC - Manual - 23
Page 24

The Sound Page
4 The Sound Page
Click on the Sound Tab (at the bottom of the instrument) to display the Sound page. This page
provides controls that you can use to adjust the sound of STRUMMED ACOUSTIC to your
needs. This page is divided into several sections, each of which is described below.
The Sound Page
▪ VOICING section: Use the Balance slider to adjust the balance between low and high voic-
ing (the concept is explained in section ↑2.3, Blending between Low and High Voicings).
To reset the slider to the center position (50% low, 50% high), press and hold [Cmd] on
your computer keyboard, then click the slider. Both low and high voicing can be set to either Stereo or Doubling mode by clicking the square Stereo or Doubling buttons. In Stereo
SESSION GUITARIST - STRUMMED ACOUSTIC - Manual - 24
Page 25

The Sound Page
mode, you can also adjust the pan balance of the left (L) and right (R) channel. Additionally, you can flip the channels of the high voicing with the channel flip button sitting below
the high voicing’s panorama slider. Here are some typical use cases:
◦ To achieve the very rich sound of four (!) players, set both low and high voicing to Dou-
bling mode, and blend them 50%. Make sure to also click the channel flip button to
invert the channels of the high voicing, which will sound even fuller.
◦ To create a special low/high doubling mode, set both low and high voicing to Stereo
mode, pan one voicing hard left, the other one hard right, and blend them 50%.
◦ To fatten up the chorus section of a song, record and automate the process of switching
from Stereo to Doubling mode at the very beginning of the chorus section in your sequencer. You might want to automate the Accent slider as well (see section ↑2.4,
Controlling the Accents of Patterns).
◦ To change the voicing without changing anything else, record and automate the process
of switching from 100% low to 100% high, or vice versa. To achieve the smoothestpossible transition, make sure, that the channels of the high voicing are not flipped.
This way, it will sound like a single guitarist playing different voicings.
◦ To add a little sheen to the (default) low voicing, dial in just a small portion of the high
voicing's additional color. Depending on your individual scenario, choose Stereo or
Doubling mode for the high voicing.
The Balance slider position of the Sound page is always mirrored by the voicing slider
position of the top left box (see section ↑2.3, Blending between Low and High Voicings),
and vice versa.
▪ FRET NOISES: Use this knob to adjust the volume of fret noises that are automatically
added to the performance in between chord changes.
▪ EQ: Activate or deactivate the equalizer with its little square button. Select an EQ preset
from the drop-down menu and set the EQ amount with the amount knob.
Technically speaking, the EQ amount knob scales the various frequency band's gain levels (boost or attenuation) in a constant relation to each other. Additionally, global volume compensation is applied in order to maintain the subjective volume.
SESSION GUITARIST - STRUMMED ACOUSTIC - Manual - 25
Page 26

The Sound Page
▪ COMP: Activate or deactivate the compressor with its little square button. Select a com-
pression preset from the drop-down menu and set the compression amount with the
amount knob.
Technically speaking, the DYN amount knob is a dry/wet mix control ranging from 0%–
100% wet. The average gain reduction (and according make-up gain) is mainly subject
to each (non-accessible) compression preset, so that, regardless of amount and compression preset, the overall subjective volume should be roughly constant.
▪ REVERB: You can place the guitarist into several virtual rooms, each of which provides a
unique sonic character. Switch the reverb on or off with its little square button. Select a
reverb preset from the drop-down menu and adjust the reverb volume with the Volume
knob. To cycle through the reverb presets, you can use the left and right arrow buttons left
to the preset name.
SESSION GUITARIST - STRUMMED ACOUSTIC - Manual - 26
Page 27

The Playback Page
5 The Playback Page
Clicking on the Playback tab (at the bottom of the instrument) will open the Playback page.
This page contains settings that affect the way the patterns are played back. This page is divided into several sections, each of which is described below.
To exclude the Playback settings from Songs or snapshots, click the lock icon on the Play-
►
back tab at the bottom of the instrument (see section ↑2.6, Locking Parameters When
Loading Snapshots or Songs).
The Playback Page
SESSION GUITARIST - STRUMMED ACOUSTIC - Manual - 27
Page 28

The Playback Page
▪ SWING section: Use the Amount knob to set the amount of swing added to each pattern,
either on a 8th note or a 16th note basis. A setting of 0% would represent the original
state of all patterns.
If the Amount knob doesn't affect the playback, it is very likely that either a triplet pattern is selected, or the timing basis has to be changed from 8th to 16th notes.
▪ HUMANIZE section: Use the Performance knob to set the amount of quantization added to
all patterns. At the right position, the original performance (with some human imperfections) will be played unaltered. At the left position, the performance will be fully quantized.
▪ LATCH MODE section: Use the drop-down menu to select one of two different modes re-
garding the continuation of the pattern playback.
◦ Keep playing: Pattern playback will continue even if you release the keys. As soon as
you play a new chord, playback will smoothly change to the new chord. To stop the
playback, trigger an ending. The advantage of this mode is that the playback will not
be interrupted as you're preparing for playing a new chord. You don't need to play the
chords legato (which wouldn't be so easy for most non-pianists) to actually achieve a
legato and musical performance. This mode is also referred to as Latch mode.
◦ Stop within...: Pattern playback will stop after you've released the keys. The advantage
of this mode is that you don't need to trigger an ending to stop the playback. Additionally, you can press the sustain pedal (MIDI CC#64) upon changing chords in order to
temporarily switch to the Latch mode.
When Stop within… is selected, you need to be careful with releasing the keys: if you
release them too early, playback will shortly be interrupted before each new chord;
maybe you won't even notice this. The problem is that, in this case, it isn't possible to
have fret noise sounds automatically inserted between the chord changes, which would
degrade the realism of the performance.
▪ PATTERN SYNC section: Use the drop-down menu to select one of two available sync
modes.
◦ Sync to host: With this mode selected, pattern playback will start in sync with your
host sequencer. As STRUMMED ACOUSTIC is based on two-bar patterns, make sure
to start your song on bar one or any other uneven bar number (e.g. bar 3, bar 5, bar
17).
SESSION GUITARIST - STRUMMED ACOUSTIC - Manual - 28
Page 29

The Playback Page
◦ Start on key: With this mode selected, pattern playback will start from beginning as
soon as the first chord is being played, ignoring the current host playback position. As
long as the playback does not get interrupted (see description of the LATCH MODE
section above), this shifted performance will be retained even if you subsequently play
chords.
▪ TIMING section: Use the Offset knob to control the amount of positive or negative lag add-
ed to the playback. Positive values, for example, will result in a laid back feel whereas negative values will result in a hasty performance.
▪ TEMPO section: Here, you can select between three tempo ratios 1⁄2 (half time), 1:1 (nor-
mal time), or ×2 (double time), which globally affect the pattern playback speed relative to
the host tempo. Please note that there is also a local time scaling feature available for each
pattern (see section ↑3.3, The Info Panel). The individual patterns' tempo factors will each
be multiplied by the global tempo factor.
With slow host tempos, switching the global tempo to half time may not work if the actual relative tempo falls below the limit of ca. 60 bpm.
SESSION GUITARIST - STRUMMED ACOUSTIC - Manual - 29
Page 30

Tips and Tricks
6 Tips and Tricks
Last, but not least, the developers would like to share a couple of tips to help you get the most
out of STRUMMED ACOUSTIC:
Create Natural Transitions between Chords
To create realistic sounding transitions between chords, do not quantize your keyboard performance. Instead, make sure that all chord and pattern changes are played approximately one
32th note early. This way, STRUMMED ACOUSTIC can anticipate that a chord change or pattern change is about to take place, and perform the transitions between patterns and chords in
the most natural way. Depending on the chord progression, an appropriate fret noise is added
automatically. These natural transitions would be impossible if you quantized your MIDI data.
Don’t worry about the timing – triggering the patterns before the beat will not make the performance sound out of time, as the timing is bound to the internal metronome of your sequencer. Also make sure that chords do not overlap, because an overlap would technically
mean that two chords are played at the same point in time.
Bad: Quantized MIDI data will cause the chord changes to happen too late for the fret noises to be played back; this will not
create realistic transitions.
SESSION GUITARIST - STRUMMED ACOUSTIC - Manual - 30
Page 31

Tips and Tricks
Good: MIDI notes placed ahead of the quantized position will result in realistic sounding transitions. Note that the keyswitches are also triggered slightly before the actual chords.
Combine Patterns Creatively
We spent a lot of time to make transitions between patterns and chords as smooth and natural
as possible. Therefore, if you switch between patterns that have a similar playing style but different rhythms, the transitions will very likely sound as smooth as if the resulting rhythm would
have actually been performed this way. So instead of sticking to a single repetitive pattern for a
long time, you can enhance realism by switching back and forth between patterns to add variations here and there. In most cases, adding minor rhythmical changes at the end of the second
bar does the trick.
Create Custom Groove Variations
If you'd like to add variations to spice up a pattern using the technique described above, you
might find yourself in a situation where the beginning of a pattern contains the bit of rhythmical variation you'd like to use at the end of another pattern. To move the variation into place,
click the i button to open the info pane and shift the pattern to the desired position. Another
way to get there is to use the “End Step” feature: Shorten the pattern to e.g. 4 steps (= one
quarter note). Although the resulting pattern will be very short and thus will sound pretty repetitive in itself, it will contain a predictable strumming pattern that you can switch to anytime to
add a variation to another pattern.
SESSION GUITARIST - STRUMMED ACOUSTIC - Manual - 31
Page 32

Tips and Tricks
Play Separate Strums
If you need individual arpeggiated or strummed chords in an arrangement which are not part of
a rhythmical pattern, you can use the yellow “ending keys” (G#1 .. B1) for that purpose. As
these keys depend on the last played chord, you need to make sure the desired chord has been
played before playing an ending key. Normally, pressing a chord automatically starts the playback of the selected pattern. To change the chord “silently”, i.e. without triggering the pattern
playback, select an empty pattern slot via keyswitch. Then play the desired chord and trigger
the yellow ending key afterwards. If no empty pattern slot is available, you can also stay on a
loaded pattern and play the desired chord immediately before triggering the yellow key. This
will leave the actual pattern inaudible but still creates the desired chord change. Pickups and
endings are velocity sensitive, so you can adjust their intensity individually.
Optimize the First Strum of a Pattern
You can spice up a performance by replacing the very first strum of a pattern loop with one of
the yellow “ending keys.” This way, you can start off with a nice arpeggio or an accent on the
first downbeat. Then, trigger the following pattern and chord after that first beat. The opening
strum will seamlessly transition into the pattern loop. This works best if you are performing to a
click track within your sequencer.
Use Authentic Humanization
The Humanize knob does not add random offsets to create some kind of fake realism. Instead,
it recreates the exact timing of the guitarist as he recorded all the patterns in the studio. That
means, although the differences may be subtle, the “Original” setting feels much more like a
real guitarist, because it delivers the actual timing of a real guitarist. To our ears, adding a
shuffle value of around 5-15% creates very appealing results.
Use the Accent Slider as a “Drama Controller”
When moving towards a quiet passage in your song, move the accent slider to the left. As you
approach the chorus, slowly move it to the right. If applied correctly, this makes the virtual guitarist play towards a certain musical event, e.g. the chorus or a break. You can also use the
pitch wheel to smoothen the transition between patterns which are played at different volumes
to a certain degree.
SESSION GUITARIST - STRUMMED ACOUSTIC - Manual - 32
Page 33

Tips and Tricks
Diversify Your Chord Voicings
Do not only mix the low and high voicing to create an “extra big” performance, but also switch
back and forth between 100% high voicing and 100% low voicing to emulate a single guitarist
playing in different positions. Furthermore, thirds, sevenths and other options sound in the
very register that you play on your keyboard. Thus, if you combine the modulation wheel with
different keyboard voicings, you get a greater variety of chords. Continuously moving the modulation wheel can be used to simulate the guitarist hitting more of the higher or more of the
lower strings at times while staying in the same voicing with his left hand. The continuous variation of the modulation wheel and pitch wheel controls helps a lot to achieve a more natural
sounding performance.
Use Two Session Guitarist Instruments Simultaneously
Instead of using just one single pattern at a time, try the following: Open two instances of
STRUMMED ACOUSTIC. While Instance one plays the regular chord progression of the song in
the low voicing panned to the right, instance two plays only an empty fifth chord as a pedal
point in high voicing panned to the left. Combining two different guitars and/or patterns in this
manner can really help to open up your arrangement.
SESSION GUITARIST - STRUMMED ACOUSTIC - Manual - 33
Page 34

7 Credits
Product Concept, Design and Production: Daniel Scholz, Samuel Dalferth
Concept and Design: Frank Elting, Sebastian Müller
User Interface Design: Fabian Ruf
KSP Scripting: Daniel Scholz
Guitarist: Floryan Kœrber
Recording Engineers: Samuel Dalferth, Daniel Scholz
Documentation: Daniel Scholz
Quality Assurance: Bymski
Artwork: Yvonne Hartmann
Finalization and Encoding: Thanos Kazakos
Credits
SESSION GUITARIST - STRUMMED ACOUSTIC - Manual - 34
 Loading...