


4

p.6
p.8
S.11
p.13
p.15
p.17
p.19
21
c.23
c.26
l.28
p.30
I.32
5

Nous vous remercions d’avoir choisi un appareil de la gamme Moulinex qui est exclusivement prévu pour la fabrication de yaourts.
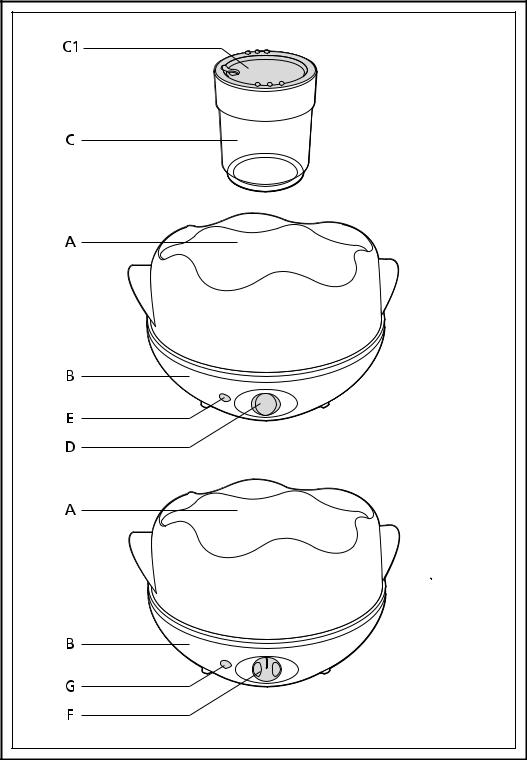
Description
ACouvercle
BCorps
CPots
C1 Couvercles dateur
Selon modèle :
DInterrupteur
ETémoin lumineux
ou
FMinuterie électronique
GBouton lumineux de mise en marche
Conseils de sécurité
-Lisez attentivement le mode d’emploi avant la première utilisation de votre appareil et conservez-le pour les utilisations futures : une utilisation non conforme au mode d’emploi dégagerait Moulinex de toute responsabilité.
-Ne laissez pas l’appareil à la portée des enfants sans surveillance. L’utilisation de cet appareil par des jeunes enfants ou des personnes handicapées doit être faite sous surveillance.
-Vérifiez que la tension d’alimentation de votre appareil correspond bien à celle de
votre installation électrique.
Toute erreur de branchement annule la garantie.
-Votre appareil est destiné uniquement à un usage domestique et à l’intérieur de la maison.
-Débranchez votre appareil dès que vous cessez de l’utiliser et lorsque vous le nettoyez.
-N’utilisez pas votre appareil s’il ne fonctionne pas correctement ou s’il a été endommagé. Dans ce cas, adressez-vous à un centre service agréé Moulinex (voir liste dans le livret service).
-Toute intervention autre que le nettoyage et l’entretien usuel par le client doit être effectuée par un centre service agréé Moulinex.
-Ne mettez pas l’appareil, le câble d’alimentation ou la fiche dans l’eau ou tout autre liquide.
-Ne laissez pas pendre le câble d’alimentation à portée de mains des enfants.
-Le câble d’alimentation ne doit jamais être à proximité ou en contact avec les parties chaudes de votre appareil, près d’une source de chaleur ou sur un angle vif.
-Si le câble d’alimentation ou la fiche sont endommagés, n’utilisez pas l’appareil. Afin d’éviter tout danger, faites-les obligatoirement remplacer par un centre service agréé Moulinex (voir liste dans le livret service).
-Pour votre sécurité, n’utilisez que des accessoires et des pièces détachées Moulinex adaptés à votre appareil.
-Tous les appareils sont soumis à un contrôle qualité sévère. Des essais d’utilisation pratiques sont faits avec des appareils pris au hasard, ce qui explique d’éventuelles traces d’utilisation.
Utilisation
-Avant la première utilisation, nettoyez les pots (C) et leur couvercle (C1) à l’eau chaude savonneuse. Rincez et séchez.
Pour préparer les pots de la yaourtière, vous aurez besoin d’un litre de lait et d’un ferment.
1) CHOIX DU LAIT
-Choisissez un lait de préférence entier ou demi-écrémé ne nécessitant pas d’ébullition (lait UHT longue conservation ou lait en poudre).
Les laits crus ou pasteurisés doivent être portés à ébullition puis refroidis et passés pour éliminer les peaux.
Remarques :
-Le lait entier donne plus de moelleux et plus d’arôme.
-Pour obtenir des yaourts plus consistants, vous pouvez ajouter au litre de lait 2 ou 3 cuillères à soupe de lait en poudre en mélangeant soigneusement.
-Il faut de 8 à 15 heures pour obtenir de bons yaourts, selon le type de lait utilisé.
2) CHOIX DU FERMENT
Il se fait soit :
. à partir d’un yaourt nature du commerce (entier de préférence) avec une date limite de consommation la plus éloignée possible.
. à partir d’un yaourt de votre fabrication.
. à partir d’un ferment sec lyophilisé (acheté dans les pharmacies ou certains magasins de produits diététiques). Rallongez alors le temps de première fabrication de deux heures.
6

Important : n’utilisez pas plus d’une dizaine de fois un yaourt prélevé sur votre fabrication, car les yaourts deviennent moins bons.
3) RÉALISATION DES YAOURTS
-Mélangez très soigneusement un litre de lait avec le ferment.
-Pour obtenir un bon mélange, battez le yaourt pour le transformer en une pâte bien lisse et ajoutez ensuite le lait, tout en continuant de battre.
-Répartissez le mélange dans les pots (C).
-Placez les pots (C), sans leur couvercle (C1), dans la yaourtière.
-Posez le couvercle (A) sur la yaourtière et branchez-la.
. Modèle sans minuterie :
Le marquage du couvercle (A) (de 1 à 12) permet d’indiquer l’heure à laquelle les yaourts seront prêts :
. faites correspondre la graduation avec le trait situé sur le corps (B) de l’appareil.
Exemple : s’il est midi et si vous avez opté pour un temps de préparation de 8 heures, positionnez la graduation sur le chiffre 8.
-Appuyez sur l’interrupteur (D) pour démarrer la fabrication.
Le témoin lumineux (E) s’allume.
En fin de préparation, appuyez sur l’interrupteur (D) et débranchez l’appareil.
. Modèle avec minuterie :
-Sélectionnez le temps de préparation à l’aide du bouton de la minuterie (F) et appuyez sur le bouton de mise en marche
(G).
Une fois le temps écoulé, la yaourtière s’arrête automatiquement.
-Débranchez l’appareil.
Remarques :
-Ne déplacez pas la yaourtière pendant son fonctionnement.
-Evitez les endroits soumis à des vibrations, ou exposés à des courants d’air.
-En chauffant légèrement le lait (37 à 40°), la préparation se trouve accélérée.
4) RÉFRIGÉRATION DES YAOURTS
-Retirez le couvercle (A) en prenant soin d’éviter l’écoulement de la condensation dans les pots.
-Fermez les pots avec les couvercles dateur
(C1).
-Indiquez à l’aide du dateur manuel, situé sur chaque couvercle, la date limite de consommation.
-Placez les yaourts au réfrigérateur au moins une heure avant de les consommer.
Si vous attendez 24 heures, ils seront plus fermes.
Remarques :
-La durée de conservation des yaourts, au réfrigérateur, est de 8 à 10 jours maximum.
-La date limite de consommation sera par conséquent J+8 ou J+10, J étant le jour de fabrication.
-Ne mettez jamais l’appareil au réfrigérateur.
5) CONSEIL PRATIQUE
- Placez les couvercles des pots sur le dessus du couvercle de la yaourtière pendant la préparation des yaourts.
Nettoyage
-Débranchez toujours l’appareil avant de le nettoyer.
-Ne trempez jamais le corps de l’appareil dans l’eau. Nettoyez-le avec un chiffon humide et de l’eau chaude savonneuse. Rincez et séchez.
-Les pots de yaourt (C) , les couvercles des
pots (C1) et le couvercle (A) de la yaourtière passent au lave-vaisselle.
Si votre appareil ne fonctionne pas, que faire ?
- Vérifiez tout d’abord le branchement.
Vous avez suivi toutes les instructions et votre appareil ne fonctionne toujours pas ? adressez-vous à votre revendeur, ou à un centre service agréé Moulinex (voir liste dans le livret “Moulinex service”).
7

Thank you for choosing an appliance from the Moulinex range, which is intended solely for making yoghurts.
Description
ALid
BBody
CPots
C1 Dater lids
Depending on model:
DSwitch
EIndicator light
or
FElectronic timer
GLuminous start button
Safety instructions
-Please read the instructions for use carefully before using your appliance for the first time and retain them for future reference: any use which does not conform to these instructions will absolve Moulinex from all liability.
-Never leave the appliance within reach of children without supervision. The use of this appliance by young children or by disabled persons must be supervised at all times.
Wiring instructions for U.K and Ireland only :
APPLIANCES WITH FITTED PLUG Important : For your convenience this appliance is supplied complete with a plug incorporating a 3 amp fuse.
In the event of replacing a fuse in the plug supplied, a 3 amp fuse approved by ASTA to BS1362 must be used.
If the socket outlets are not of the 13A BS 1363 type, and therefore do not accept the plug connected to this appliance, cut off the plugif moulded type or remove the plug if connected by screw terminals.
When the plug is a moulded type and this is cut off from the appliance, the connected wires are a shock hazard. Do not under any circumstances connect a cut off plug into the electrical socket outlet. The cut off plug must be disposed of in a safe manner that prevents any form of connection.
If the fuse cover is detachable, never use the plug with the cover omitted. Replacement covers can be obtained from your service agent.
Fit the appropriate plug according to the instructions in paragraph «Fitting a plug». With alternative plugs a 5 amp fuse must be fitted either in the plug or adaptor or at the main fuse box.
APPLIANCES WITHOUT FITTED PLUG
FITTING A PLUG - IMPORTANT
The wires in the mains lead are coloured in accordance with the following code:
BLUE : NEUTRAL BROWN : LIVE
But the colours may not correspond with the coloured markings identifying the terminals in your plug, proceed as follows:
The wire which is coloured BLUE must be connected to the terminal which is marked with the letter ‘N’ or coloured black. The wire which is coloured BROWN must be connected to the terminal which is marked with the letter ‘L’or coloured red.
This appliance is manufactured to conform to the Low Voltage Electrical Equipment (Safety) Regulations 1989 and is designed to comply with BS 3456. It complies with the requirements of the EEC Directive (89/336/EEC).
-Check that the power rating of your appliance does in fact match that of your household electrical wiring system. Any connection error will render the guarantee null and void.
-Your appliance is intended exclusively for domestic and indoor use.
-Unplug your appliance as soon as you have finished using it and when you are cleaning it.
-Never use your appliance if it is not working correctly, or if it has been damaged. If this happens, contact an approved Moulinex service centre (see list in service booklet).
-Any intervention other than cleaning and normal maintenance by the customer must be carried out by an approved Moulinex service centre.
-Never put the appliance, the power cord or the plug into water or any other liquid.
-Never allow the power cord to hang down within reach of children.
-The power cord must never be close to or in contact with the hot parts of your appliance, close to a source of heat or resting on a sharp edge.
-If the power cord or the plug are damaged, do not use your appliance. To avoid any risk, they must be replaced by an
8

approved Moulinex service centre (see list in service booklet).
-For your own safety, use only accessories and spare parts which are suitable for your appliance.
-All appliances are subjected to strict quality control. Practical user tests are performed with appliances selected at random, which explains any traces of use.
Using your appliance
-Before first use, clean the pots (C) and their lids (C1) in hot, soapy water. Rinse and dry.
To prepare the pots of the yoghurt maker, you will need one litre of milk and a yoghurt bacillus.
1) CHOICE OF MILK
-It is best to select whole or semi-skimmed milk which does not need to be boiled (UHT long-life milk or powdered milk).
Untreated or pasteurised milk has to be boiled, then cooled down and strained to eliminate the skin.
Notes:
-Whole milk makes the yoghurt smoother and gives it more flavour.
-To obtain yoghurts which are more consistent, you may add 2 or 3 tablespoons of powdered milk to a litre of milk, mixing thoroughly.
-It takes 8 to 15 hours to obtain good yoghurts, depending on the type of milk used.
2)CHOICE OF BACILLUS
This is made either:
. from a natural commercial yoghurt (preferably whole) with a use-by date as long as possible.
. from a yoghurt you have made yourself.
. from a freeze-dried bacillus (bought from pharmacies or specialis t health food stores). You will need to prolong the time for first preparation by two hours.
Important: do not use a yoghurt based on your own home-made bacillus more than ten times, as the yoghurts will not be as good.
3)CREATING YOGHURTS
-Mix a litre of milk with the bacillus very thoroughly.
-To obtain a good mixture, beat the yoghurt to turn it into a nice, smooth paste and
then add the milk, continuing to beat at the same time.
-Distribute the mixture between the pots
(C).
-Place the pots (C), without their lids (C1), in the yoghurt maker.
-Put the lid (A) on the yoghurt maker and plug it in.
. Model without timer:
The marking on the lid (A) (from 1 to 12) can be used to show the time when the yoghurts will be ready:
. match the scale to the mark situated on the body (B) of the appliance.
Example: if it is midday and if you have opted for a preparation time of 8 hours, set the scale to the figure 8.
-Press the switch (D) to start preparation. The indicator light (E) will come on.
At the end of preparation, press the switch
(D) and unplug the appliance.
. Model with timer:
-Select the preparation time using the button on the timer (F) and press the start button (G).
Once the time is up, the yoghurt maker stops automatically.
-Unplug the appliance.
Notes :
-Never move the yoghurt maker when it is in use.
-Avoid locations subject to vibrations, or exposed to draughts.
-Preparation will be speeded up by gently heating the milk (37 to 40°).
4) REFRIGERATION OF YOGHURTS
-Remove the lid (A), taking care to prevent the condensation from dripping into the pots.
-Cover the pots with the dater lids (C1).
-Indicate, using the manual dater situated on each lid, the date limit for consumption.
-Place the yoghurts in the fridge for at least one hour before eating them. If you wait 24 hours, they will be firmer.
Notes :
-The maximum length of time the yoghurts can be stored, in the fridge, is 8 to 10 days.
-The date limit for consumption will consequently be D+8 or D+10, D being the date of preparation.
-Never put the appliance in the fridge.
5) PRACTICAL TIP
- Place the lids of the pots on top of the lid
9

of the yoghurt maker during preparation of the yoghurts.
Cleaning
-Always unplug the appliance before cleaning it.
-Never immerse the body of the appliance in water. Wipe it with a damp cloth and hot, soapy water. Rinse and dry.
-The yoghurt pots (C), the lids of the pots (C1) and the lid (A) of the yoghurt maker can be washed in the dishwasher.
What to do if your appliance does not work
- Firstly, check the electrical connection.
If you have followed all the instructions and your appliance still does not work, please contact your retailer or an approved Moulinex service centre (see list in the “Moulinex service” booklet).
10
Vielen Dank, dass Sie sich für ein MoulinexGerät entschieden haben, das ausschließlich der Herstellung von Joghurt dient.
Beschreibung
AGerätedeckel
BGehäuse
CJoghurtbecher
C1 Datumsdeckel
Je nach Modell:
DEin-/Ausschalter
EKontrollleuchte
oder
Felektronische Zeitschaltuhr
GLeuchtschalter zum Einschalten
Sicherheitshinweise
-Lesen Sie diese Gebrauchsanleitung vor dem ersten Einsatz Ihres Gerätes sorgfältig durch und bewahren Sie sie gut auf: Eine unsachgemße Handhabung entbindet Moulinex von jeglicher Haftung.
-Lassen Sie Kinder niemals unbeaufsichtigt das Gerät bedienen. Die Benutzung dieses Gerätes durch kleine Kinder darf niemals ohne Aufsicht erfolgen.
-Überzeugen Sie sich, dass die Anschluss-
daten für Ihr Gerät mit denen Ihrer elektrischen Anlage übereinstimmen.
Bei fehlerhaftem Anschluss erlischt die Garantie.
-Ihr Gerät ist ausschließ lich für den Haushaltsgebrauch und für die Benutzung in geschlossenen Räumen bestimmt.
-Ziehen Sie den Netzstecker nach der Benutzung und vor jeder Reinigung.
-Benutzen Sie das Gerät nicht, wenn es nicht einwandfrei arbeitet oder beschädigt ist. Wenden Sie sich in diesem Fall an den Moulinex-Kundendienst (siehe Liste im Serviceheft).
-Jeder andere Eingriff als die normale Reinigung und Pflege muss vom MoulinexKundendienst durchgeführt werden.
-Tauchen Sie das Gerät, das Kabel oder den Stecker niemals in Wasser oder eine andere Flüssigkeit.
-Halten Sie das Kabel außerhalb der Reichweite von Kindern.
-Lassen Sie das Kabel niemals in die Nähe von oder in Berührung mit den heißen Teilen des Gerätes, einer Wärmequelle oder scharfen Kanten kommen.
-Benutzen Sie das Gerät nicht, wenn das Kabel oder der Stecker beschädigt sind. Um jegliche Gefahr zu vermeiden, lassen Sie diese Teile unbedingt vom MoulinexKundendienst austauschen (siehe Liste im Serviceheft).
-Zu Ihrer eigenen Sicherheit sollten Sie nur Zubehör und Ersatzteile von Moulinex verwenden, die für Ihr Gerät geeignet sind.
-Alle Geräte werden strengen Qualitätskontrollen unterzogen. Praktische Einsatzprüfungen werden an zufällig ausgewählten Geräten durchgeführt, so dass sich eventuelle Gebrauchsspuren feststellen lassen.
-Der Hersteller kann nicht für Schäden verantwortlich gemacht werden, die durch nicht bestimmungsgemäße Verwendung oder falsche Bedienung verursacht werden.
Gebrauchsanleitung
-Vor der ersten Benutzung spülen Sie die Becher (C) und ihre Deckel (C1) in heißem Spülwasser. Anschließend klar spülen und abtrocknen.
Für die Zubereitung von Joghurt in den Behältern des Joghurtbereiter benötigen Sie einen Liter Milch und ein Ferment.
1) AUSWAHL DER MILCH
- Wählen Sie vorzugsweise Vollmilch oder Halbfettmilch, die vorher nicht gekocht werden muss (haltbare ultrahocherhitzte Milch oder Milch aus Milchpulver).
Rohrmilch oder pasteurisierte Milch muss erst gekocht werden, anschließend abgekühlt und gefiltert werden, um die Haut zu entfernen.
Hinweise:
-Vollmilch macht den Joghurt cremiger und gibt ihm mehr Geschmack.
-Um einen festeren Joghurt herzustellen, können Sie 2 oder 3 Esslöffel Milchpulver dem Liter Milch zusetzen und sorgfältig unterrühren.
-Je nach Milchtyp benötigt ein guter Joghurt 8 bis 15 Stunden zur Reife.
2) AUSWAHL DES FERMENTS
Dabei handelt es sich um :
. einen handelsüblichen Naturjoghurt (vorzugsweise aus Vollmilch) mit möglichst langem Haltbarkeitsdatum.
. einen Joghurt aus Ihrer eigenen Herstellung.
11
 Loading...