


EN
RU
UK
KK
www.moulinex.com
6 |
7 |
|
8 |
||
|
1
17
2
3
4
5
9
10
11
12
13
14
15
16
1
1 |
2 |
3 |
4 |
5 |
2
6 |
7 |
8 |

9 |
10 |
11 |
12 |
13 |
14 |
15 |
16 |
17 |
18 |
19 |
20 |
 2h
2h 

21 |
22 |
3
23 |
24 |
25 |
26 |
27 |
28 |
29 |
30 |
31 |

32 |
33 |

SAFETY WARNINGS |
EN |
SAFETY INSTRUCTIONS
Take the time to read all the following instructions carefully.
•This appliance is not intended to be operated by means of an external timer or separate remotecontrol system.
•Indoor use only.
•For cleaning your appliance, please refer instructions for use. You can wash the cooking bowl and steam basket in soapy hot water. Clean the body of the appliance using a damp cloth.
•Do not immerse the appliance in water.
•Improper use of the appliance and its accessories may damage the appliance and cause injury.
•Do not touch hot parts of the appliance. After use, heating element surface is subject to residual heat
after use.
• For your safety, this product conforms to all applicable standards and regulations, (Electromagnetic Compatibility, Food Compliant Materials, Environment, ...).
•This appliance is not intended for use by persons (including children) with reduced physical, sensory or mental capabilities, or lack of experience
7

and knowledge, unless they have been given supervision or instruction concerning use of the appliance by a person responsible for their safety. Children should be supervised to ensure that they do not play with the appliance.
•If the supply cord is damaged, it must be replaced by the manufacturer, its service agent or similary qualified persons in order to avoid a hazard. Do not replace the power cord supplied with other cords.
•This appliance is intended for domestic household use only.
It is not intended to be used in the following applications, and the guarantee will not apply for: ––staff kitchen areas in shops, offices and other
working environments; ––farm houses;
––by clients in hotels, motels and other residential type environments;
––bed and breakfast type environments.
•This appliance shall not be used by children. Keep the appliance and its cord out of reach of children.
•Appliances can be used by persons with reduced physical, sensory or mental capabilities or lack of experience and knowledge if they have been given supervision or instruction concerning use of the
8

appliance in a safe way and if they understand the EN hazards involved.
•Children shall not play with the appliance.
•Do not fill your appliance more than the MAX mark on the pot.
•Please follow the recommendations on the volume of food and water to avoid the risk of boiling over which can damage your appliance and cause injury.
•Caution : do not spill liquid on the connector.
•Before using your appliance, check that the float valve and the pressure limit valve are clean (see section Cleaning and maintenance).
•Do not place any foreign objects in the pressure relief system. Do not replace the valve.
•When you open the lid, always hold it by the lid knob.
Position your arms in alignment with the side carrying handles. Boiling water could remain trapped between the gasket support and the lid and could cause burns.
•Be careful also about the risk of scalding from the steam coming out of the appliance when you open the lid. First open the lid very slightly to allow the steam to escape gently.
•Never force the appliance open. Make sure that the inside pressure has returned to normal. Do not
9

open the lid when the product is under pressure. To do so, see the Instructions for use.
•Use only the appropriate spare parts for your model. This is particularly important for the sealing gasket, the cooking pot and the metal lid.
•Do not damage the sealing gasket. If it is damaged, have it replaced in an Approved Service Centre.
•The heat source necessary for cooking is included in the appliance.
•Do not place the appliance in a heated oven or on a hot hob. Do not place the appliance close to an open flame or a flammable object.
•Do not heat the cooking pot with any other heat source than the heating plate of the appliance and do not use any other pot. Do not use the cooking pot with other appliances.
•Do not move the appliance when it is under pressure. Do not touch the hot surfaces. Use the carrying handles when moving it and wear oven mitts, if necessary. Do not use the lid knob to lift the appliance.
•Do not use appliance for other than the intended purpose.
•This appliance is not a steriliser. Do not use it to sterilise jars.
•The appliance cooks food under pressure. Incorrect use may cause risks of burns due to steam.
•Make sure that the appliance is properly closed before bringing it up to pressure (see Instructions for use).
•Do not use the appliance empty, without its pot or without liquid inside the pot. This could cause serious damage to the appliance.
•After cooking meat which has an outer layer of skin (such as ox tongue), which could swell due to the effects of pressure, do not pierce the skin after cooking if it appears swollen: you could get burnt. Pierce it before cooking.
•When cooking food with a thick texture (chick peas, rhubarb, compotes, etc.), shake the appliance slightly before opening it to ensure that the food or cooking juices do not spurt out.
•Do not use the appliance to fry food in oil. Only browning is allowed.
•In browning mode, be careful of risks of burns caused by spattering when you add food or ingredients into the hot pot.
•During cooking and automatic steam release at the end of cooking, the appliance releases heat and steam. Keep your face and hands away from the appliance to avoid scalding. Do not touch the lid during cooking.
•Do not use a cloth or anything else between the lid and the housing to leave the lid ajar. This can permanently damage the gasket.
•Do not touch the safety devices, except while cleaning and maintaining the appliance in accordance with the instructions given.
•Make sure that the bottom of the cooking pot and the heating element are always clean. Make sure that the central part of the heating plate is mobile.
•Do not fill up your appliance without its cooking pot.
•Use a plastic or wooden spoon to prevent any damage to the non-stick coating of the pot. Do not cut food directly in the cooking pot.
•If a great deal of steam is released from the rim of the lid, unplug the power cord at once and check whether the appliance is clean. If necessary, send the appliance to an Approved Service Centre for repair.
10
•Do not carry the appliance by holding it by the lid knob. Always use the two side handles on
the housing of the appliance. Wear oven mitts if the appliance is hot. For more safety, make EN sure that the lid is locked before transporting the appliance.
•If pressure is released continuously through the valve of the appliance (for more than 1 minute) while pressure cooking, send the appliance to a service centre for repair.
•Do not use a damaged appliance. Take it to your approved service centre.
SAVE THESE INSTRUCTIONS CAREFULLY.
•Use only spare parts sold in an approved service centre.
•The warranty does not cover the abnormal wear and tear of the cooking pot.
•Read these instructions for use carefully before using your appliance for the first time. Any use which does not conform to these instructions will absolve the manufacturer from any liability and void the warranty.
•In accordance with current regulations, before disposing of an appliance no longer needed, the appliance must be rendered inoperative (by unplugging it and cutting off the supply cord).
Environment protection first!
Your appliance contains valuable materials which can be recovered or recycled. Leave it at a local civic waste collection point.
11
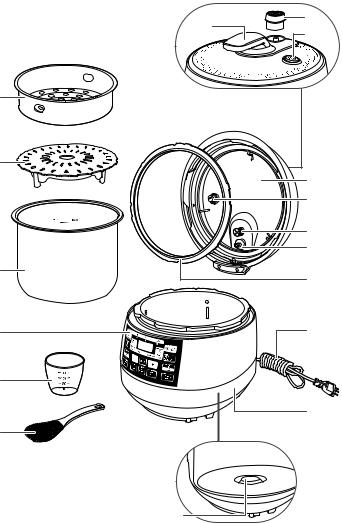
DESCRIPTION
1 |
Steam basket |
10 |
Safety valve |
2 |
Cooking pot |
11 |
Pressure Limit valve cover |
3 |
Control panel |
12 |
Float Valve |
4 |
Measuring cup |
13 |
Sealing gasket |
5 |
Rice ladle |
14 |
Power cord |
6 |
Lid handle |
15 |
Base |
7 |
Pressure limit valve |
16 |
Heating element |
8 |
Steam release button |
17 |
Trivet |
9 |
Lid |
|
|
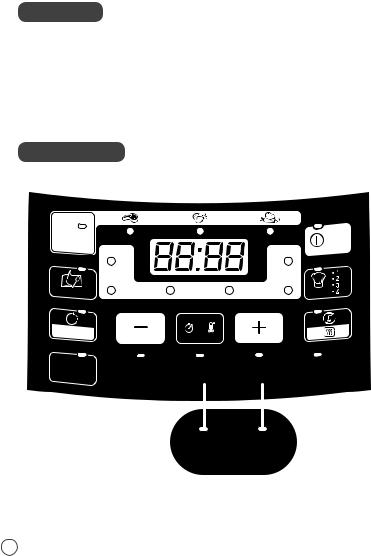
CONTROL PANEL
Type of |
|
|
Start |
food |
|
|
Stop |
|
Soup |
|
Steam |
|
Stew |
|
Under |
|
|
Vacuum |
|
Menu |
Browning |
Bake |
Manual |
|
|
|
mode |
Cancel |
|
|
|
|
|
|
|
|
|
|
|
|
|
|
1.Rice/Cereal |
1.Yoghurt |
|
|
1.Porridge |
|
|
|
1.Jam |
|
|
1.Pastry |
||
2.Pilaf |
2.Cottage |
|
|
2.Holodetz |
|
|
|
2.Boiling |
|
|
2.Dough |
||
|
cheese |
|
|
|
|
|
|
|
|
|
|
|
|
|
|
|
|
|
|
|
|
|
|
|
|
|
|
|
|
|
|
1.Porridge |
|
|
1.Jam |
|
|
||||
|
|
|
|
2.Beans |
|
|
2.Pasta |
|
|
||||
|
|
|
|
|
|
|
|
|
|
|
|
|
|
*Depending on model
12

BEFORE FIRST USE |
EN |
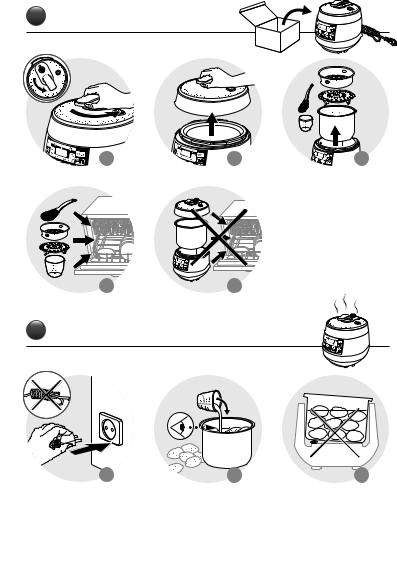
•Take your appliance out of its packaging. Please keep your warranty card and remember to read the operating instructions before using the appliance for the first time.
•Place your appliance on a flat surface. Remove all packaging materials from the inside of the
appliance: plastic bags, accessories (rice ladle, measuring cup & steam basket and trivet)
- fig. 3.
•Remove the promotional sticker on the appliance before using your appliance for the first time.
The Lid
• To open the lid, take hold of the handle, turn it anticlockwise, lift and pull the lid - fig. 1-2.
Cleaning
•Rinse the cooking bowl using gentle dish washing liquid. Do not use harsh, abrasive, or chemical cleaners at any time.
•Be aware: only the accessories are dishwasher safe - fig. 4 and 5.
•Warning : the cooking pot is not dishwasher safe (its external surface will be damaged).
Using your appliance for the first time
• Unroll the power cord then connect to a grounded socket - fig. 6.
INSTRUCTIONS FOR USE
Standby Mode
•Once the appliance is connected to a power supply, the buzzer makes a "BEEP" sound, the digital screen and all indicators light on.
After 1 second, the screen displays "-- : --" fig. 12.
Take the cooking pot out and add the ingredients
•Remove the cooking pot.
•Put ingredients in the cooking pot.
•Please note that the level of foods and liquids should never exceed the max level marking on the cooking pot - fig. 7.
Place the cooking pot in the appliance
•Wipe clean the bottom of the cooking pot and remove any food residue from the heating plate. Then place the cooking pot into the appliance - fig. 8-9.
•Do not use your appliance without the cooking pot.
Close and lock the lid
•Check that the sealing gasket is securely placed on the sealing gasket supporting cover.
•Close the lid on the appliance and turn it clockwise - fig. 10.
Place the pressure limit valve
•Position the pressure limit valve and ensure that it is on. Please note that the valve does not click into place and that it will remain somewhat loose. Check that the pressure limit valve is down before you start pressure cooking (please see appliance description)- fig. 11.
13

GENERAL INFORMATION FOR COOKING UNDER PRESSURE
•An EPC (electrical pressure cooker) is an electric pan with an hermetic lid and a special valve, that allows to cook the food under pressure, which saves cooking time and makes the stiff foods soft.
•The following programs cook automatically under pressure: Rice/Cereals, Porridge, Pilaf, Beans, Pasta (1st step) / Boiling (1st step) (depending on the model), Holodetz, Soup, Steam, Stew, Reheat. For DIY function you will enter a cooking pressure state if you select at least 100°C, with the lid closed and locked.
•Once you have selected your program, the time to reach the pressure will depend on the amount of food and liquids in the cooking pot. The lid must be closed and locked to reach a pressure state: as the appliance is hermetically closed, when the temperature increases, the liquid inside forms steam which raises the pressure in the pot (thus when preparing with pressure there should be always liquid inside the bowl).
•Once pressure has built up in the appliance, the lock mechanism system is activated and then the lid will not be able to be opened during cooking (so all ingredients must be added at the beginning of cooking). Never attempt to open the lid during pressure cooking. When the pressure for cooking is reached, the appliance switches automatically to cooking phase, and the time previously set starts counting down (except for DIY mode).
•When the food is cooked under pressure, after the cooking process the appliance will switch to keep warm state (depending on the mode : referred to the time table). The digital screen will indicate ‘’b’’.
•When using the pressure cooker for the first few times, you may notice slight steam leakage from the lid. This is normal and will occur when pressure builds up. Some leakage from the pressure limit valve may also occur during cooking.
•It is normal for a small amount of steam to escape during cooking (as the valve is a safety valve).
Opening the lid after pressure cooking
•After cooking under pressure, steam will be released (by pressing on the Steam release button), it will take from a few seconds to few minutes depending on the quantity of liquid inside.
•To open the lid, take hold of the handle, turn it anticlockwise - fig. 19-20. Unplug the power cord - fig. 21.
Note: Be careful of the hot steam coming out from the lid. Keep your face and hands away from the steam flow.
14

FUNCTION ILLUSTRATION EN
1. Self test with power on (standby)
Connect the power supply, system start to self check, buzzer make a long “beep” sound, digital screen light on, all indicators light on. After 1 second, the screen displays “----”, the appliance is in standby mode.
2.Working mode
1.In the standby mode, you can choose one of the following cooking functions: « Browning », « Steam », « Bake », « Dough », « Yogurt », « DIY chef », « Rice / Cereals », « Porridge », « Pilaf », « Stew », « Soup », « Boiling », « Holodetz / Beans », « Under vacuum », « Jam », « Dessert / Cake », « Cottage cheese », « Pasta / Boiling », « Keep warm » and « Reheat ».
- fig. 13
When a key has a double function, click once to select the first function, twice to select the second function.
For « Under vacuum », « Bake », « Steam » « Stew », « Soup », « Browning » you can choose the type of food: « Vegetable, Chicken, Meat ».
You can select the required type of food by pressing the key, the corresponding indicator will light. If you don’t select any, it will automatically select « Meat ». - fig. 17
After selecting the required cooking function and type of food, the corresponding function indicator and the type of food indicator will light. If no other function setting is required, press the “Start” key to enter the cooking mode of the selected function. The corresponding function’s indicator will move from flickering to a constant light. After one minute with no validation, it will go back to standby mode.
2. Each function default cooking temperature and time, delayed start, keep warm :
15

16
|
|
|
|
|
Pre-heating time included |
|
|
|
|
|
|
|
|
|
|
|
|
|
Adjustable |
|
|
|
|
Lid position |
|
||
|
COLOR |
|
|
|
in cooking time |
|
|
|
|
|
Adjustable range time |
|
|
|
Keep warm |
|
Temperature |
|
|
|
|
|
|
|
|
|
|
|
|
Funcntion |
|
|
Food choice |
|
default time |
|
|
Delayed function |
|
|
|
temperature |
|
Max pressure |
|
|
|
|
|
|
|||||
|
VERSION |
|
= |
|
|
|
step size |
|
|
function |
|
setting |
|
|
|
|
|
|
|
|
|||||||
|
|
|
|
|
|
|
|
|
|
|
|
|
Step size |
|
|
|
|
|
|
|
|
||||||
|
|
|
|
|
No circular frame |
|
|
|
|
|
|
|
|
|
|
|
|
|
|
|
|
|
|
|
|
|
|
|
|
|
|
|
|
|
|
|
|
|
|
|
|
|
|
|
|
|
|
|
|
|
|
|
|
|
|
|
Black and |
|
Rice/Cereal |
|
Circular frame |
|
NO |
|
9 min |
|
1 min - 2 h |
|
2 - 24 h |
|
24 h |
|
114°C |
|
NO |
|
70 kPa |
|
• |
|
|
|
|
|
|
|
|
|
|
|
|
|
|
|
|
|
|
|
|
||||||||||||
|
Champagne |
|
|
|
|
|
Step : 1 min |
|
Step : 10 min |
|
|
|
|
|
|
|
|
|
|||||||||
|
|
|
|
|
|
|
|
|
|
|
|
|
|
|
|
|
|
|
|
|
|
|
|
||||
|
|
|
|
|
|
|
|
|
|
|
|
|
|
|
|
|
|
|
|
|
|
|
|
|
|
|
|
|
Black and |
|
Pilaf |
|
Circular frame |
|
NO |
|
15 min |
|
1 min - 2 h |
|
2 - 24 h |
|
24 h |
|
114°C |
|
NO |
|
70 kPa |
|
• |
|
|
|
|
|
Champagne |
|
|
|
|
|
Step : 1 min |
|
Step : 10 min |
|
|
|
|
|
|
|
|
|
|||||||||
|
|
|
|
|
|
|
|
|
|
|
|
|
|
|
|
|
|
|
|
|
|
|
|
||||
|
Black and |
|
Yogurt |
|
Circular frame |
|
NO |
|
8 h |
|
1 min - 2 h |
|
NO |
|
NO |
|
38°~40°C |
|
NO |
|
NO |
|
• |
|
|
|
|
|
Champagne |
|
|
|
|
|
Step : 30 min |
|
|
|
|
|
|
|
|
|
|
||||||||||
|
|
|
|
|
|
|
|
|
|
|
|
|
|
|
|
|
|
|
|
|
|
|
|
|
|||
|
Black and |
|
Cottage |
|
Circular frame |
|
NO |
|
50 min |
|
10 min - 4 h |
|
NO |
|
NO |
|
80°C |
|
NO |
|
NO |
|
• |
|
|
|
|
|
Champagne |
|
Cheese |
|
|
|
|
Step : 5 min |
|
|
|
|
|
|
|
|
|
|
|||||||||
|
|
|
|
|
|
|
|
|
|
|
|
|
|
|
|
|
|
|
|
|
|
|
|
||||
|
Black and |
|
Porridge |
|
Circular frame |
|
NO |
|
15 min |
|
1 min - 2 h |
|
2 - 24 h |
|
24 h |
|
Default : 100°C |
|
2 levels : |
|
NO |
|
• |
|
|
|
|
|
Champagne |
|
|
|
|
|
Step : 1 min |
|
Step : 10 min |
|
|
|
90-100°C |
|
|
|
|
|
|
||||||||
|
|
|
|
|
|
|
|
|
|
|
|
|
|
|
|
|
|
|
|
|
|
|
|||||
|
Champagne |
|
Beans |
|
Circular frame |
|
NO |
|
1 h |
|
1 min - 2 h |
|
2 - 24 h |
|
24 h |
|
114°C |
|
NO |
|
70KP |
|
• |
|
|
|
|
|
only |
|
|
|
|
|
Step : 1 min |
|
Step : 10 min |
|
|
|
|
|
|
|
|
|
|||||||||
|
|
|
|
|
|
|
|
|
|
|
|
|
|
|
|
|
|
|
|
|
|
|
|
||||
|
|
|
Holodetz |
|
|
|
|
|
|
|
1 min - 2 h |
|
2 - 24 h |
|
|
|
|
|
|
|
|
|
• |
|
|
|
|
|
Black only |
|
(same as |
|
Circular frame |
|
NO |
|
1 h 30 min |
|
|
|
24 h |
|
114°C |
|
NO |
|
70 kPa |
|
|
|
|
|
|||
|
|
|
|
|
|
Step : 1 min |
|
Step : 10 min |
|
|
|
|
|
|
|
|
|
||||||||||
|
|
|
Beans) |
|
|
|
|
|
|
|
|
|
|
|
|
|
|
|
|
|
|
|
|
|
|||
|
|
|
|
|
|
|
|
|
|
|
|
|
|
|
|
|
|
|
|
|
|
|
|
|
|
|
|
|
Black and |
|
Jam |
|
Circular frame |
|
NO |
|
1 h 20 min |
|
1 min - 2 h |
|
2 - 24 h |
|
24 h |
|
Default : 110°C |
|
2 levels : 100- |
|
NO |
|
|
|
|
|
• |
|
Champagne |
|
|
|
|
|
Step : 1 min |
|
Step : 10 min |
|
|
|
110°C |
|
|
|
|
|
|
||||||||
|
|
|
|
|
|
|
|
|
|
|
|
|
|
|
|
|
|
|
|
|
|
|
|||||
|
Champagne |
|
|
|
Circular frame |
|
NO |
|
1st step |
|
Not adjustable |
|
NO |
|
NO |
|
100°C |
|
NO |
|
NO |
|
• |
|
|
|
|
|
|
Pasta |
|
|
|
|
|
|
|
|
|
|
|
|
|
|
|
|
|
|
|
|
|
|
|
||
|
only |
|
|
|
No circular frame |
|
NO |
|
2nd step = 8 min |
|
1 min - 2 h |
|
NO |
|
NO |
|
100°C |
|
NO |
|
NO |
|
|
|
|
|
• |
|
|
|
|
|
|
|
|
Step : 1 min |
|
|
|
|
|
|
|
|
|
|
|||||||||
|
|
|
|
|
|
|
|
|
|
|
|
|
|
|
|
|
|
|
|
|
|
|
|
|
|
||
|
|
|
Boiling |
|
Circular frame |
|
NO |
|
1st step |
|
Not adjustable |
|
NO |
|
NO |
|
100°C |
|
NO |
|
NO |
|
• |
|
|
|
|
|
Black only |
|
(same as |
|
|
|
|
|
|
|
|
|
|
|
|
|
|
|
|
|
|
|
|
|
|
|
|
|
|
|
Pasta) |
|
No circular frame |
|
NO |
|
2nd step = 8 min |
|
1 min - 2 h |
|
NO |
|
NO |
|
100°C |
|
NO |
|
NO |
|
|
|
|
|
• |
|
|
|
|
|
|
|
Step : 1 min |
|
|
|
|
|
|
|
|
|
|
||||||||||
|
Black and |
|
Dessert/Cake |
|
Preheating included |
|
NO |
|
30 min |
|
2 - 24 h |
|
2 - 24 h |
|
24 h |
|
Default : 160°C |
|
4 levels : 130-140- |
|
NO |
|
|
|
• |
|
|
|
Champagne |
|
|
NO circular frame |
|
|
|
Step : 10 min |
|
Step : 10 min |
|
|
|
150-160°C |
|
|
|
|
|
|
|||||||
|
|
|
|
|
|
|
|
|
|
|
|
|
|
|
|
|
|
|
|
|
|
||||||
|
Black and |
|
Dough |
|
Circular frame |
|
NO |
|
1 h |
|
10 min - 6 h |
|
NO |
|
NO |
|
38°~40°C |
|
NO |
|
NO |
|
• |
|
|
|
|
|
Champagne |
|
|
|
|
|
Step : 5 min |
|
|
|
|
|
|
|
|
|
|
||||||||||
|
|
|
|
|
|
|
|
|
|
|
|
|
|
|
|
|
|
|
|
|
|
|
|
|
|||
|
Black and |
|
Reheat |
|
Circular frame |
|
NO |
|
2 min |
|
1 min - 2 h |
|
2 - 24 h |
|
24 h |
|
114°C |
|
NO |
|
70 kPa |
|
• |
|
|
|
|
|
Champagne |
|
|
|
|
|
Step : 1 min |
|
Step : 10 min |
|
|
|
|
|
|
|
|
|
|||||||||
|
|
|
|
|
|
|
|
|
|
|
|
|
|
|
|
|
|
|
|
|
|
|
|
||||
|
Black and |
|
|
|
Preheating included |
|
|
|
|
|
5 min - 4 h |
|
NO (except with specific |
|
|
|
|
|
13 levels : |
|
|
|
• |
|
• |
|
• |
|
|
DIY chef |
|
|
NO |
|
30 min |
|
|
|
NO |
|
Default : 80°C |
|
40-160°C |
|
70 kPa |
|
|
|
|||||||
|
Champagne |
|
|
NO circular frame |
|
|
|
Step : 5 min |
|
modes) |
|
|
|
|
|
|
|
||||||||||
|
|
|
|
|
|
|
|
|
|
|
|
|
|
|
Step : 10°C |
|
|
|
|
|
|||||||
|
|
|
|
|
|
|
|
|
|
|
|
|
|
|
|
|
|
|
|
|
|
|
|
|
|
|
|
|
|
|
|
|
|
|
meat |
|
30 min |
|
1 min - 2 h |
|
2 - 24 h |
|
24 h |
|
114°C |
|
NO |
|
70 kPa |
|
• |
|
|
|
|
|
|
|
|
|
|
|
|
|
Step : 1 min |
|
Step : 10 min |
|
|
|
|
|
|
|
|
|
|||||||
|
|
|
|
|
|
|
|
|
|
|
|
|
|
|
|
|
|
|
|
|
|
|
|
|
|||
|
Black and |
|
Soup |
|
Circular frame |
|
chicken |
|
20 min |
|
1 min - 2 h |
|
2 - 24 h |
|
24 h |
|
114°C |
|
NO |
|
70 kPa |
|
• |
|
|
|
|
|
Champagne |
|
|
|
|
|
Step : 1 min |
|
Step : 10 min |
|
|
|
|
|
|
|
|
|
|||||||||
|
|
|
|
|
|
|
|
|
|
|
|
|
|
|
|
|
|
|
|
|
|
|
|
||||
|
|
|
|
|
|
|
vegetable |
|
12 min |
|
1 min - 2 h |
|
2 - 24 h |
|
24 h |
|
114°C |
|
NO |
|
70 kPa |
|
• |
|
|
|
|
|
|
|
|
|
|
|
|
|
Step : 1 min |
|
Step : 10 min |
|
|
|
|
|
|
|
|
|
|||||||
|
|
|
|
|
|
|
|
|
|
|
|
|
|
|
|
|
|
|
|
|
|
|
|
|
|||
1 TABLE

|
|
Pre-heating time included |
|
|
|
|
|
|
|
|
|
|
|
|
Adjustable |
|
|
|
Lid position |
||
COLOR |
|
in cooking time |
|
|
|
|
Adjustable range time |
|
|
|
Keep warm |
|
Temperature |
|
|
|
|
|
|
|
|
Funcntion |
Food choice |
|
default time |
|
|
Delayed function |
|
|
|
temperature |
|
Max pressure |
|
|
|
|
|||||
VERSION |
= |
|
|
step size |
|
|
function |
|
setting |
|
|
|
|
|
|
||||||
|
|
|
|
|
|
|
|
|
|
Step size |
|
|
|
|
|
|
|||||
|
|
No circular frame |
|
|
|
|
|
|
|
|
|
|
|
|
|
|
|
|
|
|
|
|
|
|
|
|
|
|
|
|
|
|
|
|
|
|
|
|
|
|
|
|
|
|
|
|
meat |
|
30 min |
|
1 min - 2 h |
|
2 - 24 h |
|
24 h |
|
114°C |
|
NO |
|
70 kPa |
|
• |
|
|
|
|
|
|
|
|
|
|
|
|
|
|
|
|||||||||
|
|
|
|
|
Step : 1 min |
|
Step : 10 min |
|
|
|
|
|
|
|
|||||||
|
|
|
|
|
|
|
|
|
|
|
|
|
|
|
|
|
|
|
|||
Black and |
|
|
|
|
|
|
|
|
|
|
|
|
|
|
|
|
|
|
|
|
|
Stew |
Circular frame |
chicken |
|
20 min |
|
1 min - 2 h |
|
2 - 24 h |
|
24 h |
|
114°C |
|
NO |
|
70 kPa |
|
• |
|
|
|
Champagne |
|
|
Step : 1 min |
|
Step : 10 min |
|
|
|
|
|
|
|
|||||||||
|
|
|
|
|
|
|
|
|
|
|
|
|
|
|
|
|
|
||||
|
|
|
vegetable |
|
10 min |
|
1 min - 2 h |
|
2 - 24 h |
|
24 h |
|
114°C |
|
NO |
|
70 kPa |
|
• |
|
|
|
|
|
|
|
Step : 1 min |
|
Step : 10 min |
|
|
|
|
|
|
|
|||||||
|
|
|
|
|
|
|
|
|
|
|
|
|
|
|
|
|
|
|
|||
|
|
|
|
|
|
|
1 min - 30 min |
|
|
|
|
|
|
|
7 levels : 100- |
|
|
|
|
|
• |
|
|
|
meat |
|
20 min |
|
|
NO |
|
NO |
|
Default : 160°C |
|
160°C |
|
NO |
|
|
|
||
|
|
|
|
|
Step : 1 min |
|
|
|
|
|
|
|
|
||||||||
|
|
|
|
|
|
|
|
|
|
|
|
|
|
Step : 10°C |
|
|
|
|
|
||
|
|
|
|
|
|
|
|
|
|
|
|
|
|
|
|
|
|
|
|
|
|
Black and |
Browning |
Preheating included |
|
|
|
|
1 min - 30 min |
|
|
|
|
|
|
|
7 levels : 100- |
|
|
|
|
|
• |
chicken |
|
15 min |
|
|
NO |
|
NO |
|
Default : 160°C |
|
160°C |
|
NO |
|
|
|
|||||
Champagne |
/ fry |
NO circular frame |
|
|
Step : 1 min |
|
|
|
|
|
|
|
|
||||||||
|
|
|
|
|
|
|
|
|
|
|
Step : 10°C |
|
|
|
|
|
|||||
|
|
|
|
|
|
|
|
|
|
|
|
|
|
|
|
|
|
|
|
|
|
|
|
|
|
|
|
|
1 min - 30 min |
|
|
|
|
|
|
|
7 levels : 100- |
|
|
|
|
|
• |
|
|
|
vegetable |
|
12 min |
|
|
NO |
|
NO |
|
Default : 160°C |
|
160°C |
|
NO |
|
|
|
||
|
|
|
|
|
Step : 1 min |
|
|
|
|
|
|
|
|
||||||||
|
|
|
|
|
|
|
|
|
|
|
|
|
|
Step : 10°C |
|
|
|
|
|
||
|
|
|
|
|
|
|
|
|
|
|
|
|
|
|
|
|
|
|
|
|
|
|
|
|
|
|
|
|
1 min - 2 h |
|
2 - 24 h |
|
|
|
|
|
7 levels : 100- |
|
|
|
|
• |
|
|
|
|
meat |
|
50 min |
|
|
|
24 h |
|
Default : 160°C |
|
160°C |
|
NO |
|
|
|
|||
|
|
|
|
|
Step : 1 min |
|
Step : 10 min |
|
|
|
|
|
|
|
|||||||
|
|
|
|
|
|
|
|
|
|
|
|
|
Step : 10°C |
|
|
|
|
|
|||
|
|
|
|
|
|
|
|
|
|
|
|
|
|
|
|
|
|
|
|
|
|
Black and |
|
Preheating included |
|
|
|
|
1 min - 2 h |
|
2 - 24 h |
|
|
|
|
|
7 levels : 100- |
|
|
|
|
• |
|
Baking |
chicken |
|
40 min |
|
|
|
24 h |
|
Default : 160°C |
|
160°C |
|
NO |
|
|
|
|||||
Champagne |
NO circular frame |
|
|
Step : 1 min |
|
Step : 10 min |
|
|
|
|
|
|
|
||||||||
|
|
|
|
|
|
|
|
|
|
|
Step : 10°C |
|
|
|
|
|
|||||
|
|
|
|
|
|
|
|
|
|
|
|
|
|
|
|
|
|
|
|
|
|
|
|
|
|
|
|
|
1 min - 2 h |
|
2 - 24 h |
|
|
|
|
|
7 levels : 100- |
|
|
|
|
• |
|
|
|
|
vegetable |
|
20 min |
|
|
|
24 h |
|
Default : 160°C |
|
160°C |
|
NO |
|
|
|
|||
|
|
|
|
|
Step : 1 min |
|
Step : 10 min |
|
|
|
|
|
|
|
|||||||
|
|
|
|
|
|
|
|
|
|
|
|
|
Step : 10°C |
|
|
|
|
|
|||
|
|
|
|
|
|
|
|
|
|
|
|
|
|
|
|
|
|
|
|
|
|
|
|
|
meat |
|
4 h |
|
1 h - 12 h |
|
NO |
|
NO |
|
65°C |
|
NO |
|
NO |
|
• |
|
|
|
|
|
|
|
Step : 15 min |
|
|
|
|
|
|
|
|
||||||||
|
|
|
|
|
|
|
|
|
|
|
|
|
|
|
|
|
|
|
|
||
Black and |
Under |
Circular frame |
Chicken |
|
3 h |
|
1 h - 12 h |
|
NO |
|
NO |
|
65°C |
|
NO |
|
NO |
|
• |
|
|
Champagne |
Vaccum |
|
|
Step : 15 min |
|
|
|
|
|
|
|
|
|||||||||
|
|
|
|
|
|
|
|
|
|
|
|
|
|
|
|
|
|
||||
|
|
|
vegetable |
|
2 h |
|
1 h - 12 h |
|
NO |
|
NO |
|
65°C |
|
NO |
|
NO |
|
• |
|
|
|
|
|
|
|
Step : 15 min |
|
|
|
|
|
|
|
|
||||||||
|
|
|
|
|
|
|
|
|
|
|
|
|
|
|
|
|
|
|
|
||
|
|
|
meat |
|
10 min |
|
1 min - 2 h |
|
2 - 24 h |
|
24 h |
|
114°C |
|
NO |
|
70 kPa |
|
• |
|
|
|
|
|
|
|
Step : 1 min |
|
Step : 10 min |
|
|
|
|
|
|
|
|||||||
|
|
|
|
|
|
|
|
|
|
|
|
|
|
|
|
|
|
|
|||
Black and |
Steam |
Circular frame |
chicken |
|
10 min |
|
1 min - 2 h |
|
2 - 24 h |
|
24 h |
|
114°C |
|
NO |
|
70 kPa |
|
• |
|
|
Champagne |
|
|
Step : 1 min |
|
Step : 10 min |
|
|
|
|
|
|
|
|||||||||
|
|
|
|
|
|
|
|
|
|
|
|
|
|
|
|
|
|
||||
|
|
|
vegetable |
|
3 min |
|
1 min - 2 h |
|
2 - 24 h |
|
24 h |
|
114°C |
|
NO |
|
70 kPa |
|
• |
|
|
|
|
|
|
|
Step : 1 min |
|
Step : 10 min |
|
|
|
|
|
|
|
|||||||
|
|
|
|
|
|
|
|
|
|
|
|
|
|
|
|
|
|
|
|||
17 |
EN |

*Rice/Pilaf
Pour the required quantity of rice into the cooking pot using the measuring cup provided
(N). Then fill with cold water up to the corresponding “CUP” mark printed in the bowl.
Note: Always add the rice first otherwise you will have too much water.
The table below gives a guide to cook different types of rice. For best results, we recommend using ordinary rice rather than ‘easy cook’ type of rice which tends to give a stickier rice and may adhere to the base. With other types of rice, such as brown or wild rice, the quantities of water need adjustment.
COOKING GUIDE FOR RICE
Rice measurement |
Weight |
|
Water measurement |
|
|
Serves |
|
in cups |
|
in the bowl (+ rice) |
|
|
|||
|
|
|
|
|
|
||
|
300 g |
|
2 cup mark |
|
2 |
- 4 pers. |
|
2 |
|
|
|
||||
|
|
|
|
|
|
|
|
4 |
600 g |
|
4 cup mark |
|
4 |
- 8 pers. |
|
|
|
|
|
|
|
|
|
6 |
900 g |
|
6 cup mark |
|
6 - 12 pers. |
|
|
|
|
|
|
|
|
|
|
8 |
1200 g |
|
8 cup mark |
|
8 - 16 pers. |
|
|
|
|
|
|
|
|
|
|
10 |
1500 g |
|
10 cup mark |
|
10 |
- 20 pers. |
|
|
|
|
|
|
|
|
|
•If you only want to cook 1 cup of white rice (serves 2 small or 1 large portion), use 1 measuring cup of white rice and then add one and a half measuring cup of water. With some types of rice it is normal for a little rice to stick on the base when cooking 1 cup of rice.
•The maximum quantity of water + rice should not exceed the highest mark inside the bowl. Depending on the type of rice, quantities of water may need adjustment.
**Yogurt function Milk
All our recipes (unless otherwise stipulated) are preparing using cow’s milk. You can use plant milk such as soya milk for example as well as sheep or goat’s milk but, in this case, the firmness of the yogurt may vary depending on the milk used. Raw milk or long life milks and all the milks described below are suitable for your appliance.
Fluid |
|
|
|
Firm |
|
Semi-skimmed milk |
Whole milk |
Raw milk |
|
Choose a whole milk, preferably long-life UHT. Raw (fresh) or pasteurized milk must be boiled then cooled and needs the skin removing.
––Long-life sterilised milk: UHT wholemilk results in firmer yogurts. Using semi-skimmed milk will result in less firm yogurts. However, you can use semi-skimmed milk and one or two pots of powered milk.
––Pasteurized milk: this milk gives a more creamy yogurt with a little bit of skin on the top. ––Raw milk (farm milk): this must be boiled. It is also recommended to let it boil for a log time.
It would be dangerous to use this milk without boiling it. You must then leave it too cool before
18

––using it in your appliance. Culturing using yogurts prepared with raw milk is not recommended. ––Powdered milk: using powdered milk will result in very creamy yogurts. Follow the instructions EN
on the manufacturer’s box.
The ferment
If you have boiled the milk, wait untill it has reached room temperature before adding the ferment. Too high a heat may destroy the properties of your ferment.
This is made either from:
––One shop-bought natural yogurt with the longest expiry date possible: your yogurt will therefore contain more active ferment for a firmer yogurt.
––From a freeze-dried ferment. In this case, follow the activation time specified on the ferment instructions. You can find these ferments in supermarkets, pharmacies and in certain health product store.
––From one of your recently prepared yogurts - this must be natural and recently prepared. This is called culturing. After five culturing processes, the used yogurt loses active ferments and therefore risks giving a less firm consistency. You then need start again using a shopbought yogurt or freezedried ferment.
Fermentation time
Your yogurt will need between 6 and 12 hours of fermentation, depending on the basic ingredients and the result you are after.
Fluid |
|
|
|
|
|
|
|
|
|
|
|
|
Firm |
Sweet |
|
|
|
|
|
|
|
|
|
|
|
|
Acidic |
6h |
7h |
8h |
9h |
10h |
11h |
12h |
|||||||
Yogurts can be kept max 7 days in refrigerator.
***Browning function
You can add oil firstly and then the ingredients, or you can also add oil and ingredient at the same time.
We suggest not to fry more than 30 minutes in order to avoid oil temperature going too high.
****DIY Chef function
•Thanks to this function, you are free of choice regarding the cooking time and temperature, but also the lid position.
•Be aware that to use pressure cooking, there must be liquid in the cooking pot and the temperature must be higher than a certain temperature (between 100 to 120 degrees), also the lid must be closed and locked. If you don’t respect all those conditions, the appliance will start cooking without pressure, at the selected temperature.
•There are 4 settings that keep in memory the last cooking settings. At the first use there is no setting in memory and the machine propose the default time and temperature. You can also select an existing program and change its parameters.
19

SOUS-VIDE FUNCTION
•Also known as “precision cooking”, this cooking mode consists in slow-cooking vacuum-sealed food at a low and accurately controlled temperature, to achieve a food texture that can be be obtained only in such precise cooking method.
•This function can be used for vegetables, meat and poultry, but also fish, seafood and fruit.
How does it work?
Preparing your food
•Purchase good quality raw food. If the food has visible spoilage, contamination with filth, discoloration, bad odors or taste, do not use it.
•Pre-season your food just before sealing if needed (depending on your taste).
•Place the food you wish to cook in a vaccuum-sealed bag or a heavy-duty Ziploc bag, and make sure to remove all the air from the pouch.
•If you are using a heavy-duty Ziploc bag, you can remove the air by slowly submerging the pouch containing the food half-way into cold water, and close it once the air is removed and the food inside is tightened by the water pressure.
Preparing your multicooker
•Fill the cooking pot with enough water to immerse the sealed pouch of food.
•Place your pouch of food inside the pot and close the lid.
•Press «Menu» selection key and select «Sous Vide» menu. The screen displays the default cooking time, the light of «Start» icon will flash.
•Press «Timer» key to activate the time setting function and then press «<» and «>» to change the sous vide cooking time.
•Press «Temperature» key to activate the temperature setting function and then press «<» and «>» to change the sous vide cooking temperature .
Please note that different ingredients and expected cooking results require different recommended cooking time and temperature.
You can refer to the Sous-vide cooking table below as a reference for your preferred cooking result.
At the end of the cooking time, the multicooker will “beep” three times.
Note: No keep warm function for this function
20
SOUS-VIDE COOKING TEMPERATURE
Food type |
Doneness |
Cooking Temperature |
|
|
|
|
|
FISH & SEAFOOD |
|
|
|
|
|
|
|
Salmon |
Medium |
60°C |
|
|
|
|
|
Scallops |
Medium |
60°C |
|
|
|
|
|
Tiger shrimps |
Medium |
60°C |
|
|
|
|
|
|
Medium |
60°C |
|
MEAT |
|
|
|
Medium well |
63°C |
||
(Beef, Lamb, etc) |
|||
|
|
||
|
Well done |
71°C |
|
|
|
|
|
PORK |
Well done |
> 71°C |
|
|
|
|
|
POULTRY |
Medium rare |
60°C |
|
|
|
||
|
|
||
(Chicken, Duck, Turkey, |
Medium |
60-63°C |
|
etc) |
|
|
|
Well done |
80°C |
||
|
|||
|
|
|
|
VEGETABLES & FRUIT |
|
84-87°C |
|
|
|
|
|
|
Raw egg |
60°C |
|
|
|
|
|
|
Runny |
62°C |
|
EGGS |
|
|
|
Soft cooked |
64-75°C |
||
|
|
|
|
|
Hard cooked |
71°C |
|
|
|
|
|
|
Scrambled |
75°C |
|
|
|
|
•The temperature chart is provided as a guideline.
•You may want to adjust the temperature depending how done you like your food.
EN
21

SOUS-VIDE COOKING TIME RECOMMENDATIONS
|
FOOD TYPE |
DONENESS |
COOKING |
THICKNESS |
COOKING TIME |
||
|
|
|
|||||
|
TEMPERATURE |
(min) |
Max |
||||
|
|
|
|
|
|||
|
|
|
|
|
|
||
|
FISH & SEAFOOD |
|
|
|
|
|
|
|
|
|
|
|
|
|
|
|
|
|
|
|
|
|
|
|
Salmon |
Medium |
|
60°C |
2 cm |
20 min |
40 min |
|
|
|
|
|
|
|
|
|
Scallops |
Medium |
|
60°C |
- |
40 min |
60 min |
|
|
|
|
|
|
|
|
|
Tiger shrimps |
Medium |
|
60°C |
- |
30 min |
40 min |
|
|
|
|
|
|
|
|
|
MEAT (Beef, Lamb, etc) |
|
|
|
|
||
|
|
|
|
|
|
|
|
|
Tender cuts, |
Medium |
|
60°C |
2-4 cm |
1h |
4h |
|
|
|
|
|
|
|
|
Medium well |
|
66°C |
2-4 cm |
1h |
4h |
||
|
tenderloin, chops, |
|
|||||
|
cutlets |
|
|
|
|
|
|
Well done |
|
71°C |
2-4 cm |
1h |
4h |
||
|
|
|
|||||
|
|
|
|
|
|
|
|
|
Lamb roast or leg |
|
|
> 60°C |
7 cm |
10h |
20h |
|
|
|
|
|
|
|
|
|
Flank steak, brisket |
|
|
> 60°C |
2-3 cm |
8h |
20h |
|
|
|
|
|
|
|
|
|
POULTRY (Chicken, Duck, turkey, etc) |
|
|
|
|
||
|
|
|
|
|
|
|
|
|
Chicken breast |
Medium |
|
60°C |
2.5cm |
1h25 |
2-4h |
|
without bone |
|
|||||
|
|
|
|
|
|
|
|
|
|
|
|
|
|
|
|
|
|
Medium well |
|
64°C |
2.5cm |
1h |
5h |
|
|
|
|
|
|
|
|
|
Chicken Tights |
Medium |
|
64°C |
1 pc |
2h |
4-6h |
|
without bone |
|
|||||
|
|
|
|
|
|
|
|
|
|
|
|
|
|
|
|
|
Chicken Tights with |
well done |
|
82°C |
1 pc |
2h |
6h |
|
bone |
|
|||||
|
|
|
|
|
|
|
|
|
|
|
|
|
|
|
|
|
PORK |
|
|
|
|
|
|
|
|
|
|
|
|
|
|
|
Pork Roast |
medium |
|
60°C |
5 cm |
12h |
20h |
|
|
|
|
|
|
|
|
|
Pork Spare Ribs |
well done |
|
71°C- 80°C |
7 cm |
12h |
20h |
|
|
|
|
|
|
|
|
|
Pork Belly |
well done |
|
85°C |
5 cm |
5h |
8h |
|
|
|
|
|
|
|
|
22

|
|
SOUS-VIDE COOKING TIME RECOMMENDATIONS |
|
|
EN |
||
|
FOOD TYPE |
DONENESS |
COOKING |
THICKNESS |
COOKING TIME |
||
|
|
|
|
||||
|
TEMPERATURE |
(min) |
Max |
||||
|
|
|
|
||||
|
|
|
|
|
|||
|
VEGETABLES |
|
|
|
|
|
|
|
|
|
|
|
|
|
|
|
|
|
|
|
|
|
|
|
Root vegetables |
|
|
|
|
|
|
|
(Carrots, parnships, |
- |
85°C |
- |
1h |
4h |
|
|
potatoes, turnips, |
|
|||||
|
|
|
|
|
|
|
|
|
beets, etc) |
|
|
|
|
|
|
|
|
|
|
|
|
|
|
|
Tender vegetables |
|
|
|
|
|
|
|
(Asparagus, Broccoli, |
- |
85°C |
- |
30 min |
1h30 |
|
|
Corn, cauliflower, |
|
|||||
|
|
|
|
|
|
|
|
|
eggplants, squash, etc) |
|
|
|
|
|
|
|
|
|
|
|
|
|
|
|
FRUIT |
|
|
|
|
|
|
|
|
|
|
|
|
|
|
|
Firm |
|
85°C |
- |
45 min |
2h |
|
|
(apple / pear) |
|
|
||||
|
|
|
|
|
|
|
|
|
|
|
|
|
|
|
|
|
Soft |
|
|
|
|
|
|
|
(Peach, Apricot, |
|
85°C |
- |
30 min |
1h |
|
|
Plum, Mango, Papya, |
|
|
||||
|
|
|
|
|
|
|
|
|
Netarine, berries) |
|
|
|
|
|
|
|
|
|
|
|
|
|
|
|
EGGS |
|
|
|
|
|
|
|
|
|
|
|
|
|
|
|
|
Runny |
62°C |
|
45 min |
|
|
|
|
|
|
|
|
|
|
|
|
Poached just |
65°C |
|
45 min |
|
|
|
|
set |
|
|
|
||
|
|
|
|
|
|
|
|
|
|
|
|
|
|
|
|
|
|
Medium |
68°C |
|
45 min |
|
|
|
|
poached |
|
|
|
||
|
|
|
|
|
|
|
|
|
|
|
|
|
|
|
|
|
|
Hard-boiled |
73°C |
|
45 min |
|
|
|
|
|
|
|
|
|
|
•The cooking time and temperatures suggested are provided as a guideline.
•The thicker the meat, the longer the required cooking time.
•You may wish to adjust the cooking time depending on the thickness of your food.
23

SOUS-VIDE RECIPES
|
|
SOUS-VIDE SMOKY CHEESY CHICKEN ROULADE |
|
Serve: |
|
2- 3 people |
|
|
|
||
|
|
|
|
Preparation |
|
15 minutes |
|
time: |
|
|
|
|
|
|
|
|
|
|
|
Cooking |
|
50 minutes |
|
time: |
|
|
|
|
|
|
|
|
|
|
|
Cooking |
|
63°C |
|
Temp: |
|
|
|
|
|
|
|
|
|
|
|
Cooking |
|
Sous-vide menu |
|
Mode: |
|
|
|
|
|
|
|
|
|
|
|
|
|
• 2 chicken breasts |
Seasoning ingredients |
|
|
( ~ 180/200 gr each) |
• Smoked garlic powder |
Ingredients |
|
• 2 slices of uncooked bacon |
• Salt & Pepper |
|
or any smoked cuts |
• Smoked Paprika |
|
|
|
||
|
|
• Cheese, cut in strips or |
• Thyme / Herbes de Provence |
|
|
slices |
• Tomato paste ( optional) |
|
|
|
|
COOKING INSTRUCTIONS
|
1. |
Butterfly the chicken breast by making a cut on the side. |
|
|
2. |
Open the chicken breast and season with seasoning ingredients as listed. |
|
|
3. |
Add slices of bacon, then cheese. |
|
Step 1: |
4. |
Roll the chicken breast. |
|
5. |
Season the outer part with the seasonning ingredients as listed. |
||
Preparing |
|||
6. |
Wrap the breast with a plastic cling. |
||
your food |
|||
7. |
Take the 2 extremities of the wrap and twist it to obtain a sausage |
||
|
|||
|
|
shape. Then fold the extremities of the cling to maintain the shape. |
|
|
8. |
Place the wrapped chicken into a vacuum sealed bag (or a heavy-duty |
|
|
|
Ziploc bag, then remove all the air). |
|
|
|
|
|
|
9. |
Fill in the cooking pot with water until marking level 5. |
|
Step 2: |
10. Place your sealed pouch of food inside the cooker, then close the lid. |
||
|
Set the temperature to 63°C and the time to 50 minutes. |
||
Setting the |
|
||
11. When ready, the multicooker will bip. |
|||
multicooker |
|||
12. Unwrap the chicken and slice it into 5 pcs. Serve on a plate with a side |
|||
|
|||
|
|
dish. |
|
|
|
|
|
24

|
|
SOUS-VIDE STRIP STEAK |
EN |
||
Serve: |
2 people |
|
|
||
|
|
|
|
|
|
Cooking |
2h20 |
|
|
||
time: |
|
|
|||
|
|
|
|
|
|
|
|
|
|
||
Cooking |
60-71°C (refer to the cooking table to set temperature up to your preferred |
|
|||
Temp: |
doneness) |
|
|
||
|
|
|
|
|
|
Cooking |
" Sous-vide " menu (+ "Crust/Fry" function) |
|
|||
Mode: |
|
||||
|
|
|
|
|
|
|
|
|
|
|
|
|
|
|
|
Seasoning ingredients |
|
Ingredients |
• 2 Strip Steaks, 2.5 cm |
|
• Sea Salt |
|
|
|
• Cracked Black Pepper |
|
|||
|
thick |
|
|
||
|
|
|
• Avocado Oil (or another high smoke |
|
|
|
|
|
|
|
|
|
|
|
|
point oil) |
|
|
|
|
|
|
|
COOKING INSTRUCTIONS |
|
|
|||
|
|
|
|
||
Step 1: |
1. |
Season the steaks with sea salt, cracked pepper and any armatics such |
|
||
|
as rosemary. |
|
|
||
Preparing |
2. |
Vacuum-seal the steak or place it into a heavy-duty Ziploc bag. In this |
|
||
your food |
|
case, fill the cooking pot with water and submerge the bag half way into |
|
||
|
|
the water to squeeze out all the air before sealing it. |
|
||
|
|
|
|
||
Step 2: |
3. |
Fill in the cooking pot with water until marking level 5. Place the sealed |
|
||
|
pouch inside the cooking pot: Then closed the lid. |
|
|||
Setting the |
4. |
Select “Sous-vide” menu and set the temperature to 60°C ( 60°C = |
|
||
multicooker |
|
Medium, 66°C= Medium-well, 71°C= well done) and the time to 2hours |
|
||
|
|
20. |
|
|
|
|
|
|
|
||
|
5. |
When ready the multicooker will bip. |
|
||
|
6. |
Pour out the water from the cooking pot and wipe dry. |
|
||
Step 3: |
7. |
Add some oil into the cooking pot and select the ” Crust/Fry” function |
|
||
|
for 10 minutes. Press “start”. |
|
|
||
Finalizing |
|
|
|
||
8. |
When the cooking pot is ready, sear the steak for15-20 seconds on each |
|
|||
your sous- |
|
||||
|
side. Sear one steak at a time. Add butter and any aromatics to the |
|
|||
vide dish |
|
|
|||
|
cooking pot. |
|
|
||
|
|
|
|
||
|
9. |
Serve with a side dish. Before serving, you can top the steak with the |
|
||
|
|
leftover juices and butter from the cooking pot. |
|
||
|
|
|
|
|
|
25

3. Cooking and heating state
Only « keep warm/cancel » or « start/stop » keys are available, other functions are invalid.
4. Keeping warm state
•When the holding time countdown 0, the “beep” sounds, enter keeping warm state (except for « Dough », « Cottage cheese », « Under vacuum », « Browning » and « DIY » functions), the digital screen indicates “b” and the indicator lights above the keep warm key function.
After 24 consecutive hours, this function will be cancelled automatically and it returns to the standby mode.
•If pressing « Keep warm/Cancel » key at standby mode, it enters keep warm function, the digital screen indicates “b” and the indicator lights.
3.Time setting
1.When choosing a function, before the machine has started cooking, you can change the cooking time: press « Temperature/Timer » key once, then press  or
or  to adjust. - fig. 14.
Please see table 1 to know the range and if the time increases/decreases in 1 minute increments or more.
2.When setting the timing, the corresponding timing indicator lights.
4.Temperature adjustment
In the choice of DIY chef, Porridge, Jam, Dessert / Cake, Bake and Browning function, you can press once the « Temperature/Timer » key then press  and
and  keys to adjust the set temperature value.
5.Delayed start setting
1.When choosing a function, before the appliance has started cooking, you can long press Delayed start function key to set a delayed time and through press the 
 keys to adjust the time as long as the delayed start is on, the corresponding indicator light is on, when it starts cooking, then the delayed start indicator light switch off. - fig. 16.
2.The delay setting range is 2-24 hours, time change in the unit of 10 minutes. When ready click on start.
3.Delayed start is not available for « Yogurt », « Dough », « Cottage cheese », « Pasta / Boiling » and « DIY » functions (except if reusing existing modes with compatible delayed start : referred time table).
4.The delayed start includes the cooking time.
6.Start/ Stop for different phases
A short press will start the selected cooking mode when all the desired parameters have been entered. When the applicance enters into a cooking preheat, the digital screen display « 


 » (except for Bake, Dessert / Cake, Browning, and DIY functions, for which the counting down will start immediately after pressing start button.).
When the temperature for cooking is reached, the appliance switches automatically to cooking phase, and the time previously set starts counting down.
During the cooking mode, another short press allows to stop the cooking then the product
26

come back to the standby mode.We have 1 short beep sound associated with the Start and 1 |
EN |
long beep sound associated with the Stop. |
1.It is also possible to stop the cooking with a short press on cancel button.
2.If the product is in stand by mode, a long press on the Start/Stop key will shut down completely the product , lights and screen will cut out.
If the product is shut off a short press will switch on the product then the product is in stand by mode.
7.Reheat function
1.You can activate the reheat function by a long press on the « Keep warm / Reheat functions » key.
2.You can adjust the reheat time with  and
and  then press Start .
3.The corresponding indicator will light, and the screen will display the countdown time until it is finished.
Note : the reheating time needs to be adjusted in function of the type of food (e.g. the time to reheat chili or similar compact food needs to be increased).
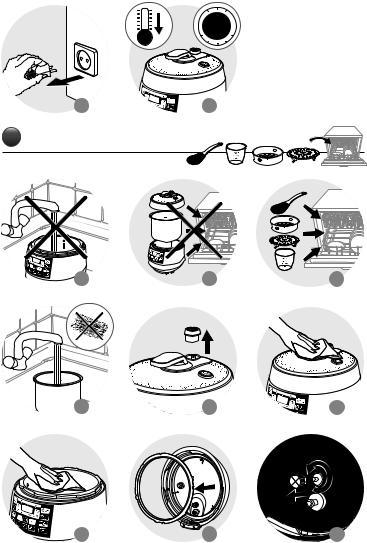
CLEANING AND MAINTENANCE
•It is recommended to clean your appliance after each use. Before cleaning let your appliance cool down for at least 2 hours. - fig. 22
•Do not immerse the appliance in water or pour water into it, do not put the appliance, cooking pot or lid into the dishwasher. - fig. 24
•You can wash the accessories in the dishwasher. - fig. 25
•Rinse the pot and dry it off thoroughly. Do not use a scourer as this can damage the non stick coating in the pot. - fig. 26
•Remove the pressure limit valve to clean it and rinse it under water. - fig. 27
•Clean the housing with a damp cloth. - fig. 28
•Rinse the inside of the lid including the sealing gasket. To clean the gasket separate it from the lid. To do this, take a hold of the knob on the lid and pull the sealing gasket upwards. Once clean, place back in their original position. - fig 30
•Remove the condensation collector and clean it thoroughly under water. Place it back in its original position.
•The float valve should be dismantled by removing the small silicone gasket, then turn the lid to get the float valve. - fig 32
•The duct cover can be unscrewed to be cleaned, and the duct should be checked regularly to prevent blockage. - fig. 31
•Press on the internal part of the safety valve spring to check that it is not clogged. - fig. 33
•Once everything is cleaned and perfecly dried, place at their original position.
•Always use the cooking pot provided.
•Do not pour water or food directly into the appliance. If you inadvertently immerse your appliance in water or spill water directly on the heating element (when the pot is not in place), take it to your service centre for repair.
•Change the sealing gasket every 2 years.
27

TROUBLESHOOTING AND REPAIR
|
Problem |
|
Possible reasons |
|
Solutions |
|
|
Unable to open lid. |
|
Unable to open because of |
|
a.Wait for the pressure in |
|
|
|
|
|
|||
|
|
|
pressure in the cooking pot. |
|
the pot to be completely |
|
|
|
|
|
|
released. |
|
|
|
|
|
|
b. Press and hold the |
|
|
|
|
|
|
pressure release button. |
|
|
|
|
|
|
|
|
|
|
|
Pressure in the pot is fully |
|
a. Once the product is cold, |
|
|
|
|
released but the float valve |
|
please use a stick to poke |
|
|
|
|
is stuck because it is too |
|
the float valve, to make it |
|
|
|
|
dirty, and therefore unable |
|
fall down. |
|
|
|
|
to fall. |
|
b. For next use, please clean |
|
|
|
|
|
|
and wipe the float valve |
|
|
|
|
|
|
- fig. 32. |
|
|
|
|
|
|
|
|
|
Unable to close lid. |
|
Sealing gasket is not |
|
Install the sealing gasket |
|
|
|
|
properly installed. |
|
properly. |
|
|
|
|
|
|
|
|
|
|
|
The float valve is stuck |
|
a. Once the product is cold, |
|
|
|
|
because it is too dirty, and |
|
Please use a stick to poke |
|
|
|
|
therefore unable to fall. |
|
the float valve, to make it |
|
|
|
|
|
|
fall down. |
|
|
|
|
|
|
b. For next use, please clean |
|
|
|
|
|
|
and wipe the float valve |
|
|
|
|
|
|
- 32. |
|
|
|
|
|
|
|
|
|
|
|
Direction at which lid was |
|
Close lid in the correct |
|
|
|
|
closed is incorrect. |
|
direction according to the |
|
|
|
|
|
|
instruction manual. |
|
|
|
|
|
|
|
|
|
Intense release of pressure |
|
Faulty pressure control |
|
Send to repair and |
|
|
from pressure limit valve. |
|
resulted in release of |
|
maintenance department. |
|
|
|
|
pressure. |
|
|
|
|
|
|
|
|
|
|
|
|
|
Pressure limit valve did not |
|
Carefully rotate/press the |
|
|
|
|
fall into place. |
|
pressure limit valve to make |
|
|
|
|
|
|
it fall into place. |
|
|
|
|
|
|
|
|
28

Problem |
Possible reasons |
Solutions |
EN |
Food is uncooked. |
Rice: water ratio is incorrect. |
Use the required rice: water |
|
|
|
ratio. cf * Rice/Pilaf |
|
|
|
|
|
|
No electricity from the |
Check the electric circuit. |
|
|
power grid. |
|
|
|
|
|
|
“E0” displayed on digital |
Pressure switch is faulty. |
Send to repair and |
|
screen. |
|
maintenance department. |
|
|
|
|
|
“E1” displayed on digital |
Temperature sensor |
Send to repair and |
|
screen. |
components in short circuit |
maintenance department. |
|
|
or open circuit. |
|
|
|
|
|
|
“E2” displayed on digital |
The lid is not in the position |
Please refer to the cooking |
|
screen. |
defined for the selected |
table to check the right |
|
|
cooking mode. |
position of the lid for the |
|
|
|
program you have selected. |
|
|
|
|
|
Steam leakage from lid. |
The sealing gasket was not |
Install the sealing gasket |
|
|
properly installed. |
properly. |
|
|
|
|
|
29

MOULINEX INTERNATIONAL LIMITED GUARANTEE
 : www.moulinex.com
This product is repairable by MOULINEX, during and after the guarantee period.
Accessories, consumables and end-user replaceable parts can be purchased, if locally available, as described on the MOULINEX internet site www.moulinex.com
The Guarantee*
MOULINEX guarantees this product against any manufacturing defect in materials or workmanship during the guarantee period within those countries*** as stated in the attached country list, starting from the initial date of purchase or delivery date.
The international manufacturer’s guarantee covers all costs related to restoring the proven defective product so that it conforms to its original specifications, through the repair or replacement of any defective part and the necessary labor. At MOULINEX’s choice, an equivalent or superior replacement product may be provided instead of repairing a defective product. MOULINEX’s sole obligation and your exclusive resolution under this guarantee are limited to such repair or replacement.
Conditions & Exclusions
MOULINEX shall not be obliged to repair or replace any product which is not accompanied by a valid proof of purchase. The product can be taken directly in person or must be adequately packaged and returned, by recorded delivery (or equivalent method of postage), to a MOULINEX authorised service centre. Full address details for each country’s authorised service centres are listed on MOULINEX website (www.moulinex.com) or by calling the appropriate consumer Service centre set out in the attached country list. In order to offer the best possible after-sales service and constantly improve customer satisfaction, MOULINEX may send a satisfaction survey to all customers who have had their product repaired or exchanged in a MOULINEX authorised service centre.
This guarantee applies only for products purchased and used for domestic purposes and will not cover any damage which occurs as a result of misuse, negligence, failure to follow MOULINEX instructions, or a modification or unauthorised repair of the product, faulty packaging by the owner or mishandling by any carrier. It also does not cover normal wear and tear, maintenance or replacement of consumable parts, or the following:
––using the wrong type of water or consumable
––damages or poor results specifically due to wrong voltage or frequency as stamped on the product ID or specification
––scaling (any de-scaling must be carried out according to the instructions for use)
––accidents including fire, flood, etc
––mechanical damages, overloading
––ingress of water, dust or insects into the product (excluding appliances with features specifically designed for insects)
––damage to any glass or porcelain ware in the product
––professional or commercial use
––damage as a result of lightning or power surges
Consumer Statutory Rights:
This international MOULINEX guarantee does not affect the Statutory Rights a consumer may have or those rights that cannot be excluded or limited, nor rights against the retailer from which the consumer purchased the product. This guarantee gives a consumer specific legal rights, and the consumer may also have other legal rights which vary from State to State or Country to Country. The consumer may assert any such rights at his sole discretion.
***Where a product purchased in one listed country and then used in another listed country, the international MOULINEX guarantee duration is the period for the country of usage, even if the product was purchased in a listed country with a longer guarantee duration. The repair process may require a longer time if the product is not locally sold by MOULINEX in the country of usage. If the product is not repairable in the new country of usage, the international MOULINEX guarantee is limited to a replacement by a similar or alternative product at similar cost, where possible.
Please keep this document for your reference should you wish to make a claim under the guarantee.
*For Australia only:
Our goods come with guarantees that cannot be excluded under the Australian Consumer Law. You are entitled to a replacement or refund for a major failure and compensation for any other reasonably foreseeable loss or damage. You are also entitled to have the goods repaired or replaced if the goods fail to be of acceptable quality and the failure does not amount to a major failure.
30
 Loading...