Motorola XT821, XT811, XT801, XT831, XT822 User Manual
...
User’s Guide
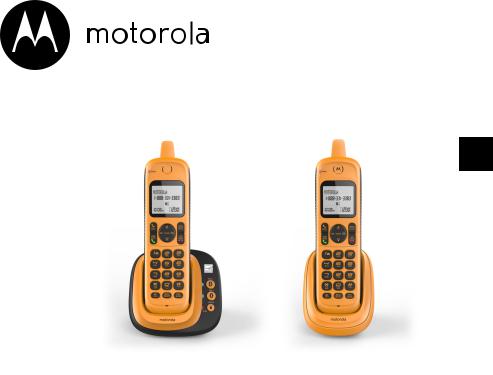
Connect to Cell™ Rugged Waterproof Digital Cordless Phone
Models: XT801 / XT802 / XT811 / XT821 / XT822 / XT831
BC

Welcome...
to your new Motorola Phone!
Please retain your original dated sales receipt for your records. For warranty service of your Motorola product, you will need to provide a copy of your dated sales receipt to confirm warranty status. Registration is not required for warranty coverage.
For product-related questions, please call or visit us online:
US and Canada 1-888-331-3383
Email:
support@motorolahome.com
This User’s Guide provides you with all the information you need to get the most from your phone.
Before you make your first call you will need to set up your phone. Follow the simple instructions in ‘Getting Started’, on the next few pages.
IMPORTANT
Only use the adapter and telephone line cord provided in the box.
This equipment is not designed to make
emergency telephone calls during power failures.
Alternative arrangements should be made for access to emergency services.
1

Got everything?
•1000 name and number directory.
•Caller ID shows you who is calling and includes details of the last 50 callers in the caller ID log.**
•Make internal calls, transfer external calls, hold 3-way conversation between two internal callers and an external caller.
•Waterproof handset with
IP67 rating.
** You must subscribe to your network provider’s Caller ID or Call Waiting service for these features to work.
Got everything?
•Waterproof handset (with Ni-MH rechargeable battery pack pre-installed)
•Base
•HandsetActivation Nail Pin
•Power Adapter
•Charger
•Telephone Line Cord
•Wall-mount Bracket
•Quick Start Guide
In multi-handset packs, you will find one or more additional handsets, and chargers with power adapter units.
EN US
2

Getting started
Getting started
Connecting the base Connecting the charger Mounting the base
Activating and charging the handset
Replacing the battery
Setting the display language
Setting the date and time
Getting started
Warning
Do not place your phone in the bathroom or other humid areas.
Location
When choosing a location for your new phone, here are some important guidelines you should consider:
•Avoid sources of noise and heat, such as motors,
fluorescent lighting, microwave ovens, heating appliances and direct sunlight.
•Avoid areas of low temperature.
•Avoid other cordless telephones or personal computers.
•Never install telephone wiring during a lightning storm.
•Never install telephone jacks in wet locations unless the jack is specifically designed for wet locations.
•Never touch non-insulated telephone wires or terminals, unless the telephone line has been disconnected at the network interface.
•Use caution when installing or modifying telephone lines.
3

Getting started
Handset range
Optimal range is reached when there are no other electrical appliances working within the range area. Any obstruction between the base and handset will also reduce the range significantly.
Signal strength
When out of range of the corded base, the screen shows
Out of range or no pwr at base. If you are on a call, the line will hang up. Move back within range. The cordless handset will automatically reconnect to the corded base.
Setting up
Important
The base must be plugged into an electrical outlet at all times.
Do not connect the telephone line cord to the telephone wall jack until the handset is fully charged. Only use the adapter and telephone line cord supplied with the product.
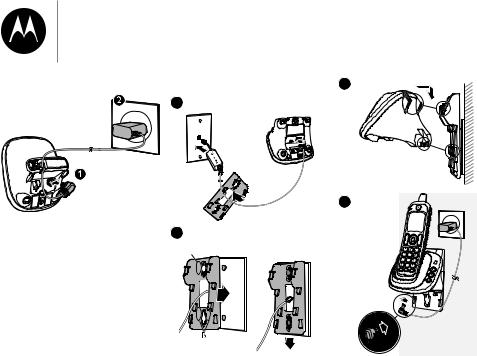
Connecting the base
Notes
•In multi-handset packs, the power adapterwith the smaller pin is for the charger.
•If you have DSL high-speed internet service, a DSL filter (not included) is required. Contact your DSL service provider for more information.
•Use only the provided power adapter.
•Steps 3 and 4 should only be done once the handset is fully charged.
EN US
4
Getting started
Connecting the charger
Note
•Make sure the power outlet is not controlled by a wall switch.
Mounting the base |
3 |
1 |
|
4
2
A
5
Getting started
Activat ng and charging the handset
Notes
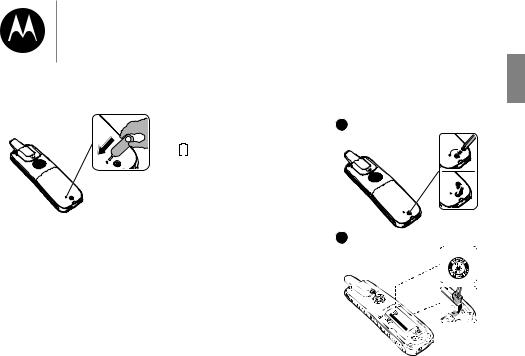
•The phone battery is pre-installed.
•Make sure the handset is activated before charging.
1.Take the nail pin from the wrapper. Insert it into the hole on the back of the handset and press the button inside. Once activated, the LCD screen will be turned on.
2.Remove the wrapper and keep the nail pin for future use.
3.Put the handset on the base to charge for at least 12 hours.
Once charged, the battery icon
 on the the handset LCD will indicate fully charged.
Replacing the battery
With average use, your phone's battery should last approximately one year. To order a replacement battery pack, visit our website at www.motorolastore.com or call
1-888-331-3383.
Important
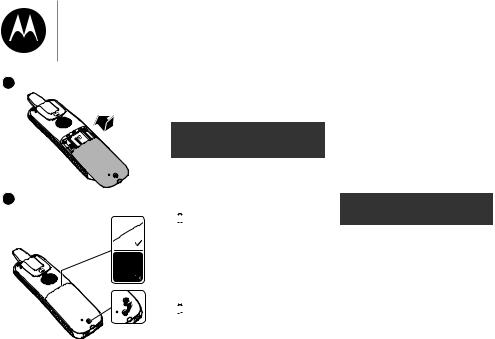
Use only the supplied rechargeable battery or replacement battery (model BT162342 / BT262342).
Note
•Use a T6 Torx screwdriver to unscrew the battery door.
1
2
EN US
6
3
4
Getting started
The handset LCD display indicates the battery status (see the table below).
|
|
|
|
Battery |
|
Battery status and |
|
|
|
indicators |
|
action |
|
|
|
|
|
|
|
|
|
|
The screen |
|
The battery has |
||
|
|
is blank, or |
|
no charge or |
||
|
|
shows Put in |
|
very little charge. |
||
|
|
charger and |
|
The handset |
||
|
|
|
|
flashes. |
|
cannot be used. |
|
|
|
|
|||
|
|
|
|
|
|
Charge without |
|
|
|
|
|
|
interruption (at |
|
|
|
|
|
|
least 30 minutes). |
|
|
|
|
|
|
|
|
|
The screen |
|
The battery has |
||
|
|
shows Low |
|
enough charge |
||
|
|
battery and |
|
to be used for |
||
|
|
|
|
flashes. |
|
a short time. |
|
|
|
|
|
||
|
|
|
|
|
|
Charge without |
|
|
|
|
|
|
interruption (at |
|
|
|
|
|
|
least 30 minutes). |
|
|
|
|
|
|
|
The screen |
The battery is |
shows |
charged, place it in |
HANDSET X. |
the telephone base |
|
or charger when |
|
not in use. |
|
|
When it is fully charged, you can expect the following performance:
Operation |
Operating |
|
time |
|
|
While handset in |
Seven hours |
use (talking*) |
|
|
|
While handset |
Three and a |
in speakerphone |
half hours |
mode (talking*) |
|
|
|
While handset |
Five days |
not in use |
|
(standby**) |
|
|
|
7

Getting started
*Operating times vary depending on your actual use and the age of the battery.
**Handset/headset is not charging or in use.
Setting the display language
The LCD language is preset to English. You can select English, French, or Spanish to be used in all screen displays.
1.Press MENU.
2.Press CID/ or
or  /
/ to choose
Settings, press SELECT.
3.Press CID/ or
or  /
/ to choose
LCD Language, press SELECT.
4.Press CID/ or
or /
/ to choose the desired language, press
SELECT to save the settings.
Note
•If you accidentally changed the LCD language to French or Spanish, you can reset it to the English easily by pressing MENU and then entering *364#.
Settingthedateandtime
Note
•If you’re a subscriber to your network’s Caller ID service, the date and time are automatically set when a call is received.
1.Press MENU.
2.Press CID/ or
or /
/ to choose
Set date/time, press SELECT.
3.Use the dialing keys (0-9) or press CID/ or
or /
/ to edit the year and the date. Then press SELECT.
4.Use the dialing keys (0-9) or press CID/ or
or /
/ to edit the time in 12 HR format. Press
CID/ or
or /
/ to toggle AM/PM settings.
5.Press SELECT to save the settings.
Your phone is now ready for use.
EN US
8
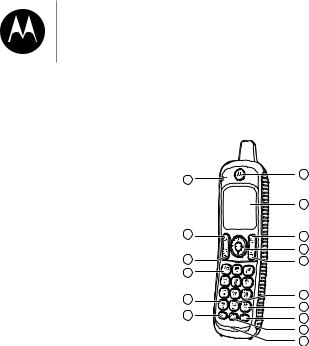
Getting to know your phone
Getting to knowyour phone
Overview ofyour handset
Cordless handset LCD display
Overview of the base Overview of the charger
Bluetooth
Getting to knowyour phone
Overview ofyour handset
11 |
1 |
|
|
|
2 |
12 |
3 |
|
4 |
13 |
5 |
14
15 |
6 |
|
7 |
||
16 |
||
8 |
||
|
||
|
9 |
|
|
10 |
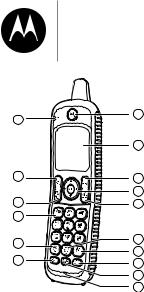
Get acquainted with the following buttons on your handset, and their multi-function tasks.
1.Receiver
2.LCD display
3.MENU/SELECT
•Show the menu.
•While in a menu, press to select an item, or save an entry or setting.
4. /
/
•Review the directory when the handset is not in use.
•Increase the listening volume during a call.
9

Getting to know your phone
•Scroll up while in a menu, or in the directory, caller ID log, or redial list.
•Move the cursor to the right when entering numbers or names.
CID/
•Review the caller ID log when the handset is not in use.
•Decrease the listening volume during a call.
•Scroll down while in a menu, or in the directory, caller ID log, or redial list.
•Move the cursor to the left when entering numbers or names.
INT
•Press to start an intercom conversation or transfer a call (for multi-handset models only).
REDIAL/PAUSE
•Press repeatedly to review the redial list.
•Press and hold to insert a dialing pause while entering a number.
5.OFF/CANCEL
•Hang up a call.
•Silence the ringer temporarily while the handset is ringing.
•Press and hold to erase the missed call indicator while the phone is not in use.
•Press to return to the previous menu; or
press and hold to return to idle mode, without making changes.
6.0 

•Press to add a space when entering names.
7.#QUIET
•Press and hold to set Quiet mode when idle.
•Press repeatedly to show other dialing options when reviewing a caller ID log entry.
8.CALL BLOCK
•Press to show the call block menu when the handset is not in use.
EN US
10
11
12
13
14
15
16
Getting to know your phone
1
2
3
4
5
6
7
8
9
10
9.MUTE/DELETE
•Mute the microphone during a call.
•Silence the ringer temporarily while the handset is ringing.
•Delete digits or characters while using the dialing keys.
•Delete the displayed entry while reviewing the directory, caller ID log, call block list or redial list.
10.Microphone
11.CHARGE light
•On when the handset is charging.
12. CELL
CELL
•Make or answer a cell call.
•Answer an incoming cell call when you hear a call waiting alert.
13.HOME/FLASH
•Make or answer a home call.
•Answer an incoming home call when you hear a call waiting alert.
14.

•Press repeatedly to add 1 in front of the caller ID log
entry before dialing or saving it to the directory.
•Press and hold to set or dial your voicemail number.
15.


•While you have set the dial mode to pulse and on a call, press to switch to tone dialing temporarily.
11
Getting to know your phone
•Press to toggle between upper and lower case of the next letters to be input.
16.
 SPEAKER
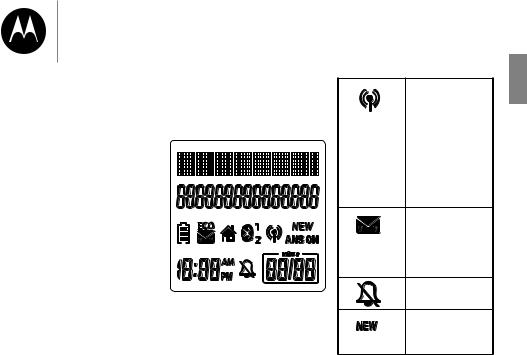
Cordless handset LCD display
Display icons
•Make or answer a call using the handset speakerphone.
•During a call, press to switch between the speakerphone and the handset.
•Lights on when the handset speakerphone is in use.
On when the cell line is in use or there is an incoming cell call.
Flashes when there is an incoming cell waiting call.
There are new voicemail received from
your telephone service provider
The handset ringer is off.
There are new caller ID log entries.
EN US
12
Getting to know your phone
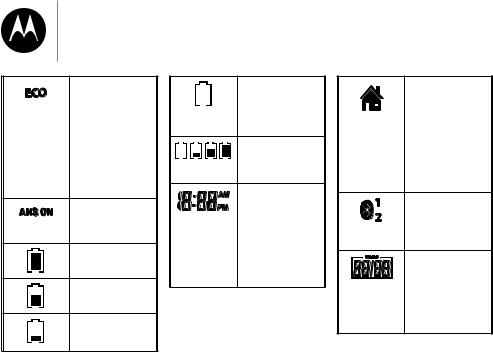
The ECO mode activates automatically to reduce power consumption when the
handset is within range from the telephone base.
The answering system is turned on.
Full battery power level.
2/3 battery power level.
1/3 battery power level.
Flashes when the battery is low and needs charging.
Animation in cycle. Battery is charging.
In idle mode, the current time is displayed.
In Caller ID mode, the time of the call is displayed.
Flashes when there is a call waiting.
On when the home line is in use or there is an incoming home call.
There are Bluetooth devices connected on the cell devices list.
The message number currently playing and total number of new/ old messages recorded.
13
Getting to know your phone
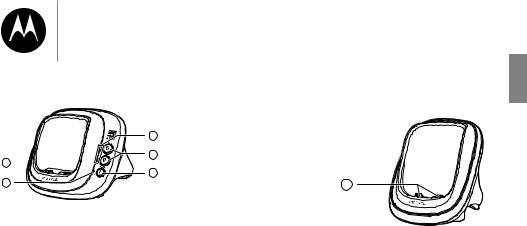
Overview of the base
4 
5
2.  CELL 1 and
  CELL 2
• Press to connect to the paired cell Bluetooth device.
1 • Press and hold to add or replace a Bluetooth device.
2
33. FIND HS 
•Press to page all system handsets.
1. CELL 1 and
 CELL 2 lights
•On when the telephone base is paired and connected with a Bluetooth device.
•Flashes when the telephone base is in a discoverable mode.
4.Charging cradle
5.IN USE light
•On when the handset is in use, or the answering system is answering a call.
•Flashes when there is an incoming call, or another telephone sharing the same line is in use.
Overview of the charger
1
1. Charging cradle
EN US
14

Getting to know your phone
Bluetooth
Your XT801/XT802/XT811/
XT821/XT822/XT831/XT8 phone system with Bluetooth wireless technology has the following features:
•Pair and connect up to a maximum of two cell phones with the telephone base to make and receive cell calls.
Only one cell phone can be active on a call at a time.
•Make and receive calls using your cell phone plan while utilizing the ease and comfort of your home telephone system.
•Receive directory entries from your cell phone.
IMPORTANT
INFORMATION
•Refer to the user's manual of your Bluetooth enabled cell phone for more information about how that device uses
Bluetooth connectivity.
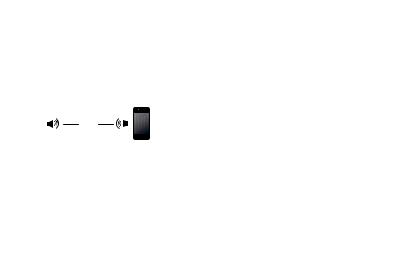
•Bluetooth wireless technology operates within a short range
(a maximum of approximately 15 feet) from the telephone base. Keep connected cell phones within this range. For optimal performance, place your cell phone next to the telephone base while using the XT801/XT802/XT811/
XT821/XT822/XT831/XT8 cell line.
Maximum of approximately 15 feet
XT801/XT802/ |
|
Cellular |
|
||
XT811/XT821/ |
|
signal |
XT822/XT831/ |
|
|
XT8 |
|
|
The Bluetooth® word mark and logos are owned by Bluetooth SIG, Inc. and any use of such marks by Motorola Mobility Holdings Limited is under license. Motorola Mobility Holdings
Limited is a member of Bluetooth SIG, Inc. Other trademarks and trade names are those of their respective owners.
15

Getting to know your phone
•If your cell phone has poor reception in your home, the
XT801/XT802/XT811/
XT821/XT822/XT831/XT8 cannot improve the reception. However, if there is a location in your house with better reception, you can leave your cell phone at that location while using the XT801/
XT802/XT811/XT821/ XT822/XT831/XT8 cell line.
•If you experience poor sound quality, place your cell phone closer to the XT801/XT802/
XT811/XT821/XT822/ XT831/XT8 to ensure strong Bluetooth signal strength.
Make sure there are no physical obstacles between the XT801/XT802/XT811/
XT821/XT822/XT831/XT8 and the cell phone, such as large furniture or thick walls.
•Charge your cell phone while it is connected to the telephone base. Your cell phone's battery will discharge faster while it is connected to the telephone base via Bluetooth wireless technology.
•Monitor your cell phone's usage because minutes are deducted from your cellular plan for the duration of all cell calls.
Refer to Bluetooth setup to learn how to set up and manage your Bluetooth enabled devices.
Refer to Telephone operation on how to operate your Bluetooth devices with your new XT801/
XT802/XT811/XT821/ XT822/XT831/XT8 telephone system with Bluetooth wireless technology. Refer to Help if you experience difficulty using the telephone system.
Bluetooth Setup
Note
•Make sure your cell phone has a good cell reception near the telephone base.
To use a Bluetooth enabled cell phone with your XT801/XT802/
XT811/XT821/XT822/XT831/ XT8, you must first pair and
connect it with the telephone base. All XT801/XT802/XT811/
XT821/XT822/XT831/XT8 handsets can be used to make or answer on the cell phone line.
Bluetooth wireless technology operates within a short range (15 feet). When you pair a Bluetooth cell phone to the telephone base, move closer to the telephone base to maintain sufficient signal strength.
EN US
16
Getting to know your phone
Notes
•For optimal performance, place your cell phone next to the telephone base while using the cell line.
•To avoid interference from other electronic devices, place your telephone base far away from devices such as baby monitors, wireless routers, microwaves, and computers.
Add a Bluetooth enabled cell phone
To pair and connect a cell phone:
1.Choose a slot to pair the cell phone. Press and hold
CELL 1 and/or CELL 2 on
the telephone base for about four seconds until the
 CELL 1 and/or
  CELL 2 light flashes.
•If there is already a cell phone in the slot, the existing cell phone will be erased from the cell devices list.
2.Turn on the Bluetooth feature of your cell phone. Once your cell phone finds your phone
(Motorola XT801/XT802/
XT811/XT821/XT822/ XT831/XT8), press the appropriate key on your cell phone to continue the pairing process.
•Your cell phone may prompt you to enter the PIN of the telephone base. The default PIN of the telephone base is 0000.
•All cell phones that are connected to the telephone base are disconnected temporarily until the pairing process is complete.
When the cell phone is successfully paired and connected to the telephone base, the corresponding status
icon ( 1 or 2) displays. The
corresponding device light
( CELL 1 and/or
  CELL 2) turns on.
17
Getting to know your phone
The pairing process may take up to one minute. If the pairing process fails, turn off the Bluetooth feature
on your cell phone and on the
XT801/XT802/XT811/XT821/ XT822/XT831/XT8 by pressing
CELL 1 / CELL 2. Then repeat the steps above to pair and connect again. In some cases, it may take you a few attempts to complete the pairing process.
The steps for the pairing process may vary for different cell phones. If this happens,
follow the prompts on your cell phone and your XT801/XT802/
XT811/XT821/XT822/XT831/ XT8 to complete the pairing
process.
Add a Bluetooth enabled headset
To pair and connect a headset:
1.Press MENU on the phone when it is not in use.
2.Press CID/ or
or /
/ to choose Bluetooth, and then press
SELECT.
3.Press CID/ or
or /
/ to choose Add BT headset, and then press SELECT. The screen displays
Search headset....
•If there is already a cell device in the slot, the existing cell phone will be erased from the cell devices list.
4.Set your headset to discoverable mode (refer to the user’s manual of your headset on the Bluetooth feature of your headset). Once your handset finds your headset, press SELECT.
•Enter the PIN of your headset if required. The PIN for most Bluetooth devices is 0000 (refer to the user’s manual ofyour headset), then press SELECT.
5.When the headset is successfully paired and connected to the telephone
base, the 2 icon displays. The CELL 2 device light turns
on.
EN US
18
Getting to know your phone
The pairing process may take up to one minute. If the pairing process fails, turn off the Bluetooth feature
on your headset and on the
XT801/XT802/XT811/XT821/ XT822/XT831/XT8 by pressing
CELL 2. Then repeat the steps above to pair and connect again. In some cases, it may take you a few attempts to complete the pairing process.
When a connected headset is charging, it may disconnect from the telephone base and the
CELL 2 light on the telephone base turns off. For some headset models, you may need to turn on the headset and reconnect it to the telephone base again.
Auto connection
A cell device may be disconnected from the telephone base when:
•The Bluetooth feature of your connected cell device is turned off.
•The power of your cell device is turned off.
•Your cell device is not within range of the telephone base.
After the cell device is disconnected, wait for about 1 minute. Then, power on the cell device, turn on the Bluetooth feature, or move it within range of the base, the base will try to reconnect to the cell device. If you disconnect the cell device from the cell devices list,
the base will not attempt to reconnect unless your cell device is moved out of range and back in range again.
Note
• If your cell device does not reconnect to the base
automatically, follow the section below to connect it manually.
Connect a paired cell phone or headset
If you need to connect your paired cell phone or headset to the telephone base manually:
1. Press CELL 1 and/or CELL 2 on the telephone
base when it is not in use. The
CELL 1 and/or CELL 2 light flashes.
2.When the cell phone or headset is connected to the telephone base, you hear two beeps. The corresponding status icon ( 1 or 2) displays. The corresponding device light ( CELL 1 and/or CELL 2 ) turns on.
19
Getting to know your phone
Disconnect a paired cell phone or headset
To disconnect a paired cell phone or headset from the telephone base, refer to the user’s manuals of your cell phone or headset for instructions to disconnect a
Bluetooth device.
If you press and hold CELL 1 and/or CELL 2 on the
telephone base, the existing
paired cell phone in that slot will be erased. See Add a Bluetooth enabled cell phone and Add a Bluetooth enabled headset on
how to pair and connect a new cell phone or headset.
Reviewthe cell devices list
1.Press MENU on the handset when it is not in use.
2. |
Press CID/ |
or |
/ |
to choose |
|
Bluetooth, and then press |
|||
|
SELECT. |
|
|
|
3. |
Press CID/ |
or |
/ |
to choose |
Device list, and then press
SELECT.
Download directory contacts
You can download directory entries to your XT801/XT802/
XT811/XT821/XT822/XT831/ XT8 telephone system via
Bluetooth wireless technology. Each downloaded directory are stored in the handset directory with up to 24 digits for each phone number and 15 characters for each name.
Before downloading the directory, make sure the cell phone is paired and connected to the XT801/XT802/XT811/ XT821/XT822/XT831/XT8.
Make sure the handset battery is charged for at least 10 minutes.
Place your cell phone next to the telephone base while downloading.
To download contacts from your Bluetooth cell phone:
1.Press MENU on the handset when it is not in use.
2. |
Press CID/ or / |
to choose |
|
Bluetooth, and then press |
|
|
SELECT. |
|
3. |
Press CID/ or / |
to choose |
|
Download dir, and then press |
|
|
SELECT. The handset displays |
|
Select a device briefly.
EN US
20
 Loading...