

Page 1

CH-9101 Herisau/Switzerland
E-Mail info@metrohm.com
Internet www.metrohm.com
787 KF Titrino
Program version 5.787.0010
Instructions for Use
8.787.1003 03.2002 / pkl
Page 2

Page 3

Table of contens
Table of contents
1 Introduction ..........................................................................................................1
1.1 Instrument description...........................................................................................1
1.2 Controls and parts................................................................................................. 2
2
Manual operation..................................................................................................6
2.1 Keypad ..................................................................................................................6
2.2 Principle of data input............................................................................................ 7
2.3 Tutorial ................................................................................................................... 8
2.3.1 Entering data, setting the dialog language....................................................8
2.3.2 Titer determination .......................................................................................10
2.3.3 Karl Fischer titration .....................................................................................15
2.3.4 Drift...............................................................................................................16
2.4 Selection of the mode, key <MODE> ................................................................ 18
2.5 Configuration, key <CONFIG>...........................................................................19
2.6 Parameters, key <PARAM> ............................................................................... 22
2.6.1 Parameters for SET ...................................................................................... 22
2.8 Result calculations............................................................................................... 31
2.9 Drift display, key <DRIFT> ................................................................................. 36
2.10 Data output ...................................................................................................... 37
3
Error messages, Troubleshooting.....................................................................39
3.1 Error and special messages................................................................................ 39
3.2 What can you do if the data transfer does not work?.......................................... 41
3.3 Diagnosis............................................................................................................. 42
3.3.1 General......................................................................................................... 42
3.3.2 Procedure..................................................................................................... 42
3.3.3 Equipment required: ....................................................................................43
3.3.4 Diagnosis steps ...........................................................................................43
3.4 Initialise and test RAM ......................................................................................... 52
3.5 Releasing a locked spindle with inserted Exchange Unit.................................... 53
4
Preparations .......................................................................................................53
4.1 Setting up and connecting the instruments ........................................................53
4.1.1 Titrino with Titration Stand or Stirrer .............................................................53
4.1.2 Connection of a printer ................................................................................54
4.1.3 Connection of a balance..............................................................................55
4.1.4 Connection of a KF Oven............................................................................. 57
4.1.5 Connection of the 774 Oven Sample Processor.......................................... 57
4.1.6 Connection of a Sample Changer ...............................................................58
4.1.7 Connection of a recorder ............................................................................. 59
4.1.8 Connection of a computer ........................................................................... 60
4.2 Connection of electrodes, preparing titration vessel...........................................61
5
Appendix.............................................................................................................63
5.1 Technical specifications ......................................................................................63
5.2 Pin assignment of the "Remote" socket............................................................... 65
5.2.1 Lines of the "Remote" socket during the titration ......................................... 67
5.3 RS232 interface ...................................................................................................68
787 KF Titrino
Page 4

Table of contents
5.4 Validation / GLP................................................................................................... 69
5.5 Warranty and conformity ..................................................................................... 70
5.5.1 Warranty....................................................................................................... 70
5.5.2 EU Declaration of conformity....................................................................... 71
5.5.3 Certificate of Conformity and System Validation ......................................... 72
5.6 Scope of delivery and ordering designations ..................................................... 73
Index...........................................................................................................................77
787 KF Titrino
Page 5
1.1 Instrument description
1 Introduction
1.1 Instrument description
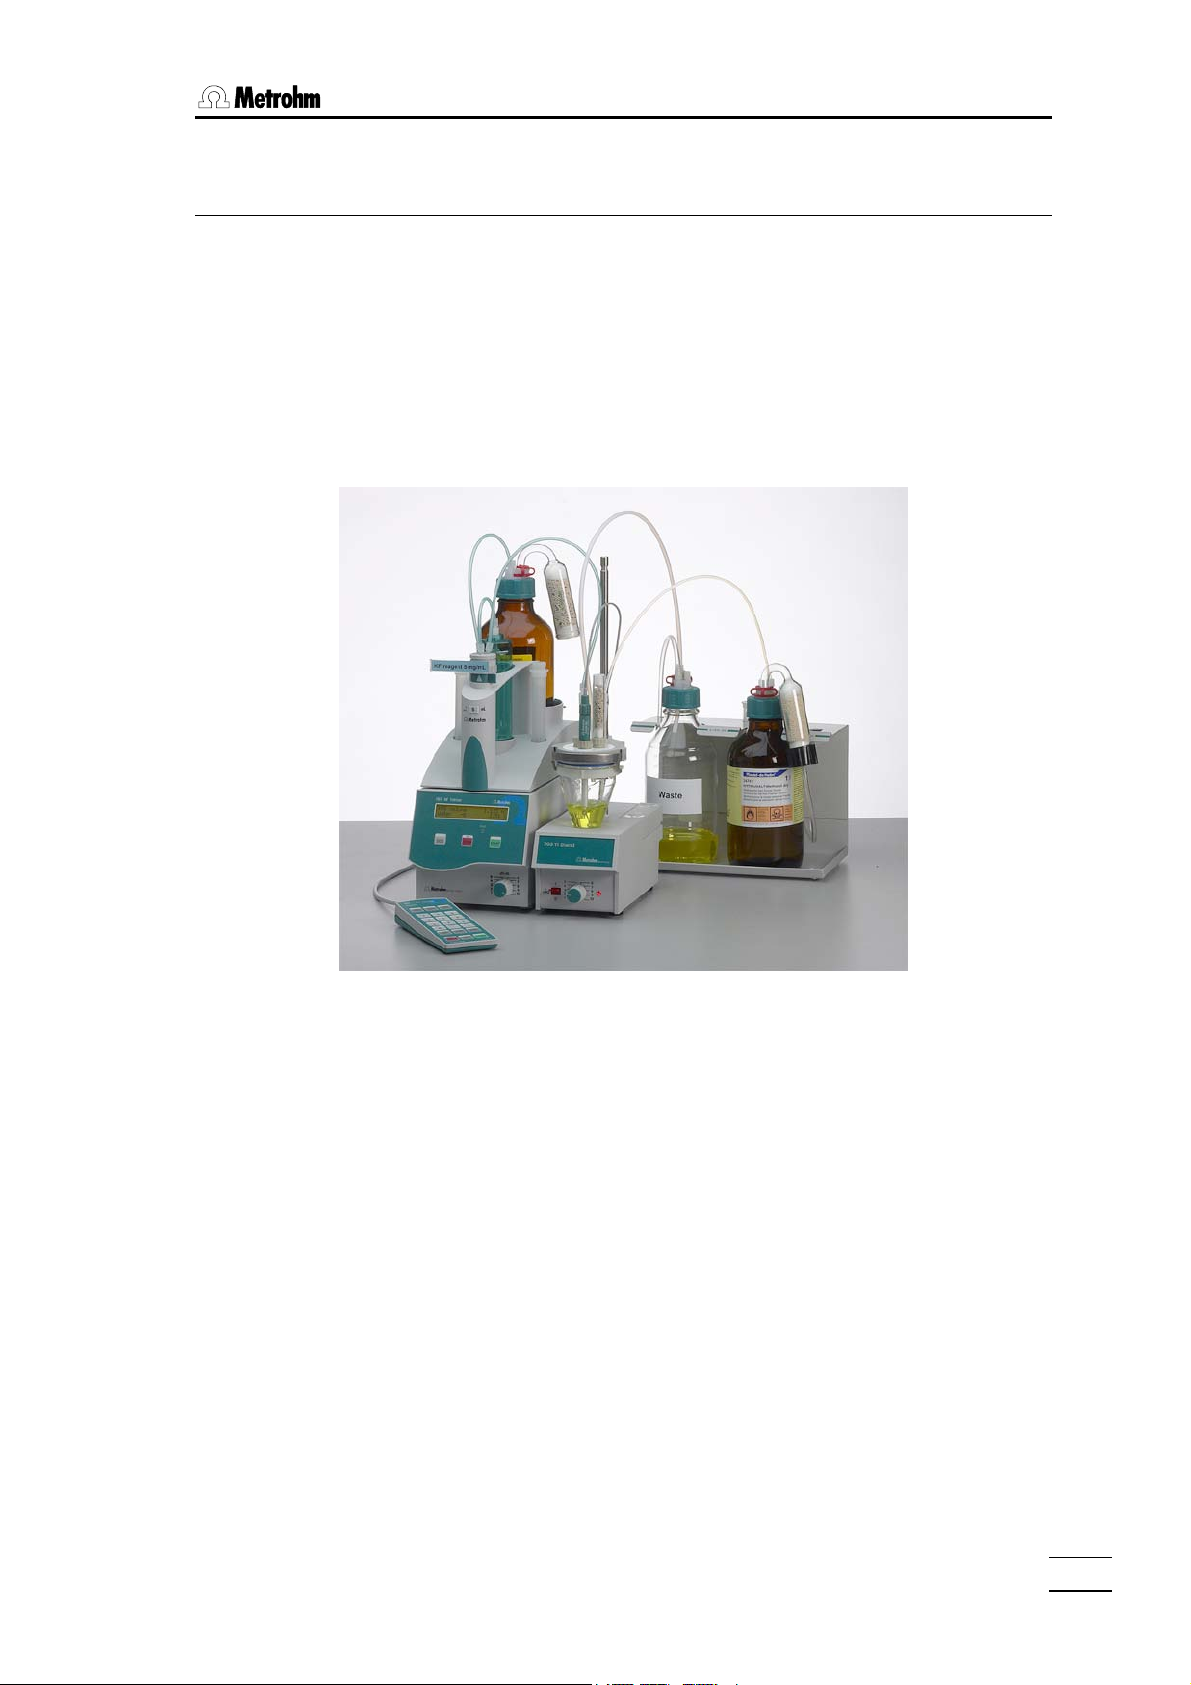
The 787 KF Titrino is a fast and precise titrator for the water determination according to
Karl Fischer.
With the Metrodata VESUV Software determination data can be saved on a PC.
787 KF Titrino
1
Page 6
1.2 Controls and parts
1.2 Controls and parts
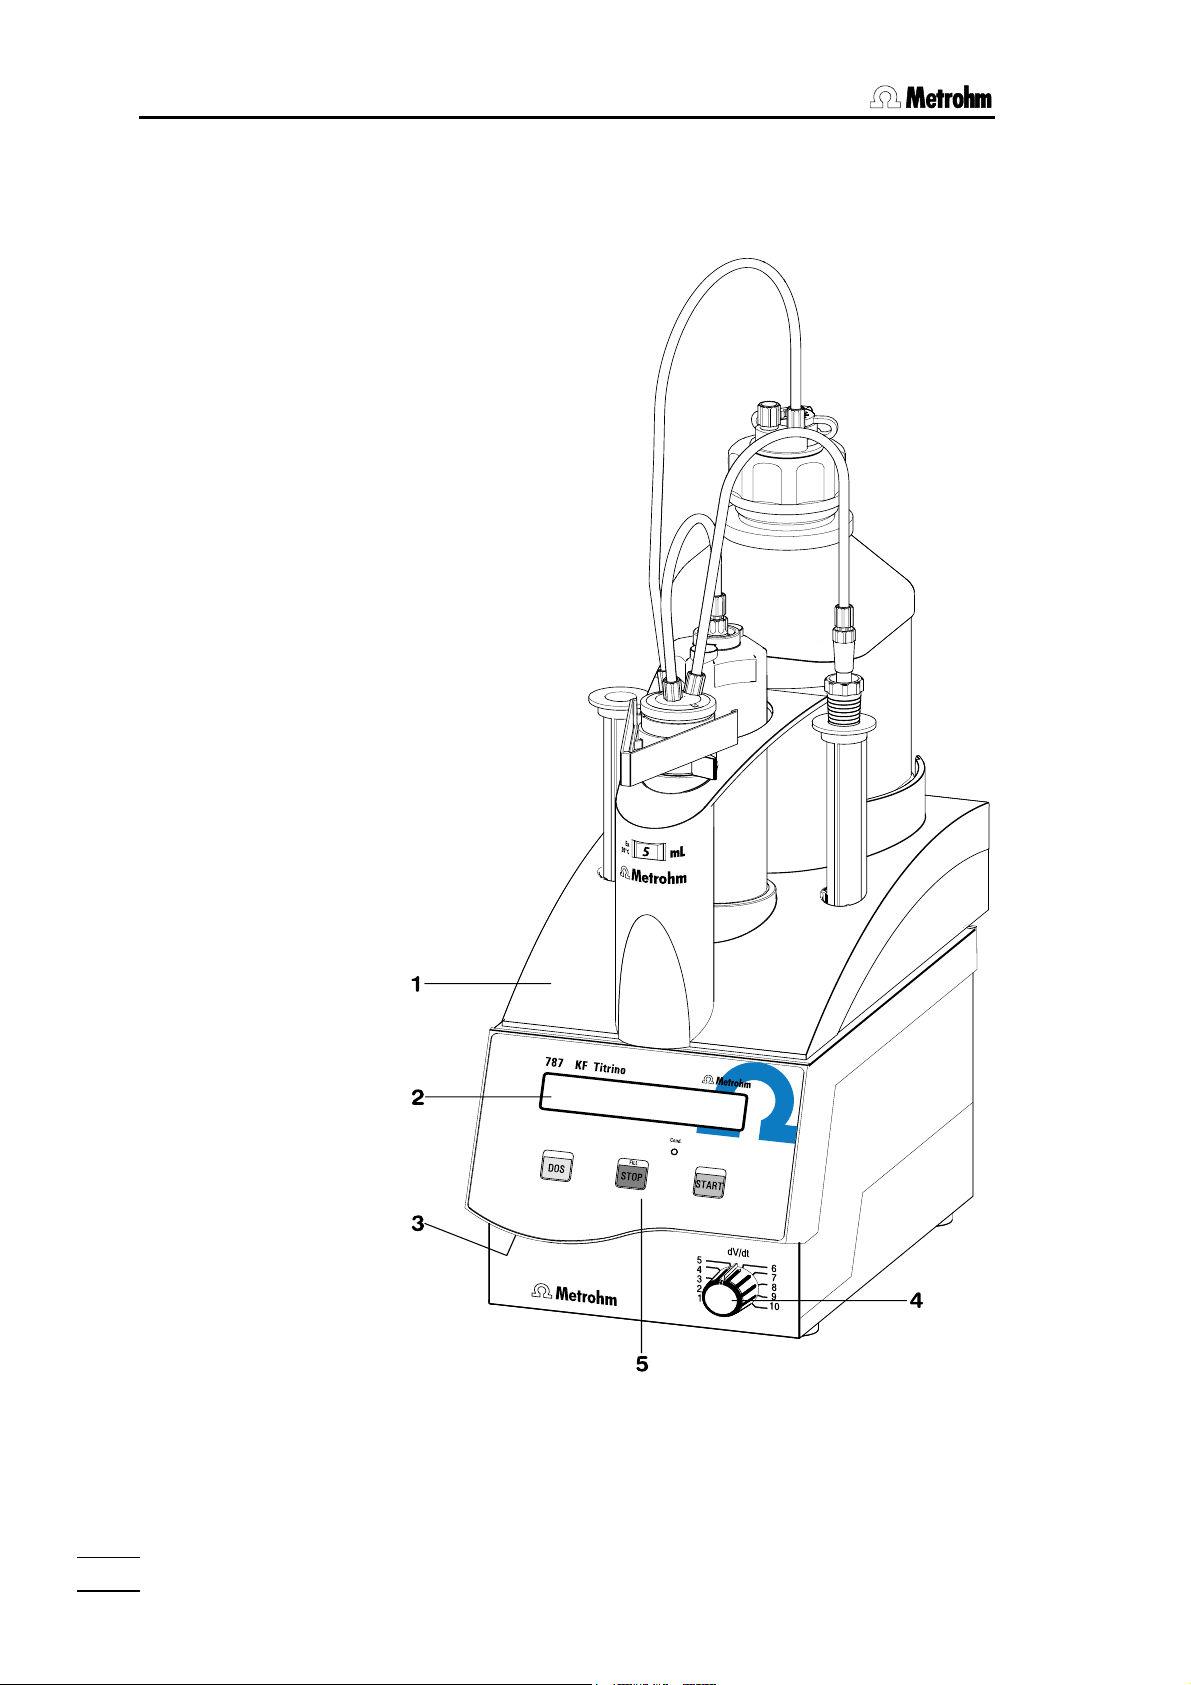
Front view of instrument:
787 KF Titrino
2
Page 7

1.2 Controls and parts
1 Exchange Unit
2 Display
3 Setting of display contrast
4 Controls the dosing rate during manual dosing with <DOS> and subse-
quent filling
5 Control keys and indicator lamps on the Titrino
Key <DOS> Dosing key. Dispensing is performed as long as <DOS> is being
pressed. Used e.g. to prepare the Exchange Unit. The dispensing
rate can be set with potentiometer (4).
Key <STOP/FILL> - Stops procedures, e.g. titrations, conditioning.
- Filling after manual dosing with <DOS>.
Key <START> Starts procedures, e.g. titrations, conditioning.
Identical with key <START> of the separate keypad.
Indicator lamp:
"Cond." Lamp flashes during conditioning. Lamp is on when the titration
cell is conditioned.
787 KF Titrino
3
Page 8
1.2 Controls and parts
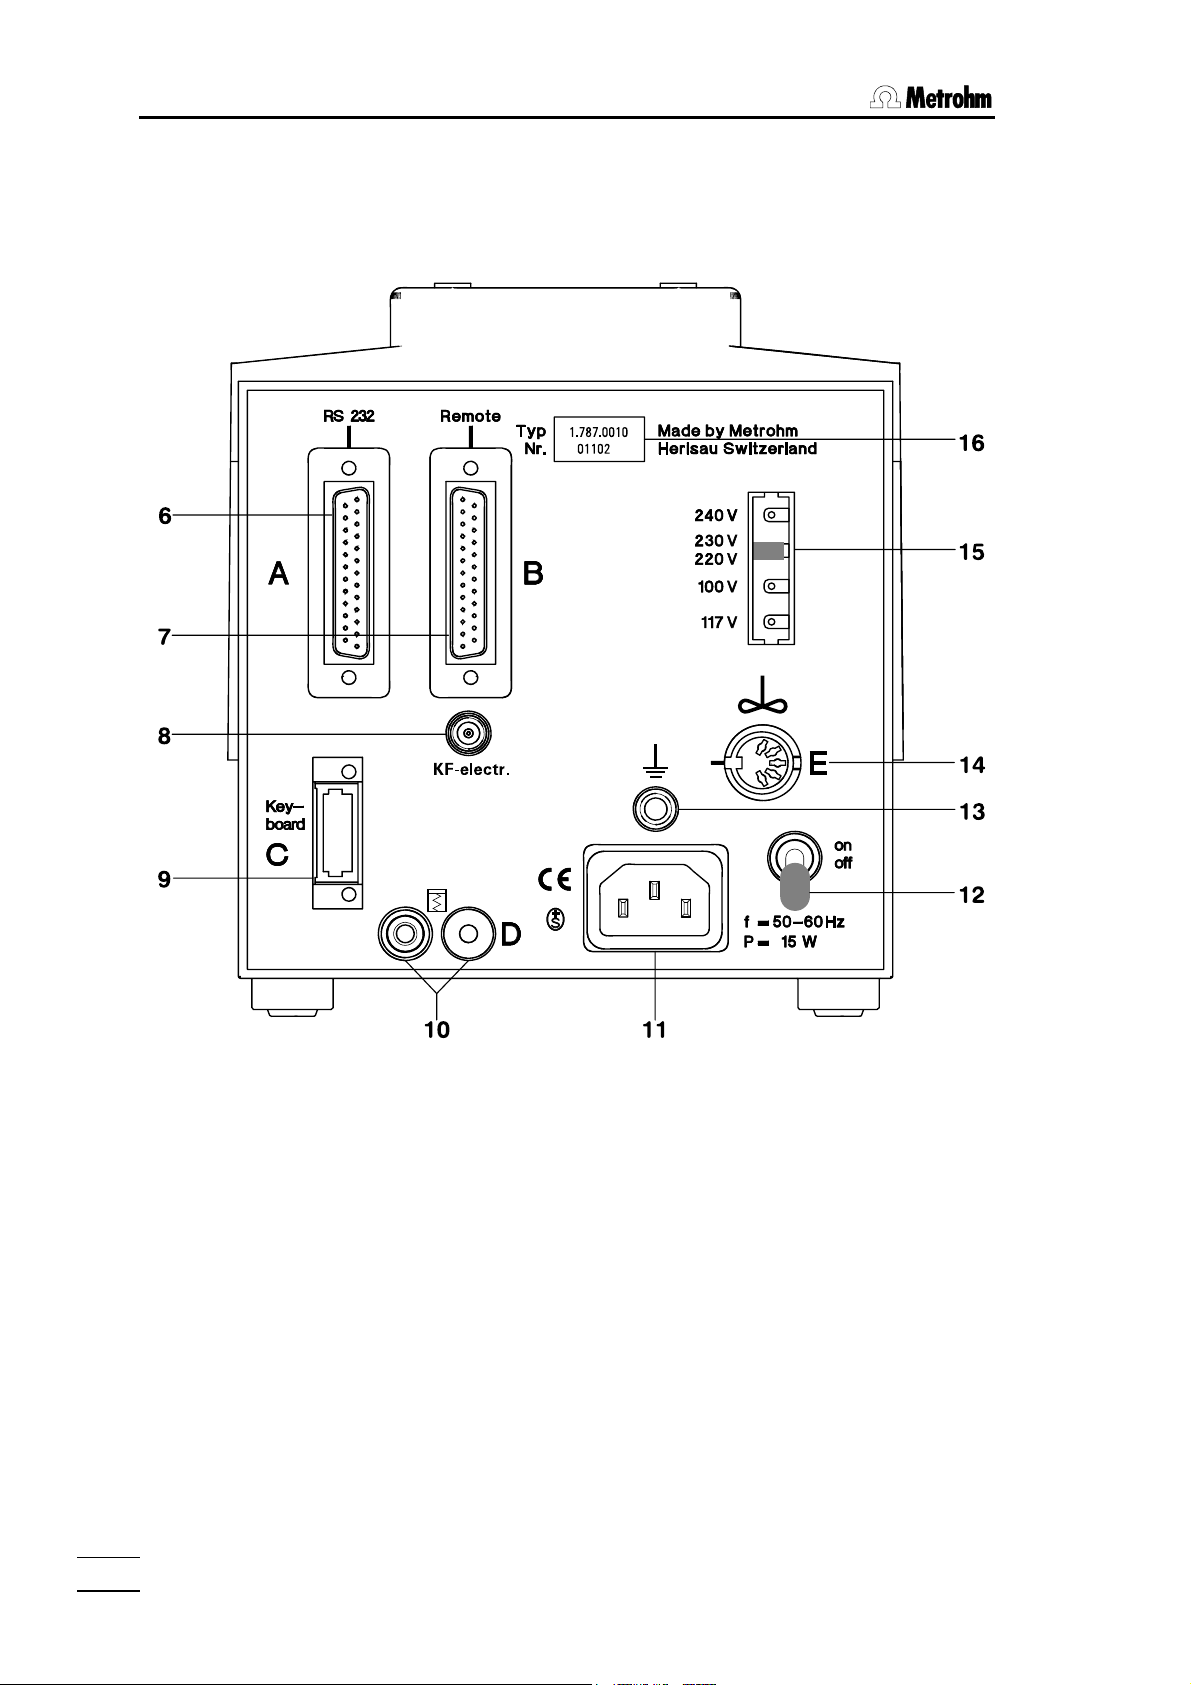
Rear view of instrument:
787 KF Titrino
4
Page 9

1.2 Controls and parts
6 RS232 interface
for the connection of printer, balance or a computer
7 Remote lines
(input/output)
for the connection of Sample Changers, robots etc.
8 Connection for the KF electrode
9 Connection for separate keypad
10 Analog output for the connection of a recorder
11 Connection for power cable
With power supplies where the voltage is subject to severe HF disturbances, the Titrino should be operated via an additional power filter, e.g. Metrohm 615 model.
12 Mains switch
13 Earthing socket
14 Connection for Ti Stand or stirrer
703 Ti Stand or 728 Magnetic Stirrer
Supply voltage: 9 VDC (I ≤ 200 mA)
15 Display of the set mains voltage
Before switching on for the first time, check that the set mains voltage matches the
voltage of your power supply. If this is not the case, disconnect mains cable and
change voltage.
16 Rating plate
with fabrication, series and instrument number
787 KF Titrino
5
Page 10
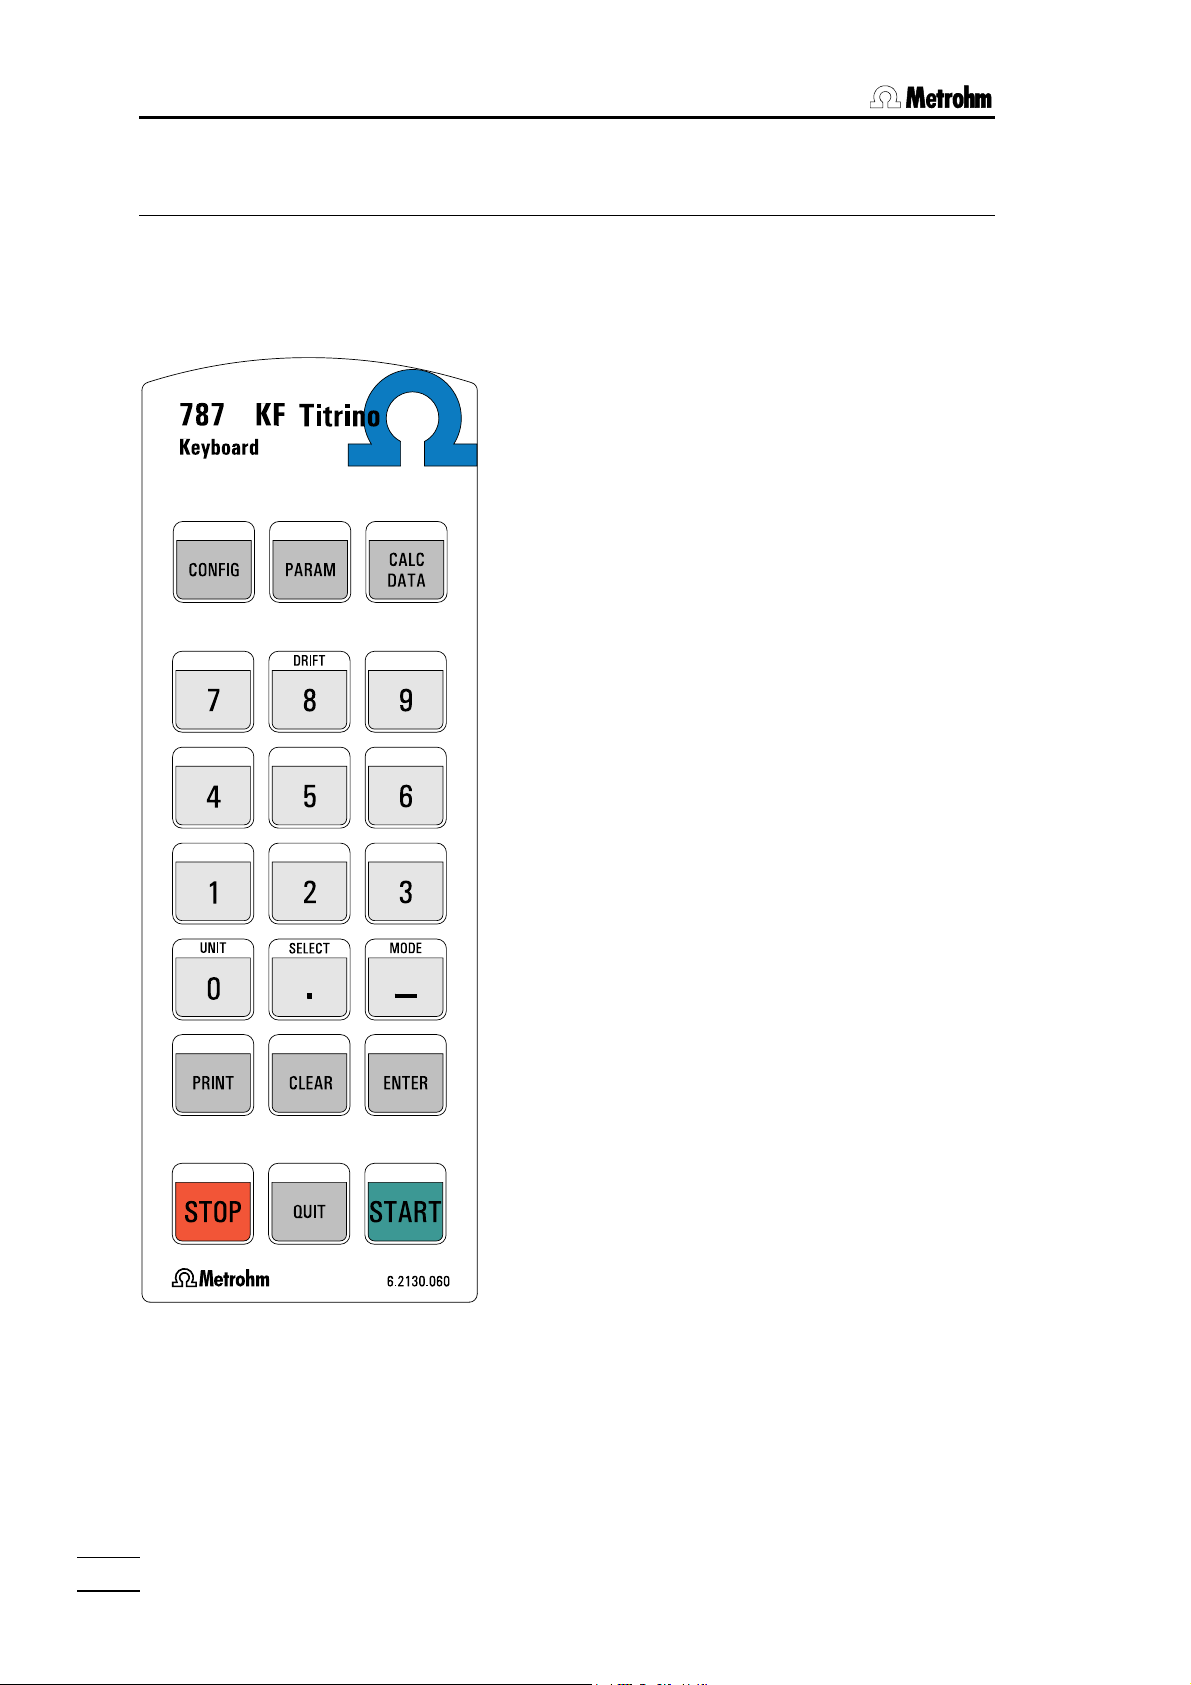
2.1. Keypad
2 Manual operation
2.1 Keypad
CONFIG Configuration, see page 19.
PARAM Parameters, see page 22.
CALC DATA Result calculation, see page 31.
These keys are opening the corresponding menus.
For the principle of data input see page 7.
DRIFT ON/OFF switching of the drift display,
see page 36.
UNIT Unit of result and sample size, see
page 34.
SELECT Selection of special values (dialog
marked with ":")
MODE Mode selection, see page 18.
PRINT Printing of reports, see page 37.
CLEAR Clears values, set special values.
ENTER Stores values.
STOP Stops methods.
QUIT Quits inquiries, waiting times, printing.
START Starts methods.
787 KF Titrino
6
Page 11
2.2 Principle of data input
2.2 Principle of data input
KFT ********
KFT ********
>KF device settings
KFT ********
>peripheral units
KFT ********
send to: IBM
KFT ********
>auxiliaries
KFT ********
• The first line of the display always shows the active
mode (in this case "KFT") and the state of the Titrino.
"********" means the Titrinos is in its standby state.
• The keys <CONFIG>, <PARAM> and <CALC
DATA> are opening the corresponding menus.
• Pressing one of this keys shows the first group of
inquiries of the corresponding menu in the second
line of the display.
Example key <CONFIG>:
You opened the configuration menu, the second line
of the display shows the first group of inquiries of
this menu ">KF device settings".
• By pressing <CONFIG> repeatedly you can move
to the other titles of this menu. With pressing
<CONFIG> 2 times you go to the group of inquiries
"peripheral units".
• If a dialog text is marked with ">", it contains a
group of inquiries. You branch into this group by
pressing <ENTER>.
• Example first inquiry of the group "peripheral units":
Now you opened the first inquiry of the group peripheral units in the configuration menu and you can
change the setting.
If a dialog text of an inquiry is marked with ":", you
can select a value with the key <SELECT>.
• A value is stored with <ENTER> and the cursor
moves to the next inquiry.
• Repeated pressing of <ENTER> moves you
through the inquiries of the group ">peripheral
units“, after the last inquiry of this group you leave
this group and return to the level above.
The next group of the menu "configuration“ appears:
">auxiliaries“
• With key <QUIT> you leave an inquiry or a group of
inquiries, it always
• In this example you leave the menu "configuration"
by pressing <QUIT> and return to the standby
state with the display of the titration mode.
moves you one level up.
787 KF Titrino
7
Page 12

2.3. Tutorial
2.3 Tutorial
This short operating course teaches you to work quick and efficient with the 787 KF Titrino, by means of the most important applications.
Set up your Titrino and connect the peripheral devices needed, see chapter 4.
2.3.1 Entering data, setting the dialog language
We can thus make a start and first take a look at the fundamentals of the entry of data.
We change the dialog language.
KFT ********
<CONFIG>
KFT ********
>KF device settings
3 × <CONFIG>
KFT ********
>auxilliaries
<ENTER>
KFT ********
dialog: english
<SELECT>
KFT ********
dialog: español
<ENTER>
KFT ********
fecha 2002-03-27
• Switch on the Titrino. It is now in the standby state, it
shows you the active mode.
• Press the key <CONFIG>, the display shows:
This is the title of the group "KF device settings".
This group contains various inquiries for the KF titraton.
• Press <CONFIG> 3 times. You see the titles of the
other groups of inquiries in the configuration menu.
The display shows
This "auxiliaries" group contains the inquiry for the
dialog language.
• Pressing the <ENTER> key takes you to the inquiries of the group "auxiliaries". Note the ">" sign. All titles of inquiry groups are prefixed by this sign.
This is the first inquiry of the "auxiliaries" group: the
selection of the dialog language.
• You select the various dialog languages with the
<SELECT> key. Press <SELECT> repeatedly until
"español" appears in the display.
Note the sign ":". It appears if the values can be selected with the key <SELECT>.
• Accept the new "value" with <ENTER>.
The next inquiry "fecha" (date) of the group "ajustes
varios" (auxiliaries) is shown.
You can open this inquiry by pressing <ENTER>
too and go through all the inquiries of this group this
787 KF Titrino
8
Page 13
2.3 Tutorial
<QUIT>
KFT ********
>ajustes varios
<QUIT>
KFT ********
way.
Because this inquiry follows no colon ":" the value
can't be selected by <SELECT>, the date "fecha"
has to be entered with the numeric keys.
• Exit the inquiries with <QUIT>. You are one level
higher in the "configuration" menu showing the title
"ajustes varios" (auxiliaries).
• Press <QUIT> once again to exit the "configuration"
menu and return to the standby state.
All the dialog texts will now be displayed in Spanish.
If you prefer English as the displayed dialog language, proceed as before and select "English".
787 KF Titrino
9
Page 14
2.3. Tutorial
2.3.2 Titer determination
Set up your titration vessel, see page 61f and plug your KF electrode into the measuring
input ('KF electr.').
Put a Exchange Unit with KF reagent on the Titrino and rinse the tubing and the buret tip
with <DOS>. Fill the buret again with <STOP/FILL>.
Fill your titration vessel with solvent, put a stirrer bar in the titration vessel and switch on
the stirrer.
For the titer determination you need water and a syringe that allows the exact dispensing
of 30 µL.
Selection of the mode
<MODE>
KFT ********
TITER with H2O or Std.
<ENTER>
TITER ********
Briefly check a few settings under the <PARAM> key:
2 × <PARAM>
TITER ********
>preselections
<ENTER>
TITER ********
conditioning: ON
<ENTER>
TITER ********
req.ident: OFF
<ENTER>
TITER ********
req.smpl size: ON
<ENTER>
TITER ********
report: OFF
• Press <MODE> repeatedly until "TITER with H2O or
std." appears in the display.
• Confirm "TITER with H2O or std." with <ENTER>.
The mode "TITER" is active and instrument is in its
standby state
• Press <PARAM> twice so that the title "preselections" appears in the display:
View the individual inquiries of this group with
<ENTER>. The following values should be set:
Automatic drying of the titration cell before and between titrations: "ON".
Request of the sample identification after the titration
start: "OFF".
Request of the sample size after the titration start:
"ON".
If no printer is attached, the report printout after the
titration must be switched off.
787 KF Titrino
10
Page 15
2.3 Tutorial
or
TITER ********
report: short
With a connected printer, the short report, for example,
can be selected.
<ENTER>
If you have to alter one of these settings, you can do this with the <SELECT> key.
Your titration vessel already contains solvent. Start with <START>. First the titrations cell
is dried. The display shows
TITER wait
as long as the vessel is still wet and the green "Cond." lamp flashes. As soon as the titration vessel is dry and hence ready for operation, this is shown by
TITER conditioning
an the "Cond."-LED lights continuously.
To determine the titer we shall perform several titrations and store the mean value as
"titer".
Calculating the mean value and standard deviation
Check that the mean value calculation is switched on:
2 × <CALC DATA>
TITER ********
>statistics
<ENTER>
TITER ********
mean: n= 20
2 × <QUIT>
• Press <CALC DATA> twice until the display shows
the title of the group is "statistics". Press <ENTER>.
Number of single determinations for the calculation of
the mean value. Since the mean value is recalculated
after every determination, the maximum value can remain set at 20. The mean calculation is terminated
when the operating mode is changed.
• Exit the inquiry.
787 KF Titrino
11
Page 16
2.3. Tutorial
Determination
<START>
KFR volume 0.000 ml
smpl size 1.0 g
0.03
<ENTER>
KFR volume ↑ 1.426 ml
#======
KFR volume 5.632 ml
titer 5.3267 mg/ml
• Now prepare the sample, e.g. 30 µL water and start
the titration with <START>. The display shows
• Inject the sample and enter the weight in g:
If you have connected a balance, you can also backweigh the syringe.
The titration now runs.
The first line of the display shows the current volume. In
addition, a "↑" appears when dispensing is being performed.
A "control bar" appears on the second line and shows
the control deviation of the current measured value
from the set endpoint.
On completion of the titration, the first line shows the
dispensed volume and the second the calculated titer.
If you have connected a printer, a report is also printed:
date 2002-03-27 time 13:55:10 3
smpl size 0.03 g
titer 5.3267 mg/ml
============
Perform another determination.
On completion of the titration, the mean value of the two determinations is calculated. The
report on the printer has the following appearance:
date 2002-03-27 time 13:55:10 3
smpl size 0.03 g
titer 5.3686 mg/ml
mean (2) 5.3477 mg/ml
+/-s 0.02973 mg/ml
s(rel) 0.56 %
============
787 KF Titrino
12
Page 17

2.3 Tutorial
Viewing the statistics data
If you have not connected a printer, you can view the statistics data on the display with
<SELECT>.
KFR volume 5.676 ml
titer 5.3686 mg/ml
<SELECT>
KFR volume 5.676 ml
mean (2) 5.3477 mg/ml
<SELECT>
KFR volume 5.676 ml
+/-s 0.02973 mg/ml
<SELECT>
KFR volume 5.676 ml
s(rel) 0.56 %
<SELECT>
• From the result display "titer", switch to the display of
the mean value with <SELECT>.
Mean value of 2 determinations.
• Press <SELECT> again and the standard deviation
is shown.
Absolute standard deviation.
• Pressing <SELECT> once more leads to the
relative standard deviation.
• <SELECT> returns you to the result display.
Repeat the titer determination once more.
With a connected printer you may want a printout of the single results that are used for the
statistics calculation: press the key sequence <PRINT><1><ENTER>.
Let us assume that you have discovered that one of the values is an "outlier" and you
would like to delete it.
Deleting a result in the mean value calculation
2 × <CALC DATA>
KFR volume 5.676 ml
>statistics
2× <ENTER>
KFR volume 5.676 ml
res.tab: original
<SELECT>
KFR volume 5.676 ml
res.tab: delete n
<ENTER>
787 KF Titrino
In our example, the deviation of the second result is
excessive. We thus wish to delete it:
• Press <CALC DATA> twice. The display shows:
• Open with <ENTER> the inquiry of the result table
"res.tab:"
• Press <SELECT> to display "delete n". This means
that you wish to delete a single result with the index
n in the result table.
13
Page 18

2.3. Tutorial
KFR volume 5.676 ml
delete n= 1
<2>
<ENTER>
2 × <QUIT>
• Enter the index of the result you wish to delete, in
our case the second:
• Exit the inquiry with <QUIT>.
Mean value and standard deviation are recalculated
and can be viewed in the display.
If you have connected a printer, a new report is printed
out.
Following this titer determination, you now decide to perform Karl Fischer determinations.
The titer just determined will be automatically used here.
787 KF Titrino
14
Page 19
2.3 Tutorial
2.3.3 Karl Fischer titration
<MODE>
KFR volume 5.676 ml
KFT
<ENTER>
KFT conditioning
<CALC DATA>
3 × <ENTER>
KFT conditioning
titer 5.3326 mg/ml
2 × <QUIT>
Now prepare your sample and titrate it.
• Select the "KFT" mode: Press <MODE> repeatedly
until the display shows
• Accept this mode with <ENTER>
The instrument is in the KFT mode and the titration
cell is ready for operation.
• Check briefly that the titer just determined has also
been adopted: Press <CALC DATA>, branch to the
group "calculation" with <ENTER> and then press
<ENTER> two times more to display the following
inquiry.
• Exit the inquiry by pressing <QUIT> twice.
Result calculation and unit of the result
The result is calculated by the following formula:
=
)content(water
<UNIT>
KFT volume 3.459 ml
result unit: %
2 × <SELECT>
<ENTER>
KFT volume 3.459 ml
result unit: mg/ml;3
<1>
<ENTER>
• Change the unit of the result to mg/mL: Press
<UNIT>. The display shows:
• You wish to have your result in mg/mL. Press
<SELECT> repeatedly until "mg/ml" appears in the
display.
• Press <ENTER>. The number of decimal places is
shown after the separator ";". The "3" flashes to show
you that you can now enter a number. Enter here,
e.g. 1 decimal place and exit the inquiry by pressing
<QUIT> twice.
<QUIT>
The result is outputted in the new unit.
××−
factortiter)blank)KFR(volume(
×
divisorsmplsize
787 KF Titrino
15
Page 20

2.3. Tutorial
It is now necessary to match the factor to the new result unit. A table with a selection of
matched quantities for factor, divisor and unit of the sample size can be found in the
quick reference.
<CALC DATA>
4 × <ENTER>
KFT volume 3.459 ml
factor 0.1
<1>
<ENTER>
KFT volume 3.459 ml
divisor 1
<ENTER>
2 × <QUIT>
• Enter a new factor: Press <CALC DATA> and enter
the inquiries of the "calculation" group with
<ENTER>. Proceed with 3 times <ENTER> to the
display:
• Enter "1".
• As divisor enter the density of the sample.
• Exit the inquiry by pressing <QUIT> twice. The re-
sult is recalculated and outputted.
2.3.4 Drift
The drift is measured in µL/min. It specifies how much KF reagent is consumed per unit
time to keep the titration cell dry. The reagent is needed,
• to titrate moisture in the titration cell.
• to compensate the iodine consumption of slow side reactions.
The drift value is generally of the order of a few µL/min for "dry conditioned" titration cells.
Checking the condition of the solvent
The drift can be displayed during the conditioning of the titration cell with the <DRIFT>
key:
<DRIFT>
Drift 4.3 µl/min
<DRIFT>
• Press <DRIFT>. The first line of the display shows
You can follow the progress of the drift. In fresh solvent
the drift value should drop to less than 10 µL/min after
a few minutes.
• Pressing <DRIFT> once again switches the drift
display off.
787 KF Titrino
16
Page 21
2.3 Tutorial
Drift correction of the results
You can correct your results by the drift. This is primarily necessary if you wish to determine very small amounts of moisture or when you have very long titration times.
For the correction "drift value ∗ titration time" is subtracted form the dispensed volume:
corrected volume = dispensed volume – (drift value ∗ titration time)
The drift value can be determined automatically or entered manually. In the automatic
determination the current drift value at the start of the titration is stored and used for the
correction. In the manual entry you yourself enter a fixed value, e.g. the stable drift value
that you have read off from the display during conditioning.
<CALC DATA>
7 × <ENTER>
KFT volume 3.459 ml
drift corr.: OFF
2 × <SELECT>
<ENTER>
KFT volume 3.459 ml
drift value 0.0 µl/min
2.2
<ENTER>
<QUIT>
KFT-Vol -d 2.365 ml
• Activate the drift correction: Press <CALC DATA>
and enter the inquiries of the "calculation" group with
<ENTER>. Proceed with <ENTER> until the display shows:
• Make your selection with <SELECT>, e.g. "man.".
• Enter a drift value, e.g. 2.2 µL/min and exit the in-
quiry.
The result is recalculated and the first line of the display
shows
-d means that a drift correction has been performed.
If you have connected a printer, the full report provides
you with all data for recalculation of the result:
date 2002-03-27 time 13:55:10 3
smpl size 0.03 g
KFR volume 3.459 ml
drift man. 2.2 µl/min
(-d)time 1.03
water 922.2 mg/ml
============
787 KF Titrino
17
Page 22
2.4. Selection of the mode, key <MODE>
2.4 Selection of the mode, key <MODE>
MODE
–
Press key <MODE> until the desired mode is
displayed and confirm with <ENTER>.
The following modes can be selected:
• KFT:
Karl Fischer titration
• TITER with H2O or std.:
Titer determination with water or water-containing
standard.
• TITER with Na2Tart*2H2O:
titer determination with sodium tartrate.
• BLANK determination:
determination of the blank value
The set values under the <CONFIG> and <PARAM>
keys apply to all modes, whereas the calculations differ
for each mode. Once values have been set they remain
effective even if the instrument is switched off.
787 KF Titrino
18
Page 23
2.5 Configuration, key <CONFIG>
2.5 Configuration, key <CONFIG>
CONFIG
KFT ********
>KF device settings
>KF device settings
limit KF reag. OFF ml
actual KF reag. 0 ml
polarizer: I(pol)
I(pol) 50 µA
EP 250 mV
cond.
U(pol) 400 mV
EP 25 µA
cond.
Key <CONFIG> serves to enter device specific data.
The set values apply to all modes. The quantities
marked with "cond." are also accessible during the
conditioning
KF device settings:
Settings for the monitoring of the reagent supply, the
measuring input, the endpoint and the filling rate.
peripheral units:
Selection of printer, balance and the curve at the analog output.
auxiliaries:
e.g. setting of dialog language, date, time, etc.
RS232 settings:
RS parameters for the COM interface.
The display texts of the Titrino are shown to the left.
The values are the default values.
KF device settings for all modes
KF reagent volume counter (0...999 mL, OFF)
is used for monitoring of the
• reagent supply
• the buffer capacity of the solvent with 2-component
reagents
<CLEAR> sets "OFF".
If the KF reagent volume counter is activated, the
inquiry of the current counter status follows.
Current counter status (0...999 mL)
Selection of the polarization mode (I(pol), U(pol))
Polarization current(-127...127 µA)
Endpoint voltage(-1500 mV...1500 mV)
Polarization voltage(-1270...1270 mV, in steps of 10 mV)
Endpoint current (-150...150 µA)
787 KF Titrino
19
Page 24

2.5. Configuration, key <CONFIG>
filling rate max. ml/min
cond.
>RS232 settings
baud rate: 9600
data bit: 8
stop bit: 1
parity: none
handshake: HWs
RS control: ON
>peripheral units
send to: IBM
balance: Sartorius
record: V vs. t
Filling rate after the titration (0.01...150 mL/min, max.)
<CLEAR> sets "max.".
The maximum rate depends on the Exchange unit:
Exchange unit max.
5 mL 15 mL/min
10 mL 30 mL/min
20 mL 60 mL/min
50 mL 150 mL/min
Settings of RS232 interface
see also page 68.
Baud rate (300, 600, 1200, 2400, 4800, 9600)
Data bit (7, 8)
Stop bit (1, 2)
Parity (even, odd, none)
Handshake (HWs, HWf, SWline, SWchar, none)
see page 68.
Control via RS232 interface (ON, OFF)
"OFF" means that the receipt of commands via the
RS232 interface is blocked. Data output
is possible.
Settings for peripheral units
Selection of printer (Epson, Seiko, IBM) at the Titrino
RS232 interface.
"Epson", for Epson Mode, e.g. Epson LX 300+,
Citizen iDP 562 RS, Custom DP40-S4N
"Seiko", e.g. for DPU-414
"IBM", e.g. for HP DeskJet types, for all printers with
IBM character set Table 437 and IBM graphics, as well
as for the data transmission to a computer with
Metrodata software VESUV.
Selection of balance (Sartorius, Mettler, AND, Precisa)
Sartorius: Models MP8, MC1
Mettler: Models AT, AM, PM, AX, MX, UMX and
balances with 011, 012, or 016 interface
AND: Models ER-60, 120, 180, 182, FR-200, 300
and FX-200, 300, 320
Precisa: Models with RS232C interface
Selection of the curve for the output at the analog
output (V vs. t, dV/dt vs. t, U vs. t, -U vs. t)
V vs. t: Volume vs. time curve
dV/dt vs. t: Drift vs. time curve
U vs. t: Control deviation (current value – EP) vs.
time curve
787 KF Titrino
20
Page 25

2.5 Configuration, key <CONFIG>
>auxiliaries
dialog: english
date 2001-03-27
time 08:13
run number 0
electrode test: ON
display KFR vol.: ON
device label
program 787.0010
General settings
Selection of dialog language (english, deutsch,
francais, español)
Current date (YYYY-MM-DD)
Format: Year-month-day, entry with leading zeros.
Current time (HH-MM)
Format: Hours-minutes, entry with leading zeros.
Current run number for result output (0...999)
The sample number is set to 0 when the instrument is
switched on and incremented on every determination.
Electrode test (ON, OFF)
Test for polarized electrodes. Performed on
changeover from the inactive state to a measurement.
"OFF" means that the test is not performed.
Display the dispensed KFR volume in the result display
(ON, OFF)
"ON" means the dispensed KFR volume will be
displayed in the result output on the first line.
Individual identification of devices (up to 8 ASCII
characters)
Display of program version
787 KF Titrino
21
Page 26

2.6. Parameters, key <PARAM>
p
2.6 Parameters, key <PARAM>
The key <PARAM> is used for the entry of values that
PARAM
determine the titration sequence. Values marked with
"cond." are accessible during the conditioning. "**titr."
means that these values can be changed during the
titration. They influence the ongoing determination.
Other values can only be changed in the inactive state.
The display texts of the Titrino are shown to the left.
The values are the default values.
2.6.1 Parameters
KFT ********
>titration parameters
>titration parameters
extr.time 0 s
**titr.
stop crit: drift
**titr.
stop drift 20 µl/min
**titr.
t(delay) 10 s
**titr.
stop V 99.99 ml
**titr.
start V: 0.00 ml
cond.
titration parameters
are valid for the global titration sequence.
preselections:
ON/OFF of various auxiliary functions such as automatic requests after the start and report.
General titration parameters
Extraction time (-9999.. 9999 s)
for
- that evolve sample slowly
- work with KF oven
With positive extraction times, titration is performed
continuously during this time; with negative values no
titrant is added during the extraction time. The
extraction time can be aborted with <QUIT>.
Type of stop criteria (drift, time)
Titration stops if EP is and stop drift is reached. (1...999
µL/min)
Titration stops if there is no dosing during t(delay).
(0...99 s)
Switch off when the end point is reached and the set
time after the last dispensing has elapsed.
Stop volume (0...99.99 mL, OFF)
Safety stop, e.g. if no endpoint is found.
<CLEAR> sets "OFF".
Start volume (0.00…99.99 mL.)
Performed and inquired only in KFT mode.
Start volume is dis
ensed before titration start. In the
787 KF Titrino
22
Page 27

2.6 Parameters, key <PARAM>
dos.rate max. ml/min
**titr.
max.rate 10.0 ml/min
**titr.
min.volume incr. min. µl
**titr.
case of a negative extraction time, it is dispensed after
the extraction time has elapsed.
If a start volume has been entered, an inquiry appears
regarding the dosing rate:
Dosing rate for start volume
(0.01...150 mL/min, max.)
<CLEAR> sets "max.".
The maximum rate depends on the Exchange Unit:
Exchange Unit max.
5 mL 15 mL/min
10 mL 30 mL/min
20 mL 60 mL/min
50 mL 150 mL/min
Maximum titration rate (0.01...150 mL/min, max.)
<CLEAR> sets "max.".
This parameter determines primarily the addition rate
outside the control range, see also page 26.
The maximum rate depends on the Exchange Unit:
Exchange Unit max.
5 mL 15 mL/min
10 mL 30 mL/min
20 mL 60 mL/min
50 mL 150 mL/min
Minimum volume increment in the titration (0.01...999.9
µL/min, min.)
<CLEAR> sets "min.".
This parameter determines the addition rate right at the
start and the end of the titration, see also page 26.
This parameter influences the titration speed and
therefore its accuracy very strongly: A smaller min.rate
results in a slower titration.
The minimum increment depends on the Exchange
Unit:
Exchange Unit min.
5 mL 0.5 µL
10 mL 1.0 µL
20 mL 2.0 µL
50 mL 5.0 µL
787 KF Titrino
23
Page 28

2.6. Parameters, key <PARAM>
>preselections
conditioning: OFF
req.ident: OFF
req.smpl size: OFF
report: OFF
cond.
Preselections for the sequence
Automatic conditioning of titration vessel. (ON, OFF)
If conditioning is "on", between the titrations the titration
solution is constantly maintained at the end point.
When conditioning is performed, the volume drift can
be displayed during the conditioning with <DRIFT>,
see page 36.
Request of the sample identification after start of
titration (ON, OFF)
After start, the sample identification can be requested
automatically.
Not performed or inquired in the "BLANK" mode.
Request of sample size after start of titration (ON, OFF)
Not performed or inquired in the "BLANK" mode.
Selection of the result report on titration completion
(short, full, OFF)
See also page 38.
787 KF Titrino
24
Page 29
2.6 Parameters, key <PARAM>
Titration sequence of KFT
<START>
(Preconditioning)
(<START>
(Request smpl size)
(Request ident.)
(Start volume)
(Extraction time)
Titration with test of
stop criterion
Calculations
Data output
(Reconditioning)
If conditioning is on, the sample solution is titrated until
the EP is reached. The display shows then
KFT conditioning
The vessel is now conditioned. The titration can be started
with <START>.
The sample size ant the sample identification are requested.
The start volume is dispensed.
The titration is executed. If the extraction time is not yet
over when the endpoint has been reached, the titration will
only be terminated after the extraction time is over.
Calculations are carried out.
Data are outputted.
Conditioning is carried out.
787 KF Titrino
25
Page 30
2.6. Parameters, key <PARAM>
Titration parameters for KFT
The titration parameters can be set according to your samples. The default parameters
are already set to get satisfactory results. Optimize the control parameters for specific
samples only.
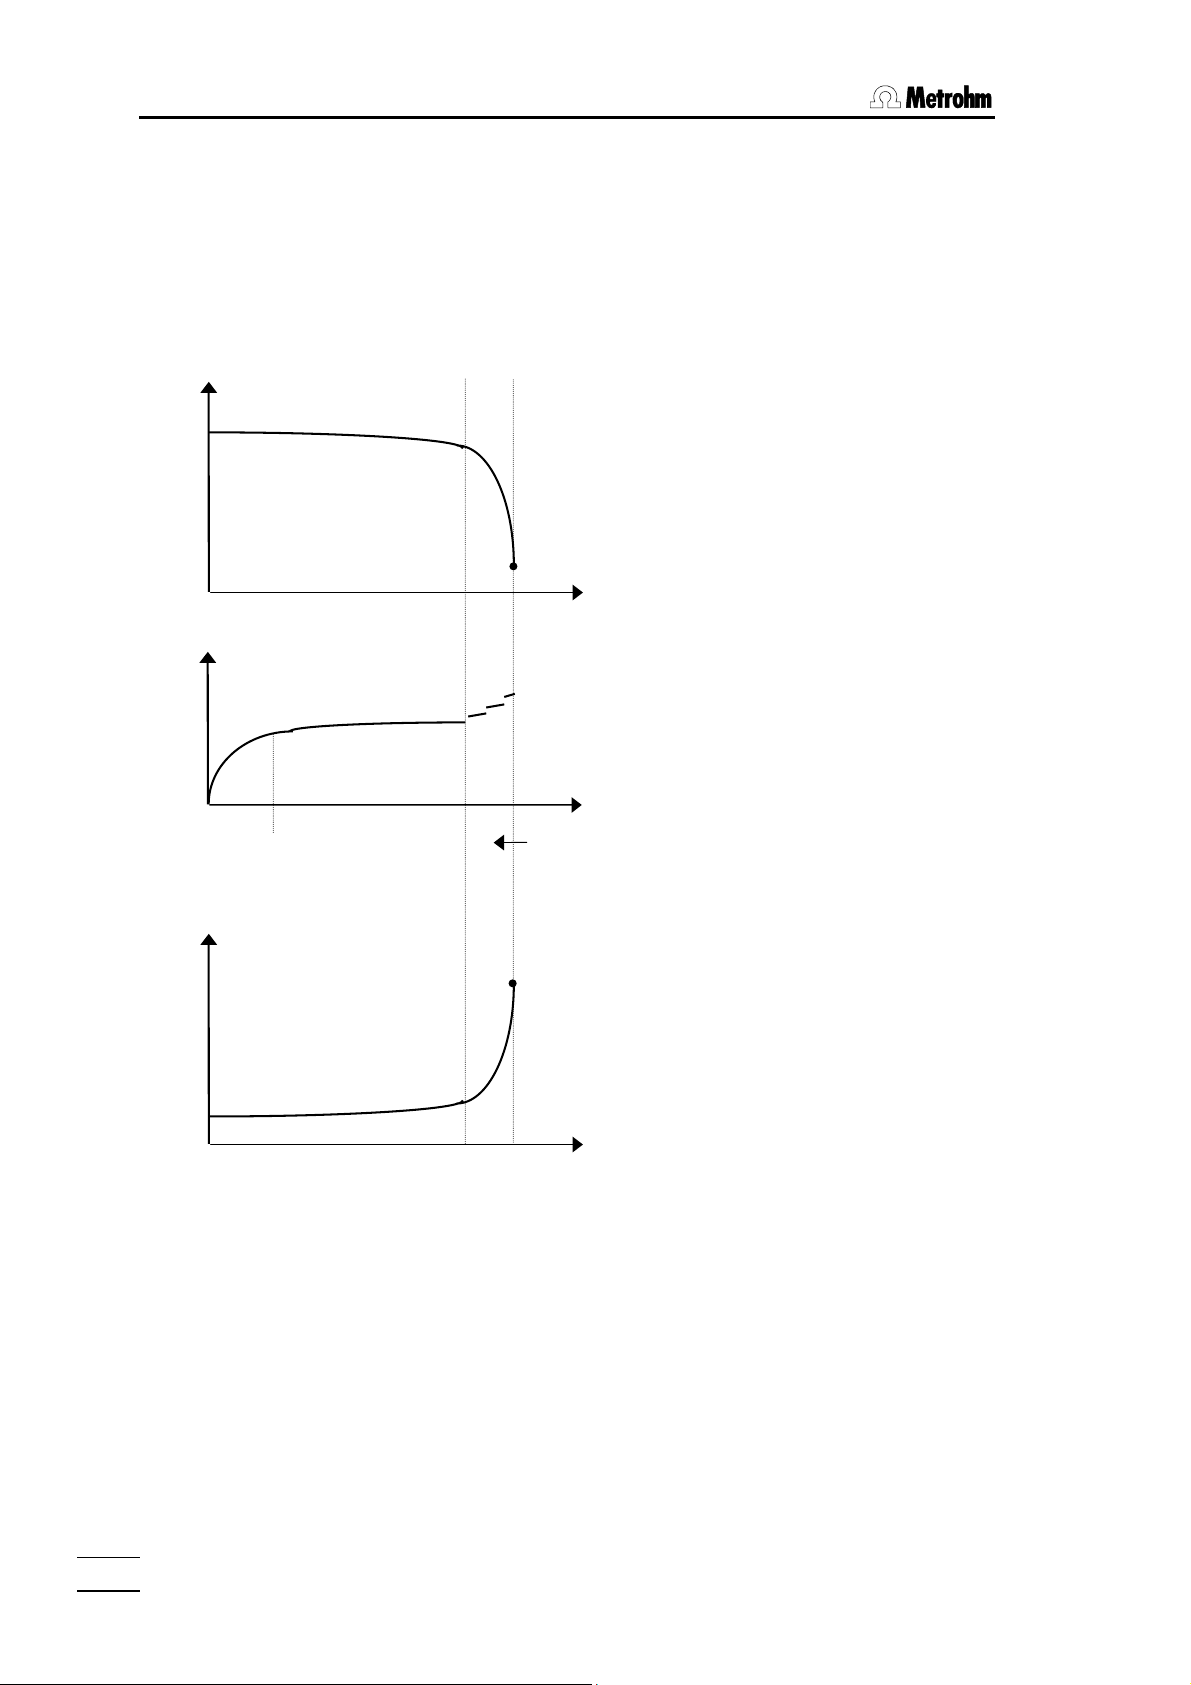
During the titration, reagent dosing is carried out in 3 phases:
U/mV
Ipol
1. Initial dosing:
Here the dosing rate
increases constantly up to
"max.rate".
2. Continuous dosing:
Dosing is performed at the
maximum rate "max.rate"
EP
V/mL
t/s
until the control range
(dynamics) is reached.
3. Control range (dynamics):
In this range, dosing is
performed in single steps.
The last dosing steps are
controlled by the
parameter "min.volume
incr.".
Initial
dosing
Continuous
dosing
V/mL
Control
range
I/uA
EP
Upol
V/mL
Remarks:
• Titer determination should have the same parameters as the sample titrations.
• In most cases the preset default parameters provide precise and reproducible results.
• Ipol gives relatively steep curves. They are flatter with Upol.
787 KF Titrino
26
Page 31
2.6 Parameters, key <PARAM>
Mechanisms of the KFT parameters in Ipol mode
U/mV
+
Titration
(direct titration)
Excess H2O
EP at U
Excess Iodine
Titration
(Back titration)
darker
solution
I(pol)
+
I/µA
• The position and curve characteristics of the line between the ranges of excess water
or excess iodine depends on the type of sample and the ingredients of the working
media.
• The endpoint has to be set close to the range margin, but always within the iodine
excess range. If the endpoint is set too close to the limit, an overdose of KF reagent
may be dispensed. The steeper the curve at the preset polarization current I(pol), the
more delicate it is to titrate to a steady and reproducible endpoint. For the titration of
troublesome samples, the particular conditions must be optimized by trial and error.
Always mind the color of the working medium at the end point as your guideline.
Remark: In most cases the preset default parameters provide precise and
reproducible results.
• If you select negative values for a polarization, you should choose negative values for
all other parameters too in order to have compatible parameter sets.
• In measurements with the setting "Upol", all parameters work in a similar manner as in
measurements with the setting " Ipol".
787 KF Titrino
27
Page 32

2.6. Parameters, key <PARAM>
Relation between the stop criteria "time" and "drift"
The stop criterion "time", t(delay), means that the end point must be exceeded for a
certain period of time. In other words, after the last dosed increment, time t is allowed to
elapse before the titration is stopped. The size of this last increment depends on the
volume of the Exchange Unit used. With a 20 mL Exchange Unit, the smallest possible
increment is 2 µL. With a t(delay) = 5 s, the last 2 µL reagent must thus suffice for 5 s or
longer. This results in a drift of ≤ 2 µL/5 s = 24 µL/min (the drift can be less than 24
µL/min as it is not known whether the last increment would also suffice for 10 s). If you
have been working up to this point with a 20 mL Exchange Unit and a t(delay) = 5 s, you
can set a value of ≤ 24 µL/min as stop drift. The following table shows several values for
the maximum stop drift.
t(delay)
min.incr. (Exchange Unit)
0.5 µL (5 mL) 6 µL/min 3 µL/min 1.5 µL/min
1 µL (10 mL) 12 µL/min 6 µL/min 3 µL/min
2 µL (20 mL) 24 µL/min 12 µL/min 6 µL/min
5 s 10 s 20 s
5 µL (50 mL) 60 µL/min 30 µL/min 15 µL/min
Same t(delay) with a range of extremely small volume increments means different switchoff points. In case the stop criterion "drift" is used, the stopping point remains the same.
The determination of the free water is easily done, as far as the specifications of the
reagent manufacturer regarding the "water capacity" of the reagents are considered.
Problems may occur with specific sample matrices. The relevant literature contains many
precise analysis instructions. Here, we give you some useful hints for the sample addition.
Sample addition
For sample addition various accessories are available, for example injection syringes,
weighing spoons etc.
It is a good idea to apply the back-weighing technique, except when you are disposing
small amounts of liquids with a micro-syringe. Fill the syringe or the weighing spoon with
your sample just before the titration (e.g. during conditioning) and tare it on a balance
with an appropriate precision, which ideally is connected to the Titrino. Sample size
request should always be switched on (see page 24). Add the sample during the request
for the sample size, and weigh the syringe or weighing spoon again to evaluate the
weight difference. Use the transfer of balance data to enter the correct sample size if
possible. The weight has to be transmitted in gram. If you transfer the sample size from
the balance, the sample size request is confirmed automatically, and the titration is
started at once. Otherwise use the keypad to enter the weight.
If the sample size request is switched off, and preconditioning is set, you are explicitly
prompted to add your sample. For six seconds, the message "add sample" is displayed
after which the titration is started by the Titrino itself.
787 KF Titrino
28
Page 33

2.6 Parameters, key <PARAM>
Solid samples
Use the glass weighing spoon 6.2412.000 and dispose the sample through the opening
for the septum stopper.
Liquid samples
Use a disposable syringe (2...20 mL) or a micro-syringe with a long needle attached.
Puncture the septum and dispose the sample carefully. When using disposable syringes,
add the liquid sample carefully without dipping into the solvent. Draw back the last drop
of sample into the syringe before you redraw the needle. For disposing an exact, small
volume of liquid sample, use a micro-syringe. Proceed as described above, but dip the
needle into the preconditioned solvent and dispose the sample carefully. Here drawing
back of solvent or sample adhering to the needle is not recommended.
Always keep in mind to exchange the septum as soon as it shows any large punctures
impairing the tightness of the titration cell.
Pasty, viscous samples
For samples which cannot be disposed with a needle because of their high viscosity, you
can handle your samples with disposable syringes with a large volume without using a
needle. Dispose your sample through the opening of the septum stopper. Back-weigh the
syringe after addition of the sample. Be sure to wipe off any adhering excess sample
substance of the syringe before taring it.
In any case, pay attention to prevent the penetration of atmospheric moisture into the
titration vessel when you are disposing the sample. If you still have to open the titration
cell for any reason, determine a blank value and take it into account for the calculation of
the titration result (see page 34).
787 KF Titrino
29
Page 34

2.6. Parameters, key <PARAM>
In the following table we attempt to show you solutions related more to the instrument's
side:
What to do if ...
Problem Possible causes and remedial action
Dosing at end too long and
increments too small. "Is never
finished!"
The increments at the end of the
titration are too large.
"Overshoots".
Solution becomes too brown at
the end of the titration.
Solution becomes darker with
every titration.
• Increase "min.volume incr.".
• Change stop criterion. Try to increase stop drift or
use a short stopping time as stop criterion, e.g.
• For problematic samples change solvents with
ketones or aldehydes in 2-methoxyethanol or with
amines mixture in methanol/glacial acetic, e.g., see
literature.
• Lower "max.rate". The following experiment gives you
a reference point for the optimum max.rate: Drift
display during conditioning and add sample without
starting the titration. Select a value below the
maximum drift as "max.rate".
• Optimize setup of electrode and buret tip and
improve stirring.
• The methanol fraction in the solvent is too low.
Change the solvent.
• Electrode could be coated; wipe off with acetone.
• Renew solvent.
• Electrode could be coated; wipe off with acetone.
The drift increases with every
titration.
The endpoint is reached "too
rapidly".
The titration times become
longer and longer.
• Does your sample evolve water extremely sluggishly?
Work with the KF oven.
• Are acids esterified in your sample? Change solution
more frequently. Increase buffer capacity of the
solvent.
• Does your sample contain ketones or aldehydes?
Use special reagents suitable for ketones and
aldehydes.
• Reduce "max.rate".
• With 2-component reagents the buffer capacity of the
solvent can be exhausted. Change solution.
• If the drift increases at the same time, see above.
787 KF Titrino
30
Page 35

2.8 Result calculations
2.8 Result calculations
Key <CALC DATA>
CALC
DATA
KFT ********
>calculation
>calculation
smpl size 1.0 g
**titr.
ident.
**titr.
titer 5 mg/ml
cond.
factor 0.1
cond.
The key <CALC DATA> is used to enter the values for
the calculations. The data of this key are method
specific to a sample (sample size and identification) or
to a mode (titer, factor, blank, mean value) and the drift
correction applies to all modes. On exit the result is
always recalculated. Values marked with "cond." are
accessible during the conditioning. "**titr." means that
these values can be changed during the titration. They
influence the ongoing determination.
calculation:
Values for result calculations.
statistics:
Calculation of mean values and standard deviation.
The display texts of the Titrino are shown to the left.
The values are the default values.
Assignments for the result calculation
Sample size (6-digit number ±X.XXXXX)
Entry using keypad, via balance.
Sample sizes that are inquired automatically in the
titration sequence can be viewed and modified with the
<CALC DATA> key. For calculation the absolute
sample size is used (negative signs that appear, e.g. in
backweighing are ignored).
No inquiry of sample size in the "BLANK" mode.
Sample identification (up to 8 ASCII characters)
Entry using keypad, via balance.
Sample sizes that are inquired automatically in the
titration sequence can be viewed and modified with the
<CALC DATA> key.
No inquiry of sample size in the "BLANK" mode.
Titer(0.0...99.9991 mg/mL)
The titer is written in automatically from the titer
determination modes.
Request only in the "KFT" mode.
±
Factor (
1000000)
in the numerator of the formula. Entries for factors with
different units for results and sample size, see page
33f.
787 KF Titrino
31
Page 36

2.8. Result calculations
divisor 0.1
cond.
blank 0.0 ml
cond.
drift corr.: auto
cond.
drift value 0.0 µl/min
cond.
>statistics
mean n= 20
cond.
res.tab: original
cond.
delete n= 1
cond.
±
Divisor (
1000000)
in the denominator of the calculation formula. Used
mainly for the density, see page 33.
Request only in the "KFT" mode.
Blank (0.0...99.9991 mL)
The blank value is written in automatically from the
blank determination mode. Values that are corrected
by a blank value are flagged with "-b".
Request only in the "KFT" mode.
Drift correction for the result (auto, man., OFF)
With the drift correction switched on, the value
(drift*titration time) is subtracted from the KFR volume.
Values that has been corrected by the drift are flagged
with "-d".
auto: The drift value at the start of the titration is
subtracted.
man: A fixed value of the drift is entered and
subtracted.
If the drift correction is set to "man.", the drift value is
requested:
Drift value for the manual drift correction (0...99.9
µL/min)
Statistics calculation
Mean value calculation from n single results (2...20)
Result table (original, delete n, delete all)
"original": The original table is used. Deleted
individual results are again incorporated in
the evaluation.
"delete n": Deletion of single results with the index n.
"delete all": The entire table is deleted.
Delete data from sample number n (1...20)
The deleted result is removed from the statistics
calculation.
787 KF Titrino
32
Page 37

2.8 Result calculations
Calculation formula and units
The calculation formulas are preset and depend on the selected mode.
Formula for the KFT mode
)content(water
=
divisorsmplsize
×
factortiter)blank)KFR(volume(
××−
Factor and divisor are used for the conversion of the result to different units.
Unit of result Sample size in... Factor Divisor
% g
0.1 1
% mg 100 1
% ml 0.1 density of sample [g/mL]
ppm g 1000 1
ppm ml 1000 density of sample [g/mL]
ppm µl 1 density of sample [g/mL]
mg/ml g 1 density of sample [g/mL]
mg/ml ml 1 1
mg 1 1 1
ml 1 1 1000 * density H
O [g/mL] ≈ 1000
2
mg/pc pc 1 1
The unit of the result can be selected with the <UNIT> key, see the following page.
Formula for the titer determination modes
TITER
titer
=
×
factorsmplsize
)KFR(volume
The factor is used to enter the water content of the standard.
Standard used Sample size in... Factor
Water g 1000
Water µl density H
O [g/mL] ≈ 1
2
Methanol ml content of methanol [g/mL]
Methanol µl 0.001 * content of methanol [g/mL]
Na
Tart*2H2O g 156.6
2
Na
Tart*2H2O mg 0.1566
2
787 KF Titrino
33
Page 38

2.8. Result calculations
Formula for the blank determination BLANK
factor)KFR(volumeblank
×=
If the blank is determined with an excessive solvent volume, the result can be
converted to the amount used subsequently with the aid of the factor.
If the drift correction is switched on, the "volume(KFR)" is corrected in all modes as
follows:
volume(KFR) – d = volume(KFR) – (drift value * (-d)time)
"(-d)time" corresponds to the time during which control is exerted (i.e. during the positive
extraction time and during the titration time, but not during the dispensing of the start
volume and during negative extraction times).
With manual drift correction, the entered drift value is reconciled in the result calculation,
whereas with automatic drift correction the drift value at the start of the titration is used.
The drift correction is used when the ingress of moisture during the titration needs to be
compensated. A drift correction is appropriate when the ratio
drift ∗ titration time
volume(KFR)
is large.
Key <UNIT>
UNIT
result unit: %
result unit: %;2
smpl size unit: %
The <UNIT> key can be used to select the unit of the
result in the KFT mode and of the sample size. It is
accessible during the conditioning and in the standby
state.
In the modes "TITER" and "BLANK", the result unit can
be viewed only but not changed.
The display texts of the Titrino are shown to the left.
The values are the default values.
Unit of the result in the KFT mode (%, ppm, mg/mL, g,
mg, mL, mg/pc, no unit)
Number of decimal places (0...9)
The number of decimal places in the result output
follows the separator ";". The number flashes to draw
attention to the fact that this value can now be entered.
Unit for the sample size (g, mg, mL, µL, pc, no unit)
787 KF Titrino
34
Page 39

2.8 Result calculations
Statistics calculations
If the mean value is active, the following quantities are calculated:
• mean
• standard deviation
• relative standard deviation
These values are printed out in the result report or they can be viewed with the
<SELECT> key:
Press the <SELECT> key repeatedly until the desired value appears in the display. The
following are displayed in succession, see also page 13.
• current result
• mean
• standard deviation
• relative standard deviation
A table of the single results can be printed out with the key sequence
<PRINT><1><ENTER>.
Remarks:
• If the number of single results n has been reached, the statistics calculation
begins anew at the next start.
• When the mode is changed, the statistics instructions of the previous mode come
to an end (res.tab. deleted) and the instructions of the new mode are followed.
• Old results that are no longer needed for the statistics calculation can be deleted
with "delete all".
• Recalculated single results are immediately incorporated in the statistics
calculation.
• If a result can not be calculated, the run counter is incremented. The counter for
the number of reconciled single results remains unchanged, however.
787 KF Titrino
35
Page 40

2.9. Drift display, key <DRIFT>
2.9 Drift display, key <DRIFT>
DRIFT
8
During the conditioning, the <DRIFT> key can be
used to switch the display of the current drift on and
off.
The value provides an idea for
• the condition of the titration cell.
• whether a drift correction should occur and the
magnitude of the drift value.
• the sample matrix. Do side reactions take place?
Does the sample contain ketones or aldehydes?
etc.
• the magnitude of the stop drift as a stop criterion
(value above basic drift).
787 KF Titrino
36
Page 41

2.10 Data output
2.10 Data output
Reports for the output at the end of a determination
PARAM
2
× <PARAM>
4
× <ENTER>
>preselections
report: OFF
Meaning of the report blocks:
full Full result report with raw results, calculations and statistics.
short Short result report with calculations and statistics.
Original reports which are put out automatically at the end of the titration and after every
recalculation of the result.
Original reports have double dashes ==== at the end, whereas recalculations are
marked by single dashes
----.
Report outputs can be stopped with <QUIT>.
With <PARAM>, the report sequence at the end of the
determination is defined.
See also page 24.
report:
Definition of report blocks to be printed automatically at
the end of the determination.
The display texts of the Titrino are shown to the left.
The values are the default values.
Preselections
Report sequence: full, short, OFF
Select a block with <SELECT>.
787 KF Titrino
37
Page 42

2.10. Data output
Example of reports:
Full result report
date 2002-03-27 time 08:33:42 4
smpl size 1.0 g ident. 08-4
KFR volume 2.278 ml
blank 0.0315 ml
titer 5.0 mg/ml
drift auto 1.9 µl/min
(-d)time 0:43
water 1.14 %
mean(4) 1.13 %
+/-s 0.005 %
s(rel) 0.44 %
============
- date, time, current run number.
- sample size, identification.
- The blank is printed out only if the value is ≠ 0 mL.
- The drift and the (-d)time are printed out only it the drift
correction has been set to "OFF".
- result
- statistics
Short result report
date 2002-03-27 time 08:35:42 5
smpl size 1.0 g ident. 08-5
(-d)time 0:45
water 1.14 %
mean(5) 1.13 %
+/-s 0.005 %
s(rel) 0.44 %
============
- date, time, current run number.
- result
- mean value with 5 single results
- standard deviation
- relative standard deviation
Additional possibilities for report outputs
In addition to the reports which are printed at the end of the titration, various other reports
can be put out. There are 2 possibilities to select the reports:
<PRINT><keyX><ENTER> key X is the key under which the appropriate data
are entered.
List of reports:
Report <Key X>
Configuration report CONFIG
Parameter report PARAM
Calculation data CALC DATA
Table of the individual results for statistics
1
calculation
Result display without a printer
Results can also be viewed in the display. After a determination the calculated result and
the single results of the statistics calculations can be displayed with <SELECT>.
<SELECT> switches to the next result, view also page 13.
787 KF Titrino
38
Page 43

3.1 Error and special messages
3 Error messages, Troubleshooting
Data transfer inoperative See measures on page 41.
3.1 Error and special messages
change solvent The limit volume of the reagent volume counter "limit KF reag."
has been reached..
Exit: Change solvent and press <CLEAR>.
check electrode
There is a break or short circuit. Possible causes and
rectification of the fault:
- the electrode is not plugged in ⇒ plug it in
- the electrode is not immersed in the solution ⇒ immerse it
- the electrode is defective ⇒ use new electrode.
- the electrode cable is defective ⇒ use new cable.
The electrode test can be switched off under the <PARAM>
key.
Exit: Rectify fault or <STOP>.
check exchange unit The Exchange Unit is not mounted (properly).
Exit: Mount Exchange Unit (properly) so that the coupling
engages or <STOP>.
cylinder empty! During dispensing with <DOS> an entire cylinder ahs been
dispensed.
Exit: Press <STOP/FILL>.
division by zero The result could not be calculated as a divisor in the formula
was equal to zero.
Exit: Enter appropriate value.
stop V reached The determination has been stopped as the stop volume has
been reached.
system error 3 The instrument adjustment data have been overwritten.
Exit: <CLEAR>. Default adjustment data are set. The error
message appears each time the instrument is switched on
until it has been readjusted (Metrohm service).
???? The result exceeds the valid data range or too many decimal
places are needed to display.
787 KF Titrino
39
Page 44

3.1. Error and special messages
Error messages in connection with the data transfer
If neither a computer nor a printer is attached, the report output at the end of the titration
must be switched off:
Receive errors:
E36 Parity
Exit: <QUIT> and set corresponding quantity the
same on both instruments
E37 Stop bit
Exit: <QUIT> and set corresponding quantity the
same on both instruments
E38 Overrun error. At least 1 character could not be read.
Exit: <QUIT>
E39 Overflow of the receive buffer of the Titrino (> 82
characters).
Exit: <QUIT>
Send errors:
E40 DSR=OFF
E41 DCD=OFF
E42 CTS=OFF
Handshake unsatisfactory for more than 1 s.
Exit: <QUIT> Is the receiver switched on and ready
to receive?
E43 The transmission of the Titrino has been interrupted
with XOFF for at least 3 s.
Exit: <QUIT>.
E44 The RS interface parameters are no longer the same
for both instruments.
787 KF Titrino
40
Page 45

3.2 What can you do if the data transfer does not work?
3.2 What can you do if the data transfer does not work?
Problem Questions for remedial action
No characters can be
received on a connected
printer.
No data transmission and the
display of the Titrino shows
an error message.
The received characters are
garbled.
Wrong line spacing.
- Are the instruments switched on and cables plugged
in correctly?
- Is the printer set to ”on-line”?
- Are baud rate, data bit and parity the same on both
instruments?
- Is the handshake set properly?
If everything seems to be ok, try to print a report with the
key sequence <PRINT><CALC DATA><ENTER>. If
this report is printed out correctly, check if reports are
defined in key <PARAM>.
- error 42: Transmission error. Is the printer set to "online"? Is the connection cable properly wired?
- error 43: Data output of the Titrino disabled for
longer than 6 s by XOFF.
- error 36-39: Receive error. Are the RS settings the
same on both devices?
- Are the RS settings the same on both devices?
- Has the correct printer been selected?
The printer does not emulate completely the preset
mode. Usually these problems arise with the IBM mode.
Set the printer to a different mode (e.g. Epson).
787 KF Titrino
41
Page 46

3.3. Diagnosis
r
3.3 Diagnosis
3.3.1 General
The 787 KF Titrino is a very precise and reliable instrument. Thanks to its rugged construction it is virtually impossible for external mechanical or electrical influences to have
an adverse effect on its functions.
Although the occasional fault in the instrument can not be excluded completely, it is certainly much more likely that malfunctions are caused by wrong operation or handling or
through improper connections and operation with non-Metrohm instruments.
It is advisable in each case to isolate the fault with the rapid and easy to perform diagnostic tests. The customer thus need not call METROHM service until there is a true fault in
the instrument. In addition, with the aid of the numbering in the diagnostic program he
can provide the service engineer with much more accurate information.
In inquiries always quote the manufacturing (page 4) and program number (see configuration, page 21) and specify possible error displays..
3.3.2 Procedure
• The diagnostic steps must be performed in sequence and compared with the reactions of the 787 KF Titrino (indented). In the "yes" case, continue with the next instruction.
• If the instrument does not show the expected reaction ("no" case), the appropriate
diagnostic step must be repeated to exclude an operating error. With repeated
wrong reactions, however, there is a strong possibility that a malfunction exists.
• The diagnostic steps allow re-entry into the test routine for repetition if the following
display appears:
diagnose press key 0...9
If the instrument is in a subprogram of the diagnostic routine: Press <Clear>.
If need be, switch the power off then on again after a few seconds. At the same time press key
<9> until the above display appears.
• If <Clear> has been pressed during the display of 'diagnose press key 0...9', the in-
strument returns to the user program.
• Error display: An error is shown in the display as follows:
error XX
error numbe
• If a fault causes the burette drive to stick at the top or bottom end of the cylinder,
see page 52, point 3.5.
787 KF Titrino
42
Page 47

3.3. Diagnosis
3.3.3 Equipment required:
− voltage calibrator, e.g. 1.773.0010 Metrohm pH Simulator
or 1.767.0010 Calibrated Reference for mV, pH, Ω µS, °C
− highly insulated interconnection cable
− cable 3.496.5070
− exchange units, if possible with different cylinder volumes (or 3.496.0070 dummy exchange unit)
− stop watch or watch with second hand
− digital or analogue voltmeter (if need be, connect a calibrated recorder)
− 2 connecting cables with 4 mm banana plugs
− test plug 3.496.8510 (necessary only if plug ‘Remote’ should be checked)
− test plug 3.496.8480 (necessary only if plug ‘RS 232’ should be checked)
6.2108.060
3.3.4 Diagnosis steps
1 Prepare instruments for diagnostic test
• Power off.
• Disconnect all external connections (cables at rear, except mains cable and key-
board).
• Remove exchange unit.
• Power on and immediately press and hold the <9> key until the power up test pat-
tern disappears.
diagnose press key 0...9
2 Perform display test
• Press <2>.
display test
• Press <Enter>.
Characters for a visual check of the display are generated on the eight lines.
Test sequence:
a) The display is cleared and overwritten from the left to the right with a dot pattern
( ▓ ▓ ▓ ▓ ▓ ▓ ▓ ▓ ).
b) The display is cleared and both lines are written into with the letters A, B, C,…Z.
c) The complete character set is shown as a moving display. At the same time with mov-
ing display the LED „Cond.“ are switches on and off.
• The test sequence can be held and then continued at any time by pressing <5>.
• Block 2 is quit by pressing <Clear>.
diagnose press key 0...9
787 KF Titrino
43
Page 48

3.3. Diagnosis
3 Keypad test
• Press <1>.
keys test
• Press <Enter>.
keys test
matrix code
• If any key is now pressed (on the 6.2130.060 keypad or on the front panel of the
787), the appropriate matrix code appears in the display.
Fig. 2 Front panel 787
Fig. 1 Keypad 787
• Block 1 is quit by pressing the <Clear> key twice.
diagnose press key 0...9
4 Cylinder code, date, time
• Put exchange unit or dummy on the Titrino and put the burette tip into a collecting
receptacle.
787 KF Titrino
44
Page 49

3.3. Diagnosis
• Press <0>.
date/time
cylinder code
• Press <Enter>.
activat ed dosing uni t
date XX-XX-XX
code:D0 XX ml
XX:XX:XX
mL-code
• Check date and time.
• Check whether the ml-code does correspond with the exchange unit placed or not.
For the sake of completeness, different exchange units can be inserted to check their ml code. If desired, the exchange unit can be removed again. If no exchange unit is inserted display does not show the ml-code but „check
exchange unit !“.
• Press <Clear>.
diagnose press key 0...9
5 Analogue output test
A voltage can be set at the analog output (sockets at D) using the keypad. But this should not exceed ± 2000 mV. This voltage can also be used for the calibration of a connected recorder.
• Connect a voltage measuring instrument (voltmeter, DVM, recorder) to the analogue output (10).
• Press <3>.
analog output-1 test
• Press <Enter>.
analog output-1 test
V-out = XXmV
Enter a voltage value in the range
been pressed, this value appears as a voltage at the analog output..
Read off value an the connected voltmeter and compare with the mV value on the display.
(Tolerance
±
2 mV)
±
2000 mV using the keypad. After the <ENTER> key has
• Press <Quit>.
• Disconnect voltmeter.
6 Motor timer test
• Press <6>.
motor-timer test
• Press <Enter>.
787 KF Titrino
45
Page 50

3.3. Diagnosis
pot.meter dV/dt 10?
• Turn knob ‘dV/dt’ to the right stop and press <Enter>.
Test sequence:
a) In a first step, the frequency of the RC oscillator (analogue rate) is tested over a period
of 1 second.
b) In a second step, the frequency of the quartz oscillator (digital rate) is tested over a
period of 1 second.
c) If no error is found, after about 3 s it appears
motor-timer test o.k.
• Press <Clear>.
diagnose press key 0...9
7 Polarizer test
• Press <7>.
polarizer test
• Press <Enter>.
dummy resistor 14.3kΩ ?
• Connect resistor switch-box (or suitable resistor 14.3 kΩ 0.1%) using 3.496.5070
cable to ‘Pol’ socket. Switch-box to 14.3 kΩ.
• Press <Enter>.
Test sequence:
1. An asterisk flashes during the test.
2. In case of an error an error message appears. (If for example the switch-box is not
connected,
3. If no error is found, after about 15 s display shows
polarizer test o.k.
error 100
appears).
• Press <Clear>.
diagnose press key 0...9
• Remove cable and resistor switch-box.
787 KF Titrino
46
Page 51

3.3. Diagnosis
8 External inputs and outputs
This test is meaningful only if the 787 KF Titrino is used interconnected with other instruments via the 'Remote' connection. In addition, a 3.496.8510 test plug normally used in the repair service is required for this test. However, this
plug can also be purchased by customers under the above number.
For the sake of completeness, the procedure is described here. If a diagnostic test of the external inputs and outputs
is not required, continue with point 9.
PIN PIN PIN PIN
1
2
3
3
24 5
12 9
23 10
22 11
21
18
17
16
Fig. 3 Connections in the 3.496.8510 test plug
• Press <4>
extern input/output test
• Press <ENTER>.
I/O-test-connector?
• Insert the 3.496.8510 test plug in port B 'Remote'. (Do not switch off instrument!)
• Press <ENTER>.
Test sequence:
1. In case of an error an error message is displayed. If for example no test plug is con-
nected, error message error 50 01HEX
2. If no error is found, after about 1 s display shows
appears).
• Remove test plug.
• Press <CLEAR>.
787 KF Titrino
extern input/output o.k.
diagnose press key 0...9
47
Page 52

3.3. Diagnosis
9 RS 232 test
A 3.496.8480 test plug normally used in the repair service is required for this test. However, this plug can also be
purchased by customers under the above number.
For the sake of completeness, the procedure is described here. If a diagnostic test of the RS 232 interface is not required, continue with point 10.
2
TxD
3
RxD
8
DCD
20
DTR
6
DSR
4
RTS
5
CTS
Fig. 4 Connections in the 3.496.8480 plug
• Press <5>.
RS232 test
• Press <ENTER>.
RS232 test-connector?
• Insert the 3.496.8480 test plug in 'RS 232' port.
• Press <Enter>.
Test sequence:
1. In case of an error an error message is displayed. If for example no test plug is connected, error message
2. If no error is found, after about 5 s display shows
RS232 test o.k.
error 68
appears).
• Remove test plug.
• Press <Clear>.
diagnose press key 0...9
787 KF Titrino
48
Page 53

3.3. Diagnosis
p
10 Spindle drive and stopcock changeover
• Press <Clear>.
The Titrino fills (only if an exchange unit is inserted)
The Titrino gets out of the diagnosis menu and returns to the user program.
• Remove exchange unit.
• Check spindle zero position, see Fig. 5.
0.2 - 0.6 mm
Fig. 5 Fig. 6
The spindle must be 0.2 - 0.6 mm below the edge of the sliding plate.
The bar of the stopcock coupling must be exactly parallel to the lateral edges of the MPT
Titrino, see Fig.6.
• Reinsert Exchange Unit.
Titrino fills.
The display of before reappears.
• Knob 'dV/dt' to right stop.
• Press the <DOS> key (on instrument) until the piston rod reaches the top and at the
same time measure the time from start to end.
XXX X ********
Spindle remains at maximum position. The transit time of the spindle is 20 s.
cylinder em
ty !
mind selected language!
• Measure spindle lifting (can be performed only if the 3.496.0070 Dummy Exchange
Unit is inserted or the locking switch (in right hole) is carefully operated with a
screwdriver after removal of the Exchange Unit).
From the start point, the spindle travels 80 mm. Instead of the spindle height, the expelled
volume can be measured (corresponds to max. vol. of Exchange Unit used).
• Press <FILL> (on instrument) and simultaneously measure the time until the Titrino is
again in the 'ready' position.
Times for filling: per stop cock cycle 1 s
for filling 20 s (Tolerance: 10 %)
The following generally holds: Spindle and stopcock must move at a constant speed
(noise!). In the filling setting, the stopcock coupling must position the lever of the Exchange
Unit correctly at the left stop (with virtually no play and without sticking).
• Set potentiometer 'dV/dt' to left stop.
• Press <DOS> (on instrument) at same time and use a stopwatch to measure the
time for 1/10 of the cylinder volume to be expelled. The time should be ca. 90 ... 110
s.
787 KF Titrino
49
Page 54

3.3. Diagnosis
• Set potentiometer 'dV/dt' to right stop.
• Press <FILL>.
11 Setting up original arrangement
Reconnect all peripherals disconnected at the start of the diagnostic routine and perform
a short function test with these.
787 KF Titrino
50
Page 55

3.4. Initialise and test RAM
3.4 Initialise and test RAM
On the odd occasion large disturbing signals (e.g. mains spikes, lightning, etc.) can have
an adverse effect on the processor functions and hence lead to a system crash. After
such a crash the RAM area must be initialised. Although the basic instrument data remain
stored, the RAM initialisation should be performed only when necessary since the stored
user data (configuration, parameters, calculation variables, etc.) are cleared as a result.
• Power OFF
• Power ON and simultaneously press keys <DOS> and <STOP/FILL>.
RAM Init.
• Press <START>.
confirm RAM Init.
• Press <START>.
RAM Init. activ
RAM is tested and initialised. Subsequently a warm start is executed.
The lost data of the user memory must now be reentered.
If 'system error 3' appears in the display, <Clear>can be used to return to the instrument
program. The initialisation values are loaded automatically. The instrument thus remains
capable of measurement. However, possibly a small loss in accuracy must be anticipated. A new optimum adjustment can be performed by Metrohm service. The error message 'system error 3' always appears after the instrument is switched on until this adjustment has been performed.
787 KF Titrino
51
Page 56

3.5. Releasing a locked spindle with inserted Exchange Unit
3.5 Releasing a locked spindle with inserted Exchange Unit
• The burette drive may very occasionally jam at the top or bottom end of the cylinder. If jamming occurs at the top or when the drive is out of function, the Exchange
Unit can no longer removed. In this case, it is necessary to proceed as follows:
2 screws (M4 countersunk)
2 screws (M3 fillister head)
knob
edge of bench
Fig. 7
• Disconnect instrument from power supply!
• Remove control knob
• Place instrument over edge of bench to allow the M3 screws to be removed (Fig. 7)
• Remove M4 screws
• Lift off top part of instrument together with Exchange Unit in the manner shown by
the arrow
The electronic circuits are now accessible!
On no account touch these!
• Remove spindle from mechanical stop by turning the large gear wheel. (In case that
the motor is inoperative, position spindle by hand to zero position.)
787 KF Titrino
52
Page 57

4.1 Setting up and connecting the instruments
4 Preparations
The mains cables supplied with the instrument are three-core and
equipped with a plug with an earthing pin. If a different plug has to
be fitted, the yellow/green lead must be connected to the protective
earth. Each break in the earthing inside or outside the instrument
can make it a hazard.
When the instrument is opened or if parts of it are removed, certain
components may be live if the instrument is connected to the mains.
The mains cable must therefore always be unplugged when certain
adjustments are made or parts replaced.
4.1 Setting up and connecting the instruments
4.1.1 Titrino with Titration Stand or Stirrer
B A
C
D
787
Cable
Ti Stand or Stirrer
6.2130.060 Keypad
The 728 Magnetic Stirrer can also be connected instead of the 703 Ti
Stand.
787 KF Titrino
53
Page 58
4.1. Setting up and connecting the instruments
4.1.2 Connection of a printer
A variety of printers can be connected to the RS232 interface of the
Titrino. If you connect a printer other than one of those mentioned
below, ensure that the Epson mode is emulated or that it uses the international character set following the IBM Standard Table 437 and
IBM-compatible graphics control characters.
If a balance is connected at the same COM of the Titrino as a
printer, you need the 6.2125.030 Adapter. The printer must be
plugged into the "data out" receptable of the adapter. It can be operated only with the simple hardware handshake (HWs) or without
handshake.
Printer Cable Settings on Titrino Settings on Printer
Seiko
DPU-414
Custom
DP40-S4N
Citizen
iDP562 RS
Epson LX300
HP Desk Jet
with serial
interface
HP Desk Jet
with parallel
interface
6.2125.130 baud rate: 9600
data bit: 8
stop bit: 1
parity: none
handshake: HWs
send to: Seiko
6.2125.130 baud rate: 9600
data bit: 8
stop bit: 1
parity: none
handshake: HWs
send to: Epson
6.2125.050 baud rate: 9600
data bit: 8
stop bit: 1
parity none
handshake: HWs
send to: Epson
6.2125.050 as above see printer manual
6.2125.050 baud rate: 9600
data bit: 8
stop bit: 1
parity none
handshake: HWs
send to: IBM
2.145.0330
RS232/
Parallel
Converter
baud rate: 9600
data bit: 8
stop bit: 1
parity none
handshake: HWs
send to: IBM
none
none, pre-set on Metrohm version
IDP-560 EMULATION
FONT MAP =GERMANY
PRINT=REVERSE
LITTLE
CR CODE=VOID
CR AFTER B :FULL=VOID
CR ON b. EMPTY=VALID
BUFFER 1K BYTE
BAUD RATE=9600
PROTOCOL=8,N,1
FLOW CONTROL CTS-RTS
ON
1 2 3 4 5 6 7 8 9 10
SSW1
A:
A4 paper
1 2 3 4 5 6 7 8
B:
1 2 3 4 5 6 7 8
see printer manual
787 KF Titrino
54
Page 59

4.1 Setting up and connecting the instruments
4.1.3 Connection of a balance
The following balances can be connected to the RS232 output of the
Titrino:
Balance Cable
Sartorius MP8, MC1 6.2125.070
Shimadzu BX, BW 6.2125.080
Settings on Titrino: balance SARTORIUS
Balance: delimiter CR+LF
Ohaus Voyager, Explorer,
Analytical Plus
from Ohaus: AS017-09 (Ohaus parts number)+
6.2125.170
Settings on Titrino: balance SARTORIUS
Balance: SET BALANCE
INTERFACE
BAUD RATE 9600
DATA BITS 8
PARITY none
STOP BITS 1
Mettler AB, AG (LC-RS25) in the scope of delivery of the balance
Mettler AM, PM 6.2146.020
additionally from Mettler:
ME 47473 Adapter and ME 42500 hand switch or ME
46278 foot switch
Mettler interface 016 Cable in scope of delivery of interface 016: red lead
to pin 3, white lead to pin 7 of the 25-pin connector
25-pole/9-pole adapter
Mettler interface 011 or 012 6.2125.020
Mettler AT 6.2146.020
Mettler PG, AB-S 6.2134.120 + 6.2125.170
Mettler AX, MX ,UMX 6.2134.120 + 6.2125.170
AND Models ER-60, 120, 180, 182
6.2125.020
Models FR-200, 300
Models FX-200, 300, 320
with RS232 interface (OP-03)
Precisa, balances with RS232C-
6.2125.080
interface
The balance type must be preselected at the Titrino with the
<CONFIG> key.
Balance and printer can be connected at the same time with the aid
of the 6.2125.030 adapter. The balance must then be plugged into
the "data in" receptable of the adapter.
787 KF Titrino
55
Page 60

4.1. Setting up and connecting the instruments
The weight is transferred as a number with up to 6 digits, sign and
decimal point. Units and control characters sent by the balance are
not transmitted.
With the aid of a special input unit supplied by the balance manufacturer, in addition to the weight an identification can be inputted from
the balance. For this, the address of the identification must be
preselected on the input unit.
Balance Id
Sartorius ID.1 or 26
Mettler (AT)
If the balance works only with 7 bit and the printer with 8 bit and if
they are at the same Titrino, the balance has to bet to "space parity"
and Titrino/printer to 8 bit, "no parity".
C (ID#1)
787 KF Titrino
56
Page 61
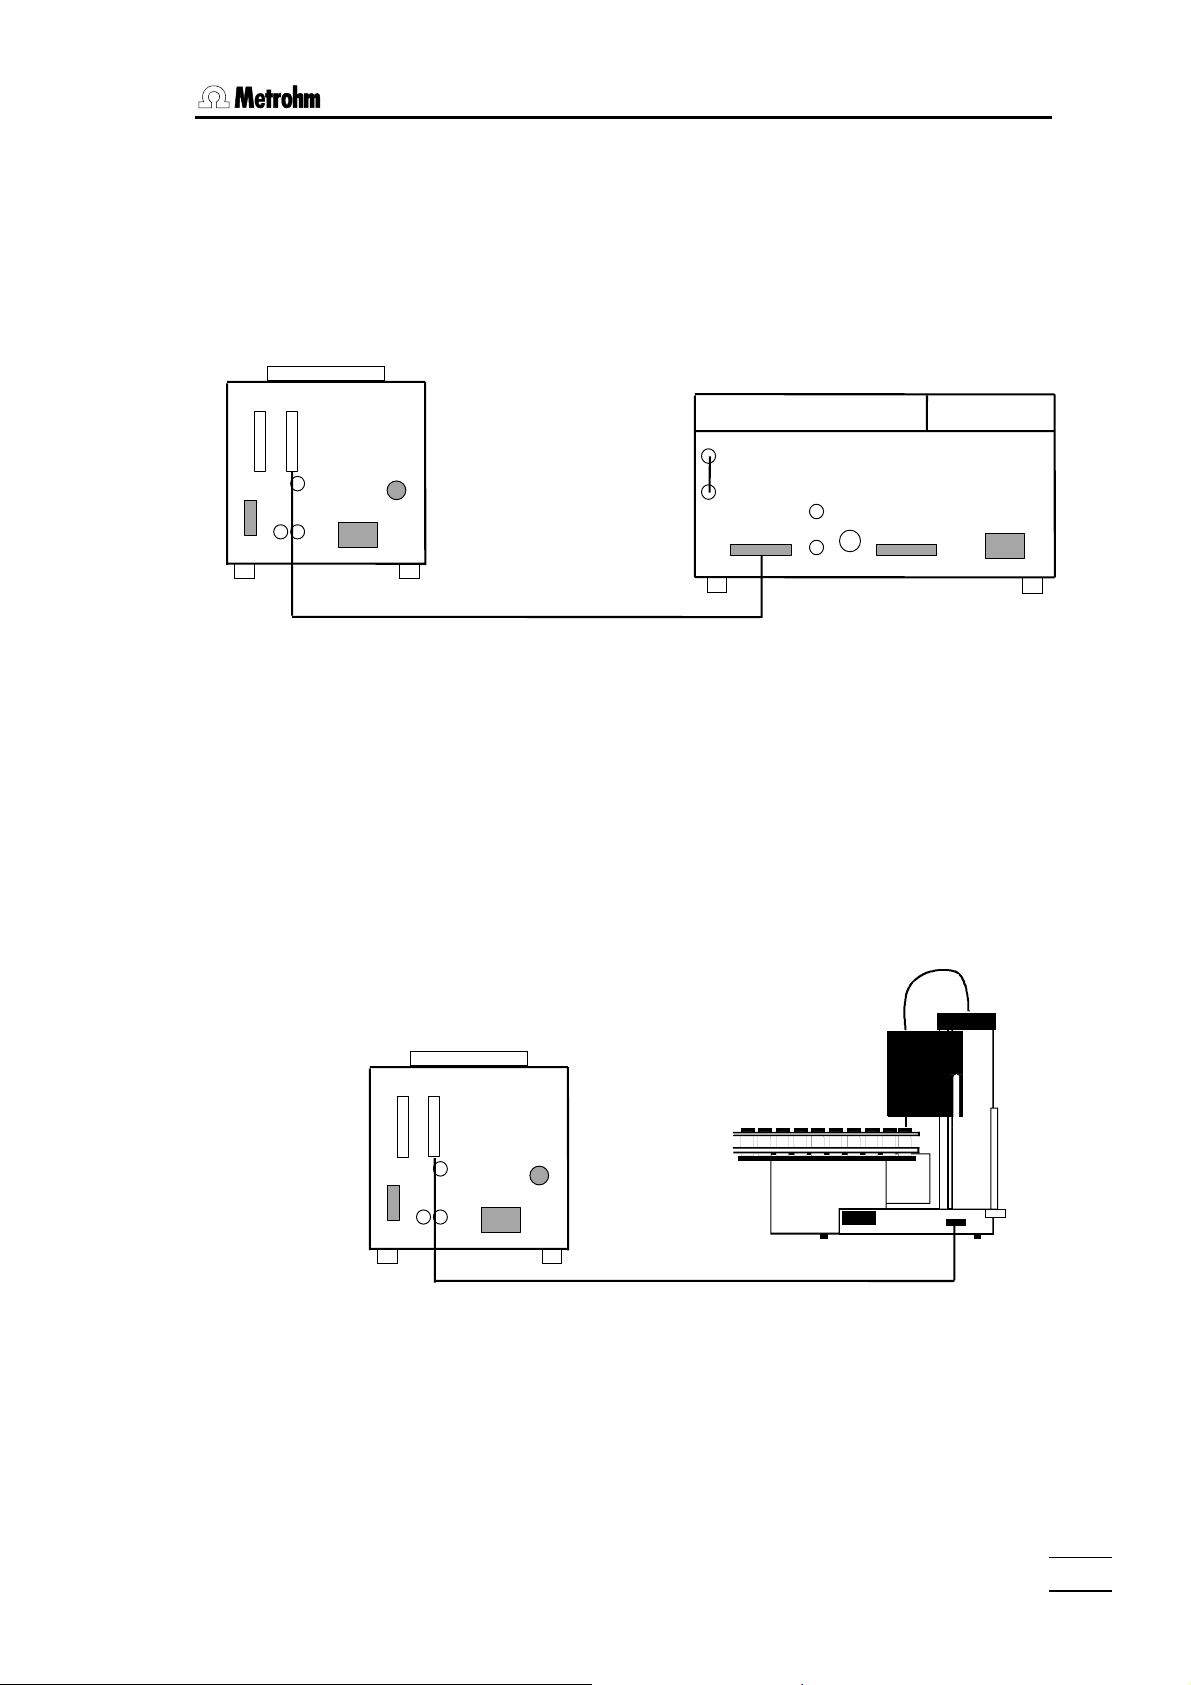
4.1 Setting up and connecting the instruments
4.1.4 Connection of a KF Oven
It is expedient to place the oven on 6.2041.180 instrument bridge.
Take care that the gas outlet of the oven enters the titration vessel as
directly as is possible to prevent the formation of condensed water in
the outlet tubing.
B A
C
D
787
768
A
C
B
D
The 707 KF Oven can also be connected instead of the 768 KF
Oven.
4.1.5 Connection of the 774 Oven Sample Processor
The Oven Sample Processor heats the sample and transfers the
moisture from the sample to the titration vessel of the Titino. Titrino
and Oven Sample Processor are connected via the remote sockets
(cable 6.2141.020).
787
B A
C
D
Cable (Remote) 6.2141.020
• The "Remote" socket allows not only connection of a sample
changer but also additional control functions. Pin assignment of
the "Remote" socket and control possibilities, see page 65f.
774
787 KF Titrino
57
Page 62
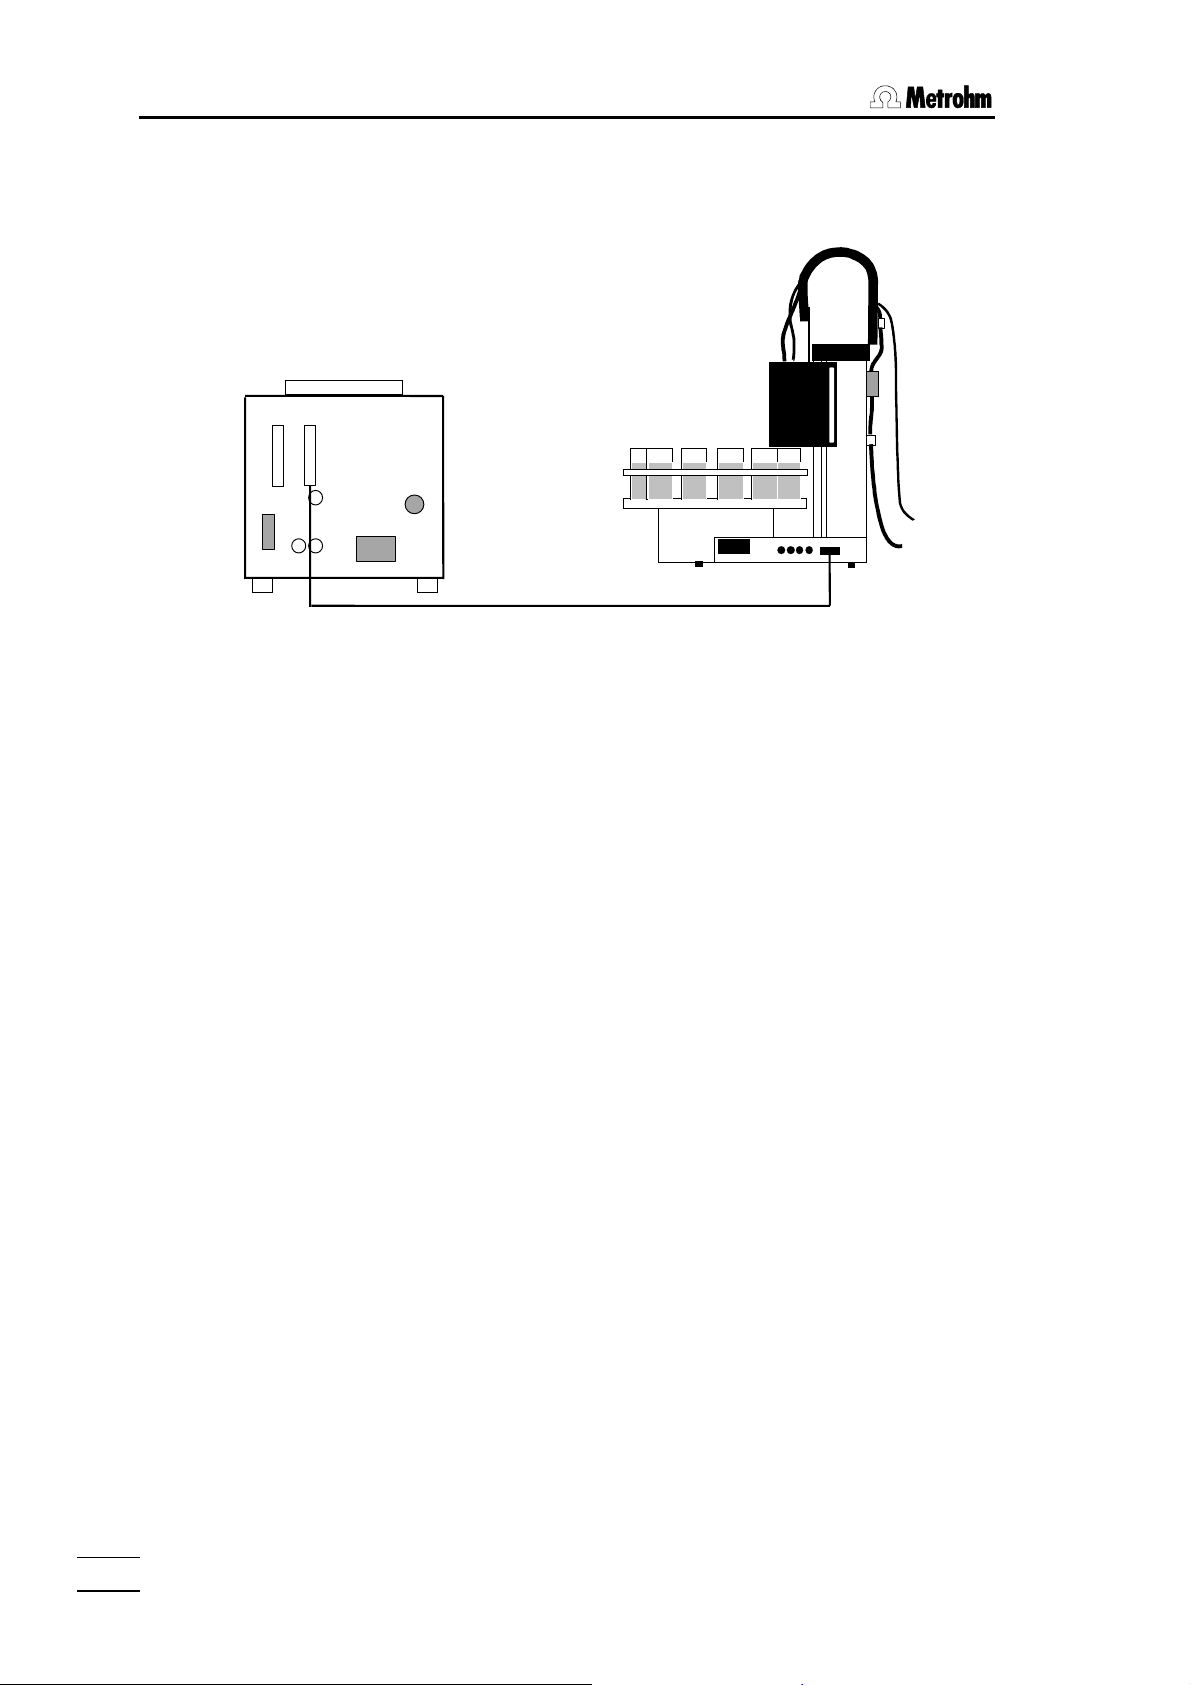
4.1. Setting up and connecting the instruments
4.1.6 Connection of a Sample Changer
B A
C
D
With 6.2141.030 cable (instead of 6.2141.020), two Titrinos can be
connected to the 730 or 760 Sample Changer at the same time.
• The "Remote" socket allows not only connection of a sample
787
730/760
Cable (Remote)6.2141.020
changer but also additional control functions. Pin assignment of
the "Remote" socket and control possibilities, see page 65f.
787 KF Titrino
58
Page 63
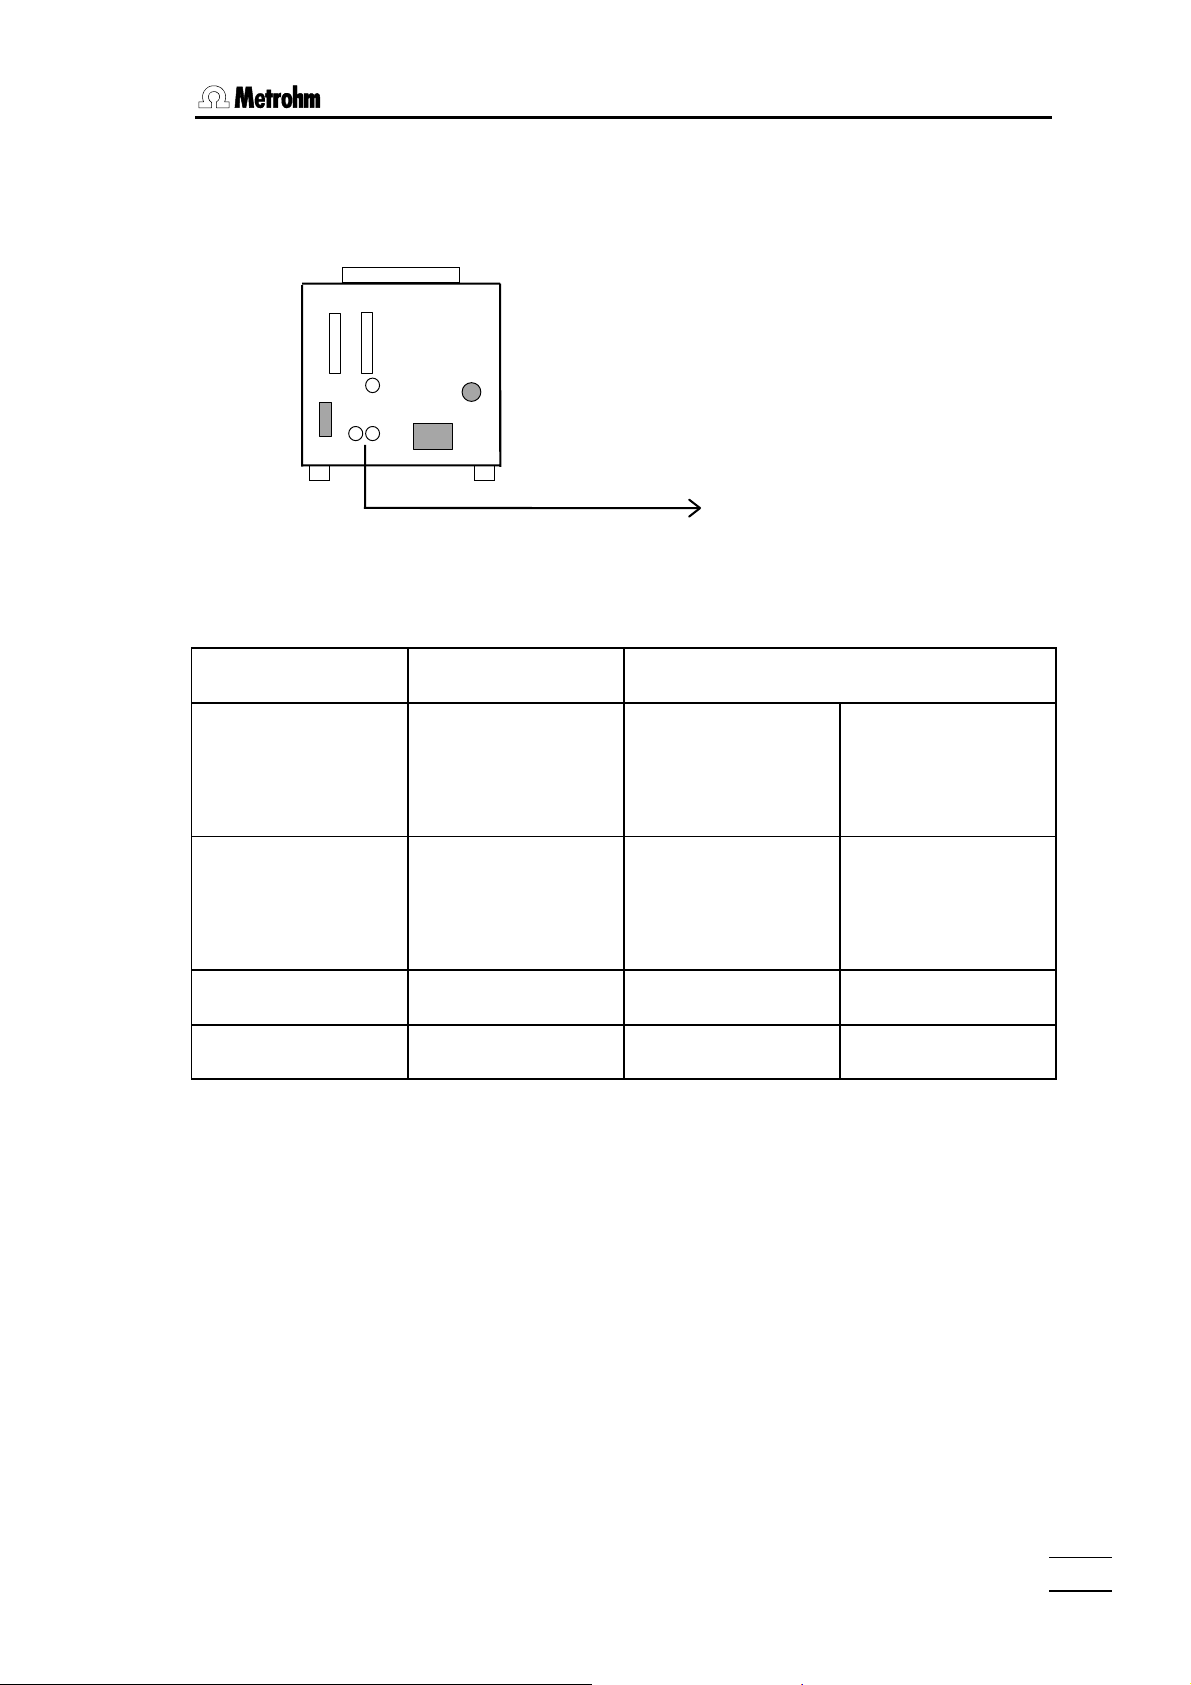
4.1 Setting up and connecting the instruments
4.1.7 Connection of a recorder
The recorder is connected to the analog output of the Titrino.
B A
C
D
The signal at the analogue output can be preselected on the Titrino (key <CONFIG>,
">peripheral units", "curve:"):
Preselection at
Titrino
V vs. t Volume vs. time
dV/dt vs. t Drift vs. time
U vs. t Control deviation vs.
-U vs. t Control deviation vs.
787
Recorder
Meaning Resolution,
Signal at analogue output
1 cylinder volume: 2000 mV
Dispensing curve,
e.g. in work with the
KF oven
100 µL/min:
Drift curve, e.g. to
observe the basic
drift
1 mV +1 mV
timet
1 mV -1 mV
time
1000 mV
787 KF Titrino
59
Page 64

4.1. Setting up and connecting the instruments
4.1.8 Connection of a computer
B A
C
D
Cable 6.2125.060 (+6.2125.010)
Preselections on the Titrino:
RS232 settings: ......................................... depend on the control program of the computer
Send to:............................................................................................................................ IBM
Vesuv 3.0, PC program for data acquisition and method backup
for up to 64 devices ...................................................................................... 6.6008.200
787
PC
787 KF Titrino
60
Page 65
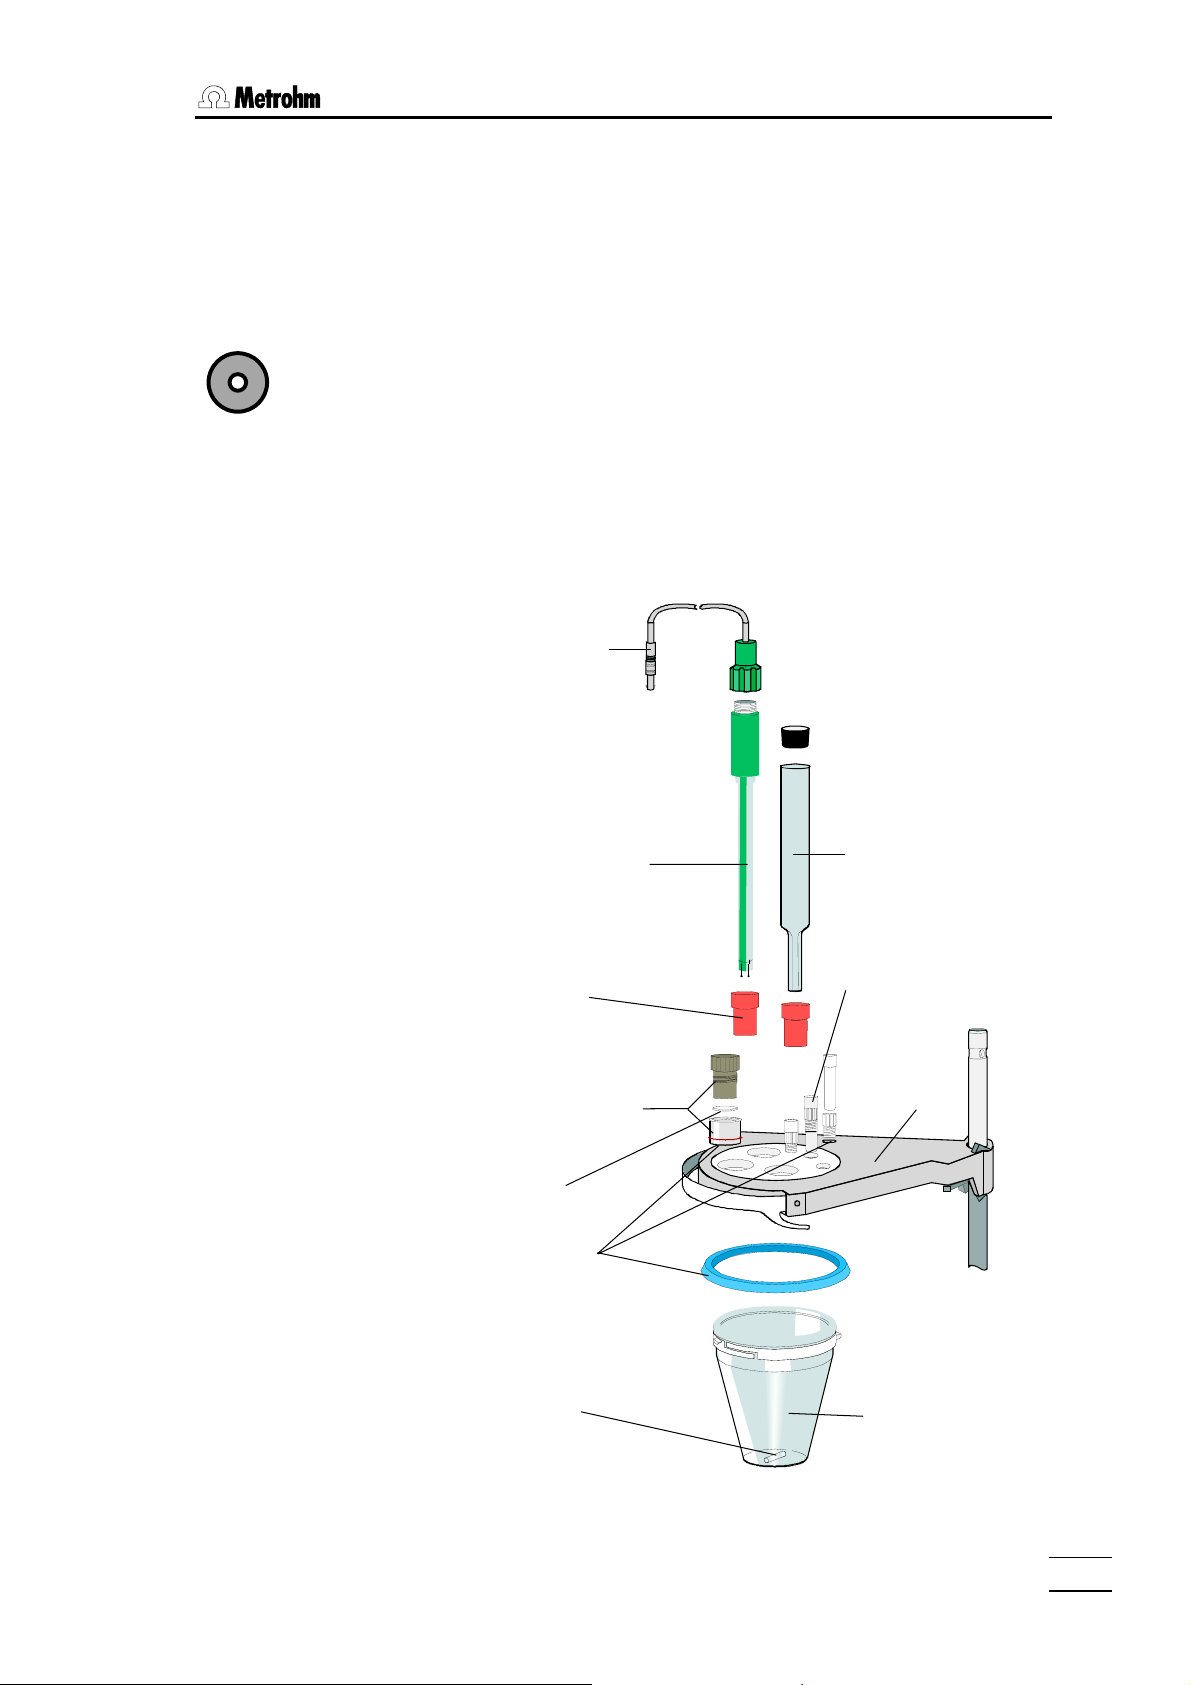
4.2 Connection of electrodes, preparing titration vessel
4.2 Connection of electrodes, preparing titration vessel
The 787 KF Titrino has one measuring input.
Rear panel:
Pol
Setting up the KF titration vessel
Pol Connection of polarized electrodes.
If measured quantities Ipol or Upol are selected, this
measuring input is automatically active.
For volumetric KF titrations install the titration vessel according to the
following figure:
Electrode cable
6.2104.020
Double Pt-electrode
6.0338.100
Screw nipple
6.2730.010
Stopper with septum
18 mm
6.2730.020
Septum
6.1448.010
Set of O-rings
6.1244.040
Magnetic
stirring bar
6.1903.020
Drying tube
6.1403.040
Stopper
6.2730.030
Titration
vessel lid
6.1414.030
Titration vessel
20...90 mL
6.1415.220
787 KF Titrino
61
Page 66

4.2. Connection of electrodes, preparing titration vessel
1
Arrangement of the parts on the titration vessel lid
View from above:
1 Electrode
2 Sample addition
3 Drying tube
5
4
6
3
2
Stirrer
4 Stopper or aspirating tube
5 Buret tip with titrant
6 Stopper or dispensing tip
This arrangement applies to the shown stirring direction.
787 KF Titrino
62
Page 67

5.1 Technical specifications
5 Appendix
5.1 Technical specifications
Modes KFT: Karl Fischer titration
TITER: Titer determination with water or water-
containing standard, resp. with sodium tartrate
BLANK: Blank determination
Measuring input 1 measuring input for polarized electrodes.
Measuring range
Voltage 0...±1500 mV, resolution 1 mV, error limit 0.1 % fullscale
Current 0...±150 µA, resolution 1 µA
Polarizer
Ipol 0...±127 µA, resolution 1 µA
Upol 0...±1270 mV, in steps of 10 mV
Measuring amplifier (at 25 °C and Titrino warmed-up)
Input resistance >10
Offset current <3
Deviation of offset voltage 15
Dosification
Volume of buret cylinder 1, 5, 10, 20 or 50 mL
Resolution 10 000 steps per buret cylinder
Titrating buret 1 internal buret
Auxiliary buret additional: 776 or 765 Dosimat
Materials
Housing Polybutyleneterephthalate (PBTP)
Keypad cover Polycarbonate (PC)
Display LCD, 2 lines of 24 characters each
Height of characters 5 mm
LED back-lit
13
∗10
Ω
–13
A
µV/K
787 KF Titrino
63
Page 68

5.1. Technical specifications
RS232 interface for printer, balance or computer connection: completely
controllable from external control unit
Remote input/output lines for Sample Changer, robot connection, etc.
Analog output
Output signal -2000 ... 2000 mV
Signal at analog- depending on preselection:
output V vs. t
dV/dt vs. t
U vs. t
-U vs. t
Ambient temperature
Nom. operation range 5 ... 40 °C
Storage – 20 ... 60 °C
Transport – 40 ... 60 °C
Safety specifications Designed and tested in accordance to IEC publication
61010-1, safety class I. This manual contains information
and warnings which have to be followed by the user to ensure safe operation and to retain the apparatus in safe
condition.
Mains connection
Voltage 100, 117, 220/230, 240 V (switchable)
Frequency 50 ... 60 Hz
Power consumption 15 W
Fuse Thermal fuse
Dimensions with Exchange Unit
Width 150 mm
Height 450 mm
Depth 275 mm
Weight, incl. keypad app. 3.6 kg
787 KF Titrino
64
Page 69

5.2 Pin assignment of the "Remote" socket
5.2 Pin assignment of the "Remote" socket
external Function
Inputs
Outputs
+5 V
+5 V
+5 V
+5 V
+5 V
+5 V
+5 V
+5 V
+5 V
+5 V
+5 V
pin 21 (Input 0)
pin 9 (Input 1)
pin 22 (Input 2)
pin 10 (Input 3)
pin 23 (Input 4)
pin 11 (Input 5)
pin 24 (Input 6)
pin 12 (Input 7)
pin 5 (Output 0)
pin 18 (Output 1)
pin 4 (Output 2)
Start
Stop
Enter
Functions see page 67
Clear
not used
Ready
inactive
Conditioning ok,
active if Cond.ok
Titration,
active during titration
tp
tp > 100 ms
787 KF Titrino
65
Page 70

5.2. Pin assignment of the "Remote" socket
Outputs
Voltage
+5 V
0 V
pin 17 (Output 3)
pin 3 (Output 4)
pin 16 (Output 5)
pin 1 (Output 6)
pin 2 (Output 7)
End of determination
EOD
Change solvent
Error,
active with errors
Activate pulse, see page 67.
Pulses for recorder (tp=150 µs)
10 000 per buret cylinder
For all outputs:
V
= 40 V
CE0
I
= 20 mA
C
> 100 ms
t
Pulse
Functions see page 67.
pin 15
pin 14
≤ 75 mA
I
0 V: active
5 V: inactive
pin 25
Ordering numbers for plug:
K.210.9004 (shell) and K.210.002
No liability whatsoever will be accepted for damage caused by improper interconnection of instruments.
787 KF Titrino
66
Page 71

5.2 Pin assignment of the "Remote" socket
5.2.1 Lines of the "Remote" socket during the titration
787 KF Titrino
67
Page 72

5.3. RS232 interface
5.3 RS232 interface
The 787 KF Titrino is configured as DTE ( Data Terminal Equipment).
The interface complies to the standard RS 232C.
The RS232 interface allows full remote control of the Titrino with an external controller.
Refer to your Metrohm agency if you need a detailed description of the RS232 interface
and the remote control commands.
787 KF Titrino
68
Page 73

5.4 Validation / GLP
5.4 Validation / GLP
GLP (Good Laboratory Practice) requires the periodic validation of the analytical instruments. The reproducibility and accuracy of the instruments are checked according to
standard operating procedures.
Guidelines for the testing regulations (SOP, Standard Operating Procedure) are given in
the following Metrohm Application Bulletin:
No. 255: Validation of Metrohm KF titrators and KF ovens according to GLP/ISO 9001.
Contact your Metrohm agency for support with the validation of your Titrino. There you get
a validation documentation, which helps you to perform the installation qualification (IQ)
and the operational qualification (OQ).
787 KF Titrino
69
Page 74

5.5. Warranty and conformity
5.5 Warranty and conformity
5.5.1 Warranty
The warranty regarding our products is limited to rectification free of
charge in our workshops of defects that can be proved to be due to
material, design or manufacturing faults which appear within 12
months from the day of delivery. Transport costs are chargeable to
the purchaser.
For day and night operation, the warranty is valid for 6 months.
Glass breakage in the case of electrodes or other glass parts is not
covered by the warranty. Checks which are not a result of material or
manufacturing faults are also charged during the warranty period.
For parts of outside manufacture insofar as these constitute an appreciable part of our instrument, the warranty stipulations of the
manufacturer in question apply.
With regard to the guarantee of accuracy, the technical specifications in the Instructions for Use are authoritative.
Concerning defects in material, construction or design as well as the
absence of guaranteed features, the purchaser has no rights or
claims except those mentioned above.
If damage of the packaging is evident on receipt of a consignment
or if the goods show signs of transport damage after unpacking, the
carrier must be informed immediately and a written damage report
demanded. Lack of an official damage report releases METROHM
from any liability to pay compensation.
If any instruments and parts have to be returned, the original packaging should be used if at all possible. This applies above all to instruments, electrodes, buret cylinders and PTFE pistons. Before
embedment in wood shavings or similar material, the parts must be
packed in a dustproof package (for instruments, use of a plastic bag
is imperative). If open assemblies are enclosed in the scope of delivery that are sensitive to electromagnetic voltages (e.g. data interfaces etc.) these must be returned in the associated original protective packaging (e.g. conductive protective bag). (Exception: assemblies with built-in voltage source belong in a non-conductive protective packaging). For damage which arises as a result of noncompliance with these instructions, no warranty responsibility whatsoever will be accepted by METROHM.
787 KF Titrino
70
Page 75

5.5 Warranty and conformity
5.5.2 EU Declaration of conformity
EU Declaration of Conformity
The METROHM AG company, Herisau, Switzerland hereby certifies, that the
instrument:
787 KF Titrino
meets the requirements of EC Directives 89/336/EEC and 73/23/EEC.
Source of the specifications:
EN 50081 Electromagnetic compatibility, basic specification;
Emitted Interference
EN 50082 Electromagnetic compatibility, basic specification;
Interference Immunity
EN 61010 Safety requirements for electrical laboratory measurement
and control equipment
Description of apparatus:
Titrator for fast and precise water determination.
Herisau, October 30, 2001
Dr. J. Frank Ch. Buchmann
Leiter Entwicklung Leiter Produktion und
Beauftragter Qualitätssicherung
787 KF Titrino
71
Page 76

5.5. Warranty and conformity
5.5.3 Certificate of Conformity and System Validation
Certificate of Conformity and System Validation
This is to certify the conformity to the standard specifications for electrical appliances and accessories, as well as to the standard specifications for security
and to system validation issued by the manufacturing company.
Name of commodity: 787 KF Titrino
System software: Stored in ROMs
Name of manufacturer: Metrohm Ltd., Herisau, Switzerland
This Metrohm instrument has been built and has undergone final type testing
according to the standards:
Electromagnetic compatibility: Emission
EN50081-1, EN50081-2, EN55022 (class B)
Electromagnetic compatibility: Immunity
EN50082-1, IEC61000-6-2, Namur, IEC61000-4-2, IEC61000-4-3,
IEC61000-4-5, IEC61000-4-6, IEC61000-4-11
Safety specifications
IEC61010-1, EN61010-1
It has also been certified by the Swiss Electrotechnical Association (SEV),
which is member of the International Certification Body (CB/IEC).
The technical specifications are documented in the instruction manual.
The system software, stored in Read Only Memories (ROMs) has been validated in connection with standard operating procedures in respect to functionality and performance. The features of the system software are documented in the instruction manual.
Metrohm Ltd. is holder of the SQS-certificate of the quality system ISO 9001 for
quality assurance in design/development, production, installation and servicing.
Herisau, October 30, 2001
Dr. J. Frank Ch. Buchmann
Development Manager Production and
Quality Assurance Manager
787 KF Titrino
72
Page 77

5.6 Scope of delivery and ordering designations
5.6 Scope of delivery and ordering designations
787 KF Titrino ......................................................................................2.787.0010
inclusive the following accessories:
1 Titrino ................................................................................................................. 1.787.0010
1 Keypad for 787 KF Titrino.................................................................................. 6.2130.060
1 Key for Exchange Units ..................................................................................... 6.2739.010
1 Double Pt-electrode with plug-in head, without cable....................................... 6.0338.100
1 Electrode cable with plug F 1M......................................................................... 6.2104.020
1 Titration vessel lid .............................................................................................. 6.1414.030
1 Titration vessel 20 mL........................................................................................ 6.1415.220
1 Titration vessel 50 mL........................................................................................ 6.1415.250
1 Set of O-rings for the Titration vessel lid............................................................ 6.1244.040
1 Drying tube ........................................................................................................ 6.1403.040
1 Molecular sieve 250 g........................................................................................ 6.2811.000
2 Screw nipple for KF ........................................................................................... 6.2730.010
1 Stopper with septum, diameter 18 mm ............................................................. 6.2730.020
3 Stopper with nipple and O-ring .........................................................................6.2730.030
2 Septum (5 p.)..................................................................................................... 6.1448.010
1 Glass weighing spoon....................................................................................... 6.2412.000
2 Teflon stirring bar, length 16 mm....................................................................... 6.1903.020
2 Teflon stirring bar, length 25 mm....................................................................... 6.1903.030
1 Cover ................................................................................................................. 6.2723.130
1 Mains cable with cable socket, type CEE(22), V
Cable plug to customer's specifications
type SEV 12 (Switzerland...)............................................................................. 6.2122.020
type CEE(7), VII (Germany...)........................................................................... 6.2122.040
type NEMA/ASA (USA...) ................................................................................. 6.2122.070
1 Vesuv 3.0 light, PC program for data acquisition and method backup
for 2 devices.................................................................................................. 6.6008.500
1 Instructions for Use for 787 KF Titrino ............................................................... 8.787.1003
1 Quick Reference for 787 KF Titrino.................................................................... 8.787.1013
787 KF Titrino
73
Page 78

5.6. Scope of delivery and ordering designations
Options
Accessories to separate order and on payment of extra charge:
Burets
Auxiliary burets
765 Dosimat ......................................................................................................... 2.765.0010
776 Dosimat ......................................................................................................... 2.776.0010
Cable Titrino (activate pulse, line L6) — 765 or 776 Dosimat.............................. 6.2139.000
Exchange Units
V = 1 mL, .......................................................................................................... 6.3026.110
V = 5 mL, .......................................................................................................... 6.3026.150
V = 10 mL, .......................................................................................................... 6.3026.210
V = 20 mL, .......................................................................................................... 6.3026.220
V = 50 mL, .......................................................................................................... 6.3026.250
Titrating Stand and Stirrer
703 Ti Stand for rinsing and addition of fresh solvent,
with built-in magnetic stirrer.......................................................................... 2.703.0010
Cable Titrino — 703 Ti Stand ............................................................................... 6.2108.100
728 Magnetic stirrer.............................................................................................. 2.728.0040
Titration equipment
Equipment for KF titrations .................................................................................. 6.5609.000
Titration vessel, volumes
1... 50 mL ...................................................................................................6.1415.110
5... 70 mL ...................................................................................................6.1415.150
10... 90 mL ...................................................................................................6.1415.210
20... 90 mL ...................................................................................................6.1415.220
50... 150 mL...................................................................................................6.1415.250
70... 200 mL...................................................................................................6.1415.310
Titration vessel with thermostatic jacket, volumes
1... 50 mL ...................................................................................................6.1418.110
5... 70 mL ...................................................................................................6.1418.150
10... 90 mL, order 6.2036.000 holding ring separately ................................6.9914.023
20... 90 mL ...................................................................................................6.1418.220
50... 150 mL...................................................................................................6.1418.250
Titration vessel lid (5 openings) ..........................................................................6.1414.010
Magnetic stirring bars, length
12 mm............................................................................................................6.1903.010
16 mm............................................................................................................6.1903.020
25 mm............................................................................................................6.1903.030
787 KF Titrino
74
Page 79

5.6 Scope of delivery and ordering designations
Electrodes and accessories
Double Pt-electrode with plug-in head, without cable ....................................... 6.0338.100
Electrode cable, 1m ........................................................................................... 6.2104.020
Printers
Custom-Drucker DP40-S4N .................................................................................2.140.0200
Cable Titrino – Custom DP40-S4N (25/9 pins)..................................................... 6.2125.130
Cable Titrino – Seiko DPU-414 ............................................................................. 6.2125.130
Cable Titrino – EPSON LX300+ (25/25 pins)...................................................... 6.2125.050
Cable Titrino – HP Desk Jet (serial interface) (25/25 pins)................................... 6.2125.050
Cable Titrino – HP Desk/Laser Jet (parallel IF)..................................................... 2.145.0330
Adapter for connection of printer/balance at the same COM .............................. 6.2125.030
Balances
Cable Sartorius – balances MP8, MC1 (9/25 pins) ..............................................6.2125.070
Cable Shimadzu – balances BX, BW ...................................................................6.2125.080
Ohaus Voyager, Explorer, Analytical Plus .................................................cable from Ohaus
Mettler AB, AG balances (interface LC-RS25).......................................... cable with balance
Mettler AT balance ............................................................................................ 6.2146.020
Mettler AM, PM balance ............................................ 6.2146.020+accessories from Mettler
Mettler balances with interface 016...........................................................cable from Mettler
Mettler balances with interface 011 or 012........................................................... 6.2125.020
Mettler PG, AB-S, AX, MX, UMX balances ...................................... 6.2134.120+6.2125.170
AND balances (with RS232 interface OP-03) ....................................................... 6.2125.020
Precisa balances .................................................................................................. 6.2125.080
Adapter for connection of printer/balance at the same COM .............................. 6.2125.030
Connection of 768 KF Oven
KF Oven................................................................................................................ 2.768.0010
Cable 795 KFT Titrino — 768 KF Oven, control ................................................... 6.2141.010
787 KF Titrino
75
Page 80

5.6. Scope of delivery and ordering designations
PC connection
Cable Titrino – PC (25/25 pins) ............................................................................ 6.2125.060
Cable Titrino – PC (25/9 pins) ......................................................... 6.2125.060+6.2125.010
RS232 C extension cable (25/25 pins)................................................................. 6.2125.020
Vesuv 3.0, PC program for data acquisition and method backup
for up to 64 devices ...................................................................................... 6.6008.200
Sample Changer
730 Sample Changer, 1 working station, 1 pump and 1 valve ............................ 2.730.0010
730 Sample Changer, 1 working station, 2 pumps and 2 valves ........................ 2.730.0020
730 Sample Changer, 2 working stations, 2 pumps and 2 valves....................... 2.730.0110
730 Sample Changer, 2 working stations, 4 pumps and 4 valves....................... 2.730.0120
760 Sample Changer, 1 working station.............................................................. 2.760.0010
760 Sample Changer, 1 working station, no pumps and 2 stirrer connections... 2.760.0020
for KFT applications
774 Oven Sample Processor ............................................................................... 2.774.0010
Cable Titrino — 730, 760, 774 Sample Changer ................................................. 6.2141.020
Cable 2x Titrino — 730, 760 Sample Changer..................................................... 6.2141.030
Cable Titrino — 730, 760 Sample Changer+665, 725, 765, 776 Dosimat ......... 6.2141.040
Cable Titrino — 730, 760 Sample Changer+ 2x 665, 725, 765, 776 Dosimat ... 6.2141.050
Cable Titrino — Control Unit 664 for Sample Changer 673/674.......................... 3.980.3560
787 KF Titrino
76
Page 81

Index
Index
Display texts are in bold characters
A
Accessories ............................................. 74ff
activate pulse:........................................ 24
actual KF reag......................................... 19
Analogue output
connection of a recorder.......................59
resolution...............................................59
test.........................................................45
auxiliaries ...............................................21
B
-b ...............................................................32
Balance
connection............................................. 55
selection ................................................20
balance: .................................................... 20
baud rate:................................................. 20
blank..........................................................32
BLANK determination................................ 18
C
Cable .......................................................75ff
calculation ...............................................31
Calculation................................................. 31
CE ..............................................................71
Certificates............................................... 71ff
change solvent .........................................39
check electrode........................................ 39
check exchange unit ................................ 39
Computer
connection............................................. 60
conditioning ....................................... 11, 25
conditioning: ...........................................24
Configuration .............................................19
Conformity ................................................. 70
Connection
balance.................................................. 55
cable....................................................75ff
computer ............................................... 60
electrode................................................61
KF Oven.................................................57
Oven Sample Processor ....................... 57
printer ....................................................54
recorder ................................................. 59
sample changer ....................................58
stirrer...................................................... 53
Ti stand..................................................53
Contrast of display ......................................3
Control
lines .....................................................65ff
cylinder empty .........................................39
D
-d .............................................................. 32
Data
input ........................................................ 7
output .................................................... 38
transmission (RS232)
problems........................................... 41
data bit: .................................................. 20
date ........................................................... 21
Decimal places ......................................... 34
Delete
statistics values..................................... 32
delete n= .................................................. 32
device label............................................. 21
dialog language ........................................ 19
dialog:...................................................... 21
Display
contrast ................................................... 3
drift ........................................................36
display KFR vol.:.................................... 21
division by zero ..................................... 39
divisor...................................................... 32
dos.rate .................................................... 22
Dosing......................................................... 3
Drift ............................................................ 36
drift corr.:............................................. 32
drift value............................................... 32
E
Earthing ....................................................... 5
Electrode
connection ............................................ 61
electrode test: ....................................... 21
EP .............................................................. 19
Error messages....................................... 39ff
Examples................................................. 10ff
Exchange unit ....................................... 3, 74
extr.time .................................................. 22
EXX ............................................................. 40
F
Fabrication number..................................... 5
factor........................................................ 31
filling rate............................................. 19
Formulas ................................................... 33
G
GLP ........................................................... 69
H
handshake: ................................................ 20
787 KF Titrino
77
Page 82

Index
I
I(pol)........................................................ 19
I/O-lines .................................................... 65f
ident......................................................... 31
Identification
request .................................................. 24
Initialise RAM............................................. 51
Inputs......................................................... 65
Inquiry.......................................................... 7
Instrument number...................................... 5
ISO............................................................. 72
K
Key
<CALC DATA> ................................ 6, 31
<CLEAR> .............................................. 6
<CONFIG> ...................................... 6, 19
<DOS> .................................................. 3
<DRIFT> .......................................... 6, 36
<ENTER> .............................................. 6
<MODE> .........................................6, 18
<PARAM>........................................ 6, 22
<PRINT>.......................................... 6, 38
<QUIT>.................................................. 6
<SELECT>............................................. 6
<START> ........................................... 3, 6
<STOP/FILL>......................................... 3
<STOP>................................................. 6
<UNIT> ............................................ 6, 34
Keypad ........................................................ 6
KF
Oven...................................................... 57
reagent volume counter........................ 19
KF device settings .................................. 19
KFR volume
display................................................... 21
KFT ............................................................ 18
L
Language .................................................. 19
LED
Cond. ...................................................... 3
limit KF reag. ......................................... 19
M
Mains........................................................... 5
Manual operation ...................................... 6ff
max.rate .................................................... 22
mean ........................................................... 32
Mean
delete result........................................... 32
Menu ........................................................... 7
min.volume incr....................................... 22
Mode
selection................................................ 18
O
Operating course ...................................... 8ff
Ordering designations ............................ 73ff
Outputs ..................................................... 65
Oven.......................................................... 57
P
Parameter ................................................. 22
parity:...................................................... 20
peripheral units ..................................... 20
Perturbation ............................................ 39ff
Pin assignment
Socket "Remote" .................................. 65f
polarizer .................................................. 19
preselections..................................... 24, 37
Printer
connection ............................................ 54
problems............................................... 41
selection................................................ 20
Printing ...................................................... 38
Problems
printer.................................................... 41
program...................................................... 21
R
RAM initialisation....................................... 51
reagent volume counter............................ 19
record:...................................................... 20
Recorder connection ................................ 59
Remote control
via "Remote" lines ............................... 65ff
via RS232.............................................. 68
Remote lines ............................................. 67
Report
output.................................................... 37
printing.................................................. 38
selection.......................................... 37, 38
report:...................................................... 37
req.ident: ................................................ 24
req.smpl size:......................................... 24
res.tab:.................................................... 32
Result
calculation............................................. 31
delete .................................................... 32
display................................................... 38
report .................................................... 37
result unit: ............................................ 34
RS control: .............................................. 20
RS232 interface ........................................ 68
configuration......................................... 20
RS232 settings......................................... 20
run number ................................................ 21
S
Sample
changer................................................. 58
Scope of delivery ...................................... 73
Selection
balance ................................................. 20
mode..................................................... 18
787 KF Titrino
78
Page 83

Index
printer ....................................................20
send to: .................................................... 20
Sensor
connection............................................. 61
Series number .............................................5
Setup .......................................................53ff
smpl size...................................................31
smpl size unit:........................................ 34
start V ......................................................22
Start volume...............................................22
statistics................................................. 32
Statistics
delete results ......................................... 32
display ...................................................38
Stirrer connnection ....................................53
stop bit:...................................................20
stop crit:................................................. 22
Stop criteria ...............................................28
stop drift................................................. 22
stop V ........................................................ 22
stop V reached .........................................39
system error 3 .........................................39
T
t(delay) .................................................... 22
Technical specifications............................ 63
time ........................................................... 21
titer ......................................................... 31
TITER with H2O or std. ............................. 18
TITER with Na2Tart*2H2O ........................ 18
Titration
parameters............................................ 22
titration parameters .............................. 22
Troubleshooting ...................................... 39ff
Tutorial....................................................... 8ff
U
U(pol)........................................................ 19
Unit
result...................................................... 34
sample size ........................................... 34
V
Validation................................................... 69
Values entry................................................. 7
W
wait ........................................................... 11
Warranty .................................................... 70
787 KF Titrino
79
 Loading...