


ENGLISH
USER GUIDE
LM-G820UM
OS: Android 10
Copyright ©2019 LG Electronics Inc. All rights reserved.
MFL71426002 (1.0) |
www.lg.com |
About this user guide
Thank you for choosing this LG product. Please carefully read this user guide before using the device for the first time to ensure safe and proper use.
•Always use genuine LG accessories. The supplied items are designed only for this device and may not be compatible with other devices.
•Descriptions are based on the device default settings.
•Default apps on the device are subject to updates, and support for these apps may be withdrawn without prior notice. If you have any questions about an app provided with the device, please contact an LG Service Center. For user-installed apps, please contact the relevant service provider.
•Modifying the device’s operating system or installing software from unofficial sources may damage the device and lead to data corruption or data loss. Such actions will violate your LG license agreement and void your warranty.
•Some content and illustrations may differ from your device, depending on the area, service provider, software version, or OS version, and are subject to change without prior notice.
•Software, audio, wallpaper, images, and other media supplied with your device are licensed for limited use. If you extract and use these materials for commercial or other purposes, you may be infringing copyright laws. As a user, you are fully responsible for the illegal use of media.
•Additional charges may incur for data services, such as messaging, uploading, downloading, auto-syncing and location services. To avoid additional charges, select a data plan suitable to your needs. Contact your service provider to obtain additional details.
•Failure to follow the instructions in this guide and improper use may damage the device.
1

Instructional notices
WARNING: Situations that could cause injury to the user and third parties.
CAUTION: Situations that may cause minor injury or damage to the device.
NOTE: Notices or additional information.
|
2 |

Table of contents
01
Custom-designed Features
6 Air Motion
10 Camera features
25Sound quality and effects
26Floating Bar
29 Google Assistant
31 Face Unlock
34 Fingerprint recognition
37 Hand ID
39AOD (always-on display)
40Quick Help
40Notes on Water Resistant Properties
02
Basic Functions
44Product components and accessories
45Parts overview
49Turning the power on or off
50Installing the SIM card and memory card
52 Removing the memory card
52 Battery
55 Touch screen
59 Home screen
68 Screen lock
73 Multi-tasking feature
79 Memory card encryption
81 Entering text
89 Content sharing
91 Do not disturb
03
Useful Apps
93 Installing and uninstalling apps
95App Shortcuts
96Phone
100 Messages
107 Camera
125 Gallery
134Chrome
135Google apps
137Contacts
139QuickMemo+
141Clock
143Tasks
143Music
Table of contents |
3 |

144Calculator
144Game Launcher
145LG Health
147 HD Audio Recorder
149File Manager
149LG Mobile Switch
150SmartWorld
150Calendar
04
Settings
152 |
Settings |
152 |
Network & internet |
159 |
Connected devices |
164 |
Sound |
166 |
Display |
168 |
Lock screen & security |
170Privacy
171Location
171Extensions
175Digital Wellbeing and parental controls
175Apps & notifications
176Battery
177Storage
177 Accounts
177 Google
177 System
181 Accessibility
05
Appendix
185LG Language Settings
185LG Bridge
186Phone software update
188Anti-Theft Guide
189Open Source Software Notice Information
189Regulatory information (FCC ID number, etc.)
190Trademarks
191Laser safety statement
192More information
194 FAQ
06
For Your Safety
07
LIMITED WARRANTY STATEMENT
Table of contents |
4 |

01
Custom-designed
Features
Air Motion
Air Motion overview
The ToF sensor and IR illuminator located near the front camera can recognize the location and shape of your hand to launch certain features or apps without touching the screen.
Show your hand to the front camera and then perform hand gestures to launch desired features or apps.
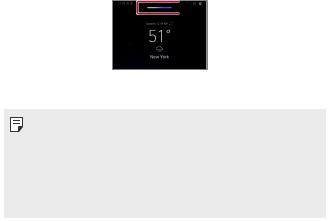
 Air Motion bar
Air Motion feature activated
• This feature may not be available depending on some features or apps.
•Make sure that the ToF sensor and IR illuminator are not blocked by a sticker or any other foreign substances.
•Make sure not to move your hand too fast or bring it too far from or close to the device while using the Air Motion feature.
•If you are wearing gloves or the ToF sensor and IR Illuminator are exposed to direct sunlight, the recognition accuracy may decrease.
Using Air Motion
You can launch the desired features or apps by using the Air Motion feature.
Shortcut and capture
While viewing the Home screen or using an app, you can swipe left or right in the air to open an app or pinch with all fingers to take a screenshot.
Custom-designed Features |
6 |

1Tap 
 Settings
  Extensions
  Air Motion
  Shortcut and capture.
2Tap  to activate this feature.
3Select desired apps under Swipe left and Swipe right to use as shortcuts with Air Motion.
Hand gestures
1To enable Air Motion, place your palm at a distance of 2-5 inches from the device.
2When the Air Motion bar appears at the top of the screen, cup your hand in the air while lifting it to the distance of 6-8 inches from the device to launch the Swipe shortcuts controller.
3Swipe your hand left or right to open the desired app. Or, pinch with all fingers to take a screenshot.
or
To open an app |
To take a screenshot |
Custom-designed Features |
7 |

Control music and videos
While using the music app or video player, you can play, pause or adjust volumes with your hand gestures in the air.
1Tap 
 Settings
  Extensions
  Air Motion
  Control music and videos.
2Tap  to activate this feature.
3Place your palm at a distance of 2-5 inches from the device to enable Air Motion.
•When the Air Motion bar appears at the top of the screen, cup your hand at a distance of 6-8 inches from the device to launch the Player controller.
4Swipe your hand left or right to control the player as desired.
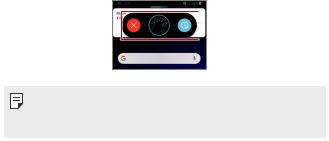
 Player controller
To adjust the volume, cup your hand in the air and wait until the volume controller appears. Then, turn left or right to decrease or increase the volume.
• This feature is available only on the music or video player screen.
Custom-designed Features |
8 |
Control calls and alarms
You can receive a call or stop alarms and timers by swiping your hand left or right in the air.
1Tap 
 Settings
  Extensions
  Air Motion
  Control calls and alarms.
2Tap  of each menu to activate.
3With Air Motion enabled, cup your hand at a distance of 6-8 inches from the device to to launch the controller.
•Air Motion is automatically enabled when a call or alarm notification is received.
4Swipe your hand left or right to control as desired.
 Alarms controller
• You can end a call with Air Motion while using the speakerphone, earphones or headsets.
• You cannot end a video call by using the Air Motion feature.
Show hand guide
Turn this on to preview your hand gesture.
Make sure your hand stays within the guide circle while you control the Air Motion controller.
1Tap Settings
 Extensions
 Air Motion
 Show hand guide.
2Tap to activate this feature.
Custom-designed Features |
9 |
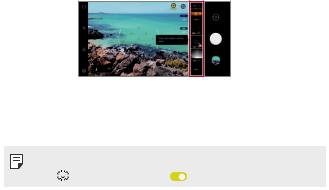
Camera features
Main features
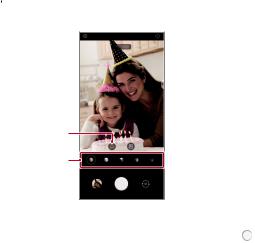
This chapter describes the main features that the camera app provides. Open the camera and explore various features.
1 Tap 

 .
.
Change timer  settings.
Change flash  settings.
Apply filter/sticker  effects.
Set camera options. 
Switch between standard angle  and wide-angle
  cameras.
 Switch between front and rear cameras.
 Take photos.
 Open Gallery.
2Tap More on the camera screen to view various camera modes.
•Select a desired mode from Night view, Panorama, Story shot, Manual Video, Slo-mo, Flash Jump-Cut, Cine shot, Cine Video, Food, YouTube Live, and AR Stickers.
Tap More
Custom-designed Features |
10 |

Dual cameras
The dual cameras, which are located on the back of the device, allow you to take photos or record videos with two different angles of view.
Tap 

 , and select
  /
/  while taking photos or recording videos with the rear camera.
Rear Camera
Steady recording
Use Steady recording to prevent the camera from shaking when recording a video while walking or making large movements.
Activate Anti-shake to reduce or eliminate motion blur in videos.
1Tap 


 Video.
2Tap 


 .
.
3Tap  to record a video.
Custom-designed Features |
11 |
Studio
You can create studio level photos by using Spotlight and Backdrop features in the camera.
Spotlight
You can apply various lighting effects while taking photos.
1Tap 

 , then tap Studio.
2Tap 
 to select a lighting effect.
•Various lighting effects appear at the bottom of the screen.
Spotlight icon
Spotlight options
3 |
Tap the desired lighting effect icon. |
|
4 |
When Studio effect is available. appears on the screen, tap |
to |
|
take a photo. |
|
•The Studio feature may not work if the camera cannot recognize the subject.
Custom-designed Features |
12 |

Backdrop
You can apply various effects for background while taking portrait photos.
1Tap 

 , then tap Studio.
2Tap  to select a backdrop effect.
•Various background colors appear at the bottom of the screen.
3Select a background color you want to apply.
Backdrop icon
Background colors
4 When Studio effect is available appears on the screen, tap to take a photo.
• If the surrounding is dark, the camera may not apply the studio effects.
Custom-designed Features |
13 |

Portrait
You can create an artistic portrait photo, whereby the subject is in focus and the background is blurred. You can also edit the image by applying lighting or color effect to the background.
• While taking a photo, keep the distance to your subject to 1.3 ~ 5 feet.
• This feature is not available if the surroundings are too dark.
1Tap 

 , and tap Portrait.
2Drag the slide bar to the left or right to adjust the blur strength.
Adjust blur strength.
3 When Portrait is available appears on the screen, tap to take a photo.
•The Portrait feature may not work if the camera cannot recognize the subject.
Custom-designed Features |
14 |

Makeup Pro
While taking selfies, you can apply various makeup techniques.
When using the front camera, adjust the skin tone and apply eye and lip makeups.
1Tap 

 , switch to the front camera, then tap
  .
.
2Select a desired makeup option, then drag the slide bar to the left or right to adjust the effect.
•When you select None, the slide bar disappears.
3Select various makeup effects as desired.
•Tap a desired makeup mode to apply the preset makeup. Tap once more to apply more detailed makeup effects.
•Move the Strength adjustment bar to adjust the intensity of the effect selected.
Strength Adjustment Bar
Select Makeup mode 
Select each category to adjust its level
4 Tap to take a photo.
Custom-designed Features |
15 |

AR features
You can use various AR (Augmented Reality) features with the Camera app. You can create your own My Avatar, AR Emoji, or AR Sticker for rich content. My Avatar helps you create a cartoon version of yourself and customize it. AR Emoji helps you create 3D animated animal emojis that mimic facial expression. AR Sticker allows you to choose from several different stickers to use on a photo or video.
Creating My Avatar
1Tap 

 , switch to the front camera, then tap

 .
.
•You can use this function only in Auto Mode.
2Tap 

 to take a photo.
•Follow the on-screen instructions to align your face on the screen.
•To make My Avatar by using one of the saved photos from Gallery, tap  .
.
Custom-designed Features |
16 |

3Select My Avatar’s gender and select details including avatar type, skin tone, hairstyle, and clothes, then tap OK.
•Taken photos are saved in Gallery.
Custom-designed Features |
17 |
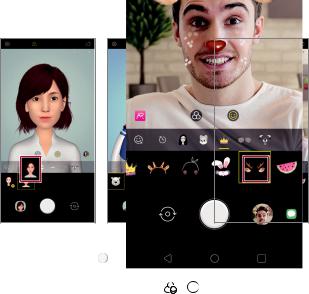
Using My Avatar, AR Emoji, AR Sticker
1Tap 

 , switch to the front camera, then tap

 .
.
2Select an option you want to record.
My Avatar |
AR Emoji |
AR Sticker |
3 To take a photo, tap . |
|
|
To record a video using My Avatar, AR Emojis or AR Stickers, select the video recording menu, and then tap 


 to select the desired item, and tap
  to start shooting the video.
• Taken photos are saved in Gallery.
Custom-designed Features |
18 |

Using Avatar Stickers
1Tap  on the LG Keyboard.
2Select an avatar sticker you want among the self-created My Avatars, etc., then select to send it.
Avatar Sticker 
icon
Using Ani Sticker
1Tap 
 on the LG Keyboard.
2Select the desired My Avatar.
3Tap  to record voice and video, and then tap
  to save.
•Ani Stickers with various facial expressions, motions, and voices are created.
4Tap  to upload Ani Sticker.
•Tap  to preview the created Ani Sticker.
Custom-designed Features |
19 |

Select an
Ani Sticker
Preview icon
Custom-designed Features |
20 |

AI CAM
You can use the AI Cam feature to automatically recognize the object when taking a photo or recording a video for an optimal quality.
1Tap 

 , then tap AI CAM.
2When the object is recognized, the best effect for the scene is applied.
•To apply other effects, tap the scene icon.
•A wide range of categories, such as portrait, animals, food, sunrise, sunset, landscape, sky, beach, babies, flowers and text, can be recognized automatically.
• The result of the scene recognition may differ depending on the illumination or the location of the subject while taking photos. Keywords do not appear on the actual photos or videos.
Custom-designed Features |
21 |

Cine shot
You can record a moment and make a video with only a part of the scene in motion.
While recording a video, hold the device steady. After recorded, rub the area in the video you want in motion. The selected area starts moving and the rest of the video remains still.
1Tap 

 , then tap More
 .
.
2Tap  to record a 3 second video.
•Hold the device steady while recording the video.
3Tap  and rub the area you want in motion with the cine shot effect.
Undo |
|
|
|
|
|
Play forward and |
||
|
|
|
|
|||||
Redo |
|
|
|
|
|
|
|
backward repeatedly. |
|
|
|
|
|
|
|
Play forward repeatedly. |
|
|
|
|
|
|
|
|
|
|
|
|
|
|
|
|
|
||
Select the area to move. |
|
|
|
Erase the selected area. |
|
|
•Tap  to erase the selected area.
•Tap  to play the selected area in motion forward repeatedly.
•Tap  to play the selected area in motion forward and backward repeatedly.
4Tap SAVE.
•The selected area will be in motion.
Custom-designed Features |
22 |

Cine Video
You can record a movie-like video.
1Tap 

 .
.
2Tap More 
 .
.
3Tap  to record a video.
•
 : Record a video by selecting the point zoom feature to zoom in/ out around a specific area.
•
 : Select an effect to apply to the recording. You can also adjust the vignette and strength for each Cine effect. This feature cannot be changed after you have started recording.
• The Point Zoom feature supports a zoom speed of up to 3x.
• This feature only supports video recordings in standard angle.
Custom-designed Features |
23 |
Graphy
You can select one of recommended images and apply the same values for the white balance, ISO and shutter speed to obtain professional level photos.
1Tap 

 , then tap Manual Camera.
2Tap  and select the desired scene from the recommended images.
 Recommended images
3Tap to take a photo.
•Photographs are taken under the same photograph settings selected in Graphy.
• |
This feature is available only in Manual Camera mode. |
|
• |
Tap , then tap Graphy photos |
to deactivate this feature. |
Custom-designed Features |
24 |
Sound quality and effects
DTS:X 3D Surround
You can play a song or video in three-dimensional, immersive and vivid sound. To use this feature, connect earphones, speaker or other external audio devices to your device.
Tap 
 Settings
  Sound
Sound  Sound quality and effects, then tap DTS:X 3D Surround
  to activate this feature.
•You can also bring down the status bar from the top of the screen and tap the icon for DTS:X 3D Surround to activate the function.
If you connect external sound devices such as earphones and speakers to your device, a pop up appears where you can turn on the DTS:X 3D Surround or Hi-Fi Quad DAC function.
Custom-designed Features |
25 |
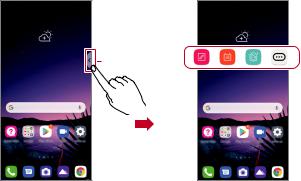
Floating Bar
Floating Bar overview
You can access frequently used features, including shortcuts, screen capture, music player, and quick contacts, by touching and then swiping Floating Bar on the screen.
To enable the Floating Bar feature, tap 
 Settings
  Extensions
  Floating Bar
  .
.
Opening and closing Floating Bar
•To open Floating Bar: Tap  or
or  .
.
•To close Floating Bar: Tap  or
or  .
.
Floating Bar
Custom-designed Features |
26 |

Moving the Floating Bar position
Touch and hold Floating Bar, then drag it to a desired location.
Disabling Floating Bar
You can disable Floating Bar by using one of the following methods:
•Touch and hold  or
or  on Floating Bar and then drag it to the Hide area at the top of the screen.
• |
Tap |
or to open Floating Bar, then tap |
. |
• |
Tap |
Settings Extensions Floating Bar |
. |
Custom-designed Features |
27 |

Setting Floating Bar
You can select features to display on Floating Bar and change their display order. Tap  from Floating Bar or tap
 Settings
  Extensions
  Floating Bar.
•Position: You can set an area within which you can move the floating bar.
•Shortcuts: Quickly access frequently used apps or features.
•Screen capture: Capture the screen to crop the desired part or to create a GIF file.
You can use Capture+ on the desired screen.
You can capture a scrolling screenshot and use it for Q Memo+ or save it in the gallery.
You can capture a desired area and use it for Q Memo+ or save it in the gallery.
Save a current screen as a GIF file. You can adjust the size of the image you want to capture.
• To move to the desired location, drag  .
.
•To start recording a GIF, tap .
.
•To stop recording a GIF, tap .
.
•Music player: Control the music you are listening to.
•Quick contacts: Call or message people set as quick contacts.
• A maximum of 5 apps or features can be added to the shortcuts.
•A maximum of 5 contacts can be added as quick contacts.
•GIF capture is a function provided for the user to produce creative images. Violating rights such as intellectual property right or defaming the reputation of another person by using the GIF capture function may lead to a civil or criminal liability in accordance with the related laws.
Be cautious not to copy or transmit another person’s work without authorization. LG Electronics is not liable in any way for such acts by users.
•A GIF can be created up to 15 seconds long.
Custom-designed Features |
28 |

Google Assistant
Google Assistant overview
Your device has the built-in Google Assistant feature. Find answers and get things done while on-the-go.
• To use this feature, first connect to the network and sign in to your Google Account.
Sign in
1Press the Google Assistant key on the left side of the device. or
Touch and hold  from the Home screen to launch Google Assistant. (If Gesture and Buttons or Buttons only is set for Navigation bar. See Changing the style of the Home touch buttons for details.)
or
Swipe diagonally from a bottom edge of the screen. (If Gestures is set for Navigation bar. See Changing the style of the Home touch buttons for details.)
2Tap GET STARTED.
3Follow the on-screen instructions.
•The device saves your voice data for recognition.
4Set whether to use the voice match unlock function.
•If you use the voice match unlock function, you can unlock the device even when the device screen is turned off or the device is charging by saying “OK Google” or “Hey Google.”.
Custom-designed Features |
29 |
 Loading...