


HT302SD-D0_NA3NLLD_ENG_3951
HT302SD
(HT302SD-D0, SH32SD-S, SH32SD-W)
English DVD/CD RECEIVER
Read the manual carefully before using the unit
GERMAN RECEPTOR DVD/CD
Lees deze handleiding aandacht door voordat u dit toestel gebruikt.
FRENCH RECEPTOR DVD/CD
Veuillez lire attentivement le présent manuel avant d'utiliser l'appareil.
DUTCH RECEPTOR DVD/CD
Lees deze handleiding aandacht door voordat u dit toestel gebruikt.


 R
R 
 USB
USB
P/N: MFL54563951
QUICK SETUP GUIDE
Speaker System Connection
Connect the speaker wires the speaker terminals. To obtain the best possible surround sound, adjust the speaker parameters (volume, distance, etc.).
Notes:
Be sure to match the speaker wires to the appropriate terminal on the components, + to + and – to –. If the cables are reversed, the sound will be distorted and will lack bass.
If you use front speakers with low maximum input rating, adjust the volume carefully to avoid excessive output on the speakers.
5.1 Speaker Setup
Make the following settings for the built-in 5.1 channel surround decoder.
1.Press ENTER and 5.1 Speaker Setup menu appears.
2.Use b / B to select the desired speaker.
3.Adjust options using v / V / b / B buttons.
4.Press ENTER to confirm your selection. Returns to the previous menu.
Speaker selection
Select a speaker that you want to adjust. [Front speaker (Front L), Front speaker (Front R), Center Speaker (Center), Subwoofer (SubWoofer), Rear speaker (Rear L), Rear speaker (Rear R)]
Note:
Certain speaker settings are prohibited by the Dolby Digital licensing agreement.
Size
Since the speaker settings are fixed, you cannot change the settings.
Volume
Press b / B to adjust the output level of the selected speaker. (-5dB ~ 5dB)
Distance
If you connected speakers to your DVD/CD Receiver, setting the Distance lets the speakers know how far the sound has to travel to reach your set listening point. This allows the sound from each speaker to reach the listener at the same time.
Press b / B to adjust the Distance of the selected speaker. (You can’t adjust front / Woofer speakers)
Test
Press b / B to test the signals of each speaker. Adjust the volume to match the volume of test signals memorized in the system.
Front Left (L) → Center → Front Right (R) → |
Rear Right (R) → Rear Left (L) → SubWoofer |
2

Introduction
Installation
Before Use . . . . . . . . . . . . . . . . . . . . . . . . . . . . . . . .3
TV Connection . . . . . . . . . . . . . . . . . . . . . . . . . . . . .4
Antenna Connection . . . . . . . . . . . . . . . . . . . . . . . .4
Speaker System Connection . . . . . . . . . . . . . . . . .4
Optional Equipment Connection . . . . . . . . . . . . . .4
Operation
Operate using the Front Panel . . . . . . . . . . . . . . . .5 Operate using the Remote Control . . . . . . . . . . .5-7
Setup
Initial Settings . . . . . . . . . . . . . . . . . . . . . . . . . . . . .7
General Operation . . . . . . . . . . . . . . . . . . . . . . . . . .7
Language . . . . . . . . . . . . . . . . . . . . . . . . . . . . . . .7
Display . . . . . . . . . . . . . . . . . . . . . . . . . . . . . . . . .7
Audio . . . . . . . . . . . . . . . . . . . . . . . . . . . . . . . . . .7
Others . . . . . . . . . . . . . . . . . . . . . . . . . . . . . . . . .7
5.1 Speaker Setup . . . . . . . . . . . . . . . . . . . . . . . .8
Lock (Parental Control) . . . . . . . . . . . . . . . . . . . . .8
Presetting the Radio Stations . . . . . . . . .8
Playing an Audio CD or MP3/WMA/JPG/DivX file
Playing an Audio CD or MP3/WMA file . . . . . . . . . .9 Viewing a JPEG file . . . . . . . . . . . . . . . . . . . . . .9-10 Playing a DivX Movie file . . . . . . . . . . . . . . . . . . .10 Additional features . . . . . . . . . . . . . . . . . . . . . . . .10
RDS Operation . . . . . . . . . . . . . . . . . . . .10
Reference
Language Codes . . . . . . . . . . . . . . . . . . . . . . . . . .11
Area Codes . . . . . . . . . . . . . . . . . . . . . . . . . . . . . .11
Troubleshooting . . . . . . . . . . . . . . . . . . . . . . . . . .12
Specifications . . . . . . . . . . . . . . . . . . . . . . . . . . . .13
Before Use
About the  Symbol Display
“  ” may appear on your TV display during operation and indicates that the function explained in this owner’s manual is not available on that specific DVD video disc.
Symbol Used in this Manual |
|
<![if ! IE]> <![endif]>ENGLISH |
|
|
|
A section whose title has one of the following symbols is |
|
|
applicable only to the disc represented by the symbol. |
|
|
DVD-V DVD and finalized DVD±R/RW |
|
|
MP3 files |
|
|
WMA |
DivX files |
|
Types of Playable Discs |
|
|
In addition, this unit can play a DVD- |
DVD+RW, and |
|
CD-R or CD-RW that contains audio |
WMA, |
|
JPEG or DivX files. |
|
|
|
|
|
Notes: |
|
|
Depending on the conditions of the |
|
|
equipment or the CD-R/RW (or |
DVD+RW) |
|
disc itself, some CD-R/RW (or DVD |
DVD+RW) |
|
discs may not be played on the unit |
|
|
Do not attach any seal or label to |
(the |
|
labeled side or the recorded side) |
. |
|
Do not use irregularly shaped CDs |
-shaped |
|
or octagonal). It may result in |
|
|
Regional Code |
|
|
This unit has a regional code printed |
bottom of the |
|
unit. This unit can play only DVD |
as the |
|
same as the bottom of the unit or |
|
|
Notes on Regional Codes |
|
|
If you try to play a DVD with a |
code |
|
from your player, the message “Check |
Code” |
|
appears on the TV screen. |
|
|
Manufactured under license from Dolby Laboratories. “Dolby”, “Pro Logic”, and the double-D symbol are trademarks of Dolby Laboratories.
DTS and DTS Digital Out are trademarks of Digital Theater Systems, Inc.
3

Installation
Do not touch the inner pins of the jacks on the rear panel. Electrostatic discharge may cause permanent damage to the unit.
Rear of TV
COMPONENT VIDEO / |
SCART INPUT |
PROGRESSIVE SCAN INPUT |
AM Loop Antenna |
Y Pb |
Pr |
(supplied) |
|
|
FM Wire Antenna (supplied)
C |
T |
Rear of DVD/CD Receiver |
To AUX IN AUDIO |
|
|
|
(L/R) |
AUDIO (L) 

AUDIO (R)

Rear of VCR
To AUDIO OUT (L/R)
TV Connection
Make one of the following connections, depending on the capabilities of your existing equipment.
Tips:
Depending on your TV and other equipment you wish to connect, there are various ways you could connect the DVD/CD Receiver. Use one of the connections described below.
Please refer to the manuals of your TV, VCR, Stereo System or other devices as necessary to make the best connections.
Caution:
Make sure the DVD/CD Receiver is connected directly to the TV. Select the correct AV input on your TV.
Do not connect your DVD/CD Receiver to the TV via your VCR. The DVD image could be distorted by the copy protection system.
SCART connection
Connect the EURO AV OUTPUT (TO TV) socket on the DVD/CD Receiver to the corresponding jacks on the TV using the scart cable (T).
Component Video connection
Connect the COMPONENT VIDEO OUT jacks from the DVD/CD Receiver to the corresponding jacks on the TV using a Y PB PR cable (C).
If your television is a high-definition or “digital ready” television, you may take advantage of the DVD/CD Receiver’s progressive scan output for higher video resolution.
If your TV does not accept your resolution setting, abnormal picture appears on the screen. Please read owner’s manual for TV then set the resolution that your TV can accept.
Antenna Connection
Connect the supplied FM/AM antenna for listening to the radio.
Connect the AM Loop aerial to the AM aerial connector.
Connect the FM Wire aerial to the FM aerial connector.
Notes:
To prevent noise pickup, keep the AM Loop aerial away from the DVD/CD Receiver and other components.
Be sure to fully extend the FM wire aerial.
After connecting the FM Wire aerial, keep it as horizontal as possible.
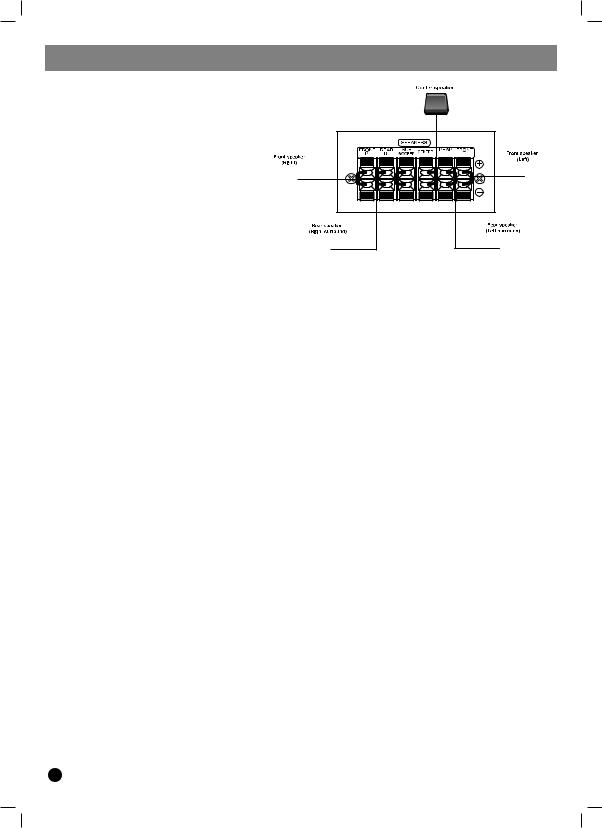
Speaker System Connection
Connect the speaker wires the speaker terminals.
To obtain the best possible surround sound, adjust the speaker parameters (volume, distance, etc.).
Notes:
Be sure to match the speaker wires to the appropriate terminal on the components, + to + and – to –. If the cables are reversed, the sound will be distorted and will lack bass.
If you use front speakers with low maximum input rating, adjust the volume carefully to avoid excessive output on the speakers.
Optional Equipment Connection
Connect a VCR to the AUX IN connectors.
4

Operation
|
|
9. STOP |
|
|
|
|
|
10. TUNING(-/+)/SKIP/SCAN(.bb/BB>) |
|
||
|
|
For manual tuning, press TUNING (-/+) repeatedly. |
|
||
|
|
For automatic tuning, press and hold TUNING (-/+) for about |
|
||
Operate using the Front Panel |
two seconds on the front panel. |
|
|||
11. VOLUME controller Adjusts speaker volume. |
|
||||
1. STANDBY/ON/STANDBY indicator |
Don’t extract the USB device while operating. |
|
|||
Lights red when the receiver is in Standby mode (off) |
Music files (MP3/WMA), image files (JPEG) and Video |
|
|||
2. USB Port |
Connect the USB port of a USB Memory (or MP3 |
files can be played. |
|
|
|
player, etc.) to the USB port on the front of the unit. |
This unit cannot use a USB HUB. |
|
|||
Removing the USB Device from the unit |
Recommended Memory Cards. |
|
|||
1. Choose a different function mode or press STOP (x) twice in |
Compact Flash Card (CFC), Micro Drive (MD), Smart |
|
|||
a row. |
|
|
|||
|
Media Card (SMC), Memory Stick (MS), Secure Digital |
|
|||
2. Remove the USB device from the unit. |
|
||||
Card (SD), Multimedia Card (MMC), Memory Stick Pro |
|
||||
3. DISC Tray |
|
|
|||
4. DISPLAY Window |
(MS-Pro) |
|
|
||
5. Remote Sensor:Remote Control Operation Range |
- Compatible with: FAT16, FAT32 |
|
|||
Point the Remote Control at the remote sensor and press the |
- Only use the memory cards recommended. |
|
|||
buttons. |
|
Devices which require additional program installation |
|
||
Distance: About 23 ft (7 m) from the front of the Remote |
when you have connected the unit to a computer are not |
||||
Sensor |
|
||||
|
supported. |
|
|
||
Angle: About 30° in each direction in front of the Remote |
|
|
|||
Sensor |
|
In case of a USB HDD, make sure to connect an |
|
||
6. OPEN/CLOSE Opens and closes the disc tray. |
auxiliary power cord to the USB HDD for proper |
|
|||
7. FUNC./PLAY Press and hold down this button about 3 |
operation. Up to four primary partitions of a drive are |
|
|||
seconds, then press repeatedly to select other function. |
supported. If there is an extension partition, it will not be |
||||
8. MONO/ST./PAUSE/STEP |
supported. |
|
|
||
If an FM program is noisy |
|
|
|||
If the drive of USB device is two or more, a drive folder is |
|||||
Press MONO/ST. on the front panel to make “ST.” disappear in |
|||||
displayed on the screen. If you want to move to the initial |
|||||
the display window. There will be no stereo effect, but the |
|||||
menu after you select a folder, press RETURN. |
|
||||
reception will improve. Press the button again to restore the |
|
||||
Digital cameras and mobile phones are not supported. |
|
||||
stereo effect. |
|
|
|||
|
|
|
|
||
Operate using the Remote Control |
Note: You can check the remaining time before the DVD/CD Receiver |
||||
|
|
turns off. |
|
|
|
|
|
Press SLEEP. The remaining time appears in the display window. |
|
||
|
2 |
5. DIMMER This function will change the brightness of the display |
|
||
1 |
window on the front panel during in power-on status. |
|
|||
|
|
Press the DIMMER repeatedly. |
|
||
|
|
6. 0-9 numerical buttons Selects a service, program number |
|
||
|
3 |
directly or selects numbered options in a menu. |
|
||
|
7. XTS Pro Each time you press XTS Pro the setting changes in the |
||||
|
|
||||
|
4 |
following order. |
|
|
|
|
XTS→ NORMAL → XTS-P... |
|
|||
|
|
XTS-P: The unique sound quality of the LG Technology creates the |
|||
6 |
5 |
optimum sound for you to play the perfect playback of the original |
|
||
sound and to feel the living sound source. |
|
||||
|
|
XTS: When playing a movie with weak bass relative to the general |
|||
|
|
music, it forces sound to the woofer. |
|
||
7 |
|
In the mode of 2 CH BYPASS, It creates the high display effect by |
|
||
|
playing the sound source via the rear speakers same as the front |
|
|||
8 |
|
speakers. |
|
|
|
10 |
Note: The XTS mode is temporarily disabled when changing from |
||||
9 |
2.1 CH to 5.1 CH and it is enabled when changing it to 2.1 CH. |
|
|||
|
|
|
|||
|
|
NORMAL: XTS-P and XTS modes turn off. |
|
||
|
|
8. RETURN Removes the setup menu. |
|
||
|
|
9. SOUND You can enjoy surround sound simply by selecting one of |
|||
1. POWER |
|
the pre-programmed sound fields according to the program you want |
|||
|
to listen to (2 ch. sound only). |
|
|||
2. OPEN/CLOSE Opens and closes the disc tray. |
Press SOUND button repeatedly. |
|
|||
3. FUNCTION SELECT buttons BAND, DVD, AUX, USB |
BPASS(BYPASS) → On STR(ON STAGE) →STU(STUDIO) → |
|
|||
4. SLEEP You can set the DVD/CD Receiver to turn off automatically |
CLUB(CLUB) → HALL(HALL) → THEA(THEATER) → |
|
|||
CHUR(CHURCH) → PL ll-1(PL ll MOVIE) → PL ll-2(PL ll MUSIC) → PL |
|||||
at a specified time. |
|||||
ll-3(PL ll MTRX) → BPASS(BYPASS)... |
|
||||
1. Press SLEEP to set the desired sleep time. The SL indicator and |
|
||||
Note: Initial sound mode is BYPASS. |
|
||||
the sleep time appears in the display window. |
|
||||
10. SUBTITLE DVD |
|
|
|||
2. Each time you press SLEEP the setting changes in the |
|
|
|||
following order. |
During playback, |
SUBTITLE repeatedly to select a |
|
||
SL 180 →150 →120→90 →80 → 70 → 60→ 50 → 40 → 30 → 20 →10 →OFF |
desired subtitle language. |
5 |
|||
|
|
||||
<![endif]>ENGLISH
 Loading...