


 Loading...
Network FAX Driver
Operation Guide

About this Operation Guide
This Operation Guide explains the settings for the Network FAX driver as well as the procedures that are required in order to use the Network FAX Transmission Function. It is recommended that you also read the corresponding Operation Guide as well.
The items that can be configured will be different depending on the model.
IMPORTANT: The use of Adobe Reader implies agreement to the terms of use as stipulated by Adobe Systems Incorporated.
Trademark Information
•Microsoft, Windows and Internet Explorer are registered trademarks of Microsoft Corporation of the United States and other countries.
•Windows Server and Windows XP are trademarks of Microsoft Corporation.
•Ethernet is a registered trademark of Xerox Corporation.
•IBM and IBM PC-AT are trademarks of International Business Machines Corporation.
•Adobe and Acrobat are registered trademarks of Adobe Systems Incorporated.
All other company and product names contained in this Operation Guide are trademarks or registered trademarks of their respective companies. The designations ™ and ® will not be used in this manual.
Operating Environment
The Network FAX Transmission Function is compatible for use under the following operating environments:
•Hardware... IBM PC-AT compatible computer
•Interface... 10BASE-T or 100BASE-TX
•Operating system... Windows XP, Windows Server 2003,
Windows Vista and Windows Server 2008,
Windows 7
The screen shots used in this Operation Guide are compiled from Windows 7. The actual displays on your computer may differ depending upon your particular operating system.
i
Network FAX Transmission Function
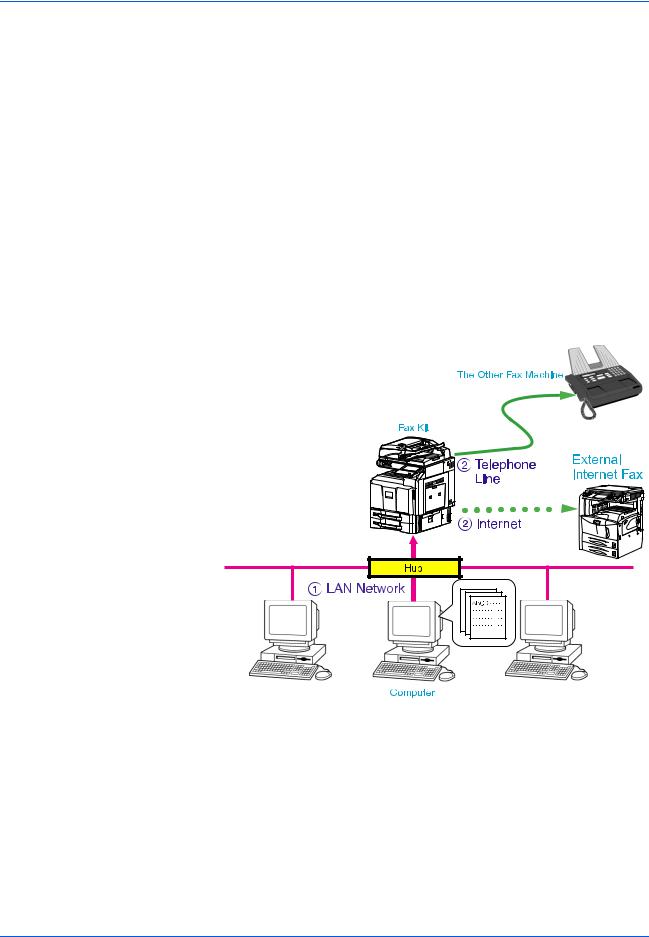
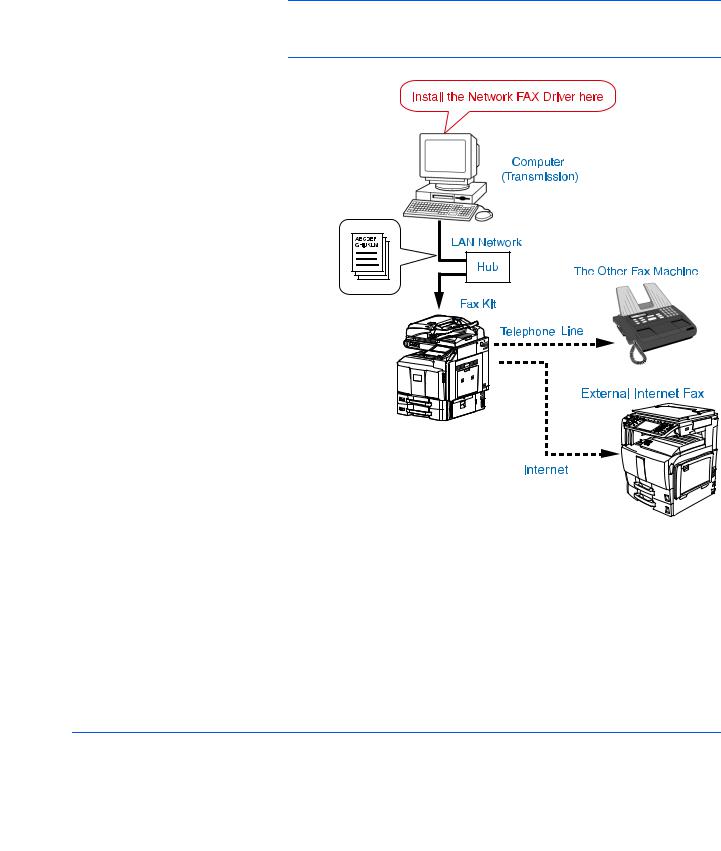
The Network FAX Transmission Function enables you to send faxes directly from your computer to receiving facsimiles.
By using the Network FAX driver, you can send directly to other facsimiles
– via the Fax Kit that is installed in this fax machine – fax documents that you have prepared using the software applications on your computer. The Network FAX driver must be installed in all computers that will be used to send fax documents.
Outline of the Network FAX Transmission Function
1Documents are sent as image data from a network computer over the LAN network to this fax machine.
2Documents are sent from this fax machine to another external fax machine or Internet fax.
ii

Contents
|
About this Operation Guide. . . . . . . . . . . . . . . . . . . . . . . . . . . . . . . . . . . . . . . . . . . . . . . . . . . . |
. . . i |
|
Trademark Information . . . . . . . . . . . . . . . . . . . . . . . . . . . . . . . . . . . . . . . . . . . . . . . . . . . . . . . |
. . . i |
|
Operating Environment . . . . . . . . . . . . . . . . . . . . . . . . . . . . . . . . . . . . . . . . . . . . . . . . . . . . . . . |
. . . i |
|
Network FAX Transmission Function . . . . . . . . . . . . . . . . . . . . . . . . . . . . . . . . . . . . . . . . . . . . |
. . . ii |
1 |
Installing the Corresponding Software |
|
|
Installing the Network FAX Driver . . . . . . . . . . . . . . . . . . . . . . . . . . . . . . . . . . . . . . . . . . . . . . . |
. 1-1 |
2 |
Sending a Fax |
|
|
Main Transmission Functions . . . . . . . . . . . . . . . . . . . . . . . . . . . . . . . . . . . . . . . . . . . . . . . . . . . |
2-2 |
|
Basic Transmission . . . . . . . . . . . . . . . . . . . . . . . . . . . . . . . . . . . . . . . . . . . . . . . . . . . . . . . . . . . |
2-5 |
|
Accessing the Printing Preferences Dialog Box . . . . . . . . . . . . . . . . . . . . . . . . . . . . . . . . . . . . . |
2-7 |
|
FAX Setting Tab . . . . . . . . . . . . . . . . . . . . . . . . . . . . . . . . . . . . . . . . . . . . . . . . . . . . . . . . . . . . . |
2-7 |
|
Default Settings Dialog Box . . . . . . . . . . . . . . . . . . . . . . . . . . . . . . . . . . . . . . . . . . . . . . . . . . . . |
2-9 |
|
Various Settings in the Transmit Settings Dialog Box . . . . . . . . . . . . . . . . . . . . . . . . . . . . . . . . |
2-12 |
|
Transmission Control . . . . . . . . . . . . . . . . . . . . . . . . . . . . . . . . . . . . . . . . . . . . . . . . . . . . . . . . |
2-17 |
3 |
Using Cover Pages |
|
|
Cover Page Selection (Transmission Settings). . . . . . . . . . . . . . . . . . . . . . . . . . . . . . . . . . . . . . |
3-1 |
|
Cover Page Registration (Default Settings) . . . . . . . . . . . . . . . . . . . . . . . . . . . . . . . . . . . . . . . . |
3-6 |
|
Creating New Cover Page Templates . . . . . . . . . . . . . . . . . . . . . . . . . . . . . . . . . . . . . . . . . . . . . |
3-8 |
4 |
Appendix |
|
|
Error Message. . . . . . . . . . . . . . . . . . . . . . . . . . . . . . . . . . . . . . . . . . . . . . . . . . . . . . . . . . . . . . . |
4-1 |
|
Specifications . . . . . . . . . . . . . . . . . . . . . . . . . . . . . . . . . . . . . . . . . . . . . . . . . . . . . . . . . . . . . . . |
4-2 |
iii

iv

1 Installing the Corresponding Software
Installing the Network FAX Driver
1 |
Turn on the power to the machine. |
|
|
|
NOTE: If the machine setup has not been completed, first set up the |
|
machine (connect cables, set up network, etc.). The machine must be |
|
recognized when installing the driver. For information regarding machine |
|
setup, refer to the Operation Guide for the machine. |
2 |
|
Insert the provided Product Library DVD into the DVD drive of the |
|
|
computer in which to install the Network FAX Driver. If the AutoPlay |
window appears, click Run setup.exe.
|
If a warning message regarding the programs on the DVD is displayed, |
|
click Allow. |
3 |
License Agreement screen will be displayed. To accept the agreement |
|
conditions, click on the Accept button. The set-up screen will then be |
displayed. The main menu window then appears.
NOTE: If the set-up screen does not appear after the DVD is loaded, double click on the DVD drive icon to open the drive directory and then double click on setup.exe.
1-1
Installing the Corresponding Software
4
5
6
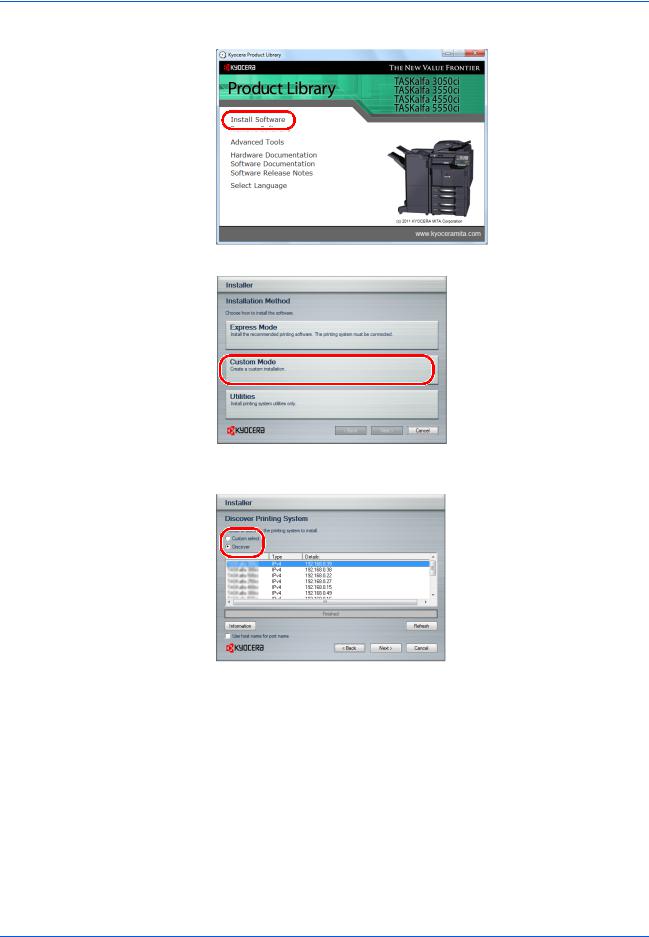
Click on Install Software.
On the Installation Method page, select Custom Mode.
The Discover Printing System page appears displaying Discover selected. You can use this option, or the Custom select option.
With the Discover option, you can let the system find all the devices available for driver installation. If you use this option, proceed to step 7.
With the Custom select option, you can choose the printing system and printer port to install. Select the Custom select and click on the Next button. Proceed to step 9.
If Discover does not find your machine, a message appears. Ensure that your machine is properly connected by the correct cable and is turned on, and then close the message box. Remove and reinsert the cable to your computer and retry the discovery. Contact your system administrator if the system cannot find your machine.
1-2
Installing the Corresponding Software
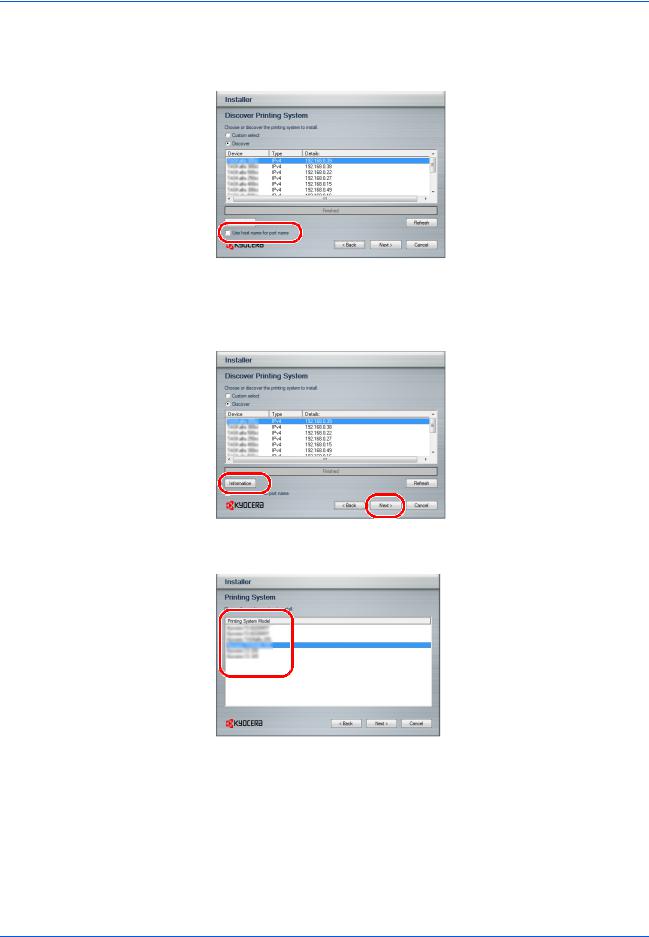
7 |
Select Use host name for port name to use a host name for the Stan- |
|
dard TCP/IP port. If the installation wizard still displays the IP address, |
contact your system administrator.
8 |
Click on the Next button. Proceed to step 15. Click Information button if |
|
you want to open a dialog box with details about IP Address, Host Name, |
|
Printer Model (the machine’s product name), Contact, Location, and |
|
Serial Number. |
9 |
On the Printing System page, Select the printing System (the machine’s |
|
product name) and click on the Next button. |
1-3
Installing the Corresponding Software
10
11
12
13
14
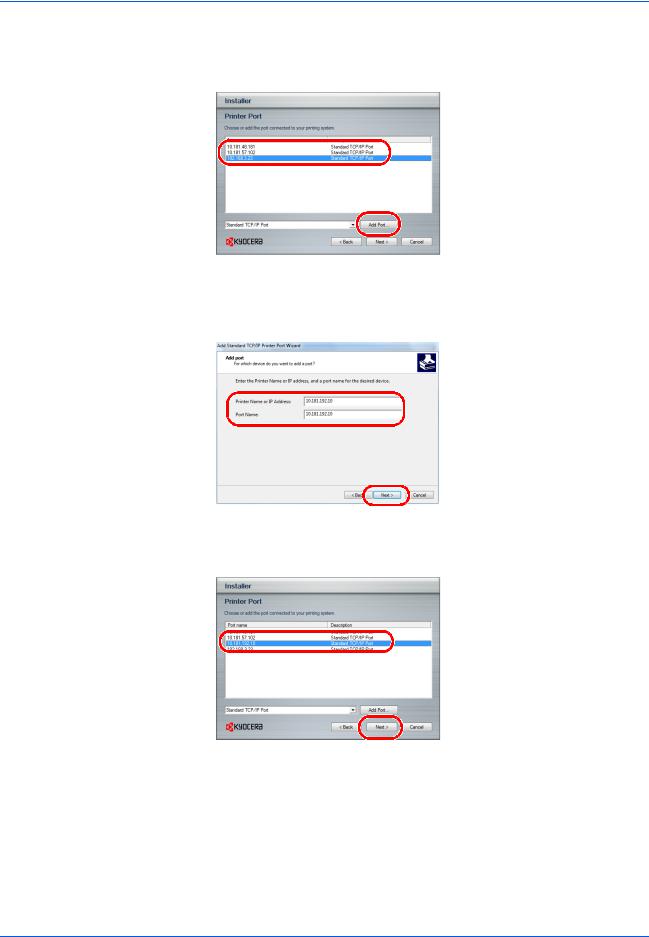
Select Standard TCP/IP Port and click on the Add Port... button.
If Standard TCP/IP Port has been already installed, proceed to step 14.
Click on the Next button.
Enter the IP address of the machine in the Printer Name or IP Address field and click on the Next button.
Click on the Finish button.
Select the created port and click on the Next button.
1-4
|
Installing the Corresponding Software |
|
|
15 |
On the Driver tab, check the box for FAX Driver. Click on the Next button. |
16 On the FAX Settings page, you can assign a name to the machine. This is the name that appears in Windows Printers and Faxes and in the printer list in applications.
Click on the Next button.
17 |
On the Confirm Settings page, click Install if the settings are correct. |
Click Back to correct the settings.
Follow the instructions in the installation wizard to continue the installation procedure.
NOTE: If Windows Security and User Account Control are displayed, no trouble should be found with operation after installing the driver and software we have provided. Continue installation.
1-5

Installing the Corresponding Software
Uninstalling the Network FAX Driver
|
Perform the following procedure to delete the Network FAX Driver from |
|
your computer. |
1 |
Click on the Start in the Task Bar and then select All Programs, Kyocera, |
|
and Uninstall Kyocera Product Library to display the Uninstall Wizard. |
2 |
Place a check in the check box of the driver to be deleted and click on |
|
Uninstall. The driver is deleted. |
3 |
Follow the instructions in the uninstallation wizard to continue the |
|
procedure. |
If a system restart message appears, restart the computer by following the screen prompts.
1-6
2 Sending a Fax
This section contains explanations on how to send documents created on a network computer directly from that computer to the other fax machine by using the Network FAX Driver.
IMPORTANT: The Network FAX Driver must be installed on the computer from which you want to send the documents. Refer to Installing the Network FAX Driver on page 1-1 for the procedure to install the software.
2-1

Sending a Fax
Main Transmission Functions
(1) Delayed Fax Transmission <see page 2-9>
This function enables you to have documents transmitted at a designated time. Delayed Fax Transmission can be carried out at any time within 24 hours from the time that is actually set in the fax itself.
(2) Subaddress-Based Communication <see page 2-14>
This is a communication method that enables you to transmit documents using Subaddress-Based Communication. A sub-address and password are set in the Subaddress-Based Communication to achieve highly confidential communication. When making the transmission settings, the sub-address and password of the other party (when these are set by the other party) must be entered.
NOTE: For more information on Subaddress-Based communication, refer to the Operation Guide for the Fax Kit.
2-2
Loading...