


 Loading...
Basic Manual
Getting Ready
Basic Operation
G03
Safety precautions
Appendix

Preface
Thank you for buying the "TORQUE G03" (simply called the "product" or "main unit" from here on).
Before using the product, be sure to read the "Basic Manual" (this manual) to ensure correct use.
List of Packaged Items
Before your start using the product, make sure that you have all the following packaged with the product.
Main unit |
Back cover (KYV41TGA/ |
|
KYV41TKA/KYV41TLA/KYV41TRA) |
|
* Installed on back of main unit |
ii
Battery cover (KYV41TBA) |
LOCK Rotating Tool |
* Installed on back of main unit |
(sample) |
Battery pack (KYV41UAA) |
Hexagon wrench |
|
(sample) |
●(Instruction Manual) (Japanese)
●(Setting Guide) (Japanese)
The following items are not included in the package.
AC adapter |
microSD memory card |
USB Type-C™ cable |
Earphones |
Wireless charging pad |
|
|
|

Purchase a specified charger (sold separately).
Illustrations of cell phones in this manual are only for reference. They may look different from the actual product.
Operating Instructions
■"Setting Guide" "Basic Manual" (This
Manual)
Handles only basic operations for main features.
■"Basic Manual App"
You can download the Basic Manual app on the product to confirm operational procedures.
From the home screen → [Apps] → [ (Support)] → [Basic Manual]
•When you activate for the first time, follow the onscreen instructions to download and install application.
1

Regarding Notations Used in This
Document
■Note on Button Illustrations
In this manual, buttons are represented by simplified as shown below.
l(Volume DOWN button) |
|
|
|
|
F |
|
|||||||||
|
|
|
|
|
|||||||||||
|
r(Volume UP button) |
(Power button) |
|||||||||||||
|
|
|
|
|
|
|
|
|
|
|
|
|
|
|
|
|
|
|
|
|
|
|
|
|
|
|
|
|
|
|
|
|
|
|
|
|
|
|
|
|
|
|
|
|
|
|
|
|
|
|
|
|
|
|
|
|
|
|
|
|
|
|
|
|
|
|
|
|
|
|
|
|
|
|
|
|
|
|
|
|
|
|
|
|
|
|
|
|
|
|
|
|
|
|
|
|
|
|
|
|
|
|
|
|
|
|
|
|
|
|
|
|
|
|
|
|
|
|
|
|
|
|
|
|
|
|
|
|
|
|
|
|
|
|
|
|
|
|
|
|
|
|
|
|
|
|
|
|
|
|
|
|
|
|
|
|
|
|
|
|
|
|
|
|
|
|
|
|
|
|
|
|
|
|
|
|
|
|
|
|
|
|
|
|
|
|
|
|
|
|
|
|
|
|
|
|
|
|
|
|
|
|
|
|
|
|
|
|
|
|
|
|
|
|
|
|
|
|
|
|
|
|
|
|
|
|
|
|
|
|
|
|
|
|
|
|
|
|
|
CHN |
■Description of Operations for Selecting
Item/Icon/Button etc.
Notations used for operation procedures in this manual are as follows.
Description |
|
|
Explanation |
|
|
|
|||
Home screen |
Tap " (Phone)" at the bottom of the |
|||
→ [Phone] → |
Home screen. And tap "DIALPAD" |
|||
"DIALPAD" tab → [1] |
tab, " |
" " |
" " |
", then tap |
[4] [1] → [ ] |
" " at the end. |
|
||
In sleep mode, F |
In sleep mode, press F(Power |
|||
(Power button) |
button). |
|
|
|
•Tapping is to select a button or icon displayed on the screen by lightly tapping it with your finger.
Navigation bar |
k |
|
2 d(Direct button) (Camera button)

■Notes on Illustrations/Screenshots
In this manual, screenshots and operations for the product with au Nano IC Card 04 attached are described.
Screen illustrations shown in this manual may look different from the actual screens. Note that part of the screen etc. may be omitted.
|
|
|
|
Actual screen |
Notations used in |
|
|
|
|
|
this manual |
||
Some icons |
|
|
|
|
|
|
etc. are |
|
|
|
|
|
|
omitted in this |
|
|
|
|
|
|
manual. |
|
|
|
|
|
|
|
|
|
|
|
|
|
In this manual, screenshots for body color "Green" are provided as examples.
In this manual, "au Nano IC Card 04" is abbreviated as "au IC card".
In this manual, "microSD™ memory card (commercially available)", "microSDHC™ memory card (commercially available)" and "microSDXC™ memory card (commercially available)" are abbreviated as "microSD memory card" or "microSD".
All of the indicated amounts exclude tax unless otherwise specified.
Company names and product names referred to in this manual are trademarks or registered trademarks of respective companies. The TM, ® marks may be omitted in this manual.
In this manual, the operations with vertically oriented screens are provided as examples. With horizontally oriented screens, descriptions for menu item/icon/onscreen button may be different.
Menu items, layers and icons described in this manual may be different according to functions being used and conditions.
3

Contents |
|
Preface............................................................................. |
ii |
List of Packaged Items..................................................... |
ii |
Operating Instructions..................................................... |
1 |
Regarding Notations Used in This Document................. |
2 |
Contents....................................................................... |
4 |
Getting Ready.............................................................. |
5 |
Names and Functions of Parts........................................ |
5 |
Attaching/Removing the Front Cover.............................. |
9 |
Attaching/Removing a Battery Pack.............................. |
10 |
au IC Card..................................................................... |
13 |
Attaching/Removing au IC Card.................................... |
14 |
Attaching/Removing microSD Memory Card................. |
17 |
Charging........................................................................ |
18 |
Turning the Power On/Off............................................. |
23 |
Switching to English Display......................................... |
24 |
Start Screen.................................................................. |
24 |
Basic Operation.......................................................... |
26 |
Using the Home Screen................................................ |
26 |
Activating the Apps........................................................ |
26 |
Switching the Home App............................................... |
26 |
Using au Basic Home.................................................... |
27 |
Monitoring the Product's Status..................................... |
27 |
Checking Your Phone Number...................................... |
29 |
Setting Silent Mode....................................................... |
29 |
Using the Fingerprint Function...................................... |
30 |
Registering Fingerprints................................................ |
30 |
4
Authenticating with Fingerprints.................................... |
30 |
Setting Airplane Mode................................................... |
30 |
Making a Call................................................................. |
31 |
Receiving a Call............................................................ |
31 |
Displaying Menu............................................................ |
31 |
Setting Home Screen.................................................... |
32 |
Saving Battery Consumption......................................... |
32 |
Safety Precautions..................................................... |
33 |
When Using the Product............................................... |
33 |
Safety Precautions (Observe Strictly)........................... |
35 |
Material List................................................................... |
46 |
Handling Precautions.................................................... |
47 |
Notes on Water, Dust, Seawater, and Shock Resistance |
|
...................................................................................... |
55 |
Notes on Using Bluetooth®/Wireless LAN (Wi-Fi®) |
|
Function......................................................................... |
66 |
Security Code/PIN Code............................................... |
69 |
Notes on Data Communication Charges....................... |
70 |
Notes on Applications.................................................... |
71 |
Setting the App Permissions......................................... |
71 |
Cell Phone Etiquette...................................................... |
72 |
Appendix.................................................................... |
74 |
Updating Software......................................................... |
74 |
Troubleshooting............................................................. |
75 |
After-Sales Service........................................................ |
77 |
SIM Unlock.................................................................... |
82 |
Related Accessories...................................................... |
82 |
Main Specifications....................................................... |
83 |
Specific Absorption Rate (SAR) of Cell Phones............ |
85 |
Export Administration Regulations................................ |
86 |
Intellectual Property Rights........................................... |
87 |
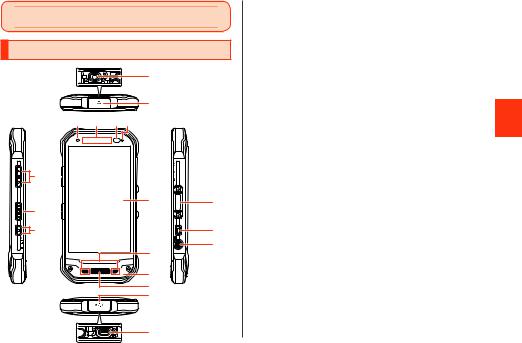
Getting Ready |
|
rlVolume UP/DOWN button |
|
|
Adjusts sound volume. Press and hold l(Volume |
||
|
|
DOWN button) on left side to set "Silent mode" ( P.29). |
|
Names and Functions of Parts |
|
dDirect button |
|
|
Press and hold to activate the set function. |
||
|
|
Strap eyelet |
|
|
Earphone microphone terminal |
||
|
|
Earphone microphone terminal cover |
|
|
The opening in the cover is a necessary part of its |
||
|
|
waterproof construction. Do not poke with a pointed object |
|
|
or block it. |
||
|
|
||
|
|
In-camera (lens) |
|
|
|
Receiver |
|
|
|
Hear the other party's voice on call, play sound of answer |
|
|
memo, etc. with the Smart Sonic Receiver ( P.8). |
||
|
|
Proximity sensor/Light sensor |
|
|
If the display becomes covered during a call, the |
||
|
|
proximity sensor turns the display off to prevent |
|
|
|
||
|
|
erroneous touch panel operation. |
|
|
|
Light sensor detects the ambient light level to adjust the |
|
|
display brightness. |
||
|
|||
|
|
Incoming (charging) light |
|
|
Lights in red while charging. |
||
|
|
||
|
Flashes in blue for an arriving call or new mail |
||
|
|
notification. |
|
|
|
||
|
|
Display (touch panel) |
|
|
|
Speaker |
|
|
Ringtone or alarm sound can be heard from here. |
||
|
|
Ready Getting
5

Ready Getting
|
|
Front cover |
|
|
Remove when performing maintenance or replacing the |
||
|
|
||
|
front screen. |
||
|
|
||
|
"Attaching/Removing the Front Cover" ( P.9) |
||
|
Mouthpiece (microphone) / atmospheric pressure sensor |
||
|
|||
|
Relays your voice to the other party. Also use to record |
||
|
|
||
|
|
audio. Take care not to cover the microphone with your |
|
|
fingers during a call or recording a video. |
||
|
|||
|
|
External connection terminal cover |
|
|
|
The opening in the cover is a necessary part of its waterproof |
|
|
|
construction. Do not poke with a pointed object or block it. |
|
|
|
External connection terminal |
|
|
|
Use for connecting a Type C Common AC Adapter 01 |
|
|
(sold separately), etc. |
||
|
|
||
|
FPower button / fingerprint sensor |
||
|
|
Power ON/OFF, activate/deactivate Sleep mode, etc. |
|
|
|
If fingerprint(s) are registered, unlock the screen with |
|
|
|
fingerprint authentication. |
|
|
Options port |
||
|
|
||
|
|
kCamera button |
|
|
Press and hold to activate camera. Also use as shutter |
||
|
|
||
|
|
for still photos and underwater camera screen. |
|
|
|
Built-in GPS antenna*1 |
|
|
|
Built-in sub antenna*1 |
|
|
|
Built-in Bluetooth®/Wi-Fi® antenna*1 |
|
|
Photo light/Simple light |
||
|
Battery cover (Back) |
||
|
|
6

NFC (FeliCa compatible) antenna*1
Hold over a reader/writer when using Osaifu-Keitai®. Send or receive data via IC transmission.
Out-camera (lens)
Back cover*2
Wireless charging area
For wireless charging, place the center of this portion on the qmark on a separately-sold wireless charging pad.
Built-in WiMAX 2+ antenna*1
Built-in main antenna*1
Wide-angle camera (lens)
Battery cover*2
Battery pack
Remove the battery cover and then the battery pack to access the au Nano IC Card 04 slot and microSD memory card slot.
Knob lock
Wireless charging antenna connection
microSD memory card slot
au Nano IC Card 04 slot
Wireless charging antenna*1/charging connection area
*1 Do not cover antennas with your hand or put stickers etc. It might affect communication quality or wireless charging.
*2 Avoid adhering stickers, etc. on the battery cover or back cover where the wireless charging antenna/charging connection area are located. Doing so may affect wireless charging.
Do not place stickers, etc. over proximity sensor/light sensor.
Product is equipped with an atmospheric pressure sensor. You can display barometric pressure and elevation when using a barometric display app, however, values are not absolute due to a number of variables, and are approximate only.
Do not remove the film sheet from the mouthpiece (microphone) / atmospheric pressure sensor.
A front screen is adhered to the product to protect the display (touch panel). If the screen becomes damaged or worn, it can be replaced with a commercially available front screen (KYV41KGA).
Ready Getting
7

Ready Getting
About SMART SONIC RECEIVER
The product features SMART SONIC RECEIVER, which relays sound by vibrating the display. The receiver does not have any holes, but can be used in a usual manner.
■Touching to Your Ear
Hold the receiver area up to your ear as shown so that your ear is covered, blocking surrounding sound and increasing audibility. Move the product up and down, left and right to suit your hearing and surroundings.
Earpiece (receiver)
Mouthpiece (microphone)
Take care not to cover the mouthpiece (microphone) of the product with your fingers during a call.
When commercially available earphones are connected, voice sound can be switched to the one via earphones not using SMART SONIC RECEIVER.
Do not cover the display with stickers or films (commercially available protective films and privacy protectors). Doing so may affect audibility.
Audibility depends on the individual.
Audibility also depends on surroundings.
8
Attaching/Removing the Front Cover
Remove the front cover to perform maintenance or replace the front screen. Do not remove in any other circumstances.
Attaching the Front Cover
Use the hexagon wrench (sample) to turn the two screws where circled ○ in the
direction shown
Avoid tightening more than necessary; may cause damage.
Removing the Front Cover
Use the hexagon wrench (sample) to turn the two screws where circled ○ in the
direction shown
The non-loss screws are designed to remain installed on the front cover. Remove the front cover with the screws attached.
Ready Getting
9
Ready Getting
Attaching/Removing a Battery Pack
Turn the power off before attaching or removing the battery pack or battery cover.
• Use only batteries designed for the product.
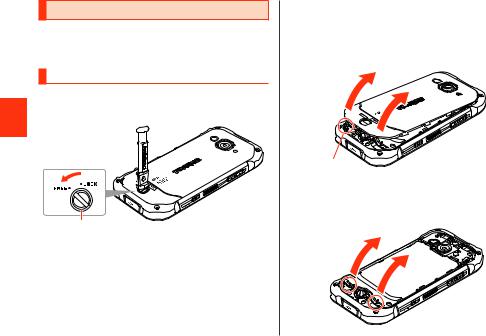
Attaching a Battery Pack
Use the LOCK Rotating Tool (sample) to turn the lock to "FREE"
LOCK Rotating Tool  (sample)

Lock
2 Remove the back cover on the rear of the product
With your fingernail in the notch on the right of the back cover, raise the cover in the direction shown one corner at a time and remove.
Notch
3 Open battery cover
With your fingernail lodged where marked ▼ at the bottom left and right of the battery cover, raise the battery cover.
10

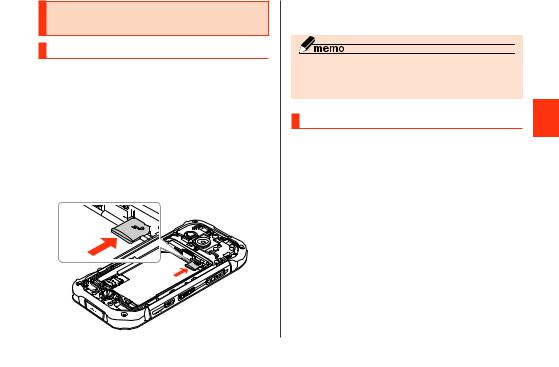
4 Attach the battery pack
Confirm where the battery pack connects, then slide the battery pack in and press securely in place. Note: pressing forcefully if the battery pack is on the catches may damage the catches.


Connection
Catches |
Battery Pack |
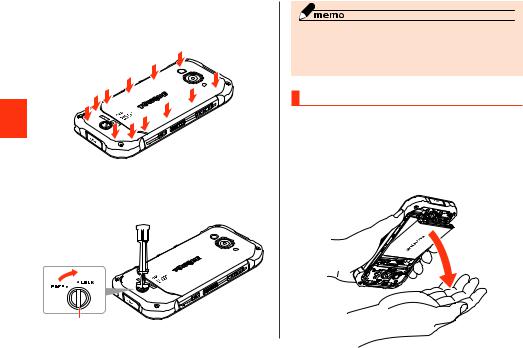
5Insert tabs on battery cover in slots on product and close battery cover
Slots


6Press the battery cover where shown making sure it is pressed down completely around
7 Attach the back cover
First insert the back cover at an angle by the two tabs at the top end of the cover , then press the bottom end into place .
Tabs
|
|
|
Ready Getting
11
Ready Getting
8Press the back cover where shown making sure it is pressed down completely around
9 Use the LOCK Rotating Tool (sample) to turn the lock to "LOCK"
Avoid tightening more than necessary; may cause damage.
LOCK Rotating Tool  (sample)
Lock
Be sure to check the au IC Card is certainly attached and then attach the battery pack.
Improperly attaching parts may damage the battery pack or attaching the battery cover.
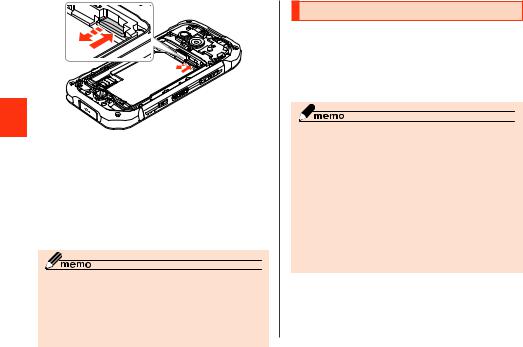
Removing a Battery Pack
Remove the back cover and battery cover ( P.10)
2 Remove the battery pack
Use one hand to catch the battery pack as shown, and tap the product while bringing hands together to remove.
12

3Attach the battery cover and back cover ( P.10)
Do not use a screwdriver, etc. to remove the battery pack. Doing so may damage the battery pack.
The battery pack is designed to fit snuggly to increase the durability of the product. Even if the battery pack loses snugness with repeated removal, it does not affect performance.
au IC Card
Your phone number etc. is recorded on the au IC card. The product is compatible with au Nano IC Card 04.
au Nano IC Card 04 (Back) (Front)
IC (metal) part 
Note that mishandling the au IC card might cause malfunction or damage, be careful not to do the followings.
•Do not touch the IC (metal) part of the au IC card.
•Check the correct insert direction.
•Do not forcefully attach/remove the card.
If the au IC card is not attached correctly or the au IC cad has any abnormality, the error message is displayed.
Do not lose the removed au IC card.
Do not insert your au IC card with an conversion adapter attached. Doing so may cause malfunction.
Ready Getting
13

Ready Getting
■When au IC Card is Not Inserted
If the au IC card is not inserted, the following operations are unavailable. And " " appears on the status bar.
•Making*/Receiving a call
•Sending/Receiving SMS
•Initial settings and sending/receiving emails of E-mail (@ezweb.ne.jp)
•PIN code setting
•Checking your phone number and email address of the
product
Besides the items above, necessary functions such as your phone number are also unavailable.
*Emergency calls such as 110 (Police), 119 (Fire and Ambulance) and 118 (Regional Coast Guard Headquarters) are unavailable. However, when the signal strength is "out of range" in the GSM/UMTS/LTE roaming area when dialing, emergency calls are available. (Since emergency call numbers varies depending on countries, they may be unavailable.)
■PIN Code Limit Settings
To protect your personal information, you can limit unauthorized use of the au IC card by a third party by changing PIN code or locking SIM card ( P. 69 "Security Code/PIN Code").
Attaching/Removing au IC Card
•Turn the power off before attaching or removing the au IC card.
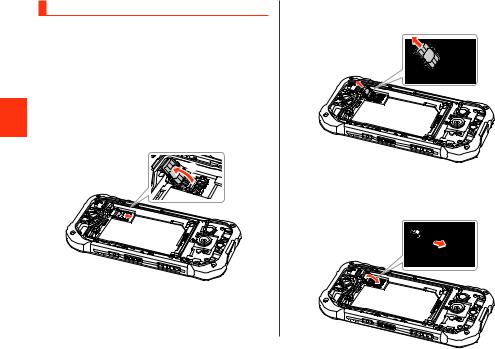
Attaching au IC Card
1Turn off the power and remove the battery pack ( P.12 "Removing a Battery Pack")
2Slide the au IC card slot cover in directionwith the pad of your finger and lift in
direction
|
|
14

3Slide the au IC card in the direction shown, and attach in the au IC card slot
cover
Note the orientations of the notch and IC (metal) surface.

 Notch
Notch
IC (metal) surface
4Lower the au IC card slot cover in direction , and slide it in direction with the pad of your finger until it clicks
locked
If the cover does not close properly, lift the cover and check that the au IC card is inserted all the way correctly.
|
|
|
Getting |
|
Ready |
|
15
Ready Getting
Removing au IC Card
1Turn off the power and remove the battery pack ( P.12 "Removing a Battery Pack")
2Slide the au IC card slot cover in directionwith the pad of your finger and lift in
direction
Take care not to touch the metal terminals on the product when lifting the cover. Also take care not to slide the cover forcefully (doing so may damage the cover or injure your hand or fingers).
|
|
3Slide the au IC card in the direction shown to remove
4Lower the au IC card slot cover in direction, and slide it in direction with the pad of your finger until it clicks locked
|
|
16
Attaching/Removing microSD Memory Card
Attaching microSD Memory Card
1Turn off the power and remove the battery pack ( P.12 "Removing a Battery Pack")
2Confirm the direction of the microSD memory card and slowly insert it into the
slot until it clicks
When inserting the card into the product, confirm the card is locked with snaps. Be aware that the card may fly out if you release your finger before the card is locked. Be careful about it.
microSD 


 logo
logo 


upward
3Attach the battery pack, battery cover, and back cover ( P.10)
The microSD memory card has a back and front side/top and bottom orientation. Trying to insert the card forcefully may cause confinement or damage.
Removing microSD Memory Card
1 Turn off the power and remove the battery |
Getting |
pack ( P.12 "Removing a Battery Pack") |
|
2 Slowly push the microSD memory card |
Ready |
|
|
toward the slot until it clicks |
|
Pull out the microSD memory card with fingers on when you hear "click". Keep your fingers on while the microSD card comes out of the slot. Be aware that the card may fly out if you release your finger while pressing hard.
17
Ready Getting
18
3 Slowly pull the microSD memory card
Slowly pull out the card as straight as possible. Depending on the microSD memory card, it is difficult to pull out from the slot due to the failure of unlocking. In that case, remove the card by pulling lightly with your fingers.
4Attach the battery pack, battery cover, and back cover ( P.10)
Do not touch the terminal part of microSD memory card.
Do not pull out the microSD memory card forcefully. Doing so might cause a fault or loss of data.
After using the product for a long time, the removed micorSD memory card may become warm. This is not a malfunction.
Charging
The battery pack is not fully charged at the time of purchase. Charge the battery pack before using the product. When the red light turns into green, the charging will be completed.
This product is compatible with Qualcomm® Quick Charge™ 3.0 Technology rapid charging.
The product may become warm while charging or during other operations, this is not abnormal.
Charging the product while using the camera function, the charging time may longer than usual.
Handle the battery pack after carefully reading "Safety Precautions (Observe Strictly)" ( P.35).
Doing various operations with the specified charger (sold separately) is connected, the battery life may get short due to the short time charging/discharge.
When temperature of environment or the product is extremely high or low, charging may be stopped. Charge the battery pack at room temperature as much as possible.
If the product’s charging light flashes red, check that the battery pack is attached properly and that connections are correct. If it still flashes, discontinue charging, and contact an au shop or Repair and Delivery Support Center.
Close the external connection terminal cover firmly after charging to prevent moisture and dust from entering. Do not pull or twist forcefully.
Do not charge the product wirelessly while connected to a specified AC adapter (sold separately) or USB Type-C cable (commercially available). The product will not charge properly, and it may also cause malfunctioning.
Keep a metal accessory or conductive materials (metal pieces, pencil lead, etc.) from coming in contact with the connection terminal and prevent them from getting inside.
A magnetic field created by current during charging may affect the geomagnetic sensor.
Charging with a Specified AC
Adapter
How to charge the product using Type C Common AC Adapter 01 (sold separately) is described here. For information on specified AC adapters (sold separately), see "Related Accessories" ( P.82).
1Plug the Type C Common AC Adapter 01 (sold separately) into an outlet (100V - 240V AC)
Ready Getting
Type C Common AC Adapter 01 (sold separately)
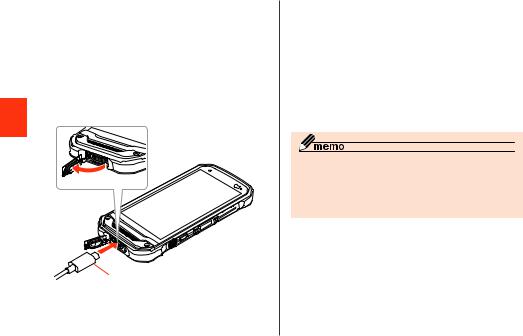
2Open the external connection terminal cover
19
Ready Getting
3 Insert the USB Type-C plug of the Type C Common AC Adapter 01 (sold separately) straight into the external connection terminal
Check that the charging light on the product lights in red. When the battery power turns on, " " appears on the status bar.
Once charging completes, the charging light turns green.
2
3
 Type C Common AC Adapter 01 (sold separately)
4After charging, remove the USB Type-C plug of the Type C Common AC Adapter 01 (sold separately) straight from the external connection terminal
5Close the external connection terminal cover
6Unplug the Type C Common AC Adapter 01 (sold separately) from the outlet
Note that applying unnecessary force with the external connection terminal connected to the external device might cause damage.
When charging starts with the battery empty, the charging light may not light immediately. But charging has started.
20
Charging with a Wireless Charging Pad
How to use the Wireless Charging Pad 02 (sold separately) for charging is explained here.
For usage precautions and details, also see the instructions included with the Wireless Charging Pad 02 (sold separately).
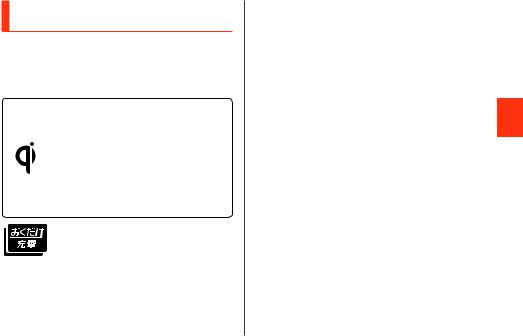
Simply placing the product on top of an au specified wireless charger product (sold separately) displaying the mark on the left allows charging without the need to connect a cable. Be sure to also read the instructions for any supported product.
Products with the mark are compliant with the wireless charging specifications of the Wireless Power Consortium (WPC).
This product supports " ® (okudake juden)" place-and-charge
functionality.
" " and the " " logo are registered trademarks of NTT DOCOMO, INC.
1Connect the microUSB connector of an AC adapter (sold separately) compatible with the Wireless Charging Pad 02 (sold separately) to its microUSB jack, and plug the compatible AC adapter (sold separately) into an outlet (100V - 240V AC)
Wireless Charging Pad 02 |
Compatible |
|
AC adapter |
|
(sold separately) |
Indicator LEDs |
|
*4 locations |
microUSB |
|
|
microUSB jack |
connector |
|
Ready Getting
21

Ready Getting
2With the wireless charging area on the back of the product downward, center it with the qmark on the Wireless Charging
Pad 02 (sold separately)
The indicator LEDs flash in blue; after about 12 seconds, check that they remain lit and that the charging light on the product is lit red. If the indicator LEDs still flash blue after about 12 seconds, the product is not positioned where it can charge. Adjust the position of the product.
Once charging completes, the charging light turns green.
*The indicator LEDs on the Wireless Charging Pad 02 (sold separately) will remain lit blue after charging with this product. For further information on lighting and charging conditions of the indicator LEDs, read the instructions that come with the Wireless Charging Pad 02 (sold separately).
Charging light
Wireless charging area
3After charging, remove the product, and unplug the compatible AC adapter (sold separately) from the outlet
22

If you move the product from its position after the indicator LEDs have already lit blue, the product may not charge or may take a long time to charge. Remove the product, wait about 15 seconds, and place again where the indicator LEDs light blue.
If charging does not start, check that the battery cover is properly attached. Also check that the charging connection under the battery cover is not soiled.
Charging is controlled at a reduced rate during wireless charging to prolong the life of the battery pack.
Turning the Power On/Off
Turning the Power On
1 Press and hold F(Power button) until the charging light turns on
The start screen appears ( P. 24).
•For the first time you turn on the product, the initial setting, "au (au Easy Setting)" activates. You need to set as required. For details, refer to "Initial Settings" in the packaged "Setting Guide".
When logos are being displayed on the screen, do not touch the screen because the initial setting of the touch panel activates. Doing so may prevent the touch panel from working properly.
The first time you turn on the product, you can skip completing "au (au Easy Setting)" and complete it later.
Turning the Power OFF
1Press and hold F(Power button) for at least 1 second
2 [Power off] → [OK]
Ready Getting
23
Ready Getting
24
Switching to English Display
Switch the language displayed on the screen to English.
1Home screen → [ (Apps)] → [(Settings)] → [ (Languages
& input)] → [ (Languages)]
2 [English]
The message " " (Applications,
mail transmission/reception, and downloads may be terminated.) appears, confirm the content and then tap [OK].
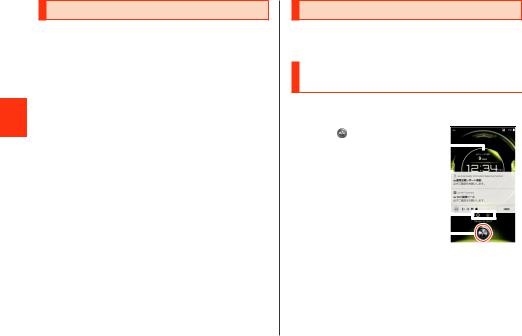
Start Screen
The start screen is displayed when you turn the product on or cancel the sleep mode.
Switching to the Home Screen from the Start Screen
You can switch to the home screen with the following operations when the start screen appears.
1 Tap " " and slide/flick |
|
|
|
|
|
|
|
|
|
|
|
toward "START" |
|
|
|
|
|
|
|
||||
|
|
|
|
|
|
|
|
|
|
|
|
The home screen appears |
|
|
|
|
|
|
|
|
|
|
|
( P.26) . Or, the previous |
|
|
|
|
|
|
|
|
|
|
|
|
|
|
|
|
|
|
|
|
|
|
|
screen which the product |
|
|
|
|
|
|
|
|
|
|
|
turns to sleep mode appears. |
|
|
|
|
|
|
|
|
|
|
|
• Slide/flick toward |
|
|
|
|
|
|
|
|
|
|
|
"CAMERA"/"PHONE" to |
|
|
|
|
|
|
|
|
|
|
|
activate camera/phone |
|
|
|
|
|
|
|
|
|||
|
|
|
|||||||||
( P.31). |
|
Start Screen |
|||||||||
Widget |
|
|
|
|
|
|
|
|
|
|
|
Widgets are displayed. |
|
|
|
|
|
|
|
|
|
|
|
• Tap a widget two times to activate.
• To delete, long-touch a widget → Drag to "Remove" at the top of the screen.

Notifications
Information is displayed for missed calls, etc.
•Double-tap a notification to activate notifying application.
Indicators
Tap "  " to change widgets, or tap "
  " to add a widget.
START icon
Sleep Mode
Press F(Power button) while the backlight is turned on or perform no operation for a certain period, the screen goes off temporarily and the product enters sleep mode. Doing the following operation, cancel the sleep mode.
1 In sleep mode, press F(Power button)
The start screen is displayed ( P.24).
To change the time to enter sleep mode, from the home screen → [Apps] → [Settings] → [Display] → [Sleep], and select the time.
When you press F(Power button) to display the screen in sleep mode, do not touch the screen. Doing so may prevent the touch panel from working properly.
Auto Assist
If there are unchecked notifications, the product emits a notification sound and vibrates when picked up from a table, etc.
The product can also enter the Silent mode when it is time to board a train or at a set time, or activate frequently used apps when an earphone is connected.
To use Auto assist, from the home screen → [Apps] → [Settings] → [Auto assist], and set each item.
Ready Getting
25
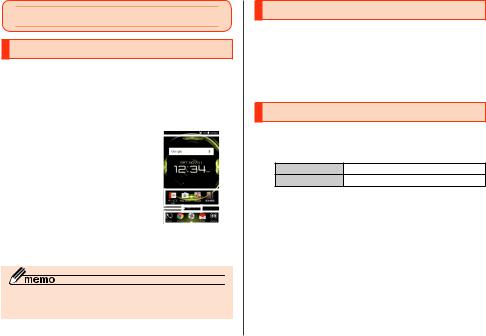
Basic Operation
Using the Home Screen
When you purchase the product, home app on home screen is set to "Standard Home". Also, home app can be switched ( P.26).
The home screen of Standard Home consists of multiple screens. Slide/flick right or left to switch them.
|
|
Status bar |
|
|
|
|
|
|
|
|
|
Shortcuts/Folders |
|
|
|
|
|
|
|
|
|
Indicator |
|
|
|
|
|
|
|
|
|
Quick launch area |
|
|
|
|
|
|
|
|
|
Apps |
|
|
|
|
|
|
|
Basic |
|
|
|
|
|
|
|
||
|
|
|
|
|
|
|
|||
|
|
|
|
|
|
|
|||
Operation |
|
|
|
|
|
|
|||
|
|
|
|
|
|||||
|
|
|
|
|
|
|
|
|
|
|
|
|
|
|
|
|
|
||
|
|
|
|
|
|
|
|||
|
|
|
|
Home Screen |
|||||
|
|
|
|
|
(Standard Home) |
||||
In this manual, the operations on home screen of "Standard Home" is provided as examples.
26
Activating the Apps
Some functions activated by tapping application icons may incur communication charges.
1 Home screen → [Apps]
The Apps list appears.
2 Tap the apps to activate
Switching the Home App
Switch home apps of the product.
1 Apps → [Settings] → [Change home]
2Standard Home P.26 "Using the Home Screen" au Basic Home P.27 "Using au Basic Home"
3 [OK]
Loading...