


 Loading...
FS-1040/FS-1041 FS-1060DN/FS-1061DN
OPERATION GUIDE

This Operation Guide is for models FS-1040, FS-1041, FS-1060DN and FS-1061DN.
This Operation Guide is intended to help you operate the machine correctly, perform routine maintenance and take a simple troubleshooting action as necessary, so that you can always use the machine in good condition.
We recommend the use of our own brand supplies. We will not be liable for any damage caused by the use of third party supplies in this machine.
A label shown in the illustration assures that the supplies are our own brand.
Included Guides
The following guides are supplied with the machine. Refer to them as necessary.
Quick Installation Guide |
Describes the procedures for installation of the machine. |
|
|
Safety Guide |
Provides safety and cautionary information for the installation and use of |
|
the machine. Be sure to read this guide before using the machine. |
|
|
Safety Guide (FS-1040 / FS-1041 / FS- |
Describes the machine installation space, cautionary space, and other |
1060DN / FS-1061DN) |
information. Be sure to read this guide before using the machine. |
|
|
Product Library disc |
|
|
|
Operation Guide (This Guide) |
Describes how to load paper, basic print operations, and troubleshooting. |
|
|
KYOCERA Client Tool User Guide |
Describes how to use KYOCERA Client Tool. KYOCERA Client Tool is a |
|
software program that is installed on your computer to enable you to |
|
configure machine settings. |
|
|
Printer Driver User Guide |
Describes how to install the printer driver and use printer functionality. |
|
|
KYOCERA Net Viewer User Guide |
Describes how to monitor the network printing system with KYOCERA |
|
Net Viewer. |
|
|

Contents
1 |
Machine Parts ................................................................................................................................................ |
1-1 |
|
Front Printer Components ........................................................................................................................... |
1-2 |
|
Rear Printer Components ............................................................................................................................ |
1-2 |
|
Operation Panel ............................................................................................................................................ |
1-3 |
2 |
Connecting and Printing .............................................................................................................................. |
2-1 |
|
Connections .................................................................................................................................................. |
2-2 |
|
Altitude Setting ............................................................................................................................................. |
2-3 |
|
Installing the Printer Driver .......................................................................................................................... |
2-4 |
|
Printing .......................................................................................................................................................... |
2-7 |
|
KYOCERA Client Tool ................................................................................................................................ |
2-10 |
|
Configuration .............................................................................................................................................. |
2-12 |
|
Uninstalling Software (Windows PC) ........................................................................................................ |
2-14 |
3 |
Loading Paper ............................................................................................................................................... |
3-1 |
|
General Guidelines ....................................................................................................................................... |
3-2 |
|
Selecting the Right Paper ............................................................................................................................ |
3-4 |
|
Paper Type ..................................................................................................................................................... |
3-9 |
|
Preparing the Paper .................................................................................................................................... |
3-10 |
|
Loading Paper into Cassette ..................................................................................................................... |
3-10 |
|
Loading Paper into Manual Feed Tray (FS-1060DN/FS-1061DN only) ................................................... |
3-13 |
4 |
Maintenance .................................................................................................................................................. |
4-1 |
|
General Information ...................................................................................................................................... |
4-2 |
|
Toner Container Replacement ..................................................................................................................... |
4-2 |
|
Maintenance Kit Replacement ..................................................................................................................... |
4-4 |
|
Cleaning the Printer ...................................................................................................................................... |
4-5 |
|
Maintenance Menu ........................................................................................................................................ |
4-6 |
|
Prolonged Non-Use and Moving of the Printer .......................................................................................... |
4-7 |
5 |
Troubleshooting ............................................................................................................................................ |
5-1 |
|
Solving Malfunctions .................................................................................................................................... |
5-2 |
|
Error Messages ............................................................................................................................................. |
5-6 |
|
Clearing Paper Jams .................................................................................................................................... |
5-8 |
6 |
Appendix ........................................................................................................................................................ |
6-1 |
|
Specifications ................................................................................................................................................ |
6-2 |
i

ii

Legal and Safety Information
CAUTION NO LIABILITY IS ASSUMED FOR ANY DAMAGE CAUSED BY IMPROPER INSTALLATION.
Notice
The information in this guide is subject to change without notification. Additional pages may be inserted in future editions. The user is asked to excuse any technical inaccuracies or typographical errors in the present edition.
No responsibility is assumed if accidents occur while the user is following the instructions in this guide. No responsibility is assumed for defects in the printer's firmware (contents of its read-only memory).
This guide, and any copyrightable subject matter sold or provided with or in connection with the sale of the page printer, are protected by copyright. All rights are reserved. Copying or other reproduction of all or part of this guide, or any copyrightable subject matter without the prior written consent of KYOCERA Document Solutions Inc. is prohibited. Any copies made of all or part of this guide, or any copyrightable subject must contain the same copyright notice as the material from which the copying is done.
Regarding Tradenames
Adobe Acrobat, and Flash are registered trademarks of Adobe Systems Incorporated. Macintosh and Mac OS are trademarks of Apple Inc., registered in the U.S. and other countries.
Microsoft, MS-DOS, and Windows are registered trademarks of Microsoft Corporation in the U.S.A. and/or other countries. ENERGY STAR is a U.S. registered mark.
All other brand and product names are registered trademarks or trademarks of their respective companies.
iii

License Agreements
Compliance and Conformity
This equipment has been tested and found to comply with the limits for a Class B digital device, pursuant to Part 15 of the FCC Rules. These limits are designed to provide reasonable protection against harmful interference in a residential installation. This equipment generates, uses and can radiate radio frequency energy and, if not installed and used in accordance with the instructions, may cause harmful interference to radio communications. However, there is no guarantee that interference will not occur in a particular installation. If this equipment does cause harmful interference to radio or television reception, which can be determined by turning the equipment off and on, the user is encouraged to try to correct the interference by one or more of the following measures:
•Reorient or relocate the receiving antenna.
•Increase the separation between the equipment and receiver.
•Connect the equipment into an outlet on a circuit different from that to which the receiver is connected.
•Consult the dealer or an experienced radio/TV technician for help.
•The use of a non-shielded interface cable with the referenced device is prohibited.
CAUTION — The changes or modifications not expressly approved by the party responsible for compliance could void the user’s authority to operate the equipment.
This device complies with Part 15 of FCC Rules.
Operation is subject to the following two conditions; (1) this device may not cause interference, and (2) this device must accept any interference, including interference that may cause undesired operation of the device.
* The above warning is valid only in the United States of America.
Interface connectors
IMPORTANT Be sure to power off the printer before connecting or disconnecting an interface cable. For protection against static electricity discharge to the printer's internal electronics through the interface connector(s), cover any interface connector that is not in use with the protective cap supplied.
 Note Use shielded interface cables.
CDRH Regulations
The Center for Devices and Radiological Health (CDRH) of the U.S. Food and Drug Administration implemented regulations for laser products on August 2, 1976. These regulations apply to laser products manufactured after August 1, 1976. Compliance is mandatory for products marketed in the United States. A label indicating compliance with the CDRH regulations must be attached to laser products marketed in the United States.
Canadian Department of Communications Compliance Statement
This Class B digital apparatus complies with Canadian ICES-003.
Avis de conformité aux normes du ministère des Communications du Canada
Cet appareil numérique de la classe B est conforme à la norme NMB-003 du Canada.
iv

Safety Instructions Regarding the Disconnection of Power
Caution: The power plug is the main isolation device! Other switches on the equipment are only functional switches and are not suitable for isolating the equipment from the power source.
VORSICHT: Der Netzstecker ist die Hauptisoliervorrichtung! Die anderen Schalter auf dem Gerät sind nur Funktionsschalter und können nicht verwendet werden, um den Stromfluß im Gerät zu unterbrechen.
Energy Saving Control Function
To reduce energy consumption while in a waiting state, the device comes equipped with an energy saving control function for switching to Sleep Mode as well as Power Off Mode where power consumption is automatically reduced to a minimum after a certain amount of time elapses since the device was last used.
Sleep Mode
The device automatically enters Sleep Mode when approximately 1 minute has passed since the device was last used. The amount of time of no activity that must pass before Sleep Mode is activated may be lengthened by changing the Auto sleep setting. For details, refer to Device Defaults Tab on page 2-12.
Power Off Mode
The device automatically turns its power off when 1 hour has passed since the device was last used. The amount of time of no activity that must pass before Power Off Mode is activated may be lengthened by changing the Power Off Timer setting. For details, refer to Device Defaults Tab on page 2-12.
In case of not using the machine for an extended period of time
CAUTION If this machine will be left unused for an extended period (e.g. overnight), turn it off at the power switch. If the machine will not be used for an even longer period of time (e.g. vacation), remove the power plug from the outlet as a safety precaution.
CAUTION Remove paper from the cassettes and seal it in the paper storage bag to protect it from humidity.
Duplex Printing (FS-1060DN/FS-1061DN only)
This printer includes duplex printing as a standard function. For example, by printing two single-sided originals onto a single sheet of paper as a duplex printing, it is possible to lower the amount of paper used.
Printing in duplex mode reduces paper consumption and contributes to the conservation of forest resources. Duplex mode also reduces the amount of paper that must be purchased, and thereby reduces cost. It is recommended that machines capable of duplex printing be set to use duplex mode by default.
Resource Saving - Paper
For the preservation and sustainable use of forest resources, it is recommended that recycled as well as virgin paper certified under environmental stewardship initiatives or carrying recognised ecolabels, which meet EN 12281:2002*1 or an equivalent quality standard, be used.
This machine also supports printing on 64 g/m² paper. Using such paper containing less raw materials can lead to further saving of forest resources.
*1: EN12281:2002 "Printing and business paper - Requirements for copy paper for dry toner imaging processes" Your sales or service technician can provide information about recommended paper types.
v

Environmental benefits of "Power Management"
To reduce power consumption when idle, this machine is equipped with a power management function that automatically activates energy-saving mode when the machine is idle for a certain period of time. Although it takes the machine a slight amount of time to return to READY mode when in energy-saving mode, a significant reduction in energy consumption is possible.
It is recommended that the machine be used with the activation time for energy-saving mode set to the default setting.
Energy Star (ENERGY STAR®)
We have determined as a company participating in ENERGY STAR® that this product has earned the ENERGY STAR®.
ENERGY STAR® is a voluntary energy efficiency program with the goal of developing and promoting the use of products with high energy efficiency in order to help prevent global warming. By purchasing ENERGY STAR® qualified products, customers can help reduce emissions of greenhouse gases during product use and cut energy-related costs.
vi

Safety Conventions in This Guide
The sections of this guide and parts of the machine marked with symbols are safety warnings meant to protect the user, other individuals and surrounding objects, and ensure correct and safe usage of the machine. The symbols and their meanings are indicated below.
WARNING: Indicates that serious injury or even death may result from insufficient attention to or incorrect compliance with the related points.
CAUTION: Indicates that personal injury or mechanical damage may result from insufficient attention to or incorrect compliance with the related points.
The following symbols indicate that the related section includes safety warnings. Specific points of attention are indicated inside the symbol.
.... [General warning]
.... [Warning of high temperature]
The following symbols indicate that the related section includes information on prohibited actions. Specifics of the prohibited action are indicated inside the symbol.
.... [Warning of prohibited action]
.... [Disassembly prohibited]
The following symbols indicate that the related section includes information on actions which must be performed. Specifics of the required action are indicated inside the symbol.
.... [Alert of required action]
.... [Remove the power plug from the outlet]
.... [Always connect the machine to an outlet with a ground connection]
Please contact your service technician to order a replacement if the safety warnings in this Operation Guide are illegible or if the guide itself is missing. (fee required)
Note An original which resembles a bank note closely may not be copied properly in some rare cases because this machine is equipped with a counterfeiting prevention function.
vii

Environment
The service environmental conditions are as follows:
•Temperature: 50 to 90.5 °F (10 to 32.5 °C)
•Humidity: 15 to 80 %
However, adverse environmental conditions may affect the image quality. Avoid the following locations when selecting a site for the machine.
•Avoid locations near a window or with exposure to direct sunlight.
•Avoid locations with vibrations.
•Avoid locations with drastic temperature fluctuations.
•Avoid locations with direct exposure to hot or cold air.
•Avoid poorly ventilated locations.
If the floor is delicate against casters, when this machine is moved after installation, the floor material may be damaged.
During printing, some ozone is released, but the amount does not cause any ill effect to one’s health. If, however, the machine is used over a long period of time in a poorly ventilated room or when printing an extremely large number of copies, the smell may become unpleasant. To maintain the appropriate environment for print work, it is suggested that the room be properly ventilated.
Cautions when Handling Consumables
Do not attempt to incinerate parts which contain toner. Dangerous sparks may cause burns.
Keep parts which contain toner out of the reach of children.
If toner happens to spill from parts which contain toner, avoid inhalation and ingestion, as well as contact with your eyes and skin.
•If you do happen to inhale toner, move to a place with fresh air and gargle thoroughly with a large amount of water. If coughing develops, contact a physician.
•If you do happen to ingest toner, rinse your mouth out with water and drink 1 or 2 cups of water to dilute the contents of your stomach. If necessary, contact a physician.
•If you do happen to get toner in your eyes, flush them thoroughly with water. If there is any remaining tenderness, contact a physician.
•If toner does happen to get on your skin, wash with soap and water.
Do not attempt to force open or destroy parts which contain toner.
Other precautions
After use, always dispose of the Toner Container in accordance with Federal, State and Local rules and regulations. Store all consumables in a cool, dark location.
If the machine will not be used for an extended period of time, remove the paper from the cassette, return it to its original package and reseal it.
viii
About the Operation Guide
This Operation Guide contains the following chapters:
1 Machine Parts
This chapter lists the names of different machine parts.
2 Connecting and Printing
This chapter explains how to start up the printer, print from your PC, and use the application software included in the
Product Library disc.
3 Loading Paper
This chapter explains paper specifications for this printer and how to load paper into the cassette or Manual Feed tray.
4 Maintenance
This chapter explains how to replace the toner container and how to care for your printer.
5 Troubleshooting
This chapter explains how to handle printer problems that may occur, such as paper jams.
6 Specifications
This chapter lists the specifications of this printer.
Conventions in This Guide
This manual uses the following conventions.
Convention |
Description |
Example |
||
|
|
|
||
Italic Typeface |
Used to emphasize a key word, phrase |
Refer to Connections on page 2-2. |
||
|
or reference to additional information. |
|
|
|
Bold |
Used to denote buttons on the |
To start printing, click OK. |
||
|
software. |
|
|
|
Bracket Bold |
Used to denote operation panel keys. |
Printing resumes when [GO] is pressed. |
||
Note |
Used to provide additional or useful |
|
|
Note Do not remove the toner container from the |
|
information about a function or feature. |
|
|
carton until you are ready to install it in the printer. |
|
|
|
||
Important |
Used to provide important information. |
IMPORTANT Take care not to touch the drum and |
||
|
|
transfer roller (black) during cleaning. |
||
Caution |
Used to suggest mechanical damage |
CAUTION When removing a paper jam, pull the paper |
||
|
as a result of an action. |
gently so as not to tear it. Torn pieces of paper are difficult |
||
|
|
to remove and may be easily overlooked, deterring the |
||
|
|
paper jam recovery. |
||
Warning |
Used to alert users to the possibility of |
WARNING If you are shipping the printer, remove and |
||
|
personal injury. |
pack the developer unit and drum unit in a plastic bag and |
||
|
|
ship them separately from the printer. |
||
ix

x

1 |
Machine Parts |
|
|
|
|
This chapter identifies machine parts, indicators, and operation panel keys. |
|
|
Front Printer Components .................................................................................................................................... |
1-2 |
|
Rear Printer Components...................................................................................................................................... |
1-2 |
|
Operation Panel...................................................................................................................................................... |
1-3 |
|
1-1

|
Machine Parts |
Front Printer Components |
|
1 |
|
2 |
|
3 |
7 |
|
|
4 |
|
5 |
8 |
6 |
9 |
1Top Tray
2Paper Stopper
3Front Cover
4Manual Feed Tray (FS-1060DN/FS-1061DN)
5Cassette Cover
6Cassette
7Operation Panel
8Main Power Switch (For Korean models)
9Power Switch
Rear Printer Components
10
11
12
13 14
10Top Cover
11Rear Cover
12Power Cord Connector
13Network Interface Connector (FS-1060DN)
14USB Interface Connector
*The illustration shows the FS-1060DN/FS-1061DN.
1-2

Machine Parts
Operation Panel
|
|
|
|
|
|
|
|
|
|
|
|
|
|
|
Keys |
|
|
|
|
|
|
|
|
|
|
|
|
|
|
|
|
|
|
|
|||
|
|
|
|
|
|
|
|
|
|
|
|
|
|
|
|
|
||
|
|
|
|
|
|
|
|
|
|
|
|
|
|
|
Refer to the following table for the name and description of the basic functions of each key. |
|||
|
|
|
|
|
|
|
|
|
|
|
|
|
|
|
|
|
|
|
|
|
|
|
|
|
|
|
|
|
|
|
|
|
|
Key |
Status |
Operation |
Function |
|
|
|
|
|
|
|
|
|
|
|
|
|
|
|
||||
|
|
|
|
|
|
|
|
|
|
|
|
|
|
|
|
|
|
|
|
|
|
|
|
|
|
|
|
|
|
|
|
|
|
[Quiet Mode] |
— |
Press once (lights up). |
Turns on Quiet Mode. |
|
|
|
|
|
|
|
|
|
|
|
|
|
||||||
|
|
|
|
|
|
|
|
|
|
|
|
|
|
|
Key |
|
|
Quiet Mode |
|
|
|
|
|
|
|
|
|
|
|
|
|
|
|
|
|
|
|
|
|
|
|
|
|
|
|
|
|
|
|
|
|
|
|
|
|
If you prefer quiet operation, press |
|
|
|
|
|
|
|
|
|
|
|
|
|
|
|
|
|
|
|
|
|
|
|
|
|
|
|
|
|
|
|
|
|
|
|
|
|
[Quiet Mode] to turn on Quiet |
|
|
|
|
|
|
|
|
|
|
|
|
|
|
|
|
|
|
|
|
|
|
|
|
|
|
|
|
|
|
|
|
|
|
|
|
|
Mode. When Quiet Mode is on, the |
|
|
|
|
|
|
|
|
|
|
|
|
|
|
|
|
|
|
print speed is slower. |
|
|
|
|
|
|
|
|
|
|
|
|
|
|
|
|
|
|
|
|
|
|
|
|
|
|
|
|
|
|
|
|
|
|
|
|
|
|
|
|
|
|
|
|
|
|
|
|
|
|
|
|
|
|
— |
Press once (turns off). |
Turns off Quiet Mode. |
|
|
|
|
|
|
|
|
|
|
|
|
|
|
|
[Cancel] Key |
— |
Press and hold for 1 |
Cancels the job being sent from the |
|
|
|
|
|
|
|
|
|
|
|
|
|
|
|
|
|
second or longer. |
PC. |
|
|
|
|
|
|
|
|
|
|
|
|
|
|
|
|
|
||
|
|
|
|
|
|
|
|
|
|
|
|
|
|
|
[GO] Key |
At Ready |
Press once. |
Switches online/offline. |
|
|
|
|
|
|
|
|
|
|
|
|
|
||||||
|
|
|
|
|
|
|
|
|
|
|
|
|
|
|
|
|
Press and hold for 5 |
Prints the status page. |
|
|
|
|
|
|
|
|
|
|
|
|
|
|
|
|
|
||
|
|
|
|
|
|
|
|
|
|
|
|
|
|
|
|
|
seconds. |
|
|
|
|
|
|
|
|
|
|
|
|
|
|
|
|
|
|
|
|
|
|
|
|
|
|
|
|
|
|
|
|
|
|
|
|
|
|
|
|
|
|
|
|
|
|
|
|
|
|
|
|
|
|
|
|
Press and hold for 10 |
Prints the network status page. (FS- |
|
|
|
|
|
|
|
|
|
|
|
|
|
|
|
|
|
||
|
|
|
|
|
|
|
|
|
|
|
|
|
|
|
|
|
seconds. |
1060DN/FS-1061DN only) |
|
|
|
|
|
|
|
|
|
|
|
|
|
|
|
|
|
||
|
|
|
|
|
|
|
|
|
|
|
|
|
|
|
|
At Error |
Press once. |
Clears the error. |
Indicators |
|
|||||||||||||||||
|
|
|
|
|||||||||||||||
There are two indicators located on the top right of the printer. The indicators are used to identify the status of the printer at any time. To identify the printer status, check the indicators on the printer and then refer to the table below.
Indicator |
Status |
Meaning |
|
|
|
|
|
Processing Indicator |
Lit |
Indicates online status (printing is possible). |
|
(Green) |
|
|
|
Fast Flashing |
Offline status. |
||
|
Slow Flashing |
The printer is processing data. |
|
|
Very slow (5-second |
The printer is in sleep mode. |
|
|
interval) flashing |
|
|
|
Off |
The power is off. |
|
|
|
|
|
Attention Indicator |
Lit |
One of the following problems has occurred on the printer. Check the |
|
(Amber) |
|
error message in KYOCERA Client Tool. |
|
|
|
• The rear cover or front cover is open. |
|
|
|
• |
Toner is empty. |
|
|
• The drum unit is not installed. |
|
|
Fast Flashing |
One of the following problems has occurred on the printer. Check the |
|
|
|
error message in KYOCERA Client Tool. |
|
|
|
• A paper jam has occurred. |
|
|
|
• The top tray is full of paper. (The printer pauses after about 150 |
|
|
|
|
sheets are printed.) |
|
|
• |
Memory is full. |
|
|
• Non-genuine toner is installed. |
|
|
Slow Flashing |
One of the following problems has occurred on the printer. Check the |
|
|
|
error message in KYOCERA Client Tool. |
|
|
|
• The paper has run out while printing. |
|
|
|
• The toner is running low. |
|
|
Off |
The printer status is normal. Or, the power is off. |
|
Note For other combinations of the two indicators, call for service. KYOCERA Client Tool (software bundled with the GX Driver) will provide more detailed information about the printer status. (Refer to KYOCERA Client Tool on page 2-10.)
1-3

Machine Parts
1-4

2 Connecting and Printing
This chapter explains how to start up the printer, print from your PC, and use the application software included in the
Product Library disc.
Connections ........................................................................................................................................................... |
2-2 |
Altitude Setting....................................................................................................................................................... |
2-3 |
Installing the Printer Driver ................................................................................................................................... |
2-4 |
Printing.................................................................................................................................................................... |
2-7 |
KYOCERA Client Tool.......................................................................................................................................... |
2-10 |
Configuration........................................................................................................................................................ |
2-12 |
Uninstalling Software (Windows PC) ................................................................................................................. |
2-14 |
2-1
Connecting and Printing
Connections
This section explains how to start up the printer.
Connecting the USB Cable
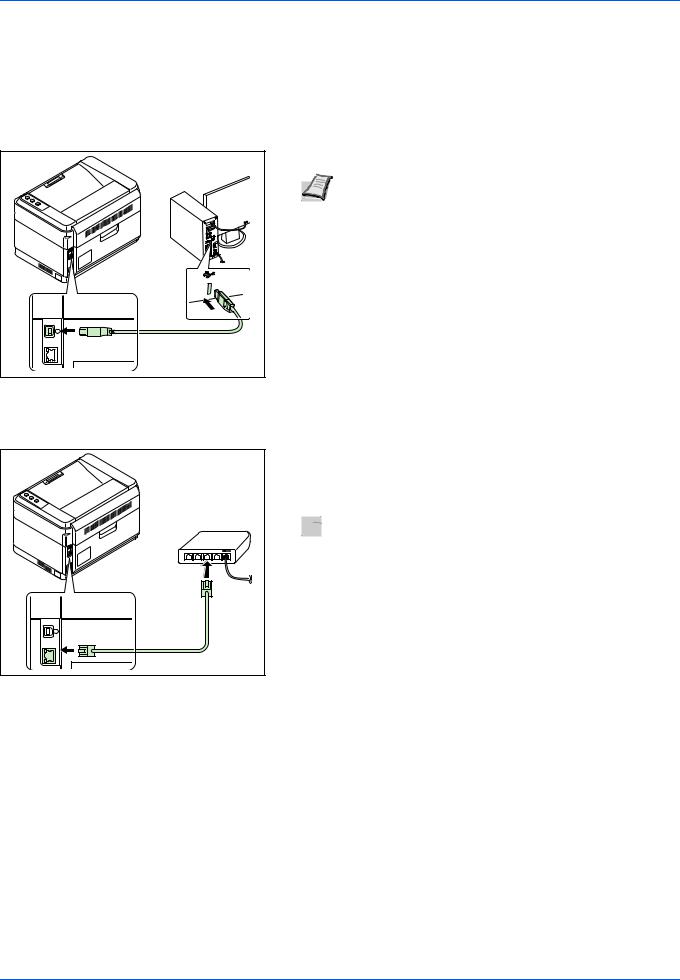
Follow the steps as below for connecting the USB cable.
1 Connect the USB cable to the printer's USB interface connector.
Note Use a USB cable with a rectangular Type A plug and a square Type B plug. The USB cable should be shielded and no longer than 5 meters (16 feet) long.
2 Connect the other end of the USB cable to the computer's USB interface connector.
Connecting the Network Cable (FS-1060DN/FS-1061DN only)
Follow the steps as below for connecting the network cable.
1 Connect the network cable (not included) to the printer's network interface connector.
2 Connect the other end of the cable to the PC or your network device.
 Note Use shielded interface cables.
2-2

Connecting and Printing
Connecting the Power Cord
Install the printer close to an AC wall outlet. If an extension cord is used, the total length of the power cord plus extension should be 5 meters (16 feet) or less.
 Note Only use the power cord supplied with the printer.
1 |
2 |
3 |
Connect the power cord to the power cord connector at the rear of the printer.
Connect the other end of the power cord to a power outlet.
(For Korean models) Turn the main power switch On.
4 Press the power switch to On. The printer begins to warm up.
IMPORTANT If you install the toner container and switch on the power, the Processing indicator and Attention indicator will blink once simultaneously, and then blink alternately. When the printer is first switched on after toner installation, there will be a delay of approximately 7 minutes before the printer gets ready to print.
Once the Processing indicator lights, printer installation is complete.
Starter Toner Container
The toner container packed with the new printer is a starter toner container. The starter toner container lasts an average of 700 pages (FS-1040/FS-1041) or 1,000 pages (FS-1060DN/FS-1061DN).
Altitude Setting
If you are using the machine at an altitude of 1500 meters (480 feet) or higher and print quality has deteriorated, the Altitude setting can be used to restore print quality. For more information, refer to KYOCERA Client Tool User Guide.
2-3

Connecting and Printing
Installing the Printer Driver
Ensure the printer is plugged in and connected to the PC before installing the printer driver from the Product Library disc.
 Note Install the printer driver when the printer status is online (the Processing indicator is lit).
Installing the Software in Windows
If you are connecting this printer to a Windows PC, follow the next steps to install the printer driver. The example shows you how to connect your printer to a Windows 7.
 Note In Windows operating systems, you must be logged in with administrator rights to install the printer driver.
You can use either Express Mode or Custom Mode to install the software. Express Mode automatically detects connected printers and installs the required software. Use Custom Mode if you want to specify the printer port and select the software to be installed.
1Turn on the computer and start up Windows.
If the Welcome to the Found New Hardware Wizard dialog box displays, select Cancel.
2Insert the included Product Library disc into the disc drive. In Windows 7, Windows Server 2008 and Windows Vista the user account control window may appear. Click Yes.
The installation program launches.
Note If the software install wizard does not launch automatically, open the Product Library disc window in Windows Explorer and double-click Setup.exe.
3Click View License Agreement and read the License Agreement. Click Accept.
The software install wizard starts up.
From this point, the procedure differs depending on your version of Windows and your connection method. Proceed to the correct procedure for your connection type.
•Express Mode
•Custom Mode
Express Mode
In Express Mode, the installer automatically detects the printer when it is turned on. Use Express Mode for standard connection methods.
1 Select the Express Install tab. The installer detects the printer.
If the installer does not detect a print system, check that the print system is connected via USB or a network and that it is turned on.
Then click  (Refresh) to search print system again.
Note While the information shown in Windows 7 and Windows Vista/Windows XP installation dialog boxes differs slightly, the installation procedure is the same.
Network connection is only possible with the FS-1060DN/FS- 1061DN.
2-4
Connecting and Printing
2Select the printer you want to install, select the Driver Package, and click Install.
Note If the Found New Hardware Wizard appears, click Cancel. If a hardware installation warning message appears, click Continue.
If the Windows security window appears, click Install this driver software anyway.
3 A message appears saying that your software is ready to use. To print a test page, select the Print a test page checkbox and select the printer.
Click Finish to exit the printer installation wizard.
This completes the printer driver installation procedure.
Custom Mode
Use Custom Mode if you want to specify the printer port and select the software to be installed.
1Select Custom Install tab.
2Select the device to be installed, and click the arrow button to move
it to the Products to Install list.
3Select the software to be installed, and click the arrow button to move it to the Products to Install list.
4Click Install.
5A message appears saying that your software is ready to use. To print a test page, select the Print a test page checkbox and select the printer.
Click Finish to exit the printer installation wizard.
This completes the printer driver installation procedure.
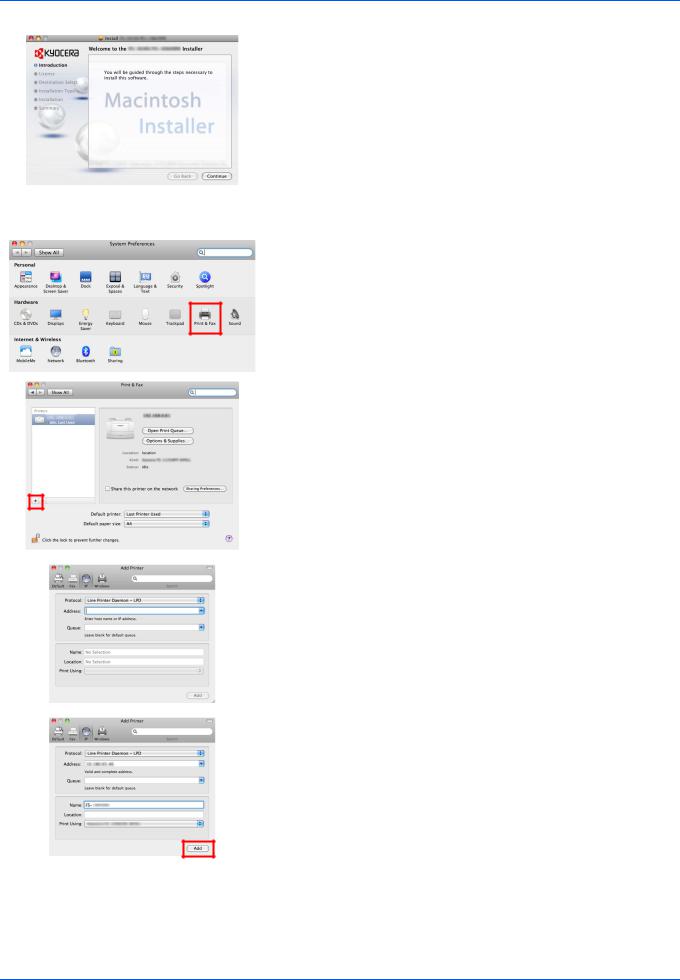
Installation on a Macintosh
This section explains how to install the printer driver in Mac OS.
1Turn on the printer and the Macintosh.
2Insert the included Product Library disc into the disc drive.
3Double-click the Product Library disc icon.
4Double-click OS X 10.5 or higher.
5 Double-click Kyocera OS X 10.5+ xxxxx.
2-5
Connecting and Printing
6The printer driver installation program starts up.
7Install the printer driver as directed by the instructions in the installation software.
IMPORTANT In the Authentication screen, enter the name and password used to log in to the operating system.
This completes the printer driver installation. If a USB connection is used, the printer is automatically recognized and connected.
(FS-1060DN/FS-1061DN only)
If an IP connection is used, the settings below are required. 8 Open System Preferences and click Print & Fax.
9 Click the plus symbol (+) to add the installed printer driver.
10Click the IP icon for an IP connection and then enter the IP address and printer name.
11Select the installed printer driver and click Add.
12The selected printer is added. This completes the printer setup procedure.
2-6
Connecting and Printing
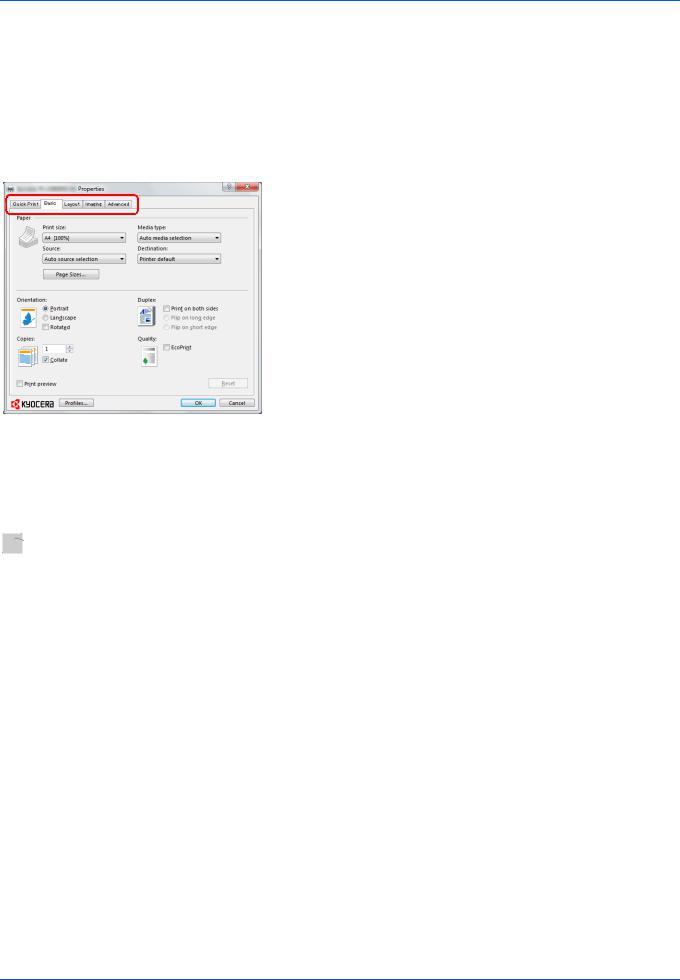
Printing
This section explains the printing procedure from an application software. You can specify the printing settings from each tab on GX Driver. GX Driver is stored in the Product Library disc. For more information, refer to the Printer Driver User Guide in the Product Library disc.
About GX Driver
GX Driver consists of the following tabs.
Quick Print
Use this tab to define basic print options into group profiles that can be accessed quickly and easily.
Basic
Use this tab to select the page size and orientation. The paper source is also selected.
Layout
Use to create multiple pages on a single sheet of paper. Also contains the scaling option.
Imaging
Select this tab to change the print quality, and graphic settings.
Advanced
Use to set up and add watermarks to your output.
Printing from Application Software
The steps required to print a document created with an application are explained below. You can select the printing paper size.
 Note You can also select the various settings by clicking Properties to open the Properties dialog box.
1Load the paper required into the cassette.
2From the application File menu, select Print. The Print dialog box appears.
3Click the drop-down list of printer names. All the installed printers are listed. Click the name of the printer.
4Use Number of copies to enter the number of copies required. Up to 999 copies can be printed. For Microsoft Word, we recommend that you click Options and specify Use printer settings for the Default tray.
5To start printing, click OK.
2-7
Loading...