

Konica Minolta bizhub C280 Design Shortcut Manual
簡易說明書
Shortcut Manual
bizhub C280 Design
Konica Minolta Business Solutions (HK) Ltd.
Room 208, 2/F., Eastern Centre, 1065 King’s Road, Quarry Bay, Hong Kong.
Tel: (852) 2565 8181 FAX: (852) 2565 761
2
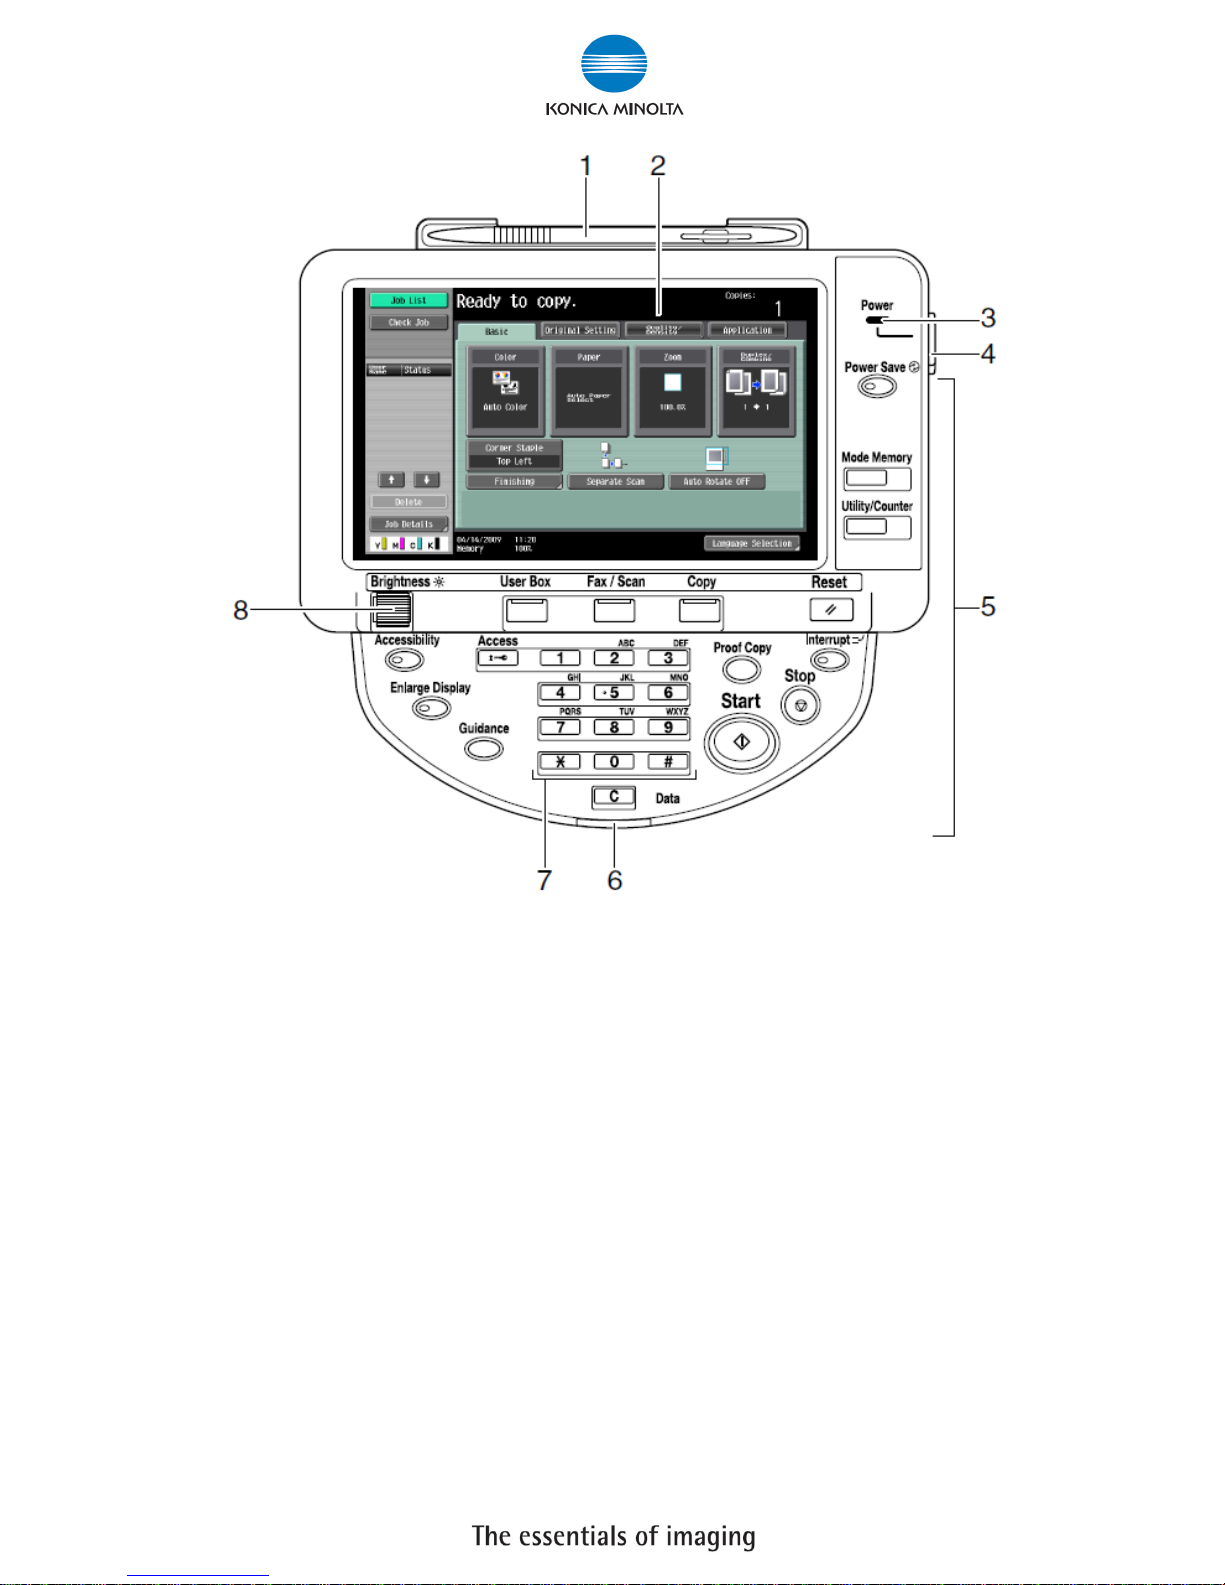
1. Touch Pen 輕觸筆
2. Touch Panel 輕觸螢光幕
3. Main Power indicator 電源指示燈
4. Sub power switch 副電源開關
5. Function key 公能鍵
6. Data indicator 資料指示燈
7. Keypad 數字鍵
8. Brightness Adjustment Dial 螢光幕亮度調整鍵
Konica Minolta Business Solutions (HK) Ltd.
Room 208, 2/F., Eastern Centre, 1065 King’s Road, Quarry Bay, Hong Kong.
Tel: (852) 2565 8181 FAX: (852) 2565 761
3
Konica Minolta
C280 Design
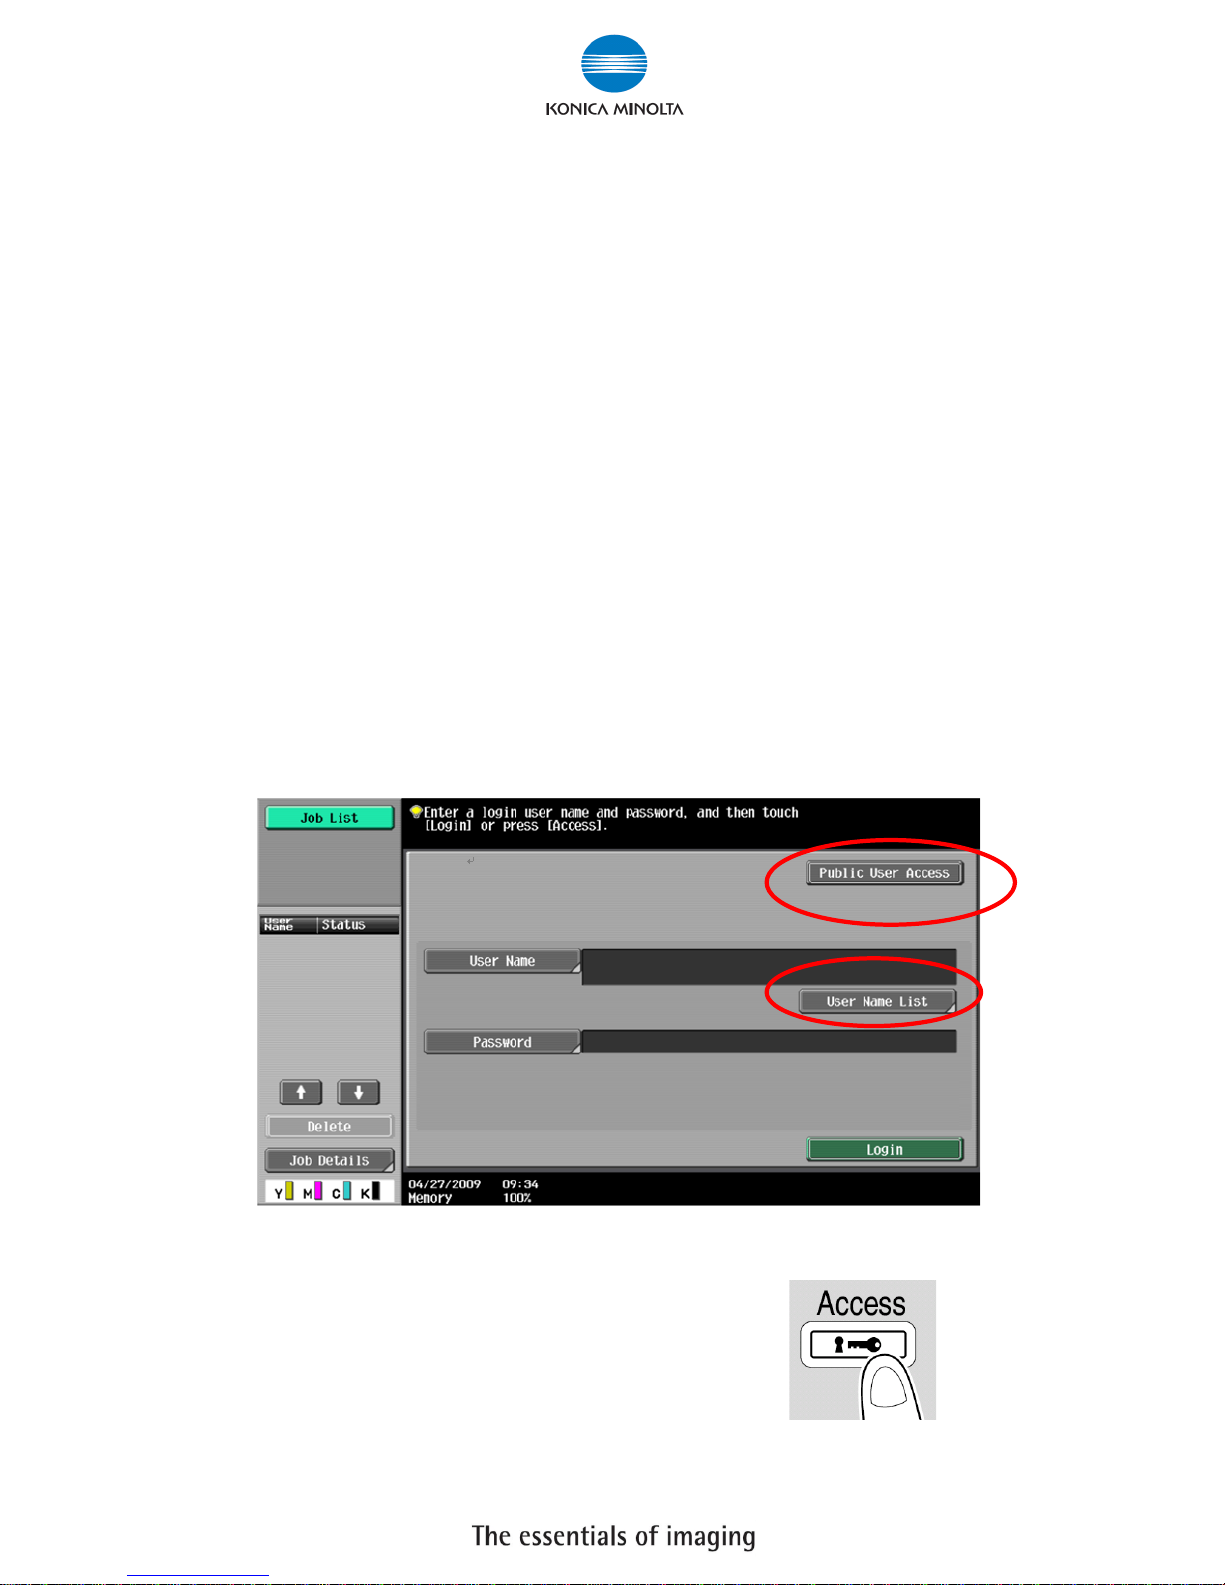
**如已選用
共用用戶
認證功能,請跟以下步驟進入使用版面
** If device with public authentication function, please follow the below steps
彩色複印
Color Copy
1.
按【列表】選擇用戶名稱,按【
確定
】
Press【User Name List】Select user name and Press【OK】
2.
按【密碼】輸入密碼,按【確定】,
Press【password】press【OK】
3.
按【
Access】。
Press【Access】
黑白複印
B/W Copy
先按
[
共同的使用者部門
]
Press [Public User access]
複印後
: (
鎖機)請按【
Access
】鍵2次
Press 【Access】twice times to logout
Konica Minolta Business Solutions (HK) Ltd.
Room 208, 2/F., Eastern Centre, 1065 King’s Road, Quarry Bay, Hong Kong.
Tel: (852) 2565 8181 FAX: (852) 2565 761
4
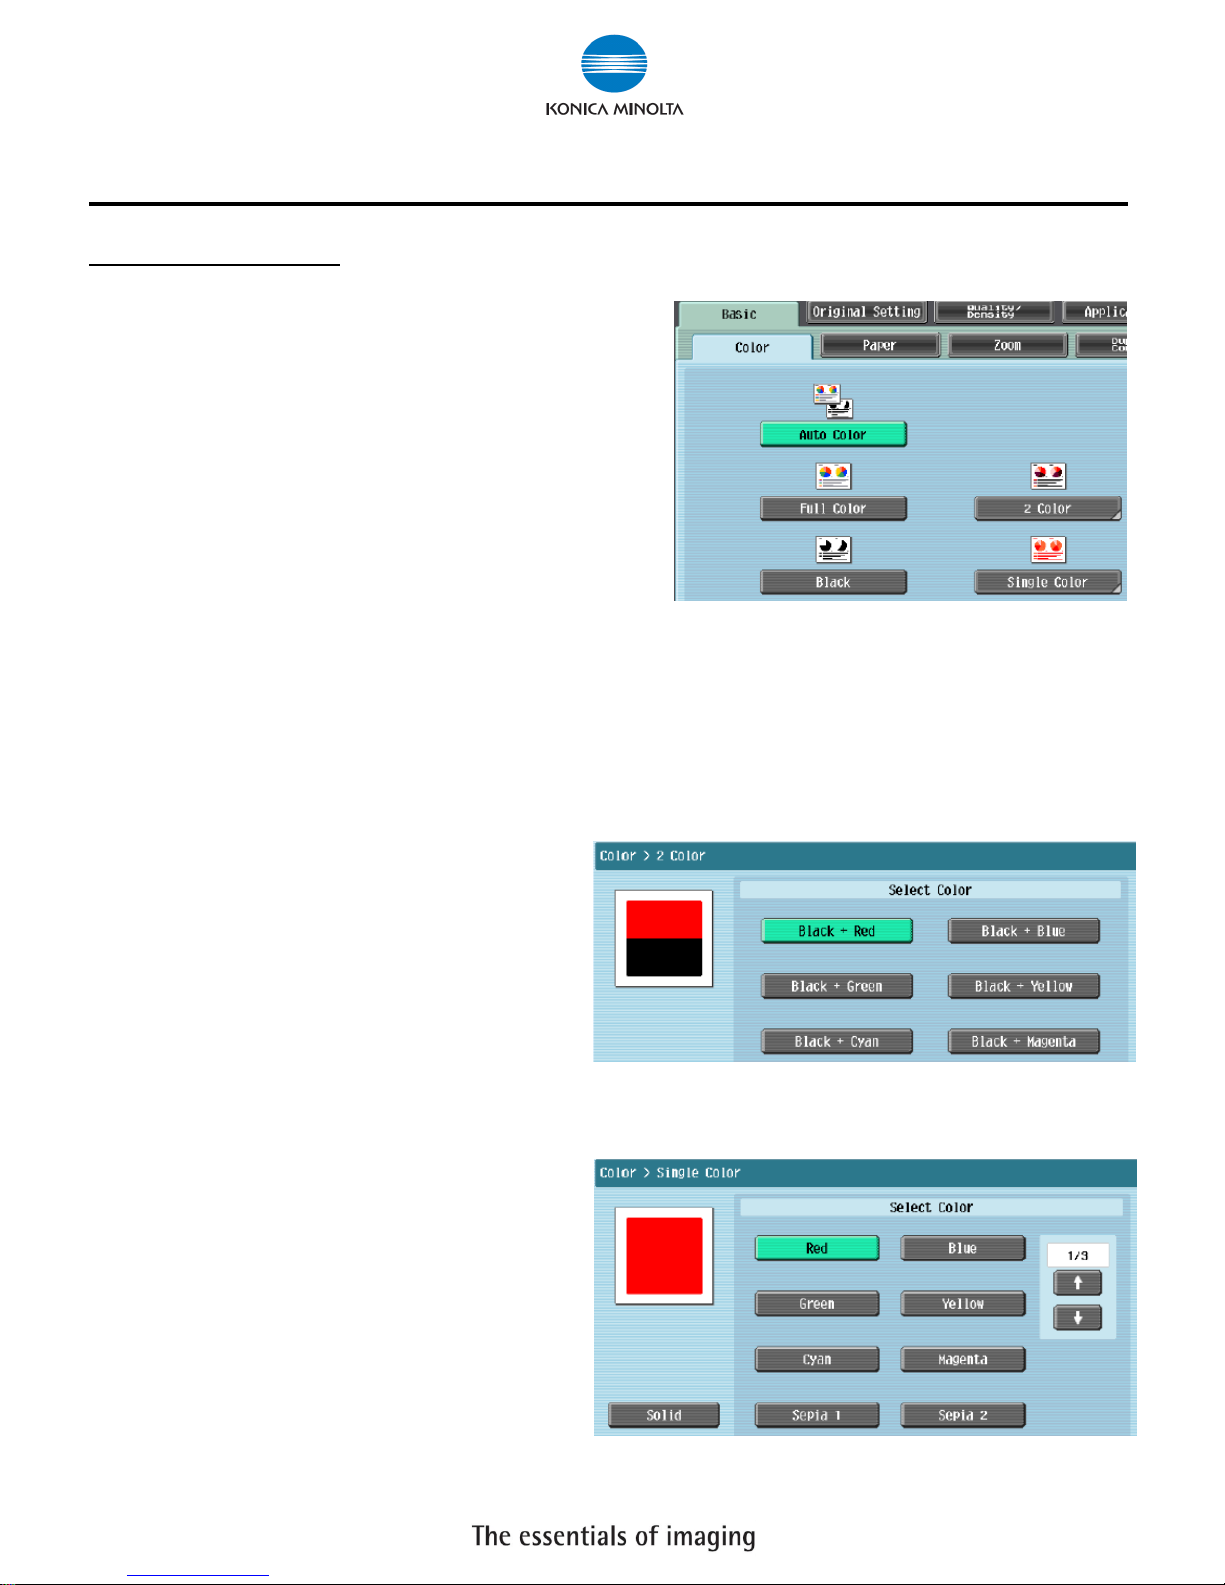
影印功能 Copy Function
Basic 基本設定 (I)
1. 自動彩色 – 自動探測原稿是彩色文件或黑白文件
Auto Color – This setting to automatically detect the
documents are in color or black and white
2. 全彩 – 列印彩色文件
Full Color – The copy in full color
3. 黑色 – 列印黑白文件
Black – The copy in black and white
4. 雙色 -- 如原稿圖案或文字分為黑色和彩
色,可把原稿彩色的部份轉變為選擇的其中
一種顏色,而黑色的部份則不變
2 Color – Print all areas of the document
determined to be in color with the specified color,
and print all areas determined to be black in black
5. 單色 – 可把文件的影像轉變為選擇的其中
一種顏色
Single Color – Print copies in the specified color,
regardless of whether the document is in color or
in black and white
Konica Minolta Business Solutions (HK) Ltd.
Room 208, 2/F., Eastern Centre, 1065 King’s Road, Quarry Bay, Hong Kong.
Tel: (852) 2565 8181 FAX: (852) 2565 761
5
Basic 基本設定 (II)
-- Paper 紙張
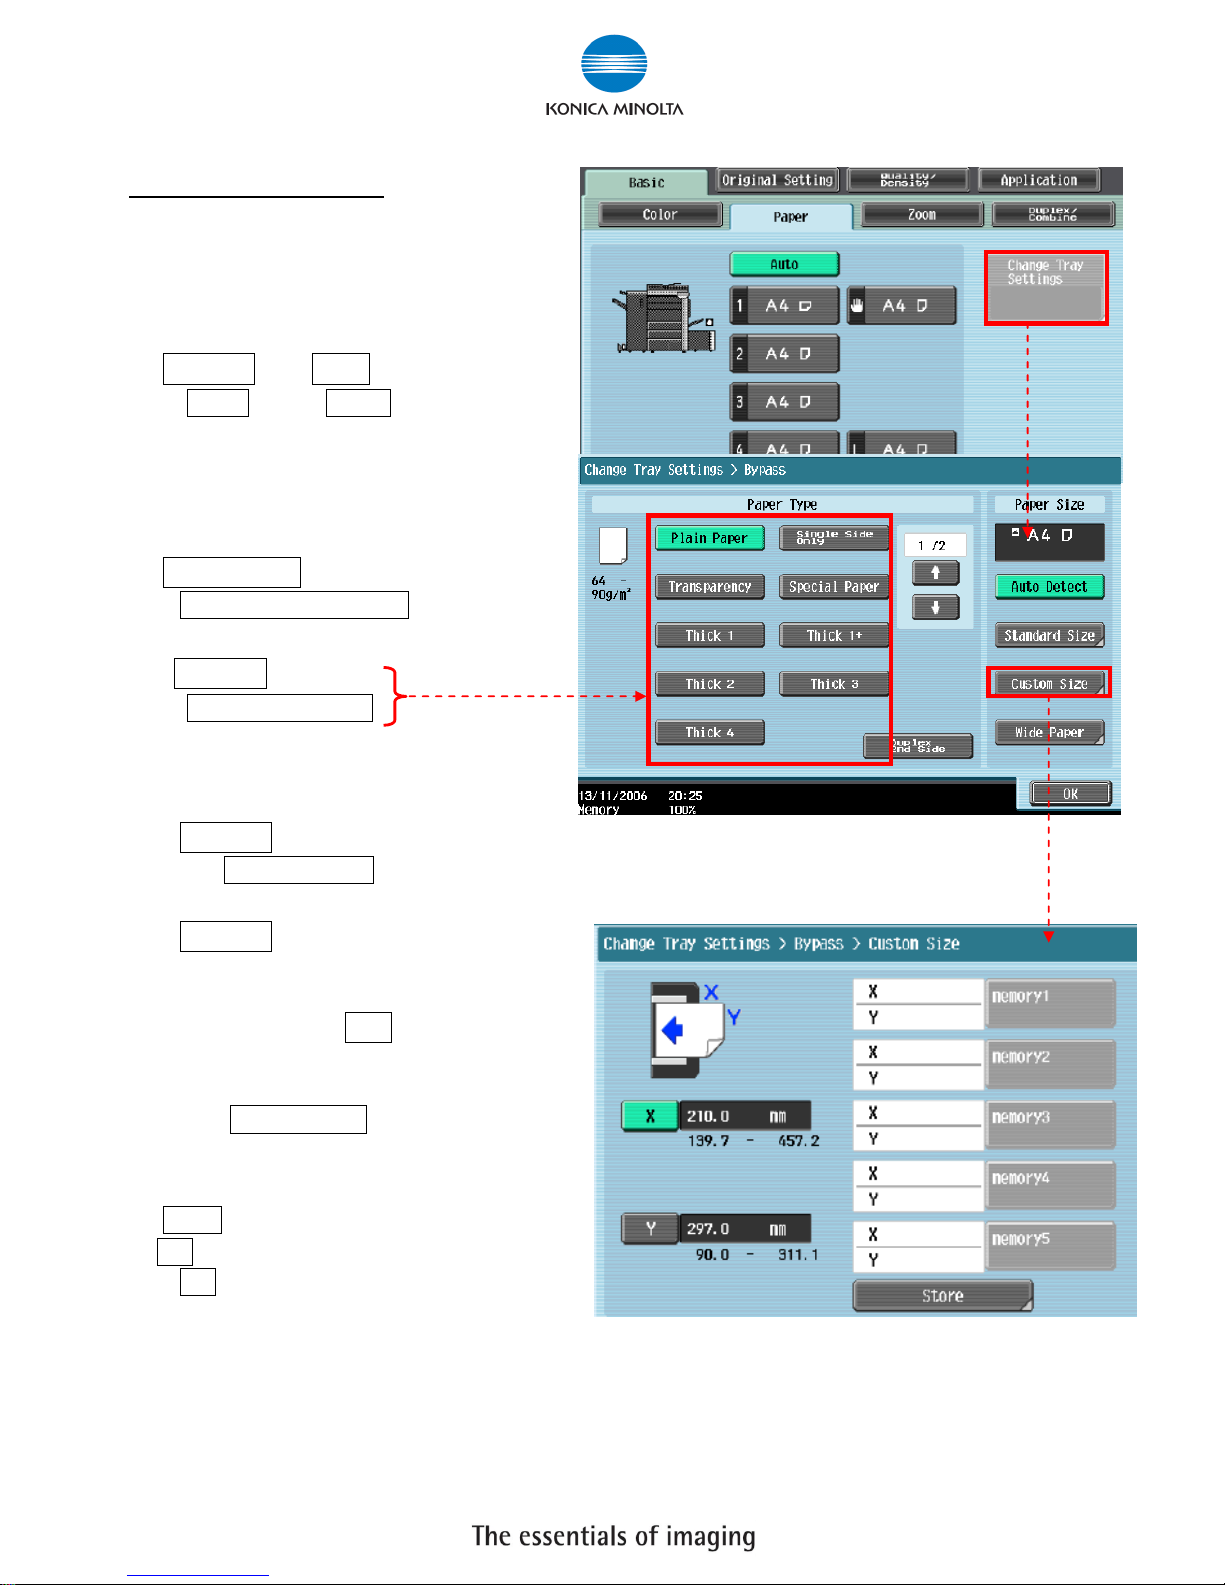
更改手送紙紙張尺寸
Change Bypass Tray Setting
1 按 基本設定 ,按 紙張
Press Basic, Press Paper
2 選擇手送紙盤
Select Paper Type
3 按 紙盤變更設定
Press change Tray Settings
4 選擇紙張類型
Press Select Paper Type
5 輸入適合的尺寸
Input paper size
a 按尺寸設定,選擇標準尺寸
Touch Standard Size
b 按自定尺寸 輸入長度 X 和寬度 Y,例如
90mm 輸入 0900
(如要儲存尺寸,按儲存, 再選擇儲存位
置 Memory1 -5 )
Touch Custom Size input (Length) X
and (width) Y,e.g. 90mm please input
0900 (If stored paper size,touch
Store, then choose Memory1 -5 )
6 按 OK
Press OK
Konica Minolta Business Solutions (HK) Ltd.
Room 208, 2/F., Eastern Centre, 1065 King’s Road, Quarry Bay, Hong Kong.
Tel: (852) 2565 8181 FAX: (852) 2565 761
6
Basic 基本設定 (III)
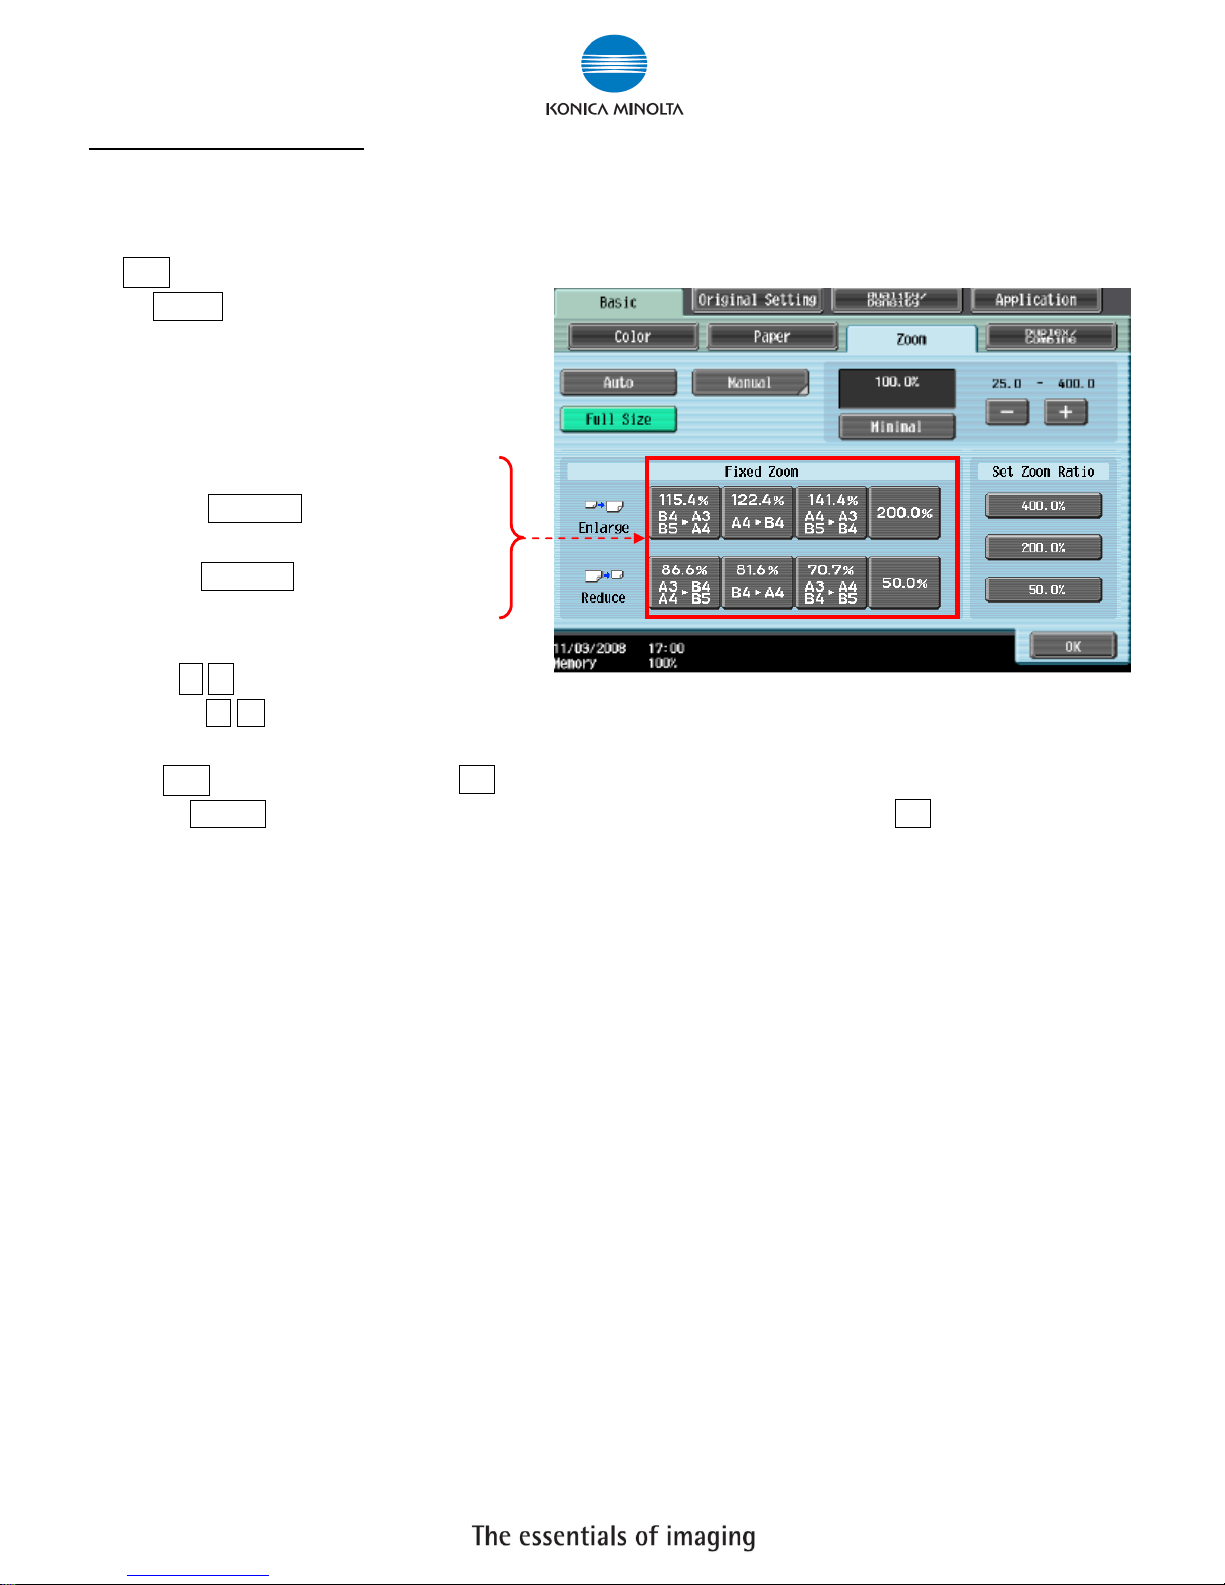
-- 倍率 Zoom
按 倍率
Press ZOOM
1 選擇一般的變焦比率
Select fixed zoom size
a 按預設的縮小 / 放大比率
例如︰A3 A4 設定數字為 0.707
Touch Fixed zoom ratios
e.g.︰A3 A4 default zoom ratio is
0.707
b 按 - + 加減號增加或減少變焦數字
Touch- + to change zoom ratio
2 按 手動 ,直接輸入變焦數字,按 OK 確定
Touch Manual , Using the keypad,type in the desired zoom ratio then touch OK
Konica Minolta Business Solutions (HK) Ltd.
Room 208, 2/F., Eastern Centre, 1065 King’s Road, Quarry Bay, Hong Kong.
Tel: (852) 2565 8181 FAX: (852) 2565 761
7
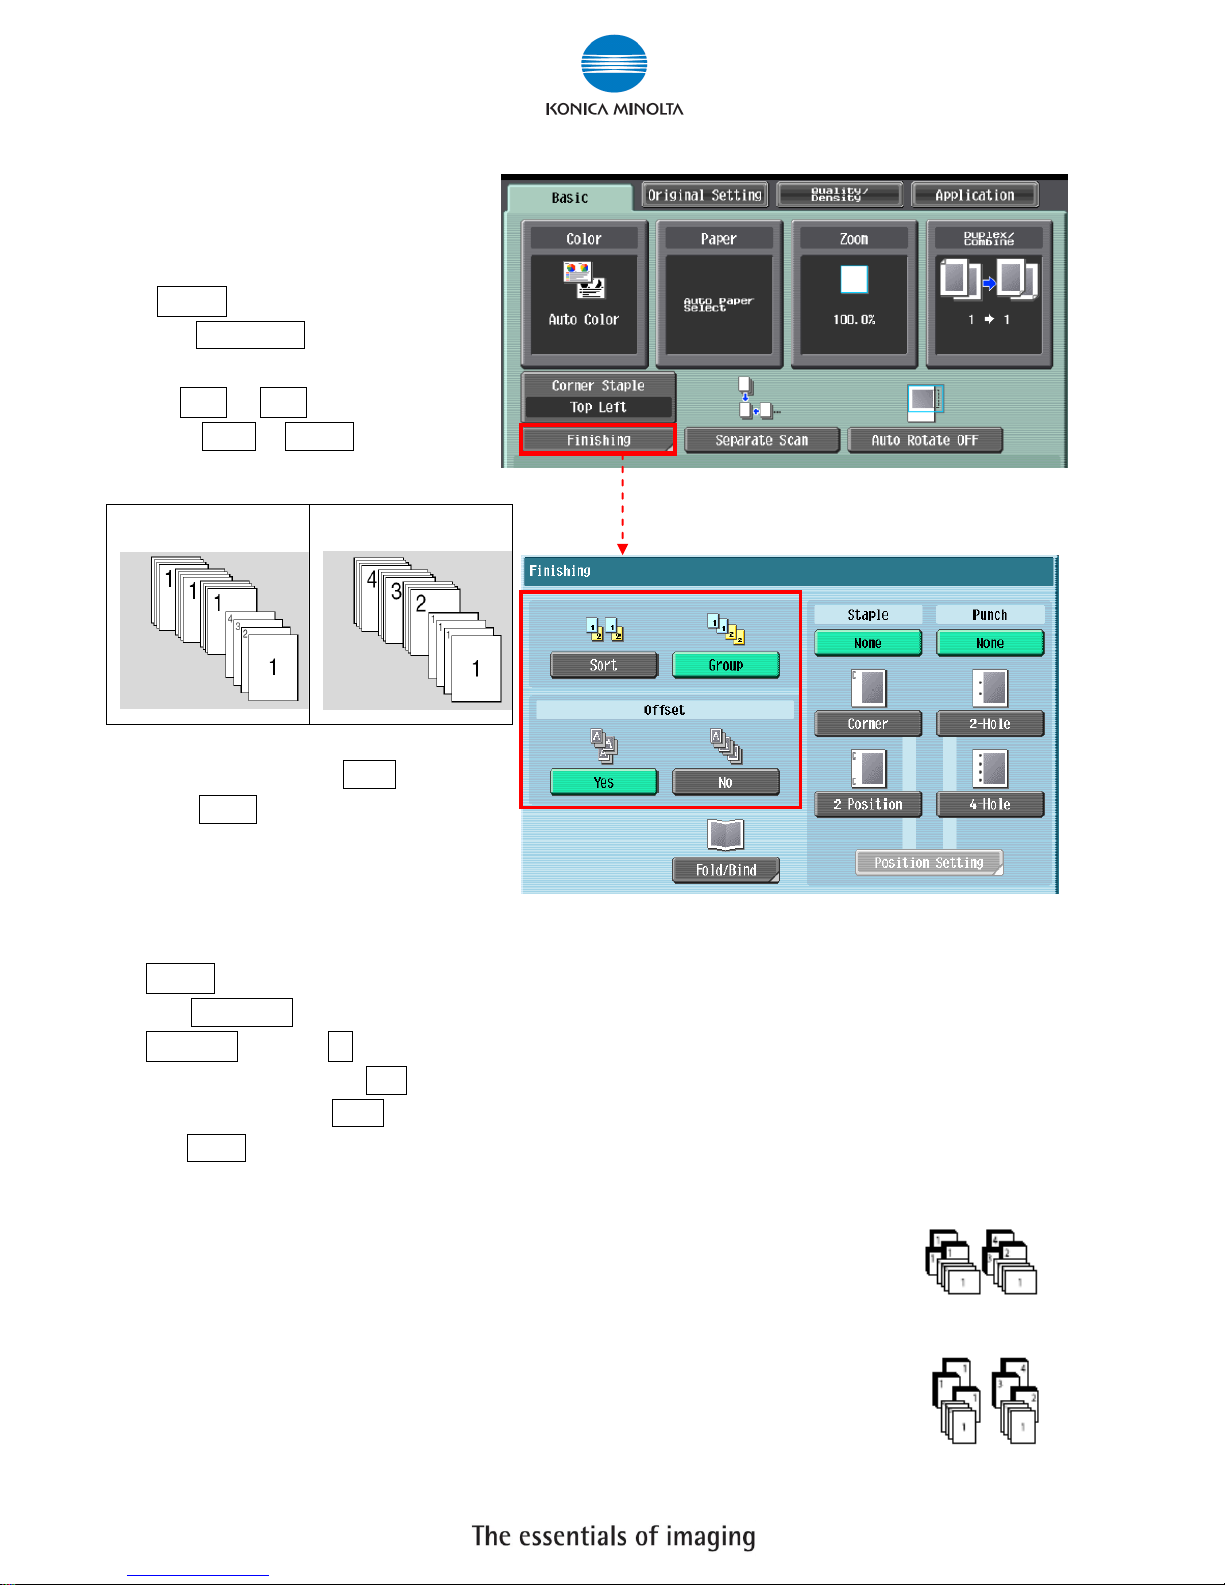
分頁/分類 Sort/Group
1. 按分頁機
Press Finishing
2. 可按分頁或 群組
Press Sort or Group
3. 如沒有其他設定,按 Start 影印鍵
Press Start to Copy
位移功能 Offset
1. 按分頁機
Press Finishing
2. 在位移功能項目中按是
In Offset option select Yes
3. 如沒有其他設定,按 Start 影印鍵
Press Start to Copy
*如沒有安裝訂裝器,副本會用十字型式分隔
If no finisher is installed, printed copies are sorted in crisscross pattern
如有安裝訂裝器,副本會用前後型式分隔
If a finisher is installed, the copies are stacked on top of each other with
each set shifted to separate it
Sort
Group

Konica Minolta Business Solutions (HK) Ltd.
Room 208, 2/F., Eastern Centre, 1065 King’s Road, Quarry Bay, Hong Kong.
Tel: (852) 2565 8181 FAX: (852) 2565 761
8
(必需加裝配件才有以下功能)
(Optional Function)
訂裝 Staple
1. 按 分頁機
Press Finishing
2. 在訂裝項目中按 訂角 或 2 個位置
At Staple select Corner or
2position
3. 按 位置設定選擇訂裝位置
Press position Setting to desired
staple positions
4. 如沒有其他設定,按 Start 影印鍵
Press Start to Copy
打孔 Punch
1. 按 分頁機
Touch Finishing
2. 在訂裝項目中按 2 孔 或 4 孔
At Staple select 2 Hole or 4 Hole
3. 按 位置設定選擇打孔位置
Touch position Setting
4. 如沒有其他設定,按 Start 影印鍵
Press Start to Copy
Konica Minolta Business Solutions (HK) Ltd.
Room 208, 2/F., Eastern Centre, 1065 King’s Road, Quarry Bay, Hong Kong.
Tel: (852) 2565 8181 FAX: (852) 2565 761
9
必須加裝配件才有此功能
(Optional Parts is needed)
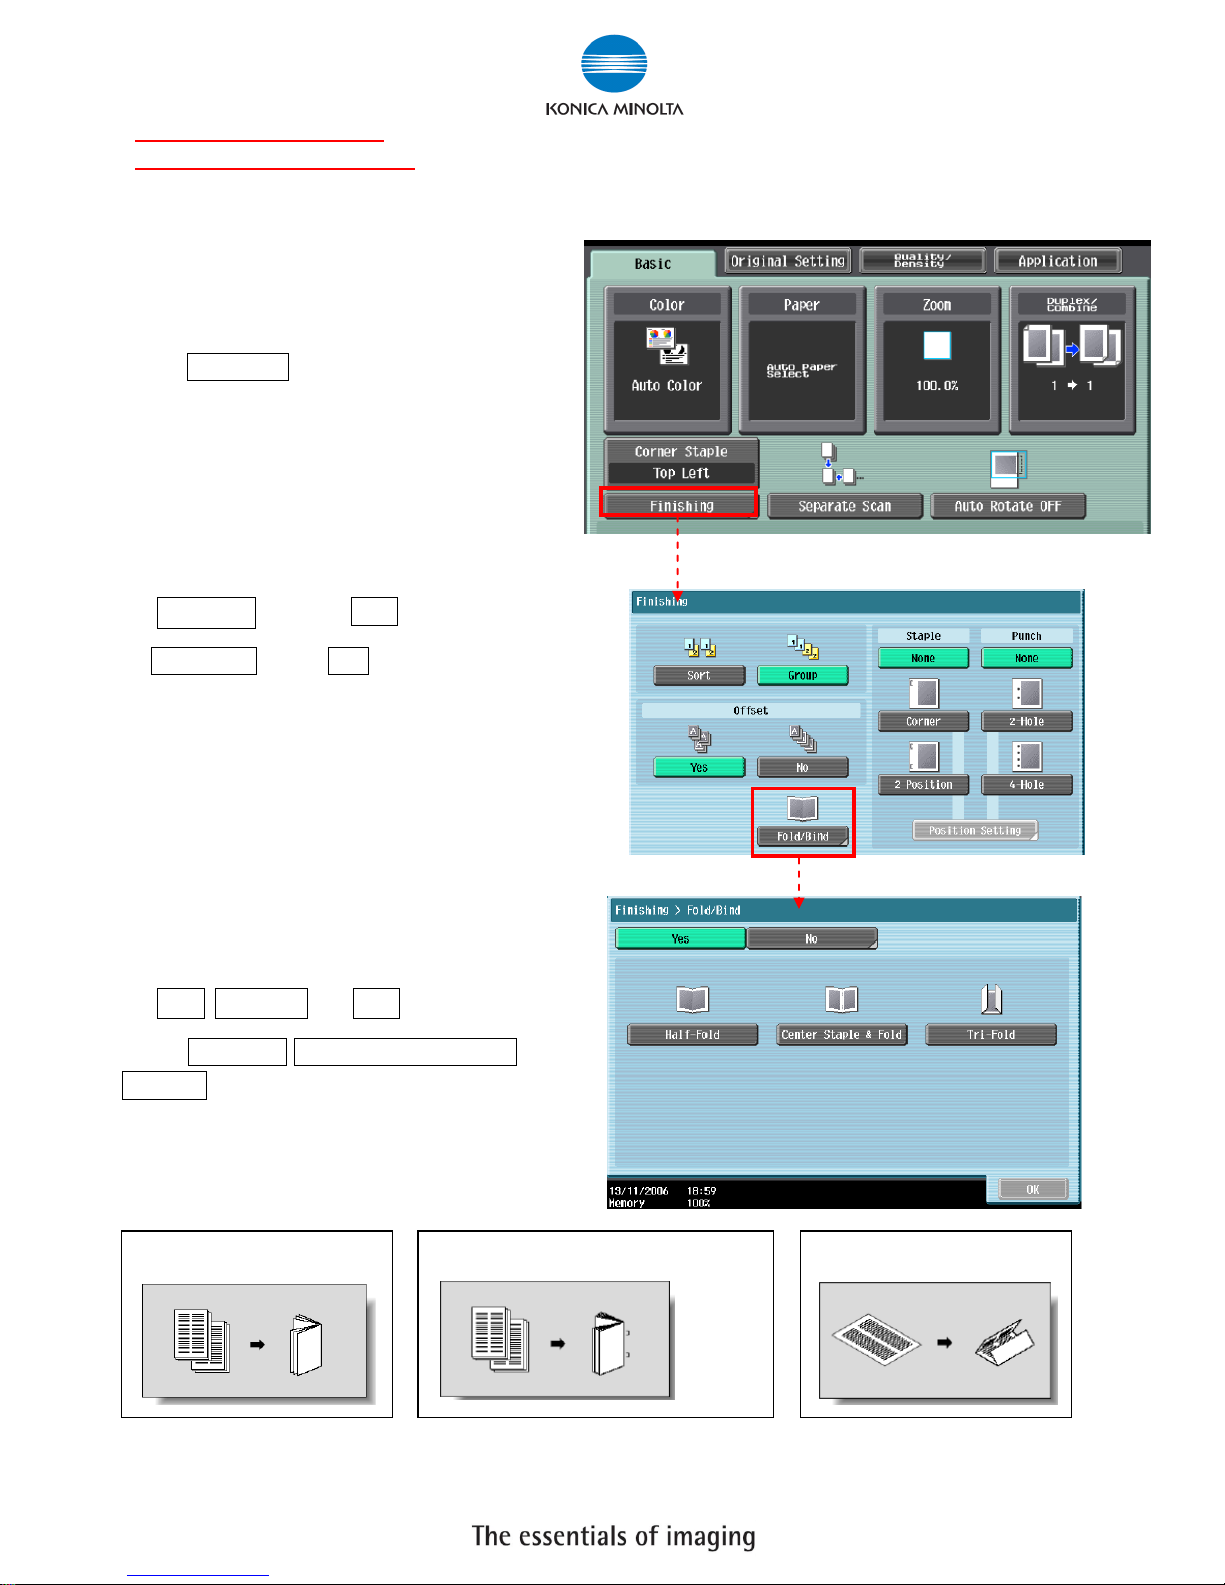
摺疊/書本訂裝 Fold/Bind
1. 按分頁機
Press Finishing
2. 在 摺疊/裝訂項目中按 Yes 啟動功能
At Fold/Bind select Yes
3. 按 對摺 中間裝訂 或 三摺
Touch Half-Fold Center Staple & Fold or
Tri-Fold
Half-Fold 對摺
Center Staple & Fold 中間裝訂
Tri-Fold 三摺
Konica Minolta Business Solutions (HK) Ltd.
Room 208, 2/F., Eastern Centre, 1065 King’s Road, Quarry Bay, Hong Kong.
Tel: (852) 2565 8181 FAX: (852) 2565 761
10
Basic 基本設定 (IV)
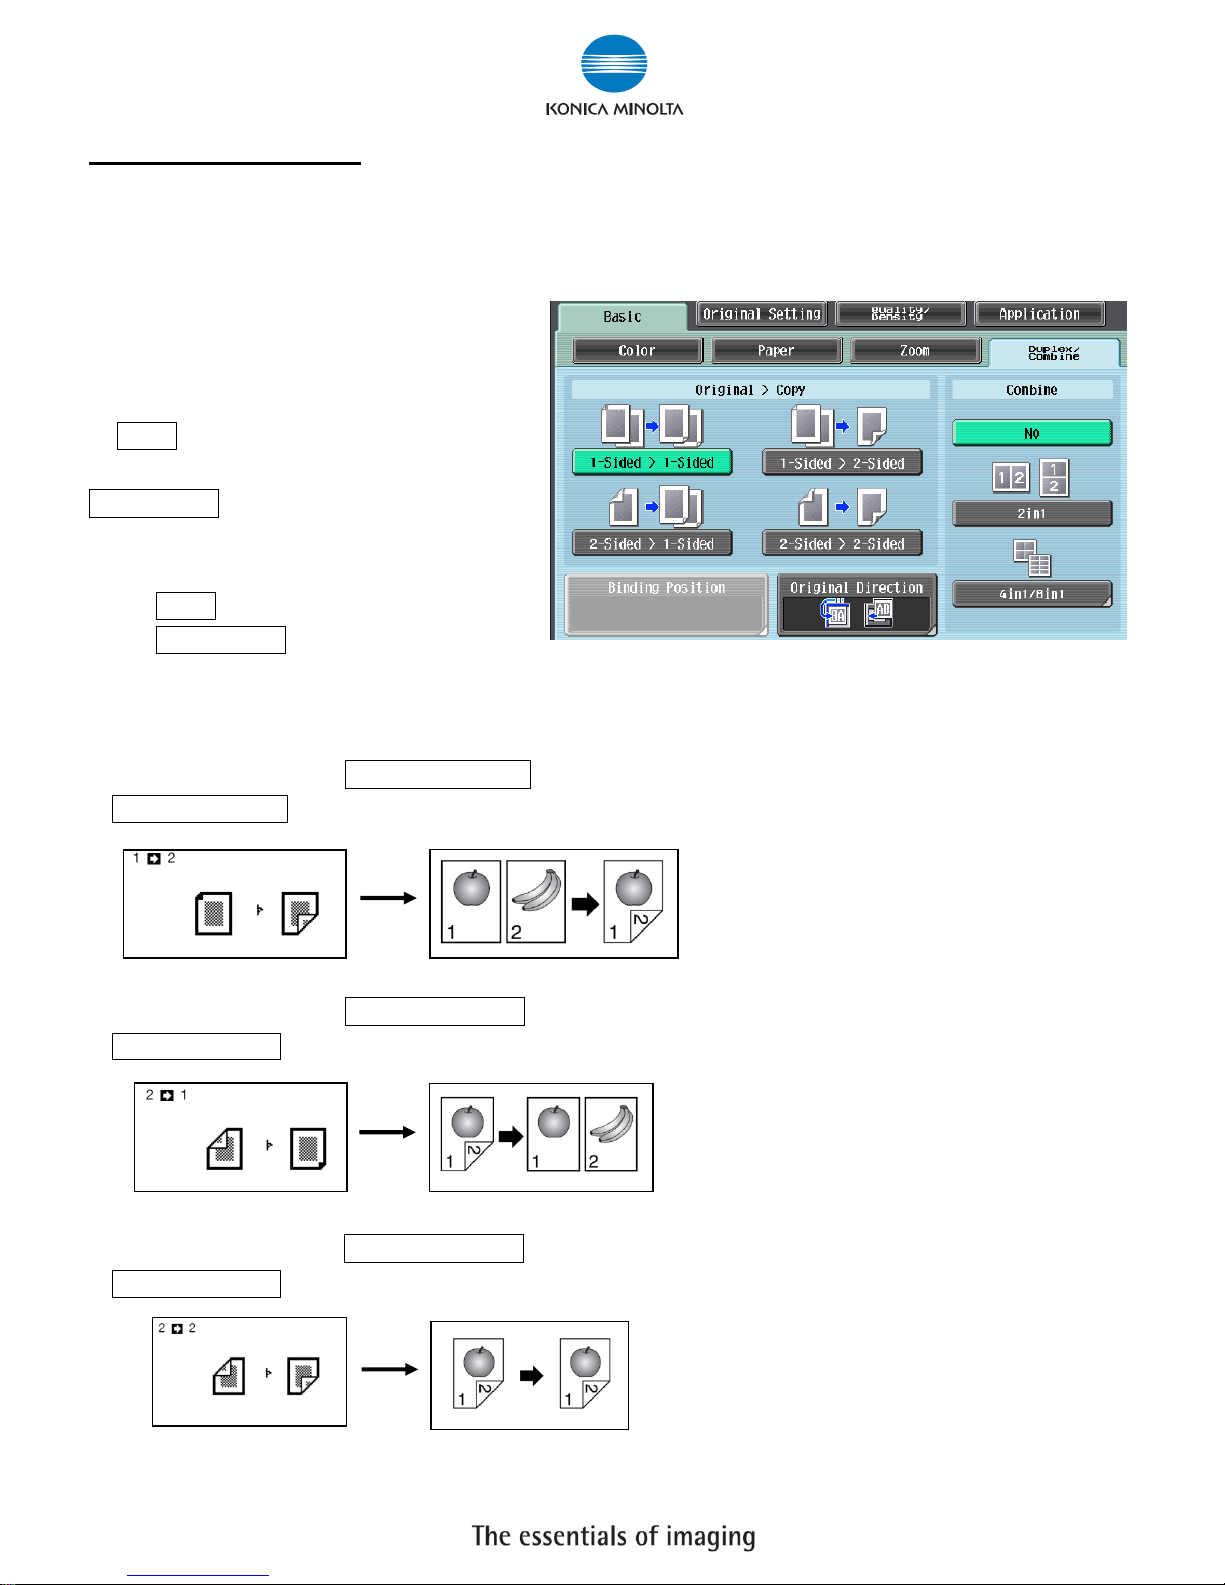
--Duplex/Combine 雙面/組合
選擇組合
Combine function
按 2 in 12 合 1 兩張原稿縮為一張 或
4 in 1/ 8 in 14 合 1/8 合 1
四張/八張原稿縮為一張
Touch 2 in 1 or
Touch 4 in 1/ 8 in 1
To reduce the size from 2 / 4 / 8 sheets originals into 1 sheet of copy
選擇 原稿 > 影本 Press Original > Copy
a.單面原稿 印 雙面副本 1-sided > 2-sided 單面 > 雙面
1-sided > 2-sided Single-sided Original to Double-sided Copy
b.雙面原稿 印 單面副本 2-sided >1-sided 雙面 > 單面
2-sided >1-sided Double-sided Original to Single-sided Copy
c.雙面原稿 印 雙面副本 2-sided >2-sided 雙面 > 雙面
2-sided >2-sided Double-sided Original to Double-sided Copy
Konica Minolta Business Solutions (HK) Ltd.
Room 208, 2/F., Eastern Centre, 1065 King’s Road, Quarry Bay, Hong Kong.
Tel: (852) 2565 8181 FAX: (852) 2565 761
11
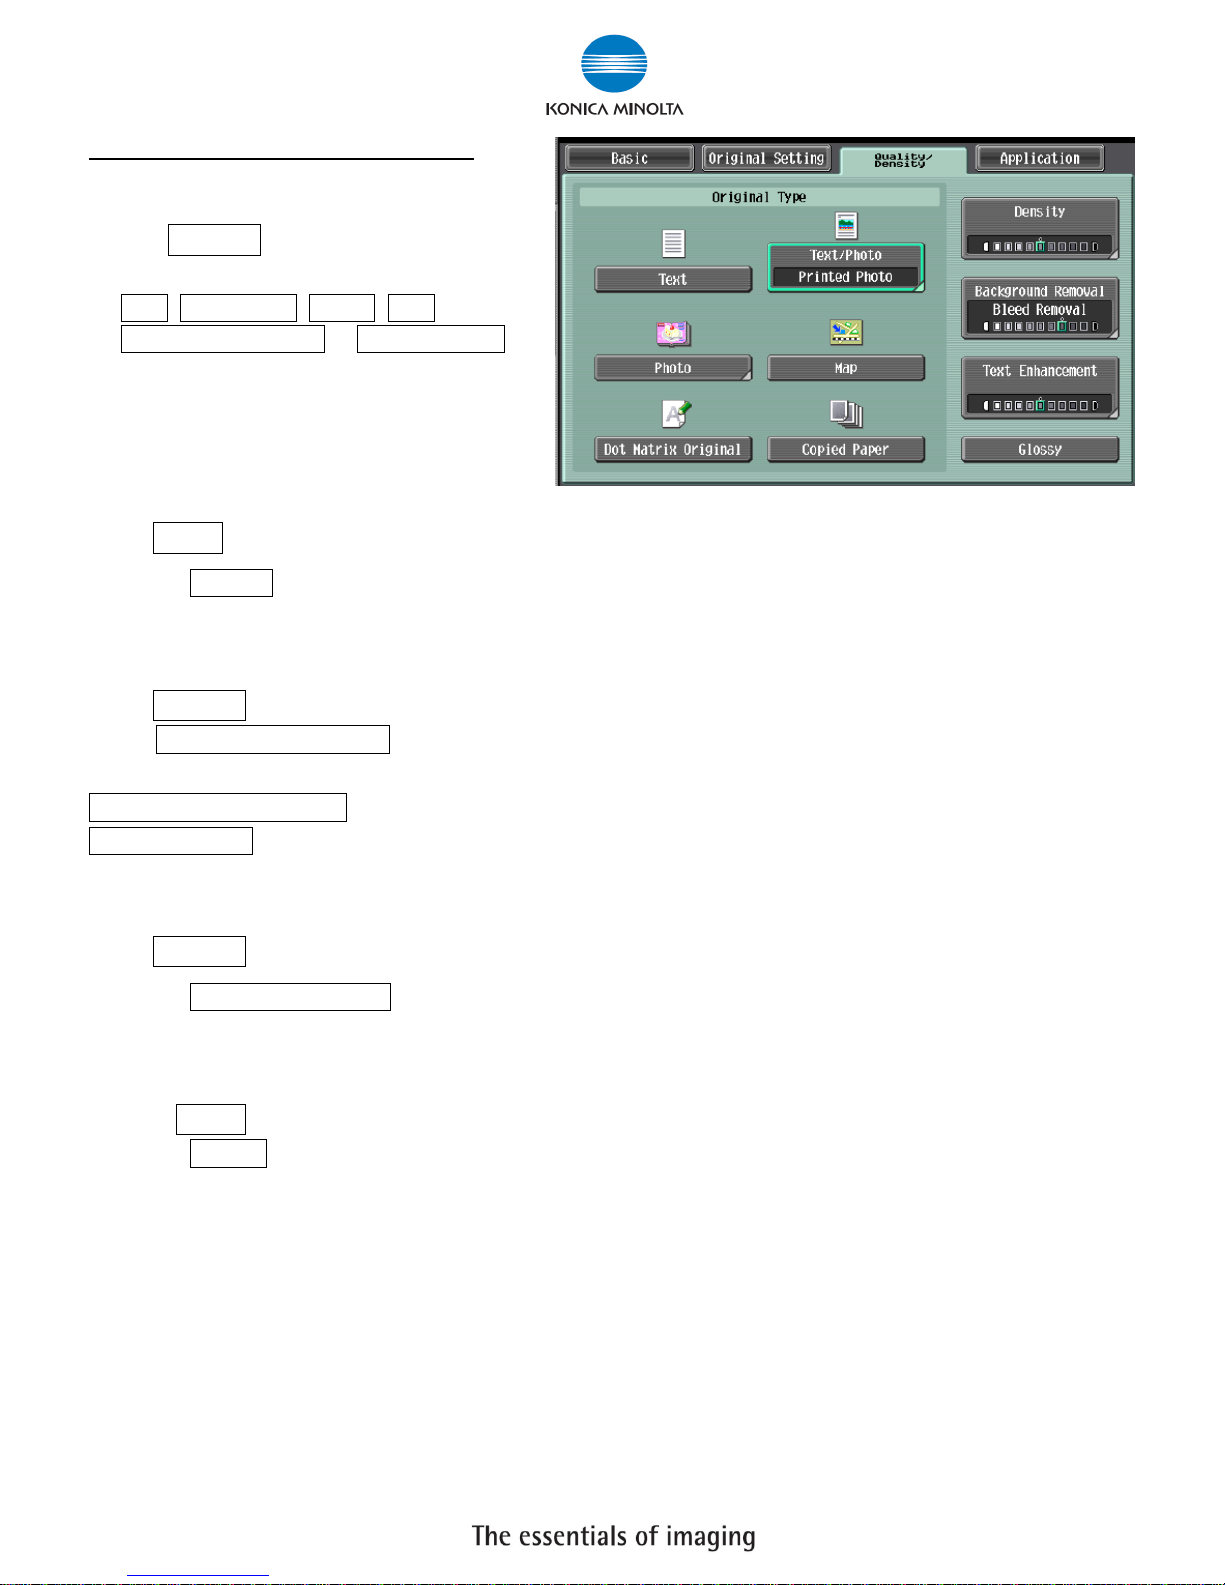
Quality/Density 品質濃淡度
1. 可在原稿類型 選擇適當的原稿類型
Select Original Type to choose
Text, Text/Photo, Photo, Map,
Dot Matrix Original or Copied Paper
2. 按 濃淡度 調校整份文件的深淺度
Touch Density – the print image can be adjusted, each time [Lighter] or [Darker] is touched, the
density is lightened or darkened by one level.
3. 按 底色調整 調校原稿背景的深淺度
Touch Background Removal – the density of the background color of the document can be adjusted,
each time [Light] or [Dark] is touched, the background density is lightened or darkened by one level.
Paper Discoloration Adj to make adjustment for background removal for copying.
Bleed Removal to make adjustment for thin paper for copying
4. 按 文字增強 調校原稿文字的深淺度
Touch Text Enhancement – select the reproduction quality of text when copying documents
consisting of text that overlaps images such as illustrations or graphs
5. 選擇 光澤面 開動光面效果
Touch Glossy – select this setting when copying images with a glossy finish
Konica Minolta Business Solutions (HK) Ltd.
Room 208, 2/F., Eastern Centre, 1065 King’s Road, Quarry Bay, Hong Kong.
Tel: (852) 2565 8181 FAX: (852) 2565 761
12
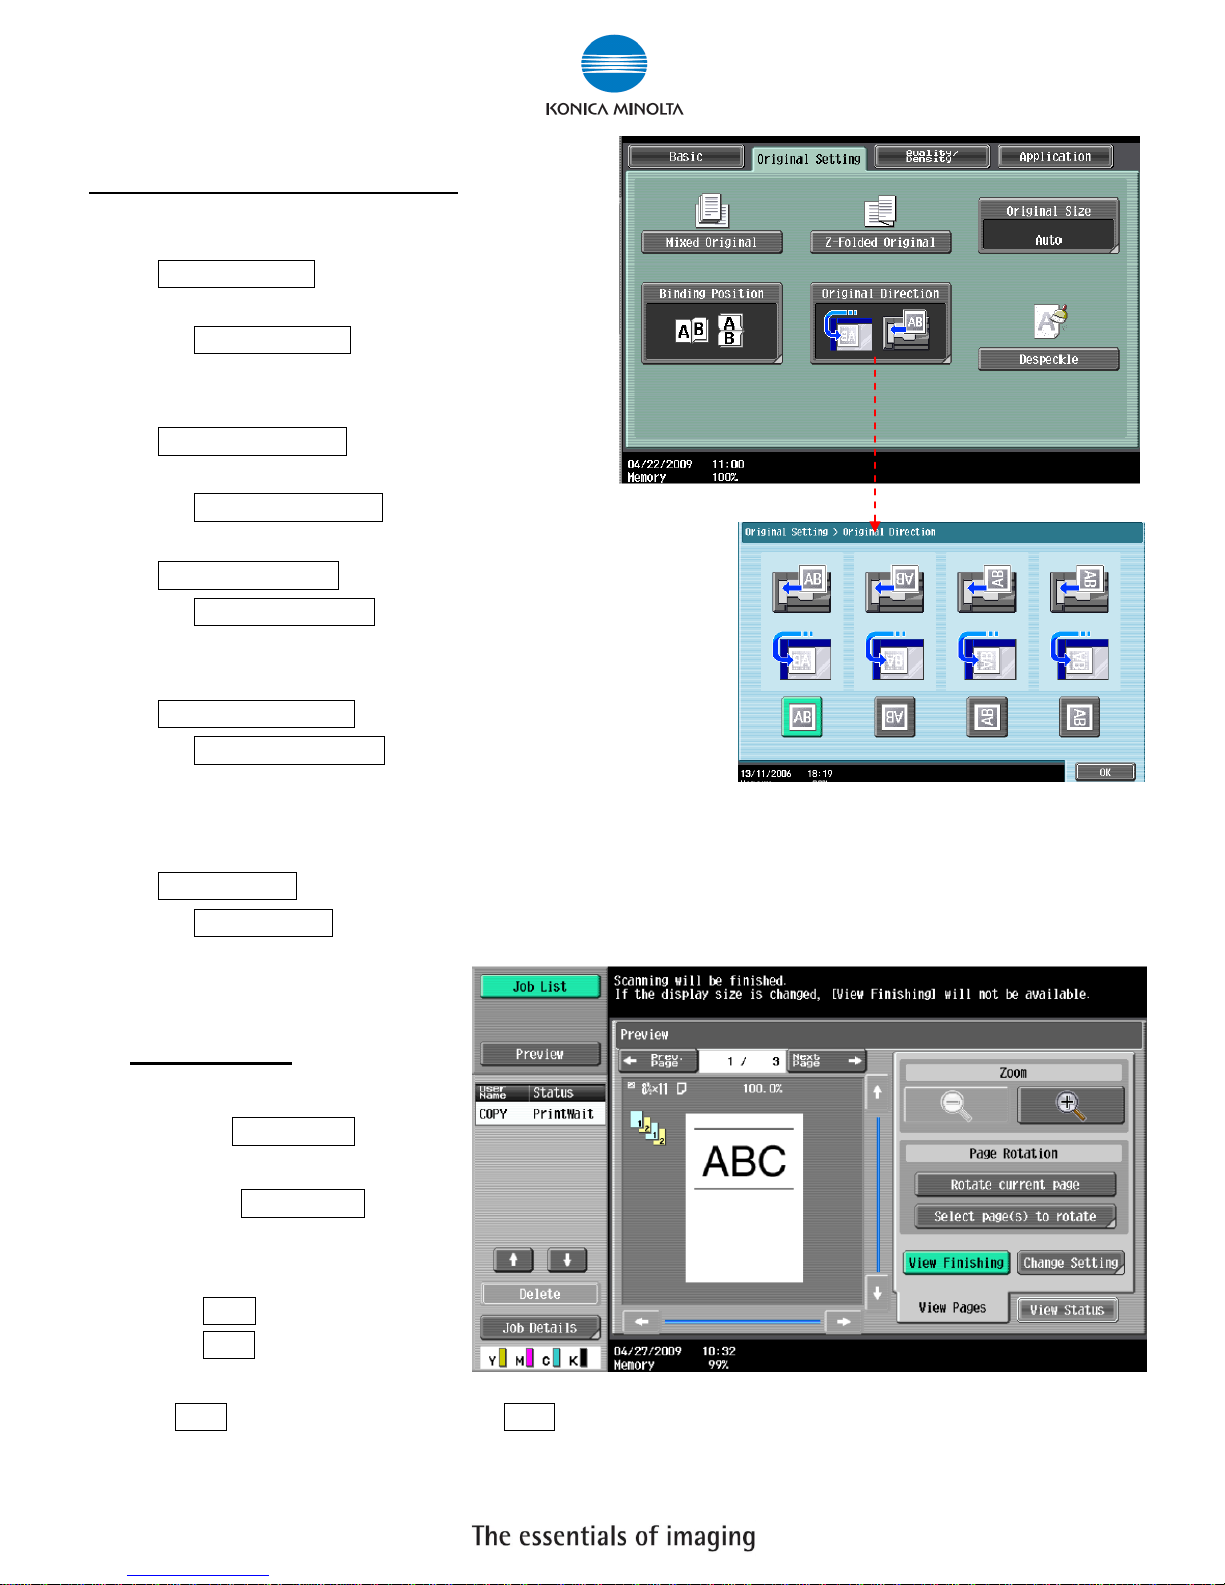
Originals Setting 原稿設定
1 按 Mixed Original 混合原稿啓動探測功能,如
放在自動送紙器的原稿有不同大小的混合
Press Mixed Original to Loads originals of
different sizes (A4 or A3) into the ADF and
scan them at a time.
2 按 Z-Folded Original 確保 Z 摺疊過的原稿在
影印時不會誤認原稿尺寸
Press Z-Folded Original correctly detects the original size
when folded originals are loaded into the ADF and copied.
3 按 Binding Position 原稿空白邊設定原稿內容的方向
Press Binding Position specify the original binding
position (page margin) to prevent the copy from being
printed upside-down when scanning a 2-sided original.
4 按 Original Direction 原稿設定方向設定預留的訂裝位置
Press Original Direction when copying double-sided
originals or making double-sided or combined copies,
press this button to specify the direction in which the original is loaded into the ADF or placed on the
Original Glass.
5 按 Original Size 原稿尺寸設定原稿大小, 預設是自動探測原稿大小
Press Original Size to specify the original size, the default setting is auto detect
Proof Copy
在做好需要的設定後,按
兩次 Proof Copy 鍵可
預覽影印效果
Press Proof Copy twice to
preview the image for
checking the copy result
按 Start 確認並列印,或
按 Stop 重選覆印功能
To confirm press the
Start button to print out or press Stop button to go back and do more adjustment
Konica Minolta Business Solutions (HK) Ltd.
Room 208, 2/F., Eastern Centre, 1065 King’s Road, Quarry Bay, Hong Kong.
Tel: (852) 2565 8181 FAX: (852) 2565 761
13
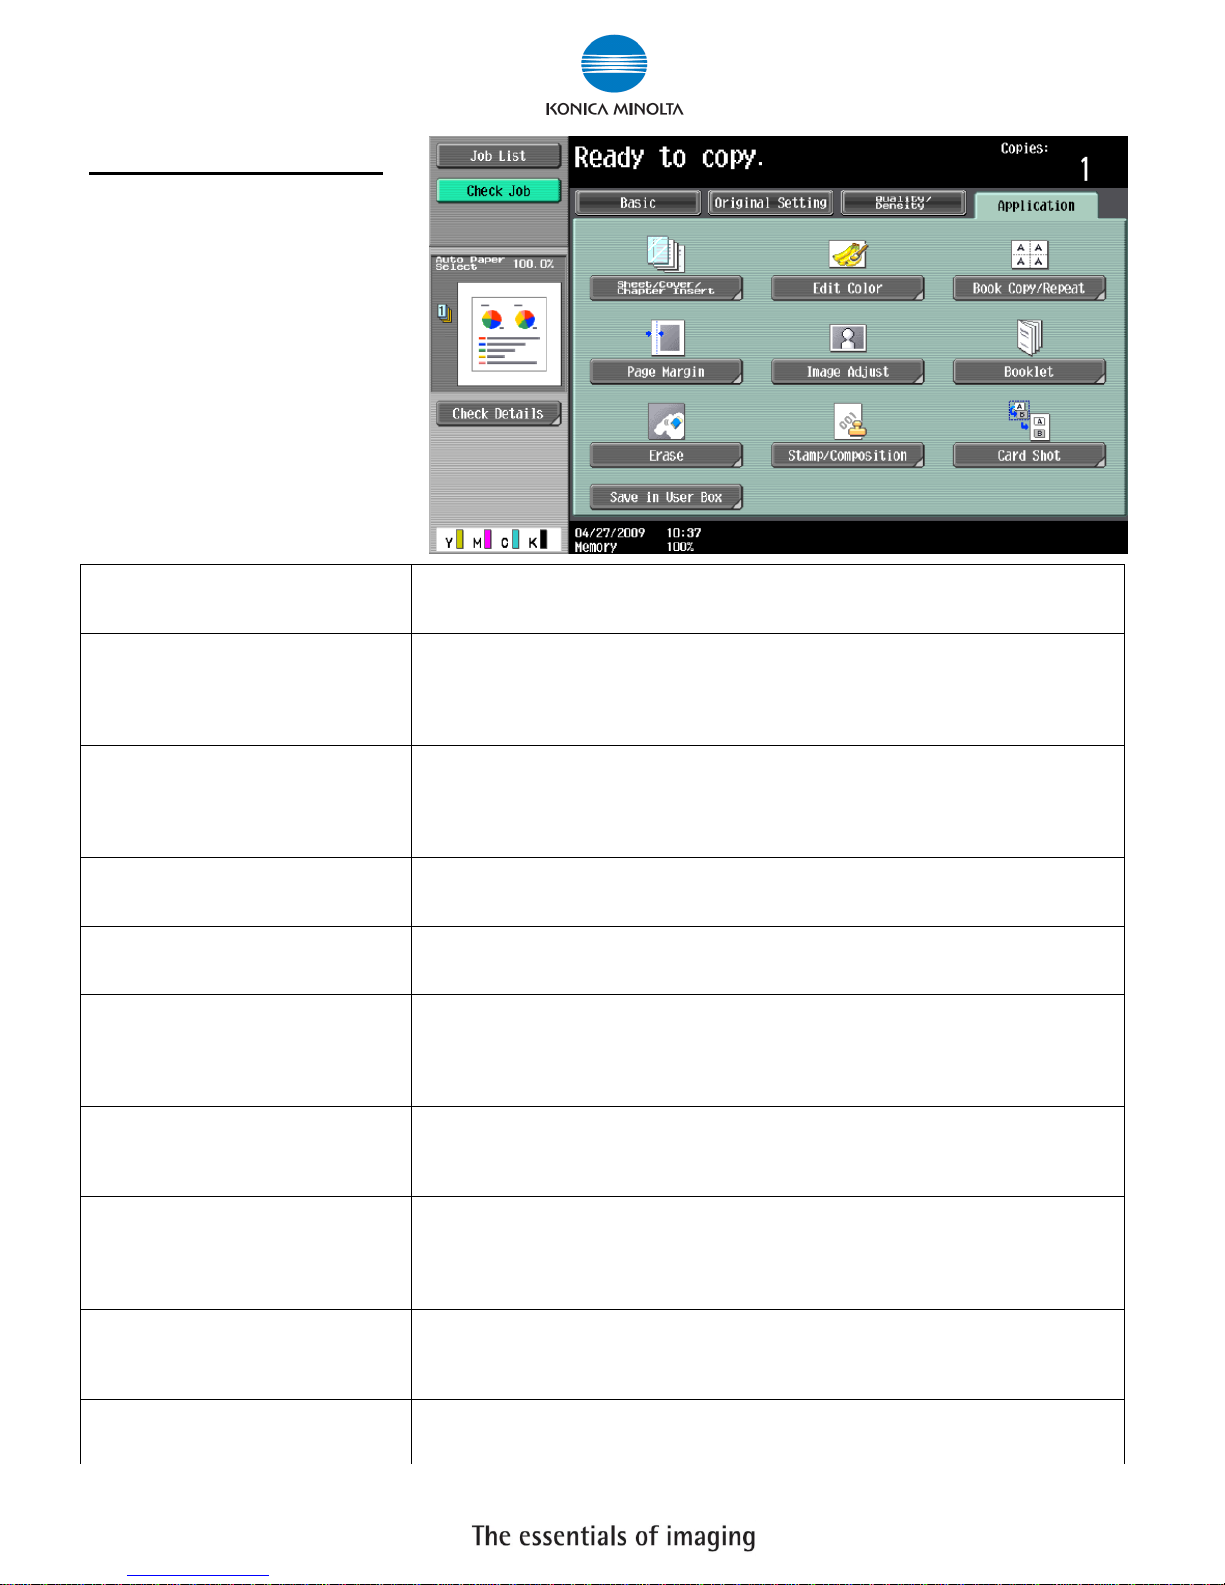
Application 應用功能
插頁/封面/章節/投影片插頁/畫像插入
[Sheet/Cover/Chapter Insert]
在副本列印時插入特定紙張或加入特殊紙張作封面
Inserts another sheet of paper or adds a cover page to the paper for copying.
Page 14 – 15
色彩編輯
[Edit Color]
調整彩色覆印的色彩效果
Inverts the contrast or gradation of the original or prints the original in the
mirror image. It also adds a color in the background or adjust the quality of a
color image.
Page 16
頁連寫/重覆
[Book Copy/Repeat]
影印書本;將細小的原稿以密舖平面方式重覆地印在副本上
Configure the settings for a book or catalog. An image on a single sheet of
original can be repeatedly copied or divided and enlarged in parts to produce
copies of the respective parts.
Page 17 – 19
頁面空白邊
[Page Margin]
預留空白邊作釘裝
Select the binding margin (blank area) of the paper used for copying.
Page 19
畫像調整
[Image Adjust]
當原稿的尺寸比副本的紙張為小時可調整顯示的內容方式
Configure the layout for the image when the paper is larger than the original.
Page 20
小冊子
[Booklet]
自動將原稿排好排版並計算好放大縮小的比例用雙面列印功能印成一本小冊子
Automatically arranges the page order of the scanned original and makes
2-sided 2 in 1 copies to produce a page layout for a center bound book, such
as a magazine.
Page 21
消框
[Erase]
將原稿以外的部份留空不印在副本上
Erases unnecessary outside portion of the original body text or erases the
area outside the original placed on the Original Glass.
Page 22
戳記/構成
[Stamp/Composition]
在副本上加上原稿沒有的日期/時間,頁碼或戳記,亦可加上複印防護的功能
Prints the date/time, page number or a stamp printed on copies. This
function also allows you to embed information for preventing unauthorized
copying in a document.
Page 23 - 25
卡片
[Card Shot]
影印卡片的正面和背面都印在同一張紙
Copies the contents of the front and back sides of a card-size original, for
example, insurance card, driver's license, or business card, on one sheet.
Page 26
儲存到使用者信箱
[Save in User Box]
將原稿儲存到影印機的硬碟內
Saves the scanned original data in a User Box.
Page 26

Konica Minolta Business Solutions (HK) Ltd.
Room 208, 2/F., Eastern Centre, 1065 King’s Road, Quarry Bay, Hong Kong.
Tel: (852) 2565 8181 FAX: (852) 2565 761
14
[Sheet/Cover/Chapter Insert] 插頁/封面/章節/投影片插頁/畫像插入
- OHP 投影片插頁
1. 按 Application 應用功能
Select Application
2. 按 Sheet /Cover /Chapter Insert 插頁 / 封面 / 插入章節
Select Sheet /Cover /Chapter Insert
3. 按 OHP Interleave OHP 白紙插頁 (必須選擇黑白模式)
Select OHP Interleave
4. 選擇分隔紙的紙盤
Select the Interleave Paper
5. 把投射膠片放在手送紙盤
Place the Transparency at the bypass tray
6. 按 OK
Press OK
7. 按 Start 影印鍵
Press Start
- Cover Mode 封面
1. 按 Application 應用功能
Select Application
2. 按 Sheet /Cover /Chapter Insert
插頁 / 封面 / 插入章節
Select Sheet /Cover /Chapter Insert
3. 按 Cover Mode 封面
Select Cover Mode
4. 選擇前封面有沒有影像或後封面有沒有影像
Select Print Image at the Front / Back Cover or not
5. 及哪一個紙盤放置前封面紙或後封面紙
Also select which tray has the Front / Back Cover
Paper
6. 按 Ok
Press OK
7. 按 Start
Press Start
Konica Minolta Business Solutions (HK) Ltd.
Room 208, 2/F., Eastern Centre, 1065 King’s Road, Quarry Bay, Hong Kong.
Tel: (852) 2565 8181 FAX: (852) 2565 761
15
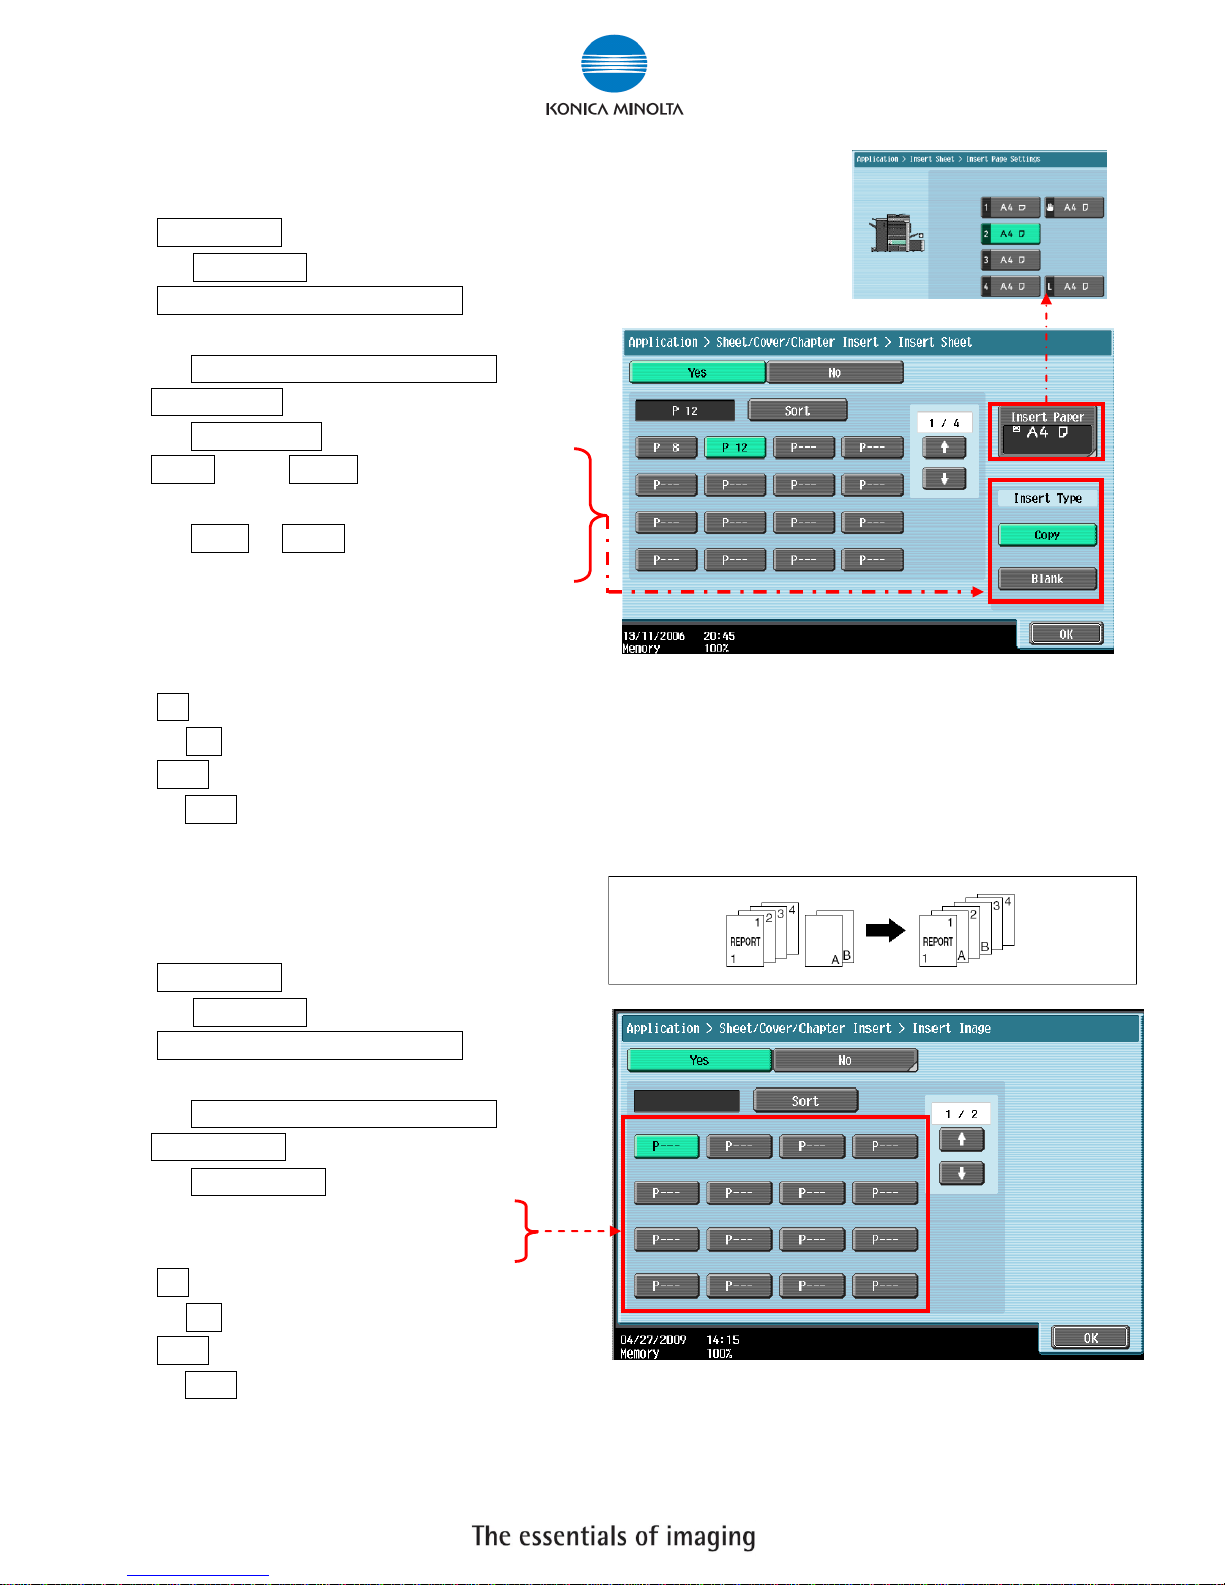
- Insert Sheet 插頁
1. 按 Application 應用功能
Select Application
2. 按 Sheet /Cover /Chapter Insert
插頁 / 封面 / 插入章節
Select Sheet /Cover /Chapter Insert
3. 按 Insert Sheet 插頁
Select Insert Sheet
4. 按 Copy 複印或 Blank 空白選擇插入的頁數有
沒有影像
Select Copy or Blank to set up print image at
the insert pages or not
5. 輸入需插入的頁號和選擇插紙的紙盤
Key in the page no. of the insert pages then
select which tray has the insert paper
6. 按 Ok
Press OK
7. 按 Start
Press Start
- Insert Image 插入影像
1. 按 Application 應用功能
Select Application
2. 按 Sheet /Cover /Chapter Insert
插頁 / 封面 / 插入章節
Select Sheet /Cover /Chapter Insert
3. 按 Insert Image 插頁
Select Insert Image
4. 輸入需插入的頁號
Key in the page no. of the insert image
5. 按 Ok
Press OK
6. 按 Start
Press Start
Konica Minolta Business Solutions (HK) Ltd.
Room 208, 2/F., Eastern Centre, 1065 King’s Road, Quarry Bay, Hong Kong.
Tel: (852) 2565 8181 FAX: (852) 2565 761
16
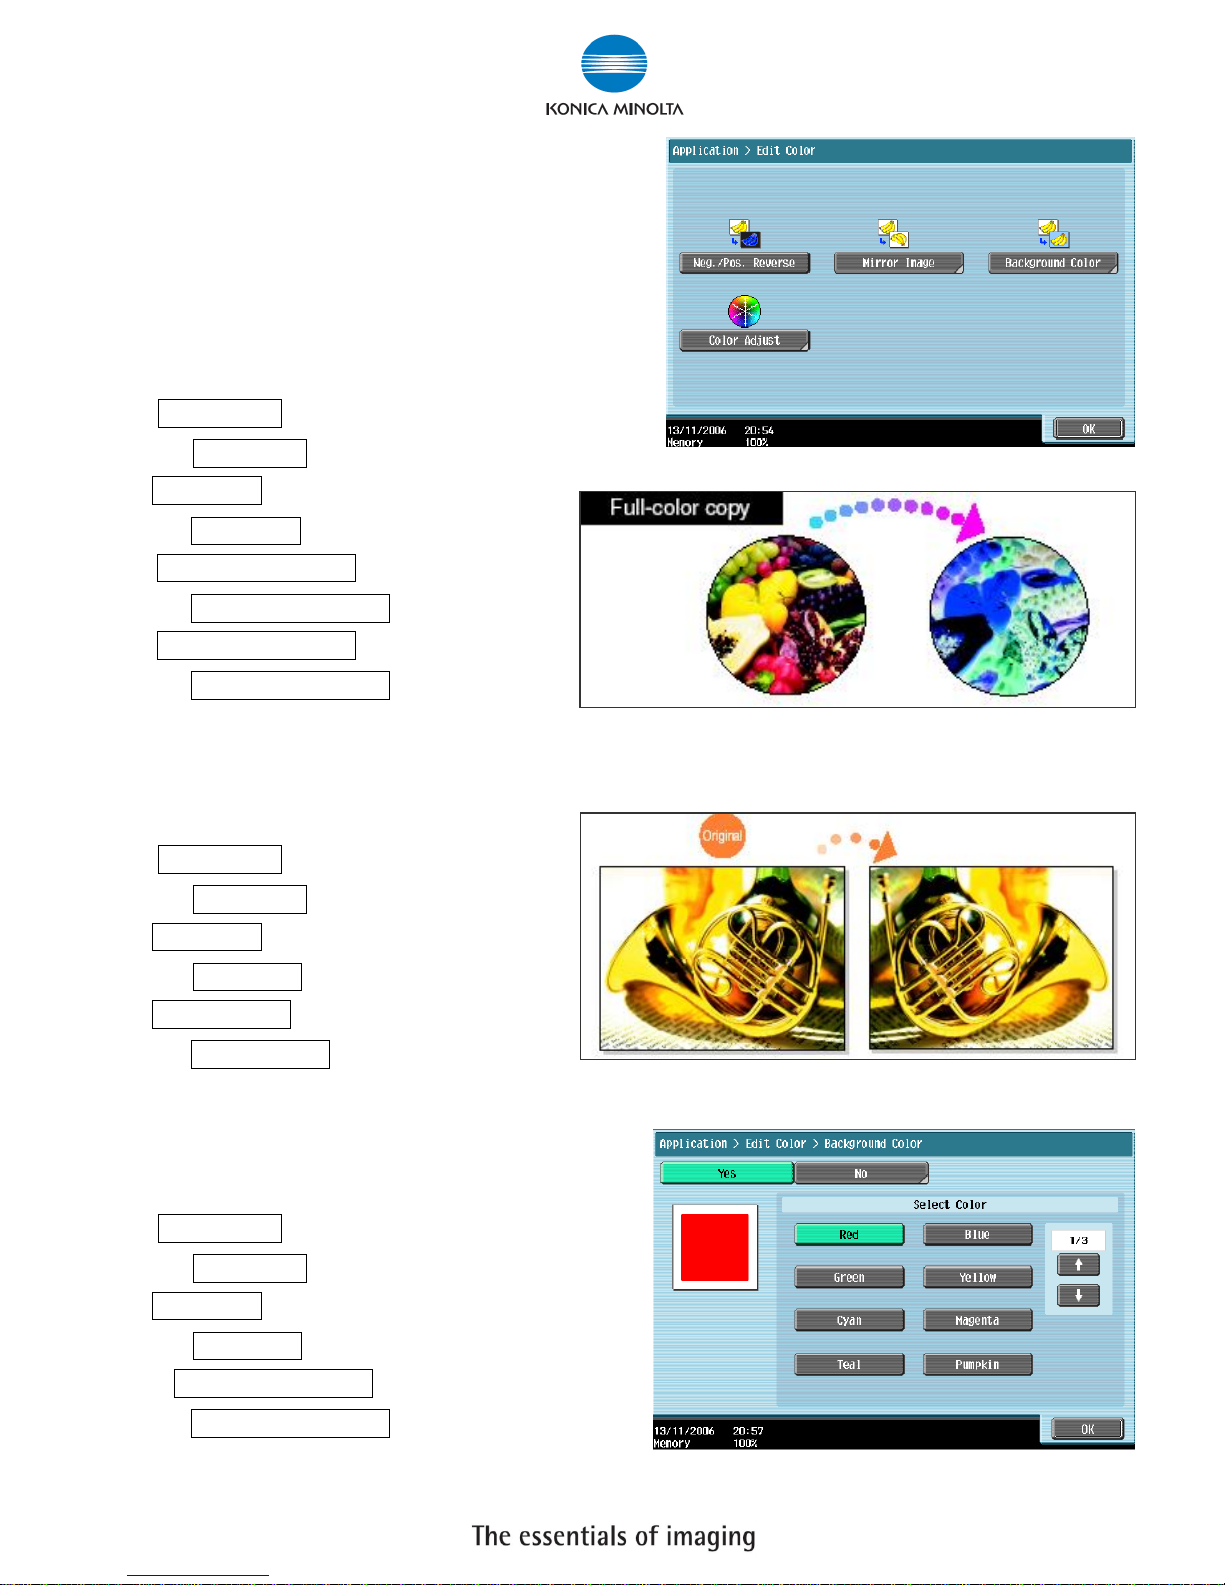
[Edit Color] 色彩編輯
- Neg. Pos. Reverse 黑白反像
1. 按 Application 應用功能
Select Application
2. 按 Edit Color 色彩編輯
Select Edit Color
3. 按 Neg. Pos. Reverse 黑白反像
Select Neg. Pos. Reverse
4. 按 Neg. Pos. Reverse 黑白反像
Select Neg. Pos. Reverse
- Mirror Image 鏡面畫像
1. 按 Application 應用功能
Select Application
2. 按 Edit Color 色彩編輯
Select Edit Color
3. 按 Mirror Image 鏡面畫像
Select Mirror Image
- Background Color 底色色彩
1. 按 Application 應用功能
Select Application
2. 按 Edit Color 色彩編輯
Select Edit Color
3. 按按 Background Color 底色色彩設定背景顏色
Select Background Color
Konica Minolta Business Solutions (HK) Ltd.
Room 208, 2/F., Eastern Centre, 1065 King’s Road, Quarry Bay, Hong Kong.
Tel: (852) 2565 8181 FAX: (852) 2565 761
17
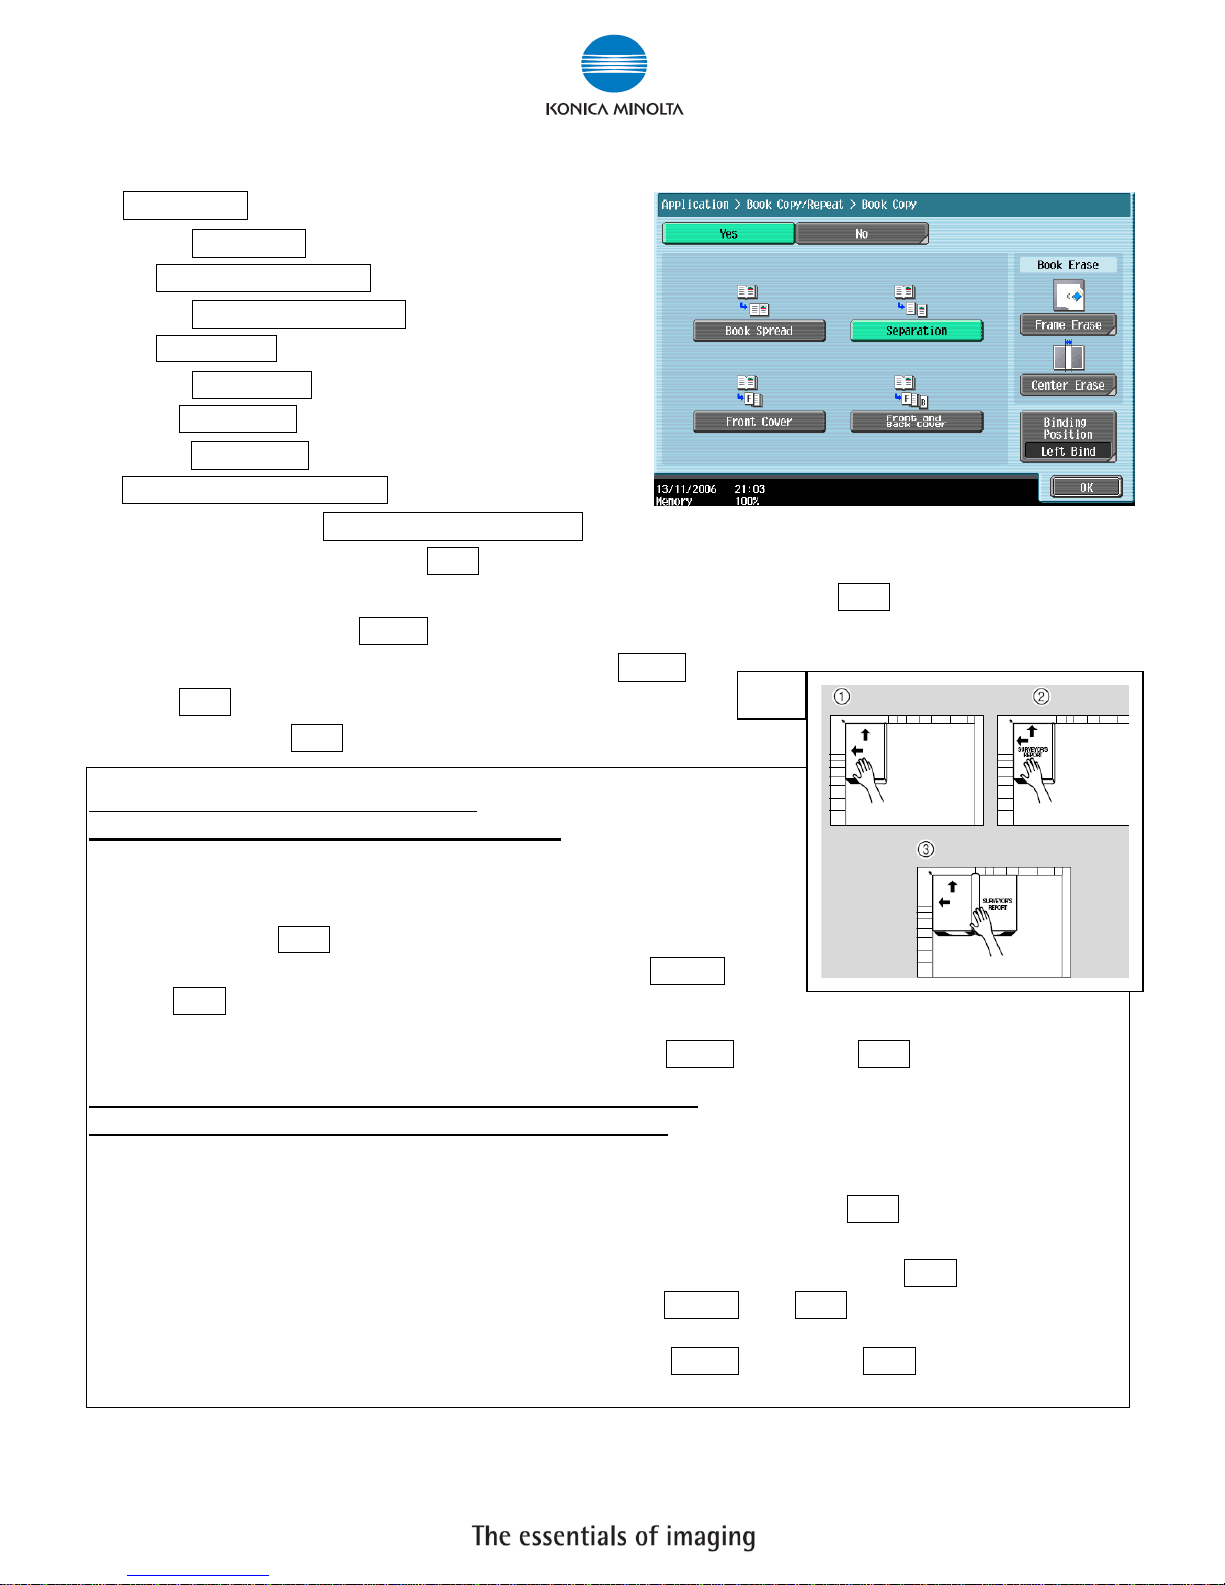
- Book Copy 書本複印
按 Application 應用功能
Select Application
1. 按 Book Copy / Repeat 頁連寫/重覆
Select Book Copy / Repeat
2. 按 Book Copy 書本掃瞄
Select Book Copy
3. 再按 Separation,同時可選擇要不要
Select Separation
4. Front Cover/Back Cover 前封面或後封面
Also you can select Front Cover/Back Cover to copy the front Cover or back cover of the original.
5. 把書打開放在鏡面左上角,按 Start
Open and place the book at the top right of the original glass and press Start
6. 直至掃描整本書後,按 Finish
Until you have scan all the original you can press Finish
7. 再按 Start
At last press the Start button to print out
如選擇 Front Cover 前封面,掃描時︰
If you have select the Front Cover Function:
Fig.1. 先把前封面放在鏡面左上角,按 Start
Place the front cover at the top right of the original glass
and press Start
Fig.3. 然後才揭至第一頁掃描,直至掃描整本書後,按 Finish 再按
Start
After you scan the front cover, open the book and place the 1st page to continues the scanning,
until you have scan all the original you can press Finish, then press Start button to print out
如選擇 Front Cover 前封面和後封面 Back Cover,掃描時︰
If you have select the Front and Back Cover Function:
Fig.1. 先把前封面放在鏡面左上角,按 Start
Place the front cover at the top right of the original glass and press Start
Fig.2. 再把後封面放在鏡面左上角,按 Start
Then place the back cover at the top right of the original glass and press Start
Fig.3. 然後才揭至第一頁掃描,直至掃描整本書後,按 Finish 再按 Start
After you scan the front cover, open the book and place the 1st page to continues the scanning,
until you have scan all the original you can press Finish, then press Start button to print out
Fig.
Konica Minolta Business Solutions (HK) Ltd.
Room 208, 2/F., Eastern Centre, 1065 King’s Road, Quarry Bay, Hong Kong.
Tel: (852) 2565 8181 FAX: (852) 2565 761
18
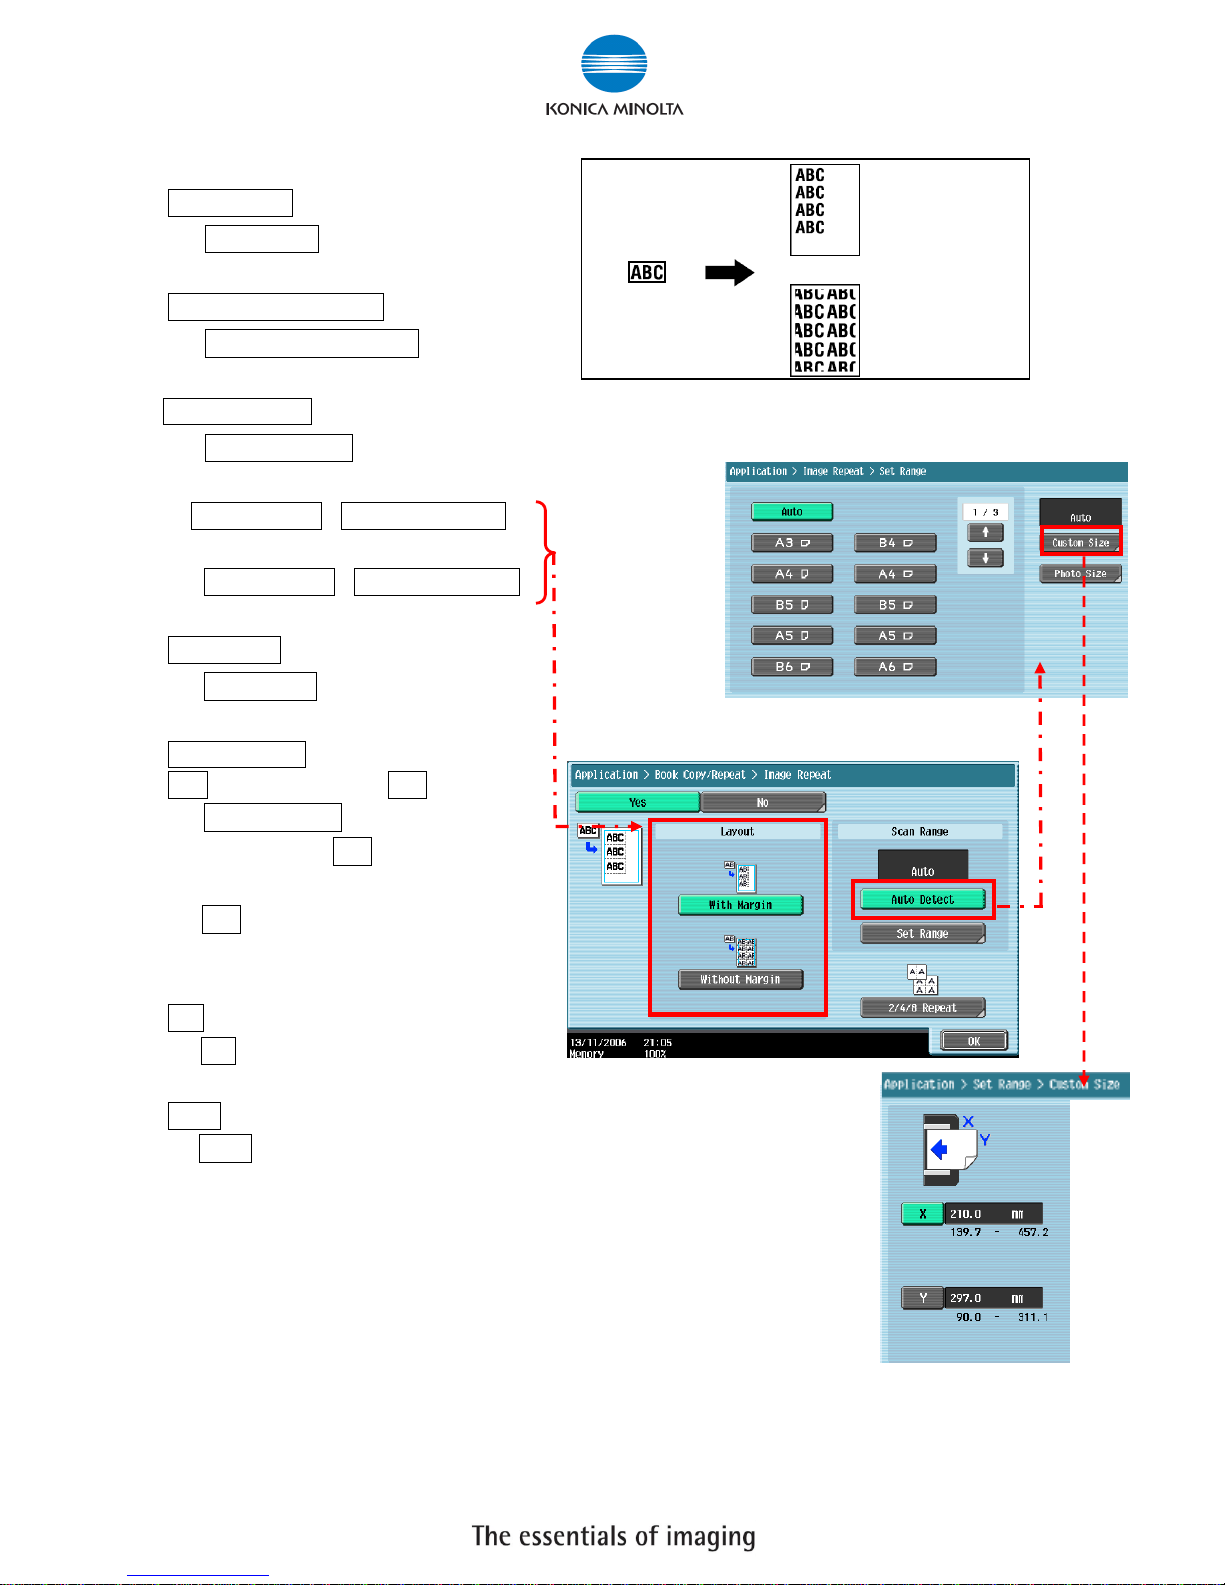
- Image Repeat 畫像重複
1. 按 Application 應用功能
Select Application
2. 按 Book Copy / Repeat 頁連寫 / 重覆
Select Book Copy / Repeat
3. 按 Image Repeat 畫像重複
Select Image Repeat
4. 選擇 With Margin / Without Margin
有空白邊 / 沒有空白邊
Select With Margin / Without Margin
5. 按 Set Range 範圍設定
Select Set Range
6. 按 Custom Size 自訂尺寸,
按 X 輸入長度 和 按 Y 輸入寬度
Select Custom Size to enter the
original size, press X then
key in the Width of the original,
press Y then key in the Height of
original.
7. 按 OK
Press OK
8. 按 Start
Press Start
With Margin
Without Margin
Original
 Loading...