


KitchenAid KOCE507EWH08, KOCE507EWH07, KOCE507ESS08, KOCE507ESS07, KOCE507EBS03 Owner’s Manual
...User Guide
Built-In Convection
Microwave Oven
THANK YOU for purchasing this high-quality product. Register your built-in oven at www.kitchenaid.com. In Canada, register your microwave oven at www.kitchenaid.ca.
For future reference, please make a note of your product model and serial numbers. These can be found on the label located on the oven frame behind the top right side of the oven door.
Model Number_______________________________________ |
Serial Number________________________________________ |
Para una versión de estas instrucciones en español, visite www.kitchenaid.com.
Deberá tener a mano el número de modelo y de serie, que están ubicados en el marco del horno, detrás del lado derecho superior de la puerta del horno.
TABLE OF CONTENTS
BUILT-IN MICROWAVE OVEN SAFETY |
................................... 2 |
Positioning Baking Tray ....................................................... |
13 |
|
Electrical Requirements ....................................................... |
3 |
Microwave Cooking Power ................................................. |
14 |
|
PARTS AND FEATURES .......................................................... |
4 |
Doneness............................................................................. |
14 |
|
Turntable .............................................................................. |
4 |
Sensor Cook........................................................................ |
14 |
|
Convection Rack .................................................................. |
4 |
Manual Cooking.................................................................. |
14 |
|
Crisper Pan and Handle ....................................................... |
4 |
Crisper Pan Frying.............................................................. |
15 |
|
Baking Tray .......................................................................... |
5 |
Reheat................................................................................. |
15 |
|
KITCHENAID™ Steamer Vessel ........................................... |
5 |
Defrost................................................................................ |
16 |
|
FEATURE GUIDE |
6 |
Steam Cooking................................................................... |
16 |
|
Popcorn |
16 |
|||
Display(s) |
10 |
|||
Keeping Food Warm |
16 |
|||
Number Codes |
10 |
|||
Crisp |
17 |
|||
Start/Add 1 Minute |
10 |
|||
Soften/Melt |
17 |
|||
Control Lock |
10 |
|||
EasyConvect™ Conversion |
18 |
|||
Microwave Oven Cancel |
11 |
|||
BUILT-IN MICROWAVE OVEN CARE |
19 |
|||
Clock .................................................................................. |
11 |
|||
Tones .................................................................................. |
11 |
General Cleaning ................................................................ |
19 |
|
Tools ................................................................................... |
11 |
TROUBLESHOOTING ........................................................... |
20 |
|
Fahrenheit and Celsius ...................................................... |
11 |
ASSISTANCE OR SERVICE .................................................. |
21 |
|
Timer .................................................................................. |
11 |
In the U.S.A. ....................................................................... |
21 |
|
BUILT-IN MICROWAVE OVEN USE ..................................... |
12 |
Accessories ........................................................................ |
21 |
|
Food Characteristics........................................................... |
12 |
Replacement Parts and Accessories ................................. |
21 |
|
Cooking Guidelines............................................................. |
12 |
In Canada ........................................................................... |
21 |
|
Cookware and Dinnerware.................................................. |
13 |
WARRANTY .......................................................................... |
22 |
|
Aluminum Foil and Metal ................................................... |
13 |
|
|
|
|
|
|
|
W10643473C

BUILT-IN MICROWAVE OVEN SAFETY
Your safety and the safety of others are very important.
many important safety messages in this manual and on your appliance. Always read and obey all safety
safety alert symbol.
alerts you to potential hazards that can kill or hurt you and others.
messages will follow the safety alert symbol and either the word “DANGER” or “WARNING.”
mean:
 DANGER
  WARNING
You can be killed or seriously injured if you don't immediately follow instructions.
You can be killed or seriously injured if you don't follow instructions.
All safety messages will tell you what the potential hazard is, tell you how to reduce the chance of injury, and tell you what can happen if the instructions are not followed.
IMPORTANT SAFETY INSTRUCTIONS
When using electrical appliances basic safety precautions should be followed, including the following:
WARNING: To reduce the risk of burns, electric shock, fire, injury to persons, or exposure to excessive microwave energy:
■Read all instructions before using the microwave oven.
■Read and follow the specific “PRECAUTIONS TO AVOID POSSIBLE EXPOSURE TO EXCESSIVE MICROWAVE ENERGY” found in this section.
■The microwave oven must be grounded. Connect only to properly grounded outlet. See “GROUNDING INSTRUCTIONS” found in this section.
■Install or locate the microwave oven only in accordance with the provided Installation Instructions.
■Some products such as whole eggs in the shell and sealed containers – for example, closed glass jars – may explode and should not be heated in the microwave oven.
■Use the microwave oven only for its intended use as described in this manual. Do not use corrosive chemicals or vapors in the microwave oven. This type of oven is specifically designed to heat, cook, or dry food. It is not designed for industrial or laboratory use.
■Oversized foods or oversized metal utensils should not be inserted in the microwave oven as they may create a fire or risk of electric shock.
■Do not clean with metal scouring pads. Pieces can burn off the pad and touch electrical parts involving a risk of electric shock.
■Do not store any materials, other than manufacturer's recommended accessories, in this oven when not in use.
■Do not operate the microwave oven if it has a damaged cord or plug, if it is not working properly, or if it has been damaged or dropped.
■Do not deep fry in oven. Microwavable utensils are not suitable and it is difficult to maintain appropriate deep frying temperatures.
■Do not use paper products when appliance is operated in the “PAN BROWN” mode.
■Do not cover racks or any other part of the oven with metal foil. This will cause overheating of the oven.
■As with any appliance, close supervision is necessary when used by children.
■The microwave oven should be serviced only by qualified service personnel. Contact nearest authorized service company for examination, repair, or adjustment.
■Do not cover or block any openings on the microwave oven.
SAVE THESE INSTRUCTIONS
2

IMPORTANT SAFETY INSTRUCTIONS
■Liquids, such as water, coffee, or tea are able to be overheated beyond the boiling point without appearing to be boiling. Visible bubbling or boiling when the container is removed from the microwave oven is not always present. THIS COULD RESULT IN VERY HOT LIQUIDS SUDDENLY BOILING OVER WHEN THE CONTAINER IS DISTURBED OR A SPOON OR OTHER UTENSIL IS INSERTED INTO THE LIQUID.
To reduce the risk of injury to persons:
–Do not overheat the liquid.
–Stir the liquid both before and halfway through heating it.
–Do not use straight-sided containers with narrow necks.
–After heating, allow the container to stand in the microwave oven for a short time before removing the container.
–Use extreme care when inserting a spoon or other utensil into the container.
■Do not store the microwave oven outdoors. Do not use this product near water - for example, near a kitchen sink, in a wet basement, or near a swimming pool, and the like.
■See door surface cleaning instructions in the “Oven Care” section.
■To reduce the risk of fire in the oven cavity:
–Do not overcook food. Carefully attend the microwave oven if paper, plastic, or other combustible materials are placed inside the oven to facilitate cooking.
–Remove wire twist-ties from paper or plastic bags before placing bags in oven.
–If materials inside the oven should ignite, keep oven door closed, turn oven off, and disconnect the power cord, or shut off power at the fuse or circuit breaker panel.
–Do not use the cavity for storage purposes. Do not leave paper products, cooking utensils, or food in the cavity when not in use.
SAVE THESE INSTRUCTIONS
PRECAUTIONS TO AVOID POSSIBLE EXPOSURE TO EXCESSIVE MICROWAVE ENERGY
(a)Do not attempt to operate this oven with the door open since open-door operation can result in harmful exposure to microwave energy. It is important not to defeat or tamper with the safety interlocks.
(b)Do not place any object between the oven front face and the door or allow soil or cleaner residue to accumulate on sealing surfaces.
(c)Do not operate the oven if it is damaged. It is particularly important that the oven door close properly and that there is no damage to the:
(1)Door (bent),
(2)Hinges and latches (broken or loosened),
(3)Door seals and sealing surfaces.
(d)The oven should not be adjusted or repaired by anyone except properly qualified service personnel.
State of California Proposition 65 Warnings:
WARNING: This product contains one or more chemicals known to the State of California to cause cancer.
WARNING: This product contains one or more chemicals known to the State of California to cause birth defects or other reproductive harm.
Electrical Requirements
Observe all governing codes and ordinances. The microwave |
GROUNDING INSTRUCTIONS |
|
oven is connected to both 120-volt sides of the 208/240-volt |
||
circuit required for electrical connections. If the incoming |
|
|
voltage to the microwave oven is less than 120 volts, cooking |
For a permanently connected microwave oven: |
|
times may be longer. Have a qualified electrician check your |
The microwave oven must be connected to a grounded, |
|
electrical system. |
||
metallic, permanent wiring system, or an equipment |
||
|
||
|
grounding conductor should be run with the circuit |
|
|
||
This device complies with Part 18 of the FCC Rules. |
conductors and connected to the equipment grounding |
|
terminal or lead on the microwave oven. |
||
This device complies with Industry Canada ICES-001. |
||
SAVE THESE INSTRUCTIONS |
||
|
||
|
3

PARTS AND FEATURES
This manual covers different models. The oven you have purchased may have some or all of the items listed. The locations and appearances of the features shown here may not match those of your model.
H
A  B
B 
C,D  E
E
F
G 
 I J
I J  K
K
A.Electronic oven control
B.Convection element and fan (hidden behind back panel)
C.Light (inaccessible, in ceiling)
D.Grill element (can be lowered)
E.Turntable
F.Metal shielded window
G.Lower oven (on combination models, see separate User Guide)
H.Door safety lock system
I.Dual microwave emission
J.Cooking guide label
K.Model/serial/rating (on right mounting rail, single oven models)
Parts and Features not shown
Steamer Convection grid
Crisper pan and handle Baking tray
Turntable
A 
B
C
A.Turntable
B.Support and rollers
C.Hub
NOTE: By touching the Turntable ON/OFF key, it is possible to switch the turntable ON and OFF during some microwave cycles. The turntable can be turned “On” or “Off” during the Manual Cook, Manual Reheat, Manual Defrost, Manual Steam Cook, and all EasyConvect™ cycles.
The turntable rotates in both directions to help cook food more evenly. Do not operate the microwave oven without having the turntable in place. See “Assistance or Service” to reorder any of the parts.
The raised, curved lines in the center of the turntable bottom fit between the 3 spokes of the hub. The hub turns the turntable during microwave oven use. The rollers on the support should fit inside the turntable bottom ridge.
Convection Rack
The convection rack provides optimal heat circulation for convection cooking.
■The rack will become hot. Always use oven mitts or pot holders when handling.
■To avoid damage to the microwave oven, do not allow the rack to touch the inside cavity walls, ceiling, or floor.
■Always use the turntable.
■To avoid damage to the microwave oven, do not store the rack in the microwave oven.
■Two-level cooking is not recommended.
■For best results, do not place popcorn bags on the rack.
■The rack is designed specifically for this microwave oven. For best cooking results, do not attempt to use any other rack in this microwave oven.
■See “Assistance or Service” section to reorder.
Crisper Pan and Handle
The crisper pan, with its nonstick surface and detachable handle, has been specifically designed for microwave use, and is ideal for pan-frying (pan-browning) foods in the microwave oven.
■The crisper pan will become hot. Always use the handle and oven mitts or pot holders when handling. Place gripping end on the edge of pan, squeeze handle,
and lift pan.
■To avoid damage to the microwave oven, do not allow the crisper pan or handle to touch the inside cavity walls, ceiling, or floor.
■Do not place crisper pan on the convection grid. Always use the turntable as a support for the crisper pan.
■To avoid damage to the microwave oven, do not use another metal object with the crisper pan.
■To avoid damage, do not place hot crisper pan directly on heat-sensitive surfaces.
■The crisper pan is designed specifically for this microwave oven. Do not use it in any other oven.
■Use only wooden or plastic cooking utensils to help avoid scratches.
■See “Assistance or Service” section to reorder.
4

Baking Tray
■Baking Tray can be used only with convection cooking.
■To avoid damage to the microwave oven, do not use in combination with microwave cooking.
■Baking Tray will become hot. Always use oven mitts or pot holders when handling.
■See “Positioning Baking Tray” section before using.
■See “Assistance or Service” section to reorder.
KITCHENAID™ Steamer Vessel
Use the KITCHENAID™ Steamer Vessel with the Steam Cook feature to steam foods.
A 
B
C
A.Lid
B.Insert
C.Base
■The steamer vessel will become hot. Always use oven mitts or pot holders when handling.
■Steamer vessel is designed to be used only in the microwave oven. To avoid damaging steamer vessel, do not use in a convectionalor combination-type oven, with any other convection or crisp function, or on electric or gas burners.
■Do not use plastic wrap or aluminum foil when covering the food.
■Always place the steamer on the glass turntable. Check that the turntable turns freely before starting the microwave oven.
■Do not remove lid while the bowl is inside the microwave oven, as the rush of steam will disrupt the sensor settings.
■To avoid scratching, use plastic utensils.
■Do not overfill with water. See steam chart in the “Steam Cooking” section for the amount of water recommended.
Lid: Always use the lid when steaming. Place directly over the insert and base or just the base.
Insert: Use when steam cooking to keep foods such as fish and vegetables out of the water. Place insert with food directly over the base. Do not use when simmering.
Base: For steam cooking, place water in base. For simmering foods such as rice, potatoes, pasta and vegetables, place food and water/liquid in base.
See “Assistance or Service” section to order replacements. See “General Cleaning” section for instructions on cleaning.
5
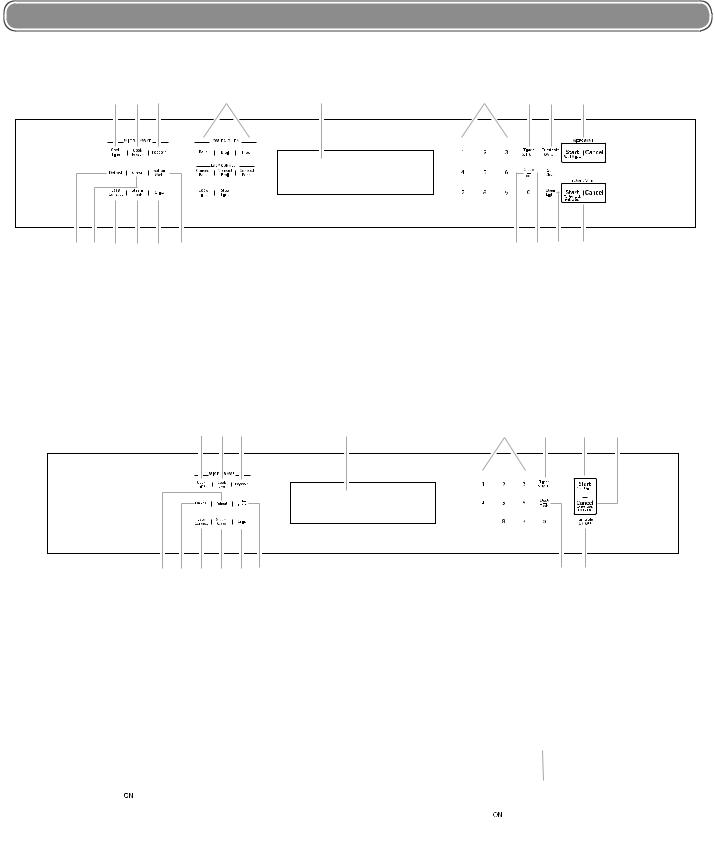
FEATURE GUIDE
This manual covers several models. Your model may have some or all of the items listed. Refer to this manual or the Frequently Asked Questions (FAQs) section of our website at www.kitchenaid.com for more detailed instructions. In Canada, refer to the Customer Service Section at www.kitchenaid.ca.
A |
B |
C |
D |
E |
F |
G |
H |
I |
S R |
Q |
P |
O |
N |
M |
L |
K |
J |
A. Cook time |
G. Timer set/off |
M. Clock/Tools |
B. Cook power |
H. Turntable on/off |
N. Soften melt |
C. Popcorn |
I. Start/Cancel microwave |
O. Crisp |
D. Lower oven controls |
J. Start/Cancel lower oven |
P. Steam cook |
(see separate Use and Care Guide) |
K. Oven light |
Q. EasyConvect™ |
E. Combination oven display |
L. Self clean |
R. Reheat |
F. Number keypad |
|
S. Defrost |
A |
B |
C |
D |
E |
F |
G |
H |
P |
O |
N |
M |
L |
K |
J |
I |
A. Cook time |
G. Start/Add 1 minute |
L. Crisp |
B. Cook power |
H. Cancel/Control lock |
M. Steam cook |
C. Popcorn |
I. Turntable on/off |
N. EasyConvect™ |
D. Microwave oven display |
J. Clock/Tools |
O. Defrost |
E. Number keypads |
K. Soften melt |
P. Reheat |
F. Timer set/off |
|
|
A |
C |
B |
||||||
|
|
|
|
|
A |
|||
|
|
|
|
|
|
|
|
|
|
|
|
|
|
|
|
|
|
|
|
|
|
|
|
|
|
|
|
|
|
|
|
|
|
|
|
|
|
|
|
|
|
|
|
|
|
|
|
|
|
|
|
|
|
|
|
|
|
|
|
|
|
|
B
Upper and Lower Oven Display (combination oven models)
A.Microwave cavity display
B.Oven cavity display
C.Time of day/timer display
Microwave Oven Display (single oven models)
A.Microwave cavity display
B.Time of day/timer display
6

KEYPAD |
FEATURE |
INSTRUCTIONS |
|
|
|
|
|
TIMER |
Oven Timer |
1. Touch TIMER SET/OFF. |
|
(SET/OFF) |
|
|
Touch again to switch between MIN/SEC, HR/MIN, and OFF. |
|
|
|
|
|
|
|
If no action is taken, the control will continue to wait for a length of time to be entered. |
|
|
2. |
Touch the number keypads to set the length of time. |
|
|
3. |
Touch TIMER SET/OFF. |
|
|
|
If the keypad is not touched, the control will continue to wait for TIMER SET/OFF to be |
|
|
|
touched. |
|
|
|
When the set time ends, 4 chimes will continuously repeat until the Timer Off keypad is |
|
|
|
touched. |
|
|
4. |
If the Cancel keypad is touched, the oven will turn off; however, the Timer can only be turned |
|
|
|
off using the Timer Off keypad. |
|
|
|
|
COOK TIME |
Crisper Pan |
1. Touch COOK TIME and then number keypads to set a length of time to cook. |
|
|
Frying |
|
OR |
|
|
|
|
|
|
|
Touch the number keypads to set a length of time to cook. To use this feature, the display |
|
|
|
must be in the time of day visualization. |
|
|
|
NOTE: Doneness function is not active for manual cooking. |
|
|
2. |
Touch START. |
|
|
|
The display will count down the cook time. |
|
|
|
When the stop time is reached, the oven will shut off automatically and “Cooking Complete” |
|
|
|
will appear on the oven display. |
|
|
|
If enabled, end-of-cycle tones will sound, and then reminder tones will sound every minute. |
|
|
3. |
Touch CANCEL or open the door to clear the display and/or stop reminder tones. |
|
|
|
|
REHEAT |
Reheat |
1. Touch REHEAT. |
|
|
|
2. |
Touch number keypad to select food type from the Reheat Chart. |
|
|
|
OR |
|
|
|
Touch REHEAT repeatedly to scan and select food settings. For example, to select the |
|
|
|
Casserole setting, REHEAT must be touched twice. |
|
|
3. |
Touch number keypads to enter quantity (slices or cups). |
|
|
|
To change the doneness setting, touch the COOK POWER keypad before or after the “Start?” |
|
|
|
prompt is displayed to toggle through and select a doneness of Normal, More, or Less. |
|
|
4. |
Touch START. |
|
|
|
When the stop time is reached, the oven will shut off automatically and “reheat complete” |
|
|
|
will appear on the oven display. |
|
|
|
If enabled, end-of-cycle tones will sound, and then reminder tones will sound every minute. |
|
|
5. |
Touch CANCEL or open the door to clear the display and/or stop reminder tones. |
|
|
|
|
REHEAT |
Manual |
1. Touch REHEAT. |
|
|
Reheat |
2. |
Touch the number “7” keypad. |
|
|
||
|
|
|
OR |
|
|
|
Touch REHEAT repeatedly to scan to the Manual setting. |
|
|
3. |
Touch the number keypads to set a length of time to reheat. Reheat time can be set up to |
|
|
|
99 minutes and 99 seconds. |
|
|
|
NOTE: The doneness function is not active during manual reheating. |
|
|
4. |
The default power level is 70%. To change the power level, touch COOK POWER, and then |
|
|
|
enter the desired power level. See the Cooking Power Chart. |
|
|
|
NOTE: If a cook time has not been entered, after 5 seconds of inactivity the power level will |
|
|
|
be automatically confirmed. The screen will then prompt to enter cook time. |
|
|
5. |
Touch START. The upper oven display will count down the reheat time. |
|
|
|
When the stop time is reached, the oven will shut off automatically and “Reheat Complete” |
|
|
|
will appear on the oven display. If enabled, the end-of-cycle tones will sound. Reminder tones |
|
|
|
will then sound every minute after the cycle has been completed. |
|
|
6. |
Touch CANCEL or open the door to clear the display and stop the reminder tones. |
|
|
|
|
7
 Loading...