


KitchenAid KMBT5511KS, KMBT5011KS, WMT55511K, KMBT5511K, WMT50011K Installation Instructions
...
BUILT-IN MICROWAVE WITH TRIM KIT
INSTALLATION INSTRUCTIONS
INSTRUCCIONES DE INSTALACIÓN DEL MICROONDAS
INTEGRADO CON KIT DE MOLDURAS
Built-In Microwave with Trim Kit Models Modelos de microondas integrados con kit de molduras
Standard Models/Modelos estándar: WMT55511K, KMBT5511K Slim Models/Modelos delgados: WMT50011K, KMBT5011K
UL listed for use over electric built-in oven, 30" (76.2 cm) wide.
This appliance is a built-in microwave with trim kit, do not use as countertop microwave oven.
Homologado por UL para su uso sobre horno eléctrico integrado, 30" (76,2 cm) de ancho.
Este electrodoméstico es un horno de microondas integrado con kit de molduras. No lo use como horno de microondas para mostrador
Table of Contents / Índice
MICROWAVE OVEN SAFETY......................................................... |
1 |
INSTALLATION REQUIREMENTS................................................. |
2 |
Tools and Parts............................................................................. |
2 |
Location Requirements................................................................ |
3 |
Product Dimensions .................................................................... |
4 |
Required Cutout Dimensions....................................................... |
5 |
Electrical Requirements................................................................ |
6 |
INSTALLATION INSTRUCTIONS................................................... |
7 |
Unpacking Instructions................................................................. |
7 |
Prepare Microwave Oven............................................................. |
7 |
Install the Rails.............................................................................. |
8 |
Install the Microwave Oven.......................................................... |
9 |
Secure the Trim Kit Frame............................................................ |
9 |
SEGURIDAD DEL HORNO DE MICROONDAS.......................... |
10 |
REQUISITOS DE INSTALACIÓN.................................................. |
11 |
Herramientas y piezas................................................................ |
11 |
Requisitos de ubicación............................................................. |
12 |
Dimensiones del producto......................................................... |
13 |
Dimensiones de recorte requeridas........................................... |
14 |
Requisitos eléctricos................................................................... |
15 |
INSTRUCCIONES DE INSTALACIÓN.......................................... |
16 |
Instrucciones para el desempaque............................................ |
16 |
Preparación del horno de microondas....................................... |
16 |
Instalación de las guías.............................................................. |
17 |
Instalación del horno de microondas......................................... |
18 |
Fijar el marco del kit de molduras.............................................. |
18 |
MICROWAVE OVEN SAFETY
W11412752C |
INSTALLATION REQUIREMENTS
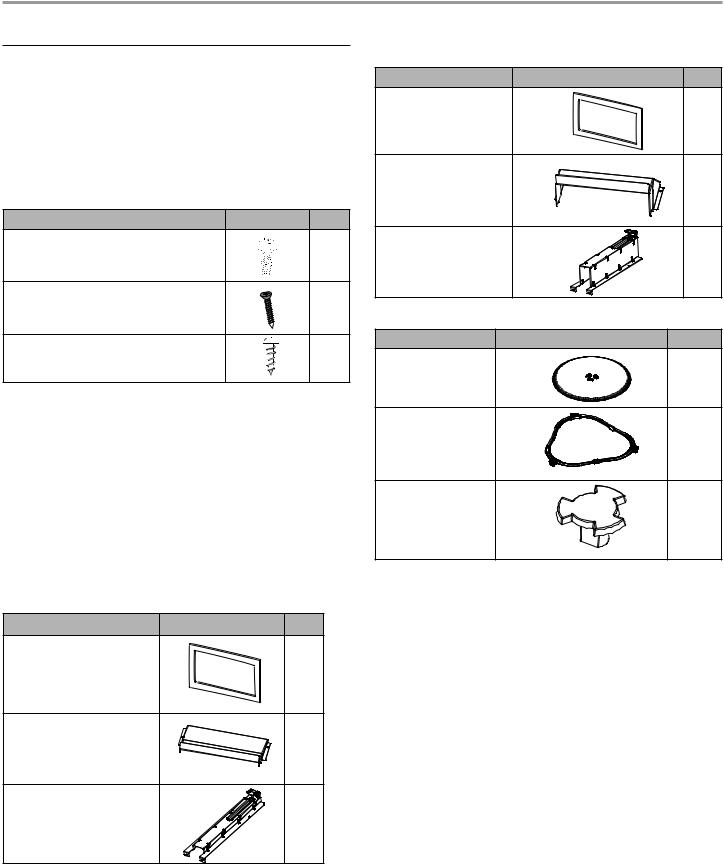
Tools and Parts
Tools Needed
Gather the required tools and parts before starting installation. Read and follow the instructions provided with any tools listed here.
■ |
Measuring tape |
■ |
Pencil |
■ Phillips screwdriver |
■ |
7/64" drill bit |
■ |
Drill |
|
Screw Pack Supplied (not shown to scale)
SCREW |
SCREW ART QTY |
#7-18x7/16" round-head sheet metal |
14 |
screw |
|
#7-16x15/16" flat head wood screw |
6 |
#7-16x7/16" round-head wood screw |
10 |
NOTE: There are some extra screws in the screw pack. They are spares for your use during installation if needed. See below:
■#7-18x7/16" round-head sheet metal screw: 4 extra.
■#7-16x15/16" fat head wood screw: 2 extra.
■#7-16x7/16" round-head wood screw: 4 extra.
Parts Supplied (not shown to scale)
This installation instruction is for various models. Some parts supplied may have different appearance, depending on your model.
NOTE: Trim kit frame (1), Cooling Ducts (2) and Rail (2) parts will need to be purchased to convert from Standard to Slim or from a Slim to a Standard installation.
Parts supplied for model: WMT50011K and KMBT5011K
PART |
PART ART |
QTY |
Trim kit frame (slim)
1
Cooling duct (slim)
2
Rail (slim)
2
Parts supplied for model: WMT55511K and KMBT5511K
PART |
PART ART |
QTY |
Trim kit frame |
|
|
(standard) |
|
1 |
|
|
|
Cooling duct (standard) |
|
|
|
|
2 |
Rail (standard) |
|
|
|
|
2 |
Parts supplied for all models
PART |
PART ART |
QTY |
Turntable
1
Turntable ring
1
Turntable driver
1
NOTE: The turntable driver is located inside the microwave oven cavity. Remove the tape before use.
2
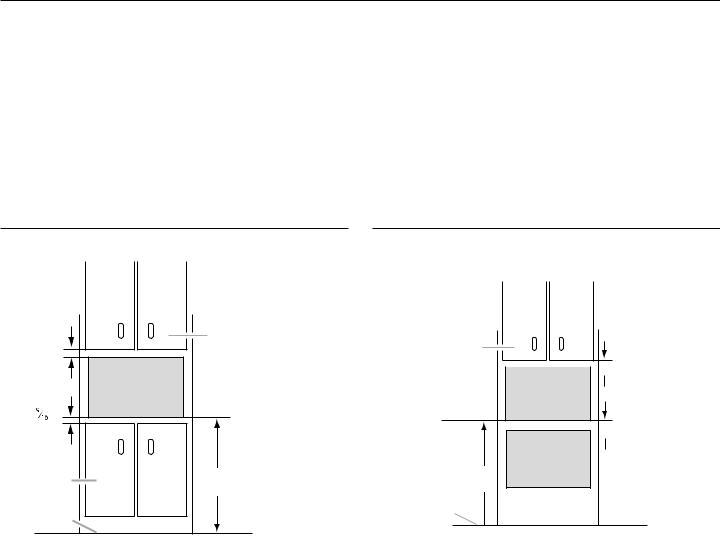
Location Requirements
This is a built-in appliance. Do not use as countertop microwave oven.
This microwave oven must be installed into a wood cabinetry. The location must provide:
■Cutout opening that is plumb and square.
■Cutout foor that is solid, level and fush with bottom of cabinet cutout.
■Support for weight of at least 150 lbs (68 kg), which includes microwave oven and items placed inside.
■There must be minimum of 36" from the foor to cut-out foor. See pictorial below.
■Grounded electrical outlet. See “Electrical Requirements” section.
■Minimum installation clearances for installation location. See “Required Cutout Dimensions” section.
■Complete enclosure around the recessed portion of the microwave oven.
■Mounting distance between a fixed wall on the hinged-side of the door and the microwave oven is 0.5" (1.3 cm).
Not installed over a built-in oven |
Installed over a built-in oven |
|
2" |
A |
|
|
|
|
|
(5.1 cm) |
|
|
|
|
|
B |
|
1 |
" |
|
|
(4.0 cm) |
|
|
|
|
C |
min. |
36" |
|
(91.4 cm) |
||
|
|
||
|
D |
|
|
A. Upper cabinet |
C. Lower cabinets |
B. Microwave oven cutout |
D. Floor |
1.Minimum distance of 36" (91.4 cm) from the foor to the cutout foor.
2.The microwave oven may also be installed in a cabinet by itself (without a built-in oven below). Allow a clearance of at least 19/16" (4.0 cm) below the cabinet.
3.Make sure the surrounding cabinetry has clearance to open and close freely. Allow a clearance of at least 2" (5.1 cm) above the cutout opening.
A
2" 
 (5.1 cm)
B
3"
 (7.6 cm)
F
min. 36" (91.4 cm)
D
A. Upper cabinet |
D. Floor |
B. Microwave oven cutout |
F. Lower oven cutout |
1.Minimum distance of 36" (91.4 cm) from the foor to the cutout foor.
2.The microwave oven may be installed over a built-in oven. If installing over a built-in oven, make sure there is a minimum of 3" (7.6 cm) between the top of the lower oven cutout and the microwave oven cutout foor.
3.Make sure the surrounding cabinetry has clearance to open and close freely. Allow a clearance of at least 2" (5.1 cm) above the cutout opening.
3
|
|
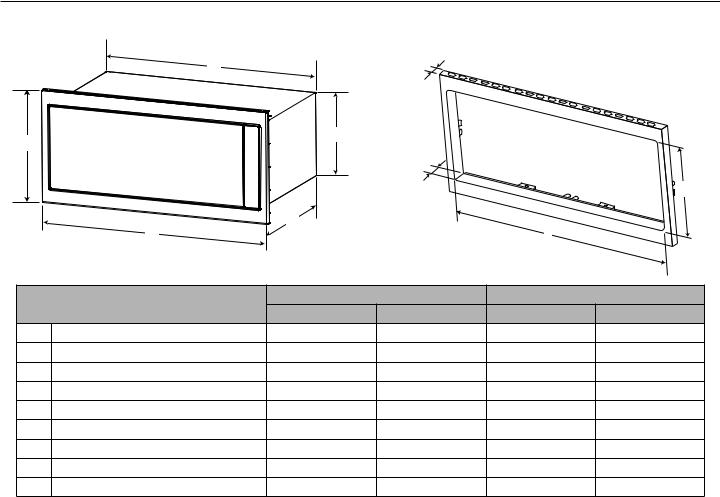
Product Dimensions |
|
|
|
|
E |
|
F |
|
|
B |
|
D |
|
|
|
|
|
|
|
|
|
|
|
|
G |
|
|
|
|
|
|
|
J |
|
A |
C |
|
H |
|
|
|
|
|
||
Unit Measurement |
|
Slim models |
Standard models |
||
|
|
in |
cm |
in |
cm |
A |
Width of unit with trim kit frame |
293/4 |
75.6 |
293/4 |
75.6 |
B |
Height of unit with trim kit frame |
14 |
35.6 |
191/8 |
48.6 |
C |
Depth of unit |
18 |
45.7 |
18 |
45.7 |
D |
Height of unit without trim kit frame |
105/16 |
26.2 |
105/16 |
26.2 |
E |
Width of unit without trim kit frame |
2713/16 |
70.7 |
2713/16 |
70.7 |
F |
Trim kit frame thickness (visible) |
7/8 |
2.2 |
7/8 |
2.2 |
G |
Total thickness of frame |
25/16 |
5.8 |
25/16 |
5.8 |
H |
Trim kit frame inner opening width |
28 |
71.1 |
28 |
71.1 |
J |
Trim kit frame inner opening height |
109/16 |
26.9 |
109/16 |
26.9 |
4
Required Cutout Dimensions
Wooden Cabinet
B
A
C
F
|
|
J |
|
E |
Receptacle |
|
e |
|
H |
|
|
|
|
Back of the |
|
|
Cabinet |
D |
|
Back of the |
Recommended |
|
microwave oven |
Receptacle |
G |
|
Location |
|
|
|
|
Cabinet Cutout Measurement |
|
Slim models |
Standard models |
||||
|
|
|
|
|
|
|
|
|
|
in |
|
cm |
in |
|
cm |
|
|
|
|
|
|
|
|
A |
Width of cabinet opening |
281/2 |
|
72.4 |
281/2 |
|
72.4 |
B |
Height of cabinet opening |
12 |
|
30.5 |
171/8 |
|
43.5 |
C |
Depth of cabinet opening |
|
Minimum 213/4 " (55.2 cm) with flush receptacle |
|
|||
D |
Trim kit frame overhang-lower frame |
1 |
|
2.54 |
1 |
|
2.54 |
|
|
|
|
|
|
|
|
E |
Trim kit frame overhang-upper frame |
1 |
|
2.54 |
1 |
|
2.54 |
|
|
|
|
|
|
|
|
F |
Trim kit frame overhang-left frame |
5/8 |
|
1.6 |
5/8 |
|
1.6 |
|
|
|
|
|
|
|
|
G |
Trim kit frame overhang-right frame |
5/8 |
|
1.6 |
5/8 |
|
1.6 |
|
|
|
|
|
|
|
|
H |
Recommended region for receptacle |
|
|
Upper right quadrant |
|
||
|
|
|
|
|
|
||
J |
Receptacle surface to the back of |
|
|
4" (10.2 cm) < J < 40" (102 cm) |
|
||
|
the microwave oven |
|
|
|
|
|
|
NOTE:
■Flush receptacle is recommended. For non-flush receptacle, make sure you have at least 4" (10.2 cm) clearance between the back of microwave oven and the receptacle.
■If the receptacle is placed outside of the recommended region, make sure from the back of the microwave oven to the receptacle must be within 40" (102 cm). Otherwise, the power cord is not long enough to plug in.
■Tolerance for width and height of cabinet opening is 1/16" (2 mm).
5

Electrical Requirements
 WARNING
Electrical Shock Hazard Plug into a grounded 3 prong outlet. Do not remove ground prong.
Do not use an adapter.
Do not use an extension cord.
Failure to follow these instructions can result in death, fire, or electrical shock.
Observe all governing codes and ordinances.
Required:
■A 120 V, 60 Hz, AC only, 15 or 20 A electrical supply with a fuse or circuit breaker
Recommended:
■A time-delay fuse or time-delay circuit breaker
■A separate circuit serving only this microwave oven
GROUNDING INSTRUCTIONS
 For all cord connected appliances:
The microwave oven must be grounded. In the event of an electrical short circuit, grounding reduces the risk of electric shock by providing an escape wire for the electric current. The microwave oven is equipped with a cord having a grounding wire with a grounding plug. The plug must be plugged into an outlet that is properly installed and grounded.
WARNING: Improper use of the grounding plug can result in a risk of electric shock. Consult a qualified electrician or serviceman if the grounding instructions are not completely understood, or if doubt exists as to whether the microwave oven is properly grounded.
Do not use an extension cord. If the power supply cord is too short, have a qualified electrician or serviceman install an outlet near the microwave oven.
SAVETHESE INSTRUCTIONS
This device complies with Part 18 of the FCC Rules.
6
 Loading...