


KitchenAid KMC4241TG0, KMC4241OB0, KMC4241MY0, KMC4241MS0, KMC4241GC0 Owner’s Manual
...KMC4241
KMC4244
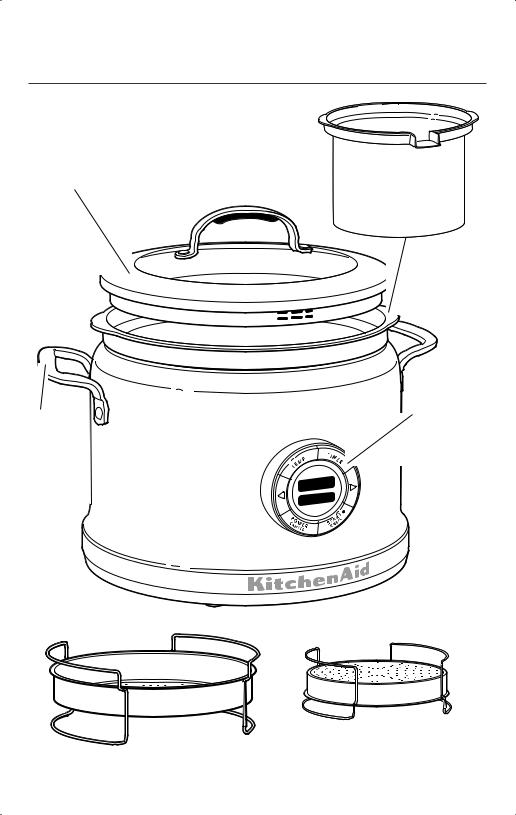
PARTS AND FEATURES
PARTS AND ACCESSORIES
Ceramashield nonstick cooking pot with pouring spout
Tempered glass lid with integrated strainer/pour openings
Built-in |
Control |
|
panel |
||
lifting |
||
|
||
handles |
|
Flip for convenient roasting rack
2-in-1 reversible steam basket/roasting rack
PARTS AND FEATURES
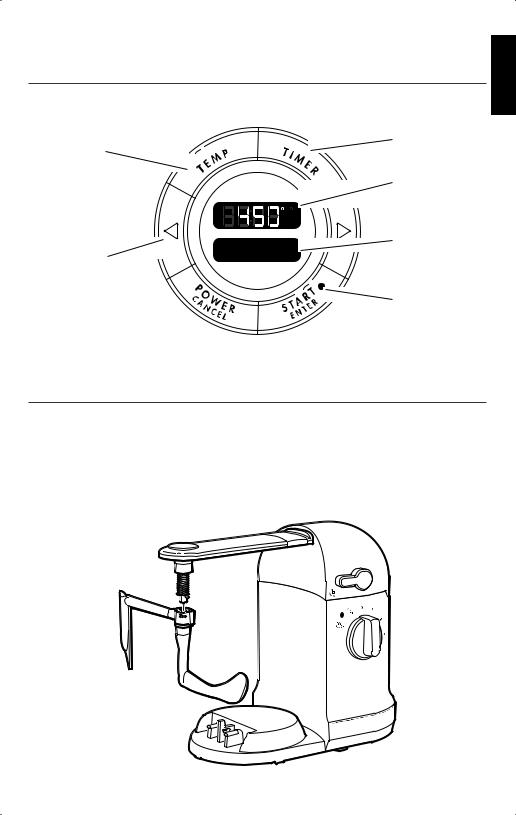
CONTROL PANEL FEATURES
Timer adjust Temperature select adjust select
|
|
Temperature/ |
|
|
|
time display |
|
|
F |
C |
|
|
h |
|
|
Cooking mode/ |
Sear |
Cooking mode |
|
display |
|||
option select |
|||
< and > |
|
|
|
|
|
Power on/status |
|
|
|
light |
AVAILABLE ACCESSORIES
Stir Tower KST4054 (sold separately)
The Stir Tower works like your own personal sous chef to help keep things moving, no matter what you are cooking. Specially designed flipping wand and scraping blade
keep food circulating, allowing for even heating and consistent mixing, all at the touch of a switch.
ENGLISH
PARTS AND FEATURES | 3

MULTI-COOKER SAFETY
IMPORTANT SAFEGUARDS
When using electrical appliances, basic safety precautions should always be followed, including the following:
1.Read all instructions.
2.Do not touch hot surfaces. Use potholders or oven mitts when handling the cooking bowl or lid.
3.To avoid electrical shock do not immerse cord, plugs, or the Multi-Cooker base in water or other liquid.
4.Close supervision is necessary when any appliance is used by or near children.
5.Unplug from outlet when not in use and before cleaning. Allow to cool before putting on or taking off parts.
6.Do not operate any appliance with a damaged cord or plug or after the appliance malfunctions or has been damaged in any manner. Return appliance to the nearest Authorized Service Facility for examination, repair, or adjustment.
7.The use of accessory attachments not recommended by KitchenAid may cause injuries.
8.Do not use outdoors.
4 | MULTI-COOKER SAFETY
MULTI-COOKER SAFETY
9. |
Do not let cord hang over edge of table or counter, or touch hot surfaces, |
ENGLISH |
|
including the top of the Multi-Cooker. |
|
10. |
Do not place on or near a hot gas or electric burner, or in a heated oven. |
|
11. |
Extreme caution must be used when moving an appliance containing |
|
|
hot oil or other hot liquids. |
|
12. |
Do not use appliance for other than intended use. |
|
13. |
To disconnect, set all controls to “Off,” then remove plug from wall outlet. |
|
14. |
Cook only in removable container. |
|
15. |
Do not fill cooking pot above the Max Fill line. |
|
16. |
Do not exceed 16 ounces (475 ml) of oil when cooking with the |
|
|
Multi-Cooker. |
|
17. |
If control panel is blank during or after a cooking cycle, the Multi-Cooker |
|
|
may have lost power during the cooking cycle. Check food to be sure it is |
|
|
cooked to an internal temperature of at least 165°F (74°C). |
|
18. |
Intended for countertop use only. |
|
19. |
WARNING: Spilled food can cause serious burns. Keep appliance and cord |
|
|
away from children. Never drape cord over edge of counter, never use outlet |
|
|
below counter, and never use with an extension cord. |
|
SAVE THESE INSTRUCTIONS
This product is designed for household use only.
ELECTRICAL REQUIREMENTS
Voltage: 120 VAC
Frequency: 60 Hz
Wattage: 700 Watts
NOTE: This Multi-Cooker has a 3 prong grounded plug. To reduce the risk of electrical shock, this plug will fit in an outlet only one way. If the plug does not fit in the outlet, contact a qualified electrician. Do not modify the plug
in any way.
A short power-supply cord is used to reduce the risk resulting from it being grabbed by children, becoming entangled in, or tripping over a longer cord.
Do not use an extension cord. If the power supply cord is too short, have a qualified electrician or technician install an outlet near the appliance.
MULTI-COOKER SAFETY | 5

COOKING MODES GUIDE
 F C h
F C h
Sear
Your Multi-Cooker features over 10 cooking methods, including a Manual mode, and
4 step-by-step cooking modes, specially designed for a variety of cooking tasks.
Refer to the quick guide below for cooking methods and step-by-step cooking mode options, or see detailed explanations and tips for each cooking mode on the following pages.
F C h
Sear
Keep |
Slow |
Slow Simmer |
Boil/ Sauté |
Sear |
Manual |
Soup |
Risotto Yogurt Rice |
|||||
Warm |
Cook |
Cook |
Steam |
|
|
|
|
|
|
|
||
|
Low |
High |
|
|
|
|
|
|
|
|
|
|
COOKING METHODS |
|
|
|
|
|
|
|
|
|
|||
|
|
|
|
|
|
|
|
|
|
|
||
|
|
|
|
|
|
|
|
|
|
|
||
COOKING |
PRESET |
MIN. TEMP |
MAX. TEMP |
KEEP |
|
|
MAX. |
|||||
METHOD |
TEMP* |
SETTING |
SETTING |
WARM |
|
|
COOK |
|||||
IN °F (°C) |
IN °F (°C) |
IN °F (°C) |
|
|
TIME (HRS.) |
|||||||
|
|
|
|
|
||||||||
Sear |
|
450°F (232°C) |
430°F (221°C) |
450°F (232°C) |
Manual |
|
|
2 |
||||
|
|
|
|
|
|
|
|
|
|
|
|
|
Sauté |
|
350°F (177°C) |
330°F (166°C) |
370°F (188°C) |
Manual |
|
|
2 |
||||
|
|
|
|
|
|
|
|
|
|
|
||
Boil/Steam |
212°F (100°C) |
192°F (89°C) |
232°F (111°C) |
Manual |
|
|
5 |
|||||
|
|
|
|
|
|
|
|
|
|
|
|
|
Simmer |
|
205°F (96°C) |
185°F (85°C) |
210°F (99°C) |
Manual |
|
|
5 |
||||
|
|
|
|
|
|
|
|
|
|
|
|
|
Slow Cook |
HI |
N/A |
N/A |
|
|
Auto |
|
|
12 |
|||
High |
|
|
|
|
|
|
|
|
|
|
|
|
|
|
|
|
|
|
|
|
|
|
|
|
|
Slow Cook Low |
LO |
N/A |
N/A |
|
|
Auto |
|
|
12 |
|||
|
|
|
|
|
|
|
|
|
|
|
|
|
Keep Warm |
165°F (74°C) |
N/A |
N/A |
|
|
N/A |
|
|
24 |
|||
|
|
|
|
|
|
|
|
|
|
|
||
* “Preheating” will appear in the display until the selected temperature is reached. |
|
|
|
|||||||||
STEP-BY-STEP COOKING MODES |
|
|
|
|
|
|
|
|||||
|
|
|
|
|
|
|
|
|
|
|
|
|
|
|
|
|
|
|
|
|
|
|
|
||
COOKING |
|
STEP 1 |
|
STEP 2 |
|
|
STEP 3 |
|
KEEP WARM |
|||
MODE |
|
|
METHOD |
|
METHOD |
|
METHOD |
|
||||
|
|
|
|
|
|
|
||||||
Rice |
|
|
White Rice |
|
Brown Rice |
|
N/A |
|
|
Auto |
||
|
|
|
|
|
|
|
|
|
|
|
||
Soup |
|
|
Sauté |
|
Boil |
|
|
Simmer |
|
Manual |
||
|
|
|
|
|
|
|
|
|
|
|
|
|
Risotto |
|
|
Sauté |
|
Simmer |
|
|
N/A |
|
|
Manual |
|
|
|
|
|
|
|
|
|
|
|
|
|
|
Yogurt |
|
|
Simmer |
|
Culture |
|
|
N/A |
|
|
N/A |
|
|
|
|
|
|
|
|
|
|
|
|
|
|
6 | COOKING MODES GUIDE

COOKING METHODS
For cooking and food preparation tips, see “Tips for great results” on how to get the most from each cooking method. Also, refer to the cookbook for special tips and tricks specially suited to each recipe, or visit www.kitchenaid.com/quickstart.
Sear (430–450°F/221–232°C)
Searing allows you to prepare meats for stews, soups, and other dishes. It uses high temperatures to cook the outside surfaces quickly, trapping flavor and juices inside.
Sauté (330–370°F/166–188°C)
Sautéing is ideal for giving meats and vegetables a fresh, crisp flavor and texture. Use Sauté for creating oriental dishes, stir-fries, and breakfast foods such as sausage and scrambled eggs.
Boil/Steam (192–232°F/89–111°C)
Use Boil/Steam to prepare a variety of foods such as hot cereals, steam shrimp, or to heat delicate foods such as fish with indirect heat.
Simmer (185–210°F/85–99°C)
Simmer is great for soups and stews where gentle cooking helps yield rich, hearty flavors.
Slow Cook (Low or High)
Slow Cook allows the Multi-Cooker to be used like a slow cooker, making it ideal for slow cooking BBQ, chili, and meatballs, to name just a few.
Keep Warm (165°F/74°C)
Keep Warm mode is designed to keep foods at serving temperature after cooking has finished for up to 24 hours. Certain cooking methods and modes feature an automatic Keep Warm mode. For other cooking methods and modes, Keep Warm can be selected manually.
IMPORTANT: Use Keep Warm only with fully cooked food. Keep Warm is intended to keep fully cooked food at serving temperature.
SETTING THE TIMER FOR COOKING METHODS
1.Press TIMER. The timer display will begin to blink, showing a default time of 0:00.
2.Press > to scroll to your desired time. Press START/ENTER to select.
NOTE: The light on the Start/Enter button will flash until you press it.
3.When the timer countdown is complete, the Multi-Cooker will beep 3 times and the light will stay on without flashing.
NOTE: The timer will not affect the cooking method itself. When the timer countdown is complete, the cooking method you’ve chosen will continue to run and the heater will stay on unless cancelled manually.
4.To clear the timer after a countdown has already begun, press START/ ENTER.
ENGLISH
COOKING METHODS | 7
 Loading...