


JUW248RYRP10
Jenn-Air JUW248RYRP10, JUW248RYRP00, JUW248RBRS01, JUW248RBRS00, JUW248RBRB01 Owner’s Manual
...
i_iiiiiiiiiiiiiiii[__
JENN-AIR WINECELLAR/BODEGA/CAVE VIN
USE& CAREGUIDE
For questions about features, operation/performance, parts, accessories, or service, call:
1-800-JENNAIR (1-800-536-6247} or visit our website at www.jennair.com.
In Canada, call: 1-800-807-6777, or visit our website at www.jennair.ca.
MANUAL DEUSOY CUIDADO
Si tiene preguntas respecto a las caracteristicas, funcionamiento, rendimiento, partes, accesorios o servicio tecnico, flame al:
1-800-JENNAIR (1-800-536-6247) o visite nuestro sitio web en www.jennair.com,
En Canada, flame al: 1-800-807-6777, o visite nuestro sitio web en www.jennair.ca.
GUIDED'UTILISATIONETD'ENTRETIEN
Au Canada, pour assistance, installation ou service, composez le 1-800-807-6777 ou visitez notre site web & www.jennair.ca,
Table of Contents/indice/Table des matieres ...................................................................................... 2
_]ENN-AIRo
2300282B / 8336411 g62800

TABLEOF CONTENTS
WINE CELLAR SAFETY ................................................................. 3
Proper Disposal of Your Old Wine Cellar .................................... 3
INSTALLATION INSTRUCTIONS .................................................. 3
Tools and Parts ............................................................................ 3
Location Requirements ................................................................ 4
Electrical Requirements ............................................................... 4
Unpack the Wine Cellar ............................................................... 4
Door Closing ................................................................................. 5
Base Grille .................................................................................... 5
WINE CELLAR USE ........................................................................ 5
Normal Sounds ............................................................................ 5
Using the Control ......................................................................... 5
INDICE
SEGURIDAD DE LA BODEGA ..................................................... 11
CGmo deshacerse adecuadamente de su bodega vieja ........... 11
INSTRUCCIONES DE INSTALACION ......................................... 12
Piezas y herramientas ................................................................ 12
Requisites de ubicaciGn ............................................................. 12
Requisites electricos .................................................................. 12
Desempaque de la bodega ........................................................ 12
CGmo cerrar la puerta ................................................................ 13
Rejilla de la base ........................................................................ 13
USO DE LA BODEGA ................................................................... 14
Sonidos normales ...................................................................... 14
Use del control ........................................................................... 14
Wine Racks ................................................................................... 6
Stocking the Wine Cellar .............................................................. 6
Lighting the Wine Cellar ............................................................... 7
WINE CELLAR CARE ..................................................................... 7
Cleaning ........................................................................................ 7
Changing the Light Bulb ............................................................... 7
Vacation and Moving Care ........................................................... 8
TROUBLESHOOTING .................................................................... 8
ASSISTANCE OR SERVICE ........................................................... g
In the U.S.A.................................................................................. 9
In Canada ..................................................................................... 9
WAR RANTY .................................................................................. 10
Portabotellas .............................................................................. 14
CGmo almacenar en la bodega .................................................. 15
CGmo encender la bodega ........................................................ 15
CUIDADO DE LA BODEGA .......................................................... 15
Limpieza ..................................................................................... 15
C6mo cambiar el foco ................................................................ 16
Cuidado durante las vacaciones y mudanzas ........................... 16
SOLUCION DE PROBLEMAS ...................................................... 17
AYUDA O SERVICIO TI_CNICO ................................................... 18
En los EE.UU .............................................................................. 18
En Canada .................................................................................. 18
GARANTIA ..................................................................................... 19
TABLEDESMATIERES
SI_CURITE DE LA CAVE ._,VIN .................................................... 20
Mise au rebut de votre vieille cave a vin.................................... 20
INSTRUCTIONS D'INSTALLATION ........................................... 21
Outillage et pieces ...................................................................... 21
Exigences d'emplacement ......................................................... 21
Specifications electriques .......................................................... 21
Deballage de la cave & vin ......................................................... 21
Fermeture de la porte ................................................................. 22
Grille de la base.......................................................................... 22
UTILISATION DE LA CAVE ._,VIN ............................................... 23
Sons normaux ............................................................................ 23
Utilisation de la commande ....................................................... 23
Casiers a vin ............................................................................... 23
Stockage dans la cave a vin ...................................................... 24
Eclairage de la cave a vin ........................................................... 24
ENTRETIEN BE LA CAVE .&.VIN .................................................. 24
Nettoyage ................................................................................... 24
Changement de I'ampoule d'eclairage ...................................... 25
Precautions a prendre pour les
vacances et avant un demenagement ....................................... 25
DI_PANNAGE ................................................................................. 26
ASSISTANCE OU SERVICE ......................................................... 27
Aux Ctats-Unis ............................................................................ 27
Au Canada .................................................................................. 27
GARANTIE ..................................................................................... 28
WINECELLARSAFETY
Your safety and the safety of others are very important.
We have provided many important safety messages in this manual and on your appliance. Always read and obey all safety
messages.
This is the safety alert symbol.
This symbol alerts you to potential hazards that can kill or hurt you and others.
All safety messages will follow the safety alert symbol and either the word "DANGER" or "WARNING."
These words mean:
You can be killed or seriously injured if you don't immediately
follow instructions.
You can be killed or seriously injured if you don't follow
instructions.
All safety messages will tell you what the potential hazard is, tell you how to reduce the chance of injury, and tell you what can
happen if the instructions are not followed.
IMPORTANT SAFETY INSTRUCTIONS
WARNING: To reduce the risk of fire, electric shock, or injury when using your wine cellar, follow these basic precautions:
• Plug into a grounded 3 prong outlet.
• Do not remove ground prong.
• Do not use an adapter.
• Do not use an extension cord.
• Disconnect power before servicing.
• Replace all parts and panels before operating.
SAVE THESE INSTRUCTIONS
• Remove doors from your old wine cellar.
• Use nonflammable cleaner.
• Keep flammable materials and vapors, such as gasoline,
away from wine cellar.
• Use two or more people to move and install wine cellar.
ProperDisposalofYourOld Wine Cellar
Suffocation Hazard
Remove door from your old wine cellar.
Failure to do so can result in death or brain damage.
IMPORTANT: Child entrapment and suffocation are not problems
of the past. Junked or abandoned wine cellars are still dangerous
- even if they will sit for "just a few days." If you are getting rid of
your old wine cellar, please follow these instructions to help
prevent accidents.
INSTALLATIONINSTRUCTIONS
TOOLS NEEDED:
Gather the required tools and parts before starting installation.
• Phillips screwdriver
Before You Throw Away Your Old Wine Cellar:
• Take off the door.
• Leave the racks in place so that children may not easily climb
inside.
Explosion Hazard
Keep flammable materials and vapors, such as
gasoline, away from wine cellar.
Failure to do so can result in death, explosion, or fire.
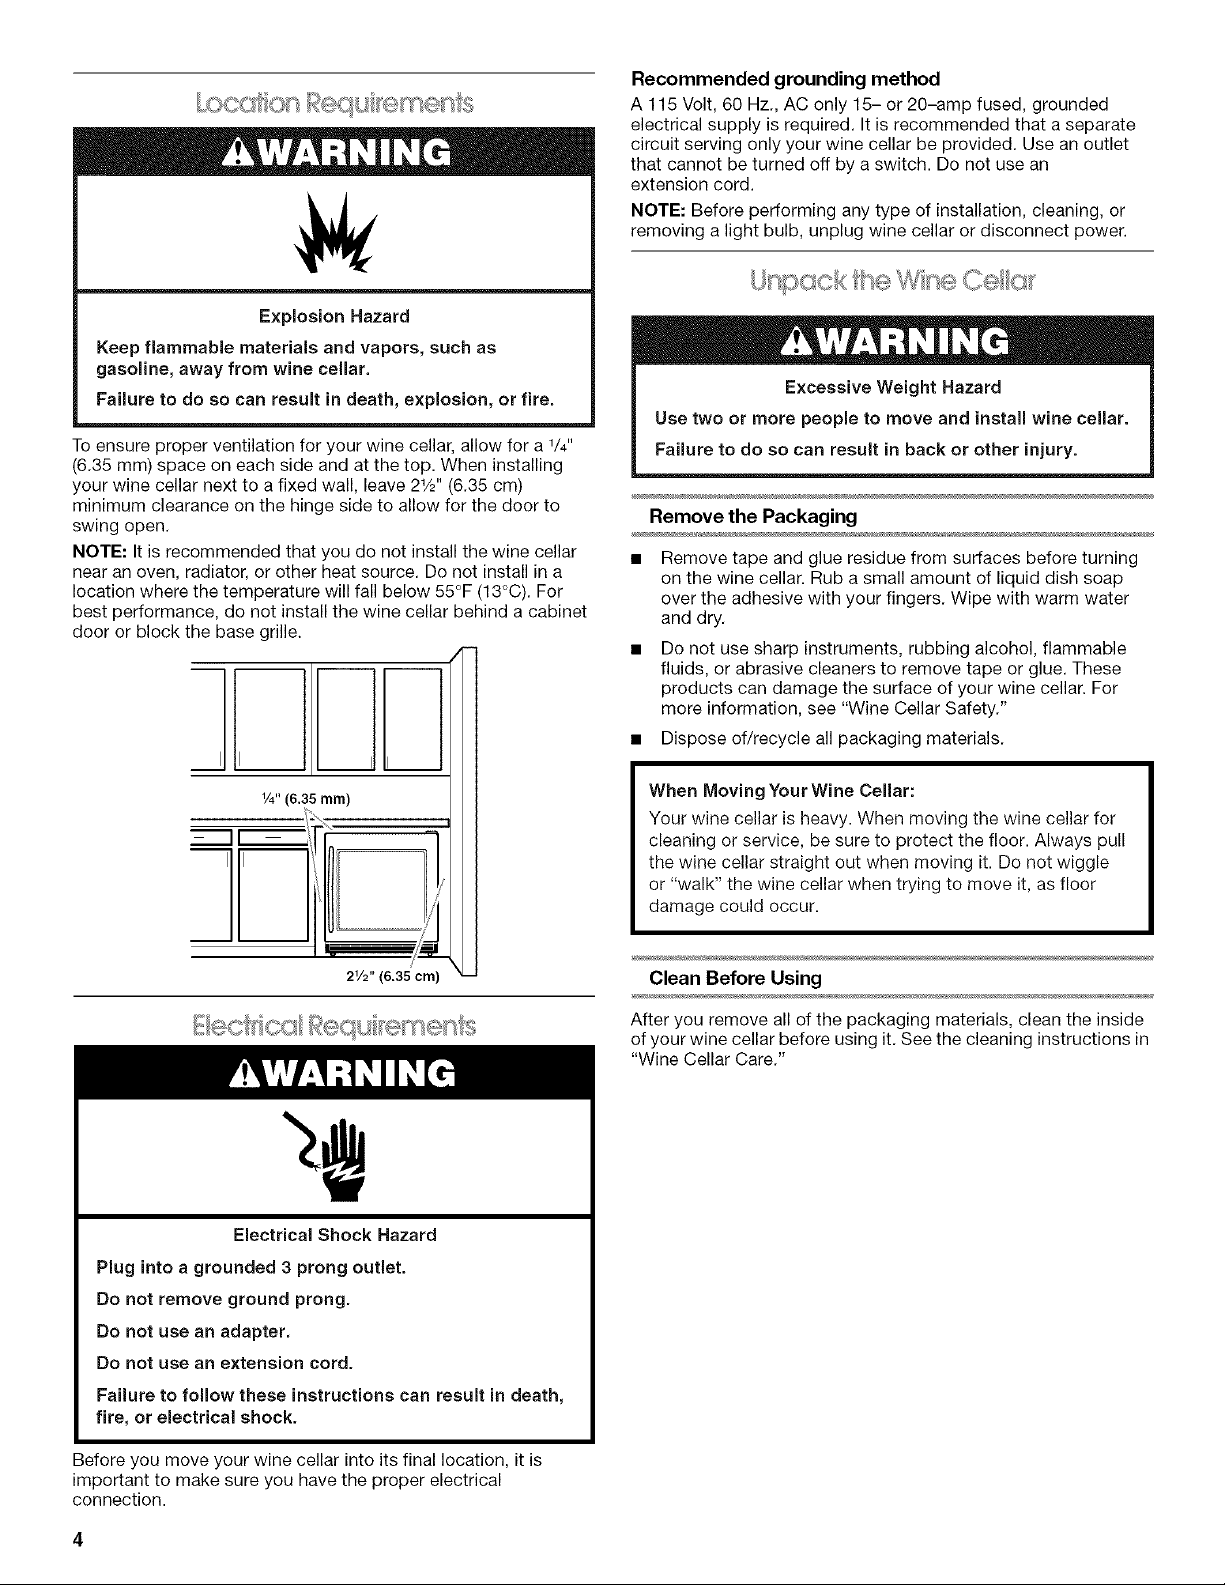
To ensure proper ventilation for your wine cellar, allow for a V4"
(6.35 mm) space on each side and at the top. When installing
your wine cellar next to a fixed wall, leave 2_/2'' (6.35 cm)
minimum clearance on the hinge side to allow for the door to
swing open.
NOTE: It is recommended that you do not install the wine cellar
near an oven, radiator, or other heat source. Do not install in a
location where the temperature will fall below 55°F (13°C). For
best performance, do not install the wine cellar behind a cabinet
door or block the base grille.
I I II
Recommended grounding method
A 115 Volt, 60 Hz., AC only 15- or 20-amp fused, grounded
electrical supply is required. It is recommended that a separate
circuit serving only your wine cellar be provided. Use an outlet
that cannot be turned off by a switch. Do not use an
extension cord.
NOTE: Before performing any type of installation, cleaning, or
removing a light bulb, unplug wine cellar or disconnect power.
Excessive Weight Hazard
Use two or more people to move and install wine cellar.
Failure to do so can result in back or other injury.
Remove the Packaging
• Remove tape and glue residue from surfaces before turning
on the wine cellar. Rub a small amount of liquid dish soap
over the adhesive with your fingers. Wipe with warm water
and dry.
• Do not use sharp instruments, rubbing alcohol, flammable
fluids, or abrasive cleaners to remove tape or glue. These
products can damage the surface of your wine cellar. For
more information, see "Wine Cellar Safety."
• Dispose of/recycle all packaging materials.
1/4" (6.35 ram)
2V2"(6.35era)
Electrical Shock Hazard
Plug into a grounded 3 prong outlet.
Do not remove ground prong.
Do not use an adapter.
Do not use an extension cord.
Failure to fellow these instructions can result in death,
fire, or electrical shock.
When Moving Your Wine Cellar:
Your wine cellar is heavy. When moving the wine cellar for
cleaning or service, be sure to protect the floor. Always pull
the wine cellar straight out when moving it. Do not wiggle
or "walk" the wine cellar when trying to move it, as floor
damage could occur.
Clean Before Using
After you remove all of the packaging materials, clean the inside
of your wine cellar before using it. See the cleaning instructions in
"Wine Cellar Care."
Before you move your wine cellar into its final location, it is
important to make sure you have the proper electrical
connection.
Door Closing
Your wine cellar has four leveling legs. If your wine cellar seems
unsteady or you want the door to close more easily, adjust the
wine cellar's tilt using the instructions below.
Electrical Shock Hazard
Plug into a grounded 3 prong outlet.
Do not remove ground prong.
Do not use an adapter.
Do not use an extension cord.
Failure to follow these instructions can result in death,
fire, or electrical shock.
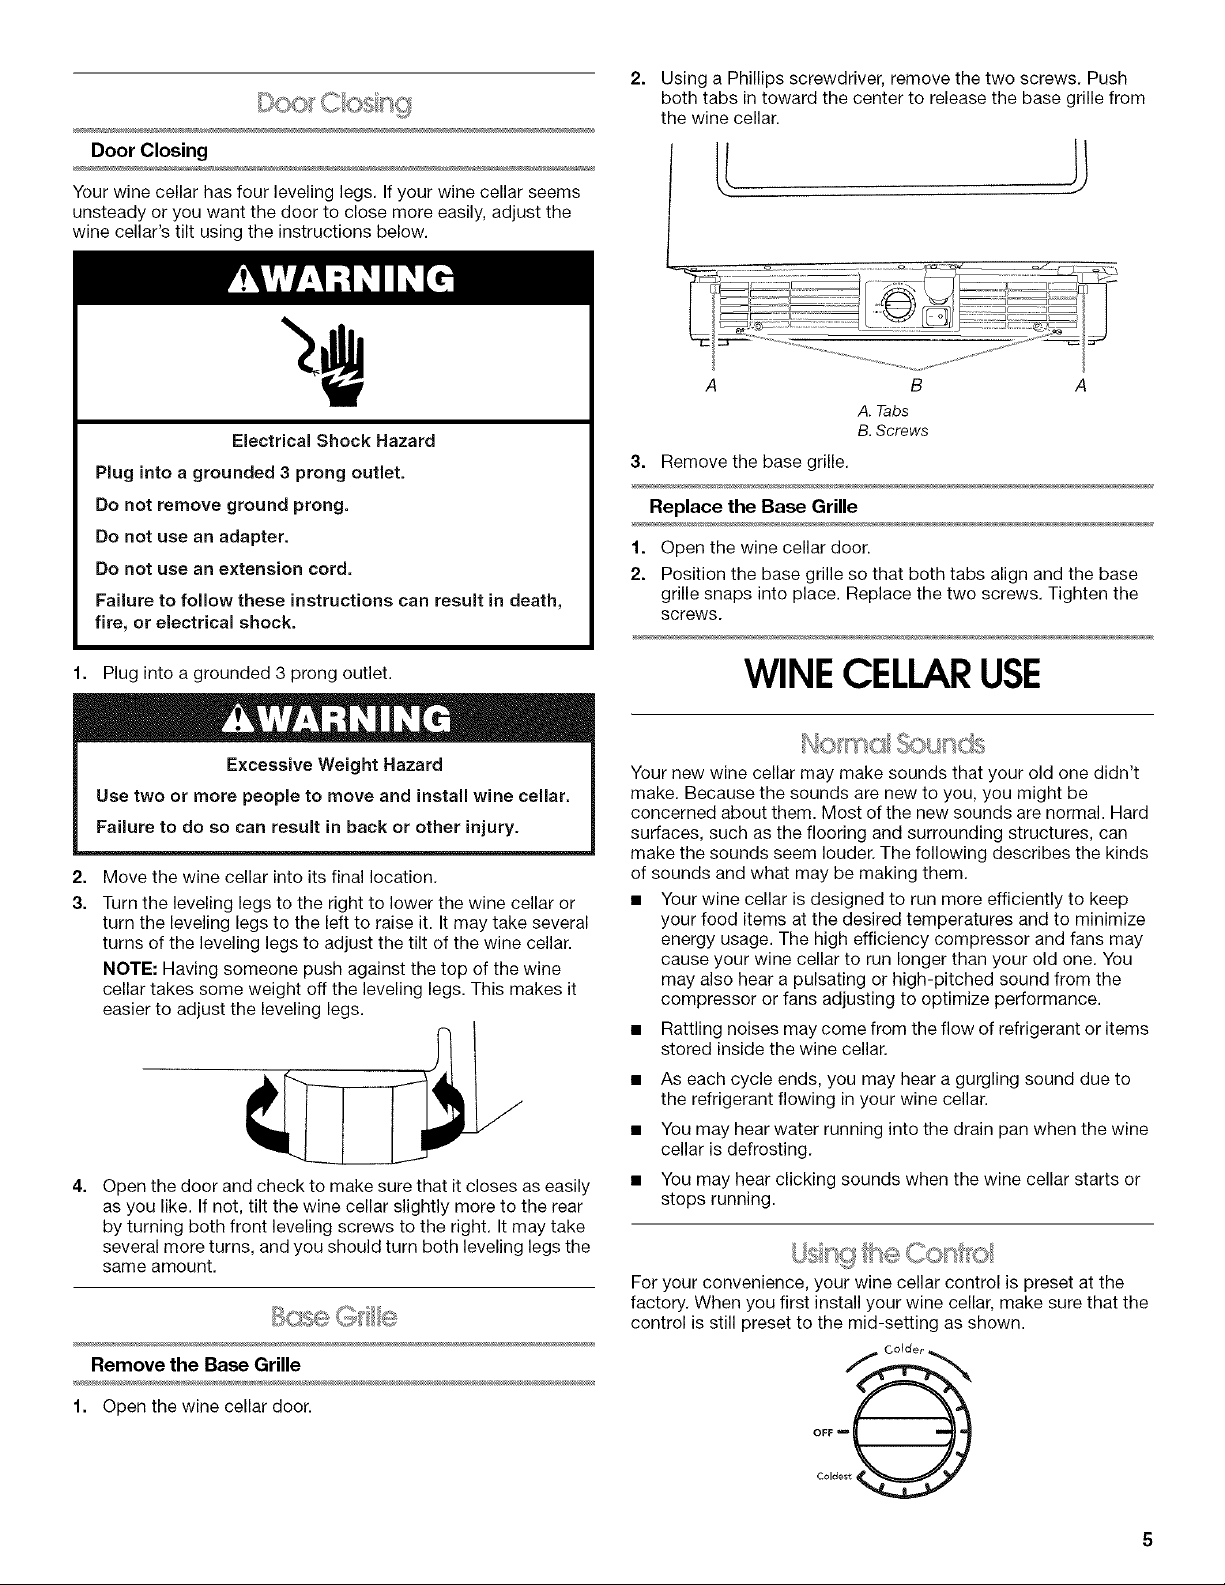
2.
Using a Phillips screwdriver, remove the two screws. Push
both tabs in toward the center to release the base grille from
the wine cellar.
,,:o
A B A
A. Tabs
B. Screws
3. Remove the base grille.
Replace the Base Grille
1. Open the wine cellar door.
2. Position the base grille so that both tabs align and the base
grille snaps into place. Replace the two screws. Tighten the
screws.
1. Plug into a grounded 3 prong outlet.
Excessive Weight Hazard
Use two or more people to move and install wine cellar.
Failure to do so can result in back or other injury.
2. Move the wine cellar into its final location.
3. Turn the leveling legs to the right to lower the wine cellar or
turn the leveling legs to the left to raise it. It may take several
turns of the leveling legs to adjust the tilt of the wine cellar.
NOTE: Having someone push against the top of the wine
cellar takes some weight off the leveling legs. This makes it
easier to adjust the leveling legs.
4.
Open the door and check to make sure that it closes as easily
as you like. If not, tilt the wine cellar slightly more to the rear
by turning both front leveling screws to the right. It may take
several more turns, and you should turn both leveling legs the
same amount.
WINECELLARUSE
No mc , S4:}u sds
Your new wine cellar may make sounds that your old one didn't
make. Because the sounds are new to you, you might be
concerned about them. Most of the new sounds are normal. Hard
surfaces, such as the flooring and surrounding structures, can
make the sounds seem louder. The following describes the kinds
of sounds and what may be making them.
• Your wine cellar is designed to run more efficiently to keep
your food items at the desired temperatures and to minimize
energy usage. The high efficiency compressor and fans may
cause your wine cellar to run longer than your old one. You
may also hear a pulsating or high-pitched sound from the
compressor or fans adjusting to optimize performance.
• Rattling noises may come from the flow of refrigerant or items
stored inside the wine cellar.
• As each cycle ends, you may hear a gurgling sound due to
the refrigerant flowing in your wine cellar.
• You may hear water running into the drain pan when the wine
cellar is defrosting.
• You may hear clicking sounds when the wine cellar starts or
stops running.
For your convenience, your wine cellar control is preset at the
factory. When you first install your wine cellar, make sure that the
control is still preset to the mid-setting as shown.
Remove the Base Grille
1. Open the wine cellar door.
OFF__
Coldest
Adjusting Controls
The mid-setting indicated in the previous section should be
correct for normal usage. The control is set correctly when
beverages are as cold as you like.
If you need to adjust the temperature, wait at least 24 hours
between adjustments and then recheck the temperature.
To make the wine cellar colder, adjust the control to the next
higher setting. To make the wine cellar less cold, adjust the
control to the next lower setting.
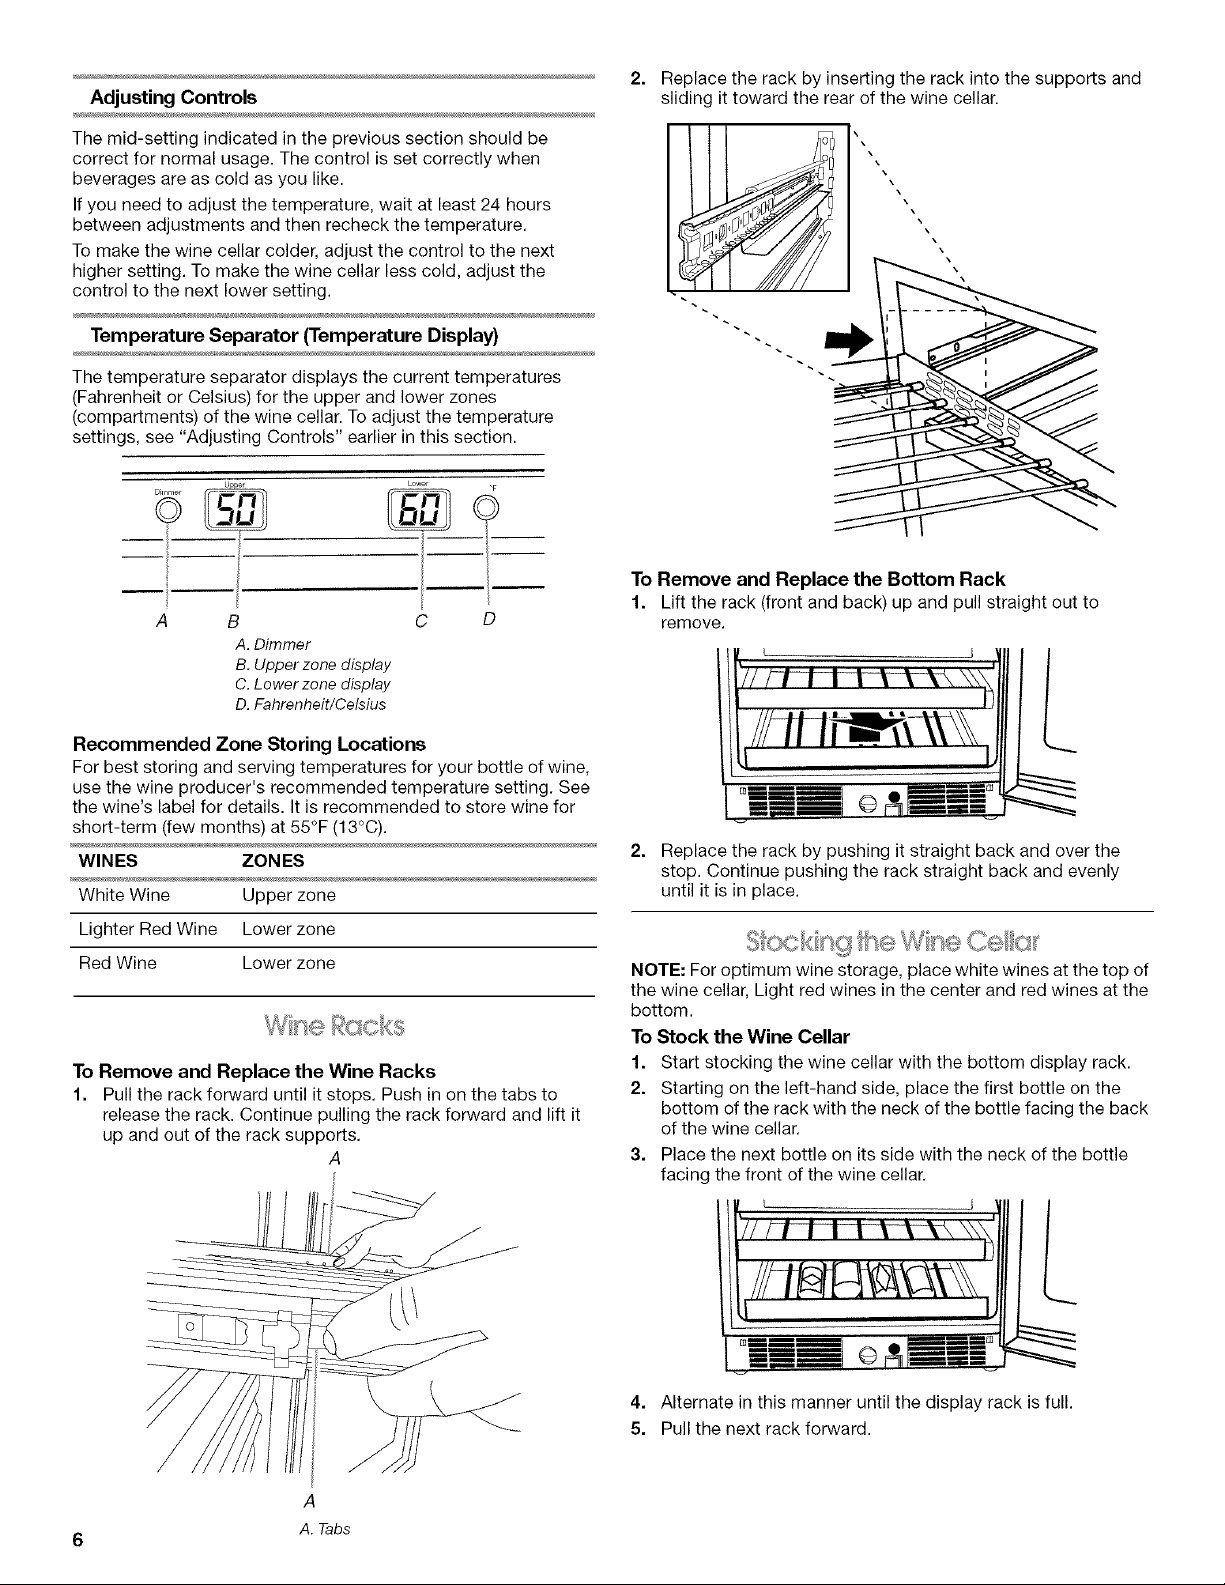
Temperature Separator (Temperature Display)
The temperature separator displays the current temperatures
(Fahrenheit or Celsius) for the upper and lower zones
(compartments) of the wine cellar. To adjust the temperature
settings, see "Adjusting Controls" earlier in this section.
!
A B C D
A. Dimmer
B. Upperzone display
C. Lowerzone display
D. Fahrenheit/Celsius
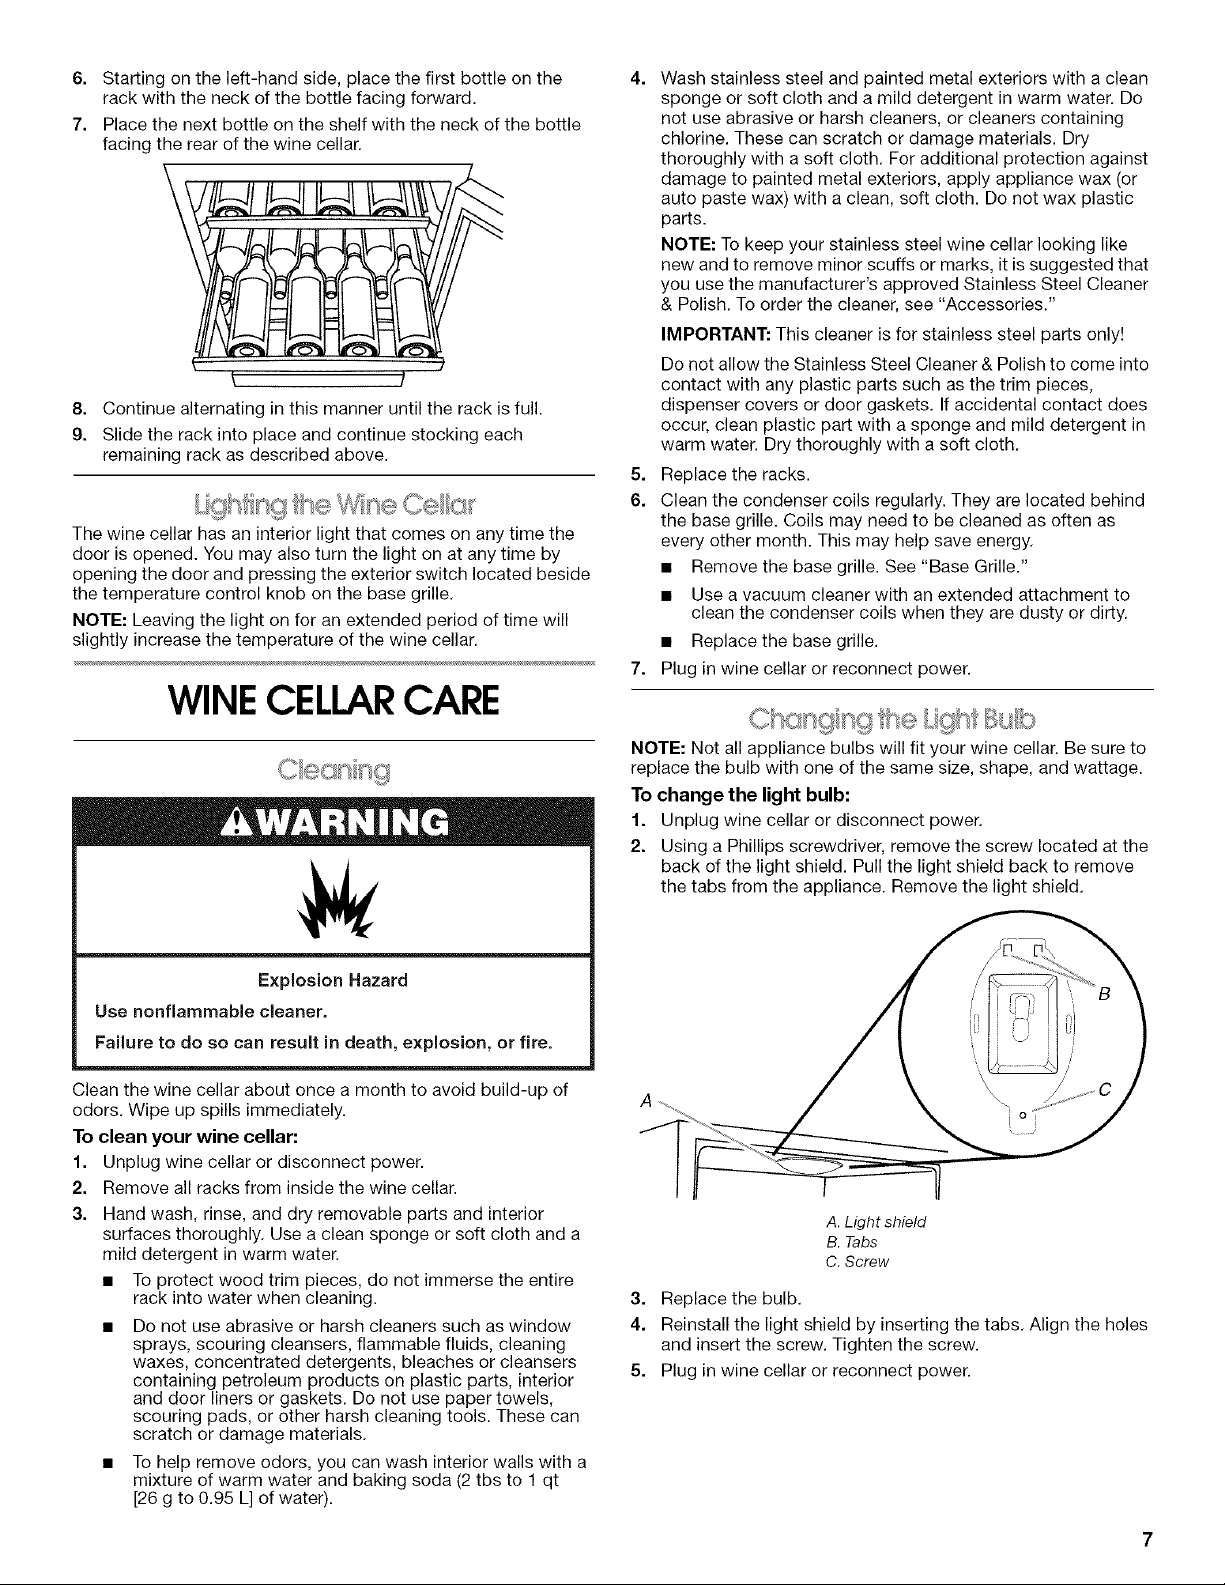
2=
Replace the rack by inserting the rack into the supports and
sliding it toward the rear of the wine cellar.
\
\
\
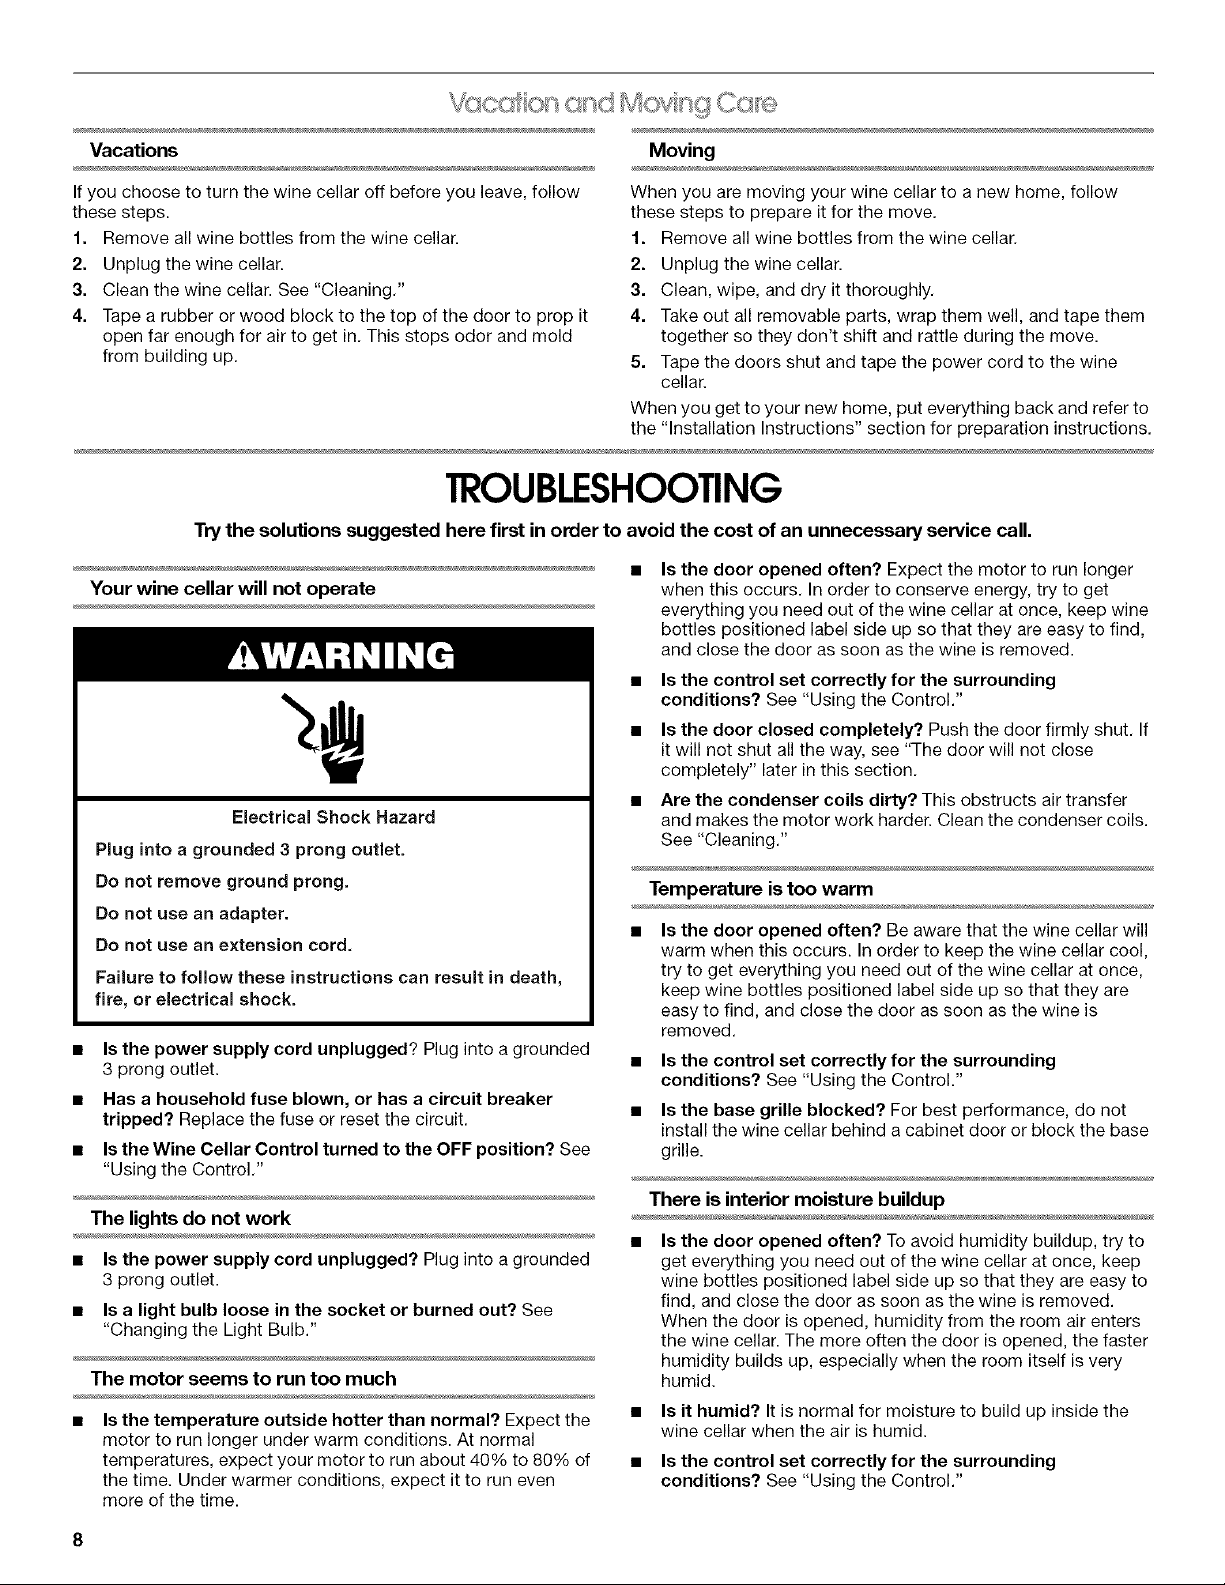
To Remove and Replace the Bottom Rack
1. Lift the rack (front and back) up and pull straight out to
remove.
Recommended Zone Storing Locations
For best storing and serving temperatures for your bottle of wine,
use the wine producer's recommended temperature setting. See
the wine's label for details. It is recommended to store wine for
short-term (few months) at 55°F (13°C).
WINES ZONES
White Wine Upper zone
Lighter Red Wine Lower zone
Red Wine Lower zone
To Remove and Replace the Wine Racks
1. Pull the rack forward until it stops. Push in on the tabs to
release the rack. Continue pulling the rack forward and lift it
up and out of the rack supports.
A
f
2. Replace the rack by pushing it straight back and over the
stop. Continue pushing the rack straight back and evenly
until it is in place.
NOTE: For optimum wine storage, place white wines at the top of
the wine cellar, Light red wines in the center and red wines at the
bottom.
To Stock the Wine Cellar
1. Start stocking the wine cellar with the bottom display rack.
2. Starting on the left-hand side, place the first bottle on the
bottom of the rack with the neck of the bottle facing the back
of the wine cellar.
3. Place the next bottle on its side with the neck of the bottle
facing the front of the wine cellar.
4. Alternate in this manner until the display rack is full.
5. Pull the next rack forward.
A
6
A. Tabs
6.
Starting on the left-hand side, place the first bottle on the
rack with the neck of the bottle facing forward.
7.
Place the next bottle on the shelf with the neck of the bottle
facing the rear of the wine cellar.
8. Continue alternating in this manner until the rack is full.
g. Slide the rack into place and continue stocking each
remaining rack as described above.
ng F® ........,,,,,
The wine cellar has an interior light that comes on any time the
door is opened. You may also turn the light on at any time by
opening the door and pressing the exterior switch located beside
the temperature control knob on the base grille.
NOTE: Leaving the light on for an extended period of time will
slightly increase the temperature of the wine cellar.
WINECELLARCARE
4.
Wash stainless steel and painted metal exteriors with a clean
sponge or soft cloth and a mild detergent in warm water. Do
not use abrasive or harsh cleaners, or cleaners containing
chlorine. These can scratch or damage materials. Dry
thoroughly with a soft cloth. For additional protection against
damage to painted metal exteriors, apply appliance wax (or
auto paste wax) with a clean, soft cloth. Do not wax plastic
parts.
NOTE: To keep your stainless steel wine cellar looking like
new and to remove minor scuffs or marks, it is suggested that
you use the manufacturer's approved Stainless Steel Cleaner
& Polish. To order the cleaner, see "Accessories."
IMPORTANT: This cleaner is for stainless steel parts only!
Do not allow the Stainless Steel Cleaner & Polish to come into
contact with any plastic parts such as the trim pieces,
dispenser covers or door gaskets. If accidental contact does
occur, clean plastic part with a sponge and mild detergent in
warm water. Dry thoroughly with a soft cloth.
5. Replace the racks.
6. Clean the condenser coils regularly. They are located behind
the base grille. Coils may need to be cleaned as often as
every other month. This may help save energy.
• Remove the base grille. See "Base Grille."
• Use a vacuum cleaner with an extended attachment to
clean the condenser coils when they are dusty or dirty.
• Replace the base grille.
7. Plug in wine cellar or reconnect power.
Chc ng sg t t" eLght Bub
NOTE: Not all appliance bulbs will fit your wine cellar. Be sure to
replace the bulb with one of the same size, shape, and wattage.
To change the light bulb:
1. Unplug wine cellar or disconnect power.
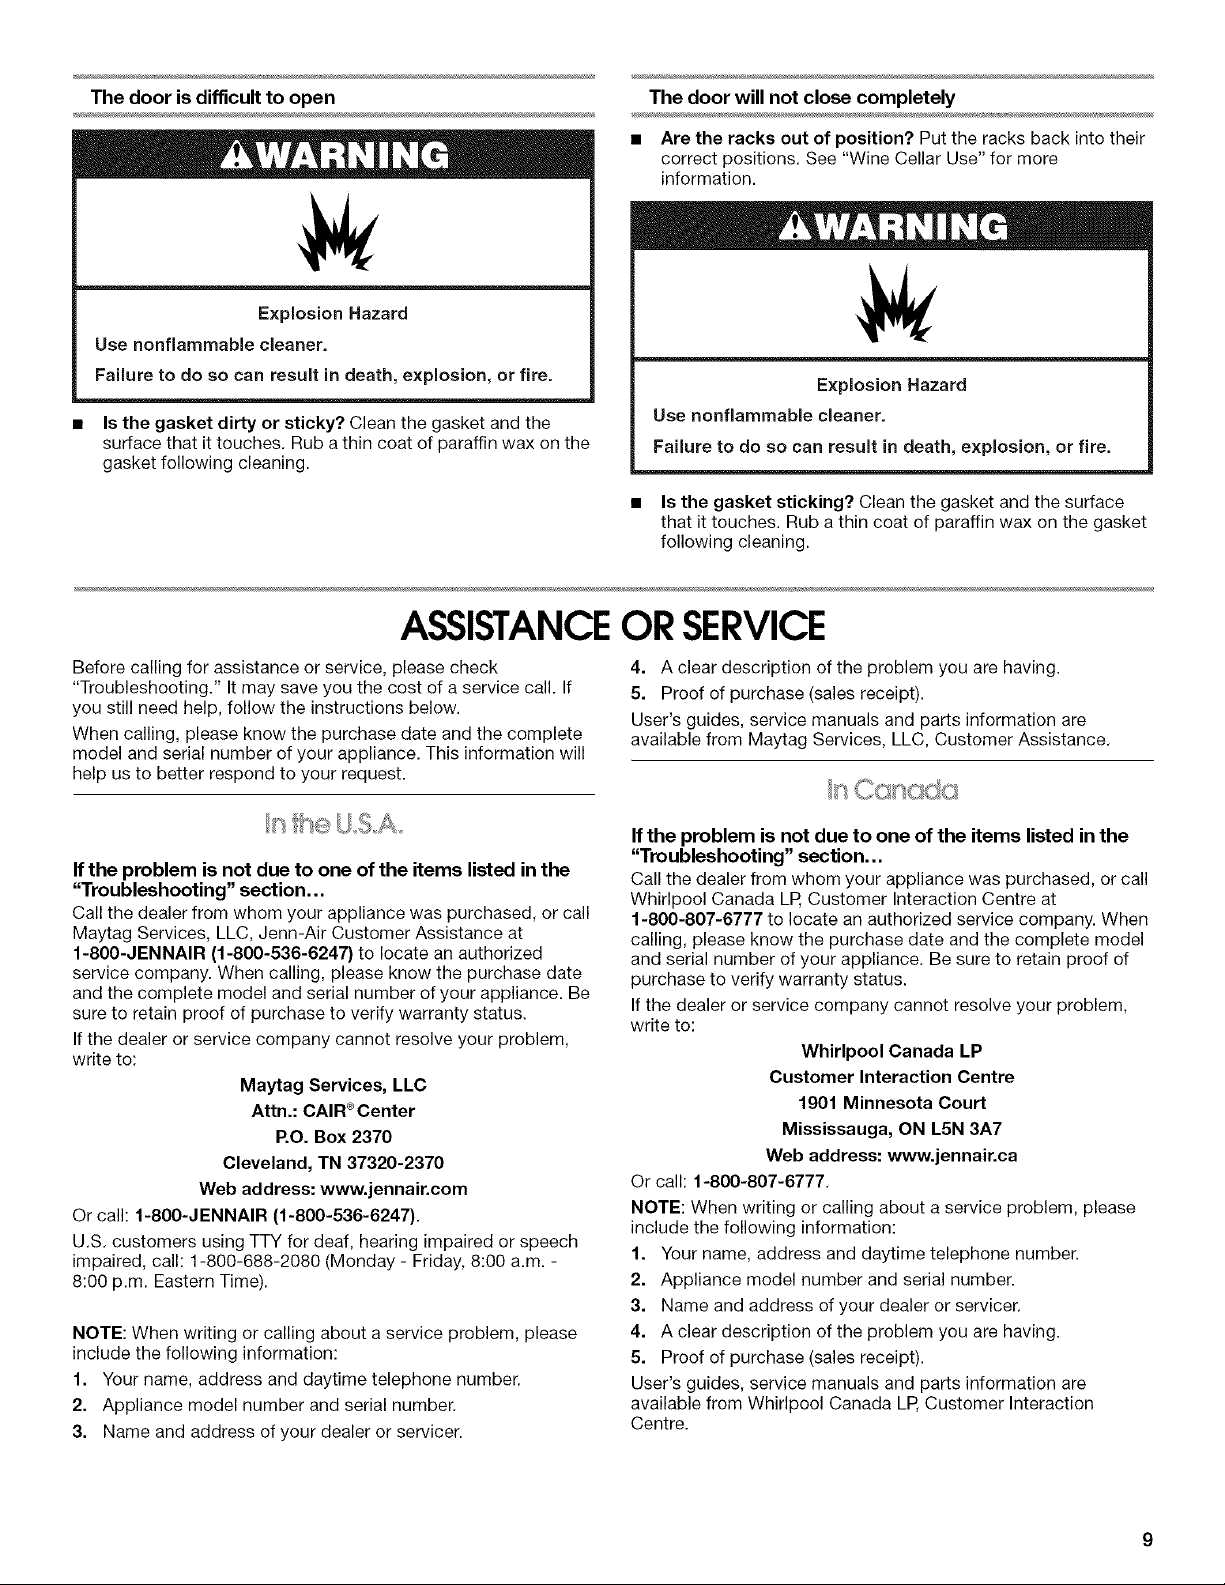
2. Using a Phillips screwdriver, remove the screw located at the
back of the light shield. Pull the light shield back to remove
the tabs from the appliance. Remove the light shield.
Explosion Hazard
Use nonflammable cleaner.
Failure to do so can result in death, explosion, or fire.
Clean the wine cellar about once a month to avoid build-up of
odors. Wipe up spills immediately.
To clean your wine cellar:
1. Unplug wine cellar or disconnect power.
2. Remove all racks from inside the wine cellar.
3. Hand wash, rinse, and dry removable parts and interior
surfaces thoroughly. Use a clean sponge or soft cloth and a
mild detergent in warm water.
• To protect wood trim pieces, do not immerse the entire
rack into water when cleaning.
• Do not use abrasive or harsh cleaners such as window
sprays, scouring cleansers, flammable fluids, cleaning
waxes, concentrated detergents, bleaches or cleansers
containing petroleum products on plastic parts, interior
and door liners or gaskets. Do not use paper towels,
scouring pads, or other harsh cleaning tools. These can
scratch or damage materials.
• To help remove odors, you can wash interior walls with a
mixture of warm water and baking soda (2 tbs to 1 qt
[26 g to 0.95 L] of water).
j O
A. Light shield
B. Tabs
C. Screw
3. Replace the bulb.
4. Reinstall the light shield by inserting the tabs. Align the holes
and insert the screw. Tighten the screw.
5. Plug in wine cellar or reconnect power.
i _ _ ,_qi _ _ _ _,) _ _ )_ _ _ _ _'_ _ _
Vacations
If you choose to turn the wine cellar off before you leave, follow
these steps.
f. Remove all wine bottles from the wine cellar.
2. Unplug the wine cellar.
3. Clean the wine cellar. See "Cleaning."
4. Tape a rubber or wood block to the top of the door to prop it
open far enough for air to get in. This stops odor and mold
from building up.
TROUBLESHOOTING
Trythe solutions suggested here first in order to avoid the cost of an unnecessary service call.
Your wine cellar will not operate
Electrical Shock Hazard
Plug into a grounded 3 prong outlet.
Do not remove ground prong.
Do not use an adapter.
Do not use an extension cord,
Failure to follow these instructions can result in death,
fire, or electrical shock.
Is the power supply cord unplugged? Plug into a grounded
3 prong outlet.
Has a household fuse blown, or has a circuit breaker
tripped? Replace the fuse or reset the circuit.
Is the Wine Cellar Control turned to the OFF position? See
"Using the Control."
The lights do not work
• is the power supply cord unplugged? Plug into a grounded
3 prong outlet.
• Is a light bulb loose in the socket or burned out? See
"Changing the Light Bulb."
The motor seems to run too much
Is the temperature outside hotter than normal? Expect the
motor to run longer under warm conditions. At normal
temperatures, expect your motor to run about 40% to 80% of
the time. Under warmer conditions, expect it to run even
more of the time.
Moving
When you are moving your wine cellar to a new home, follow
these steps to prepare it for the move.
1. Remove all wine bottles from the wine cellar.
2. Unplug the wine cellar.
3. Clean, wipe, and dry it thoroughly.
4. Take out all removable parts, wrap them well, and tape them
together so they don't shift and rattle during the move.
5. Tape the doors shut and tape the power cord to the wine
cellar.
When you get to your new home, put everything back and refer to
the "Installation Instructions" section for preparation instructions.
Is the door opened often? Expect the motor to run longer
when this occurs. In order to conserve energy, try to get
everything you need out of the wine cellar at once, keep wine
bottles positioned label side up so that they are easy to find,
and close the door as soon as the wine is removed.
• Is the control set correctly for the surrounding
conditions? See "Using the Control."
• is the door closed completely? Push the door firmly shut. If
it will not shut all the way, see "The door will not close
completely" later in this section.
• Are the condenser coils dirty? This obstructs air transfer
and makes the motor work harder. Clean the condenser coils.
See "Cleaning."
Temperature is too warm
is the door opened often? Be aware that the wine cellar will
warm when this occurs. In order to keep the wine cellar cool,
try to get everything you need out of the wine cellar at once,
keep wine bottles positioned label side up so that they are
easy to find, and close the door as soon as the wine is
removed.
• Is the control set correctly for the surrounding
conditions? See "Using the Control."
• is the base grille blocked? For best performance, do not
install the wine cellar behind a cabinet door or block the base
grille.
There is interior moisture buildup
is the door opened often? To avoid humidity buildup, try to
get everything you need out of the wine cellar at once, keep
wine bottles positioned label side up so that they are easy to
find, and close the door as soon as the wine is removed.
When the door is opened, humidity from the room air enters
the wine cellar. The more often the door is opened, the faster
humidity builds up, especially when the room itself is very
humid.
• is it humid? It is normal for moisture to build up inside the
wine cellar when the air is humid.
• Is the control set correctly for the surrounding
conditions? See "Using the Control."
The door isdifficult to open
Explosion Hazard
Use nonflammable cleaner.
Failure to do so can result in death, explosion, or fire.
• Is the gasket dirty or sticky? Clean the gasket and the
surface that it touches, Rub a thin coat of paraffin wax on the
gasket following cleaning.
ASSISTANCEORSERVICE
The door will not close completely
• Are the racks out of position? Put the racks back into their
correct positions. See "Wine Cellar Use" for more
information.
Explosion Hazard
Use nonflammable cleaner.
Failure to do so can result in death, explosion, or fire.
• Is the gasket sticking? Clean the gasket and the surface
that it touches. Rub a thin coat of paraffin wax on the gasket
following cleaning.
Before calling for assistance or service, please check
"Troubleshooting." It may save you the cost of a service call. If
you still need help, follow the instructions below.
When calling, please know the purchase date and the complete
model and serial number of your appliance. This information will
help us to better respond to your request.
If the problem is not due to one of the items listed in the
"Troubleshooting" section...
Call the dealer from whom your appliance was purchased, or call
Maytag Services, LLC, Jenn-Air Customer Assistance at
f-800-JENNAIR (1-800-536-6247) to locate an authorized
service company. When calling, please know the purchase date
and the complete model and serial number of your appliance. Be
sure to retain proof of purchase to verify warranty status.
If the dealer or service company cannot resolve your problem,
write to:
Maytag Services, LLC
Attn.: CAIR c_Center
P.O. Box 2370
Cleveland, TN 37320-2370
Web address: www.jennair.com
Or call: 1-800-JENNAIR (1-800-536-6247),
U,S, customers using TTY for deaf, hearing impaired or speech
impaired, call: 1-800-688-2080 (Monday - Friday, 8:00 a.m. -
8:00 p.m. Eastern Time).
NOTE: When writing or calling about a service problem, please
include the following information:
1. Your name, address and daytime telephone number.
2. Appliance model number and serial number.
3. Name and address of your dealer or servicer.
4. A clear description of the problem you are having.
5. Proof of purchase (sales receipt).
User's guides, service manuals and parts information are
available from Maytag Services, LLC, Customer Assistance.
If the problem is not due to one of the items listed in the
"Troubleshooting" section...
Call the dealer from whom your appliance was purchased, or call
Whirlpool Canada LP, Customer Interaction Centre at
1-800-807-6777 to locate an authorized service company. When
calling, please know the purchase date and the complete model
and serial number of your appliance. Be sure to retain proof of
purchase to verify warranty status.
If the dealer or service company cannot resolve your problem,
write to:
Whirlpool Canada LP
Customer Interaction Centre
1901 Minnesota Court
Mississauga, ON L5N 3A7
Web address: www.jennair.ca
Or call: 1-800-807-6777,
NOTE: When writing or calling about a service problem, please
include the following information:
1. Your name, address and daytime telephone number.
2. Appliance model number and serial number.
3. Name and address of your dealer or servicer.
4. A clear description of the problem you are having.
5. Proof of purchase (sales receipt).
User's guides, service manuals and parts information are
available from Whirlpool Canada LID,Customer Interaction
Centre.
 Loading...