


USE AND CARE GUIDE AND
INSTALLATION INSTRUCTIONS
DOUBLE REFRIGERATOR DRAWERS/REFRIGERATOR/
FREEZER DRAWERS
GUIDE D’UTILISATION ET D’ENTRETIEN
ET INSTRUCTIONS D’INSTALLATION
TIROIRS RÉFRIGÉRANTS DOUBLES/RÉFRIGÉRATEUR/
TIROIRS DE CONGÉLATION
For questions about features, operation/performance, parts, accessories, or service, call:
1-800-JENNAIR (1-800-536-6247) or visit our website at www.jennair.com.
In Canada, call: 1-800-JENNAIR (1-800-536-6247), or visit our website at www.jennair.ca.
Pour des questions à propos des caractéristiques, du fonctionnement/rendement,
des pièces, accessoires ou service, composer le :
1 800 JENNAIR (1 800 536-6247) ou visiter notre site Web au www.jennair.com.
Au Canada, composer le : 1 800 JENNAIR (1 800 536-6247) ou visiter notre site Web au www.jennair.ca.
W11357308B
TABLE OF CONTENTS |
|
INTRODUCTION |
|
Safety..................................................................................................................... |
3 |
Proper Disposal of your |
|
old Refrigerator.............................................................................................. |
4 |
Design configuration................................................................................. |
4 |
Features............................................................................................................... |
5 |
INSTALLATION REQUIREMENTS |
|
Tools and Parts............................................................................................... |
6 |
Location Requirements............................................................................ |
6 |
Product Dimensions................................................................................... |
7 |
Custom Overlay Drawer Panels.......................................................... |
8 |
Electrical Requirements.......................................................................... |
9 |
Water Supply Requirements |
|
(Refrigerator/Freezer Drawers only)................................................ |
9 |
INSTALLATION INSTRUCTIONS |
|
Unpack The Refrigerator Drawers.................................................... |
10 |
Connect Water Supply |
|
(Refrigerator/Freezer Drawers only)................................................ |
10 |
Move the Refrigerator Drawers to Final Location.................. |
11 |
Install Custom Overlay Panel............................................................... |
11 |
Level the Refrigerator Drawers........................................................... |
12 |
Complete Installation................................................................................ |
12 |
REFRIGERATOR DRAWERS USE |
|
Controls............................................................................................................... |
13 |
Normal Sounds.............................................................................................. |
15 |
Ensuring Proper Air Circulation.......................................................... |
15 |
Ice Maker............................................................................................................ |
15 |
CARE AND CLEANING |
|
Cleaning.............................................................................................................. |
16 |
Changing the Water Filter..................................................................... |
16 |
Power Interruptions.................................................................................... |
16 |
Vacation Care.................................................................................................. |
17 |
TROUBLESHOOTING |
|
Operation........................................................................................................... |
17 |
Temperature Moisture.............................................................................. |
17 |
Drawers............................................................................................................... |
18 |
ASSISTANCE |
|
In the U.S.A........................................................................................................ |
19 |
In Canada........................................................................................................... |
19 |
Accessories........................................................................................................ |
19 |
Product Data Sheet.................................................................................... |
20 |
Warranty............................................................................................................. |
21 |
TABLE DES MATIÈRES |
|
INTRODUCTION |
|
Sécurité................................................................................................................ |
23 |
Mise au rebut du vieux réfrigérateur.............................................. |
24 |
Configuration.................................................................................................. |
24 |
Caractéristiques............................................................................................. |
25 |
EXIGENCES D’INSTALLATION |
|
Outils et pièces............................................................................................... |
26 |
Exigences d’emplacement.................................................................... |
26 |
Dimensions du produit............................................................................ |
27 |
Panneaux décoratifs de tiroirs personnalisés........................... |
28 |
Spécifications électriques...................................................................... |
29 |
Spécifications de l’alimentation en eau |
|
(réfrigérateur et tiroir de congélation seulement)................ |
29 |
INSTRUCTIONS D’INSTALLATION |
|
Déballage du tiroir de réfrigération................................................. |
30 |
Raccordement de l’alimentation en eau |
|
(réfrigérateur et tiroir de congélation seulement).... |
30 |
Déplacement des tiroirs de réfrigération à leur |
|
emplacement final...................................................................................... |
31 |
Installation du panneau décoratif personnalisé..................... |
31 |
Réglage de l’aplomb des tiroirs de réfrigération.................... |
32 |
Terminer l’installation................................................................................ |
32 |
UTILISATION DES TIROIRS |
|
DE RÉFRIGÉRATION |
|
Commandes.................................................................................................... |
33 |
Sons normaux................................................................................................. |
35 |
Pour assurer une circulation d’air correcte................................. |
35 |
Machine à glaçons....................................................................................... |
35 |
ENTRETIEN ET NETTOYAGE |
|
Nettoyage.......................................................................................................... |
36 |
Remplacement du filtre à eau............................................................ |
36 |
Pannes de courant...................................................................................... |
37 |
Entretien avant les vacances................................................................ |
37 |
DÉPANNAGE |
|
Utilisation........................................................................................................... |
37 |
Température et humidité....................................................................... |
37 |
Tiroirs..................................................................................................................... |
38 |
ASSISTANCE |
|
Aux É.-U............................................................................................................... |
39 |
Au Canada......................................................................................................... |
39 |
Accessoires........................................................................................................ |
39 |
Fiches de données de produitS.......................................................... |
40 |
Garantie............................................................................................................... |
41 |
2

INTRODUCTION
SAFETY
Your safety and the safety of others are very important.
many important safety messages in this manual and on your appliance. Always read and obey all safety
safety alert symbol.
alerts you to potential hazards that can kill or hurt you and others.
messages will follow the safety alert symbol and either the word “DANGER” or “WARNING.”
mean:
 DANGER
  WARNING
You can be killed or seriously injured if you don't immediately follow instructions.
You can be killed or seriously injured if you don't follow instructions.
All safety messages will tell you what the potential hazard is, tell you how to reduce the chance of injury, and tell you what can happen if the instructions are not followed.
IMPORTANT SAFETY INSTRUCTIONS
WARNING: To reduce the risk of fire, electric shock, or injury when using your refrigerator drawer(s), follow these basic precautions:
■Plug into a grounded 3 prong outlet.
■Do not remove ground prong.
■Do not use an adapter.
■Do not use an extension cord.
■Disconnect power before servicing.
■Connect to potable water supply.
■Replace all parts and panels before operating.
■Remove door or drawer(s) from your old refrigerated appliance.
■Use non flammable cleaner.
■Do not store or use petrol, flammable liquids or gas in the vicinity of this or other electrical appliances. The fumes can cause fires or explosions.
■Do not store explosive substances such as aerosol cans with a flammable propellant in this refrigerator drawer(s).
■Do not use or place electrical devices inside the refrigerator drawer(s) compartments if they are not of the type expressly authorized by the manufacture.
■Use two or more people to move and install refrigerator drawer(s).
■This appliance is not intended for use by persons (including children) with reduced physical, sensory or mental capabilities, or lack of experience and knowledge, unless they have been given supervision or instruction concerning use of the appliance by a person responsible for their safety.
■Children should be supervised to ensure that they do not play with the appliance.
■To avoid the risk of children becoming trapped and suffocating, do not allow them to play or hide inside the refrigerator drawer(s).
■If the power supply cord is damaged, it must be replaced by the manufacturer or its service agent or a similarly qualified person.
■Keep ventilation openings, in the appliance enclosure or in the built-in structure, clear of obstruction.
■Do not use mechanical devices or other means to accelerate the defrosting process, other than those recommended by the manufacturer.
■Do not damage the refrigerant circuit.
SAVE THESE INSTRUCTIONS
3

PROPER DISPOSAL OF YOUR
OLD REFRIGERATOR
 WARNING
Suffocation Hazard
Remove door or drawer(s) from your old refrigerated appliance.
Failure to do so can result in death or brain damage.
IMPORTANT: Child entrapment and suffocation are not problems of the past. Junked or abandoned refrigerators are still dangerous – even if they will sit for “just a few days.” If you are getting rid of your old refrigerator, please follow these instructions to help prevent accidents.
Before You Throw Away Your Old Refrigerator:
Remove the door or drawer(s).
Important information to know about disposal of refrigerants:
Dispose of refrigerator in accordance with Federal and Local regulations. Refrigerants must be evacuated by a licensed, EPA certified refrigerant technician in accordance with established procedures.
DESIGN CONFIGURATION
DOUBLE REFRIGERATOR DRAWERS
Refrigerator drawers provide additional storage options in the kitchen or other areas of the home.
|
|
|
|
|
|
|
|
|
|
|
|
|
|
|
|
|
|
|
|
|
|
|
|
|
|
|
|
|
|
|
|
|
|
|
|
|
|
|
|
|
|
|
|
|
|
|
|
|
|
|
|
|
|
|
|
|
|
|
|
|
|
|
|
|
|
|
|
|
|
|
|
|
|
|
|
|
|
|
|
|
|
|
|
|
|
|
|
|
|
|
|
|
|
|
|
|
|
|
|
|
|
|
|
|
|
|
|
|
|
|
|
|
|
|
|
|
|
|
|
|
|
|
|
|
|
|
|
|
|
|
|
|
|
|
|
|
|
|
|
|
|
|
|
|
|
|
|
|
|
|
|
|
|
|
|
|
|
|
|
|
JUDFP242HM |
|
|
JUDFP242HL |
|
|
|
|
JUDFP242HX |
|
|||||
REFRIGERATOR/FREEZER DRAWERS (WITH ICE MAKER AND WATER FILTER)
Upper refrigerator drawer and lower freezer drawer provide additional storage options in the kitchen or other areas of the home. Factory-installed ice maker in lower drawer ensures a constant supply of ice on hand at all times.
|
|
|
|
|
|
|
|
|
|
|
|
|
|
|
|
|
|
|
|
|
|
|
|
|
|
|
|
|
|
|
|
|
|
|
|
|
|
|
|
|
|
|
|
|
|
|
|
|
|
|
|
|
|
|
|
|
|
|
|
|
|
|
|
|
|
|
|
|
|
|
|
|
|
|
|
|
|
|
|
|
|
|
|
|
|
|
|
|
|
|
|
|
|
|
|
|
|
|
|
|
|
|
|
|
|
|
|
|
|
|
|
|
|
|
|
|
|
|
|
|
|
|
|
|
|
|
|
|
|
|
|
|
|
|
|
|
|
|
|
|
|
|
|
|
|
|
|
|
|
|
|
|
|
|
|
|
|
|
|
|
|
|
|
|
|
|
|
|
|
|
|
|
|
|
|
|
JUCFP242HM |
|
|
JUCFP242HL |
|
|
|
|
JUCFP242HX |
|
|||||
4

FEATURES |
|
|
|
||||||||||||||||||||||||||||||
12. |
|
|
|
|
|
|
|
|
|
|
|
|
|
|
|
|
|
|
|
|
|
|
|
|
|
|
|
|
1. |
|
|
||
|
|
|
|
|
|
|
|
|
|
|
|
|
|
|
|
|
|
|
|
|
|
|
|
|
|
|
|
||||||
|
|
|
|
|
|
|
|
|
|
|
|
|
|
|
|
|
|
|
|
|
|
|
|
|
|
|
|
2. |
|||||
|
|
|
|
|
|
|
|
|
|
|
|
|
|
|
|
|
|
|
|
|
|
|
|
|
|
|
|
|
|
|
|||
11. |
|
|
|
|
|
|
|
|
|
|
|
|
|
|
|
|
|
|
|
|
|
|
|
|
|
|
|
|
|||||
|
|
|
|
|
|
|
|
|
|
|
|
|
|
|
|
|
|
|
|
|
|
|
|
|
|
|
|
|
|
|
|||
|
|
|
|
|
|
|
|
|
|
|
|
|
|
|
|
|
|
|
|
|
|
|
|
|
|
|
|
3. |
|
||||
|
|
|
|
|
|
|
|
|
|
|
|
|
|
|
|
|
|
|
|
|
|
|
|
|
|
|
|
|
|
|
|
||
|
|
|
|
|
|
|
|
|
|
|
|
|
|
|
|
|
|
|
|
|
|
|
|
|
|
|
|
|
|
|
|
|
|
10. |
|
|
|
|
|
|
|
|
|
|
|
|
|
|
|
|
|
|
|
|
|
|
|
|
|
|
|
|
4. |
|
|||
|
|
|
|
|
|
|
|
|
|
|
|
|
|
|
|
|
|
|
|
|
|
|
|
|
|
|
|
|
|
|
|||
|
|
|
|
|
|
|
|
|
|
|
|
|
|
|
|
|
|
|
|
|
|
|
|
|
|
|
|
5. |
|
||||
|
|
|
|
|
|
|
|
|
|
|
|
|
|
|
|
|
|
|
|
|
|
|
|
|
|
|
|
|
|
|
|
||
9. |
|
|
|
|
|
|
|
|
|
|
|
|
|
|
|
|
|
|
|
|
|
|
|
|
|
|
|
|
6,7,8. |
|
|||
|
|
|
|
|
|
|
|
|
|
|
|
|
|
|
|
|
|
|
|
|
|
|
|
|
|
|
|
|
|
|
|||
|
|
|
|
|
|
|
|
|
|
|
|
|
|
|
|
|
|
|
|
|
|
|
|
|
|
|
|
|
|
|
|
|
|
1. Stealth Flush Design
Create an unbroken silhouette. Discreet 1/8" envelop every side, without exposed hinges or trim pieces.
2. Daring Obsidian Interior
Inspired by volcanic glass, this dark finish erupts with reflective, high-contrast style. Let the object of your desire emerge like vibrant art, begging to be consumed.
3. Sabbath Mode
Allows the refrigerator or freezer to be opened or closed on the Sabbath or other religious holidays without directly turning on or off any lights, digital readouts, fans, valves, tones or alarms.
4. Over Temp Alarm
Chimes when the temperature in either drawer rises above 45°F (7°C) for longer than 10 minutes.
5. LED Lighting
LED lights instinctively come alive, chasing away shadows to reveal vivid details.
6. RISE™ Design Expression
Embrace an era of striking proportions. A stainless steel suite of armor gleams with spectacular light. This is strength—inextricable from beauty. Forged in the fires of progress, the RISE™ design expression towers over stagnant, uninspired designs that have inherited undeserved standing.
7. NOIR™ Design Expression
Lose yourself in a world that’s yours alone. Crisp silhouettes crackle with mystique; beguiling reflections flow in and out of sight. Taut with ceaseless allure and minimalist appeal, the NOIR™ design expression rejects dated ideals of beauty.
8. Custom Panel Overlay
Break free with custom panels that allow unapologetic expression. Custom panels and handles must be purchased separately.
9. Drawer Open Alarm
Helps prevent food spoilage by sounding an alarm at 2-minute intervals when either drawer is open for longer than 5 minutes.
10. Drawer Dividers
Divide and conquer. Add or remove barriers to organize each drawer as you see fit.
11. Hushed Acoustics
Our internal compressor keeps your beverages impeccably chilled, while running unobtrusively in the background. Brilliance doesn’t have to announce itself; it just is.
12. Max Cool Option
Plummet internal temperatures to their lowest point for 24 hours.
5
INSTALLATION REQUIREMENTS
TOOLS AND PARTS
Gather the required tools and parts before starting installation.
Read and follow the instructions provided with any tools listed here.
TOOLS AND PARTS NEEDED:
Phillips screwdriver
Cordless drill
1/8" Drill bit
Tape measure
Level
ADDITIONAL TOOLS NEEDED (CUSTOM OVERLAY PANEL ONLY):
Scissors
Pencil
Scribe
PARTS NEEDED (CUSTOM OVERLAY PANEL ONLY):
Custom Overlay Drawer Panels — See “Custom Overlay Drawer Panels.”
Hardware
PARTS NEEDED (CUSTOM OVERLAY PANEL ONLY):
Hooks (8)
Screws (16)
Self-tap wood screws (4)
LOCATION REQUIREMENTS
ARNING
Explosion Hazard
Keep flammable materials and vapors, such as gasoline, away from refrigerator drawer(s).
Failure to do so can result in death, explosion, or fire.
IMPORTANT: This appliance is intended to be used in household and similar applications such as:
Staff kitchen areas in shops, office and other working environments;
Farm houses and by clients in hotels, motels and other residential type environments;
Bed and breakfast type environments;
Catering and similar non-retail applications.
NOTES:
For the refrigerator drawers to be flush with the front of the base cabinets remove any baseboards or moldings from the rear of the opening. See “Product Dimensions” and later in this section “Opening Dimensions”
It is recommended that you do not install the refrigerator drawers near an oven, radiator, or other heat source.
Do not install in a location where the temperature will fall below 55°F (13°C).
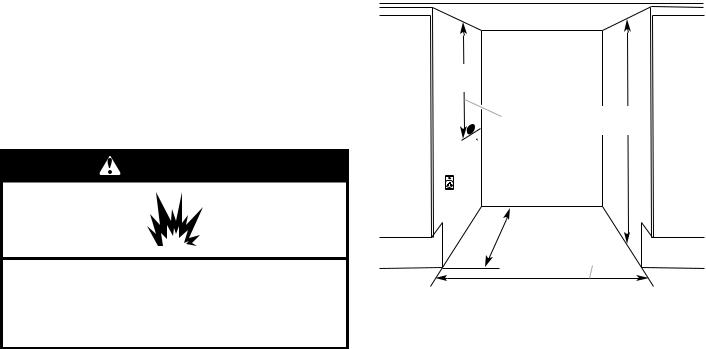
OPENING DIMENSIONS
Height dimensions are shown with the leveling legs extended to the minimum height of 1/4" (6 mm) below the refrigerator drawers.
NOTE: When leveling legs are fully extended to 1" (25 mm) below the refrigerator drawers, add 3/4" (19 mm) to the height dimensions. See “Product Dimensions.”
If the floor of the opening is not level with the kitchen floor, shim the opening to make it level with the kitchen floor.
143/4" (375 mm)
1/2"  (13 mm)
A |
343/8" (873 mm) min. |
|
35" (889 mm) max. |
24" (609.6 mm) min.
B
24" (609.6 mm) min.
Critical Dimensions:
A.Utility opening
B.Minimum opening width
6
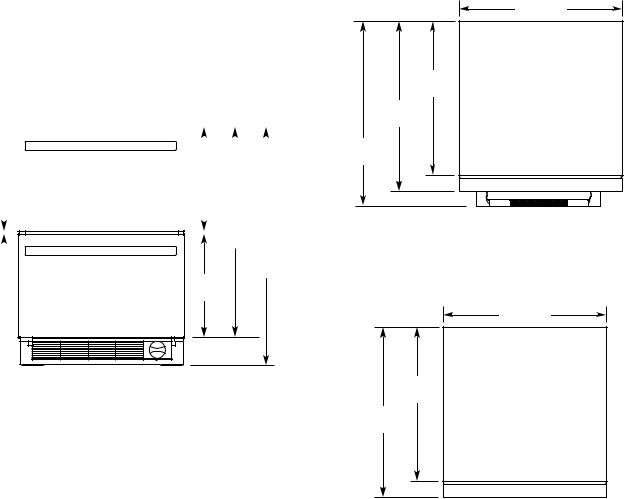
PRODUCT DIMENSIONS
DRAWER HEIGHT DIMENSIONS
Height dimensions are shown with the leveling legs extended to 1/4" (6 mm) below the refrigerator drawers.
When leveling legs are fully extended to 1" (25 mm) below the refrigerator drawers, add 3/4" (19 mm) to the height dimensions.
The power cord is 60" (1.52 m) long.
RISE™/NOIR™/OVERLAY (FRONT VIEW)
|
|
|
|
|
|
|
|
|
|
|
|
|
|
|
|
|
|
|
|
|
|
|
|
|
|
|
|
|
|
|
|
|
|
|
|
|
|
|
|
|
|
|
|
15" |
|
|
|
|
|
||||
|
|
|
|
|
|
|
|
(380 mm) |
|
|
|
|
|||||
|
|
|
|
|
|
|
|
|
|
|
|
|
|
|
|
||
|
|
|
|
|
|
|
|
|
|
|
|
|
|
|
|
|
|
|
|
|
|
|
|
|
|
|
|
|
|
|
|
|
|
|
|
1/4" |
|
|
|
|
|
|
|
|
|
|
30¼" |
|
|
||||
(6 mm) |
|
|
|
|
|
|
|
|
|
|
(760 mm) |
|
|
||||
|
|
|
|
|
|
|
|
|
|
|
|
|
|
|
|
|
|
|
|
|
|
|
|
|
|
|
|
|
|
|
|
|
|
|
|
34⅛"
(868 mm)
15" (380 mm)
DRAWER WIDTH DIMENSIONS
RISETM/NOIRTM (TOP VIEW)
23⅞"
(606 mm)
21⅝"
(550 mm)
23⅞"
(606 mm)
265/8"
(676 mm)
OVERLAY (TOP VIEW)
233/4"
(603 mm)
21⅝"
(550 mm)
231/8"*
(588.2 mm)
*DIMENSION INCLUDES 3/4" (19 MM) THICK CUSTOM DRAWER PANEL
7
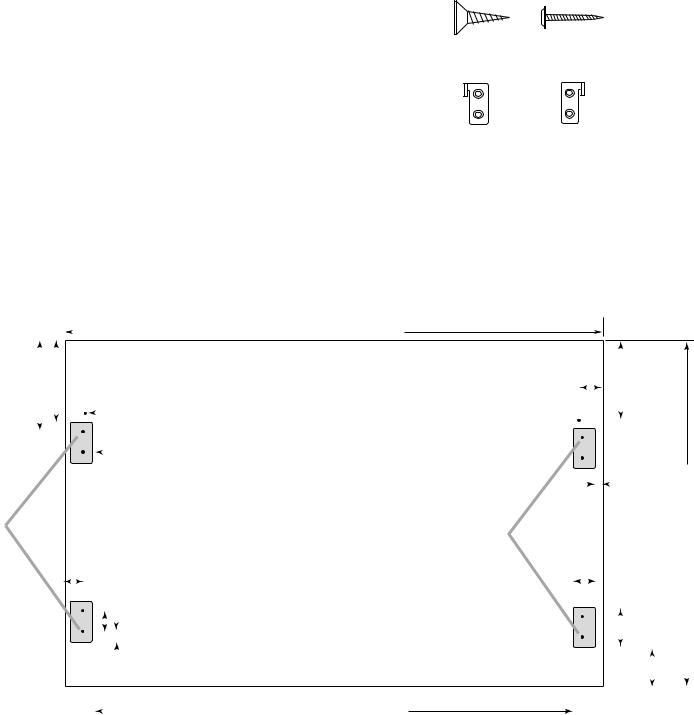
CUSTOM OVERLAY DRAWER PANELS
If you plan to install custom wood panels, you will need to create the panels yourself or consult a qualified cabinetmaker or carpenter. See dimension drawings for panel specifications.
IMPORTANT:
The thickness of the overlay panels must be 3/4" (19 mm).
To avoid damage to the drawers, each overlay panel must not weigh more than 10 lbs (4.5 kg).
Do not exceed the height dimension for the overlay panels. Panels that exceed the height dimension may damage the refrigerator drawers, cabinets or countertop.
The width of the overlay panels may vary according to the width of the cabinet opening.
For the installation of the customer panel, you will need the following parts:
16 screws (SS Flat M4x12 tapping 1)
4 Self-tap wood screws
4 Drawer overlay hook plate right (SPHC T=2.3)
4 Drawer overlay hook plate left (SPHC T=2.3)
A B
C |
D |
A. SS Flat M4x12 tapping screws |
C. Overlay hook plate right |
B. Self-tap wood screws |
D. Overlay hook plate left |
NOTE: Some or all parts may or may not be included. If your product does not include these parts, contact Assistance or Service or ask a specialist.
TOP AND BOTTOM OVERLAY DRAWER PANEL DIMENSIONS
|
|
|
|
|
|
|
|
|
|
|
|
|
|
|
|
|
|
|
|
|
|
|
|
|
|
|
|
|
|
|
|
|
|
|
|
|
|
|
|
|
|
|
|
|
|
|
|
|
|
|
|
233/4" (603 mm) |
|
|
|
|
|
|
|
|
mm)(95"33/4 |
|
|
|
|
|
|
|
|
|
|
|
|
|
||||||
|
|
|
|
|
|
|
|
|
|
|
|
|
|
|
|
|
|
|
||||||||
mm)(107"43/16 |
|
|
|
|
|
|
|
|
|
|
|
|
|
|
|
|
|
Top |
|
|||||||
|
|
|
|
|
|
|
|
|
|
|
|
|
|
|
|
|
||||||||||
|
|
|
|
|
|
|
|
|
|
|
|
|
|
|
|
|
|
|
|
|
|
|
|
|
|
|
|
|
|
|
|
|
|
|
|
|
|
|
|
|
|
|
|
|
|
|
|
|
|
1/8" (2.5 mm) Holes [Depth 3/8" (10 mm)] |
|
||
|
|
|
|
|
|
|
|
|
|
|
|
|
|
|
|
|
|
|
|
|
|
|
|
|||
|
|
|
|
|
|
|
|
|
|
|
|
|
|
|
|
|
|
|
|
|
|
|
1/8" (2.5 mm) Holes [Depth 3/8" (10 mm)] |
|
||
|
|
|
|
|
|
|
|
|
|
|
|
|
|
|
|
|
|
|
|
|
|
|
|
|||
|
|
|
|
|
|
|
|
|
|
|
|
|
|
|
|
|
|
|
|
|
|
|
|
|||
|
|
|
|
|
|
|
|
|
|
|
|
|
|
|
|
|
|
|
|
|
|
|
|
|||
|
|
|
|
|
|
|
|
|
|
|
|
|
|
|||||||||||||
A |
"15/16 |
|
|
|
|
|
|
|
|
|
|
|
|
|
|
Back Panel |
|
|||||||||
|
|
|
|
|
|
|
mm) 3.(23 |
|
|
|
|
|
|
|
|
|
|
|
|
|
|
|
||||
|
|
|
|
|
|
|
|
|
(20 "13/16 |
|
|
|
|
|
|
|
|
|||||||||
|
|
|
|
|
|
|
|
|
|
|||||||||||||||||
|
|
|
|
|
|
|
|
|
|
|
|
|
|
|
mm) |
|
||||||||||
|
|
|
|
|
|
|
|
|
|
|
|
|
|
|
|
|||||||||||
|
|
|
|
|
|
|
|
|
|
|
|
|
|
|
|
|
|
|
|
|
|
"7/16 |
|
|
|
|
|
|
|
|
|
|
|
|
|
|
|
|
|
|
|
|
|
|
|
|
|
|
|
|
|
||
|
|
|
|
|
|
|
|
|
|
|
|
|
|
|
|
|
|
|
|
|||||||
|
|
|
|
|
|
|
|
|
|
|
|
|
|
|
|
|
|
|
|
|
|
|||||
|
|
|
|
|
|
|
|
|
|
|
|
|
|
|
|
|
|
|
|
|
|
|
mm) (12 |
|
||
|
|
|
|
|
|
|
|
|
|
|
|
|
|
|
|
|
|
|
|
|
|
|
|
|||
|
|
|
|
|
|
|
|
|
|
|
|
|
|
|
|
|
|
|
|
|
|
|
|
|||
|
|
|
|
|
|
|
|
|
|
|
|
|
|
|
|
|
|
|
|
|
|
|
|
|||
|
|
|
|
|
|
|
|
|
|
|
|
|
|
|
|
|
|
|
|
|
|
|
|
|||
|
|
|
|
|
|
|
|
|
|
|
|
|
|
|
|
|
|
|
|
|
|
|
|
|
Bottom |
|
|
|
|
|
|
|
|
|
|
|
|
|
|
|
|
|
|
|
|
|
|
|
|
|
|
|
|
|
|
|
|
|
|
|
|
|
|
|
|
|
|
|
|
|
|
|
|
|
|
|
|
|
211/8" (536.4 mm) |
|
|
|
|
|
|
|
|
|
|
|
|
|
|
|
|
|
|
|
|
|
|
|
|
|
|
|
|
|
|
|
|
|
|
|
|
|
|
|
|
|
|
|
|
|
|
|
|
|
|
|
|
|
|
|
A.Router 1/8" (2.5 mm) deep.
1" |
|
|
|
"33/8 |
|||||
(26 mm) |
mm) (86 |
||||||||
|
|
|
|
|
|
|
|
||
|
|
|
|
|
|
|
|
||
|
|
|
|
|
|
|
|
||
|
|
|
|
|
|
|
|
|
|
|
|
|
|
|
|
|
|
|
|
|
|
|
|
|
|
|
|
|
|
|
|
|
|
|
|
|
|
|
|
|
|
|
|
|
|
|
|
|
|
|
|
|
|
|
|
|
|
|
|
|
|
|
|
|
|
|
|
|
|
|
|
|
|
|
|
|
|
|
|
|
|
|
|
|
|
|
|
|
|
|
|
|
|
|
|
|
|
|
|
|
|
mm) (9 |
"3/8 |
|
|
.(380 "15 |
|
|
|
|
|
|
|
|
|
|
|
|
|
|
|
|
|
||||
|
|
|
|
|
|
|
|
|
|
|
|
|
|
|||||
|
|
|
|
|
|
|
|
|
|
|
|
|
|
|
||||
A |
|
|
|
mm) 5 |
|
|||||||||||||
15/16" |
|
|
|
|
|
|
|
|
|
|
|
|||||||
(24.3 mm) |
|
|
|
|
|
|
||||||||||||
|
|
|
|
|
|
|||||||||||||
|
|
|
|
|
|
|
|
|
|
|
|
mm) (44 |
"13/4 |
|
|
|
|
|
|
|
|
|
|
|
|
|
|
|
|
|
|
|
|
|
|
||
|
|
|
|
|
|
|
|
|
|
|
|
|
|
|
|
|
||
|
|
|
|
|
|
|
|
|
|
|
|
|
||||||
|
|
|
|
|
|
|
|
|
|
|
|
|
|
|
|
|
||
|
|
|
|
|
|
|
|
|
|
|
|
|
|
|
|
|
||
|
|
|
|
|
|
|
|
|
|
|
|
|
|
|
|
|
||
|
|
|
|
|
|
|
|
|
|
|
|
|
|
|
|
|
|
|
|
|
|
|
|
|
|
|
|
|
|
|
|
|
|
|
|
|
|
|
|
|
|
|
|
|
|
|
|
|
|
|
|
|
|
|
|
|
|
|
|
|
|
|
|
|
|
|
|
|
|
|
|
|
|
|
|
|
|
|
|
|
|
|
|
|
|
|
|
|
|
|
|
|
|
|
|
|
|
|
|
|
|
|
|
|
|
|
|
|
|
|
|
|
|
|
|
|
|
|
|
|
|
|
|
|
|
|
|
|
|
|
|
|
8
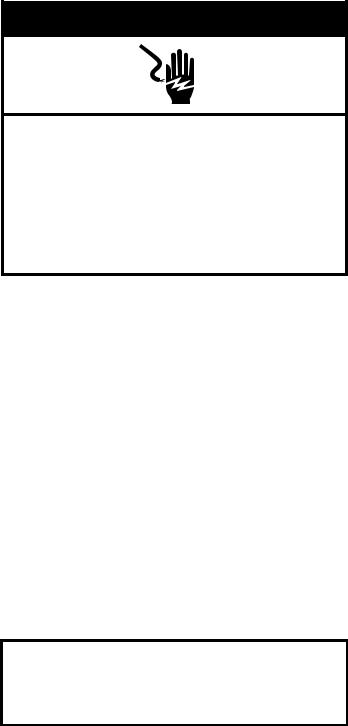
ELECTRICAL REQUIREMENTS
 WARNING
Electrical Shock Hazard Plug into a grounded 3 prong outlet. Do not remove ground prong.
Do not use an adapter.
Do not use an extension cord.
Failure to follow these instructions can result in death, fire, or electrical shock.
Before you move your refrigerator drawers into its final location, it is important to make sure you have the proper electrical connection.
RECOMMENDED GROUNDING METHOD
A 115 V, 60 Hz, AC only, 15 or 20 A fused, grounded electrical supply is required. It is recommended that a separate circuit serving only your refrigerator drawers be provided. Use an outlet that cannot be turned off by a switch. Do not use an extension cord.
NOTE: Before performing any type of installation, cleaning, or removing a light bulb, unplug refrigerator drawers or disconnect power.
WATER SUPPLY REQUIREMENTS (REFRIGERATOR/FREEZER DRAWERS ONLY)
Gather the required tools and parts before starting installation. Read and follow the instructions provided with any tools listed here.
IMPORTANT:
Connect to potable water supply.
Do not use with water that is microbiologically unsafe or of unknown quality without adequate disinfection before or after the system. Systems certified for cyst reduction may be used on disinfected waters that may contain filterable cysts.
If you turn ON the refrigerator drawers before the water line is connected, turn OFF the ice maker.
All installations must meet local plumbing code requirements.
Use copper tubing and check for leaks. Install copper tubing only in areas where the household temperatures will remain above freezing.
TOOLS NEEDED: Flat-blade screwdriver, 7/16" and 1/2" open-end wrenches or two adjustable wrenches, 1/4" nut driver and drill bit, cordless drill.
NOTE: Your refrigerator dealer has a kit available with a 1/4" (6 mm) saddle-type shutoff valve, a union, and copper tubing. Before purchasing, make sure a saddle-type valve complies with your local plumbing codes. Do not use
a piercing-type or 3/16" (4.76 mm) saddle valve which reduces water flow and clogs more easily.
WATER PRESSURE
A cold water supply with water pressure of between 30 and 120 psi (207 and 827 kPa) is required to operate ice maker. If you have questions about your water pressure, call a licensed, qualified plumber.
REVERSE OSMOSIS WATER SUPPLY
IMPORTANT: The pressure of the water supply coming out of a reverse osmosis system going to the water inlet valve of the refrigerator needs to be between 30 and 120 psi (207 and 827 kPa).
If a reverse osmosis water filtration system is connected to your cold water supply, the water pressure to the reverse osmosis system needs to be a minimum of 40 to 60 psi (276 to 414 kPa).
If the water pressure to the reverse osmosis system is less than 40 to 60 psi (276 to 414 kPa):
Check to see whether the sediment filter in the reverse osmosis system is blocked. Replace the filter if necessary.
Allow the storage tank on the reverse osmosis system to refill after heavy usage.
If you have questions about your water pressure, call a licensed, qualified plumber.
9
INSTALLATION INSTRUCTIONS
UNPACK THE REFRIGERATOR DRAWERS
 WARNING
Excessive Weight Hazard
Use two or more people to move and install refrigerator drawer(s).
Failure to do so can result in back or other injury.
REMOVE THE PACKAGING
Remove tape and glue residue from surfaces before turning on the refrigerator drawers. Rub a small amount of liquid dish soap over the glue residue with your fingers. Wipe with warm water and dry. Do not use sharp instruments, rubbing alcohol, flammable fluids, or abrasive cleaners to remove tape or glue.
These products can damage the surface of your refrigerator drawers. Properly dispose of packaging.
When Moving Your Refrigerator Drawers:
Your refrigerator drawers are heavy. When moving the appliance for service, be sure to cover the floor with cardboard or hardboard to avoid floor damage. Always pull the appliance straight out when moving it. Do not wiggle or “walk” the appliance when trying to move it, as floor damage could occur.
CLEAN BEFORE USING
After you remove all of the package materials, clean the inside of your refrigerator drawers before using them. See “Cleaning.”
CONNECT WATER SUPPLY (REFRIGERATOR/ FREEZER DRAWERS ONLY)
CONNECT TO WATER LINE
Do not use with water that is microbiologically unsafe or of unknown quality without adequate disinfection before or after the system. Systems certified for cyst reduction may be used on disinfected waters that may contain filterable cysts.
1.Unplug refrigerator drawers or disconnect power.
2.Turn OFF main water supply. Turn ON nearest faucet long enough to clear line of water.
3.Locate a 1/2" to 1¹⁄ " (12.5 mm to 31.8 mm) vertical cold water pipe near the refrigerator drawers.
IMPORTANT:
Make sure it is a cold water pipe.
Horizontal pipe will work, but drill on the top side of the pipe, not the bottom. This will help keep water away from the drill and normal sediment from collecting in the valve.
4.Determine the length of copper tubing you need. Measure from the connection on the lower left rear of refrigerator drawers to the water pipe. Add 7 ft
(2.1 m) to allow for cleaning. Use 1/4" (6 mm)
O.D. (outside diameter) copper tubing. Be sure both ends of copper tubing are cut square.
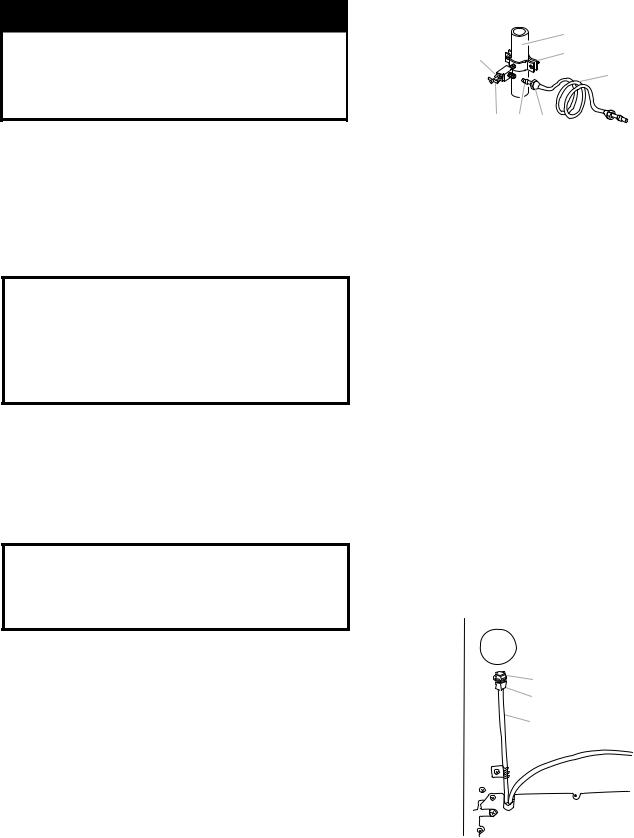
5.Using a cordless drill, drill a 1/4" hole in the cold water pipe you have selected.
|
|
A |
G |
|
B |
|
|
C |
F |
E |
D |
A. Cold water pipe |
|
E. Compression sleeve |
B. Pipe clamp |
|
F. Shutoff valve |
C. Copper tubing |
|
G. Packing nut |
D.Compression nut
6.Fasten the shutoff valve to the cold water pipe with the pipe clamp. Be sure the outlet end is solidly in the 1/4" drilled hole in the water pipe and that the washer is under the pipe clamp. Tighten the packing nut. Tighten the pipe clamp screws slowly and evenly so washer makes a watertight seal. Do not overtighten or you may crush the copper tubing.
7.Slip the compression sleeve and compression nut on the copper tubing as shown. Insert the end of the tubing into the outlet end squarely as far as it will go. Screw compression nut onto outlet end with adjustable wrench. Do not overtighten.
8.Place the free end of the tubing in a container or sink, and turn ON the main water supply. Flush the tubing until water is clear. Turn OFF the shutoff valve on the water pipe. Coil the copper tubing.
CONNECT TO REFRIGERATOR
1.Attach the copper tube to the valve inlet using a compression nut and sleeve as shown. Tighten the compression nut. Do not overtighten. Use the tube clamp on the back of the refrigerator drawers to secure the tubing to the refrigerator drawers. This will help avoid damage to the tubing when the refrigerator drawers are pushed back against the wall.
2.Turn ON shutoff valve.
3.Check for leaks. Tighten any connections (including connections at the valve) or nuts that leak.
A
B
C
A.Plug
B.Compression nut
C.Pex tubing
10
4.The ice maker is equipped with a built-in water strainer. If your water conditions require a second water strainer, install it in the 1/4" (6 mm) water line at either tube connection. Obtain a water strainer from your nearest appliance dealer.
5.Plug in refrigerator drawers or reconnect power.
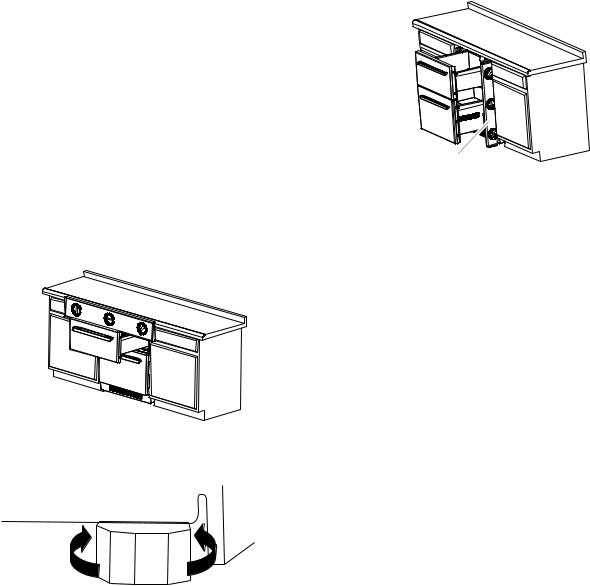
MOVE THE REFRIGERATOR DRAWERS TO FINAL LOCATION
1.Place top of cardboard carton or plywood under the appliance. Remove dolly.
2.Do not remove film or cover.
 WARNING
Electrical Shock Hazard Plug into a grounded 3 prong outlet. Do not remove ground prong.
Do not use an adapter.
Do not use an extension cord.
Failure to follow these instructions can result in death, fire, or electrical shock.
3.Plug into a grounded 3 prong outlet.
4.Move the refrigerator drawers straight back and evenly in front of the opening.
INSTALL CUSTOM OVERLAY PANEL
IMPORTANT:
For standard stainless steel models, skip these instructions and go to "LEVEL THE REFRIGERATOR DRAWERS" section.
Create a custom overlay panel according to the specifications in “Custom Overlay Drawer Panels.”
JennAir is not responsible for the removal or addition of molding or decorative panels that would not allow access to the refrigerator drawers for service.
ATTACH THE OVERLAY PANEL
NOTE: If the overlay hooks are not installed, see “Custom Overlay Drawer Panels” for overlay hook locations. The location of the hooks must be as precise as possible. If the custom panel is incorrectly placed, the panel may interfere with optimal use of the drawers.
1.Attach the custom handle of your preference on the overlay before attaching the overlay to the drawer of the refrigerator.
NOTE: Custom handles may vary in dimensions. Holes must be made on the panel according to the specific dimensions of your handle.
2.Attach the hooks to their corresponding recessions on the panel, using the SS Flat M4x12 screws. Two screws are needed per hook. The hooks must be on the outer edge of the panel.
3.Gently pull back the gasket from the top corners of the door until you can see the screw that is behind the gasket. There is one screw on each side. It is not necessary to remove the gasket.
4.Remove the screws behind the gasket (one per side).
5.Align the panel to the drawer and position the overlay panel 1/2" (12.5 mm) higher than the door. Position the overlay hooks with the pilot holes and push the hooks into the holes. The drawer has insulant foam in its interior so you may feel some interference while pushing. Push until the hooks go through the foam.
11
6.Push straight down on the overlay panel to secure the overlay hooks to the drawer.
7.Using the self-tap wood screws (two per drawer; one in each corner of the drawers), attach the panel to the drawer.
NOTE: Do not put the screws removed in step 4 back on the door.
8.Once the overlay is securely attached to the drawer with the two screws, put the gasket back in its place by pressing it against the door until the gasket is even and firmly secured.
3.Remove the level and close the top drawer. Check the gap between the top of the drawer and the countertop. If the gap measures less than 3/8" (9.5 mm) minimum, turn all four leveling bolts
equally to the left to raise the leveling legs (this will lower the appliance). Recheck the level.
4.Open both drawers less than midway. Place the level on the side flange beside the drawers as shown. Turn the front leveling bolts together in order to either raise or lower the appliance until the sides of the refrigerator drawers are plumb.
LEVEL THE REFRIGERATOR DRAWERS
IMPORTANT:
Overlay Model—Be sure to install the custom overlay drawer panels before leveling the refrigerator drawers. See “Install Custom Overlay Panel.”
Before installing the refrigerator drawers, be sure that the countertop is level.
If the countertop is not level, adjust the refrigerator drawers’ leveling legs until the appliance is square with the countertop. Be sure to maintain 3/8" (9.5 mm) minimum gap between the top of the drawer and the countertop.
1.Open the top drawer and place the level across the top drawer as shown. Check the level from left to right.
A 
A.Check the level from left to right.
2.Turn the leveling legs (front and back) until the top drawer measures level from left to right.
A
A.Check the level from front to back.
5.Remove the level and close the drawers. Recheck the gap between the top of the drawer and the countertop. If the gap measures less than 3/8"
(9.5 mm), turn all four leveling bolts equally to raise the leveling legs (this will lower the appliance). Recheck the level.
NOTE: Be sure to recheck the horizontal level of the top drawer.
6.Be sure all four levelers are on the floor and supporting the full weight of the refrigerator drawers.
COMPLETE INSTALLATION
1.Remove all boxes, parts packages and packing materials from the interior of the refrigerator drawers.
2.Remove the film.
3.Clean the refrigerator drawers before use. Refer "CARE AND CLEANING" section.
4.The controls are preset at the factory to the recommended settings. Be sure that the compressor is operating properly and that all the lights are working.
5.If construction will continue after the refrigerator drawers have been installed, turn OFF the power for both drawers.
To get the most efficient use from your new refrigerator drawers, read the “Refrigerator Drawers Use” section.
12
REFRIGERATOR DRAWERS USE
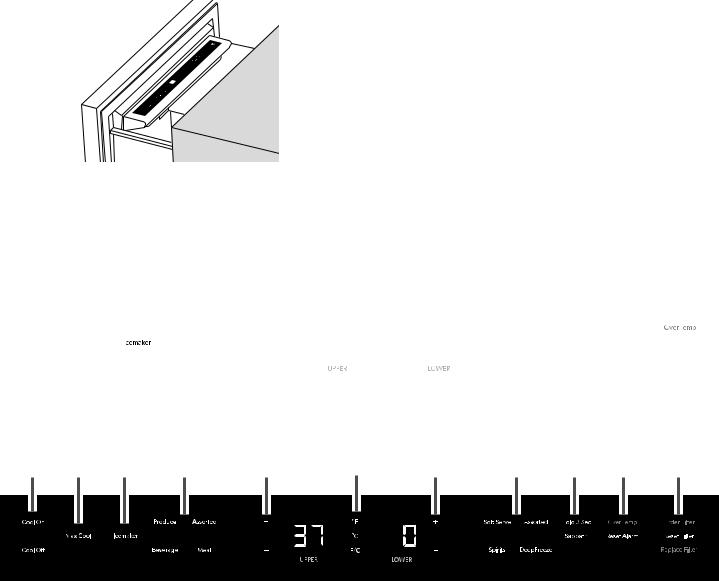
CONTROLS
The control panels for both double drawer models are located in the upper drawer. To view and set the Upper and Lower control panel, pull out the upper drawer.
IMPORTANT:
Wait 24 hours after you turn on the refrigerator drawers before you put food into the drawers. If you add food before the drawers have cooled completely, your food may spoil.
NOTE: Adjusting the controls to a lower (colder) setting in one or both drawers will not cool them any faster.
If the temperature is too warm or too cold in the drawers, first check the air vents to be sure they are not blocked before adjusting the controls.
The preset settings should be correct for normal household usage. The refrigerator control is set correctly when milk or juice is as cold as you like.
The freezer control is set correctly when ice cream is firm.
The actual temperature may differ from the display when a drawer is open for an extended period of time.
1 |
2 |
4 |
5 |
6 |
5 |
4 |
7 |
8 |
||||||||
|
|
|
|
|
|
|
|
|
|
|
|
|
|
|
|
|
|
|
|
|
|
|
|
|
|
|
|
|
|
|
|
|
|
|
|
|
|
|
|
|
|
|
|
|
|
|
|
|
|
|
|
|
|
|
|
|
|
|
|
|
|
|
|
|
|
|
|
Refrigerator drawer models
1 2 3 4 5 6 5 4 7 8 9
Refrigerator/freezer combo models
1.Turning Drawers On/Off
The first time that the drawers are plugged in, the control will be in Cool Off mode. Cool On and Cool Off will be the only options that display.
Press COOL ON for 3 seconds to turn on the drawers. All menus and recommended temperature settings will be displayed.
The left temperature and preset touch pads control the temperature of the upper compartment.
The right temperature and preset touch pads control the temperature of the lower compartment.
13
2. Max Cool
The Max Cool feature assists with periods of heavy usage, full grocery loads or temporarily warm room temperatures.
Max Cool will reset the temperature for the refrigerator drawer to 32°F (0°C) and -3°F (-19°C) for the freezer drawer for a 24-hour period.
Press MAX COOL to activate Max Cool feature.
NOTE: The temperature display will remain at -3°F (-19°C) and the indicator light will remain On for a 24-hour period unless any of the following happens:
User adjusts any of the compartment temperatures
Cool Off Mode is entered (activated by user)
Sabbath Mode is entered (activated by user)
After 24 hours, the temperature will automatically return to the previous temperature set point and the indicator light will turn Off.
NOTE: If the previous temperature set point was set to Soft Serve in the freezer drawer, the temperature will return to the recommended temperature (0°F/- 17°C) instead when Max Cool is complete.
3. Ice Maker and Water Filtration System
(Refrigerator/Freezer Drawers only)
Connect to potable water supply.
IMPORTANT: After connecting the refrigerator to a water source or replacing the water filter, fill and discard three full containers of ice to prepare the water filter for use before using ice.
TURNING THE ICE MAKER ON/OFF
IMPORTANT: Use the Ice maker touch pad on the control panel to turn on or off the Ice maker. Do not adjust the wire arm located on the ice maker.
Press the ICEMAKER touch pad to turn on the ice maker. The indicator will illuminate when On.
Press the ICEMAKER touch pad to turn off the ice maker.
REMEMBER:
Allow 24 hours to produce the first batch of ice.
The quality of your ice will only be as good as the quality of the water supplied to your ice maker.
Avoid connecting the ice maker to a softened water supply. Water softener chemicals (such as salt) can damage parts of the ice maker and
lead to poor quality ice. If a softened water supply cannot be avoided, make sure the water softener is operating properly and is well maintained.
Do not store anything in the ice storage bin.
4. Using Presets
For your convenience, each drawer also has controls that are preset to recommended storage temperatures for specific products.
Pressing any preset option will set the temperature to the recommended temperature for each category:
Refrigerator Drawers
Produce: 39°F (3°C)
Assorted: 37° (2°C)
Beverage: 34°F (1°C)
Meat: 32°F (0°C)
Freezer Drawer
Soft Serve: 6°F (-14°C)
NOTE: Soft Serve is a temporary temperature setting that will only last for 4 hours and returns to the previous temperature set point when complete.
Assorted: 0°F (-17°C)
Spirits: -2°F (-18°C)
Deep Freeze: -8°F (-22°C)
5.Adjusting the Temperatures
When the refrigerator drawers are turned On for the first time, a recommended temperature is set by default. The controls adjust the temperature of both compartments independently.
To adjust set point temperatures, press “+” (plus) or “-” (minus) until the desired temperature setting is reached.
Model JUDFP242*
NOTE: The set point for the double refrigerator drawers model is 37°F(2°C). The set point range for this model is 32°F to 42°F (0°C to 5°C) for both compartments.
Model JUCFP242*
NOTE: The set point for the refrigerator/freezer drawers model is 37°F (2°C) for the refrigerator drawer and 0°F (-17°C) for the freezer drawer. The set point range for the refrigerator/freezer drawers model is 32°F to 42°F (0°C to 5°C) for the refrigerator drawer and -8°F to 6°F (-22°C to -14°C) for the freezer drawer.
NOTE: Wait at least 24 hours between adjustments for the product to acclimate.
6. Viewing Celsius/Fahrenheit Temperatures
Press the F/C touch pad to toggle between displaying the temperature in degrees Fahrenheit and degrees Celsius. The corresponding indicator will illuminate.
14
 Loading...