


Jenn-Air JSM900DAAP, JSM900DAAS, JSM900EAAB, JSM900EAAS, JSM900EAAU Owner's Manual
...J E N N - A I R ™ M I X E R
M O D E L NO. J S M 9 0 0
U S E R G U I D E
Part No. 606-009000 |
4/05 |
J E N N - A I R ™
M I X E R
C O N G R AT U L AT I O N S on your purchase of a Jenn-Air™ mixer. Inspired by classic Italian design, Jenn-Air captures the European appetite for life – combining art, form and function into beautiful appliances for your home.
Your sleekly styled, gracefully curved Jenn-Air mixer – offering a selection of innovative features designed for ease of use and versatility – makes food preparation and presentation a joy.
The innovative touch wheel puts speed selection, pause mode and start/stop right at your fingertips.The Jenn-Air mixer’s powerful high-efficiency 400-watt motor and drive system work in combination with the precision planetary mixing action to handle a wide range of mixing needs.The designer bowl features ergonomic dual handles and a convenient pouring spout. And the solid, all-metal, die-cast construction makes the mixer as rugged as it is beautiful ... too beautiful to put away.
The Jenn-Air mixer is just one of the unique offerings in our expanding line of small appliances for your home. And of course, a beautiful addition to our broad line of fine kitchen major appliances. Jenn-Air. For the love of cooking™.
1
Proof of Purchase
and Product Registration
Always keep the sales receipt showing the date of purchase of your mixer.
Please return the product registration card packaged with this unit or visit www.jennair.com to register online. Returning this card will allow us to contact you in the unlikely event of a product safety recall notification and assist us in complying with the provisions of the Product Safety Recall Act.
Please complete the following for your personal records:
Model Number |
________________________________________________ |
Serial Number |
________________________________________________ |
Date Purchased |
________________________________________________ |
Store Name |
________________________________________________ |
Table of Contents
Safety Instructions . . . . . . . . . . . . . . . . . . . . . . . . . . . . . . . . . . . . . . . . . . 3-4 Parts and Features . . . . . . . . . . . . . . . . . . . . . . . . . . . . . . . . . . . . . . . . . . . 5-6 AssemblingYour Mixer . . . . . . . . . . . . . . . . . . . . . . . . . . . . . . . . . . . . . . . 7-8 OperatingYour Mixer . . . . . . . . . . . . . . . . . . . . . . . . . . . . . . . . . . . . . . . . . . 9 Speed Control Guide . . . . . . . . . . . . . . . . . . . . . . . . . . . . . . . . . . . . . . . . . 10 Care and Cleaning . . . . . . . . . . . . . . . . . . . . . . . . . . . . . . . . . . . . . . . . . . . 11 BeforeYou Call for Service . . . . . . . . . . . . . . . . . . . . . . . . . . . . . . . . . . . . . 12 Recipes . . . . . . . . . . . . . . . . . . . . . . . . . . . . . . . . . . . . . . . . . . . . . . . . 13-16 Warranty/Customer Service . . . . . . . . . . . . . . . . . . . . . . . . . . . . . . . . . . 17-18 Guide de L’utilisateur . . . . . . . . . . . . . . . . . . . . . . . . . . . . . . . . . . . . . . . . . 20 Guía del Usuario . . . . . . . . . . . . . . . . . . . . . . . . . . . . . . . . . . . . . . . . . . . . 37
2

What You Need to Know
About Safety Instructions
Warning and important safety instructions appearing in this manual are not meant to cover all possible conditions and situations that may occur. Common sense, caution and care must be exercised when installing, maintaining or operating appliance.
Always contact your dealer, distributor, service agent or manufacturer about problems or conditions you do not understand.
Recognize Safety Symbols,Words, Labels
 WARNING
WARNING – Hazards or unsafe practices which COULD result in severe personal injury or death.
 CAUTION
CAUTION – Hazards or unsafe practices which COULD result in minor personal injury.
Important Safeguards
 WARNING
When using electrical appliances, basic safety precautions should always be observed, including the following:
1.Read all instructions.
2.To protect against risk of electrical shock, do not put the cord, plug or mixer in water or other liquid.
3.Close supervision is necessary when any appliance is used by or near children.
4.Unplug mixer from outlet when not in use, before putting on or taking off parts and before cleaning.
5.Remove beaters and other attachments from mixer before cleaning.
6.Avoid contacting moving parts.
7.Keep hands, hair, clothing, as well as spatulas and other utensils away from beaters during operation to reduce the risk of injury to persons and/or damage to the mixer.
3

8.Do not operate mixer unattended or near the edge of a work surface.When used for heavy loads or at high speeds, mixer may move on a work surface.
9.Do not operate mixer with a damaged cord or plug, or after the mixer malfunctions, or is dropped or damaged in any manner. Return appliance to the nearest authorized service facility for examination, repair, electrical or mechanical adjustment. Call the Jenn-Air Customer Service Center at 1-866-982-3313 for assistance.
10.Using attachments not recommended or sold by the appliance manufacturer for use with this model is not recommended and may cause fire, electric shock or injury.
11.Do not use the mixer outdoors.
12.Do not let the cord hang over the edge of a table or counter. Do not let cord contact hot surfaces, including stove.
13.Do not place on or near a hot gas or electric burner, or in a heated oven.
14.Do not use an extension cord with this mixer.
 WARNING
Electrical Grounding Instructions – This appliance is equipped with a (3-prong) grounding plug for your protection against shock hazard and it should be plugged directly into a properly grounded, 110V/120V AC
receptacle only. Do not cut or remove the grounding prong from this plug.
SAVE THESE INSTRUCTIONS FOR FUTURE REFERENCE.
If the plug fails to fit into an existing outlet, contact a qualified electrician to update the outlet.
This product is designed for household use only. Do not use mixer for other than intended purpose.
SAVE THESE INSTRUCTIONS FOR FUTURE REFERENCE.
4

1
2
3
5
7
8 |
4 |
|
9
6
5
Parts and Features
1.Touch wheel control
The innovative touch wheel puts speed selection, pause mode and start/stop control right at your fingertips.
2.Mixer head
3.Mixer head release button
Simply press the button while holding the mixer head with your hand. Raise or lower the mixer head, by carefully guiding it with your hands.The mixer head will snap into the raised or lowered positions.
4.Power base
The mixer has a powerful 400-watt motor to handle a variety of mixing needs.
5.Attachment post
Mixer attachments slide on here and are turned slightly to lock into place.
6.Attachments
The mixer attachments include a wire whip, a flat beater and a dough hook.
•The wire whip is best for light mixtures that need air incorporated such as eggs and whipping cream.
•The flat beater works well for normal to heavy mixtures such as cake batter, cookie dough, and mashed potatoes.
•The dough hook is for mixing and kneading yeast dough for bread, rolls, etc.
7.Mixing bowl
The mixer includes a mixing bowl with dual handles.
8.Detachable power cord
The detachable power cord is interchangeable with other Jenn-Air™ small appliances.
9.Bowl locking plate
The bowl is placed on this plate and turned slightly to lock into place for mixing.
6
Assembling Your Mixer
NOTE: Before first use, wash bowl and attachments in hot, soapy water. Rinse and dry.The bowl and attachments are also dishwasher safe.
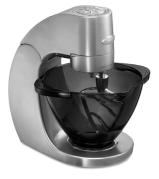
To attach the bowl
1.Make sure the touch wheel control is set to “OFF” and the power cord is unplugged.
2.Press the mixer head release button and lift the
mixer head up until it locks into place.
3. Place bowl on the bowl locking plate and turn clockwise until the bowl locks into place.
4.Attach the dough hook, flat beater or wire whip to the mixer attachment post (see page 8).
5. Lower the mixer head by pressing the mixer head release button and guiding the mixer head down carefully with your hands.
6.Plug power cord into a grounded 3-prong electrical outlet.The mixer is now ready to use.
 WARNING
Electrical Shock Hazard – Plug into grounded outlet. Do not remove ground prong. Do not use an adapter. Do not use an extension cord. Failure to follow these instructions can result in death, fire or electrical shock.
To remove the bowl
1.Make sure that the touch wheel control is set to “OFF” and the power cord is unplugged.
2.Press the mixer head release button and lift the mixer head up until it locks into place.
3.Turn the bowl counterclockwise to unlock and remove.
7
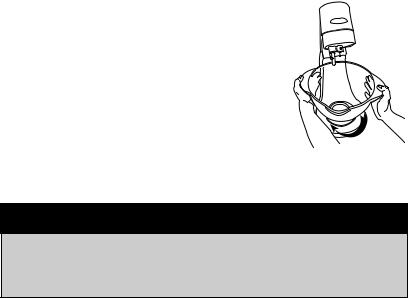
To attach the wire whip, flat beater or dough hook
 WARNING
Injury Hazard – Unplug mixer before inserting or removing attachments. Failure to do so may result in broken bones or cuts.
1. Make sure that the touch wheel control is set to “OFF” and the mixer is unplugged.
2. Press the mixer head release button and lift the mixer head up until it locks into place.
3. Insert desired attachment onto attachment post and press upward as far as possible.
4.Turn the attachment clockwise, hooking the attachment to the post.
5.Be sure the bowl is attached to the mixer before operating (see page 7).
6.Lower the mixer head by pressing the mixer head release
button and guiding the mixer head down carefully with your hands.
7.Plug power cord into a grounded 3-prong electrical outlet.
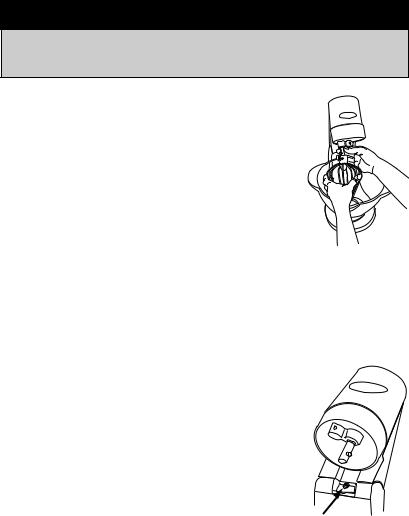
8.Your mixer is adjusted at the factory so that the flat beater just clears the bottom of the bowl. Should the flat beater strike the bottom of the bowl or is too far away from the bowl, clearance can be corrected as follows:
•Lift mixer head.
•Turn the mixer head adjustment screw counterclock-
wise to raise the head and clockwise to lower the head.
• Make this adjustment using the flat beater until it just clears the bottom of the bowl.
Adjustment Screw
8

Operating Your Mixer
1.Make sure the touch wheel control is SET TO “OFF” and the mixer is unplugged.
2.Press the mixer head release button and LIFT MIXER HEAD UP.
3. INSERT AN ATTACHMENT.
4. LOCK BOWL onto the bowl locking plate.
5. LOWER THE MIXER HEAD by pressing the mixer head release button and guiding the mixer head down carefully with your hands.
6. PLUG POWER CORD into 3-prong electrical outlet.
7.TURN TOUCH WHEEL CONTROL until desired setting is illuminated.
8.PRESS “START/STOP” BUTTON in center of wheel.The mixer will start gradually, to avoid spattering, and build up to the selected speed.
9.To PAUSE, press the “start/stop” button again.The mixer will stop.To restart at the same speed setting, simply press “start/stop” again.The mixer will resume, ramping up to the selected speed.
10.To CHANGE THE SPEED, simply turn the touch wheel control until the desired setting is illuminated.
11.To TURN MIXER OFF, turn the touch wheel control to “OFF.” Unplug the power cord from the electrical outlet.
12.REMOVE ATTACHMENTS by pressing them up as far as possible, then turn counterclockwise to release. Pull from the attachment post.
 WARNING
To avoid risk of injury, be sure to press “stop” before scraping the sides of the bowl. The bowl is designed to mix effectively and require minimal scraping. Never attempt to scrape the sides of the bowl while the mixer is operating.
9
Speed Control Guide
The following speed control guide provides suggested settings for your mixer. If in doubt, always start on a lower setting and work your way up.
NOTE: When working with ingredients that spatter easily, start on a lower speed and then proceed to the recommended setting.
FOOD |
ATTACHMENT |
SETTING |
Cakes |
flat beater |
3-5 |
|
|
|
Cookie dough |
flat beater |
3-5 |
|
|
|
Mashed potatoes |
flat beater |
4-6 |
|
|
|
Frosting |
flat beater |
6-7 |
|
|
|
Egg whites |
wire whip |
8-10 |
|
|
|
Whipped cream |
wire whip |
8-10 |
|
|
|
Bread/rolls |
dough hook |
1-2 |
|
|
|
Tips
Before adding ingredients to the mixer bowl, press the “start/stop” button and the mixer will pause.To resume at the same speed, press the “start/stop” button again.
When adding flour to recipes, mix at a low speed until incorporated.
Mixtures with large quantities of liquid should be mixed at lower speeds to avoid spattering.
Be sure to watch liquids closely while whipping, since the powerful 400-watt motor beats quickly.
10

Care and Cleaning
 WARNING
Injury Hazard – Unplug mixer before cleaning. Failure to do so can result in broken bones or cuts.
1.Turn the touch wheel control to the “OFF” position and unplug the power cord.
2.Press the mixer head release button and lift the mixer head up.
3.Remove attachments by pressing them up as far as possible, then turn counterclockwise to release. Pull from the attachment post.
4.The bowl and attachments can be washed in warm, soapy water or in a dishwasher. Attachments are top rack dishwasher safe.
5.Wipe down the mixer head and power base with a damp cloth. DO NOT immerse the mixer in water. Do not use an abrasive cleaning pad on the mixer base.
6.DO NOT use household cleaners that contain bleach or pine cleaners. Do not use any type of solvent-based cleaner or metal polish on the mixer base. Do not spray cleaners directly on the mixer. Cleaners should be applied to a clean cloth before using on the mixer. If these cleaning products DO come in contact with the mixer, immediately clean with a water-dampened cloth and wipe dry.
Mixing Bowls
•Neither glass nor stainless steel mixing bowls are designed for use in the oven.
•Stainless steel mixing bowls are not suitable for use in microwave ovens. Glass bowls are microwave safe, however, they should be cooled to room temperature before use in the stand mixer.
•Both glass and stainless steel bowls may be used in the refrigerator or freezer. Chilled glass bowls should be allowed to warm to room temperature before use in the stand mixer.
•For best results, hand wash the mixing bowl. Both glass and stainless steel bowls may be cleaned in the dishwasher.
11
Before You Call for Service
PROBLEM |
POSSIBLE SOLUTION |
The mixer will |
• Check the power cord to make sure it is securely fas- |
not start. |
tened into the mixer and into the electrical outlet. |
|
• Make sure the mixer head has been lowered and |
|
locked into place. |
|
• Be sure you’ve turned the touch wheel control to one |
|
of the 10 power settings. |
|
• Press the start button in the center of the touch wheel |
|
control. |
|
|
The mixer bowl |
• Make sure the bowl is securely locked into place on |
wobbles back and |
the bowl locking plate before operating the mixer.The |
forth when mixing. |
bowl should be level and will lock into place with a |
|
slight turn. |
|
• Make sure that the beater attachment is not contacting |
|
the bowl. If necessary, adjust the mixer head height |
|
with the adjustment screw until the beater clears the |
|
bottom of the bowl. See page 8. |
|
|
The mixer is |
• The bowl may be overloaded. |
spattering ingredients |
• The speed may be turned up too high.The 400-watt |
outside the mixer |
motor on your mixer is powerful.Try a lower speed. |
bowl. |
|
|
|
The mixer motor |
• The mixing bowl may be overloaded with a heavy mix- |
seems to be bogging |
ture. If so, divide into smaller portions and resume |
down. |
mixing. |
|
|
The mixer shuts down |
• The mixer has been programmed to protect itself from |
while mixing. |
damage while mixing heavy loads. Divide the load into |
|
smaller portions. Restart the mixer. |
12
Recipes
Tuscan Flatbread (focaccia)
This deliciously simple focaccia recipe can be served alongside soups and stews or sliced and used to make toasted panini sandwiches. For a sweet variation, try topping with slivers of red grapes and sprinkling with sugar.
21⁄2 - 3 cups flour
1 package (1⁄4 ounce) rapid rise yeast
1 tablespoon sugar 3⁄4 teaspoon salt 1 cup water
1⁄4 cup olive oil, divided
Combine 21⁄4 cups of flour, yeast, sugar and salt. Set aside. Heat water and 2 tablespoons oil until 120-130° F (approximately 1-11⁄2 minutes in the microwave). Using dough hook attachment on setting #1, mix dry ingredients into water and oil mixture. Gradually add remaining flour until soft dough forms. Continue kneading with dough hook until dough is smooth and elastic, about 3-5 minutes. Cover and let rise for 10-15 minutes.
Divide dough in half, place each on greased cookie sheets and press into two 8" circles. Cover loosely with plastic and let stand 15 minutes. Press fingertips into dough, creating indentations. Brush with remaining 2 tablespoons of oil. Sprinkle with choice of toppings.
Optional toppings: 2 tablespoons of chopped fresh rosemary + 2 tablespoons grated Parmesan cheese OR 1⁄4 pound coarsely chopped fresh red grapes + 2 teaspoons sugar.
Bake at 425° F (Convect Bake 400° F) for 15-17 minutes or until crust is golden brown. Cut into wedges. Serve hot.
Makes two round loaves.
NOTE: One tablespoon of fresh herbs equals 1 teaspoon dried in most recipes.
13
Lemon-Pistachio Biscotti
This twice-baked Italian cookie is a perfect accompaniment to your favorite cup of coffee. It also makes a wonderful gift, tucked in a gift bag along with some gourmet coffee beans.
3⁄4 cup (3 ounces) unsalted pistachio nuts 1⁄2 cup butter (1 stick)
11⁄2 cups sugar 3 eggs
1 tablespoon finely grated lemon peel
1 teaspoon vanilla
3 cups flour
1⁄2 teaspoon salt
1 tablespoon baking powder
1 cup powdered sugar
2 tablespoons lemon juice
Lightly butter a large cookie sheet. Set aside. In large bowl, use flat beater attachment to beat together butter and sugar. Gradually work up to setting #5. Add eggs, lemon peel and vanilla, and resume beating on setting #2 until combined. In medium bowl, stir together flour, salt and baking powder. Gradually add flour mixture to egg mixture using setting #1 and then mix well on setting #4. Stir in pistachios. Turn onto floured surface and divide dough into two pieces. Shape each piece into a tube that is approximately 12" long. Place rolls on cookie sheet, leaving space between rolls. Flatten tops of rolls slightly so they are about 21⁄2" wide.
Bake at 350° F (Convect Bake 325° F) for 25-30 minutes or until lightly browned and firm to the touch. Cool for 10 minutes. Reduce oven temperature to 325° F (Convect Bake 300° F).
Carefully transfer the rolls to a cutting board and slice each one diagonally into cookies about 1⁄2" thick. Place wire cooling racks on each of three cookie sheets. Lay biscotti, cut side down, on wire racks (approximately 12 cookies per sheet).* Return them to the oven for 10-15 minutes or until biscotti are firm and crisp. Cool.
Beat together powdered sugar and lemon juice on setting #6 until smooth. Drizzle over biscotti and serve.
*If cooling racks are not available, add 5 minutes to the baking time and simply turn biscotti halfway through.
Makes 36 biscotti.
14
Artisan Dill Loaves
The “herb decoupage” technique detailed in this recipe creates beautiful, showy loaves. It may be used with many different herbs on any shape, size or recipe of bread dough as well.
1 tablespoon active dry yeast
2 teaspoons sugar
1⁄4 cup warm water (110-115° F)
1 cup low-fat cottage cheese, room temperature 1⁄2 cup finely chopped red onion
2 tablespoons chopped fresh dill
2 teaspoons dried dill seed
1 egg, lightly beaten
1 teaspoon salt
2-21⁄2 cups all-purpose flour
egg wash: 1 egg + 1 tablespoon water, beaten large sprigs of fresh dill, whole
In a large mixing bowl, dissolve the yeast and sugar in warm water. Let stand until foamy. Using the dough hook attachment on setting #1, mix in cottage cheese, onion, fresh dill, dill seed, 1 egg, salt and 2 cups of flour. Gradually mix in another 1⁄4-1⁄2 cup flour or until a soft dough forms. Continue mixing for approximately 3-5 minutes or until the dough is pliable and elastic. Place dough in an oiled bowl, cover with plastic wrap and allow to rise until double in bulk, about 11⁄2 hours.
Divide dough into 2 pieces. Shape each piece into a smooth round. Place each round onto a large, oiled baking sheet. Brush heavily with egg wash. Gently apply whole dill sprigs to the tops of the loaves (they will stick to the egg glaze). Brush egg wash over the dill sprigs again, making sure that the dill sprigs are adhering to the loaves. Allow loaves to rise for an additional 30-45 minutes.
Bake loaves at 375° F (Convect Bake 350° F) for 25-27 minutes, or until a thermometer inserted into the center reads 190° F. Cool slightly before slicing.
Serves 12 per loaf.
15
Italian Cream Cake
This delicious three-layer cake is perfect for entertaining guests.
It makes an impressive ending to any Italian meal.
5 egg whites 1⁄2 cup butter
1⁄2 cup shortening 2 cups sugar
5 egg yolks
1 teaspoon baking soda
2 cups flour
1 cup sour milk (1 cup milk + 1 teaspoon vinegar) 1 teaspoon almond extract
1⁄2 cup flaked coconut
1 cup chopped toasted almonds, divided
Frosting
1 package (8 ounces) cream cheese, softened 1⁄4 cup butter, softened
1 box (1 pound) confectioners’ sugar
1 teaspoon almond extract
Using wire whip attachment, beat egg whites on setting #10 until stiff peaks form (approximately 1 minute). Set egg whites aside.
Using the flat beater attachment, cream butter, shortening and sugar. Gradually work up to setting #5. Add egg yolks and resume on setting #2. Beat well on setting #4. Combine soda and flour and add to creamed mixture alternately with milk using setting #1. Add almond extract. Add coconut and 3⁄4 cup nuts.
Fold in egg whites. Pour into 3 greased and floured 8" round cake pans;* bake at 350° (Convect Bake 325° F) for 25-30 minutes or until toothpick inserted in cake comes out clean.
Frosting: Using flat beater, beat cream cheese and butter on setting #5 until smooth; gradually mix in sugar on setting #1. Add almond extract and beat on setting #6 until smooth. Spread on cake layers; sprinkle top with remaining chopped nuts.
*May substitute two 9" round cake pans. Increase baking time by 3-5 minutes, if needed.
Serves 12-15.
16
 Loading...