


Jenn-Air JMW2430DS00, JMW2430DP01, JMW2430DP00, JMW2430DB01, JMW2430DB00 Owner’s Manual
...User Guide
Built-In Electric Single
and Double Ovens
THANK YOU for purchasing this high-quality product. Register your built-in oven at www.jennair.com. In Canada, register your built-in oven at www.jennair.ca.
For future reference, please make a note of your product model and serial numbers. These can be located on the right-hand side underneath the control panel.
Model Number_______________________________________ |
Serial Number________________________________________ |
Para una versión de estas instrucciones en español, visite www.jennair.com.
Deberá tener a mano el número de modelo y de serie. Pueden encontrarse del lado derecho debajo del panel de control.
Table of Contents |
|
BUILT-IN OVEN SAFETY.......................................................... |
2 |
PARTS AND FEATURES .......................................................... |
3 |
FEATURE GUIDE ..................................................................... |
4 |
Touch Panel.......................................................................... |
5 |
Display ................................................................................. |
5 |
Display Navigation ............................................................... |
5 |
Menu Demonstrations .......................................................... |
5 |
Kitchen Timer ....................................................................... |
7 |
Tones/Sounds ...................................................................... |
7 |
Tools ..................................................................................... |
7 |
Button Lock ......................................................................... |
8 |
Oven Temperature Control ................................................... |
8 |
Sabbath Mode...................................................................... |
8 |
OVEN USE ............................................................................... |
9 |
Aluminum Foil....................................................................... |
9 |
Position Racks and Bakeware............................................ |
10 |
Roll-Out Extension Rack .................................................... |
10 |
Bakeware ............................................................................ |
11 |
Oven Vents........................................................................... |
12 |
Preheating and Oven Temperature..................................... |
12 |
Baking and Roasting........................................................... |
12 |
Broiling................................................................................ |
12 |
Convection.......................................................................... |
13 |
Convection Bake................................................................. |
13 |
Convection Roast............................................................... |
13 |
Convection Broil.................................................................. |
13 |
Proofing Bread.................................................................... |
13 |
Temperature Probe.............................................................. |
14 |
Timed Cooking.................................................................... |
14 |
OVEN CARE .......................................................................... |
15 |
Self-Cleaning Cycle ............................................................ |
15 |
General Cleaning................................................................. |
15 |
Oven Lights......................................................................... |
16 |
Oven Door .......................................................................... |
16 |
TROUBLESHOOTING ........................................................... |
17 |
ACCESSORIES ..................................................................... |
18 |
WARRANTY .......................................................................... |
19 |
W10754335D

Built-In Oven Safety
Your safety and the safety of others are very important.
many important safety messages in this manual and on your appliance. Always read and obey all safety
safety alert symbol.
alerts you to potential hazards that can kill or hurt you and others.
messages will follow the safety alert symbol and either the word “DANGER” or “WARNING.” mean:
 DANGER
  WARNING
You can be killed or seriously injured if you don't immediately follow instructions.
You can be killed or seriously injured if you don't follow instructions.
All safety messages will tell you what the potential hazard is, tell you how to reduce the chance of injury, and tell you what can happen if the instructions are not followed.
IMPORTANT SAFETY INSTRUCTIONS


 SAVE THESE INSTRUCTIONS
State of California Proposition 65 Warnings:
WARNING: This product contains one or more chemicals known to the State of California to cause cancer.
WARNING: This product contains one or more chemicals known to the State of California to cause birth defects or other reproductive harm.
2
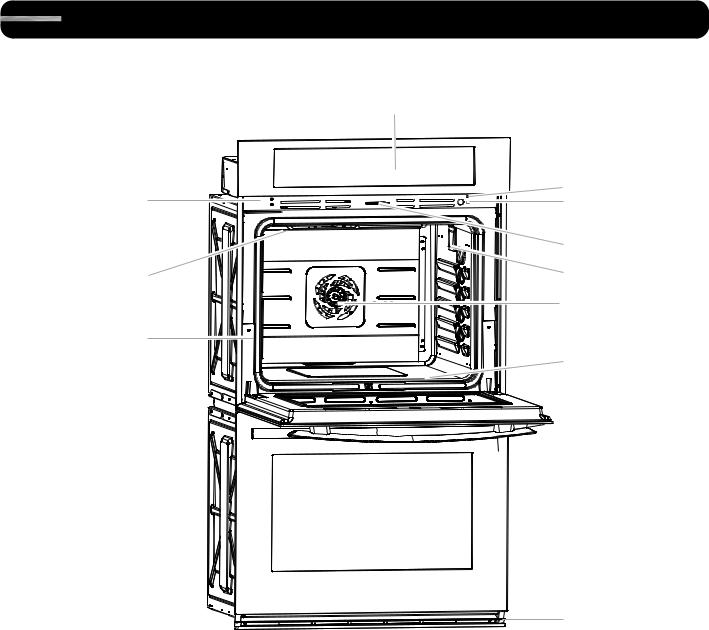
Parts and Features
This manual covers several models. Your model may have some or all of the items listed. Refer to this manual or the Frequently Asked Questions (FAQs) section of our website at www.jennair.com for more detailed instructions. In Canada, refer to the Customer Service Section at www.jennair.ca.
A
B |
L |
K |
|
|
J |
C |
I |
|
H |
D |
|
|
G |
 F
F
|
|
E |
A. Electronic oven control |
H. Convection element and fan |
Parts and Features not shown |
B. Oven vent |
I. Oven lights (left side, not shown) |
Temperature probe jack |
C. Broil elements |
J. Oven door lock latch |
Temperature probe |
D. Gasket |
K. Oven light switch |
Racks |
E. Bottom vent |
L. Model and serial number plate |
|
F. Lower oven (on double oven models) |
(on right-hand side underneath |
|
G. Hidden bake element |
the control panel) |
|
3

Feature Guide
This manual covers several models. Your model may have some or all of the items listed. Refer to this manual or the Frequently Asked Questions (FAQs) section of our website at www.jennair.com for more detailed instructions. In Canada, refer to the Customer Service Section at www.jennair.ca.
Single Oven:
A B C D E F G H
A. Power |
E. Self clean |
B. Kitchen timer |
F. Oven light |
C. Tools |
G. Oven cancel |
D. Display |
H. Start |
Double Oven:
A B C D E F G H I
A. Power |
F. Lower oven |
B. Upper cancel |
G. Lower light |
C. Upper light |
H. Lower cancel |
D. Upper oven |
I. Clean |
E. Display |
|
KEYPAD |
FEATURE |
INSTRUCTIONS |
|
|
|
POWER |
Power |
Touch the Power keypad to turn the oven display on and off. |
OVEN LIGHT |
Oven cavity light |
The desired oven light is controlled by a touch keypad on the oven control |
UPPER LIGHT |
|
panel. While the oven door is closed, touch the desired Oven Light to turn |
LOWER LIGHT |
|
the oven lights on and off. When the oven door is opened, the oven lights will |
|
|
automatically come on for the corresponding oven. |
KITCHEN TIMER |
Timer |
The Kitchen Timer can be set in hours, minutes, or seconds up to 23 hours, |
(on some models) |
|
59 minutes, and 59 seconds. |
|
|
The Kitchen Timer does not start or stop the oven(s). |
OVEN CANCEL |
Oven function |
The Lower Cancel, Upper Cancel, and Cancel stop their respective oven |
UPPER CANCEL |
|
functions except for the Clock, Kitchen Timer, and Button Lock. The oven |
LOWER CANCEL |
|
cooling fan(s) may continue to operate even after an oven function has been |
(on some models) |
|
canceled or completed, depending on the oven temperature. |
START |
Mode Start |
Start begins some oven functions. If Start is not touched within 2 minutes after |
(on some models) |
|
touching a keypad, the function is canceled, and the time of day is displayed. |
|
|
|
4

KEYPAD |
FEATURE |
INSTRUCTIONS |
|
|
|
CLEAN |
Self-clean cycle |
See the “Self-Clean Cycle” section. |
SELF CLEAN |
|
|
(on some models) |
|
|
|
|
|
TOOLS |
Oven use function |
The Tools keypad enables you to personalize the oven operation to suit |
(on some models) |
|
your needs. See the “Tools” section. |
|
|
|
UPPER OVEN |
Oven selection |
The Upper and Lower Oven keypads enable you to select which oven |
LOWER OVEN |
|
you want to use. |
(on some models) |
|
|
|
|
|
Touch Panel
The touch panel houses the control menu and function controls. The touch pads are very sensitive and require only a light touch to activate.
For more information about the individual controls, see their respective sections in this manual.
Welcome Guide
This appears on your display the first time the oven is powered up. The Welcome Guide allows you to set up your new oven.
After every selection, a tone will sound.
1.Select your language.
2.Select the clock by scrolling to the correct time in the hours and minutes column. You can then select AM/PM or 24-hour clock (military time).
3.Choose to have daylight savings time Auto Sync (turn on), or Do Not Adjust (turn off).
4.Enter current date (MM/DD/YYYY) by scrolling to the column to set the Month, Day, and Year. Touch SAVE.
5.Select the units of temperature. You can choose Fahrenheit or Celsius. Touch SAVE.
6.Select the Clock Theme by scrolling to the desired setting. Touch SAVE.
NOTE: This is the background for the center touch display.
Display
The display is for both the menu and oven function controls. The touchpanel allows you to scroll through the oven menus. The display is very sensitive and requires only a light touch to activate and control.
When an oven is in use, the display will show the clock, mode, oven temperature, kitchen timer, and oven timer, if set. If the oven timer is not set, you can set it from this screen.
After approximately 2 minutes of inactivity, the display will go into sleep mode and the display will dim. When the oven is in operation, the display will remain bright.
During use, the display will show menus and the appropriate selections for the options being chosen.
Display Navigation
If the oven is off, touch the Power keypad to activate the menu. From the home screen, all automatic cooking programs can be activated, all manual cooking programs can be set, options can be adjusted, and instructions, preparation, and tips can
be accessed.
Menu Demonstrations
ARNING
Food Poisoning Hazard
Do not let food sit in oven more than one hour before or after cooking.
Doing so can result in food poisoning or sickness.
In double oven models, touch the corresponding oven keypad to show the cooking modes and temperatures for the desired oven.
NOTE: A line will appear above the corresponding oven.
In single oven models, the display will show cooking modes and temperatures when the oven is turned on.
Bake Demonstration
A |
B |
|
Conv |
ke |
|
Rapid Preheat |
|
Delay |
|
|
|
Convert Recipe |
375 |
|
For Convection |
|
|
Bake
No Preheat
1-rack Cooking
Broil
A.Modes column
B.Temperature column
1.Confirm the Bake mode is selected.
2.In the temperature column, scroll to the desired temperature. The temperature must be between 170°F and 550°F (77°C and 288°C).
3.Touch START to begin preheating.
5

Drop-down Message Demonstration
The next steps will convert |
standard recipe for use with |
convection cooking. |
|
Convert Bake |
|
Rapid Preheat |
|
Convert Recipe |
Cookies, |
For Convection |
|
Bake |
|
There are some menus that prompt a drop-down message to appear. Once the message is read, you can dismiss the menu by touching the directional arrow and swiping up.
Cook Time Demonstration (Optional)
NOTE: In some cooking modes the user can set the cooking time while other modes have fixed times.
To set a cooking time, follow these instructions.
1.To set a cook time, touch OVEN TIMER once the cycle begins. Use the time columns or number keypads to enter the cooking length.
2.Touch START to begin the timer.
NOTE: The Oven Timer is only visible once a cooking cycle has been activated.
OR
Select oven action when the timer expires. The default action is Hold Temp.
To change the default oven end of cycle action, touch HOLD TEMP, then select the desired oven action. Touch SET when completed or touch BACK to return to the oven timer screen.
Keep Warm™ setting will reduce the oven temperature to 170°F (77°C) after the cook time ends. Hold Temp will keep the set oven temperature after the cook time ends. Oven Off will turn the oven off when the cook time ends.
Delay Start Demonstration (Optional)
1.To set a delayed start and end time, touch DELAY.
NOTE: The cooking start time always begins on the nearest quarter hour (0:00, 0:15, 0:30 and 0:45). The cooking time includes oven preheating time. Adjust the start and end times accordingly.
A B
A.Start time column
B.End time column
2.Touch or scroll to the desired cooking start time in the Start Time column on the left-hand side. The oven cannot be delayed more than 11 hours and 45 minutes.
3.Touch or scroll to the desired cooking end time in the End Time column on the right-hand side. The cook time cannot be longer than 12 hours.
4.Touch BACK to return to the Cooking Mode menu or touch SET when done. The oven will start preheating when the Start Time is reached. Once the end time is reached, the oven will go in to Keep Warm mode by default.
5.Touch START NOW to start the oven from the Delay screen.
NOTE: Do not use Delay Start for items that require
a preheated oven, such as cakes, cookies, and breads. If food is in the oven during preheat, it may become overcooked.
6.To change a cooking mode or temperature while the oven is preheating or in a Delay Start, touch the cooking mode key, make the new selection, and then touch SET.
7.Touch OVEN CANCEL, UPPER CANCEL, or LOWER CANCEL to turn off the desired oven.
Cooking Modes
The previous steps can be used for the following cooking modes:
|
|
DEFAULT |
MODE |
TEMP. RANGE |
TEMP. |
Convect Frozen Pizza |
300°F–500°F |
375°F |
|
(149°C–260°C) |
(191°C) |
|
|
|
Convect Pastry |
170°F–550°F |
325°F |
|
(77°C-288°C) |
(163°C) |
Convect Slow Roast |
190°F–225°F |
200°F |
12hrs |
(88°C–107°C) |
(93°C) |
|
|
|
Convect Slow Roast |
200°F–250°F |
225°F |
8hrs |
(93°C–121°C) |
(107°C) |
|
|
|
6
 Loading...