

Page 1

nglish
E
Description
OptraSculpt Pad is a modelling instrument designed for the intraoral adapta-
ion, shaping and contouring of uncured packable composite filling materials.
t
OptraSculpt Pad consists of an autoclavable handheld instrument and singleuse disc-shaped attachments (pads) in diameters ranging from 4 to 6 mm.
he handheld instrument contains a metal spatula on one working end and a
T
olding ring on the other. The single-use disc-shaped attachments, which are
h
made of soft, highly flexible synthetic foam material, are inserted into the
holding ring. These OptraSculpt Pad attachments allow users to contour pack-
ble composite restorations quickly and effectively without encountering
a
stickiness between the instrument and composite. This presents a clear advantage, particularly in the fabrication of large Class III, IV and V restorations
nd direct laminate veneers. Reference scales on the handheld instrument
a
ssist in establishing appropriate symmetries, tooth width proportions and
a
alignments when creating a restoration with composite materials.
Composition
The OptraSculpt Pad attachments consist of polyethylene and EVA.
–
– The handheld instrument consists of stainless steel and PEEK.
Indication
uitable for adapting, shaping and contouring uncured packable composite
S
and compomer materials in Class III, IV and V restorations and direct
laminate veneers.
ontraindication
C
he use of OptraSculpt Pad is contraindicated
T
– if the stipulated working technique cannot be applied;
– if a patient is known to be allergic to any of the components of
ptraSculpt Pad.
O
Side effects
one known to date
N
Application
– NOTE – Brush NEW instruments with soapy water, rinse and dry. Then,
carry out a complete hygiene cycle (see “Disinfection, cleaning and
terilization”).
s
– Make sure to use only OptraSculpt Pad attachments and instruments that
are in impeccable mechanical and hygienic conditions.
Make sure to insert the OptraSculpt Pad attachments into the instrument
–
correctly to achieve a tight fit.
– Do not use damaged instruments and attachments.
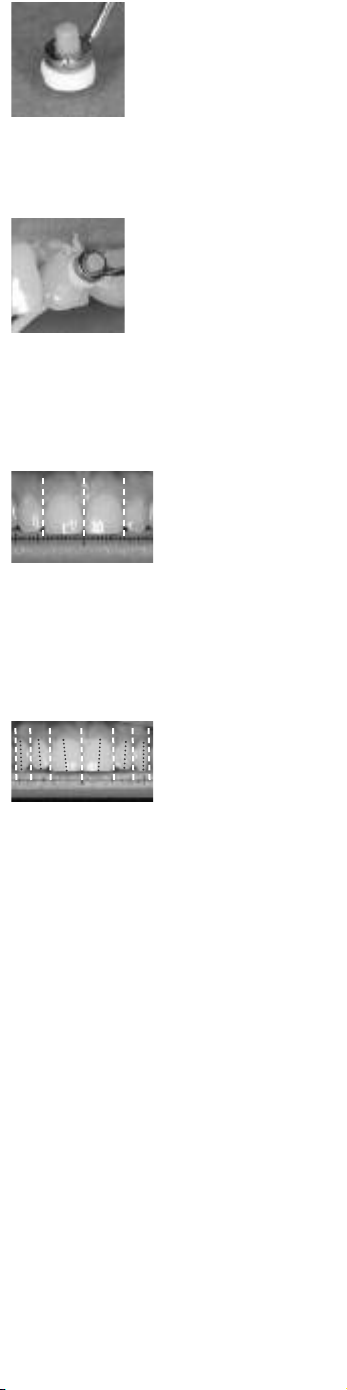
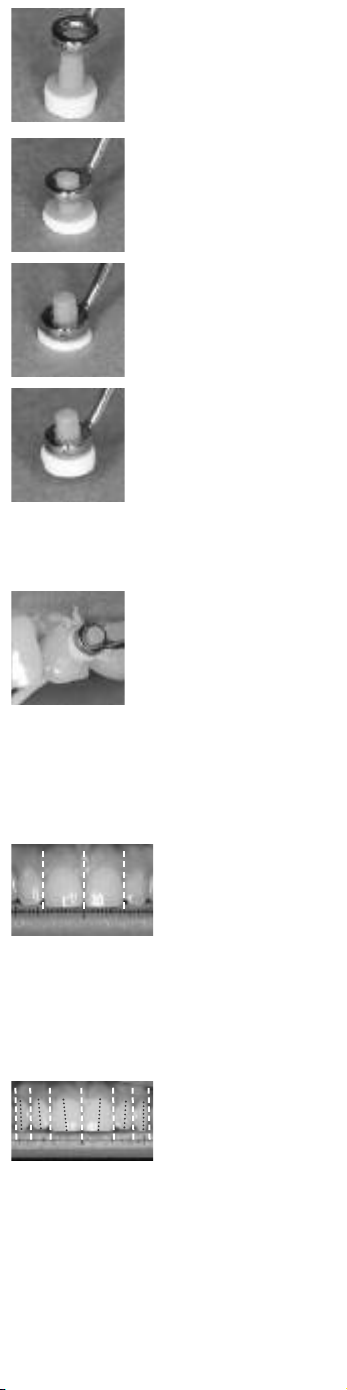
Select either a 4 mm or 6 mm OptraSculpt Pad attachment, depending on the
ize of the restoration. Using sterilized tweezers, remove the attachment from
s
the packaging and place it flat on a firm, contamination-free working surface.
Next, slide the holding ring over the body of the attachment, applying pres-
ure, until the ring sits flat on the basis of the attachment.
s
Place the OptraSculpt Pad attachment flat on a
working surface.
Slide the instrument over the body of the
attachment, applying pressure.
Insert the ring over the body until it meets the
base.
Pad
®
muotoiluinstrumentti
modellering av komposittmateriale
Bruksanvisning
NO
FI Käyttöohjeet
– Yhdistelmämuovin veisto- ja
– Instrument til skulptering og
instrument
EN Instructions for Use
– Composite Sculpting & Modelling
DE Gebrauchsinformation
OptraSculpt
– Modellier-Instrument für Composites
Εργαλείο γλυπτικής &
μοντελαρίσματος με σύνθετη ρητίνη
voor composiet
NL Productinformatie
– Adapteer- en modelleerinstrument
EL Oδηγίες Xρήσεως
des composites
FR Mode d’emploi
– Instrument pour le modelage
IT Istruzioni d’uso
Aleti
ФЛПВМВМЛ˛
‰Оfl ‡·УЪ˚ Т НУПФУБЛЪМ˚ПЛ
–
TR Kullanma Talimatı
– Kompozit flekillendirme ve Modelaj
per composito
y modelar composite
– Strumento di modellazione
ES Instrucciones de uso
– Instrumento para esculpir
χÚ¡·ÏË
RU àÌÒÚÛ͈Ëfl ÔÓ
– еУ‰ВОЛУ‚У˜М˚И ЛМТЪЫПВМЪ
Modelar Compósitos
PT Instruções de Uso
instrument för komposit
– Instrumento para Esculpir &
SV Bruksanvisning
– Skulpterings- och modellerings-
Page 2
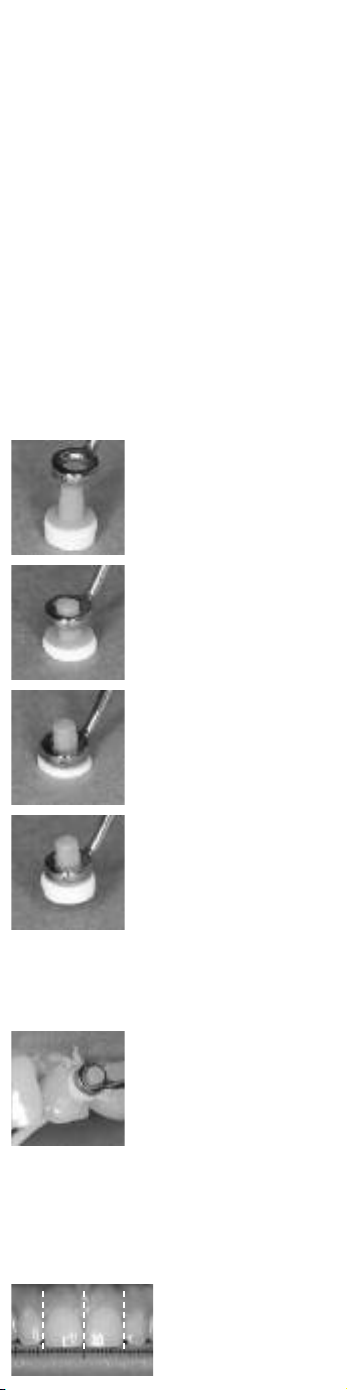
ptraSculpt Pad attachment is correctly inserted
O
in the holding ring.
he OptraSculpt Pad attachments are designed for single use
T
xclusively!
e
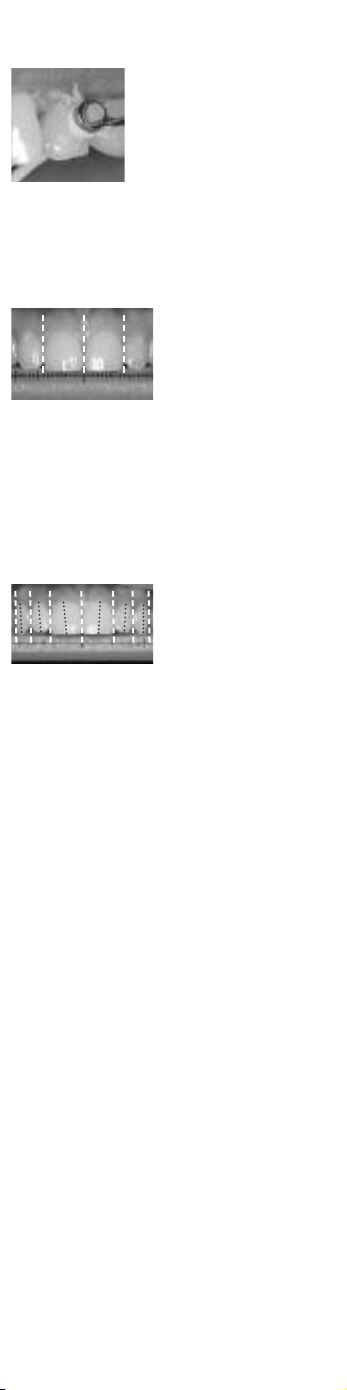
Use the metal spatula on the other side of the instrument to pick up and
place the restorative material. After placing the uncured packable composite
nto the prepared cavity, adapt and contour the material with the soft
i
ptraSculpt Pad attachment, using a dabbing motion.
O
OptraSculpt Pad during clinical use. Use the pad
ith a dabbing motion, applying only gentle
w
ressure. Place material and remove excess with
p
the metal spatula on the other end of the instrument.
fter having completed the restoration, remove the OptraSculp Pad from the
A
instrument and dispose of it appropriately. Subsequently, disinfect, clean and
sterilize the instrument.
sing the reference scales
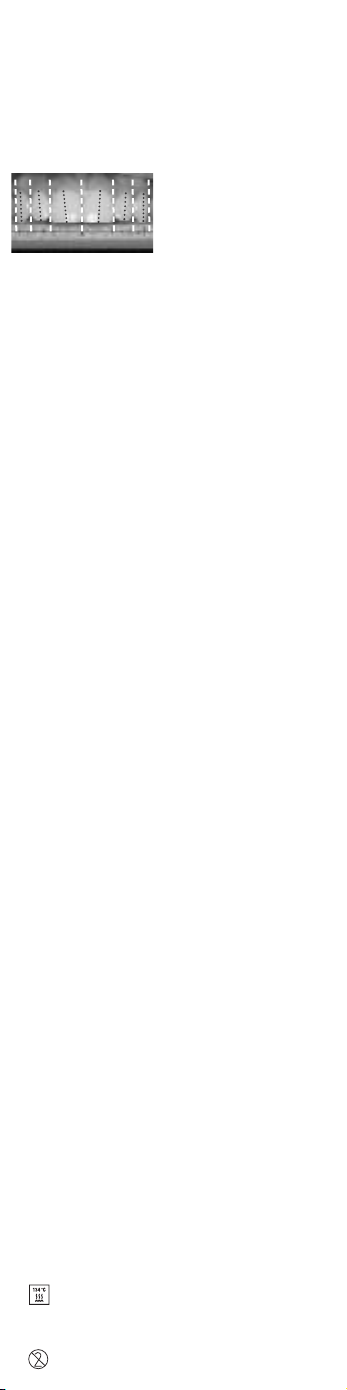
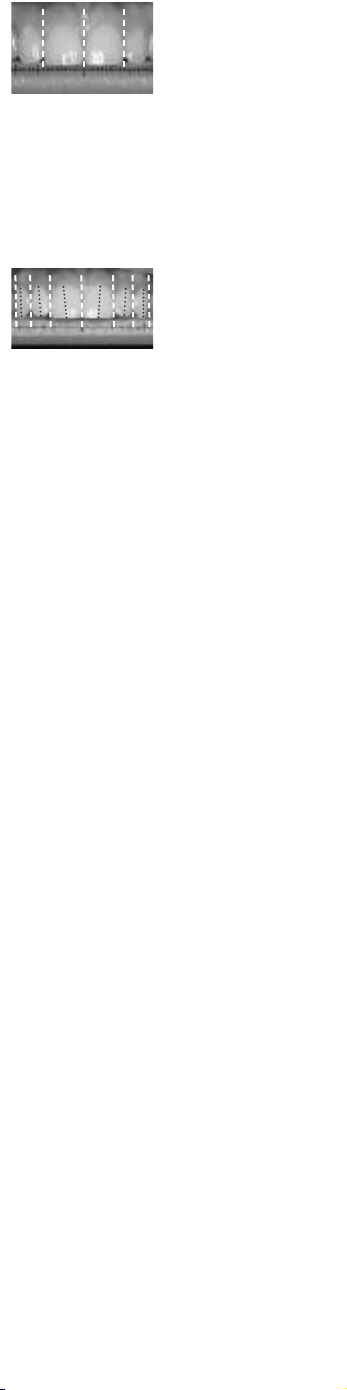
U
The OptraSculpt Pad instrument features two reference scales.
Scale 1 provides plain reference markings to compare the tooth-to-tooth
idth proportions. In addition, the horizontal line on the scale facilitates the
w
evaluation of the incisal edge line.
Scale 1 can be aligned with the incisal
dge to e.g. compare the contralateral
e
tooth width proportions and/or evaluate
the incisal edge line against the horizontal line on the scale.
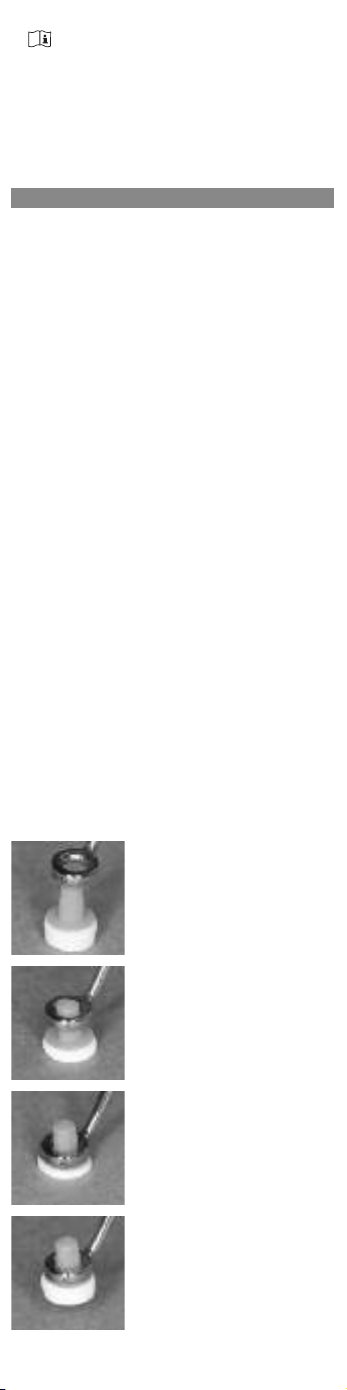
Scale 2 contains the markings for the ideal average anterior tooth widths
vertical lines). This scale is used as a reference in the esthetic design of
(
extensive anterior reconstructions. The markings present only relative values,
from which the individual widths of the teeth can be derived or assessed in
relation to each other. The oblique dotted markings indicate the typical aver-
ge position of the tooth axis in the maxillary jaw and, consequently, also
a
provide useful guidance in the reconstruction of harmonious anterior esthetics. The scale is positioned correctly if the triangle in the middle of the scale
points towards the contact point between the central incisors and the
numbers at both sides of the scale are consistent with the quadrants under
examination. The scale is unsuitable for use in the mandibular jaw!
Scale 2 is utilized to compare the clinical
situation against the ideal average tooth
width proportions and angular alignments in the maxillary anterior dentition.
Consequently, esthetic enhancements can
be easily planned and areas of improvement identified.
Important! This scale indicates relative values only. The marked widths and
angular alignments should not just be adopted as they are. They should be
adjusted to meet the requirements of the individual situation.
The example depicted above shows comparatively ideal tooth width proportions, even if the overall tooth width may appear slightly larger than average.
The angles of the second incisors and canines appear to be a touch too
straight.
Warning
It is recommended to use a rubber dam to avoid accidental ingestion
or aspiration of small parts.
Do not use OptraSculpt Pad for purposes other than intended!
Disinfection, cleaning and sterilization
General notes:
Clean and disinfect every instrument before each use. It is strongly recommended that the instruments are additionally sterilized in a steam sterilizer.
Do not use damaged instruments. Only suitably trained staff should carry out
repair and maintenance work.
Do not place the instruments in NaCl solution (to avoid the risk of pitting
and/or stress corrosion cracking).
Protective gloves and goggles complying with the requirements of directive
89/686/EEC must be worn to handle any used and contaminated instruments.
Disinfect and clean instruments immediately after use.
Generally, processing in a washer-disinfector unit is preferable to
manual cleaning.
Pre-cleaning:
Carefully remove large unhardened residues from the instruments using a
lint-free cellulose tissue. For preliminary disinfection, place the instruments
in a disinfection bath (with a lid and sieve insert) filled with aldehyde-free
alkaline disinfectant (e.g. immersion in ID 212 forte, Dürr Dental, for 15 min).
Make sure that the instruments are completely covered in disinfectant and
that the disinfectant is free of bubbles.
Only use a soft brush for the manual removal of residues. Never use a metal
brush or steel wool.
For automated processing, carefully rinse the instruments under running tap
water after preliminary disinfection.
Page 3

utomated cleaning and disinfection:
A
– Washer-disinfector unit (e.g. Miele thermal washer-disinfector G7882)
– Cleaning and disinfection program (e.g. Vario TD)
Detergent and disinfectant (e.g. Neodisher FA, Dr. Weigert)
–
f the instruments are only cleaned in a washer-disinfector, subsequent
I
thermal disinfection in a steam sterilizer is mandatory.
Manual cleaning and disinfection:
Soft brush (e.g. Miltex nylon cleaning brush for instruments)
–
– Detergent and disinfectant (e.g. immersion in ID 212 forte, Dürr Dental,
for at least 15 min)
fter cleaning and disinfection, thoroughly rinse the instruments in the sieve
A
nsert under running tap water.
i
Drying:
– Compressed air or clean, lint-free cellulose tissue
terilization:
S
– Suitable sterile packaging (e.g. aluminium sterile container system)
– Autoclave (e.g. Systec HX-320)
Program: steam sterilization with a fractionated pre-vacuum process at
–
134 °C (273 °F) for at least 4 min.
Maintenance, checking and inspection:
fter cleaning and disinfecting the instruments, visually inspect them to see if
A
hey are clean, undamaged and function properly. If macroscopically visible
t
residual debris is present, repeat the cleaning and disinfection process.
Storage
Store instruments in dry conditions to avoid condensation build-up.
–
– Store OptraSculpt Pad attachments in the original packaging at room tem-
perature, protected from dust, moisture, compression and contamination.
Store at 12 - 28 °C (54 - 82 °F).
–
Expiry date: see printed inscription and label.
–
Notes
The handheld instrument is autoclavable and designed for multiple
–
se and at least 200 sterilization cycles in the autoclave.
u
See “Disinfection, cleaning and sterilization” for the stipulated procedures.
– Before autoclaving the handheld instrument, remove the modelling
ttachments.
a
– The OptraSculpt Pad attachments are intended for single use only.
They must not be cleaned, disinfected, sterilized and reused.
– Since small parts generally involve a risk of ingestion and aspiration, it is
dvisable to use a rubber dam.
a
– The Instructions for Use and detailed information on the reprocess-
ing of handheld instruments are available on the website of
voclar Vivadent AG (www.ivoclarvivadent.com).
I
Store out of the reach of children!
For dental use only!
The material has been developed solely for use in dentistry. Processing should be carried out strictly
according to the Instructions for Use. Liability cannot be accepted for damages resulting from failure to
observe the Instructions or the stipulat ed area of application. The user is responsible for testing the material for its suitability and use for any purpose not explicitly stated in the Instructions. Descriptions and data
constitute no warranty of attributes and are not binding.
Deutsch
Beschreibung
Das Modellierinstrument OptraSculpt Pad dient dem Zahnarzt zum intraoralen Adaptieren, Modellieren und zur Oberflächengestaltung von nicht ausgehärteten stopfbaren Composite-Füllungsmaterialien. Das OptraSculpt PadInstrument besteht aus einem autoklavierbaren OptraSculpt
Pad-Handinstrument sowie scheibenförmigen Einweg-Aufsätzen (Pads) in
Durchmessern von 4 mm und 6 mm.
Das Handinstrument ist an einem Arbeitsende mit einem Metallspatel und
am anderen Arbeitsende mit einer ringförmigen Aufnahme ausgestattet. Letztere dient zur Aufnahme der scheibenförmigen Einwegaufsätze, die aus
einem weichen, hochelastischen Kunststoffschaum bestehen. Das Besondere
dieser OptraSculpt Pad-Aufsätze ist, dass sich stopfbare Composite-Materialien, insbesondere bei grossen Restaurationen der Klasse III, IV und V sowie
direkten Veneers, schnell und einfach mit geringer Klebrigkeit zwischen Instrument und Composite modellieren lassen. Mit Hilfe der auf dem Handgriff
aufgezeigten Vergleichsskalen lassen sich Symmetrien, Zahnbreitenverhältnisse und Zahnachsen bei der Rekonstruktion mit Compositen besser abschätzen.
materiałów zło˝onych
PL Instrukcja stosowania
– Instrument do modelowania
FL-9494 Schaan/Liechtenstein
Manufacturer
Ivoclar Vivadent AG
modellering af kompositmateriale
Brugsanvisning
DA
– Instrument til formning og
Rx ONLY
Date information prepared:
641367/WE3
2013-10-07/Rev. 1
Page 4
usammensetzung
Z
– Die OptraSculpt Pad-Aufsätze bestehen aus: Polyethylen und EVA
– Das Handinstrument besteht aus: Edelstahl und PEEK
ndikation
I
Adaption, Modellation und Oberflächengestaltung von nicht ausgehärteten
stopfbaren Composite- und Compomer-Materialien für Klasse III-, IV- und V-
estaurationen, sowie für direkte Veneers.
R
ontraindikation
K
Der Einsatz ist kontraindiziert,
– wenn die vorgeschriebene Anwendungstechnik nicht möglich ist.
bei erwiesener Allergie gegen Bestandteile von OptraSculpt Pad.
–
Nebenwirkungen
Bisher keine bekannt.
nwendung
A
– ACHTUNG - NEUE Instrumente mit Seifenwasser abbürsten, spülen und
trocknen. Anschließend durch den kompletten Hygienezyklus führen
siehe Desinfektion, Reinigung und Sterilisation)
(
Es ist darauf zu achten, nur technisch und hygienisch einwandfreie
–
OptraSculpt Pad-Aufsätze und Handinstrumente zu verwenden.
– Die OptraSculpt Pad-Aufsätze müssen korrekt und fest im Handinstru-
ent eingesetzt sein.
m
– Defekte Handinstrumente und Einwegaufsätze dürfen nicht verwendet
werden.
n Abhängigkeit von der Restaurationsgrösse wird der 4 mm bzw. 6 mm
I
ptraSculpt Pad-Aufsatz in das ringförmige Ende des Handinstrumentes auf-
O
gesteckt. Hierzu den gewünschten OptraSculpt Pad-Aufsatz mit einer sterilen
Pinzette aus der Verpackung entnehmen und plan auf eine feste, kontamina-
ionsfreie Arbeitsfläche legen. Dann das ringförmige Ende des Instrumentes
t
mit Druck über den Schaft des Aufsatzes schieben bis es der Basis plan
anliegt.
ptraSculpt Pad-Aufsatz plan aufrecht
O
ereitlegen
b
Instrument mit Druck über den Schaft schieben.
Ring soweit über den Schaft schieben bis dieser
plan der Basis des Pads anliegt.
OptraSculpt Pad Aufsatz ist korrekt mit dem
Instrument verbunden.
Die OptraSculpt Pad-Aufsätze sind ausschliesslich als Einwegprodukt
zu verwenden!
Das Arbeitsende mit dem Metallspatel dient der Aufnahme und Platzierung
des Füllungsmaterials. Ist das unausgehärtete stopfbare Composite-Material
in der vorbereiteten Kavität platziert, erfolgt die Adaption und Formgebung
mit Hilfe des weichen OptraSculpt Pad-Aufsatzes mit tupfenden Bewegungen.
OptraSculpt Pad bei der klinischen Anwendung.
Das Pad sollte tupfend und nur mit leichtem
Druck verwendet werden. Um Material vorzulegen oder Überschüsse vom Zahn zu entfernen
ist der Metallspatel am anderen Arbeitsende des
Instrumentes zu verwenden.
Nach der Anwendung am Patienten und vor dem Desinfizieren, Reinigen und
Autoklavieren des Handinstrumentes müssen die OptraSculpt Pad-Aufsätze
von diesem entfernt und sachgemäss entsorgt werden.
Verwendung der Hilfsskalen
Das OptraSculpt Pad-Instrument ist mit zwei Hilfsskalen ausgestattet.
Skala 1 ist eine einfache Orientierungsskala zum Vergleich von Zahnbreiten.
Sie enthält zudem eine horizontale Linie als Referenz zur Beurteilung des Inzisalkantenverlaufs.
Skala 1 kann an die Inzisalkanten angelegt werden um bspw. kontralaterale
Zahnbreiten zu vergleichen und / oder
den Verlauf der Inzisalkanten im Verhältnis zur horizontalen Linie besser beurteilen zu können.
Page 5
kala 2 ist mit idealtypischen mittleren Frontzahnbreiten versehen (senk-
S
rechte Linien) und dient so der ästhetischen Orientierung bei umfangreichen
Frontzahnrekonstruktionen. Die Werte sind nur als relative Orientierung zu
erstehen aus der individuelle Zahnbreitenverhältnisse abgeleitet werden
v
zw. bewertet werden können. Die schrägen, gestrichelten Linien zeigen ide-
b
altypische mittlere Oberkiefer-Zahnachsenstellungen und geben so ebenfalls
Hilfestellung bei der Gestaltung einer harmonischen Frontzahnanatomie. Die
kala ist korrekt angelegt, wenn das mittlere Dreieck mit seiner Spitze auf
S
en Kontaktpunkt zwischen den zentralen Frontzähnen weist und die Zahlen
d
an den Enden der Skala mit den betrachteten Quadranten übereinstimmen.
Die Skala ist nicht für die Anwendung im Unterkiefer geeignet!
it der Skala 2 kann die klinische Situa-
M
tion mit idealtypischen Werten für die
mittleren Zahnbreiten und Achsstellun-
en der OK Frontzähne verglichen wer-
g
en. Auf diese Weise können ästhetische
d
Korrekturen geplant bzw. ästhetische Defizite identifiziert werden.
ichtig! Diese Skala dient nur der relativen Orientierung und ist keinesfalls
W
so zu verstehen, dass die aufgedruckten Breiten und Winkel individuell übernommen werden sollen!
m Bildbeispiel sind die Zahnbreitenverhältnisse als relativ ideal einzuschät-
I
zen, wobei die Zahnbreiten insgesamt etwas überdurchschnittlich erscheinen.
Die Zahnachsen der seitlichen Schneidezähne und insbesondere der Eckzähne
ind hingegen etwas zu aufrecht.
s
Warnhinweise!
Die Verwendung von Kofferdam ist angezeigt, um mögliches
Verschlucken oder Aspirieren von Kleinteilen zu vermeiden.
ptraSculpt Pad nicht zweckentfremdet verwenden!
O
Desinfektion, Reinigung und Sterilisation
Grundsätzliche Anmerkungen:
or jedem Gebrauch müssen alle Instrumente gereinigt und desinfiziert wer-
V
den. Eine ergänzende Sterilisation im Dampfsterilisator wird ausdrücklich
empfohlen!
enutzen Sie keine beschädigten Instrumente. Service und Reparaturen soll-
B
ten nur durch entsprechend trainierte Personen durchgeführt werden.
Instrumente nicht in NaCI-Lösungen ablegen (ansonsten Gefahr für Lochbzw. Spannungsriss-Korrosion).
Beim Umgang mit allen gebrauchten und kontaminierten Instrumenten müssen eine Schutzbrille und Schutzhandschuhe getragen werden, welche die
Anforderungen der Richtlinie 89/686/EWG erfüllen.
einigung und Desinfektion unmittelbar nach Gebrauch durchführen.
R
Die maschinelle Aufbereitung in einem RDG (Reinigungs-Desinfektions-Gerät) ist generell einer manuellen Aufbereitung vorzuziehen!
orbehandlung:
V
Grobe nicht ausgehärtete Verunreinigungen an Instrumenten vorsichtig mit
einem fusselfreien Zellstofftuch entfernen. Zur Vordesinfektion Instrumente
blasenfrei, vollständig bedeckt in eine mit alkalischer, aldehydfreier Desinfektionsmittellösung (z.B. für 15 min. in ID 212 forte, Dürr Dental) gefüllte Desinfektionswanne (mit Siebeinsatz und Deckel) legen.
Zur manuellen Entfernung von groben Verunreinigungen nur eine weiche
Bürste benutzen. Keinesfalls Metallbürsten oder Stahlwolle verwenden.
Bei maschineller Aufbereitung Instrumente nach der Vordesinfektion sorgfältig unter fliessendem Leitungswasser spülen.
Maschinelle Reinigung und Desinfektion:
– RDG (z.B. Thermodesinfektor G7882, Miele)
– Reinigungs- und Desinfektionsprogramm (z.B. Vario TD)
– Reinigungs- und Desinfektionsmittel (z.B. Neodisher FA, Dr. Weigert)
Bei ausschliesslich maschineller Reinigung der Instrumente ist anschliessend
eine thermische Desinfektion im Dampfsterilisator zwingend erforderlich!
Manuelle Reinigung und Desinfektion:
– weiche Bürste (z.B. Reinigungsbürste für Instrumente aus Nylon, Miltex)
– Reinigungs- und Desinfektionsmittel (z.B. Einlegen für mind. 15 min. in
ID 212 forte, Dürr Dental)
Instrumente nach Reinigung und Desinfektion gründlich im Siebeinsatz mit
Leitungswasser abspülen.
Trocknung:
– Druckluft oder sauberes, fusselfreies Zellstofftuch
Sterilisation:
– geeignete Sterilgutverpackung (z.B. Aluminium Sterilisationscontainer)
– Autoklav (z.B. Systec HX-320)
– Programm: Dampfsterilisation im fraktionierten Vorvakuum bei 134 °C
für mind. 4 min.
Wartung, Kontrolle und Prüfung:
Nach Reinigung und Desinfektion Sichtprüfung auf Unversehrtheit, Funktionstüchtigkeit und Sauberkeit der Instrumente. Bei makroskopisch sichtbarer
Restverschmutzung Reinigungs- und Desinfektionsprozess wiederholen.
Lagerung und Aufbewahrung
– Lagerung der Instrumente in trockenen Räumen, um Kondensations-
bildung zu vermeiden
– Aufbewahrung der OptraSculpt Pad-Aufsätze in der Originalverpackung
bei Zimmertemperatur staub-, feuchtigkeits-, druck- und kontaminations-
geschützt
– Lagerung bei 12 - 28 °C
– Verfalldatum: Siehe Aufdruck auf Etikett
Hinweise
– Das Basis-Instrument ist autoklavierbar und zur Mehrfach-Verwen-
dung für mindestens 200 Autoklavierzyklen ausgelegt. Bedingun-
gen siehe „Desinfektion, Reinigung und Sterilisation“.
– Vor dem Autoklavieren des Basis-Instrumentes müssen die Modellierauf-
sätze entfernt werden.
– Die OptraSculpt Pad-Modellieraufsätze sind nur für den Einmal-
gebrauch bestimmt und können nicht gereinigt, desinfiziert, sterili-
siert und wiederverwendet werden.
Page 6
Da bei Kleinteilen generell eine Verschluckungs- und Aspirationsgefahr
–
besteht, ist die Verwendung eines Kofferdam angezeigt.
– Die Gebrauchsinformation sowie ausführliche Informationen zur
iederaufbereitung von Handinstrumenten sind auf der Homepage
W
er Ivoclar Vivadent AG hinterlegt (www.ivoclarvivadent.com).
d
Für Kinder unzugänglich aufbewahren!
ur für zahnärztlichen Gebrauch!
N
Das Produkt wurde für den Einsatz im Dentalbereich entwickelt und muss gemäss Gebrauchsinformation
verarbeitet werden. Für Schäden, die sich aus anderweitiger Verwendung oder nicht sachgemässer Verarbeitung ergeben, übernimmt der Hersteller keine Haftung. Darüber hinaus ist der Verwender verpflichtet,
das Material eigenverantwortlich vor dessen Einsatz auf Eignung und Verwendungsmöglichkeit für die
vorgesehenen Zwecke zu prüfen, zumal wenn diese Zwecke nicht in der Gebrauchsinformation aufgeführt
sind.
Français
Description
ptraSculpt Pad est un instrument à modeler indiqué pour l'adaptation, la mise
O
en forme et le modelage en bouche des matériaux d'obturation composites
modelables non polymérisés. OptraSculpt Pad se compose d'un instrument à
main pouvant être stérilisé en autoclave et d'embouts jetables en forme de
isque de diamètres 4 et 6 mm.
d
L'instrument à main présente une spatule en métal à l'une des extrémités, et un
anneau de maintien sur l'autre. Les embouts jetables en forme de disque, fabri-
ués dans une mousse synthétique souple et très flexible, s'insèrent dans l'an-
q
neau de maintien. Ces embouts OptraSculpt Pad permettent de modeler
rapidement les restaurations en composite modelable, sans que l'instrument ne
colle au composite. Cela présente un avantage certain, notamment lors de la
éalisation de restaurations étendues de Classe III, IV et V et de facettes à in-
r
crustation en technique directe. Les échelles de référence sur l'instrument à
main aident à établir les symétries appropriées, les largeurs et les alignements
ors de la création de la restauration en composite.
l
Composition
– Les embouts OptraSculpt Pad sont en polyéthylène et EVA.
L'instrument à main est en acier inoxydable et PEEK.
–
Indications
Indiqué pour l'adaptation, la mise en forme et le modelage des composites et
compomères modelables non polymérisés dans le cadre de la réalisation de
estaurations de Classes III, IV et V et facettes en technique directe.
r
Contre-indications
L'utilisation d'OptraSculpt Pad est contre-indiquée
Si la technique de travail stipulée ne peut être appliquée ;
–
– En cas d'allergie connue à l'un des composants d'OptraSculpt Pad.
Effets secondaires
ucun effet secondaire connu à ce jour.
A
Application
– NOTE – Nettoyer les NOUVEAUX instruments à l'eau savonneuse à l'aide
d'une brosse, rincer et sécher. Puis effectuer un cycle d'hygiène complet
(désinfection, nettoyage et stérilisation).
– Veillez à n'utiliser les embouts et manches OptraSculpt Pad que dans des
conditions mécaniques et d'hygiène impeccables.
– Vérifier que les embouts OptraSculpt Pad sont correctement insérés sur
l'instrument afin d'obtenir un ajustage précis.
– Ne pas utiliser d'embouts ou d'instruments endommagés.
Choisir un embout OptraSculpt Pad de 4 ou 6 mm, en fonction de la taille de
la restauration. À l'aide de pinces stériles, retirer l'embout de l'emballage et
le poser à plat sur une surface stable et exempte de toute contamination.
Ensuite, glisser l'anneau de maintien sur l'embout, appuyer jusqu'à ce que
l'anneau soit à plat sur la base de l'embout.
Placer l'embout OptraSculpt Pad à plat sur la
surface de travail.
Presser l'instrument sur l'embout.
Insérer l'anneau jusqu'à ce qu'il touche la base
de l'embout.
L'embout OptraSculpt Pad est correctement
inséré dans l'anneau.
Les embouts OptraSculpt Pad sont à usage unique !
Page 7
tiliser la spatule en métal située à l'autre extrémité de l'instrument pour
U
saisir et placer le matériau de restauration. Après avoir placé le composite
modelable non polymérisé dans la cavité préparée, adapter et modeler le
atériau à l'aide d'un embout OptraSculpt Pad souple, en tapotant.
m
ptraSculpt Pad en utilisation clinique. Utiliser
O
l'embout en tapotant, par pressions légères.
Modeler le matériau et retirer les excès à l'aide
e la spatule en métal, à l'autre extrémité de
d
l'instrument.
Lorsque la restauration est terminée, retirer l'embout OptraSculpt Pad de
'instrument et le jeter. Ensuite, désinfecter, nettoyer et stériliser l'instrument.
l
Utilisation des échelles de référence
Les instruments OptraSculpt Pad sont munis de deux échelles de référence.
'échelle 1 permet de comparer les proportions, en largeur, d'une dent par
L
rapport à la dent adjacente. La ligne horizontale sur l'échelle facilite la détermination de la position du bord incisal.
'échelle 1 peut être alignée avec le bord
L
incisal pour comparer les proportions de
largeur de la dent adjacente et/ou évaluer
la ligne du bord incisal par rapport à la
igne horizontale sur l'échelle.
l
'échelle 2 repère les largeurs moyennes idéales pour les dents antérieures
L
(lignes verticales). Cette échelle est utilisée comme référence dans la conception esthétique des reconstructions antérieures étendues. Les repères ne pré-
entent que les valeurs relatives, desquelles on peut déduire ou estimer les
s
argeurs individuelles des dents les unes par rapport aux autres. Les pointillés
l
obliques indiquent la position moyenne de l'axe de la dent sur l'arcade maxillaire et, par conséquent, constitue également un guide pour la reconstruction
sthétique et harmonieuse des dents antérieures. L'échelle est correctement
e
positionnée lorsque le triangle du milieu est dirigé vers le point de contact
entre les incisives centrales et si les numéros sur les deux côtés de l'échelle
coïncident avec les quadrants à examiner.
'échelle n'est pas adaptée pour être utilisée sur l'arcade
L
mandibulaire !
L'échelle 2 est utilisée pour comparer la
ituation clinique aux proportions idéales
s
et aux axes des dents dans la zone antérieure maxillaire. Les mises en valeur esthétiques peuvent alors être facilement
lanifiées et les zones à améliorer facile-
p
ment identifiées.
Important ! Cette échelle n'indique que les valeurs relatives. Les largeurs et
les axes des dents indiqués ne doivent pas être pris tels quels. Ils doivent être
adaptés à chaque patient.
L'exemple illustré ci-dessus compare les largeurs idéales de dents, pour ce
cas la dent peut sembler légèrement plus large que la moyenne. Les axes des
incisives latérales et des canines semblent trop droites.
Mise en garde
Il est conseillé d'utiliser une digue pour éviter l'ingestion ou
l'aspiration accidentelles des petits éléments.
Ne pas utiliser OptraSculpt Pad pour d'autres indications que celles
mentionnées dans le mode d'emploi !
Désinfection, nettoyage et stérilisation
Information générale
Nettoyer et désinfecter tous les instruments avant chaque utilisation. Il est
fortement recommander que les instruments soient également stérilisés dans
un stériilisateur vapeur.
Ne pas utiliser d'instruments endommagés. Seules les personnes correctement formées sont en mesure d'effectuer les réparations ou la maintenance.
Ne pas plonger les instruments dans une solution NaCI (afin d'éviter tout
risque de corrosion).
Des gants et lunettes de protection conformes à la directive 89/686/EEC
doivent être portés pendant la manipulation de tous les éléments utilisés ou
contaminés.
Désinfecter et nettoyer les instruments immédiatement après utilisation.
Il est préférable d'utiliser un nettoyeur-désinfecteur plutôt que
d'effectuer un traitement manuel.
Pré-nettoyage :
Retirer soigneusement les résidus non durcis des instruments à l'aide d'un
chiffon en cellulose non pelucheux. Pour la désinfection préliminaire, placer
les instruments dans un bain de désinfection (avec couvercle et panier)
rempli d'un désinfectant alcalin sans aldéhyde (ex. ID 212 forte, Dürr Dental,
pendant 15 min). Vérifier que les instruments sont complètement recouverts
par le désinfectant et que ce dernier ne présente pas de bulles.
N'utiliser que des brosses douces pour le retrait manuel des résidus. Ne
jamais utiliser de brosse métallique ou de laine d'acier.
Pour le traitement automatisé, rincer soigneusement les instruments à l'eau
courante après la désinfection préliminaire.
Nettoyage et désinfection automatisés :
– Nettoyeur-désinfecteur (ex. nettoyeur-désinfecteur thermique Miele
G7882)
– Programme de nettoyage et désinfection (ex. Vario TD)
– Détergent et désinfectant (ex. Neodisher FA, Dr. Weigert)
Si les instruments ont seulement été nettoyés dans le ND, une désinfection
thermique dans un stérilisateur vapeur est obligatoire !
Nettoyage et désinfection manuels :
– Brosse douce (ex. brosse en nylon pour le nettoyage des instruments,
Miltex)
Page 8

Détergent et désinfectant (ex. ID 212 forte, Dürr Dental, pendant au
–
moins 15 min)
Après nettoyage et désinfection, rincer soigneusement les instruments dans
e panier, à l'eau courante.
l
Séchage
– Air comprimé ou chiffon cellulose non pelucheux.
térilisation
S
Emballage stérile adapté (ex. récipient en aluminium pour la stérilisation)
–
– Autoclave (ex. Systec HX-320)
– Programme : stérilisation vapeur avec pré-vide fractionné à 134°C pen-
ant au moins 4 min.
d
Maintenance, vérification et inspection :
Après nettoyage et désinfection des instruments, vérifier qu'ils sont propres,
ntacts et qu'ils fonctionnent correctement. En présence de résidus microsco-
i
iques, répéter le processus de nettoyage/désinfection.
p
Conservation
Conserver les instruments dans un endroit sec pour éviter la condensa-
–
ion.
t
– Conserver les embouts OptraSculpt Pad dans leur emballage d'origine à
température ambiante, à l'abri de la poussière, de l'humidité, de la
ondensation et de toute contamination.
c
– Conserver entre 12 et 28 °C
– Date d'expiration : voir l'inscription imprimée et voir sur l'étiquette
emarques
R
L'instrument à main peut être stérilisé en autoclave, et il est conçu
–
pour un usage multiple et au moins 200 cycles de stérilisation en
autoclave. Voir le chapitre "Désinfection, nettoyage et stérilisation" pour
es procédures stipulées.
l
– Avant la stérilisation en autoclave de l'instrument à main, retirer les em-
bouts de modelage.
– Les embouts OptraSculpt Pad sont à usage unique. Ils ne doivent
as être nettoyés, ni désinfectés, ni stérilisés, ni réutilisés.
p
– Les petites pièces comportant le risque d'être avalées ou aspirées, il est
recommandé d'utiliser une digue.
Le mode d'emploi et les informations détaillées sur le retraitement
–
des instruments sont disponibles sur le site Internet Ivoclar
Vivadent AG (www.ivoclarvivadent.com).
Ne pas laisser à la portée des enfants!
éservé à l’usage exclusif du Chirurgien-Dentiste.
R
Ce matériau a été développé en vue d'une utilisation dans le domaine dentaire et doit être mis en oeuvre
selon le mode d'emploi. Les dommages résultant du nonrespect de ces prescriptions ou d'une utilisation à
d'autres fins que celles indiquées n'engagent pas la responsabilité du fabricant. L'utilisateur est tenu de
vérifier sous sa propre responsabilité l'appropriation du matériau à l'utilisation prévue et ce d'autant plus
si celle-ci n'est pas citée dans le mode d'emploi.
Italiano
Descrizione
Lo strumento di modellazione OptraSculpt Pad serve all’odontoiatra per
l’adattamento, la modellazione e la conformazione superficiale intraorale di
materiali compositi da restauro zeppabili, non induriti. Lo strumento
OptraSculpt Pad si compone di uno strumento manuale autoclavabile
OptraSculpt Pad nonché da inserti a disco monouso (Pads) del diametro di
4 mm e 6 mm.
Lo strumento manuale è composto da una parte da una spatola metallica e
dall’altra da un alloggiamento ad anello. Quest’ultimo serve per l’applicazione di inserti monouso, composti da schiuma in plastica morbida altamente
elastica. La particolarità di questi inserti OptraSculpt Pad consiste nel fatto
che i materiali compositi zeppabili, soprattutto in caso di grandi otturazioni di
classe III, IV e V, nonché in caso di faccette dirette, risultano modellabili in
modo rapido e semplice, con minima appiccicosità fra strumento e composito.
Con l’aiuto delle scale di confronto riportate sul manico, nella ricostruzione
con compositi, si possono valutare più facilmente simmetrie, rapporti di larghezza del dente ed assi.
Composizione
– Gli inserti OptraSculpt Pad sono composti da: polietilene ed EVA
– Lo strumento manuale è composto da: acciaio e PEEK
Indicazioni
Adattamento, modellazione e conformazione superficiale di materiali compositi e compomeri non induriti e zeppabili per restauri di classe III, IV e V, nonché per faccette dirette.
Controindicazioni
L’impiego è controindicato,
– quando non è possibile applicare la tecnica di utilizzo prescritta.
– in caso di allergia nota a componenti di OptraSculpt Pad.
Effetti collaterali
Finora non noti.
Utilizzo
– ATTENZIONE – spazzolare con acqua saponata, sciacquare ed asciugare
gli strumenti NUOVI. Quindi eseguire un completo ciclo di igiene (vedi di-
sinfezione, pulizia e sterilizzazione)
– Prestare attenzione ad utilizzare soltanto inserti e strumenti manuali
OptraSculpt Pad tecnicamente ed igienicamente ineccepibili.
– Gli inserti OptraSculpt Pad devono essere inseriti correttamente ed in
modo fisso nello strumento manuale.
– Non si devono utilizzare strumenti manuali ed inserti monouso difettosi.
A seconda delle dimensioni del restauro, si applica l’inserto da 4 o da 6 mm
OptraSculpt Pad sulla parte terminale ad anello dello strumento manuale.
A tale scopo, con una pinzetta sterile prelevare l’inserto OptraSculpt Pad desiderato e posizionarlo su una superficie di lavoro priva di contaminazione e
solida. Quindi spingere la parte terminale ad anello dello strumento sul
manico dell’inserto fino all’allineamento con la base.
Page 9
reparare l’inserto OptraSculpt Pad su
P
una superficie piana.
Spingere con pressione lo strumento
ul manico.
s
Spingere l’anello sul manico fino a che è
allineato con la base del Pad.
’inserto OptraSculpt Pad è correttamente
L
ollegato allo strumento.
c
Gli inserti OptraSculpt Pad sono esclusivamente prodotti monouso!
a parte terminale con la spatola in metallo serve ad accogliere e posizionare
L
il composito. Avendo posizionato il composito zeppabile, non indurito nella
cavità preparata, segue l’adattamento e la modellazione con l’aiuto dell’inserto OptraSculpt Pad morbido picchiettando leggermente.
OptraSculpt Pad nell’utilizzo clinico. Utilizzare il
Pad picchiettando solo leggermente e con pressione leggera. Per applicare materiale o rimuo-
ere materiale dal dente, utilizzare la spatola
v
metallica della parte finale dello strumento.
Dopo l’utilizzo su paziente e prima della disinfezione, pulizia e autoclave
dello strumento manuale, gli inserti OptraSculpt Pad devono essere rimossi e
smaltiti correttamente.
Utilizzo delle scale
Lo strumento OptraSculpt Pad é dotato di due scale.
Scala 1 è una semplice scala di orientamento per il confronto delle larghezze
del dente. Contiene inoltre una linea orizzontale come riferimento per valutare il decorso del bordo incisale.
Scala 1 può essere appoggiata ai bordi
incisali per facilitare il confronto p.es.
delle larghezze dentali controlaterali e/o
il decorso del bordo incisale in relazione
alla linea orizzontale.
La Scala 2 é dotata delle larghezze medie ideali tipiche degli anteriori (linee
verticali) e serve pertanto ad un orientamento estetico in caso di grandi ricostruzioni negli anteriori. I valori sono da intendersi solo come orientativi, dai
quali si possono trarre o valutare individuali rapporti di larghezza. Le linee
tratteggiate oblique indicano posizioni ideali tipiche, medie, assiali dell’arcata
superiore e sono perciò di aiuto nella conformazione di un’armonica anatomia nei denti anteriori. La scala è posizionata in modo corretto, quando la
punta del triangolo centrale indica il punto di contatto fra gli incisivi centrali
e le cifre all’altro lato della scala corrispondono al quadrante in osservazione.
La scala non è indicata per l’utilizzo nel mascellare inferiore!
Con la scala 2 è possibile confrontare la
situazione clinica con valori ideali tipici
per le larghezze dentali medie e le posizioni assiali dei denti del mascellare
superiore. In tal modo si possono pianificare correzioni estetiche o identificare
deficit estetici.
Importante! Questa scala serve soltanto ad un relativo orientamento e non
deve essere intesa come obbligo a riportare individualmente le larghezze e le
angolazioni!
Nell’esempio dell’immagine, i rapporti della larghezza del dente sono da considerarsi relativamente ideali, mentre le larghezze dentali in totale appaiono
leggermente sopra la media. Gli assi degli incisivi laterali ed in particolare dei
canini invece sono leggermente troppo diritti.
Avvertenze!
L’utilizzo di diga è indicato per evitare un possibile ingerimento o
aspirazione di piccole parti.
Non utilizzare OptraSculpt Pad per scopi originariamente non previsti!
Disinfezione, pulizia e sterilizzazione
Annotazioni generali:
Page 10

rima di ogni utilizzo, tutti gli strumenti devono essere puliti e disinfettati. A
P
completamento, si consiglia espressamente una sterilizzazione nello sterilizzatore a vapore!
on utilizzare strumenti danneggiati. L’assistenza e le riparazioni devono
N
essere eseguite esclusivamente da personale specializzato specificatamente
addestrato.
on immergere gli strumenti in soluzioni di NaCI. (Altrimenti sussiste il
N
ericolo di corrosione e formazione di fori o incrinature da tensione.)
p
Nella manipolazione di tutti gli strumenti usati e contaminati è necessario
ndossare occhiali e guanti di protezione, che soddisfino i requisiti della
i
irettiva 89/686/CEE.
d
Effettuare la pulizia e la disinfezione subito dopo l’uso.
In generale, la disinfezione automatizzata in un apparecchio di
isinfezione e pulizia è da preferire a quella manuale!
d
Pre-trattamento:
Impurità grossolane non indurite sugli strumenti vanno rimosse cautamente
on un panno in cellulosa privo di peli. Per la pre-disinfezione, gli strumenti
c
vengono immersi completamente, senza formazione di bolle, in vasca per
disinfezione riempita con soluzione disinfettante alcalina, priva di aldeide
(p.es per 15 min. in ID 212 forte, Dürr Dental) (con filtro e coperchio).
er la rimozione manuale di impurità visibili, si devono utilizzare soltanto
P
spazzolini per pulizia morbidi. Non utilizzare in alcun caso spazzole in
metallo o lana di acciaio.
n caso di disinfezione automatizzata, dopo la pre-disinfezione, sciacquare
I
accuratamente gli strumenti sotto acqua corrente.
Pulizia e disinfezione automatizzata:
Apparecchio di pulizia e disinfezione (p.es. Termodisinfettore G7882,
–
Miele)
– Programma di pulizia e disinfezione (p.es. Vario TD)
– Detergente e disinfettante (p.es. Neodisher FA, Dr. Weigert)
n caso di sola pulizia automatizzata degli strumenti, è assolutamente indi-
I
spensabile una successiva disinfezione termica nello sterilizzatore a vapore!
Pulizia e disinfezione manuale:
spazzolino morbido (p.es. spazzola di pulizia per strumenti in Nylon,
–
Miltex)
– detergente e disinfettante (p.es. immersione per almeno 15 min. in
D 212 forte, Dürr Dental)
I
Dopo la pulizia e la disinfezione, sciacquare accuratamente gli strumenti nel
filtro con acqua corrente.
Asciugatura:
aria compressa oppure panno in cellulosa pulito, privo di peli
–
Sterilizzazione:
– idoneo confezionamento sterile (p.es. container di sterilizzazione in allu-
inio)
m
– autoclave (p.es. Systec HX-320)
– programma: sterilizzazione a vapore in pre-vuoto frazionati a 134°C per
min. 4 min.
Manutenzione, controllo e verifica:
Dopo la pulizia e la disinfezione avviene il controllo visivo dell’integrità,
funzionalità e pulizia degli strumenti. In caso di residui di sporco macroscopicamente visibili sugli strumenti, questi devono essere sottoposti ad un
ripetuto trattamento di pulizia e disinfezione.
Conservazione e staccaggio
– Conservazione degli strumenti in locali asciutti, per evitare la formazione
di condensa.
– Conservazione degli inserti OptraSculpt Pad in confezionamento originale
a temperatura ambiente e protetti da polvere, umidità, pressione e conta-
minazione.
– Conservazione a 12 - 28°C.
– Data di scadenza: vedi etichetta.
Avvertenze
– Lo strumento di base è autoclavabile e ideato per il riutilizzo per al-
meno 200 cicli di autoclave. Condizioni: vedi „Disinfezione, pulizia
e sterilizzazione“.
– Gli inserti di modellazione devono essere rimossi prima dell’autoclavag-
gio degli strumenti.
– Gli inserti di modellazione OptraSculpt Pad sono monouso e non
possono essere puliti, disinfettati, sterilizzati e riutilizzati.
– L’uso di diga è indicato poiché sussiste il pericolo di ingestione e aspira-
zione di piccole parti.
– Le istruzioni d’uso, nonchè informazioni dettagliate in merito alla
disinfezione di strumenti manuali si trovano sulla Homepage Ivo-
clar Vivadent AG (www.ivoclarvivadent.com).
Tenere lontano dalla portata dei bambini!
Solo per uso odontoiatrico!
Il prodotto é stato realizzato per l'impiego nel campo dentale e deve essere utilizzato secondo le istruzioni
d'uso. Il produttore non si assume alcuna responsabilitá per danni derivanti da diverso o inadeguato utilizzo. L'utente é tenuto a controllare personalmente l'idoneità del prodotto per gli impieghi da lui previsti,
soprattutto se questi impieghi non sono riportati nelle istruzioni d'uso.
Español
Descripción
OptraSculpt Pad es un instrumento de modelado diseñado para la adaptación, perfilado y contorneado de materiales de obturación de composite
modelable no polimerizados. OptraSculpt Pad consta de un instrumento
manual que puede esterilizarse en autoclave y accesorios en forma de disco
(almohadillas) de un solo uso con diámetros de 4 a 6 mm.
El instrumento manual consta de una espátula metálica en un extremo y de
un anillo de sujeción en el otro. Los accesorios en forma de disco de un solo
uso, compuestos por un material de espuma sintética suave y muy flexible, se
insertan en el anillo de sujeción. Estos accesorios de OptraSculpt Pad permiten al usuario configurar las restauraciones de composite amalgamable de
forma rápida y eficaz sin que se produzca adhesión entre el instrumento y el
composite. Esto supone una ventaja clara, en particular en la fabricación de
Page 11

estauraciones de gran tamaño de Clase III, IV y V y en las carillas laminadas
r
directas. Las escalas de referencia del instrumento manual ayudan a establecer las simetrías apropiadas, las proporciones en la anchura de las piezas y
as alineaciones a la hora de crear una restauración con composite.
l
omposición
C
– Los accesorios del OptraSculpt Pad son de polietileno y EVA.
– El instrumento manual es de acero inoxidable y PEEK.
ndicaciones
I
Adecuado para la adaptación, perfilado y contorneado de materiales de composite y compómero amalgamable no polimerizados en las restauraciones de
lase III, IV y V y las carillas de laminación directa.
C
Contraindicaciones
El uso de OptraSculpt Pad está contraindicado
si no se puede aplicar la técnica prescrita;
–
en el caso de alergia conocida de un paciente a cualquiera de los compo-
–
nentes de OptraSculpt Pad.
Efectos secundarios
o se conocen ninguno hasta la fecha.
N
Aplicación
– OBSERVACIÓN - Cepille los instrumentos NUEVOS con agua y jabón, en-
uáguelos y séquelos. A continuación efectúe un ciclo de higienización
j
completo (véase "Desinfección, limpieza y esterilización").
– Asegúrese de emplear únicamente accesorios e instrumentos OptraSculpt
Pad que estén en condiciones mecánicas e higiénicas impecables.
Asegúrese de insertar los accesorios OptraSculpt Pad en el instrumento
–
correctamente hasta conseguir un ajuste perfecto.
– No emplee instrumentos y accesorios dañados.
eleccione un accesorio OptraSculpt Pad de 4 mm o 6 mm, dependiendo del
S
tamaño de la restauración. Con unas pinzas esterilizadas extraiga el accesorio del envoltorio y colóquelo boca abajo sobre una superficie de trabajo
irme y no contaminada. Pase el anillo de sujeción sobre el vástago del acce-
f
orio y presione hasta que el anillo quede ajustado a la base del accesorio.
s
Coloque el accesorio OptraSculpt Pad boca
bajo sobre una superficie de trabajo.
a
Pase el instrumento sobre el vástago
del accesorio y presione.
Inserte el anillo sobre el vástago hasta el tope.
El accesorio OptraSculpt Pad está insertado
correctamente en el anillo de sujeción.
Los accesorios OptraSculpt Pad están diseñados exclusivamente para
un solo uso.
Utilice la espátula metálica del otro extremo del instrumento para coger y
colocar el material de restauración. Después de colocar el composite amalgamable no polimerizado en la caries preparada, adapte y dé forma al material
con el accesorio blando OptraSculpt Pad, empleando un movimiento de
frotación.
OptraSculpt Pad durante el uso clínico. Use la almohadilla frotando levemente con una presión
suave. Coloque el material y elimine el exceso
con la espátula metálica del otro extremo del
instrumento.
Una vez finalizada la restauración, saque OptraSculp Pad del instrumento y
deséchelo de forma adecuada. Posteriormente, desinfecte, limpie y esterilice
el instrumento.
Uso de las escalas de referencia
El instrumento OptraSculpt Pad cuenta con dos escalas de referencia.
La escala 1 presenta marcas de referencia sencillas para comparar las proporciones de la anchura entre dientes. Además, la línea horizontal de la escala facilita la evaluación de la línea del borde incisal.
Page 12
a escala 1 puede alinearse con el borde
L
incisal, por ejemplo, para comparar las
proporciones de la anchura del diente
ontralateral o evaluar la línea del borde
c
ncisal con la línea horizontal de la escala
i
a escala 2 presenta marcas de las anchuras medias ideales de los dientes
L
anteriores (líneas verticales). Esta escala se emplea como referencia en el diseño estético de las grandes reconstrucciones anteriores. Las marcas indican
olo valores relativos, a partir de los que se pueden derivar o evaluar las an-
s
huras individuales entre diferentes dientes. Las líneas oblicuas discontinuas
c
indican la posición media habitual del eje de los dientes del maxilar superior
y, por ello, también constituyen una guía útil en la reconstrucción de una es-
ética anterior armoniosa. La escala está colocada correctamente cuando el
t
riángulo del centro de la escala apunta hacia el punto de contacto de los in-
t
cisivos centrales y los números de ambos lados de la escala coinciden con los
cuadrantes que se están examinando. La escala no es adecuada para la
andíbula inferior.
m
La escala 2 se utiliza para comparar la
situación clínica con las proporciones de
a anchura media ideal de los dientes y
l
las alineaciones angulares de la dentición
anterior del maxilar superior. Por ello es
muy fácil planificar mejoras estéticas e
dentificar las áreas a perfeccionar.
i
Importante: Esta escala sólo indica valores relativos. Las anchuras y alineaciones angulares indicadas no deben adoptarse tal cual. Deben ajustarse a
as necesidades personales de cada paciente.
l
El ejemplo que se presenta anteriormente muestra las proporciones ideales
comparativas de la anchura de los dientes, aunque la anchura global de los
ientes pueda parecer ligeramente mayor que la media. Los ejes de los se-
d
undos incisivos y caninos parecen ser algo demasiado rectos.
g
Advertencia
Se recomienda emplear un dique de goma para evitar la ingestión o
spiración accidental de pequeños fragmentos.
a
No emplee OptraSculpt Pad en indicaciones distintas a las propuestas.
Desinfección, limpieza y esterilización
bservaciones generales:
O
Limpie y desinfecte los instrumentos antes del uso. Se recomienda encarecidamente esterilizar además los instrumentos en un autoclave de vapor.
o emplee instrumentos dañados. Las operaciones de reparación y manteni-
N
miento serán realizadas únicamente por personas con la instrucción adecuada.
No introduzca los instrumentos en solución de NaCI (para evitar el riesgo de
orrosión por picadura o tensofisuración).
c
Para manipular instrumentos usados o contaminados lleve guantes y gafas
de protección que cumplan los requisitos de la directiva 89/686/CEE.
Desinfecte y limpie el instrumental inmediatamente después del uso.
Generalmente es preferible emplear limpiar un aparato de lavado y
desinfección que hacerlo manualmente.
Limpieza preliminar:
Retire cuidadosamente los restos de gran tamaño no endurecidos de los instrumentos con un paño de celulosa sin pelusa. Para la desinfección preliminar, introduzca los instrumentos en una solución (con tapa y jaula) con
desinfectante alcalino sin aldehídos (por ejemplo, inmersión en ID 212 forte,
Dürr Dental, durante 15 min). Asegúrese de que los instrumentos estén completamente cubiertos de desinfectante y de que el desinfectante no tenga burbujas.
Emplee únicamente un cepillo suave para eliminar los residuos manualmente.
No emplee nunca un cepillo metálico ni lana de acero.
Para el procesamiento automatizado enjuague cuidadosamente los instrumentos en agua corriente tras la desinfección preliminar.
Limpieza y desinfección automatizadas:
– Unidad de lavado y desinfección (p. ej., aparato de lavado y desinfección
térmica Miele G7882)
– Programa de limpieza y desinfección (p. ej., Vario TD)
– Detergente y desinfectante (p. ej., Neodisher FA, Dr. Weigert)
Si los instrumentos se limpian únicamente en un aparato de lavado y desinfección, es obligatorio realizar después una desinfección térmica en un autoclave de vapor.
Limpieza y desinfección manuales:
– cepillo suave (p. ej., cepillo de limpieza de nailon Miltex para instrumentos)
– Detergente y desinfectante (p. ej., inmersión en ID 212 forte, Dürr Dental,
durante al menos 15 min)
Después de la limpieza y desinfección, enjuague abundantemente los instrumentos en la jaula interior con agua corriente.
Secado:
– Aire comprimido o paño de celulosa sin pelusa y limpio
Esterilización:
– Envasado estéril adecuado (p. ej., sistema de envases estériles de alumi-
nio)
– Autoclave (p. ej., Systec HX-320)
– Programa: esterilización con vapor con un proceso previo al vacío
fraccionado a 134°C (273°F) durante al menos 4 min
Mantenimiento, comprobación e inspección:
Después de lavar y desinfectar los instrumentos, efectúe una inspección
visual para comprobar si están limpios, intactos y funcionan correctamente. Si
se observan restos visibles macroscópicamente, repita los procesos de limpieza y desinfección.
Page 13

onservación
C
- Almacene el instrumental en condiciones secas para evitar la formación
de agua de condensación.
Almacene los accesorios OptraSculpt Pad en el envase original a tempe-
-
atura ambiente, protegidos del polvo, la humedad, la compresión y la
r
contaminación.
- Almacenar a 12°C-28°C (54°F-82°F)
Fecha de caducidad: consulte la inscripción impresa y la etiqueta.
-
Observaciones
– El instrumento manual puede desinfectarse en autoclave y está
revisto para usos múltiples y al menos 200 ciclos de esterilización
p
n el autoclave. Consulte en la sección “Desinfección, limpieza y esterili-
e
zación” los procesos estipulados.
– Antes de desinfectar en autoclave el instrumento manual, retire los acce-
orios de modelado.
s
Los accesorios OptraSculpt Pad son de un solo uso. No deben lim-
–
piarse, desinfectarse, esterilizarse ni reutilizarse.
– Dado que generalmente las piezas pequeñas pueden suponer un riesgo
e ingestión y aspiración, se recomienda emplear un dique de goma.
d
– Consúltense en las instrucciones de uso y en la información
detallada el reprocesamiento de los instrumentos manuales en la
ágina web de Ivoclar Vivadent AG (www.ivoclarvivadent.com).
p
¡Manténgase fuera del alcance de los niños!
¡Sólo para uso odontológico!
Este material ha sido fabricado para su uso dental y debe manipularse según las instrucciones de uso. El
fabricante no se hace responsable de los daños ocasionados por otros usos o una manipulación indebida.
Además, el usuario está obligado a comprobar, bajo su propia responsabilidad, antes de su uso, si el
material es apto para los fines previstos, sobre todo si éstos no figuran en las instrucciones de uso.
Português
Descrição
OptraSculpt Pad é um instrumento de modelagem projetado para adaptação,
onformação e delineamento intra-orais de compósitos de restauração, ainda
c
ão polimerizados. OptraSculpt Pad consiste de um instrumento manual auto-
n
clavável e de attachments (“pads”), com diâmetros variando de 4 a 6 mm.
O instrumento manual contém uma espátula de metal em um final de trabalho
um anel de retenção no outro. Os attachments de uso único e em forma de
e
discos, que são feitos de material de espuma sintética altamente flexível, são
inseridos no anel de manutenção. Os attachments OptraSculpt Pad permitem
ue os usuários possam rapidamente contornar o pacote das restaurações de
q
compósitos, sem encontrar viscosidade entre o instrumento e o compósito. Isto
apresenta uma vantagem clara, particularmente na fabricação de grandes
restaurações de Classes III, IV e V, e de facetas laminadas. As escalas de refe-
ência no instrumento manual ajudam no estabelecimento das simetrias apro-
r
priadas, nas proporções das larguras dos dentes e dos alinhamentos, ao criar
uma restauração com compósitos.
omposição
C
– Os attachments OptraSculpt Pad consistem de polietileno e EVA.
– O instrumento manual consiste de aço inoxidável e PEEK.
Indicação
Adequado para adaptar, modelar e delinear pacotes não polimerizados
de compósitos e de compômeros em restaurações de Classes III, IV e V, e
em facetas laminadas diretas.
Contra-indicação
O uso de Optra Sculpt Pad está contra-indicado:
– quando a técnica de trabalho estipulada não puder ser aplicada;
– quando o paciente for alérgico a qualquer um dos componentes do Optra
Sculpt Pad
Efeitos colaterais
Nenhum conhecido até esta data.
Aplicação
– NOTA - Escovar os instrumentos NOVOS com água ensaboada, enxaguar
e secar. A seguir, executar um ciclo de higiene completo (ver “Desinfec-
ção, limpeza e esterilização”).
– Tenha certeza de usar somente instrumentos e “attachments” do
OptraSculpt Pad que estejam em condições mecânicas e higiênicas
impecáveis.
– Tenha certeza de inserir corretamente os “attachments” do OptraSculpt
Pad no instrumento, para alcançar um ajuste perfeito.
– Não usar instrumentos e “attachments” deteriorados.
Selecionar um “attachment” OptraSculpt Pad de 4 mm ou 6 mm, dependendo do tamanho da restauração. Usando pinças esterilizadas, remover o
“attachment” da embalagem e colocar em uma superfície de trabalho plana,
firme e livre de contaminação. A seguir, deslizar o anel de retenção sobre o
corpo do “attachment”, aplicando pressão, até situar o anel na base do “attachment”.
Colocar o “attachment” OptraSculpt Pad sobre
uma superfície de trabalho plana.
Deslizar o instrumento sobre o corpo do “
attachment”, aplicando pressão.
Page 14

nserir o anel sobre o corpo, até alcançar a base.
I
O attachment OptraSculpt Pad está, de modo
orreto, inserido no anel de retenção.
c
Os “attachments” OptraSculpt Pad são projetados somente para um
único uso!
sar a espátula de metal no outro lado do instrumento para apanhar e
U
colocar o material restaurador. Depois de colocar o pacote do compósito na
cavidade preparada, adaptar e delinear o material com o OptraSculpt Pad
“attachment” macio, usando movimentos de toques leves.
ptraSculpt Pad durante o uso clínico. Usar a
O
almofada com movimentos leves de toque e
aplicando somente leve pressão. Colocar o ma-
erial e remover o excesso com a espátula de
t
metal, usando a outra extremidade do instrumento.
Depois de ter completado a restauração, remover o OptraSculp Pad do instru-
ento e dispor adequadamente dele. A seguir, desinfetar, limpar e esterilizar
m
o instrumento.
Usando as escalas de referência
instrumento OptraSculpt Pad apresenta duas escalas de referência.
O
A Escala 1 provê planos de referência marcados para comparar as
proporções de largura de “dente-para-dente”. Além disso, a linha horizontal
da escala facilita a avaliação da linha da extremidade incisal.
A Escala 1 pode ser alinhada com a margem incisal para, p.ex., comparar o dente
lateral com o dente contralateral nas pro-
orções de largura e/ou avaliar a mar-
p
gem incisal, em relação à linha horizontal
da escala.
A Escala 2 contém as marcações para a média ideal das larguras dos dentes
anteriores (linhas verticais). Esta escala é usada como referência para o
desígn estético das reconstruções anteriores extensas. As marcações apresentam somente valores relativos, a partir dos quais podem ser derivadas as larguras individuais dos dentes ou podem ser avaliadas, uma em relação à
outra. As marcações pontilhadas oblíquas indicam a posição típica e média
do eixo do dente no maxilar e, deste modo, também permitem útil orientação
para as reconstruções estéticas anteriores harmoniosas. A escala é posicionada corretamente quando o triângulo, do meio da balança, apontar para o
ponto de contato entre os incisivos centrais e quando os números, de ambos
os lados da balança, são concordantes com os quadrantes que estão sendo
examinados. A escala é inadequada para uso na mandíbula!
A Escala 2 é utilizada para comparar a
situação clínica que a largura ideal do
dente comum proporciona e os alinhamentos angulares na dentição anterior
do maxilar. Por conseguinte, podem ser
facilmente planejados os aperfeiçoamentos estéticos e as áreas de melhoria
podem ser identificadas
Importante! Esta escala só indica valores relativos. As larguras marcadas e
os alinhamentos angulares não podem ser adotados como eles são. Eles
devem ser ajustados para satisfazer as exigências individuais do paciente.
O exemplo descrito acima mostra, de modo comparativo, as proporções
ideais das larguras dos dentes, até mesmo quando a largura do dente pode
parecer ligeiramente maior que a média. Os eixos dos incisivos laterais e dos
caninos parecem também estar em posição.
Advertência
É recomendado usar um dique de borracha para evitar a ingestão ou
a aspiração de pequenas partes.
Não usar o OptraSculpt Pad para propósitos diferentes dos indicados.
Desinfecção, limpeza e esterilização
Notas gerais:
Limpar e desinfetar todos os instrumentos, antes de cada uso. Recomenda-se
que os instrumentos também sejam esterilizados em um esterilizador a vapor.
Não usar instrumentos estragados. Só o pessoal adequadamente treinado
deve executar os consertos e os trabalhos de manutenção.
Não colocar os instrumentos em solução de NaCl (para evitar o risco de
corrosão ou de corrosão por fadiga).
Usar luvas protetoras e óculos de proteção que obedeçam as exigências da
norma 89/686/EEC para manusear quaisquer instrumentos usados e contaminados.
Desinfetar e limpar os instrumentos, imediatamente depois do uso.
Geralmente, o processamento realizado dentro de uma unidade
“lavadora-desinfectora” (“washer-disinfector”) é preferível ao da
limpeza manual.
Page 15

ré-limpeza
P
De um modo cuidadoso, remover os grandes e endurecidos resíduos dos instrumentos, usando um tecido de celulose, livre de linho. Para efetuar a desin-
ecção preliminar, colocar os instrumentos em banho de desinfecção (com a
f
ampa e o suplemento da peneira) cheio com desinfetante alcalino, livre de
t
aldeído (p.ex., imersão em ID 212 forte, Dürr Dental, por 15 min.). Certificarse de que os instrumentos estejam totalmente cobertos por desinfetante e
ue o desinfetante esteja livre de bolhas.
q
Somente usar uma escova macia para a remoção manual de resíduos. Nunca
usar uma escova de metal ou de lã de aço.
ara o processo automatizado, enxaguar os instrumentos debaixo de água
P
orrente, depois da desinfecção preliminar.
c
Limpeza automatizada e desinfecção:
Unidade “washer-disinfector” (p.ex., Miele thermal washer-disinfector
–
7882).
G
– Programa de limpeza e desinfecção (p.ex., Vario TD).
– Detergente e desinfetante (p.ex., Neodisher FA, Dr. Weigert).
uando os instrumentos apenas forem limpos dentro de uma lavadora-desin-
Q
fectora, a desinfecção térmica subseqüente, em um esterilizador a vapor, será
obrigatória.
impeza manual e desinfecção:
L
– Escova macia (p.ex., escova de nylon Miltex para instrumentos)
– Detergente e desinfetante (p.ex., imersão em ID 212 forte, Dürr Dental,
durante, pelo menos, 15 min.)
epois da limpeza e da desinfecção, enxaguar completamente os
D
instrumentos do suplemento da peneira sob água corrente.
Secagem:
ecar com ar comprimido ou limpar com tecido de celulose, livre de linho.
S
Esterilização:
– Embalagem estéril adequada (p.ex., sistema de container estéril de
lumínio).
a
– Autoclave (p.ex., Systec HX-320)
– Programa: esterilização a vapor com processo de fracionado de
pré-vácuo a 134 °C (273 °F) de, no mínimo, 4 min.
Manutenção, checagem e inspeção:
Depois da limpeza e desinfecção, efetuar a inspeção visual dos instrumentos,
para verificar se eles estão limpos, não danificados e se estão funcionando
orretamente. Se, macroscopicamente, escombros residuais estiverem presen-
c
tes e forem visíveis, repetir os processos de limpeza e de desinfecção.
Armazenamento
Armazenar os instrumentos em condições secas para evitar a formação
–
de condensação.
– Armazenar os “attachments” OptraSculpt Pad na embalagem original,
na temperatura ambiente, protegidos do pó, umidade, compressão e
ontaminação.
c
– Armazenar em 12 - 28 °C (54 - 82 °F).
– Data de validade: ver inscrição impressa e rótulo.
Notas
– O instrumento manual é autoclavável e projetado para uso múltiplo
de, pelo menos, 200 ciclos de esterilização na autoclave. Ver
“Desinfecção, limpeza e esterilização” para os procedimentos estipulados.
– Antes de autoclavar o instrumento manual, remover os “attachments” de
modelagem.
– Os “attachments” OptraSculpt Pad são planejados para um único
uso. Eles não devem ser limpos, desinfetados, esterilizados e re-
usados.
– Desde que as partes pequenas geralmente podem envolver um risco de
ingestão e aspiração, é aconselhável usar um dique de borracha.
– As Instruções de Uso e a informação detalhada sobre o reprocessa-
mento dos instrumentos manuais estão disponíveis no site da Web
da Ivoclar Vivadent AG (www.ivoclarvivadent.com).
Manter fora do alcance das crianças.
Somente para uso odontológico.
Este material foi fabricado somente para uso dental e deve ser manipulado de acordo com as Instruções
de Uso. O fabricante não é responsável pelos danos causados por outros usos ou por manipulação incorreta. Além disto, o usuário está obrigado a comprovar, antes do uso e sob sua responsabilidade, se o
material é compatível com a utilização desejada, principalmente quando esta utilização não está indicada
nestas Instruções de Uso. Descrições e dados não constituem nenhum tipo de garantia e, por isto, não
possuem qualquer vinculação.
Svenska
Beskrivning
OptraSculpt Pad är ett modelleringsinstrument avsett för intraoral adaptering,
formgivning och konturering av opolymeriserade, packningsbara kompositer
avsedda som tandfyllningsmaterial. OptraSculpt Pad består av ett autoklaverbart, handhållet instrument och skivformade tillbehör (s.k. pads) i diameter
från 4 till 6 mm, för engångsbruk.
Det handhållna instrumentet består av en metallspatel i den ena arbetsänden
och en ringformad hållare i den andra änden. De skivformade engångstillbehören som är tillverkade av ett mjukt, högelastisk skummaterial förs in i den
ringformade hållaren. De här OptraSculpt Pad-tillbehören gör det möjligt för
användaren att konturera packningsbara kompositfyllningar snabbt och effektivt utan att kompositmaterialet klibbar vid instrumentet. Detta är en klar
fördel, särskilt vid uppbyggnad av stora fyllningar av klass lll, lV och V samt
direkta skalfasader. Referenslinjaler på det handhållna instrumentet hjälper
till att skapa riktig symmetri, tandbreddsproportion och linjering när
kompositfyllningen byggs upp.
Sammansättning
– OptraSculpt Pad-tillbehören består av polyetylen och EVA.
– Det handhållna instrumentet består av rostfritt stål och PEEK.
Avsedd användning
Lämpligt för adaptering, formgivning och konturering av opolymeriserade,
packningsbara komposit- och kompomermaterial i fyllningar av klass lll, lV
och V samt direkta skalfasader.
Page 16
ontraindikation
K
Användning av OptraSculpt Pad är kontraindicerad
– om den angivna arbetstekniken inte kan tillämpas
om patienten har en känd allergi mot något av de ingående materialen i
–
ptraSculpt Pad.
O
Biverkningar
nga kända vid dags dato
I
illämpning
T
– OBS! – Diska NYA instrument med diskmedel och vatten, skölj och torka.
Utför därefter en fullständig hygiencykel (se ”Desinficering, rengöring
ch sterilisering”).
o
– Säkerställ att du bara använder OptraSculpt Pad-tillbehör och instrument
som är i oklanderligt mekaniskt och hygieniskt skick.
Säkerställ att OptraSculpt Pad-tillbehören införs korrekt i instrumentet så
–
tt de sitter fast ordentligt.
a
– Använd inte instrument eller tillbehör som är skadade.
Beroende på fyllningens storlek väljer du antingen ett 4 mm eller 6 mm
ptraSculpt Pad-tillbehör. Tag tillbehöret ur förpackningen med en steril
O
pincett och lägg det platt på en stabil, ren arbetsyta. Låt därefter den
ringformade hållaren glida med tryck över stommen på tillbehöret, tills
ringen ligger plant mot tillbehörets basdel.
lacera OptraSculpt Pad-tillbehöret plant
P
på en arbetsyta.
Låt den ringformade hållaren glida med tryck
ver tillbehörsstommen.
ö
För ringen över stommen tills den kommer i
kontakt med basdelen.
OptraSculpt Pad-tillbehöret är korrekt infört i
den ringformade hållaren.
OptraSculpt Pad-tillbehöret är konstruerat endast för engångsbruk!
Använd metallspateln på den andra änden av instrumentet för att ta och
placera fyllningsmaterialet. När den opolymeriserade, packningsbara
kompositen placerats i den preparerade kaviteten, adapterar och konturerar
du fyllningen genom att trycka lätt upprepade gånger med det mjuka
OptraSculpt Pad-tillbehöret på kompositmaterialet.
OptraSculpt Pad under klinisk användning. Tryck
lätt upprepade gånger med pad-instrumentet.
Använd metallspateln i den andra änden av instrumentet för att placera material och ta bort
överskott.
När fyllningen är klar tar du bort OptraSculp Pad-tillbehöret från instrumentet
och kasserar det enligt klinikens rutiner. Därefter desinficeras, rengörs och
steriliseras instrumentet.
Så här använder du referenslinjalerna
OptraSculpt Pad-instrument har två referenslinjaler.
Linjal 1 tillhandahåller referensmarkeringar för jämförelse av breddproportioner tand för tand. Dessutom underlättar den horisontella linjen på linjalen bedömning av linjen på den incisala kanten.
Linjal 1 kan riktas in efter den incisala
kanten för att t.ex. jämföra kontralaterala
tandbreddsproportioner eller utvärdera
linjen på den incisala kanten gentemot
den horisontella linjen på linjalen.
Linjal 2 innehåller markeringar för idealiska genomsnittsbredder på framtänder (vertikala linjer). Den här linjalen används som referens vid estetisk
utformning av omfattande framtandsrekonstruktioner. Markeringarna visar
endast relativa värden från vilka tändernas individuella bredd kan räknas ut
eller bedömas i relation till varandra. De något lutande, streckade linjerna
indikerar tandaxelns typiska genomsnittsläge i överkäken och ger därför användbar vägledning för att återställa ett harmoniskt utseende på fronttänderna. Linjalen är korrekt placerad för undersökning när triangeln i mitten på
linjalen är riktad mot de mediala incisivernas kontaktpunkt och skaldelarna
på ömse sidor följer kvadranterna. Linjalen kan inte användas i underkäken!
Page 17

injal 2 används för att i överkäksfron-
L
ten jämföra den kliniska situationen mot
idealiska tandbreddsproportioner och
inkelinställningar. På så sätt kan det bli
v
ättare att planera estetiska förändringar
l
och hitta områden som behöver förbättras.
iktigt! Linjalen visar enbart relativa värden. De markerade bredderna och
V
inkelinställningarna kan inte bara övertas som de är. De ska justeras för att
v
uppfylla behoven hos varje individuell patient.
xemplet ovan visar jämförelsevis idealiska tandbreddsproportioner även om
E
en totala tandbredden kan verka något bredare än genomsnittet. Axlarna
d
på de laterala incisiverna och hörntänderna verkar vara en aning för raka.
Varning
i rekommenderar användning av kofferdam för att undvika att små-
V
delar sväljs eller inandas.
Använd bara OptraSculpt Pad för den avsedda indikationen!
esinficering, rengöring och sterilisering
D
Allmän information:
Rengör och desinficera varje instrument före varje användning. Vi rekommenderar att du dessutom steriliserar instrumenten i en autoklav.
nvänd inte skadade instrument. Endast personal som fått lämplig utbildning
A
ska utföra reparations- och underhållsarbeten.
Placera inte instrumenten i NaCl-lösning. Detta för att undvika risken för
prickbildning genom gropfrätning eller spänningskorrosion.
s
Vid hantering av använda och kontaminerade instrument ska skyddshandskar
och skyddsglasögon som uppfyller kraven i direktiv 89/686/EEG användas.
esinficera och rengör instrumenten omedelbart efter användning.
D
Principiellt är rengöring i diskdesinfektor att föredra framför manuell
rengöring.
örrengöring:
F
Avlägsna omsorgsfullt stora opolymeriserade rester från instrumentet med
hjälp av en luddfri pappersnäsduk. För inledande desinficering placeras in-
trumenten i ett desinfektionsbad med lock och silinsats, fyllt med ett alde-
s
hydfritt, alkaliskt desinfektionsmedel (t.ex. nedsänkning i ID 212 Forte från
Dürr Dental i 15 min.). Säkerställ att instrumenten är fullständigt täckta med
desinfektionsmedel och att det inte finns luftbubblor i desinfektionsmedlet.
nvänd enbart mjuk borste för att manuellt avlägsna ev. rester. Använd aldrig
A
metallborste eller stålull.
Vid automatisk bearbetning sköljer du instrumenten under rinnande kranvat-
en efter den inledande desinfektionen.
t
Automatisk rengöring och desinfektion:
– Diskdesinfektor (t.ex. Miele G7882 diskdesinfektor med termisk
esinfektion)
d
– Rengörings- och desinfektionsprogram (t.ex. Vario TD)
– Rengörings- och desinfektionsmedel (t.ex. Neodisher FA, Dr. Weigert)
Om instrumenten endast diskas i diskdesinfektorn måste termisk
desinficering i autoklav utföras efteråt.
Manuell rengöring och desinfektion:
– Mjuk borste (t.ex. Miltex diskborste av nylon för instrument)
– Disk- och desinfektionsmedel (t.ex. nedsänkning i ID 212 Forte från
Dürr Dental, i minst 15 min.)
Efter rengöring och desinfektion ska instrumenten omsorgsfullt sköljas i
silinsatsen under rinnande kranvatten.
Torkning:
– Med tryckluft eller ren, luddfri pappersnäsduk
Sterilisering:
– Lämplig sterilförpackning (t.ex. sterilbehållarsystem av aluminium)
– Autoklav (t.ex. Systec HX-320)
– Program: Ångsterilisering med fraktionerad förvakuumbehandling vid
134 °C (273 °F) i minst 4 min.
Underhåll, kontroll och inspektion:
Efter rengöring och desinfektion av instrumenten ska de noga granskas så att
de är rena, oskadade och fungerar som avsett. Om det finns restdebris som kan
ses med blotta ögat ska rengörings- och desinfektionsbehandlingen upprepas.
Förvaring
– Förvara instrumenten på torr plats så att kondensbildning undviks.
– Förvara OptraSculpt Pad-tillbehören i originalförpackningen i rumstempe-
ratur skyddade från damm, fukt, sammantryckning och kontaminering.
– Förvara vid 12–28 °C (54–82 °F).
– Utgångsdatum: se tryckt text och märkning.
OBS!
– Det handhållna instrumentet är konstruerat för flergångsanvänd-
ning och autoklavering, med minst 200 steriliseringscykler i autoklav. Se ”Desinficering, rengöring och sterilisering” för behandlingarna
som ska tillämpas.
– Avlägsna modellerande tillbehör från det handhållna instrumentet innan
detta autoklaveras.
– OptraSculpt Pad-tillbehören är avsedda endast för engångsbruk! De
får inte rengöras, desinficeras, steriliseras och återanvändas.
– Använd alltid kofferdam eftersom det annars finns risk att smådelar
sväljs eller inandas.
– Bruksanvisningen och detaljerad information om hur de hand-
hållna instrumenten ska återbearbetas finns på Ivoclar Vivadent
AG-webbplatsen (www.ivoclarvivadent.com).
Förvaras utom räckhåll för barn!
Endast för tandläkarbruk!
Materialet har utvecklats för användning inom den dentala marknaden. Materialet skall bearbetas enligt
bruksanvisningen. Ansvar tas inte för skada som p.g.a. brist i instruktions eller föreskriven arbetsgång.
Användaren är ansvaring för materialets lämplighet samt för användning inom andra områden än de som
rekommenderas i bruksanvisingen.
Page 18

Dansk
Beskrivelse
OptraSculpt Pad er et modelleringsinstrument, der er designet til intraoral til-
asning, formning og konturering af uhærdede, pakbare kompositfyldnings-
p
materialer. OptraSculpt Pad består af et autoklaverbart håndholdt instrument
og skiveformede engangsindsatser (puder) i diametre fra 4 til 6 mm.
et håndholdte instrument indeholder en metalspatel i den ene arbejdsende
D
g en holdering i den anden. De skiveformede engangsindsatser, der er frem-
o
stillet af blødt, meget fleksibelt syntetisk skummateriale, sættes i holderingen. Disse OptraSculpt Pad-indsatser gør brugeren i stand til at konturere
akbare kompositrestaureringer hurtigt og effektivt uden at opleve en klæ-
p
ende fornemmelse mellem instrument og komposit. Dette er en klar fordel,
b
ærligt ved fremstilling af store restaureringer i klasse II, IV og V samt direkte
s
laminatfacader. Referenceskalaer på det håndholdte instrument hjælper med
at etablere korrekte symmetrier, tandbreddeproportioner og justeringer, når
er fremstilles en restaurering med kompositmaterialer.
d
Sammensætning
– OptraSculpt Pad-indsatserne består af polyethylen og EVA.
Det håndholdte instrument består af rustfrit stål og PEEK.
–
Indikationer
Egnet til tilpasning, formning og konturering af uhærdede, pakbare kompositog kompomer-materialer til restaureringer i klasse III, IV og V samt direkte
aminatfacader.
l
ontraindikationer
K
nvendelsen af OptraSculpt Pad er kontraindiceret,
A
– hvis den stipulerede arbejdsteknik ikke kan anvendes;
– hvis en patient vides at være allergisk over for en eller flere
f komponenterne i OptraSculpt Pad.
a
Bivirkninger
Ingen kendte til dato.
nvendelse
A
– BEMÆRK – Børst NYE instrumenter med sæbevand, skyl og tør dem. Der-
næst udføres en fuldstændig hygiejnecyklus (se “Desinfektion, rengøring
og sterilisering”).
Sørg for kun at anvende OptraSculpt Pad-indsatser og instrumenter, der
–
er er i ulastelig mekanisk og hygiejnisk tilstand.
– Sørg for at indsætte OptraSculpt Pad-indsatserne i instrumentet korrekt
or at opnå en tætsiddende tilpasning.
f
– Anvend ikke beskadigede instrumenter og indsatser.
Vælg enten en 4 mm eller 6 mm OptraSculpt Pad-indsats, afhængig af restaureringens størrelse. Vha. en steriliseret pincet fjernes indsatsen fra pakningen,
g den lægges fladt ned på en fast, ukontamineret arbejdsflade. Dernæst
o
skubbes holderingen over indsatsen, mens der trykkes ned, indtil ringen sidder fladt på bunden af indsatsen.
nbring OptraSculpt Pad-indsatsen fladt på en
A
arbejdsflade.
Skub instrumentet hen over indsatsen og
tryk ned.
Sæt ringen over indsatsen, indtil den når
bunden.
OptraSculpt Pad-indsatsen er sat korrekt
i holderingen.
OptraSculpt Pad-indsatserne er udelukkende designet til
engangsbrug!
Anvend metalspatelen på den anden side af instrumentet til opsamling og
anbringelse af restaureringsmaterialet. Når det uhærdede kompositmateriale
er blevet anbragt i den klargjorte kavitet, tilpasses og formes materialet med
den bløde OptraSculpt Pad-indsats med en duppende bevægelse.
OptraSculpt Pad under klinisk anvendelse.
Anvend pad'en med en duppende bevægelse og
tryk kun let. Anbring materialet og fjern
overskydende materiale med metalspatelen i
den anden ende af instrumentet.
Page 19

år restaureringen er færdig, fjernes OptraSculpt Pad-en fra instrumentet, og
N
den bortskaffes behørigt. Efterfølgende desinficeres, rengøres og steriliseres
instrumentet.
ådan anvendes referenceskalaerne
S
ptraSculpt Pad-instrumentet har to referenceskalaer.
O
Skala 1 giver tydelige referencemarkeringer til sammenligning af
reddeproportionerne tand-til-tand. Endvidere gør den vandrette linje på
b
kalaen evalueringen af incisalkantlinjen nemmere.
s
Skala 1 kan holdes mod incisalkanten
f.eks. til sammenligning af de kontralate-
ale tandbreddeproportioner og/eller til
r
evaluering af incisalkantlinjen i forhold til
skalaens vandrette linje.
Skala 2 indeholder markeringerne for gennemsnitsidealbredden på fortænder (lodrette linjer). Denne skala anvendes som en reference i det æstetiske
esign af omfattende anteriore rekonstruktioner. Markeringerne viser kun
d
relative værdier, fra hvilke de individuelle bredder på tænderne kan udledes
eller vurderes i forhold til hinanden. De skrå, stiplede markeringer angiver
en typiske gennemsnitlige position for tandaksen i overkæben og giver såle-
d
es også en nyttig retningslinje for rekonstruktion af harmonisk anterior
d
æstetik. Skalaen er anbragt korrekt, hvis trekanten i midten af skalaen peger
mod kontaktpunktet mellem de centrale incisiver, og tallene i begge sider af
kalaen stemmer med de kvadranter, der undersøges. Skalaen er uegnet til
s
anvendelse i underkæben!
Skala 2 benyttes til at sammenligne den
liniske situation med de ideelle gennem-
k
nitlige tandbreddeproportioner og vinkel-
s
justeringer i den maksillære, anteriore
dentition. Dermed kan æstetiske forbed-
inger nemt planlægges og områder til
r
forbedring identificeres.
igtigt! Denne skala indikerer kun relative værdier. De markerede bredder
V
og vinkeljusteringer bør ikke blot anvendes, som de er. De bør justeres, så de
passer til den individuelle patients behov.
venstående billedeksempel viser forholdsvis ideelle tandbreddeproportioner,
O
selvom den overordnede tandbredde kan synes lidt større end gennemsnittet.
Insicivernes (2+) og hjørnetændernes akser synes en smule for lige.
Advarsel
et anbefales at anvende en kofferdam for at undgå utilsigtet
D
indtagelse eller aspiration af små dele.
OptraSculpt Pad må ikke anvendes til andre formål end de tilsigtede!
esinfektion, rengøring og sterilisering
D
Generelle bemærkninger:
Rengør og desinficér hvert instrument før hver brug. Det anbefales, at
instrumenterne endvidere steriliseres i en dampsteriliseringsenhed.
Beskadigede instrumenter må ikke anvendes. Kun korrekt uddannet
personale må udføre reparationer og vedligeholdelse.
Instrumenterne må ikke anbringes i NaCI-opløsning (for at undgå risikoen for
grubetæring og/eller spændingskorrosionsrevnedannelse).
Der skal bæres beskyttelseshandsker og beskyttelsesbriller i henhold til
kravene i direktiv 89/686/EØF under håndtering af brugte og kontaminerede
instrumenter.
Desinficér og rengør instrumenterne straks efter brug.
Generelt er behandling i en vaske-/desinfektionsmaskine at
foretrække frem for manuel rengøring.
Indledende rengøring:
Fjern forsigtigt store, uhærdede rester fra instrumenterne vha. en fnugfri
celluloseklud. Til indledende desinfektion anbringes instrumenterne i et
desinfektionsbad (med låg og siindsats) fyldt med aldehydfri alkalisk
desinfektionsmiddel (f.eks. nedsænkning i ID 212 forte, Dürr Dental, i
15 min.). Sørg for, at instrumenterne er helt dækket af desinfektionsmiddel,
og at desinfektionsmidlet er fri for bobler.
Brug kun en blød børste til manuel fjernelse af rester. Brug aldrig børster af
metal eller ståluld.
Forud for automatiseret behandling skylles instrumenterne omhyggeligt
under rindende vand efter den indledende desinfektion.
Automatiseret rengøring og desinfektion:
– Vaske-/desinfektionsmaskine (f.eks. Mieles termiske vaske-/desinfektions-
maskine G 7882)
– Rengørings- og desinfektionsprogram (f.eks. Vario TD)
– Rengørings- og desinfektionsmiddel (f.eks. Neodisher FA, Dr. Weigert)
Hvis instrumenterne kun rengøres i en vaske-/desinfektionsmaskine, er efterfølgende termiske desinfektion i et dampsteriliseringsapparat obligatorisk.
Manuel rengøring og desinfektion:
– Blød børste (f.eks. Miltex nylon rengøringsbørste til instrumenter)
– Rengørings- og desinfektionsmiddel (f.eks. nedsænkning i ID 212 forte,
Dürr Dental, i mindst 15 min.)
Efter rengøring og desinfektion skylles instrumenterne grundigt i siindsatsen
under rindende vand.
Tørring:
– Komprimeret luft eller en ren, fnugfri celluloseklud
Sterilisering:
– Egnet steril indpakning (f.eks. et sterilt beholdersystem af aluminium)
– Autoklave (f.eks. Systec HX-320)
– Program: dampsterilisering vha. en fraktioneret præ-vakuumproces ved
134 °C i mindst 4 min.
Vedligeholdelse, kontrol og inspektion:
Efter rengøring og desinfektion af instrumenterne undersøges instrumenterne
visuelt for at se, om de er rene, ubeskadigede og fungerer korrekt. Hvis makroskopisk synlige rester er til stede, gentages rengørings- og desinfektionsprocessen.
Page 20
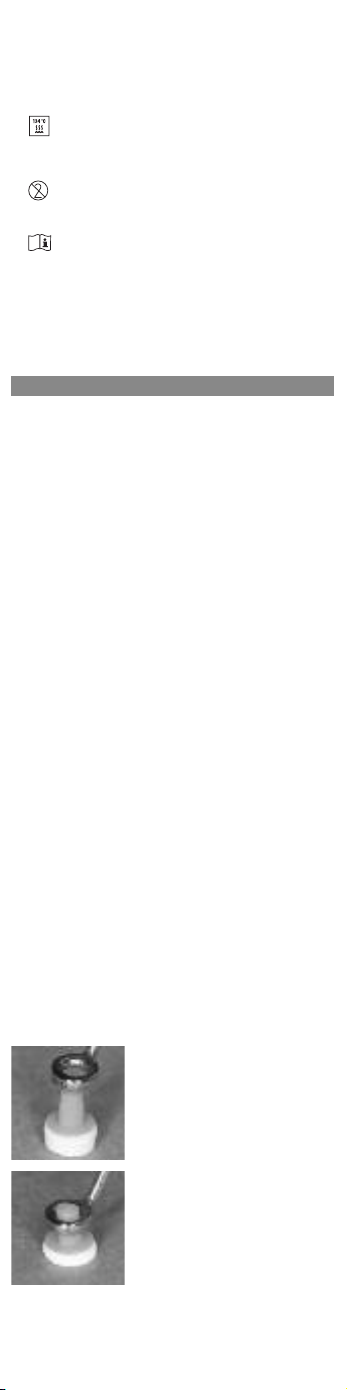
pbevaring
O
– Opbevar instrumenterne et tørt sted for at undgå kondensdannelse.
– Opbevar OptraSculpt Pad-indsatserne i den originale emballage ved stue-
emperatur, beskyttet mod støv, fugt, kompression og kontaminering.
t
Opbevares ved 12-28 °C.
–
– Udløbsdato: se det påtrykte stempel og etiketten.
emærkninger
B
Det håndholdte instrument kan autoklaveres og er designet til fler-
–
gangsbrug og mindst 200 steriliseringscyklusser i autoklaven. Se
“Desinfektion, rengøring og sterilisering” for de stipulerede procedurer.
Før autoklavering af det håndholdte instrument, fjernes modelleringsind-
–
atserne.
s
– OptraSculpt Pad-indsatserne er kun beregnet til engangsbrug. De
må ikke rengøres, desinficeres, steriliseres eller genbruges.
Siden små dele generelt udgør en risiko for indtagelse og aspiration tilrå-
–
des det at anvende en kofferdam.
– Brugsanvisningen og detaljerede oplysninger om klargøring af
åndholdte instrumenter fås på Ivoclar Vivadent AG's website
h
www.ivoclarvivadent.com).
(
Opbevares utilgængeligt for børn.
Kun til dentalt brug.
Produktet er udviklet til dentalt brug og må kun benyttes som beskrevet i brugsanvisningen. Skader som
skyldes forkert brug eller anvendelse påtager producenten sig intet ansvar for. Derudover er brugeren af
produktet forpligtet til på eget ansvar at sikre sig, at produktet er egnet til en given anvendelse, navnlig
hvis anvendelsen ikke er anført i brugsanvisningen.
uomi
uvaus
K
OptraSculpt-alusta on muotoiluinstrumentti, joka on tarkoitettu kovettumattomien pakattavien yhdistelmämuovitäytteiden intraoraaliseen adaptaatioon,
uotoiluun ja hahmotteluun. OptraSculpt-alusta sisältää autoklavoitavan
m
äsi-instrumentin ja kertakäyttöisiä levynmuotoisia kiinnittimiä (alustoja),
k
joiden halkaisijat vaihtelevat välillä 4–6 mm.
Käsi-instrumentti sisältää metallisen lastan toisessa työskentelypäässä ja
itorenkaan toisessa. Kertakäyttöiset levynmuotoiset kiinnittimet, jotka on
p
tehty pehmeästä, joustavasta synteettisestä vaahtomuovista, asetetaan pitorenkaaseen. Nämä OptraSculpt-alustan kiinnittimet mahdollistavat pakatta-
ien yhdistelmämuovipaikkojen muotoilun nopeasti ja tehokkaasti ilman, että
v
instrumentin ja yhdistelmämuovin välissä esiintyy takertuvuutta. Tämä on
selkeä etu, erityisesti suurten luokan III, IV ja V restauraatioiden ja suorien
laminaattien valmistuksessa. Käsi-instrumentin viiteasteikot auttavat määrit-
ämään asianmukaisen symmetrian, hampaan leveyssuhteet ja kohdistukset
t
luotaessa restauraatiota yhdistelmämuovimateriaaleista.
Koostumus
OptraSculpt-alustan kiinnittimet on valmistettu polyeteenistä ja EVA:sta.
–
– Käsi-instrumentti on valmistettu ruostumattomasta teräksestä ja
PEEK-materiaalista.
Indikaatiot
Sopii kovettumattomien, pakattavien yhdistelmämuovi- ja kompomeerimateriaalien adaptointiin, muotoiluun ja hahmotukseen luokan III, IV ja V restauraatioissa ja suorissa laminaateissa.
Kontraindikaatio
OptraSculpt-alustan käyttö on vasta-aiheista
– jos määritettyä työskentelytekniikkaa ei voida käyttää
– jos potilaan tiedetään olevan allerginen jollekin OptraSculpt-alustan
ainesosalle.
Haittavaikutukset
Ei tähän mennessä tunnettuja.
Käyttö
– HUOMAUTUS – Harjaa UUDET instrumentit saippuavedellä, huuhtele ja
kuivaa. Suorita sitten täydellinen desinfiointi, puhdistus ja sterilointi
(katso "Desinfiointi, puhdistus ja sterilointi").
– Käytä vain OptraSculpt-alustan kiinnittimiä ja instrumentteja, jotka ovat
moitteettomassa kunnossa mekaanisesti ja steriloitu vaatimusten mukaisesti.
– Muista asettaa OptraSculpt-alustan kiinnittimet instrumenttiin oikein,
jotta ne asettuvat tiukasti.
– Älä käytä vaurioituneita instrumentteja ja kiinnittimiä.
Valitse joko 4 tai 6 mm:n OptraSculpt-alustan kiinnitin restauraation koon
mukaan. Poista kiinnitin pakkauksesta steriileillä pinseteillä ja aseta se
makaamaan tukevalle, kontaminaatiottomalle työskentelyalustalle. Liu'uta
seuraavaksi pitorengasta kiinnittimen rungon yli alaspäin, kunnes rengas on
sijoittunut tasaisesti kiinnittimen pohjaan.
S
Aseta OptraSculpt-alustan kiinnitin
makaamaan työskentelyalustalle.
Liu'uta instrumenttia liitännän rungon yli
alaspäin.
Page 21

ie rengasta rungon päälle, kunnes se saavuttaa
V
pohjan.
OptraSculpt-alustan kiinnitin on asetettu oikein
itorenkaaseen.
p
OptraSculpt-alustan kiinnittimet on suunniteltu vain
kertakäyttöisiksi!
ta kiinni restauraatiomateriaalista instrumentin toisessa päässä olevalla
O
etallilastalla ja sijoita materiaali. Kun olet asettanut kovettumattoman
m
pakattavan yhdistelmämuovin valmisteltuun reikään, mukauta ja muotoile
materiaali pehmeällä OptraSculpt-alustan kiinnittimellä taputtelemalla.
ptraSculpt-alusta kliinisen käytön aikana.
O
Käytä alustaa taputtelevalla liikkeellä käyttäen
vain pientä painetta. Asettele materiaali ja
oista ylimääräinen materiaali instrumentin
p
oisessa päässä olevalla metallilastalla.
t
Kun olet saanut restauraation valmiiksi, poista OptraSculpt-alusta instrumen-
ista ja hävitä se asianmukaisesti. Seuraavaksi desinfioi, puhdista ja steriloi
t
instrumentti.
Viiteasteikkojen käyttäminen
ptraSculpt-alustan instrumentissa on kaksi viiteasteikkoa.
O
Asteikko 1 sisältää tavalliset viitemerkinnät, joiden avulla voidaan verrata
hampaiden välisiä leveyssuhteita. Lisäksi asteikon vaakaviiva helpottaa
inkisiivirivistön arviointia.
Asteikko 1 voidaan kohdistaa
inkisiiviriviin esim. vastakkaisen
hampaan leveyteen vertaamiseksi ja/tai
nkisiivirivin arvioimiseksi asteikon
i
vaakaviivaa vasten.
Asteikko 2 sisältää ideaalisten keskimääräisten etuhampaiden leveyksien
merkinnät (pystyviivat). Tätä asteikkoa käytetään viitteenä laajojen etuhammasrestauraatioiden esteettisessä suunnittelussa. Merkinnät osoittavat vain
suhteellisia arvoja, joista hampaiden yksittäiset leveydet voidaan päätellä tai
arvioida suhteessa toisiinsa. Vinot pistemerkinnät osoittavat hammasakselin
tyypillisen keskimääräisen sijainnin yläleuassa ja siten toimivat hyödyllisenä
ohjeena harmonisen etuhammasestetiikan rekonstruoinnissa. Asteikko on
asetettu oikein, jos asteikon keskellä oleva kolmio osoittaa kohti kosketuspistettä keski-inkisiivien välissä ja numerot asteikon molemmilla puolilla
vastaavat tutkittavia neljänneksiä. Asteikko ei sovi käytettäväksi
alaleukaan!
Asteikkoa 2 käytetään vertaamaan
kliinistä tilannetta yläleuan etuhampaiden ideaaliseen keskimääräiseen
hammasleveyteen ja kulmakohdistuksiin.
Tämän ansiosta esteettisiä parannuksia
voidaan suunnitella helposti ja parannusalueita tunnistaa.
Tärkeää! Tämä asteikko osoittaa vain suhteelliset arvot. Merkittyjä leveyksiä
ja kulmakohdistuksia ei pidä käyttää sellaisenaan. Ne on säädettävä täyttämään yksittäisen potilaan tarpeet.
Yllä hahmoteltu esimerkki esittää vertailua varten ideaalisen hammasleveyden suhteet, vaikka hampaan yleinen leveys voi olla hieman keskiarvoa
suurempi. Toisten inkisiivien ja kulmahampaiden akselit vaikuttavat olevan
aavistuksen verran liian suorat.
Varoitus
On suositeltavaa käyttää kofferdamia estämään tahaton pienten
osien nieleminen tai henkeen vetäminen.
Älä käytä OptraSculpt-alustaa muuhun tarkoitukseen kuin ilmoitettuun
käyttötarkoitukseen!
Desinfiointi, puhdistus ja sterilointi
Yleisiä huomautuksia:
Puhdista ja desinfioi kaikki instrumentit ennen jokaista käyttökertaa. On erittäin suositeltavaa, että instrumentit lisäksi steriloidaan höyrysterilaattorissa.
Älä käytä vaurioituneita instrumentteja. Vain koulutettu henkilöstö saa
suorittaa korjaus- ja ylläpitotyöt.
Älä aseta instrumentteja NaCl-liuokseen (syöpymisen ja/tai rasituskorroosiomurtumien vaaran estämiseksi).
Direktiiviä 89/686/ETY noudattavia suojakäsineitä ja -laseja on käytettävä
käsiteltäessä käytettyjä ja kontaminoituja instrumentteja.
Desinfioi ja puhdista instrumentit heti käytön jälkeen.
Yleensä käsittely pesu-desinfiointilaitteessa on suositeltavampaa
kuin manuaalinen puhdistus.
Esipuhdistus:
Poista huolellisesti suuret kovettumattomat jäämät instrumenteista nukkaamattomalla paperipyyhkeellä. Aseta instrumentit alustavaa desinfiointia varten
desinfiointihauteeseen (jossa on kansi ja siivilä), joka on täytetty aldehydittö-
Page 22

ällä emäksisellä desinfiointiaineella (esim. upotus ID 212 forte -aineeseen,
m
Dürr Dental, 15 minuutiksi). Varmista, että instrumentit ovat kokonaan uponneet desinfiointiaineeseen ja että desinfiointiaineessa ei näy kuplia.
äytä vain pehmeää harjaa jäämien poistamiseen manuaalisesti. Älä koskaan
K
käytä metallista harjaa tai teräsvillaa.
Huuhtele instrumentit huolellisesti juoksevalla vedellä alustavan desinfioinnin
älkeen automaattista käsittelyä varten.
j
Automaattinen puhdistus ja desinfiointi:
– Pesu-desinfiointilaite (esim. Mielen lämpöpesu-desinfiointilaite G7882)
Puhdistus- ja desinfiointiohjelma (esim. Vario TD)
–
Puhdistusaine ja desinfiointiaine (esim. Neodisher FA, Dr. Weigert)
–
Jos instrumentit puhdistetaan vain pesu-desinfiointilaitteessa, sen jälkeinen
lämpödesinfiointi höyrysterilaattorissa on pakollista.
anuaalinen puhdistus ja desinfiointi:
M
– Pehmeä harja (esim. Miltex-nailonpuhdistusharja instrumentteja varten)
– Puhdistusaine ja desinfiointiaine (esim. upotus ID 212 forte -aineeseen,
ürr Dental, vähintään 15 minuutiksi).
D
uuhtele instrumentit siivilässä huolellisesti juoksevalla vedellä puhdistuksen
H
ja desinfioinnin jälkeen.
Kuivaaminen:
Paineilma tai puhdas, nukkaamaton paperipyyhe
–
Sterilointi:
– Sopiva steriili pakkaus (esim. alumiininen steriili astia).
Autoklaavi (esim. Systec HX-320).
–
– Ohjelma: höyrysterilointi ja fraktioitu esivakuumiprosessi 134 °C (273 °F)
vähintään neljä minuuttia.
lläpito ja tarkastaminen:
Y
nstrumenttien puhdistuksen ja desinfioinnin jälkeen on tarkistettava visuaali-
I
sesti, että ne ovat puhtaita ja vahingoittumattomia ja että ne toimivat oikein.
Jos istrumenteissa näkyy epäpuhtauksia, toista puhdistus- ja desinfiointiprosessi.
äilytys
S
– Säilytä instrumentteja kuivassa, jottei niihin tiivisty kosteutta.
– Säilytä OptraSculpt-alustan kiinnittimet alkuperäispakkauksessa huoneen
ämpötilassa suojassa pölyltä, kosteudelta, paineelta ja kontaminaatiolta.
l
– Säilytä lämpötilassa 12–28 °C (54–82 °F).
– Viimeinen käyttöpäivä: katso painettua kirjoitusta ja etikettiä.
Huomautuksia
Käsi-instrumentti voidaan autoklavoida ja se on suunniteltu
–
kestokäyttöiseksi. Se kestää vähintään 200 sterilointikertaa
autoklaavissa. Katso määritetyt toimenpiteet kohdasta "Desinfiointi,
uhdistus ja sterilointi".
p
– Ennen käsi-instrumentin autoklavointia muotoilukiinnittimet on
poistettava.
– OptraSculpt-alustan kiinnittimet on tarkoitettu vain
ertakäyttöisiksi. Niitä ei saa puhdistaa, desinfioida, steriloida tai
k
käyttää uudelleen.
– Koska pieniin osiin liittyy yleensä nielemisen ja henkeen vetämisen vaara,
on suositeltavaa käyttää kofferdamia.
– Käyttöohjeita ja tarkempia tietoja käsi-instrumenttien
steriloinnista on saatavilla Ivoclar Vivadent AG:n verkkosivustossa
(www.ivoclarvivadent.com).
Ei lasten ulottuville.
Vain hammaslääketieteelliseen käyttöön.
Tämä tuote on tarkoitettu ainoastaan hammaslääketieteelliseen käyttöön. Tuotetta tulee käsitellä tarkasti
käyttöohjeita noudattaen. Valmistaja ei vastaa vahingoista, jotka johtuvat siitä, että käyttöohjeita tai
ohjeiden mukaista soveltamisalaa ei noudateta. Tuotteen soveltuvuuden testaaminen muuhun kuin
ohjeissa mainittuun tarkoitukseen on käyttäjän vastuulla. Kuvaukset ja tiedot eivät takaa ominaisuuksia
eivätkä ole sitovia.
Norsk
Beskrivelse
OptraSculpt Pad er et modelleringsinstrument designet for intraoral tilpasning,
forming og konturering av uherdede sammentrykkbare kompositte fyllematerialer. OptraSculpt Pad består av et autoklaverbart håndholdt instrument og
skiveformede tilbehør (puter) til engangsbruk i diametere fra 4 til 6 mm.
Det håndholdte instrumentet har en metallspatel i én arbeidsende og en
holdering i den andre. De skiveformede tilbehørene til engangsbruk, som er
laget av mykt, svært fleksibelt syntetisk skummateriale, settes inn i holderingen. Disse OptraSculpt Pad-tilbehørene lar brukere konturere sammentrykkbare komposittrestaureringer raskt og effektivt uten klebrighet mellom
instrumentet og komposittmaterialet. Dette gir en klar fordel, spesielt ved
konstruksjon av store restaureringer klasse III, IV og V og direkte laminerte
fasadeerstatninger. Referanseskalaene på det håndholdte instrumentet bidrar
til å etablere passende symmetrier, tannbreddeproporsjoner og innrettinger
når det lages restaureringer med komposittmaterialer.
Sammensetning
– OptraSculpt Pad-tilbehørene består av polyetylen og EVA.
– Det håndholdte instrumentet består av rustfritt stål og PEEK.
Indikasjon
Egnet til tilpasning, forming og konturering av uherdet sammentrykkbare
kompositt- og kompomermaterialer i restaureringer klasse III, IV og V og
direkte laminerte fasadeerstatninger
Kontraindikasjon
Bruk av OptraSculpt Pad er kontraindisert
– hvis den foreskrevede bruksteknikken ikke er mulig;
– hvis pasienten har kjent allergi mot noen av komponentene i OptraSculpt
Pad.
Bivirkninger
Ingen kjente per i dag.
Anvendelse
– MERKNAD – Børst NYE instrumenter med såpevann, skyll og tørk. Utfør
deretter en fullstendig hygienesyklus (se "Desinfeksjon, rengjøring og
sterilisering").
Page 23

Bruk kun OptraSculpt Pad-tilbehør og instrumenter som er i plettfri stand,
–
både mekanisk og hygienisk.
– Sørg for at OptraSculpt Pad-tilbehørene settes riktig inn i instrumentet
lik at det oppnås en tettsluttende tilpasning.
s
Ikke bruk instrumenter og tilbehør som er skadet.
–
Velg OptraSculpt Pad-tilbehør på enten 4 mm eller 6 mm avhengig av
størrelsen på restaureringen. Ta tilbehøret ut av innpakningen ved hjelp av en
terilisert pinsett, og plasser det flatt på en fast, kontaminasjonsfri arbeids-
s
late. Deretter lar du holderingen gli over tilbehørets hoveddel mens du påfø-
f
rer trykk til ringen sitter flat på tilbehørets base.
lasser OptraSculpt Pad-tilbehøret flatt på
P
n arbeidsflate.
e
La instrumentet gli over tilbehørets hoveddel
mens du påfører trykk.
ett ringen over hoveddelen til den møter
S
basen.
OptraSculpt Pad-tilbehøret er riktig innsatt
holderingen.
i
OptraSculpt Pad-tilbehørene er utelukkende til engangsbruk!
Bruk metallspatelen på den andre siden av instrumentet til å plukke opp og
plassere restaureringsmaterialet. Etter at det uherdete sammentrykkbare
komposittmaterialet er plassert i den preparerte kaviteten, tilpasses og kontureres materialet med det myke OptraSculpt Pad-tilbehøret, med lette dunkebevegelser.
OptraSculpt Pad under klinisk bruk. Bruk puten
med en lett dunkebevegelse mens du påfører
kun et lett trykk. Plasser materialet og fjern det
overflødige med metallspatelen på den andre
enden av instrumentet.
Etter fullendt restaurering, fjernes OptraSculpt Pad-tilbehøret fra instrumentet
og kastes på egnet måte. Deretter skal instrumentet desinfiseres, rengjøres
og steriliseres.
Bruk av referanseskalaene
OptraSculpt Pad-instrumentet har to referanseskalaer.
Skala 1 gir enkle referansemarkeringer for å sammenligne tann-til-tannbreddeproporsjoner. I tillegg forenkler skalaens horisontale linje vurderingen
av den incisale kantlinjen.
Skala 1 kan innrettes med den incisale
kanten eksempelvis for å sammenligne
de kontralaterale tannbreddeproporsjonene og/eller evaluere den incisale kantlinjen mot den horisontale linjen på
skalaen.
Skala 2 inneholder markeringene for de ideelle gjennomsnittlige tannbreddene for anteriore tenner (vertikale linjer). Denne skalaen brukes som
referanse for estetisk design av omfattende anteriore rekonstruksjoner. Markeringene gir bare relative verdier som de individuelle breddene til tennene
kan utledes fra, eller vurderes i henhold til hverandre. De skråstilte stiplede
markeringene angir tannaksens typiske gjennomsnittlige stilling i underkjeven, og gir derfor også nyttig veiledning ved rekonstruksjon av harmonisk
anterior estetikk. Skalaen er korrekt plassert hvis triangelen i midten av
skalaen peker mot kontaktpunktet mellom de sentrale fortennene og tallene
på begge sider av skalaen er forenlige med kvadrantene under undersøkelse.
Skalaen er ikke egnet til bruk i overkjeven!
Skala 2 benyttes til å sammenligne den
kliniske situasjonen mot de ideelle
gjennomsnittlige tannbreddeproporsjonene og vinkeltilpasningene i underkjevens anteriore tannstilling. Følgelig kan
estetiske forbedringer lett planlegges og
Viktig! Denne skalaen indikerer kun relative verdier. De markerte breddene
og vinkeltilpasningene skal ikke bare godtas som de er. De må justeres for å
oppfylle kravene til hver enkel pasient.
områder som kan bedres, identifiseres.
Page 24

ksemplet avbildet over, viser forholdsvis ideelle tannbreddeproporsjoner,
E
selv om den generelle tannbredden synes å være litt større enn gjennomsnittet. Aksene til de andre fortennene og hjørnetennene ser ut som om de er litt
or rette.
f
Advarsel
Det anbefales å bruke en kofferdam for å unngå utilsiktet svelging
ller innånding av små deler.
e
kke bruk OptraSculpt Pad til andre formål enn tilsiktet!
I
Desinfeksjon, rengjøring og sterilisering
Generelle merknader:
engjør og desinfiser hvert instrument før hver bruk. Det anbefales sterkt å
R
sterilisere instrumentene i en dampsterilisator i tillegg.
Ikke bruk instrumenter som er skadet. Kun hensiktsmessig opplært personell
kal utføre reparasjoner og vedlikeholdsarbeid.
s
Ikke plasser instrumenter i NaCi-oppløsning (for å unngå fare for tæring
og/eller korroderende spenningssprekking).
ruk vernehansker og vernebriller i samsvar med kravene i direktiv
B
89/686/EØF ved håndtering av brukte og kontaminerte instrumenter.
Desinfiser og rengjør instrumentene umiddelbart etter bruk.
rosessering i en vaske-desinfeksjonsmaskin er vanligvis å foretrekke
P
remfor manuell rengjøring.
f
Forhåndsrengjøring:
Fjern forsiktig store uherdete rester fra instrumentene med et lofritt cellulose-
apirtørkle. For innledende desinfeksjon plasserer du instrumentene i et
p
desinfeksjonsbad (med lokk og silinnsats) fylt med aldehydfritt alkalisk
desinfeksjonsmiddel (f.eks. nedsenkning i ID 212 forte, Dürr Dental, i 15 min.).
ørg for at instrumentene er fullstendig dekket av desinfeksjonsmiddelet, og
S
t middelet ikke har bobler.
a
Bruk kun en myk børste for manuell fjerning av rester. Bruk aldri en metallbørste eller stålull.
or automatisert prosessering skylles instrumentene forsiktig under rennende
F
vann fra kranen etter innledende desinfeksjon.
Automatisert rengjøring og desinfeksjon:
Vaske-desinfeksjonsmaskin (f.eks. Miele termisk vaske-desinfeksjonsma-
–
skin G7882)
– Rengjøring og desinfeksjonsprogram (f.eks. Vario TD)
Vaskemiddel og desinfeksjonsmiddel (f.eks. Neodisher FA, Dr. Weigert)
–
Dersom instrumentene bare rengjøres i en vaske-desinfeksjonsmaskin, er
etterfølgende termisk desinfeksjon i en dampsterilisator obligatorisk.
Manuell rengjøring og desinfeksjon:
Myk børste (f.eks. Miltex-rensebørste av nylon for instrumenter)
–
– Vaskemiddel og desinfeksjonsmiddel (f.eks. nedsenkning i ID 212 forte,
Dürr Dental, i minst 15 min.)
tter rengjøring og desinfeksjon, skyll instrumentene grundig i silinnsatsen
E
under rennende vann fra kranen.
Tørking:
– Komprimert luft eller rent, lofritt cellulose-papirtørkle
Sterilisering:
– Egnet steril innpakning (f.eks. steril beholdersystem av aluminium)
– Autoklav (f.eks. Systec HX-320)
– Program: dampsterilisering med en fraksjonert før-vakuumprosess ved
134 °C (273 °F) i minst 4 min.
Vedlikehold, kontroll og inspeksjon:
Etter at instrumentene er rengjorte og desinfiserte, skal du inspisere dem for
å bekrefte at de er rene, uskadet og fungerer riktig. Hvis gjenværende belegg
er synlig makroskopisk, må rengjørings- og desinfeksjonsprosessen gjentas.
Oppbevaring
– Oppbevar instrumentene i tørre forhold for å unngå kondensansamling.
– Oppbevar OptraSculpt Pad-tilbehørene i opprinnelig emballasje ved
romtemperatur, beskyttet mot støv, fuktighet, sammentrykking og
kontaminasjon.
– Oppbevares ved 12–28 °C (54–82 °F).
– Utløpsdato: se trykt inskripsjon og etikett.
Merknader
– Det håndholdte instrumentet er autoklaverbart og designet til
flergangsbruk og minst 200 steriliseringssykluser i autoklav. Se
"Desinfeksjon, rengjøring og sterilisering" for beskrevne prosedyrer.
– Før det håndholdte instrumentet autoklaveres, skal modelleringstilbehø-
ret fjernes.
– OptraSculpt Pad-tilbehørene er kun til engangsbruk. De må ikke
rengjøres, desinfiseres, steriliseres og gjenbrukes.
– Siden små deler vanligvis medfører fare for svelging og innånding,
anbefales det å bruke en kofferdam.
– Bruksanvisningen og detaljert informasjon om reprosessering av
håndholdte instrumenter er tilgjengelig på nettstedet til Ivoclar
Vivadent AG (www.ivoclarvivadent.com).
Oppbevares utilgjengelig for barn!
Bare til odontologisk bruk!
Produktet er utviklet til bruk på det odontologiske området og må brukes i henhold til bruksanvisningen.
Produsenten påtar seg intet ansvar for skader som oppstår på grunn av annen bruk eller ufagmessig bearbeiding. I tillegg er brukeren forpliktet til på forhånd og på eget ansvar å undersøke om produktet egner
seg og kan brukes til de tiltenkte formål dersom disse formålene ikke er oppført i bruksanvisningen.
Nederlands
Omschrijving
OptraSculpt Pad is een modelleerinstrument voor het intraoraal adapteren,
vormgeven en contoureren van niet-uitgeharde, stopbare composietvulmaterialen. OptraSculpt Pad bestaat uit een autoclaveerbaar handinstrument en
schijfvormige appendages (pads) voor eenmalig gebruik, in een diameter van
4 of 6 mm.
Het handinstrument heeft aan het ene uiteinde een metalen spatel en aan
het andere uiteinde een ringvormige houder. De schijfvormige appendages
voor eenmalig gebruik zijn gemaakt van een zacht, heel flexibel synthetisch
Page 25

oammateriaal en worden in de ringvormige houder gezet. Met de
f
OptraSculpt Pad-appendages kunnen gebruikers stopbare composietrestauraties snel en effectief vormgeven, zonder dat het instrument en het materiaal
an elkaar gaan kleven. Dit heeft veel voordelen, vooral bij grote restauraties
a
n klasse III, IV en V en bij directe veneers. Met behulp van de referentiescha-
i
len op het handinstrument krijgen restauraties van composietmaterialen de
juiste symmetrie, elementbreedte en uitlijning.
amenstelling
S
– De OptraSculpt Pad-appendages zijn gemaakt van polyethyleen en EVA.
– De handinstrumenten zijn gemaakt van roestvrijstaal en PEEK.
ndicaties
I
eschikt voor het adapteren, vormgeven en contoureren van niet-uitgeharde,
G
stopbare composiet- en compomeermaterialen ten behoeve van restauraties
in klasse III, IV en V en directe veneers
ontra-indicaties
C
Voor het gebruik van de OptraSculpt Pad bestaat een contra-indicatie
– wanneer de voorgeschreven toepassingstechniek niet mogelijk is.
als bekend is dat een patiënt allergisch is voor een van de bestanddelen
–
van OptraSculpt Pad.
Bijwerkingen
ot op heden geen bijwerkingen bekend.
T
Toepassing
– LET OP – Reinig NIEUWE instrumenten met water en zeep, spoel ze
schoon en droog ze af. Bewerk het instrument vervolgens door middel
an een complete hygiënecyclus (zie ‘Desinfectie, reiniging en sterilisatie’).
v
– Gebruik alleen OptraSculpt Pad-appendages en -instrumenten die zowel
mechanisch als hygiënisch in een onberispelijke toestand zijn.
Zorg dat u de OptraSculpt Pad-appendages op de juiste manier aan het
–
nstrument bevestigt, zodat ze stevig vastzitten.
i
– Gebruik geen beschadigde instrumenten of appendages.
Kies een OptraSculpt Pad-appendage van 4 mm of 6 mm, al naar gelang de
mvang van de restauratie. Neem de appendage uit de verpakking met een
o
steriele pincet en leg hem vlak op een stevige ondergrond, die vrij is van
contaminatie. Schuif vervolgens de ringvormige houder over de appendage.
efen een beetje druk uit tot de ring vlak tegen de basis van de appendage
O
zit.
Zet de OptraSculpt Pad-appendage vlak op
een werkblad.
chuif het instrument vervolgens over de
S
appendage. Oefen daarbij lichte druk uit.
Schuif de ring over de appendage tot hij de
basis raakt.
De OptraSculpt Pad-appendage zit correct
in de ringvormige houder.
OptraSculpt Pad-appendages zijn uitsluitend bedoeld voor eenmalig gebruik!
Gebruik de metalen spatel aan de andere kant van het instrument om het
restauratiemateriaal op te pakken. Breng het niet-uitgeharde, stopbare composietmateriaal in de geprepareerde caviteit aan en adapteer en contoureer
het materiaal in een deppende beweging met de zachte OptraSculpt Padappendage.
OptraSculpt Pad bij klinisch gebruik. Werk in een
deppende beweging en met weinig druk. Breng
het materiaal aan en verwijder overtollig materiaal met de metalen spatel aan de andere kant
van het instrument.
Werk de restauratie af, haal de OptraSculp Pad van het instrument en voer
het op de juiste wijze af. Desinfecteer, reinig en steriliseer daarna het instrument.
Gebruik van de referentieschalen
Het OptraSculpt Pad-instrument is voorzien van twee referentieschalen.
Schaal 1 bestaat uit gewone referentiemarkeringen waarmee de breedteverhoudingen tussen elementen onderling kunnen worden bepaald. Daarnaast
kan met de horizontale lijn van deze schaal de lijn van de incisale rand beter
worden beoordeeld.
Page 26

chaal 1 kan worden uitgelijnd met de
S
incisale rand, bijv. om de breedteverhoudingen van de contralaterale elementen
e vergelijken en/of om de lijn van de
t
ncisale rand te vergelijken met de
i
horizontale lijn op de schaal.
chaal 2 heeft markeringen voor de ideale, gemiddelde breedte van anterior-
S
elementen (verticale lijnen). Deze schaal wordt gebruikt als referentie bij het
esthetisch vormgeven van uitgebreide reconstructies in het anteriorgebied.
e markeringen zijn slechts relatieve waarden; hieruit kunnen de individuele
D
aarden van de wijdte van gebitselementen worden afgeleid of de onder-
w
linge verhoudingen van elementen worden bepaald. De schuine streepjeslijnen geven de typische, gemiddelde stand van de as van het gebitselement in
e bovenkaak aan en zijn daarmee een nuttige leidraad voor het reconstrue-
d
ren van de harmonieuze esthetiek van het anteriorgebied. De schaal is juist
aangelegd als het driehoekje in het midden ervan naar het contactpunt van
e centrale incisieven wijst. De nummers aan beide kanten van de schaal
d
omen overeen met de onderzochte kwadranten. De schaal is niet geschikt
k
voor toepassing bij de onderkaak!
Schaal 2 wordt gebruikt om de klinische
ituatie te vergelijken met de ideale ge-
s
middelde breedteverhoudingen van gebitselementen en de hoekuitlijning van
e anteriordentitie van de bovenkaak. Op
d
ie manier kunnen esthetische aanpas-
d
singen gemakkelijker worden gepland en
plekken waar verbeteringen nodig zijn
neller worden herkend.
s
Belangrijk! Deze schaal geeft alleen relatieve waarden aan. De gemarkeerde
breedten en hoekuitlijningen mogen dan ook niet zomaar worden overgeno-
en. Pas deze aan aan de individuele behoeften van de patiënt.
m
In het bovenstaande voorbeeld is een verhoudingsgewijs ideale breedteverhouding van gebitselementen te zien, zelfs al lijkt de algehele breedte van de
elementen iets groter dan gemiddeld. De assen van de tweede incisieven en
e hoektanden lijken iets te recht te zijn.
d
Desinfectie, reiniging en sterilisatie
Algemene opmerkingen:
einig en desinfecteer ieder instrument voor gebruik. Het is sterk aan te
R
raden om de instrumenten daarnaast te steriliseren met behulp van een
stoomsterilisator.
ebruik geen beschadigde instrumenten. Laat reparatie- en onderhoudswerk-
G
zaamheden alleen uitvoeren door personeel dat daartoe is opgeleid.
Dompel de instrumenten niet onder in NaCl-oplossingen (om vorming van
putjes en/of het ontstaan van corrosiescheurtjes bij belasting te vermijden).
Draag bij het hanteren van gebruikte en gecontamineerde instrumenten
handschoenen en een beschermende bril die voldoen aan de eisen van Richtlijn 89/686/EEG.
Desinfecteer en reinig instrumenten direct na gebruik.
Reiniging in een was- en desinfectieapparaat heeft over het algemeen de voorkeur boven handmatige reiniging.
Voorbehandeling:
Verwijder grote, niet uitgeharde resten materiaal zorgvuldig van de instrumenten met behulp van niet pluizende cellulosedoekjes. Leg de instrumenten
voor eerste desinfectie in een desinfectiebad (met een deksel en een inzetzeef), gevuld met een alkalisch desinfectiemiddel dat vrij is van aldehyde
(bijv. onderdompeling in ID 212 forte, Dürr Dental, gedurende 15 min.). Zorg
dat de instrumenten volledig zijn bedekt en dat er zich geen luchtbellen in
het desinfectiemiddel bevinden.
Gebruik voor het handmatig verwijderen van restanten alleen een zachte borstel. Gebruik nooit een metalen borstel of staalwol.
Spoel de instrumenten na de eerste desinfectie zorgvuldig schoon onder stromend water, voor ze automatisch worden gereinigd.
Geautomatiseerde reiniging en desinfectie:
– Was- en desinfectieapparaat (bijv. Miele thermisch was- en desinfectieap-
paraat G7882)
– Reinigings- en desinfectieprogramma (bijv. Vario TD)
– Reinigings- en desinfectiemiddel (bijv. Neodisher FA, Dr. Weigert)
Als de instrumenten alleen in een was- en desinfectieapparaat worden gereinigd, is thermische desinfectie in een stoomsterilisator verplicht.
Handmatige reiniging en desinfectie:
– Zachte borstel (bijv. Miltex nylon reinigingsborstel voor instrumenten)
– Reinigings- en desinfectiemiddel (bijv. onderdompeling in ID 212 forte,
Dürr Dental, gedurende minimaal 15 min.)
Spoel de instrumenten in de zeef na reiniging en desinfectie goed schoon
onder stromend water.
Drogen:
– Perslucht of schone, niet pluizende cellulosedoekjes
Sterilisatie:
– Een geschikte steriele verpakking (bijv. systeem van steriele aluminium
houders)
– Autoclaveren (bijv. Systec HX-320)
– Programma: stoomsterilisatie met een gefractioneerd voorvacuüm, op
een temperatuur van 134°C gedurende minimaal 4 min.
Onderhoud, controles en inspecties:
Controleer visueel of de instrumenten na reiniging en desinfectie schoon zijn,
geen beschadigingen vertonen en goed werken. Herhaal het reinigings- en
desinfectieproces als er macroscopisch restanten te zien zijn.
Bewaren
– Bewaar instrumenten onder droge omstandigheden om ontstaan van
condens te voorkomen.
– Bewaar de appendages van OptraSculpt Pad op kamertemperatuur, in de
oorspronkelijke verpakking, bescherm ze tegen stof, vocht, druk en contaminatie.
Page 27
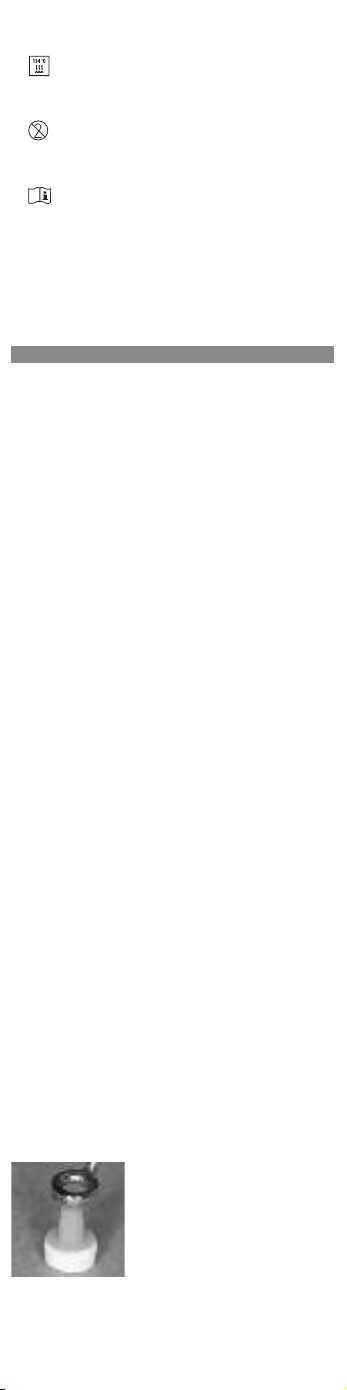
Bewaar bij een temperatuur van 12 à 28°C.
–
– Vervaldatum: zie gedrukte inscriptie en het etiket.
Opmerkingen
Het handinstrument kan worden geautoclaveerd en is bedoeld voor
–
ergebruik en een minimum van 200 sterilisatiecycli in een auto-
h
claaf. Zie ‘Desinfectie, reiniging en sterilisatie’ voor de juiste procedures.
– Verwijder de modelleerelementen vóór het handinstrument wordt
eautoclaveerd.
g
– OptraSculpt Pad-appendages zijn uitsluitend bedoeld voor eenmalig
gebruik. Deze mogen niet worden gereinigd, gedesinfecteerd,
esteriliseerd en hergebruikt.
g
Gebruik liefst een cofferdam, aangezien bij toepassing van kleine onder-
–
delen altijd het risico bestaat van inslikken of aspiratie.
– Zie de website van Ivoclar Vivadent AG (www.ivoclarvivadent.com)
oor de productinformatie en gedetailleerde informatie over
v
ergebruik van handinstrumenten.
h
Buiten bereik van kinderen bewaren!
lleen voor tandheelkundig gebruik.
A
Dit product werd ontwikkeld voor tandheelkundig gebruik en moet volgens de gebruiksaanwijzing worden
toegepast. Indien er schade optreedt door toepassing voor andere doeleinden of door verkeerd gebruik,
kan de fabrikant daarvoor niet aansprakelijk worden gesteld. De gebruiker is bovendien verplicht om vóór
gebruik na te gaan of het product voor de beoogde toepassing geschikt is, vooral als deze toepassing niet
in de gebruiksaanwijzing vermeld staat.
λληνικά
E
Περιγραφή
Το OptraSculpt Pad είναι ένα εργαλείο μοντελαρίσματος σχεδιασμένο για
ην ενδοστοματική προσαρμογή, διαμόρφωση και δημιουργία περιγράμ-
τ
ατος απολυμέριστων συμπυκνώσιμων εμφρακτικών υλικών από σύνθετη
μ
ρητίνη. Το OptraSculpt Pad αποτελείται από ένα εργαλείο χειρός με δυνατότητα αποστείρωσης σε αυτόκαυστο και δισκοειδή προσαρτήματα (pads)
ίας χρήσης με διάμετρο στο εύρος από 4 έως 6 mm.
μ
Το εργαλείο χειρός περιλαμβάνει μια σπάθη στο ένα άκρο εργασίας και
δακτύλιο συγκράτησης στο άλλο άκρο. Τα δισκοειδή προσαρτήματα μίας
ρήσης, τα οποία είναι κατασκευασμένα από μαλακό, ιδιαιτέρως εύκαμπτο
χ
συνθετικό αφρώδες υλικό, εισάγονται στο δακτύλιο συγκράτησης. Αυτά τα
προσαρτήματα OptraSculpt Pad επιτρέπουν στους χρήστες να δημιουργούν το περίγραμμα αποκαταστάσεων από συμπυκνώσιμη σύνθετη ρη-
ίνη γρήγορα και αποτελεσματικά χωρίς να συναντούν κολλώδη
τ
συμπεριφορά μεταξύ του εργαλείου και της σύνθετης ρητίνης. Αυτό αποτελεί σαφές πλεονέκτημα, ειδικά στην κατασκευή μεγάλων αποκαταστάσεων των ομάδων III, IV και V και άμεσων όψεων από πολυστρωματικό
λικό. Κλίμακες αναφοράς στο εργαλείο χειρός βοηθούν στον καθορισμό
υ
των κατάλληλων συμμετριών, των αναλογιών πλάτους δοντιών και των
ευθυγραμμίσεων, κατά τη δημιουργία μιας αποκατάστασης με υλικά
ύνθετης ρητίνης.
σ
Σύνθεση
– Τα προσαρτήματα OptraSculpt Pad αποτελούνται από
πολυαιθυλένιο και EVA.
– Το εργαλείο χειρός αποτελείται από ανοξείδωτο ατσάλι και PEEK.
Ενδείξεις
Κατάλληλο για την προσαρμογή, διαμόρφωση και δημιουργία περιγράμματος απολυμέριστων συμπυκνώσιμων υλικών από σύνθετη ρητίνη και
συμπολυμερή στις αποκαταστάσεις των ομάδων III, IV και V και άμεσες
όψεις από πολυστρωματικό υλικό.
Αντενδείξεις
Η χρήση του OptraSculpt Pad αντενδείκνυται
– εάν η προγραμματισμένη τεχνική εργασίας δεν μπορεί να
χρησιμοποιηθεί,
– σε περίπτωση γνωστής αλλεργίας του ασθενούς σε οποιοδήποτε
από τα συστατικά του OptraSculpt Pad.
Παρενέργειες
Καμία γνωστή μέχρι σήμερα
Εφαρμογή
– ΥΠΟΔΕΙΞΗ – Βουρτσίστε τα ΚΑΙΝΟΥΡΙΑ εργαλεία με σαπουνόνερο,
ξεπλύνετε και στεγνώστε. Στη συνέχεια, διενεργήστε έναν πλήρη
κύκλο υγιεινής (βλ. "Απολύμανση, καθαρισμός και αποστείρωση").
– Διασφαλίστε ότι χρησιμοποιείτε μόνο προσαρτήματα και εργαλεία
OptraSculpt Pad που βρίσκονται σε άριστη κατάσταση μηχανικής
λειτουργίας και υγιεινής.
– Διασφαλίστε ότι εισάγετε τα προσαρτήματα OptraSculpt Pad στο
εργαλείο σωστά, έτσι ώστε να επιτύχετε καλή εφαρμογή.
– Μη χρησιμοποιείτε κατεστραμμένα εργαλεία και προσαρτήματα.
Επιλέξτε ένα προσάρτημα OptraSculpt Pad 4 mm ή 6 mm, ανάλογα με το
μέγεθος της αποκατάστασης. Χρησιμοποιώντας αποστειρωμένη λαβίδα,
αφαιρέστε το προσάρτημα από τη συσκευασία και τοποθετήστε το επίπεδα σε μια σταθερή, απαλλαγμένη από επιμολύνσεις επιφάνεια εργασίας.
Στη συνέχεια, ολισθήστε το δακτύλιο συγκράτησης επάνω από το σώμα
του προσαρτήματος, ασκώντας πίεση, μέχρι ο δακτύλιος να "καθίσει" επίπεδα στη βάση του προσαρτήματος.
Τοποθετήστε το προσάρτημα OptraSculpt Pad
επίπεδα σε μια επιφάνεια εργασίας.
Page 28

λισθήστε το εργαλείο επάνω από το σώμα
Ο
του προσαρτήματος, ασκώντας πίεση.
Εισάγετε το δακτύλιο επάνω από το σώμα
έχρι να συναντήσει τη βάση.
μ
Το προσάρτημα OptraSculpt Pad έχει εισαχθεί
σωστά στο δακτύλιο συγκράτησης.
Τα προσαρτήματα OptraSculpt Pad είναι σχεδιασμένα
ποκλειστικά για μία χρήση!
α
Χρησιμοποιήστε τη μεταλλική σπάθη στην άλλη πλευρά του εργαλείου για
να πάρετε και να τοποθετήσετε το υλικό αποκατάστασης. Αφού τοποθετή-
ετε την απολυμέριστη συμπυκνώσιμη σύνθετη ρητίνη μέσα στην παρα-
σ
κευασμένη κοιλότητα, προσαρμόστε και δημιουργήστε το περίγραμμα
σ
του υλικού με το μαλακό προσάρτημα OptraSculpt Pad, χρησιμοποιώντας
επιθίξεις.
Το OptraSculpt Pad κατά τη διάρκεια της
κλινικής χρήσης. Χρησιμοποιήστε το pad με
επιθίξεις, ασκώντας μόνο ελαφριά πίεση.
οποθετήστε το υλικό και αφαιρέστε την
Τ
περίσσεια με τη μεταλλική σπάθη στο άλλο
άκρο του εργαλείου.
Αφού έχετε ολοκληρώσει την αποκατάσταση, αφαιρέστε το OptraSculp
ad από το εργαλείο και απορρίψτε το κατάλληλα. Στη συνέχεια, απολυμά-
P
νετε, καθαρίστε και αποστειρώστε το εργαλείο.
Χρήση των κλιμάκων αναφοράς
Το εργαλείο OptraSculpt Pad διαθέτει δύο κλίμακες αναφοράς.
Η κλίμακα 1 παρέχει σκέτες σημάνσεις αναφοράς για τη σύγκριση των
αναλογιών πλάτους δόντι-με-δόντι. Επιπλέον, η οριζόντια γραμμή στην
κλίμακα διευκολύνει την αξιολόγηση της γραμμής κοπτικού άκρου.
Η κλίμακα 1 μπορεί να ευθυγραμμιστεί
με το κοπτικό άκρο με σκοπό π.χ. τη
σύγκριση των αναλογιών πλάτους των
αντίπλευρων δοντιών ή/και την αξιολόγηση της γραμμής κοπτικού άκρου
έναντι της οριζόντιας γραμμής στην κλίμακα.
Η κλίμακα 2 περιλαμβάνει τις σημάνσεις για το ιδανικό μέσο πλάτος των
προσθίων δοντιών (κατακόρυφες γραμμές). Αυτή η κλίμακα χρησιμοποιείται ως αναφορά στον αισθητικό σχεδιασμό εκτεταμένων ανακατασκευών
προσθίων. Οι σημάνσεις δείχνουν μόνο σχετικές τιμές, από τις οποίες τα
επιμέρους πλάτη των δοντιών μπορούν να εξαχθούν ή να αξιολογηθούν
σε σχέση το ένα με το άλλο. Οι λοξές στικτές σημάνσεις υποδεικνύουν την
τυπική μέση θέση του οδοντικού άξονα στην άνω γνάθο και, επομένως,
παρέχουν επίσης χρήσιμη καθοδήγηση στην ανακατασκευή αρμονικής αισθητικής προσθίων. Η κλίμακα είναι τοποθετημένη σωστά εάν το τρίγωνο
στο μέσον της κλίμακας δείχνει προς το σημείο επαφής μεταξύ των κεντρικών τομέων και οι αριθμοί στις δύο πλευρές της κλίμακας είναι συναφείς
με τα τεταρτημόρια υπό εξέταση. Η κλίμακα είναι ακατάλληλη για
χρήση στην κάτω γνάθο!
Η κλίμακα 2 χρησιμοποιείται για τη
σύγκριση της κλινικής κατάστασης
έναντι των ιδανικών μέσων αναλογιών
πλάτους δοντιών και γωνιακών ευθυγραμμίσεων στην πρόσθια οδοντοστοιχία της άνω γνάθου. Με τον τρόπο αυτό,
διευκολύνεται ο σχεδιασμός των αισθητικών βελτιώσεων και η αναγνώριση
των περιοχών προς βελτίωση.
Σημαντικό! Αυτή η κλίμακα υποδεικνύει μόνο σχετικές τιμές. Τα επισημασμένα πλάτη και οι γωνιακές ευθυγραμμίσεις δεν πρέπει να υιοθετούνται
απλά ως έχουν. Πρέπει να προσαρμόζονται ούτως ώστε να ικανοποιούν τις
ατομικές απαιτήσεις του ασθενούς.
Το παράδειγμα που απεικονίζεται παραπάνω δείχνει συγκριτικά τις ιδανικές αναλογές πλάτους δοντιών, ακόμα και αν το συνολικό πλάτος δοντιών
μπορεί να φαίνεται ελαφρώς μεγαλύτερο από το μέσο όρο. Οι άξονες των
δεύτερων τομέων και των κυνοδόντων φαίνονται να είναι ελάχιστα πιο
ευθείς από το συνηθισμένο.
Προειδοποίηση
Συνιστάται η χρήση ελαστικού απομονωτήρα προκειμένου να
αποφευχθεί η τυχαία κατάποση ή αναρρόφηση μικρών μερών.
Μη χρησιμοποιείτε το OptraSculpt Pad για σκοπούς άλλους από τους
προβλεπόμενους!
Απολύμανση, καθαρισμός και αποστείρωση
Γενικές υποδείξεις:
Page 29

αθαρίστε και απολυμάνετε κάθε εργαλείο πριν από κάθε χρήση. Συνιστάται
Κ
θερμά η επιπρόσθετη αποστείρωση των εργαλείων σε αποστειρωτή ατμού.
Μη χρησιμοποιείτε κατεστραμμένα εργαλεία. Εργασίες επιδιόρθωσης και
υντήρησης επιτρέπεται να διενεργούνται μόνο από κατάλληλα εκπαιδευ-
σ
ένο προσωπικό.
μ
Μην τοποθετείτε τα εργαλεία σε διάλυμα NaCl (για να αποφύγετε τον κίν-
υνο τοπικής διάβρωσης ή/και ρωγμών από διάβρωση υπό συνθήκες έν-
δ
ασης).
τ
Κατά το χειρισμό χρησιμοποιημένων και μολυσμένων εργαλείων, είναι
απαραίτητη η χρήση προστατευτικών γαντιών και γυαλιών σύμφωνα με
ις απαιτήσεις της οδηγίας 89/686/EEC.
τ
Απολυμάνετε και καθαρίστε τα εργαλεία αμέσως μετά τη χρήση.
Γενικά, η επεξεργασία σε μονάδα πλυντηρίου-απολυμαντή είναι
ροτιμώτερη από τον καθαρισμό με το χέρι.
π
Προκαθαρισμός:
Αφαιρέστε προσεκτικά από τα εργαλεία τα μεγάλα υπολείμματα που δεν
χουν ξεραθεί χρησιμοποιώντας ένα μαντήλι από κυτταρίνη που δεν αφή-
έ
νει χνούδι. Για την προκαταρκτική απολύμανση, τοποθετήστε τα εργαλεία
σε λουτρό απολύμανσης (με καπάκι και ένθετο σίτας) γεμάτο με αλκαλικό
απολυμαντικό χωρίς αλδεΰδες (π.χ. εμβύθιση σε ID 212 forte, Dürr Dental,
ια 15 λεπτά). Βεβαιωθείτε ότι τα εργαλεία είναι πλήρως καλυμμένα από το
γ
απολυμαντικό και ότι το απολυμαντικό δεν έχει φυσαλλίδες.
Χρησιμοποιήστε μόνο μια μαλακή βούρτσα για την αφαίρεση των υπο-
ειμμάτων με το χέρι. Ποτέ μη χρησιμοποιείτε μεταλλική βούρτσα ή
λ
σύρμα καθαρισμού.
Για αυτοματοποιημένη επεξεργασία, ξεπλύνετε προσεκτικά τα εργαλεία
άτω από τρεχούμενο νερό της βρύσης μετά την προκαταρκτική απολύ-
κ
ανση.
μ
Αυτοματοποιημένος καθαρισμός και απολύμανση:
Μονάδα πλυντηρίου-απολυμαντή (π.χ. θερμικό
–
λυντήριο-απολυμαντής Miele G 7882)
π
–
Πρόγραμμα καθαρισμού και απολύμανσης (π.χ. Vario TD)
–
Απορρυπαντικό και απολυμαντικό (π.χ. Neodisher FA, Dr. Weigert)
άν τα εργαλεία καθαρίζονται μόνο σε πλυντήριο-απολυμαντή, η επακό-
Ε
λουθη θερμική απολύμανση σε αποστειρωτή ατμού είναι υποχρεωτική.
Καθαρισμός και απολύμανση με το χέρι:
αλακή βούρτσα (π.χ. νάυλον βούρτσα καθαρισμού εργαλείων Miltex)
Μ
–
–
Απορρυπαντικό και απολυμαντικό (π.χ. εμβύθιση σε ID 212 forte, Dürr
Dental, για τουλάχιστον 15 λεπτά)
Μετά τον καθαρισμό και την απολύμανση, ξεπλύνετε πολύ καλά τα εργα-
εία μέσα στο ένθετο σίτας κάτω από τρεχούμενο νερό της βρύσης.
λ
Στέγνωμα:
Πεπιεσμένος αέρας ή καθαρό μαντήλι από κυτταρίνη που δεν αφήνει
–
νούδι
χ
Αποστείρωση:
Κατάλληλη συσκευασία αποστείρωσης (π.χ. σύστημα δοχείου
–
αποστείρωσης από αλουμίνιο)
–
Αυτόκαυστο (π.χ. Systec HX-320)
–
Πρόγραμμα: αποστείρωση ατμού με κλασματοποιημένη διαδικασία
προ-κενού 134 °C (273 °F) για τουλάχιστον 4 λεπτά
Συντήρηση, έλεγχος και επιθεώρηση:
Μετά τον καθαρισμό και την απολύμανση των εργαλείων, επιθεωρήστε τα
οπτικά για να επιβεβαιώσετε ότι είναι καθαρά, άθικτα και λειτουργούν
σωστά. Εάν υπάρχουν μακροσκοπικά ορατά υπολείμματα, επαναλάβετε τη
διαδικασία καθαρισμού και απολύμανσης.
Αποθήκευση
Αποθηκεύστε τα εργαλεία σε ξηρές συνθήκες για να αποφύγετε τη
–
σωσσώρευση συμπυκνωμένης υγρασίας.
–
Αποθηκεύστε τα προσαρτήματα OptraSculpt Pad στην αρχική
συσκευασία σε θερμοκρασία δωματίου, προστατευμένα από σκόνη,
υγρασία, συμπύκνωση υγρασίας και επιμόλυνση.
–
Φυλάσσετε σε θερμοκρασία 12 - 28 °C (54 - 82 °F).
–
Ημερομηνία λήξης: βλ. εκτυπωμένη επιγραφή και ετικέτα.
Επισημάνσεις
– Το εργαλείο χειρός μπορεί να αποστειρωθεί σε αυτόκαυστο
και είναι σχεδιασμένο για πολλαπλή χρήση και για τουλάχιστον 200 κύκλους αποστείρωσης στο αυτόκαυστο. Βλ. "Απολύμανση, καθαρισμός και αποστείρωση" για τις προβλεπόμενες
διαδικασίες.
– Πριν την αποστείρωση του εργαλείου χειρός σε αυτόκαυστο,
αφαιρέστε τα προσαρτήματα μοντελαρίσματος.
– Τα προσαρτήματα OptraSculpt Pad προορίζονται μόνο για
μία χρήση! Δεν επιτρέπεται ο καθαρισμός, η απολύμανση, η
αποστείρωση και η επαναχρησιμοποίησή τους.
– Δεδομένου ότι τα μικρά μέρη γενικά ενέχουν τον κίνδυνο κατάποσης
και αναρρόφησης, συνιστάται η χρήση ελαστικού απομονωτήρα.
– Οι οδηγίες χρήσης και λεπτομερείς πληροφορίες σχετικά με
την επανεπεξεργασία των εργαλείων χειρός είναι διαθέσιμες
στην ιστοσελίδα της Ivoclar Vivadent AG
(www.ivoclarvivadent.com).
Φυλάσσετε μακριά από παιδιά!
Μόνο για οδοντιατρική χρήση!
Tο υλικ κατασκευάστηκε αποκλειστικά για οδοντιατρική χρήση. Oι διαδικασίες πρέπει να ακολουθούνται
σχολαστικά και ακολουθώντας αυστηρά τις οδηγίες χρήσεως. Aπαιτήσεις για βλάβες που µπορεί να
προκληθούν απ µη ορθή ακολουθία των οδηγιών ή απ χρήση σε µη ρητώς ενδεικνυµενη περιοχή,
είναι απαράδεκτες. O χρήστης είναι υπεύθυνος για δοκιµασίες καταλληλτητας του υλικού σε
οποιαδήποτε άλλη εφαρµογή εκτς αυτών που αναγράφονται σαφώς στις οδηγίες χρήσεως. Περιγραφές
και στοιχεία δεν αποτελούν εγγύηση των ιδιοτήτων και δεν είναι δεσµευτικά.
Page 30

ürkçe
T
Tanım
ptraSculpt Pad sertleflmemifl, kondanse edilebilir kompozit dolgu materyal-
O
erinin intraoral adaptasyonu, flekillendirilmesi ve konturlanması için tasarlan-
l
mıfl bir modelaj aletidir. OptraSculpt Pad otoklavlanabilen bir el aleti ile
çapları 4 ila 6 mm arasında de¤iflen tek kullanımlık, disk fleklindeki aparatlar-
an (pedler) oluflmufltur.
d
El aletinin bir ucunda metal bir spatül ve di¤er ucunda bir tutma halkası bulunmaktadır. Yumuflak ve oldukça elastik bir malzeme olan sentetik köpükten
apılmıfl tek kullanımlık, disk fleklindeki aparatlar tutma halkasının içine
y
erlefltirilir. Bu OptraSculpt Pad aparatları kullanıcının kondanse edilebilir
y
kompozit restorasyonları, kompozitin alete yapıflması gibi bir sorunla
karflılaflmadan, hızlı ve etkin bir flekilde konturlamasına olanak sa¤lar. Bu
lanak, özellikle büyük Sınıf III, IV ve V restorasyonların ve direkt laminate
o
veneerlerin yapımında net bir avantaj sunar. El aleti üzerindeki referans skalaları, kompozit materyallerle bir restorasyon olufltururken simetrilerin, difl
enifllik oranlarının ve hizalamaların gerekti¤i gibi yapılmasına yardımcı olur.
g
Bileflimi
– OptraSculpt Pad aparatları polietilen ve EVA'dan yapılmıfltır.
– El aleti paslanmaz çelik ve PEEK'ten yapılmıfltır.
ndikasyonları
E
Sınıf III, IV ve V restorasyonların ve direkt laminate veneerlerin yapımında
sertleflmemifl, kondanse edilebilir kompozit ve kompomer materyallerin adap-
asyonu, flekillendirilmesi ve konturlanması.
t
Kontrendikasyonları
OptraSculpt Pad'in kullanılması flu durumlarda kontrendikedir:
Belirtilen çalıflma tekni¤i uygulanamıyorsa;
–
Hastanın OptraSculpt Pad'in bileflenlerinden herhangi birine karflı alerjik
–
oldu¤u biliniyorsa.
Yan etkiler
ugüne kadar bilinen bir yan etkisi yoktur.
B
Uygulama
– NOT – YEN‹ aletleri sabunlu su ile fırçalayın, durulayın ve kurutun. Ardın-
an, tam bir hijyen döngüsü gerçeklefltirin (bkz. “Dezenfeksiyon, temiz-
d
leme ve sterilizasyon”).
– Yalnızca mekanik ve hijyenik açıdan mükemmel durumdaki OptraSculpt
Pad aparat ve aletlerini kullanın.
Sıkıca oturmalarını sa¤lamak için OptraSculpt Pad aparatlarını alete
–
do¤ru yerlefltirdi¤inizden emin olun.
– Hasarlı alet ve aparatları kullanmayın.
estorasyonun büyüklü¤üne göre 4 mm veya 6 mm'lik bir OptraSculpt Pad
R
aparatı seçin. Sterilize edilmifl bir presel kullanarak aparatı ambalajından
çıkarın ve sabit, kontaminasyonsuz bir çalıflma yüzeyinin üzerine düz biçimde
yerlefltirin. Sonra, tutma halkasını aparatın gövdesine geçirin ve halka apara-
ın kaidesine düz bir biçimde oturana kadar bastırın.
t
OptraSculpt Pad aparatını bir çalıflma yüzeyinin
üzerine düz bir biçimde yerlefltirin.
Aleti bastırarak aparatın gövdesine geçirin.
Halkayı kaideye oturacak flekilde aparatın gövdesine yerlefltirin.
OptraSculpt Pad aparatı tutma halkasının içine
do¤ru yerlefltirilmifl durumdadır.
OptraSculpt Pad aparatları sadece tek kullanımlık olarak tasarlanmıfltır!
Restoratif materyali aletin di¤er ucundaki metal spatül ile alın ve yerlefltirin.
Sertleflmemifl, kondanse edilebilir kompoziti hazırlanan kaviteye yerlefltirdikten sonra materyali, yumuflak OptraSculpt Pad aparatı ile hafif vurufllarla
adapte edin ve konturlayın.
OptraSculpt Pad'in klinik kullanımdaki görünümü. Pedi yalnızca hafif bir basınç uygulayarak, yumuflak vurufllarla kullanın. Materyali
yerlefltirin ve aletin di¤er ucundaki metal spatül
ile fazlalıkları temizleyin.
Page 31

estorasyonu tamamladıktan sonra, OptraSculp Pad aparatını aletten çıkarın
R
e uygun flekilde bertaraf edin. Sonra aleti dezenfekte edin, temizleyin ve ste-
v
rilize edin.
Referans skalalarının kullanılması
OptraSculpt Pad aletinde iki adet referans skalası bulunmaktadır.
kala 1 difllerin genifllik oranlarının karflılafltırılması için net referans iflaret-
S
eri sa¤lar. Buna ilaveten, skala üzerindeki yatay çizgi insizal kenar hattının
l
de¤erlendirilmesini kolaylafltırır.
kala 1 kontralateral difl genifllik oranla-
S
ını karflılafltırmak ve/veya skala üzerin-
r
deki yatay çizgiye göre insizal kenar
hattını de¤erlendirmek için insizal ke-
arla hizalanabilir.
n
kala 2'de ideal ortalama anterior difl genifllikleri için iflaretler bulunmakta-
S
dır (dikey çizgiler). Bu skala, genifl anterior rekonstrüksiyonların estetik
tasarımı için referans olarak kullanılır. ‹flaretler yalnızca münferit difl genifllik-
erinin türetilebilece¤i veya birbirine oranla de¤erlendirilebilece¤i göreceli
l
e¤erleri gösterir. Noktalı verev iflaretler, difl ekseninin üst çenedeki tipik
d
ortalama pozisyonunu gösterir ve dolayısıyla, yeniden uyumlu bir anterior
estetik oluflturulmasında yararlı bir kılavuz sa¤lar. E¤er skalanın ortasındaki
çgen santral kesici difllerin arasındaki temas noktasını gösteriyorsa, skala
ü
do¤ru konumlandırılmıfltır ve skalanın her iki yanındaki rakamlar incelenen
kuadrantlarla uyumludur. Skala alt çenede kullanıma uygun de¤ildir!
Skala 2 klinik durumun, üst çenedeki
nterior difllerin ideal ortalama genifllik
a
oranları ve açısal dizilimiyle kıyaslanması
için kullanılır. Dolayısıyla, estetik
elifltirmeler kolaylıkla planlanabilir ve
g
yilefltirme yapılacak alanlar belirlenebilir.
i
nemli! Bu skala yalnızca göreceli de¤erleri gösterir. ‹flaretli genifllikler ve
Ö
açısal dizilimler oldu¤u gibi uyarlanmamalıdır. Hastanın kiflisel ihtiyaçlarını
karflılayacak flekilde ayarlanmaları gerekir.
ukarıda verilen örnek, tam difl geniflli¤i ortalamadan biraz büyük görünse
Y
de, görece olarak ideal difl geniflli¤i oranlarını göstermektedir. ‹kinci kesici
difllerin ve kanin difllerin eksenleri biraz fazla düzgün görünmektedir.
Uyarı
üçük parçaların kazara yutulmasını veya aspirasyonunu önlemek için
K
bir rubber dam kullanılması tavsiye edilir.
OptraSculpt Pad'i tasarım amacından farklı amaçlar için kullanmayın!
ezenfeksiyon, temizleme ve sterilizasyon
D
Genel notlar:
Her aleti, her kullanımdan önce temizleyin ve dezenfekte edin. Aletlerin
ayrıca bir buhar sterilizatöründe sterilize edilmesi kuvvetle tavsiye edilir.
Hasarlı aletleri kullanmayın. Onarım ve bakım ifllemleri yalnızca uygun e¤itimi
almıfl olan personel tarafından gerçeklefltirilmelidir.
Aletleri NaCl çözeltisi içine koymayın (oyuk korozyonu ve/veya gerilmeli
korozyon çatla¤ı riskinden kaçınmak için).
Kullanılmıfl ve kontamine olmufl aletlerle meflgul olurken 89/686/EEC
direktifinin gerekliliklerine uygun koruyucu eldiven ve gözlük takılmalıdır.
Kullandıktan sonra aletleri derhal dezenfekte edin ve temizleyin.
Genel olarak, aletlerin bir yıkayıcı-dezenfektör ünitesinde ifllemden
geçirilmesi manuel temizli¤e tercih edilir.
Ön temizleme:
Aletlerdeki sertleflmemifl büyük kalıntıları hav bırakmayan selüloz bir mendil
ile temizleyin. Ön dezenfeksiyon için aletleri, aldehit içermeyen alkali dezenfektan (örn. 15 dakika süreyle ID 212 forte, Dürr Dental, içine batırma) ile
doldurulmufl bir dezenfeksiyon küvetine (kapaklı ve süzgeçli) yerlefltirin.
Aletlerin tamamen dezenfektanla örtüldü¤ünden ve dezenfektanın kabarcık
içermedi¤inden emin olun.
Kalıntıların elle çıkarılması için sadece yumuflak bir fırça kullanın. Kesinlikle
metal fırça veya çelik yünü kullanmayın.
Otomatik ifllemleme için ön dezenfeksiyondan sonra aletleri akan suyun
altında dikkatlice durulayın.
Otomatik temizleme ve dezenfeksiyon:
– Yıkayıcı-dezenfektör ünitesi (örn. Miele termal yıkayıcı-dezenfektör
G7882)
– Temizleme ve dezenfeksiyon programı (örn. Vario TD)
– Deterjan ve dezenfektan (örn. Neodisher FA, Dr. Weigert)
E¤er aletler bir yıkayıcı-dezenfektör içinde yalnızca temizleme iflleminden
geçirildilerse, sonrasında bir buhar sterilizatöründe termal dezenfeksiyon
uygulanması zorunludur.
Manuel temizleme ve dezenfeksiyon:
– Yumuflak fırça (örn. Miltex naylon alet temizleme fırçası)
– Deterjan ve dezenfektan (örn. 15 dakika süreyle ID 212 forte,
Dürr Dental, içine batırma)
Temizleme ve dezenfeksiyondan sonra, aletleri akan su altında, süzgeç içinde
iyice durulayın.
Kurutma:
Basınçlı hava veya temiz, hav bırakmayan selüloz mendil
Sterilizasyon:
– Uygun sterilizasyon ambalajı (örn. alüminyum sterilizasyon konteynırı)
– Otoklav (örn. Systec HX-320)
– Program: parçalı ön vakum ifllemiyle 134 °C (273 °F) sıcaklıkta en az 4
dakika süreyle buhar sterilizasyonu
Bakım, kontrol ve muayene:
Aletleri temizledikten ve dezenfekte ettikten sonra gözle muayene ederek,
temiz ve hasarsız olduklarını ve gerekti¤i gibi çalıfltıklarını kontrol edin. E¤er
gözle görülebilir kalıntılar mevcutsa, temizleme ve dezenfeksiyon ifllemlerini
tekrar yapın.
Page 32

aklama koflulları
S
Kondansasyon oluflmasını önlemek için aletleri kuru bir ortamda saklayın.
–
– OptraSculpt Pad aparatlarını orijinal ambalajlarının içinde oda
sıcaklı¤ında ve toz, nem, basınç ve kontaminasyona karflı korunmufl
ekilde saklayın.
fl
Saklama sıcaklı¤ı: 12 - 28 °C (54 - 82 °F).
–
– Son kullanma tarihi: basılı tarihe ve etikete bakın.
otlar
N
El aleti otoklavlanabilir olup, çok sayıda kullanım ve otoklavda en
–
az 200 sterilizasyon döngüsü için tasarlanmıfltır. Öngörülen prosedürler için “Dezenfeksiyon, temizleme ve sterilizasyon” bölümüne bakın.
El aletini otoklava koymadan önce modelaj aparatlarını çıkarın.
–
OptraSculpt Pad aparatları sadece tek kullanımlıktır. Temizlenip,
–
dezenfekte ve sterilize edilip tekrar kullanılmaları yasaktır.
– Küçük parçalar genellikle yutulma ve aspirasyon riski taflıdıkları için bir
ubber dam kullanılması tavsiye edilir.
r
– Kullanma Talimatı ve el aletlerinin yeniden ifllemlenmesine iliflkin
ayrıntılı bilgiler Ivoclar Vivadent AG'nin web sitesinde mevcuttur
www.ivoclarvivadent.com).
(
Çocukların ulaflamayaca¤ı yerlerde saklayın!
Sadece difl hekimli¤inde kullanılmak içindir!
Bu madde sadece difl hekimli¤i kullanımı için gelifltirilmifltir. Uygulamada kullanma talimatına riayet edilmelidir. Belirlenen kullanım alanı dıflında kullanıldı¤ı veya kullanma talimatına uyulmadı¤ı durumlarda
oluflacak zararlardan sorumluluk kabul edilmez. Talimatta belirtilenin dıflındaki kullanım ve denemelerin
sonuçlarından kullanıcı sorumludur. Açıklamalar ve veriler garanti mesnedi oluflturmaz ve ba¤layıcı
de¤ildir.
ЫТТНЛИ
ê
éÔËÒ‡ÌËÂ
ptraSculpt Pad ПУ‰ВОЛУ‚У˜М˚И ЛМТЪЫПВМЪ, ФВ‰М‡БМ‡˜ВММ˚И ‰Оfl ЛМЪ‡-
O
‡О¸МУИ ‡‰‡ФЪ‡ˆЛЛ, ЩУПЛУ‚‡МЛfl Л ФЛ‰‡МЛfl НУМЪЫ‡ МВ‚˚ТУı¯ВПЫ
У
Ф‡НЫВПУПЫ НУПФУБЛЪМУПЫ ФОУП·ЛУ‚У˜МУПЫ П‡ЪВЛ‡ОЫ. OptraSculpt Pad
ТУТЪУЛЪ ЛБ ‡‚ЪУНО‡‚ЛЫВПУ„У ЛМТЪЫПВМЪ‡ Л ‡‚ЪУНО‡‚ЛЫВПУИ
У‰ВОЛУ‚У˜МУИ М‡Т‡‰НЛ (ФУ‰Ы¯В˜НЛ) У‰МУ‡БУ‚У„У ЛТФУО¸БУ‚‡МЛfl ‚
Ï
ÙÓÏ ‰ËÒ͇ ‰Ë‡ÏÂÚÓÏ ÓÚ 4 ‰Ó 6 ÏÏ.
аМТЪЫПВМЪ ТУТЪУЛЪ ЛБ ПВЪ‡ООЛ˜ВТНУ„У ¯Ф‡ЪВОfl М‡ У‰МУП-‡·У˜ВП НУМˆВ
ÍÓθˆ‡-‰ÂʇÚÂÎfl ̇ ‰Û„ÓÏ. é‰ÌÓ‡ÁÓ‚‡fl ̇҇‰Í‡ ‚ ÙÓÏ ‰ËÒ͇,
Л
Т‰ВО‡М‡ ЛБ Пfl„НУ„У, У˜ВМ¸ ˝О‡ТЪЛ˜МУ„У, ТЛМЪВЪЛ˜ВТНУ„У ФВМЛТЪУ„У
П‡ЪВЛ‡О‡, ‚ТЪ‡‚Оfl˛˘В„УТfl ‚ НУО¸ˆУ-‰ВК‡ЪВО¸. з‡Т‡‰НЛ OptraSculpt Pad
ФУБ‚УОfl˛Ъ ФУО¸БУ‚‡ЪВО˛ НУМЪЫЛУ‚‡Ъ¸ Ф‡НЫВП˚И НУПФУБЛЪМ˚И П‡ЪВЛО‡
˚ТЪУ Л ˝ЩЩВНЪЛ‚МУ, МВ ‰УФЫТН‡fl ФЛОЛФ‡МЛfl НУПФУБЛЪ‡ Н ЛМТЪЫПВМЪЫ.
·
óÚÓ ‰‡ÂÚ Ó˜Â‚Ë‰Ì˚ ÔÂËÏÛ˘ÂÒÚ‚‡, ÓÒÓ·ÂÌÌÓ ÔË ÒÓÁ‰‡ÌËË ·Óθ¯Ëı
ÂÒÚ‡‚‡ˆËÈ Í·ÒÒÓ‚ III, IV Ë V, ‡ Ú‡ÍÊ βÏËÌËÓ‚. éˆÂÌӘ̇fl ¯Í‡Î‡ ̇
·‡БУ‚УП ЛМТЪЫПВМЪВ ФУПУ„‡ВЪ ЫТЪ‡МУ‚ЛЪ¸ ТУУЪ‚ВЪТЪ‚Ы˛˘ЛВ ТЛППВЪЛЛ,
УФУˆЛЛ ¯ЛЛМ˚ БЫ·‡ Л ˆВМЪУ‚НЫ ФЛ ТУБ‰‡МЛЛ ВТЪ‡‚‡ˆЛЛ ЛБ
Ф
НУПФУБЛЪМУ„У П‡ЪВЛ‡О‡.
ëÓÒÚ‡‚
з‡Т‡‰НЛ OptraSculpt Pad ТУТЪУflЪ ЛБ ФУОЛ˝ЪЛОВМ‡ Л
–
˝ЪЛОВМ‚ЛМЛО‡ˆВЪ‡Ъ‡.
– Е‡БУ‚˚И ЛМТЪЫПВМЪ ТУТЪУЛЪ ЛБ МВК‡‚В˛˘ВИ ТЪ‡ОЛ Л
ФУОЛ˝ЩЛ˝ЩЛНВЪУМ‡.
èÓ͇Á‡ÌËfl
иЛПВМfl˛ЪТfl ‰Оfl ‡‰‡ФЪ‡ˆЛЛ, ЩУПЛУ‚‡МЛfl Л НУМЪЫЛУ‚‡МЛfl МВУЪ‚ВК‰ВММ˚ı Ф‡НЫВП˚ı НУПФУБЛЪМ˚ı Л НУПФУПВМ˚ı П‡ЪВЛ‡ОУ‚ ‚ ВТЪ‡‚‡ˆЛflı НО‡ТТУ‚ III, IV Л V Л ФУТЪ‡МУ‚НВ О˛ПЛМЛУ‚.
èÓÚË‚ÓÔÓ͇Á‡ÌËfl
иЛПВМВМЛВ OptraSculpt Pad ФУЪЛ‚УФУН‡Б‡МУ
– З ТОЫ˜‡В ВТОЛ ЫТЪ‡МУ‚ОВММ‡fl ЪВıМЛН‡ ‡·УЪ˚ МВ ПУКВЪ ·˚Ъ¸ ТУ·О˛‰ВМ‡
– ЦТОЛ ЛБ‚ВТЪМУ, ˜ЪУ Ы Ф‡ˆЛВМЪ‡ ВТЪ¸ ‡ООВ„Лfl Н О˛·˚П НУПФУМВМЪ‡П
OptraSculpt Pad.
иУ·У˜М˚В ˝ЩЩВНЪ˚
ç ‚˚fl‚ÎÂÌ˚
иЛПВМВМЛВ
– З‡КМУ – ‚˚ПУИЪВ зйЗхв ЛМТЪЫПВМЪ ‚ П˚О¸МУИ ‚У‰В, ФУПУИЪВ Л
‚˚ТЫ¯ЛЪВ. б‡ЪВП, ФУЛБ‚В‰ЛЪВ ФУОМ˚И „Л„ЛВМЛ˜ВТНЛИ ˆЛНО
(ТП. «СВБЛМЩВНˆЛfl, У˜ЛТЪН‡ Л ТЪВЛОЛБ‡ˆЛfl»).
– аТФУО¸БЫИЪВ ЪУО¸НУ М‡Т‡‰НЛ OptraSculpt Pad Л ЛМТЪЫПВМЪ˚,
М‡ıУ‰fl˘ЛВТfl ‚ ·ВБЫФВ˜МУП ПВı‡МЛ˜ВТНУП Л Т‡МЛЪ‡МУ„Л„ЛВМЛ˜ВТНУП ТУТЪУflМЛЛ.
– м·В‰ЛЪВТ¸ ˜ЪУ М‡Т‡‰НЛ OptraSculpt Pad ФЛТУВ‰ЛМВМ˚ Н ЛМТЪЫПВМЪЫ
Ф‡‚ЛО¸МУ Л ‰УТЪЛ„МЫЪУ ФОУЪМУВ ФЛОВ„‡МЛВ.
– зВ ФУ‚ВК‰‡ИЪВ ЛМТЪЫПВМЪ˚ Л М‡Т‡‰НЛ.
З˚·ВЛЪВ М‡Т‡‰НЫ OptraSculpt Pad 4 ПП ЛОЛ 6 ПП., ‚ Б‡‚ЛТЛПУТЪЛ УЪ
‡БПВ‡ ВТЪ‡‚‡ˆЛЛ. аТФУО¸БЫfl ТЪВЛО¸М˚В ˘ЛФˆ˚, ЛБ‚ОВНЛЪВ М‡Т‡‰НЫ
ЛБ ЫФ‡НУ‚НЛ Л ФУПВТЪЛЪВ М‡ У‚МЫ˛, ЫТЪУИ˜Л‚Ы˛ ˜ЛТЪЫ˛ ‡·У˜Ы˛
ФУ‚ВıМУТЪ¸. б‡ЪВП, ‰‚Л„‡ИЪВ НУО¸ˆУ ‚‰УО¸ М‡Т‡‰НЛ, ФЛПВМflfl ‰‡‚ОВМЛВ,
ФУН‡ НУО¸ˆУ МВ ·Ы‰ВЪ У‚МУ ОВК‡Ъ¸ М‡ УТМУ‚‡МЛЛ М‡Т‡‰НЛ.
иУПВТЪЛЪВ М‡Т‡‰НЫ OptraSculpt Pad М‡ У‚МЫ˛
‡·У˜Ы˛ ФУ‚ВıМУТЪ¸.
С‚Л„‡ИЪВ ЛМТЪЫПВМЪ Н УТМУ‚‡МЛ˛ М‡Т‡‰НЛ,
ФЛПВМflfl ‰‡‚ОВМЛВ.
Page 33

ÒÚ‡‚¸Ú ÍÓθˆÓ ‰Ó ÓÒÌÓ‚‡ÌËfl.
Ç
‡Т‡‰Н‡ OptraSculpt Pad НУВНЪМУ ТУВ‰ЛМВМ‡
ç
НУО¸ˆУП-‰ВК‡ЪВОВП.
Ò
ç‡Ò‡‰ÍË OptraSculpt Pad ‡Á‡·ÓÚ‡Ì˚ ËÒÍβ˜ËÚÂθÌÓ ‰Îfl Ó‰ÌÓ‡-
У‚У„У ФЛПВМВМЛfl!
Á
аТФУО¸БЫИЪВ ПВЪ‡ООЛ˜ВТНЛИ ¯Ф‡ЪВО¸ М‡ ‰Ы„УП НУМˆВ ЛМТЪЫПВМЪ‡ ‰Оfl
‚БflЪЛfl Л ФУБЛˆЛУМЛУ‚‡МЛfl ФОУП·ЛУ‚У˜МУ„У П‡ЪВЛ‡О‡.
иУТОВ ФУПВ˘ВМЛfl МВТФУОЛПВЛБУ‚‡ММУ„У Ф‡НЫВПУ„У НУПФУБЛЪМУ„У П‡ЪВ-
ЛО‡ ‚ ФВ‰‚‡ЛЪВО¸МУ ФУ‰„УЪУ‚ОВММЫ˛ ФУОУТЪ¸, ФУЛБ‚В‰ЛЪВ ‡‰‡ФЪ‡ˆЛ˛
Л НУМЪЫЛУ‚‡МЛВ П‡ЪВЛ‡О‡ ФЛ ФУПУ˘Л М‡Т‡‰НЛ OptraSculpt Pad, Н‡Н
·˚ ÔÓÏÓ͇fl ÔÓ‚ÂıÌÓÒÚ¸.
ЛПВМВМЛВ OptraSculpt Pad ‚ НОЛМЛ˜ВТНУП
è
ОЫ˜‡В. иУП‡НЛ‚‡˛˘ЛПЛ ‰‚ЛКВМЛflПЛ, ФЛ-
Т
ПВМflfl МВБМ‡˜ЛЪВО¸МУВ ‰‡‚ОВМЛВ. иУПВТЪЛЪВ
П‡ЪВЛ‡О Л Ы‰‡ОЛЪВ ЛБОЛ¯НЛ ПВЪ‡ООЛ˜ВТНЛП
Ф‡ЪВОВП М‡ ‰Ы„УП НУМˆВ ЛМТЪЫПВМЪ‡.
¯
иУТОВ Б‡‚В¯ВМЛfl ВТЪ‡‚‡ˆЛЛ, Ы‰‡ОЛЪВ OptraSculp Pad ЛБ ЛМТЪЫПВМЪ‡ Л
ЪЛОЛБЛЫИЪВ. б‡ЪВП, ‰ВБЛМЩЛˆЛЫИЪВ, У˜ЛТЪЛЪВ Л ТЪВЛОЛБЫИЪВ ЛМТЪЫ-
Û
ÏÂÌÚ.
аТФУО¸БУ‚‡МЛВ УˆВМУ˜МУИ ¯Н‡О˚
м ЛМТЪЫПВМЪ‡ OptraSculpt Pad ВТЪ¸ ‰‚В ˝Ъ‡ОУММ˚В ¯Н‡О˚.
ò͇· 1 У·ВТФВ˜Л‚‡ВЪ У·˚˜МЫ˛ УˆВМНЫ БМ‡˜ВМЛИ ‰Оfl Т‡‚МВМЛfl
ФУФУˆЛИ ¯ЛЛМ˚ БЫ· Н БЫ·Ы. дУПВ ЪУ„У, „УЛБУМЪ‡О¸М‡fl ОЛМЛfl М‡
¯Н‡ОВ У·ОВ„˜‡ВЪ УˆВМНЫ ОЛМЛЛ ВКЫ˘В„У Н‡fl.
ò͇· 1 ПУКВЪ ·˚Ъ¸ Ы‚flБ‡М‡ Т
ВКЫ˘ЛП Н‡ВП, ˜ЪУ·˚, М‡ФЛПВ,
Т‡‚МЛЪ¸ ФУФУˆЛЛ ¯ЛЛМ˚ НУМЪ‡О‡ЪВ‡О¸МУ„У БЫ·‡ Л/ЛОЛ УˆВМЛЪ¸ ОЛМЛ˛
ВКЫ˘В„У Н‡fl УЪМУТЛЪВО¸МУ „УЛБУМЪ‡О¸МУИ ОЛМЛЛ М‡ ¯Н‡ОВ.
ò͇· 2 ТУ‰ВКЛЪ П‡НЛУ‚НЫ ‰Оfl Л‰В‡О¸МУИ ТВ‰МВИ ¯ЛЛМ˚ ФВВ‰МВ„У
БЫ·‡ (‚ВЪЛН‡О¸М˚В ОЛМЛЛ). щЪ‡ ¯Н‡О‡ ЛТФУО¸БЫВЪТfl ‚ Н‡˜ВТЪ‚В ¯‡·ОУМ‡
‰Оfl ˝ТЪВЪЛ˜ВТНУ„У ‰ЛБ‡ИМ‡ БМ‡˜ЛЪВО¸МУИ ВНУМТЪЫНˆЛЛ ФВВ‰МЛı БЫ·У‚.
т‡·ОУМ ФВ‰ТЪ‡‚ОflВЪ ОЛ¯¸ УЪМУТЛЪВО¸М˚В БМ‡˜ВМЛfl, ЛТıУ‰fl ЛБ НУЪУ˚ı
ПУКВЪ ·˚Ъ¸ УФВ‰ВОВМ‡ ЛОЛ ‚˚˜ЛТОВМ‡ ЛМ‰Л‚Л‰Ы‡О¸М‡fl ¯ЛЛМ‡ БЫ·У‚ ФУ
УЪМУ¯ВМЛ˛ ‰Ы„ Н ‰Ы„Ы. дУТ‡fl ФЫМНЪЛМ‡fl ‡БПВЪН‡ ЫН‡Б˚‚‡ВЪ ЫУ‚ВМ¸
ЪЛФЛ˜МУ„У ТВ‰МВ„У ФУОУКВМЛfl УТЛ БЫ·‡ ‚ НУТЪЛ ‚ВıМВИ ˜ВО˛ТЪЛ Л,
ТОВ‰У‚‡ЪВО¸МУ, Ъ‡НКВ ТОЫКЛЪ ФУОВБМ˚П ЫНУ‚У‰ТЪ‚УП ‚ ‚УТТУБ‰‡МЛЛ
˝ТЪВЪЛНЛ ФВВ‰МЛı БЫ·У‚. тН‡О‡ ‡ТФУОУКВМ‡ Ф‡‚ЛО¸МУ, ВТОЛ ЪВЫ„УО¸МЛН ‚ ТВВ‰ЛМВ ¯Н‡О˚ ЫН‡Б˚‚‡ВЪ М‡ НУМЪ‡НЪМ˚И ФЫМНЪ ПВК‰Ы ˆВМЪ‡О¸М˚ПЛ ВБˆ‡ПЛ Л ФЛ ‡ТТПУЪВМЛЛ ˜ЛТОУ ФУ У·В ТЪУУМ˚ ¯Н‡О˚
ТУУЪ‚ВЪТЪ‚Ы˛Ъ ФОУ˘‡‰flП. тН‡О‡ МВ ФЛ„У‰М‡ ‰Оfl ЛТФУО¸БУ‚‡МЛfl ‚
МЛКМВИ ˜ВО˛ТЪЛ!
ò͇· 2 ЛТФУО¸БЫВЪТfl ‰Оfl Т‡‚МВМЛfl
НОЛМЛ˜ВТНУИ ТЛЪЫ‡ˆЛЛ Т Л‰В‡О¸М˚П
ТУУЪМУ¯ВМЛВП ТВ‰МВИ ¯ЛЛМ˚ БЫ·‡ Л
Ы„ОУ‚У„У ‚˚‡‚МЛ‚‡МЛfl ФВВ‰МЛı БЫ·У‚
‚ ‚ВıМВИ ˜ВО˛ТЪЛ. лОВ‰У‚‡ЪВО¸МУ,
У·ОВ„˜‡ВЪТfl ФО‡МЛУ‚‡МЛВ ˝ТЪВЪЛ˜ВТНЛı
ЫОЫ˜¯ВМЛИ Л УФВ‰ВОВМЛВ У·О‡ТЪВИ
‰Оfl ЫОЫ˜¯ВМЛfl.
LJÊÌÓ! тН‡О‡ ФВ‰УТЪ‡‚ОflВЪ ЪУО¸НУ УЪМУТЛЪВО¸М˚В БМ‡˜ВМЛfl. йЪПВ˜ВММ˚В ¯ЛЛМ‡ Л Ы„ОУ‚УВ ‚˚‡‚МЛ‚‡МЛВ, МВ ‰УОКМ˚ ·˚Ъ¸ ФЛМЛП‡Ъ¸Тfl, Н‡Н
УМЛ ВТЪ¸. йМЛ ‰УОКМ˚ ·˚Ъ¸ ‡‰‡ФЪЛУ‚‡М˚ Т Ы˜ВЪУП ЪВ·У‚‡МЛИ Н‡К‰У„У
НУМНВЪМУ„У Ф‡ˆЛВМЪ‡.
иЛ‚В‰ВММ˚И ‚˚¯В ФЛПВ ФУН‡Б˚‚‡ВЪ ФЛ·ОЛКВММ˚В Н Л‰В‡О¸М˚П
ФУФУˆЛЛ ¯ЛЛМ˚ БЫ·‡, ‰‡КВ ВТОЛ У·˘‡fl ¯ЛЛМ‡ БЫ·‡ ПУКВЪ УН‡Б‡Ъ¸Тfl
МВПМУ„У ·УО¸¯В, ˜ВП ‚ ТВ‰МВП. йТЛ ‚ЪУ˚ı ВБˆУ‚ Л НО˚НУ‚ Н‡КЫЪТfl
ТОЛ¯НУП ФflП˚ПЛ.
иВ‰ЫФВК‰ВМЛВ
кВНУПВМ‰ЫВЪТfl ‚ТВ„‰‡ ЛТФУО¸БУ‚‡Ъ¸ НУЩЩВ‰‡П, ФУТНУО¸НЫ ФЛ ‡·УЪВ
Т ПВОНЛПЛ ФВ‰ПВЪ‡ПЛ ‚ТВ„‰‡ ТЫ˘ВТЪ‚ЫВЪ УФ‡ТМУТЪ¸ Лı ‡ТФЛ‡ˆЛЛ.
зВ ЛТФУО¸БЫИЪВ OptraScupt Pad ‰Оfl ЛМ˚ı ˆВОВИ, МВ ЫН‡Б‡ММ˚ı ‚
ЛМТЪЫНˆЛЛ!
СВБЛМЩВНˆЛfl, У˜ЛТЪН‡ Л ТЪВЛОЛБ‡ˆЛfl
й·˘ЛВ ФУОУКВМЛfl:
зВУ·ıУ‰ЛПУ ˜ЛТЪЛЪ¸ Л ‰ВБЛМЩЛˆЛУ‚‡Ъ¸ Н‡К‰˚И ЛМТЪЫПВМЪ ФВВ‰
Н‡К‰˚П ЛТФУО¸БУ‚‡МЛВП. з‡ТЪУflЪВО¸МУ ВНУПВМ‰ЫВЪТfl ‰УФУОМЛЪВО¸МУ
ТЪВЛОЛБУ‚‡Ъ¸ ЛМТЪЫПВМЪ˚ ‚ Ф‡У‚УП ТЪВЛОЛБ‡ЪУВ.
зВ ЛТФУО¸БЫИЪВ ФУ‚ВК‰ВММ˚В ЛМТЪЫПВМЪ˚. кВПУМЪ Л ЪВıМЛ˜ВТНУВ
У·ТОЫКЛ‚‡МЛВ ‰УОКВМ УТЫ˘ВТЪ‚ОflЪ¸Тfl ЪУО¸НУ ‰УОКМ˚П У·‡БУП ФУ‰„УЪУ‚ОВММ˚П ФВТУМ‡ОУП.
зВ ФУПВ˘‡ИЪВ ЛМТЪЫПВМЪ˚ ‚ ‡ТЪ‚У NaCl (‚У ЛБ·ВК‡МЛВ ФУfl‚ОВМЛfl
К‡‚˜ЛМ˚ Л/ЛОЛ НУУБЛУММУ„У ‡ТЪВТНЛ‚‡МЛfl).
Page 34

Л О˛·УП У·‡˘ВМЛЛ Т Б‡„flБМВММ˚ПЛ ЛМТЪЫПВМЪ‡ПЛ М‡‰В‚‡ИЪВ
è
‡˘ËÚÌ˚ ӘÍË Ë Ô˜‡ÚÍË, ÒÓÓÚ‚ÂÚÒÚ‚Û˛˘Ë Ú·ӂ‡ÌËflÏ ‰ËÂÍÚË‚˚
Á
89/686/EEC.
ВБЛМЩВНˆЛfl Л У˜ЛТЪН‡ ЛМТЪЫПВМЪУ‚ ‰УОКМ‡ ФУЛБ‚У‰ЛЪ¸Тfl Т‡БЫ ФУТОВ
Ñ
ÒÔÓθÁÓ‚‡ÌËfl. д‡Н Ф‡‚ЛОУ, У·‡·УЪН‡ ‚ ПУИНВ-‰ВБЛМЩВНЪУВ
Ë
ФВ‰ФУ˜ЪЛЪВО¸МВВ Ы˜МУИ У˜ЛТЪНЛ.
ВВ‰ ˜ЛТЪНУИ:
è
ТЪУУКМУ Ы‰‡ОЛЪВ ·УО¸¯ЛВ МВБ‡Ъ‚‰‚¯ЛВ Б‡„flБМВМЛfl ЛБ ЛМТЪЫПВМ-
й
ЪУ‚, Т ФУПУ˘¸˛ Пfl„НУИ МВ‚УТЛТЪУИ ˆВОО˛ОУБМУИ ЪН‡МЛ. СОfl ФВ‰‚‡ЛЪВО¸МУИ ‰ВБЛМЩВНˆЛЛ, ФУПВТЪЛЪВ ЛМТЪЫПВМЪ˚ ‚ ‰ВБЛМЩВНˆЛУММЫ˛ ‚‡ММЫ
Т Н˚¯НУИ Л ‚ТЪ‡‚¸ЪВ ЩЛО¸Ъ), Б‡ФУОМВММЫ˛ ·ВБ‡О¸‰В„Л‰М˚П ˘ВОУ˜М˚П
(
‰ВБЛМЩЛˆЛЫ˛˘ЛП ТВ‰ТЪ‚УП (М‡ФЛПВ, ФУ„ЫКВМЛВ ‚ ID 212 212 forte,
Dürr Dental М‡ 15 ПЛМ.). м·В‰ЛЪВТ¸, ˜ЪУ ЛМТЪЫПВМЪ˚ ФУОМУТЪ¸˛ ФУН˚Ъ˚
ВБЛМЩЛˆЛЫ˛˘ЛП ‡ТЪ‚УУП, Л ‚ МВП МВЪ ФЫБ˚¸НУ‚.
‰
УО¸БЫИЪВТ¸ ЪУО¸НУ Пfl„НУИ ˘ВЪНУИ ‰Оfl Ы˜МУ„У Ы‰‡ОВМЛfl Б‡„flБМВМЛИ.
и
зЛНУ„‰‡ МВ ФУО¸БЫИЪВТ¸ ПВЪ‡ООЛ˜ВТНУИ ˘ВЪНУИ ЛОЛ ТЪ‡О¸МУИ ТЪЫКНУИ.
Оfl ‡‚ЪУП‡ЪЛБЛУ‚‡ММУИ У·‡·УЪНЛ, Ъ˘‡ЪВО¸МУ ФУП˚Ъ¸ ЛМТЪЫПВМЪ˚ ‚
Ñ
УЪУ˜МУИ ‚У‰В ФУТОВ ФВ‰‚‡ЛЪВО¸МУИ ‰ВБЛМЩВНˆЛЛ
Ô
Д‚ЪУП‡ЪЛ˜ВТН‡fl ˜ЛТЪН‡ Л ‰ВБЛМЩВНˆЛfl:
– еУИН‡-‰ВБЛМЩВНЪУ (М‡ФЛПВ, Miele ПУИН‡-‰ЛБВМЩВНЪУ G7882)
иУ„‡ПП‡ У˜ЛТЪНЛ Л ‰ВБЛМЩВНˆЛЛ (М‡ФЛПВ, Vario TD)
–
– СВЪВ„ВМЪ˚ Л ‰ВБЛМЩЛˆЛЫ˛˘ЛВ ТВ‰ТЪ‚‡ (М‡ФЛПВ, Neodisher FA,
Dr. Weigert)
ТОЛ ЛМТЪЫПВМЪ˚ ЪУО¸НУ У˜Л˘ВМ˚ ‚ ПУИНВ-‰ЛБВМЩВНЪУВ, ФУТОВ‰Ы˛˘‡fl
Ö
ВПЛ˜ВТН‡fl ‰ВБЛМЩВНˆЛfl ‚ Ф‡У‚УП ТЪВЛОЛБ‡ЪУВ fl‚ОflВЪТfl
Ú
Ó·flÁ‡ÚÂθÌÓÈ.
Ы˜М‡fl У˜ЛТЪН‡ Л ‰ВБЛМЩВНˆЛfl:
ê
– еfl„НУИ НЛТЪУ˜НУИ (М‡ФЛПВ, Miltex МВИОУМУ‚‡fl НЛТЪУ˜Н‡ ‰Оfl
ЛМТЪЫПВМЪУ‚)
– СВЪВ„ВМЪ˚ Л ‰ВБЛМЩЛˆЛЫ˛˘ЛВ ТВ‰ТЪ‚‡ (М‡ФЛПВ, ФУ„ЫКВМЛВ ‚
D 212 212 forte, Dürr Dental ̇ 15 ÏËÌ.)
I
иУТОВ ˜ЛТЪНЛ Л ‰ВБЛМЩВНˆЛЛ, Ъ˘‡ЪВО¸МУ ФУПУИЪВ ЛМТЪЫПВМЪ˚ ФУ‰
ФУЪУ˜МУИ ‚У‰УИ.
ۯ͇:
ë
– лК‡Ъ˚П ‚УБ‰ЫıУП ЛОЛ ˜ЛТЪУИ, ·ВБ‚УТУ‚УИ ˆВОО˛ОУБМУИ ЪН‡М¸˛
ëÚÂËÎËÁ‡ˆËfl:
Ç ÔÓ‰ıÓ‰fl˘ÂÈ ‰Îfl ÒÚÂËÎËÁ‡ˆËË ÛÔ‡ÍÓ‚Í (̇ÔËÏÂ, ÒÚÂËθÌÓÏ
–
‡О˛ПЛМЛВ‚УП НУМЪВИМВВ)
– Д‚ЪУНО‡‚ (М‡ФЛПВ, Systec HX-320)
– иУ„‡ПП‡: Ф‡У‚‡fl ТЪВЛОЛБ‡ˆЛЛ Т Щ‡НˆЛУММ˚П ФВ‰‚‡НЫЫПМ˚П
УˆВТТУП ФЛ 134 °C ‚ ЪВ˜ВМЛВ Н‡Н ПЛМЛПЫП 4 ПЛМЫЪ.
Ô
лУ‰ВК‡МЛВ, УТПУЪ Л ФУ‚ВН‡:
иУТОВ У˜ЛТЪНЛ Л ‰ВБЛМЩВНˆЛЛ ЛМТЪЫПВМЪУ‚, ‚ЛБЫ‡О¸МУ ФУ‚В¸ЪВ Лı
ЛТЪУЪЫ, УЪТЫЪТЪ‚ЛВ ФУ‚ВК‰ВМЛИ Л ЩЫМНˆЛУМ‡О¸МЫ˛ ФЛ„У‰МУТЪ¸. ЦТОЛ
˜
ФЛТЫЪТЪ‚Ы˛Ъ П‡НУТНУФЛ˜ВТНЛ ‚Л‰ЛП˚В УТЪ‡ЪУ˜М˚В Б‡„flБМВМЛfl,
ФУ‚ЪУЛЪВ ФУˆВТТ У˜ЛТЪНЛ Л ‰ВБЛМЩВНˆЛЛ.
ï‡ÌÂÌËe
– п‡МЛЪВ ЛМТЪЫПВМЪ˚ ‚ ТЫıУП ПВТЪВ ‚У ЛБ·ВК‡МЛВ ФУfl‚ОВМЛfl
ÍÓ̉ÂÌÒ‡Ú‡.
– ï‡ÌËÚ ̇҇‰ÍË OptraSculpt Pad ‚ ÓË„Ë̇θÌÓÈ ÛÔ‡ÍÓ‚Í ÔË
НУПМ‡ЪМУИ ЪВПФВ‡ЪЫВ, Б‡˘Л˘ВММ˚ПЛ УЪ Ф˚ОЛ, ‚О‡КМУТЪЛ, ‰‡‚ОВМЛfl
Л Б‡„flБМВМЛfl.
– п‡МВМЛВ ФЛ 2 - 28°C
– лУН „У‰МУТЪЛ: ТП. М‡ ˝ЪЛНВЪНВ
ÇÌËχÌËÂ
– Е‡БУ‚˚И ЛМТЪЫПВМЪ ‡‚ЪУНО‡‚ЛЫВП˚И Л ‡Б‡·УЪ‡М ‰Оfl
ПМУ„УН‡ЪМУ„У ФЛПВМВМЛfl Л, Н‡Н ПЛМЛПЫП, 200 ˆЛНОУ‚ ТЪВЛОЛБ‡ˆЛЛ ‚ ‡‚ЪУНО‡‚В. лП. «СВБЛМЩВНˆЛfl, У˜ЛТЪН‡ Л ТЪВЛОЛБ‡ˆЛfl»
‰Оfl ФВ‰ЫТПУЪВММ˚ı ФУˆВ‰Ы.
– иВВ‰ ‡‚ЪУНО‡‚ЛУ‚‡МЛВП ·‡БУ‚У„У ЛМТЪЫПВМЪ‡ Ы‰‡ОЛЪВ
ÏÓ‰ÂÎËÓ‚Ó˜ÌÛ˛ ̇҇‰ÍÛ.
– ç‡Ò‡‰ÍË OptraSculpt Pad Ô‰̇Á̇˜ÂÌ˚ ÚÓθÍÓ ‰Îfl Ó‰ÌÓ‡ÁÓ-
‚У„У ЛТФУО¸БУ‚‡МЛfl. аı МВ МЫКМУ ˜ЛТЪЛЪ¸, ‰ВБЛМЩЛˆЛУ‚‡Ъ¸,
ТЪВЛОЛБУ‚‡Ъ¸ Л ЛТФУО¸БУ‚‡Ъ¸ ТМУ‚‡.
– иУТНУО¸НЫ ФЛ ‡·УЪВ Т ПВОНЛПЛ ФВ‰ПВЪ‡ПЛ ‚ТВ„‰‡ ТЫ˘ВТЪ‚ЫВЪ УФ‡Т-
МУТЪ¸ Лı ‡ТФЛ‡ˆЛЛ, ‚ТВ„‰‡ ВНУПВМ‰ЫВЪТfl ЛТФУО¸БУ‚‡Ъ¸ НУЩЩВ‰‡П.
– аМТЪЫНˆЛЛ ФУ ЛТФУО¸БУ‚‡МЛ˛ Л ·УОВВ ‰ВЪ‡О¸М‡fl ЛМЩУП‡ˆЛfl
ФУ ФЛПВМВМЛ˛ ЛМТЪЫПВМЪУ‚ ‰УТЪЫФМ‡ М‡ Т‡ИЪВ Ivoclar Vivadent
AG (www.ivoclarvivadent.com).
п‡МЛЪ¸ ‚ ПВТЪВ, МВ‰УТЪЫФМУП ‰Оfl ‰ВЪВИ!
нУО¸НУ ‰Оfl ФЛПВМВМЛfl ‚ ТЪУП‡ЪУОУ„ЛЛ!
иУ‰ЫНЪ ‡Б‡·УЪ‡М ‰Оfl ФЛПВМВМЛfl ‚ ТЪУП‡ЪУОУ„ЛЛ Л ФУ‰ОВКЛЪ ЛТФУО¸БУ‚‡МЛ˛ ЪУО¸НУ ‚ ТУУЪ‚ВЪТЪ‚ЛЛ Т ЛМТЪЫНˆЛВИ ФУ ФЛПВМВМЛ˛. иУЛБ‚У‰ЛЪВО¸ МВ МВТВЪ УЪ‚ВЪТЪ‚ВММУТЪЛ Б‡ ФЛПВМВМЛВ ‚ ЛМ˚ı
ˆВОflı ЛОЛ ЛТФУО¸БУ‚‡МЛВ, МВ ТУУЪ‚ВЪТЪ‚Ы˛˘ВВ ЛМТЪЫНˆЛЛ. дУПВ ЪУ„У, ФУЪВ·ЛЪВО¸ У·flБ‡М ФУ‰ Т‚У˛
УЪ‚ВЪТЪ‚ВММУТЪ¸ ФУ‚ВЛЪ¸ ФУ‰ЫНЪ ФВВ‰ В„У ЛТФУО¸БУ‚‡МЛВП М‡ ТУУЪ‚ВЪТЪ‚ЛВ Л ‚УБПУКМУТЪ¸ ФЛПВМВМЛfl ‰Оfl ФУТЪ‡‚ОВММ˚ı ˆВОВИ, ВТОЛ ˝ЪЛ ˆВОЛ МВ ЫН‡Б‡М˚ ‚ ЛМТЪЫНˆЛЛ.
Polski
Opis
OptraSculpt Pad jest narz´dziem przeznaczonym do wewnàtrzustnego kształtowania i modelowania nie utwardzonej powierzchni materiałów kompozytowych. OptraSculpt Pad składa si´ z r´kojeÊci, (która mo˝e byç poddana
sterylizacji w autoklawie) i jednorazowych nakładek w kształcie dysków,
o Êrednicy od 4 do 6 mm.
R´kojeÊç składa si´ z metalowej szpatułki, która pełni rol´ uchwytu. Z drugiej
strony narz´dzie zakoƒczone jest metalowym okràgłym pierÊcieniem.
Jednorazowe nakładki w kształcie dysków, wykonane sà z mi´kkiego, bardzo
elastycznego tworzywa sztucznego i sà dopasowane do pierÊcienia, który je
podtrzymuje. Szczególnà właÊciwoÊcià OptraSculpt Pad jest to, i˝ dzi´ki
niemu mo˝na łatwo i sprawnie modelowaç materiał kompozytowy przy
ograniczonym klejeniu si´ materiałów do instrumentu. Ma to znaczenie
w du˝ych ubytkach klasy III, IV i V oraz podczas wykonywania licówek
metodà bezpoÊrednià. Za pomocà znajdujàcej si´ na uchwycie skali porównawczej łatwiej jest oceniç symetri´ z´bów, stosunek szerokoÊci koron
i szyjek z´bów przy odbudowie z u˝yciem materiałów zło˝onych.
Page 35

Skład
Okràgłe nakładki OptraSculpt Pad wykonane sà z polietylenu i EVA.
–
– Instrument zasadniczy (r´kojeÊç) wykonany jest ze stali szlachetnej
(nierdzewnej) i PEEK.
skazania
W
ształtowanie i modelowanie nie utwardzonej i nie spolimeryzowanej
K
warstwy kompozytów i kompomerów w ubytkach klasy III, IV i V oraz
licówek wykonywanych metodà bezpoÊrednià w ustach pacjenta.
rzeciwwskazania
P
Stosowanie OptraSculpt Pad jest przeciwwskazane gdy:
– zalecana technika pracy nie jest mo˝liwa do wykonania,
przy stwierdzonej nadwra˝liwoÊci na którykolwiek ze składników
–
ptraSculpt Pad.
O
Działania niepo˝àdane
otychczas nie sà poznane
D
Stosowanie
– UWAGA – Wymyç nowy instrument wodà z mydłem, wypłukaç
i wysuszyç. Nast´pnie przeprowadziç pełny cykl zabiegów higienicznych
patrz "Dezynfekcja, czyszczenie i sterylizacja").
(
– Nale˝y zwracaç uwag´, aby u˝ywaç tylko sprawnych technicznie
instrumentów OptraSculpt Pad oraz takich, które nie wzbudzajà ˝adnych
àtpliwoÊci pod wzgl´dem stanu higienicznego.
w
Nakładki OptraSculpt Pad muszà byç prawidłowo i stabilnie nało˝one
–
na r´kojeÊç.
– Nie wolno u˝ywaç uszkodzonych r´kojeÊci i wielokrotnie stosowaç
akładek jednorazowego u˝ytku.
n
W zale˝noÊci od wielkoÊci ubytku, nale˝y u˝yç nakładek OptraSculpt Pad
o wielkoÊci od 4 do 6 mm. Wysterylizowanà p´setà wyjàç nakładk´
opakowania i umieÊciç jà na stabilnej, twardej, nie zanieczyszczonej
z
odkładce. Nast´pnie wcisnàç pierÊcieƒ r´kojeÊci na trzon nakładki
p
i umocowaç jà stabilnie na koƒcówce instrumentu.
Prawidłowe zakładanie nakładki.
Instrument wcisnàç na trzon nakładki.
PierÊcieƒ przesunàç w dół trzonu nakładki,
a˝ do momentu, gdy znajdzie si´ we właÊciwym
poło˝eniu.
Nakładka OptraSculpt Pad jest prawidłowo
połàczona z instrumentem
Nakładki OptraSculpt Pad sà przeznaczone wyłàcznie do
jednorazowego u˝ytku !
Metalowà łopatkà, znajdujàcà si´ z drugiej strony instrumentu, nale˝y pobraç
odpowiednià iloÊç materiału wypełniajàcego i umieÊciç w opracowanym
ubytku. Nast´pnie nie utwardzony kompozyt wymodelowaç za pomocà mi´kkiej nakładki Optra Sculpt Pad, dotykajàc delikatnie powierzchni materiału.
OptraSculpt Pad podczas zastosowania
klinicznego. Nakładkà delikatnie ukształtowaç
materiał w ubytku, wywierajàc na instrument
niewielki nacisk. Aby nało˝yç materiał, bàdê
usunàç jego nadmiar, nale˝y u˝yç koƒcówki
z drugiej strony instrumentu.
Po ukoƒczeniu odbudowy w ustach pacjenta, usunàç jednorazowe nakładki
OptraSculpt Pad z r´kojeÊci i poddaç je recyklingowi. CzynnoÊç t´ nale˝y wykonaç przed dezynfekcjà, czyszczeniem i sterylizacjà instrumentu w autoklawie.
Korzystanie ze skali referencyjnych
Instrument OptraSculpt Pad posiada dwie skale referencyjne.
Skala 1 jest zwykłà skalà orientacyjnà, zawierajàcà oznaczenia w celu
porównywania szerokoÊci poszczególnych z´bów. Zawiera ona ponadto,
poziomà lini´, która słu˝y jako odnoÊnik do oceny zasi´gu brzegu siecznego.
Page 36

kala 1 mo˝e byç przyło˝ona do brze-
S
ów siecznych z´bów górnych aby np.
g
porównaç szerokoÊç z´bów przeciwległych i/lub oceniç zasi´g brzegu siecznego
stosunku do linii horyzontalnej
w
kala 2 zawiera oznaczenia dla typowych Êrednich szerokoÊci z´bów
S
przednich (linie pionowe). Skala ta jest u˝ywana jako punkt odniesienia dla
ogólnej orientacji estetycznej, jak równie˝ podczas rozległych rekonstrukcji
odcinku przednim. Przedstawione, oznaczone wartoÊci na skali powinny
w
yç rozumiane jako wartoÊci wzgl´dne. Na ich podstawie, szerokoÊci poszcze-
b
gólnych z´bów mogà byç ze sobà porównywane. UkoÊne linie przerywane
wskazujà idealnà, Êrednià pozycj´ ustawienia długich osi z´bów w szcz´ce,
w konsekwencji stanowià równie˝ przydatnà wskazówk´ podczas este-
a
ycznej, harmonijnej odbudowy z´bów przednich. Skala jest ustawiona
t
prawidłowo, jeÊli trójkàt umieszczony poÊrodku skali wskazuje swoim wierzchołkiem na punkt styczny pomi´dzy centralnymi siekaczami górnymi,
liczby na koƒcu skali sà zgodne z odpowiednimi kwadrantami.
a
Skala nie nadaje si´ do stosowania w odniesieniu do z´bów ˝uchwy!
kala 2 słu˝y do porównania proporcji
S
´bów w danej sytuacji klinicznej z typo-
z
wymi, Êrednimi wartoÊciami szerokoÊci
z´bów przednich górnych i ustawienia
ługich osi tych z´bów wzgl´dem siebie.
d
W ten sposób mogà byç łatwo zaplanowane korekty estetyczne i zdefiniowane
warunki poprawy estetyki.
a˝ne ! Ta skala słu˝y tylko do relatywnej orientacji ogólnej i w ˝adnym
W
przypadku nie mo˝e byç rozumiana jako bezwzgl´dny wyznacznik szerokoÊci
z´bów i kàtów ustawienia ich długich osi, w ka˝dym przypadku klinicznym
a przykładzie przedstawionym na zdj´ciu, szerokoÊci z´bów mogà byç
N
ocenione jako relatywnie idealne, przy czym z´by wydajà si´ byç ogólnie
szersze, ni˝ pokazujà to typowe Êrednie wartoÊci dla poszczególnych z´bów,
oÊ długa siekaczy bocznych i kłów wydaje si´ przebiegaç zbyt prosto.
a
Ostrze˝enie !
Zaleca si´ u˝ywanie koferdamu, aby uniknàç przypadkowego
połkni´cia lub aspiracji drobinek materiału.
ie u˝ywaç OptraSculpt Pad do innych celów, ni˝ wskazane powy˝ej !
N
Dezynfekcja, czyszczenie i sterylizacja
Wskazówki ogólne:
rzed ka˝dym zastosowaniem, wszystkie instrumenty muszà byç oczyszczone
P
i zdezynfekowane. Szczególnie zalecana jest dodatkowa sterylizacja w sterylizatorze parowym !
ie nale˝y u˝ywaç instrumentów uszkodzonych. Ich naprawa i serwis powi-
N
nien byç prowadzony przez przeszkolone i uprawnione do tego osoby.
Instrumentów nie wkładaç do roztworów soli, poniewa˝ istnieje ryzyko ich
uszkodzenia, powstania rys i korozji.
JeÊli mamy do czynienia z u˝ywanymi i zanieczyszczonymi instrumentami,
konieczne jest stosowanie okularów ochronnych i r´kawiczek, które odpowiadajà wytycznym 89/686 EWG.
Czyszczenie i dezynfekcja powinny byç przeprowadzane natychmiast po u˝yciu instrumentów.
Zasadniczo, oczyszczanie mechaniczne w urzàdzeniu RDG ( urzàdzenie
czyszczàco-dezynfekujàce) ma przewag´ nad czyszczeniem manualnym i jest preferowane!
Czyszczenie wst´pne:
Usunàç ostro˝nie z instrumentów du˝e, nie spolimeryzowane zanieczyszczenia za pomocà serwetki celulozowej bez włókien. Do dezynfekcji wst´pnej
u˝yç alkalicznego roztworu dezynfekcyjnego (bez aldehydów), nie zawierajàcego p´cherzyków powietrza. Roztworem tym (np. ID 212 forte, Dürr Dental),
nale˝y całkowicie pokryç u˝ywane instrumenty i na 15 minut pozostawiç
w kàpieli dezynfekcyjnej w wannie z sitem i pod przykryciem.
Do manualnego usuni´cia du˝ych zanieczyszczeƒ u˝ywaç tylko mi´kkiej
szczoteczki. W ˝adnym wypadku nie stosowaç szczoteczki metalowej, czy
stalowego czyÊcika.
W przypadku czyszczenia mechanicznego, po etapie czyszczenia wst´pnego,
instrumenty nale˝y starannie przepłukaç pod bie˝àcà wodà.
Czyszczenie mechaniczne i dezynfekcja:
– RDG (np. termodezynfektor G7882, Miele)
– Program czyszczàco-dezynfekujàcy (np. Vario TD)
– Ârodki czyszczàco-dezynfekujàce (np. NeodisherFA, Dr Weigert)
JeÊli stosowane jest wyłàcznie czyszczenie mechaniczne instrumentów,
to absolutnie konieczne jest te˝ przeprowadzanie dezynfekcji termicznej
i sterylizacji ciÊnieniowej !
Czyszczenie manualne i dezynfekcja
– Mi´kka szczoteczka (np. szczoteczka czyszczàca z nylonu lub miltexu)
– Ârodki czyszczàco-dezynfekujàce (np. wło˝yç na 15 min. do ID 212 forte,
Dürr Dental)
Po oczyszczeniu i dezynfekcji, instrumenty nale˝y starannie przepłukaç na
sicie pod bie˝àcà wodà.
Suszenie:
– Strumieniem powietrza pod ciÊnieniem, lub przy u˝yciu serwetki
celulozowej bez włókien
Sterylizacja:
– odpowiednie sterylne opakowania (np. sterylne opakowanie
aluminiowe),
– autoklaw (np. Systec HX-320),
– program: sterylizacja parowa we frakcjonowanej pró˝ni wst´pnej,
w temp. 134°C przez minimum 4 minuty.
Kontrola przydatnoÊci do u˝ycia
Po oczyszczeniu i dezynfekcji powinna nastàpiç wizualna kontrola czystoÊci
instrumentów, braku uszkodzeƒ i ich przydatnoÊci do prawidłowego u˝ycia.
W przypadku makroskopijnych widocznych zanieczyszczeƒ, powtórzyç proces
czyszczenia i dezynfekcji.
Page 37

Składowanie i przechowywanie
Unikaç przechowywania instrumentów w wilgotnych pomieszczeniach.
–
– Przechowywaç nakładki Optra Sculpt Pad tylko w oryginalnych
opakowaniach, w temperaturze pokojowej, zabezpieczone przed kurzem,
ilgocià, naciskiem oraz zanieczyszczeniami.
w
Przechowywaç w temperaturze 12-28°C.
–
– Data wa˝noÊci umieszczona jest na opakowaniu i etykiecie.
Wskazówki:
R´kojeÊç mo˝na sterylizowaç w autoklawie. Przewidziana jest
–
bowiem do wielorazowego u˝ytku (co najmniej 200 cykli).
Patrz:„ Dezynfekcja, czyszczenie i sterylizacja”.
Przed sterylizacjà instrumentu w autoklawie, nakładki modelujàce
–
owinny byç usuni´te.
p
– Nakładki OptraSculpt Pad przeznaczone sà tylko do jednorazowego
u˝ytku i nie mogà byç czyszczone, dezynfekowane, sterylizowane,
ni u˝ywane powtórnie.
a
Z uwagi na to, ˝e istnieje niebezpieczeƒstwo połkni´cia lub aspiracji
–
drobinek materiału, wskazane jest u˝ywanie koferdamu.
– Instrukcja u˝ytkowania, jak równie˝ dokładne informacje
otyczàce zastosowania instrumentu, znajdujà si´ na stronie
d
www firmy Ivoclar Vivadent AG (www.ivoclarvivadent.com).
Materiał przechowywaç w miejscu niedost´pnym dla dzieci!
ateriał przeznaczony tylko do u˝ytku w stomatologii!
M
Materiały sà przeznaczone wyłàcznie do stosowania w stomatologii. Przy ich u˝yciu nale˝y ÊciÊle przestrzegaç instrukcji stosowania. Nie ponosi si´ odpowiedzialnoÊci za szkody powstałe w wyniku nieprzestrzegania instrukcji, lub u˝ycia materiałów niezgodnie ze wskazaniami. U˝ytkownik jest odpowiedzialny
za testowanie materiałów dla swoich własnych celów i za ich u˝ycie w ka˝dym innym przypadku nie
wyszczególnionym w instrukcji. Opisy materiałów i ich skład nie stanowià gwarancji i nie sà wià˝àce.
Page 38

voclar Vivadent AG
I
Bendererstrasse 2, 9494 Schaan, Liechtenstein
Tel. +423 235 35 35, Fax +423 235 33 60
ww.ivoclarvivadent.com
w
Ivoclar Vivadent Pty. Ltd.
1 – 5 Overseas Drive, P.O. Box 367, Noble Park, Vic. 3174, Australia
el. +61 3 9795 9599, Fax +61 3 9795 9645
T
ww.ivoclarvivadent.com.au
w
Ivoclar Vivadent Ltda.
lameda Caiapós, 723, Centro Empresarial Tamboré
A
CEP 06460-110 Barueri – SP, Brazil
Tel. +55 11 2424 7400, Fax +55 11 3466 0840
ww.ivoclarvivadent.com.br
w
Ivoclar Vivadent Inc.
1-6600 Dixie Road, Mississauga, Ontario, L5T 2Y2, Canada
el. +1 905 670 8499, Fax +1 905 670 3102
T
www.ivoclarvivadent.us
Ivoclar Vivadent Shanghai
rading Co., Ltd., 2/F Building 1, 881 Wuding Road, Jing An District
T
200040 Shanghai, China
Tel. +86 21 6032 1657, Fax +86 21 6176 0968
ww.ivoclarvivadent.com
w
Ivoclar Vivadent Marketing Ltd.
Calle 134 No. 7-B-83, Of. 520, Bogotá, Colombia
el. +57 1 627 3399, Fax +57 1 633 1663
T
www.ivoclarvivadent.co
Ivoclar Vivadent SAS
.P. 118, F-74410 Saint-Jorioz, France
B
Tel. +33 4 50 88 64 00, Fax +33 4 50 68 91 52
www.ivoclarvivadent.fr
Ivoclar Vivadent GmbH
Dr. Adolf-Schneider-Str. 2, D-73479 Ellwangen, Jagst, Germany
Tel. +49 7961 889 0, Fax +49 7961 6326
ww.ivoclarvivadent.de
w
Wieland Dental + Technik
mbH & Co. KG, Schwenninger Strasse 13, D-75179 Pforzheim, Germany
G
Tel. +49 7231 3705 0, Fax +49 7231 3579 59
www.wieland-dental.com
voclar Vivadent Marketing (India) Pvt. Ltd.
I
503/504 Raheja Plaza, 15 B Shah Industrial Estate
Veera Desai Road, A, ndheri (West), Mumbai, 400 053, India
Tel. +91 22 2673 0302, Fax +91 22 2673 0301
ww.ivoclarvivadent.in
w
Ivoclar Vivadent s.r.l.
Via Isonzo 67/69, 40033 Casalecchio di Reno (BO), Italy
Tel. +39 051 6113555, Fax +39 051 6113565
www.ivoclarvivadent.it
Ivoclar Vivadent K.K.
1-28-24-4F Hongo, Bunkyo-ku, Tokyo 113-0033, Japan
Tel. +81 3 6903 3535, Fax +81 3 5844 3657
www.ivoclarvivadent.jp
Ivoclar Vivadent Ltd.
12F W-Tower, 1303-37, Seocho-dong, Seocho-gu
Seoul 137-855, Republic of Korea
Tel. +82 2 536 0714, Fax +82 2 596 0155
www.ivoclarvivadent.co.kr
Ivoclar Vivadent S.A. de C.V.
Av. Insurgentes Sur No. 863, Piso 14, Col. Napoles
03810 México, D.F., México
Tel. +52 55 5062 1000, Fax +52 55 5062 1029
www.ivoclarvivadent.com.mx
Ivoclar Vivadent BV
De Fruittuinen 32, 2132 NZ Hoofddorp, Netherlands
Tel. +31 23 529 3791, Fax +31 23 555 4504
www.ivoclarvivadent.com
Ivoclar Vivadent Ltd.
12 Omega St, Rosedale, PO Box 303011 North Harbour
Auckland 0751, New Zealand
Tel. +64 9 914 9999, Fax +64 9 914 9990
www.ivoclarvivadent.co.nz
Ivoclar Vivadent Polska Sp. z o.o.
Al. Jana Pawla II 78, 00-175 Warszawa, Poland
Tel. +48 22 635 5496, Fax +48 22 635 5469
www.ivoclarvivadent.pl
Ivoclar Vivadent Marketing Ltd.
Prospekt Andropova 18 korp. 6/, office 10-06, 115432 Moscow, Russia
Tel. +7 499 418 0300, Fax +7 499 418 0310
www.ivoclarvivadent.ru
Ivoclar Vivadent Marketing Ltd.
Qlaya Main St., Siricon Building No.14, 2nd Floor, Office No. 204
P.O. Box 300146, Riyadh 11372, Saudi Arabia
Tel. +966 11 293 8345, Fax +966 11 293 8344
www.ivoclarvivadent.com
Page 39

voclar Vivadent Pte. Ltd.
I
171 Chin Swee Road, #02-01 San Centre, Singapore 169877
Tel. +65 6535 6775, Fax +65 6535 4991
ww.ivoclarvivadent.com
w
Ivoclar Vivadent S.L.U.
C/ Ribera del Loira nº 46, 5ª planta, 28042 Madrid, Spain
el. + 34 913 757 820, Fax + 34 913 757 838
T
ww.ivoclarvivadent.es
w
Ivoclar Vivadent AB
alvägen 14, S-169 56 Solna, Sweden
D
Tel. +46 8 514 939 30, Fax +46 8 514 939 40
www.ivoclarvivadent.se
voclar Vivadent Liaison Office
I
: Tesvikiye Mahallesi, Sakayik Sokak, Nisantas’ Plaza No:38/2
Kat:5 Daire:24, 34021 Sisli – Istanbul, Turkey
el. +90 212 343 0802, Fax +90 212 343 0842
T
www.ivoclarvivadent.com
Ivoclar Vivadent Limited
round Floor Compass Building, Feldspar Close, Warrens Business Park,
G
Enderby, Leicester LE19 4SE, United Kingdom
Tel. +44 116 284 7880, Fax +44 116 284 7881
ww.ivoclarvivadent.co.uk
w
Ivoclar Vivadent, Inc.
175 Pineview Drive, Amherst, N.Y. 14228, USA
el. +1 800 533 6825, Fax +1 716 691 2285
T
www.ivoclarvivadent.us
 Loading...